1
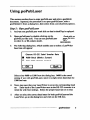
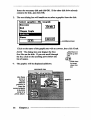
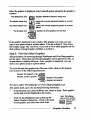
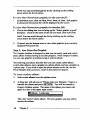
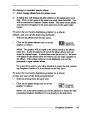
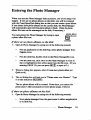
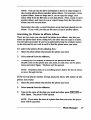
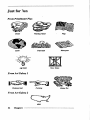
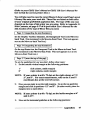
GEOPUBLISH
Manual Addendum
Berkeley Softworks
2150 Shattuck Ave.
Berkeley, CA 94704
Copyright Information
geoPublish software design by Michael Vargas, Jim Defrisco, Doug Fulls,
Chris Hawley, Alice Ng, and Tony Requist.
geoPubLaser software design by Tony Requist.
Graphics Grabber and Photo Manager software design by Chris Hawley.
geoPublish Manual Addendum by Patricia Huey, © Copyright Berkeley
Softworks, Inc. 1988.
Printed 10/88
Commodore 64 ® is a registered trademark and Commodore 128 is a
trademark of Commodore Electronics, Ltd.
GEOS 2.0, geoWrite 2.1, geoPubLaser, Graphics Grabber, geoPublish,
Photo Manager are trademarks of Berkeley Softworks, Inc.
Apple LaserWriter™ is a trademark of Apple Computer, Inc. PostScript ®
is a registered trademark of Adobe Systems, Incorporated.
PrintMaster™, PrintMaster Plus™, Art Gallery I™, Art Gallery II™,
Fantasy™, and U.S. History™ are trademarks of Kyocera Unison, Inc.
How to Get Help
If you ever encounter any problems with GEOS, there are several steps you
should take before trying to contact Customer Service. First, re-read the
pertinent chapters) in the manual. With a graphic interface it is often
tempting to ignore the manual and forge ahead with using the program.
However, if the program does not perform in a manner you expect, reading
the manual may help clarify any confusion. If the chapter does not answer
your question directly, try looking in the table of contents and the index for
help. Error messages are explained in Appendix B on page 43.
QuantumLink
The first, fastest, and recommended way to obtain information about and
help with GEOS and its follow-on applications is through the Q-Link
telecommunications network. Q-Link is an on-line service network
designed for Commodore users.
Berkeley Softworks provides Customer Service message boards, along with
a Programming message board and other useful services, in the Commodore
Software Showcase section of Q-Link. Through these message boards, you
can receive the most timely help and information from Berkeley Softworks
employees and thousands of GEOS users. In addition, you will have access
to programs and products from Berkeley Softworks that are offered through
Q-Link, many of them free of charge.
Customer Service
The second way to obtain help is to contact Customer Service at Berkeley
Softworks, either by phone or letter. If you write, please include your
telephone number. AH inquiries are answered in order received. The
Berkeley Softworks customer service telephone number and address are as
follows:
Call:
Customer Service: (415) 644-0890,9 a.m.-5 p.m. Pacific Time
Or write:
Berkeley Softworks
Commodore Customer Service Division
2150 Shattuck Avenue
Berkeley, CA 94704
Welcome
Use this manual addendum along with your geoPublish User's Manual.
This manual is divided into five chapters:
1:
geoPubLaser explains how to use the geoPubLaser application. This
application enables you to print a geoPublish document with an Apple
LaserWriter.
2:
Graphics Grabber describes how to use the Graphics Grabber
application. Graphics Grabber converts artwork created with the
PrintMaster, PrintMaster Plus, Print Shop, and Newsroom graphics
programs for use with GEOS, and places the converted art into photo
albums from the Photo Manager desk accessory.
3:
Photo Manager explains how to use the Photo Manager desk acces
sory, which enables you to store artwork in permanent flies called
photo albums. The Photo Manager has been upgraded from the version
described in the geoPublish User's Manual. You can now name and
search for photos within a photo album. Another new feature is that the
Photo Manager automatically opens the first photo album on the disk.
Use the instructions in this addendum manual to learn how to use the
upgraded Photo Manager.
4:
Clip Art illustrates the art supplied in the Just for Fun, Work & Play,
Fantasy, U.S. History, and Holidays photo albums on your geoPublish
disk.
5:
Appendices contains four appendices. Appendix A is a listing of the
command menu options found in Graphics Grabber and the Photo
Manager. Appendix E explains error messages and offers solutions to
possible problems. Appendix C contains errata information for the
geoPublish User's Manual. Appendix D describes how to use the
GEOS Demo program.
Table of Contents
1
geoPubLaser
1
Before You Try to Use geoPubLaser 2
Using geoPubLaser 3
How Files Are Printed 7
Differences Between geoPublish and geoPubLaser
Printed Documents 9
2 Graphics Grabber
11
Before You Try to Use Graphics Grabber
Entering Graphics Grabber 14
Converting the Artwork 15
3
12
Photo Manager 21
Entering the Photo Manager 23
The Photo Album Screen
25
Using Photo Albums 26
4
Clip Art
31
Just for Fun
32
Work & Play 33
Fantasy
35
U.S. History
36
Holidays 40
5 Appendices 41
A: Menu Listing 42
B: Error Messages 43
C: geoPublish User's Manual Errata Information 45
D: GEOS Demo 52
Index
53
geoPubLaser
This chapter describes geoPubLaser, a powerful tool used for printing
geoPublish files with the Apple LaserWriter printer.
x.v*XvXwx«x<vX-XvX-x-x-x-x-x-xw^^
geoPubLaser
Before You Try to Use geoPubLaser
geoPubLaser and Work Disks
geoPubLaser is located on Side B of Disk 1. Suggested work disk configu
rations are as follows:
Ifyou have one disk drive:
•
Copy geoPubLaser, fonts, printer driver, and the geoPublish documents
to one disk. If you have room, add the DESKTOP file from your
System or Backup System disk.
Ifyou have one disk drive and a RAM Expansion Unit (REU):
•
Copy geoPubLaser, fonts, printer driver, and DESKTOP file to the
REU.
•
Use the disk drive for the disk containing the geoPublish documents.
Ifyou have two disk drives:
•
Copy geoPubLaser, fonts, printer driver, and DESKTOP file to one
disk.
Use the second disk drive for the disk containing the geoPublish
documents.
Laser Printing Service
The LaserDirect printing service (using the Apple LaserWriter) is accessible
over QuantumLink. Using it, you can get professional quality output by
mail. You can learn more about this service from the GEOS Forum section
of the Commodore Information Network in QuantumLink.
Connecting Your Computer to a LaserWriter
In order to print using a LaserWriter, you need a RS-232 interface for your
computer (connected to the user port). Only the Jameco JE-232CM
interface card has been tested. Its switch settings are: 1-OFF, 2-ON, 3-ON,
4-OFF. Use a modem cable to connect the interface card and the Laser
Writer.
IMPORTANT Make sure your LaserWriter contains the PostScript lan
guage. geoPubLaser will not operate without the use of PostScript
2
Chapter 1
X-XvX-X-:-X<*X-X*^
^^
Using geoPubLaser
This section describes how to enter geoPubLaser and print a geoPublish
document In general, the procedure is to open geoPubLaser, select a
geoPublish flle from a dialog box, then select from a set of printing options.
Stepl: Open geoPubLaser
1:
Activate your geoPubLaser work disk so that its deskTop is displayed.
2:
Open geoPubLaser by double-clicking on the
Double-click on
j
» this icon.
geoPubLaser file icon. You can use geoPubLaser
in either 40- or 80-column mode.
3:
GEOPUBLASER
The following dialog box, which enables you to select a LaserWriter
baud rate, will appear:
Choose RS-232 Serial Transfer Rote
■
9600 Baud (Blanks Screen)
D
1280 Baud (Blanks Screen)
I
OK
I
|
1 Quit 1
————^
Select either 9600 or 1200 from the dialog box. 9600 is the normal
setting for use with geoPubLaser, since it is eight times faster than the
1200 baud rate.
4:
Next, make sure that your LaserWriter is set at the corresponding baud
rat
On the back of the LaserWriter next to the RS-232 connector is a
metal dial with four settings. Select the proper baud rate on the dial.
5:
After you select the correct baud rates for both geoPubLaser and the
LaserWriter, go to the dialog box and click on the OK box.
w-:*xw
geoPubLaser
3
•x-x^x*:>x*:-x*:*x*x-x-x*:*:*:*x*w^
Step 2: Select afile
After you open geoPubLaser, the File dialog box will appear with a list of
geoPublish flies on the current disk. You can use this dialog box to print a
document on the current disk, a disk in the other disk drive, or on a different
disk.
IGEO5
News
"10n disk:
RAM 1571
Brochure
Advertisement
1 Open I 1
Select a file
in either disk
drive.
1 Drive 1 1
L Quit 11
To select a file on the current disk:
Click on the file name, then click on Open. The Print Options will
appear next.
To select a file on a disk in the other disk drive:
1:
Click on the Drive icon. The dialog box will display the geoPublish
documents on the disk in the other drive.
2:
Click on a file name, then click Open. The Print Options will appear
next.
To select a file on another disk:
1:
Click on the Drive icon.
2:
When the Disk icon appears, click on this icon.
3:
When prompted, remove the current disk from the disk drive and insert
the disk containing the documents you need. Click OK.
4:
The dialog box will display the names of the geoPublish documents on
the new disk. Click on a file name, then click Open. The Print
Options will appear next.
4
Chapter 1
:v:v:v:-:-:-:-Xv:vX\W^
Step 3: Select from the Print Options
After you select a file, the Print File dialog box will appear.
| Current file: CEOS Items
J
Print...
3861 Smoothing |
From Page | 1
1
1:
| Thumbnails
~]To Poqe | 1
I Copies Reduce to I 168i
"|
Click on the following options as needed:
•
From Page and To Page enable you to print a range of pages
within the file. •Normally the entire file is printed. To change the
pages printed, click on either of the boxes and enter a new value.
•
Copies allows you to print multiple copies of the file. Normally a
single copy is printed. To change the number of copies, click on
the box and enter a new value.
•
Smoothing controls the amount of smoothing to be done on
bitmaps or special text which you designated to be smoothed.
Clicking on this option switches between 75,150,300, or none.
(Selecting "none" will turn off smoothing.) 75,150, or 300
smooth to the specified dots per inch. The smoothing option is
available because of the large amounts of time required for
smoothing. 300 dpi smoothing takes about four times longer than
150 dpi smoothing, and about 16 times longer than 75 dpi smooth
ing.
•
Thumbnails will print a reduced version of every single page of
the document onto one page. The pages are reduced to 22% of
their original size to make all the document pages fit onto one
printed page.
Reduce to enables you to reduce or enlarge your documents. A
value of 100 is the default for normal printing. Values less than
geoPubLaser
^
100 reduce each page to that percent of the normal. Values of
more than 100 enlarge the document to that percent of the normal.
Enlarging causes several sheets of paper to be printed for each
page of the document. For instance, enlarging one page to 200
percent causes four pages to be printed. Each enlarged page has
tiny crop marks in the comers indicating where the page needs to
be trimmed to allow the pages to be spliced together. Selecting
Thumbnails with a Reduce to value of more than 100 causes just
the first enlarged page (the upper left corner) to be printed.
2:
After selecting from the Print Options, click on OK to print the file. To
cancel the printing and return to the File dialog box, click on Cancel.
NOTE If you are operating in 40-column mode, the screen will go
blank during the printer initialization and printing process. If you wish
to cancel printing, press the input device button (but do not move the
input device). If you are operating in 80-column mode, however, the
screen will display the message "Initializing Printer."
When printing large files, and if you are in 40-column mode, the screen
will occasionally change colors. This lets you know that geoPubLascr
is working.
After the File Is Printed
After the file is printed, the File dialog box will appear. You can select
another file to print, or you can click on Quit to return to'the deskTop. If
your work disk does not contain a copy of the DESKTOP file (which is
located on your System or Backup System disks), a dialog box will ask you
to insert a disk containing a copy of this file. Remove the current disk and
insert either your System or Backup System disk. Click OK. You will be
returned to the deskTop of the disk you inserted.
Chapter 1
^^
How Files Are Printed
The LaserWriter is a very high resolution (300 dots per inch) printer.
Working with this printer, geoPubLaser can print all types of geoPublish
files. Both text and graphics can be pinted.
Resident Fonts
The LaserWriter contains several internal fonts that can be printed with a
high resolution. These fonts apply to both text regions and special text.
These fonts are: Times Roman, Helvetica, Symbol, and Courier, as well as
the bold, italic, and bold-italic styles of these (except for Symbol). It is
these internal LaserWriter fonts (referred to as resident fonts) that produce
the best printed output. The LaserWriter will use these internal fonts in
place of certain GEOS fonts. The following table summarizes this substitu
tion:
LaserWriter™ Fonts:
GEOS Fonts:
Times Roman:
substituted for
LW_Roma (also Roma)
Helvetica:
Symbol:
substituted for
LW_Cal (also California)
substituted for
LW_Greek
Courier
substituted for
LW_Barrows
NOTE Roma and California (used for Times Roman and Helvetica) do not
produce as Fine results as the other fonts above (including LWJtoma and
LW.Cal).
The GEOS fonts (LWJtoma, LW_Cal, LW_Greek, and LWJBarrows) are
found on back of your geoPublish upgrade program disk.
Non-resident Fonts
Non-resident fonts are fonts that are not supported by the LaserWriter.
geoPubLaser prints text in non-resident fonts by sending the LaserWriter a
pixel-by-pixel picture of each character. Since GEOS's resolution is 80 dpi,
non-resident fonts appear jagged and broken compared to resident fonts.
Non-resident fonts can also take considerably longer to print than resident
fonts.
geoPubLaser improves the appearance of non-resident fonts by substituting
a larger version of the font (if a larger version is available). For example,
^
geoPubLaser
•::•::•:■:•:-: :-::xx::::::::::^^
geoPubLaser will send University 24 point in place of University 10 point
(or any other smaller size of University) to the LaserWriter. The Laser
Writer then reduces this larger font to the correct size. This font substitu
tion can only happen if the font file contains a larger point size than the one
being printed.
8
Chapter 1
Differences Between geoPublish and
geoPubLaser Printed Documents
If you print a document using geoPublish only, the document will print
exactly as it appears on the screen. If you use geoPubLaser to print the
document, there will be a few differences in the document's appearance.
The Transparent/Opaque, Brush Shape, and Pattern options will be affected.
Transparent/Opaque Option
The LaserWriter does not support the transparent option; it prints all objects
opaque. To minimize the effect of this problem on the printing of docu
ments, geoPubLaser prints objects in a different order from how they appear
on the screen.
geoPublish prints in the following order
1.
Master page objects (in priority order).
2.
Page Layout regions (in priority order).
3.
Page Graphics objects (in priority order).
geoPubLaser prints in the following order:
1.
Master Page transparent objects (in priority order).
2.
3.
4.
5.
Page Graphics transparent objects (in priority order).
Master Page opaque graphics (in priority order).
Page Layout regions (in priority order).
Page Graphics opaque objects (in priority order).
Brush Shape Option
The LaserWriter does not support "brushes" and "brush shapes," but has
"line cap types" instead. This causes the endpoints of objects with large
brushes to appear slightly different.
Pattern Option
The LaserWriter does not support patterns, only levels of gray. Thus most
of the GEOS patterns are not supported and are mapped to 50% (halfway
between white and gray). The GEOS 25%, 50%, 75%, and a few others arc
mapped to gray levels on the LaserWriter.
^^
geoPubLaser
Graphics Grabber
The GEOS Graphic Grabber converts artwork available with other Commo
dore 64/128 programs for use with GEOS programs. Use Graphics Grabber
to convert graphics from PrintMaster, PrintMaster Plus, Print Shop, and
Newsroom. Once you have converted a graphic to GEOS format, you can
copy it to a geoPublish, geoWrite, or geoPaint document
This chapter describes how you can:
•
convert PrintMaster, Print Shop, and Newsroom graphics using
Graphics Grabber.
•
copy PrintMaster, Print Shop, and Newsroom graphics to a photo scrap
or a photo album.
•
use the icons in Graphics Grabber.
Descriptions of Graphics Grabber's menu items are found in the appendi
ces.
*:*:*:*:-xw^^
Graphics Grabber
11
Before You Try to Use Graphics
Grabber
Is Graphics Grabber Installed?
Before you can use Graphics Grabber, you will need to install it to your
System disk. Do not copy Graphics Grabber to a work disk until you have
installed it.
To install Graphics Grabber:
1:
Install geoPublish as described on page 1-4 of the geoPublish User's
Manual.
2:
Double-click on Graphics Grabber application file. In a moment, a
dialog box saying "Graphics Grabber installed" will appear. Click on
OK to return to the deskTop.
NOTE Another method of opening Graphics Grabber is to click once
on its file icon, then select open from the file menu.
Graphics Grabber and Work Disks
Use the following instructions to set up work disks for using Graphics
Grabber, depending on your project needs and the disk drive set up you
have. Graphics Grabber is located on Side B of Disk 1.
Ifyou have one or two disk drives:
•
12
Copy Graphics Grabber, the Photo Manager, photo albums (if desired),
and the DESKTOP file (from your System disk) onto one disk. Be
cause Graphics Grabber can read files on different disks, it is not
necessary to place it on the same disk as the artwork you wish to
convert. If you have one disk drive, you will be prompted to swap
disks when necessary. If you have a second disk drive, use it for the
disk containing the artwork you wish to convert
Chapter 2
Ifyou have one disk drive and a RAM Expansion Unit
(REU):
•
Copy Graphics Grabber, the Photo Manager, photo albums, and the
DESKTOP file (from your System disk) to the REU.
•
Use the disk drive for the disk containing the artwork you wish to
convert.
Why You Need the DESKTOP File
It is recommended that you place a copy of the DESKTOP flle on all of
your application work disks. If not, when you exit the application, a
message will instruct you to insert a disk containing any version of the
DESKTOP file. You will need to remove the current disk and insert your
System disk (which contains the DESKTOP file). Storing a copy of the
DESKTOP file on your application work disk will enable you to exit a
document directly to the deskTop.
GEOS 2.0
If you are using GEOS 2.0, you may be using two different disk drive types
(e.g., a 1541 and a 1571). If this is the case, you will need to add the
CONFIGURE 2.0 file (from the System disk) to any work disk containing
the DESKTOP 2.0 file. If you have a RAM Expansion Unit, however, you
need not copy the CONFIGURE file to the work disk containing the
DESKTOP file.
Graphics Grabber
13
::-x^^
Entering Graphics Grabber
After you have installed Graphics Grabber and prepared a work disk, you
will be ready to use Graphics Grabber.
To enter Graphics Grabber, use one of the following
methods:
__
Double-click on Graphics Grabber file icon.
•
Click once on Graphics Grabber file icon so
this file
icon.
GRAPHICS CPftBBEft
that it is highlighted, then select open from the file menu. (If you are
using GEOS 2.0, you can use the keyboard shortcut: [frjfzl).
The following screen will appear
1 qeoj j file j *<ig« j
IMMP
mm
iiiili
M
BraBBHM
Copyright 1986 I Berkeley
Softuiotks
^ili^Killi
You are now ready to convert artwork from PrintMaster, Print Shop, or
Newsroom graphics.
14
Chapter 2
^x•^:•:•^:♦:•;•x•:■:•x•x•x•x•x•v.^^^:
XvX-X-X-X-XvX-XttvX-XvX-XvX-'
:•:*:•:•:•:■:*:•:•:■:•:•:•:•:•:•>:•::•:•:•
Converting the Artwork
The procedures for converting graphics from the PrintMaster, Print Shop,
and Newsroom graphics programs are the almost the same. The general
procedure is to display the graphic you wish to convert, then copy it to a
photo scrap or a photo album. In this manner you will have converted
artwork to GEOS format and stored it an easily accessible GEOS file for
future use.
At any time, you can switch to another disk containing a different set of
graphics. To do so, simply select the name of the graphics program type
(i.e., PrintMaster, Print Shop, or Newsroom) from the file menu. You
will be prompted to insert the disk you need. Once you have loaded a
graphic from the new disk, you can copy it to any of the photo albums on
the disk. If you are using a one-drive system, you will be prompted to swap
disks. If you are using two disk drives or one disk drive and an REU, you
will only be prompted to insert the new artwork disk once.
The following instructions describe how to gain access to the art you wish
to convert, select a specific graphic, and copy the graphic to a photo scrap
or a photo album. The photo scrap or photo album can be created within
Graphics Grabber.
Stepl: Load the Graphic
1:
Open the file menu and select PrintMaster, Print Shop, or
Newsroom.
2:
A dialog box will ask you to insert a disk containing the desired
graphic. For example, if you selected PrintMaster, here is how the
dialog box will appear:
Insert a disk containing a
PrintMaster graphic in Drive A.
I
OK
XvXW-x*w^
I
I Cancel I
Graphics Grabber
15
x-:-:v:^*w^^
Insert the necessary disk and click OK. If the other disk drive already
contains the disk, just click OK.
3:
The next dialog box will enable you to select a graphic Crom the disk:
Select graphics file to grab:
Dinosc
I Grab I
Bird
Matjan Eagle
Godzilla
Piano
I Cancel I
-scrolling arrows
Click on the name of the graphic you wish to convert, then click Grab.
NOTE The dialog box only displays the first
five files on the disk. If you wish scroll through
the list, click on the scrolling arrows below the
Click here to
move up the
list.
list of names.
Click here
4:
The graphic will be displayed as follows:
to move
down the
list.
command menu
os I hie I save I options
Use these
icons to
display
different
graphics or
copy the
current graphic
to a photo
graphic
scrap or a
photo album.
16
Chapter 2
^
^^
After the graphic is displayed, four icons will appear alongside the graphic's
window:
The dialog box icon
The photo scrap icon
displays the Select Graphics dialog box.
copies the currently displayed graphic to a photo
scrap.
The photo album icon
copies the currently displayed graphic to a photo
album.
The browse icon
displays the other graphics on the disk.
If the graphic displayed in the window is the graphic you want, you can
copy it to a photo scrap or a photo album. If so, go to Step 3: Now Store
the Graphic (page 18). However, if you wish to view other graphics on the
disk without exiting Graphics Grabber, go to Step 2.
Step 2: View the Other Graphics
The procedures for browsing through PrintMaster and Print Shop graphics
are the same. More than one Newsroom graphic can be placed in a file, so
its procedure is slightly different. Once a graphic is displayed, you can
store it in a photo scrap or a photo album.
To cycle through the graphics in a file or on a disk, click on the browse
icon to move in the following directions:
displays first graphic in file
displays previous graphic
displays next graphic
||rj-J- displays last graphic
To view other PrintMaster or Print Shop graphics on
the same disk, use one of thefollowing methods:
•
In the browse icon, click on First, Prev, Next, or Last. Each graphic
on the disk will be displayed in the window.
Click on the dialog box icon to bring up the
Select Graphics dialog box. Click on the name
of the graphic you need, then click Grab.
I-X-X-I-X-IXwXvX-XvC-X-XvXvXvXvXvX-XvXvXvXvX
X*X-X-X-XvX-X-XvX-XvX
Hint: The dialog
box icon is a quick
way to open
another
graphic.
Graphics Grabber
17
•:x-x-::-::*:-x::-:*x*x*x-X*::-:*:w
NOTE You can scroll through the list by clicking on the scrolling
arrows below the list of names.
To view other Newsroom graphics in the currentfile:
In the browse icon, click on First, Prev, Next, or Last. Each graphic
in the current Newsroom file will be displayed in the window.
To view other Newsroom graphics in anotherfile:
1:
Click on the dialog box icon to bring up the "Select graphics to grab"
dialog box. Click on the name of the file you need, then click Grab.
NOTE You can scroll through the list by clicking on the scrolling
arrows below the list of names.
2:
If desired, use the browse icon to view other graphics in the currently
displayed Newsroom file.
Step 3: Now Store the Graphic
The Graphics Grabber is designed so that you can easily create and switch
photo albums without having to exit the program. From Graphics Grabber,
you can copy graphics to a photo scrap or a photo album.
The following procedures describe how you can create a photo album,
switch photo albums, save a graphic to a photo album, and save a graphic to
a photo scrap. If you wish to open the photo albums on the disk, use the
Photo Manager desk accessory, which is described in Chapter 3.
To create a photo album:
1:
2:
Select create album from the options menu.
A dialog box will ask you to "Please enter new filename." Type in a
name for the album and press I RETURN 1. You will be returned to
Graphics Grabber screen. The name of the album you created will
appear in a box in the upper right corner:
I Album:
Landscape
This is the "active" photo album. The next graphic you copy will be
saved to this album.
18
Chapter 2
-x^
To change to another photo album:
1:
Select change album from the options menu.
2:
A dialog box will display the photo albums on the application work
disk. Click on the name of the album you need, then click OK. You
will be returned to Graphics Grabber screen. The name of the album
you selected will appear in the album name box in the upper right
corner.
To save the currently displayed graphic to a photo
album, use one of the following methods:
•
Select in an album from the save menu.
•
Click on the photo album icon next to the
graphic's window.
(IWl the photo
1^4—J album icon
NOTE The graphic will be copied to the album listed in the album
name box. It will be added to the end of the photo album and will
retain its original name. A photo album must be active (i.e., its name
will appear in the album name box) before you can copy a graphic to
the album. If the album name box is not displayed, you will be
prompted to open a photo album.
On a one-drive system, you will be asked to re-insert the disk contain
ing Graphics Grabber if it is not already in the disk drive.
To save the currently displayed graphic to a photo
scrap, use one of the following methods:
•
Select in a scrap from the save menu.
Click on the photo scrap icon next to the
graphic's window.
i ij
l^f) £#£,
NOTE On a one-drive system, you will be asked to re-insert the disk
containing Graphics Grabber if it is not already in the disk drive.
^^
Graphics Grabber
19
Photo Manager
The Photo Manager desk accessory will store and handle graphics created
with geoPaint or converted from the PrintMaster, Print Shop, or Newsroom
graphics programs. Graphic images are stored in special files called photo
albums. Each photo album may contain up to 60 pages of graphic images.
For example, one photo album may contain charts and graphs for a business
proposal; another album may contain illustrations for your upcoming novel.
The version of the Photo Manager on your geoPublish disk has been
enhanced for this upgrade of geoPublish. Copy the upgraded Photo
Manager to your GEOS work disks so that you can use the Photo Manager
with other GEOS applications, such as geoPaint and geoWrite as well as
geoPublish. Use the documentation in this addendum manual rather than
the instructions found in Appendix E: Using the Photo Manager, page 6-13,
in the geoPublish User's Manual.
The Photo Manager and Graphics Grabber
You can use the upgraded version of the Photo Manager with earlier
versions of Graphics Grabber (version 2.0 or less). However, do not have
Graphics Grabber try to place more than 60 pictures at a time, since the
maximum capacity of the upgraded photo album is 60. It is recommended
that you use the version of the Graphics Grabber supplied on the geoPublish
program disk.
Photo Scraps and Photo Albums
There is a distinct relationship between the "photo files." Whenever you
cut or copy a picture (graphic image), it is placed into a photo scrap file,
which is a temporary storage file. Photo albums are a means of saving the
^^^^
Photo Manager
21
v::: :•: :v:::::::::::x:-::x:::v^^^
image you placed in the photo scrap and turning it into a permanent file.
The Photo Manager allows you to cut and paste images to and from a photo
album. A photo album may contain many separate pages. When you need
to place an image from a photo album into a document, copy the photo
album contents into a photo scrap and paste the photo scrap contents into the
document
Remember that the photo scrap is a temporary file; each time you move or
copy an image into it, the new image will replace the current contents of the
photo scrap.
Location on Disk
The Photo Manager desk accessory is located on Side A of Disk 2.
22
Chapter 3
:^^
Entering the Photo Manager
When you open the Photo Manager desk accessory, one of two things will
happen. If there are no photo albums on that disk, you will be prompted
with the Create/Open/Quit dialog box so that you can create a photo album.
If you already have photo albums on the current disk, the Photo Manager
will automatically open the first photo album it finds. (Note that photo
album file icons can be rearranged on the disk, if necessary.)
You cannot enter the Photo Manager by trying to open
a photo album file icon.
If there are no photo albums on the disk:
1:
Open the Photo Manager by using one of the following methods:
•
From an application or the deskTop, select photo manager from
the geos menu.
•
From the deskTop, double-click on the Photo Manager file icon.
•
From the deskTop, click once on the Photo Manager file icon so
that it is highlighted, then select open from the file menu. (If you
are using GEOS 2.0, you can press [§[Z] to open a file.)
2:
When the dialog box appears, select Create new photo album (or
Quit to exit).
3:
The next dialog box will ask you to "Please enter new filename". Type
in a name and press [RETURN 1.
The new photo album will be created. From there, you can use the
photo album's edit commands to insert photo scraps, if desired.
If there are photo albums on the disk:
1:
Open the Photo Manager by using one of the following methods:
•
Select photo manager from the geos menu in either an application
or the deskTop.
Photo Manager
23
.;..:..:
:.:.;.:.:.:.:.v.:.:.:.:.v.:.:.:.x.:x.vv:v::::::^
•
From the deskTop, double-click on the Photo Manager file icon.
From the deskTop, click once on the Photo Manager file icon so
that it is highlighted, then select open from the file menu. (If you
arc using GEOS 2.0, you can press [§[Z] to open a file.)
2:
The first photo album on the disk will be opened. If this is not the
photo album you want, select close from the photo album's file menu.
The Create/Open/Quit dialog box will appear and enable you to create a
new photo album or open an existing one. To create a new album,
select Create new photo album, enter a name, and press IRETURNI.
To open an existing album, select Open existing photo album, click on
the name you need, then click on Open. If there arc more than five
names on the list, click on the scrolling arrows at the bottom of the
dialog box until you find the album you want.
NOTE The album name dialog box will display the first 1S album
names on the disk. If you have more than 15 albums and wish to
display a different set of names, you will need to move, delete, or
rearrange the file icons on the deskTop.
24
Chapter 3
x*x*x-x*x<*>x«v:«*:«*x-x*xw^^
The Photo Album Screen
Once inside the photo album, use the two items in the command menu, file
and edit (located at the top of the album screen), to work with the images
you copied or moved into the album.
photo album command menu
window indicator
close hon
Use the Photo Manager in an application
or on the deskTop.
To return to the previous application, click on the close icon at the top right
of the album screen. At the lower left corner of the album screen is the
window indicator, which will enable you to move the photo album window
to another part of the photo album's current page.
Photo Manager
25
Using Photo Albums
This section describes how to place graphic images into a photo album,
search for a photo in an album, and rename a photo. This section also
describes how to use the window indicator to scroll to other parts of the
currently displayed photo, and how to exit a photo album.
Placing an Image into a Photo Album
Before you can place an image into a photo album, you first need to move or
copy the image to a photo scrap. Images that have been placed into a
geoPublish or a geoWrite document cannot be placed into a photo album.
If you wish to place an image into a photo album using the Graphics
Grabber, refer to "Step 3: Now Store the Graphic," page 18.
To place an image into a photo album using geoPaint:
1:
Select the Edit Box icon and define the region that contains the image
to be placed into the photo album.
NOTE You cannot place an image that is in a geoWrite document into
a photo album.
2:
Select cut (to move) or copy from the edit menu. The image will be
placed in a photo scrap.
3:
Select photo manager from the geos menu. (You need not be in the
document in which you originally created the photo scrap.)
4:
A dialog box will give you three options: Create new photo album,
Open existing photo album, or Quit.
5:
6:
In the next dialog box, enter a name for a new photo album and press
I RETURN I, or select an existing album and click Open.
When the album appears, note that it has its own command menu: file
and edit. Select edit, then select paste. The image that you placed in
the photo scrap will be copied into the album.
26
Chapter 3
X-XvXv^
NOTE
You can use the above commands to move or copy images in
the existing photo album to another photo album. For example, create
a photo album, insert an image into it, cut or copy the image, then
select close from the file menu to exit that album. Next, create or open
another album, and insert the cut or copied image from the first photo
album into this second album.
Remember that only a copy of the photo scrap has been pasted into the
album. If you wish, you may use the same scrap in another album.
Searching for Photos in a Photo Album
There are two ways you can search for photos in an album: one lets you
select the photo name from a dialog box; the other lets you type in a name.
Use the latter procedure if you have a particularly long list of photo names
on the disk and do not wish to scroll to find the photo name you want
To select the photo from a dialog box:
1:
Open the photo album that contains the photo you need.
2:
Select search from the edit menu.
3:
A dialog box will display the names of the photos on that disk.
Double-click on the photo name you need, or click once on the photo
name and select Open. The photo will be opened.
NOTE If needed, click on the scrolling arrows below the list of names
to move through the list
If the list ofphoto names is long and you know the name of the
photo you want:
1:
Open the photo album that contains the photo you need.
2:
Select search from the edit menu.
3:
Type in the name of the photo you need and either press I RETURN I or
click Open. The photo will be opened.
NOTE If you enter the name of a photo that does not exist, the proce
dure will be canceled.
^
Photo Manager
27
*:*:*x*:wx*ra
Renaming a Photo
Though photos automatically are assigned names (photo #1, photo #2, etc.),
you can change the name of a photo, if desired.
To rename a photo:
1:
2:
Open the photo album that contains the photo you wish to rename.
Move to the photo you wish to rename so that it is currently displayed
on the screen.
3:
4:
Select rename from the edit menu.
A dialog box will ask you to "Enter the new picture name." Enter a
new name and press IRETURNI. (If the name is displayed, press
[INST/DELI to backspace over it.)
NOTE To cancel, eithcf press I RETURN! before you have changed the
name, or click on Cancel.
If the Image is Too Big for the Photo Album Screen
Below the dog-ear corner of the photo album is the window indicator. The
grey (filled in) box represents the area encompassed by your photo. The
hollow rectangle on top represents the photo album window. To view
another portion of the current photo, you can move the photo album window
much as you would using geoPaint's Page Map to move the Drawing
Window.
To move the photo album window:
1:
Click on hollow rectangle representing the
photo album window. It will become
attached to the pointer.
2:
i
[EM}— album window
1
entire photo
Position the photo album window over a new location and click to
deposit it. The new photo album window will be displayed on the
screen.
28
Chapter 3
Exiting a Photo Album
Use one of the following methods:
•
Select close from the file menu if you wish to open another album or
create a new one.
Select quit from the file menu or click on the close
icon to return to the previous application or to the
deskTop.
•x:vXvX-Xv>:-x<vXv>X\vX-:\w:-X\%v:w^
Click here
to exit.
Photo Manager
29
Clip Art
On Side A of Disk 2 you will find a number of photo albums. These
albums contain clip art gathered from the PrintMaster graphics program:
PrintMaster Plus, Art Gallery 1, Art Gallery 2, Fantasy, and U.S. History.
Use the Photo Manager desk accessory (described in Chapter 3 of this
manual) to manage the clip art photo albums. When needed, you can copy
the clip art into a geoPublish document, as well as any GEOS application
document that accepts photo scraps.
The clip art photo albums are distinguished by themes: Just for Fun, Work
& Play, Fantasy, U.S. History, and Holidays. This chapter describes and
illustrates the contents of each photo album.
Clip Art
31
ro^^
Just for Fun
From PrintMaster Plus
Clown
Flag
Pointing Hand
Newspaper
Cityscape
Earth
Hour Glass
Light Bulb
From Art Gallery 1
Shaking Hand
Pointing
Happy Bear
From Art Gallery 2
USA
32
Chapter 4
-x^^^
::*:*:*:^^^
Work & Play
From PrintMaster Plus
Overtime
Balloon
Sailboat
Football
From Art Gallery 1
Coffee
Waste Basket
Work Station
Batter
From Art Gallery 2
Drafting Tools
::*:x:::w^^
Math Professor
Finish Line
Clip Art
33
(Art Gallery II, continued)
Scuba Diver
34
Chapter 4
*:::x*'^:™--™<*-<<^<^^
Fantasy
From PrintMaster Plus
Unicorn
From Art Gallery 1
Castle
Old Dragon
From Fantasy
Open Scroll
Broad Sword
Knight
Large Shield
wXtt^
Fairy
Clip Art
35
U.S- History
From Art Gallery 1
Liberty Bell
Lincoln
Washington
From U.S. History
John Glenn
Uncle Sam
Ben Franklin
36
Chapter 4
Puritan Man
*:*:*x-xw
Statue of Liberty
^^
Clip Aft
37
>:*:*x*:*:*:*x*:*:*:*x-xtt^^^
(US. History, continued)
Progress
38
Chapter 4
:>:>:>x:":ix'::"-:-::::—::-^
«
Columbia
^^
Clip Art
39
Holidays
From PrintMaster Plus
Cake
Christmas Tree
Pumpkin
Graduate
Dinner Turkey
From Art Gallery 1
Easter Egg
From Art Gallery 2
Balloons
40
Chapter 4
XvX^XvX-X-XvXvIX-X-XvX-IvXWXvXvX-XvXvX-Xvw^
Wedding
Dancers
Appendices
This section contains the following appendices:
•
Appendix A: Menu Listing
•
Appendix B: Error Messages
•
Appendix C: geoPublish User's Manual Errata Information
•
Appendix D: GEOSDemo
*X%vX-XW
Appendices
41
Appendix A: Menu Listing
Graphics Grabber
file menu
PrintMaster loads graphics from a PrintMaster, an Ait Gallery, or a
disk containing a user-created graphic made with PrintMaster.
Print Shop loads graphics from a Print Shop disk, a Graphics Library
disk, or a disk containing a user-created graphic made with Print Shop.
Newsroom loads graphics from a Newsroom disk or a Clip Art disk.
Quit exits the Graphics Grabber to the deskTop.
save menu
in a scrap copies the currently displayed graphic to a photo scrap.
in an album copies the currently displayed graphic to the active photo
album. The name of the active photo album is displayed in the album
name box at the upper right corner of the screen.
options menu
choose album enables you to select another photo album on the disk as
the active photo album.
create album enables you to create a new photo album. The new
album's name will be displayed in the album name box at the upper
right corner of the screen.
Photo Manager
file menu
close exits the current photo album and enables you to create or open
another photo album.
quit exits to the previous application or to the deskTop.
edit menu
cut moves the currently displayed photo page to a photo scrap.
copy copies the currently displayed photo page to a photo scrap.
paste pastes the contents of the photo scrap into the currently displayed
photo album.
search enables you to search for another photo album page.
rename enables you to rename the currently displayed photo album
page.
42
Chapter 5
^^^^
Appendix B: Error Messages
Cannot install (application name) to this disk.
•
You tried to install the application on a work disk. You can only install
the application from its original application disk. Close the current disk
and install the application from its application disk. After you have
installed the application, copy it to your work disks.
Graphics Grabber cannot read one or more graphics in this file.
•
Something is preventing the Graphics Grabber from reading a
Newsroom graphic file correctly. Either the Newsroom disk or the
Graphics Grabber file is damaged. If the disk is not damaged, try
copying the original Graphics Grabber file (from the geoPublish master
disk) onto the work disk containing the damaged Graphics Grabber file.
If the problem persists, contact Customer Service. (See the "How to
Get Help" section at the front of this manual.)
Graphics Grabber cannot read this graphic.
•
Graphics Grabber is unable to grab one of the graphics on the disk.
Check to see that the disk has been inserted correctly. The error
message could also indicate that there is a problem with the file or the
disk.
Graphics Grabber is unable to load this desk accessory.
•
You may have inserted the disk incorrectly. Try re-inserting the disk
into the disk drive.
•
The disk or the desk accessory may have been damaged. Try copying
the original desk accessory (from the master disk it came on) onto a
new work disk.
Graphics Grabber is unable to save the graphic on this disk.
•
You may have inserted the disk incorrectly. Try re-inserting the disk
into the disk drive.
•
The disk containing the artwork may have been damaged.
Operation canceled due to disk error: missing or unformatted disk.
•
If the disk you are trying to open is formatted, then you may have
w^
Appendices
43
x*x*:*rc^
improperly inserted the disk into the disk drive. Click OK and re-insert
the disk, then try opening the disk again.
Insert a disk containing (graphics disk name).
•
If this message appears twice in a row, the disk may not have been
inserted correctly into the disk drive, or it may have been inserted into
the incorrect disk drive. Check to make sure the disk is properly
inserted into the correct disk drive.
Please insert a disk with deskTop V(#) or higher.
You tried to exit a document when there is no DESKTOP file on the
work disk. Remove the current disk from the disk drive and insert the
System disk, which contains the DESKTOP file. (If you are using
GEOS 2.0, make sure you insert the System disk you booted with.)
Click OK. You will be returned to the System deskTop. If you wish to
avoid this procedure in the future, copy the DESKTOP file to your
application work disks.
Re-insert your GEOS disk in Drive #.
•
The program needs to read data from the Photo Manager or Graphics
Grabber files. Insert your Graphics Grabber application work disk into
the disk drive.
There are no readable graphics in this file.
•
See the instructions for Graphics Grabber cannot read one or more
of the graphics in this file.
There is insufficient memory to convert this graphic.
•
See the instructions for Graphics Grabber cannot read one or more
of the graphics in this file.
There is no graphic to save.
•
There is no graphic currently loaded and displayed in the graphics
window. You must "grab" a graphic (i.e., cause it to appear in the
window) before you can save it to a photo scrap or a photo album.
Refer to "Converting the Artwork" on page 15.
There is not enough space on disk to save this graphic.
•
The current disk is running out of room. Exit the Graphics Grabber and
move some of the files to another work disk. Reenter the Graphics
Grabber and try saving the graphic again.
4*4
Chapter 5
*:*:*:*:*:*tt"*£^
Appendix C: geoPublish User's Manual
Errata Information
This section contains errata information for the geoPublish User's Manual.
To find the change, go to the indicated page and section in the geoPublish
User's Manual (e.g., "Page 1-4 (under "A. First install geoPublish"). In the
correction described in this addendum, text in a regular typeface comes
directly from the manual. Text that appears in a bold typeface indicates
corrected or added text.
Page 1-4 (under "A. First install geoPublish")
1:
You can boot in either 64 or 128 mode. To boot in 64 mode, see page
1 -4 of your GEOS User's Manual. To boot in 128 mode, see page 1 -2
of your GEOS 128 User's Manual.
NOTE:
If you are running GEOS in 128 mode, note that geoPublish
operates in 40-column mode, not 80-column mode. If you try
to open geoPublish in 80-column mode, a dialog box will
enable you to switch column modes. In the dialog box, click
YES. When the screen goes dark, press the RGB button or
composite switch on your monitor. geoPublish will open in
40-column mode.
I Pages 1-5-1-6 (Under Use thefollowing setup:)
geoPublish program, geoPublish data file, deskTop 1J, printer driver,
fonts needed, geoWrite data files, Photo Scrap or Photo Manager/Albums as
needed, and Libraries (see "Library Files You Need for Your Work
Disk," below, for details).
Setup 1: RAM disk: geoPublish, geoPublish data file, fonts needed,
geoWrite data files, Photo Scrap or Photo Manager/Albums, deskTop 1-3,
printer driver, and Library files. (See "Library Files You Need for Your
Work Disk," below, for details.) Floppy, formatted disk: used to save
geoPublish and geoWrite data files.
Setup 2: RAM disk: geoPublish, fonts needed, Photo Scrap or Photo
Manager/Albums, deskTop 1J, printer driver, and Library files. (See
Appendices
45
"Library Files You Need for Your Work Disk," below, for details.)
Floppy, formatted disk: geoPublish and geoWrite data flies.
I Page 1-6 (after description for "Setup 2") |
Library Files You Need for Your Work Disk
The Master Page and Page Layout Library files you need to copy onto
your work disk depend on the type of dot matrix printer you use. The
60 and 72 dpi library files are located on pages 1 and 2 of the disk note
pad at the back of your geoPublish disk, and the 80 dpi files are on
page 1 at the front of your geoPublish disk.
Ifyour
printer is:
Copy the followingfiles to your work disk:
60 dpi
MP Master 60 dpi
72 dpi
MP Master 72 dpi
80 dpi
MP Master 80 dpi
PL Layout 60 dpi
PL Layout 72 dpi
PL Layout 80 dpi
I Page 2-5 (under 'The Master Pages'*)
Use the master page to create page numbers, headers, footers, any other
original text or graphics, and to import bitmaps. You can use the Master
Page to place items anywhere on the geoPublish document page, not
just as heade > or footers.
I Page 2-7 (under "Page Layout Mode")
This is handy for you, since the 2.1 version of geoWrite has features not
found in the earlier versions.
IMPORTANT: If you do not own geoWrite 2.1, you will be unable to
use the 2.1 version of your geoWrite files in a word processing (i.e.,
non-geoPublish) format Therefore, it is most important that you
import a copy, not the original, of your geoWrite file into a geoPublish
document.
Page 3-2 (under 'The Sample Work Disk")
Copy the following files to a work disk: the geoPublish program, Text 1,
Text 2, the Photo Scrap, the LW Roma font file, and your printer driver.
46
Chapter 5
":*:*:*:*:*:
«*:*:*:-:*:*x*!*:*:*:*x«:*:^
(Refer to your GEOS User's Manual or GEOS128 User's Manual for
how to find the correct printer driver.)
You will also need to copy the correct Master Library and Page Layout
Library files onto your work disk. These files are found on both sides
of your original geoPublish application disk. The type of file you copy
depends on the type of dpi printer you are using. Refer to Appendix G:
Disk Contents, on page 6-17 of the geoPublish User's Manual for the
disk location of the type of library files you need.
Page 3-5 (regarding the top illustration)
(In the Graphic Toolbox illustration, the Background Tool is the Move-toback Tool. Not mentioned is the Move-to-front Tool. This tool appears
next to the Move-to-back Tool icon.)
Page 3-6 (regarding the top illustration)
(In the top illustration, the Foreground Tool is the Move-to-front Tool.
Not mentioned is the Move-to-back Tool. This tool appears next to the
Move-to-front Tool icon.)
Page 3-7 (near the top of the page)
To set the guidelinesfor our newsletter, follow these steps:
1:
Set the outside vertical margins at the following positions:
1"
(left column, outside margin)
8"
(right column, outside margin)
NOTE:
If your printer is a 60 or 72 dpi, set the right column at 7-1/
2", not 8".
For exact measurements, refer to the X and Y
coordinates box at the lower left corner.
2:
Now you are ready to set the inside margins. Go to the top guideline
margin and click at positions 4 1/2" and 5". (In other words, place the
margins next to each other.)
NOTE:
3:
If your printer is a 60 or 72 dpi, set the inside margins at 4"
and 4-1/2".
Now set the horizontal guidelines at the following positions:
:*xW^^
Appendices
47
-:*tt-x*x*:*:*:w
1"
(header margin)
2-1/2"
(header guideline)
10"
(footer margin)
Page 3-7 (under "Create a Header")"]
Move the cursor into the small area of the page above the topmost
guideline. Pick a position along the top left of the page for the header
and click to choose the starting point for the text.
I Page 3-9 (at the top of the page) |
...in the lower right (below the lowest guideline) to place the text. (If you
are using a 60 or 72 dpi printer, select a place within the 5-1/2" guide
line.)
I Page 3-9 (under "Create Master Page Graphics")
Running horizontally at the top of each page we want to have some sort of
graphic. We will use a horizontal line for this purpose.
To create a running horizontal line, follow these steps:
1:
2:
Select the Line tool from the toolbox.
Go to the horizontal guideline you placed at the 1" mark at the top
of the page. We want to have the line extend from the 1" vertical
guideline to the 8" (or 7-1/2") vertical guideline. Move the cross
hair pointer to the left point and click to plant the first endpoint A
rubber-banding line will be drawn.
3:
Drag the line across until it touches the 8" (or 7-1/2") vertical guide
line. Ratcheting should make this a simple operation. Plant the second
endpoint by clicking. The line will be entered on the page.
4:
Now move the horizontal guideline (under the line you just drew)
from 1" to 1-1/2".
I Page 3-11 (under "Use the Snapping Feature")
You will usually want to disable ratcheting when snapping is enabled and
disable snapping when ratcheting is enabled. (You cannot use them both
at once; selecting snap disables ratchet, and vice versa.)
48
Chapter 5
^^^
Page 3-11 (under "Reserve Space for the Headline") |
2:
With snap enabled, drag the cursor into the upper left corner of the
page where the 1-1/2" horizontal guideline and the 1" vertical
guideline intersect. The cursor should snap to the guidelines. Click
here to plant one corner of the region. A rubber-banding box will
appear.
Page 3-18 (under item # 4)j
The region's outline will highlight, and a move button and size button will
appear in the upper left and lower right corners of the region, respectively.
I
Page 3-18 (under item #5) I
geoPublish will read and analyze the Photo Scrap on the disk and you will
see the following dialog box:
1 Page 3-19 (under "E. Create the Page One Headline") [
At the head of the first page we want a headline under the name of the
newsletter. This is why we reserved the top portion of the page.
Page 3-20 (at the top of the page) |
3:
Click the pointer somewhere near the left side of the box we reserved
for the headline.
I
Page 3-24 (under "Flow Text into Page T)
5:
Open a second text region along the right column guidelines. It should
extend from the 4" mark to the 10" mark (vertically). We will place
graphics in the upper portion of this column.
| Page 3-26 (under "To draw circles, follow these steps:") |
2:
Move the pointer to one of the empty regions and click once to plant
one side of the circle. A rubber-banding circle will appear.
3:
As you move the pointer away from the point you selected, the circle
will become larger. As you move closer, the circle will become
smaller. Select a good-sized circle and single-click to make it perma
nent.
Appendices
49
^
| Page 3-28 (under "F. Now Print The Jelly RrtF)]
Once you have completed assembling The Jelly Roll into a presentable
newsletter, you are ready to print it out. Make sure that your printer is
properly connected to your computer. Also make sure that the correct
printer driver has been selected as the default printer driver. If
necessary, refer to your GEOS User's Manual or GEOS128 User's
Manual for how to set up a printer for use with GEOS.
[ Page 4-9 (under Step 2 of "To create a library") |
NOTE:
You can store more than one master library per disk. How
ever, when you need to use a library entry, geoPublish will use
the first master library file it finds (i.e., the first one that
appears on the disk). You can rearrange libraries on the disk,
if necessary, to enable geoPublish to gain access to certain file.
However, because of limited disk space, it is easier to store
only one library per disk.
Page 4-13 (under "Importing a geoWrite File")
IMPORTANT: Before you import a geoWrite file, make sure you have
created a backup of that file. Once a geoWrite file has been converted to
a 2.1 version, it cannot be changed back into its original version. If you
do not own geoWrite 2.1, you will be unable to use the converted file
later on in a word processing (i.e., non-geoPublish) format.
Page 4-21 (under Step 2 of "To create a new library)
NOTE:
You can store more than one layouts library per disk.
However, when you need to use a library entry, geoPublish
will use the first layouts library file it finds (i.e., the first
library file icon on the disk). You can rearrange library file
icons on the disk, if necessary, to enable geoPublish to gain
access to certain file. However, because of limited disk
space, it is easier to store only one library per disk.
Page 4-36 (under "To set text attributes")
Point Size Click on the scrolling arrows to increase or decrease the
current size. Point sizes range from 4 to 192.
50
Chapter 5
^^^^
^
I Page 4-56 (under "Printing Your Document")
Before you select a file to print, make sure that your printer is properly
connected to your computer and that your work disk contains the
necessary printer driver. To select and copy the appropriate files, refer
to "D. Now, Make a Work Copy" on page 1-5 of the geoPublish User's
Manual.
I
Page 6-4 (under "Copying a Disk") |
Ifyou have one disk drive and a RAM Expansion Unit:
1: Open the source disk to its deskTop.
2:
3:
Select copy from the disk menu.
A dialog box will ask you if you wish to "Replace the contents of
(RAM type) with the contents of (source disk name)? Click YES.
The contents of the source disk will be copied onto the REU.
4:
After the source disk contents have been copied to the REU, close
the source disk and remove it from the disk drive.
5:
Insert the destination disk into the disk drive and activate the
destination disk.
6:
Open the RAM disk drive and use Steps 2-3 to copy the contents of
the REU to the destination disk.
Page 6-22 (middle two layout samples)
Master Page: 1C R Punch
Master Page 1C L Punch
Page Layout: 2C Big RM
Page Layout: 2C Big LM
Page 6-23 (lower right sample)
Master Page: 1C Big RM
Page Layout 2C Big RM
Page 6-24 (upper left sample)
Master Page: 1C Big LM
Page Layout- 2C Big LM
x-:-X'XW
Appendices
51
tt^^^
Appendix E: Demo Program
The GEOS demonstration program is provided on Side B of Disk 2. Use
this demonstration program to get an introduction to some of Berkeley
Softworks' most popular programs, including GEOS 2.0.
Once you open the GEOS demonstration program, it will continue until it
completes its performance, then it will return you to the deskTop after
wards. You can interrupt the program at any time.
Ifyou wish to:
Move to the next dialog box
Do the following:
Press the space bar.
Continue after stopping
Hold down [§ and _
Stop a screen
Exit to the deskTop
Hold down ® and j
Hold down S3 and press [z].
To open the demonstration program:
1:
Boot GEOS.
NOTE If you are using a Commodore 128, boot GEOS in 64 mode.
2:
Remove the System disk from the disk drive.
3:
Insert Side 2 of the geoChart program disk into the disk drive. Activate
the disk by clicking on its disk drive icon.
4:
When the Demo deskTop appears, look for the GEOS
DEMO file icon.
Look for this
5: Double-click on the GEOS DEMO file icon to
open it.
p™**"™""""l filo icon
|>^||
CE0S DEM0
NOTE Another method is to click once on the file icon so that it is
highlighted, then select open from the file menu.
The GEOS demonstration program will begin. Enjoy!
52
Chapter 5
:*:v:-x*xw^
Index
Large Shield 35
Liberty Bell 36
Light Bulb 32
A
appendices 41
Art Gallery 42
Lincoln 36
Art Gallery 131
Math Professor 33
Art Gallery 2 31
Newspaper 32
Old Dragon 35
B
Open Scroll 35
baud rate 3
Overtime 33
browse icon 17,18
Pointing (hand) 32
Progress 38
Brush Shape option 9
C
Pumpkin 40
change album command 19
Puritan Man 36
clip art 31
Sailboat 33
location on disk 31
clip art, illustrated
Scuba Diver 34
Shaking Hand 32
Skier D 34
Balloon 33
Balloons 40
Soldier 36
Batter 33
Statue of Liberty 37
Ben Franklin 36
Uncle.Sam 36
Broad Sword 35
Unicom 35
Cake 40
USA 32
Castle 35
Washington 36
Chrismas Tree 40
Waste Basket 33
Cityscapc 32
Wedding 40
Work Station 33
Clown 32
Coffee 33
Copies option 5
Columbia 39
create album command 18
Dancers 40
Dinner Turkey 40
Drafting Tools 33
Earth 32
Easter Egg 40
Fairy 35
Finish Line 33
Flag 32
Football 33
Graduate 40
DESKTOP file 13
demo program 52
dialog box icon 17,18
E
edit menu 42
error messages 43
F
Happy Bear 32
Fantasy 31
Hour Glass 32
file menu
John Glenn 36
Graphics Grabber 42
Knight 35
Photo Manager 42
Index
53
fonts 7
M
From Page option 5
menu listings 42
G
N
geoPubLaser 1
Newsroom 11,15,17,18,21,42
fonts 7
O
location on disk 2
options menu 42
print options 5
procedure 3
work disks 2
Pattern option 9
GEOS 2.0 13
GEOS Demo program 52
graphics
copying to albums 18
loading 15
viewing others on disk 17
Graphics Grabber
compatible art disks 11
description 11
photo album icon 17,19
photo albums 21,23,26
copying Graphics Grabber art to 19
creating in Graphics Grabber 18
placing image into 26
screen description 25
scrolling 28
switching in Graphics Grabber 19
Photo Manager
entering 14
entering 23
how it works 15
general description 21
installation 12
location on disk 12
menu listing 42
location on disk 22
menu listing 42
procedure 26
procedure 15
photo scrap
work disks 12
Graphics Grabber icons
description 17
copying Graphics Grabber graphics
to 19
photo scrap icon 17,19
Graphics Library 42
photo scraps 21
photos
I
renaming 28
in a scrap command 19
in an album command 19
installation 12
searching for 27
PostScript 2
Print Shop 11,15,17,21,42
PrintMaster 11,15,17,21,42
LaserDirect printing service 2
PrintMasterPlus31
LaserWriter
baud rates 3
connecting computer to 2
fonts, non-resident 7
fonts, resident 7
how files are printed 7
PostScript 2
RS-232 interface 2
54
Index
^^
RAM Expansion Unit 13
Reduce to option 5
RS-232 interface 2
w^^
s
save menu 42
smoothing 5
Smoothing option 5
T
Thumbnails option 5
To Page option 5
Transparent/Opaque option 9
U
U.S. History 31
W
window indicator 28
photo albums 25
work disks
geoPubLaser 2
Graphics Grabber 12
v::x-x::::-::-::-::-x^
IndCX
55
Part No.: 11-0325-0111