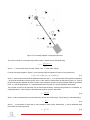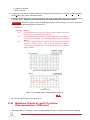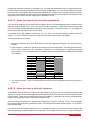
1
c 2011 Quanser Inc., All rights reserved. ⃝ Quanser Inc. 119 Spy Court Markham, Ontario L3R 5H6 Canada [email protected] Phone: 1-905-940-3575 Fax: 1-905-940-3576 Printed in Markham, Ontario. For more information on the solutions Quanser Inc. offers, please visit the web site at: http://www.quanser.com This document and the software described in it are provided subject to a license agreement. Neither the software nor this document may be used or copied except as specified under the terms of that license agreement. All rights are reserved and no part may be reproduced, stored in a retrieval system or transmitted in any form or by any means, electronic, mechanical, photocopying, recording, or otherwise, without the prior written permission of Quanser Inc. Acknowledgements Quanser, Inc. would like to thank the following contributors: Dr. Hakan Gurocak, Washington State University Vancouver, USA, for his help to include embedded outcomes assessment, and Dr. K. J. Åström, Lund University, Lund, Sweden for his immense contributions to the curriculum content. QNET ROTPENT Laboratory Manual - Instructor Manual 2 Contents 1 Introduction 4 2 Simple Modeling 2.1 Background 2.2 Simple Modeling Virtual Instrument 2.3 Damping [15 min] 2.4 Friction [15 min] 2.5 Moment of Inertia [30 min] 2.6 Results 6 6 8 8 9 9 11 3 Balance Control Design 3.1 Background 3.2 Balance Control Design VI 3.3 Model Analysis [20 min] 3.4 Control Design and Simulation [45 min] 12 12 12 14 15 4 Balance Control Implementation 4.1 Background 4.2 Balance Control VI 4.3 Default Balance Control [30 min] 4.4 Implement Designed Balance Control [20 min] 4.5 Balance Control with Friction Compensation [30 min] 18 18 18 19 20 21 5 Swing-Up Control 5.1 Background 5.2 Swing-Up Control VI 5.3 Energy Control [30 min] 5.4 Hybrid Swing-Up Control [20 min] 24 24 26 26 27 6 System Requirements 6.1 Overview of Files 6.2 Simple Modeling Laboratory VI 6.3 Control Design VI 6.4 Swing-Up Control VI 29 29 29 30 30 7 Lab Report 7.1 Template for Content (Simple Modeling) 7.2 Template for Content (Balance Control Design) 7.3 Template for Content (Balance Control Implementation) 7.4 Template for Content (Swing-Up Control) 7.5 Tips for Report Format 36 36 37 38 39 40 8 Scoring Sheets 8.1 Simple Modeling: Pre-Lab Questions 8.2 Simple Modeling Lab Report 8.3 Balance Control Design: Lab Report 8.4 Balance Control Implementation: Lab Report 8.5 Swing-Up Control: Lab Report 41 41 42 43 44 45 A QNET Instructor's Guide A.1 Pre-lab Questions and Lab Experiments A.2 Assessment for ABET Accreditation A.3 Rubrics 46 46 47 53 QNET ROTPENT Laboratory Manual - Instructor Manual v 1.0 1 INTRODUCTION Regulation and servo problems are very common, but feedback can be used in many other useful ways. The name task-based control is used as a common classification of a wide variety of problems. For instance, stabilization of an unstable system can be considered a task-based problem. However, it is a borderline example since it can also be viewed as a regulation problem. The Segway transporter is a typical example where stabilization is a key task. In that case stabilization is also merged with the steering functions. Other examples are damping of a swinging load on a crane, stabilization of a rocket during take-off, and the human posturing systems. There are many examples of task-based control in aerospace such as automatic landing and orbit transfer of satellites. Robotics is a rich field for task-based control with challenges such as collision avoidance, motion planning, and vision based control. Taskbased control is typically more complicated than regulation and servoing but they may contain servo and regulation functions as sub-tasks. We have chosen the rotary pendulum system to illustrate task-based control The QNET rotary inverted pendulum trainer is shown in Figure 1.1. The motor is mounted vertically in a metal chamber. An L-shaped arm is connected to the motor shaft and pivots between ±180 degrees. A pendulum is suspended on a horizontal axis at the end of the arm. The pendulum angle is measured by an encoder. The control variable is the input voltage to the pulse-width modulated amplifier that drives the motor. The output variables are the angle of the pendulum and the angle of the motor. Figure 1.1: QNET rotary inverted pendulum trainer (ROTPENT) There are three experiments: simple modeling, inverted pendulum balance control, and swing-up control. The experiments can be performed independently. Topics Covered • Modeling the pendulum • Balance control (via state-feedback) QNET ROTPENT Laboratory Manual - Instructor Manual 4 • Control optimization (LQR) • Friction compensation • Energy control • Hybrid control Prerequisites In order to successfully carry out this laboratory, the user should be familiar with the following: • Transfer function fundamentals, e.g. obtaining a transfer function from a differential equation. • Using LabVIEWr to run VIs. QNET ROTPENT Laboratory Manual - Instructor Manual v 1.0 2 SIMPLE MODELING 2.1 Background This experiment illustrates some control tasks for gantry cranes. The gantry is a moving platform or trolley that transports the crane about the factory floor or harbor. The load hangs from the crane using wires and is moved by the gantry crane. Typically the problem is to move the load quickly and move it to the correct position. The fast motion necessary for production makes it more difficult to move the load to the correct location given the swinging motions of the crane. This problem can be mimicked using the rotary pendulum system by viewing the tip of the L-shaped arm as the moving trolley and the pendulum tip as the load being carried. In this experiment we will begin by modeling the system and determine strategies to dampen the oscillations of the system. Figure 2.1: Free-body diagrams of pendulum assembly Figure 2.1 shows the free-body diagram of the pendulum assembly that is composed of two rigid bodies: the pendulum link with mass Mp1 and length Lp1 , and the pendulum weight with mass Mp2 and a length Lp2 . The center of mass of the the pendulum link and the pendulum weight are calculated separately using the general expression ∫ p x dx xcm = ∫ p dx where x is the linear distance from the pivot axis and p is the density of the body. The circle in the top-left corner of Figure 2.1 represents the axis of rotation or the pivot axis that goes into the page. The pendulum system is then expressed as one rigid body with a single center of mass, as shown in Figure 2.2. QNET ROTPENT Laboratory Manual - Instructor Manual 6 Figure 2.2: Free-body diagram of composite pendulum The center of mass of a composite object that contains n bodies can be calculated using ∑n mx ∑n i cm,i xcm = i=1 i=1 mi where xcm,i is the known center of mass of body i and mi is the mass of body i. From the free-body diagram in Figure 2.2, the resulting nonlinear equation of motion of the pendulum is Jp α̈(t) = Mp g lp sin α(t) + Mp u lp cos α(t) (2.1) where Jp is the moment of inertia of the pendulum at the pivot axis z0 , Mp is the total mass of the pendulum assembly, u is the linear acceleration of the pivot axis, and lp is the center of mass position as depicted in Figure 2.2. Thus as the pivot accelerates towards the left the inertia of the pendulum causes it to swing upwards while the gravitation force Mp g and the applied force Mp u (the left-hand terms in Equation 2.1) pull the pendulum downwards. The moment of inertia of the pendulum can be found experimentally. Assuming the pendulum is unactuated, linearizing Equation 2.1 and solving for the differential equation gives the expression Jp = Mp g lp 4f 2 π 2 (2.2) where f is the measured frequency of the pendulum as the arm remains rigid. The frequency is calculated using f= ncyc ∆t (2.3) where ncyc is the number of cycles and ∆t is the duration of these cycles. Alternatively, Jp can be calculated using the moment of inertia expression ∫ J= r2 dm QNET ROTPENT Laboratory Manual - Instructor Manual (2.4) v 1.0 where r is the perpendicular distance between the element mass, dm, and the axis of rotation. In addition to finding the moment of inertia, this laboratory investigates the stiction that is present in the system. The rotor of the DC motor that moves the ROTPEN system requires a certain amount of current to begin moving. In addition, the mass from the pendulum system requires even more current to actually begin moving the system. The friction is particularly severe for velocities around zero because friction changes sign with the direction of rotation. See Wikipedia for more information on: center of mass, inertia, pendulum, and friction. 2.2 Simple Modeling Virtual Instrument The virtual instrument for studying the physics of the pendulum when in the gantry configuration is shown in Figure 2.3. Figure 2.3: LabVIEW VI for modeling QNET rotary pendulum. 2.3 Damping [15 min] 1. Ensure the QNET ROTPENT Simple Modeling VI is open and configured as described in Section 2.2. Make sure the correct Device is chosen. 2. Run the QNET ROTPENT Simple Modeling.vi shown in Figure 2.3. 3. Hold the arm of the rotary pendulum system stationary and manually perturb the pendulum. 4. While still holding the arm, examine the response of Pendulum Angle (deg) in the Angle (deg) scope. This is the response from the pendulum system. 5. Repeat 3 above but release the arm after several swings. QNET ROTPENT Laboratory Manual - Instructor Manual 8 6. B-5, B-7 Examine the Pendulum Angle (deg) response when the arm is not fixed. This is the response from the rotary pendulum system. Given the response from the pendulum and rotary pendulum system, which converges faster towards angle zero? Why does one system dampen faster than the other? Answer 2.1 Outcome B-5 B-7 Solution If the procedure was followed correctly, they should be able to draw some conclusions based on examined responses. The rotary pendulum system converges to angle zero more rapidly. The rotary pendulum system is naturally more damped due to the coupling effect between the rotary arm and pendulum link. 7. Stop the VI by clicking on the Stop button. 2.4 Friction [15 min] 1. Run the QNET ROTPENT Simple Modeling.vi. 2. In the Signal Generator section set • Amplitude = 0 V • Frequency = 0.25 Hz • Offset = 0.0 V 3. Change the Offset in steps of 0.10 V until the pendulum begins moving. Record the voltage at which the pendulum moved. 4. Repeat Step 3 above for steps of -0.10 V. 5. B-5, B-7 Enter the positive, Vf p , and negative voltage, Vf n , values needed to get the pendulum moving. Why does the motor need a certain amount of voltage to get the motor shaft moving? Answer 2.2 Outcome B-5 B-7 Solution If the procedure was followed correctly, they should be able to draw some conclusion based on examined responses. The positive and negative Coulomb friction voltages recorded are Vf p = 2.1 V and Vf n = −2.9 V. These results will vary between QNET ROTPEN systems. To overcome the friction in the motor, a certain amount of current is required to make the rotor move. The amount of voltage in either direction varies between 1.0 V and 3.0 V. 6. Stop the VI by clicking on the Stop button. 2.5 Moment of Inertia [30 min] 2.5.1 Pre-Lab Questions 1. A-1, A-2 Find the moment of inertia acting about the pendulum pivot using the free-body diagram. Make sure you evaluate numerically using the parameters defined in the QNET ROTPEN User Manual ([2]). QNET ROTPENT Laboratory Manual - Instructor Manual v 1.0 Answer 2.3 Outcome A-1 A-2 Solution Use Equation 2.4 with the pendulum free-body diagram given in Figure 2.1 to find its moment of inertia. Using Equation 2.4 on the FBD in Figure 2.1 ∫ Jp ∫ Lp1 0 = Lp1 +Lp2 r2 dr + p2 = p1 r2 dr Lp1 1 1 Mp1 L2p1 + Mp2 L2p1 + Mp2 Lp1 Lp2 + Mp2 L2p2 . 3 3 When evaluated with the pendulum parameters given in the QNET Rotary Pendulum User Manual ([2]), Jp = 6.98 × 10⁻⁴ kg · m2 2.5.2 In-Lab Exercises 1. Run the QNET ROTPENT Simple Modeling.vi. 2. In the Signal Generator section set • Amplitude = 1.0 V • Frequency = 0.25 Hz • Offset = 0.0 V 3. Click on the Disturbance toggle switch to perturb the pendulum and measure the amount of time it takes for the pendulum to swing back-and-forth in a few cycles (e.g., 4 cycles). 4. B-5, K-1 Find the frequency and moment of inertia of the pendulum using the observed results. See Section 2.1 to see how to calculate the inertia experimentally. Answer 2.4 Outcome B-5 K-1 Solution If they were able to follow the procedure properly, then they should be able to measure the number of cycles. After performing the experiment, the pendulum goes through 6 cycles in 2.5 s. Using Equation 2.3, the frequency is f= 6 = 2.4 Hz 2.5 Substituting this and the pendulum parameters defined in [2] in Equation 2.2, 0.0270 × 9.81 × 0.153 Jp,exp = = 1.77 × 10⁻⁴ kg · m2 4 × 2.42 × π 2 5. B-9 Compare the moment of inertia calculated analytically in Exercise 1 and the moment of inertia found experimentally. Is there a large discrepancy between them? QNET ROTPENT Laboratory Manual - Instructor Manual 10 Answer 2.5 Outcome B-9 Solution The moment of inertia found analytically is 6.98 × 10⁻⁴ kg · m2 while the experimentally determined inertia is 1.77 × 10⁻⁴ kg · m2 . This discrepancy may be due to an inaccuracy when measuring the pendulum frequency or the fact that this frequency is the damped frequency (not the undamped natural frequency that the equation to compute the inertia uses). 6. Stop the VI by clicking on the Stop button. 2.6 Results Fill out Table 1 with your answers from above. Description Section 2.4: Friction Positive Coulomb Friction Voltage Negative Coulomb Friction Voltage Section 2.5: Moment of Inertia Calculated inertia Experimentally found inertia Symbol Value Unit Vf p Vf n 2.1 -2.9 V V Jp Jp,exp 6.98 × 10⁻⁴ 1.77 × 10⁻⁴ kg · m2 kg · m2 Table 1: QNET ROTPENT Modeling results summary QNET ROTPENT Laboratory Manual - Instructor Manual v 1.0 3 BALANCE CONTROL DESIGN 3.1 Background A rich collection of methods for finding parameters of control strategies have been developed. Several of them have also been packaged in tools that are relatively easy to use. Linear Quadratic Regulator (LQR) theory is a technique that is suitable for finding the parameters of the balancing controller in Equation 4.1 in Section 4. Given that the equations of motion of the system can be described in the form ẋ = Ax + Bu the LQR algorithm computes a control task, u, to minimize the criterion ∫ ∞ J= x(t)T Qx(t) + u(t)T Ru(t)dt 0 The matrix Q defines the penalty on the state variable and the matrix R defines the penalty on the control actions. Thus when Q is made larger, the controller must work harder to minimize the cost function and the resulting control gain will be larger. In our case the state vector x is defined [ x= θ ]T α θ̇ α̇ Since there is only one control variable, R is a scalar and the control strategy used to minimize cost function J is given by u = −K(x − xr ) = −kp,θ (θ − θr ) − kp,α (α − π) − kd,θ θ̇ − kd,α α̇. The LQR theory has been packaged in the LabVIEWr Control Design and Simulation Module. Thus given a model of the system in the form of the state-space matrices A and B and the weighting matrices Q and R, the LQR function in the Control Design Toolkit computes the feedback control gain automatically. In this experiment, the model is already available. In the laboratory, the effect of changing the Q weighting matrix while R is fixed to 1 on the cost function J will be explored. See Wikipedia for more information on optimal control. 3.2 Balance Control Design VI The QNET ROTPENT Control Design VI has three tabs. Each tab is explained in the following sections. 3.2.1 Symbolic Model Tab The Symbolic Model tab shown in Figure 3.1 is used to setup the QNET rotary pendulum model. QNET ROTPENT Laboratory Manual - Instructor Manual 12 Figure 3.1: LabVIEW VI to generate state-space model of QNET rotary pendulum. 3.2.2 Open Loop Analysis Tab The Open Loop Analysis tab on the VI is used to analyze the open loop stability of the QNET rotary pendulum system, shown in Figure 3.2. Figure 3.2: LabVIEW VI used to analyze open loop stability of QNET rotary pendulum system. QNET ROTPENT Laboratory Manual - Instructor Manual v 1.0 3.2.3 Simulation Tab On the Simulation tab shown in Figure 3.3, users can generate the balance control gains for the QNET rotary pendulum system using LQR and simulate the closed-loop system. Figure 3.3: LabVIEW VI for QNET rotary pendulum balance control design. 3.3 Model Analysis [20 min] 1. Open the QNET ROTPENT Control Design.vi. 2. Run the QNET ROTPENT Control Design.vi. The front panel of the VI shown in Figure 3.1. 3. Select the Symbolic Model tab. 4. The Model Parameters array includes all the rotary pendulum modeling variables that are used in the statespace matrices A, B, C, and D. 5. Select the Open Loop Analysis tab, shown in Figure 3.2. 6. B-5, B-7 This shows the numerical linear state-space model and a pole-zero plot of the open-loop inverted pendulum system. What do you notice about the location of the open-loop poles? How does that affect the system? Recommended: In the Model Parameters section, it is recommended to enter the pendulum moment of inertia, Jp, be determined experimentally in Section 2.5. Answer 3.1 Outcome B-5 B-7 Solution If the VI was ran correctly, they should be able to draw some conclusions based on the pole locations. The inverted rotary pendulum system is unstable because there is one pole in the right-hand plane. 7. In the Symbolic Model tab, set the pendulum moment of inertia, Jp, to 1.0 × 10⁻⁵ kg · m2 . QNET ROTPENT Laboratory Manual - Instructor Manual 14 8. K-1, B-9 Select the Open Loop Analysis tab. How did the locations of the open-loop poles change with the new inertia? Enter the pole locations of each system with a different moment of inertia. Are the changes of having a pendulum with a lower inertia as expected? Answer 3.2 Outcome K-1 B-9 Solution The poles are at {9.0,-9.2,-0.35,0} for Jp = 1.7 × 10⁻⁴ kg · m2 and {11,11.3,-0.35,0} for Jp = 1.0 × 10⁻⁵ kg · m2 . The poles in the right-hand plane (RHP) move further into the RHP when the inertia is decreased. This implies that it's is easier to stabilize or balance an inverted pendulum that has a larger moment of inertia. Which makes sense from a practical standpoint, e.g., it's easier to balance a broom stick with one hand then it is a pencil. 9. Reset the pendulum moment of inertia, Jp, back to 1.77 × 10⁻⁴ kg · m2 . 10. Stop the VI by clicking on the Stop button. 3.4 Control Design and Simulation [45 min] 1. Open the QNET ROTPENT Control Design.vi. 2. Select the Simulation tab. 3. Run the VI. The VI running is shown Figure 3.3. 4. In the Signal Generator section set: • Amplitude = 45.0 deg • Frequency = 0.20 Hz • Offset = 0.0 deg 5. Set the Q and R LQR weighting matrices to the following: • Q(1,1) = 10, i.e., set first element of Q matrix to 10 • R=1 Changing the Q matrix generates a new control gain. 6. B-5, K-1 The arm reference (in red) and simulated arm response (in blue) are shown in the Arm (deg) scope. How did the arm response change? How did the pendulum response change in the Pendulum (deg) scope. Answer 3.3 Outcome B-5 K-1 Solution If the VI was ran correctly, they should be able to make the following observations. The arm response becomes faster, i.e., peak time decreases, mainly due to the increased arm proportional gain. In the pendulum tends to deflect form its vertical position more as the gain is increased, however. 7. Set the third element in the Q matrix to 0, i.e., Q(3,3) = 0. 8. B-7 Examine and describe the change in the Arm (deg) and Pendulum (deg) scope. QNET ROTPENT Laboratory Manual - Instructor Manual v 1.0 Answer 3.4 Outcome B-7 Solution Decreasing this LQR term makes the arm response faster but the pendulum angle tends to overshoot more. The proportional and derivative gains of the pendulum go down when Q(3,3) decreases. 9. K-3 By varying the diagonal elements of the Q matrix, design a balance controller that adheres to the following specifications: • Arm peak time less than 0.75 s: tp ≤ 0.75 s. • Motor voltage peak less than ± 12.5 V: |Vm | ≤ 12.5 V. • Pendulum angle less than 10.0 deg: |α| ≤ 10.0 deg. Record the Q and R matrices along with the control gain used to meet the specifications in your report. Answer 3.5 Outcome K-3 Solution Using the weighting matrices 40 0 0 0 0 1 0 0 Q= 0 0 0 0 0 0 0 1 and R = 1, the following gain was generated [ ] K = −6.32 81.2 −2.76 10.87 (Ans.3.1) 10. K-2, B-9 Attach the responses from the Arm (deg), Pendulum (deg), and Control Input (V) scopes when using your designed balance controller. Does it satisfy the specifications? Answer 3.6 Outcome K-2 B-9 Solution The simulated closed-loop response of the QNET rotary inverted pendulum is given in Figure 3.4. This is using the LQR gain given in Equation Ans.3.1. The response in Figure 3.4 meets the specifications given in Step 9. 11. Stop the VI by clicking on the Stop button. QNET ROTPENT Laboratory Manual - Instructor Manual 16 (a) Rotary Arm (b) Pendulum Link (c) Motor Voltage Figure 3.4: Simulated rotary inverted pendulum response. QNET ROTPENT Laboratory Manual - Instructor Manual v 1.0 4 BALANCE CONTROL IMPLEMENTATION 4.1 Background Balancing is a common control task. In this experiment we will find control strategies that balance the pendulum in the upright position while maintaining a desired position of the arm. When balancing the system the pendulum angle, α, is small and balancing can be accomplished simply with a PD controller. If we are also interested in keeping the arm in a fixed position a feedback from the arm position will also be introduced. The control law can then be expressed as u = −kp,θ (θ − θr ) − kp,α (α − π) − kd,θ θ̇ − kd,α α̇ (4.1) where kp,θ is the arm angle proportional gain, kp,α is the pendulum angle proportional gain, kd,θ is the arm angle derivative gain, and kd,α is the pendulum angle derivative gain. The desired angle of the arm is denoted by θr and there is no reference for the pendulum angle because the desired position is zero. There are many different ways to find the controller parameters. As discussed in Section 3.1, one method is based on LQR-optimal control. Initially, however, the behaviour of the system will be explored using default parameters. When balancing the pendulum over a fixed point, the arm tends to oscillate about that reference because of the friction present in the motor. Due to friction, the motor will not move until the control signal is sufficiently large and the generated torque is larger than the stiction (see Section 2.1 for more details). This means that the pendulum has to fall a certain angle before the motor moves and the net result is an oscillating motion. Friction can be compensated by introducing a Dither signal at the input voltage of the DC motor. The Dither signal used has the form Vd = Ad sin fd t + Vd0 where Ad is the voltage amplitude, fd is the sinusoid frequency, and Vd0 is the offset voltage of the signal. See Wikipedia for more information on PID and friction. 4.2 Balance Control VI The virtual instrument used to run the balance controller (and the swing-up, shown later) on the QNET rotary pendulum system is shown in Figure 4.1. QNET ROTPENT Laboratory Manual - Instructor Manual 18 Figure 4.1: LabVIEW VI for QNET rotary pendulum balancing control (and swing-up). 4.3 Default Balance Control [30 min] 1. Open the QNET ROTPENT Swing Up Control.vi and ensure it is configured as described in Section 6. Make sure the correct Device is chosen. 2. Run the QNET ROTPENT Swing Up Control.vi. The VI should appear similarity as shown in Figure 4.1. 3. In the Signal Generator section set: • Amplitude = 0.0 deg • Frequency = 0.10 Hz • Offset = 0.0 deg 4. In the Balance Control Parameters section set: • kp theta = -6.5 V/rad • kp alpha = 80 V/rad • kd theta = -2.75 V/(rad/s) • kd alpha = 10.5 V/(rad/s) 5. In the Swing-Up Control Parameters section set: • mu = 55 m/s2/J • Er = 20.0 mJ • max accel = 10 m/s2 • Activate Swing-Up = OFF (de-pressed) 6. Adjust the Angle/Energy (deg/mJ) scope scales to see between -250 and 250 (see Reference [2] for help). QNET ROTPENT Laboratory Manual - Instructor Manual v 1.0 7. Manually rotate the pendulum in the upright position until the In Range? LED in the Control Indicators section turns bright green. Ensure the encoder cable does not interfere with the pendulum arm motion. 8. B-5, K-1 Vary Offset and observe the Arm Angle (deg) response in the Angle/Energy (deg/mJ) scope. Do not set the Offset too high or the encoder cable will interfere with the pendulum arm motion. Answer 4.1 Outcome B-5 K-1 Solution If the VI was ran correctly and the pendulum is being balance, then they should be able to make some observations below. The Offset input box in the Signal Generator generates a constant setpoint. The rotary arm is stabilized about the set offset angle. 9. K-1 As the pendulum is being balanced, describe the red Arm Angle (deg) and the blue Pendulum Angle (deg) responses in the Angle/Energy (deg/mJ) scope. Answer 4.2 Outcome K-1 Solution Both are stabilized but students may notice that the rotary arm tends to rotate back-and-forth about the set offset angle. 10. In the Signal Generator section set: • Amplitude = 45.0 deg • Frequency = 0.10 Hz • Offset = 0.0 deg 11. B-7 Observe the behaviour of the system when a square wave command is given to the arm angle. Why does the arm initially move in the wrong direction? Answer 4.3 Outcome B-7 Solution This is necessary to keep the pendulum balanced. If the arm didn't go back a bit before moving forward then the pendulum would have a tendency to rotates downwards and go unstable. The technical answer is the system is non-minimum phase. 12. Click on the Stop button to stop running the VI. 4.4 Implement Designed Balance Control [20 min] 1. Go through Section 3.4 and design a balance control according to the given specifications. Remark: It is recommended to use the experimental determined pendulum moment of inertia that was found in Section 2.5. 2. Open the QNET ROTPENT Swing Up Control.vi and ensure it is configured as described in Section 6. Make sure the correct Device is chosen. 3. Run the QNET ROTPENT Swing Up Control.vi. The VI should appear similarity as shown in Figure 4.1. 4. In the Signal Generator section set: • Amplitude = 45.0 deg QNET ROTPENT Laboratory Manual - Instructor Manual 20 • Frequency = 0.20 Hz • Offset = 0.0 deg 5. To implement your balance controller, enter the control gain found in Section 3.4 in kp theta, kp alpha, kd theta, and kd alpha in the Control Parameters section. 6. Manually rotate the pendulum in the upright position until the In Range? LED in the Control Indicators section turns bright green. Ensure the encoder cable does not interfere with the pendulum arm motion. 7. B-5, K-2, B-9 Attach the response found Angle/Energy (deg/mJ) and the Voltage (V) scopes. Does your system meet the specifications given in Section 3.4? Answer 4.4 Outcome B-5 K-2 B-9 Solution If the student was able to get the response given in Figure 4.2, then the procedure to run the VI was done properly. The measured closed-loop response of the QNET rotary inverted pendulum is given in Figure 4.2. This is using the LQR gain given in Equation Ans.3.1. As shown in Figure 4.2, the arm peak time is around 0.75 seconds, the input motor voltage is within ± 10.5 V, and the pendulum oscillates ± 5 deg about the vertical position. So the specifications given in Section 3.4 are satisfied. (a) Rotary Arm, Pendulum Angle, and Energy (b) Motor Voltage Figure 4.2: Simulated rotary inverted pendulum response. 8. Click on the Stop button to stop running the VI. 4.5 Balance Control with Friction Compensation [30 min] 1. Go through steps 1-7 in Section 4.3 to run the default balance control. The pendulum should be balancing. QNET ROTPENT Laboratory Manual - Instructor Manual v 1.0 2. In the Signal Generator section set: • Amplitude = 0.0 deg • Frequency = 0.10 Hz • Offset = 0.0 deg 3. In the Dither Signal section set: • Amplitude = 0.00 V • Frequency = 2.50 Hz • Offset = 0.00 V 4. B-5, B-8 Observe the behaviour of Arm Angle (deg) in the Angle/Energy (deg/mJ) scope. Intuitively speaking, can you find some reasons why the arm is oscillating? Answer 4.5 Outcome B-5 B-8 Solution If the procedure was followed correctly and pendulum is balancing, they should be able to make the following analysis. Due to static friction found in motor, it typically takes at least ± 2.5 V to get the rotor moving. As a result, the pendulum has to fall enough such that the balance controller generates over ± 2.5 V. To keep the pendulum balanced, the arm has to move back-and-forth and this is why is oscillates about the offset angle. 5. Increase the Amplitude in the Dither Signal section by steps of 0.1 V until you notice a change in the arm angle response. 6. K-1 From the Voltage (V) scope and the pendulum motion, what is the Dither signal doing? Compare the response of the arm with and without the Dither signal. Answer 4.6 Outcome K-1 Solution The Dither signal applied a sinusoidal voltage signal to the motor. This is added to the balance control signal. Adding the Dither reduces the amount of arm oscillation. For example, without the Dither the arm would oscillate between -25 and 40 degrees. When adding a Dither with 3.50 V at 2.50 Hz the arm would oscillate between -5 and -13 degrees. 7. Increase the Frequency in the Dither Signal section starting from 1.00 to 10.0 Hz. 8. B-7 How does this effect the pendulum arm response? Answer 4.7 Outcome B-7 Solution In general, increasing the frequency minimizes the amount the arm oscillation about a certain angle. For example, the arm will tend to move back-and-forth more with a Dither of 3.0 V at 1.0 Hz then with a Dither of 3.0 V at 2.5 Hz. However, increasing the Dither frequency too much causes the pendulum arm to vibrate without improving the swing that much. 9. B-9 Set the Dither Signal properties according to the friction measured in Section 2.4. How does this effect the pendulum arm response? QNET ROTPENT Laboratory Manual - Instructor Manual 22 Answer 4.8 Outcome B-9 Solution By using the identified Coulomb friction, the oscillatory arm angle response should be minimized optimally. 10. Click on the Stop button to stop running the VI. QNET ROTPENT Laboratory Manual - Instructor Manual v 1.0 5 SWING-UP CONTROL 5.1 Background 5.1.1 Energy Control If the arm angle is kept constant and the pendulum is given an initial position it would swing with constant amplitude. Because of friction there will be damping in the oscillation. The purpose of energy control is to control the pendulum in such a way that the friction is constant. The potential energy of the pendulum is Ep = Mp g lp (1 − cos α) (5.1) and the kinetic energy is Ek = 1 Jp α̇2 . 2 (5.2) The potential energy is zero when the pendulum is at rest at α = 0 in Figure 2.2, and equals 2Mp g lp when the pendulum is upright at α = ±π. The sum of the potential and kinetic energy of the pendulum is E= 1 Jp α̇2 + Mp g lp (1 − cos α) . 2 (5.3) Differentiating 5.3 results in the differential equation ( ) Ė = α̇ Jp α̈2 + Mp g lp sin α . (5.4) Substituting the pendulum equation of motion given in Equation 2.1 for pendulum acceleration into Equation 5.4 gives Ė = Mp u lp α̇ cos α. Since the acceleration of the pivot is proportional to current driving the arm motor and thus also proportional to the drive voltage we find that it is easy to control the energy of the pendulum. The proportional control law u = (Er − E) α̇ cos α (5.5) drives the energy towards the reference energy Er . Notice that the control law is nonlinear because the proportional gain depends on the pendulum angle, α. Also, notice that the control changes sign when α̇ changes sign and when the angle is ± 90 deg. However, for energy to change quickly the magnitude of the control signal must be large. As a result the following swing-up controller is implemented in the LabVIEW VI u = satumax (µ(Er − E)sign(α̇ cos α)) (5.6) where µ is a tunable control gain and the satumax function saturates the control signal at the maximum acceleration of the pendulum pivot, umax . See Wikipedia for more information on potential energy, kinetic energy, control theory, and nonlinear control. 5.1.2 Hybrid Swing-Up Control The energy swing-up control in 5.5 (or 5.6 can be combined with the balancing control law in 4.1 to obtain a control law which performs the dual tasks of swinging up the pendulum and balancing it. As illustrated in Figure 5.1, this can be accomplished by switching between the two control systems. QNET ROTPENT Laboratory Manual - Instructor Manual 24 Figure 5.1: Swing-up hybrid control This system can be modeled as a hybrid system. Hybrid systems are systems with both continuous and discrete parts. There are two continuous part: the closed-loop system using the swing-up energy controller and the closedloop system using the PD balance controller. The switching strategy is the discrete element that chooses which controller, or system, to run. The switching logic can be obtained by determining a region in state space where the balancing works well. Balancing control is then used inside this region and energy control is used outside the region. Figure 5.2 is a called a hybrid automaton and, for this specific task, can be used to describe the system model and the switching logic. Figure 5.2: Hybrid swing-up controller automaton The circles in Figure 5.2 are called locations and represent the two different continuous system. The arrows are called edges and represent the discrete jumps taken when certain condition are satisfied. The angle used in the switching logic in Figure 5.2 is called the upright angle. It is defined as zero when the pendulum is about its upright vertical position and expressed mathematically using αup = α mod 2π − π. The various switching parameters shown in Figure 5.2 can then be set as: ϵ = 2 deg η γ = 720 deg/s = 30 deg Given that the pendulum starts in the downward vertical position, it is in the swing-up location of the hybrid automaton. The swing-up controller pumps energy into the pendulum until it swings within ± 2 deg of its upright vertical position. Once the pendulum is within that that range and does not exceed 720 deg/s in either direction, the edge is taken to engage the balance controller. It remain in the Balance PD control location until the pendulum goes beyond the ± 30 deg position range or beyond ± 720 deg/s. QNET ROTPENT Laboratory Manual - Instructor Manual v 1.0 5.2 Swing-Up Control VI The virtual instrument used to run the swing-up controller on the QNET rotary pendulum system is the same as the balance control given in Section 4.2 shown in Figure 4.1. 5.3 Energy Control [30 min] 1. Open the QNET ROTPENT Swing Up Control.vi and ensure it is configured as described in Section 6. Make sure the correct Device is chosen. 2. Run the QNET ROTPENT Swing Up Control.vi. The VI should appear similarity as shown in Figure 4.1. 3. In the Balance Control Parameters section ensure the following parameters are set: • kp theta = -6.50 V/rad • kp alpha = 80.0 V/rad • kd theta = -2.75 V/(rad/s) • kd alpha = 10.5 V/(rad/s) 4. In the Swing-Up Control Parameters section set: • mu = 55 m/s2 /J • Er = 20.0 mJ • max accel = 10 m/s2 • Activate Swing-Up = OFF (de-pressed) 5. Adjust the Angle/Energy (deg/mJ) scope scales to see between -250 and 250 (see the ROTPEN User Manual ([2]) for help). 6. Manually rotate the pendulum at different levels and examine the blue Pendulum Angle (deg) and the green Pendulum Energy (mJ) in the Angle/Energy (deg/mJ) scope. The pendulum energy is also displayed numerically in the Control Indicators section. 7. B-5, K-1 What do you notice about the energy when the pendulum is moved at different positions? Record the energy when the pendulum is being balanced (i.e., fully inverted in the upright vertical position). Answer 5.1 Outcome B-5 K-1 Solution If they followed the procedure correctly, they should be able to perform the following analyssi as well as measure the energy. The pendulum energy increases proportionally with the pendulum angle. When being balanced, the energy read is 81.0 mJ. 8. Click on the Stop button to bring the pendulum down to the gantry position and re-start the VI. 9. In the Swing-Up Control Parameters section, turn ON the Activate Swing-Up switch (the pressed down position). 10. If the pendulum is not moving, click on the Disturbance button in the Signal Generator section to perturb the pendulum. 11. B-7, K-2 In Swing-Up Control Parameters, change the reference energy Er between 5.0 mJ and 50.0 mJ. As it is varied, examine the control signal in the Voltage (V) scope as well as the blue Pendulum Angle (deg) and the red Pendulum Energy (mJ) in the Angle/Energy (deg/mJ) scope. Attach the response of the Angle/Energy (deg/mJ) and Voltage (V) scopes. QNET ROTPENT Laboratory Manual - Instructor Manual 26 Answer 5.2 Outcome B-7 Solution The larger the reference energy, the large the amplitude of the control signal. The responses shown in Figure 5.3 are using energy control with mu = 55 m/s2 /J and Er = 50 mJ, and max accel = 10 m/s2 . K-2 (a) Rotary Arm, Pendulum Angle, and Energy (b) Motor Voltage Figure 5.3: Pendulum response using energy control with Er = 50 mJ. 12. B-7 In Control Parameters fix Er to 20.0 mJ and vary the swing-up control gain mu between 10 and 100 m/s2 /J. Describe how this changes the performance of the energy control. Answer 5.3 Outcome B-7 Solution As the mu gain increases the amplitude of the pendulum swings become larger. Recall from swing-up controller given in 5.6, which is implemented in the VI, that µ is the proportional gain. 13. Click on the Stop button to stop running the VI. 5.4 Hybrid Swing-Up Control [20 min] 1. Open the QNET ROTPENT Swing Up Control.vi and ensure it is configured as described in Section 6. Make sure the correct Device is chosen. 2. Run the QNET ROTPENT Swing Up Control.vi. The VI should appear similarity as shown in Figure 4.1. 3. In the Balance Control Parameters section ensure the following parameters are set: • kp theta = -6.50 V/rad QNET ROTPENT Laboratory Manual - Instructor Manual v 1.0 • kp alpha = 80.0 V/rad • kd theta = -2.75 V/(rad/s) • kd alpha = 10.5 V/(rad/s) 4. In the Swing-Up Control Parameters section set: • mu = 55 m/s2 /J • Er = 20.0 mJ • max accel = 10 m/s2 • Activate Swing-Up = OFF (de-pressed) 5. Adjust the Angle/Energy (deg/mJ) scope scales to see between -250 and 250 (see the ROTPEN User Manual ([2] for help). 6. Make sure the pendulum is hanging down motionless and the encoder cable is not interfering with the pendulum. 7. In the Swing-Up Control Parameters, set the Activate Swing-Up switch to ON (pressed down position). 8. The pendulum should begin going back and forth. If not, click on the Disturbance button in the Signal Generator section to perturb the pendulum. Turn off the Active Swing-Up switch if the pendulum goes unstable or if the encoder cable interferes with the pendulum arm motion. 9. B-5 Gradually increase the reference energy Er in the Control Parameters section until the pendulum swings up to the vertical position. Answer 5.4 Outcome B-5 Solution Setting the reference energy, Er , between 80 and 85 mJ should be adequate to swing-up the pendulum to its vertical position. 10. B-9 What reference energy was required to swing-up the pendulum? Was this value expected? Answer 5.5 Outcome B-9 Solution Between 80 and 85 mJ. This is inline with the potential energy of the pendulum that was measured in Step 7 in Section 5.3 when the pendulum is vertically upwards. 11. Click on the Stop button to stop running the VI. QNET ROTPENT Laboratory Manual - Instructor Manual 28 6 SYSTEM REQUIREMENTS Required Hardware • NI ELVIS II (or NI ELVIS I) • Quanser QNET Rotary Inverted Pendulum Trainer (ROTPENT). See QNET ROTPENT User Manual ([2]). Required Software • NI LabVIEWr 2010 or later • NI LabVIEWr Control Design and Simulation Module • ELVIS II Users: NI ELVISmx (installs required NI DAQmx drivers) • ELVIS I Users: – NI DAQmx – ELVIS CD 3.0.1 or later installed Caution: If these are not all installed then the VI will not be able to run! Please make sure all the software and hardware components are installed. If an issue arises, then see the troubleshooting section in the QNET ROTPENT User Manual ([2]). 6.1 Overview of Files File Name QNET ROTPENT User Manual.pdf QNET ROTPENT dent).pdf Workbook (Stu- QNET ROTPENT Simple Modeling.vi QNET ROTPENT Control Design.vi QNET ROTPENT Swing Up Control.vi QNET DCMCT Workbook (Instructor).pdf Description This manual describes the hardware of the QNET Rotary Pendulum Trainer system and how to setup the system on the ELVIS. This laboratory guide contains pre-lab questions and lab experiments demonstrating how to design and implement controllers on the QNET DCMCT system LabVIEWr . Apply voltage to DC motor and examine the arm and pendulum responses. Design and simulate LQR-based balance controller. Swing-up and balance pendulum. Same as the student version except it includes the exercise solutions. Table 2: Instructor design files supplied with the QNET ROTPENT Laboratory. 6.2 Simple Modeling Laboratory VI The QNET-ROTPENT Simple Modeling VI is shown in Figure 6.1. It runs the DC motor connected to the pendulum arm in open-loop and plots the corresponding pendulum arm and link angles as well as the applied input motor voltage. Table 3 lists and describes the main elements of the ROTPENT Simple Modeling virtual instrument front panel. Every element is uniquely identified through an ID number and located in Figure 6.1. QNET ROTPENT Laboratory Manual - Instructor Manual v 1.0 Figure 6.1: QNET-ROTPENT Simple Modeling virtual instrument. 6.3 Control Design VI The QNET ROTPENT Control Design VI enables users to design a balance controller and simulate its response. The matrices for the state-space model of the rotary inverted pendulum system is shown in the Symbolic Model tab and illustrated in Figure 6.2. The values of the variables used in the state-space model can be changed. In the Open Loop Analysis tab, shown in Figure 6.3, the numerical state-space model is displayed and the resulting open-loop poles are plotted on a phase plane. Based on this model, a controller to balance the rotary inverted pendulum system can be designed using the Linear-Quadratic Regulator (LQR) optimization technique, as shown in the Simulation tab in Figure 6.4. The resulting closed-loop inverted pendulum system can be simulated. Table 4 lists and describes the main elements of the ROTPENT Control Design virtual instrument user interface. Every element is uniquely identified through an ID number and located in figures 6.2, 6.3, and 6.4. 6.4 Swing-Up Control VI The QNET Rotary Pendulum Trainer Swing-Up Control VI implements an energy-based control that swings up the pendulum to its upright vertical position and a state-feedback controller to balance the pendulum when in its upright position. The main elements of the VI front panel are summarized in Table 5 and identified in Figure 6.5 through the corresponding ID number. QNET ROTPENT Laboratory Manual - Instructor Manual 30 ID # 1 Label Theta Symbol θ 2 Alpha α 3 4 5 Current Voltage Signal Type Im Vm 6 7 8 9 10 11 12 13 Amplitude Frequency Offset Disturbance Device Sampling Rate Stop Scopes: Angle 14 Scopes: Voltage Vsd θ, α Vm Description Arm angle numeric display measured by encoder on motor. Pendulum angle numeric display measured by encoder on pendulum pivot. Motor armature current numeric display. Motor input voltage numeric display. Type of signal generated for the input voltage signal. Generated signal amplitude input box. Generated signal frequency input box. Generated signal offset input box. Apply simulated disturbance voltage. Selects the NI DAQ device. Sets the sampling rate of the VI. Stops the LabVIEW VI from running. Scope with measured arm angle (in red) and pendulum angle (in blue). Scope with applied motor voltage (in red). Unit deg deg A V V Hz V V Hz deg V Table 3: QNET ROTPENT Simple Modeling VI Components Figure 6.2: QNET ROTPENT Control Design VI: Symbolic Model tab. QNET ROTPENT Laboratory Manual - Instructor Manual v 1.0 Figure 6.3: QNET ROTPENT Control Design VI: Open Loop Analysis tab. Figure 6.4: QNET ROTPENT Control Design VI: Simulationtab. QNET ROTPENT Laboratory Manual - Instructor Manual 32 ID # 1 2 Label Mp lp Symbol Mp lp 3 4 5 r Jp Jeq r Jp Jeq 6 7 Bp Beq Bp Beq 8 9 10 Kt Km Rm Kt Km Rm 11 12 13 14 15 16 17 A B C D 18 Symbolic A Symbolic B Symbolic C Symbolic D Stop Error Out Open-Loop Equation Pole-Zero Map 19 Signal Type 20 21 22 23 24 Amplitude Frequency Offset Disturbance Q Vsd Q 25 R R 26 Optimal Gain (K) K 27 Arm θ 28 29 Pendulum Control Input α Vm Description Mass of pendulum assembly (link + weight). Center of mass of pendulum assembly (link+weight) input box. Length from motor shaft to pendulum pivot. Pendulum moment of inertia relative to pivot. Equivalent moment of inertia acting on the DC motor shaft. Viscous damping about the pendulum pivot. Equivalent viscous damping acting on the DC motor shaft. DC motor current-torque constant. DC motor back-emf constant. Electrical resistance of the DC motor armature. Rotary pendulum linear state-space matrix A. Rotary pendulum linear state-space matrix B. Rotary pendulum linear state-space matrix C. Rotary pendulum linear state-space matrix D. Stops the LabVIEW VI from running. Displays any error encountered in the VI. Numeric linear state-space model of rotary pendulum. Maps pole and zeros of open-loop rotary pendulum system. Type of signal generated for the arm position reference. Generated signal amplitude input box. Generated signal frequency input box. Generated signal offset input box. Apply simulated disturbance voltage. Linear-quadratic weighting matrix that defines a penalty on the state. Linear-quadratic weighting matrix that defines a penalty on the control action. State-feedback control gain calculated using LQR. Scope with reference (in blue) and measured (in red) arm angles. Scope with inverted pendulum angle (in blue). Scope with applied motor voltage (in red). Unit kg m m kg.m2 kg.m2 N.m.s/rad N.m.s/rad N.m/A V.s/rad Ω V Hz V V deg deg V Table 4: QNET ROTPENT Control Design VI Components QNET ROTPENT Laboratory Manual - Instructor Manual v 1.0 Figure 6.5: QNET ROTPENT Swing-Up Control VI. QNET ROTPENT Laboratory Manual - Instructor Manual 34 ID # 1 Label Theta Symbol θ 2 Alpha α 3 4 Current In Range? Im 5 6 Energy Signal Type 7 8 9 10 11 12 13 14 15 16 17 18 19 20 21 Amplitude Frequency Offset Disturbance Amplitude Frequency Offset kp theta kp alpha kd theta kd alpha mu Er Max accel Activate Swing Up 22 23 Mp lp Mp lp 24 25 26 27 Marm r Jp Jeq Marm r Jp Jeq 28 29 Kt Rm Kt Rm 30 31 32 33 Device Sampling Rate Stop Scopes: Angle θ, α 34 Scopes: Voltage Vm Vsd Ad fd Vd0 kp,θ kp,α kd,θ kd,α µ Er umax Description Arm angle numeric display measured by encoder on motor. Pendulum angle numeric display measured by encoder on pendulum pivot. Motor armature current numeric display. Balance controller is engaged when this LED is turns bright green. Numeric display of the pendulum energy. Type of signal generated for the arm reference signal (i.e., desired angle of arm). Reference position amplitude input box. Reference position frequency input box. Reference position offset input box. Apply simulated disturbance voltage. Dither signal amplitude input box. Dither signal frequency input box. Dither signal offset input box. Arm angle proportional gain input box. Pendulum angle proportional gain input box. Arm angle derivative gain input box. Pendulum angle derivative gain input box. Proportional gain for energy controller. Reference energy for energy controller. Maximum acceleration When pressed down the energy controller that swings-up the pendulum is engaged. Mass of pendulum assembly (link + weight). Center of mass of pendulum assembly (link+weight) input box. Mass of rotary arm. Length from motor shaft to pendulum pivot. Pendulum moment of inertia relative to pivot. Equivalent moment of inertia acting on the DC motor shaft. DC motor current-torque constant. Electrical resistance of the DC motor armature. Selects the NI DAQ device. Sets the sampling rate of the VI. Stops the LabVIEW VI from running. Scope with measured arm angle (in red) and pendulum angle (in blue). Scope with applied motor voltage (in red). Unit deg deg A mJ deg Hz deg V V Hz V V/rad V/rad V.s/rad V.s/rad m/(s2.J) mJ m/s2 kg m kg m kg.m2 kg.m2 N.m/A Ω Hz deg V Table 5: QNET ROTPENT Swing-Up Control VI Components QNET ROTPENT Laboratory Manual - Instructor Manual v 1.0 7 LAB REPORT This laboratory contains three groups of experiments, namely, 1. Modeling, 2. Balance control design 3. Balance control implementation 4. Swing-up control For each experiment, follow the outline corresponding to that experiment to build the content of your report. Also, in Section 7.5 you can find some basic tips for the format of your report. 7.1 Template for Content (Simple Modeling) I. PROCEDURE 1. Damping • Briefly describe the main goal of the experiment. • Briefly describe the experiment procedure in Step 6 in Section 2.3. 2. Friction • Briefly describe the main goal of the experiment. • Briefly describe the experiment procedure in Step 5 in Section 2.4. 3. Moment of Inertia • Briefly describe the main goal of the experiment. • Briefly describe the experiment procedure in Step 4 in Section 2.5. II. RESULTS Do not interpret or analyze the data in this section. Just provide the results. 1. Provide applicable data collected in this laboratory from Table 1. III. ANALYSIS Provide details of your calculations (methods used) for analysis for each of the following: 1. Damping analysis in step 6 in Section 2.3. 2. Finding friction in step 5 in Section 2.4. 3. Calculating moment of inertia of pendulum in step 4 in Section 2.5. IV. CONCLUSIONS Interpret your results to arrive at logical conclusions for the following: 1. How well does the experimentally derived moment of inertia compare with analytically derived value in step 5 of Section 2.5. QNET ROTPENT Laboratory Manual - Instructor Manual 36 7.2 Template for Content (Balance Control Design) I. PROCEDURE 1. Model Analysis • Briefly describe the main goal of the experiment. • Briefly describe the experimental procedure in Step 6 in Section 3.3. 2. Control Design and Simulation • Briefly describe the main goal of the experiment. • Briefly describe the experimental procedure in Step 6 in Section 3.4. II. RESULTS Do not interpret or analyze the data in this section. Just provide the results. 1. LQR matrices and control gain found in Step 9 in Section 3.4. 2. Simulated closed-loop response plot from Step 10 in Section 3.4. III. ANALYSIS Provide details of your calculations (methods used) for analysis for each of the following: 1. Open-loop poles in Step 6 in Section 3.3. 2. Effect of changing moment of inertia on open-loop poles in Step 8 in Section 3.3. 3. Effect of changing LQR elements on response in Step 6 in Section 3.4. 4. Effect of changing different LQR element on the response in Step 8 in Section 3.4. IV. CONCLUSIONS Interpret your results to arrive at logical conclusions for the following: 1. Does lowering the moment of inertia of the pendulum have the expected result Step 8 in Section 3.3. 2. Does the simulation match the specifications in Step 10 in Section 3.4. QNET ROTPENT Laboratory Manual - Instructor Manual v 1.0 7.3 Template for Content (Balance Control Implementation) I. PROCEDURE 1. Default Balance Control • Briefly describe the main goal of the experiment. • Briefly describe the experimental procedure in Step 8 in Section 4.3. 2. Implement Designed Balance Control • Briefly describe the main goal of the experiment. • Briefly describe the experimental procedure in Step 7 in Section 4.4. 3. Balance Control with Friction Compensation • Briefly describe the main goal of this experiment. • Briefly describe the experimental procedure in Step 4 in Section 4.5. II. RESULTS Do not interpret or analyze the data in this section. Just provide the results. 1. Balance control response plot from step 7 in Section 4.4. III. ANALYSIS Provide details of your calculations (methods used) for analysis for each of the following: 1. Effect of changing offset in Step 8 in Section 4.3. 2. Balance control analysis in Step 9 in Section 4.3. 3. Balance control analysis when tracking step reference in 11 in Section 4.3. 4. Examining the arm oscillation in Step 4 in Section 4.5. 5. Explain what the Dither signal is doing in Step 6 in Section 4.5. 6. Effect of increasing Dither signal frequency in Step 8 in Section 4.5. IV. CONCLUSIONS Interpret your results to arrive at logical conclusions for the following: 1. Whether the balance controller meets the specifications in Step 7 in Section 4.4. 2. Effect of setting the Dither signal to the identified friction parameters in Step 9 of Section 4.5. QNET ROTPENT Laboratory Manual - Instructor Manual 38 7.4 Template for Content (Swing-Up Control) I. PROCEDURE 1. Energy Control • Briefly describe the main goal of the experiment. • Briefly describe the experimental procedure in Step 7 in Section 5.3. 2. Hybrid Swing-Up Control • Briefly describe the main goal of the experiment. • Briefly describe the experimental procedure in Step 9 in Section 5.4. II. RESULTS Do not interpret or analyze the data in this section. Just provide the results. 1. Pendulum response from Step 11 in Section 5.3. III. ANALYSIS Provide details of your calculations (methods used) for analysis for each of the following: 1. Energy at different pendulum position in Step 7 in Section 5.3. 2. Effect of changing reference energy in Step 11 in Section 5.3. 3. Effect of changing proportional gain in Step 11 in Section 5.3. IV. CONCLUSIONS Interpret your results to arrive at logical conclusions for the following: 1. Reference energy required to swing-up pendulum in Step 10 of Section 5.4. QNET ROTPENT Laboratory Manual - Instructor Manual v 1.0 7.5 Tips for Report Format PROFESSIONAL APPEARANCE • Has cover page with all necessary details (title, course, student name(s), etc.) • Each of the required sections is completed (Procedure, Results, Analysis and Conclusions). • Typed. • All grammar/spelling correct. • Report layout is neat. • Does not exceed specified maximum page limit, if any. • Pages are numbered. • Equations are consecutively numbered. • Figures are numbered, axes have labels, each figure has a descriptive caption. • Tables are numbered, they include labels, each table has a descriptive caption. • Data are presented in a useful format (graphs, numerical, table, charts, diagrams). • No hand drawn sketches/diagrams. • References are cited using correct format. QNET ROTPENT Laboratory Manual - Instructor Manual 40 8 SCORING SHEETS 8.1 Simple Modeling: Pre-Lab Questions Student Name : Question1 A-1 A-2 A-3 1 Total . 1 This scoring sheet is for the Simple Modeling Pre-Lab questions in Section 2 QNET ROTPENT Laboratory Manual - Instructor Manual v 1.0 8.2 Simple Modeling Lab Report Student Name: K-1 Item1 I. PROCEDURE B-5 CONTENT B-6 B-7 B-9 FORMAT GS-1 GS-2 I.1. Damping 1 I.2. Friction 2 I.3. Moment of Inertia 3 II. RESULTS 1 III. ANALYSIS 1 2 3 IV. CONCLUSIONS 1 Total 1 This scoring sheet corresponds to the report template in Section 7.1. QNET ROTPENT Laboratory Manual - Instructor Manual 42 8.3 Balance Control Design: Lab Report Student Name: K-1 Item1 I. PROCEDURE K-2 CONTENT K-3 B-5 B-7 B-9 FORMAT GS-1 GS-2 I.1. Model Analysis 1 I.2. Control Design and Simulation 2 II. RESULTS 1 2 III. ANALYSIS 1 2 3 4 IV. CONCLUSIONS 1 2 Total 1 This scoring sheet corresponds to the report template in Section 7.2. QNET ROTPENT Laboratory Manual - Instructor Manual v 1.0 8.4 Balance Control Implementation: Lab Report Student Name: K-1 Item1 I. PROCEDURE K-2 CONTENT B-5 B-7 B-8 B-9 FORMAT GS-1 GS-2 I.1. Default Balance Control 1 I.2. Implement Designed Balance Control 2 I.3. Balance Control with Friction Compensation 3 II. RESULTS 1 III. ANALYSIS 1 2 3 4 5 6 IV. CONCLUSIONS 1 Total 1 This scoring sheet corresponds to the report template in Section 7.3. QNET ROTPENT Laboratory Manual - Instructor Manual 44 8.5 Swing-Up Control: Lab Report Student Name: K-1 Item1 I. PROCEDURE K-2 CONTENT B-5 B-7 B-9 FORMAT GS-1 GS-2 I.1. Energy Control 1 I.2. Hybrid Swing-Up Control 2 II. RESULTS 1 III. ANALYSIS 1 2 3 IV. CONCLUSIONS 1 Total 1 This scoring sheet corresponds to the report template in Section 7.4. QNET ROTPENT Laboratory Manual - Instructor Manual v 1.0 Appendix A QNET Instructor's Guide Every laboratory in this manual is organized into four parts: Background section provides all the necessary theoretical background for the experiments. Students should read this section first to prepare for the Pre-Lab questions and for the actual lab experiments. Virtual Instrument introduces the LabVIEWr Virtual Instrument that is to be used for the lab experiment. Lab Experiments section provides step-by-step instructions to conduct the lab experiments and to record the collected data. The lab may also include a set of pre-lab questions that need to be done prior to the lab experiments. System Requirements section describes all the details of how to configure the hardware and software to conduct the experiments. It is assumed that the hardware and software configuration have been completed by the instructor or the teaching assistant prior to the lab sessions. However, if the instructor chooses to, the students can also configure the systems by following the instructions given in this section. Assessment of ABET outcomes is incorporated into this manual as shown by indicators such as A-1, A-2 . These indicators correspond to specific performance criteria for an outcome. A.1 Pre-lab Questions and Lab Experiments A.1.1 How to use the pre-lab questions All or some of the questions in the Pre-Lab Questions sections can be assigned to students as homework. One possibility is to assign them as a homework one week prior to the actual lab session and ask the students to bring their assignment to the lab session. This would help them get ready for the lab session. You should encourage them to study the background section of the chapter prior to attempting the pre-lab questions. Note that solutions for some of the Pre-Lab questions are parameters needed for the experiments in the lab session. Another possibility is to go over some of these questions either in class or in the lab session together with the students. This could generate an interactive learning opportunity for them prior to the lab. Finally, it is possible to use some of the pre-lab questions in your mid-term or final exams. This would reinforce the concepts covered in the labs; connections between the abstract theory and the real hardware; and would give you an option to integrate some of the work done in the lab sessions into your exams. A.1.2 How to use the laboratory experiments This manual is organized into several laboratory sections. Each section contains several experiments which are, for the most part, independent of each other. Therefore, one possible way to use this material is to conduct the individual experiments in your weekly lab sessions. Another possibility is to divide the class into teams and have each team conduct an experiment given in a section. QNET ROTPENT Laboratory Manual - Instructor Manual 46 A.2 Assessment for ABET Accreditation In the United States, accreditation is a peer-review process. Educational institutions or programs volunteer to undergo this review periodically to determine if certain criteria are being met. The Accreditation Board for Engineering and Technology, ABET, is responsible for the specialized accreditation of educational programs in applied science, computing, engineering, and technology. ABET accreditation is assurance that a college or university program meets the quality standards established by the profession for which it prepares its students. It is the responsibility of the program seeking accreditation to demonstrate clearly that the program meets a set of criteria. One of these criteria is the ``Criterion 3: Program Outcomes''. Engineering programs must demonstrate that their students attain program outcomes (a) through (k). Much more information about this can be found in the ``Criteria for Engineering Accreditation'' document ABET publishes on its website annually (http://www.abet.org). For fulfillment of Criterion 3, a program must show that there is an assessment and evaluation process in place that periodically documents and demonstrates the degree to which the program outcomes are attained by their students. Most programs do this by mapping the outcomes (a) through (k) to the courses in the curriculum1 . Then, these outcomes are assessed in the courses. Finally, the assessment results are collected from the courses and compiled into program-level data to demonstrate the ``degree to which the program outcomes are attained by their students''. If your course is part of a similar assessment effort in your program, you probably need to assess the following outcomes in your course: (A) An ability to apply knowledge of mathematics, science, and engineering, (B) An ability to design and conduct experiments, as well as to analyze and interpret data, (G) An ability to communicate effectively, and (K) An ability to use the techniques, skills, and modern engineering tools necessary for engineering practice. These outcomes can be assessed in your course using various assessment tools, such as student surveys and assignments or questions targeting specific outcomes. To measure achievement of an outcome (such as outcome ``A'' in the list above), typically some performance criteria are defined for the outcome. The performance criteria are a set of measurable statements to define each learning outcome. They identify the specific knowledge, skills, attitudes, and/or behavior students must demonstrate as indicators of achieving the outcome. For the purpose of this laboratory curriculum, we defined a set of performance criteria for each outcome. These criteria are labeled as ``A-1, A-2, B-3, ..., K-3'' as indicated in the rubrics in Section A.3 below. We also embedded these performance criteria in the curriculum shown by indicators such as A-1, A-2 . A.2.1 Assessment in your course Assessment of outcomes is different than grading. A course grade (or a grade on an assignment or exam), is a composite indicator. For example, if a student receives "B" as a grade in your course, it is probably difficult to tell his/her level of achievement in outcome "A" versus "G". One of the purposes of assessment is to "measure" the level of achievement of these specific skills and knowledge so that improvements can be made in the future offerings of the course. So, how should you introduce outcomes assessment into your course? The outcomes assessment approach described here can be applied to each pre-lab homework assignment and lab report of each student throughout the semester. This may or may not be feasible depending on your class size. In general, a representative sample of student work is assessed. You can continue to give assignments/exams and grade them in the traditional way. To introduce assessment into your course, you can pick a representative sample of student work and "score" their work using the scoring sheets and rubrics given in this manual. This is a good way to start introducing assessment into your course. 1 Disclaimer: The opionions expressed or the assessment techniques described here have not been endorsed by ABET in any way. QNET ROTPENT Laboratory Manual - Instructor Manual v 1.0 Recall that for fulfillment of Criterion 3, a program must ``document'' the assessment process. Programs collect sample student work in the academic year prior to the site visit by an ABET team. You can retain the sample homeworks, lab reports, their scoring sheets and the assessment workbook as ``evidence'' for the ongoing assessment effort in your course. This collection can then be given to the assessment committee in your program to be incorporated into the program-level evidence they will compile prior to the ABET site visit. A.2.2 How to score the pre-lab questions If you choose to assign the pre-lab questions as homework, then the outcome targetted by these questions can be assessed using the student work. The pre-lab questions require students to ``apply'' their math and engineering science knowledge through calculations and problem solving strategies. Therefore, outcome ``A'' was mapped to the pre-lab questions through its performance criteria. If you assign the pre-lab questions as homework, you can ``score'' the returned homeworks using the rubric for outcome ``A'' given in Section A.3 and the scoring sheet provided for that pre-lab in that chapter. To score homework of one student: 1. Print the scoring sheet for the Pre-Lab Questions section you assigned as homework. One sheet is used per student. 2. Use the rubric for ``Outcome A'' (Section A.3) to assign a score for each question. The rubric gives the description of ``levels of achievement'' (4 = exemplary, 3 = proficient, 2 = developing and 1 = beginning/incomplete) for each criterion. As an example, below is a completed sample scoring sheet after evaluating the homework of one student. Question A-1 A-2 1 3 2 2 4 2 3 3 4 3 5 4 6 3 7 3 8 9 A-3 3 3 3 10 3 4 11 3 4 32 8 Total 10 3. You can then enter the ``Total'' for each performance criterion into the assessment workbook [1] as shown in Figure A.1. A.2.3 How to score the lab reports As mentioned earlier in Section A.1.2, there are various ways in which you can use the material provided in this manual. In any case, the outcomes targetted by the lab experiments can be assessed from the lab reports submitted by the students. These reports should follow the specific template for content given at the end of each laboratory chapter. This will provide a basis to assess the outcomes easily. The lab activities correspond to the ``applied'' part of engineering. Therefore, outcomes ``B'' and ``K'' were mapped to the lab activities through their performance criteria. The lab reports themselves match outcome ``G'' on effective communication skills. If you choose to do an individual experiment in your weekly lab sessio then you can ask the students to submit a lab report using the report template provided for this experiment. The template contains the main ``content'' sections you QNET ROTPENT Laboratory Manual - Instructor Manual 48 Figure A.1: Pre-Lab entry into the assessment workbook for one student. would expect in a typical lab report (procedure, results, analysis, conclusions). Each section of the report template ties back to the activities in the lab and the corresponding assessment indicators. It also contains performance criteria related to the ``format'' of the report. You can score the lab reports using the rubric for outcome ``G'' given in Section A.3 and the scoring sheet provided for the experiment in that section. Note that each lab report scoring sheet directly corresponds to the lab report content template for that experiment. Also, note that the rubric for outcome ``G'' already contains rubrics for outcomes ``B'' and ``K'' since these outcomes appear as an integral part of the report. To score the lab report of one student: 1. Print the scoring sheet for the Lab Report for the experiment they conducted in the lab. One sheet is used per student. 2. Use the ``Content'' rubric (Section A.3) to assign a score for each entry in the scoring sheet. The rubric gives the description of ``levels of achievement'' (4 = exemplary, 3 = proficient, 2 = developing and 1 = beginning/incomplete) for each criterion. As an example, below is a completed scoring sheet after evaluating the lab report of one student. 3. Use the ``Format'' rubric (Section A.3) for the ``GS-1 and GS-2'' criteria to score the formatting of the report on the same scoring sheet. QNET ROTPENT Laboratory Manual - Instructor Manual v 1.0 K-1 Item1 I. PROCEDURE K-2 CONTENT B-5 B-6 B-7 B-9 FORMAT GS-1 GS-2 I.1. Frequency Response Experiment 1 I.2. Bump Test Experiment 4 1 4 I.3. Model Validation Experiment 1 II. RESULTS 4 1 4 2 3 3 3 4 III. ANALYSIS 3 III.1. Frequency Response Experiment 1 2 2 3 III.2. Bump Test Experiment 1 3 IV. CONCLUSIONS 1 Total 6 10 12 3 2 3 3 4 3 4. You can then enter the ``Total'' for each performance criterion into the assessment workbook [1] as show in Figure A.2. Figure A.2: Lab report score entries in the workbook for one student. A.2.4 Assessment of the outcomes for the course As explained earlier, the performance criteria, such as A-1, A-2, A-3, are used to describe a set of measurable statements to define each learning outcome. Up to this point, we explained how to assess each performance criterion using the pre-labs, the lab reports and the scoring sheets. A single score for each outcome can be computed to indicate the level of attainment of that outcome by the entire class. One approach is to simply average the scores for the performance criteria for that outcome. For example, in case of outcome ``A'', you can use: SCOREA = SCOREA−1 + SCOREA−2 + SCOREA−3 3 (A.1) Another possibility is to use a weighted-average where some of the performance criteria are considered to be more important than the others. In case of outcome ``A'', you can use: w1 · SCOREA−1 + w2 · SCOREA−2 + w3 · SCOREA−3 (A.2) w1 + w2 + w3 where w1 , w2 and w3 are weights you can assign (on the 0 to 1 scale) for the performance criteria A-1, A-2 and A-3, respectively. The total of all weights should equal 1. SCOREA = QNET ROTPENT Laboratory Manual - Instructor Manual 50 A.2.5 Course Score for outcome A The assessment workbook [1] incorporates the simple average approach as shown in Figure A.3. Figure A.3: Computation of single score for outcome ``A'' in the assessment workbook. A.2.6 Course Scores for outcomes B, K and G Similarly, the simple average approach is also used for outcomes B, K and G. Referring to the rubrics in Section A.3, it should be noted that outcome ``G'' contains performance criteria for both ``B'' and ``K'' to assess the content of the report. In addition, there are two performance criteria, GS-1 and GS-2, to assess the format of the report. The scores for all of these performance criteria are averaged to arrive at the single score for outcome G. For example, the single score for outcome G in Figure A.4 for the Modelling experiment was calculated using: SCOREG = AV ERAGE(SK−1 + SK−2 + SB−5 + SB−6 + SB−7 + SB−9 + SGS−1 + SGS−2 ) (A.3) where SK−1 · · · SGS−2 are the scaled average scores for K-1 through GS-2 in the workbook. Figure A.4: Computation of single score for outcome ``G'' in the assessment workbook. QNET ROTPENT Laboratory Manual - Instructor Manual v 1.0 A.2.7 Assessment workbook The assessment workbook [1] was developed using Microsoft Excelr . It is intented to give a general idea for how the assessment scores can be tracked and brought together. On purpose we designed the workbook to have no automatic features. You can use it as is or customize it in any way you like. The assessment workbook has a tab for the Pre-Lab Questions and a tab for each of the laboratory chapters. Only 10 students were listed assuming you would use samples of student work and not the entire class. If you want to add more students, you can insert rows into the spreadsheets. Note: If you insert new rows, make sure that the formula ranges in the cells with calculations are correct. At the bottom of each pre-lab section, there is a row entitled ``Total Possible''. To count a pre-lab assignment in the calculation of the overall scores, you need to enter the correct totals here. For example, to count the Pre-Lab for modeling, you need to enter 12, 44 and 8 (Figure A.1). If you want to exclude an assignment from the overall calculation, enter ``0'' as shown in Figure A.5. Of course, if you are excluding a pre-lab, then do not enter any scores for the students under those columns. Figure A.5: Enter ``0'' to exclude or ``correct totals'' to include a Pre-Lab assignment in the calculation of the overall scores. QNET ROTPENT Laboratory Manual - Instructor Manual 52 Apply math, science and engineering A.3 Rubrics Code Perf. Criteria A-1 Has strategies to solve the problem A-2 Performs calculations A-3 Explains results 4 Exemplary 3 Proficient 2 Developing Uses a sophisticated strategy. Employs refined and complex reasoning to arrive at the solution. Arrived at correct answer. Calculations are complete. Precise math language, symbolic notation, graphs diagrams, etc. are used. Explains the result in the context of the completed calculations by providing complex reasoning and interpretations. Clear logical conclusions are drawn. Uses an appropriate strategy for solution. Content knowledge is used correctly. Has a strategy for solution but content knowledge has some conceptual errors. 1 Beginning or incomplete Uses a wrong strategy or there is no evidence of a strategy. Content knowledge has many errors. Arrived at correct answer with correct calculations. Arrived at correct answer. Calculations are mostly correct but there are some minor errors. No answer or arrived at wrong answer. Calculations are mostly or completely wrong. Explains the result in the context of the completed calculations. Logical conclusions are drawn. Some explanation of the result is provided but it does not demonstrate logical reasoning. There are no explanations of the result or an attempt was made to provide an explanation but it is incomplete or wrong. Table 6: OUTCOME A: An ability to apply knowledge of mathematics, science, and engineering QNET ROTPENT Laboratory Manual - Instructor Manual v 1.0 Design Code Perf. Criteria B-1 Identifies pothesis test hyto B-2 Identifies independent and dependent variables B-3 Lists assumptions made B-4 Formulates experimental plan to investigate a phenomenon 4 Exemplary 3 Proficient a Framed a Framed testable ques- testable question correctly tion correctly and explained the anticipated cause-andeffect expectation leading to the question variables All variables All identified are identified are correctly, expla- correctly nations about their relations are provided All assumptions All assumptions and their rea- are listed sons are clearly listed Developed a Developed corsophisticated rect experimenexperimental procedure to tal procedure test the hypothcomplete with esis details of every step to test the hypothesis (Continued on the next page) 2 Developing Framed a question that may or may not be testable 1 Beginning or incomplete Incomplete or no testable question Most variables are identified correctly None or only a few variables are identified correctly Assumptions are listed but some are missing Attempted but could not completely develop an experimental procedure to test the hypothesis No assumptions listed or most of them are missing Could not develop an accurate experimental procedure QNET ROTPENT Laboratory Manual - Instructor Manual 54 Code Perf. Criteria Follows experimental procedures B-6 Documents data collected B-7 Uses appropriate methods to analyze data B-8 Accounts for experimental uncertainties B-9 Interprets results with respect to the original hypothesis Interpret Analyze Conduct B-5 4 Exemplary 3 Proficient 2 Developing 1 Beginning or incomplete Follows experimental procedures carefully with great attention to detail. Makes precise measurements Systematically documents all data in an exemplary way and by using accurate units Follows experimental procedures leading to correct measurements Follows experimental procedures with some mistakes leading to mostly correct measurements Follows experimental procedures with many mistakes leading to mostly wrong measurements Documents all data and with accurate units. No data are documented or there are major mistakes in the units Excellent, indepth analysis of the data using appropriate methods Is aware of all potential experimental errors and can fully account for them with suggestions to improve them Provides clear, in-depth, accurate explanations, including trends, and arrives at logical conclusions based on data and results Appropriate level of analysis of data using correct methods Documents data with some mistakes in the units or some data missing. Data organization needs improvement Some data analysis but incomplete Is aware of all potential experimental errors Is aware of some of the potential experimental errors Is unaware of any experimental errors Provides accurate explanations and logical conclusions based on data and results Provides explanations and conclusions but with some errors No explanation or conclusions are provided or they are wrong No analysis or attempts to analyze with wrong methods Table 7: OUTCOME B: An ability to design and conduct experiments, as well as to analyze and interpret data. QNET ROTPENT Laboratory Manual - Instructor Manual v 1.0 Code Perf. Criteria B-1 Identifies hypothesis to test Procedure B-2 B-3 B-4 B-5 Identifies independent and dependent variables Lists assumptions made Formulates experimental plan to investigate a phenomenon Follows experimental procedures 4 Exemplary 3 Proficient 2 Developing Framed a testable question correctly and explained the anticipated cause-and-effect expectation leading to the question All variables are identified correctly, explanations about their relations are provided All assumptions and their reasons are clearly listed Developed a sophisticated experimental procedure complete with details of every step to test the hypothesis Framed a testable question correctly Framed a question that may or may not be testable All variables are identified correctly Most variables are identified correctly None or only a few variables are identified correctly All assumptions are listed Assumptions are listed but some are missing Attempted but could not completely develop an experimental procedure to test the hypothesis Could not develop an accurate experimental procedure Follows experimental procedures with some mistakes leading to mostly correct measurements No assumptions listed or most of them are missing Developed correct experimental procedure to test the hypothesis Follows experi- Follows experimenmental procedures tal procedures leadcarefully with great ing to correct meaattention to detail. surements Makes precise measurements (Continued on the next page) QNET ROTPENT Laboratory Manual - Instructor Manual 1 Beginning or incomplete Incomplete or no testable question Follows experimental procedures with many mistakes leading to mostly wrong measurements 56 Results Code Perf. Criteria 3 Proficient 2 Developing 1 Beginning incomplete Documents data with some mistakes in the units or some data missing. Data organization needs improvement Can use software tools for data presentation with only a few mistakes No data are documented or there are major mistakes in the units Cannot use software tools for simulation or attempts to use them but with many mistakes No analysis or attempts to analyze with wrong methods or B-6 Documents data collected Systematically documents all data in an exemplary way and by using accurate units Documents all data and with accurate units. K-2 Uses software tools to present data in useful format (graphs, numerical, table, charts, diagrams) Uses software tools to simulate physical systems Uses appropriate methods to analyze data Accounts for experimental uncertainties Can use various software tools and their advanced features correctly for data presentation Can use software tools correctly for data presentation Can use software tools and their advanced features correctly for simulation Excellent, in-depth analysis of the data using appropriate methods Is aware of all potential experimental errors and can fully account for them with suggestions to improve them Can use various software tools and their advanced features correctly for analysis Provides clear, in-depth, accurate explanations, including trends, and arrives at logical conclusions based on data and results Can use software tools correctly for simulation Can use software tools for simulation with only a few mistakes Appropriate level of analysis of data using correct methods Some data analysis but incomplete Is aware of all potential experimental errors Is aware of some of the potential experimental errors Is unaware of any experimental errors Can use software tools correctly for analysis Can use software tools for analysis with only a few mistakes Provides accurate explanations and logical conclusions based on data and results Provides explanations and conclusions but with some errors Cannot use software tools for analysis or attempts to use them but with many mistakes No explanation or conclusions are provided or they are wrong K-3 B-7 Analysis B-8 Conclusions 4 Exemplary K-1 Uses software tools for analysis B-9 Interprets results with respect to the original hypothesis Cannot use software tools for data presentation or attempts to use them but with many mistakes (missing labels, etc.) Table 8: OUTCOME G: Ability to communicate effectively. (for Lab Report - CONTENT) QNET ROTPENT Laboratory Manual - Instructor Manual v 1.0 Code GS-1 GS-2 3 Proficient 2 Developing • Each of the required sections is completed. • If necessary, subsections are used • All necessary background principles and information for the experiment are given • All grammar/spelling correct • References are cited Two of the conditions for the "exemplary" category were not met Three of the conditions for the "exemplary" category were not met 1 Beginning or incomplete Four or none of the conditions for the "exemplary" category were not met Professional • Has cover page with all necesappearsary details (title, course, student ance name(s), etc.) • Typed • Report layout is neat • Does not exceed specified maximum page limit • Pages are numbered • Equations are consecutively numbered • Figures are numbered, axes have labels, each figure has a descriptive caption • Tables are numbered, they include labels, each table has a descriptive caption • No hand drawn sketches/diagrams • References are cited using correct format Two of the conditions for the "exemplary" category were not met Four of the conditions for the "exemplary" category were not met Five or more of the conditions for the "exemplary" category were not met Perf. Criteria Content presentation well organized 4 Exemplary Table 9: OUTCOME G: Ability to communicate effectively. (for Lab Report - FORMAT) QNET ROTPENT Laboratory Manual - Instructor Manual 58 Use techniques, skills and modern eng. tools Code Perf. Criteria K-1 Uses software tools for analysis K-2 Uses software tools to present data in useful format (graphs, numerical, table, charts, diagrams) K-3 Uses software tools to simulate physical systems 4 Exemplary 3 Proficient 2 Developing Can use various software tools and their advanced features correctly for analysis Can use various software tools and their advanced features correctly for data presentation Can use software tools correctly for analysis Can use software tools for analysis with only a few mistakes Can use software tools correctly for data presentation Can use software tools for data presentation with only a few mistakes Can use software tools and their advanced features correctly for simulation Can use software tools correctly for simulation Can use software tools for simulation with only a few mistakes 1 Beginning or incomplete Cannot use software tools for analysis or attempts to use them but with many mistakes Cannot use software tools for data presentation or attempts to use them but with many mistakes (missing labels, etc.) Cannot use software tools for simulation or attempts to use them but with many mistakes Table 10: OUTCOME K: An ability to use the techniques, skills, and modern engineering tools necessary for engineering practice QNET ROTPENT Laboratory Manual - Instructor Manual v 1.0 References [1] Quanser Inc. Qnet assessment workbook microsoft excel file, 2011. [2] Quanser Inc. QNET Rotary Pendulum Control Trainer User Manual, 2011. QNET ROTPENT Laboratory Manual - Instructor Manual 60