1
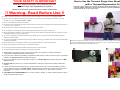
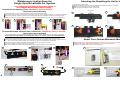
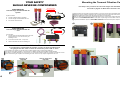
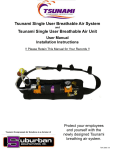
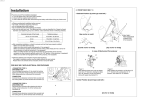
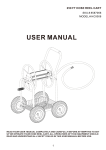
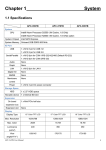
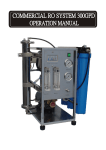
Tsunami Single User Breathable Air System
and
Tsunami Single User Breathable Air Unit
User Manual
Installation Instructions
!! Please Retain This Manual for Your Records !!
a division of:
Suburban Manufacturing, Inc.
Monticello, MN 55362
1-800-782-5752
Tsunami Compressed Air Solutions is a division of
Protect your employees
and yourself with the
newly designed Tsunami
breathing air system.
Suburban Manufacturing, Inc. 10531 Dalton Avenue Monticello, MN 55362 USA (800)782-5752 fax (763) 295-6601
www.gosuburban.com
12
764-2066
YOUR SAFETY IS IMPORTANT
How to Use the Tsunami Single User Breathable Air Unit
with a Tsunami Regenerative Dryer
Read ALL instructions before you install and use your
Tsunami Single User Breathable Air System
Using this system allows you to provide pre-filtered air for the breathable air drops without having to
purchase additional filtration to meet the specifications required by OSHA and NIOSH all while drying
the downstream air for your spray drops.
Observe and follow all warning and caution instructions
!! Warning: Read Before Use !!
•
•
Failure to understand and follow the warnings and instructions contained in this manual may cause Injury or Death.
•
•
Not for use with gasoline powered air compressors.
Failure to read and understand all warning and instructions on the products you are using (paints, solvents, epoxy resins,
pesticides, etc.) may cause Injury, Disease, or Death.
All maintenance and operational instructions contained within this manual must be followed. Failure to follow these instructions
may result in injury or loss of life.
•
•
•
All instructions for the carbon monoxide (CO) monitor must be followed exactly.
•
You must use a supplied air respirator that adheres to the guidelines set by the American National Standard Practices for
Respiratory Protection Z88.2.
•
You must use a supplied air respirator that adheres to the statutes set forth by your federal, state, and local Occupational Safety
and Health organizations.
1
Remove the plug from the auxiliary port which normally blocks off the flow through of compressed air from the dryer inlet air supply.
Always make sure your compressed air system has been depressurized prior to servicing of this product.
2
You can plumb regular air lines or install a hose coupler and run hose to your booth or to the location you wish to use breathable
air with the Tsunami Single User Breathable Air Unit.
•
•
•
•
Do not attempt to use the respirator without reading and understanding the instructions of the product.
Never wear supplied air respirators in any atmosphere that may contain levels of contamination which are unknown or may be
Immediately Dangerous to Life or Health (IDLH).
Always wear eye protection when working on compressed air systems.
Use only proper tools and follow all precautions that pertain to the use of those tools.
Use appropriate thread sealant on all fittings unless otherwise specified.
1
2
♦ This breathing air system reduces but does not eliminate your exposure to inhaled chemicals or
contaminants. It Does Not provide total protection.
♦ If you have ever experienced breathing complications while around or after exposure to paint, isocyanates,
solvents, etc. DO NOT USE this breathing air system.
♦ If you are sensitized to paint, isocyanates, solvents, etc., DO NOT USE this breathing air system, it WILL
NOT protect you.
♦ DO NOT USE this product if you cannot understand the warnings or instructions contained within this
manual.
♦ If these warnings and instructions lead you to believe that you should not use this breathing air system
or that it will not protect you, DO NOT USE IT, regardless of any instructions or statements from another
source such as an employer, a parts supplier, product manufacturer, etc, that indicate you will be
protected.
♦ YOU ARE SOLELY RESPONSIBLE for any injury, disease, damage, or death caused by failure to follow
these warnings and instructions.
11
Wearing the Breathing Air Unit
1
Buckle the breathing air unit around your waist and adjust the placement of the filter pad along the belt until the unit fits
comfortably in the center of your back.
2
Adjust the belt to your desired snugness and cut any excess material from the belt tongue.
3
Connect the whip hose to the filter unit.
1
2
3
DIRECTORY
Maintenance Guide and Instructions
Page
4
Page
5
Product Overview
Page
6
Tsunami Filtration Package Mounting Instructions
Page
7
Assembly of Tsunami Single User Breathable Air Unit
Page
8-10
How to Use the Tsunami Single User Breathable Air Unit with
a Tsunami Regenerative Dryer
Page
11
Oil Coalescing and Activated Carbon Replacement Elements
Maintenance Guide and Instructions
Float Drains and Carbon Monoxide (CO) Monitor Calibration
4
Clip the CO monitor onto the belt and connect the sampling tube to the barbed fitting on the breathing air regulator end of the filter.
Note: The CO monitor should be attached to the opposite side of the belt from where the work line is being used.
5
Put your breathing air hood or mask on and connect to the coupler installed on the belt mounted breathing air unit.
Note: Some brands of hoods by different manufacturers may require that you replace the supplied breathing
air coupler for the hood with one that is specific to their hood inlet connection.
4
5
For technical support or application assistance please call 1-800-782-5752
www.tsunami.us.com
www.gosuburban.com
Tsunami Compressed Air Solutions is a division of
10
Maintenance Instructions for
Single User Breathable Air System
** SYSTEM PRESSURE MUST BE RELEASED PRIOR TO
PERFORMING MAINTENANCE PROCEDURES **
Attaching the Breathing Air Unit to the Belt
Loosen the mounting straps.
Set the breathing air unit on the mounting pad with the gauges facing the top of the belt.
Slide the mounting straps through the strap buckle.
Securely strap the breathing air filter unit into place.
1
2
3
4
Tsunami Oil Coalescing Filter - Mandatory every 6 months
(Replacement P/N 21999-0202)
1
2
3
4
Top of Belt
Top of Belt
1
2
3
4
Unscrew the outer tube from the Tsunami head of the 2nd stage oil coalescing filter.
Remove the bottom nylon lock nut and remove the element. Do not lose the top element adaptor or the bottom baffle plate.
Slide element adaptor, replacement element, and bottom baffle plate up the threaded rod into the Tsunami filter head.
Tighten the nylon lock nut until the element is firmly secured (Do Not Crush Element) and screw the outer tube back on.
1
2
4
3
Tsunami Activated Carbon Filter on Belt Unit - Mandatory every 3 months
(Replacement P/N 21999-0395)
Some compressed air systems may require replacement of the activated carbon element more often than specified
ALWAYS REPLACE THE ELEMENT IF THE USER CAN “SMELL” OR “TASTE” THE AIR THEY ARE BREATHING
1
2
3
4
5
Disconnect the CO sampling tube from the carbon monoxide monitor and unbuckle the filter unit from the belt.
Remove the breathing air regulator from the filter assembly and remove the activated carbon element, baffle, and spring.
Note: There are two element gaskets which must stay in place for the replacement element seal.
Hold the new element, baffle, and spring; slide the tube down over the spring and element.
Screw the breathing air regulator back onto the filter tube.
Attach the breathing air unit back onto the belt and re-connect the sampling tube to the CO monitor
1
2
4
About Your Carbon Monoxide Monitor
1
2
3
3
1
5
2
4
Important: Read your Operations Manual for your CO monitor and be sure to send in your warranty registration.
Push the carbon monoxide sampling tube adaptor into the top of the CO monitor.
Twist the tube adaptor until you hear it ‘’click” into place.
3
9
Maintenance Instructions for
Single User Breathable Air System
Assembling the Fittings to the Breathing Air Unit
Use appropriate thread sealant - thread tape is easy and preferred for this application
Install the two elbows on the inlet and outlet ports of the Inlet Air / Whip Hose regulator.
Note: The inlet air supply fitting and the whip hose fitting are at an approximate 45° angle.
Pre-assemble the brass nipple and the female tee and then attach to the outlet elbow for the work line (whip hose)
Install CUSTOMER SUPPLIED inlet air fitting and outlet air quick coupler for 5’ work hose (Preferred Installation).
Note: You can attach the hose directly to the outlet of the filter unit but is not recommended.
1
2
3
** SYSTEM PRESSURE MUST BE RELEASED PRIOR TO
PERFORMING MAINTENANCE PROCEDURES **
Float Drain Replacement on Wall Mounted Tsunami Filtration Package
(Float Drain - P/N 9000801)
Unscrew the bottom cap from the Tsunami tube.
Remove the float drain; this is easily achieved by grasping the lower portion of the float stem
Note: You can also reach the float stem from the underside of the Tsunami bottom cap.
Discard the old float and replace with a new one and screw the bottom cap back onto the Tsunami filter tube.
Note: Float drains only need to be hand tight or just slightly past hand tight.
1
1
2
3
2
Whip Hose
3
1
2
3
Inlet Air
Inlet Air
Whip Hose
How to Convert the Breathing Air Unit for Left Hand Painters
Important: This belt filter has two different regulators; one for breathing air and one for the work line
see page 6
1
2
3
4
5
Remove the regulator gauge assemblies from the gauge ports. (see page 6)
Turn the filter so you can access the gauge ports on the reverse side of the regulators
Remove port plugs with 3mm hex wrench and install the gauge assemblies as shown.
Plug the open gauge ports on the reverse side of the regulators.
Switch the fixed buckle from the right side of the belt to the left side of the belt.
Carbon Monoxide (CO) Monitor Calibration - Every 1 to 3 months
(Calibration Kit - P/N 21999-0264)
1
2
3
1
2
1
Purchase a calibration kit and follow all procedures outlined in the GFG operators manual for the CO monitor.
Send your CO monitor to Suburban Manufacturing, Inc and we will calibrate the unit for you.
2
To arrange the calibration of your CO monitor;
Please contact GFG Instrumentation.
4
5
Fixed buckle to the
right for right handed
painters
-standard configuration-
1-800-959-0329
GFG Instrumentation will guide you through the
correct procedure for returning the CO monitor.
Fixed buckle to the
left for left handed
painters.
8
5
Mounting the Tsunami Filtration Package
YOUR SAFETY
SHOULD NEVER BE COMP
COMPROMISED
ROMISED
This step is only used for the Tsunami Single User Breathable Air System
Proceed to page 8 for Belt Unit instructions only.
MASK OR HOOD
SOLD SEPARATELY
P/N 21999-0791
Tsunami Single User Breathable Air
System
1
2
System Includes:
3
•
•
•
Tsunami 2-Stage Filtration Package
4
Tsunami Single User Breathable Air Unit
6
5
Securely attach the universal mounting bracket to your wall or booth using appropriate hardware.
Attach the Tsunami Filtration Package to the mounting bracket using the proper size bolts supplied with the filter.
Install the plastic drain fittings onto the bottom caps of the Tsunami filters.
Push the clear drain tubing onto the barbed fittings and then route the drain tubing discharge to a suitable location.
Connect the CUSTOMER SUPPLIED air hose quick coupler fitting and then attach main air hose to run to belt filter.
A preferred installation requires a CUSTOMER SUPPLIED brass elbow and quick coupler fitting.
50’ Tsunami Ultra-flo Hose
1
2
3
4
P/N 21999-0790
Tsunami Single User Breathable Air
Unit
MASK OR HOOD
SOLD SEPARATELY
Unit Includes:
•
Tsunami belt mounted activated carbon filter with
dual regulators for your work line and your
breathing air line
•
•
5’ Tsunami Ultra-flo Hose - “whip” hose
Carbon Monoxide monitor for breathing air
Your Unit at a Glance
It is important to understand the location of each of these regulators and
the gauges that are used on them as well as the ports used on each.
1
2
3
4
6
The breathing air regulator on this filter has a 0-30psi regulator with a 0-30psi gauge attached.
The inlet air / whip hose regulator on this filter has a 0-180psi regulator and a 0-200psi gauge attached.
The carbon monoxide sampling port; this is where you connect the sampling tube from your belt mounted CO monitor.
This is the breathing air coupler for the breathing air hood. This is the only coupler supplied with this unit.
Breathing Air
Regulator
1
3
6
5
Inlet Air / Whip Hose
Regulator
2
4
7