1
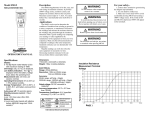
RAMiX PMC Ethernet
Installation Guide
January 2006
R
EA
D
TH INS M
IS TA E B
PR LL EF
O IN OR
D G
E
U
CT
0890531-240
Disclaimer
The information contained in this document is subject to change without notice. Concurrent Computer Corporation has taken
efforts to remove errors from this document, however, Concurrent Computer Corporation’s only liability regarding errors that
may still exist is to correct said errors upon their being made known to Concurrent Computer Corporation.
License
Duplication of this manual without the written consent of Concurrent Computer Corporation is prohibited. Any copy of this
manual reproduced with permission must include the Concurrent Computer Corporation copyright notice.
Trademark Acknowledgments
Ethernet is a trademark of the Xerox Corporation.
Power Hawk, PowerMAXION and PowerMAX OS are trademarks of Concurrent Computer Corporation.
All other trademarks are the property of the respective owners.
© 2006 Concurrent Computer Corporation – Al l Rights Reserved
Concurrent Computer Corporation
2881 Gateway Drive
Pompano Beach, FL 33069
Note: Information subject to change without notice.
Chapter 0
Contents
1.0. Introduction . . . . . . . . . . . . . . . . . . . . . . . . . . . . . . . . . . . . . . . 1
2.0. Documentation . . . . . . . . . . . . . . . . . . . . . . . . . . . . . . . . . . . 1
2.1. Concurrent Documentation . . . . . . . . . . . . . . . . . . . . . 1
2.2. Vendor Documentation . . . . . . . . . . . . . . . . . . . . . . . . . 1
3.0. Prerequisites . . . . . . . . . . . . . . . . . . . . . . . . . . . . . . . . . . . . . . . 2
3.1. Software . . . . . . . . . . . . . . . . . . . . . . . . . . . . . . . . . . . . . . . . 2
3.2. Hardware . . . . . . . . . . . . . . . . . . . . . . . . . . . . . . . . . . . . . . 2
4.0. Syntax Notation . . . . . . . . . . . . . . . . . . . . . . . . . . . . . . . . . . . 2
5.0. Installation Procedures . . . . . . . . . . . . . . . . . . . . . . . . . . . . 3
5.1. RAMiX 665/675 Device Controller Installation . . . . . . 3
5.1.1. RAMiX 665/675 PMC Ethernet Controller Installation
on Power Hawk 600/700/900 Systems . . . . . . . . . . . . .
5.1.2. VMETRO MIDAS 20 Hardware Configuration
in a PowerMAXION 6400 or Power Hawk 600 . . . . . . .
5.1.3. RAMiX 665/675 PMC Ethernet Controller Installation
on VMETRO MIDAS 20 in a PowerMAXION 6400 . . . . .
5.1.4. RAMiX 665/675 Network Connection . . . . . . . . . . . . .
6.0.
7.0.
RAMiX PMC Ethernet Installation Guide
3
4
4
5
5.2. RAMiX 665/675 Driver Installation . . . . . . . . . . . . . . . . . 6
5.2.1. Driver Installation on PowerMAXION 6400 or
Power Hawk 600 Systems . . . . . . . . . . . . . . . . . . . . . . . 6
5.2.2. Driver Installation on Power Hawk 600/700/900
Systems . . . . . . . . . . . . . . . . . . . . . . . . . . . . . . . . . . . . . 7
5.2.3. Network Configuration . . . . . . . . . . . . . . . . . . . . . . . . 9
5.2.4. Verifying the Network Interface . . . . . . . . . . . . . . . . 11
Troubleshooting . . . . . . . . . . . . . . . . . . . . . . . . . . . . . . . . . . 13
6.1. Applications . . . . . . . . . . . . . . . . . . . . . . . . . . . . . . . . . . . 13
6.2. Controller . . . . . . . . . . . . . . . . . . . . . . . . . . . . . . . . . . . . . . 13
6.3. RAMiX 665/675 LED Definition . . . . . . . . . . . . . . . . . . . 14
Direct Software Support . . . . . . . . . . . . . . . . . . . . . . . . . . 15
iii
iv
RAMiX PMC Ethernet Installation Guide
1.0.
Introduction
This document provides instructions for installing and configuring the RAMiX 665 or 675 PMC
Ethernet device on both the Power HawkTM and PowerMAXIONTM systems.
The RAMiX 665/675 is an intelligent dual 100BaseFX PMC EthernetTM device for high
performance data exchange. Features include embedded TCP/IP, embedded firmware allowing
user addition of application specific functionality, and failover firmware. It contains an onboard
RISC co-processor and dual Ethernet access.
2.0.
Documentation
2.1.
Concurrent Documentation
The RAMiX PMC Ethernet Installation Guide is provided by Concurrent
Computer Corporation with this product.
2.2.
Vendor Documentation
Vendor documentation for the VMETRO MIDAS 20 PMC Carrier board
may accompany this product. Contact the vendor if you have questions
regarding this documentation.
RAMiX PMC Ethernet Installation Guide
1
Prerequisites
3.0.
Prerequisites
The following prerequisites apply to the RAMiX 665/675 PMC Ethernet device at firmware revision
level 5.17 (665) and 2.1.1 (675).
NOTE: The latest firmware for rmxf is provided as part of the package. After installation, the firmware
can be downloaded using the "rmxf_util" utility. There are two versions of the firmware in /var/sadm:
•
•
665_rmxf_fw - the latest for 665 boards
675_rmxf_fw - the latest for 675 boards
3.1.
3.2.
4.0.
Software
•
PowerMAX OSTM Revision 4.3P11 or later
•
PowerMAX OS Revision 5.1SR6 or later
•
PowerMAX OS Release 6.3
Hardware
•
Concurrent Power Hawk or PowerMAXION system
•
3.3 volt PMC slot
Syntax Notation
The following notation is used throughout this manual:
2
italic
Books, reference cards, and items that the user must specify
appear in italic type. Special terms may also appear in italics.
list bold
User input appears in list bold type and must be entered
exactly as shown. Names of directories, files, commands, options
and system manual page references also appear in list bold
type.
list
Operating system and program output such as prompts and messages and listings of files and programs appear in list type.
[
Brackets enclose command options and arguments that are
optional. You do not type the brackets if you choose to specify
such options or arguments
]
RAMiX PMC Ethernet Installation Guide
Installation Procedures
5.0.
Installation Procedures
5.1.
RAMiX 665/675 Device Controller Installation
This section includes the following:
5.1.1.
•
Installing the controller into a PMC slot on a Power Hawk system.
•
Configuring the VMETRO MIDAS 20 and installing the controller on a
PowerMAXION 6400 system or a Power Hawk 600 system.
•
Connecting the controller to the network.
RAMiX 665/675 PMC Ethernet Controller Installation
on Power Hawk 600/700/900 Systems
1. With power disconnected and the cpu board faceplate screws
unfastened, remove the SBC from the chassis.
2. Remove the spring metal clip covering the mezzanine aperture on the
faceplate of the SBC.
3. If the target slot is dusty, remove any dust from the connector ports
with dry, compressed air.
4. Attach a grounding strap to your wrist or ankle, and carefully remove
the controller from its anti-static bag.
5. Install the controller as follows:
a. Remove the four screws from the bottom of the standoff of the
RAMiX 665/675 controller.
b. Hold the RAMiX 665/675 controller at an angle and insert it
through the rear of the faceplate of the SBC while aligning the
dual mating connectors on the SBC with the dual connectors
(P1 and P2) on the controller.
c. Carefully press the controller into place. A metal standoff post
on the SBC and an alignment hole on the RAMiX 665/675
controller facilitate alignment.
6. Fasten the cards together with the four screws removed during step a.
7. Replace the assembly in the system chassis.
8. Connect the RAMiX 665/675 controller to the network following the
steps in section 5.1.4.
RAMiX PMC Ethernet Installation Guide
3
Installation Procedures
5.1.2.
VMETRO MIDAS 20 Hardware Configuration
in a PowerMAXION 6400 or Power Hawk 600
Note
The VMETRO MIDAS 20 is not supported on Power Hawk 700
and 900 systems.
The MIDAS 20 has one DIP switch and five jumpers used for VMEbus configuration.
Locations and functionality of all jumpers and switches are provided in the MIDAS
20/20R User's Manual. The page number in this manual for each jumper/switch setting is
referenced after each step.
1. Enable the VME Register Access Image (VRAI) by setting the
jumper in the “UP” position. (page 11)
2. Set the VME Register Access Image (address size) to allow A32
access by setting both jumpers in the “DOWN/DOWN” positions.
(page. 12)
3. Disable the VME64 Auto-Slot ID function by setting the jumper in
the “DOWN” position. (page 13)
4. Disable the SYSFAIL Assertion by setting the jumper in the “UP”
position. (page 13)
5. The DIP switch is used to define the A32 base address for the VME
Register Access Image. (page 12-13)
Board 1:
Board 2:
0xE1000000
0xE2000000
To reflect a VMEbus address of 0xE1000000, the DIP switch on the device should be set
to reflect the MSB of the address (0xE1).
The following DIP switch setting will configure the device to respond to 0xE1000000:
E
1
5.1.3.
2
3
1
4
5
6
ON
7
8
OFF
RAMiX 665/675 PMC Ethernet Controller Installation
on VMETRO MIDAS 20 in a PowerMAXION 6400
1. With power disconnected and the VMETRO MIDAS 20 board
faceplate screws unfastened, remove the MIDAS 20 board from the
chassis.
2. Remove the spring metal clip covering the mezzanine aperture on the
faceplate of the MIDAS 20 for the PMC position required.
4
RAMiX PMC Ethernet Installation Guide
Installation Procedures
3. If the target slot is dusty, remove any dust from the connector ports
with dry, compressed air.
4. Attach a grounding strap to your wrist or ankle, and carefully remove
the controller from its anti-static bag.
5. Install the controller as follows:
a. Remove the four screws from the bottom of the standoff of the
RAMiX 665/675 controller.
b. Hold the RAMiX 665/675 controller at an angle and insert it
through the rear of the faceplate of the MIDAS 20 while
aligning the dual mating connectors on the MIDAS 20 with the
dual connectors (P1 and P2) on the controller.
Note
The RAMiX 665/675 controller requires 3.3 volts, and thus must
be installed in the first (top) PMC slot of a factory modified
MIDAS 20 card (the standard MIDAS 20 does not provide 3.3
volts at either PMC slot). This modified card is available from
VMETRO, and is not provided by Concurrent Computer Corp.
c. Carefully press the controller into place. A metal standoff post
on the MIDAS 20 and an alignment hole on the RAMiX
665/675 controller facilitate alignment.
6. Fasten the cards together with the four screws removed during step a.
7. Replace the MIDAS 20 assembly in system chassis in the slot desired.
8. Ensure proper configuration of the backplane by checking that the
interrupt acknowledge jumper and the bus grant level jumpers are
removed where the board resides.
9. Connect the RAMiX 665/675 controller to the network following the
steps in section 5.1.4.
5.1.4.
RAMiX 665/675 Network Connection
Once the controller card has been installed onto the system, the RAMiX 665/675 can then
be connected to the network.
1. Attach the RAMiX 665/675 Dual SC Fiber Cables to each port.
2. Turn power on to the computer.
3. Check the RAMiX 665/675 controller’s LEDs to verify that the
controller is operating correctly. (A yellow LED will be illuminated for
each port to indicate the device is properly connected to the network.)
RAMiX PMC Ethernet Installation Guide
5
Installation Procedures
5.2.
RAMiX 665/675 Driver Installation
This section includes the following:
5.2.1.
•
Installing the VMETRO MIDAS 20 and RAMiX 665/675 driver packages for
PowerMAX OS on a PowerMAXION 6400 or Power Hawk 600.
•
Installing the RAMiX 665/675 driver package for PowerMAX OS on a Power
Hawk system.
•
Configuring the network interface.
•
Verifying the network interface.
Driver Installation on PowerMAXION 6400 or Power Hawk
600 Systems
The PowerMAXION platform requires both the RAMiX 665/675 driver package (rmxf)
and the VMETRO MIDAS 20 driver package (vmet) installed. For Power Hawk 700/900
systems only the rmxf driver package is required (follow the instructions in 5.2.2.). For
Power Hawk 600 systems, installation may require only the rmxf driver package (follow
the instructions in 5.2.2.) but could also be configured with the vmet package. In the case
where the vmet is configured, follow the steps below.
Locate the 4mm DAT tape provided by Concurrent Computer Corporation containing both
driver packages.
1. Boot the system to single-user mode.
2. Sign onto the system as root user.
3. If a version of the RAMiX 665/675 driver (rmxf) already exists on this
machine, issue the pkgrm(1m) command and confirm to the
command that the rmxf package is to be removed. (Note: this step can
be followed to remove the driver regardless of whether a new version
is to be installed.) Do the following step:
# pkgrm rmxf
4. Load the package tape into the 4mm DAT tape drive.
5. Install the software packages to the system using the pkgadd(1m)
command. When asked which packages to install, indicate ‘all’ to
install both packages with a single invocation of pkgadd.
# pkgadd -d tape1
.
.
.
Installation of VMETRO MIDAS 20 (vmet) was successful.
.
.
Installation of RAMiX 665/675 Dual Ethernet Driver (rmxf)
was successful.
#
6. Edit the /etc/conf/sadapters.d/kernel file to define the VME
start and VME end address* of the VMETRO MIDAS 20 device in the
kernel. Add the following line to end of the file:
6
RAMiX PMC Ethernet Installation Guide
Installation Procedures
#Adapter Logical
#Name
Adptr #
#----------
Bus Intr
Type Type
---------
vmet
vme0 intr
0
Slot
Number
------
I/O
Addr 1
------
I/O
Addr 2
------
e1000000 e13fffff
*
Note: The VME end address (I/O Address 2) must be at least 128KB
greater than the starting address specified (I/O Address 1).
7. Rebuild the kernel and reboot.
# /etc/conf/bin/idbuild
The PowerMAX OS kernel will be rebuilt now.
This will take some time. Please wait.
Root for this process is /
[...]
The PowerMAX OS kernel has been rebuilt.
The following command reboots the system:
# shutdown -i6 -g0 -y
5.2.2.
Driver Installation on Power Hawk 600/700/900 Systems
Locate the CD-ROM provided by Concurrent Computer Corporation containing the
RAMiX 665/675 driver package.
This media also contains the VMETRO MIDAS 20 driver installation package (vmet) for
PowerMAXION or Power Hawk 600 systems. For Power Hawk 700/900 systems only the
rmxf driver package is required (follow the instructions below). For Power Hawk 600
systems, installation may require only the rmxf driver package (follow the instructions
below) but could also be configured with the vmet package. In the case where the vmet is
configured, follow the steps in section 5.2.1.
1. Boot the Power Hawk system to single-user mode.
2. Sign onto the system as root user.
3. If a version of the driver already exists on this machine, issue the
pkgrm(1m) command and confirm to the command that the rmxf
package is to be removed. (Note: this step can be followed to remove the
driver regardless of whether a new version is to be installed.) Do the
following step(s):
# pkgrm rmxf
If installation is NOT being performed on a closely-coupled system – skip
to step 7.
4. If the package is on any of the clients, after performing pkgrm, also issue
a vmebootconfig(1m) command for each of these clients to purge
the old driver files and find and remove any other related files:
# vmebootconfig -U -v client_vme
RAMiX PMC Ethernet Installation Guide
7
Installation Procedures
and
# find vroot_path -name ‘*rmxf*’ -print | xargs rm -rf
5. If the RAMiX card will be used on a VMETRO card, follow the same
steps used in #6 on page 6 for the PowerMAXION.
6. If you plan to rebuild the kernel before installing the package, perform
further cleanup:
# vi /etc/diskless.d/custom.conf/client.private/client_vme/memfs.files.add
and delete the following lines:
c
c
c
c
/dev/rmxf0
/dev/rmxf1
/dev/rmxf2
/dev/rmxf3
0644
0644
0644
0644
/dev/rmxf0
/dev/rmxf1
/dev/rmxf2
/dev/rmxf3
7. Rebuild the kernel and reboot.
# /etc/conf/bin/idbuild
The PowerMAX OS kernel will be rebuilt now.
This will take some time. Please wait.
Root for this process is /
.
.
.
The PowerMAX OS kernel has been rebuilt.
The following command will reboot the system:
# shutdown -i6 -g0 -y
8. Load the CD-ROM into the CD-ROM drive and mount the file system
as shown below. In this example, the CD-ROM device is /dev/cd/0
and the CD-ROM disc is mounted under /mnt/cdrom.
# mkdir /mnt/cdrom
# mount -F cdfs -r /dev/cd/0 /mnt/cdrom
9. Install the rmxf package:
# pkgadd -d /mnt/cdrom/pkgs.dstream rmxf
.
.
.
Installation of RAMiX 665/675 Dual Ethernet Driver (rmxf)
was successful.
#
8
RAMiX PMC Ethernet Installation Guide
Installation Procedures
5.2.3.
Network Configuration
This example assumes an IP network address of 129.134.71.10 and a host name of ramix0
(if on a closely-coupled system, this is the IP address of the RAMiX 665/675 on the
boot/file server). The actual IP network address and host name should be determined by
the network administrator for your system. Hostnames and IP addresses must be unique.
1. Edit /etc/conf/sdevice.d/rmxf to enable the driver by
ensuring that a “Y” is indicated in the conf column:
#name conf unit
rmxf
Y
0
On PowerMAXION or PowerHawk 600 systems configured with
vmet, also edit /etc/conf/sdevice.d/vmet to enable that
driver by ensuring that a “Y” is indicated in the conf column.
#name conf unit
vmet Y
0
2. Insert the RAMiX 665/675 Ethernet host IP network address and name
to /etc/hosts file:
129.134.71.10 ramix0 RAMIX0 #RAMiX Dual Ethernet PMC
3. Define the IP network address entry in the /etc/confnet.d/
inet/interface file:
rmxf:0:ramix0:/dev/rmxf0:netmask 255.255.255.0 arp::
If installation is NOT being performed on a closely-coupled system – skip to step 11.
4. Put files such as /etc/conf/sdevice.d/rmxf in the root tree
for each client:
# vmebootconfig -U -v client_vme
5. Add the RAMiX 665/675 device files to the memfs root file system that
serves as the client’s root file system by editing the file
/etc/diskless.d/custom.conf/client.private/
client_vme/memfs.files.add
# cp -p /etc/diskless.d/custom.conf/client.shared/nfs/memfs.files.add \
/etc/diskless.d/custom.conf/client.private/client_vme
# vi /etc/diskless.d/custom.conf/client.private/client_vme/memfs.files.add
Add the following lines:
c
c
c
c
/dev/rmxf0
/dev/rmxf1
/dev/rmxf2
/dev/rmxf3
0644
0644
0644
0644
/dev/rmxf0
/dev/rmxf1
/dev/rmxf2
/dev/rmxf3
6. Enable the rmxf module on the client:
# vi vroot_path/etc/conf/sdevice.d/rmxf
Change ‘N’ to ‘Y’.
RAMiX PMC Ethernet Installation Guide
9
Installation Procedures
7. Insert the “client_ramix0” Ethernet host IP network address and name
to /etc/hosts file:
129.134.45.11 client_ramix0 #RAMIX 665/675 PMC on client_vme hostname
8. Define the IP network address entry in the vroot_path/etc/
confnet.d/inet/interface file:
rmxf:0:client_ramix0:/dev/rmxf0:netmask 255.255.255.0 arp::
Note: client_ramix0 is the hostname for the 129.134.71.11 IP address of the RAMiX
665/675 that resides on the diskless client in a closely-coupled configuration.
9. Regenerate the memfs.cpio file system image:
# mkvmebstrap -B -r all client_vme
10. Perform steps 4-9 for each client.
11. Rebuild the kernel and reboot:
# /etc/conf/bin/idbuild
The PowerMAX OS kernel will be rebuilt now.
This will take some time. Please wait.
Root for this process is /
.
.
.
The PowerMAX OS kernel has been rebuilt.
The following command reboots the system:
# shutdown -i6 -g0 -y
During reboot, observe console messages to ensure the RAMiX 665/675 PMC
Ethernet controller has not failed boot diagnostics:
Power Hawk: During reboot, observe that the RAMiX 665/675 (rmxf) driver
is recognized by observing the following message (this message may not be
displayed if the system is built with a dynamic kernel.):
rmxf0: on SYS.PCI0.PCI1
PowerMAXION: During reboot, observe console messages to ensure the
VMETRO MIDAS 20 vmet driver has not failed boot diagnostics. Also
observe during boot that the RAMiX 665/675 rmxf driver is recognized on
the VMETRO MIDAS 20.
The following message indicates PCI bus on the vmet:
Initialize I/O level 1 interface: SYS.VME0.PCI12
The following message indicates RAMiX 665/675 on the MIDAS 20:
rmxf0: on SYS.PCI0.VME0.PCI12
10
RAMiX PMC Ethernet Installation Guide
Installation Procedures
5.2.4.
Verifying the Network Interface
1. Verify that the rmxf0 controller was found on the PCI bus by the kernel
during boot.
# hwstat
.
.
11 Devices Configured:
Device
Major/Minor
Bus
Bus I/O Addr Std I/O Addr
=============
============
====
============ ============
( 7, 70 )
pci0
0xE13FF000
.
.
RMXF 0 Ethernet
0x00003000
.
.
2. Verify that the IP address was successfully assigned to the rmxf0 controller
using the ifconfig(1M) command.
# ifconfig rmxf0
rmxf0: flags=c43<UP,BROADCAST,RUNNING,MULTICAST>
inet 129.134.71.10 netmask ffffff00 broadcast 129.134.71.255
3. Verify that the local network functions using the ping(1M) command. This
determines that the local network is properly configured.
# ping ramix0
ramix0 is alive
4. Verify that a route exists for the rmxf0 interface. Use netstat(1M) to
list all routes in the routing table. Ensure that a route exists for the RAMiX
665/675 PMC Ethernet interface.
# netstat -r
Destination Gateway
.
ramix0
ramix0
Flags
Use
Interface
Pmtu
UH
0
rmxf0
8232
.
5. Verify there are no conflicting IP addresses. Ensure that for each interface, the
information in the Network and Address columns is unique.
# netstat -i
Name
Mtu
.
rmxf0 4352
.
RAMiX PMC Ethernet Installation Guide
Network
Address
Ipkts
Ierrs
Opkts
Oerrs
Collis
129.134.52
ramix0
4327
0
2886
0
0
11
Installation Procedures
6. Verify that the controller can communicate with other hosts using the
ping(1M) command. For this example, the remote Ethernet node
host name is ramix0.
# ping ramix0
ramix0 is alive
12
RAMiX PMC Ethernet Installation Guide
Troubleshooting
6.0.
Troubleshooting
This section provides possible solutions for common problems encountered while installing and
operating the RAMiX 665/675 PMC Ethernet controller.
6.1.
Applications
Problem
A network
application no longer
works
6.2.
Possible Solution(s)
If the application worked prior to the installation of the RAMiX
665/675 PMC Ethernet controller, there is probably a hardware
conflict.
Controller
Problem
RAMiX 665/675
controller not found
during boot
Possible Solution(s)
During kernel boot, the RAMiX controller should be automatically located
on the PCI bus and assigned a PCI bus address. If the driver is correctly
installed, a driver message should appear on the system console during the
boot process.
1. Make sure the controller is seated correctly in the bus expansion slot. Try
another controller known to operate correctly.
2. Check for correct configurations of the Ethernet cable into the controller.
Verify the cable is properly connected at both ends. Ping the failed
system from another host on the network.
3. Inspect the LEDs on the controller’s faceplate (see section 6.3. for LED
definitions). Re-seat the card.
The card cannot
communicate with
other hosts on the
network
1. Check the Ethernet cables. Make sure the Ethernet media is correctly
installed.
2. Try to ping other hosts on the network from your host computer. If this is
not successful, check the LEDs on the controller’s faceplate (see section
6.3. for LED definitions).
3. Check the interface configuration.
Cannot connect to
Network
1. Check Primary and Secondary Fiber Cables to verify that they are in the
appropriate ports.
2. Check the interface software configuration.
3. Check the Ethernet cable. Make sure the Ethernet media is correctly
installed.
RAMiX PMC Ethernet Installation Guide
13
Troubleshooting
6.3.
14
RAMiX 665/675 LED Definition
Primary (Top)
Secondary (Bottom)
Green (XMIT) LED
Yellow (LINK) LED
Green (RCV) LED
Green (XMIT) LED
Yellow (LINK) LED
Green (RCV) LED
Green
(XMIT)
Yellow
(LINK)
Green
(RCV)
Off
On
Off
Network link established
On
On
Off
Device Xmit on respective link (Primary or Secondary)
Off
On
On
Device Receiving on respective link
Off
Off
Off
•
Device not powered
•
Network link not established
Meaning
RAMiX PMC Ethernet Installation Guide
Direct Software Support
7.0.
Direct Software Support
Software support is available from a central source. If you need assistance or information about
your system, please contact the Concurrent Software Support Center at our toll free number
1-800-245-6453. For calls outside the continental United States, the number is
1-954-283-1822. The Software Support Center operates Monday through Friday from 8 a.m. to
5 p.m., Eastern Standard Time.
Calling the Software Support Center gives you immediate access to a broad range of skilled
personnel and guarantees you a prompt response from the person most qualified to assist you.
If you have a question requiring on-site assistance or consultation, the Software Support Center
staff will arrange for a field analyst to return your call and schedule a visit.
You may also submit a request for assistance at any time by using the Concurrent Computer
Corporation web site at http:// www.ccur.com/isd_support_contact.asp or by sending an
email to [email protected].
RAMiX PMC Ethernet Installation Guide
15
Direct Software Support
16
RAMiX PMC Ethernet Installation Guide