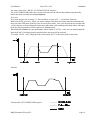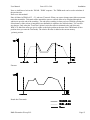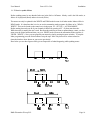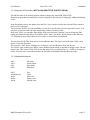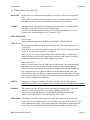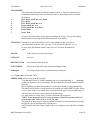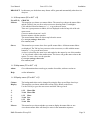
1
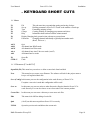
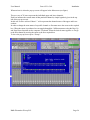
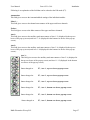
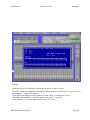
User Manual
PowerVCA 3.00
page 1-35
POWERVCA
MANUAL
version 3.00
Installation
User Manual
PowerVCA 3.00
Installation
1. INTRODUCTION . . . . . . . . . . . . . . . . . . . . . . . . . . . . . . . . . . . . . . . . . . . . . . . . . . . . . . . . . . . . . . . . . . . . . 3
2. Installation . . . . . . . . . . . . . . . . . . . . . . . . . . . . . . . . . . . . . . . . . . . . . . . . . . . . . . . . . . . . . . . . . . . . . . . . . . . . 4
2.1. . Hardware Installation . . . . . . . . . . . . . . . . . . . . . . . . . . . . . . . . . . . . . . . . . . . . . . . . . . . . . . . . . . . . 4
2.2. Software Installation . . . . . . . . . . . . . . . . . . . . . . . . . . . . . . . . . . . . . . . . . . . . . . . . . . . . . . . . . . . . . . 5
2.2.1. Installing Smart Drive . . . . . . . . . . . . . . . . . . . . . . . . . . . . . . . . . . . . . . . . . . . . . . . . . . . . . . . . . . . 6
2.2.2. Making a DOS-flop . . . . . . . . . . . . . . . . . . . . . . . . . . . . . . . . . . . . . . . . . . . . . . . . . . . . . . . . . . . . 6
2.2.3. Example of AUTOEXEC.BAT and CONFIG.SYS . . . . . . . . . . . . . . . . . . . . . . . . . . . . . . . . 6
3. Getting Started . . . . . . . . . . . . . . . . . . . . . . . . . . . . . . . . . . . . . . . . . . . . . . . . . . . . . . . . . . . . . . . . . . . . . . . . 7
3.1. Introduction . . . . . . . . . . . . . . . . . . . . . . . . . . . . . . . . . . . . . . . . . . . . . . . . . . . . . . . . . . . . . . . . . . . . . . 7
3.1.1. Menubar . . . . . . . . . . . . . . . . . . . . . . . . . . . . . . . . . . . . . . . . . . . . . . . . . . . . . . . . . . . . . . . . . . . . . 7
3.1.2. Timecode bar . . . . . . . . . . . . . . . . . . . . . . . . . . . . . . . . . . . . . . . . . . . . . . . . . . . . . . . . . . . . . . . . . 8
3.1.3. Status bar . . . . . . . . . . . . . . . . . . . . . . . . . . . . . . . . . . . . . . . . . . . . . . . . . . . . . . . . . . . . . . . . . . . . 8
3.1.4. Mix section . . . . . . . . . . . . . . . . . . . . . . . . . . . . . . . . . . . . . . . . . . . . . . . . . . . . . . . . . . . . . . . . . . . 8
3.2. Starting a Mix . . . . . . . . . . . . . . . . . . . . . . . . . . . . . . . . . . . . . . . . . . . . . . . . . . . . . . . . . . . . . . . . . . . . 9
4. Enhanced Mixing /Editing a Mix . . . . . . . . . . . . . . . . . . . . . . . . . . . . . . . . . . . . . . . . . . . . . . . . . . . . . . 11
4.1. Update in automation . . . . . . . . . . . . . . . . . . . . . . . . . . . . . . . . . . . . . . . . . . . . . . . . . . . . . . . . . . . 11
4.1.1. Updating fader levels . . . . . . . . . . . . . . . . . . . . . . . . . . . . . . . . . . . . . . . . . . . . . . . . . . . . . . . . . . 13
4.1.2. How to update mutes . . . . . . . . . . . . . . . . . . . . . . . . . . . . . . . . . . . . . . . . . . . . . . . . . . . . . . . . . 16
4.2. Using the off-line editor (not available for Octagon!) . . . . . . . . . . . . . . . . . . . . . . . . . . . . 17
4.2.1. Keyboard shortcuts . . . . . . . . . . . . . . . . . . . . . . . . . . . . . . . . . . . . . . . . . . . . . . . . . . . . . . . . . . . 17
5. Keyboard shortcuts . . . . . . . . . . . . . . . . . . . . . . . . . . . . . . . . . . . . . . . . . . . . . . . . . . . . . . . . . . . . . . . . . . . 18
5.1. Menu . . . . . . . . . . . . . . . . . . . . . . . . . . . . . . . . . . . . . . . . . . . . . . . . . . . . . . . . . . . . . . . . . . . . . . . . 18
5.1.1. File menu (F1 or ALT+F) . . . . . . . . . . . . . . . . . . . . . . . . . . . . . . . . . . . . . . . . . . . . . . . . . . . . . . 18
5.1.2. Set-up menu (F2 or ALT+S) . . . . . . . . . . . . . . . . . . . . . . . . . . . . . . . . . . . . . . . . . . . . . . . . . . . 19
5.1.3. Tape menu (F3 or ALT+P) . . . . . . . . . . . . . . . . . . . . . . . . . . . . . . . . . . . . . . . . . . . . . . . . . . . . 20
5.1.4. Group menu (F4 or ALT + G) . . . . . . . . . . . . . . . . . . . . . . . . . . . . . . . . . . . . . . . . . . . . . . . . . . 21
5.1.5. Help menu (F5 or ALT + H) . . . . . . . . . . . . . . . . . . . . . . . . . . . . . . . . . . . . . . . . . . . . . . . . . . . 21
5.1.6. Display menu (F6 or ALT + D) . . . . . . . . . . . . . . . . . . . . . . . . . . . . . . . . . . . . . . . . . . . . . . . . . 21
5.1.7. Edit menu (F7 or ALT + E) . . . . . . . . . . . . . . . . . . . . . . . . . . . . . . . . . . . . . . . . . . . . . . . . . . . . 21
6. Switches Status Settings . . . . . . . . . . . . . . . . . . . . . . . . . . . . . . . . . . . . . . . . . . . . . . . . . . . . . . . . . . . . . . . . 24
7. Trouble shooting (FAQ)
27
8. Addresses
28
9. What’s new in Power VCA . . . . . . . . . . . . . . . . . . . . . . . . . . . . . . . . . . . . . . . . . . . . . . . . . . . . . . . . . . . . . .
.............................................................................................
User Manual
PowerVCA 3.00
Installation
INTRODUCTION
Thank you for choosing D&R's PowerVCA Automation software. PowerVCA software gives you
automated fader mix-movements on your console. This software package contains a floppy with
PowerVCA software, a Midi Man Interface (not necessary with the Octagon console) ,
communication cable, and a manual.
Installation of this package needs as a minimum PC configuration,
a Pentium 2, 233 Mhz 32 Mb internal memory,
a free ISA slot, one free IRQ (2/9 or 3 or 5 or 7) and a VGA display adapter.
Note: There need to be no onboard Soundcard!!
PowerVCA software requires 1 MB of Harddisk space. Mixfile size depends on the configuration
of your console. (9.0 Gb harddisk is optimal)
PowerVCA software was exclusively written for users of D&R consoles. This software can record
(write) and play (read) your mix movements to and from your harddisk. As synchronisation with
your Music/Video, SMPTE (Timecode) is used. For simplicity you can compare this functionality
with a tape deck. Having recorded your mix it may be changed. With PowerVCA software you
have the tools to make changes in the mix. But you can only make changes in the mix where there is
timecode present. Timecode is precisely linked to recorded audio material and avoids unwanted
changes in mix data.
User Manual
PowerVCA 3.00
Installation
. Installation (not necessary with the Octagon)
Before installation you must know that the software only works fine in MS-DOS.
Prevent problems by not running PowerVCA in combination with Windows 3.1, Windows for Workgroups
(3.11), Windows 95/98 or Windows NT.
Be sure you DO NOT use one of these programs at the same time.
While installing you need an empty floppy-disk . Get one prior to installation of PowerVCA.
1.1.
. Hardware Installation
Unpack your Midiman interface and connect the powerpack to the unit(10)
Then take the cable supplied wit the unit which should have on one side a 25 pole sub-D connector and on
the other side 4 Din type connectors.
Connect the din connectors of the enclosed cable to In-A (1) and Out-A (2) (Orion only) and also to
In-B(15) and Out-B (16) (Cinemix), as is labelled on the connectors.
Your PC is connected form the Host in (11) connector to its Serial port (Com1)
A connection should also be made between the SMPTE connectors(13/14) and your multitrack.
1. Now you have installed the hardware, turn on your console and PC
D&R Electronica Weesp B.V.
Page 4
User Manual
PowerVCA 3.00
Installation
1.2. Software Installation (also in case you have an Octagon)
Now you can install your software.
1. Go to the Dos prompt and type A:<enter>
2. Now insert your PowerVca floppy and type <install> <enter>
PowerVCA will ask some questions which has to be answered very carefully. After the program files are
copied you must initialize your start-up sequence. This set-up is needed to be sure you have the following
performance and installation:
*
A fast access to harddisk (use SMARTDRV).
*
580 kB of free base memory is required
*
Operating without Windows (NOTE: PowerVCA is not running while Windows
Operating System is active!!!).
D&R Electronica Weesp B.V.
Page 5
User Manual
PowerVCA 3.00
Installation
1.2.1 Installing Smart Drive
Smart Drive can be installed using two methods, we prefer the first one. But when you have problems you
can also use the second method. The functionality of both installations is the same.
First method uses "AUTOEXEC.BAT" (Dos version 6 or higher is preferred):
C:\DOS\SMARTDRV.EXE 2048 1024
Caution:
When SMARTDRV.EXE is located into another directory you can change these into
C:\DOS\SMARTDRV.EXE 2048 1024
The first number entered after SMARTDRV specifies the size (in kilobytes) of the memory cache in
MS-DOS. The second number specifies the size (in kilobytes) of the memory cache when Windows is
running.
The first number should be 2048 but when you want to reserve more memory for cache you
may increase this number. The second number determines the cache for Windows, PowerVCA doesn't use
this number. You can't execute PowerVCA using Windows!
Second method uses "CONFIG.SYS":
DEVICE = C:\DOS\SMARTDRV.SYS 2048
You will have to adjust the drive and path for your computer when SMARTDRV is located in another
directory or on another drive.
The number specifies the size (in kilobytes) of the memory cache. If you have more memory in the computer,
you can increase the memory for SMARTDRV. If more memory is specified, larger mixfiles can be saved
more quickly. A good ratio between mixfile/cache size is 2:1
1.2.2 Making a DOS-flop
You can run DOSFLOP.BAT from your install disk to make a bootable floppy.
This floppy can be used instead of running Windows first. The computer can be started with software from
the bootable floppy-disk.
Check the directories of SMARTDRV and your mouse driver. You can eventually change these directories
to your custom directory names.
1.2.3 Example of AUTOEXEC.BAT and CONFIG.SYS
In the root of your floppy (A:\) you can find two file examples of AUTOEXEC.BAT and CONFIG.SYS.
These files give you an idea for your own start-up files.
We also added an ICON and PIF file. You can use these when you want to execute PowerVCA from
Windows 95. To do this you must copy Power.PIF from A: to the desktop.
D&R Electronica Weesp B.V.
Page 6
User Manual
PowerVCA 3.00
Installation
. Getting Started
1.1. Introduction
When PowerVCA has been installed correctly, you can start "PowerVCA". This can be achieved by going
to [POWER] in the sub directory where PowerVCA has been installed, followed by an <ENTER>.
PowerVCA is now executed and will normally show the screen below. If the Music Quest interface card
cannot be found, the software exits with an error code. To solve this problem go to chapter
"Troubleshooting".
The mix screen is divided into four main sections; Menu bar, Timecode bar, Status bar and the Mix window.
1.1.1 Menu bar
With this bar you have the possibility to access all functions of PowerVCA. You can use a mouse to open
several menus. You also can use the keyboard; use the function keys to open a sub menu, for example press
[F5] to open the help menu. You can also open the help menu by pressing [ALT + H]. When you are in the
help menu you can choose "Help" or "About" topics using the mouse or cursor controls. All other menu's can
be accessed in the same way.
D&R Electronica Weesp B.V.
Page 7
User Manual
PowerVCA 3.00
Installation
1.1.2 The Timecode bar
The timecode bar displays the timecode the computer (MQ-card/Octagon) is receiving. When you are in
automation mode (Recording and Playback), the timecode screen area displays red.
If the timecode display is grey, no mix information will be stored on disk.
NOTE:
!!!It is important that no timecode is generated during fast forward and fast rewind modes! This
timecode can messup already recorded automation data. (On an ADAT BRC it can be switched off
for example)!!!
1.1.3 The Status bar
Project name:
The status bar gives you information about the set-up PowerVCA is using. On the top of the status bar you
find the name of the project you are currently working in.
Filename:
When the filename is displayed you can see how files are stored on your harddisk. This is useful when you
want to manage your mix files with an external manager (e.g. Norton Commander).
Tape mode:
The tape mode shows the format of timecode that is activated. The interface will be set-up accordingly to the
setting made in this bar.
AutoM Modes:
The next line shows how the automation modes activated. The automation mode can be toggled by pressing
the SEL switch on the console or by mouse clicks on the screen.
Fader Mode / Switch mode:
There is a global fader and switch setting that can have three modes.
On
The object (fader or switch) can record and playback data.
Safe Data may be played back but the object cannot record data
Off
There is no interaction with this object (no record and playback).
(global means that all the channels are set into the selected mode).
All these setting may be modified by using the menu's. You can also alternate between Tape mode,
Automation mode, Fader mode and Switch mode by simply clicking the mouse on the spot.
Write to end.
When the tape stops, data of the channels in “Write mode” will be overwritten until the end of the
Mix.
Autowrite.
When using motorfaders the channel stays in the “Write mode” if the fader is untouched in
Autotakeover.
1.1.4The Mix section
This section is used to display all information of the console. It shows the modules (the number is
equal to that in your console) and the master (when your console has an automated master
section).
The picture on the left gives a section of an module. On top you see a button (MUTE). this button
shows the state in which the console mute (of that specific channel) is.
You can change the state by clicking with the mouse or by pressing the mute on the console. Then
there is the fader knob which displays the exact position of the console fader (whether it is a VCA
or motor type fader. When a fader is configured as a slave or as a group fader the knob will have
the selected group colour
D&R Electronica Weesp B.V.
Page 8
User Manual
PowerVCA 3.00
Installation
. Positioned on the left side of the knob you see a red line. This line is only displayed when a console with
VCA faders has been connected to the computer. This line gives an indication of the actual VCA level inside
the console. The little white triangle on the right is called the memory pointer This triangle displays the
position / level of the VCA's in the mix. When you are recording it shows the previous VCA level, so you
can fade back to the old VCA level easily.
Direct under the fader the module number is shown of the fader/mute/select. This box shows a related group
colour when the fader is a group or master fader. This is selected in the menu "Groups (F4)".
The next button is the Select switch. A mouse click can change this state (depending on your set-up of
automation modes). You can also change this state by pressing the knob on the console.
The two little boxes display the local switch and fader modes. Now you can set-up the switches and faders
in the module section individually to On, Safe and Off.
The above instructions also applies for the master section. The master fader contains the same elements as the
channel faders. Also the mutes are working like channel mutes.
1.2. Start Mixing
After this introduction you are ready for the real thing.
First check if your console is powered up and turn on your computer and start PowerVCA.
Press F5 and see what console type PowerVCA has installed. When these setting are wrong try to reinstall
PowerVCA and be sure to properly answer the questions of the installation program!
Use the escape key or right mouse button to exit to the main screen.
Now you're ready to start your first (new) mix.
Your first activity, when starting a new mix, is to choose the item “create dir” to create a new “work/project”
directory.Now select “NEW” form the file menu and select the right directory and press <ENTER> Type
here the filename of your mix. When the name already exists an error alert comes up and asks you to change
the name.
In the menu set-up you can change the number of backups. This determines how many old mixes (of the
current project) will stay on the harddisk. The backup number is saved in the extension; M01, M02, M03
etc. The highest number is the latest mix .
WARNING: you can have a maximum of 100 backups. Never use the backups like safety backups. Save or
copy your mixes with another name to a floppy for safety backups. When your mix files are greater than
1.44 MB they don't fit on a floppy. The files should be compressed with a compression program like
PKZIP, RAR or ARJ. Ask you local computer dealer for more information.
How to used PowerVCA with file management?
PowerVCA works with normal MS-DOS files. These files may be copied and moved using a DOS file
manager.
How to set-up the management system?
When you start a project make a directory for that project (in menu "File - Create Dir"). All your mixes and
backups/undo's of the specific project should be saved in the new directory.
In the SMPTE menu you must set-up the Time Code format you are working with. This is a very important
item because you could loose some valuable information. You can choose out of 24, 25, 30 frames and 30
drop frame.
You also can set-up your global switch and fader modes. The modes you can use are:
On,
record and playback allowed.
Safe, record not allowed and playback only.
Off, record and playback not allowed. (For your first mix On and Safe should be active).
D&R Electronica Weesp B.V.
Page 9
User Manual
PowerVCA 3.00
Installation
After this whole set-up you can begin with your mix.
PowerVCA has been designed to work fast, when mixing it is never necessary to leave the main screen!
First press the shortcut ALT + W to set all modules into the automation mode called WRITE.
This mode is used to write a new mix or overwrite existing mixdata. The next step is to set the fader and
mutes to there initial values. When timecode runs PowerVCA responds and locks into automation.
NOTE:
It is absolutely necessary to start the initial recording of data at least 30 sconds before any sound is
coming from connected machines. This to avoid sudden level jumps.
The area in which timecode is displayed changes into red when locked in. When this does not happen please
go to chapter "Trouble shooting.". The initial fader and mute positions are saved and while timecode is
running you can change fader positions and switch mute's on and off . Now stop the tape and the following
message will be shown in a question box. Answer "YES" to save all fader and mute changes, now the version
number will be updated and you will return to the main screen. The select switches turn automatically to
READ (for safety). When the timecode is started again (after rewind) the mix is played back. When the
Select switches are in Read mode you cannot record anything. This is the procedure to start with a mix. To
further adjust this mix will be explained in the next chapter.
The picture below gives an example of a simple mix and is used as an example in the next chapter
Legenda used in the diagrams
D&R Electronica Weesp B.V.
Page 10
User Manual
PowerVCA 3.00
Installation
Enhanced Mixing / Editing a Mix
After you have made your first mix, you can improve and correct your mix of course.
There are two methods to do this.
* You can edit the mix while in automation mode with time code running (dropping in your
new movements
* You can use the off-line editor (not available on the Octagon console) .
This editor gives you an event list where you can change events.
1.1. Update in automation
When you have recorded your first mix, you can correct your mix while its played back. Therefore D&R has
developed a simple and efficient software program. With the Select switch you can choose how the software
handles the data. This Select switch determines the automation mode of one channel. This include Mutes and
Faders at the same time. There are several modes to choose from which will be shown below.
ISO
No automation will be used, either in playback (read) and record (write).
The select box is grey with an 'I' inside.
READ
Mutes:
PowerVCA can only playback recorded data
Faders:
PowerVCA can only playback recorded data
The select box is green with an 'R' inside.
AUTOTAKEOVER Mutes:
Faders:
PowerVCA can only playback recorded data
Fader moves are played back until you touch the motor fader. when
the fader has been touched the new fader move will be recorded.
For VCA-faders PowerVCA writes data when you match the
Fader knob with the VCA-line / Memory pointer.
AUTOTAKEOVER consists of two sub modes, Read and Write.
with VCA Faders you can toggle from AUTO-write to AUTO-read
with your select button.
Motorfaders exit the sub mode Write when the faders are
untouched.
In AUTO-write the select box on the screen is coloured red with an 'A' inside.
In AUTO-read the select box on the screen is coloured blue with an 'A' inside.
WRITE
Mutes:
Faders:
The actual value overwrites the old value in the mix.
The current fader position overwrites the old one.
WARNING: When you drop in with WRITE the old value shall be
overwritten! This can give an jump in your audio!
The select box is red with a 'W' inside.
D&R Electronica Weesp B.V.
Page 11
User Manual
TRIM
PowerVCA 3.00
Mutes:
Faders:
Installation
Mutes will be recorded.
In this mode you can give an offset to the fader envelope.
Motorfaders get there offset from the point you touch them.
VCA-faders calculate the offset depending on the current position
and the position when the TRIM mode has been entered.
The select box is yellow with an 'T' inside.
Its also possibly to activate the Select button for one or more Mutes or Faders. Use the global switch or
fader status.
When your faders are in the following modes you can expect the action shown below.
On
Safe
Off
Faders act normal.
Faders are switched into playback-mode
Faders do not work (are in ISO).
If the switches are set in these three modes you can expect the following behaviour.
On
Safe
Off
Switches act normal
Switches will follow saved mix (playback).
Switches do not work (are in ISO).
You can choose in which operating mode you like to mix.
In the next chapter we give an example of how to update your mix.
Write to end
The write to end function writes the current data until the end of a mix and the tape stops.
This only happens for those channels that are in the “Write” or “Auto-write” mode at that moment.
Auto-write
The Auto-write function prevents the fader of having a release when the motorfader is untouched.
The fader stays in the “Write” mode until the tape stops or the Select switch is pressed.
1.1.1 Updating Fader levels
Before updating faders be sure that the switches are in the Off or Safe mode. Now your switch (mute) data
will not be affected. Before updating we should have a look at the automation mode sequence. This
sequence determines which mode would be most likely to follow the current mode you are in.
First we have a look to the "READ - WRITE" sequence. The WRITE mode can be used to overwrite data
of the old mix.
We start with the basic mix, recorded in the previous chapter. You have to place all the faders in Read (ALT
+ R); start Timecode (before the point of requested change). When you reach the timecode position where
an update is necessary, press the Select button of the channel. Now the channel switches to the Write mode
and all data will be overwritten until the tape is stopped or the Select button is pressed again. When you
D&R Electronica Weesp B.V.
Page 12
User Manual
PowerVCA 3.00
Installation
press that button your are going back to Read mode and the fader position returns to the old mix position
within a (user definable) release time.
See picture:
Results of an update:
D&R Electronica Weesp B.V.
Page 13
User Manual
PowerVCA 3.00
Installation
Let's take a look at the "READ - AUTOTAKE OVER" sequence.
The AUTOTAKEOVER mode can be used to write data over the old mix data without using the Select
button, this mode is usually used with motorfaders.
Let's start:
We use the first mix out of section 3.2. Place all faders in Auto (ALT + A); and start Timecode.
Both Select LED's ar on now. When you want to change some fader movements touch the motorfader and
the green Select LED turns off and you are in record (write) mode. Now your movements are recorded until
you stop the tape or lift your fingers from the motor fader knob. After returning to Read the faders will return
to the previous mix position (if exists) with a user definable speed.
When using VCA faders the same performance will be shown in "AUTO - write" now you should match the
fader knob and VCA/Memorypointer position before auto-write will be activated
To exit the "AUTO - write" simply press the select button. the VCA also return with a release time.
First mix:
First mix after AUTOTAKEOVER sequence.
D&R Electronica Weesp B.V.
Page 14
User Manual
PowerVCA 3.00
Installation
Now we shall have a look at the "READ - TRIM" sequence. The TRIM mode can be used to trim data of
the previous mix.
How to use this method?
Place all faders in TRIM (ALT + T); and start Timecode. When you want to change some fader movements
touch the motorfader. Trim mode with a motorfader causes a selected offset to be calculated through the
whole mix up to the end of the recording. The end of the recording is when you leave TRIM by pressing the
Select button (a fader release is introduced (user definable) in relation to the old fader data). You can also
stop the tape. Only when the "Total Trim" option is active the offset is calculated to the end of the mix.
With VCA faders the offset you give is relative to the fader position at the start of the TRIM mode (Fader
position when you enter the Trim mode). The relative dB value is added to the current memory
(pointer) position.
First mix
Result after Trim mode.
D&R Electronica Weesp B.V.
Page 15
User Manual
PowerVCA 3.00
Installation
1.1.2 How to update Mutes
Before updating mutes be sure that the faders are in the Safe or Off status. Mostly used is the Safe mode, so
faders are in playback (Read) and not in record (Write)
The mutes can only be updated in the WRITE and TRIM mode because in all other modes Mutes will be in
READ mode. It is therefore that it is wise to use the automation mode sequence for Mutes to be "READ WRITE". This can be found on the status bar or in the menu 'F2 - SET-UP -> AUTOM MODE".
Before starting timecode put all of your channels in READ by pressing ALT + R, then start timecode.
While timecode is running the mix is read. But from the moment you want to update/change a mute, you first
must press the Select button and then you go to WRITE mode (because the automation mode sequence is
"READ - WRITE"). Now you can program your mutes by simply pressing the mute switches. To stop the
Mute programming press the Select button or stop the tape. Note: only data will be written related to
timecode that have been shown on your screen previously!
Here below you see three figures which give an impression of what's happening while updating mutes.
D&R Electronica Weesp B.V.
Page 16
User Manual
PowerVCA 3.00
Installation
1.2. Using the off-line editor (NOT AVIALABLE FOR THE OCTAGON)
The Off-line editor is an external program written to change mix data (PWR_EDIT.EXE).
When the program has been started an event list is displayed. This list may be changed by adding and deleting
events.
In the first menu you have the options Save and Exit. Save is used to save the new mix and Exit to return to
the PowerVCA program.
The next menu "Search" gives the possibility to search for a specific timecode or the start/end of a mix. You
only have to enter the timecode in the format hours, minutes, seconds, frames.
In the item "Filter" you can make filter settings. With your keyboards "spacebar" you can change the filter
setting pro channel and pro item such as Master Fader, Mute, Aux Mutes, Inserts, Master mute. When an
"X" is display the item will be shown in de event list. or else this item isn't displayed.
The last menu is Edit. This menu can be used to add/delete data. The topic Undo in the menu "Edit" can be
used to restore the last action.
The next topic "Add" shows a dialogue box. In this box you can add data to insert into the mix.
The "Delete" topic enables you to delete events. With the option modify its possible to change events. The last
option in the "Edit" menu is Trim. You can use this option to give an relative trim (e.g. +10dB) on an range of
events. You may enter a start and end timecode, the offset is calculated within the timecode range.
1.2.1 Keyboard shortcuts
Alt-F
Alt-S
Alt-I
Alt-E
File menu
Search Menu
Filter Menu
Edit Menu
Alt-X
Alt-Backspace
Insert
Delete
Alt-M
Exit
Undo
Add event
Delete event
Modify event
D&R Electronica Weesp B.V.
Page 17
User Manual
PowerVCA 3.00
Installation
. KEYBOARD SHORT CUTS
1.1. Menu
F1
F2
F3
F4
F5
F6
F7
File
This sub menu lets you manipulate getting and saving of mixes
Set-up
Defining parameters of PowerVCA such as the number of back-ups
Tape
Formatting (striping) of tape
Groups
Creating, deleting or changing group masters and slaves
Help
Information about software and the written manual
DisplayChanging back ground colour schemes to personal taste
Edit mode
Changing channels individually or globally into another mode
(Read, Write etc.)
Alt-X
Alt-R
Alt-W
Alt-A
Alt-I
Quit
All channel into READ mode
All channels into Write mode
All channels into Auto Take over mode (AutoT)
All channel into Iso mode
F9
CTRL-U
Open file
Undo
1.1.1 File menu (F1 or ALT+F)
Open/Del (F9) This menu lets you retrieve or delete a stored mix from hard disk
New
This menu lets you create a new filename. The software will ask for the project name to
keep a well organised hard disk.
Save (Config) In this menu you save the configuration in the work directory of PowerVCA .
Everytime a new mix is made this configuration will be used!
Save as
In this menu you can save mixes to other directories (floppies) then the PowerVCA
work directory.You can also choose to save from start or the curremt position.
Create Dir... In this menu you can create a directory to store more mix files.
Edit
This menu is for Off-line editing of a mix file.
Quit
(Alt-X) use this menu to quit from PowerVCA correctly
UNDO
Opens the previous mix and deletes the current mix.
D&R Electronica Weesp B.V.
Page 18
User Manual
PowerVCA 3.00
Installation
1.1.2 Set-up menu (F2 or ALT+S)
BACKUPS
In this menu you decide how many backups of your mixes will be stored onto hard
disk.
Page up (Pg Up) and Page down (Pg Dn) lets you set a number between 1 and 99.
The Enter key enters the chosen information onto PowerVCA's hard disk.
LABELS
Information with a maximum of 40 characters can be typed for every channel fader.
Use Page up and Page down to move to the next page.
Use Alt-P to print the information. PowerVCA sends it information to LPT1 first.
If your printer is not hooked up to LPT1 it asks for LPT2.
SET-UP RELEASE
Set-up release.
When a channel changes from "WRITE" into "READ" (WRITE>READ,
TRIM>READ),
the VCA-level and Mute will go back to their old value. (The mem-pointer for the
VCA-level).
With "Release" you select the number of frames the fader (VCA) needs to go back to
its old level. The range is set from 1- 255 frames.
Note: The VCA 's or mutes will go back to their old value if there is old mix-data.
When you start a new mix, and a channel goes out of the "write" mode, it holds the
position from that moment. (See "Make changes in you mix").
Set-up Total Trim.
When you trim a channel, let's say 3dB, and you stop the tape, the channel normally
goes back to the old value (in the mix) at the moment you have stopped the tape.
When Total Trim is On, and you have trimmed a channel with 3 dB, the moment you
have stopped the tape, the offset of 3dB will be on that channel for the entire mix.
This is also true for mutes. When you stop the tape, the mute will go back (in the mix)
to the old level. When Total Trim is On, the mute keeps its value until the end of the
mix, or when a change occurs in the mix.
SMPTE
Here you can change the number of frames per second. (24,25,30D,30 Frames)
NOTE: PowerVCA reads all frames, but can only generate 30+30D at this moment.
FADERS
This menu lets you decide if you want to store fader movements (ON) or just want
them to be replayed only (SAFE), or not doing anything at all (OFF).
You can also change the fadermode by pressing the left mouse button on the
"fader-mode" in the info box on the top right side of the screen
SWITCHES This menu is exactly the same as the faders menu. This menu lets you decide if you
want to store switch settings (ON) or just want them to be replayed only (SAFE) or not
doing anything at all (OFF). You can also change the switch mode by pressing the left
mouse button on "switch mode" in the info-box on the top right side of the screen.
D&R Electronica Weesp B.V.
Page 19
User Manual
PowerVCA 3.00
Installation
AUTOMODES
This menu shows the status in which the channels can be set. There is a choice out of 6
combinations that will be active in that specific order by depressing the select switch in
the channels
1.
ISO, Read, AutoTake over, Write
2.
ISO, Read
3.
ISO, Read, AutoTake over
4.
Read, AutoTake over
5,
Read, AutoTake over, Write
6.
Read, Write
7.
Read, Trim
To select one of the modes use the Page up and Page down keys. You can also change
the Automodes by pressing the left mouse button on "Auto Modes".
AUTOSAVE If autoSave is active (On/Off) PowerVCA stops asking you after every mix if
you want to Store your mix with "yes or no". (Y/N) (on your keyboard Y or N )
In cases where the filename already exists PowerVCA will ask for another file
name.
MOUSE
In this menu you set the mouse speed.
CLEAN UP
Not used
WRITE TO END
Overwrite data until end of mix.
AUTO-WRITE
Stays in write after after Auto-mode+untouching the fader
Comm-port
For Octagon only to select a communication comm-port.
1.1.3 Tape menu (F3 or ALT+P)
STRIPE TAPE (Not necessary with the Octagon)
To synchronise PowerVCA with a multitrack tape it is essential that there is
information
on that tape that PowerVCA can identify. We have chosen for the world standard SMPTE
timecode.
Before beginning any form of automation it is necessary to format (or stripe) the tape first.
The Music Quest card has 2 cinch connectors for reading and writing SMPTE codes. Please
a use a corner track of your multitrack or a special timecode track of your machine Page up
and down lets you choose between timecode format writing.
It is good practise to record about -20 below maximum tape input level.
NOTE: At the moment PowerVCA only generates 30 and 30 D frames, but it can
read all other time codes such as 24, 25, 30, 30D.
The arrow keys lets you move from one position to the other to enter the start time by using
the Page up (Pg Up) and Page down (Pg Dn) keys.
NOTE: Always start with 1 hour to begin with, to avoid negative time code when rewinding
too far.
D&R Electronica Weesp B.V.
Page 20
User Manual
PowerVCA 3.00
Installation
DROP OUT In this menu you decide how many frames will be generated automatically when there is a
drop out.
1.1.4 Group menu (F4 or ALT + G)
F4 (ALT-G) GROUPS
Masters
This menu lets you choose you master faders. The arrow keys choose the master fader
and the TAB key lets you move to the next screen showing fader 33 and higher.
Click with the left mouse button on ">>" to go to the next screen
There are 8 group masters available, all 8 are displayed on the left top side of the sub
menu screen.
Choose a number between 1 and 8
Remove masters with the spacebar.
The unused master faders are shown top left on the screen.
Cr= accepts settings, then exits.
Esc=cancel, exit.
Slaves
This menu lets you create slaves for a specific master fader. All chosen master faders
are displayed. The Tab key lets you move to the next screen, or click with the mouse
button on ">>"to go to the next screen.
A slave is selected by the arrow keys and coupled to the master by one of the numbers
1 to 8 as selected earlier in the masters menu. The slaves will get the same colour as the
master. To erase a slave use the spacebar.
Cr=accept settings, then exits.
Esc=cancel, exit.
1.1.5 Help menu (F5 or ALT + H)
About
Gives information about console type, number of modules, software version etc.
Help
on-line information.
1.1.6 Display menu (F6 or ALT + D)
Colours
Display
The background colour can be changed by using the Page up and Page down keys.
This menu lets you choose which fader section will be shown on the screen
Use the Tab key to go to the next screen and shift-Tab to go back.
1.
2.
3.
4.
5.
6.
1-32
33-64
1-32
33-64
1-32
33-64
Master
This menu lets you choose whether you want to display the master fader or not.
A not shown master fader will always be active in the automation sequences.
Chan+Mix
Chan+Mix
Chan
Can
Mix
Mix
D&R Electronica Weesp B.V.
Page 21
User Manual
PowerVCA 3.00
Installation
1.1.7 Edit menu (F7 or ALT + E)
This menu lets you change the individual modes of a channel. Every channel can be put
into Read, Write, Autotakeover (AutoT) , or Iso mode individually.
Select a channel with the arrow keys and change the mode with the Page up or Page
down keys.
All selections in all the menus use the ENTER key to confirm and the ESC key to
cancel and leave the screen.
To Change the Automation mode of one channel:
Click with the left mouse button on the automation mode of that specific channel.
To change the fader- or Switch-mode of one channel.
Click with the left mouse button on the indicators under the automation mode.
POWER-EDIT
Start the off-line editor from the PowerVCA software. (File - Edit)
When a mix file was opened in PowerVCA the screen shows the timecodes with the events.
You can scroll with the up and down keys or Pg Up and Pg Dn or use the mouse (click with
left button to select a timecode) .To scroll with the mouse click on the upper and
lower
horizontal lines. At the top of the screen you see the following commands :
Filter, Edit, Search, File These menu's have the following sub menu's
ALT-I
ALT-EEdit
ALT-S
ALT-F File
ALT-XExit
Filter - Set-up Filter
- Undo, Add, Delete, Modify
Search - Time Code, Start of mix, End of mix
- Save, Exit
- exit without save
Set-up Filter
This menu allows you to put some channels or events on or off. At the top of the screen you
see the channels. When an 'X' is placed at the channel number, the data of that channel will be
shown. Select a channel with cursor keys or mouse. Toggle its value with the spacebar or left
mouse button.
You can also select what you wish to see. If you only want to see the fader movements,
select it. the same goes for the master fader, mutes etc
Edit-Undo (ALT-Backspace)
Undo the previous editor action
Edit-Add (Ins)
Select if you want to add a Fader move, Mute, Aux mute etc.
D&R Electronica Weesp B.V.
Page 22
User Manual
PowerVCA 3.00
Installation
Edit-Add-Fadermove
Fill in the timecode where the fader move has to start. Select the Channel or Mix (toggle with
spacebar or mouse button) and number. Value gives the value of the fader at the point where
the fader move starts.
Fill in "End" the dB-value the fader move has to end. Fill in "Length" the length of the fader
move (seconds)
Edit_Add_Mute
Fill in the timecode where a Mute has to be active. Fill in, channel or mix (toggle with
spacebar) and number. Fill in "Mute" Yes or No to put a mute on or off.
When playing a mute ON, and the mute was already on, the second mute will not be
displayed, because it was already on and only changes are displayed.
Edit-Add-MasterMute
This is the same as Add-mute. Now you cannot select a channel or mix, but an Aux number
and Left or Right
Edit-Delete (Del)
Deletes the event you selected
Edit-Modify
Modifies the Fader value (dB) or modifies mutes (On > Off etc.)
F7 EDIT
Search Timecode
Fill in the timecode you are looking for. The editor will search for that specific timecode, or
when it does not exists, the next or previous one.
Search Start of mix
Goes to the beginning of the mix
Search End of mix
Goes to the end of the mix
File-Save
Stores the mix file on disk. If the filename exists a new filename shall be asked for.
File-Exit
To exit the off-line editor correctly. You return to PowerVCA automatically. PowerVCA opens the latest
saved version of the mix file you have saved in the editor.
D&R Electronica Weesp B.V.
Page 23
6.0 Switches status settings.
The switches (channel mute upper section , channel mute lower section , all auxiliary send mutes)
and faders of the console can be put in different statuses; “On” , “Off” or “Safe”.
When in the “On” mode the fader or switch is able to record and playback data , depending on the
automation mode (READ , WRITE , TRIM , etc.) that has been selected for that particular part of
the channelstrip.
When in the “Off” mode , the fader or switch is not reacting on any commands from the system. In
this mode the fader or switch will not follow commands that were recorded previously nor will it
record new data. The fader or switch is isolated from the system.
When in “Safe” mode the fader or switch will only follow previously recorded commands. In this
status it is not possible to record new commands.
The current status of the switches and fader of a channel is also shown in the channel’s fadersegment
on the PowerVCA screen.
At the bottom of the fadersegment two small square (LED like) boxes represent the Fader and
Switch modes.
The right box represents the channel’s Fader Mode. This box can change to three different colours ,
each different colour indicating a different status.
Grey: “On”.
Green: “Safe”.
Red: “Off”.
To improve visibility the line left of the faderknob (the fadertrack) will also be displayed in the colour
corresponding to the channel’s fader-status.
The left box represents the channel’s Switch Mode. This box also can change into the three different
colours for the three different status.
Grey: “On”.
Green: “Safe”.
Red: “Off”.
To improve visibility the channel’s Mute box (positioned at the top of the fadersegment) will also be
displayed in the colour corresponding to the chanel’s switch-status.
In the Status bar two global status modes can be accessed: Fader Mode and Switch Mode.
With these functions all faders (Fader Mode) and all switches (Switch Mode) can be set in a
different status globally (on the complete console).
The current status is indicated behind both functions. When the this indication is clicked on with the
mouse it will jump to the next status.
D&R Electronica Weesp B.V.
Page 24
User Manual
PowerVCA 3.00
Installation
For example:
The current status of the Fader Mode is “On” (Status bar shows: Fader Mode: On )
When clicked on once the Fader Mode will change to “Safe”. (Status bar shows: Fader Mode: Safe
).
Now all of the console’s faders are set in the “Safe” mode. They will only follow commands that
were previously recorded. It will not be possible to record or update new fadermovements.
If clicked on once more the status of the Fader mode will change to “Off” (Status bar shows:
Fader Mode: Off).
In this status all faders will not interact with any previously recorded commands. Neither is it
possible to record new movements.
Obviously the above also applies for the function “Switch Mode”. With this function all the console’s
switches (channel mute upper section , channel mute lower section , all auxiliary send mutes) will be
set to the “On” , “Safe” or “Off” status.
Note: The console’s mastersection is only connected to the global Fader Mode function. It will not
react on global Switch Mode settings.
The status of the masterfader mute can be changed by clicking on the boxes at the bottom of the
fadersegment of the mastersection.
Besides changing Fader and Switch status golbally it is also possible to select individual channels.
All local settings (upper and lower faders , upper and lower channel mutes , all auxiliary send mutes)
can be accessed in the Edit menu under F7.
The status of both faders and channel mutes can also be changed in the mixscreen by clicking on the
small square boxes positioned at the bottom of each fadersegment. The right box is for the
Fadermode, the left box is for the mode of the channel’s mute.
When the Edit mode is activated (press F7) a toolbar with the following modes will appear:
Automation.
Mute 1.
Faders.
Aux 1.
Aux 2.
Aux 3.
Each of these items can be selected by a double mouseclick or with the cursor and pressing
<enter>.
D&R Electronica Weesp B.V.
Page 25
User Manual
PowerVCA 3.00
Installation
When an item is selected a pop-up screen will appear in the faderscreen (see figure)
The two rows of 32 boxes represent the individual upper and lower channels.
Each box indicates the current status of that particular channel (a simple legenda is given in the top
left of the pop-up screen).
In this case we have selected “Mute 1.” wich represents the channel mutes of the upper and lower
sections.
In order to change the mute status of a specific channel we first must move the cursor to the required
box. When the cursor is positioned we can toggle through the 3 different statuses using the Page Up
and Page Down functions on the computer’s keyboard. When the desired status appears we can go
to the next channel by moving the cursor to the next required box.
To leave the pop-up screen press “Escape”.
D&R Electronica Weesp B.V.
Page 26
User Manual
PowerVCA 3.00
Installation
Following is an explanation of the field that can be selected at the Edit mode (F7):
Automation:
This field gives access to the AutomationMode settings of the individual modules
Mute 1.:
This field gives access to the channel mute statuses of the upper and lower channels.
Faders:
This field gives access to the fader statuses of the upper and lower channels.
Aux 1.:
This field gives access to the auxiliary send mute statuses of Aux.1 / 2 (displayed in the top row
boxes of the pop-up screen) and Aux. 7 / 8 (displayed in the bottom row boxes of the pop-up
screen).
Aux 2.:
This field gives access to the auxiliary send mute statuses of Aux 3 / 4 (displayed in the top row
boxes of the pop-up screen) and Aux 9 / 10(displayed in the bottom row boxes of the pop-up
screen)..
Aux 3.:
This field gives access to the auxiliary send mute statuses of Aux 5 / 6 (displayed in
the top row boxes of the pop-up screen) and Aux 11 / 12(displayed in the bottom
row boxes of the pop-up screen).
Status changed at:
F7 , Aux 1 , top row boxes pop-up screen.
Status changed at:
F7 , Aux 2 , top row boxes pop-up screen.
Status changed at:
F7 , Aux 3 , top row boxes pop-up screen.
Status changed at:
F7 , Aux 1 , bottom row boxes pop-up screen.
Status changed at:
F7 , Aux 2 , bottom row boxes pop-up screen.
Status changed at:
D&R Electronica Weesp B.V.
F7 , Aux 3 , bottom row boxes pop-up screen.
Page 27
User Manual
PowerVCA 3.00
Installation
Example:
In the figure above the faderscreen with the pop-up screen of Aux 1 is given.
The Aux 1 pop-up screen displays the auxiliary send mute statuses of auxiliary 1 / 2 (top row boxes)
and auxiliary 7 / 8 (bottom row boxes).
In this figure two status boxes have been set in “Safe” mode , 10 bottom and 32 top.
This means that of module 10 , the mute status of aux send 7 / 8 is “Safe”.
Also, of module 32 , the mute status of aux. send 1 / 2 is “Safe”.
D&R Electronica Weesp B.V.
Page 28
User Manual
PowerVCA 3.00
Installation
AutomationModes for auxiliary send mutes.
As mentioned in chapter 4.1.2 of the PowerVCA manual aux. mutes can be recorded in the WRITE
and TRIM automation modes. In any other “active” automation mode (READ ,
AUTOTAKEOVER ) the aux mutes will follow the commands that have been recorded previously.
In the ISO mode the aux. mutes will not react as this is not an “active” automation mode.
The automation modes of the input channels can be selected in two ways;
1) via global selecting ( for example: ALT+W for all channels in WRITE mode).
2) via individual “auto” select switches (the automation select switches positioned right of the +10dB
mark at every faderscale on the channels)
If the global selection is used (ALT+…..) the system will override all status settings that have been
programmed and put all of them in the “On” mode.
For this reason we will look at the “modus operandi” when using the individual automation select
switches on the module.
Each input module has two automation select switches. One is positioned near the upper fader ,
selecting the automation mode of the upper fader.
The other is positioned near the lower fader , selecting the automation mode of the lower fader.
These automation select switches are also effective on the aux. send mutes of the module.
All 6 aux. send mutes have been assigned permanently to the two automation select switches as
follows:
Aux. sends 1 / 2 , 3 / 4 , 5 / 6
> upper automation select switch.
Aux. sends 7 / 8 , 9 / 10 , 11 / 12
> lower automation select switch.
AUX SENDS 1-6 ASSIGNED TO UPPER “AUTO” SELECT SWITCH.
AUX SENDS 7-12 ASSIGNED TO LOWER “AUTO” SELECT SWITCH.
D&R Electronica Weesp B.V.
Page 29
User Manual
PowerVCA 3.00
Installation
Please note that these assignments are permanent!
Although auxiliaries can be reassigned to the upper or lower signal paths via the Control Module ,
they will always stay connected to the same automation select switch.
For example:
When auxiliary pair 1 / 2 is reassigned to the lower signalpath of the module , it will still react on the
automation modes as activated by the automation select switch of the upper signal path.
D&R Electronica Weesp B.V.
Page 30
User Manual
PowerVCA 3.00
Installation
7. Trouble shouting (FAQ)
PowerVCA doesn't start or works unstable:
1. Be sure you don't run PowerVCA under Windows, Window 95, Windows NT.
You can make for example a DOS-floppy to start into REAL MS-DOS.
When the computer is only used for PowerVCA set your autoexec.bat and config.sys
file to start only MS-DOS.
2. Arrange more free (600kB) base memory. Use DOS program “mem.exe” to check this.
3. Also check if there is time code generated while rewinding or fast forwinding, this option should
be turned off. (for instance in the big remote of the ADAT’s)
When I start PowerVCA, a wrong console configuration will be displayed:
1. Be sure the PowerVCA application is started after the console has been powered up.
2. Reinstall the software, be sure you choose the right settings while installing.
3. When the first two points are correct and the problem isn't solved try to delete the file
NONAME.M00 (located in your Power directory).
No timecode is running in the main window:
1. Restart PowerVCA and try it again.
2. Check the connections from your SMPTE-device to the computer (interface). It should be
connected to the SMPTE-in cinch connector.
3. Check the IRQ and Address setting on your Music Quest Interface card . (See chapter
installation) (not in case you have the Octagon)
Grey timecode display
1. Retry
2. Harddissk is full
When I move a fader on the console nothing happens on the screen:
1. Check you MIDI/interface connection. (not applicable for the Octagon)
MIDI-Out should be connected to MIDI-In, and MIDI-In should be connected to MIDI-Out
If your console has a sub D connector, it can only be connected in one way.
2. Check if timecode is running when timecode is sent to the Music Quest card in your PC. When
Timecode isn't running you must check the IRQ and Address settings of the interface (See
Installation) (not applicable for the Octagon)
3. You can also try the communication in the other direction by pressing ALT-W or ALT-R on the
keyboard. when the Status LED's changes the connection to the console is correct.
4. Probably your cable is broken.
D&R Electronica Weesp B.V.
Page 31
User Manual
PowerVCA 3.00
Installation
When I playback a Mix nothing happens in the console:
1. Check your MIDI/interface connection.
MIDI-Out should be connected to MIDI-In and MIDI-In should be connected to MIDI-Out
a SUB-D connector can only be connected in one way. (Not applicable for the Octagon)
2. Check if timecode is running when timecode is connected to the Music Quest card in your PC.
When timecode isn't running you must check the IRQ and Address settings of the interface (See
Installation) (not applicable for the Octagon)
3. You can also try the communication in the other direction by moving a Fader. When this
movement is displayed on the screen the communication from console to computer is correct.
Properly your cable is broken.
The fader movements are jumping up and down when in playback:
1. Check your SMPTE-Timecode setting, when playing an 30 frame mix with 25 frame timecode
the last five frames will be skipped.
2. Also check if there is time code is generated while rewinding or fast forwinding, this
option should be turned off. (for instance in the big remote of the ADAT’s)
My select button don't respond correctly, I always stay in the READ mode):
1. Reinstall the PowerVCA software and answer the Question "Console is manufactured before 1
Nov. 1996" to Yes.
8. Contact address
D&R Electronica Weesp b.v.
Rijnkade 15B
1382 GS WEESP-The Netherlands
Phone: ++31 (294) 418014
Fax:
++31 (294) 416987
Webpage:
http://www.d-r.nl (download your latest PowerVCA software version)
E-mail: [email protected] (we appreciate your comments on our software)
We reserve the right to change specifications and features without prior notice.
D&R Electronica Weesp B.V.
Page 32
User Manual
PowerVCA 3.00
Installation
9. What's new!
Thank you for using this new version of PowerVCA, version 2.15 gives you an incredible
performance. The new features are described in this file.
*
Fast locking to timecode.
A little trick enhanced this feature about 10x for large mix-files.
*
Text to save a mix has been changed to:
'Store mix on disk?
Yes/No'
*
Trim mode
The trim mode is working with a higher resolution (steps of 0.2 dB).
*
Groups
The group feature is now really dB-relative we even have increased its resolution.
Note: The group feature may be used in all automation-modes (READ,
WRITE etc.) a known phenomenon arises when the motorfader slaves
are in de ISO or WRITE mode. A motorfader in WRITE or ISO can't be
positioned by the PC. In the group feature the PC tries to
position the motorfaders in all modes. This gives strange effects.
The audio which also is send by the PC will follow the group-master exactly in
all modes, so its only a visual phenomenon.
In certain Mix-modes you want to record only a group-master move, the slaves
are relative, so when using the new group feature take care your slaves are in
READ/AUTOTAKEOVER / TRIM and your group master is working in
WRITE/ISO or AUTOTAKEOVER. This phenomenon didn't exist when using
VCA-faders.
*
Mouse support fixed.
No more Grey strings or hanging PC when using the mouse.
*
Mouse control under automation.
This feature is very valuable for people using the low-budget automation.
*
2.18
*
*
*
*
*
*
Faster Saving
The Save procedure (leaving the automation mode) has been optimised to give you the
opportunity to record repeatedly on the same time codes.
Write to end
Auto write
Octadump is implemented within Powerfade
Undo
Save as from current Timecode position
Windows Pif file
D&R Electronica Weesp B.V.
Page 33
User Manual
PowerVCA 3.00
Installation
Bugs Fixed in PowerVCA 2.11
*
*
*
*
Save does not crash after "Create Dir...."
Save does not crash with F10 or Cleanup
Store Mix question can be answered with 'y','Y','n','N'
VCA Group slave can be repositioned without loss of data.
Bugs Fixed in PowerVCA 2.12
*
*
*
Mouse disappears while cleanup is fixed
Data of first frames (snapshot) are no longer lost when recording in write
Spaces in filenames disabled.
Bugs Fixed in PowerVCA 2.13
*
*
*
Orion background is repaired.
Load function does not crash anymore.
CopyFrom/CopyTo/Open functions do not have a display error (coloured
pixels).
Bugs Fixed in PowerVCA 2.14
*
*
*
*
*
Group function has been rewritten.
It is now possible to automate group movements without touching slave data.
VCA channels that are connected to the "high"CPU board are now behaving
correctly when going out of the Autotakeover-"write" mode.
The display of the help file is corrected.
Overwriting an already existing file of 8 characters, after writing , with another
file name will not cause any problem anymore
Bugs Fixed in PowerVCA 2.15
(February 20, 1998)
*
*
*
When a mix is saved the correct Tape setup (no of frames) is now saved
correctly.
A beep occurring after saving a mix is removed
The joystick select switches are now active again!
Bugs Fixed in PowerVCA 2.16
*
Function group auto
D&R Electronica Weesp B.V.
Page 34
User Manual
PowerVCA 3.00
Installation
Bugs Fixed in PowerVCA 2.17
*
*
Less memory space is used.
SMPTE reading more stable now.
New/Bugs Fixed in PowerVCA 2.18 Beta
*
*
*
*
*
*
Write to end
Auto write
Octadump is implemented within Powerfade
Undo
Save as from current Timecode position
Windows Pif file
New/Bugs Fixed in PowerVCA 2.18 Beta 2
*
Timecode fix for Cinemix/Merlin/Orion
New/Bugs Fixed in PowerVCA 2.18 Beta 3
*
*
*
No more saving while whole console in ISO (cinemix/merlin/orion)
Groupsettings loaded okay now, while startup! (graphic error)
MasterFader Touch is now functioning for the Octagon.
New/Bugs Fixed in PowerVCA 3.0
*
*
*
*
*
*
*
*
Up to 96 modules for Octagon (192 fader)
TC Offset
TRIM mode stays in TRIM after recording
Edit trim function in Power
Seperate On/Off/Safe switch for Aux mutes for Octagon
Files are sorted in reserve for fast access
When file is saved after recording the AutoModes changes to thecorresponding
playback mode!
Bug fixes, write without touch/moving a fader or switching mute is now
functioning fine! (ISO-WRITE)
D&R Electronica Weesp B.V.
Page 35