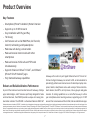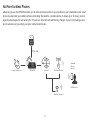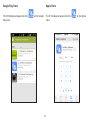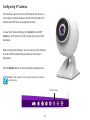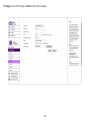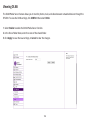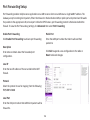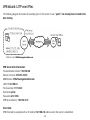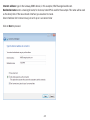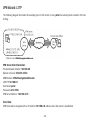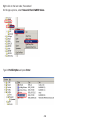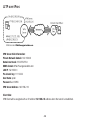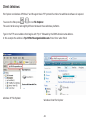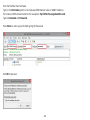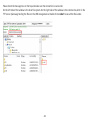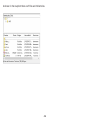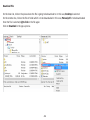
1
User Manual
EPG600
version 1.0
IoT Gateway
With High Performance Wi-Fi & Phone Ports
1
IMPORTANT
To install this Gateway, please refer to the Quick Start Guide
included in the product packaging.
To activate and use EnShare™, EnTalk™, and EnRoute™ refer to the
documents “Using EnShare™”,
“Using EnTalk™“, and “Using EnRoute™“ also in the product
packaging.
2
Table of Contents
Chapter 1 Product Overview.............................................................. 6
Setting Up Your Internet Connection.........................................................................45
Setting Up Your Wireless Security...............................................................................46
Network Address Translation .......................................................................................47
Product Overview..................................................................................................................7
Key Features...........................................................................................................................7
Applications..........................................................................................................................10
Technical Specifications..................................................................................................14
Software Features.............................................................................................................14
Physical Interface...............................................................................................................16
Easy Installation..................................................................................................................17
Wall Mounting The Gateway..........................................................................................19
Chapter 4 Cloud Services.................................................................48
EnGenius Cloud Services..................................................................................................49
EnShare...................................................................................................................................50
Setting Up EnShare.....................................................................................................51
EnRoute..................................................................................................................................57
Setting up EnRoute.....................................................................................................58
EnRoute Settings.........................................................................................................59
Account Settings.........................................................................................................60
EnTalk......................................................................................................................................61
EnTalk Setup for Smartphones..............................................................................62
Basic..................................................................................................................................68
Account Settings.........................................................................................................69
Dial Plan Settings........................................................................................................70
Chapter 2 Web Configuration Interface..........................................20
Logging In..............................................................................................................................21
Viewing the Web Configuration Dashboard.............................................................22
Home Page............................................................................................................................23
Web Menus Overview.......................................................................................................24
Cloud Services......................................................................................................................24
EnShare...................................................................................................................................24
EnRoute..................................................................................................................................25
EnTalk......................................................................................................................................26
EnViewer................................................................................................................................27
Gateway Management.....................................................................................................28
System.............................................................................................................................28
Internet............................................................................................................................29
Wireless 2.4 GHz..........................................................................................................30
Wireless 5 GHz..............................................................................................................31
Parental Controls.........................................................................................................32
Guest Network..............................................................................................................33
IPv6...................................................................................................................................34
Firewall............................................................................................................................35
VPN....................................................................................................................................36
USB Port..........................................................................................................................37
Advanced........................................................................................................................38
Tools.................................................................................................................................40
Tips....................................................................................................................................42
Chapter 5 Gateway Management Settings...................................72
System....................................................................................................................................73
Status ..............................................................................................................................75
Configuring the LAN (Local Area Network)......................................................80
DHCP Server...................................................................................................................81
Log.....................................................................................................................................85
Monitoring Bandwidth Usage.................................................................................86
Configuring the System Language.......................................................................87
Configuring IP Cameras.............................................................................................88
Configuring Internet Settings.......................................................................................90
Internet ...........................................................................................................................92
Status...............................................................................................................................92
Configuring Dynamic IP.............................................................................................94
Configuring Static IP...................................................................................................96
Configuring PPPoE......................................................................................................98
Configuring PPTP............................................................................................................100
PPTP Settings...................................................................................................................101
Configuring L2TP......................................................................................................102
L2TP Settings............................................................................................................103
Chapter 3 Installation Setup Wizard..............................................43
Internet Setup Wizard.......................................................................................................44
3
Configuring DS-Lite..................................................................................................104
Wireless LAN Setup .......................................................................................................105
Configuring Security.......................................................................................................111
Filters...................................................................................................................................116
Configuring Wi-Fi Protected Setup...........................................................................118
Configuring the Client List...........................................................................................120
Port Mapping Setup.................................................................................................168
Port Forwarding Setup...........................................................................................170
ALG Setup....................................................................................................................175
UPnP Setup.................................................................................................................176
IGMP Setup..................................................................................................................177
QoS Setup....................................................................................................................178
Routing Setup............................................................................................................181
Tools Setup........................................................................................................................184
Configuring the Administrator Account...........................................................184
System Time Settings.............................................................................................186
Unique Identifier (UID)............................................................................................188
DDNS Setup.................................................................................................................189
Diagnosis ...........................................................................................................................191
Upgrading The Gateway’s Firmware.......................................................................192
Backing Up The Gateway’s Settings........................................................................194
Reset to default / Reboot the Gateway.................................................................195
Chapter 6 Advanced Settings......................................................... 121
Configuring Advanced Settings.................................................................................122
Setting Up Parental Controls......................................................................................125
Web Monitor................................................................................................................130
Guest Network..................................................................................................................131
Enabling the Guest Network................................................................................131
Configuring DHCP Server Settings....................................................................132
Viewing the DHCP Client List...............................................................................133
IPv6 ...................................................................................................................................134
Enabling IPv6 Settings...........................................................................................134
Viewing the IPv6 Connection Status................................................................135
Configuring Static IPv6..........................................................................................136
Autoconfiguration....................................................................................................138
Configuring PPPoE...................................................................................................140
Configuring 6to4.......................................................................................................143
Viewing Local Connections...................................................................................144
Firewall ...............................................................................................................................145
Configuring Basic Settings....................................................................................145
Configuring Advanced Settings..........................................................................146
Configuring Demilitarized Zone..........................................................................147
Configuring Denial of Service..............................................................................148
VPN ...................................................................................................................................149
Configuring a VPN Tunnel Profile......................................................................149
Profile Settings .........................................................................................................150
Configuring User Settings.....................................................................................153
VPN Wizard..................................................................................................................155
USB Port..............................................................................................................................161
File Sharing.................................................................................................................162
Viewing the File Server..........................................................................................163
Guest Account............................................................................................................165
Viewing DLNA............................................................................................................166
Advanced Network Settings................................................................................167
NAT Setup....................................................................................................................167
Glossary............................................................................................. 196
Appendix............................................................................................ 203
Federal Communication Commission Interference Statement ....................204
Europe – EU Declaration of Conformity..................................................................206
How to setup VPN function? ......................................................... 209
VPN Wizard.........................................................................................................................210
Introduction................................................................................................................210
VPN Basics............................................................................................................210
VPN Profile & Users Setting..........................................................................214
VPN Wizard: IPSec Site-to-Site............................................................................219
Site A Configuration.........................................................................................220
Site B Configuration..........................................................................................225
VPN Wizard: IPSec Client to Site...............................................................................231
Site Configuration..............................................................................................232
Client Configuration..........................................................................................236
VPN Wizard: L2TP over IPSec.....................................................................................242
VPN Server (Gateway Side)...........................................................................243
VPN Client.............................................................................................................248
Windows XP.........................................................................................................248
Windows Vista....................................................................................................260
4
How to setup DLNA function?........................................................ 473
Windows 7............................................................................................................271
Windows 8............................................................................................................282
VPN Wizard: L2TP............................................................................................................291
VPN Server (Gateway Side)...........................................................................292
VPN Client....................................................................................................................297
Windows XP................................................................................................................297
Windows Vista...........................................................................................................310
Windows 7...................................................................................................................324
Windows 8...................................................................................................................337
PPTP ...................................................................................................................................349
VPN Server (Gateway Side)..................................................................................350
VPN Clients..................................................................................................................355
Windows XP................................................................................................................355
Windows Vista...........................................................................................................368
Windows 7...................................................................................................................379
Windows 8...................................................................................................................388
DLNA ...................................................................................................................................474
How to setup Port forwarding function?...................................... 477
Configuring your Gateway /Router for Port Forwarding.................................478
Setup Overview................................................................................................................478
Configuring Port Forwarding......................................................................................480
VPN Manual Setup (Server Side Only).....................................................................397
IPsec ...................................................................................................................................403
Site A Configuration................................................................................................404
L2TP over IPsec...............................................................................................................409
Site B Configuration................................................................................................414
Client-to-Site..............................................................................................................419
PPTP ...................................................................................................................................429
How to use EnShare function?....................................................... 434
EnShare................................................................................................................................435
Guest Account............................................................................................................437
File Sharing (EnShare & Samba).........................................................................439
Web Browser...............................................................................................................441
Administrator Access..............................................................................................441
Guest Access..............................................................................................................456
How to use FTP function?............................................................... 459
File Server (FTP)..............................................................................................................460
File Server Configuration..............................................................................................461
Client: Windows................................................................................................................462
Client: FileZilla..................................................................................................................466
5
Chapter 1
Product Overview
6
Product Overview
Key Features
• Smartphone (iPhone® & Android™) Home Extension
• Supports up to 10 SIP Accounts
• Easy Installation with Plug and Play
• Toll Saving
• Call Features such as Call Hold/Mute, Call Transfer,
Caller ID, Call Waiting, and Speakerphone
• Make new calls during a conversation
• Make and receive intercom calls with other
smartphones
• Make and receive 2G/3G calls and PSTN calls
simulataneously
• Supports EnGenius EnShare™, EnTalk™, and EnRoute™
(iPhone®/ iPad®/ Android™) apps
• Fully featured Gateway capabilities
As part of the EnGenius Fusion Solution Series of Gateways, lifestyle
Gateway with a built-in 4-port Gigabit Ethernet Switch. This cost effective intelligent Gateway can connect to DSL or cable modems to
provide high performance Internet access for desktop or laptop computers, tablets, smartphones and a wide variety of home entertainment devices, like HDTVs, set top boxes, Blu-ray players and game
apps, media bridges, and IP cameras specifically designed for home
and small business, the EPG600 provides a unique cost-saving communication solution. The EPG600 is a Dual-band Wireless N600 IoT
consoles. Its calling capabilities are a cost effective way to utilize
your smartphone when traveling overseas, supporting up to 10 SIP
accounts for convienence and the EnTalk, Enshare and EnRoute apps.
•
Robust and Reliable Wireless Performance
Maximum data rates are based on IEEE 802.11 standards. Actual throughput and range may vary depending on many factors including environmental conditions, distance between devices, radio interference in the
operating environment, and mix of devices in the network. EnGenius Technologies, Inc. EnShareTM supports both FAT32 and NTFS USB formats. Transfer speeds of data from your Gateway-attached USB storage
device to a remote/mobile device may vary based on Internet uplink and downlink speeds, bandwidth traffic at either send or receive locations, the data retrieval performance of the attached storage device or
other factors. EnGenius does not guarantee compatibility with all USB drives. EnGenius does not warrant its products or EnShare from loss of data or loss of productivity time. Features and specifications subject
to change without notice. Trademarks and registered trademarks are the property of their respective owners. For United States of America: Copyright ©2014 EnGenius Technologies, Inc. All rights reserved.
7
The Gateway’s concurrent Dual-band design enables users to connect numerous wireless devices to it, giving them the option to use
the less congested 5 GHz frequency for bandwidth intensive applications like streaming HD video throughout the
home from one device to another. The EPG600 is an Xtra Range IoT
Gateway that provides enhanced wireless signal coverage throughout the home.
A Media Sharing Platform
The EPG600 is designed to access and share media for devices on the
home network. In addition to connecting home entertainment components to any of its available Gigabit Ethernet ports, the EPG600
also includes a USB port for attaching a USB storage device so wireless devices in the home or away from the home can access media
content wherever there is an available Internet connection through
EnShare™ - Your Personal Cloud.
Industry-standard Wireless Security
EnShare is available as an Internet portal for accessing stored media
The Gateway supports a variety of security features and mechanisms including industry-standard WPA/WPA2 wireless encryption to
prevent unauthorized access to your network. It also includes a builtin SPI (Stateful Packet Inspection) firewall to help prevent attacks
from malicious software (malware) from the Internet. The Gateway
also supports IPv6.
connected to the USB port of the Gateway (See the Using EnGenius
Cloud Service document in the product packaging). EnShare will also
be available as an app for Apple iOS devices (iPads and iPhones) and
Android-based devices (smartphones, tablet PCs, and other mobile
readers) soon. The apps will be available through the Apple® Store
and Google Play™ Store respectively.
8
More Guest Access Options
Track Family and Friends for Peace of Mind
The EPG600 allows the option to assign 8 SSIDs (4 on each
band) for the home network so friends or visitors can access the user’s Internet connection without accessing personal data stored on networked computers in the home.
With the EnGenius EnRoute app, you can track other EnRoute enabled devices to keep track of family and friends
when they are on the go or traveling. Great for parents
wishing to make sure their children are safe, tracking lost
or stolen devices, or employers making sure employees are
utilizing company devices properly, the EnGenius EnRoute
app gives you the peace of mind when you or someone
you care about is out and about with GPS tracking, location
sharing, and parental controls for easy utilizationn.
View Multiple Live Video Feeds with an EnGenius
IP Camera
With the EnViewer app, users can view multiple live video feeds from connected EnGenius IP Cameras and receive
alert messages when triggered by the camera’s motion-detection feature straight to users’ iPhone, iPad or Android
smartphones and tablets to stay synced with family or personnel.
View and Share Photos, Videos, and more with
Else
Share media content in the office, home or away from the
office or home to and from mobile devices such as smartphones or tablets and laptop computers with the free EnShare app for iPhone, iPad or Android smartphones and
tablets.
Connecting your Smartphone with VoIP Capabilities
The EPG600 IoT Gateway lets you manage calls through
your smartphone from around the world, wherever you
may be. Call from abroad using your home PTSN line as a
local call to save on roaming charges.
9
Applications
There are many applications for your EPG600 Intelligent Phone Gateway. From saving money on overseas business
trips, to holding calls for up to 10 SIP accounts, the EPG600 is a smart choice for travelers and business professionals
connecting around the world.
Easily Save Hundreds of Dollars When Traveling Overseas
The EPG600 Wireless N600 Intelligent Phone Gateway enables you to call from foreign locations as local calls, thus saving
on tremendous international roaming bills, even if the recipient does not have Internet access available.
PSTN LINE
Home Telephone
EPG600
Internet
3G Base Station
Android
iPhone
Device
EnTalk User
Wireless Hotspot
10
No More Cordless Phones
Wherever you are, the EPG600 enables you to make and receive calls on your landline via your smartphone; your smartphone now becomes your cordless phone, eliminating the need for a cordless phone. It allows up to 10 (max.) users to
enjoy its advantages. All calls among the 10 users are intercom calls without any charges. If you’re not making a wireless to wireless call, you simply use your normal local minutes.
PSTN LINE
Home Telephone
EPG600
Internet
3G Base Station
Android
iPhone
Device
EnTalk User
Wireless Hotspot
11
Use your Telephone Line Anywhere
When you are away from home (whether on a business trip or vacation), the EPG600 still enables you to receive and place
calls on your home telephone line via your smartphone from anywhere. With the EPG600, you will never lose an important
call again.
PSTN LINE
Home Telephone
EPG600
Internet
3G Base Station
Android
iPhone
Device
User away from Home
Home User
Wireless Hotspot
Make Local Calls with Different Telecom Operators
Users registered in different telecom operating areas can make any call as a local call, saving tremendous charges on
telephone bills. Great for traveling abroad or connecting to friends and family around the globe.
PSTN LINE
Home Telephone
EPG600
Internet
3G Base Station
Wireless Hotspot
EnTalk User A
Telecom A
EnTalk User B
Telecom B
Technical Specifications
RJ11 Line Cable
Power Specification
External Power Adapter
DC In, 12V 1.25A
Device Interface
1 x 10/100/1000 Mbps WAN Port
4 x 10/100/1000 Mbps LAN Port
1 x Line Port (FXO)
1 x Tel Port (Fake FXS)
1 x USB Host Port
1 x WPS Button
1 x Reset Button
1 x REG Button
DC Jack
Certifications
FCC/CE
Physical/Environmental Conditions
Operating Temperature: 32º~104º Fahrenheit, 0º~40º Celsius
Humidity: 90% or less (non-condensing)
Storage Temperature: -4º~140º Fahrenheit, -20º~60º Celsius
Humidity: 95% or less (non-condensing)
IEEE Standards
802.11a/b/g/n
Up to 600 Mbps wireless speed
with both the 2.4 and 5 GHz frequency bands (300 Mbps each)
802.3i/u/ab
Software Features
LED Indicators
5 GHz Wireless
2.4 GHz Wireless
Power LED
WAN LED (Internet connection)
WPS LED
Line LED
Frequency Bands
2.400~2.484 GHz (11b/11g/11n)
5.18~5.82 GHz (11a/11n)
Operating Mode
AP Gateway/WDS
Package Contents
EPG600 IoT Gateway
Power Adapter (12V 1.25A)
Quick Start Guides
RJ45 Ethernet Cable
Wireless Features
Auto Channel Selection
WiFi On/Off
14
Output Power Control
Local Firmware Upgrades
WMM (Wireless Multimedia)
Emergency Recovery Page (System Failure)
MSSID (Multiple SSID)
Backup/Restore Settings
Security
Auto Power Saving
WEP/WPA-PSK/WPA2-PSK
IPv6 Pass-through
TKIP/AES
Clone MAC
Hidden SSID
Traffic Monitor
MAC Address Filtering
WAN Type: PPPoE/DHCP/Static IP
802.1X Authentication
USB Features: FTP Server/SAMBA/File Sharing
DDoS
DHCP Server/Client
VoIP Features & Specifications
SPI (Stateful Packet Inspection) Firewall/Anti-DoS Attack
Supports 10x SIP Accounts (5x Concurrent SIP Calls)
NAT
Make or Receive PSTN Calls
Port Forwarding
DMZ
Port Mapping/Triggering
VPN Server (PPTP/L2TP)
VPN Client (PPTP/L2TP)
VPN Pass-through (PPTP/L2TP/IPSec)
Rule Based (IP Address Ranges, Port Block ICMP
VPN Tunnel (Maximum 5)
VPN server: with PPTP/L2TP/IPSec/L2TP over IPSec Supported
ALG
QoS (Mac/IP/Port Based)
URL/IP/Port/ICMP Filtering
DDNS/DNS/EnGenius DDNS Service
NTP/Sync with Computer
UPnP/UPnP NAT Traversal
DLNA
IGMP Proxy
15
Physical Interface
8.
1. 2. 3. 4.
5. 6.
Dimensions
Width: 5.43”
Length: 8.58”
7.
Height: 1.26”
1. WPS Button — Used to associate another WPS-enabled client device
(computer, wireless media bridge, USB adapter, etc.). Press the WPS
button for 2 - 5 seconds on the while also pressing the WPS button on
the end device.
2. Power LED
3. WLAN 2.4 GHz LED
4. WLAN 5 GHz LED
5. WPS (Wireless Protected Setup) LED - works when WPS function is
enabled.
6. Telephone LED indicator –
(A) FLASH – When user presses the REG button, LED will keep flashing at a 1 second interval.
(B) Solid Light – PSTN line is in use
7. WAN Port/(Internet) Status LED - Works when WAN port is connected.
8. LAN Port LEDs (1-4)
When considering the placement of the Gateway remember the following:
• It must be close to an electrical outlet.
• For optimal wireless connectivity, place the Gateway near the center of the room at a higher level if possible.
Other electronic devices and some architectural construction materials or impediments may interfere with the wireless
signal(s) of the Gateway and reduce its range or coverage. Try to minimize the number of walls or floors that the Gateway’s signal needs to penetrate to connect to other wireless devices.
9. USB Port - Used for connecting a USB Storage Device.
10.Reset Button — For resetting the Gateway to its factory default settings by pressing button for more than 11 econds or until the Power LED starts flashing.
11.REG Button - This button will register your Smartphone device automatically by depressing the button and holding for 2 seconds and
9. 10. 11. 12.
clicking Auto Registration on your Smartphone. Your Smartphone
will now be registered to the EPG600.
12.DC Power Jack — Connects the EPG600 to its DC power adapter.
13.LAN Ports (1 – 4) — For connecting home entertainment components,
computers or other Ethernet-enabled devices using Ethernet cables.
14.WAN Port — Connects the EPG600 to a cable or DSL modem to access
the user’s Internet connection.
15.Tel Ports
16
13.
14.
15.
Easy Installation
1. Plug the telephone line to the LINE port and the other RJ-11 port to your Tel port. (Optional)
b
a
PSTN
2. Plug in the AC power adapter to the DC JACK.
17
3. Connect the MODEM to WAN. Next, connect your modem to the WAN port. Now the EPG600 is ready for smartphone
registration.
PSTN
4. If needed, you can still connect the TEL to a EnGenius long range cordless phone as a wireless extension, in case you
are unable to pick up calls via a smartphone.
18
Wall Mounting The Gateway
The following are instructions for mounting the Gateway on a wall.
Note: Choose a location that is within reach of an electrical
outlet for the AC adapter and the DSL or Cable modem.
To mount the device on the wall please follow the steps below:
1. Measure the distance from the middle of each mounting screw hole.
2. Mark the locations of the screw holes on the wall.
3. Drill a hole for each marked location and insert a screw in each.
Note: Make sure to leave enough of the screw head above the
wall surface to secure the Gateway.
4. Install the Gateway on the wall.
19
Chapter 2
Web Configuration Interface
20
Logging In
During the Quick Start Guide procedure, you should have
successfully logged into the Gateway’s Web Configuration
User Interface (essentially the Gateway’s operating system that controls how it operates) and established some
initial settings and controls for the Gateway.
If you wish to change the Gateway’s settings (such as establish a new username and password for the person who
manages and maintains the Gateway, set Parental Controls, establish a Guest Access-SSID setting for visitors, or
any number of other settings) This can also be done at this
time on your computer or tablet device.
The default login settings are:
To do this, enter the Gateway’s default IP address of
192.168.0.1 into your browser’s address window.
username: admin
1. At the login screen enter your username and a password.
It’s highly recommended that if you haven’t done so already, to change these default names to something more
unique so your Gateway and the devices connected to it on
your home network are more secure.
password: admin
2. Click Login to continue.
21
Viewing the Web Configuration Dashboard
The Home Page screen of the Web Configuration interface, or dashboard, provides access to the Gateway’s settings and
controls.
Logout
Language
IP Cam Viewer
USB Storage Sharing
Network Settings
Setup Wizard
Home
22
Home Page
USB Storage Sharing
The USB Storage Sharing link displays the menus to access
The Home Page displays the areas within the Web Configuration to which you can navigate: Cloud Services, Setup
Wizard, Network Settings, USB Storage Sharing, IP Cam
Viewer, Language, and Logout.
shared storage devices connected to the Gateway.
IP Cam Viewer
The IP Cam Viewer link displays the menus to view IP
cameras connected to the network.
Cloud Services
The Cloud Services page lets you scan a QR code which
can take you to the Google Play Store or Apple App Store
for downloading EnShare, EnRoute, and EnTalk. Download
these apps to fully utilize your EPG600.
Language
The Language link displays the menu to set the OSD language.
Home
Logout
The Home link takes you back to the dashboard screen no
The Logout link closes the Gateway’s Web Configuration
interface from any screen.
matter where you are in the Web Configuration interface.
Setup Wizard
The Setup Wizard link starts the wizard that assists you
into setting up your Gateway.
Network Settings
The Network Settings link displays the menus to manually
configure the Gateway.
23
Web Menus Overview
Cloud Services
EnShare
View and edit settings for the EnShare app.
Enshare
View and access content from the USB storage.
24
EnRoute
EnRoute
View and edit settings for the EnRoute app.
Account Setting
View and edit account settings for the EnRoute app.
25
EnTalk
View and edit settings for the EnTalk app.
Basic
View and configure basic settings for the EnTalk app.
Account Setting
View and configure account settings for the EnTalk app.
Dial Plan Setting
View and configure Dial Plan settings for the EnTalk app.
26
EnViewer
View and edit settings for the Smart Recording page.
IP Camera
From here you can view information about IP cameras connected
to the EPG600.
27
Gateway Management
System
View and edit settings that affect system functionality.
Status
Displays the summary of the current system status.
LAN
From here you can configure the LAN settings for the EPG600.
DHCP
From here you can configure the DHCP settings and enable static IP addresses.
Log
View recorded system information for the EPG600.
Monitor
View the current network traffic bandwidth usage.
Language
From here you can configure the application menu and GUI language.
28
Internet
View and edit settings that affect network connectivity.
Status
Displays a summary of the Internet status and type of connection.
Dynamic IP
From here you can setup a dynamic IP connection to your ISP (Internet Service Provider).
Static IP
From here you can setup a static IP connection to your ISP.
PPPoE
From here you can setup a PPPoE connection to your ISP.
PPTP
From here you can setup a PPTP connection to your ISP.
L2TP
From here you can setup a L2TP connection to your ISP.
DS-Lite
From here you can configure DS-Lite settings for the EPG600.
29
Wireless 2.4 GHz
View and edit settings for 2.4 GHz wireless network connectivity.
Basic
From here you can configure the minimum settings required to setup a wireless
network connection.
Advanced
From here you can configure advanced network settings.
Security
From here you can configure wireless network security settings.
Filter
From here you can establish a list of client devices (computer, tablets, smartphones,
printers, etc.) based on MAC (Media Access Control) address numbers that are
allowed to wirelessly connect to the 2.4 GHz network.
WPS
WPS is a system that simplifies the process to established wireless security
connection.
Client List
View the 2.4 GHz wireless devices currently connected to the network.
30
Wireless 5 GHz
View and edit settings for 5 GHz wireless network connectivity.
Basic
From here you can configure the minimum settings required to setup a wireless
network connection.
Advanced
From here you can configure the advanced network settings.
Security
From here you can configure the wireless network security settings.
Filter
From here you can establish a list of client devices (computer, tablets,
smartphones, printers, etc.) based on MAC (Media Access Control) address numbers
that are allowed to wirelessly connect to the 5 GHz network.
WPS
WPS is a system that simplifies the process to established wireless security
connection.
Client List
View the 5 GHz wireless devices currently connected to the network.
31
Parental Controls
View and edit settings for Parental Controls.
Wizard
Click to enable or disable the Parental Controls feature. The menu also
provides information for configuring Parental Control policies.
Web Monitor
The menu provides a log of the events for defined Parental Control policies.
32
Guest Network
View and edit settings for a Guest Network.
Selection
Click to enable or disable the Guest Network feature.
DHCP Server Setting
From here you can configure the Guest Network DHCP server settings.
DHCP Client List
From here you can configure the Guest Network client list.
33
IPv6
View and edit settings for the IPv6 protocol.
Basic
Allows you to enable or disable the IPv6 and IPv6 Pass-through functions.
Status
View the current configurations and other information for the IPv6 protocol.
Static IPv6
From here you can configure the IPv6 protocol.
Auto Configuration
From here you can configure the IPv6 network by obtaining the information
through the ISP (Internet Service Provider).
PPPoE
From here you can configure the PPPoE network protocol and obtain information
from your ISP.
6to4
Allows IPv6 packets to be transmitted over an IPv4 network.
Link Local
From here you can configure the IPv6 link local address.
34
Firewall
View and edit settings for the network firewall.
Basic
Click to enable or disable the network firewall.
Advanced
From here you can configure virtual private network (VPN) packets.
DMZ
The DMZ feature redirect packets from the WAN port IP address to a particular IP
address on the LAN.
DoS
Click to enable or disable blocking of DoS (Denial of Service) attacks.
ACL
This feature allows parents to control Internet access time and web content
filtering by setting up schedules and policies.
35
VPN
View and edit settings for VPN tunnelling.
Status
View the current configurations for VPN tunnelling on the Gateway.
Profile Settings
From here you can manually configure VPN tunnels.
User Settings
From here you can configure users, user ID and password combinations, and assign
access to specific VPN tunnels.
Wizard
From here you can automatically configure VPN tunnels with guidance from the
setup Wizard.
36
USB Port
For viewing and editing settings for storage sharing.
File Sharing
From here you can enable or disable the Samba sharing feature.
File Server
From here you can enable and configure the File Server feature.
Guest Account
From here you can add and configure guest accounts on the Gateway. Note that
guest accounts do not have full access rights.
DLNA
DLNA enables the discovery of DLNA devices (some HDTVs, gaming consoles,
some set top boxes/media players, Blu-ray players, some smartphones, and
network attached storage devices) on the home network.
37
Advanced
View and configure advanced system and network settings for the Gateway.
NAT
From here you can enable or disable Network Address Translation (NAT) feature.
Port Mapping
Re-direct a range of service port numbers to a specified LAN IP address.
Port Forwarding
From here you can configure server applications to send and receive data from
specific ports on the network.
Port Triggering
From here you can configure applications that require multiple connections and
different inbound and outbound connections.
ALG
From here you can configure the Application Layer Gateway (ALG), a security component that augments a firewall or NAT employed within a network.
UPnP
From here you can enable or disable Universal Plug and Play (UPnP) functionality.
UPnP is a protocol that permits networked devices to seamlessly discover each
other’s presence on the network.
38
IGMP
From here you can enable or disable the Internet Group Multicast Protocol (IGMP).
QoS
From here you can configure the network quality of service (QoS) setting by
prioritizing the uplink and downlink bandwidth.
Routing
From here you can configure static routing.
WOL (Wake On LAN)
From here you can configure the Wake on LAN feature to turn on a computer over
the network.
TTL
From here you can configure the TTL=1 packet setting for some special network
environment.
39
Tools
Use the Tools section for viewing and configuring the Gateway’s operating system
and network tools settings.
Admin
From here you can set the administrator’s password used to log into the Gateway.
Time
From here you can configure the system time on the Gateway.
UID/DDNS
UID service is the login value required for accessing EnGenius APPs. DDNS service
maps a static domain name to a dynamic IP address for the Gateway.
Diagnosis
The Diagnosis feature performs a Ping test to verify whether a specific device is
connected to the LAN.
Firmware
This section lets you update the Gateway’s firmware, , and you can also receive new
firmware notification whan a newer firmware version is available.
40
Backup
The Backup feature is used for loading or saving the configuration settings to or
from a backup file.
Reset to Default / Reboot
The Reset feature restore the Gateway to its factory default settings, and the
Reboot feature reboos the Gateway.
41
Tips
At the right side of the Network Settings page, you will
find helpful tips regarding the specific section you are
on. If you are stuck or are unsure about the nature of the
section you are browsing, please refer to these tips. In the
event that your issue still persists, you can contact EnGenius tech support via phone or email:
USA Technical Support
Monday - Friday from 8:00 am - 4:00 pm (Pacific Time)
Toll-Free: 888-735-7888
Local: 714-432-8668
Technical Forum
www.engeniusforum.com
42
Chapter 3
Installation Setup Wizard
43
Internet Setup Wizard
Use the Wizard to detect and set up the type of Internet connection you need to set up a secure wireless connection, to
create an administrator password to secure the device, or set the Gateway’s date and time properties.
To use the Internet Setup Wizard, follow these steps:
1. Click the Wizard button to show the Wizard start screen.
2. Click Next to continue with the setup procedure.
Setup Wizard
Home
44
Setting Up Your Internet Connection
1. Decide how you wish to set up the Internet connection.
If you selected Manual Setup, please follow these steps:
Note: It is recommended to let the device setup the
Internet connection automatically.
3. Select the Internet connection type you wish to use
and enter the connection properties.
• Select Auto Detect to let the Wizard set up the
Internet connection.
• Select Manual Setup to set the properties yourself.
Note: The connection types available are: Static IP, PPPoE,
2. Click Next to continue or Prev to return to the previous
Dynamic IP, PPTP, and L2TP.
screen.
4. Click Next to continue, Prev to return to the previous screen, or Cancel to halt the procedure.
45
Setting Up Your Wireless Security
From here you can set the wireless encryption features for
the 2.4 GHz and 5 GHz networks. To encrypt the wireless
signals for either or both of the frequency bands for the
EPG600, please follow these steps:
Important: To ensure the network is secure, it is
recommended to select High for an encryption level.
3. Enter a unique password in the Encryption Key text field.
1. Enter the Gateway name in the wireless Name (SSID) text
field.
4. Repeat steps 1 through 3 to encrypt the 5 GHz band.
5. Click Next to continue, Prev to return to the previous
screen, Skip to skip this procedure , or Cancel to halt the
procedure.
2. Select the security level from the Encryption dropdown
list.
46
Network Address Translation
From here, you can set up the Network Address Translation (NAT) feature for the EPG600. A NAT is used for modifying
network address information in Internet Protocol (IP) datagram packet headers while in transit across a traffic routing device.
This is to remap one IP address space into another. With this feature, you can use the EnGenius Cloud service in your home
even with an ADSL Gateway connected to the network.
There are four types of NATs:
1. Full Cone NAT- The most common type on the SOHO Gateway
2. Restricted Cone NAT
3. Port Restricted Cone NAT
4. Symmetric NAT – The most complex type of NAT
47
Chapter 4
Cloud Services
48
EnGenius Cloud Services
The EPG600 includes a Cloud Services feature to help you manage your EnGenius apps. Available through the Apple
Store and Google Play Store, the EPG600 is compatible with EnShare, EnRoute, and EnTalk to help you get the most out
of your EPG600.
49
EnShare
EnShare allows you to access content from your USB storage
device connected to the Gateway. Access saved music, video,
files and more easily.
Note: You must be connected to the Internet in order to use
EnShare. Please ensure you’ve completed the initial wireless
Gateway setup before proceeding to EnShare™ setup.
UID Login
To setup EnShare web service, you will need to access DDNS.
Please refer to page 185 to setup the UID/DDNS service for
the Gateway.
50
EnShare
™
Setting Up EnShare
Access EnShare Services Through the Device Host Name
(DDNS)/QR Code
1. Your Gateway will have a unique default domain name
located on the device label on the bottom of it. You may also
access the EnShare page by scanning the unique QR code
located on the bottom of your Gateway with your smartphone.
Please skip to step 2 if you are using this method to access
EnShare. To set up EnShare using a Static IP Address, refer to
the UID/DDNS section on page185 under Tools.
51
3. Select Storage Sharing.
2. You must attach a USB storage device to the USB port
of the Gateway. Open an Internet Browser (IE, Firefox or
Chrome) and type in the DDNS DOMAIN address located on
the bottom of your Gateway. Depending on the ISP (Internet Service Provider), you can access the EnShare service
through the Port 9000 or alternative Port 80 as shown
below.
Next, enter the username and password configured in the Wizard from your Gateway setup.
Example: http://xxxxxx.engeniusddns.com: 9000
or http://xxxxxx.engeniusddns.com, where “xxxxxx” refers to the unique DDNS Domain account information
located on the bottom of your Gateway.
IMPORTANT: If you are not able to access the EnShare service, the service port may be blocked by your ISP. Please
contact your Internet Service Provider directly to find out
what port is acceptable to use; or see the Tools/Admin
section of the User Manual.
Guest Folders
A Guest folder is present by default for your convenience.
The username is: guest and password is: guest.
52
Select the USB device.
You may now access the files on your USB drive.
53
How to Enable/Disable EnShareTM
1. Enter http://192.168.0.1 into a web browser as shown below.
2. You may enable or disable EnShare by selecting Cloud Service then EnShare as shown below.
54
Advanced Setup
Access EnShareT Services Through a Static IP
1. You may also access EnShare if you are using a Static IP
Address.
3. Select Storage Sharing.
2. You must attach a USB storage device to the USB port
of the Gateway. Open an Internet Browser (IE, Firefox or
Chrome) and type in the Static IP address of your Gateway. Depending on the ISP (Internet Service Provider), you
can access the EnShare service through the Port 9000 or
alternative Port 80 as shown below.
Example: 99.125.71.80:10000 or 99.125.71.80
4. Enter the username and password used for configuration in the Wizard setup process.
IMPORTANT: If you are not able to access the EnShare
service, the service port may be blocked by your ISP.
Please contact your Internet Service Provider directly to
find out what port is acceptable to use; or refer to the
Tools/Admin section of this manual.
55
5. Next, select the USB device you wish to use.
You may now access the files on your USB drive.
56
EnRoute
The EnGenius EnRoute app provides an added level of security and peace-of-mind for friends and family members. The
EnRoute app includes GPS tracking, location sharing, and parental controls for your convenience. Never lose track of
friends or family again.
57
Setting up EnRoute
To set up EnRoute, download the EnRoute app from the Google Play store or Apple store by clicking on Cloud Services
and using the QR code to go to the corrsponding store or via the app on your mobile device and follow the directions
below:
1. Open the app.
2. Fill in username and password of your EPG600.
3. Fill in the DDNS name or the IP Address of your Gateway.
4. You can either login locally or remotely.
Note: You may only have one EnRoute acccount on your phone. If you forget what E-mail or password you used to
register with, if you try to reregister a new account on your phone, it will display warning message “Oops! Signup
failed. Please contact your service manager”. Please keep this information in a safe place and use a unique username
and password that is easy to remember.
58
EnRoute Settings
EnRoute allows administrators to keep track of the location of business colleagues or family members who belong to a
registered account on a device such as a smartphone or tablet. Please note that EnRoute will need a USB storage device
connected and Internet access to work.
Map
This map indicates all of the registered and connected users’ location. The admin can click one of the location icons to
display detailed user info.
User Info
Displays user information including name, latitude, longitude, and time they were at the specific location.
Name
Displays the EnRoute username for the account.
Latitude
Displays user latitude.
Longitude
Displays user longitude.
Time
Display the timestamp record via its current location.
59
Account Settings
The Account settings page lets you manage accounts that have been registered to the EPG600 for use with the EnRoute app. Click Edit to edit a user account and Delete to delete an existing user account from the list. A total of ten
(10) devices can be registered at a time to the EPG600.
60
EnTalk
The EnGenius EnTalk app turns existing smartphones into cordless phone extensions with unlimited range, enabling each
user to make and receive calls associated with a home telephone line to save on long distance and international phone
calls. The EPG600 supports up to 10 smartphones registered to the Gateway and can make or receive calls anywhere in
the world with an Internet connection.
With the EnTalk app, you can:
• Save on international calling
• Make calls as local calls among different telecom users, saving on international fees
• Forward calls from your telephone to your smartphone automatically
61
EnTalk Setup for Smartphones
The EnGenius EnTalk app lets you connect to your EPG600 as well as other EnTalk enabled smartphones from anywhere. Please follow these steps to setup your EnTalk SIP account for your smartphone (iOS/Android).
1. Download the EnTalk app from the Google Play store or Apple store.
62
Google Play Store
The EnTalk App will appear like this
Play store.
Apple Store
on the Google
The EnTalk App will appear like this
store.
63
on the Apple
2. Make sure your mobile device is connected to EPG600.
Open the EnTalk™ App in your smartphone.
3. Please follow the assistant steps to complete registration for your smartphone. Press the Next button to continue or the Cancel button to quit the application at any
time.
64
4. Choose how you would like to register the EnTalk app.
You can either choose to manually register or through
Auto Registration. Press the Back button to go back a
step or the Cancel button to quit the application. It is reccomended that you use the Auto Registration feature.
5. You can choose between a local or remote registry.
To register automatically, press the REG button on the
EPG600 for 2 or more seconds and press the corresponding Auto Registration button on the EnTalk app. Your
Smartphone is now registered to the EPG600.
65
6. To manually register, enter your VoIP information here,
including your username, password, and host name. To
auto register, enter your desired user name and click on
Registry from Remote (Internet). Enter the Gateway’s login information and IP or DDNS name. Click Apply and you
will be registered to the Gateway immeditely.
7. Once finished registering, the main menu page will
appear. Enter phone numbers or addresses you would like
to connect with. You can connect up to 10 other EnTalk
enabled SIP accounts per EPG600. Your menu options are
History list, Contacts, Numberpad, Chat history, and Settings.
66
From your smartphone screen, the EnTalk app shortcut
will look like this. You have now sucessfully installed and
registered EnTalk.
67
Basic
The Basic section lets you view and manage basic settings for the EnTalk app.
VoIP Server Port
Enter the port number for VoIP services on the EPG600. The default port for VoIP service is 5060.
68
Account Settings
The Account Settings page lets you manage and configure registered accounts connected to the EPG600. After downloading the EnTalk app and registering a smartphone, you can manage settings per account or for all registered users.
Click Edit to manage a registered account and click Release to disconnect the account from the EPG600.
Display Name
Shows the account user name displayed on the VoIP user’s SIP contact list.
Potocol
Display the SIP account VoIP potocol.
Operator
Operator feature allows you to designate one or several
of your EnTalk-registered users to be an “operator” who
will take all in-coming calls.
Status
Shows the user’s connection status.
Paired
This item displays the VoIP account’s behavior. Available
means this account is able to register with the EPG600.
Manual means this account has been manually registered.
Pair Success means this account has been registered via
the Auto Registration button. Account Active shows the
account status as active.
Action
Click Edit to manage the VoIP settings for the selected
account.
69
Dial Plan Settings
The Dial Plan settings page lets you setup the prefix number for PSTN calls for regiserted smartphones connected to
the EPG600 for the EnTalk app.
Description
Shows the description for the given Dial Plan rule.
Pattern/Attach Pattern
Shows how the system will transfer the number for all outgoing telephone calls. For example, If a user sets up the pattern as 01, it will attach the pattern as 1906. When the number is transmitted with entering 01123456, the system will
replace it with 1906123456.
Action
Click Edit to manage the Dial Plan setting. Click Release to delete the given Dial Plan setting.
70
Chapter 5
Gateway Management Settings
71
System
Viewing the System Status
To see a more detailed view of the Gateway’s status than the information displayed on the Home page of the Web
Configuration interface, click on Network Settings in the upper navigation bar from the dashboard.
Network Settings
Home
72
Note:If a feature or function does not apply to all modes, a note indicates which modes are applicable.
Otherwise, it is assumed the feature or function applies to all modes.
73
Status
On the Status page, you can view a summary of the current Gateway system status including the Gateway’s hardware/
software version, date/time, wired network (LAN), and wireless network (WLAN) information.
Model
The model name of the EPG600 Series Gateway.
Mode
The operating mode for the EPG600.
Uptime
The amount of time the Gateway has been connected for
the current session.
Current Date/Time
The current system date and time.
Note: To update the Gateway’s firmware, visit www.engeniustech.
com and go to the product page for your Gateway, then select the
Downloads tab at the bottom of the web page to see if a newer
version of the firmware is available.
Hardware Version
The hardware version number of the Gateway.
Serial Number
The serial number of the Gateway (*this is required for
customer service or support).
Application Version
The version of the Gateway’s firmware.
74
WAN Settings
Attain IP Protocol
The primary DNS of an ISP provider.
Displays the IP protocol in use for the Gateway. It can be a
dynamic or static IP address.
Secondary DNS
The secondary DNS of an ISP provider.
IP Address
The Gateway’s IP address as designated by an ISP (Internet
Service Provider).
Subnet Mask
The Gateway’s WAN Subnet mask as designated by an ISP
provider.
Default Gateway
The Gateway’s Gateway address as designated by an ISP
provider.
MAC Address
The Gateway’s WAN MAC (Media Address Control) address.
The Gateway’s MAC address is located on the label on
the bottom panel of the Gateway and is unique for each
Gateway.
Primary DNS
75
LAN Settings
IP Address
Shows the Gateway’s local IP address. The default LAN
IP address is http://192.168.0.1. To access the Web
Configuration Interface for the Gateway, type this address
into the address (URL) field of your web browser. This
can only be done in the same physical location where the
Gateway resides (your home network).
Subnet Mask
Shows the Gateway’s local Subnet mask.
DHCP Server
Shows the DHCP setting status. It is enabled by default.
The DHCP (Dynamic Host Control Protocol) is a software
mechanism in your Gateway that assigns IP addresses to
wired and wireless devices on your network. For example, a
computer, printer, tablet, or HDTV on your network may be
assigned an IP address of http://192.168.0.104. Note how
the address is essentially an extension or addition of your
Gateway’s IP address.
MAC Address
Shows the Gateway’s unique MAC address.
76
WLAN Settings
Channel
Shows the communications channel used by all stations or
computing devices on the network.
ESSID
This is the ID value of a set of one or more interconnected
basic service sets (BSSs).
Security
Shows the security setting status (Default: Disabled).
BSSID
The unique ID of the BSS using the above channel value on
this
Gateway. The ID is the MAC address of the BSSs access
point.
Associated Clients
The number of clients associated (actively linked to the
Gateway via a wireless or wired/Ethernet connection) with
this SSID.
77
Guest Network Settings
Guest Network
Shows the guest network status. It is disabled by default.
IP Address
Shows the Guest Network’s LAN IP address.
Subnet Mask
Shows the Guest Network’s local Subnet mask.
DHCP Server
Shows the Guest Network DHCP setting status (Default:
Enabled).
Guest Network Interface
Shows the SSID (Service Set Identifier) of the Guest Network.
78
Configuring the LAN (Local Area Network)
The settings on this page allow you to configure the wired
network settings. Devices connected to the Gateway’s
Ethernet ports comprise its LAN. The Gateway’s IP is
defined in the IP Address field. The default setting of the
DHCP server is set to Enabled so that networked clients
(computers, home entertainment components, printers, etc.)
will automatically be assigned IP addresses by the Gateway.
LAN IP
More advanced users may wish to configure the DNS server
settings to meet their specific requirements. Changing the
settings in this section are not necessary for most situations.
IP Address
To view the LAN settings, click System, then click LAN.
IP Subnet Mask
For configuring the Gateway’s LAN IP address.
For configuring the Gateway’s LAN Subnet Mask
Note: Keep the Gateway’s default values if you are
uncertain of the settings values.
802.1d Spanning Tree
The Spanning Tree is disabled by default. When enabled,
the Spanning Tree protocol prevents network loops so that
transmissions won’t pass the same node twice or several
times to reach the destination.
Note: The default device IP address is: 192.168.0.1
79
DHCP Server
The DHCP server assigns IP addresses to the devices on the
LAN.
DHCP Server
From here you can enable or disable the DHCP server. It is
enabled by default.
Lease Time
From here you can configure the amount of time each
allocated IP address can be used by a client.
Start IP
The first IP address in the range of addresses assigned by
the Gateway.
End IP
The last IP address in the range of addresses assigned by the
Gateway.
Domain Name
Shows the domain name of the Gateway.
80
Configuring Dynamic Host Configuration Protocol
This page allows you to view and configure Dynamic Host Configuration Protocol (DHCP) addresses.
WARNING! Do not modify the settings in this section without a thorough understanding of the parameters.
To view the DHCP settings, click System then click DHCP.
DHCP Client Table
Displays the connected DHCP clients whose IP addresses are
Expiration Time
assigned by the DHCP server of the Gateway.
Shows the date and time when the current DHCP address is
no longer valid.
IP Address
Click Refresh to update the table.
Displays the IP address of the static DHCP client device in the
table.
MAC Address
Displays the MAC address of the static DHCP client device
in the table.
81
Enabling Static DHCP IP
There are reasons why you may wish to enable a static IP address on a client device on your Gateway’s network.
On occasion, if there are power outages or if you’ve reconfigured the settings on your EPG Gateway and reboot it to apply
the new settings, the previous IP address that the Gateway’s DHCP server assigned to one or more devices on the network
may have changed. Some client devices on your network may also have web configuration interfaces (set top boxes, Network
Attached Storage, etc.) that are accessible from the Gateway’s assigned IP address from its DHCP server, so the client device
can be managed. Thus if the client device’s IP address changes from time to time, it may be difficult linking to it unless you find
its new address through the Gateway’s DHCP Client Table. If you wish to avoid this, then the Enable Static DHCP IP option
allows you set a static (essentially a permanent) address for given client devices on your network. To do so, select the Enable
Static DHCP IP option.
IP Address
Enter the IP address of the device you wish to add as a static DHCP client.
MAC Address
Enter the MAC address of the device you wish to add as a static DHCP client.
Click Add to add the device to the static DHCP client table or Reset to return the table to its previous state.
82
Current Static DHCP Table
From here you can view the active static DHCP IP addresses that have been manually assigned to client devices with their
corresponding MAC addresses.
No. (Number)
Displays the ID of the static DHCP client device in the table.
IP Address
Displays the IP address of the static DHCP client device in the table.
MAC Address
Displays the MAC address of the static DHCP client device in the table.
Select
Click to select static DHCP client devices you wish to be deleted.Click Delete Selected to remove a selected address. Click
Delete All to remove all addresses from the table. Click Reset to return the table to its previous state. Click Apply to save the
settings or Cancel to discard changes.
83
Log
The logging service records and displays important system information and activity on the network. The events are stored in
a memory buffer with older data overwritten by newer when the buffer is full. To view the Log settings, click System then
click Log.
SysLog Settings - Log Message List
Select Enable Logging to Syslog Server. Next, click Save to start logging information to the system.
Log Message Window
The Log Message Window shows the current system operations and network activity. Click Save to save the message list
to a text file, Clear to discard the message from the memory buffer, or Refresh to clear previous messages and write new
messages to the memory buffer. When finished with configuration, click Apply to save the changes.
84
Monitoring Bandwidth Usage
This tool allows you to view real-time bandwidth usage for WAN (Wide Area Network - or Internet), LAN (Local Area Network)
and WLAN (Wireless Local Area Network) traffic. For the EPG600, it shows both the bandwidth traffic in both the 2.4 and
5 GHz frequency bands. To view the Bandwidth Monitor settings, click System, then click Monitor. The screens display the
active bandwidth usage for both the LAN and WLAN networks as well as the bandwidth being used on the WAN connection.
85
Configuring the System Language
The Gateway’s Web Configuration interface supports multiple languages for your convenience. To view the language
settings, click System, then click Language or via the Language icon in the top right corner of the dashboard. Select the
language you wish to use from the drop-down menu.
System Language
86
Configuring IP Cameras
This Gateway supports up to ten (10) EnGenius IP Cameras. If
no IP Camera is detected, please check that the IP Camera’s IP
address and UPnP client are configured correctly.
To view the IP Camera settings, click System, then click IP
Camera or the IP camera icon from the top right corner of the
dashboard.
Before starting this procedure, you must connect your EnGenius
IP camera to the network. Please make sure the camera is
powered on.
Click the Refresh button to view a listing of available devices.
Note: The IP Camera function supports EnGenius IP Camera
products only.
IP Cam Viewer
87
When you click on the IP Cam Viewer icon on the dashboard, you will be redirected to the IP Cam login screen. This page
will show a list of all cameras that have been connected to the Gateway. You can view the current status or add profiles
for selected cameras. Please note that you cannot view multiple cameras simultaniuesly via the Gateway’s UI. Click Add
Profile to add a user profile for a camera or Refresh to refresh the page.
NOTE: The connected EnGenius IP cameras support the free Enviewer™ app for your mobile device to help you keep track
of your home or office while on the go. You can download it from the Apple or Google Play Store.
88
Configuring Internet Settings
View Internet Status
MAC Address
The WAN Settings, or Internet Status page shows a summary
of the current Internet connection information. This section
is also shown on the System Status page. To view the
Status settings, click Internet, then click Status.
Shows the Gateway’s WAN MAC address. The Gateway’s
MAC address is located on the label on the back side of the
Gateway.
Primary DNS
WAN Settings
This is the IP Address of the Domain Name System. This
allows the recognition of domain names such as www.
yahoo.com instead of 98.139.183.24, which is more difficult
to remember. This is provided by your ISP.
To view the WAN Settings, click Internet, then select Status.
Attain IP Protocol
Display the IP Protocol type used for the Gateway (Dynamic
IP Address or Static IP Address).
IP Address
Shows the Gateway’s WAN IP address.
Subnet Mask
Shows the Gateway’s WAN Subnet mask.
Default Gateway
Shows the ISP’s Gateway IP address.
89
Secondary DNS
Shows the secondary DNS address of an ISP provider.
90
Internet
Status
The Status section shows the current WAN settings for the EPG600. To refresh the page, click Renew.
WAN Settings
Attain IP Protocol
Displays the IP protocol in use for the Gateway. It can be a dynamic or static IP address.
IP Address
The Gateway’s IP address as designated by an ISP (Internet Service Provider).
91
Subnet Mask
The Gateway’s WAN Subnet mask as designated by an ISP
provider.
Default Gateway
The Gateway’s Gateway address as designated by an ISP
provider.
MAC Address
The Gateway’s WAN MAC (Media Address Control) address.
The Gateway’s MAC address is located on the label on
the bottom panel of the Gateway and is unique for each
Gateway.
Primary DNS
The primary DNS of an ISP provider.
Secondary DNS
The secondary DNS of an ISP provider.
92
Configuring Dynamic IP
Dynamic IP addressing assigns a different IP address each time a device connects to an ISP (Internet Service Provider) and
are most commonly used by cable ISPs. To view the Dynamic IP, click Internet then select Dynamic IP.
Dynamic IP
Hostname
From here you can assign a name for the Internet connection
type. This field can be blank.
MTU (Maximum Transmission Unit)
This section allows you to configure the MTU. The MTU
specifies the largest packet size permitted for an internet
transmission. The factory default MTU size for Dynamic IP
(DHCP) is: 1500. The MTU size can be set between 512 and
1500.
Note: Some ISP providers require registering the MAC address
of the Network Interface Card (NIC) connected directly to the
cable or DSL modem. Clone MAC masks the Gateway’s MAC
address with the MAC address of the computer’s NIC.
Clone MAC
Enter the MAC address of your computer’s (or tablet’s) twork
embedded Network Interface Card (NIC) in the MAC address
field and click Clone MAC.
93
DNS Servers
The DNS server translates a domain or website name into a URL (Uniform Resource Locator), or Internet address. There are
two options to choose from: From ISP or User-Defined. Select From ISP to retrieve the DNS address value from the ISP;
select User-Defined to assign a custom DNS server address.
DNS Server
From here you can configure the type of DNS server. From ISP is enabled by default.
First DNS Server
Configure the first (primary) DNS server.
Second DNS Server
Configure the second (secondary) DNS server.
Click Apply to save the settings or Cancel to discard the changes.
94
Configuring Static IP
Setting a static IP address allows an administrator to set a specific IP address for the Gateway and guarantees that it can
not be assigned a different address. To view the Static IP settings, click Internet, then click Static IP.
Static IP
IP Address
MTU (Maximum Transmission Unit)
Shows the Gateway’s WAN IP address.
The MTU specifies the largest packet size permitted for
an internet transmission. The factory default MTU size for
static IP is: 1500. The MTU size can be set between 512
and 1500.
Subnet Mask
Shows the Gateway’s WAN Subnet mask.
MAC Address
Default Gateway
Shows the Gateway’s MAC address.
The WAN Gateway address.
Click Apply to save the settings or Cancel to discard the
changes.
Primary DNS
Shows the primary DNS server address.
Secondary DNS
Shows the secondary DNS server address.
95
MTU (Maximum Transmission Unit)
The MTU specifies the largest packet size permitted for an internet transmission. The factory default MTU size for static IP
is: 1500. The MTU size can be set between 512 and 1500.
MAC Address
Shows the Gateway’s MAC address.
Click Apply to save the settings or Cancel to discard the changes.
96
Configuring PPPoE
Point-to-Point Protocol over Ethernet (PPPoE) is used mainly by ISPs that provide DSL modems to connect to the Internet. To
view your PPPoE settings, click Internet, then click PPPoE.
Username
Type
Enter the username assigned by an ISP.
Configure the connection type between the Gateway and
the ISP. Select one of the following: Keep Connection,
Automatic Connection or Manual Connection.
Password
Enter the password assigned by an ISP.
Idle Timeout
Service Name
Configure the maximum idle time allowed for an inactive
connection. The range is from 1 to 1,000 minutes
Enter the service name of an ISP (optional).
MTU (Maximum Transmission Unit)
Enter the Maximum Transmission unit (MTU). The MTU
specifies the largest packet size permitted for an internet
transmission (the PPPoE default is: 1492). The MTU size can
be set between 512~1492.
Enter the MAC address of the devices’ Network Interface
Card (NIC) in the MAC address field and click Clone MAC.
Note: Some ISP providers require registering the MAC address
Authentication Type
of the Network Interface Card (NIC) connected directly to
Select the type of authentication provided by the ISP: Auto,
PAP, or CHAP. If unsure of the best setting, select Auto or
check with your Internet Service Provider.
the cable or DSL modem. A Clone MAC masks the Gateway’s
MAC address with the MAC address of the computer’s NIC.
97
Click Apply to save the settings or Cancel to discard the changes.
98
Configuring PPTP
Point-to-Point Tunnelling Protocol (PPTP) is used in association with Virtual Private Networks (VPNs). There are two parts to
a PPTP connection: the WAN interface settings and the PPTP settings. To view the PPTP settings, click Internet, then click
PPTP.
WAN Interface Settings
WAN Interface Type
Clone MAC
Select Dynamic IP Address to assign an IP address provided
by an
Enter the MAC address of the computer’s (or tablet’s)
embedded Network Interface Card (NIC) in the MAC address
field and click Clone MAC.
ISP.
Note: Some ISP providers require registering the MAC address of the
Network Interface Card (NIC) connected directly to the cable or DSL
modem. A Clone MAC masks the Gateway’s MAC address with the MAC
address of the computer’s NIC.
Hostname
Enter a host name of an ISP (optional).
99
PPTP Settings
User Name
Enter the username assigned by your ISP.
Password
Configure the maximum amount of time, in minutes, allowed
for inactive Internet connection. The Internet connection will
be dropped when the maximum idle time is reached. Valid
values are between one and one thousand.
Enter the password assigned by your ISP.
Service IP Address
Click Apply to save the settings or Cancel to discard the
changes.
Enter the PPTP server IP address provided by your ISP.
Connection ID
Enter the connection ID provided by your ISP (optional).
MTU (Maximum Transmission Unit)
Enter MTU. The MTU specifies the largest packet size
(Default: 1462) permitted for an Internet transmission. The
MTU size can be set between 512 and 1492.
Type
Configure the connection type between the Gateway and
the ISP. Select one of the following: Keep Connection,
Automatic Connection or Manual Connection.
Idle Timeout
100
Configuring L2TP
Layer 2 Tunneling Protocol (L2TP) is used in association with Virtual Private Networks (VPNs). There are two parts to a L2TP
connection:
Note: Some ISP providers require registering the MAC address
of the network interface card (NIC) connected directly to the
cable or DSL modem. Clone MAC masks the Gateway’s MAC
address with the MAC address of the computer’s NIC.
1. The WAN interface settings
2. The L2TP settings.
To view the L2TP settings, click Internet, then click L2TP.
WAN Interface Settings
WAN Interface Type
Select Dynamic IP Address to assign an IP address
provided by an ISP.
Hostname
Enter a host name of an ISP (optional).
Clone MAC
Enter the MAC address of your computer’s embedded
network
Interface Card (NIC) in the MAC address field and click Clone
MAC.
101
L2TP Settings
Username
Enter the username assigned by an ISP.
Password
Enter the password assigned by an ISP.
Service IP Address
Enter the L2TP server IP address provided by an ISP.
Idle Timeout
Configure the maximum amount of time, in minutes,
allowed for an inactive Internet connection. The Internet
connection will be dropped when the maximum idle time is
reached. Valid values are between one and one thousand
(1~100000).
Click Apply to save the settings or Cancel to discard the
changes.
Connection ID
Enter the connection ID provided by an ISP (optional).
MTU (Maximum Transmission Unit)
Enter MTU. The MTU specifies the largest packet size
(Default: 1460) permitted for an Internet transmission. The
MTU size can be set between 512 and 1492.
Type
Configure the connection type between the Gateway and
the ISP. Select one of the following: Keep Connection,
Automatic Connection or Manual Connection.
102
Configuring DS-Lite
Dual-Stack Lite (DS-Lite), allows ISPs to stop IPv4 addresses from reaching a user’s network devices and uses IPv6 exclusively.
To view the DS-Lite settings, click Internet, then click DS-Lite.
DS-Lite Configuration
Select DS-Lite DHCPv6 Option or Manual Configuration.
AFTR IPv6 Address
Enter the AFTR IPv6 connection type.
B4 IPv4 Address
Enter an optional B4 IPv4 address.
WAN IPv6 Address
Enter the WAN IPv6 address.
IPv6 WAN Default Gateway
Enter the IPv6 WAN default Gateway address.
Click Apply to save the settings or Cancel to discard the changes.
103
Wireless LAN Setup
To view the Wireless Basic settings, click Wireless 2.4 Ghz or Wireless 5 Ghz then select Basic.
Radio
Click to enable or disable the wireless radio. If the wireless radio is disabled, wireless Access Points are not available.
Mode
Select the wireless operating mode for the Gateway. Two modes are available: Access Point or Wireless Distribution
System (WDS) mode.
AP (Access Point)
Provides a connection Access Point for wireless devices.
WDS (Wireless Distribution System)
Allows the wireless network to be expanded using multiple
Access Points without wired connections.
Click Apply to save the settings or Cancel to discard
changes.
104
Access Point Mode
These instructions apply to both the 2.4 GHz and 5 GHz frequency bands. The Gateway by default is already configured in
Access Point Mode. For optimum connectivity to a number of different wireless client devices, it’s recommended that you
keep the Gateway in its default wireles s settings. You can choose to have the Gateway associate only with certain iterations
(IEEE standards) and by doing so this will either positively or negatively affect the Gateway’s speed and throughput
performance.
Band
Select a wireless standard for the network from the following options:
• 2.4 GHz (IEEE 802.11b)
• 2.4 GHz (IEEE 802.11n)
• 2.4 GHz (IEEE 802.11b/g)
• 2.4 GHz (IEEE 802.11g)
• 2.4 GHz (IEEE 802.11b/g/n)
• 5 GHz (IEEE 802.11a)
• 5 GHz (IEEE 802.11n)
• 5 GHz (IEEE 802.11a/n)
Enable SSID#
Select the number of wireless groups, between 1~4 available on the network.
105
SSID[#]
Enter the name of the wireless network(s).
Auto Channel
Click to enable or disable having the Gateway automatically select a channel for the wireless network. Auto Channel is
enabled by default. Select Disable to manually assign a specific channel.
Check Channel Time
When Auto Channel is enabled, select a time period that the system checks the appropriate channel for the Gateway.
Channel
When Auto Channel is disabled, select a channel to assign to the wireless network. The valid values are from 1~11 in the US
and 1~13 in the EU.
106
Wireless Distribution System Mode
From here you can configure the Gateway’s wireless settings for WDS (Wireless Distribution System) mode.
Channel
Select a channel to assign to the wireless network. Valid values are from 1~11 in the US and 1~13 in the EU.
MAC Address
Enter the MAC address(es) for the wireless Access Point(s) that are part of the WDS.
WDS Data Rate
Select the data rate for the WDS.
Set Security
Click Set Security to set up the WDS security settings screen.
107
WDS Security Settings
Select the type of WDS encryption you wish to use: WEP or WPA (Pre-Shared Key), or Disable for the wireless network.
Wired Equivalent Privacy (WEP)
Key Length
Select between a 64-bit and 128-encryption.
Key Format
Select the type of characters used for the WEP Key: ASCII (5
characters) or Hexadecimal (10 characters).
Default Key
Select the default encryption key for wireless transactions.
Encryption Key
Enter the encryption key(s) used to encrypt the data packets
during data transmission.
108
Wi-Fi Protected Access (WPA Pre-Shared Key)
WPA Type
Select the type of WPA encryption you would like to use. Your choices are WPA (TKIP) and WPA (AES).
Pre-Shared Key Format
Select the key format you would like to use.
Pre Shared Key
Enter the encryption key you would like to use.
Disabled
WDS security is disabled for the EPG600.
Click Apply to save the settings or Cancel to discard changes.
109
Configuring Security
From here you can enable security options on the wireless network to prevent intrusions to systems on the wireless network.
To view the security settings, click Wireless 2.4 Ghz or Wireless 5 Ghz then select Security.
SSID Selection
Select the wireless network group in which you wish to change wireless security settings.
Broadcast SSID
Click to enable or disable the broadcast SSID. Choose whether or not the wireless group is visible to other members.
Wi-Fi Multimedia (WMM)
Click to enable or disable Quality of Service (QoS) to optimize the streaming for bandwidth sensitive data such as HDTV video
streaming, online gaming, VoIP, videoconferencing, and etc.
Encryption
Select the encryption type for the Gateway. First, enable
802.1X
Authentication. Next, enable or disable 802.1X
authentication.
Click Apply to save the settings or Cancel to discard the
changes.
110
Encryption Type
Enabling encryption on the EPG600 is strongly encouraged as unauthorized parties within range of your Gateway’s wireless
signal may attempt to access your wireless network and then gain access to private information on devices on your network.
It’s highly recommended that you encrypt your Gateway with WPA2 (AES) for optimal security and throughput performance.
Always select a strong passphrase greater than 8 characters long and comprised of letters, numbers, and symbols. Please
make note of the passphrase and keep it in a secure location somewhere in your home in case you need to retrieve it.
Click Apply to save the settings or Cancel to discard the changes.
IMPORTANT! WPA2 (AES) offers much stronger security than WEP
(Wired Equivalent Privacy) which has been and can be compromised.
111
WPA Pre-Shared Key
WPA Type
Select the type of WPA from the following:
• WPA2 Advanced Encryption Standard (AES): RECOMMENDED: Government standard packet encryption which is
stronger than TKIP.
• WPA Temporal Key Integrity Protocol (TKIP): Generates a 128-bit key for each packet.
• WPA2 Mixed: Mixed mode allows client devices to first associate to the Gateway using WPA2, and if they fail to connect,
then they are connected via WPA (TKIP).
Pre-Shared Key Type
Select the type of pre-shared key as Passphrase (ASCII) or Hexadecimal.
Pre-Shared Key
Enter the Pre-Shared Key value.
112
WPA RADIUS
Use a RADIUS server to authenticate wireless stations and provide a session key to encrypt data during communications.
WPA Type
Select the type of Wireless Protected Access (WPA) from the following:
• WPA2 Advanced Encryption Standard (AES): RECOMMENDED — Government standard packet encryption which is
stronger than TKIP.
• WPA Temporal Key Integrity Protocol (TKIP): Generates a 128-bit key for each packet.
• WPA2 Mixed: Mixed mode allows client devices to first associate to the Gateway using WPA2, and if they fail to connect,
then they are connected via WPA (TKIP).
RADIUS Server IP Address
Enter the IP address of the server.
RADIUS Server Port
Enter the port number of the server.
RADIUS Server Password
Enter the password of the server.
113
Wired Equivalent Privacy (WEP)
Authentication Type
Select the type of authentication from the following:
• Open System: Wireless stations can associate with the Gateway without WEP encryption.
• Shared Key: Devices must provide the corresponding WEP key(s) when connecting to the Gateway.
• Auto: The Gateway automatically detects whether Open System or Shared Key is being used.
Key Length
Select between 64-bit and 128-encryption.
Key Type
Select the type of characters used for the WEP Key: ASCII
(5 characters) or Hexadecimal (10 characters).
Encryption Key [#]
Enter the encryption key(s) used to encrypt the data packets
during data transmission.
Enable 802.1x Authentication
Enable or disable 802.1X authentication.
114
Filters
WARNING! Incorrectly changing these settings may cause the device to stop functioning. Do
not modify the settings in this section without a thorough understanding of the parameters.
When Enable Wireless Access Control is selected, only wireless clients with MAC addresses listed in the table are allowed to
connect to the wireless network. To view the Filter settings, click Wireless 2.4 Ghz or Wireless 5 Ghz then select Filter.
Enabling Wireless Access Control
Select Enable Wireless Access Control.
Description
Enter a description of the device
allowed to connect to the network.
MAC Address
Enter the MAC Address of the
wireless device.
Click Add to append a new device
to the list or Reset to discard changes.
115
MAC Address Filtering Table
No. (Number)
Shows the sequence number of the device.
Description
Shows the description of the device.
MAC Address
Shows the MAC address of the device.
Select
Indicates the device(s) that can have actions performed on them.
Click Delete Selected to remove selected devices from the list. Click Delete All to remove all devices from the list. Click Reset
to discard changes. Click Apply to save the settings or Cancel to discard changes.
116
Configuring Wi-Fi Protected Setup
Wi-Fi Protected Setup (WPS) is an quick and easy way to associate a new wireless client device to the encrypted Gateway
using a PIN or the WPS buttons on each device. To view the WPS settings, click Wireless 2.4 Ghz or Wireless 5 Ghz then
select WPS.
WPS
Click to enable or disable WPS for the Gateway.
WPS Current Status
Displays whether or not the wireless security is configured.
Self Pin Code
An 8-digit PIN which is required when configuring the Gateway
for the first time in Windows 7 or Vista.
SSID
The name of the wireless network.
Authentication Mode
The current security settings for the corresponding SSID
(wireless network).
117
Passphrase Key
A randomly generated key created by the Gateway during the WPS process.
WPS via Push Button
Click Start to Process to activate WPS.
WPS via PIN
Enter the PIN of a wireless device click Start to Process to activate WPS.
118
Configuring the Client List
View the wireless devices currently connected to the Gateway. To view the Client List settings, click Wireless 2.4 Ghz or
Wireless 5 Ghz then select Client List.
Interface
The type of network connected to the device.
MAC Address
Shows the MAC address of the device connected to the network.
Signal
Shows the signal strength of the device connected to the network.
Idle Time
The amount of time the connected device has been inactive on
the network.
Click Refresh to refill the list with currently connected devices.
119
Chapter 6
Advanced Settings
120
Configuring Advanced Settings
This section allows you to define the Advanced Settings available on the Gateway.To view the Advanced settings, click
Wireless 2.4 Ghz or Wireless 5 Ghz then select Advanced.
WARNING! Incorrectly changing these settings may cause the device to stop functioning. Do not modify
the settings in this section without a thorough understanding of the parameters.
Fragment Threshold
Enter the maximum size of a packet during data transmission. Please take note that a lower value can lead to a lower
performance.
RTS Threshold
Enter the RTS threshold. If the packet size is smaller than the RTS threshold, the Gateway does not use RTS/CTS to send the
data packet.
121
Beacon Interval
Enter the beacon interval. This is the amount of time that the Gateway sets to synchronize the network.
Delivery Traffic Indication Message (DTIM) Period
Enter the DTIM period. The DTIM is a countdown period informing clients of the next point of broadcast and multicast of
messages over the network. Valid values are between 1~255.
N Data Rate
Select the N data rate. This is the rate in which the Gateway will transmit data packets to wireless N compatible devices.
Channel Bandwidth
Select the channel bandwidth. The factory default is: Auto 20/40MHz. This default setting provides the best performance by
auto selecting channel bandwidth.
122
Preamble Type
Select the preamble type. A Long Preamble provides better LAN compatibility and a Short Preamble provides better wireless
performance.
CTS Protection
Select the type of CTS protection you wish to use. Using CTS Protection can lower the data collisions between Wireless B
(802.11b) and Wireless G (802.11g) devices, which in turn lower data throughput.
Tx Power
Select the wireless signal strength level. Valid values are between 25%~100%.
Click Apply to save the settings or Cancel to discard changes.
123
Setting Up Parental Controls
Offensive web content can be blocked when a parent specifies keywords. Parents can also limit Internet access within a
specified time and day, with a Schedule. A Policy is a rule profile which describes the keyword filter and Internet access
schedule. Parents can apply the policy to multiple users or Policy Members. The Parental Controls tool will screen policy
members based on applied policies.
Note: By default, everyone is allowed to view all the contents
without any limitation and filter.
124
Adding a Control Policy
To learn how to create and add a policy to the access control list, refer to Adding a Control Policy. To view the Wizard
settings, click Parental Control then select Wizard.
Enable Parental Controls (Access Control)
Click to enable the Parental Control feature.
Add Policy
Click to add a new control policy to the network.
Policy Table
Shows the control policies available on the network.
The Gateway provides a wizard to guide you through setting up a new Access Control Policy. To start the procedure, click
the Add Policy button. Click Next to continue the procedure or Cancel to stop the procedure. The procedure consists of the
following steps:
125
1. Choose Policy Name: Enter a unique name for your policy
in the Policy Name text field. Click Prev to return to the
previous screen, Next to continue the procedure, or Cancel
to stop the procedure.
2. Select Target Device: Select a device you wish to set
parental controls on via its MAC address or its IP address.
Click Add to add a policy to the access control policy list. To
add a device, continue to step 3.
126
3. Select Schedule: From here, you can set up a schedule for
the Gateway services for the selected device.
To add a device to the Member List, follow these steps:
a. Click MAC or IP from the Filter Type option.
b. Click Add to show the add client dialog.
c. Enter the name of the device in the Device Name text
field.
d. Enter either a MAC address or an IP address in the Addressfield depending upon which filter type you
chose.
e. Click the Add Device Button
to close the screen and add the device to the Member List.
Click Prev to return to the previous screen, Next to continue
the procedure, Save to save the changes, or Cancel to stop
the procedure.
To set up a Service Schedule, follow these steps:
a. Select Allow from the Schedule option.
b. Click the days that the schedule will be active.
c. Enter the time period that the schedule will be active.
Click Prev to return to the previous screen, Next to continue
the procedure, Save to save the changes, or Cancel to stop
the procedure.
127
4. Web Keyword Filter: Setup a keyword and URL filter list.
6. Configure Web Access Logging: Select Enable to save
the web access information to a log file or Disable to ignore
the information.
To set up a keyword/URL filter list, follow these steps:
a. Select Allow from the Filtering option.
b. Enter a keyword or URL in the URL/Keyword text field.
c. Click the Add button to add the filter to the list.
d. Repeat steps a through c for each filter.
5. Click Enable Application Filter to filter software
applications.
128
Web Monitor
Viewing Parental Policies
Available parental control policies are shown in a table where each policy can be enabled, disabled, edited, and/or deleted. To
view the Web settings, click Parental Control then select Web Monitor.
Enable
Click to enable or disable the control policy.
Policy Name
Shows the control policy name.
Target Device
Shows the target device MAC address or IP address.
Schedule
Shows the control policy schedule.
Logged
Shows whether the control policy is storing log information.
Modify
Edit a policy by clicking the Edit Button.
Delete a policy by clicking the Delete Button.
129
Guest Network
The Guest Network function enables you to offer Internet connectivity to visitors or guests while keeping other networked
devices (computers and hard drives) and sensitive personal or company information private and secure. The Guest Network
is controlled by the Wireless SSID function. When the Guest Network function is enabled, the Guest SSID can only receive the
internet connection from WAN, but can not reach the client from the LAN port.
Enabling the Guest Network
To view the Selection settings, click Guest Network then select Selection.
Guest Network
Enable or Disable the Guest Network function.
Client Isolation
Guest clients are isolated and cannot communicate with each other.
SSID
Choose a SSID for the Guest Network used. The SSID can be
defined from the Wireless setting page.
Click Apply to save the settings or Cancel to discard changes.
130
Configuring DHCP Server Settings
The Guest Network SSID should be on a different subnet from the Gateway’s DHCP server. To view the DHCP Server Settings,
click Guest Network then select DHCP Server Settings.
Gateway IP address
Define the Gateway’s IP address for the Guest network.
Default Subnet Mask
Define the Subnet mask IP address for the Guest network.
Start IP
Used to define the Guest network DHCP server start IP.
End IP
Used to define the Guest network DHCP server End IP.
Click Apply to save the settings or Cancel to discard changes.
131
Viewing the DHCP Client List
The DHCP Client list page shows the list of guest clients registered on the network. To view the DHCP Client List settings,
click Guest Network then select DHCP Client List.
DHCP Client Table
Shows the IP address, MAC address, and expiration time of each
of the registered clients on the list.
IP Address
The IP address of the guest client.
MAC Address
The MAC address of the guest client.
Expiration Time
The time that the guest client’s DHCP address will expire and
must be renewed.
Click Refresh to refresh the view of the list.
132
IPv6
There are several connection types to choose from: Auto Detection, Static IPv6, Autoconfiguration (SLAAC/DHCPv6),
PPPoE, IPv6 in IPv4 Tunnel, 6to4, and Link-local. If you are unsure of your connection method, please contact your IPv6
Internet Service Provider.
Note: If you are using the PPPoE option, you will need to ensure that any PPPoE client software on your computers has been removed or
disabled.
Enabling IPv6 Settings
To view the Basic settings, click IPv6 then select Basic.
Before using or configuring the IPv6 protocol or IPv6
passthrough on the EPG600, you must enable it.
IPv6
Select Enable to configure the IPv6 protocol on the Gateway.
IPv6 Passthrough
Select Enable to allow IPv6 passthrough functionality. IPv6
must be disabled to enable this feature.
Click Apply to save the settings or Cancel to discard changes.
133
Viewing the IPv6 Connection Status
To view the Status information, click IPv6 then select Status.
IPv6 Connection Information
Shows the IPv6 connection type, the LAN IPv6 link-local address, and the DHCP-PD.
LAN IPv6 Computers List
Shows a list of network computers and their IPv6 connection information.
134
Configuring Static IPv6
To view the Static IPv6 settings, click IPv6 then select Static IPv6.
Use Link-Local Address
Click to enable or disable the LAN link-local address.
LAN IPv6 Link-Local Address
Enter the LAN IPv6 link-local address.
IPv6 Address
Enter the LAN (local) IPv6 address for the Gateway.
Enable Automatic IPv6 Address Assignment
Click to enable or disable automatic IPv6 address assignment.
Subnet Prefix Length
Enter the subnet prefix length.
Default Gateway
Enter the default Gateway.
Autoconfiguration Type
Enter the autoconfiguration type. The default setting is:
LAAC+RDNSS.
Primary IPv6 DNS Address
Enter the primary IPv6 DNS address.
Autoconfiguration Type
Enter the autoconfiguration type. The default setting is:
LAAC+RDNSS.
Secondary IPv6 DNS Address
Enter the secondary IPv6 DNS address.
Gateway Advertisement Lifetime
Enter the IPv6 Address Lifetime (in minutes).
LAN IPv6 Address
Enter the LAN IPv6 address.
Click Apply to save the settings or Cancel to discard
changes.
135
136
Autoconfiguration
To view the Auto Configuration settings, click IPv6 then select Auto Configuration.
Enable Automatic IPv6 Address Assignment
Obtain A DNS Server Address Automatically
Click to enable or disable obtaining a DNS server automatically. Click to enable or disable automatic IPv6 address assignment.
Primary IPv6 DNS Address
Autoconfiguration Type
Enter the primary IPv6 DNS address.
Enter the autoconfiguration type. (Default: SLAAC+RDNSS)
Secondary IPv6 DNS Address
Gateway Advertisement Lifetime
Enter the secondary IPv6 DNS address.
Enter the IPv6 Address Lifetime (in minutes).
Enable DHCP-PD
Click Apply to save the settings or Cancel to discard
changes.
Click to enable or disable DHCP-prefix delegation (PD).
LAN IPv6 Address
Enter the LAN IPv6 address.
LAN IPv6 Link-Local Address
Enter the LAN IPv6 link-local address.
137
138
Configuring PPPoE
To view the PPPoE settings, click IPv6 then select PPPoE.
Address Mode
Reconnect Mode
Select Static if your ISP assigned you the IP address, Subnet
mask, Gateway, and DNS server addresses. In most cases,
select Dynamic.
Select either Always-on, On-Demand, or Manual.
Maximum Idle Time
Enter the IP address (Static PPPoE only).
Enter a maximum idle time during which the Internet
connection is maintained during inactivity. To disable this
feature, enable Auto-reconnect.
User Name
Obtain A DNS Server Address Automatically
IP Address
Enter your PPPoE user name.
Password
Enter your PPPoE password.
Verify Password
Click to enable or disable obtaining a DNS server
automatically.
Primary IPv6 DNS Address
Enter the primary IPv6 DNS address.
Retype the your PPPoE password.
Service Name
Enter the ISP Service Name (optional).
139
MTU
Enable Automatic IPv6 Address Assignment
Maximum Transmission Unit - you may need to change the
MTU for optimal performance with your specific ISP. The
default MTU is 1492.
Click to enable or disable automatic IPv6 address assignment.
Obtain A DNS Server Address Automatically
Autoconfiguration Type
Enter the autoconfiguration type. (Default: SLAAC+RDNSS)
Click to enable or disable obtaining a DNS server
automatically.
Primary IPv6 DNS Address
Enter the primary IPv6 DNS address.
Secondary IPv6 DNS Address
Enter the secondary IPv6 DNS address.
Enable DHCP-PD
Click to enable or disable DHCP-prefix delegation (PD).
LAN IPv6 Address
Enter the LAN IPv6 address.
LAN IPv6 Link-Local Address
Enter the LAN IPv6 link-local address.
140
Gateway Advertisement Lifetime
Enter the IPv6 Address Lifetime (in minutes).
Click Apply to save the settings or Cancel to discard changes.
141
Configuring 6to4
To view and configure the 6to4 settings, click IPv6 then select 6to4.
6to4 Address
Gateway Advertisement Lifetime
Enter the 6to4 IP address.
Enter the IPv6 Address Lifetime (in minutes).
Primary IPv6 DNS Address
Enter the primary IPv6 DNS address.
Click Apply to save the settings or Cancel to discard changes.
Secondary IPv6 DNS Address
Enter the secondary IPv6 DNS address.
LAN IPv6 Address
Enter the LAN IPv6 address.
LAN IPv6 Link-Local Address
Enter the LAN IPv6 link-local address.
Enable Automatic IPv6 Address Assignment
Click to enable or disable automatic IPv6 address
assignment.
Autoconfiguration Type
Enter the autoconfiguration type. The default type is: SLAAC+RDNSS
142
Viewing Local Connections
To view the Link Local settings, click IPv6 then select Link Local.
LAN IPv6 Link-Local Address
Enter the LAN IPv6 Link-Local address.
Click Apply to save the settings or Cancel to discard changes.
143
Firewall
Configuring Basic Settings
To view the Basic settings, click Firewall then select Basic. The EPG600 firewall automatically detects and blocks Denial of
Service (DoS) attacks. URL blocking, packet filtering, and stateful packet inspection (SPI) are also supported. The details of the
attack and the timestamp are recorded in the security log.
Firewall
Note: This section applies to Client Gateway mode.
Click to enable or disable the firewall for the EPG600.
Click Apply to save the settings or Cancel to discard changes.
144
Configuring Advanced Settings
The Gateway supports VPN pass-through, which allows virtual private networking (VPN) packets to pass through the firewall.
To view advanced settings, click Firewall then select Advanced.
VPN L2TP Pass-through
Note: VPN L2TP Pass-through, VPN PPTP Pass-through,
and VPN IPSec Pass-through are enabled by factory
default.
Click Select to allow an L2TP connection method over a VPN.
VPN PPTP Pass-through
Click Select to allow a PPTP connection method over a VPN.
VPN IPSec Pass-through
Click Select to allow an IPSec connection method over a VPN.
IPv6 Pass-through
Click Select to allow IPv6 packets to pass through the firewall.
PPPoE Pass-through
Click Select to allow a PPPoE packets to pass through the firewall.
Click Apply to save the settings or Cancel to discard changes.
145
Configuring Demilitarized Zone
Configuring a device on the LAN as a Demilitarized Zone (DMZ) host allows unrestricted two-way Internet access for Internet
applications such as online video games to run from behind the NAT firewall. The DMZ function allows the Gateway to
redirect all packets going to the WAN port IP address to a particular IP address on the LAN. The difference between the
virtual server and the DMZ function is that a virtual server redirects a particular service or Internet application, such as FTP, to
a particular LAN client or server, whereas a DMZ redirects all packets, regardless of the service, going to the WAN IP address
to a particular LAN client or server. A DMZ host allows a computer to have all its connections and ports completely open
during data transmission.
WARNING! The PC or computer defined as a DMZ host is not protected by the firewall and is vulnerable to malicious network
attacks. Do not store or manage sensitive information on the DMZ host.
To view the DMZ settings, click Firewall then select DMZ.
Enabling DMZ
Click Enable DMZ to activate DMZ functionality.
Local IP Address
Enter an IP address of a device on the LAN.
Click Apply to save the settings or Cancel to discard changes.
146
Configuring Denial of Service
To enable blocking of Denial of Service (DoS) attacks, select the DoS option in the Firewall section. DoS attacks can flood the
Internet connection with the continuous transmission of data. Blocking these attacks ensures that the Internet connection is
always available.To view the DoS settings, click Firewall then select DoS.
Block DoS
Click to enable or disable the blocking of DoS attacks.
Discard Ping on WAN
ICMP (ping) packages are blocked while Block DoS is enabled. Enable Discard Ping on WAN if the WAN port is required.
Click Apply to save the settings or Cancel to discard changes.
147
VPN
Configuring a VPN Tunnel Profile
To view the Status settings, click VPN then select Status. From here, you can manually configure a VPN tunnel profile.
Creating a Profile
• Click Add to create a new VPN tunnel profile.
• Click Edit to edit the settings of the selected profile.
• Click Delete Selected to delete the selected profile.
• Click Delete All to delete all current profiles.
148
Profile Settings
From here, you can manually configure a VPN tunnel profile.
Name
Enter the name for this profile.
Connection Type
Click the drop-down menu to select the connection type. Your choices are: PPTP, L2TP, IPSec, and L2TP over IPSec.
Connection Type
Click the drop-down menu to select the connection type.
L2TP
Set the authentication type and add a user. Click the check
box to enable the feature.
Shared Key
Enter the shared key to be used for this profile.
Confirm
Enter the shared key a second time to confirm the shared
key.
149
General
If under connection type you select L2TP, please add the connection type by user.
SA
If under profile settings you select SA as a connection type then select the SA tab, please select the IKE(Phase 1)Proposal
settings and the IPSec(Phase 2)Proposal settings by user you wish to apply.
150
Network
If under profile settings you select L2TP as a connection type then select the Network tab, please select the Server IP and
Remote IP range you would like.
Advanced
If under profile settings you select L2TP as a connection type then select the Advanced tab, please click to enable or disable
the NAT Traversal and the Dead Peer Detection features.
151
Configuring User Settings
The User Settings feature allows you to create user profiles in order to setup login access to the VPN service.
Name
Delete All
Enter the name of the new user profile.
Click to delete all the current user profiles.
Password
Reset
Enter the password for the user name.
Click to clear the selections from the Current VPN User Table.
Confirm
Enter the password a second time to confirm the setting.
Add
Click Add to accept the profile and add it to the Current VPN
User Table.
Apply
Click to accept and save the new settings.
Cancel
Click to clear the new changes.
Reset
Click Reset to clear the new settings.
Current VPN User Table
Displays the User ID, User Name, and Selection status.
Delete Selected
Click to delete the selected user profile.
152
153
VPN Wizard
Follow these step to setup a simple VPN connection for the Gateway.
154
1. Enter the VPN Policy name you wish for the VPN connection. Click Next to continue, Back to return to the previous
setp, or Cancel to cancel the VPN Wizard setup.
155
2. Select the VPN connection type you wish to utilize. Your options are: IPSec, L2TP over IPSec, L2TP, and PPTP. Click
Next to continue, Back to return to the previous setp, or Cancel to cancel the VPN Wizard setup.
156
3. Select the VPN IPSec mode. Your options are Client to Site or Site to Site. Click Next to continue, Back to return to
the previous setp, or Cancel to cancel the VPN Wizard setup.
157
4. Enter the shared key for the VPN connection. For security purposes, please choose something unique. Click Next to
continue, Back to return to the previous setp, or Cancel to cancel the VPN Wizard setup.
SA
Shows the Security Association number for the IPSec.
158
5. Click Enable to enable the policy immediately when the Gateway is on. Click Apply to apply the setup configurations to the
Gateway. You have now successfuly setupt a simple VPN connection for the Gateway.
159
USB Port
The EPG600 is equipped with a USB port for connecting a hard drive so media content can be accessed or transferred to
other devices in the home or devices away from home.
160
File Sharing
The File Sharing function allows you to provide users the ability to share files over the network through the Samba service.
By default this EnShare feature is enabled. To view the File Sharing settings, click USB Port then select File Sharing.
1. Select Enable to enable the Samba Service function.
2. Click Apply to save the new settings, or click Cancel to delete the changes.
161
Viewing the File Server
The File Server feature allows you to provide network users FTP access to shared USB stored files. To view the File Server
settings, click USB Port then select File Server.
Enable FTP Service
Select this to enable the FTP service to share files on the USB device
Port Number
Define the port number (default: 21) to open for the FTP service.
Login Timeout
Define the period of inactivity (default: 90) before a user is logged out.
Stay Timeout
Define the lockout period (default: 90) before a user is allowed to attempt a login.
Login User
Define the number of concurrent users to access the service (Max: 20 users)
Share Mode
Define the type of share priviledge: Read/Write or Read only.
Use Anonymous Login
Select this to allow anonymous user logins.
162
User Name
Enter the user name to login to the FTP service.
Password
Enter the password to login to the FTP service.
163
Guest Account
The guest account page allows you to configure an account for visitors to access the network while bloacking access to
folders to protect sensitive or make unauthorized changes to the network. There is only one “Administrator” user who can
access all folders on the network. The Guest Account is only available for USB related file sharing functions (EnShare, File
Sharing and File Server). Click to enable or disable the Guest Account feature.
Login Name
Enter the login name you wish to use for the guest account.
Old Password
Enter the old password you wish to use for the guest account.
New Password
Enter the new password you wish to use for the guest account.
Repeat New Password
Enter the new password again for verification.
Guest Folder Name
Enter a name you wish to use for the guest folder.
164
Viewing DLNA
The DLNA Media Server feature allows you to transfer photos, music, and video between networked devices through the
EPG600. To view the DLNA settings, click USB Port then select DLNA.
1. Select Enable to enable the DLNA Media Server function.
2. In the Share Folder Name, enter the name of the shared folder.
3. Click Apply to save the new settings, or Cancel to clear the changes.
165
Advanced Network Settings
NAT Setup
Network Address Translation (NAT) allows users on the LAN to access the Internet through a single public IP Address or
multiple public IP Addresses. NAT provides firewall protection from hacker attacks and allows for mapping LAN IP addresses
to WAN IP addresses with key services such as websites, FTP, and video game servers. To view the NAT settings, click
Advanced then select NAT.
NAT
Click to enable or disable the NAT feature.
Network Turbine
Click to enable or disable the network turbine.
Click Apply to save the settings or Cancel to discard changes.
Note: The network turbine is designed to improve the
Gateway’s performance. There is about 20~30% improvement when the network turbine is enabled.
Note: The network turbine may cause problems with the
Internet connection. Disable the network turbine function
if you experience connection issues.
166
Port Mapping Setup
Port Mapping allows you to redirect a particular range of service port numbers from the WAN to a particular LAN IP address.
To view the Port Mapping settings, click Advanced then select Port Mapping.
Enable Port Mapping
Click Enable Port Mapping to activate port mapping.
Description
Enter notes or details about the mapped port range configuration.
Local IP
Enter the local IP address of the server behind the NAT firewall.
Protocol
Select the protocol to use for mapping from the following: TCP,
UDP, or Both.
Port Range
Enter the range of ports to be forwarded.
Click Add to append a new device to the list or Reset to discard changes.
167
Current Port Mapping Table
Displays a list of mapped port ranges in use on the network.
No. (Number)
Select
The sequence number of the mapped port range.
Indicates the device(s) that can have actions performed on
them.
Description
Notes or details about the mapped port range.
Local IP
Click Delete Selected to remove selected devices from
the list. Click Delete All to remove all devices form the list
or Reset to discard changes. Next, click Apply to save the
settings or Cancel to discard changes.
Shows the IP address of the server for the mapped port
range.
Type
The protocol used to communicate with the WAN ports and
LAN server.
Port Range
Shows the range of mapped ports.
168
Port Forwarding Setup
Port forwarding enables multiple server applications on a LAN to serve clients on a WAN over a single WAN IP address. The
Gateway accepts incoming client packets, filters them based on the destination WAN, or public port and protocol and forwards
the packets to the appropriate LAN, or local port. Unlike the DMZ feature, port forwarding protects LAN devices behind the
firewall. To view the Port Forwardung settings, click Advanced then select Port Forwarding.
Enable Port Forwarding
Public Port
Click Enable Port Forwarding to activate port forwarding.
Enter the WAN port number that clients will send their
packets to.
Description
Enter notes or details about the forwarded port
configuration.
Click Add to append a new configuration to the table or
Reset to discard changes.
Local IP
Enter the local IP address of the server behind the NAT
firewall.
Protocol
Select the protocol to use for mapping from the following:
TCP, UDP or Both.
Local Port
Enter the LAN port number that WAN client packets will be
forward to.
169
Current Port Forwarding Table
This section shows the current port forwarding table configurations for the Gateway. Click Delete Selected to remove
selected devices from the list. Click Delete All to remove all devices form the list or Reset to the discard changes. Next, click
Apply to save the settings or Cancel to discard changes.
170
Port Triggering Setup
Some applications, such as online games, videoconferencing, and VoIP telephony, require multiple ports for inbound and
outbound traffic. If an application requires simultaneous use of incoming and an outgoing ports, you can configure port
triggering to map a local port or range of ports to a specific public port. Sending packets out over the local port triggers the
Gateway to open an incoming local port that is mapped to the same public port and application as the outgoing local port(s).
The local application can communicate over the incoming and outgoing ports without the need for creating a fixed address.
To view the Port Triggering settings, click Advanced then select Port Triggering.
Enable Port Triggering
Click Enable Trigger Port to activate port triggering.
Description
Enter notes or details about the port triggered configuration.
Popular Applications
Select a default application or add a new one.
Trigger Port
Enter the application’s outbound port number(s).
Trigger Type
Select the protocol to use for port triggering from the following:
TCP, UDP, or Both.
171
Public Port
Enter the inbound port(s) for the application in the following format: 2300-2400 or 47624.
Public Type
Select the protocol you wish to use for the inbound port from the following: TCP, UDP, or Both.
Click Add to append a new configuration to the table or Reset to discard changes.
172
Current Port Triggering Table
This table shows the list of current port triggering configurations. Click Delete Selected to remove selected devices from the
list, Delete All to remove all devices form the list, or Reset the discard changes. Click Apply to save the settings or Cancel to
discard changes.
173
ALG Setup
The Application Layer Gateway (ALG) serves as a window between correspondent application processes so that they may
exchange information on an open environment. To view the ALG settings, click Advanced then select ALG. Select the listed
applications that need ALG support to have the Gateway authorize them to pass through the NAT Gateway.
Click Apply to save the settings or Cancel to discard changes.
174
UPnP Setup
Universal Plug and Play (UPnP) helps internet devices such as gaming and videoconferencing to access the network and
connect to other registered UPnP devices. UPnP is designed to support zero-configuration, “invisible” networking, and
automatic discovery for a range of devices from a wide range of vendors. With UPnP, a device can dynamically join a
network, obtain an IP address and learn about the presence and capabilities of other devices automatically. Devices can the
subsequently communicate with each other directly. To view the UPnP settings, click Advanced then select UPnP. Click to
enable or disable to activate or deactivate the UPnP feature.
Click Apply to save the settings or Cancel to discard changes.
175
IGMP Setup
Internet Group Multicast Protocol (IGMP) is a network-layer protocol used to establish membership in a multicast group. To
view the IGMP settings, click Advanced then select IGMP. Click to enable or disable to activate or deactivate IGMP for the
Gateway. Click Apply to save the settings or Cancel to discard changes.
Note: Disabling the Multicast function may cause IP based multimedia
devices, such as an IP-STB or OTT box, to lose connectivity with the
media streaming server.
176
QoS Setup
Quality of Service (QoS) can prioritize bandwidth use such as video streaming, online gaming, VoIP telephony and
videoconferencing to ensure stable and efficient network performance. To view the QoS settings, click Advanced then select
QoS.
Total Bandwidth Settings
Uplink
Select the maximum bandwidth speed for outbound traffic.
Downlink
Select the maximum bandwidth speed for inbound traffic.
Note
Click Disabled if you do not wish to prioritize any data or protocol.
177
Priority Queue
Set network resource usage based on specific protocols or port ranges. Incoming packets are processed based on the protocols’
position within the queue.
Unlimited Priority Queue
Local IP Address
Enter the local IP address of a device on the network. This device’s activity is not restricted by the QoS feature.
High/Low Priority Queue
Specify the priority for different protocols. Additional protocols and port ranges can be added.
Click Apply to save the settings or Cancel to discard changes.
178
Bandwidth Allocation
From here you can set network resource usage for inbound and outbound traffic based on local IP and port ranges.
Type
Select Download or Upload to specific the direction of packet
traffic.
Local IP Range
Enter the local IP range of the current configuration.
Protocol
Select the protocol to manage for the current configuration.
Port Range
Enter the local port range of the current configuration.
Policy
Select Min or Max to specify the type of configuration policy.
Rate (bps)
Select the bandwidth rate in bits per second (bps) of the current configuration.
Click Add to save the settings and list the configuration in the Current QoS table or Reset the discard changes. Click Apply to
save the settings or Cancel to discard changes.
179
Routing Setup
Typically, static routing does not need to be setup because the Gateway has adequate routing information after it has been
configured for Internet access. Static routing is only necessary if the Gateway is connected to a network under a different set
of subnets. To view the routing settings, click Advanced then select Routing.
Note: To enable a static routing, NAT must be disabled. If the Gateway is connected with a network under the different
subnet, the routing setup allows the network connection within two different subnets.
Enable Static Routing
Enable Static Routing
Hops
Click Enable Static Routing to activate the feature.
Enter the maximum number of hops within the static routing
that a packet is allowed to travel.
Destination LAN IP
Enter the LAN IP address of the destination device.
Interface
Select LAN or WAN as the interface.
Subnet Mask
Enter the Subnet mask of the destination device.
Default Gateway
Enter the default Gateway IP address for the destination
device.
180
Current Static Routing Table
Click Add to save the settings and list the configuration in the Current Static Routing table or Reset to discard the changes.
Click Delete Selected, Delete All to remove devices from the table, or Click Reset to stop. Click Apply to save the settings or
Cancel to discard changes.
181
Wake on LAN Setup
Wake on LAN setup (WOL) allows the administrator to activate a computer over the network. To view the WOL settings, click
Advanced then select WOL.
Enabling WOL over WAN
Click Enable WOL over WAN to activate the feature.
Server Port
Enter the server port of the device to activate.
Wake MAC Address
Enter the MAC address of the device to activate.
Click Start to activate the device. Click Apply to save the settings or Cancel to discard changes.
182
Tools Setup
Configuring the Administrator Account
From here, you can Change the Gateway’s system password as well as setup a device to remotely configure the settings.To
view the Admin settings, click Tools then select Admin.
Login Name
Keep or change the existing login name.
Old Password
Enter the existing administrator password.
New Password
Enter the new administrator password.
Repeat New Password
Re-type the new administrator password.
Graphical Authentication
Enables or disables CAPTCHA authentication.
183
Remote Management
Host Address
Note: To access the settings of the EPG600 remotely,
Enter the designated host IP Address.
enter the Gateway’s WAN IP address and port number.
Port
Enter the port number for remote accessing of the management
web interface. The default number is: 8080.
Enable
Select to enable remote management.
Click Apply to save the settings or Cancel to discard changes.
184
System Time Settings
Change the system time of the EPG600 and setup automatic updates through a network time (NTP) protocol server or
through a computer. To view the Time Settings, click Tools then select Time.
Synchronizing with an NTP Server
Time Setup
Select how the Gateway obtains the current time.
Click Apply to save the settings or Cancel to discard changes.
Time Zone
Select the time zone for the Gateway.
NTP Time Server
Enter the domain name or IP address of an NTP server.
Enabling Daylight Savings
Click to enable or disable daylight savings time.
Start Time
Select the date and time when daylight savings time starts.
End Time
Select the date and time when daylight savings time ends.
185
Synchronizing with a Computer
From here, you can setup the date and time syncronization on the EPG600 with a computer. To synchronize date and time
settings with a computer, please follow these steps:
1. Select Synchronize with PC (computer) from the Time Setup dropdown list. The date and time values are shown in the PC
Date and Time text field.
2. Click Prev to return to the previous screen, Apply to save the settings, or Cancel to stop the procedure.
186
Unique Identifier (UID)
From here, you can configure the Unique Identifier (UID) settings for the EPG600. The UID is an EnGenius proprietary feature
that allows Gateways to be connected by EnGenius mobile apps regardless if they is situated behind another Gateway or not.
This is accomplished through the implementation of NAT passthrough. Under the Tools section, click on UID/DDNS. Please
follow the steps below to setup your UID login:
1. Click the bubble to enable the UID/Dynamic DNS feature.
2. Click the Use Default UID/EnGenius DDNS Services bubble to automatically receive a static domain name for a dynamic IP
address.
3. Enter an Alias DDNS name and click Availability Check to see if the name is free or in use.
4. Select the Refresh Time interval. This will refresh the UID/DDNS service based on how often you specify.
5. Click Apply to save the configuration.
Default UID
Refresh Time
Displays the default UID in use.
Specifies how often the UID/DDNS service will refresh. Your
options are: 24 hr, 12 hr, 9 hr, 6 hr, and 3 hr increments.
UID Status
DDNS Status
Displays the current connection status for the UID service.
Displays the current connection status for the DDNS service.
Default DDNS Name
Displays the default name for the DDNS address.
Alias DDNS Name
The common name for the DDNS address. Similar to how a
URL is easier to remember than an IP address, but represent
the same destination.
187
DDNS Setup
The most common use for Dynamic Domain Name Service (DDNS) is in allowing an Internet domain name to be assigned
to a computer with a varying (dynamic) IP address. This makes it possible for other sites on the Internet to establish
connections to the machine without needing to track the IP address themselves. To view the DDNS settings, click Tools
then select UID/DDNS.
Use Other DDNS Services
Click to enable or disable alternate DDNS services for the EPG600.
Server Address
Select the server address. Your options are: 3322 (qdns), DHS,
DynDNS, Zone Edit, or Cyber Gate
Host Name
Enter the host name.
Username
Enter a username for the host service.
Password
Enter a password for the host service.
Click Apply to save the settings or Cancel to discard changes.
188
The EnGenius DDNS feature is easy to use:
1. Users can find the default DDNS value under the device label.
2. The DDNS service is free.
3. The DDNS name can be changed to a custom name if you wish.
189
Diagnosis
The Diagnosis feature allows the administrator to verify that a client device is available on the network and is accepting
request packets. If the ping results return “alive”, it means a device is connected. Please note that this feature does not work
if the target device is behind a firewall or has security software installed. To view the Diagnosis settings, click Tools then
select Diagnosis.
Diagnosing a Network Connection Problem
Address to Ping
Enter the IP address of the device you wish to ping.
Ping Frequency
Select the interval, in seconds that the ping message is to be sent out.
Click Start to begin the diagnosis.
190
Upgrading The Gateway’s Firmware
Firmware is the Gateway’s system software that operates and allows the administrator to interact with it. To view the
Firmware settings, click Tools then select Firmware.
WARNING! Upgrading firmware through a wireless connection is not recommended. Firmware upgrading must be performed while
connected to an Ethernet (LAN port) with all other clients disconnected.
To update the firmware version, please follow these steps:
Manual Firmware Upgrade:
1. Download the appropriate firmware approved from an EnGenius web site such as www.engeniustech.com. See the Downloads tab on the product page for this product. For new products, new firmware may not be readily available.
2. Click Choose File.
3. Browse the file system and select the firmware file.
4. Click Apply.
191
Auto Firmware Upgrade:
Enable the Auto Firmware Upgrade function, and the latest update firmware information will be shown. Click Release Note
to check the update details and click Upgrade to proceed the firmware upgrade immediately.
WARNNING!Do not turn off the device in the middle of upgrade process. Terminating the device during the
process will damage the device and may cause the device to fail.
192
Backing Up The Gateway’s Settings
Save your current Gateway’s settings as a configuration file on your computer. To view the Back-up settings, click Tools then
select Back-up.
Backup Settings
Click Save to save the current configuration on the Gateway to a *.dlf file.
Restore Settings
To restore saved settings, follow the steps below:
1. Click Choose File.
2. Browse the file system for location of the settings file (*.dlf).
3. Click Upload.
193
Reset to default / Reboot the Gateway
This feature allows you to reboot the Gateway in the event of a system hangup or other disruption to the network. To view
the reset settings, click Tools then select Reset. Click Apply to reset the device.
Restoring to the Gateway’s Factory Default Settings
Click Reset to restore the EPG600 to its factory default settings.
194
Glossary
195
6to4
ACL
Access Point Mode
ALG
Backup
Bandwidth
Bit Rate
Boot
Community String
Default Gateway
DHCP
Dial Plan
DDNS
DLNA
Diagnostic
6to4 allows IPv6 packets to be transmitted over an IPv4 network.
The Access Control List specifies which users or processes are granted access to objects, as
well as which operations are allowed.
In Access Point mode, the EPG600 allows wireless devices to connect to a wired network
using Wi-Fi, or other related standards. You can choose to have the Gateway associate only
with certain iterations (IEEE standards) and by doing so this will either positively or negatively
affect the Gateway’s speed and throughput performance.
Application Layer Gateway serves as a window between correspondent application processes
so that they may exchange
information on an open environment.
A copy of a set of files made for replacement purposes in case the original set is damaged
or lost.
Bandwidth refers to the information-carrying capacity of a network or component of a
network expressed in bits per second.
The rate at which bits are transmitted or received during communication, expressed as the
number bits in a given amount of time, usually one second.
A computer’s startup operation.
A text string that acts as a password and is used to authenticate messages sent between
a management station and a Gateway containing a SNMP agent. The community string is
sent in every packet between the manager and the agent.
A Deafult Gateway is the device that passes traffic from the local subnet to devices on other subnets. It is usually the IP address of the Gateway to which your network is connected.
The Dynamic Host Cnfiguation protocol is used for dynamically distributing network configuration parameters, such as IP addresses for interfaces and services.
A Dial Plan establishes an expected sequence of digits dialed on subscriber devices, such as
telephones, in private branch exchange (PBX) systems, or in other telephone switches.
Dynamic Domain Name Service (DDNS) allows for an Internet domain name to be assigned to a
computer with a varying (dynamic) IP address.
The Digital Living Network Alliance DLNA is a nonprofit collaborative trade organization
that is responsible for defining interoperability guidelines to enable the sharing of digital
media between multimedia devices. Some HDTVs, Gaming Consoles, and other media devices adhere to DLNA guidelines.
A test or the data from a test which indicates the condition of thestate of a computer or
network’s health.
196
DMZ
DNS
Domain
DoS
Download
DS-Lite
Dynamic IP
Encryption
Firewall
Firmware
FTP
Gateway
A Demilitarized Zone allows unrestricted two-way Internet access for Internet applications
such as online video games to run from behind the NAT firewall. DMZ allows the Gateway to
redirect all packets going to the WAN port IP address to a particular IP address on the LAN.
A Domain Name System is a hierarchical distributed naming system for computers, services,
or any resource connected to the Internet or a private network. This allows the recognition
of domain names such as www.yahoo.com instead of 98.139.183.24, which is more difficult to
remember.
A portion of the spanning hierarchy tree that refers to general groupings of networks
based on organization type or geography.
Denial of Service is an interruption in an authorized user’s access to a computer network
and is typically caused with malicious intent. Although the process and targets of a DoS attack vary, it generally consists of efforts to temporarily or indefinitely interrupt or suspend
services of a host connected to a network.
The transfer of a file from a remote computer to a local computer.
Dual Stack-Lite uses IPv6-only links between the networks while maintaining the IPv4 (or
dual-stack) hosts in a network by encapsulating an IPv4 packet in an IPv6 packet for transport into the provider network.
An IP address that is assigned and changed periodically. Dynamic IP addresses can change
each time you connect to the Internet, while static IP addresses are reserved for you statically and don’t change over time.
The application of a specific algorithm to data so as to alter the appearance of the data
making it incomprehensible to those who are not authorized to see the information.
A Gateway or access server, or several Gateways or access servers designated as a buffer
between any connected public networks and a private network. A firewall Gateway uses
access lists and other methods to ensure the security of the private network.
A collection of programmed routines and instructions that is implemented in a computer
chip or similar hardware form instead of a software form. Please check www.engeniustech.
com for firmware updates.
An application protocol that uses the TCP/IP protocols. It is used to exchange files between
computers/devices on networks.
A Gateway is a point in a network that acts as an entry point to another network. In a
corporate network for example, a computer server acting as a Gateway often also acts as
a proxy server and a firewall server. A Gateway is often associated with both a Gateway,
which knows where to direct a given packet of data that arrives at the Gateway,and a
Switch, which furnishes the actual path in and out of the Gateway for a given packet.
197
Guest Network
GUI
IGMP
IP
IP Address
IPv6
L2TP
LAN
MAC Address
A guest network is a section of an computer network designed for use by temporary visitors. This subnetwork often provides full Internet connectivity, but also strictly limits access to any internal Web sites or files.
Graphical User Interface. User environment that uses pictorial as well as textual representations of the input and output of applications and the hierarchical or other data structure
in which information is stored.
The Internet Group Multicast Protocol is a protocol that provides the means for a host to
inform its attached Gateway that an application running wants to join a specific multicast
group.
The Internet Protocol is a method transmitting data over a network. Data to be sent is
divided into individual and completely independent “packets.” Each computer (or host)
on the Internet has at least one address that uniquely identifies it from all others, and
each data packet contains both the sender’s address and the receiver’s address. The
Internet Protocol ensures that the data packets all arrive at the intended address. As IP is
a connectionless protocol, (which means that there is no established connection between
the communication end-points) packets can be sent via different routes and do not need
to arrive at the destination in the correct order. Once the data packets have arrived at the
correct destination, another protocol, Transmission Control Protocol (TCP) puts them in the
right order.
An IP address is simply an address on an IP network used by a computer/device connected
to that network. IP addresses allow all the connected computers/devices to find each other
and to pass data back and forth. To avoid conflicts, each IP address on any given network
must be unique. An IP address can be assigned as fixed, so that it does not change, or it can
be assigned dynamically (and automatically) by DHCP. An IP address consists of four groups
(or quads) of decimal digits separated by periods, e.g. 130.5.5.25. Different parts of the
address represent different things. One part represent the network number or address, and
other part represents the local machine address.
IPv6 provides an identification and location system for computers on networks and routes
that traffic across the Internet.
The Layer 2 Tunneling Protocol is used to support VPNs or as part of the delivery of services by ISPs.
A communication infrastructure that supports data and resource sharing within a small area
that is completely contained on the premises of a single owner.
Standardized data link layer address that is required for every port or device that connects
to a LAN. Other devices in the network use these addresses to locate specific ports in the
network and to create and update routing tables and data structures. MAC addresses are 6
bytes long and are controlled by the IEEE.
198
MAC Address Filtering
MTU
NAT
NTP Sevrer
Packet
Port Forwarding
Port Mapping
Port Triggering
PPPoE
PPTP
Priority Queue
QoS
RADIUS
Mac Address Filtering permits and denies network access to specific devices based on a
device’s MAC address.
Maximum Transmission Unit. A specification in a data link protocol that defines the maximum number of bytes that can be carried in any one packet on that link.
Network Address Translation is a methodology of modifying network address information
in Internet Protocol (IP) datagram packet headers while they are in transit across a traffic
routing device.
The Network Time Protocol is used for clock synchronization between computer systems.
A discrete chunk of communication in a pre-defined format.
Port Forwarding allows remote computers to connect to a specific computer or service
within a private LAN.
Port Mapping allows you to redirect a particular range of service port numbers from the WAN to
a particular LAN IP address
Port Triggering lets you map a local port or range of ports to a specific public port. Sending
packets out over the local port triggers the Gateway to open an incoming local port that
is mapped to the same public port and application as the outgoing local port(s). The local
application can communicate over the incoming and outgoing ports without the need for
creating a fixed address.
Point-to-Point Protocol over Ethernet (PPPoE) is a network protocol for encapsulating PPP
frames inside Ethernet frames. PPPoE can be used to have an office or building-full of users
share a common DSL, cable modem, or wireless connection to the Internet.
A protocol that allows corporations to extend their own corporate network through private
“tunnels” over the public Internet. In this way a corporation can effectively use a WAN as a
large single LAN.
A Priority queue is a queue where an element with a high priority is served before an element with low priority. If two elements happen to have the same priority, they are served
according to their order in the queue.
Quality of service is the ability to provide different priority to different applications, users,
or data flows, or to guarantee a certain level of performance to a data flow. It is espcially
important for applications like multimedia streaming and VoIP.
Remote Authentication Dial In User Service is a networking protocol that provides centralized authentication, authorization, and accounting management for users that connect and
use a network service.
199
RAM
Reboot
Server
Gateway
Static IP
SSID
Subnet Mask
Throughput
Time-Out
TKIP
UID
Upload
UPnP
USB
Random Access Memory. A group of memory locations that are numerically identified to
allow high speed access by a CPU. In random access, any memory location can be accessed
at any time by referring to its numerical identifier as compared to sequential access, where
memory location 6 can only be accessed after accessing memory locations 1-5.
A user activity where the user starts a computing device without interrupting its source of
electrical power.
In general, a server is a computer program that provides services to other computer programs
within the same or other computers. A computer running a server program is also frequently
referred to as a server. In practice, the server may contain any number of server and client
programs. A web server is the computer program that supplies the requested HTML pages or
files to the client (browser).
A device that determines the next network point to which a packet should be forwarded to
on its way to its final destination. A Gateway creates and/or maintains a special routing table
that stores information on how best to reach certain destinations. A Gateway is sometimes
included as part of a network Switch.
An IP address that is unchanging. It is more reliable when dealing with VoIP, online gaming,
and VPNs.
A Service Set Identifier is a set consisting of all the devices associated with a WLAN.
A representation of a user’s Internet address where all of the bit positions corresponding to
the user’s network and subnetwork id are 1’s and the bit corresponding to the user’s host id
are 0’s.
Rate of information arriving at, and possibly passing through, a particular point in a network
system.
Event that occurs when one network device expects to hear from another network device
within a specified period of time, but does not. The resulting time-out usually results in a
retransmission of information or the dissolving of the session between the two devices
Temporal Key Integrity Protocol is a stopgap security protocol used in IEEE 802.11 wireless
networking standards used to replace WEP.
A Unique Identifier is a unique reference number used as an identifier.
The activity of transferring a file from a user’s computer system to a remote system
Universal Plug n Play is a protocol that permits networked devices to seamlessly discover
each other’s presence on the network.
A plug-and-play interface between a computer and peripheral devices, e.g. scanners, printers,
etc.
200
VoIP
VPN
VPN Tunnel
WAN
WDS Mode
WEP
WLAN
WOL
WPA / WPA2
Voice over IP is a technology used for the delivery of voice communications and multimedia
sessions over IP networks rather than a PSTN line.
A Virtual Private Network creates a secure “tunnel” between the points within the VPN. Only
devices with the correct “key” will be able to work within the VPN. The VPN network can be
within a company LAN (Local Area Network), but different sites can also be connected over
the Internet in a secure way. One common use for VPN is for connecting a remote computer
to the corporate network, via e.g. a direct phone line or the Internet.
VPN Tunneling is a link which connects a network directly to another network. The connection between the complementary links is called a VPN tunnel VPN comprises with a VPN
server and a VPN client. A VPN client is usually a software program which can be configured to the VPN server.
A Wide Area Network is a network that covers a broad area over long distances using private or public network transports between different LANs, MANs and other localised computer networking architectures.
Wireless Distribution System Mode is a MAC address-based system enabling the wireless
interconnection of Access Points in an IEEE 802.11 network.
Wired Equivalent Privacy is a is a security protocol for wireless networks that encrypts
transmitted data.
A Wireless LAN is a LAN that links two or more devices using some wireless distribution
method. This gives users the ability to move around within a local coverage area and still
be connected to the network.
Wake on LAN allows a computer to be turned on or awakened by a network message.
Wi-Fi Protected Access and Wi-Fi Protected Access II are security protocols and security
certification programs used to secure wireless computer networks. They are reccomended
over WEP.
201
Appendix
202
Federal Communication Commission Interference Statement
This equipment complies with Part 68 of the FCC rules and the requirements adopted by the ACTA. On the bottom of this
equipment is a label that contains, among other information, a product identifier in the format US: SNIIT01BEPG600. If
requested, this number must be provided to the telephone company.
The REN is used to determine the number of devices that may be connected to a telephone line. Excessive RENs on a
telephone line may result in the devices not ringing in response to an incoming call. In most but not all areas, the sum of
RENs should not exceed five (5.0). To be certain of the number of devices that may be connected to a line, as determined by
the total RENs, contact the local telephone company. For products approved after July 23, 2001, the REN for this product is
part of the product identifier that has the format US: SNIIT01BEPG600. The digits represented by 01 are the REN without a
decimal point (e.g., 03 is a REN of 0.3). For earlier products, the REN is separately shown on the label.
A plug and jack used to connect this equipment to the premises wiring and telephone network must comply with the applicable
FCC Part 68 rules and requirements adopted by the ACTA. A compliant telephone cord and modular plug is provided with this
product. It is designed to be connected to a compatible modular jack that is also compliant. See installation instructions for
details.
If this equipment causes harm to the telephone network, the telephone company will notify you in advance that temporary
discontinuance of service may be required. But if advance notice isn’t practical, the telephone company will notify the
customer as soon as possible. Also, you will be advised of your right to file a complaint with the FCC if you believe it is
necessary.
The telephone company may make changes in its facilities, equipment, operations or procedures that could affect the
operation of the equipment. If this happens, the telephone company will provide advance notice in order for you to make
necessary modifications to maintain uninterrupted service.
203
If trouble is experienced with this equipment, for repair or warranty information, please contact:
Company: EnGenius Technologies, Inc.
Address: 1580 Scenic Avenue Costa Mesa, CA 92626 USA
Tel no.: 1-714-432-8668
If the equipment is causing harm to the telephone network, the telephone company may request that you disconnect the equipment until the problem is resolved.
Connection to party line service is subject to state tariffs. Contact the state public utility commission, public service commission or corporation commission for information.
If your home has specially wired alarm equipment connected to the telephone line, ensure the installation of this equipment
does not disable your alarm equipment. If you have questions about what will disable alarm equipment, consult your telephone
company or a qualified installer.
204
Europe – EU Declaration of Conformity
This device complies with the essential requirements of the R&TTE Directive 1999/5/EC. The following test methods have
been applied in order to prove presumption of conformity with the essential requirements of the R&TTE Directive 1999/5/EC:
• EN60950-1
Safety of Information Technology Equipment
• EN50385
Generic standard to demonstrate the compliance of electronic and electrical apparatus with the basic restrictions related to human
exposure to electromagnetic fields (0 Hz - 300 GHz)
•
EN 300 328
ElectromagneticcompatibilityandRadiospectrumMatters(ERM);WidebandTransmissionsystems;Datatransmissionequipmentoperating
in the 2,4 GHz ISM band and using spread spectrum modulation techniques; Harmonized EN covering essential requirements under article
3.2 of the R&TTE Directive
• EN 301 893
Broadband Radio Access Networks (BRAN); 5 GHz high performance RLAN; Harmonized EN covering essential requirements of article 3.2
of the R&TTE Directive
• EN 301 489-1
ElectromagneticcompatibilityandRadioSpectrumMatters(ERM);ElectroMagneticCompatibility(EMC)standardforradioequipmentand
services; Part 1: Common technical requirements
• EN 301 489-17
ElectromagneticcompatibilityandRadiospectrumMatters(ERM);ElectroMagneticCompatibility(EMC)standardforradioequipmentand
services; Part 17: Specific conditions for 2,4 GHz wideband transmission systems and 5 GHz high performance RLAN equipment
205
This device is a 5 GHz wideband transmission system (transceiver), intended for use in all EU member states and EFTA
countries, except in France and Italy where restrictive use applies.
In Italy the end-user should apply for a license at the national spectrum authorities in order to obtain authorization to use the
device for setting up outdoor radio links and/or for supplying public access to telecommunications and/or network services.
This device may not be used for setting up outdoor radio links in France and in some areas the RF output power may be
limited to 10 mW EIRP in the frequency range of 2454 – 2483.5 MHz. For detailed information the end-user should contact
the national spectrum authority in France.
Česky [Czech]
[Jméno výrobce] tímto prohlašuje, že tento [typ zařízení] je ve shodě se základními požadavky a dalšími příslušnými
ustanoveními směrnice 1999/5/ES.
Dansk [Danish]
Undertegnede [fabrikantens navn] erklærer herved, at følgende udstyr [udstyrets typebetegnelse] overholder de
væsentlige krav og øvrige relevante krav i direktiv 1999/5/EF.
Deutsch [German]
Hiermit erklärt [Name des Herstellers], dass sich das Gerät [Gerätetyp] in Übereinstimmung mit den grundlegenden
Anforderungen und den übrigen einschlägigen Bestimmungen der Richtlinie 1999/5/EG befindet.
Eesti [Estonian]
Käesolevaga kinnitab [tootja nimi = name of manufacturer] seadme [seadme tüüp = type of equipment] vastavust
direktiivi 1999/5/EÜ põhinõuetele ja nimetatud direktiivist tulenevatele teistele asjakohastele sätetele.
English
Hereby, [name of manufacturer], declares that this [type of equipment] is in compliance with the essential requirements
and other relevant provisions of Directive 1999/5/EC.
Español [Spanish]
Por medio de la presente [nombre del fabricante] declara que el [clase de equipo] cumple con los requisitos esenciales
y cualesquiera otras disposiciones aplicables o exigibles de la Directiva 1999/5/CE.
Ελληνική [Greek]
ΜΕ ΤΗΝ ΠΑΡΟΥΣΑ [name of manufacturer] ΔΗΛΩΝΕΙ ΟΤΙ [type of equipment] ΣΥΜΜΟΡΦΩΝΕΤΑΙ ΠΡΟΣ ΤΙΣ ΟΥΣΙΩΔΕΙΣ
ΑΠΑΙΤΗΣΕΙΣ ΚΑΙ ΤΙΣ ΛΟΙΠΕΣ ΣΧΕΤΙΚΕΣ ΔΙΑΤΑΞΕΙΣ ΤΗΣ ΟΔΗΓΙΑΣ 1999/5/ΕΚ.
206
Français [French]
Par la présente [nom du fabricant] déclare que l’appareil [type d’appareil] est conforme aux exigences essentielles et aux
autres dispositions pertinentes de la directive 1999/5/CE.
Italiano [Italian]
Con la presente [nome del costruttore] dichiara che questo [tipo di apparecchio] è conforme ai requisiti essenziali ed alle
altre disposizioni pertinenti stabilite dalla direttiva 1999/5/CE.
Latviski [Latvian]
Ar šo [name of manufacturer / izgatavotāja nosaukums] deklarē, ka [type of equipment / iekārtas tips] atbilst Direktīvas
1999/ 5/EK būtiskajām prasībām un citiem ar to saistītajiem noteikumiem.
Lietuvių [Lithuanian]
Šiuo [manufacturer name] deklaruoja, kad šis [equipment type] atitinka esminius reikalavimus ir kitas 1999/5/EB
Direktyvos nuostatas.
Nederlands [Dutch]
Hierbij verklaart [naam van de fabrikant] dat het toestel [type van toestel] in overeenstemming is met de essentiële eisen
en de andere relevante bepalingen van richtlijn 1999/5/EG.
Malti [Maltese]
Hawnhekk, [isem tal-manifattur], jiddikjara li dan [il-mudel tal-prodott] jikkonforma mal-ħtiġijiet essenzjali u ma provvedimenti
oħrajn relevanti li hemm fid-Dirrettiva 1999/5/EC.
Magyar [Hungarian]
Alulírott, [gyártó neve] nyilatkozom, hogy a [... típus] megfelel a vonatkozó alapvetõ követelményeknek és az 1999/5/EC
irányelv egyéb elõírásainak.
Polski [Polish]
Niniejszym [nazwa producenta] oświadcza, że [nazwa wyrobu] jest zgodny z zasadniczymi wymogami oraz pozostałymi
stosownymi postanowieniami Dyrektywy 1999/5/EC.
Português [Portuguese]
[Nome do fabricante] declara que este [tipo de equipamento] está conforme com os requisitos essenciais e outras
disposições da Directiva 1999/5/CE.
Slovensko [Slovenian]
[Ime proizvajalca] izjavlja, da je ta [tip opreme] v skladu z bistvenimi zahtevami in ostalimi relevantnimi določili direktive
1999/5/ES.
Slovensky [Slovak]
[Meno výrobcu] týmto vyhlasuje, že [typ zariadenia] spĺňa základné požiadavky a všetky príslušné ustanovenia Smernice
1999/5/ES.
Suomi [Finnish]
[Valmistaja = manufacturer] vakuuttaa täten että [type of equipment = laitteen tyyppimerkintä] tyyppinen laite on
direktiivin 1999/5/EY oleellisten vaatimusten ja sitä koskevien direktiivin muiden ehtojen mukainen.
Svenska [Swedish]
Härmed intygar [företag] att denna [utrustningstyp] står I överensstämmelse med de väsentliga egenskapskrav och
övriga relevanta bestämmelser som framgår av direktiv 1999/5/EG.
207
How to setup VPN function?
208
VPN Wizard
Introduction
VPN Basics
A Virtual Private Network (VPN) provides a secure connection between two remote private network users over the
public Internet. It provides authentication to secure the encrypted data communicated between the two remote endpoints.
There are two types of components in a VPN setup: VPN Server and VPN Client.
VPN server in charges of encapsulating and encrypting the passing traffic of its local domain so that the local traffic can be hidden inside a normal packet to be routed over the Internet. VPN server plays the security role that ensures
only legitimate personnel can get access the private network that sits behind. EPG600 is a VPN server.
VPN Client is a software that allows user to establish a secured tunnel with a specific VPN server so that private
network can be accessible over the Internet. The VPN client needs to provide a legitimate username and password for
security check. There are many commercial software VPN Clients such as TheGreenBow. However, the most accessible
and convenient way is by using the Windows native VPN client.
EPG600 supports two types of VPN setups: Client-to-Site and Site-to-Site. The “Site” can be regarded as a private network that holds important resource only accessible to legitimate client users in a VPN setup.
209
Client to Site
Single VPN server sits in front of the private network. The users use VPN client software to gain access to the private network. For example, the sales on business travel can get remotely access company’s confidential file stored in
headquarter (private network). Multiple clients/users can connect to VPN server concurrently.
Site to Site
Two VPN servers, each in charges of its own private network. The users use VPN client software to gain access to
the private network. The users under these two LANs are allowed to the EPG600 can then exchange the data securely
using the VPN tunnel. For example, headquarter can establish a VPN over the Internet with a branch office at a remote
site so that users of both sides can link to each other as if they are under the same local network.
210
EPG600 supports 4 types of VPN tunnels
1. IPSec (Internet Protocol Security)
2. L2TP over IPSec (Layer 2 Tunneling Protocol over Internet Protocol Security)
3. L2TP (Layer 2 Tunneling Protocol)
4. PPTP (Point to Point Tunneling Protocol)
DDNS / WAN IP address / LAN IP address
Users are recommended to use the free DDNS address printed on the label at the back of the Gateway. This is because ISP often leases dynamic WAN IP address that changes from time to time. DDNS domain name will always be the
same even if the WAN IP address changes. The domain name can also be found on your DDNS configuration page located under Tools section. As shown in the snapshot below, the DDNS domain name used for the example is 0f9e76a.
engeniusddns.com.
211
For users who really need to know the current WAN IP address and LAN/Gateway IP address on your Gateway.
The IP Addresses can be found at the Network Setting page after Gateway login. For example, as shown on the snapshot below, the WAN IP address is 1.172.111.142 and the LAN/Gateway IP address is 192.168.0.1.
Note: Administrator access to the operating system is required for client interface configuration.
212
VPN Profile & Users Setting
Profile Setting
A VPN setting is stored as a profile. That is, a profile is a representation of VPN tunnel configuration.
VPN profile can be viewed under Profile Setting. You won’t be needed to create profile here if using VPN Wizard.
213
If this is the first time your configure VPN on this Gateway, the profile list should be empty as shown below. User is
allowed to Add, Edit and Delete the selected profiles. Please refers to VPN manual Setup chapter for more detail.
The VPN profiles can be enabled or disabled dynamically. Click on the checkboxes under Enable column to set enable or
disable the profile.
Then, most importantly, click Apply button to apply the settings.
214
User Setting
EPG600 (VPN server) is responsible for user authentication. A list of users must be created before creating VPN profile.
For each profile, users must be assigned to the profile.
215
The following example shows how to add a user named “peter” with a password “ax123456”.
Click on User Setting under VPN section.
Type in peter for Name
Type in password ax123456
Click Add to add the user to the user table.
216
In this example, two users are added. Now select all the users by clicking on the check boxes beside User Name.
Click Apply to make is user table active for VPN profiles. This list of users will become available for selection when creating VPN profiles.
217
VPN Wizard: IPSec Site-to-Site
IPSec Site-to-Site VPN tunnels are used for connecting two remote sites (LANs). Under each site, there may be multiple devices that need to exchange confidential data while direct connection is not possible because of the fact that
they are under different domain. By establishing an IPSec Site-to-Site VPN tunnel the data is encapsulated and handled
by the VPN servers on each site so that the communication becomes possible.
Two EnGenius VPN compatible Gateways are required to establish a Site-to-Site VPN tunnel. You can set up the
VPN profile by either using a friendly, point-and-click Wizard or entering profile settings manually. To set up your VPN
profile in the quickest way possible, use the Wizard. If you are a technical user and prefer to set up your VPN profile
manually.
The following diagram illustrates the example given in this section. This example consists of two VPN Gateways
(servers) with unique DDNS 0f9e76a and 0f9e76b. IPSec site-to-site VPN tunnel will enable the PCs under these two
sites to communicate despite of the different LANs (192.168.1.X and 192.168.2.X) they are under.
218
Site A Configuration
Login into Gateway 0f9e76a.engeniusddns.com and use VPN Wizard. Click Next to start.
219
Enter a name for VPN policy name; for this example we
enter SiteB (meaning that it is used to connect to SiteB).
Click Next to continue.
Select Site to Site and click Next to continue.
Select IPSec and click Next to continue.
220
Security Gateway Type: Select Domain Name
Security Gateway: enter the counter-site DDNS. In this case we enter 0f9e76b.engeniusddns.com which is the remote site VPN server that SiteA needs to communicate with.
Enter Remote Address: enter the counter-site domain. In this case we enter 192.168.2.0 which is the SiteB LAN domain.
Remote Netmask: enter the netmask of the counter-site netmask. In this case we enter 255.255.255.0.
Once completed, click Next to continue.
221
Enter the Shared Key (note: both sites MUST have the exact same key password). In this case, we enter “11112222”.
This key will be used when configuring the VPN client for authentication purpose.
Note: You should use more sophisticated key to enhance security.
Click Next to continue.
222
Make sure the checkbox “Enable this policy immediately” is selected.
Click Apply to create and enable this policy.
223
Site B Configuration
Login into Gateway 0f9e76b.engeniusddns.com and use VPN Wizard. Click Next to start.
224
Enter a name for VPN policy name; for this example we enter SiteA (meaning that it is used to connect to Site A). Click
Next to continue.
225
Select IPSec and click Next to continue.
Select Site to Site and click Next to continue.
226
Security Gateway Type: Select Domain Name
Security Gateway: enter the counter-site DDNS. In this case we enter 0f9e76a.engeniusddns.com which is the remote site VPN server that Site B needs to communicate with.
Enter Remote Address: enter the counter-site domain. In this case we enter 192.168.1.0 which is the Site A LAN
domain.
Remote Netmask: enter the netmask of the counter-site netmask. In this case we enter 255.255.255.0.
Once completed, click Next to continue.
227
Enter the Shared Key (note: both sites MUST have the exact same key password). In this case, we enter “12345678”.
This key will be used when configuring the VPN client for authentication purpose.
Note: You should use more sophisticated key to enhance security.
Click Next to continue.
228
Make sure the checkbox “Enable this policy immediately” is selected.
Click Apply to create and enable this policy.
229
VPN Wizard: IPSec Client to Site
The following diagram illustrates the example given in this section. This example consists of a VPN Gateway (servers) with unique DDNS 0f9e76a. A client device (PC or laptop) with the VPN-client software TheGreenBow installed.
230
Site Configuration
Under VPN section, choose Wizard.
Assign a VPN profile name by typing homeVPN (or any other preferable name).
Click Next to proceed.
231
Select IPSec and click Next
Select Client to Site and click Next
232
Enter the shared key for your profile; for this example, enter “11112222”
This key will be used when configuring the VPN client for authentication purpose.
Note: You should use more sophisticated key to enhance security.
233
Click Apply to complete the server side configuration.
234
Client Configuration
IPSec Client-to-Site VPN tunnel requires additional 3rd-party VPN client (TheGreenBow) with EnGenius VPN Gateway. This is one of the most popular IPSec VPN client software downloadable on the Internet. Please download the
software from TheGreenBow official web site https://www.thegreenbow.com/. Please note that you will have to
purchase a license after the trial period.
Start the application. First, we need to create a new tunnel.
Right-Click on VPN Configuration to get
the pop-up menu.
Select New Phase 1 to create.
The new item Gateway is now created.
235
Right Click on Gateway and click on New Phase 2 to create Phase 2.
Once completed, you should see something like the following. We will now start configuring the newly created items.
236
Click on Gateway on the left and then click on Authentication tab.
Select the network interface you will use to connect to the Internet. Then, enter the VPN Gateway DDNS. In this example we enter 0f9e76a.engeniusddns.com.
As for the pre-shared Key we enter 11112222 (you may have a different shared-key, please type yours accordingly).
By default, the IKE setting does not require any modification; however, you should check if you have the same setting.
Please change it if it’s not the same as shown below.
Encryption: 3DES
Authentication: SHA-1
Key Group: DH2 (1024)
Click on Save button when done.
237
Click on Gateway on the left and then click on IPSec tab.
VPN Client address: 0.0.0.0.
Address type: select Subnet address
Remote LAN address: 192.168.0.0
Subnet mask: 255.255.255.0
Encryption: 3DES
Authentication: SHA-1
Model: Tunnel
Make sure PFS is un-checked.
Click Save when done.
238
We have now completed the IPSec VPN-client setup.
To establish the tunnel, right-click on Tunnel.
Click Open tunnel to start.
239
Please pay attention to your system tray on the bottom right corner of your screen.
It may take a few seconds for the connection.
When successfully connected, the message “Tunnel opened” will appear.
240
VPN Wizard: L2TP over IPSec
The following diagram illustrates the example given in this section. A user, “peter”, has already been created in the
User Setting.
VPN Server Side Information:
Private Network domain: 192.168.0.X
Domain net mask: 255.255.255.0
DDNS domain: 0f9e76a.engeniusddns.com
LAN IP: 192.168.0.1
Pre-shared key: 11112222
User Name: peter
Password: ax123456
VPN Server Address: 192.168.2.10
Client Side:
VPN Client will be assigned with an IP address 192.168.2.X address when the tunnel is established.
241
VPN Server (Gateway Side)
Under VPN section, choose Wizard.
242
Assign a VPN profile name by typing homeVPN (or any
other preferable name).
Click Next to proceed.
Select L2TP over IPSec and click Next to proceed.
243
Select a user (which created earlier in User Setting section) from the user list. In this example “peter” is selected.
VPN Server IP is given to the VPN server on EPG600. In this case, please type in 192.168.2.10.
Type in 192.168.2.100 and 200 into the Remote IP range fields.
Click Next to continue.
Note1: Server IP and Remote IP Range should be under the same domain. The server
will be listening to the traffic for from 192.168.2.X.
Note2: Remote IP range is the range of IP addresses space reserved for VPN the connecting VPN clients.
244
Enter 11112222 for the Shared Key.
This key will be used when configuring the VPN client for authentication purpose.
Note: You should use more sophisticated key to enhance security.
Click Next to continue.
245
At this very last page, click Apply to enable the policy immediately.
It takes about 15 seconds for the Gateway to activate the VPN profile.
Once the Gateway is ready, the page will be redirected to Profile Setting section where the new profile homeVPN is
shown.
246
VPN Client
You will need a PC or Laptop running VPN enabled operating system. The following sections demonstrate how to use
built-in VPN client to establish a VPN tunnel with the VPN server.
Windows XP
Please ensure you have updated your Windows XP with latest service pack.
Before adding a new VPN connection to your XP system, we have to add a new registry to your system.
On the Start Menu, click Run…
Type in regedit to start the Registry Editor
Press Enter or click on OK
247
You have to add a new registry value to your XP system to enable L2TP over IPSec.
Locate the registry HKEY_LOCAL_MACHINE\System\CurrentControlSet\Services\Rasman\Parameters and add
the following registry value to this key:
Value Name: ProhibitIpSec
Data Type: REG_DWORD
Value: 1
248
Right-click on the last node, “Parameters”.
On the pop-up menu, select New and then DWORD Value.
Type in ProhibitIpSec and press Enter
249
Double click on ProhibitIpSec.
In the pop-up window, enter 1 for Value data.
Click OK to complete.
Your new registry should look like this.
Close the Registry Editor.
IMPORTANT: Please Reboot your system now, to make the new setting affective.
250
Once we have added the registry, we can create the VPN connection for L2TP over IPSec now.
Start Menu → Control Panel → Network Connections → Net Connection Wizard
251
Click Next to proceed.
Select Connect to the network at my workplace.
Click Next to proceed.
252
Select Virtual Private Network connection.
Click Next to proceed.
Enter a meaningful name; for instance, homeVPN is used
for the example. This name will be used as the description
of the new network interface you are about to create.
Click Next to proceed.
253
Choose Do not dial the initial connection.
Please enter the DDNS name of your VPN Gateway.
In this example, we enter 0f9e76a.engeniusddns.com.
Click Next to proceed.
Click Next to proceed.
254
Select Add a shortcut to this connection to my desktop for easy access to establish a connection.
Click on Properties.
Click Finish to complete the setup.
255
Under Networking tab, select L2TP IPSec VPN.
Select Advanced (custom settings)
Click OK to close the window.
Click on Settings
256
Select Required encruption (disconnect if sever declines)
Select Allow these protocols
Select Microsoft CHAP Version 2 (MS-CHAP v2)
Click OK to complete
Click OK to finish.
257
Enter peter for user name and ax123456 for the password.
Click on Connect to start connection.
The client device can now access to the internal FTP server 192.168.0.116 over the Internet.
258
Windows Vista
On the Task Bar
Sharing Center
, right click on the network interface icon
Click on Set up a connection or network
Choose Connect to a workplace from the option menu.
259
Left-Click on Network and
Click on Next to proceed.
Choose Use my Internet connection (VPN) from the
option menu.
260
Internet address: type in the Gateway DDNS domain, in this example, 0f9e76a.engeniusddns.com.
Destination name: enter a meaningful name; for instance, homeVPN is used for the example. This name will be used
as the description of the new network interface you are about to create.
Select checkbox Don’t connect now; just set it up so I can connect later
Click on Next to proceed.
261
Enter peter for user name and ax123456 for the password.
Now the profile has been created. Click Close to complete.
Click on Connect to start connection.
262
Back to Network and Sharing Center, Click on Manage network connections.
In the Network Connections window, find homeVPN (the new created VPN interface).
263
Right-click on homeVPN, and choose Properties.
Click Security tab in the Properties window.
Choose Advanced (custom settings)
Click Settings…
264
In Advanced Security Settings window, check if the setting
is the same the default shown below.
If yours is different, please adjust the settings accordingly.
Back to Properties window, click on Networking tab.
For VPN type, choose L2TP IPsec VPN.
Click OK when done.
265
Then, click on IPsec Settings.
Choose Use preshared key for authentication and enter
the Key 11112222.
Back to Properties window, click on OK to complete.
Click OK when done.
266
Back to Network Connections, find homeVPN and rightclick on the icon.
A window prompts for user verification, enter peter for
user name and ax123456 for the password.
Click Connect to establish the VPN tunnel.
Click on Connect to start connection.
267
The client device can now access to the internal FTP server 192.168.0.116 over the Internet.
To verify the connection, please follow the instructions below.
Press keyboard
+
to run File Explorer. Type in cmd then press Enter key to run Command Prompt
268
Under Command Prompt type in ping 192.168.0.116. Replies should be received as shown below.
269
Windows 7
On the Task Bar
, right click on the network interface icon
work and Sharing Center.
Under Network and Sharing Center, click on Set up a new connection or network.
270
Left-Click on Open Net-
Choose Connect to a workplace from the option menu.
Click Use my Internet connection (VPN)
Click on Next to proceed.
271
Internet address: type in the Gateway DDNS domain, in this example, 0f9e76a.engeniusddns.com.
Destination name: enter a meaningful name; for instance, homeVPN is used for the example. This name will be used
as the description of the new network interface you are about to create.
Select checkbox Don’t connect now; just set it up so I can connect later
Click on Next to proceed.
272
Click Close to finish.
Go back to Network and Sharing Center
Click on Change adapter settings to view all network
adapters.
273
In the Network Connections window, find homeVPN (the
new created VPN interface) and right-click on it.
In the pop-up menu, click on Properties.
In the Properties window, click on Security tab.
Change Type of VPN to Layer 2 Tunneling Protocol
with IPSec (L2TP/IPSec)
274
Click on Advanced settings
In the Advanced Properties, choose Use preshared key for
authentication.
Once completed all changes, click on OK to complete the
setting.
Enter the Key 11112222 and click OK to close the window.
275
Back to Network Connections, find homeVPN and right-click on the icon.
Click Connect to establish the VPN tunnel.
276
A window prompts for user verification, simply enter peter for user name and ax123456 for the password.
Click Connect to start connection.
277
Depends on the location and network traffic of your region this may take a while.
Once VPN tunnel is established successfully homeVPN will be marked Connected.
The client device can now access to the internal FTP server 192.168.0.116 over the Internet.
278
To verify the connection, please follow the instructions below.
Press keyboard
+
to run File Explorer.
Type in cmd then press Enter key to run Command Prompt
279
Under Command Prompt type in ping 192.168.0.116.
Replies should be received as shown below.
280
Windows 8
On the Task Bar
, right click on the network interface icon
Left-Click on Open Network and Sharing Center.
Under Network and Sharing Center, click on Set up a new connection or network.
281
.
Choose Connect to a workplace from the option menu.
Click on Use my Internet connection (VPN).
Click on Next to proceed.
282
Internet address: type in the Gateway DDNS domain, in this example, 0f9e76a.engeniusddns.com.
Destination name: enter a meaningful name; for instance, homeVPN is used for the example. This name will be used
as the description of the new network interface you are about to create.
Click on Create to proceed.
283
Please wait for a few seconds. The creation process will
be completed once the following window disappear.
Left click on the network interface icon
on the task
bar. The new interface homeVPN should be found as
shown below.
Go back to Network and Sharing Center and click on
Change adapter settings.
284
In the Network Connections window, find homeVPN icon
and right-click.
In the Properties window, click on Security tab.
Change Type of VPN to Layer 2 Tunneling Protocol
with IPsec (L2TP/IPsec)
Choose Properties to continue setting.
Click on Advanced settings
In the pop-up window, enter 11112222 for the preshared
key used for this example. Click OK to close the window.
285
Change Require encryption (disconnect if server declines)
Click Allow these protocols and check Microsoft CHAP
Version 2 (MS-CHAP v2)
To connect to the VPN, click on homeVPN.
When the Connect button appears, click on Connect to
initiate the link.
Click OK when completed.
286
Now type in the username and password. In this example
our user name is peter and password is ax123456.
If you don’t know the user name and password, please go
back to User Setting under VPN section for detail.
Depends on the location and network traffic of your region this may take a while.
Click Ok to start continue.
287
Once the VPN tunnel is established successfully, you
should see your VPN interface labeled Connected.
The client device can now access to the internal FTP server 192.168.0.116 over the Internet.
To verify the connection, please follow the instructions
below.
Press keyboard
+
to run File Explorer.
Type in cmd then press Enter key to run Command
Prompt
288
Under Command Prompt type in ping 192.168.0.116. Replies should be
received as shown below.
289
VPN Wizard: L2TP
The following diagram illustrates the example given in this section. A user, peter, has already been created in the User
Setting.
VPN Server Side Information:
Private Network domain: 192.168.0.X
Domain net mask: 255.255.255.0
DDNS domain: 0f9e76a.engeniusddns.com
LAN IP: 192.168.0.1
User Name: peter
Password: ax123456
VPN Server Address: 192.168.2.10
Client Side:
VPN Client will be assigned with an IP address 192.168.2.X address when the tunnel is established.
290
VPN Server (Gateway Side)
Under VPN section, choose Wizard.
Assign a VPN policy name by typing homeVPN (or any other preferable name).
Click Next to proceed.
291
Select L2TP and click Next to proceed.
292
Select a user (which created earlier in User Setting section) from the user list. In this example “peter” is selected.
VPN Server IP is given to the VPN server on EPG600. In this case, please type in 192.168.2.10.
Type in 192.168.2.100 and 200 into the Remote IP range fields.
Click Next to continue.
Type in 192.168.2.100 and 200 into the Remote IP range fields.
Click Next to continue.
Note1: Server IP and Remote IP Range should be under the same domain. The server will be listening to
the traffic for from 192.168.2.X.
Note2: Remote IP range is the range of IP addresses space reserved for VPN the connecting VPN clients.
293
At this very last page, click Apply to enable the policy immediately.
294
It takes about 15 seconds for the Gateway to activate the VPN profile.
Once the Gateway is ready, the page will be redirected to Profile Setting section where the new profile homeVPN is
shown.
295
VPN Client
You will need a PC or Laptop running VPN enabled operating system. The following sections demonstrate how to use
built-in VPN client to establish a VPN tunnel with the VPN server.
Windows XP
Please ensure you have updated your Windows XP with latest service pack.
Before adding a new VPN connection to your XP system, we have to add a new registry to your system.
On the Start Menu, click Run…
Type in regedit to start the Registry Editor
Press Enter or click on OK
296
You have to add a new registry value to your XP system to enable L2TP.
Locate the registry HKEY_LOCAL_MACHINE\System\CurrentControlSet\Services\Rasman\Parameters and add the
following registry value to this key:
Value Name: ProhibitIpSec
Data Type: REG_DWORD
Value: 1
297
Right-click on the last node, “Parameters”.
On the pop-up menu, select New and then DWORD Value.
Type in ProhibitIpSec and press Enter
298
Double click on ProhibitIpSec.
In the pop-up window, enter 1 for Value data.
Click OK to complete.
Your new registry should look like this.
Close the Registry Editor.
IMPORTANT: Please Reboot your system now, to make the new setting affective.
299
Then, we have to turn off IPSec service.
In the Control Panel, find Administrative Tools and double-click on Services.
300
In the Services window, please find IPSEC Services.
Right-click on IPSEC Services.
On the pop-up menu, click on Stop (note that this service will start again if you reboot).
301
Once we have added the ProhibitIpSec registry and stop IPSEC Services, we can create the VPN connection for L2TP
over IPSec now.
Start Menu → Control Panel → Network Connections → Net Connection Wizard
302
Click Next to proceed.
Select Connect to the network at my workplace.
Click Next to proceed.
303
Select Virtual Private Network connection.
Click Next to proceed.
Enter a meaningful name; for instance, homeVPN is used
for the example. This name will be used as the description
of the new network interface you are about to create.
Click Next to proceed.
304
Choose Do not dial the initial connection.
Please enter the DDNS name of your VPN Gateway.
In this example, we enter 0f9e76a.engeniusddns.com.
Click Next to proceed.
Click Next to proceed.
305
Select Add a shortcut to this connection to my desktop for
easy access to establish a connection.
Click on Properties.
Click Finish to complete the setup.
306
Under Networking tab, select L2TP IPSec VPN.
Please note that since XP does not support pure L2TP, we
have to choose L2TP IPSec VPN.
This is the reason why we need to turn off IPSEC Service
at the beginning of this chapter.
Under Security tab.
Select Typcial (recommended settings)
Uncheck Require data encryption.
Click OK when done.
Click OK to close the window.
307
Click OK to complete
Enter peter for user name and ax123456 for the password.
Click on Connect to start connection.
The client device can now access to the internal FTP server 192.168.0.116 over the Internet.
308
Windows Vista
As part of Windows 7 limitation, using L2TP requires extra setting. To be able to use L2TP VPN tunnel, IKE AuthIP IPsec service on the client device must be disabled. Please note that disabling this service may affect other IEK/IPsec
dependent applications.
Click on Windows Start icon, type in services and press enter to open services window.
309
Right-click on IKE AuthIP IPsec Keying Modules and choose Properties.
310
For Startup type choose Disabled.
Then click on Stop to stop the service immediately.
Click Apply to apply the changes.
Finally, click OK to complete.
On the Task Bar
the network interface icon
and Sharing Center
311
, right click on
Left-Click on Network
Click on Set up a connection or network
312
Choose Connect to a workplace from the option menu.
Choose Use my Internet connection (VPN) from the
option menu.
Click on Next to proceed.
313
Internet address: type in the Gateway DDNS domain, in this example, 0f9e76a.engeniusddns.com.
Destination name: enter a meaningful name; for instance, homeVPN is used for the example. This name will be used
as the description of the new network interface you are about to create.
Select checkbox Don’t connect now; just set it up so I can connect later
Click on Next to proceed.
314
Now the profile has been created. Click Close to complete.
315
Back to Network and Sharing Center, Click on Manage network connections.
316
In the Network Connections window, find homeVPN
(the new created VPN interface).
Right-click on homeVPN, and choose Properties.
317
Click Security tab in the Properties window.
Uncheck Require data encryption (disconnect if none)
Back to Properties window, click on Networking tab.
For VPN type, choose L2TP IPsec VPN.
318
Back to Properties window, click on OK to complete.
Back to Network Connections, find homeVPN and rightclick on the icon.
Click Connect to establish the VPN tunnel.
319
A window prompts for user verification, simply enter peter for user name and ax123456 for the password.
Click on Connect to start connection.
The client device can now access to the internal FTP server 192.168.0.116 over the Internet.
320
To verify the connection, please follow the instructions below.
Press keyboard
+
to run File Explorer.
Type in cmd then press Enter key to run Command Prompt
321
Under Command Prompt type in ping 192.168.0.116. Replies should be received as shown below.
322
Windows 7
As part of Windows 7 limitation, using L2TP requires extra setting. To be able to use L2TP VPN tunnel, IKE AuthIP
IPsec service on the client device must be disabled. Please note that disabling this service may affect other IEK/IPsec
dependent applications.
Click on Windows Start icon, type in services and press enter to open services window.
323
In the Services window, right click on the service name IEK and AuthIP IPsec Keying Modules
Click on Properties.
324
At Startup type, set to Disabled and press OK or Apply to apply the change.
The IKE AuthIP IPsec service is now disabled.
325
On the Task Bar
, right click on the network interface icon
Left-Click on Open Network and Sharing Center.
Under Network and Sharing Center, click on Set up a new connection or network.
326
Choose Connect to a workplace from the option menu.
Click Use my Internet connection (VPN)
Click on Next to proceed.
327
Internet address: type in the Gateway DDNS domain, in this example, 0f9e76a.engeniusddns.com.
Destination name: enter a meaningful name; for instance, homeVPN is used for the example. This name will be used
as the description of the new network interface you are about to create.
Select checkbox Don’t connect now; just set it up so I can connect later
Click on Next to proceed.
328
Click Close to finish.
329
Go back to Network and Sharing Center
Click on Change adapter settings to view all network adapters.
In the Network Connections window, find homeVPN (the new created VPN interface) and right-click on it.
In the pop-up menu, click on Properties.
330
In the Properties window, click on Security tab.
Change Type of VPN to Layer 2 Tunneling Protocol with IPSec (L2TP/IPSec)
Change Data encryption to No encryption allowed (server will disconnect if it requires encryption)
Click OK to apply the change
331
Back to Network Connections, find homeVPN and rightclick on the icon.
A window prompts for user verification, simply enter peter
for user name and ax123456 for the password.
Click Connect to establish the VPN tunnel.
Click Connect to start connection.
332
Depends on the location and network traffic of your region this may take a while.
Once VPN tunnel is established successfully homeVPN will be marked Connected.
The client device can now access to the internal FTP server 192.168.0.116 over the Internet.
333
To verify the connection, please follow the instructions below.
Press keyboard
+
to run File Explorer.
Type in cmd then press Enter key to run Command Prompt
334
Under Command Prompt type in ping 192.168.0.116. Replies should be received as shown below.
335
Windows 8
On the Task Bar
, right click on the network interface icon
Left-Click on Open Network and Sharing Center.
Under Network and Sharing Center, click on Set up a new connection or network.
336
.
Choose Connect to a workplace from the option menu.
Click on Next to proceed.
337
Click on Use my Internet connection (VPN).
338
Internet address: type in the Gateway DDNS domain, in this example, 0f9e76a.engeniusddns.com.
Destination name: enter a meaningful name; for instance, homeVPN is used for the example. This name will be used
as the description of the new network interface you are about to create.
Click on Create to proceed.
339
Please wait for a few seconds. The creation process will be completed once the following window disappear.
340
Left click on the network interface icon
below.
on the task bar. The new interface homeVPN should be found as shown
341
Go back to Network and Sharing Center and click on Change adapter settings.
In the Network Connections window, find homeVPN icon and right-click.
Choose Properties to continue setting.
342
In the Properties window, click on Security tab.
Change Type of VPN to Point to Point Tunneling Protocol (PPTP)
Change Require encryption (disconnect if server declines)
Click Allow these protocols
Click OK to apply the change
343
To connect to the VPN, click on homeVPN.
When the Connect button appears, click on Connect to initiate the link.
Now type in the username and password. In this example our user name is peter and password is ax123456.
If you don’t know the user name and password, please go back to User Setting under VPN section for detail.
Click Ok to start continue.
344
Depends on the location and network traffic of your region this may take a while.
Once the VPN tunnel is established successfully, you should see your VPN interface labeled Connected.
The client device can now access to the internal FTP server 192.168.0.116 over the Internet.
345
To verify the connection, please follow the instructions below.
Press keyboard
+
to run File Explorer.
Type in cmd then press Enter key to run Command Prompt
346
Under Command Prompt type in ping 192.168.0.116. Replies should be received as shown below.
347
PPTP
The following diagram illustrates the example given in this section. A user, peter, has already been created in the User
Setting.
VPN Server Side Information:
Private Network domain: 192.168.0.X
Domain net mask: 255.255.255.0
DDNS domain: 0f9e76a.engeniusddns.com
LAN IP: 192.168.0.1
User Name: peter
Password: ax123456
VPN Server Address: 192.168.2.10
Client Side:
VPN Client will be assigned with an IP address 192.168.2.X address when the tunnel is established.
348
VPN Server (Gateway Side)
Under VPN section, choose Wizard.
Assign a VPN policy name by typing homeVPN (or any other preferable name).
Click Next to proceed.
349
Select PPTP and click Next to proceed.
350
Select a user (which created earlier in User Setting section) from the user list. In this example “peter” is selected.
VPN Server IP is given to the VPN server on EPG600. In this case, please type in 192.168.2.10.
Type in 192.168.2.100 and 200 into the Remote IP range fields.
Click Next to continue.
Note1: Server IP and Remote IP Range should be under the same domain. The server will be listening to the
traffic for from 192.168.2.X.
Note2: Remote IP range is the range of IP addresses space reserved for VPN the connecting VPN clients.
351
At this very last page, click Apply to enable the policy immediately.
It takes about 15 seconds for the Gateway to activate the VPN profile.
352
Once the Gateway is ready, the page will be redirected to Profile Setting section where the new profile homeVPN is
shown.
353
VPN Clients
You will need a PC or Laptop running VPN enabled operating system. The following sections demonstrate how to use
built-in VPN client to establish a VPN tunnel with the VPN server.
Windows XP
Please ensure you have updated your Windows XP with latest service pack.
Before adding a new VPN connection to your XP system, we have to add a new registry to your system.
On the Start Menu, click Run…
Type in regedit to start the Registry Editor
Press Enter or click on OK
354
You have to add a new registry value to your XP system to enable L2TP over IPSec.
Locate the registry HKEY_LOCAL_MACHINE\System\CurrentControlSet\Services\Rasman\Parameters and add the
following registry value to this key:
Value Name: ProhibitIpSec
Data Type: REG_DWORD
Value: 1
355
Right-click on the last node, “Parameters”.
On the pop-up menu, select New and then DWORD Value.
Type in ProhibitIpSec and press Enter
356
Double click on ProhibitIpSec.
In the pop-up window, enter 1 for Value data.
Click OK to complete.
357
Your new registry should look like this.
Close the Registry Editor.
IMPORTANT: Please Reboot your system now, to make the new setting affective.
358
Once we have added the registry, we can create the VPN connection for PPTP now.
Start Menu → Control Panel → Network Connections → Net Connection Wizard
359
Click Next to proceed.
Select Connect to the network at my workplace.
Click Next to proceed.
360
Select Virtual Private Network connection.
Enter a meaningful name; for instance, homeVPN is used
Click Next to proceed.
for the example. This name will be used as the description
of the new network interface you are about to create.
Click Next to proceed.
361
Choose Do not dial the initial connection.
Please enter the DDNS name of your VPN Gateway.
In this example, we enter 0f9e76a.engeniusddns.com.
Click Next to proceed.
Click Next to proceed.
362
Select Add a shortcut to this connection to my desktop for easy access to establish a connection.
Click on Properties.
Click Finish to complete the setup.
363
Under Networking tab, select PPTP VPN.
Select Advanced (custom settings)
Click OK to close the window.
Click on Settings
364
Select Required encruption (disconnect if sever declines)
Select Allow these protocols
Select Microsoft CHAP Version 2 (MS-CHAP v2)
Click OK to complete
Click OK to finish.
365
Enter peter for user name and ax123456 for the password.
Click on Connect to start connection.
The client device can now access to the internal FTP server 192.168.0.116 over the Internet.
366
Windows Vista
On the Task Bar
Sharing Center
, right click on the network interface icon
Click on Set up a connection or network
367
Left-Click on Network and
Choose Connect to a workplace from the option menu.
option menu.
Click on Next to proceed.
Choose Use my Internet connection (VPN) from the
368
Internet address: type in the Gateway DDNS domain, in this example, 0f9e76a.engeniusddns.com.
Destination name: enter a meaningful name; for instance, homeVPN is used for the example. This name will be used
as the description of the new network interface you are about to create.
Select checkbox Don’t connect now; just set it up so I can connect later
Click on Next to proceed.
369
Now the profile has been created. Click Close to complete.
370
Back to Network and Sharing Center, Click on Manage network connections.
371
In the Network Connections window, find homeVPN (the new created VPN interface).
Right-click on homeVPN, and choose Properties.
372
Click Security tab in the Properties window.
Click on Advanced (custom settings) then Settings
button
In the Advanced Security Settings, ensure you have the
same settings below.
Set Data encryption to Require encryption (disconnect if server declines)
Set Allow these protocols and check on Microsft Chap
Version 2 (MS-CHAP v2)
373
Click on Networking tab.
For VPN type, choose PPTP VPN
Back to Network Connections, find homeVPN and rightclick on the icon.
Click on OK to complete.
Click Connect to establish the VPN tunnel.
374
A window prompts for user verification, simply enter peter for user name and ax123456 for the password.
Click on Connect to start connection.
The client device can now access to the internal FTP server 192.168.0.116 over the Internet.
375
To verify the connection, please follow the instructions below.
Press keyboard
+
to run File Explorer.
Type in cmd then press Enter key to run Command Prompt
376
Under Command Prompt type in ping 192.168.0.116. Replies should be received as shown below.
377
Windows 7
On the Task Bar
work and Sharing Center.
, right click on the network interface icon
Under Network and Sharing Center, click on Set up a new connection or network.
378
Left-Click on Open Net-
Choose Connect to a workplace from the option menu.
Click Use my Internet connection (VPN)
Click on Next to proceed.
379
Internet address: type in the Gateway DDNS domain, in this example, 0f9e76a.engeniusddns.com.
Destination name: enter a meaningful name; for instance, homeVPN is used for the example. This name will be used
as the description of the new network interface you are about to create.
Select checkbox Don’t connect now; just set it up so I can connect later
Click on Next to proceed.
380
Click Close to finish.
Go back to Network and Sharing Center
Click on Change adapter settings to view all network adapters.
381
In the Network Connections window, find homeVPN (the
new created VPN interface) and right-click on it.
In the pop-up menu, click on Properties.
In the Properties window, click on Security tab.
Change Type of VPN to Point to Point Tunneling Protocol (PPTP)
Change Require encryption (disconnect if server declines)
Click OK to apply the change
382
Back to Network Connections, find homeVPN and rightclick on the icon.
A window prompts for user verification, simply enter peter for user name and ax123456 for the password.
Click Connect to establish the VPN tunnel.
Click Connect to start connection.
383
Depends on the location and network traffic of your region this may take a while.
Once VPN tunnel is established successfully homeVPN will be marked Connected.
The client device can now access to the internal FTP server 192.168.0.116 over the Internet.
384
To verify the connection, please follow the instructions below.
Press keyboard
+
to run File Explorer.
Type in cmd then press Enter key to run Command Prompt
385
Under Command Prompt type in ping 192.168.0.116. Replies should be received as shown below.
386
Windows 8
On the Task Bar
, right click on the network interface icon
Left-Click on Open Network and Sharing Center.
Under Network and Sharing Center, click on Set up a new connection or network.
387
.
Choose Connect to a workplace from the option menu.
Click on Use my Internet connection (VPN).
Click on Next to proceed.
388
Internet address: type in the Gateway DDNS domain, in this example, 0f9e76a.engeniusddns.com.
Destination name: enter a meaningful name; for instance, homeVPN is used for the example. This name will be used
as the description of the new network interface you are about to create.
Click on Create to proceed.
389
Please wait for a few seconds. The creation process will be completed once the following window disappear.
Go back to Network and Sharing Center and click on Change adapter settings.
390
In the Network Connections window, find homeVPN icon
and right-click.
Choose Properties to continue setting.
In the Properties window, click on Security tab.
Change Type of VPN to Point to Point Tunneling Protocol (PPTP)
Change Require encryption (disconnect if server declines)
Click Allow these protocols
Click OK to apply the change
391
Left click on the network interface icon
on the task
bar. The new interface homeVPN should be found as
shown below.
To connect to the VPN, click on homeVPN.
When the Connect button appears, click on Connect to
initiate the link.
392
Now type in the username and password. In this example
our user name is peter and password is ax123456.
If you don’t know the user name and password, please go
back to User Setting under VPN section for detail.
Depends on the location and network traffic of your region this may take a while.
Click Ok to start continue.
Once the VPN tunnel is established successfully, you
should see your VPN interface labeled Connected.
The client device can now access to the internal FTP server 192.168.0.116 over the Internet.
393
To verify the connection, please follow the instructions below.
Press keyboard
+
to run File Explorer.
Type in cmd then press Enter key to run Command Prompt
394
Under Command Prompt type in ping 192.168.0.116. Replies should be received as shown below.
395
VPN Manual Setup (Server Side Only)
This chapter demonstrates VPN manual setup on the server side using Profile Setting under VPN section. For VPN
Client setup, please refers to VPN Wizard chapter for instructions.
If this is the first time you setup this VPN Gateway, the profile list should be empty as shown below.
User is allowed to Add, Edit and Delete the selected profiles.
396
Enable/Disable Profile
The VPN profiles can be enabled or disabled dynamically.
Click on the checkboxes under Enable column to set enable or disable the profile.
Then, most importantly, click Apply button to apply the settings.
397
Add Profile
Click Add to create a new VPN profile.
On the Add page, user can switch between functional tabs (General, SA, Network, Advanced) to modify the profile setting.
Please note that the page content will be slightly different depends on the profile VPN type (the diagram shows the content type IPsec).
After modifying the page content, click on Apply to create the profile.
398
Edit Profile
To modify a profile, select the profile to be edited.
Click on Edit button.
On the Edit page, user can switch between functional tabs (General, L2TP & Network) to modify the profile setting.
Please note that the page content will be slightly different depends on the profile VPN type (the diagram shows the
content of type L2TP over IPsec).
After modifying the page content, click on Apply to update the change.
399
Delete Profile(s)
To delete a single profile, select the profile to be deleted.
Click on Delete Selected button.
Click OK to confirm.
400
To delete all VPN profiles, click on Delete All button.
Click OK to confirm.
401
IPsec
The following diagram illustrates the example given in this section. This example consists of two VPN Gateways (servers) with unique DDNS 0f9e76a and 0f9e76b. IPSec site-to-site VPN tunnel will enable the PCs under these two sites
to communicate despite of the different LANs (192.168.1.X and 192.168.2.X) they are under.
402
Site A Configuration
Click on Profile Setting under VPN section.
Click on Add button to create a new VPN profile.
403
General Tab
Name Enter a name for the profile; for this example we enter Site B (meaning that it is used to connect to SiteB).
Connection Type: IPSec
Shared Key Create a shared key 11112222 for the profile and Confirm the shared key.
Local ID Type Select Domain Name.
Local ID: Type in the local DDNS 0f9e76a.engeniusddns.com
Peer ID Type: Select Domain Name.
Peer ID: Type in 0f9e76b.engeniusddns.com
404
SA
Unless otherwise defined by other vendor, please leave the default setting for this example.
405
Network
Security Gateway Type: select Domain Name
Security Gateway: enter 0f9e76b.engeniusddns.com (the peer DDNS).
Local Address: enter 192.168.1.100 (the address of this Gateway)
Local Netmask: enter 255.255.255.0
Remote Address: enter 192.168.2.0 (remote network domain)
Remote Netmask: enter 255.255.255.0
406
Advanced
Unless otherwise defined by other vendor, please leave the default setting for this example.
Click Apply to finish the creation process.
407
L2TP over IPsec
VPN Server Side Information:
Private Network domain: 192.168.0.X
Domain net mask: 255.255.255.0
DDNS domain: 0f9e76a.engeniusddns.com
LAN IP: 192.168.0.1
Pre-shared key: 11112222
User Name: peter
Password: ax123456
VPN Server Address: 192.168.2.10
Client Side:
VPN Client will be assigned with an IP address 192.168.2.X address when the tunnel is established.
408
Click on Profile Setting under VPN section.
Click on Add button to create a new VPN profile.
409
General Tab
Name: Assign a VPN profile name by typing homeVPN (or any other preferable name)
Connection Type: select L2TP over IPSec
Shared Key: enter 1111222
Confirm: enter 11112222
Click on L2TP tab to proceed.
410
L2TP Tab
Authentication: leave as default MSCHAP_V2.
Add user peter to Member list by clicking on peter and then click >> button.
Once the user is added, the user name peter will appear under the Member list.
Click on Network Tab to proceed.
411
Network Tab
VPN Server IP Setting: enter 192.168.2.10
Remote IP range: type in 192.168.2.100 and 200 into the Remote IP range fields.
Click Apply to finish the creation process.
The created profile will be shown on the Profile Setting section. At this stage, the profile is not yet enabled.
To enable the profile, click on Enable.
Finally, click on Apply.
The new profile is now activated.
412
Site B Configuration
Click on Profile Setting under VPN section.
Click on Add button to create a new VPN profile.
413
General Tab
Name Enter a name for the profile; for this example we
enter siteA (meaning that it is used to connect to Site A).
Connection Type: IPSec
Shared Key: Create a shared key 11112222 for the profile and Confirm the shared key.
Local ID Type Select Domain Name.
Local ID: Type in 0f9e76b.engeniusddns.com (local DDNS)
Peer ID Type: Select Domain Name.
Peer ID: Type in 0f9e76a.engeniusddns.com (peer DDNS)
414
SA
Unless otherwise defined by other vendor, please leave
the default setting for this example.
415
Network
Security Gateway Type: select Domain Name
Security Gateway: enter 0f9e76b.engeniusddns.com (if this Gateway is Site A).
Local Address: enter 192.168.2.100 (the address of this Gateway)
Local Netmask: enter 255.255.255.0
Remote Address: enter 192.168.1.0 (remote network domain)
Remote Netmask: enter 255.255.255.0
416
Advanced
Unless otherwise defined by other vendor, please leave
the default setting for this example.
Click Apply to finish the creation process.
417
Client-to-Site
The following diagram illustrates the example given in this section. This example consists of a VPN Gateway (servers)
with unique DDNS 0f9e76a. A client device (PC or laptop) with the VPN-client software TheGreenBow installed.
Click on Profile Setting under VPN section.
Click on Add button to create a new VPN profile.
418
General Tab
Name: Assign a VPN profile name by typing homeVPN (or any other preferable name)
Connection Type: IPSec
Shared Key: 11112222
Confirm: enter 11112222 again.
Local ID Type: Select Domain Name.
Local ID: Type in 0f9e76a.engeniusddns.com for this example.
Peer ID Type: Leave default
Local ID: Leave blank
419
SA Tab
Unless otherwise defined by other vendor, please leave the default setting for this example.
420
Network Tab
Security Gateway Type: select Domain Name
Security Gateway: leave it blank
Local Address: enter 192.168.0.1 (the address of this Gateway)
Local Netmask: enter 255.255.255.0
Remote Address: leave it blank
Remote Netmask: leave it blank
421
Advanced Tab
Unless otherwise defined by other vendor, please leave the default setting for this example.
Click Apply to complete the setting.
422
L2TP
VPN Server Side Information:
Private Network domain: 192.168.0.X
Domain net mask: 255.255.255.0
DDNS domain: 0f9e76a.engeniusddns.com
LAN IP: 192.168.0.1
User Name: peter
Password: ax123456
VPN Server Address: 192.168.2.10
Client Side:
VPN Client will be assigned with an IP address 192.168.2.X address when the tunnel is established.
423
Click on Profile Setting under VPN section.
Click on Add button to create a new VPN profile.
424
General Tab
Name: Assign a VPN profile name by typing homeVPN (or any other preferable name)
Connection Type: select L2TP
Click on L2TP tab to proceed.
425
L2TP Tab
Authentication: leave as default MSCHAP_V2.
Add user peter to Member list by clicking on peter and then click >> button.
Once the user is added, the user name peter will appear under the Member list.
Click on Network Tab to proceed.
426
Network Tab
VPN Server IP Setting: enter 192.168.2.10
Remote IP range: type in 192.168.2.100 and 200 into the Remote IP range fields.
Click Apply to finish the creation process.
The created profile will be shown on the Profile Setting section. At this stage, the profile is not yet enabled.
To enable the profile, click on Enable.
Finally, click on Apply.
The new profile is now activated.
427
PPTP
VPN Server Side Information:
Private Network domain: 192.168.0.X
Domain net mask: 255.255.255.0
DDNS domain: 0f9e76a.engeniusddns.com
LAN IP: 192.168.0.1
User Name: peter
Password: ax123456
VPN Server Address: 192.168.2.10
Client Side:
VPN Client will be assigned with an IP address 192.168.2.X address when the tunnel is established.
428
Click on Profile Setting under VPN section.
Click on Add button to create a new VPN profile.
429
General Tab
Name: Assign a VPN profile name by typing homeVPN (or any other preferable name)
Connection Type: select PPTP
Click on PPTP tab to proceed.
430
PPTP Tab
Authentication: leave as default MSCHAP_V2.
Add user peter to Member list by clicking on peter and then click >> button.
Once the user is added, the user name peter will appear under the Member list.
Click on Network Tab to proceed.
431
Network Tab
VPN Server IP Setting: enter 192.168.2.10
Remote IP range: type in 192.168.2.100 and 200 into the Remote IP range fields.
Click Apply to finish the creation process.
The created profile will be shown on the Profile Setting section. At this stage, the profile is not yet enabled.
To enable the profile, click on Enable.
Finally, click on Apply.
The new profile is now activated.
432
How to use EnShare function?
433
EnShare
The EnShare interface allows user to connect storage devices such as USB flash-disk or portable/external hard-
disk. The USB configuration functions can be located under USB port section. The following guide will demonstrate how
to make use of the major functions easily.
Login into your Gateway Portal page and click on EnShare.
Or login into your Gateway management page and click on Network Setting.
Click on EnShare to open the sub-menu.
434
Note:For demonstration purpose, the following guide uses a USB flash-disk as an example. In this example,
the Gateway has been pre-configured and is accessible on the Internet using DDNS domain name. Both File
Sharing and File Server are enabled.
435
Guest Account
If you are the only user (administrator) that will accesses the shared files, please skip this section.
Since files can be shared by many people, there will be times where you want to limit some users to see only specific
files. The user of limited access is referred to as a “guest”. While you are using Administrator account, the guest should
use a Guest Account with a different user name and password to access the files.
Guest Account is the place you can manage the guest account.
436
By default the guest account is disabled.
437
File Sharing (EnShare & Samba)
The File Sharing function supports EnShare and Samba:
EnShare is a proprietary feature that allows user to access the files through web browser and the free EnShare APP
on mobile phones. EnShare allows user to convenience access the files remotely over the Internet while offering security protection.
Samba is a file sharing function widely used among Windows operating system users. However, Samba file sharing is
limited to local access only (within homes/office).
438
Hardware Setting
This Gateway supports any USB 2.0 compatible storage devices. If you are using a portable/external hard-disk, it is recommended to use external power source to ensure disk stability.
Plug in the USB device (which contains the files to be shared over the Internet) into the USB interface on the side of
the Gateway.
The Gateway should recognizes and initiate the device automatically.
Gateway Setting
By default, you should have your File Sharing function enabled.
Please check your File Sharing setting and make sure Samba Service has been Enabled.
If not, please click on Enable and Click Apply to enable the service.
439
Web Browser
Administrator Access
On your web browser, enter in the DDNS domain name of your Gateway into the web browser. (Check the label on the
back of Gateway for the unique DDNS domain. The DDNS domain name can also be found in DDNS setting under Tools
on the Gateway management page.)
For this example, 0f9e76a.engeniusddns.com.
440
Administrator is allowed to access all the files and folders of the attached USB storage device. If the files are to be
shared by users other than yourself, it is recommended to provide the user with Guest Account user name and password so that important files are secured.
Please select user role. Click Admin for this example.
441
A list of available attached USB storage devices will be shown on the page.
There is only one device listed Ut165 USB Flash Disk.
You should click on the one that has the file to be accessed. In this case, we click UT165 USB Flash Disk.
When encountering the security prompt, please enter your administrator account user name and password.
It is the same user name and password your use to enter the Gateway management page.
442
Once passed the security check, the page will be directed to file list. As shown, these are the files we placed in the USB
flash disk.
To open or download the file, simply click on the file name.
Note1: EnShare Web Access supports most of the web browsers available today, even on mobile phones. Please
note that there are several folders created by the system automatically; please do not delete them.
Note2: Folder “Guest” is used for storing files to be shared by guest users. Files placed under “video” folder is to
be used by DLNA services.
443
Users are allow to perform basic file operation including upload, move, delete and create folder.
Upload
To upload a file remotely into the shared device, click on Upload icon.
Click Browse to choose the file to be uploaded.
444
Select the file to be uploaded by selecting the file and then click Open.
In this example, a file named “newfile.txt” is to be uploaded from the Desktop.
445
The path of the file is now inserted.
Click Upload to start uploading the file.
Please note that it may take a very long time to upload a large file under very slow network environment.
Therefore, large files are recommended to be copied into the device before attaching to the Gateway for sharing.
Once upload is complete, click on OK on the message box.
446
The file “newfile.txt” is now available for sharing over the cloud.
447
Move
Users are allowed to move files from one folder to the other.
Click on the Select boxes of the files to be moved. In this example, three MP3 files were selected.
Then, click on Move icon.
448
Then, choose the destination folder. In this case, we choose Guest.
The path is now changed to the Guest folder.
Click on Move.
449
When done, click on OK.
The files are now moved to the Guest folder.
450
Delete
To delete the file, click on the Select box of the file and then click on Delete icon. In this example, three “README.txt”
is selected.
451
Click on OK to confirm.
The file “README.txt” is now deleted.
452
Create Directory/Folder
Directory is also known as Folder.
To delete a directory/folder, click on the Create Directory icon.
In the pop-up box, enter the new directory name. In this example, a new directory named pictures is to be created.
Click OK when done.
453
The new directory/folder is now created.
The new folder picture is now available for access.
454
Guest Access
To login as a Guest, you must first use the gust account user name and password. The default gust account user name
is guest and the password is also guest. Please refer to Guest Account chapter for changing the guest account user
name and password. In this example, we have changed the user name to myguest and password to “12345678”. If
you did not change the guest password, then your password is “12345678”.
The guests are only allowed to access the files under the Guest folder of the attached USB storage device. Therefore,
files that are not intended to share with the guests MUST NOT be placed under this folder.
455
Enter Guest account user name myguest and password 12345678.
Click OK when done.
456
Once passed the security check, the guests can get access to the files as shown in the diagram.
Guests are also allowed to upload, move and delete files just like the administrator; however, the operation is limited
to operations under guest folder. For more detail on using the file operation functions, please refer to Administrator
Access section.
457
How to use FTP function?
458
File Server (FTP)
This Gateway has FTP server function embedded and allows user to share file locally and remotely. File Transfer Protocol (FTP) is a common protocol used to transfer files. Users can use FTP client software to get access to the files on the
FTP server (which hosts the files of the USB storage device).
459
File Server Configuration
Enable FTP Service: Select this to enable the FTP service to share files on the USB device
Port Number: Define the port number (default: 21) to open for the FTP service.
Login Timeout: Define the period of inactivity (default: 90) before a user is logged out.
Stay Timeout: Define the lockout period (default: 90) before a user is allowed to attempt a login.
Login User: Define the number of concurrent users to access the service (Max: 20 users)
Share Mode: Define the type of share privilege: Read/Write, Read only.
Use Anonymous Login: Select this to allow anonymous user login.
FTP Remote Access: Select Enable if files are intended to be accessed over the Internet.
Please ensure Enable FTP Service box is checked and leave the other setting as default.
Note: If you want to open your files to all the users click on the Use Anonymous Login (not recommended).
460
Client: Windows
File Explorer on Windows XP/Vista/7 and 8 support basic FTP protocol functions. No additional software is required.
To access the files press
+
to run File Explorer.
The user interface may look slightly different between these Windows platforms.
Type in the FTP server address that begins with “ftp://” followed by the DDNS domain name address.
In this example the address is ftp://0f9e76a.engeniusddns.com. Press Enter when finish.
Windows XP File Explorer
Windows Vista File Explorer
461
Windows 7 File Explorer
Windows 8 File Explorer
462
For administrator, please enter the Gateway’s administrator user name and password.
If the Anonymous Login is set enabled on the Gateway(FTP server), then simply click on Log on anonymously and
leave everything blank.
Click Log On button to proceed.
It may take a few seconds for the FTP server to respond.
463
Once passed the security check, double click on sda1 folder.
This is the place where files are stored.
The snapshot below shows the shared files of the USB storage device plugged on the remote Gateway. The files can
now be accessed exactly the same way as if they were on
the local disks. Please note that since the files are stored
at the remote site, therefore the file operations may take
longer time to process.
If files are intend to be shared read/download only please
go back to File Server section and set Share Mode to
“Read-Only”.
464
Client: FileZilla
FileZilla Client is a popular and free FTP client software downloadable at its official web-site https://filezilla-project.
org/.
It can also be used to access the FTP server on the Gateway. FileZilla offers a convenient interface for user to transfer
files between local and remote site. In comparison with the Windows File Explorer, FileZilla has many advanced features
and allow user to manage local and remote site concurrently.
465
Start the FileZilla Client software.
Type in the Host name (which is the Gateway DDNS domain name or WAN IP address).
For Instance, DDNS domain name for this example is ftp://0f9e76a.engeniusddns.com.
Type in Username and Password.
Press Enter as soon as you finished typing the Password.
Click OK to proceed.
466
Please check the message box on the top and make sure the connection is successful.
On the left side of the window is the local file system. On the right side of the window is the remote site, which is the
FTP server (Gateway) hosting the files on the USB storage device. Double click on sda1 to see all the files under.
467
As shown in the snapshot there are 6 files and 4 directories.
468
Download File
On the local site, click on the place where the file is going to be download to. In this case, Desktop is selected.
On the remote site, click on the file or folder which is to be downloaded. In this case, Manual.pdf is to be downloaded.
Once the file is selected, right-click on the file again.
Click on Download in the pop-up menu.
469
The file will transfer immediately. The download progress will be shown at the bottom.
Depends on the download and upload speed of the Internet service of both local and remote site, it may take a while for
a larger file.
470
Upload File
On the remote site, click on the folder where the file is going to be uploaded to. In this case, Guest folder is selected.
On the local site, click on the file which is to be uploaded. In this case, map.html is selected.
Once the file is selected, right-click on the file again.
Click on Upload in the pop-up menu.
The file will transfer immediately. The download progress will be shown at the bottom.
Depends on the download and upload speed of the Internet service of both local and remote site, it may take a while for a larger file.
471
How to setup DLNA function?
472
DLNA
To enable DLNA media support, please go to DLNA section.
DLNA is enabled by default.
Share Folder Name is the folder name in your external storage device that media files are placed.
For instance, you have placed all the media files inside a folder name called “video” on your external storage device.
Then, you should type in “video” here so that the Gateway knows where to locate the media files for DLNA service.
473
You can use Windows Media Player to view the media files you shared over DLNA. The Gateway name will be displayed
on the left menu. In this example, EPG600 is shown.
474
Under EPG600 there are several items.
To view the video we shared inside the “video” folder, click on Videos.
The files are displayed on the right; in this example, there are two files: movieClip and RGPtest.
Simply double-click on one of the files to play the video.
There are many DLNA enabled players and TVs available; the usage varies depends on the vendor.
Please refer to the vendor’s manual for detail DLNA setup.
475
How to setup Port forwarding
function?
476
Configuring your Gateway /Router for Port Forwarding
When you have two or more devices on a network which connects to the internet using a broadband Gateway/Router,
and if you want each device to be able to be accessed individually over the internet, you will need to configure your
network Gateway/Router for Port Forwarding.
Setup Overview
1. Configure your Gateway/Router that it can access the internet. (The explanation below assumes you have already
done this.)
2. Configure each device connected to the Gateway/Router so that it can access the internet.
3. Configure your Gateway/Router Port Forwarding setting.
477
This sample configuration is for the following environment.
• Internet connection type: xDSL or cable internet
• Type of IP address provided by Internet Service Provider (ISP): static*
• IP address provided by ISP: 111.222.123.1 (sample only)
• Network devices: 1 computer, 2 Network Cameras
• IP address of computer: 192.168.0.100
• IP address of camera 1: 192.168.0.10
• IP address of camera 2: 192.168.0.20
• LAN-side address of Gateway/Router: 192.168.0.1 (sample only)
• Assign an IP address to each device. Also make sure you have assigned a port number to your Network Cameras. For this example,
CAM1’s port number is 6001, and CAM2’s port number is 6002. For information on configuring a Network Camera, refer to the operating
instructions.
478
Configuring Port Forwarding
1. Access the Gateway/Router’s setup page by entering its LAN-side IP address in the address field of your web
browser. (192.168.0.1, in this example.) The Gateway/Router setup page should appear. You may need to enter an
administrator username and password in order to access the setup page.
2. Click on the link which opens the Port Forwarding setup page. This page is located within the “Advanced” ->
“Port Forwarding” page.
3. Once you have opened the Gateway/Router’s Port Forwarding setup page, you should see a number of data fields,
such as “IP address”, “Local Port” or “Public port”, etc.
Here you will enter the port numbers you want to be forwarded, and the IP addresses of your network devices
which you want those messages forwarded to. In this example:
Network Camera 1
IP address: 192.168.0.10
Local Port: 6001 (used to access the camera’s integrated web server)
Public Port: 6001
Network Camera 2
IP address: 192.168.0.20
Local Port: 6002 (used to access the camera’s integrated web server)
Public Port: 6002
4. Click “Apply” to save your Port Forwarding settings.
5. Test your settings.
To access the Local network device remotely, enter your Gateway/Router’s static IP address followed by the port
number of the device. In this example, by entering: http://111.222.123.1:6001 in a web browser, you would see
the top page of Network Camera 1.
479