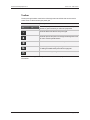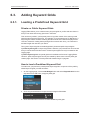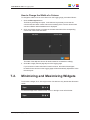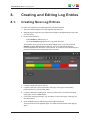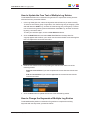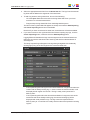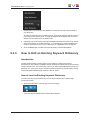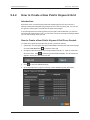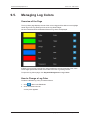
1
USER MANUAL
Logging Editor
Version 1.5 - March 2015
USER MANUAL MAD 1.5 Logging Editor
Copyright
EVS Broadcast Equipment S.A.– Copyright © 2003-2015. All rights reserved.
Disclaimer
The information in this manual is furnished for informational use only and subject to
change without notice. While every effort has been made to ensure that the information
contained in this user manual is accurate, up-to-date and reliable, EVS Broadcast
Equipment cannot be held responsible for inaccuracies or errors that may appear in this
publication.
Improvement Requests
Your comments will help us improve the quality of the user documentation. Do not
hesitate to send improvement requests, or report any error or inaccuracy on this user
manual by e-mail to [email protected].
Regional Contacts
The address and phone number of the EVS headquarters are usually mentioned in the
Help > About menu in the user interface.
You will find the full list of addresses and phone numbers of local offices either at the end
of this user manual (for manuals on hardware products) or at the following page on the
EVS website: http://www.evs.com/contacts.
User Manuals on EVS Website
The latest version of the user manual, if any, and other user manuals on EVS products
can be found on the EVS download center, on the following webpage:
http://www.evs.com/downloadcenter.
I
USER MANUAL MAD 1.5 Logging Editor
Table of Contents
TABLE OF CONTENTS
III
1.
INTRODUCTION
1
1.1. About the Application
1
1.2. System Requirements
1
1.3. Logging Into the Application
1
2.
3
SEARCH PAGE
2.1. Search Tab
3
2.2. To Do Tab
4
3.
5
SEARCHING FOR ASSETS
3.1. Using the Search Field
5
3.2. Using Search Filters
6
3.2.1. About Search Filters
6
3.2.2. Building a Search Filter
6
3.2.3. Removing Filters
7
3.3. Search Results
8
4.
9
STARTING TO LOG
4.1. Starting to Log From the Search Tab
4.2. Starting to Log from the To Do Tab
5.
10
13
5.1. Overview of the Logging Page
13
5.2. Logsheet Widget
14
5.3. Video Player Widget
19
5.4. Keyword Dictionary Widget
22
5.5. Keyword Grid Widget
23
6.
Table of Contents
LOGGING PAGE
9
ADDING WIDGETS
25
6.1. Introduction
25
6.2. Adding Keyword Dictionaries
25
6.3. Adding Keyword Grids
28
6.3.1. Loading a Predefined Keyword Grid
28
6.3.2. Creating a New Keyword Grid from Scratch
30
6.3.3. Creating a New Keyword Grid From a Keyword Dictionary
35
III
EVS Broadcast Equipment S.A.
7.
Issue 1.5.D - March 2015
ARRANGING THE LOGGING PAGE LAYOUT
39
7.1. Selecting a Page Layout Type
39
7.2. Minimizing and Maximizing Widgets
41
7.3. Resizing Widgets
42
7.4. Moving Widgets
42
7.5. Removing Widgets
42
7.6. Saving, Reusing and Deleting Page Layouts
43
8.
CREATING AND EDITING LOG ENTRIES
45
8.1. Creating New Log Entries
45
8.2. Navigating Through a Loaded Video File
46
8.3. Editing, Viewing and Deleting Log Entries
46
8.3.1. About Editing Logs
46
8.3.2. Editing a Single Log Entry
46
8.3.3. Editing Log Entries in Bulk
47
8.3.4. Viewing the Event Described by a Log Entry
51
8.3.5. Deleting Log Entries
51
8.4. Importing Log Sheets
9.
MANAGING KEYWORDS, DICTIONARIES AND KEYWORD
GRIDS
55
9.1. Keyword Management Area
55
9.2. Managing Keywords
55
9.2.1. The Keyword List Page
55
9.2.2. How to Search for a Keyword
57
9.2.3. How to Add a New Keyword to the Keyword List
57
9.2.4. How to Edit an Existing Keyword
57
9.3. Creating and Managing Keyword Dictionaries
58
9.3.1. The Keyword Dictionary Creation Page
58
9.3.2. How to Create a New Keyword Dictionary
59
9.3.3. How to Edit an Existing Keyword Dictionary
61
9.3.4. How to Link a Dictionary to a Metadata Level
63
9.4. Managing Public Keyword Grids
65
9.4.1. The Keyword Grid Creation Page
65
9.4.2. How to Create a New Public Keyword Grid
66
9.4.3. How to Edit an Existing Public Keyword Grid
67
9.5. Managing Log Colors
IV
52
70
Table of Contents
USER MANUAL MAD 1.5 Logging Editor
1.
Introduction
1.1.
About the Application
Logging Editor is a web-based application that forms part of the logging module of the
central archiving system MediArchive Director.
It is mainly used to add logs, i.e. timecode-based metadata (keywords, free text, color,
rating), to video segments that have been ingested in the MAD digital archive so that they
become searchable. The logs describe certain events in the video content.
Logging Editor also allows to search for segments that have already been ingested and
logged to correct a particular spelling mistake in one or more of the logs, to adjust the log
timecode, or to simply add extra logs or remove logs that are no longer relevant.
The changes performed with the Logging Editor will have an impact on its own search
engine and that of the web client.
Logging Editor also contains a section that is only accessible to administrators which
allows to manage all keywords that are available in the MAD database and that form the
pool from which can be drawn to create all keyword dictionaries and public keyword grids.
New keywords can be added and existing keywords can be modified.
It also allows to compose new and update existing keyword dictionaries. The finished
keyword dictionaries can be linked to one or more of the MAD metadata levels, i.e. main
category, subcategory, grouping category and asset.
The keyword dictionaries can be used to create new, public keyword grids. Existing
keyword grids can be adjusted and resaved.
1.2.
System Requirements
To be able to run Logging Editor on your computer, the following system requirements
should be met:
1.3.
•
An active Internet connection.
•
A web browser: Internet Explorer 11 or later, Google Chrome 38, Firefox , Safari,
Opera
•
JavaScript should be enabled in your web browser.
Logging Into the Application
To log into Logging Editor, proceed as follows:
1. Launch the web browser on your computer.
2. Enter the web address of Logging Editor in your browser's address bar.
1. Introduction
1
EVS Broadcast Equipment S.A.
Issue 1.5.D - March 2015
The Login page of Logging Editor opens.
3. Enter your username and password.
4. Click Sign In.
If your login is successful, the Search page of Logging Editor opens by default. See
section "Search Page" on page 3.
2
1. Introduction
USER MANUAL MAD 1.5 Logging Editor
2.
Search Page
2.1.
Search Tab
The Search tab of the Search page is opened by default when you log into Logging Editor.
It provides you with a number of tools which allow you to quickly search for specific
assets with segments that have been ingested into the MAD digital archive. The
segments may already have been logged, and you just want to correct a particular
mistake in one or more of the logs, or you simply want to add extra logs or remove logs
that are no longer relevant. It can also be that some of the segments have no logs yet and
you want to start logging them so that they become searchable in the MAD Web Client. It
displays the assets that match your search query and allows you to select one or more of
their segments to start logging them.
Part
2. Search Page
Name
Description
1.
Search field
Used to enter words by which you want to search
particular assets. See section "Using the Search
Field" on page 5.
2.
Search button
Used to start a search query.
3.
Advanced button
Used to hide or display the search filters pane. See
section "Using Search Filters" on page 6.
4.
Search Filters pane
Used to add and remove search filters. See section
"Building a Search Filter" on page 6.
5.
Search Results area
Displays the assets that match your search query.
See section "Search Results" on page 8.
3
EVS Broadcast Equipment S.A.
2.2.
Issue 1.5.D - March 2015
To Do Tab
The To Do tab contains a list of assets of which one or more segments have been
automatically requested to be logged. The request originates from the Media Manager
application and was made by the ingest workflow that was selected and started for each
segment in the Technical Form of the corresponding asset item. See the Media Manager
manual for more information.
It allows you to manually mark the start of the logging process for a particular asset. It
also offers you the possibility to view which of the segments of the asset have been
requested to be logged and which of these have already been logged .
You can select a particular asset and start logging one or more of its segments. Once you
have completed logging certain segments, you can manually thick them off. Assets of
which all segments have been logged can be closed. They will then disappear from the To
Do tab. See section "Starting to Log from the To Do Tab" on page 10.
4
2. Search Page
USER MANUAL MAD 1.5 Logging Editor
3.
Searching for Assets
3.1.
Using the Search Field
In the Search field of the Search tab you can enter one or more words by which you want
to search for specific assets.
Each time you want to enter an additional word in the Search field, press ENTER.
Note
You cannot enter the same word twice in the Search field. The second instance
of the word will be highlighted in red. Remove it and if necessary enter another
word.
If you want to omit assets containing certain words, you can use the minus (-) sign before
a word. For example, the search query 'Ronaldo -Portugal' will only return the assets in
which Ronaldo plays for Real Madrid, not the ones in which he plays for Portugal.
If you want to remove a particular word from the Search field, you can click the x. You can
also press BACKSPACE. This will highlight in red the word that was last added to your
search string. If you click BACKSPACE once more, the word will be removed.
To start your search, press ENTER or click the Search button. The assets that match
your search query will be displayed.
Tip
To search for all assets, leave the Search field empty and click the Search
button or press ENTER.
To refine your search results, you can also make use of search filters. See section "Using
Search Filters" on page 6.
3. Searching for Assets
5
EVS Broadcast Equipment S.A.
3.2.
Using Search Filters
3.2.1.
About Search Filters
Issue 1.5.D - March 2015
Search filters are search queries containing predefined search criteria and values chosen
by the users. They provide more efficient and effective searches. The users can make
use of them to find particular assets . They can also be used in combination with the free
text search of the Search field. Multiple search filters can be created and combined.
The available search filters can differ from MAD setup to MAD setup.
3.2.2.
Building a Search Filter
To build a search filter, proceed as follows:
1. Click the filter box in the search filters pane to open a drop-down list containing the
names of the available filters.
2. Select the desired filter from the list, for example ‘Venue’.
The name of the selected filter appears in the search filters pane. Next to it, a filter
element box appears. The white check mark indicates that the filter is not ready yet to
be used. A new filter box is automatically added below these elements allowing you to
select and start building a second search filter.
3. Click the filter element box to open a drop-down list, and then select the desired filter
element from the list.
6
3. Searching for Assets
USER MANUAL MAD 1.5 Logging Editor
The name of the selected filter element appears in the filter element box. A second
filter element box appears next to the first one.
4. Click the second filter element box to open a drop-down list, and then select the
desired value from the list.
The selected value appears in the second filter element box. The green check mark
turns grean. This means that the filter is active, i.e. ready for use.
5. Click the Search button to apply the filter to the search results or to start the search.
If the search filters pane is collapsed, the number of search filters that is selected is
displayed below the Search field.
3.2.3.
Removing Filters
To remove a filter from the search filters pane, just click the red x next to the filter. A new
filter box is automatically added to the search filters pane when you have removed all
filters from the pane.
3. Searching for Assets
7
EVS Broadcast Equipment S.A.
3.3.
Issue 1.5.D - March 2015
Search Results
The assets that match your search query are displayed in the form of rectangular tiles in
the area below the search filters pane. A maximum of 16 matching assets can be
displayed per page.
Each tile contains the following information about an asset:
•
a thumbnail taken from a frame of one of its ingested segments;
•
the name of the asset;
•
the name of the grouping category, main and subcategory the asset belongs to.
By default, the assets are ordered according to relevance.
If you click an asset tile, additional information about the asset is revealed.
By default, all the asset items of the asset that have ingested segments are listed. If you
select a particular asset item, its ingested segments are revealed.
A Start Logging button is provided to open the Logging page and to load all the segments
of the asset and any logs linked to the segments in the Log Sheet widget. See section
"Logging Page" on page 13.
To hide the additional information again, click x.
8
3. Searching for Assets
USER MANUAL MAD 1.5 Logging Editor
4.
Starting to Log
4.1.
Starting to Log From the Search Tab
In the Search tab you have the following options to start logging the segments of a
particular asset:
•
You can decide to start logging all the ingested segments of the asset. To do this,
double-click the asset, and then click the Start Logging button.
The Logging page opens. The first segment of the first asset item and its logs (if any)
are loaded in the Log Sheet widget. The corresponding video file will be loaded in the
Video Player widget.
•
You can decide to start logging all the segments of a particular asset item. To do this,
hover your mouse pointer over the desired asset item, and then click the button that
appears.
The Logging page opens. The first segment of the selected asset item and its logs (if
any) are loaded in the Log Sheet widget. The corresponding video file is loaded in the
Video Player widget.
•
4. Starting to Log
You can choose to start logging a single segment. To do this, select a particular asset
item, and then hover your mouse pointer over the desired segment. Click the button
that appears.
9
EVS Broadcast Equipment S.A.
Issue 1.5.D - March 2015
The Logging page opens.The segment and its logs (if any) are loaded in the Log Sheet
widget. See section "Logging Page" on page 13.
4.2.
Starting to Log from the To Do Tab
To start logging one or more segments from the To Do tab, proceed as follows:
1. In the To Do tab, double-click the desired asset.
2. Click the green Start Logging button to mark the start of the logging process.
Note
Once you have clicked the green Start Logging button, new segments that are
added in Media Manager to one of the asset items of the selected asset and that
are ingested with the same ingest workflow will be considered by the
MAD system as forming part of another logging process. A new instance of the
same asset will appear in the To Do list containing these new segments.
Next to the segments that have been requested to be logged, a white check mark
appears. The green Start Logging button has disappeared.
10
4. Starting to Log
USER MANUAL MAD 1.5 Logging Editor
Do one of the following:
•
To start logging all the segments with a white check mark, click the blue Start
Logging button.
The Logging page opens. The first segment of the first asset item is loaded in the Log
Sheet widget. The corresponding video file will be loaded in the Video Player widget.
•
To start logging all the segments with a white check mark of particular asset item,
hover your mouse pointer over the desired asset item, and then click the button that
appears.
The Logging page opens. The first segment of the selected asset item is loaded in the
Log Sheet widget. The corresponding video file is loaded in the Video Player widget.
•
4. Starting to Log
To start logging a single segment, select a particular asset item, and then hover your
mouse pointer over a segment with a check mark next to it. Click the button that
appears.
11
EVS Broadcast Equipment S.A.
Issue 1.5.D - March 2015
3. Start logging the segments. See section "Creating New Log Entries" on page 45.
4. Once you have logged the necessary number of segments, return to the To Do tab.
5. Tick off the segments that you have already logged.
The white check mark will turn into a green one.
In Media Manager the logging action in the ingest workflow of each of these segments
will be set to completed.
6. Once you have logged and ticked off all segments, the Finish Logging button
appears. Click this button to close the logging process and remove the asset from the
To Do tab.
12
4. Starting to Log
USER MANUAL MAD 1.5 Logging Editor
5.
Logging Page
5.1.
Overview of the Logging Page
The Logging page is the principal working area for the logger. Here, the logger can play
back video files and log their content by adding free text and keywords from self made and
predefined keyword grids. Logs that have already been added can be checked and if
necessary edited one by one or all at once.
The page consists of two fixed widgets which the logger can freely supplement with a set
of optional widgets. The logger can organize these widgets in columns or freely arrange
them on the Logging page. The selected layout can then be saved for future use.
5. Logging Page
Part
Name
Description
1.
Toolbar
Allows to add new widgets and to edit or save the
current page layout or to load a previously saved
page layout. See section "Arranging the Logging
Page Layout" on page 39 for more information.
2.
Video Player widget
Used to play back the video file whose content has
to be logged. See section "Video Player Widget" on
page 19 for more information.
3.
Log Sheet widget
Displays the logs that have already been created
and allows to create new and edit existing logs.
See section "Logsheet Widget" on page 14
13
EVS Broadcast Equipment S.A.
Part
5.2.
Issue 1.5.D - March 2015
Name
Description
4.
Keyword Grid widget
Contains groups of keywords that can be used to
log the content of the video files. See section
"Keyword Grid Widget" on page 23 for more
information.
5.
Keyword Dictionary
widget
Contains groups of keywords in the form of a tree
structure. They form the pool from which can be
drawn to create the keyword grids. See section
"Keyword Dictionary Widget" on page 22 for more
information.
Logsheet Widget
General Description
The Log Sheet widget displays the log entries that have been created for a particular
segment. It allows you to manually add or import new logs and edit or delete existing
ones. You can edit or delete logs one by one, but also in bulk.
It consists of three views: the Log Sheet Grid view, the Create a New Log view and the
Import Log Sheet view.
Log Sheet Grid View
The Log Sheet widget displays the Log Sheet Grid view by default when entering the
Logging page. It displays the log entries that have already been created for a particular
segment.
14
5. Logging Page
USER MANUAL MAD 1.5 Logging Editor
Part
Name
Description
1.
Title bar
Displays the title of the log sheet. It also contains a
button to open the log sheet in Edit Mode and a
Minimize and Maximize button. The button to
close the widget is grayed out. The title can be
modified in Edit Mode.
2.
Toolbar
It contains a drop-down list See section "Creating
and Editing Log Entries" on page 45
Provides buttons for performing operations on the
log entries.See section "Creating and Editing Log
Entries" on page 45.
3.
Log Sheet grid
Holds the log sheet content, with each row
representing one log. The data of the logs is
displayed in a set of columns: Timecode, Free
Text, Keywords, Rating. A maximum of 25 logs
can be displayed per page. An Edit button allows
you to edit the content of a single log entry.
4.
Page Navigation buttons
Used to navigate to different pages of logs.
Log Sheet Grid Editing Toolbar
The Log Sheet Grid Editing toolbar contains functions that allow you to modify the content
of the log sheet grid:
5. Logging Page
15
EVS Broadcast Equipment S.A.
Issue 1.5.D - March 2015
Button
Description
Contains a list with the segments of the
asset you selected in the Search page.
• If you have selected a particular segment
in the Search page, it will display this
segment.
• If you have selected a particular asset
item, it will display the first segment of
this asset item.
• If you have selected a particular asset, it
will display the first segment of the first
asset.
Used to select all log entries on a particular
page.
Used to undo a selection of log entries on a
particular page.
Used to add a new log. See section
"Creating New Log Entries" on page 45.
Used to delete one or more logs. See section
"Deleting Log Entries" on page 51.
Used to import the logs of a particular log
sheet XML file into the current log sheet. See
section "Importing Log Sheets" on page 52.
Used to edit a selection of logs in bulk. The
following log information can be changed in
bulk: rating, color, free text and keywords.
This can also be used to add a timecode
offset to multiple log entries. See section
"Editing Log Entries in Bulk" on page 47.
Create a New Log View
The Create a New Log view appears when the user clicks the Add New Log button in the
Log Sheet Grid view or when he presses ENTER. It allows you to add a new and edit an
existing log. See section "Creating New Log Entries" on page 45.
16
5. Logging Page
USER MANUAL MAD 1.5 Logging Editor
Part
Name
Description
1.
Timecode field
Displays the timecode grabbed from the frame of
the video file.
2.
Level Rating
A rating which can be given to an event from 0 to 3
stars.
3.
Clear button
Used to clear the level rating.
4.
Highlight Colors
Set of colors which can be selected to in order to
highlight the log line with the selected color. If you
hover your mouse pointer over a color, the meaning
of that color will appear.
Log entries can thus be displayed with a different
color in the log sheet grid view.
5.
Free Text field
Used to add alphanumeric free text from the
keyboard.
This will appear in the Free Text column of the Log
Sheet Grid view for the corresponding log.
6.
Keywords area
Displays the keywords that have been added to the
log.
7.
Save and Cancel button
Used to save or cancel the log.
Import Log Sheet View
The Import Log Sheet view appears when the user clicks the Import Log Sheet button. It
allows you to import the logs of an externally created log sheet XML file, add them to the
segments of a particular asset item and inject them in the MAD system. See section
"Importing Log Sheets" on page 52.
5. Logging Page
17
EVS Broadcast Equipment S.A.
Part
18
Issue 1.5.D - March 2015
Name
Description
1.
Asset Item box
Used to select the asset item
2.
Log Sheet drop zone
Used to browse for or drop a log sheet XML file.
3.
Start Importing/ Cancel
Importing button
Used to start or cancel the import of the logs of the
log sheet XML file.
5. Logging Page
USER MANUAL MAD 1.5 Logging Editor
5.3.
Video Player Widget
General Description
The Video Player widget is used for viewing the content of the video file that corresponds
to the segment you have selected to log.
Part
5. Logging Page
Name
Description
1.
Title bar
Displays the title of the video player. It also
contains a button to open the video player in Edit
Mode, and a Minimize and Maximize button. The
button to close the video player is grayed out. The
title can be modified in Edit Mode.
2.
Current Timecode field
Displays the timecode of the currently displayed
frame. You can enter a different timecode here to
jump to another frame in the video file.
3.
Full Screen button
Used to switch to full screen mode.
19
EVS Broadcast Equipment S.A.
Part
Issue 1.5.D - March 2015
Name
Description
4.
Transport controls
Used to play back and navigate through the loaded
video file.
5.
Scrubber bar
Used to move through the loaded video file by
dragging the playhead. A light-gray bar points out
the part of the video file that has already been
played back.
You can click anywhere in the scrubber bar to
instantly move the playhead to that location.
If you hover your mouse pointer over a particular
point on the scrubber bar, then the duration of the
video file up to this point is displayed.
Transport Controls
The transport controls let you play back and navigate through the loaded video file. The
following buttons are available:
Button
Shortcut Key
Description
Play/Pause
SPACEBAR
Used to play back the video file from
the current location of the playhead.
Rewind
J
Used to move backwards through the
video file at normal speed or at a
speed that is 2x, 4x, 6x or 8x faster
than normal.
Move to Previous Frame
←
Used to move to the previous frame.
Move to Next Frame
→
Used to move to the next frame.
Fast Forward
K
Used to move forwards through the
video file at normal speed or at a
speed that is 2x, 4x, 6x or 8x faster
than normal.
Full Screen Mode
To switch to full screen, click the Full Screen button in the bottom corner of the Video
Player widget. Full-screen mode allows you to use the entire computer screen to preview
the video file. This removes all transport controls, the Current Timecode field and the
scrubber bar, but you will off course still be able to use the keyboard shortcut keys.
20
5. Logging Page
USER MANUAL MAD 1.5 Logging Editor
To return to normal screen view, press ESC.
5. Logging Page
21
EVS Broadcast Equipment S.A.
5.4.
Issue 1.5.D - March 2015
Keyword Dictionary Widget
The Keyword Dictionary widget contains groups of keywords organized according to a
tree structure. It is mainly used to create new keyword grids.
Part
Name
Description
1.
Title bar
Displays the title of the keyword dictionary. It also
contains a button to open the keyword dictionary in
Edit Mode, a Minimize and Maximize button and a
button to close it. The title can be modified in Edit
Mode.
2.
Toolbar
Contains buttons to create (part of) a keyword grid
and to load existing keyword dictionaries.
3.
Breadcrumbs
Allows you to keep track of your location within the
keyword dictionary tree structure.
4.
Keyword area
Displays one or more branches of the keyword tree
or one or more keywords with a particular branch.
5.
Search field
Used to quickly search a particular keyword.
See section "Adding Keyword Dictionaries" on page 25 for more information.
22
5. Logging Page
USER MANUAL MAD 1.5 Logging Editor
5.5.
Keyword Grid Widget
General Description
The keyword grid widget allows you to build groups of keywords that you can use to log
the events in a particular video file.
Part
5. Logging Page
Name
Description
1.
Title bar
Displays the title of the keyword grid. It also
contains a button to open the keyword grid in Edit
Mode, a Minimize and Maximize button and a
button to close it. The title can be modified in Edit
Mode.
2.
Toolbar
Contains buttons for performing operations on the
keyword grid.
3.
Tab drop-down list
Contains the title of the tab that is currently shown
and allows to open a list of available tabs. Used to
navigate between the various tabs.
4.
Keyword buttons area
Displays the keyword buttons of a particular tab.
Each button has a background color and can
contain one keyword. A radio button indicates if the
button is selected or not.
23
EVS Broadcast Equipment S.A.
Issue 1.5.D - March 2015
Toolbar
The keyword grid toolbar contains the following buttons and fields that can be used to
create a new or edit an existing keyword grid:
Button/Field
Description
Used to specify the number of columns and rows. By
default, a grid of 5 rows by 5 columns is proposed.
Used to add a new tab to the keyword grid.
Used to open a color picker to change the background color
of one or more keyword buttons.
Used to delete a tab or one or more keywords.
Used to open an existing keyword grid. See section
"Loading a Predefined Keyword Grid" on page 28.
Used to save a keyword grid.
See section "Creating a New Keyword Grid from Scratch" on page 30 for more
information.
24
5. Logging Page
USER MANUAL MAD 1.5 Logging Editor
6.
Adding Widgets
6.1.
Introduction
Each time you enter the Logging page to start logging a segment, Logging Editor
automatically adds the Log Sheet and Player widget. Note that you cannot add them
yourself. Moreover, the Logging page can only hold one instance of each of these widgets.
You can supplement these two widgets with one or more Keyword Dictionary and
Keyword Grid widgets. To do this, click the Add Widget button and select the desired
widget from the drop-down list. You will notice that the Log Sheet and Player widget are
unavailable.
There is no limit on how many Keyword Dictionaries and Keyword Grid widgets you can
add to the Logging page.
Once you have added these widgets, you still have to add content, i.e. keywords, to these
widgets.
6.2.
Adding Keyword Dictionaries
Introduction
Logging Editor allows you to add a number of predefined keyword dictionaries to the
Logging page. Each of these dictionaries will contain a set of keywords that relate in some
way or another to the content of the segment you are about to log.
For example, if you have selected a segment that contains content of a tennis match, then
most probably a dictionary containing the names of the competing players and referee will
be provided, as well as a dictionary with tennis specific keywords like 'ace', 'set' and
'smash'.
Each of these dictionaries has been carefully composed by a system administrator and
has been linked to one of the hierarchical metadata levels, i.e. asset, grouping category,
subcategory and main category, the segment is classified under.
The keyword dictionaries are predefined, so you cannot modify their content or structure.
You need them to create one or more new or to edit one or more existing keyword grids.
See section "Creating a New Keyword Grid From a Keyword Dictionary" on page 35.
6. Adding Widgets
25
EVS Broadcast Equipment S.A.
Issue 1.5.D - March 2015
How to Add a Keyword Dictionary
To add a predefined keyword dictionary to the Logging page, proceed as follows:
1. Click the Add Widget button and select Dictionary from the drop-down list.
An empty keyword dictionary widget is added.
2. (Optional) Click the gear wheel button to open the keyword grid in Edit Mode and enter
a custom keyword dictionary title. By default, 'Dictionary' is added as title.
3. Click the folder button to have a look at the keyword dictionaries that come with the
segment you are about to log.
4. Select the keyword dictionary whose entire content you want to load in the empty
keyword dictionary widget on the Logging page and then click OK.
26
6. Adding Widgets
USER MANUAL MAD 1.5 Logging Editor
The keyword dictionary on the Logging page now contains the same keywords and
has the same structure as the selected keyword dictionary.
6. Adding Widgets
27
EVS Broadcast Equipment S.A.
Issue 1.5.D - March 2015
6.3.
Adding Keyword Grids
6.3.1.
Loading a Predefined Keyword Grid
Private vs. Public Keyword Grids
Logging Editor allows you to create as many keyword grids as you like and save them so
that you can reuse them at any given time in the future.
This can be very useful if you frequently have to log video content of the same type and
need the same keywords each time. For example, to log the matches of FC Barcelona, a
keyword grid could be created containing the names of all the FC Barcelona players and
coaches. Instead of creating the keyword grid from scratch each time, you could save it
and load it again the next time you need it.
Two types of keyword grids can be distinguished: private and public keyword grids.
A private keyword grid is a keyword grid that is linked to your personal user account and
that you cannot share with other users. Private keyword grids can only be created on the
Logging page.
A public keyword grid is a keyword grid that is available to all users of Logging Editor.
However, public keyword grids can only be created by admin users in the keyword grid
creation page. See section "The Keyword Grid Creation Page" on page 65.
How to Load a Predefined Keyword Grid
To load one of your previously saved private keyword grids or to open one of the publicly
shared keyword grids, proceed as follows:
1. On the Logging page, click the Add Widget button and select Keyword Grid from the
drop-down list to add a new, empty keyword grid.
2. Click the gear wheel button to open the keyword grid in Edit Mode.
3. Click the folder button to browse for the available keyword grids.
28
6. Adding Widgets
USER MANUAL MAD 1.5 Logging Editor
A window appears which allows you to search for and load a particular private or
public keyword grid. A tab is provided for each type of keyword grid. The name of each
grid is displayed together with the number of grid rows and columns. A search field is
available allowing you to quickly search for a particular grid by name.
4. Select the desired grid and then click OK to load it.
Modifying and Saving Public Grids
If you modify and save a public grid, it will be added to your private grids. The
original public grid will remain unchanged.
6. Adding Widgets
29
EVS Broadcast Equipment S.A.
6.3.2.
Issue 1.5.D - March 2015
Creating a New Keyword Grid from Scratch
Logging Editor allows you to create and customize your keyword grids step by step.
Step 1: Adding an Empty Keyword Grid
To add an empty keyword grid to the Logging page, click Add Widget and select
Keyword Grid.
Step 2: Opening the Keyword Grid in Edit Mode
To be able to customize your keyword grid, you should open it in Edit Mode. Click the gear
wheel button in the toolbar to achieve this. The keyword grid toolbar will appear.
Step 3: Adding a Custom Keyword Grid Title
By default, when you add a new keyword grid to the Logging Page, 'Keyword Grid' is used
as default title. Click inside the text field to add your own title.
Step 4: Specifying the Grid Dimensions
By default, a keyword grid with 5 rows and 5 columns is proposed. You can use the spin
boxes to change the default dimensions.
30
6. Adding Widgets
USER MANUAL MAD 1.5 Logging Editor
Step 5: Adding Tabs
To add a tab to your keyword grid, click the + button in the keyword grid toolbar. A tab with
empty keyword buttons is added. 'Tab [Nr.]' is used as default tab title.
Click inside the box containing the tab title to enter your own tab title.
Repeat these steps until you have added the necessary number of tabs.
To remove a tab again, select it from the drop-down list and click the garbage bin button.
You can also opt to add a tab that already contains keywords. See section "Creating a
New Keyword Grid From a Keyword Dictionary" on page 35.
6. Adding Widgets
31
EVS Broadcast Equipment S.A.
Issue 1.5.D - March 2015
Step 6: Adding Keywords
To manually add one or more keywords to a tab, proceed as follows:
1. Open the keyword dictionary that contains the keywords you want to add to the
keyword grid. See section "Adding Keyword Dictionaries" on page 25.
2. In the keyword dictionary, hover your mouse pointer over the desired keyword. It will
turn into a four-headed arrow.
3. Drag and drop the keyword on the desired keyword button.
Repeat this step until you have added the desired number of keywords or until all
keywords with the tab have a keyword assigned.
To remove a particular keyword again from the keyword grid, select the corresponding
keyword button and click the garbage bin.
To swap the position of two keywords, simply drag and drop one of keywords onto the
other.
32
6. Adding Widgets
USER MANUAL MAD 1.5 Logging Editor
To replace a keyword with another keyword , simply drag the new keyword from the
dictionary onto the keyword button that contains the keyword that has to be replaced.
Step 7: Specifying the Background Color of the Keyword
Buttons
When creating a new tab, empty keyword buttons with a light blue background are created
by default. Logging Editor allows you to customize the color of each button. This is useful
if you want to highlight some frequently used keywords or organize them visually in
groups in a grid.
To set a color for one or more keyword buttons, proceed as follows:
1. Select the buttons whose background color you want to change.
2. Click the drop button.
A color picker appears.
6. Adding Widgets
33
EVS Broadcast Equipment S.A.
Issue 1.5.D - March 2015
The color picker allows you to pick a color from the color field. With the color slider to
the right you can determine the color range. At the bottom you get a preview of the
selected color.
Click outside the color picker to close it again.
The background of the selected keyword buttons will change accordingly.
Deselect the keyword buttons again.
Step 8: Saving Your Keyword Grid
Once your keyword grid is ready to be used, you can save it so that you can reuse it at any
future moment. Click the Save button
to add your keyword grid to your collection of
private keyword grids. See section "Loading a Predefined Keyword Grid" on page 28.
34
6. Adding Widgets
USER MANUAL MAD 1.5 Logging Editor
6.3.3.
Creating a New Keyword Grid From a
Keyword Dictionary
How to Create a Keyword Grid From an Entire Keyword
Dictionary
To create a new keyword grid and add all the keywords of a particular keyword dictionary
in one go, proceed as follows:
1. Add the Dictionary widget to the Logging page.
2. Load the Keyword Dictionary from which you want to create a keyword grid. See
section "Adding Keyword Dictionaries" on page 25.
3. Click the Add New Grid button to create a new grid.
A new keyword grid is added to the Logging page.
4. Specify the dimensions, i.e. the number of rows and columns, of the keyword grid and
click the Create Grid button. By default, a 5 x 5 grid is proposed.
6. Adding Widgets
35
EVS Broadcast Equipment S.A.
Issue 1.5.D - March 2015
Logging Editor will create a tab in the keyword grid for each parent node in the keyword
dictionary and fill them with the corresponding keywords.The name of the parent
nodes is used as tab name. The name of the dictionary is taken as the name of the
keyword grid.
If a tab cannot hold all the keywords of a particular parent node because of its limited
dimensions, then Logging Editor will create additional tabs until all the keywords have
been allocated. An incremental suffix is automatically added to the name of the tabs
that hold the keywords of the same parent node. For example, FC Barcelona_1, FC_
Barcelona_2, etc.
How to Create a Keyword Grid From a Parent Node
Suppose you have to log the footage of a particular sports match in which two teams
compete, and you quickly need two keyword grids, each grid containing the names of the
players of one particular team, but you do not want to spend time creating each keyword
grid manually, then Logging Editor provides a swift solution .
It is namely possible to create an entire keyword grid from a particular parent node in a
particular keyword dictionary. In the example above, this would be the keyword dictionary
linked to the match and the two parent nodes within this dictionary with the names of the
players.
To create a new keyword grid from a specific parent node in a keyword dictionary, proceed
as follows:
1. Add the Dictionary widget to the Logging page.
2. Load the Keyword Dictionary that contains the parent node(s) from which you want to
create a keyword grid.
3. Select the desired parent node.
4. Click the Add New Grid button to create a new grid.
36
6. Adding Widgets
USER MANUAL MAD 1.5 Logging Editor
5. Specify the dimensions, i.e. the number of rows and columns, of the keyword grid and
click the Create Grid button. By default, a 5 x 5 grid is proposed.
Logging Editor will create a tab in the keyword grid for the parent node you selected in
the keyword dictionary and fill them with the corresponding keywords.The name of the
parent nodes is used as keyword grid and also as tab name.
How to Create Keyword Grid Tabs From a Parent Node
To create a tab with keywords from a parent node and add it to one or more existing
keyword grids, proceed as follows:
1. In the Keyword Dictionary, select the parent node from which you want to create a
keyword grid tab.
2. Click the Add New Tab button.
6. Adding Widgets
37
EVS Broadcast Equipment S.A.
Issue 1.5.D - March 2015
A message appears in all the keyword grids that are on the Logging page.
3. Click the Add button in the keyword grids you want to add the tab to.
Logging Editor will create a tab in the keyword grid for the parent node you selected in
the keyword dictionary and fill them with the corresponding keywords.The name of the
parent node is used as tab name.
If a tab cannot hold all the keywords of a particular parent node because of its limited
dimensions, then Logging Editor will create additional tabs until all the keywords have
been allocated. An incremental suffix is automatically added to the name of the tabs
that hold the keywords of the same parent node. For example, FC Barcelona_1, FC_
Barcelona_2, etc.
38
6. Adding Widgets
USER MANUAL MAD 1.5 Logging Editor
7.
Arranging the Logging Page
Layout
7.1.
Selecting a Page Layout Type
Workspace vs. Column Layout
By default, the Logging page is set in Workspace layout. In this layout, you can freely
arrange and resize each widget. The Logging page then consists of one large column.
The Logging page can also be set in Column layout. In this layout, you can add columns to
the Logging page. Each widget can then be arranged in a particular column and cannot
span more than one column. Each column can contain multiple widgets. You can
rearrange widgets within the same column and move them from one column to another.
You can adjust the width of the widget by changing the width of the columns they are
located in.
How to Select a Page Layout Type
To select a particular page layout type, proceed as follows:
1. Click the Edit Layout button.
The Edit Layout dialog box opens.
2. In the Layout Type area, select the desired page layout type.
3. Click OK to apply the selected page layout to the Logging page.
7. Arranging the Logging Page Layout
39
EVS Broadcast Equipment S.A.
Issue 1.5.D - March 2015
How to Add and Remove Columns
By default, in the Column layout the Logging page consists of one column. Logging Editor
allows you to add up to five extra columns. Columns that you no longer need can be
removed again.
To add or remove one or more columns from the Logging page layout, proceed as follows:
1. Click the Edit Layout button.
The Edit Layout dialog box opens.
2. If necessary, select the Column page layout
In the area below the initial column is visible.
3. Do one of the following:
◦
Click the Add Column button to add an extra column.
By default, each new column is inserted to the right of the existing columns and
takes up 1/6th of the total available width. The width of the existing columns is
adjusted accordingly. Next to the border(s) of the columns whose width can be
modified a double-headed arrow appears allowing you to widen and/or narrow
them.
Repeat this action until you have added the necessary amount of columns.
◦
Click the Remove Column button to get rid of a column.
The column you last added is removed. The width of the other columns is adjusted
accordingly.
4. Click OK to apply the new page layout to the Logging page.
If you increase or reduce the number of columns, the width of the widgets already on
the Logging page will be automatically adjusted to fit into the new layout. If you add
extra columns, the new columns will be empty until you move widgets into them.
40
7. Arranging the Logging Page Layout
USER MANUAL MAD 1.5 Logging Editor
How to Change the Width of a Column
To change the width of one or more columns on the Logging page, proceed as follows:
1. Click the Edit Layout button.
The Edit Layout dialog box opens. In the Column Layout area you can see the
columns that have been created. Next to the border(s) of the columns whose width
can be modified a double-headed arrow is displayed.
2. Click one of these arrows to increase or decrease the width of the corresponding
column with 1/6th of the total width.
The width of the adjacent column will be decreased or increased accordingly.
3. Click OK to apply the new page layout to the Logging page.
If you increase or reduce the width of certain columns, the width of the widgets
located in those columns on the Logging page will be automatically adjusted to fit into
the new layout.
7.2.
Minimizing and Maximizing Widgets
To minimize a widget, click - in the right corner of its title bar. Only the title bar will remain
visible.
To restore a widget to its maximum size, click + in the right corner of its title bar.
7. Arranging the Logging Page Layout
41
EVS Broadcast Equipment S.A.
7.3.
Issue 1.5.D - March 2015
Resizing Widgets
You can easily change the width and height of each widget on the Logging page. The way
to do this depends on the selected page layout.
If the Logging page is set in Workspace Layout, you can make a widget wider or narrower
by dragging its right edge left or right. You can change the height of a widget by dragging
its bottom edge up or down.
If the Logging page is set in Column Layout, and one or more columns have been added,
you can:
•
change the height of a widget by dragging its bottom edge up or down.
•
change the width of a widget by changing the width of the column in which the widget
is located. Note that all the widgets that are in the same column will be resized
accordingly.
Note that each type of widget has a minimum width and height.
7.4.
Moving Widgets
If the Logging page is set in Workspace layout, you can freely change the position of each
widget. Simply hold your mouse pointer over the title bar of the widget you want to move,
and then drag it to its new position.
If the Logging page is set in Column layout, and one or more columns have been added,
you can move widgets to another column or rearrange their order within the same column.
To move a widget from one column to another, hold your mouse pointer over its title bar
and drag it to the desired column. A drop target will indicate where you can drop the
widget. The width of the widget will automatically adjust itself to the width of the column.
To move a widget to another position within the same column, hold your mouse pointer
over its title bar and drag it to the desired position. Once again, a drop target will indicate
where you can drop the widget.
7.5.
Removing Widgets
To remove a widget from the Logging page, click X in the right corner of its title bar.
Note that it is impossible to remove the Log Sheet and Player widget. The X button is
unavailable.
42
7. Arranging the Logging Page Layout
USER MANUAL MAD 1.5 Logging Editor
7.6.
Saving, Reusing and Deleting Page
Layouts
Introduction
Logging Editor allows you to quickly save a particular Logging page layout and then reuse
it at any future moment.
This can be very useful when you frequently have to log the same type of video content
and you like the Logging page to be arranged in a certain way, but you do not want to
manually prepare the Logging page each time. Instead of adding and arranging widget by
widget, you can simply load an existing page layout.
Logging Editor saves the following page layout elements:
•
the layout type;
•
the number of columns (if any);
•
the number and type of widgets;
•
the size and height of each widget;
•
the way in which the widgets are arranged.
It should be noted that Logging Editor does not save the content (e.g. keywords, video file,
logs) that might be loaded in the widgets. Once you have opened an existing page layout,
you can manually load the content in each widget again.
Note also that these layouts will not be available to other users. They are only linked to
your personal user account.
How to Save a Page Layout
To save a page layout, click the Save Layout button, enter a name for the layout and then
click the Save Layout button. From now on, you will be able to reuse this layout at any
moment you like.
How to Reuse a Page Layout
To load an existing page layout, click the Open Layout button. A list of previously saved
page layouts appears. The following information about each layout is shown: name, layout
type, number of columns and number of widgets.
7. Arranging the Logging Page Layout
43
EVS Broadcast Equipment S.A.
Issue 1.5.D - March 2015
Select the desired page layout and click OKto load it in the Logging page.
How to Delete a Page Layout
If you no longer need a certain page layout, you can easily remove it from the page layout
list. Click the Open Layout button, select the page layout you want to delete, and then
click the Delete button
44
.
7. Arranging the Logging Page Layout
USER MANUAL MAD 1.5 Logging Editor
8.
Creating and Editing Log Entries
8.1.
Creating New Log Entries
To create a new log entry in a loaded log sheet, proceed as follows:
1. Select the desired segment from the segment drop-down list.
2. Start playing the video file in the Video Player widget or navigate directly to the event
you want to log.
3. Do one of the following:
◦
Press ENTER to add free text, or
◦
Click the Add New Log button in the Log Sheet Grid view.
The Create a New Log view of the Log Sheet widget opens. If you have pressed
ENTER, the Free Text field will be selected. The Timecode field displays the
timecode grabbed from the frame of the video file. The video file in the Video Player is
paused on the frame that corresponds to the timecode.
4. If required, enter free text into the log.
5. If required, add one or more keywords to the log by clicking the corresponding
keyword buttons in your keyword grid(s).
6. If required, add select a rating level, from one to three stars. To undo the assigned
rating again, click the Clear button.
7. For an easy tracking of the logs, you can select a color for the log by clicking one of
the color buttons.
8. Click the Save button to add the log to the Log Sheet Grid view.
The Log Sheet Grid view appears again. The video file automatically starts playing
again.
8. Creating and Editing Log Entries
45
EVS Broadcast Equipment S.A.
8.2.
Issue 1.5.D - March 2015
Navigating Through a Loaded Video
File
When logging the content of a video file it is always useful when you can easily jump
towards a particular point in time to log a certain event without having to watch through the
entire video file.
The Video Player widget allows many ways to navigate through the loaded video file.
You can:
•
click at a specific point on the scrubber bar; or
•
manually enter a timecode in the Timecode field; or
•
click on a log entry in the Log Sheet Grid view, or
•
drag the playhead on the scrubber bar to skim the content; or
•
click one of the Navigation buttons, or
•
use a Shuttle Pro device.
8.3.
Editing, Viewing and Deleting Log
Entries
8.3.1.
About Editing Logs
Logging Editor allows you to make changes to logs that have already been saved. This
can be because you want to correct a spelling mistake in the free text, or because there is
a discrepancy between the timecode of the video file and timecode of the corresponding
log. It could also be because you want to change the level rating or log color, or because
you want to remove certain keywords with new keywords.
You can edit the logs in a log sheet one by one, but you can also make use of the bulk
editing feature to make changes to a selection of logs in one go.
Take into account that when you make changes to logs, that this has a major impact on
the MAD search engine which makes use of these logs to easily find back specific events
in the video files that have been ingested in the MAD digital archive.
8.3.2.
Editing a Single Log Entry
To edit a single log entry, proceed as follows:
1. In the Log Sheet Grid view, click the Edit Log Entry button
modify.
of the log you want to
The Create a New Log view opens.
46
8. Creating and Editing Log Entries
USER MANUAL MAD 1.5 Logging Editor
2. Perform the necessary changes, e.g. adding extra keywords, changing the level
rating, etc., and then click the Save button
.
The log entry is updated in the Log Sheet Grid view.
8.3.3.
Editing Log Entries in Bulk
Introduction
Logging Editor comes with a great feature which allows you to adjust the same log
element for a selection of logs in one go. For example, instead of changing the level rating
log by log, you can select the desired logs and let Logging Editor automatically update the
level rating for you. This is a real time saver.
How to Change the Color of Multiple Log Entries
To change the color of a selection of log entries, proceed as follows:
1. In the Log Sheet grid view, select the log entries whose log color you want to modify.
To select a consecutive group of log entries, click the first log entry of the group, press
and hold down the SHIFT key, and then click the last log entry of the group. To select
non-consecutive log entries, press and hold down the CTRL key, and then click each
log entry you want to select.
To undo your selection again, click the Clear Selection button.
2. Click the Bulk Edit button and select Change Color from the drop-down list.
A popup appears which allows you to select another color.
3. Click in the field to open the drop-down list and select another color.
8. Creating and Editing Log Entries
47
EVS Broadcast Equipment S.A.
Issue 1.5.D - March 2015
4. Click Save to update the color of the selected log entries.
How to Change the Level Rating of Multiple Log Entries
To change the level rating of a selection of log entries, proceed as follows:
1. In the Log Sheet grid view, select the log entries whose level rating you want to
modify.
To select a consecutive group of log entries, click the first log entry of the group, press
and hold down the SHIFT key, and then click the last log entry of the group. To select
non-consecutive log entries, press and hold down the CTRL key, and then click each
log entry you want to select.
To undo your selection again, click the Clear Selection button.
2. Click the Bulk Edit button and select Change Rating from the drop-down list.
A popup appears which allows you to set another rating.
3. Use the spin box to set a new rating or enter a value between 0 and 3.
4. Click Save to update the level rating of the selected log entries.
48
8. Creating and Editing Log Entries
USER MANUAL MAD 1.5 Logging Editor
How to Update the Free Text of Multiple Log Entries
To add additional free text to a selection of log entries or to replace the existing free text
with new free text, proceed as follows:
1. In the Log Sheet grid view, select the log entries whose free text you want to modify.
To select a consecutive group of log entries, click the first log entry of the group, press
and hold down the SHIFT key, and then click the last log entry of the group. To select
non-consecutive log entries, press and hold down the CTRL key, and then click each
log entry you want to select.
To undo your selection again, click the Clear Selection button.
2. Click the Bulk Edit button and select Add Free Text from the drop-down list.
A popup appears which allows you to enter new free text and add it to the existing free
text or to replace the current free text with it.
3. Enter the new free text in the corresponding text field and then select one of the
following actions:
◦
Replace Current Value if you want to replace the current free text with the new
value.
◦
Add to Current Value if you want to supplement the current free text with the
new free text value.
4. Click the Save button to update the free text of the selected log entries.
How to Change the Keywords of Multiple Log Entries
To add additional keywords to a selection of log entries or to replace the existing
keywords with new keywords, proceed as follows:
8. Creating and Editing Log Entries
49
EVS Broadcast Equipment S.A.
Issue 1.5.D - March 2015
1. In the Log Sheet grid view, select the log entries whose keywords you want to modify
or supplement.
To select a consecutive group of log entries, click the first log entry of the group, press
and hold down the SHIFT key, and then click the last log entry of the group. To select
non-consecutive log entries, press and hold down the CTRL key, and then click each
log entry you want to select.
To undo your selection again, click the Clear Selection button.
2. Click the Bulk Edit button and select Add Keywords from the drop-down list.
A popup appears which allows you to add new keywords and add them to the existing
keywords or to replace the current keywords with them.
3. Add new keywords by clicking the corresponding keyword buttons in your keyword
grids, and then select one of the following actions:
◦
Replace Current Value if you want to replace the current keywords with the
newly added keywords.
◦
Add to Current Value if you want to supplement the current keywords with the
new keywords.
4. Click the Save button to update the keywords of the selected log entries.
Applying a T/C Offset
Introduction
Imagine the logs and the recordings are made in different locations or on two different
setups with a T/C offset between the two. For example, the images are recorded live at
the event while the logger works in a studio, with IP Logger on his laptop. The log entries
created with IP Logger carry the PC time code of the laptop and the recordings have the
actual live time code.
When importing the log sheet from IP Logger into Logging Editor, you will notice that the
time codes of the video files and the logs won't match and you need to enter an offset.
How to Apply a T/C Offset
To apply a timecode offset to a selection of logs, proceed as follows:
1. In the Log Sheet grid view, select the log entries you want to apply a T/C offset to.
50
8. Creating and Editing Log Entries
USER MANUAL MAD 1.5 Logging Editor
To select a consecutive group of log entries, click the first log entry of the group, press
and hold down the SHIFT key, and then click the last log entry of the group. To select
non-consecutive log entries, press and hold down the CTRL key, and then click each
log entry you want to select.
To undo your selection again, click the Clear Selection button.
2. Click the Bulk Edit button and select Add Time Offset.
A popup appears which allows you to enter and apply a positive or negative
T/C offset.
3. Enter the amount of time and frames should be subtracted or added to the timecode of
the selected log entries and then click Save to apply the T/C offset.
8.3.4.
Viewing the Event Described by a Log Entry
To view in the Video Player the event that is described by a particular log entry, doubleclick that log entry in the Log Sheet grid view.
The frame of the video file that corresponds to the timecode of the log entry is loaded in
the Video Player.
8.3.5.
Deleting Log Entries
To delete one or more log entries from a log sheet, proceed as follows:
1. In the Log Sheet grid view, select the log entries you want to remove.
To select a consecutive group of log entries, click the first log entry of the group, press
and hold down the SHIFT key, and then click the last log entry of the group. To select
non-consecutive log entries, press and hold down the CTRL key, and then click each
log entry you want to select.
To undo your selection again, click the Clear Selection button.
8. Creating and Editing Log Entries
51
EVS Broadcast Equipment S.A.
Issue 1.5.D - March 2015
2. Click the Delete Selected Logs button.
A dialog box appears asking you to confirm your action.
3. Click the Delete Dictionary Element button to continue.
The selected logs are removed from the Log Sheet grid.
8.4.
Importing Log Sheets
Introduction
Logging Editor allows you to import logs that were created with an external logging tool
like for example IPDirector, link them to the proper segments of an asset item, and finally
inject them in the MAD system.
If the segments of an asset item already contain logs, then the imported logs will be
merged with the existing logs. When imported logs fall outside the timecode boundaries of
a particular segment, or if their timecode is identical to the timecode of an existing log,
Logging Editor will mark the problematic logs.
Procedure
To import the logs of an externally created log sheet XML file into Logging Editor and add
them to the segments of a particular asset item, proceed as follows:
1. Click the Import Log Sheet button in the toolbar of the Log Sheet widget.
The Import Log Sheet view appears.
52
8. Creating and Editing Log Entries
USER MANUAL MAD 1.5 Logging Editor
2. Select the appropriate asset item from the Asset Item list. The logs from the external
log sheet will be added to the segments of this asset item.
3. To add a log sheet to the log sheet view, do one of the following:
◦
Click the Open File button to browse for the log sheet XML file on your local
machine or on a shared network drive.
◦
Drag and drop the log sheet XML file on the designated drop zone.
The name of the log sheet XML file appears in the drop zone and the Start Importing
and Cancel Importing button become available.
Note that if you have not selected an asset item, these buttons will not be available.
4. If you want to return to the Log Sheet Grid view without importing any logs, click the
Cancel Importing button, otherwise click the Start Importing button.
Logging Editor will distribute the logs over the segments of the selected asset item
taking into account the start timecode of each log and the timecode boundaries of
each segment.
The newly imported logs will appear in the log sheet grid together with the already
existing logs (if any) of the first segment of the selected asset item.
◦
If an imported log falls withing the timecode boundaries of a segment and does not
conflict with an already existing log, i.e. does not have the same timecode, it will
be displayed with a green check mark. The log is ready to be injected in the
MAD system.
◦
If an imported log falls within the timecode boundaries of a segment, but has the
same timecode as an already existing log, the new and existing log will be
displayed with a red prohibition sign. The logs cannot be imported into the
MAD system yet. You will have to modify the timecode of the imported or existing
log first.
8. Creating and Editing Log Entries
53
EVS Broadcast Equipment S.A.
◦
Issue 1.5.D - March 2015
If an imported log falls outside the timecode boundaries of a segment, it will be
displayed with an orange warning sign. You will have to modify the timecode of
the log until it falls within the boundaries of the segment.
5. If needed, do one or more of the following:
◦
Try to resolve all conflicting logs.
◦
Make sure that all logs fall within the timecode boundaries of the segments.
◦
Edit the data of the desired logs. Note that bulk editing is possible.
◦
Select the imported and/or existing logs you do not want to import into the MAD
system and click the Delete Selected Logs button.
A white garbage bin icon will appear next to the selected logs.
6. Click the Cancel Importing button if you want to return to the Log Sheet Grid view
without importing any logs, otherwise click the Finish Importing button.
The logs and all changes you performed on the logs are saved. The logs you marked
to be deleted are removed from the Log Sheet Grid view and are not saved in the
MAD database.
54
8. Creating and Editing Log Entries
USER MANUAL MAD 1.5 Logging Editor
9.
Managing Keywords,
Dictionaries and Keyword Grids
9.1.
Keyword Management Area
The Keyword Management area of the Logging Editor is only accessible to users with the
necessary user rights, in most cases the manager of a team of loggers or a system
administrator.
It allows to manage all keywords that are available in the MAD database and that form the
pool from which can be drawn to create all keyword dictionaries and keyword grids. New
keywords can be added and existing keywords can be modified.
It also allows to compose new and update existing keyword dictionaries. The finished
keyword dictionaries can be linked to one or more of the MAD metadata levels, i.e. main
category, subcategory, grouping category and asset.
The keyword dictionaries can be used to create new, public keyword grids. Existing
keyword grids can be adjusted and resaved.
Finally, this area contains a page where you can manage the colors loggers can use to
highlight a group of log entries.
Click the Keyword Management link in the navigation bar to open this area.
9.2.
Managing Keywords
9.2.1.
The Keyword List Page
The Keyword List page presents all keywords that are available in the MAD database in
the form of a list, with each keyword having a name and a unique ID. It allows quickly
searching for and editing existing keywords and also adding new ones.
To open the Keyword List page, click Keyword Management > Keywords in the Logging
Editor navigation bar.
9. Managing Keywords, Dictionaries and Keyword Grids
55
EVS Broadcast Equipment S.A.
Issue 1.5.D - March 2015
These keywords form the pool from which can be drawn to compose all keyword
dictionaries. See section "How to Create a New Keyword Dictionary" on page 59.
Warning
All changes performed on these keywords will reverberate on the keyword
dictionaries, keyword grids and logs containing these keywords.
56
9. Managing Keywords, Dictionaries and Keyword Grids
USER MANUAL MAD 1.5 Logging Editor
9.2.2.
How to Search for a Keyword
The keywords in the Keyword List can be searched for by name and by ID.
As soon as you type (part of) the keyword name or ID in the corresponding search field, all
keyword records that contain the string will be displayed.
9.2.3.
How to Add a New Keyword to the Keyword
List
To add a new keyword to the Keyword List, enter the new keyword in the text field below
the Keyword List and click the Add Keyword button.
The new keyword is added at the bottom of the Keyword List. Logging Editor has
automatically generated and assigned a keyword ID.
9.2.4.
How to Edit an Existing Keyword
Editing an existing keyword might be necessary because it has been misspelled or
because it has to be renamed.
To edit an existing keyword, proceed as follows:
1. In the Keyword List, click the cell of the desired keyword.
The cell turns into a text field.
2. Correct the spelling mistake or remove the existing keyword and enter a new one.
3. Click outside the cell again.
Warning
All changes performed on a keyword will also be reflected in the keyword
dictionaries, keyword grids and logs that contain this keyword.
9. Managing Keywords, Dictionaries and Keyword Grids
57
EVS Broadcast Equipment S.A.
Issue 1.5.D - March 2015
9.3.
Creating and Managing Keyword
Dictionaries
9.3.1.
The Keyword Dictionary Creation Page
Overview of the Page
The Keyword Dictionary Creation page allows to create and save new keyword
dictionaries, to load and edit existing ones, and to link each created dictionary to a
particular MAD metadata level, i.e. main category, subcategory, grouping category and/or
asset.
The Keyword Dictionary Creation page can be divided into two main areas.
The first area located at the left holds a list with all the keywords that are available in the
MAD database. Its a replica of the Keyword List. See section "The Keyword List Page" on
page 55. These keywords form the pool from which can be drawn to create the various
parent and child nodes of the keyword dictionary. This area also contains a field which
allows you to specify the maximum number of levels of the keyword dictionary.
The second area located at the right holds the keyword dictionary that is being created or
edited. It allows to add or change the dictionary title and description, to link the dictionary
to a particular MAD metadata level instance, to work out or rethink the dictionary structure
and to fix its content by adding and removing and arranging the necessary keywords.
Finally, the changes made to the existing keyword dictionaries and all newly created
dictionaries can be saved.
To open the Keyword Dictionary Creation page, click Keyword Management >
Dictionaries.
58
9. Managing Keywords, Dictionaries and Keyword Grids
USER MANUAL MAD 1.5 Logging Editor
Keyword Types
The keyword list contains two types of keywords: participant and standard keywords.
The participant keyword can be used to distinguish between:
•
the competitor or player keywords, i.e. the participant keywords, and
•
the action keywords, i.e. the standard keywords.
By default, the keywords are defined as standard keywords.
Two types of participant keywords have been defined: player and team.
The participant keywords are identified by a specific icon.
9.3.2.
How to Create a New Keyword Dictionary
To create a new keyword dictionary, proceed as follows:
1. Specify the maximum number of levels the dictionary may have. By default, this is set
to 5 levels.
2. Click
fields.
and enter a custom dictionary title and description in the corresponding
3. In the keyword list, select the keyword you want to add as root node to the keyword
dictionary. A root node is a part of the keyword dictionary that has no parent. It can
contain many child and parent nodes.
To quickly find back the desired keyword, you can make use of the search field. Enter
(part of) the keyword to filter the list.
4. Drag and drop the keyword in the Keyword Dictionary area.
A drop target will indicate where you can drop the keyword. In the example below,
Northern Ireland is added as root node.
9. Managing Keywords, Dictionaries and Keyword Grids
59
EVS Broadcast Equipment S.A.
Issue 1.5.D - March 2015
To remove the keyword again, hover your mouse pointer over the keyword and then
click the Delete button
. A message will appear asking you to confirm your action.
Click Delete Dictionary Element to continue.
5. Now search for the keywords you want to add to the root node as children and drag
and drop them one by one to the right of the parent keyword. Once again, a drop target
will indicate where you can drop the keywords.
As soon as you have added one child keyword, an right-pointing arrow will appear next
to the parent keyword.
6. Click the arrow to view all the child keywords you have already added.
In the example below, some names of players have already been added to the parent
node Northern Ireland.
The order in which you have added the child keywords to the parent node will be the
order in which the keywords will be presented in the keyword dictionary. If you are not
satisfied with this order, you can still change the position of the keywords. Select the
keywords whose position you want to change and drag and drop them on the desired
position. A drop target will indicate where you can drop them.
60
9. Managing Keywords, Dictionaries and Keyword Grids
USER MANUAL MAD 1.5 Logging Editor
7. Repeat steps 3 to 6 until you have added the necessary root and child keywords to
your dictionary.
To make a parent node out of a child keyword, simply drag and drop another keyword
to the right of this child keyword. The right-pointing arrow will appear and you will be
able to view the child of this new parent node.
8. (Optional) Link the dictionary to the desired MAD metadata level instance. By default,
each new dictionary is a public dictionary, i.e. not linked to any MAD metadata level
instance. See section "How to Link a Dictionary to a Metadata Level" on page 63.
9. Click the Save button to add this keyword dictionary to the MAD database.
9.3.3.
How to Edit an Existing Keyword Dictionary
Introduction
The Keyword Dictionary Creation page not only allows to create new keyword
dictionaries, it also makes it possible to load an existing keyword dictionary and to edit its
content and structure. This can be very useful if you want to add additional keywords to a
dictionary or if you want to remove certain keywords that have become obsolete. Linking
to (another) MAD metadata level instance is also an option.
How to Load an Existing Keyword Dictionary
To load an existing keyword dictionary into the Keyword Dictionary Creation page,
proceed as follows:
1. Click the folder button in the top right corner of the page.
A list with all the available keyword dictionaries appears.
9. Managing Keywords, Dictionaries and Keyword Grids
61
EVS Broadcast Equipment S.A.
Issue 1.5.D - March 2015
2. Search for and select the desired dictionary and click OK.
The keyword dictionary is loaded in the Keyword Dictionary Creation page.
How to Delete a Keyword
To remove a keyword from a keyword dictionary, proceed as follows:
1. Search inside the dictionary for the keyword you want to delete. To speed up things,
you can make use of the search field below the dictionary title. Enter (part of) the
keyword in the search field.
The autocomplete feature will suggest a number of keywords that match your search
string.
2. Select the desired keyword and press ENTER.
Logging Editor will automatically jump to that keyword in the dictionary and highlight it.
It will also highlight the parent node it belongs to.
3. Hover your mouse pointer over the keyword and then click the Delete button.
A message will appear asking you to confirm your action.
62
9. Managing Keywords, Dictionaries and Keyword Grids
USER MANUAL MAD 1.5 Logging Editor
Note that if you delete a keyword that has child keywords, also these children will be
removed.
Click Delete Dictionary Element to continue.
The keyword and its children (if any) will be removed.
How to Move a Keyword or Parent Node
To move a keyword or parent node within the same list or to move them to another node,
proceed as follows:
1. Select the keyword or parent node you want to move.
2. Drag and drop the keyword or parent node to the desired position.
A drop target will indicate where you can drop the keyword.
How to Turn a Keyword into a Parent Node
To turn a keyword into a parent node, just drag and drop another keyword next to that
keyword. A right-pointing arrow will appear allowing you to view all of its children.
9.3.4.
How to Link a Dictionary to a Metadata Level
Introduction
Logging Editor allows you to assign a dictionary and its keywords to a particular
MAD metadata level instance. Dictionaries that are linked to a particular metadata level
will also be shared by the underlying child metadata levels. For example, a dictionary
linked to a main category will also be shared by the subcategories, grouping categories
and assets belonging to that main category.
When loggers load the segments of a particular asset in the Logging page, the dictionaries
with the appropriate keywords will immediately be available in the Keyword Dictionary
widget.
Dictionaries containing very general keywords can be linked to the highest metadata
level. For example, a dictionary with keywords like 'spectators', 'sponsor', 'cheers', etc.
can be linked to the main category 'Sport'. A dictionary with more sports specific
keywords like 'goal', 'foul', 'red card' can be linked to the subcategory 'Football'. A
dictionary with keywords that are related to a particular competition can be linked to the
grouping category 'World Championships 2014'. A dictionary containing keywords that
relate to a specific football match within that competition can be linked to an asset, for
example 'USA vs. Belgium'.
9. Managing Keywords, Dictionaries and Keyword Grids
63
EVS Broadcast Equipment S.A.
Issue 1.5.D - March 2015
Procedure
To link a dictionary to a particular MAD metadata level instance, proceed as follows:
1. In the Keyword Dictionary Creation page, select the MAD metadata level you want to
assign the dictionary to. You can link the dictionary to the following metadata levels:
main category, subcategory, grouping category and asset.
Note that if you assign a dictionary to a particular MAD metadata level, all child
metadata levels will share this dictionary.
In the example below, the user links the dictionary to a grouping category, i.e. level 3
of the MAD metadata structure.
If you select one of these levels, the search field next to the drop-down list becomes
available.
If you select the option 'Public Dictionary', the dictionary will not be linked to any
metadata level instance. You will always be able to select it from the Keyword
Dictionary widget in the Logging page. The search field will remain unavailable.
2. Start typing the name of the desired MAD metadata level instance in the search field.
The autocomplete function will suggest the values that contain the string you just
entered.
3. Select the desired metadata level instance.
In the example below, the user links the dictionary to the grouping category instance
'Red Bull Race World Championship 2009'.
4. Click the Save button.
As of now, the dictionary and its keywords are available for loggers that have to log
the segments of assets that belong to the selected grouping category, in the example
'Red Bull Race World Championship 2009'.
64
9. Managing Keywords, Dictionaries and Keyword Grids
USER MANUAL MAD 1.5 Logging Editor
9.4.
Managing Public Keyword Grids
9.4.1.
The Keyword Grid Creation Page
Overview of the Page
The Keyword Grid Creation page allows to create and save new and to load and edit
existing public keyword grids. The keyword grids that are created here will be shared with
all loggers.
The creation of keyword grids can be very time consuming for loggers. By preparing these
grids beforehand and sharing them with the loggers, a lot of time can be saved. Moreover,
you are certain that everybody is using the same keyword grids.
To open the Keyword Grid Creation page, click Keyword Management > Keyword
Grids in the Logging Editor navigation bar.
The Keyword Grid Creation page can be divided into two main areas.
The first area located at the left of the page is used to load and display the contents of a
particular keyword dictionary. You can leaf through the loaded dictionary and select and
add the necessary keywords one by one to the keyword grid by a simple drag-and-drop
operation, or you can opt to create an entire tab of keywords in one go from a specific
parent node.
The second area to the right of the keyword dictionary is used to compose a new or to edit
an existing keyword grid. All elements of the keyword grid can be set here: title,
dimensions, number of tabs, position of keywords, background color of the keyword
buttons. The resulting keyword grid can be saved.
9. Managing Keywords, Dictionaries and Keyword Grids
65
EVS Broadcast Equipment S.A.
9.4.2.
Issue 1.5.D - March 2015
How to Create a New Public Keyword Grid
Introduction
By default, when you enter the Keyword Grid Creation page for the very first time, it
already contains a default public keyword grid of 5 by 5 with one empty tab. You can use
this grid as a starting point to create the new public keyword grid.
It can also happen that an existing public keyword grid is still loaded when you open the
Keyword Grid Creation page. Then, you first have to clear the existing keyword grid before
you can start working on the new one.
How to Create a New Public Keyword Grid From Scratch
To create a new public keyword grid step by step, proceed as follows:
1. (Optional) If an existing keyword grid is still loaded in the Keyword Grid Creation page,
click the Clear Grid button
to reset the entire grid.
2. Change the default title of the keyword grid and the first tab, i.e. 'Open or create new
Grid' and 'Tab 1'. Click
to make the grid and tab title editable. Two text fields will
appear in which you can enter a new title.
3. Click
to close the Edit Mode again.
4. Click the folder button to get an overview of the available keyword dictionaries.
66
9. Managing Keywords, Dictionaries and Keyword Grids
USER MANUAL MAD 1.5 Logging Editor
5. Select the desired keyword dictionary and click OK.
The content of the keyword dictionary is loaded in the Keyword Grid Creation page. Its
title appears in the top left corner of the page.
6. Select a keyword you want to add to the keyword grid and then drag and drop it on the
desired keyword button within the tab. Repeat this action until you have added the
desired number of keywords or until all keyword buttons within the tab have a keyword
assigned.
To remove a particular keyword again from the keyword grid, select the corresponding
keyword button and click the garbage bin.
To swap the position of two keywords, simply drag and drop one of keywords onto the
other.
7. (Optional) Select the buttons the background color of which you want to change and
then click on the drop button.
A color picker appears. The color picker allows you to pick a color from the color field.
With the color slider to the right you can determine the color range. At the bottom you
get a preview of the selected color.
Click outside the color picker to close it again.
The background of the selected keyword buttons will change accordingly.
Click
to deselect all buttons again.
8. (Optional) Click
to add one or more additional tabs to the public keyword grid.
Repeat steps 2 to 7.
To remove a tab again, select it from the drop-down list and click the garbage bin
button.
9. Click
9.4.3.
to add the keyword grid to the collection of public keyword grids.
How to Edit an Existing Public Keyword
Grid
Introduction
The Keyword Grid Creation page not only allows to create new public keyword grids, it
also makes it possible to load existing public keyword grids to edit their content and
structure. This can be very useful if you want to add additional keywords or tabs, or
rearrange certain keywords, or remove certain keywords and/or tabs that have become
obsolete.
How to Load an Existing Public Keyword Grid
To load an existing keyword grid into the Keyword Grid Creation page, proceed as follows:
1. Click the folder button in the top right corner of the page.
9. Managing Keywords, Dictionaries and Keyword Grids
67
EVS Broadcast Equipment S.A.
Issue 1.5.D - March 2015
A list with all the available public keyword grids appears. You can make use of the
search field to quickly search for a particular grid by name.
2. Select the desired keyword grid and then click OK.
The keyword grid is loaded in the Keyword Grid Creation page.
How to Delete Keywords and Tabs
To delete a selection of keywords, select the appropriate keyword buttons and click the
garbage bin button.
To delete a tab, select it from the drop-down list and click the garbage bin button.
Click the Save button to keep your changes.
How to Rearrange Keywords
To swap the position of two keywords, simply drag and drop one of keywords onto the
other.
Click the Save button to keep your changes.
How to Add an Empty Tab
To add a new, empty tab, click
. Click the Save button to keep your changes.
How to Change the Grid Dimensions
To increase or reduce the number of columns and rows, enter the desired values in the
corresponding grid dimensions fields.
68
9. Managing Keywords, Dictionaries and Keyword Grids
USER MANUAL MAD 1.5 Logging Editor
If you reduce the number of columns and rows, and as a result the existing tabs can no
longer accomodate all their keywords, then Logging Editor will automatically create
additional tabs until all keywords are allocated again. An incremental suffix is
automatically added to the name of the tabs that hold the keywords of the same parent
node. For example, FC Barcelona_1, FC_Barcelona_2, etc.
If you increase the number of columns and rows, then Logging Editor will add additional
empty keyword buttons.
Click the Save button to keep your changes.
How to Create Keyword Grid Tabs From a Parent Node
To create a tab with keywords from a parent node and add it to the existing public keyword
grid, proceed as follows:
1. In the Keyword Dictionary, select the parent node from which you want to create a
keyword grid tab.
2. Click the Add New Tab button.
Logging Editor will create a tab in the keyword grid for the parent node you selected in
the keyword dictionary and fill them with the corresponding keywords.The name of the
parent node is used as tab name.
If a tab cannot hold all the keywords of a particular parent node because of its limited
dimensions, then Logging Editor will create additional tabs until all the keywords have
been allocated. An incremental suffix is automatically added to the name of the tabs
that hold the keywords of the same parent node. For example, FC Barcelona_1, FC_
Barcelona_2, etc.
3. Click the Save button to keep your changes.
9. Managing Keywords, Dictionaries and Keyword Grids
69
EVS Broadcast Equipment S.A.
9.5.
Issue 1.5.D - March 2015
Managing Log Colors
Overview of the Page
The Log Colors page displays the set of the colors a logger will be able to use to highlight
certain logs in the Log Sheet grid view of the Log Sheet widget.
On the screenshot below the default IPDirector log colors are displayed.
It allows you to set new colors and to assign a different name and meaning to the colors.
The changes performed here will also be reflected in the Log Sheet grid view.
To open the Log Colors page, click Keyword Management > Log Colors.
How to Change a Log Color
To select a different log color, proceed as follows:
1. Click
to launch the Edit Mode.
2. Click the desired color bar.
A color picker appears.
70
9. Managing Keywords, Dictionaries and Keyword Grids
USER MANUAL MAD 1.5 Logging Editor
The color picker allows you to pick a color from the color field. With the color slider to the
right you can determine the color range. At the bottom you get a preview of the selected
color.
Click outside the color picker to close it again.
The color of the selected color bar will change accordingly.
3. Click
to save your changes and close the Edit Mode again.
Logs that were already highlighted with the original log color will now be highlighted
with the new log color. In the Create a New Log view of the Log Sheet widget, the
original highlight color is replaced by the new log color.
How to Assign a Different Color Name and/or Meaning
To assign a different name and/or meaning to a particular log color, proceed as follows:
1. Click
to launch the Edit Mode.
2. Enter a new name and/or meaning in the corresponding text field.
3. Click
to save your changes and close the Edit Mode again.
9. Managing Keywords, Dictionaries and Keyword Grids
71
Corporate
+32 4 361 7000
North & Latin America
+1 973 575 7811
EVS Headquarters
Liège Science Park
16, rue Bois St Jean
B-4102 Seraing
Belgium
To learn more about EVS go to www.evs.com
Asia & Pacific
+852 2914 2501
Other regional offices
www.evs.com/contact
EVS Broadcast Equipment is continuously adapting and improving its products in accordance with the ever changing
requirements of the Broadcast Industry.
The data contained herein is therefore subject to change without prior notice. Companies and product names are
trademarks or registered trademarks of their respective companies.