1
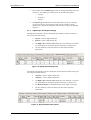
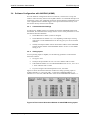
9400TP
Termination Panel
User Manual
Version: 1.1
www.ecotech.com
ECOTECH Pty Ltd
9400TP Termination Panel Manual
Copyright Ecotech Pty Ltd © 2008
All rights reserved
Information in this document is subject to change without notice and does not represent a
commitment on the part of Ecotech Pty Ltd.
No part of this publication may be reproduced, distributed, transmitted, stored in a retrieval system, or
reduced to any electronic medium without the prior consent of Ecotech Pty Ltd.
Ecotech Pty Ltd assumes no responsibility for any errors that may appear in this document or any
damages arising out of the use or inability of this document.
Ecotech Pty Ltd acknowledges the various trademarks and proprietary names of companies and
products mentioned in this document. Ecotech Pty Ltd is not affiliated with any of these organizations.
No approval or endorsement by the organizations mentioned is intended or given either expressly or
by implication.
Ecotech Pty Ltd reserves the right to change any in part or all specifications without prior notice.
Each Ecotech 9400TPIM Terminal Panel has a unique ID number.
Ecotech Stock Code: D-ECO-9400AD16-O.
Printed in Australia
Revision Number: 1.1
Issue Date: November 2008
9400TP Manual.doc
Manual ID: MAN 0030
Ecotech Pty Ltd
A.B.N 32 005 752 081
1492 Ferntree Gully Road
Knoxfield, Victoria 3180, AUSTRALIA
Telephone:
Facsimile:
URL:
1300 364 946
1300 668 763
http://www.ecotech.com.au
ECOTECH Pty Ltd
9400TP Termination Panel Manual
Page Intentionally left Blank
ECOTECH Pty Ltd
9400TP Termination Panel Manual
TABLE OF CONTENTS
1
2
Introduction ........................................................................................................ 6
1.1
Description ............................................................................................................................................ 6
1.2
9400TP Features ................................................................................................................................... 7
1.3
Ecotech Dataloggers and Software Packages ..................................................................................... 7
9400TP Connection. ........................................................................................... 8
2.1
Connecting to WINAQMS Logger ...................................................................................................... 8
2.2
Connecting to the 9400 DAS ................................................................................................................ 8
2.3
Changing the Hardware Address. ....................................................................................................... 8
2.3.1
Default Factory Setting................................................................................................................... 8
2.3.2
To change the J5 jumper setting: .................................................................................................... 8
2.4
Power Supplies .................................................................................................................................... 10
2.4.1
Input Connections......................................................................................................................... 10
2.4.2
Output Connections ...................................................................................................................... 10
3
9400TP Input / Output Configuration.............................................................. 11
3.1
9400TP Jumpers ................................................................................................................................. 11
3.1.1
Access to Jumpers......................................................................................................................... 11
3.2
Hardware Configuration.................................................................................................................... 13
3.2.1
Analog Inputs................................................................................................................................ 13
3.2.2
Temperature Input......................................................................................................................... 13
3.2.3
Frequency Inputs. ......................................................................................................................... 14
3.2.4
Counter Inputs. ............................................................................................................................. 14
3.2.5
Digital Outputs.............................................................................................................................. 14
3.2.6
Digital Inputs ................................................................................................................................ 15
3.3
Software Configuration with WINAQMS ........................................................................................ 16
3.3.1
Analyser Parameters ..................................................................................................................... 16
3.3.2
Communication Settings............................................................................................................... 16
3.3.3
Channel Information ..................................................................................................................... 17
3.3.4
Digital Input and Output Settings ................................................................................................. 18
3.4
Software Configuration with 9400DAS (AQMS)............................................................................. 19
3.4.1
Communications Settings ............................................................................................................. 19
3.4.2
Analog Inputs................................................................................................................................ 19
3.4.3
Differential Inputs......................................................................................................................... 20
3.4.4
Frequency Inputs .......................................................................................................................... 20
3.4.5
Counter Inputs .............................................................................................................................. 20
3.4.6
Digital Inputs ................................................................................................................................ 21
3.4.7
Digital Outputs.............................................................................................................................. 21
4
Lightning Protection ........................................................................................ 22
5
Field Calibration ............................................................................................... 23
5.1
Analog Inputs...................................................................................................................................... 23
5.2
Temperature Sensor ........................................................................................................................... 23
5.3
Frequency Inputs ................................................................................................................................ 23
6
Trouble Shooting.............................................................................................. 24
7
Upgrading the Early 9400TP............................................................................ 25
4
7.1
Scope .................................................................................................................................................... 25
7.2
Parts Required .................................................................................................................................... 25
Contents
ECOTECH Pty Ltd
7.3
8
9400TP Termination Panel Manual
Procedure ............................................................................................................................................ 25
List of RS232 Commands ................................................................................ 26
8.1
Notations used in this Section ............................................................................................................ 26
8.1.1
Symbols ........................................................................................................................................ 26
8.1.2
Syntax ........................................................................................................................................... 26
8.2
List of Commands............................................................................................................................... 26
8.2.1
Analog Input ................................................................................................................................. 26
8.2.2
Differential Input .......................................................................................................................... 26
8.2.3
Frequency Input ............................................................................................................................ 26
8.2.4
Counter Input ................................................................................................................................ 27
8.2.5
Digital Output ............................................................................................................................... 27
8.2.6
Digital Input.................................................................................................................................. 27
8.2.7
Counter Inputs Reset..................................................................................................................... 27
8.2.8
Device Identification..................................................................................................................... 27
9
10
Termination Panel Connections...................................................................... 28
List of Figures................................................................................................ 29
Contents
5
ECOTECH Pty Ltd
9400TP Termination Panel Manual
1 Introduction
The Ecotech series of Data loggers achieve a very high standard of accuracy due to
the use of RS232 protocols to log data from various analysers. However it is not
always the case that an analyser or an instrument will have RS232 capabilities. Hence
the 9400TP Termination Panel fills this void by not only allowing logging of non
RS232 instruments, but also controlling digital signals and detecting external alarms.
Figure 1: A typical Data Logging System
1.1
Description
Using the analogue or frequency inputs, all types of instruments can be connected to
the Ecotech Dataloggers. The 9400TP has digital inputs and outputs for system
control. It can be easily used on the bench or it can be rack mounted using the rack
mounting shelf (PN: A-HAR-3012). The 9400TP has 48 screw terminals. Each one is
numbered in sequence as well as an indication of its function directly below it on the
printed circuit board.
Figure 2: 9400TP Termination Panel
6
Introduction
9400TP Termination Panel Manual
1.2
ECOTECH Pty Ltd
9400TP Features
The 9400TP includes two printed circuit assemblies (PCA) inside its enclosure:
1.3
•
The Terminationl Panel PCA, (PN: D-ECO-9400E1) which provides the
terminals and associated circuitry to connect external sensors.
•
The 9400TPIM PCA, (PN: D-ECO-9400TPIM-S) which contains the
circuitry for the analog to digital conversion and serial interface.
•
Together they provide the following features:
•
48 way numbered terminal block (orange).
•
16 Analogue input channels (CH1 to CH16).
•
8 Differential Analogue inputs (CH1 to CH16).
•
± 10V range.
•
16 bit Resolution analogue to digital converter (±3mV).
•
13 Frequency / Counter Inputs.
•
8 Digital Outputs, (4 optically Isolated).
•
8 Digital Inputs, (4 optically isolated).
•
Lightning protection on analog & frequency inputs.
•
Jumper configurable digital inputs & outputs.
•
Interfaces directly to existing 9400DAS & WinAQMS data loggers
using one RS232 cable.
•
Optically Isolated RS232 serial interface.
•
Operates from a single +12V supply, either external or from the
WINAQMS Datalogger (port TPIM) or the 9400DAS (Port 4, 5 &
6). The power supply has a floating ground.
•
Jumper settable address so that up to 8 9400TPIMs can be daisy
chained together for expansion up to 128 analogue channels.
•
Built in temperature sensor.
•
± 12V & + 5V supplies.
•
Black anodised aluminium case.
•
19” Rack mounting kit. (optional).
Ecotech Dataloggers and Software Packages
The 9400TP may be connected to two types of dataloggers manufactured by Ecotech:
Introduction
•
The 9400DAS datalogger which uses the AQMS® software running on
Microsoft DOS® platform.
•
The WINAQMS® datalogger which uses the WINAQMS® software
running on Microsoft WINDOWS NT ® platform.
7
ECOTECH Pty Ltd
9400TP Termination Panel Manual
2 9400TP Connection.
The 9400TP has a single ribbon cable fitted with a DB9 female connector. This
provides the RS232 communications between the 9400TP and the data logger.
NOTE: This is not a standard RS232 connection as it also contains the +12V power
supply.
DO NOT CONNECT THE 9400TP TO A STANDARD COMPUTER SERIAL
PORT.
2.1
Connecting to WINAQMS Logger
The serial cable must be connected to port TPIM of the WINAQMS logger. All
software configuration of the 9400TP is completed within WINAQMS. If you have
more than one 9400TP, then the additional one can be connected in parallel (i.e.
daisy chain). If you are using daisy chaining, then the hardware address of the second
9400TP board must be changed as shown in section 2.3 below.
2.2
Connecting to the 9400 DAS
The RS232 cable must be connected to port 4, 5 or 6 of the 9400DAS. All software
configuration of the 9400TP is completed within AQMS. If you have more than one
9400TP, then the additional one can be connected to one of the other ports. If you do
not have sufficient ports, then the additional termination panel can be connected in
parallel (i.e. daisy chain). If you are using daisy chaining, then the hardware address
of the second 9400TP board must be changed as shown in section 2.3 below.
2.3
Changing the Hardware Address.
The 9400TP has a hardware address setting. If it is necessary for several termination
panels to be connected in parallel, each 9400TP will require a different address.
2.3.1
Default Factory Setting
Figure 3 shows the default factory configuration of the 9400TP (address = 0). By
changing the jumper configuration of J5 on the 9400TPIM, the hardware address of
the 9400TPIM can be set between 0 and 8. Figure 4 shows the jumper positions for
different addresses . If you are only using one 9400TP on a given port, there is no
need to change the hardware address.
2.3.2
8
To change the J5 jumper setting:
•
Observe electrostatic precautions: wear an antistatic writs strap connected to
the datalogger ground or another ground connected terminal.
•
Remove the RS232 connector from the back of the WINAQMS or
9400DAS (power off),
•
Open the 9400TP enclosure by removing the 4 screws on the side,
•
Remove the 3 screws holding the 9400TPIM in place,
•
Carefully remove the 9400TPIM PCA from the three DB connectors
without twisting it. (try using a screwdriver).
•
Change the Jumper J5 settings as required.
•
Replace the 9400TPIM, screws, lid and cable.
9400TP Connection
9400TP Termination Panel Manual
ECOTECH Pty Ltd
Figure 3: 9400TPIM Default Factory Jumper Configuration
PGM
ID2
Address = 2
ID1
PGM
ID2
ID1
Address = 1
ID0
PGM
ID2
ID1
ID0
Address = 0
(Default)
J8
ID0
J7
R10
Open
Closed
J5
J5
J5
Figure 4. 9400TPIM (J5), Hardware Address Jumper Configuration.
9400TP Connection
9
ECOTECH Pty Ltd
2.4
9400TP Termination Panel Manual
Power Supplies
2.4.1
Input Connections
The 9400TP can be powered from a single +12V power source. This can be
connected in two ways.
•
The first and most common method is through the 9 pin DB9 RS232 cable.
This cable has been suitably modified to accommodate the +12V power
supply on Pin 7 of this connector. The serial ports for connecting the
9400TP on the WinAQMS and 9400DAS data loggers, have been modified
to provide the +12V supply. Do not connect to any other serial port.
(Refer to section 2.1 & 2.2). J7 on the 9400TPIM board must be closed in
order for this method to work.
•
The second method is to connect the +12 V power supply directly to the
9400TPIM board. This is useful when connecting the 9400TP to a standard
computer running WINAQMS or AQMS. The +12V supply can come from
a 12V plug-pack or some other power source. The +12V supply can be
connected to J8 on the 9400TPIM board (see Figure 3). It can be soldered on
directly or a connector can be fitted. When using this method, it is important
to remove the jumper from J7 so as not to damage the computer serial port.
2.4.2
Output Connections
The 9400TP has three DC voltage outputs available on the 48 way terminal strip.
•
The +12 volt supply located on terminal 26 is to be used for powering
sensors which require a 12 volt supply. The maximum load is up to 200mA.
This supply has overload protection however caution should be used when
connecting it up.
•
The other is a +5 volt supply (terminal 28). This is current limited to around
100 mA and should only be used as a reference for a wind direction sensor.
•
Terminal 30 can also be used to provide a -12V supply if the jumper (J1) on
the termination panel board is moved to the –12V position. The jumper
allows the operator to use terminal 30 as either a frequency input (default)
(F5) or as a -12V supply.
Terminals 27 & 29 are common grounds for all of these supplies. These supplies all
have lightning protection.
9400 DAS or WinAQMS
DB9 M
TD
RD
SG
+12
2
3
5
7
9400TPIM
DB9 F
2
3
5
7
Figure 5. 9400TPIM RS232 Cable configuration.
10
9400TP Connection
9400TP Termination Panel Manual
ECOTECH Pty Ltd
3 9400TP Input / Output Configuration
When setting up a data logger for use, it is recommended that you spend some time
deciding which inputs are most suitable for your particular application. Then you can
proceed with hardware configuration of the 9400TP, and then the software
configuration of the data logging software.
The software settings for the different channels are explained in section 3.3 for the
WINAQMS software and section 3.4 for the AQMS software.
Figure 6 shows the factory default configuration of the 9400TP as well as the
locations of the various features.
3.1
9400TP Jumpers
The functions of the 9400TP inputs and outputs, may be altered by changing some of
the jumpers located on the Termination Panel PCA.
The table below is a summary of the functions of these jumpers.
Table 1: 9400TP Jumpers Summary
Jumper
Default Setting Function
Alternative Setting Function
J1
Frequency Input (F5)
-12 V
J2
Digital Output OP0 – OP3
+5V Pull up
Digital Output OP0 – OP3
open collector output
J3
Digital Input IP0 TTL Input
Digital Input IP0 CC Input
J4
Digital Input IP1 TTL Input
Digital Input IP1 CC Input
J5
Digital Input IP2 TTL Input
Digital Input IP2 CC Input
J6
Digital Input IP3 TTL Input
Digital Input IP3 CC Input
J7
Temperature Input
Analog or Frequency Input
3.1.1
Access to Jumpers
The 9400TP configuration may be altered by changing jumpers located on the
terminal panel PCA. To gain access to the jumpers, open the 9400TP enclosure by
unscrewing the 4 screws located on its sides using a No 1 Philips screwdriver.
Turn off the power before changing any jumpers.
Note:
Observe electrostatic precautions if you need to change jumper settings.
Input / Output Configuration
11
ECOTECH Pty Ltd
9400TP Termination Panel Manual
Figure 6: 9400TP Termination Panel Factory Configuration
DIO
Connection to
9400TPIM
Digital Inputs or
Frequency Inputs
(IP0 to IP7)
Digital Outputs
(OP0 to OP7)
Internal
Temperature
Sensor
Frequency Input (F5) or –12V Supply
Power Supplies
J7
Earth Stake Connection
Frequency
Inputs
(F1 to F4)
Analog Input
Connection to
9400TPIM
Analog Inputs
(CH1 to CH16)
12
Input / Output Configuration
9400TP Termination Panel Manual
3.2
ECOTECH Pty Ltd
Hardware Configuration
3.2.1
Analog Inputs
There are 16 analog input channels available on the termination panel, each with
± 10V input range. These inputs each have single stage lightning protection circuitry.
CH1 to CH12. Standard Analog Inputs.
Analog Inputs
CH1 - CH12 +/-10V
R1 - R12
CH1 - CH12
To 9400TPIM ADC
Input CH1 - CH12
1K
Z1 - Z12
Transorb
AGND
x12
SG1 - SG12
Lightning Arrestor
AGND
CH13, CH14, CH15 are dual purpose inputs. They can be used as either analog
inputs OR frequency/counter inputs (F1, F2 & F3), depending on the software
configuration. Refer to section 3.2.3 for frequency configuration of these inputs.
Inputs CH13 - CH15
Analog Inputs
CH13 - CH15 +/-10V
or
R13 - R15
CH13 - CH15
*F1 - *F3
Frequency Inputs
F1 - F3. 0 - 300Hz
x3
1K
Z13 - Z15
Transorb
AGND
To 9400TPIM Frequency
Inputs F1 - F3
1M
5V1
SG13 - SG15
Lightning Arrestor
AGND
GND
3.2.2
Temperature Input
CH16 has three functions: Standard analog input, Frequency/counter input, or
Internal Temperature.
The default configuration of this input is as a temperature sensor. This is useful for
measuring the rack temperature where the data logger is operating. e.g. Room
Temperature.
The AD590 temperature sensor is mounted on the 9400TP. In the software
configuration of this channel you will need a multiplier of 100 and offset of -273 to
obtain a reading in oC. To calibrate the sensor, you will need to change the offset in
the software configuration.
CH16 can be set up as an analog/frequency input by removing the jumper on J7.
Figure 6 shows the location of J7 on the termination panel. You may have to remove
the 9400TPIM board to access this jumper.
To 9400TPIM ADC
Input CH16
Analog Inputs
CH16 +/-10V
or
R16
CH16
*F4
Frequency Inputs
F4. 0 - 300Hz
1K
Z16
Transorb
AGND
To 9400TPIM Frequency
Input F4
1M
5V1
SG16
Lightning Arrestor
AGND
AD590
+12V
1
J7
GND
2
Temperature Sensor
R37
10K
Close Jumper J7 to read temperature on CH16.
AGND
Input / Output Configuration
13
ECOTECH Pty Ltd
9400TP Termination Panel Manual
3.2.3
Frequency Inputs.
The frequency inputs are designed for sensors such as wind speed sensors which give
a frequency output proportional to the wind speed. As mentioned before CH13,
CH14, CH15 & CH16 may be used as frequency inputs instead of analog inputs.
These are frequency inputs F1 to F4. They have a range of 0 to 400Hz.
There is a another dedicated high speed opto-isolated frequency input F5. This is
found on pins 29 & 30. It senses a contact closure type input. There is no need for
any external components. Just connect the sensor wires into pins 29 and 30. This
input has a maximum frequency of 3000Hz. It also has lightning protection as most
wind speed sensors are susceptible to lightning strikes.
+5V
R19
470
+5V
0V
R36
100K
R18
10K
Frequency Input
F5. 0 - 3000Hz
To 9400TPIM Frequency
Input F5
J1
Wind Speed Sensor or
Rain Gauge with
Voltage Free Contacts.
F5
*F5 (30)
-12V
0V (29)
I1
4N35
-12V
GND
GND
SG17
Lightning Arrestor
-12V
Digital inputs IP0 to IP7 can also be used as frequency inputs (refer to section 3.2.6
for hardware configuration). These also have a maximum range of 400Hz.
Note
Frequency inputs F1 to F4 require a switching signal of +4V or greater.
3.2.4
Counter Inputs.
Counter inputs are useful for connecting a tipping bucket rain gauge to the 9400DAS
and WinAQMS data loggers. Each of the frequency inputs (13 in total) can be used
as counter inputs also. They only difference is the software setup.
3.2.5
Digital Outputs
The 9400TP has eight digital outputs, OP0 to OP7. These can be used for controlling
calibration equipment or indicating alarm conditions.
14
•
The first four outputs (OP0 to OP3) are optically isolated.
•
The default factory set-up for the opto isolators (OP0 to OP3) is in an
inverting configuration with +5V pull-up resistors on the outputs
(collectors) and all the commons (emitters) connected to terminal pin 31.
•
When this output is turned on, the output will drop from 5V to 0V.
•
The pull-up resistor for each output can be removed by removing the
appropriate jumper on J2.
•
The common terminal (COM) is linked to the 0V rail of the analog input
side of the 9400TP. However it can be disconnected for total isolation by
cutting the track on the bottom side of the PCB.
•
The total current that the opto-isolator can sink is around 20mA.
Input / Output Configuration
9400TP Termination Panel Manual
ECOTECH Pty Ltd
•
The opto-isolators can also be wired for non-inverting operation if you feel
like moving a couple of resistors on the PCB (Contact Ecotech for further
details).
•
Outputs OP4 to OP7 are wired straight through from the 9400TPIM board.
+5V
J2
Close Jumper to add 5V Pull-up Resistor
Digital Outputs
OP0 - OP7
R19 - R22
10K
R23 - R26
OP0 - OP3 (32 -35)
Output connection to:
Calibration control input of instrument,
Solid state relay,
COM (31)
External transistor.
x4
470
I2 - I5 4N35
GND GND
From9400TPIM
OP0 - OP7
GND
x4
OP4 - OP7 (36 - 39)
Note: If the Digital outputs of the Termination panel (OP4, OP5,
OP6 or OP7) are connected with a GasCal’s digital inputs then a
100ohm resistor should be placed in series with this connection in
order to prevent damage to either devices.
3.2.6
Digital Inputs
The digital inputs IP0 to IP7 to the 9400TP are used for recording alarms from
analysers and Out Of Service status inputs. They can also be used as frequency or
counter inputs.
•
There are eight digital inputs of which the first four IP0 to IP3 are optically
isolated. The other four IP4 to IP7 are wired straight through to the
9400TPIM board.
•
Terminal 40 is the common of all the opto-isolators. It is linked to the 0V
rail. However if this link is cut, it can be totally isolated like the digital
outputs.
•
The polarity of the inputs can be changed within the Data logger software.
•
The input configuration for IP0 to IP3 can be changed by moving the
Jumpers (J3, J4, J5, J6). J3 is for IP0, J4 is for IP1 ….
•
If J3 - J6 are left in their factory default setting (TTL INPUT) they will
accept a TTL input of +4V and above.
•
If the J3 - J6 jumpers are moved to the CC INPUT position, then the digital
input will be suitable for using with a contact closure input.
•
All these inputs can be used as frequency or counter inputs.
J3 - J6
1
2
4
3
5
6
TTL INPUT
J3 - J6
1
3
5
2
4
6
CC INPUT
Input connection from:
TTL output alarm,
TTL Wind speed sensor,
+5V
(Jumpers J3 - J6 in Default factory configuration)
+5V
R31 - R34
10K
Digital Inputs
IP0 - IP7
R27 - R30
IP0 - IP3 (41 - 43)
470
COM (40)
1
J3
2
3
4
5
6
x4
To 9400TPIM
IP0 - IP7
I6 - I9 4N35
GND
GND
IP4 - IP7
(45 - 48)
Input / Output
Configuration
GND
x4
15
ECOTECH Pty Ltd
3.3
9400TP Termination Panel Manual
Software Configuration with WINAQMS
The purpose of this section is to show how to configure the TPIM card.
Communication settings, some aspects of Channel Information, Digital Input and
Output are covered in the following sub-sections. Refer to the WINAQMS manual
for more information. The scope of this manual will only cover the sections directly
relevant to setting up the 9400TP.
3.3.1
Analyser Parameters
In WINAQMS the TPIM configuration parameters can be accessed by clicking the
“Analyser Parameters” button on the menu bar.
Select TPIM in the Analyser pop-down menu to display the screen shown below:
Figure 7 TPIM Information Card
3.3.2
Communication Settings
Click the Communication Settings tab. The screen below shows the default TPIM
settings in WINAQMS. The
In order for the WINAQMS software to communicate with the 9400TPIM board
inside the 9400TP, the communications settings must be as follow:
16
•
Analyser Type “TPIM”
•
Device ID “0” (This is the hardware address of the 9400TPIM).
•
Max. Response Time > 0.5 Sec.
•
Serial Port: usually 2 or 4. Check WINAQMS hardware configuration.
•
Baud Rate “4800”.
•
8 Data Bits, 1 Stop Bit, no Parity.
Input / Output Configuration
9400TP Termination Panel Manual
ECOTECH Pty Ltd
Figure 8 TPIM Communication Settings Card
3.3.3
Channel Information
The Channel Information tab shows details on the input data channels for the
analyser. To add a channel to the system click on the Add Channel button. To
remove a channel, highlight it by clicking on the grey block at the left end of the
channel row and click on the Delete Channel button. The fields present in the
Channel Information tab includes those listed below and more if you scroll across.
Figure 9: Channel Information Card
Input / Output Configuration
•
Analogue Input # is the physical channel number on the analyser, while
System Channel # is the number that WinAQMS uses to identify the
channel
•
The Label field allows you to enter a label to easily identify the channels in
other parts of WinAQMS.
•
The Log check box determines whether the channel data will be recorded in
the database. If unticked, the channel will still request data but there will be
no data recorded in the database.
•
The Description field is a fifty-character text field.
17
ECOTECH Pty Ltd
9400TP Termination Panel Manual
•
•
3.3.4
Each channel has a Channel Type, which can change depending on the type
of analyser. For TPIM type Analyser there are the following options:
o
Voltage
o
Frequency
o
Counter
The Input Type field determines what mathematical property of the data
received over the log period will be stored. Options include: Average
(default), Max, Min, Total (should be used for counter inputs) and standard
deviation.
Digital Input and Output Settings
The Digital Input Settings tab show the digital input channels and their settings for
the currently selected analyser.
•
Input # 0 refers to digital input IP0.
•
Input # 1 refers to digital input IP1.
•
The High Value and Low Value fields show the value that is recorded
into the database for the digital channels when they are high or low.
•
All other fields have the same function as described in Channel
Information
Figure 10: Digital Input Setting Card
The Digital Output Settings tab show the digital output channels and their settings for
the currently selected analyser.
•
Output # 0 refers to digital output OP0.
•
Output # 1 refers to digital output OP1.
•
The High Value and Low Value fields show the value that is recorded
into the database for the digital channels when they are high or low.
•
The Default Output sets the default status of the output on powerup.
•
All other fields have the same function as described in Channel
Information
Figure 11: Digital Output Setting Card
18
Input / Output Configuration
9400TP Termination Panel Manual
3.4
ECOTECH Pty Ltd
Software Configuration with 9400DAS (AQMS)
Once the hardware configuration has been sorted out, it is then time to set up the
software. There are many menus in the AQMS software. For a detailed description of
each feature, refer to the “9400 Data Acquisition System Reference Manual Revision
3.00” supplied with the 9400 data logger. The scope of this manual will only cover
the sections directly relevant to the 9400TP.
3.4.1
Communications Settings
In order for the AQMS software to communicate with the 9400TPIM board inside
the 9400TP, the communications settings must be correct. These parameters are set in
the Channel AllocationWindow:
•
Set the Baud rate to 4800. (cannot be changed).
•
Set the RS232 Port number to 4, 5 or 6 depending on which port is being
used. (Note: On the 9400DAS these are the only ports you can use with the
9400TP).
•
The Physical Input Number reflects the hardware address of the 9400TPIM
and the channel number of the 9400TPIM. Refer to section 2.3. the default
setting is “0”.
3.4.2
Analog Inputs
To set up Analog Inputs in AQMS, Use the following parameters in the Channel
Allocation window:
•
Set Type to "EV"
•
Set Physical Input number to 0.01 to 0.16 for channels CH1 to CH16.
•
If the hardware address of a second 9400TPIM has been set to 1, use 1.01 to
1.16 for channels CH1 to CH16.
•
If you are using the internal temperature sensor, use CH16.
Figure 12 shows the Channel Allocation window for setting up analog inputs in
AQMS. Channels 1 to 5 are using CH1 - 5 of the first 9400TPIM (address = 0).
Channels 6 to 8 use CH9, CH10 & CH16 of the second 9400TPIM with address = 1.
Figure 12 The Channel Allocation Window for 9400TPIM Analog Inputs
Input / Output Configuration
19
ECOTECH Pty Ltd
9400TP Termination Panel Manual
3.4.3
Differential Inputs
In AQMS, differential inputs may be directly read from adjacent analog input
channels.
I.e. (CH2 - CH1), (CH4 - CH3) to (CH16 - CH15).
To set-up the Differential inputs in AQMS, use the following parameters in the
Channel Allocation window:
•
Set Type to "EV"
•
Set Physical Input number to:
3.4.4
•
0.17 for CH2 - CH1
•
0.18 for CH4 - CH3
•
:
•
0.24 for CH16 - CH15.
:
Frequency Inputs
To set up the Frequency inputs in AQMS, use the following parameters in the
Channel Allocation window:
•
For ALL frequency inputs, set Type to either "EF" or "FF".
•
If the frequency input is 0Hz, type "EF" will respond with –9999, type "FF"
will respond with 0.0.
•
Set the Physical Input number to:
•
3.4.5
•
0.13 for F1 on CH13 (terminal 20),
•
0.14 for F2 on CH14 (terminal 21),
•
0.15 for F3 on CH15 (terminal 23),
•
0.16 for F4 on CH16 (terminal 24),
•
0.17 for F5 frequency input (terminal30).
To use the digital inputs as frequency inputs, set the Physical Input number
to 0.00 to 0.07 for inputs IP0 to IP7.
Counter Inputs
To set-up the Counter inputs in AQMS, use the following parameters in the Channel
Allocation window:
20
•
For ALL Counter inputs, set Type to "EC"
•
For F1 to F4, set Physical Input number to 0.13 to 0.16 for channels CH13
to CH16.
•
For F5 (terminal 30) set Physical Input number to 0.17.
•
To use the digital inputs as counter inputs, set the Physical Input number to
0.00 to 0.07 for inputs IP0 to IP7.
•
In the Channel Parameters window, set the type to "T" which will calculate
the total number of counts during the reporting period.
Input / Output Configuration
9400TP Termination Panel Manual
3.4.6
ECOTECH Pty Ltd
Digital Inputs
To setup the Digital inputs in AQMS, use the following parameters in the Physical
Bit Allocation window:
Figure 13: AQMS Physical bit Allocation for the 9400TPIM digital inputs
•
Logical bit number 16 to 23 correspond to digital inputs IP0 to IP7
respectively.
•
Set Type to "I"
•
Set Physical Bit Address to 0.00 to 0.07 for digital inputs IP0 to IP7.
3.4.7
Digital Outputs
To setup the Digital outputs in AQMS, use the following parameters in the Physical
Bit Allocation window:
Figure 14: AQMS Physical bit Allocation for the 9400TPIM digital outputs
•
Logical bit number 0 to 7 correspond to logical outputs OP0 to OP7
respectively.
•
Set Type to "O"
•
Set Physical Bit Address to 0.00 to 0.07 for digital outputs OP0 to OP7.
You can test the digital outputs using the Operate Solenoids menu.
Input / Output Configuration
21
ECOTECH Pty Ltd
9400TP Termination Panel Manual
4 Lightning Protection
The 9400TP termination Panel is usually used for connecting meteorological sensors
to the data logger. As these sensors are always located in wide open areas and usually
mounted on tall conductive masts, they are in the high risk category of being struck
by lightning. Even an indirect strike can induce large voltage surges into equipment
wiring. It is for these reasons that the 9400TP has various forms of protection.
•
All the analog inputs are fitted with a surge protection device and a
dissipation resistor to protect against voltages of ± 12 volts and over.
•
Each analog input has lightning protection devices which are capable of
handling huge voltage surges (> 90V) without destruction.,
•
These are also on the Frequency input (F5) , the + 12 volt supply, the + 5
volt supply and the 0 volt rail.
•
All the lightning protection devices are connected to a common
EARTHING point (terminal 25), which is separate to all the other ground
points.
•
This EARTH terminal should be wired to an earth stake as close as possible
to the termination panel.
Refer to section 3.2 for details on input and output protection.
In very hazardous locations, additional lightning protection is available by adding an
Ecotech Lightning Protection Board (A-CIR-1455). This unit can be mounted outside
a station to prevent large surges from entering the station and damaging sensitive
equipment. In these situations it is advisable to also mount a lightning rod on the
mast. For further information in relation to additional lightning protection, contact
Ecotech.
22
Input / Output Configuration
9400TP Termination Panel Manual
ECOTECH Pty Ltd
5 Field Calibration
5.1
Analog Inputs
The 9400TPIM analog to digital conversion is very stable and adjustments should not
be required. However the procedure following is recommended for QC purposes
every 12 months.
It is best to perform this operation with nominal loading on the +12V output
(terminal 26).
Equipment required:
•
Digital multimeter (DMM) with 3 ½ digit display.
•
Philips screwdriver, No 1
•
Small blade screwdriver (for pot. Adjustment).
•
Nail polish
1.
Power down the 9400TP by disconnecting the serial cable.
2.
Open the 9400TP enclosure by removing the 4 screws on the side,
3.
Reconnect the serial cable to power up the 9400TP Termination Panel. Wait
at least 10 minutes before proceeding.
4.
Measure the 5V reference at terminal 28 (ground is terminal 27).
5.
Connect the 5V to an analog input.
6.
Monitor the analog channel using the datalogger.
7.
Locate the 10 turn trim pot. R10 at the back left corner of the 9400 TPIM
PCA (Figure 3, page 9). Adjust R10 so that the datalogger and the DMM
agree. The datalogger reading may vary by ± 0.003V. Adjust for best fit. For
most data logging systems 0.1% of full scale is sufficient.
8.
Check your adjustment using two more analog inputs.
9.
Lock R10 with the nail polish.
Procedure:
If a multipoint linearity check is required, use a variable DC source over the range –
10V to +10V. The R10 pot should be adjusted only at 5.000V DC.
5.2
Temperature Sensor
The temperature sensor mounted in the 9400TP can only be calibrated within the
WinAQMS or AQMS software. This is simply done by adjusting the Offset (usually
–273) until the data logger reads the same as a calibrated temperature probe. If the
analog input calibration (section 5.1) was performed, then you will have to
recalibrate the temperature sensor.
5.3
Frequency Inputs
The frequency counter inputs may be checked using a calibrated frequency generator.
However no adjustment is possible.
If the calibration gives incorrect results refer to the trouble shooting guide (section 6).
Field Calibration
23
ECOTECH Pty Ltd
9400TP Termination Panel Manual
6 Trouble Shooting
Problem
Check
For any problem with
the inputs or outputs,
start with these three
checks.
•
•
No Response from
Terminal Panel via
RS232 cable.
•
•
•
•
•
•
•
Analog Input Voltage
reading incorrectly
•
•
•
•
•
Check the Terminal panel DB9 connection.
Check that the 9400TPIM Board is plugged in correctly to its
sockets.
Check that the ground/0V connection is correct.
Check that the RS232 cable is properly connected to port 4,5 or 6
of the Datalogger (9400) or TPIM (WINAQMS).
Check that there is +12V at terminal 26 and 27.
Check the address setting in the Datalogger software and on
9400TPIM Board.
Check jumper J7 on the 9400 TPIM Board.
Check the Software setup.
Check that 9400TPIM DB9 connector is plugged in.
Measure the voltage on the input, check that it is within range
(±10V).
Check that the channel is set up correctly in hardware and
software.
Try the alternative input setup to see if the problem is uniform.
Check for excessive loading of the +12V or +5V outputs. Measure
these voltages and check that they are stable.
If all above checks are OK, and if the problem is found on all
analog inputs, calibrate using RV10 as shown page 23.
Frequency/Counter
input reading
incorrectly
•
•
•
•
•
Check that the signal amplitude is sufficient to drive the input (over
+4V).
Check that the signal frequency is within range
Check Software and Hardware configurations.
Check that the pulse width/duty cycle are within range (>5%).
Check for bouncy reed switch.
Digital Outputs
•
Check the jumper and software configurations.
Digital Inputs
•
Check the jumper and software configurations.
If the problem is still present after these checks, contact Ecotech Service Department.
24
Trouble Shooting
9400TP Termination Panel Manual
ECOTECH Pty Ltd
7 Upgrading the Early 9400TP
7.1
Scope
Termination panels manufactured before December 1999 were fitted with the PICO,
8 channel, ADC card instead of the 9400TPIM card, and the DIO board was installed
inside the 9400 DAS data logger.
These early Termination Panels can be upgraded by fitting the 9400TPIM board
which replaces the old PICO board. After doing this, your old termination panel will
carry all the features of a new 9400TP Termination Panel.
7.2
Parts Required
D-ECO-9400TPIM-S
9400TPIM Printed Circuit Assembly.
26 way IDC Ribbon Cable.
7.3
Procedure
•
Observe electrostatic precautions.
•
Turn off the 9400DAS data logger.
•
Disconnect the 9400TP ribbon cables.
•
Open the 9400TP enclosure by removing the 4 screws located on its sides.
•
Remove the 2 screws holding down the PICO Board.
•
Remove the IDC 26 ribbon connector and cable tie.
•
Remove the PICO Board.
•
Fit the new 9400TPIM Board.
If the PICO Board had a DB25 RS232 connector, then the RS232 cable will
have to be replaced with a cable fitted with DB9 connectors.
•
Screw in the new 9400 TPIM Board.
•
Connect the 26 way ribbon cable between the new 9400TPIM Board and the
9400TP Board.
•
Connect the RS232 cable to either port 4 or 5 of the 9400 Datalogger.
Do not connect to the DIO port, this port is no longer used.
•
Turn on the Data logger and check that there is+12V at terminal 26.
•
Re-configure AQMS Menu Screens “Channel Allocation”, Physical Bit
Allocation” and “Channel Parameters.
•
Check that all inputs and outputs are functioning before you replace the lid.
Note:
Digital outputs OP4-OP7 and inputs IP4-IP7 will have a different mode of operation.
Upgrading the Early 9400TP
25
ECOTECH Pty Ltd
9400TP Termination Panel Manual
8 List of RS232 Commands
8.1
Notations used in this Section
8.1.1
Symbols
[…]
Enter the information as requested between the brackets. Note that the
brackets are not part of the command.
Press “Enter”
8.1.2
Syntax
Each Input/Output command consists of two CAPITAL LETTERS (example: VI for
Analog Input, DO for Digital Output) followed by three or four digits and the “Enter”
key symbolized by
Other commands include INIT which is used to reset counter inputs and ID for
device identification. Each command is illustrated by an example. Do not press the
space bar at any time when entering commands.
8.2
List of Commands
8.2.1
Analog Input
VI[A][BB]
A=Address
Enter 0 for Default Address
BB= Channel Index
01 to 16
Example:
VI007
8.2.2
is the command for
“Read Channel 07”
Differential Input
VI[A][BB]
A=Address
Enter 0 for Default Address
BB=Channel pair index
17 to 24
Examples:
VI017
is the command for
Read [Channel 2]–[Channel 1]
VI024
is the command for
Read [Channel 16 ]–[Channel 15]
8.2.3
Frequency Input
FI[A][CC]
A=Address
Enter 0 for Default Address
CC= Input Index:
13 to 17 for inputs F1 to F5
0 to 07 for inputs IP0 to IP7
Example:
FI013
26
This commands reads the frequency input F1.
RS232 Commands
9400TP Termination Panel Manual
8.2.4
ECOTECH Pty Ltd
Counter Input
CI[A][DD]
A=Address
Enter 0 for Default Address
DD= Input Index:
13 to 17 for inputs F1 to F5
41 to 48 for inputs IP0 to IP7
Example:
CI048
8.2.5
This command sets up input IP07 as a Counter Input and
reads it to default address.
Digital Output
DO[A][EE][F]
A=Address
Enter 0 for Default Address
EE= Output Index
00 to 07 for outputs OP0 to OP7
F=Output Status
0 for Low, 1 for High
Example:
DO0051
8.2.6
Sets Digital Output OP5 High.
Digital Input
DI[A][G]
A=Address
Enter 0 for Default Address
G= Input Index
00 to 07 for inputs IP0 to IP7
Returns 1 or 0.
Example
DI004
8.2.7
Reads Digital Input IP4.
Counter Inputs Reset
INIT[A]
A=Address
Enter 0 for Default Address
Example:
INIT0
8.2.8
resets all Counter Inputs to 0.
Device Identification
ID[A]
A=Address
Example:
RS232 Commands
Enter 0 for Default Address
ID0
returns “9400TPIM V4.0”
27
ECOTECH Pty Ltd
9400TP Termination Panel Manual
9 Termination Panel Connections
9400TP Termination Panel. Rev.C
Markings
Ø
1
2
CH1
3
CH2
Ø
4
5
CH3
6
CH4
Ø
7
8
CH5
9
CH6
10 Ø
11 CH7
12 CH8
13 ØB
14 CH9
15 CH10
16 Ø
17 CH11
18 CH12
19 Ø
20 CH13
21 CH14
22 Ø
23 CH15
24 CH16
25
26
27
28
29
30
+12V
0V
+5V
0V
F5
31
32
33
34
35
36
37
38
39
40
41
42
43
44
45
46
47
48
COM
OP0
OP1
OP2
OP3
OP4
OP5
OP6
OP7
COM
IP0
IP1
IP2
IP3
IP4
IP5
IP6
IP7
28
Description
Ground
Channel 1
Channel 2
Ground
Channel 3
Channel 4
Ground
Channel 5
Channel 6
Ground
Channel 7
Channel 8
Ground
Channel 9
Channel 10
Ground
Channel 11
Channel 12
Ground
Channel 13 ( F1 )
Channel 14 ( F2 )
Ground
Channel 15 ( F3 )
Channel 16 ( F4 ) &
Temperature
EARTH
+ 12 volt supply
0 volt
+ 5 volt reference
Common
Frequency input (F5)
or –12V supply
Common /0V
Output 0
Output 1
Output 2
Output 3
Output 4
Output 5
Output 6
Output 7
Common / 0V
Input 0
Input 1
Input 2
Input 3
Input 4
Input 5
Input 6
Input 7
Lightning
Protection
Yes
Yes
Yes
Yes
Yes
Yes
Yes
Yes
Yes
Yes
Yes
Yes
Yes
Yes
Yes
Yes
Yes
Yes
Yes
Yes
Yes
Yes
Yes
Yes
Yes
Yes
Yes
Yes
Opto
Yes
Opto
Opto
Opto
Opto
No
No
No
No
Yes
Opto
Opto
Opto
Opto
No
No
No
No
Input
Number
Baud
rate
1
2
4800
4800
3
4
4800
4800
5
6
4800
4800
7
8
4800
4800
9
10
4800
4800
11
12
4800
4800
13
14
4800
4800
15
16
4800
4800
17
4800
0
1
2
3
4
5
6
7
4800
4800
4800
4800
4800
4800
4800
4800
0
1
2
3
4
5
6
7
4800
4800
4800
4800
4800
4800
4800
4800
Connected To?
List of Figures
9400TP Termination Panel Manual
ECOTECH Pty Ltd
10 List of Figures
Figure 1: A typical Data Logging System................................................................................................ 6
Figure 2: 9400TP Termination Panel ...................................................................................................... 6
Figure 3: 9400TPIM Default Factory Jumper Configuration ................................................................... 9
Figure 4. 9400TPIM (J5), Hardware Address Jumper Configuration. .................................................... 9
Figure 5. 9400TPIM RS232 Cable configuration. ................................................................................. 10
Figure 6: 9400TP Termination Panel Factory Configuration ................................................................ 12
Figure 7 TPIM Information Card ........................................................................................................... 16
Figure 8 TPIM Communication Settings Card ...................................................................................... 17
Figure 9: Channel Information Card...................................................................................................... 17
Figure 10: Digital Input Setting Card..................................................................................................... 18
Figure 11: Digital Output Setting Card .................................................................................................. 18
Figure 12 The Channel Allocation Window for 9400TPIM Analog Inputs............................................. 19
Figure 13: AQMS Physical bit Allocation for the 9400TPIM digital inputs ............................................ 21
Figure 14: AQMS Physical bit Allocation for the 9400TPIM digital outputs .......................................... 21
Termination Panel Connections
29
ECOTECH Pty Ltd
9400TP Termination Panel Manual
Page Intentionally left Blank
30
List of Figures