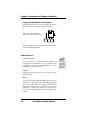
1
SoundDrive 16
User’s Manual
ORCHID
1994, Orchid Technology. This manual is copyrighted. All rights reserved.
This document may not, in whole or part, be copied, reproduced, reduced or
translated by any means, either mechanical or electronic, without prior
consent in writing from Orchid Technology, Incorporated.
SoundDrive 16 is a trademark of Orchid Technology. All other products
mentioned in this manual are trademarks of their respective manufacturers.
Orchid Technology
45365 Northport Loop West
Fremont, CA 94538-9973
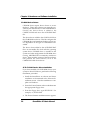
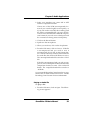
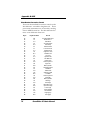
TABLE OF CONTENTS
Foreword
Introduction
About This Manual
Before You Begin
5
6
7
8
SECTION 1
Installing the SoundDrive 16
Quick Installation
Hardware Installation
Software Installation
Figure 1.1: SoundDrive 16 Diagram
Jumper Settings
Table 1.1: Summary of Jumper Settings
11
11
11
13
10
14
14
Jumper JP1: SCSI Memory Address Segment
Jumper JP2: CD-ROM/SCSI IRQ Address
15
Jumper JP4: Mitsumi I/O Address
Jumper JP5: SoundDrive 16 I/O Address
15
16
External Devices
The MIDI Interface
Optional WaveBooster Daughtercard Interface
16
18
18
Installing a CD-ROM Drive
19
CD-ROM Device Drivers
SCSI CD-ROM Device Drivers Installation
20
20
Configuring the SCSI CD-ROM Device Drivers
Mitsumi Compatible CD-ROM Device Drivers
21
27
Configuring the MSCDEX.EXE Device Driver
27
SoundDrive 16 User's Manual
14
1
SECTION 2
Orchid Utilities
29
SCSI CD-ROM Utilities
29
Key-Z Player
Key-Z Player - Solo
31
34
Key-Z Player - Accompanied
35
SECTION 3
Audio Applications
37
Using Audio Recorder
Recording an Audio File
37
38
Playing an Audio File
Changing the Waveform
39
40
Edit Menu Commands
The Recording Control
The Volume Control
42
44
45
The Mixer Control
The Extender Recorder
46
47
The Audio Clip Library
Talking Calculator
49
50
The Chime
The Audio Reminder
52
53
The Talking Clock
Stopwatch
54
55
APPENDIX A
Technical Help
CompuServe
2
SoundDrive 16 User's Manual
57
57
Troubleshooting the SoundDrive 16
Avoiding Address Conflicts
Technical Information
57
64
65
SoundDrive 16 Specifications
Features
65
65
Additional Features
66
Address Settings and Pin Assignments
68
Sound Blaster Mode Addresses
Windows Sound System Mode Addresses
68
68
CD-ROM Audio Cable Connector
Joystick-MIDI Port Pin Assignments
68
69
APPENDIX B
MIDI
71
MIDI Overview
WaveBooster Sounds
71
72
WaveBooster Percussion Sounds
76
Limitation of Liability
77
FCC Notice
78
Index
79
SoundDrive 16 User's Manual
3
4
SoundDrive 16 User's Manual
Orchid Technology has been a leading manufacturer of hardware
and peripherals for personal computers since its incorporation in
1982, and is noted for introducing new standards to the personal
computer industry:
1982
PCnet: the first personal computer Local Area Network.
1984
PCturbo: the first Accelerator card for PC compatible
computers.
1985
ECCELL: the first PC Multifunction card with error
correction.
1987
RamQuest 50/60: the first EMS (Expanded Memory
Specification) product for the IBM PS/2 computers.
1990
ProDesigner II: the first Super VGA graphics adapter
to support 1024 x 768 graphics in 256 colors on interlaced and non-interlaced monitors.
1991
Fahrenheit 1280°: first to ship a Windows accelerator,
based on S3's 86C911 chip.
1992
Fahrenheit VA: first to ship a Windows accelerator
with video audio built-in.
1993
Celsius/VLB first to ship a Windows accelerator based
on IIT's award-winning AGX015 chip.
ORCHID
SoundDrive 16 User's Manual
5
Introduction
The SoundDrive 16™ is an advanced 16-bit sound
card. With SoundDrive 16 you can play and record
digital audio, play and record MIDI, and experience
multimedia and entertainment software with full,
rich sound.
Two versions of the SoundDrive 16 are available:
SoundDrive 16EZ +SCSI features both SCSI and
Mitsumi CD-ROM interfaces. SoundDrive 16EZ features the Mitsumi CD-ROM interface only, and is
upgradeable to the SCSI interface with a single chip!
In addition, joystick and MIDI ports are provided for
entertainment and music software.
SoundDrive 16 uses FM synthesis for creating musical instrument sounds. A unique feature of the
SoundDrive 16 is the optional Orchid Wave Booster
wavetable synthesis daughtercard.
This
daughtercard plugs into the SoundDrive 16 and
enhances the sound in Windows, and multimedia
applications with real music instruments.
Because it is multimedia ready, the SoundDrive 16's
hardware and software interfaces turn your 386 or
486 PC into an MPC Level 2 compliant system. It is
compatible with software that supports the major
sound standards, including AdLib, Sound Blaster
and Microsoft Sound System. With the software
applications and utilities included, you can create
and control your multimedia environment.
Thank you for purchasing the SoundDrive 16. Care
has been taken to ensure that it will provide you with
years of trouble-free operation. We believe you will
be pleased with your purchase.
6
SoundDrive 16 User's Manual
About This Manual
This manual presumes that you are already familiar
with your IBM PC-compatible computer. While the
SoundDrive 16 has been designed to be easy to install,
we recommend that you refer to your computer’s
reference manual when terminology or installation
steps are unfamiliar to you.
Each chapter is divided into short, easy-to-follow
steps, to help you understand the installation and
function of the SoundDrive 16.
Chapter 1: Hardware and Software Installation
Whether you are a beginner or an experienced user,
this chapter will give you important information on
proper installation, and instructions on how to connect external devices to SoundDrive 16.
Chapter 2: Orchid Utilities
This chapter provides you with several Orchid utilities. Utilities are included to enhance the capabilities
of your SoundDrive 16 and your CD-ROM drive.
Chapter 3: Audio Applications
Here you are given information on the use of the
Orchid Audio Applications to create and control
your multimedia environment.
Appendix A: Technical Help and Information
If you are experiencing installation difficulties or
require troubleshooting information, this appendix
gives you checkpoints to ensure that your SoundDrive
16 is operating properly. Appendix A also includes
the SoundDrive 16 technical specifications.
Appendix B: MIDI
Here you are given an overview of the MIDI specification and a list of the optional General MIDI, MT-32
and percussion sounds available.
SoundDrive 16 User's Manual
7
Important! - Before You Begin
This manual contains information for the products
listed below. All references to "SoundDrive 16" will
refer to all products listed unless otherwise noted.
SoundDrive 16EZ
The SoundDrive 16EZ is an FM Synthesis, OPL-3,
16-bit sound card. It can record and play back 16-bit
resolution, 44KHz sample frequency stereo audio.
In addition it provides a Mitsumi CD-ROM interface. The SoundDrive 16EZ is also designed for the
optional Orchid WaveBooster wavetable synthesis
daughtercard.
SoundDrive 16EZ +SCSI
The SoundDrive 16EZ has all the features of the
SoundDrive 16EZ, and adds the SCSI-2 CD-ROM
interface.
8
SoundDrive 16 User's Manual
Before You Begin
This manual will familiarize you with the features,
installation and use of the SoundDrive 16. There are
several symbols and conventions used throughout this
manual to help draw your attention to a feature or to
focus on important information:
When you see the Magnifying Glass it
means the text is referring to something you should take a closer look at
before proceeding further.
When you see the Exclamation Mark,
it gives important information to avoid
damage to property.
Common Names
BBS
Bulletin Board System
DAC
Digital/Analog Converter
DSP
Digital Signal Processor
MIDI
Musical Instrument Digital Interface
MPC
Multimedia PC
PC
Refers to the family of IBM PC, PC/XT or
PC/AT compatible computers
SoundDrive 16 User's Manual
9
10
SoundDrive 16 User's Manual
Chapter 1: Hardware and Software Installation
Chapter
1
INSTALLING SOUNDDRIVE 16
Designed to be easy to use and easy to install,
SoundDrive 16 can be used with the preset jumper
settings. If you need to change the default address
settings, see the section "Jumper Settings."
Quick Installation
Hardware Installation
If you are connecting a CD-ROM drive, go to "Installing
a CD-ROM Drive," otherwise continue. Please refer to
Figures 1.1 and 1.7 for SoundDrive 16 connection locations.
STATIC!
Before
handling the
SoundDrive
16, be sure
to guard
against
electrostatic
discharge.
Be properly
grounded by
touching the
power
supply
housing, or
you may
want to buy
a Ground
strap from
your local
computer
store.
1.
If you previously installed another sound card,
remove it and all associated files from your
SYSTEM.INI and CONFIG.SYS files.
2.
Turn off the power to your computer, unplug all
power cords and remove the computer cover.
3.
Install the SoundDrive 16 into a 16-bit expansion slot.
4.
If you are connecting external speakers to the
SoundDrive 16, connect the speaker cable to the
SPEAKER jack on the metal bracket.
5.
If you are connecting amplified external speakers to the SoundDrive 16, connect the speaker
cable to the LINE OUT jack on the metal bracket.
6.
If you are connecting a microphone to the
SoundDrive 16, connect the microphone cable
to the MIC jack on the metal bracket.
7.
If you are connecting a MIDI device or a joystick
to the SoundDrive 16, connect the cable to the
joystick port on the metal bracket (refer to Figure 1.7).
SoundDrive 16 User's Manual
11
Chapter 1: Hardware and Software Installation
8.
Reconnect previously removed cables and power
cords and replace the cover of the computer.
Software Installation
1.
Start Microsoft Windows.
2.
Insert the SoundDrive 16 software disk into
your floppy drive.
3.
From the Program Manager File menu, choose
Run.
4.
Type the drive letter, then SETUP.EXE, e.g.,
A:\SETUP.EXE.
5.
The SETUP.EXE program automatically copies
the SoundDrive 16 software and application programs to your hard drive.
6.
Once the software is installed, the SETUP.EXE
program automatically updates your
CONFIG.SYS and AUTOEXEC.BAT files.
7.
At this point, you must exit Windows and reboot
your system. The CD-ROM drive is initialized
on bootup. If it does not initialize on bootup,
check for an I/O, DMA or IRQ address conflict.
Verify the address settings of other peripherals in
your system to correct the address conflict(s).
8.
If you are installing a Mitsumi compatible CDROM drive, refer to the installation procedures
provided by the CD-ROM manufacturer.
The SoundDrive 16 hardware and software installations are complete! The application programs installed will be located in the Orchid
Audio Applications group on the Windows desktop.
12
SoundDrive 16 User's Manual
If you are
installing a
SCSI
peripheral,
you must
run the
Future
Domain
setup
utilities from
the DOS
prompt. See
the section
"SCSI CDROM Device
Drivers
Installation."
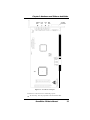
Chapter 1: Hardware and Software Installation
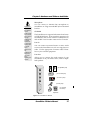
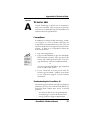
SPKR
Jack
Line
Out
Line
In
MIC
Jack
Joystick
Connector
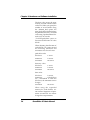
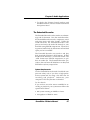
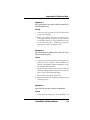
➞
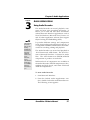
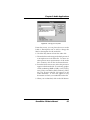
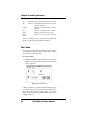
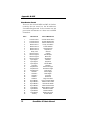
Figure 1.1: SoundDrive 16 Diagram
NOTE: Pin 1 on the connectors is indicated by a square.
The SCSI chip. This chip is optional on the SoundDrive 16EZ .
➞
SoundDrive 16 User's Manual
13
Chapter 1: Hardware and Software Installation
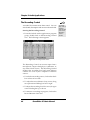
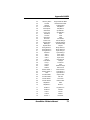
Jumper Settings
The following table lists the jumpers used in the
configuration of SoundDrive 16. The information
following the table explains the jumpers in more
detail.
Jumper
JP1
(SCSI Memory
Segment)
JP2
(CD-ROM/SCSI
IRQ)
JP4
JP5
(SoundDrive 16
I/O Address)
Setting
Default
No Connection
✔
Connect option 1
Connect option 2
Connect 1 & 2
No Connection
✔
Connect option 1
Connect option 2
Connect option 3
Connect option 4
No Connection
✔
Connect option 1
Connect option 2
Connect 1 & 2
Connect 1 & 2
Connect 2 & 3
✔
Function
Set SCSI address - CA000
Set SCSI address - C8000
Set SCSI address - CE000
Set SCSI address - DE000
No Interrupt Used
Set Interrupt 5
Set Interrupt 7
Set Interrupt 10
Set Interrupt 11
Set Mitsumi I/O Address - 360H
Set Mitsumi I/O Address - 320H
Set Mitsumi I/O Address - 340H
Set Mitsumi I/O Address - 310H
Enable I/O address 240
Enable I/O address 220
Table 1.1: Summary of Jumper Settings
Jumper JP1: SCSI Memory Address Segment
If you do not have the optional SCSI chip installed on your
SoundDrive 16, you can ignore this jumper setting. This
jumper sets the memory address for the SCSI interface. The default address is OFF, which configures
for memory address CA000. The address ranges
used are CA000-CBFFF, C8000-C9FFF, CE000-CFFFF,
or DE000-DFFFF.
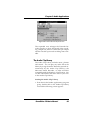
Figure 1.2: Jumper JP1 (no
connection). Default address
1
14
2
SoundDrive 16 User's Manual
For help on
avoiding
address
conflicts, see
Appendix A.
Chapter 1: Hardware and Software Installation
Jumper JP2: CD-ROM/SCSI IRQ Address
SCSI CDROM drives
do not require
an interrupt.
If a SCSI CDROM drive is
installed,
disable
Jumper JP2
by removing
the connector.
Jumper JP2 sets the interrupt for a Mitsumi CDROM drive, or a SCSI device such as a scanner that
requires an interrupt. The default setting is no
connection (no interrupt used).
Figure 1.3: Jumper JP2 no
connection). Default
address
1
2
3
4
If you encounter a conflict with another device in your system,
you can select IRQ 5, 7, 10 or 11.
Jumper JP4: Mitsumi I/O Address
When
installing a
Mitsumi CDROM drive,
be sure to
configure the
Device Driver
for Programmed I/O,
not DMA
Transfer.
If you are not using a Mitsumi CD-ROM drive, this
jumper can be ignored. This jumper sets the interrupt
address for the Mitsumi interface. The default address is OFF, which configures for I/O address 360H.
Figure 1.5: Jumpers JP4 (no
connection) Default address
1
For details on
the device
driver
parameters,
see "CDROM Device
Drivers."
2
If you need encounter a conflict with another device in your
system, you can select I/O address 320H, 340H or 310H.
SoundDrive 16 User's Manual
15
Chapter 1: Hardware and Software Installation
Jumper JP5: SoundDrive 16 I/O Address
Jumper JP5 sets the base I/O port address for Sound
Blaster mode. The default setting is 220Hex.
Figure 1.6: Jumper JP5 (pins 2
and 3 connected). Default address
1
2
3
Position the jumper connector across Pins 1 and 2 of Jumper
JP5 to enable address 240Hex.
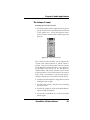
External Devices
External Speakers
You can connect 4 or 8 ohm external speakers or
headphones to SoundDrive 16. The speakers and
headphones plug into the SPEAKER jack on the
SoundDrive 16 metal bracket.
Joystick
Plug the joystick into the 15-pin connector on the
metal bracket.
MIDI
If you purchased the optional MIDI interface kit, you
will have an additional cable. This cable plugs into
the 15-pin connector and provides MIDI IN and
MIDI OUT connections, in addition to a joystick
connection. Connect this cable to the joystick port
and connect any MIDI devices to the appropriate
cables.
16
SoundDrive 16 User's Manual
See Figure
1.7 for the
connection
locations of
the external
devices.
Chapter 1: Hardware and Software Installation
Microphone
WARNING!
The
SoundDrive
16 can
produce high
sound levels
when played
through
headphones.
To avoid
permanent
or temporary
hearing loss
or impairment,
always hold
the
headphones
away from
your ears
when
adjusting the
volume.
You can connect a 300-600 ohm microphone to
SoundDrive 16. Plug it into the MIC jack on the metal
bracket.
CD-ROM
The SoundDrive 16 supports both internal and external CD-ROM drives. It has interface connectors for
the Mitsumi and SCSI-2 internal CD-ROM drives,
and an MPC Level 2 audio connector for CD audio.
Line In
You can connect an external mono or stereo audio
source to the SoundDrive 16, such as a tape player or
radio. Use the appropriate converter cable to interface to your external equipment.
Line Out
Allows you to connect the audio output of your
SoundDrive 16 to your home stereo, VCR or amplified speakers.
(To Speaker jack)
(To Line Out jack)
(To Line In jack)
(To MIC jack)
(To Joystick
connector)
MIDI
Keyboard
Figure 1.7: SoundDrive 16 Bracket
SoundDrive 16 User's Manual
17
Chapter 1: Hardware and Software Installation
The MIDI Interface
An optional MIDI Kit is available for SoundDrive
16. The kit includes a Sound Blaster-type MIDI cable
and MIDI software. To purchase the kit call your
local dealer or the Orchid Sales department. See the
Technical Help and Warranty Information card for
Orchid telephone numbers.
Optional WaveBooster Daughtercard Interface
An optional WaveBooster daughtercard is available for SoundDrive 16. Installation is easy! It plugs
right into the SoundDrive 16 (see Figure 1.1). Refer
to Appendix B for a listing of the General MIDI and
MT-32 sounds available. To purchase the
WaveBooster call the Orchid Sales department.
18
SoundDrive 16 User's Manual
Chapter 1: Hardware and Software Installation
Installing a CD-ROM Drive
If you are installing a CD-ROM drive these instructions
will help you, but you should also refer to the documentation that came with your CD-ROM drive. Before starting the setup and installation, make sure that your
computer is turned OFF and the power cord has been
disconnected from the wall outlet. Your CD-ROM
drive kit should contain the following items for a
successful installation:
❏
❏
❏
Try to avoid
excessive
twists or
bends in
the cable
that might
damage it
or interfere
with other
boards in
your
computer.
SoundDrive
16 uses an
MPC-2
compatible
audio cable
for the CDROM drive.
Please
contact your
drive
manufacturer or local
dealer if you
need this
cable.
CD ROM Drive with optional slide rails
Interface Cable
Audio Cable
Install the CD-ROM hardware as recommended by
the CD-ROM manufacturer. Follow the steps below
for help on installing the CD-ROM audio cable.
Installing the cable:
1.
Connect one end of the interface cable (ribbontype) to the CD-ROM drive interface connector.
Be sure to match the colored stripe to Pin 1 of the
CD-ROM drive connector.
2.
Connect the other end of the cable to the SCSI or
Mitsumi connector on the SoundDrive 16 card.
Pin 1 is located on the bottom right corner of the
connectors. Make sure that Pin 1 on your cable
(colored stripe) is connected to this pin.
3.
Connect the audio cable to the CD-ROM drive's
audio connector.
4.
Connect the other end of the audio cable to the
MPC-2 compatible CD-ROM audio connector on
the SoundDrive 16.
5.
You are now ready to install the SoundDrive 16.
Go to "Quick Installation" at the beginning of this
chapter. See "Software Installation" to install the
SoundDrive 16 software and application programs.
SoundDrive 16 User's Manual
19
Chapter 1: Hardware and Software Installation
CD-ROM Device Drivers
CD-ROM drives require device drivers to access
the drive. These device drivers are generally provided by the manufacturer of the CD-ROM drive.
Usually one device driver is added to the
CONFIG.SYS file and one to the AUTOEXEC.BAT
file.
The device driver added to the CONFIG.SYS file is
the CD-ROM device driver. This file configures the
CD-ROM drive and initializes the drive on boot up.
It is dependent on the type of CD-ROM drive installed.
The device driver added to the AUTOEXEC.BAT
file is an executable file, which tells the operating
system that a CD-ROM drive is installed in the
system and what configuration the CD-ROM drive
is using. MSCDEX.EXE is a commonly used device
driver. There are other versions of this device driver
that perform the same function, such as the
CORELCDX.COM device driver.
SCSI CD-ROM Device Drivers Installation
If you have installed a SCSI CD-ROM drive in your
system or other SCSI device, perform the following
installation procedure:
1. Install the SoundDrive 16 software and driver
installation as documented in the Software Installation section. After the installation is complete exit Windows.
2. Insert the Future Domain software diskette into
the appropriate floppy drive.
3. From the floppy drive, type SETUP.EXE. For
example, A:\SETUP.EXE.
4. The Future Domain installation menu appears.
20
SoundDrive 16 User's Manual
Chapter 1: Hardware and Software Installation
5. The installation program automatically detects
the presence of a SCSI CD-ROM drive or other
SCSI device. The device drivers are automatically copied to your hard drive and the program
modifies the CONFIG.SYS and AUTOEXEC.BAT
files.
6. When the installation is complete reboot your
system to access your CD-ROM drive.
Configuring the SCSI CD-ROM Device Drivers
The SoundDrive 16 setup program automatically
installs two device drivers for a SCSI CD-ROM
drive: FDCD.SYS and CORELCDX.COM.
FDCD.SYS is added to the CONFIG.SYS file. This
device driver initializes the SCSI CD-ROM drive on
boot up and configures the settings for the drive.
CORELCDX.COM is added to the AUTOEXEC.BAT
file. This device driver tells the operating system
that a CD-ROM drive is installed. CORELCDX.COM
is similar to the MSCDEX.EXE device driver.
If you need to configure theFDCD.SYS device driver,
the following syntax is used:
device=FDCD.SYS /D:name [/F /I /N:# /R /T
/V /Z]
The parameters are defined as follows:
/D
1 to 8 character device name.
/F
scans CD-ROM drives in ascending SCSI ID
numbers.
/I
inhibits invalid disk change status.
/N:# sets a maximum number of units to support
with # as the number.
SoundDrive 16 User's Manual
21
Chapter 1: Hardware and Software Installation
/R
forces a SCSI Bus Reset to occur before driver
initialization.
/T
forces drive to use the OEM Tool Kit even if
Future/CAM{SYMBOL 212 \f “Symbol”} is
available.
/Z
displays the driver size.
If you need to configure the CORELCDX.COM
device driver, the following syntax is used:
CORELCDX /D:driver_name /M:mem_bufs
L:drive_letter/E /FILES: num
/CACHE:pt;dir;data/DATABLK:blk_val /E:emm_val
/STACK [:stack_size]
The parameters are defined as follows:
/D:driver_name
identifies the name of the CDROM device driver to be used.
You can enter more than one
/D:driver_name option to identify multiple CD-ROM device
drivers. The names you enter
must match names used in the /
D:device_name parameters for
each device driver entry in the
CONFIG.SYS file.
/M:mem_bufs
specifies the approximate number of sector buffers allocated.
Using a predetermined formula,
the total number of sector buffers
is divided among the path table
directory and data cache. Minimum, maximum and alignment
requirements may require that
the actual number of buffers differ slightly from those you
specify.
22
SoundDrive 16 User's Manual
Chapter 1: Hardware and Software Installation
/L:drive_letter
forces the CD-ROM drive letter
assignment to begin at a particular drive letter if you have software that requires your CD-ROM
drive to be assigned a specific
drive letter. If that drive letter is
not available, CD-ROM drives are
assigned from the next available
drive letter.
/E
uses expanded memory for the
cache buffers if it is available.
Expanded memory is allocated
in blocks. To make the most efficient use of allocated memory,
this option may slightly increase
the number of specified cache
buffers.
/FILES: num
specifies the number of CD-ROM
files that you can open at the
same time. Each file requires
approximately 16 bytes. By default, the limit is the number
specified by the FILES= line in
the CONFIG.SYS file.
/CACHE:pt;dir;data specifies the number of cache
blocks to allocate for the path table
cache, directory cache, and data
cache. Each block requires 2K.
The path table cache stores information about the name and location of each sub-directory on the
CD. Each (2K) path table cache
buffer accommodates approximately 100 sub-directories.
The directory cache stores information such as the name and location of the files in each subdirectory on the CD.
SoundDrive 16 User's Manual
23
Chapter 1: Hardware and Software Installation
The data cache stores the most
recently accessed contents of files
on the CD. When you specify the
number of sector buffers using
the /M:mem_bufs option, the
mem_buf value is divided among
the path table, directory, and data
cache using a predetermined formula. You can use the
/CACHE:pt;dir;data option to
fine-tune the allocation of cache
blocks.
When adjusting the allocation of
cache blocks, you cannot exceed
the following minimum and
maximum sizes for each area:
path table cache:
block size
1 sector
minimum
2 sectors
maximum
64 sectors
directory cache:
block size
minimum
maximum
1 sector
2 sectors
64 sectors
data cache:
block size
2 sectors
minimum
1 block (If you
use /DATABLK to alter the
block size, the minimum sectors
change).
maximum
64 sectors
When using the expanded
memory for cache buffers, certain internal alignment requirements are enforced. You cannot
change these requirements.
24
SoundDrive 16 User's Manual
Chapter 1: Hardware and Software Installation
NOTE: The /CACHE: and /M:
options are mutually exclusive.
If you use both switches, the
/M: option is ignored.
/DATABLK:blk_val adjusts the number of 2K sec-tors
assigned to each data cache block.
Valid values are 1, 2, 4, or 8. The
default is 2. This option is useful
for applications that read data
from a CD in contiguous segments. CORELCDX uses a read
ahead plus least recently used
(LRU) algo-rithm for its data
cache. Data read into the cache is
read in blocks.
Setting the data block size to 1
disables read-ahead caching, but
an additional 4K of conventional
memory is required. Also, note
that the read-ahead caching logic
internal of some CD-ROM drives
is adversely affected by changing
the default data cache block size.
/E:emm_val
extends the basic MSCDEX compatible/E option by allowing you
to force CORELCDX to use expanded memory, if it is available,
for code, data, or cache buffer
storage.
The valid emm_val options are:
code/data only in expanded
memory.
cache blocks only in expanded
memory, the same as the /E option.
code/data and cache blocks in
expanded memory.
SoundDrive 16 User's Manual
25
Chapter 1: Hardware and Software Installation
When expanded memory is used
for code and data, only a small
‘footprint’ (less than 2K) remains
resident in conventional memory.
This option may be incompatible
with some CD-ROM applications.
For example, those that perform
absolute disk reads into expanded memory buffers.
If cache buffers are located in expanded memory, a small amount
of conventional memory may also
be allocated for storage of required tables. Also, to make efficient use of expanded memory,
and due to internal cache alignment requirements, the number
of cache blocks in use may be
adjusted slightly when this option is used.
/STACK[:stack_size] causes CORELCDX to switch to
its own internal stack while processing software interrupts,
rather than using the programs
stack.
Use the stack_size variable to
change the stack from its default
size of 512. For example,
/STACK:1024 causes a 1K stack
to be used, while /STACK:256
causes a 256 byte stack to be used.
26
SoundDrive 16 User's Manual
Chapter 1: Hardware and Software Installation
Mitsumi Compatible CD-ROM Device Drivers
If you are installing a Mitsumi compatible CD-ROM
drive, you will need to install the device drivers
provided by the CD-ROM manufacturer. Follow the
installation procedure provided by the CD-ROM
manufacturer. Remember, you will need a CDROM device driver added to the CONFIG.SYS file
and an operating system device driver like
MSCDEX.EXE added to your AUTOEXEC.BAT file.
In addition, you will need to configure the parameters of the drive to use programmed I/O. Refer to
your CD-ROM manufacturer’s documentation.
Configuring the MSCDEX.EXE Device Driver
If you are using the MSCDEX.EXE device driver
and need to configure the driver, the following
syntax is used:
[drive:\][path\]mscdex.exe
[/l:m]
/d:device_name
The parameters are defined as follows:
/d: Specifies the device name of the CD-ROM drive.
The driver1 parameter must match the parameter specified by the /D switch on the
CONFIG.SYS command that starts the corresponding CD-ROM device driver.
The MSCDEX command must include at least
one /D switch. To install additional CDROM device drivers, specify an additional
/D switch for each device driver.
/l:
Specifies the drive letter of the first CD-ROM
drive. If you have more than one CD-ROM
drive, MS-DOS assigns additional CD-ROM
drives subsequent available drive letters.
SoundDrive 16 User's Manual
27
Chapter 1: Hardware and Software Installation
/m: Specifies the number of sector buffers.
/e:
Specifies that the CD-ROM driver use expanded memory, if available, to store sector
buffers.
/k: Specifies that MS-DOS should recognize CDROM volumes encoded in Kanji. By default,
MS-DOS does not recognize Kanji CD-ROM
volumes.
/s:
Enables sharing of CD-ROM drives on MSNET or Windows for Workgroups servers.
/v: Directs MSCDEX to display memory statistics when it starts.
28
SoundDrive 16 User's Manual
Chapter 2: Orchid Utilities
Chapter
2
This manual
presumes
that you are
already
familiar with
the basics of
Microsoft
Windows.
Please refer
to the
Microsoft
manual when
terminology
or installation
steps are
unfamiliar to
you.
ORCHID UTILITIES
SoundDrive 16 comes with DOS and Windows utilities that allow you to send commands to your CDROM drive, software volume control, and a mixer.
In addition, you have the ability to play instrumental
music through your computer keyboard.
Also included are audio applications to take advantage of the multimedia capabilities of SoundDrive
16. The utilities and audio applications are automatically installed using the SETUP.EXE program.
Refer to Chapter 1 if you have not installed the
SoundDrive 16 software.
SCSI CD-ROM Utilities
The following SCSI CD-ROM utilities are DOS programs and must be run from the DOS (C:\) prompt:
FDCDTEST
This test utility will test the integrity of the CD-ROM
device driver(s) and drive.
FDEJECT
You cannot
run the CDROM utilities
from the
Windows
MS-DOS
prompt. You
must first exit
Windows.
Ejects the CD-ROM disc from the CD-ROM drive. If
the drive door is locked, this utility first unlocks the
door and then ejects the disc. This function is valid
only for CD-ROM drives that support a software
controlled eject command.
FDLOCK
Locks the door on the CD-ROM drive. On most
drives, this disables the eject button on the front of
the drive.
FDUNLOCK
Unlocks the CD-ROM door that has previously been
locked by FDLOCK or another utility.
SoundDrive 16 User's Manual
29
Chapter 2: Orchid Utilities
FDAUDIO
A Terminate-and-Stay Resident (TSR) utility that
can be used as an audio CD player. Once it is loaded
into memory, FDAUDIO can be accessed from within
a program by pressing the SHIFT-ALT-CTRL keys
simultaneously. Press the ALT-F4 key to terminate
the TSR.
The following options are available for FDAUDIO:
<< Skip Back: skips back one track.
>> Skip Forward: skips forward one track.
< Fast Reverse: skips back 10 seconds into current
track.
> Play: plays the current track if the CD is not
currently playing.
>> Fast Forward: skips forward 10 seconds into the
current track if the CD is currently playing.
" Pause/Resume: Pauses the current track if the CD
is playing, or resumes if the CD is paused.
■ Stop: stops the CD.
▲ Next CD: goes to the next CD player if there is
more than one CD in the system (for example, if
the current CD is at drive letter D:, then the next
CD will be at E:).
▼ Previous CD: goes to the previous CD player if
there is more han one CD in the system (for
example, if the current CD is at drive letter E:, then
the previous CD would be D:).
30
SoundDrive 16 User's Manual
Chapter 2: Orchid Utilities
Key-Z Player
Key-Z player allows you to play instrumental music
from your computer, using a standard computer
keyboard. The unique note mapping feature prevents you from playing an incorrect note in your
chosen Key or Scale. Your computer is transformed
into an intelligent polyphony (multiple notes at a
time) musical instrument that is exhilarating to play.
Key-Z Player incorporates the following features: a
standard MIDI file song player, graphic piano keyboard display, graphic mixer with volume, channel,
patch, pan and mute control, and over 40 song styles.
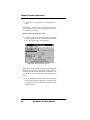
To run Key-Z Player:
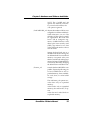
1. From the Orchid Audio Applications program
group, double-click on the Key-Z Player icon. The
following screen appears:
Figure 2.1: Key-Z Player Screen
The buttons at the top of the screen are from left to
right: File, Key, Scale, Layout, Settings, Player, Piano, Mixer, and Help. To access a feature, click once
on the feature.
SoundDrive 16 User's Manual
31
Chapter 2: Orchid Utilities
Key - allows you to choose from 12 different keys.
Click on the key of your choice. You can change the
key any time by clicking on the Key button and
selecting another key. NOTE: After you have made
your selection, a check mark appears next to your
selection.
Scale - Key-Z Player offers four types of scales:
Major, Minor, Blues and Harmonic Minor. Choose a
Scale the same way you choose a Key Signature.
Click once on the preferred scale to start playing
music from your computer keyboard.
Layout - maps the notes on your keyboard to your
choice of Jagged or Horizontal.
Jagged - maps the keys so that they progress up the
scale alternating rows. This mapping also works
well for organ solos and arpeggios.
Horizontal - maps the keys so that they progress up
the scale from left to right, from the bottom to the
top, while increasing the pitch for each row. This
mapping works great for quick string-scale runs
and playing blues’ piano.
Setting - offers the following four features:
MIDI Mapper - allows you to view your current
MIDI Mapper settings from inside Key-Z Player.
NOTE: All notes from Key-Z Player are routed
through the Mapper. Refer to the Windows User’s
Guide for instructions on setting up the MIDI
Mapper.
Multimedia Drivers - allows you to view your currently installed multimedia drivers. NOTE: Your
multimedia drivers must be installed for Key-Z
Player to function.
32
SoundDrive 16 User's Manual
Chapter 2: Orchid Utilities
Patch Names - this feature gives you a list of eight
types of sound hardware:
0-127
General MIDI
MT-32
U-110
1-128
Proteus
Roland GS
U-110 Tones
Keyboard - brings up a dialog box that allows you
to type in Channel, Patch and Volume changes.
NOTE: You may add to the Patch List by editing the
PATCHES-INI file located in your Key-Z Player
directory.
Player - opens or hides the Song Player window that
includes the controls for playing standard MIDI
Song Files. You can also measure the length of a song
by using the Bar Control option.
Bar Control - the bar control detects the length of
the song, (how many measures the song consists
of). For example, ifyou have a 128 bar song, the bar
control will start at Bar Zero, which is the beginning of the song. It will play through the entire
song, ending at Bar 128. NOTE: The song must be
stopped before using the bar control slider.
Piano - graphically displays all notes that are playing. The graphic keyboard has seven full octaves.
Mixer - features 16 channels, and allows you to
control the Patch, Volume, Pan and Mute of each
track in the Song File. Make sure the patch for each
track is set to an appropriate patch for your output
device.
SoundDrive 16 User's Manual
33
Chapter 2: Orchid Utilities
Key-Z Player - Solo
Key-Z Player can be used to perform solo compositions, test melodies, play rhythm and bass tracks,
and learn scales and arpeggios in various keys.
To play Key-Z Player - Solo:
1. Select the Key and Scale you desire.
2. Select the Patch for the sound you desire.
3. Select the keyboard mapping from the Layout
menu.
4. Set your Volume and begin playing by tapping
out notes on your computer keyboard.
Keyboard Notes
The playable key is shown in white. You can play
multiple notes and chords by pressing several keys
at once (this is called polyphony).
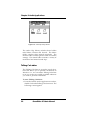
Figure 2.2: Playable Keyboard Note
Note Progression
Notes begin with the lowest left row (the Z row) in
Horizontal Mapping, and the “A” key in Jagged
Mapping. This ends with the highest note on the
upper right.
34
SoundDrive 16 User's Manual
Chapter 2: Orchid Utilities
Sustain
There are several ways to get sustained notes: (1) for
continuous sustain, press the Caps Lock key. The
notes played are sustained until the Caps Lock key is
pressed again. (2) Hold down the Shift key while
playing various notes.
Key-Z Player - Accompanied
Key-Z Player can perform melodies while being
accompanied by any standard MIDI Song File played
in real-time.
To play Key-Z Player - Accompanied:
1. Open the Song Player window by clicking on the
Player menu button.
2. Click on the Open Song button and select a song
to play.
3. When the file is opened, it will use the default
settings for Key, Scale and Tempo. In addition,
the track structure of the Song File (including the
instrument name and MIDI channel is set into the
Mixer.
Please refer
to Appendix
B for the
MIDI Drum
Patch
Settings.
NOTE: Key-Z Player can read and play Format 0
and Format 1 MIDI files. The standard MIDI files
included with Key-Z Player are Format 1 files and
contain the optional Key and Scale data.
SoundDrive 16 User's Manual
35
Chapter 2: Orchid Utilities
36
SoundDrive 16 User's Manual
Chapter 3: Audio Applications
Chapter
3
This manual
presumes
that you are
already
familiar with
the basics of
Microsoft
Windows.
Please refer
to the
Microsoft
user's
manual when
terminology
or installation
steps are
unfamiliar to
you.
AUDIO APPLICATIONS
Using Audio Recorder
The Audio Recorder can record, playback, compress and store voice recordings and music. It
allows you to add and edit voice annotations
within Microsoft Windows applications such as
Word for Windows, Microsoft Excel, Lotus 1-2-3
and all other application software that support
Object Linking and Embedding (OLE).
It provides different settings and compression
levels for recording and output level controls. It
is compatible with Microsoft Windows Sound Recorder for recording, editing and playback.
The Audio Recorder can record and playback in
.WAV format and .AUD format. The .WAV format is Microsoft Windows 3.1 format for audio
files. The .AUD format uses ESPCM/ADPCM
compression to produce an audio file.
Different levels of compression are available in
the Audio Recorder: ESPCM compression at low,
medium and high levels, and linear PCM and
ADPCM compressions.
To start Audio Recorder:
1. Start Microsoft Windows.
2. From the Orchid Audio Applications window, double-click on the Audio Recorder icon.
The following screen appears:
SoundDrive 16 User's Manual
37
Chapter 3: Audio Applications
To access
Help, click on
Contents from
the Help
menu in the
Audio
Recorder
window.
Figure 3.1: Audio Recorder Screen
The buttons at the bottom of the Audio Recorder
window are from left to right: Record, Play and Stop.
The Audio Recorder can receive input from microphones, a cassette tape player, a compact disk player,
or any other line-in source. The large area in the
center of the window shows the waveform of the
current audio file.
Recording an Audio File
To record a new file:
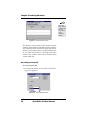
1. From the File menu, click on New. The following screen appears:
Figure 3.2: Sound Attributes Screen
38
SoundDrive 16 User's Manual
Chapter 3: Audio Applications
2. Select your sampling rate, stereo ON or OFF
and the compression format.
Choose one of the PCM (uncompressed) formats if you want the highest sound quality, or
if you wish to edit or modify the recording with
the Effects command before you save the file.
Choose one of the ESPCM or ADPCM compression formats if you wish to save disk space and
do not mind sacrificing some sound quality.
3. Click on the Record button.
4. Speak into the microphone.
5. When you are done, click on the Stop button.
6. From the File menu, click on Save As. If the file
is uncompressed and you wish to save it
uncompressed, do not click on the Options button. Choose a directory location, enter a name for
the audio file, then click on OK button to save it.
The uncompressed audio file is saved as a .WAV
file.
If the file is uncompressed and you wish to compress it, click on the Options button and select the
compression format you want. Click on the OK
button. The compressed audio file is saved as a
.AUD file.
You can use the Recording Control window to regulate the mix of audio from several sources. See the
Recording Control section for more information.
Playing an Audio File
To play a file:
1. From the File menu, click on Open. The following screen appears:
SoundDrive 16 User's Manual
39
Chapter 3: Audio Applications
Figure 3.3: Playing a File Display
2. Load an audio file into the Audio Recorder.
3. Click on the Audio Recorder’s Play button to hear
the audio file. The file will play to the end unless
you interrupt it by pressing the Stop button.
While a file is playing, the wave box graphically
displays the waveform of the audio file as if it
were being shown on an oscilloscope.
Changing the Waveform
The Audio Recorder’s waveform display provides
a graphic representation of the audio file currently
in memory. You can control the display with the
vertical and horizontal scroll bars.
• To zoom in on (or magnify) the waveform, move
the vertical scroll button down. To zoom out,
move the vertical scroll button up.
• To see more of the waveform ahead or behind
the part currently displayed, click the right or
left area of the horizontal scroll bar.
• To mark a portion of the audio file for playback,
use the mouse to select that section in the waveform display. Then choose Play to hear the
selected section.
40
SoundDrive 16 User's Manual
Chapter 3: Audio Applications
• To deselect a selected portion of the waveform,
click anywhere in the waveform display.
• To select the entire file, double-click anywhere in
the waveform display.
Adding the Volume Control and Mixer
You can regulate the playback sound level or stereo
balance with the Volume Control. See the Volume
Control section for more information.
You can also use the Mixer option to play the current
audio file together with other sound sources. See the
Mixer section for more information.
Adding Sound
The Audio Recorder’s drag and drop feature enables you to embed audio files in documents.
1. Load your Windows application and open a document.
2. Load an audio file.
3. Move the cursor to the icon at the top right of the
Audio Recorder. The cursor changes into a hand.
Press the mouse button down and drag the icon to
the document window. Release the button at the
place you want the audio icon to appear.
For more
information
on OLE, refer
to your
Microsoft
Windows
User's Guide.
4. To play the audio in your document, double-click
on the icon.
You can also add audio to a document from the
document’s application. Place the cursor where
you want the audio icon to appear, choose the
application’s command for inserting an object,
then select Audio Recorder in the list box.
SoundDrive 16 User's Manual
41
Chapter 3: Audio Applications
Edit Menu Commands
Insert File
Inserts another audio file into the current audio
file at the current playing position. Inserting a file
increases the length of the current audio file. The
maximum length of a file is determined by the
amount of memory available. You can also insert
audio from the Clipboard.
Mix File
Mixes another audio file with the current audio file
at the beginning or at the end. The audio files will
blend together and play simultaneously. Mixing a
file may increase the length of the current audio
file. The maximum length of the new audio file is
determined by the amount of memory available.
You can also mix with audio from the Clipboard.
Delete File
Deletes the selected portion of the audio file. If you
wish to save the deleted section, use the Cut command instead of Delete. To restore a deleted audio
section, choose the Undo command before making
any other changes to the file.
Changing the Properties
An audio file contains more than sound. You can
attach a title, description and an icon to the audio file.
To change the properties of a file:
1. From the File menu, click on Properties. The
following screen appears:
42
SoundDrive 16 User's Manual
Chapter 3: Audio Applications
Figure 3.4: Changing the Properties
From this screen, you can place the cursor in the
Label or Description area to add or change the
label or description for the audio file.
2. Click the Play button to hear the audio file.
3. The Audio Recorder assigns a default picture of
a microphone to each audio file. To select another picture more representative of the audio
file’s contents, click on the Set Picture button.
4. From the Set Picture screen, select the picture to
appear with the audio file. It can be any graphic
saved in a bitmap (.BMP or .DIB), wave (.WAV),
icon (.ICO), executable (.EXE) or library (.DLL)
file. The picture selected will appear in the
Audio Recorder. It will also appear in any
document in which you embed the audio file.
5. When you are finished, click on the OK button.
SoundDrive 16 User's Manual
43
Chapter 3: Audio Applications
The Recording Control
An audio file contains more than sound. You can
attach a title, description and an icon to the audio file.
Starting the Recording Control:
1. From the Orchid Audio Applications program
group, double-click on the Recording Control
icon. The following screen appears:
Figure 3.5: Recording Control Screen
The Recording Control can receive input from a
microphone, compact disk player, synthesizer, or
any other Line-In source. The Recording Control
displays the recording level and stereo balance
controls for each of your computer’s hardware
sources.
1. To include a recording source, click on the check
box in front of its name.
2. To adjust the stereo balance of any source, drag
its top horizontal sliding bar left or right.
3. To adjust the recording level of a source, drag its
vertical sliding bar up or down.
4. To monitor a recording in progress, click on the
Record Monitor check box.
44
SoundDrive 16 User's Manual
To access
Help, click on
Contents
from the Help
menu in the
Recording
Control
window.
Chapter 3: Audio Applications
The Volume Control
Starting the Volume Control:
1. From the Orchid Audio Applications program
group, double-click on the Audio Recorder icon
or the Mixer icon. From the Options menu,
select Volume Control and the following screen
appears:
Figure 3.6: Volume Control Screen
The Volume Control enables you to regulate the
volume and stereo balance at which sound is
played. You can use the Volume Control with the
Audio Recorder during playback. If you are playing multiple sources you can use the Mixer to
combine them, and use the Volume Control as the
master regulator. The Volume Control can receive
input from a microphone, cassette tape player,
compact disk player or any other Line-In source.
2. To adjust the stereo balance, drag the horizontal
sliding bar left or right.
3. To adjust the volume, drag the vertical sliding
bar up or down.
4. To turn the sound off, click on the Mute button.
The word MUTE appears.
5. To turn the sound back on, click on the Mute
button again.
SoundDrive 16 User's Manual
45
Chapter 3: Audio Applications
The Mixer
Starting the Mixer:
1. From the Orchid Audio Applications program
group, double-click on the Mixer icon. From the
Audio Recorder or Volume Control Window,
open the Options menu and select Mixer. The
following screen appears:
Figure 3.7: Mixer Screen
The Mixer allows you to combine signals from
several audio sources during playback, with control over the volume and stereo balance of each
source. When you use the Audio Recorder to play
an audio file, you can open the Mixer to combine
audio from the file with audio from other sources.
The Volume Control acts as a master regulator of
the combined signal from the Mixer. The Mixer
can receive input from a waveform audio file, a
microphone, a compact disk player, a synthesizer
or other Line-In source.
1. To adjust the stereo balance of a source, drag its
top sliding bar left or right. To adjust the volume of a source, drag its vertical sliding bar up
or down.
2. To turn off audio from any source, click on the
Mute button. The word MUTE appears. Click
the Mute button again to turn the audio back on.
46
SoundDrive 16 User's Manual
Chapter 3: Audio Applications
3. To display the Volume Control window with
the Mixer window, choose Volume Control from
the Options menu.
The Extended Recorder
The Extended Recorder can be used to record meetings and for dictation. Like the Audio Recorder,
the Extended Recorder records, compresses, stores
and plays music and other sounds. Unlike the
Audio Recorder, the Extended Recorder compresses and stores the audio file directly to your
hard disk using ESPCM compression. The recording time is limited only by the amount of hard disk
space you have available.
The Extended Recorder can record to and play
back from both PCM and .AUD formats. PCM is
the Microsoft Windows 3.1 audio file format. The
.AUD format uses ESPCM compression to produce an audio file. The Extended Recorder provides a choice of linear PCM (8-bits or 16 bits) and
ESPCM low (4-bits) compression.
System Requirements
Use the Extended Recorder with a hard disk compression utility only if you have a high-performance system and are using a low data rate for
recording and playback. Otherwise, your
computer's CPU may become overloaded.
For Best Results
If you wish to use 16-bit stereo at 44KHz for recording or playback, your system must follow the
specifications below:
• 486 system running at 50MHz or faster
• 8 megabytes of RAM or more
SoundDrive 16 User's Manual
47
Chapter 3: Audio Applications
• a hard disk access time of 15 milliseconds or
faster
Operating a system without these specifications
may cause data loss when you attempt 16-bit stereo, 44KHz recording.
Starting the Extended Recorder:
1. From the Orchid Audio Applications program
group, double-click on the Extended Recorder
icon. The following screen appears:
Figure 3.8: Extended Recorder Window
The buttons at the bottom of the Extended Recorder
window are from left to right: Record, Play and Stop.
This window shows the current file’s name, the current location in seconds and the total length in seconds.
2. You can display more information on the selected
file from the Extended Recorder. From the Options menu, select Expanded View. The following
screen appears:
48
SoundDrive 16 User's Manual
Chapter 3: Audio Applications
Figure 3.9: Extended Recorder Expanded View
The expanded view enlarges the Extender Recorder window to show the length of the recording, sample rate, mono or stereo, bits per sample
and the free disk space and recording time available.
The Audio Clip Library
The Audio Clip Library includes music, phrases
and sounds. You can play any audio file in the
library by using the Audio Recorder (opened automatically by the Audio Clip Library), the
Microsoft Sound Recorder, or other recorders
compatible with the Windows .WAV format. You
can also add folders and audio files of your own
to the Audio Clip Library.
Starting the Audio Clip Library:
1. From the Orchid Audio Applications program
group, double-click on the Audio Clip Library
icon and the following screen appears:
SoundDrive 16 User's Manual
49
Chapter 3: Audio Applications
Figure 3.10: Audio Clip Library Window
The Audio Clip Library includes three folders
titled Music, Phrases and Sounds. The Music
folder contains short musical interludes. The
Phrases folder contains phrases used in business
settings. The Sound folder contains a variety of
mechanical and animal sound clips.
Talking Calculator
The Talking Calculator is an audio/visual calculator that allows you to perform calculations in
Windows 3.1. You can reduce Talking Calculator
to an icon so that it is readily available whenever
you want to perform calculations.
To start Talking Calculator:
1. From the Orchid Audio Applications window,
double-click on the Talking Calculator icon. The
following screen appears:
50
SoundDrive 16 User's Manual
Chapter 3: Audio Applications
Figure 3.11: Talking Calculator Screen
To perform calculations with your mouse, just
point and click. You will hear the number or
operation clicked and the resulting answer. You
can also use the keyboard by pressing the corresponding keys for each Calculator button. The
following table describes each key on the calculator, its keyboard equivalent, and its function.
Button
+
*
/
sqrt
%
=
+/
1/x
Back
AC
CE
MC
MR
Key
+
*
/
@
%
=
Function
Addition
Subtraction
Multiplication
Division
Square root of the displayed value
Calculates percentages
or ENTER performs any operation on
the previous numbers
F9
Changes the sign of the displayed number
r
Calculates the reciprocal of the displayed number
Backspace Deletes the rightmost digit of the displayed number
ESC
Clears the current calculation
DEL Clears the displayed number
CTRL+L Clears any value stored in memory
CTRL+R Recalls the value stored in memory
SoundDrive 16 User's Manual
51
Chapter 3: Audio Applications
MM+
NUM
DIG
ANS
MUT
ments
CTRL+M Stores the displayed value in memory
CTRL+P Adds the displayed value to any value
already in memory
Directs to announce results as whole
number
Directs to announce results as digit
Directs to announce answer only
Directs to not make any announce-
To access Help, click on Contents from the Help
menu in the Talking Calculator window.
The Chime
The Chime announces the time musically. Chime
can announce the time or play audio files at different intervals when enabled.
To start Chime:
1. From the Orchid Audio Applications window,
double-click on the Chime icon. The following
screen appears:
Figure 3.12: Chime Screen
Chime continues to make announcements when
you reduce it to an icon. All Chime parameters can
be set by selecting the Settings menu. To access
Help, click on Contents from the Help menu in the
Chime window.
52
SoundDrive 16 User's Manual
Chapter 3: Audio Applications
The Timer
The Timer helps you to record time. Whenever
you stop the Timer, it announces the amount of
time remaining. It continues to display and announce count time remaining when you reduce it
to an icon.
To start Timer:
1. From the Orchid Audio Applications window,
double-click on the Timer icon. The following
screen will appear:
Figure 3.13: Timer
The Timer window can appear in analog or digital
display. Click on the Start button from the Timer
window to begin the countdown. If there is zero
time on the timer, click on the Reset button. This
will reset the timer to the previous countdown. To
stop the Timer at any time, click on Stop (the start
button switches to stop when the timer is in operation). To access Help, click on Contents from the
Help menu in the Timer window.
The Audio Reminder
The Audio Reminder features two alarms with
different time, sound and snooze setups. These
reminders are set up as alarms that will play the
selected audio files at selected times.
SoundDrive 16 User's Manual
53
Chapter 3: Audio Applications
To start Auto Reminder:
1. From the Orchid Audio Applications window,
double-click on the Audio Reminder icon. The
following screen appears:
Figure 3.14: Audio Reminder Screen
When the Audio Reminder is reduced to an icon,
it will continue to operate, display and set off the
alarms as required. To access Help, click on Contents from the Help menu in the Audio Reminder
window.
The Talking Clock
The Talking Clock helps you keep track of time. It
announces the time when you select the Say command. You can display the Talking Clock as an
analog or digital clock.
To start Talking Clock:
1. From the Orchid Audio Applications window,
double-click on the Talking Clock icon. The following screen appears:
54
SoundDrive 16 User's Manual
Chapter 3: Audio Applications
Figure 3.15: Talking Clock Screen
When you start the Talking Clock for the first
time, a window with a standard analog clock
appears and displays the system time. The next
time you start the Talking Clock, the last display
mode used will appear.
You can change the size of the Clock window and
move it wherever you wish so that the current
time, including seconds and date, appear on the
screen. When the Talking Clock is set to "Always
Minimize," it will continue to display and announce the time when you reduce it to an icon. To
access Help, click on Contents from the Help menu
in the Talking Clock window.
Stopwatch
The Stopwatch allows you to measure duration of
time. You can set the Stopwatch to sound a tick
each second and announce the amount of time
elapsed from the time it was activated. When you
start the Stopwatch for the first time, it displays in
analog display mode.
To start Stopwatch:
1. From the Orchid Audio Applications window,
double-click on the Stopwatch icon. The following screen appears:
SoundDrive 16 User's Manual
55
Chapter 3: Audio Applications
Figure 3.16: Stopwatch Screen
Digital display mode allows you to change the
font. From the Settings menu, click on Set Font
and select a font. You can change the size of the
Stopwatch window and move it wherever you
wish so that the time lapsed, including minutes
and seconds, appear on the screen. Stopwatch
continues to display and keep time when you
reduce it to an icon. To access Help, click on
Contents from the Help menu in the Stopwatch
window.
56
SoundDrive 16 User's Manual
Appendix A: Technical Help
Appendix
A
TECHNICAL HELP
Orchid Technology is known for its responsiveness to its customers. This section gives you helpful hints for troubleshooting the SoundDrive 16
and the technical specifications.
CompuServe
In addition to calling Orchid technology, technical support is now available through the
CompuServe Information Service (CIS). You can
also download drivers and get new product information. To find us on CompuServe follow the
instructions below:
1. Log onto CompuServe.
All commands can
be typed in
lower or
upper case
letters.
2. Type GO MULTIBVEN to get into the Multimedia Vendor Forum B. Once you are in this
forum, select Message Section #10. The message and library sections are labeled Orchid. . .
or
You may type GO ORCHID to get immediate
access to the Orchid section.
3. If you would like to leave private mail for
Orchid, type GO MAIL. Address your letters
to our technical support account number
72662,2672.
Troubleshooting the SoundDrive 16
The following information will help you diagnose
problems you may have with the SoundDrive 16.
Following these simple steps serves a twofold
purpose:
You may be able to fix your problem and
avoid having to contact the Orchid Technology Technical Support Department . . .
SoundDrive 16 User's Manual
57
Appendix A: Technical Help
or
if these steps do not help you solve your
problem, they will most certainly give you a
better handle on what to tell Technical
Support once you do contact them.
The information provided here is in symptom/response form. That is, a symptom is given, and a
check point response is provided for you.
Symptom 1
System locks up on bootup with the SoundDrive 16
installed.
Check
1. Check whether another peripheral in your system is using the same I/O address configured by
Jumper JP5 on the SoundDrive 16.
Symptom 2
No sound output.
Check
1. Is the external speaker properly connected to
the SoundDrive 16 SPEAKER jack?
2. Is there another adapter in your system that
may be using the same address (I/O Address,
DMA Channel or Interrupt)? If so, change its
addressing or select another address for
SoundDrive 16. (Refer to Chapter 1 for available addresses).
58
SoundDrive 16 User's Manual
Appendix A: Technical Help
Symptom 3
Certain applications do not play sound.
Check
1. Verify that the SoundDrive 16 and the software
application are configured for the same sound
emulation modes (for example, Sound Blaster or
Sound Blaster Pro for digitized sound).
2. Many software applications require a large
amount of base memory, such as 640KB and are
unable to operate if any drivers or TSR programs
are installed. Try removing all unnecessary drivers and TSRs or load them in high memory (refer
to your DOS user’s manual for more information).
3. Verify that the SET BLASTER statement is in the
AUTOEXEC.BAT file.
4. Make sure the application is configured for the
same IRQ, I/O, or DMA as the SoundDrive 16.
Symptom 4
Certain applications do not play digitized sound,
such as speech or sound effects.
Check
1. Check for a conflict with the Sound Blaster interface configuration settings. Digitized sounds are
played back through this interface.
2. Verify that the SET BLASTER statement is in the
AUTOEXEC.BAT file. Some applications look
specifically for this statement to set the Sound
Blaster environment. Verify that the settings of
the statement match the configuration for the
SoundDrive 16 and the software application.
3. Verify that there is sufficient base memory to run
the software application. If you are configuring
SoundDrive 16 User's Manual
59
Appendix A: Technical Help
the software application for Sound Blaster, the
software application may omit digitized sound if
there is not enough base memory available.
Symptom 5
I cannot access the CD-ROM drive.
Check
1. Verify that the FDCD.SYS device driver (or
other CD-ROM device driver) is loaded in the
CONFIG.SYS file. Verify that the MSCDEX or
CORELCDX.COM device driver is loaded in
the AUTOEXEC.BAT file.
2. Verify that the path and syntax for each of the
device driver lines are correct (refer to Chapter
1: "Device Drivers").
3. If there is a LASTDRIVE statement in the
CONFIG.SYS file, verify that the drive letter
used is set to a letter after the CD-ROM drive
(refer to your DOS manual for more information).
4. Verify that the colored stripe on ribbon cable is
correctly installed on Pin 1 on both the
SoundDrive 16 and the CD-ROM drive.
Symptom 6
My CD-ROM drive does not play CD Audio.
Check
1. Verify that the audio cable used matches the
pin-outs for the CD Audio connector. See Appendix A for the CD-ROM Audio Cable Connector pin assignments. Contact your CDROM manufacturer for the appropriate audio
cable. The SoundDrive 16 has an MPC-2 audio
connector.
60
SoundDrive 16 User's Manual
Appendix A: Technical Help
Symptom 7
My joystick does not work when connected to
the SoundDrive 16.
Check
1. Verify that the Joystick Port in the SD16.EXE
program is enabled.
2. Many I/O adapter cards have a built-in joystick/game port (even if they do not contain a
15-pin DB connector). The SoundDrive 16 has
its own joystick port. Disable the joystick/
game port on the I/O adapter card.
Symptom 8
My microphone recording level is too soft or unable to record properly.
Check
1. Verify that your microphone has the proper impedance or is too sensitive. The SoundDrive 16
expects a microphone with an impedance of approximately 600-10K ohms.
2. Verify that the software used to record, and the
Windows temporary directory are not on a drive
that is using a disk doubling utility.
3. Turn up the microphone input level.
4. Make sure that the microphone is selected as the
recording source.
Symptom 9
Wave files do not play correctly in Windows.
Check
1. Verify that the settings for the SoundDrive 16
SoundDrive 16 User's Manual
61
Appendix A: Technical Help
driver in Windows match the hardware settings.
This can be done by opening the Driver icon from
the Control Panel and double-clicking on the
driver.
2. If the .WAV file keeps repeating, this indicates an
IRQ conflict.
Symptom 10
I received the error message "Could not load
audio driver" or "General Protection Fault."
Check
1. Is the SoundDrive 16 audio driver installed in
Windows? If no, install the driver. If yes, reinstall
the driver. From the Control Panel window, click
on the Drivers icon, click on Add, and reload the
"SoundDrive 16 WAVE & MIDI" driver. Restart
Windows and check the sound again.
2. Did you change the default address settings? If
so, you need to reset the address settings in Windows.
Symptom 11
I received the error message "Disk Could Not
Keep Up with Digital Audio Rate."
Check
1. Were you recording when you received this error
message? Decrease the sample rate or bit resolution. If you where recording in stereo, switch to
mono.
2. Are you using a disk doubling utility? When you
record, you are recording directly to the hard
drive. Disk compression utilities can affect the
performance of the hard drive.
62
SoundDrive 16 User's Manual
Appendix A: Technical Help
3. Have you defragmented your hard drive lately?
Your software applicaton may have encountered
a performance problem with your hard drive.
Use one of the commercial disk optimizing utilities available. Excellent digital audio performance requires that you optimize your hard drive
often.
SoundDrive 16 User's Manual
63
Appendix A: Technical Help
Avoiding Address Conflicts
A conflict may occur if you have another card in
your system using the same I/O, DMA or IRQ
addresses as SoundDrive 16. Resolve the conflict
by selecting another available address. When selecting a different address, please note the following information:
☞ A BUS mouse commonly uses I/O address
240H
☞ Network cards commonly use the following
addresses:
IRQ 10 or 11
I/O 300H, 320H, 340H or 360H
☞ Other devices such as SCSI cards, hard disks
andCD-ROM drives commonly use the following addresses:
IRQ 10, 11, 14 or 15
I/O 330H or 340H
☞ When you encounter an IRQ conflict, you will
normally hear a continuous noise from the
speakers. I/O and DMA conflicts normally
lock up your system.
☞ SoundDrive 16 may use DMA Channel 0, 1 or
3.
64
SoundDrive 16 User's Manual
Appendix A: Technical Help
TECHNICAL INFORMATION
The features and specifications of the SoundDrive
16 are covered in this appendix. Also included are
the specifications for the Joystick/MIDI Port.
SoundDrive 16 Specifications
Features
Full compatibility with the following sound
and multimedia standards:
• Sound Blaster
• AdLib
• Microsoft Windows Sound System
• MPC Level I and II
Chipsets
ESS688 Audio Drive
Yamaha OPL3 FM Synthesis
Computers Supported:
ISA machines:
IBM ATs—286, 386, 486,
and compatibles
Card Size:
6" x 4.5"
Interfaces:
Optional SCSI-2 CD-ROM interface
Optional Wave Booster daughtercard
Mitsumi CD-ROM interface
DB-15 port for Joystick/MIDI Port
3.5 mm mono jack for microphone input
3.5 mm 4W amplified speaker output
3.5 mm stereo jack for line input
3.5 mm stereo jack for line out
SoundDrive 16 User's Manual
65
Appendix A: Technical Help
Temperature:
Operating: from 0 to 40 degrees C
Storage: from -25 to 90 degrees C
Humidity:
Operating: from 15% to 90%
Storage: from 0% to 90%
Additional Features:
FM Synthesizer
• 20-voice Stereo Synthesizer
Stereo Digital/Analog Mixer (built-in)
• Selectable input and mixing of all audio
sources for recording:
Line-in
Stereo CD-Audio
Mono Microphone
Synthesizer
Digital Audio
Stereo Digitized Audio Playback
• 8-bit and 16-bit sample modes
• Sampling Rate of :
2KHz to 44.1KHz (mono or stereo)
• Hardware audio decompression ESPCM
(ratios of 2:1, 3:1, and 4:1)
Audio Amplifier
• Frequency Response: 20Hz to 22KHz
Stereo Digitized Audio Recording
• 8-bit and 16-bit sample modes
• Sampling Rate of 2KHz to 44.1KHz
66
SoundDrive 16 User's Manual
Appendix A: Technical Help
CD-ROM
• One built-in Mitsumi AT-Bus CD-ROM
interface and one built-in SCSI-2 CD-ROM
interface (SCSI-2 CD-ROM interface optional
on the SoundDrive EZ)
MIDI
• Sound Blaster type Joystick/MIDI cable
Wavetable
• Interface for optional Wave Booster
daughtercard
Joystick Port/MIDI Interface
• Standard built-in (15-pin D-sub) connector
• Game I/O port for PC analog joystick
• Built-in interface for Sound Blaster MIDI
cable with MIDI IN and MIDI OUT
connectors
• MIDI time-stamp for Multimedia extension
• Sound Blaster MIDI compatible
• 64-byte FIFO buffer
Mono Microphone Input
• Automatic Gain Control for direct sound
input
SoundDrive 16 User's Manual
67
Appendix A: Technical Help
Address Settings and Pin Assignments
The SoundDrive 16 uses an I/O port address for
the Sound Blaster emulation mode. This address
is hardware configured (see Chapter 1). The following addresses are available for SoundDrive
16:
Sound Blaster Mode Addresses
I/O
* 220
240
IRQ
3
4
5
*7
DMA
0
*1
3
Table A.1: Sound Blaster Mode Addresses
Windows Sound System Mode Addresses
I/O
* 220
240
IRQ
DMA
3
4
5
*7
0
1
3
Table A.2: Sound System Addresses
CD-ROM Audio Cable Connector
Pin 1
Pin
Assignment
1
2
3
4
Left Channel
Ground
Ground
Right Channel
Table A.3: CD-ROM Audio Cable Pin-Outs
* Default Setting
68
SoundDrive 16 User's Manual
Appendix A: Technical Help
Joystick/MIDI Port Pin Assignments
The joystick port on SoundDrive 16 is identical to
the standard PC Game Control adapter. The 15pin D-sub connector is also used as the built-in
MIDI interface. The pin-out assignments are as
follows:
Pin
Function
Pin
Function
1
+5V
9
+5V
2
A-1
10
B-1
3
A-X
11
B-X
4
GND
12
MIDI-OUT
5
GND
13
B-Y
6
A-Y
14
B-2
7
A-2
15
MIDI-IN
8
+5V
Table A.4: Joystick/MIDI Pin Assignments
Figure A.1: Joystick/MIDI Pin-Outs
SoundDrive 16 User's Manual
69
Appendix A: Technical Help
70
SoundDrive 16 User's Manual
Appendix B: MIDI
Appendix
B
MIDI
This section gives you an overview of the MIDI
specification, and provides a list of the Patches
and Percussion sounds available with the optional Orchid Wave Booster daughtercard. This
wavetable synthesis upgrade option enhances the
sound in Windows and multimedia applications
with real music instruments.
MIDI Overview
MIDI (Musical Instrument Digital Interface) is a
serial communications protocol designed specifically for electronic music devices. MIDI (pronounced "mid-ee") has revolutionized the composition, recording, and performance processes by
allowing many instruments to be centrally-controlled like one electronic orchestra. The MIDI
Manufacturers Association (MMA) is responsible
for the development and evolution of MIDI.
MIDI contains instructions controlling how and
when devices like digital synthesizers produce
sound. You can think of MIDI as a sort of Postscript for music. Postscript describes objects,
rather than casting them into bitmapped form.
MIDI describes the elements of the musical performance, rather than casting them into the
bitstreams of digital audio.
General MIDI
General MIDI defines specific and predictable
sounds for each of 128 program locations. This
allows composers and producers to include program change commands in compositions that will
configure the timbres appropriately for the tracks.
SoundDrive 16 User's Manual
71
Appendix B: MIDI
WaveBooster Sounds
These are the General MIDI and MT-32 Patches
(sounds) that are stored on the WaveBooster
wavetable daughtercard. It also contains over 118
percussion instruments in 7 drum sets on MIDI
channel 10.
72
Patch
MT-32 Sound
General MIDI Sound
1
2
3
4
5
6
7
8
9
10
11
12
13
14
15
16
17
18
19
20
21
22
23
24
25
26
27
28
29
30
31
32
33
Acoustic Piano 1
Acoustic Piano 2
Acoustic Piano 3
Electric Piano 1
Electric Piano 2
Electric Piano 3
Electric Piano 4
Honky Tonk
Electric Organ 1
Electric Organ 2
Electric Organ 3
Electric Organ 4
Pipe Organ 1
Pipe Organ 2
Pipe Organ 3
Accordion
Harpsichord 1
Harpsichord 2
Harpsichord 3
Clavinet 1
Clavinet 2
Clavinet 3
Celesta 1
Celesta 2
Synth Brass 1
Synth Brass 2
Synth Brass 3
Synth Brass 4
Synth Bass 1
Synth Bass 2
Synth Bass 3
Synth Bass 4
Fantasy
Acoustic Grand Piano
Acoustic Bright Piano
Electric Grand Piano
Honky Tonk Piano
Fender Rhodes
Chorused Piano
Harpsichord
Clavinet
Celesta
Glockenspiel
Music Box
Vibraphone
Marimba
Xylophone
Tubular Bells
Dulcimer
Hammond Organ
Percussive Organ
Rock Organ
Church Organ
Reed Organ
Accordion
Harmonica
Tango Accordion
Nylon Acoustic Guitar
Steel Acoustic Guitar
Jazz Electric Guitar
Clean Electric Guitar
Muted Electric Guitar
Overdriven Guitar
Distorted Guitar
Guitar Harmonics
Acoustic Bass
SoundDrive 16 User's Manual
Appendix B: MIDI
34
35
36
37
38
39
40
41
42
43
44
45
46
47
48
49
50
51
52
53
54
55
56
57
58
59
60
61
62
63
64
Harmony Piano
Chorale
Glasses
Soundtrack
Atmosphere
Warm Bell
Funny Vox
Echo Bell
Ice Rain
Oboe 2001
Echo Pan
Doctor Solo
School Daze
Bellsinger
Square Wave
String Section 1
String Section 2
String Section 3
Pizzicato
Violin 1
Violin 2
Cello 1
Cello 2
Contrabass
Harp 1
Harp 2
Guitar 1
Guitar 2
Electric Guitar 1
Electric Guitar 2
Sitar
Fingered Electric Bass
Picked Electric Bass
Fretless Bass
Slap Bass 1
Slap Bass 2
Synth Bass 1
Synth Bass 2
Violin
Viola
Cello
Contrabass
Tremelo Strings
Pizzicato Strings
Orchestral Harp
Timpani
String Section 1
String Section 2
Synth Strings 1
Synth String 2
Choir "Aahs"
Voice "Oohs"
Synth Voice
Orchestra Hit
Trumpet
Trombone
Tuba
Muted Trumpet
French Horn
Brass Section
Synth Brass 1
Synth Brass 2
65
Acoustic Bass 1
Soprano Sax
66
Acoustic Bass 2
Alto Sax
67
Electric Bass 1
Tenor Sax
68
Electric Bass 2
Baritone Sax
69
Slap Bass 1
Oboe
70
Slap Bass 2
Basoon
71
Fretless 1
English Horn
72
Fretless 2
Clarinet
73
Flute 1
Piccolo
74
Flute 2
Flute 81
75
Piccolo 1
Recorder
SoundDrive 16 User's Manual
73
Appendix B: MIDI
Patch
74
MT-32 Sound
General MIDI Sound
76
Piccolo 2
Pan Flute
77
Recorder
Bottle Blow
78
Pan Pipes
Shakuhachi
79
Sax 1
Whistle
80
Sax 2
Ocarina
81
Sax 3
Lead 1
82
Sax 4
Lead 2
83
Clarinet 1
Lead 3
84
Clarinet 2
Lead 4
85
Oboe
Lead 5
86
English Horn
Lead 6
87
Bassoon
Lead Fifths
88
Harmonica
Lead + Bass
89
Trumpet 1
New Age Pad
90
Trumpet 2
Warm Pad
91
Trombone 1
Polysynth Pad
92
Trombone 2
Choir Pad
93
French Horn 1
Bowed Pad
94
French Horn 2
Metallic Pad
95
Tuba
Halo Pad
96
Brass Section 1
Sweep Pad
97
Brass Section 2
Rain
98
Vibe 1
Soundtrack
99
Vibe 2
Crystal
100
Synth Mallet
Atmosphere
101
Windbell
Brightness
102
Glockenshpiel
Goblins
103
Tube Bell
Echoes
104
Xylophone
Sci-Fi
105
Marimba
Sitar
106
Koto
Banjo
107
Sho
Samisen
108
Shakuhachi
Koto
109
Whistle 1
Kalimba
SoundDrive 16 User's Manual
Appendix B: MIDI
110
Whistle 2
111
Bottleblow
Bagpipe
Fiddle
112
Breathpipe
Shanai
113
Timpani
Tinkle Bell
114
Melodic Tom
Agogo
115
Deep Snare
Steel Drums
116
Electric Percussion 1
Woodblock
117
Electric Percussion 2
Taiko Drum
118
Taiko
Melodic Tom
119
Taiko Rim
Synth Drum
120
Cymbal
Reverse Cymbal
121
Castanets
Guitar Fret Noise
122
Triangle
Breath Noise
123
Orchestra Hit
Seashore
124
Telephone
Bird Tweet
125
Bird Tweet
Telephone Ring
126
One Note Jam
Helicopter
127
Water Bells
Applause
128
Jungle Tune
Gunshot
SoundDrive 16 User's Manual
75
Appendix B: MIDI
WaveBooster Percussion Sounds
These are the standard Percussion sounds on the
WaveBooster wavetable daughtercard. These
percussion instruments are accessed by sending
data to MIDI channel 10. The WaveBooster features seven different drum sets.
76
Key #
Keyboard Note
Sound
35
36
37
38
39
40
41
42
43
44
45
46
47
48
49
50
51
52
53
54
55
56
57
58
59
60
61
62
63
64
65
66
67
68
B0
C1
C1+
D1
D1+
E1
F1
F1+
G1
G1+
A1
A1+
B1
C2
C2+
D2
D2+
E2
F2
F2+
G2
G2+
A2
A2+
B2
C3
C3+
D3
D3+
E3
F3
F3+
G3
G3+
Acoustic Bass Drum
Bass Drum 1
Side Stick
Acoustic Snare
Hand Clap
Electric Snare
Low Floor Tom
Closed Hi-Hat
High Floor Tom
Pedal Hi-Hat
Low Tom
Open Hi-Hat
Low-Mid Tom
Hi-Mid Tom
Crash Cymbal 1
High Tom
Ride Cymbal 1
Chinese Cymbal
Ride Bell
Tambourine
Splash Cymbal
Cow Bell
Crash Cymbal 2
Vibraslap
Ride Cymbal 2
Hi Bongo
Low Bongo
Mute Hi Conga
Open Hi Conga
Low Conga
High Timbale
Low Timbale
High Agogo
Low Agogo
SoundDrive 16 User's Manual
Appendix B: MIDI
69
70
71
72
73
74
75
76
77
78
79
80
81
A3
A3+
B3
C4
C4+
D4
D4+
E4
F4
F4+
G4
G4+
A4
Cabasa
Maracas
Short Whistle
Long Whistle
Short Guiro
Long Guiro
Claves
High Wood Black
Low Wood Bock
Mute Cuica
Open Cuica
Mute Triangle
Open Triangle
NOTE: C1 refers to the lowest C-key on a standard 5-octave
keyboard. The + sign refers to a half-step (sharp).
SoundDrive 16 User's Manual
77
Limitation of Liability
Neither Orchid Technology nor anyone else who
has been involved in the creation, production, or
delivery of this product shall be liable for any
direct, indirect, special, punitive, consequential,
or incidental damages (including, without limitation, damages for loss of business profits, business
interruption, loss of business information, and the
like) arising out of the use of or inability to use this
product, even if Orchid Technology has been advised of the possibility of such damages.
Because some states do not allow the exclusion of
liability for consequential or incidental damages,
the above limitation may not apply to you. In any
event, Orchid Technology's liability arising in any
manner in connection with this product, whether
based in contract, product liability, or tort, shall
not exceed the purchase price of the product.
78
SoundDrive 16 User's Manual
FCC
FCC NOTICE
FCC# DDS7EF0494-16-SDR
SoundDrive 16
Certified compliant with FCC Class B limits, part 15
To meet FCC requirements, shielded cables are required
to connect the unit to a Class B certified device
“This device complies with Part 15 of the FCC Rules. Operation is subject to the
following two conditions: (1) this device may not cause harmful interference, and (2)
this device must accept any interference received, including interference that may
cause undesired operation.”
This equipment generates and uses radio frequency energy and, if not installed and
used properly in strict accordance with the manufacturer’s instructions, may cause
interference to radio or television reception.
This device has been tested and found to comply with the limits for a Class B
computing device in accordance with the specifications in Subpart J of Part 15 of
FCC Rules, which are designed to provide reasonable protection against such
interference in a residential installation. Only equipment (computer input/output
devices, terminals, printers, etc.) certified to comply with the Class B limits may be
attached to this product.
If this equipment causes interference to radio or television reception, which can be
determined by turning the equipment off and on, the user is encouraged to try and
correct the interference by one or more of the following measures:
1. Reorient the receiving antenna.
2. Relocate the computer with respect to the receiver.
3. Move the computer away from the receiver.
4. Plug the computer into an outlet which resides on a different circuit breaker
than the receiver.
5. If necessary, consult your dealer, or an experienced radio or television
technician for additional suggestions.
You may find the booklet How To Identify and Resolve Radio-TV Interference
Problems helpful. It was prepared by the Federal Communications Commission
and is available from the U.S. Government Printing Office, Washington, DC 20402.
Refer to stock number: 004-000-00345-4.
Orchid Technology is not responsible for any radio or TV interference caused by
unauthorized modifications to this equipment. It is the responsibility of the user to
correct such interference.
Operation with non-certified equipment is likely to result in interference to radio
and TV reception. The user must use shielded interface cables in order to maintain
the product within FCC compliance.
SoundDrive 16 User's Manual
79
Index
INDEX
A
Address Settings - 68
Address Conflicts - 64
Audio Applications - 37
C
CD-ROM Device Drivers - 20-22
CompuServe - 57
Configuring
MSCDEX.EXE Device Driver - 27
SCSI CD-ROM Device Drivers - 21
SoundDrive 16 - 14
Connecting External Devices - 16
D
D-sub connector for joystick/MIDI input - 17, 69
Device Drivers - 20
Diagram (SoundDrive 16) - 10
E
External Devices - 16
G
Game Port - 17, 69
H
Help
Troubleshooting - 57
80
SoundDrive 16 User's Manual
Index
I
Installation
CD-ROM Drive - 19
Microphone - 11
Mitsumi Compatible CD-ROM Device Drivers - 27
SCSI CD-ROM Device Drivers - 20
SoundDrive 16 - 11
J
Joystick port/MIDI Port Pin Assignments - 17, 69
Jumpers
Locations of Jumpers - 14
Jumper Settings
JP1 (SCSI Memory Address Segment) - 14
JP2 (CD-ROM-SCSI IRQ Address) - 15
JP4 (Mitsumi I/O Address) - 15
JP5 (SoundDrive 16 I/O Address) - 16
Summary - 14
K
Key-Z Player - 31
Key-Z Player - Solo - 34
Key-Z Player - Accompanied - 35
L
Line input jack - 17
M
Microphone input jack - 17
MIDI
General MIDI - 71
Interface - 17
Overview - 71
Specifications - 69
SoundDrive 16 User's Manual
81
Index
S
SCSI CD-ROM Utilities - 29
Software Installation - 11, 20
Sounds
General MIDI - 71
MT-32 - 72
Percussion - 76
Speaker output jack - 17
Summary of Jumpers Settings - 14
T
Technical Help - 57
Technical Information - 65
Technical Specifications - 65
Troubleshooting - 57
U
Utilities
Key-Z player - 31
SCSI CD-ROM Utilities - 29
82
SoundDrive 16 User's Manual