1
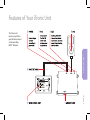
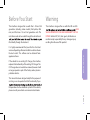
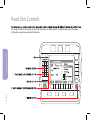
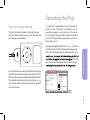
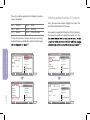
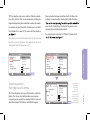
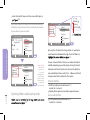
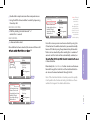
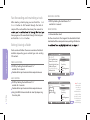
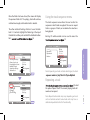
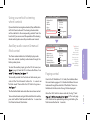
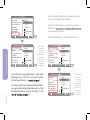
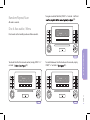
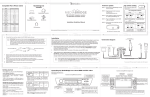
Welcome to iTronic Audio
This iTronic kit is designed to allow you to seamlessly integrate popular
consumer-electronic devices into your vehicle such as iPod, auxillary input
devices and more. In most cases full functionality of your device is available
via the vehicle’s radio/navigation display and steering wheel button controls.
Let us help you learn about your new iTronic unit.
Contents
2008 ECP, LLC
The iTronic unit connects your
iPod to your Vehicle head-unit via
the optic-fiber MOST® Network.
iTronic Features
03
Supported iPods
04
Before You Start
05
Head Unit Controls
06
Operating the iPod
07
Basic Radio Control – Non-text display head-units
17
Warranty
20
Features of Your iTronic Unit
PAGE 03
iTRONIC FEATURES
The iTronic unit
connets your iPod to
your Vehicle head-unit
via the optic-fiber
MOST® Network.
Supported iPods
expect from iPod and Apple.
SUPPORTED IPODS
&120GB
& 4th generation
PAGE 04
& iPhones (all models)
Warning
This interface is designed for use with iPod 4th and 5th
generation (including video models), iPod photo, iPod
mini, and iPod nano 1st and 2nd generation units. This
unit allows audio to be routed through the vehical head
This interface is designed for use with iPod 4th and 5th
SAFE
VEHICLE OPERATION IS THE SOLE RESPONSIBILITY OF THE
DRIVER. Neither ECP, LLC, their agents, distributors or
resellers accept responsibility for any damage or injury
resulting from the use of this product.
iPod directly through the head unit.
It is highly recommended that your iPod has the latest
version of operating software installed in order to acheive
the best results. This software can be obtained from:
apple.com/itunes
If the vehicle has an existing CD Changer, this interface
replaces the functionality of the existing CD Changer. The
CD Changer does not need to be removed, however it will
no longer operate as part of the factory audio system in
particular vehicles.
BEFORE YOU START
Before You Start
This manual has been designed solely for the purpose of
assisting a user to operate the iPod functionality. If you
PAGE 05
the operation of other electronics systems in the vehicle,
please consult your vehicle user manual or local dealer.
Head Unit Controls
are a number of buttons on the head unit which will enable access to those functions. The diagram below shows the location
of the buttons required to operate the iPod interface.
HEAD UNIT CONTROLS
PAGE 06
Operating the iPod
Plug in and charge the iPod
Plug the iTronic dock connector into the base of your
iPod. The dock connector inserts into the iPod with the
icon facing up as shown below .
It is important to remember that the iPod replaces the
function of the CD Changer and therefore must be
expected to operate in a very similar way. If the vehicle
has an existing CD Changer, it will be replaced by the iPod
and the CD Changer will no longer operate as part of the
factory audio system.
01). You will
note that the top of the display reads “Audio CD Changer”,
Audio CD – Changer
CD 1 2
3 4 5 6
Playlists/iPod
iPod
00:23
23ºC
1/14
CD 1 Track 1
CD List
Track/List
CD Name
Track Seq.
Scan
Traffic Programme
Mute
23.02.07
PAGE 07
Once the iPod has been connected it will begin to charge
and all functions will be transfered to the head unit. iPod
functions will no longer be accesible directly from the iPod.
The iPod will charge whenever the audio system is in use
and will stop charging whenever the vehicle’s electrical
system shuts down.
OPERATING THE IPOD
To begin operating the iPod, Push the CD button on the head
unit. Allow a few seconds for the Head unit to recognise the
iPod as the CD Changer. Once the iPod has loaded and is
The six discs will be replaced by the following functions
(genres) by default:
Disc 1
Disc 2
Disc 3
Playlists
Artists
Albums
Disc 4
Disc 5
Disc 6
Genre
All Songs
Aux Audio Input
Selecting options from the CD list menu
Using the head unit controls highlight and select the
desired function from the CD list menu.
For example, to select Artists from the CD list scroll using
the head unit controls to highlight the option. Press the
To view the disc list on screen, select your head unit’s
method of viewing available discs and the iPod disc layout
03.
05.
OPERATING THE IPOD
Audio CD – Changer
Audio CD – Changer
CD 1 2
CD List
Track/List
CD Name
Track Seq.
Scan
Traffic Programme
Mute
3 4 5 6
Playlists/iPod
iPod
00:23
1/14
23ºC
CD 1 Track 1
Audio CD – Changer
PAGE 08
23ºC
23.02.07
23ºC
CD List
Track/List
CD Name
Track Seq.
Scan
Traffic Programme
Mute
CD
23.02.07
23ºC
CD List
Playlist s/iPod
Artists
Albums
Genre
All Songs
Aux Audio Input
CD 1 Track 1
CD List
Playlist s/iPod
Artists
Albums
Genre
All Songs
Aux Audio Input
CD List
Track/List
CD Name
Track Seq.
Scan
Traffic Programme
Mute
CD 1 Track 1
23.02.07
Audio CD – Changer
2
1
3 4 5 6
Artist s /Joliet Jak...
ACDC
00:23
8/99
CD 1 Track 1
CD List
Track/List
CD Name
Track Seq.
Scan
Traffic Programme
Mute
23.02.07
Note: You do not need to be viewing the CD list menu to
be able to use this function. This method can be used
throughout the CD changer menus.
Audio CD – Changer
For example, after selecting the “Playlists” function from
07.
CD List
Playlist s/iPod
Artists
Albums
Genre
All Songs
Aux Audio Input
23ºC
view the CD track listing. The track listing menu varies
according to head and vehicle controls.
Audio CD – Changer
CD List
Track/List
CD Name
Track Seq.
Scan
Traffic Programme
Mute
CD 1 Track 1
23.02.07
Selecting options
from the track list menu
All of the information from your iPod remains sorted into
folders. The iTronic user interface allows you to access
songs and peruse song lists by opening folders to view and
select the contents. This feature is called folder support.
CD List
Playlist s/iPod
Artists
Albums
Genre
All Songs
Aux Audio Input
23ºC
CD List
Track/List
CD Name
Track Seq.
Scan
Traffic Programme
Mute
CD 1 Track 1
23.02.07
Audio CD – Changer
CD 1 2
3 4 5 6
Playlists/iPod
iPod
00:08
23ºC
OPERATING THE IPOD
For example to select the Artists function, push and hold
the ‘2’ button for 2 seconds. The screen will then display as
06 .
Once a selection has been made from the CD List Menu, the
contents can be viewed by selecting the track list function.
1/14
CD 1 Track 1
CD List
Track/List
CD Name
Track Seq.
Scan
Traffic Programme
Mute
23.02.07
Note: The head
unit may take
some time to
process the
information from
your iPod. Allow
around 5 seconds
for the head unit
to update the
track list display.
PAGE 09
TIP: Disc selection varies across vehicles. Particular vehicles
have disc shortcuts that can be achieved by holding the
keypad corresponding disc number for a number of seconds.
Select the track list menu and the screen will display as
10.
Note: Vehicle controls to display track list vary according to
vehicle type. Figures shown may not necessarily correspond
to your vehicle type and control.
Audio CD – Changer
CD List
iPod
Albums
Library
On-The-Go
CD List
Track/List
CD Name
Track Seq.
Scan
Traffic Programme
Mute
Audio CD – Changer
CD 1 2
CD List
Track/List
CD Name
Track Seq.
Scan
Traffic Programme
Mute
3 4 5 6
Playlists/iPod
iPod
00:23
1/14
OPERATING THE IPOD
23ºC
CD 1 Track 1
Audio CD – Changer
23ºC
CD List
Track/List
CD Name
Track Seq.
Scan
Traffic Programme
Mute
CD 1 Track 1
23.02.07
Note: The head
unit may take
some time to
process the
information from
your iPod. Allow
around 5 seconds
for the head unit
to update the
track list display.
PAGE 10
Opening folders and playing tracks
11.
CD 1 Track 1
23.02.07
By using the CD controls to change tracks, it is possible to
move forward and backward through the list of folders to
12.
23.02.07
CD List
iPod
Albums
Library
On-The-Go
23ºC
iPod
Albums
Library
On-The-Go
To open and enter folders there are a number of methods
available depending upon vehicle type & existing CD controls.
Mercedes and Porsche head units also have the ability to
auto select folders. Please see the ‘Disc 6 Menu and Control’
chapter under ‘Auto Selection’ for this option.
PORSCHE CONTROL
FFWD by holding the track forward “>>”
controls for 2 seconds
Double click in rapid succession like a computer mouse
AUDI & SAAB CONTROL
FFWD by holding the track forward “>>”
controls for 2 seconds
FFWD by holding the track forward “>>”
controls for 2 seconds
BMW CONTROL
I-drive controller select.
Once a folder has been selected, the screen will show a list
13.
Audio CD – Changer
CD List
iPod
Albums
Library
On-The-Go
23ºC
CD List
Track/List
CD Name
Track Seq.
Scan
Traffic Programme
Mute
CD 1 Track 1
Audio CD – Changer
CD List
<< iPod
She Caught the katy
Gimme Some Lovin
Everybody Needs Some
Rawhide (Theme)
Sweet Home Chicago
Jailhouse Rock
23ºC
23.02.07
CD 1 Track 1
CD List
Track/List
CD Name
Track Seq.
Scan
Traffic Programme
Mute
23.02.07
CD List
She Caught the katy
Gimme Some Lovin
Everybody Needs Some
Rawhide (Theme)
Sweet Home Chicago
Jailhouse Rock
23ºC
CD 1 Track 1
CD List
Track/List
CD Name
Track Seq.
Scan
Traffic Programme
Mute
23.02.07
Note: The head
unit may take
some time to
process the
information from
your iPod. Allow
around 5 seconds
for the head unit
to update the
track list display.
From this screen you can now browse tracks by using the
CD controls on the vehicle head unit as you would normally
browse CD tracks by using the up/down/rotary dial controls.
Tracks can be selected by either waiting for a number of
seconds and the track will be automatically selected, or
i-drive controller.
Alternatively the track forward button can be used to move
forward through the track list and the track back button
can be used to move backwards through the list.
OPERATING THE IPOD
MERCEDES CONTROL
Audio CD – Changer
<< iPod
Note: If the track back button is double pressed to quickly
it will perform the function of exiting the folder on those
vehicles that support the double click action.
PAGE 11
Double click in rapid succession like a computer mouse
Using the MMI i-drive controller to select by depressing
the rotary dial.
Fast forwarding and rewinding a track
After selecting a track to play, press and hold the track
forward button to fast forward through the track. A
sample of the audio will be heard every few seconds to
have progressed. To rewind back through the track, press
and hold the track back button.
Exiting (closing) a folder
OPERATING THE IPOD
To close and exit folders there are a number of methods
available depending upon vehicle type and existing
CD controls.
PORSCHE CONTROL
FFWD by holding the track forward “<<”
controls for 2 seconds
Double click in rapid succession like a computer mouse
MERCEDES CONTROL
FFWD by holding the track forward “<<”
controls for 2 seconds
BMW CONTROL
I-drive controller select.
On those head units that support the double click track
back method like a computer mouse, exiting a folder can
15.
Audio CD – Changer
CD List
<< iPod
CD List
Track/List
CD Name
Track Seq.
Scan
Traffic Programme
Mute
She Caught the katy
Gimme Some Lovin
Everybody Needs Some
Rawhide (Theme)
Sweet Home Chicago
Jailhouse Rock
23ºC
CD 1 Track 1
23.02.07
AUDI CONTROL
PAGE 12
FFWD by holding the track forward “<<”
controls for 2 seconds
Double click in rapid succession like a computer mouse
Using the MMI i-drive controller to select by depressing
the rotary dial.
Audio CD – Changer
CD List
iPod
Albums
Library
On-The-Go
23ºC
CD List
Track/List
CD Name
Track Seq.
Scan
Traffic Programme
Mute
CD 1 Track 1
23.02.07
Note: The head
unit may take
some time to
process the
information from
your iPod. Allow
around 5 seconds
for the head unit
to update the
track list display.
The other method of exiting a folder is to use the track
back “<<” controls. Highlight the folder tag at the top of
the track list and then push and hold the track back button
for 2
18.
Using the track sequence menu
The track sequence menu allows the user to alter the
sequence in which tracks are played. The user can repeat
tracks or groups of tracks, or randomize the selections
being played.
Existing CD vehicle controls can be used to access the
19.
Audio CD – Changer
CD List
CD List
Track/List
CD Name
Track Seq.
Scan
Traffic Programme
Mute
She Caught the katy
Gimme Some Lovin
Everybody Needs Some
Rawhide (Theme)
Sweet Home Chicago
Jailhouse Rock
23ºC
CD 1 Track 1
Audio CD – Changer
CD List
Track/List
CD Name
Track Seq.
Scan
Traffic Programme
Mute
CD 1 Track 1
CD 1 Track 1
23.02.07
Note: Depending on head unit and vehicle type, the track
Repeating a track
CD List
iPod
Albums
Library
On-The-Go
23ºC
23.02.07
23ºC
CD List
Track/List
CD Name
Track Seq.
Scan
Traffic Programme
Mute
23.02.07
19) select
the option “Repeat Track”. The current playing track will
now be set on repeat.
Note: Repeat track controls may vary depending on head
unit and vehicle controls. Some head units may have a
dedicated repeat button for this functionality.
PAGE 13
Audio CD – Changer
<< iPod
CD List
Normal
Repeat CD
Repeat track
Random
OPERATING THE IPOD
Once the folder has been closed, the screen will display
the previous folder list. The playing track will continue
until continue to play until another track is selected.
Repeating a CD
19) select
the option “Repeat CD”. The current playing folder will now be
set on repeat.
Note: Scan controls may vary depending on head unit and
vehicle controls. Some head units may have a dedicated
scan button for this functionality.
Playing tracks in normal order
Note: Repeat CD controls may vary depending on head unit
and vehicle controls. Some head units may not support this
functionality.
19) select
the option “Normal”. This selection will cancel any previous
selections which have been made from this menu.
Random mode
Track sequence menu may differ depending on head unit type.
Selecting normal mode and unselecting Random/Repeat/
Scan may be achieved by unselecting the current settings.
OPERATING THE IPOD
19) select
the option “Random”. This will randomize the current folder.
Note: Random controls may vary depending on head unit
and vehicle controls. Some head units may have a dedicated
random button for this functionality.
Please note: It takes a number of seconds to update the
vehicle head unit screen with the correct track sequence
when exiting and entering random mode. Allow 10 seconds
for the screen to update with the correct track sequence.
Scan
PAGE 14
19) select
10 seconds of each
track in the folder from the current playing track.
Note: Random/Scan/Repeat controls may vary depending
on head unit and vehicle controls. Some head units may
have dedicated buttons for these functions.
Please note: It takes a number of seconds to update the
vehicle head unit screen with the correct track sequence
when exiting and entering random mode. Allow 10 seconds
for the screen to update with the correct track sequence.
Auxillary audio source & manual
iPod control
The iTronic audio interface has the facility to play audio
from and external (auxiliary) audio device through the
factory audio system.
To select the auxiliary input, go to the CD List menu (see
3, page 8). From the CD List choose the “Menu / Aux
20.
To manually control the iPod and exit lock mode, press
and old the Track Forward button for 2 seconds on
“Exit lock mode” from within the CD Track listing menu.
21.
The iPod will exit lock mode and allow manual user control.
To re-enter lock mode and gain full control from the vehicle,
press and hold the Track Forward button for 2 seconds on
the “Enter lock mode” track index.
CD List
23ºC
CD List
Track/List
CD Name
Track Seq.
Scan
Traffic Programme
Mute
CD 1 Track 1
Audio CD – Changer
CD List
Exit lock mode >>
Enter lock mode >>
Aux Input >>
BL Ver: 01.00.01
SW Ver: 02.02.21
Vehicle: Porsche
Browsing: Folder Su
23ºC
23.02.07
CD 1 Track 1
CD List
Track/List
CD Name
Track Seq.
Scan
Traffic Programme
Mute
23.02.07
Tip: Push and
hold Rotary
Selection
button on the
numeric keypad
from any screen
as a shortcut to
select the
Menu/Auxillary
audio input
Paging control
OPERATING THE IPOD
If your vehicle has steering wheel controls, they will function
with the iTronic audio unit. The steering wheel controls
will be identical to the corresponding controls from the
head unit. If you are unsure of the operation of the steering
wheel controls, please consult your vehicle user manual.
Audio CD – Changer
Playlist s/iPod
Artists
Albums
Genre
All Songs
Menu/Aux Audio Input
Due to the CD limitation of 99 tracks, the interface allows
the user to load up pages of 99 tracks which allows the user
to browse through the entire list of iPod tracks. There is no
limitation to the thousands of songs that can be paged.
Once the 99th track has been reached, the tag “[ Next
22. The next page
of 99 tracks can be uploaded by pressing and holding the
Track Forward button for 2 seconds.
PAGE 15
Using your vehicle’s steering
wheel controls
Audio CD – Changer
23ºC
CD List
Track/List
CD Name
Track Seq.
Scan
Traffic Programme
Mute
CD 1 Track 1
Audio CD – Changer
OPERATING THE IPOD
Dreams
Together We Are One
Suffer Well
Check On It (Beyonce)
There You Go
I’m Outta Love
CD 1 Track 1
Note: The CD track limitation on the Mercedes vehicles is
limited to 98
particular Mercedes vehicles.
Note: The BMW limitation is 250 tracks rather than 99 .
23.02.07
CD List
<< Exit Pre v >>
23ºC
Note: The double click method is only available on those
head units that support this functionality.
CD List
Is It Just Me?
Computer Camp Love
State of the Union
Irish Coffee
Deeper Water
Run Baby Run
Next Page >>
CD List
Track/List
CD Name
Track Seq.
Scan
Traffic Programme
Mute
23.02.07
Note: The head
unit may take
some time to
process the
information from
your iPod. Allow
around 5 seconds
for the head unit
to update the
track list display.
To go to the previous page, highlight track 1 which will be
displaying the tag “[ << Exit / Prev >>]” and press and hold
24.
the track forward button for 2
PAGE 16
It is always possible to exit a folder to the folder list from
any page by double clicking track back or press and hold
the track back button for 2 seconds on the tag “[ << Exit /
24.
Audio CD – Changer
CD List
<< Exit Pre v>>
CD List
Track/List
CD Name
Track Seq.
Scan
Traffic Programme
Mute
Dreams
Together We Are One
Suffer Well
Check On It (Beyonce)
There You Go
I’m Outta Love
23ºC
CD 1 Track 1
Audio CD – Changer
CD List
<< iPod
The Kill
Best Friend
Window Shopper
Rock Superstar
Love Like Winter
Not My Kinda Scene
23ºC
23.02.07
CD 1 Track 1
CD List
Track/List
CD Name
Track Seq.
Scan
Traffic Programme
Mute
23.02.07
Note: The head
unit may take
some time to
process the
information from
your iPod. Allow
around 5 seconds
for the head unit
to update the
track list display.
Basic Radio Control
For non-text display head-units
02 Mercedes Audio 20, Audio50
01) shows Playlists loaded as discs.
In this particular case playlist “DISC 1” is loaded.
03 BMW i-drive for non-mp 3 vehicles
Playlist setup
CD1
TRACK
RDM
RPT
1
SC
T
Without text display on the HU, it is not possible to
browse the iPod by folder. Instead the user can load up
select playlists. These playlists can be numbered “DISC 1”,
“DISC 2”,”DISC 3”,”DISC 4”,”DISC 5”. The sixth disc is reserved
for the Aux audio/Menu control.
only labelled a limited number of discs such as only DISC 1
and DISC 2, then the remaing discs will be loaded with
the iPod playlists.
The user can go track up/down via either sterring wheel
buttons or via the HU controls/idrive system.
PAGE 17
01 Porsche CDR23/24
BASIC RADIO CONTROL
Supported vehicles
Paging
Should the playlist contain more than 99 tracks, it is
possible for the user to move within the playlist to the
next list of 99 songs.
To do this, track 99 can be selected and the user can FFWD on
this track. When the next page of 99 tracks is loaded, the
The user can also “<<” FRWD on track 1to page back to the
previous 99
03).
CD
CD
CD 1
9
Track 1
CD 01-01
99
01 02
0
04
00:00
8
3
96
Set
9
98 9 01 0
99
03
PAGE 18
Track 99
CD 01-99
7
2
9
Set
CD 1
97
BASIC RADIO CONTROL
02) demonstrates track 99 on
which the user can FFWD “>>”.
00:14
Random/Repeat/Scan
To regain control of the iPod, FFWD “>>” on track 2 of Disc6
05).
All work as normal.
Disc 6 works as the Auxillary audio and Menu control.
To unlock the iPod for manual control, simply FFWD “>>”
on track 1
04).
TRACK
RDM
RPT
2
SC
T
To switch between the iPod audio and Aux audio, simply
06 ).
FFWD “>>” on track 3
CD6
TRACK
RPT
1
SC
TRACK
T
RDM
RPT
3
SC
T
PAGE 19
CD6
RDM
CD6
BASIC RADIO CONTROL
Disc 6 Aux audio / Menu
Warranty
Your iTronic audio interface is warranted against any manufacturing defects for a period of
12months from purchase. Any
part of the iTronic audio interface may be replaced or repaired at the discretion of the manufacturer after such part is
deemed to have a manufacturing fault.
If you have any questions about your iTronic audio interface, please contact your local service agent, whose details are
attached to the back page of this user instruction manual.
WARRANTY
FCC information
(for US customers only)
PAGE 20
This equipment has been tested and found to comply with
the limits for a Class B digital device, pursuant to Part 15
of the FCC Rules. These limits are designed to provide
reasonable protection against harmful interference in a
residential installation. This equipment generates, uses, and
can radiate radio frequency energy and, if not installed
and used in accordance with the instructions, may cause
harmful interference to radio communications. However,
there is no guarantee that interference will not occur in a
particular installation. If this equipment does cause harmful
interference to radio or television reception, which can be
determined by turning the equipment off and on, the user
is encouraged to try to correct the interface by one or more
of the following measures:
Reorient or relocate the receiving antenna
Increase the separation between the equipment
and receiver
Connect the equipment into an outlet on a circuit
different from that to which the receiver is connected
Consult the dealer or an experienced radio/TV
technician for help
Warning: Any changes
approved by ECP, LLC could void the user’s authority to
operate this equipment.