1
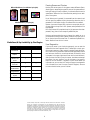
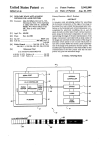
Tips and Tricks for ColorSpan Legacy
ColorMark Pro Print Server and RIPStation
TN2500C
Legal notices
© Copyright 2008 Hewlett-Packard Development Company, L.P.
Confidential computer software. Valid license from HP required for possession, use or copying. Consistent with
FAR 12.211 and 12.212, Commercial Computer Software, Computer Software Documentation, and Technical
Data for Commercial Items are licensed to the U.S. Government under vendor's standard commercial license.
The information contained herein is subject to change without notice. The only warranties for HP products and
services are set forth in the express warranty statements accompanying such products and services. Nothing
herein should be construed as constituting an additional warranty. HP shall not be liable for technical or editorial
errors or omissions contained herein.
Printed in the US
For additional technical support and user documentation please refer to: www.hp.com/go/graphicarts
CONTENTS
Executive Summary ................................................. 3
Printing ......................................................................... 7
Achieving the Fastest RIP Times
Disk Space and SCSI Drives
The ColorSpan Downloader
Image Quality and Output Resolution
Getting Around System Control ....................... 3
“Mousing Around”
Keyboard Shortcuts
System Control Roadmap
Ports
The 5 Different Ports
Using Routing/Port Configurations
Making Changes
Input Queues
Process
Output Queues
RipSaver™
External Drives
Printers
Color
Tips and Tricks ........................................................... 8
MediaSaver™/N-Up
Pausing Queues and Printers
User Dignostics
Appendix A ........................................................10
OTIS
Technical Problems?
Appendix B ........................................................11
Description of Supported Printers
......................................................................... 6
Color and Editing Files
Color Modes
EFIColor (Macintosh)
Photoshop - Monitor Settings
Screen Calibration
Appendix C ........................................................12
The Halon System
Appendix D ........................................................13
The Halon System
Color Matching ........................................................... 6
Photographic Images
Spot colors
Pantone vs. TRUMATCH
What Happens if I Select a Pantone Color?
TRUMATCH Poster
2
Executive Summary
Getting Around System Control
Getting Around System Control
“Mousing Around”
The interface is divided into five sections: Ports, Process, Output,
and Printers. Each section delineates part of the spooling - ripping
- printing process.
The mouse on your ColorMark Print Server includes two buttons.
Each of these buttons serves different purposes within the user
interface. Below are the mouse button conventions:
Ports - where data enters the system from the network.
Input - where incoming print data is spooled for processing
Process - where print data is processed for printing
Output - where processed data is stored/queued for printing
Printers - where print data is actually printed
Left button: This button ‘opens’ queue, rip, and printer icons to
see what document(s) reside in that location. One, quick click will
open a window showing the contents of that particular icon. The
left mouse button is also used to bring down the menus at the top
of the System Control Window (System, Preferences, and Help),
and to pull down the menus that correspond to the individual queue
icons. Be aware, however, that there will be a slight pause before
the system will display the menu for that icon. In addition, the left
mouse button is used to select documents in windows, data entry
fields, etc., as well as drag documents from one location to another.
A detailed discussion of the Sytem Control user interface begins
on page 3.
Color and Color Matching
• You should limit the number of color corrections you apply to an
image, and avoid making color mode changes.
• A calibrated color monitor will significantly help you anticipate
the colors of final printed output.
• Photographic images should be in the RGB color space, while
spot colors are best selected using CMYK process values.
• TRUMATCH is a better spot color selection guide for process printing
than Pantone.
Right button: This mouse button is used to bring down the queue
menus instantaneously. There will be no pause before the system
displays the menu as there is when the left button is used to bring
down these queue icon menus.
Keyboard Shortcuts
Below is a list of some useful keyboard shortcuts when navigating
the user interface on your ColorMark Print Server:
A discussion of Color and Color Matching begins on page 6.
Key
Function
Control-/
Select all (documents in a window)
Mouse Actions
Shift-click Add multiple, non-continuous documents to a
selection
Alt-drag
Add multiple, continuous documents to a selection
Control-drag When moving documents to different queues, makes
a copy in the destination location
Printing
• Files can be designed to minimize RIP time on the print server.
• Attaching external SCSI storage devices can speed RIP times.
• Use of ColorSpan Downloader can save time and processing on
both your workstation and the ColorMark Print Server.
A discussion of printing tips begins on page 7.
Document Details Window
Tips and Tricks
Double clicking on any document in any queue will bring up the
Document Details window which lists information about the file.
• MediaSaver allows you to interactively organize or nest multiple,
smaller documents onto a larger sheet, saving media.
• Pausing queues and printers allows you to stop certain processes
of the print server without shutting down the whole system.
• Diagnostics allow you to test your system for errors.
System Control Roadmap
Below and on the next page are diagrams of the System Control
(SysCon) User Interface, with a brief description of each section:
The Tips and Tricks discussion begins on page 8.
Within Queue Windows
This Tips and Tricks document is not a replacement for your Print
Server User Guide. You should also refer to the Tips and Tricks
document(s) that accompanies your ColorSpan printer(s). Those
documents will provide details on optimizing files for output on
those printers as well as the operation of the printers themselves.
All Tips and Tricks documents are available for ColorSpan’s web
site and OTIS, ColorSpan’s automated faxback service. See
Appendix A for information on accessing these services.
Close the
Window
Delete selected
document(s)
Resume Pause
(effects selected
jobs only)
View/change
Document MediaSaver™
Routing
Display
Display
Document On-Screen
Information Preview
Move Document
to top or bottom of
queue
Note: All icons/operations not available in all queues
3
System Control User Interface
Input (queues)
Process
Output (queues)
Jobs spooled from network
PostScript interpreter prepares RIP'ed print jobs are
are queued for RIP processing. print jobs for output on printer. queued for final output.
LaserLine No. 2502 v1.00
Copyright 1996 LaserMaster Corporation All rights reserved
System Control
Ports
This is where print data
from network workstations
spools into the print server.
Attention Queues
Alert you to problems in file(s)
prior to processing/printing.
Page 5 of 5
Tracking Log
Detailed information on system and
printer activity is stored by print job.
Information is exportable into tabdelimited text file on floppy disk.
Printers
The actual ouptut device(s)
connected to your server.
68.3% Free
2,049.3 MB
Ports
DiskDirect - This port allows the user to access PostScript print
files on the print server’s internal floppy drive or internal hard
drive. Be aware that it is not possible to access input files from the
CD-ROM or external drives. These files should be sent to the server
from your workstation using the ColorSpan Downloader (see ‘The
ColorSpan Downloader’, this document).
The Port icons reflect the network connections available on your
server, and each port will appear as a unique printer on your
network. The ports are divided into different types. There are ports
for Macintosh, Windows, TCP/IP, NetWare, and DiskDirect (see
diagram and brief description of each below). You can have several
ports of each type, limited by the type of server you own (see your
Print Server User Guide for the limit on your particular server).
Each port can be configured with default settings based on RIP
mode, media and ink selections, etc. It is possible to override these
settings by configuring the print job on your workstation, however.
You can also select a route that any jobs entering the system through
a particular port should take through the system. Be sure to check
your Print Server User Guide or on-line help for more information
on making port configuration changes. Finally, any of the network
ports can be paused. This action causes that port to be unavailable
to users on the network until the port is ‘resumed.’
Using Routing/Port Configurations
Since you can configure multiple ports for a single printer, you can
setup individual ports for individual users, priorities, and/or job
characteristics. For instance, let’s say you have three designers,
Joe, Bob, and Sally. You know that Sally always does the jobs with
the highest priority, so you will want to set up a port just for her
(you could even call it, “Sally”) that is routed through the highest
priority queues in the system. That way, Sally’s jobs will get
processed and printed first, followed by the jobs from the other
ports. Joe and Bob could also have respective ports to match their
needs, even though all three ports are actually routed to the same
printer. The flexibility of the port configuration and routing is
provided to allow you to customize the operation of your print
server to match the needs of your work environment. Some
experimentation may be needed to find the setup that works best
for you.
The 5 Different Ports
AppleTalk/EtherTalk - This port is used by Apple Macintosh
workstations, and will appear as PostScript printers in the
Macintosh Chooser.
WinLink - This port is used for printing across a Windows for
Workgroups, Windows95, or WindowsNT network. The print server
will be in a ColorSpan workgroup with a shared printer (or printers) matching the WinLink port name(s).
Making Changes
To make a change in the routing or configuration of a particular
port, click and hold the mouse button on the icon for the port you
wish to change until the menu for that icon appears, then make
the appropriate selection from the menu.
NetWare - This port is used for printing across Novell NetWare
3.11 or 3.12 networks. When properly configured, this port will
attach to Novell print servers via Novell’s IPX protocols.
TCP/IP - This port is used for printing across a TCP/IP network
from UNIX-based workstations.
4
media. To preview a RipSaver document, select the document, and
hit the monitor button at the top of the queue’s document window.
The system will then display an on-screen representation of the
RIP’ed file. The first time you select the on-screen preview for a
document, the system will have to create it for you—this can take a
few minutes for large RipSaver documents. Once the preview has
been created for a particular file, the system will display the preview
immediately without delay. Previews can be automatically created
in the RIP if you desire. See your Print Server User Guide for
details on creating previews in the RIP.
Input Queues
The Input queues are used to store and prioritze print jobs waiting
for the RIP process. The Input portion of the interface consists of
three queues, with fourth and fifth, special queues (Direct and
Attention). Jobs in the Priority queue will be processed by the
RIP first, followed by jobs in the Standard queue. The Direct queue
only appears on the interface during routing or direct printing,
and allows direct communication with the RIP without spooling
the print data to the server’s disk. The Direct queue takes priority
over all of the other input queues. Jobs in the Hold queue, however,
will remain there until you move the job to the Standard or Priority
queue. The Attention queue will only appear when there is a problem
with the configuration of the spooled data. When you view the
document in the Attention queue window, the system will give you
a message regarding the error condition.
In addition to on-screen previews, documents in the Output queues
can be configured with MediaSaver/N-up which allows you to
interactively organize, or nest, multiple documents into a single
print job. See MediaSaver/N-up, this document, for more
information on using these features.
While jobs are in the Input queues, you can check and change the
job characteristics and/or routing of any of the jobs. You can also
change the priority of a job by moving it to the top (or bottom) of
a queue, or by moving it to another queue. To move a job, drag it
to the icon of the queue you wish to move it to. To move a job to
the top or bottom of a queue, select the job and click on the up or
down arrow at the top of the window, respectively. A single click
on a queue’s icon will open a window with a list of the jobs in that
queue. See your print server user guide for more information on
these queues and manipulating documents within these queues.
RipSaver. The RipSaver Temporary and RipSaver Permanent queues
store the RIP’ed files for printing (or re-printing) at a later time. As
the names imply, files in the Temporary queue will be stored until
the system needs drive space to process incoming print jobs, while
jobs in the Permanent queue can only be deleted by the user. Files
deleted from the Temporary queue by the system will be deleted in
order from the oldest to the youngest files. RipSaver documents
can be printed by dragging the job to either the Standard or Priority
Output queue.
External Drives. Your ColorMark Print Server supports a variety
of external hard drives in addition to removable storage media.
Refer to your Print Server User Guide for a list of supported devices
and attaching these to your particular print server. External drives
are intended for permanent storage of RipSaver documents only,
and are displayed in the SysCon interface under the Output heading.
Hard drives or removable media can be transported to another
ColorMark Print Server for output from that server.
Process
The Process column of the SysCon Interface contains the RIP and
the Tracking Log. The RIP (Raster Image Process) converts print
jobs from their PostScript-language description to a raster (bitmap)
for the print engine. The RIP icon will turn green and display a
completion percentage when it is active. Due to the complex nature
of PostScript, the percentage numbers may pause occassionally—
this is normal. The Tracking Log stores information of all jobs
spooled, processed, printed, deleted, etc. by the system.
Printers
The information within the Tracking Log is exportable to a tabdelimited text file for importation into spreadsheet or database
applications. The Tracking Log tracks ink/media usage, RIP time,
print time, user, printer, media type, etc. for each job. For
information on RIP configuration, or exporting Tracking Log data,
refer to your Print Server User Guide.
Your ColorMark Print Server supports a variety of possible output
devices, but is limited by the type of server you own. RipStation
servers are limited to a single type of output device, but may support
more than one of that type of printer. ColorMark Pro print servers,
on the other hand, can support multiple, different printers from
the single server. See Appendix C, Description of Supported
Printers, for more information on the printers that your print server
can support.
Output Queues
Regardless of the type of printer(s) you have attached to your print
server, there are several configurations that can be made at the
printer icon in the user interface. Most printers can be configured
with media and/or ink type, while others can be configured to
automatically cut after every job, and other configurations based
on the type of printer you are configuring. Refer to your Print
Server User Guide or Printer Manual for more information on the
configuration of your particular printer(s). Finally, the menu for
the color printer icons contains an item called ‘Calibrate...’ Selecting
this menu item allows you to color calibrate your printer with the
ColorMark Calibrator. Color calibration is an extremely important
step in getting consistent color from your printer/print server, and
should be performed often. Refer to your Print Server User Guide,
Printer Manual, and/or Tips and Tricks for your printer for
information on color calibrating your printer.
The Output queues consist of the same three primary queues that
make up the Input queues—Priority, Standard, and Hold. The
Output queue section of the interface also contains RipSaver
Temporary and RipSaver Permanent queues. An Attention queue
also appears when a job is incorrectly configured for a particular
output device (most commonly the media type in the job
configuration not matching the media installed on the printer).
The Output queues function the same way as the Input queues—
jobs are stored, in their RIP’ed form in this case, and prioritized
for the printer(s) attached to the system. Additionally, files in the
Output queues can be previewed on-screen prior to printing to
catch errors in file setup prior to commiting the file to ink and
5
Screen Calibration
Color
In order to print colors that match those on your monitor, calibrate
your monitor using a reputable monitor calibrator. Select the profile
that matches your monitor type. If your monitor is not listed, contact
the manufacturer for more information. Calibrating your monitor
will provide a much more consistent display of the colors in your
files, which will provide you a much better anticipation of what a
particular file will look like when printed.
Color and Editing Files
Every time you modify a file in an image-editing application like
Photoshop, you lose information which can cause color shifts. It is
best to do all of your color correction on an image in as few steps
as possible. If you need to do significant color correction to a scan,
apply your edits to a copy of the scan—that way you can ‘start over’
if you are unable to achieve satisfactory results after the first couple
of edits.
The environment in which you work can also affect the accuracy of
the colors you see on your monitor. For optimum viewing, the
lighting in your work space should be 5000 Kelvin.
Color Modes
When creating files for output on a printer connected to your
ColorMark print server, you may unknowingly perform tasks that
will affect the accurate reproduction of the colors you originally
chose. Switching between color modes of photographic images is
one area where users frequently degrade the color quality of their
images. To prevent color degradation and color shifts, always save
your images in the same color mode in which they were scanned.
For example, if you scan something on an RGB scanner, save the
image in RGB mode—not CMYK. Also, do not switch between color
modes when working with images in your applications. Each time
you switch between RGB and CMYK, your image loses color
information which can cause unpredictable color shifts. RGB is
the preferred color space for photographic images (see ‘Color
Matching,’ this document).
Color Matching
Photographic Images
The best color match from photographic images is provided by the
RGB color space. The ColorMark Color Management system is
specifically designed to match the RGB colors of a calibrated
monitor. In addition, images in RGB color space are 25% smaller
than images in CMYK space, making them easier to work with on
your workstation and faster to process and print.
Spot Colors
When selecting spot colors be sure to use the CMYK color space.
Most applications convert RGB spot color selections to CMYK
during the printing process, and generally do a relatively poor job
of converting those RGB spot colors to CMYK. So, when designing
artwork in Illustrator, Freehand, or just selecting colors in a page
layout application (Quark XPress or PageMaker, for example), select
spot colors as CMYK, not RGB. You may also select a spot color
from a swatch book, such as Pantone or TRUMATCH (see discussion
of Pantone vs. TRUMATCH, below).
EFICOLOR (Macintosh)
For accurate color matching, go to your System folder and remove
the EFICOLOR Processor file and the EFICOLOR DB folder and
place them in a temporary folder outside the System. You may also
use an extension manager to disable the EFICOLOR Processor
file. Also, be sure to remove the EFICOLOR XTension from the
QuarkXPress folder and place it in the temporary folder. (Simply
turning EFICOLOR off is not sufficient.) Restart your computer.
EFICOLOR is a rudimentary color management system for files
destined to printers with little or no color management. EFICOLOR,
therefore, can help the color reproduction of those printers. On
printers with sophisticated color management such as those driven
by ColorMark print servers, EFICOLOR actually interferes with
accurate color reproduction.
Pantone vs. TRUMATCH
Pantone and TRUMATCH are two common color selection models.
Pantone has been around for a long time, and most designers are
familiar with the Pantone swatch books and color selection systems.
TRUMATCH, however, is a relatively new player, but in many ways is a
better choice for the digital designer.
Pantone spot color selection corresponds to specific pure ink colors
that are used in offset printing. The user selects a specific Pantone
number for a spot color, and gives that number to his printer. This
process therefore works ideally with offset printing, where a
particular Pantone ink can be used. In four-color process work,
however, Pantone color selection creates many problems. First,
about 60% of Pantone spot colors are out of the gamut of CMYK
devices, and typically do not print very close to the desired color.
Evidence of this can be seen in the Process Color Imaging Guide,
available from Pantone. Comparison of a Pantone color against its
process equivalent will illustrate the problems involved with using
a CMYK printer to reproduce Pantone colors.
Photoshop—Monitor Settings
When printing files directly from Photoshop (which you probably
shouldn’t be doing anyway—see “ColorSpan Downloader,” this
document), you will get the most consistent color output when
your monitor is configured to certain settings. To change your
monitor settings, go to File and pull down to Preferences (Color
Settings in Photoshop 4.0) and across to Monitor Setup. No matter
what type of monitor you have or what environment you’re in, use
the following settings. For Monitor, choose Apple 13-inch RGB
(Macintosh) or Default (PC). For Monitor Parameters, set Gamma
at 1.80, White Point at 6500 degrees Kelvin, Phosphors to Trinitron,
and Ambient Light to Normal.
The TRUMATCH system, on the other hand, was designed specifically
with CMYK printers in mind. The color swatches are organized in
a logical sequence for designing in four colors, and each color gets
a TRUMATCH designation as well as the percentages of Cyan, Magenta,
6
Yellow, and Black needed to reproduce that color. Consequently,
all TRUMATCH spot colors are reproducible by CMYK printers.
file RIPing. Do not allow the remaining hard disk space to
drop below 300MB. If you commonly produce files larger than
50MB, complex files, or if you store numerous RIPSaver
documents, consider adding an external SCSI hard disk to the
ColorMark print server. This can substantially reduce RIP times
for large, complex jobs. (See “Disk Space and SCSI Drives,”
below.)
Since the TRUMATCH system was specifically designed for CMYK
printers, ColorSpan has built TRUMATCH support into the ColorMark
Color Management System. Users can specify a TRUMATCH color,
and count on getting that color from their printer(s). All major
applications support both systems, so choosing a TRUMATCH color is
just as easy as selecting a Pantone spot color.
4)
Increasing the resolution of your images can unnecessarily
increase RIP times. A higher resolution would offer little
improvement in output quality and would produce a larger
than needed file which wastes storage space and lengthens
RIP and spool times. See “Image Quality and Output
Resolution”, below, for recommendations on output size and
resolution.
5)
Interpolation and sharpening filters allow you to enlarge lowresolution files without pixelization. However, they increase
RIP times, sometimes significantly.
6)
Disabling the option to create a preview of a RIPed image will
decrease the amount of time it takes the ColorMark print server
to prepare the file for printing. This is done from the System
Control menu under Preferences. Even though the option is
disabled, when Preview is selected in an output queue, the
ColorMark print server can still create one for you.
What happens if I select a Pantone color?
Applications that support Pantone color selections, when sending
a print job to a CMYK print device, send the process equivalents as
stated in the Process Color Imaging Guide. Consequently, if you
print a job with Pantone spot color specifications, those colors will
print as their process equivalents, not the Pantone spot color. By
selecting TRUMATCH colors, however, you are assured that you will
get the color you specified, not an ‘equivalent.’
TRUMATCH Poster
Two TRUMATCH color selection posters are available by printing
TRUMTCH1.PS and TRUMTCH2.PS from Disk Direct on your print
server. To print these posters, route the Disk Direct port to the
desired printer, click on the Disk Direct icon once with the left
mouse button, select one of the TRUMATCH posters, and click ‘OK.’
Each poster is approximately E/A0 size (36 x 48 inches), and contain
all of the possible TRUMATCH color selections. A TRUMATCH poster is
available for DisplayMaker Pro, DisplayMaker Express, and
DesignWinder. A Trumatch color swatch print is also available for
Halon. This document for the color copier(s) prints as 23 lettersize pages.
Disk Space and SCSI Drives
Large page sizes with large, complex images such as TIFFs, require
such an enormous amount of memory to RIP that the ColorMark
print server compresses the image and writes part of the file to the
hard disk. If the hard disk has insufficient free space because of
fonts or RIP Saved files, the ColorMark print server must keep the
page in memory and use a slower compression routine. Generally,
you should always have at least 300MB or more of hard disk space
free on the ColorMark print server.
Printing
Achieving the Fastest RIP Times
There are a variety of factors that can affect RIP times. PostScript
can repeat small sections of code numerous times, increasing the
RIP time of a relatively small file. Below is a list of items that
increase RIP times. Avoid them and you will achieve faster
processing and throughput of your files.
1)
An external SCSI hard drive will increase the ColorMark print
server’s disk capacity, allowing larger files to be RIPed more quickly.
It also allows you to store more RIP Saved jobs, spooled jobs, and
additional fonts. Refer to your Print Server User Guide for more
information on attaching external SCSI devices.
RIP times increase when the printer is active or when the
ColorMark print server is multi-tasking. For example, spooling
a file while the ColorMark print server is RIPing and printing
other files will increase the RIP time.
2)
The ColorMark print server’s virtual memory (VM) should be
set to 5MB. Higher settings can increase RIP times. You should
only increase the VM if a VM error occurs, and it should rarely
need to be set to more than 8MB. To check or change your
setting, click and hold on the RIP icon and pull down to
Configure. Type a value in the VM box, then click on the restart
button. (This restarts the RIP only, not the entire system.)
Changes made to this window will not take affect until the
RIP is restarted.
3)
Do not print when ColorMark print server has insufficient disk
space. This is the primary cause of poor performance for large
The ColorSpan Downloader
The CSDownloader is one of the best features of the ColorSpan
print server printing tools. This is an application that allows you to
download tiff, PhotoCD, and PostScript print files directly to the
printer. The application lets you resize and rotate tiffs and PhotoCD
images, and even contains some rudimentary page placement
features. For all supported file types, you are able to select RIP
mode, media type, sharpening, and PS interpolation for that
download. You can even set up a list of files of various types to be
downloaded. The beauty of the downloader is twofold: 1) it will
run in the background quite painlessly—you’ll hardly notice that it
is working behind the scenes when you are working on something
else in the foreground, and 2) the RIP of tiffs or PhotoCD images
is dramatically faster than printing directly from an application.
You can even print to the same (or different) printer in the
7
foreground while the downloader is downloading in the background!
Use of the downloader application can increase productivity
dramatically. By downloading tiff and PhotoCD images, you can
save the significant amounts of time that Photoshop (or other image
editing program) would normally take on your workstation to
process the information and send it to the print server.
Consequently, use of the LMDownloader maximizes your
productivity by allowing you to send one file to the printer in the
background, while editing or even scanning the next image in the
foreground.
Tips and Tricks
MediaSaver/N-Up
MediaSaver is a feature that allows you to interactively organize or
“nest” multiple, smaller print jobs onto one, larger sheet (see
illustration below). For instance, you could print up to 16 letter size
documents onto one E/AO-size (36 x 48 inch) sheet. MediaSaver is
available on most of the ColorSpan printers (see table, next page).
N-up, on the other hand, is designed to print multiple copies of the
same RipSaver document on a single, larger sheet. MediaSaver can
also allow you to print multiple copies of a single, smaller document
onto a larger sheet (as with N-up) for those printers that do not
directly support N-up.
The CSDownloader also allows you to save media over printing
from certain applications such as Photoshop. The ‘Conserve Media’
button in the downloader’s window tells the print server to use a
paper size that is the same size as the final printed image, saving
media both before and after the job. In Photoshop, you typically
need to pick a paper size that is larger than your desired printed
image. Photoshop then centers the image within the paper size
you have selected, often wasting significant amounts of media. You
can also choose to rotate some images so that their printed
orientation will use the least amount of media off of the roll. While
few people enjoy learning new programs, the CSDownloader is
worth the effort in the amount of time and media that can be saved
through its use. Detailed instructions on using the CSDownloader
is available in your Printing Tools Manual, and on-line by selecting
‘Help’.
To activate MediaSaver, route the jobs you want printed together
into one of the RIPSaver queues (temporary or one of the permanent
queues). Then shift-click on those jobs and hit the MediaSaver button
( ) at the top of the RipSaver document window. The ColorMark
print server will then try to organize all of the jobs together onto
one sheet (if possible). Jobs that cannot fit on the page will be placed
onto the desktop work area. If you do not like the placement of the
jobs on the sheet, you may interactively move them around by
clicking on a document and dragging it to the desired location. You
can change the default space between images by selecting “Gutter
Width” from the menu at the top of the MediaSaver window.
Once you have organized the printout, you may give the MediaSaver
job a name, and save it by selecting ‘Save and Exit’ from the menu
at the top of the MediaSaver window. Once you have saved the
MediaSaver document, you may delete the individual RipSaver
documents if you desire, however you will not be able to reprint the
documents individually.
Image Quality and Output Resolution
A detailed primer on scanning, image quality, and resolution is
available in the Tips and Tricks document for your printer(s). Please
refer to that document for details on getting the highest quality
images from your output device(s). Below is a table that provides a
quick reference of the recommended image resolution for optimum
quality from each of the supported devices on your ColorMark
Print Server:
N-up allows you to print multiple copies of the same image on a
single, larger sheet. To activate N-up, open the document information
window, enter the number of copies you desire, and hit the ‘N-up’
button. You will then be allowed to enter your desired space between
images (default is 1 inch/2.54 cm). Finally, click ‘OK’ until you have
exited the document information window. The thumbnail icon will
show three small white boxes over the image indicating that the
document is configured for N-up printing. When this document is
printed, the system will automatically fit as many copies across the
page as it can, and repeat the N-up print until all copies have been
printed.
Optimum Output Resolution for Images by Device
Device
Resolution
(dpi)
DisplayMaker
Professional
75 to 150
DisplayMaker
Express
50 to 100
DisplayMaker
HiRes 8-Color
Series
150 to 200
DisplayMaker
Series XII
200 to 300
Giclée
PrintMakerFA
200 to 300
DesignWinder
150 to 200
Halon/Color
Copier
150 to 200
PressMate
*
Printing multiple copies of a single RipSaver document with Media
Saver works in the same manner as other MediaSaver documents.
In this case, however, select the single document you want printed,
hit the media saver button and proceed as in the above example. Be
sure to select the number of copies you desire in the document
information window before configuring the document for
MediaSaver.
*output resolution on PressMate is dependent on desired line screen,
halftoning method, and other variables. See PressMate Tips and Tricks for
details.
8
Pausing Queues and Printers
Without MediaSaver (four individual print jobs):
Pausing the various parts of the system creates different effects,
allowing you to essentially stop specific parts of the system without
having to unplug it from the network, or otherwise shut the entire
system down. Below is a list of the effect that pausing has on each
part of the system.
Ports When a port is paused, it is removed from the network, and
will not spool any additional jobs. Jobs spooling when the port is
paused will finish before the port is removed from the network.
Queues (Input and Output) Will continue to accept jobs, but will
not pass them to the printer or RIP. Queues, when paused, act like
Hold queues.
RIP and Printers Will complete the print job/process active when
paused (if any), but will not accept any additional jobs.
With MediaSaver (one print job):
Pausing a printer would allow you to change inks, media, etc. on a
printer without having to worry about the server trying to print a
job on that printer at the same time. To reactivate a paused icon,
select ‘Resume’ from the icon’s menu.
MediaSaver/N-Up Availability by Print Engine
User Diagnostics
Print Engine
MediaSaver
N-Up
DisplayMaker
Professional
✓
✓
DisplayMaker
Express
✓
✓
DisplayMaker
HiRes 8-Color
Series
✓
✓
DisplayMaker
Series XII
✓
✓
Giclée
PrintMakerFA
✓
DesignWinder
✓
If your print server is not functioning properly, you can test the
system with the User Diagnostic Disk. It allows you to check your
print server’s memory, video, network interfaces, hard disk drive,
SCSI, serial circuitry, and Halon Interface (when applicable). Before
use, make sure the disk is not write protected. (On the disk, there
is a square in the upper right hand corner which should be black.)
After you insert the disk in your print server, shut down and restart
the system. You can choose to run all the tests or just specific
tests. You will be alerted if a problem is found. Write down the
information so you can relay it to Technical Support (see Appendix
A for information on how to contact Technical Support). Be sure
to remove the disk when you are finished.
Halon/Color
Copier
PressMate-FS
© 1999 ColorSpan Corporation, 7090 Shady Oak Road, Eden Prairie, MN 55344. ColorSpan
Europe, Ltd., Hoofddorp, The Netherlands, (31) 25 5622000. Big Color, Big Ink, RIP Saver,
DisplayMaker, ColorMark, and PressMate are registered trademarks; SmoothTone, Single RIP
Architecture, DesignWinder, and the ColorSpan logo are trademarks of ColorSpan Corporation.
PostScript is a trademark of Adobe Systems, Inc. This product incorporates the PowerPage
interpreter from Pipeline Associates, Inc.—Corel Optimized. All other product or brand names
are marks of their respective holders. Specifications subject to change without notice. Subject to
patents pending and issued in the USA and internationally. 6/99
9
Appendix B
Description of Supported Printers
DisplayMaker® HiRes 8-color Series - Produce huge 72” wide prints for banners, murals, signs, transportation graphics,
tradeshow images and more! Or quickly gang together smaller-format prints to take full advantage of media size.
Output speed is up to 28.5 square feet/hour in HIGH-QUALITY, apparent 1200-dpi mode, and at up to 57.0 square
feet/hour in HIGH-SPEED mode. Uses 8-printhead design and multi-density inks for continuous-tone, apparent 1200dpi image resolution with super-vibrant colors and subtle gradations. The DisplayMaker HiRes 8-color Series Printers
offer a variety of different printing modes and ink options for optimal speed and quality. The printer contains advanced
unattended printing features including built-in dryer, humidity sensor and motorized take-up spool. A built-in color
camera provides automation of many printing functions critical for quality including: AutoSet™ cartridge calibration
and AutoJet™ cartridge analysis and compensation.
DisplayMaker® Series XII- New 12-printhead design allows you to print wide-format images with a unique advantage:
speed without sacrificing quality! Print at speeds up to 240 square feet per hour and apparent resolutions up 1800-dpi.
The radical 12-printhead design sets the stage for countless color possibilities. Through multiple print mode options,
Gamut+ Variable Mode Printing empowers you with the ability to quickly reconfigure color settings. The DisplayMaker
Series XII takes the developments of the DisplayMaker HiRes 8-color Series to a new level of sophistication, power,
dependability, and productivity.
Giclée PrintMakerFA™ - ColorSpan’s PrintMaker digital color printer is a high-precision, drum-based Big Color inkjet
printer that utilizes a revolutionary eight-print-head design, 600-dpi print-heads, and lightfast dye inks to produce up
to E/A0 size (36 x 48 inch) digital fine art reproductions. PrintMaker produces the highest quality prints (apparent
1800-dpi) of any digital digital printer on the market. With Endura•Chrome™ lightfast dye inks, the prints produced by
PrintMaker will last for many generations in indoor settings and displays.
DesignWinder™ - ColorSpan’s DesignWinder digital color printer is a high-precision, drum-based Big Color inkjet
printer that utilizes a revolutionary eight-print-head design to produce high quality up to E/A0 size (36 x 48 inch)
signs, photos, and digital art. The DesignWinder features a ColorSpan-designed and manufactured print engine and
patent-pending inkjet technology to produce high-quality photographic images up to 36-inches wide by over 47inches long. Using ColorMark dye-based or pigmented Big Ink packs, the DesignWinder can produce an E/A0 size
print in under 5 minutes in high speed mode. For a high-quality, continuous tone image, DesignWinder uses ColorSpan
Wide Gamut multi-density inks to produce an image with an apparent 1200 dpi resolution in as little as 15 minutes.
DisplayMaker Express - DisplayMaker Express combines the speed of an electrostatic plotter with the quality of an
inkjet printer, and features a ColorSpan-designed and manufactured print engine that produces photographic-quality
images up to 54-inches wide by almost any length on a variety of substrates. It prints up to ten times faster than
aqueous ink-jet printers. With dramatically faster printing speeds, output service providers can now profitably produce
high-volume print runs while offering their customers volume discounts without the mess or expense of the hazardous
chemicals used by electrostatic plotters. Because DisplayMaker Express uses solid, pigmented inks rather than the
dye-based inks used by aqueous ink-jet printers, DisplayMaker Express prints are waterfast and more resistant to UV
light fading. ColorSpan's phase-change printing technology uses four solid color inks -- cyan, magenta, yellow, and
black -- that users can refill “on-the-fly,” even while printing.
PressMate®-FS - PressMate-FS is an extraordinary advancement in desktop printing technology. Featuring ColorSpan’s
patented ThermalRes technology, PressMate-FS produces up to 12x26-inch film positives and film negatives without
chemicals and without a darkroom. With a typical UV DMax of 3.5, heat-activated ThermalRes film does not require
exposure modifications to the traditional plate-burning process used by most prepress operations. This technology
produces 2400x2400 ThermalRes text and line art with SmoothTone and traditional halftone screens and tints up to
133 lpi.
Halon® - Transform your standard color laser copier into a high-quality, high-performance digital color printer. The
combined power of ColorSpan’s ColorMark® Pro Print Server and the Halon Interface lets you produce full-color,
400-dpi photo-realistic originals for presentation materials, mock-ups, t-shirt transfers, and more.
DisplayMaker® Professional - The DisplayMaker Professional is a four-color ink-jet printer that produces digital color
output up to 36-inches wide and up to 50-feet long that’s ideal for posters, displays, banners, backlit signs, and more.
Using ColorSpan’s proprietary ColorMark Color Management and SmoothTone image enhancement technologies,
the DisplayMaker Professional produces beautiful, photo-realistic large format output. ColorSpan’s patented Big Ink
Delivery System increases the ink capacity and productivity of the DisplayMaker Professional, while decreasing ink
costs. With one set of dye-based or pigmented Big Ink packs, you can print more than 250 representative 2x3-foot
full-coverage images for indoor or outdoor applications.
Refer to your server user manual for more information on the number and type of printer(s) your server supports.
* Each RIPStation supports only one type of output device (i.e. RIPStation for DisplayMaker Professional only supports up to two
DisplayMaker Professionals). There are models that drive each of the supported output devices. ColorMark Pro print servers will
drive any of the supported print engines concurrently. Refer to your Print Server User Guide for recommended configurations.
11
Appendix C
The Halon System
Optional Halon Interfaces provide digital connectivity for up to two color laser copiers (one interface for
each copier). Comparable in speed to other dedicated PostScript RIPs, the Halon System consists of the
ColorMark Pro, a high-speed controller that is placed in ColorMark Pro, and a cable that connects ColorMark
Pro to your color laser copier(s).
Supported color laser copiers include the following models equipped with a digital interface: Canon CLC,
Kodak, and Xerox. Also, Xerox MajestiK and Regal models must be equipped with an optional interface unit
(IFU) port kit available from Xerox. For more information, contact your ColorSpan representative. Please
specify what type of copier you have.
Special Note for the Canon CLC 300
Follow the steps below to configure your Canon CLC 300 before using it in conjunction with the Halon
Interface. Failure to follow these steps results in two-color output anytime two or more copies is specified.
1)
Press the * key and release it.
2)
Simultaneously press the left and right arrow keys and release them.
3)
Press the * key again.
4)
Use the arrow keys to select Option from the LCD menu and press OK.
5)
Use the arrow keys to select Option2 and press OK.
6)
Use the arrow keys to change PS-Type and remote to 0.
7)
Press the reset key to end.
Using a single Halon Interface with Multiple Copiers
If you have Canon and Kodak color laser copiers, but only one Halon Interface, you can safely move the
Halon cable between the two. (You cannot switch the cable from Canon/Kodak to Xerox copiers.) Follow
the steps below:
1)
Wait until the connected copier is idle.
2)
Unplug the Halon cable from the copier and wait (about 10 seconds) until the Color Copier icon on
the System Control monitor turns red.
3)
Plug the Halon cable into the second copier. When the Color Copier icon on the System Control
monitor turns gray, the process is complete. You can start printing to the new copier immediately.
12
Appendix D
ColorMark+ Advanced Color Management System
Here is your freedom to drive the quality, control and creativity of your color management. ColorMark+
Advanced Color Management System is the tool to enhance your digital color productivity.
This advanced software provides digital color professionals with the next level of color control in the ColorMark
Color Management System, available for ColorSpan ColorMark Pro and RIPStation™ print servers 200 MHz
and faster.
For use with the following ColorSpan printers:
* DisplayMaker® Series XII
* DisplayMaker HiRes 8-Color Series
* Giclée PrintMakerFA™
ColorMark+ increases productivity through:
1. ICC and ColorMark color profile creation: ColorMark+ works interactively with you to profile a unique
media and ink combination. Color swatches are printed and then measured with digital accuracy. Use the
Automation Eye (DisplayMaker Series XII only), ColorMark Calibrator (DisplayMaker HiRes 8-Color Series,
Giclée PrintMakerFA) or optional X-Rite DTP-41 strip reader for maximum productivity.
2. Support ICC: Allows users to utilize industry-standard ICC color profiles thoughout the entire process,
from scanner to workstation to printer.
3. Adjust image color post-RIP: Permits color adjustments to image brightness, contrast, saturations and
hue, plus color balance in the highlights, midtones and shadows of RIPped files. No longer do you need to
go back to the original image editing application to make color adjustments. With the easy-to-follow user
interface, you can make color adjustments such as brightness, contrast and color balance on the print server.
Why Use ColorMark+?
*
*
*
*
*
*
Extends your color management capabilities
Increases productivity and minimizes remakes
Builds custom profiles for specialty media applications
Compliments existing ColorMark workflow
Compatible with ICC-standard workflow
Allows manipulation of colors post-RIP
Push the Boundaries of Color
With the ability to match, manipulate and create custom colors, the boundaries have been lifted. You now
have freedom to expand your ColorMark system. Contact a ColorSpan Representative at 1-877-BIG-COLOR
for more information on ColorMark+.
13