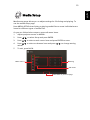
1
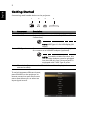
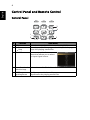
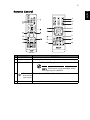
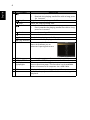
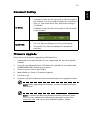
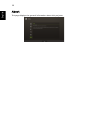
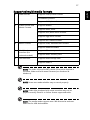
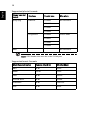
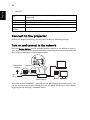
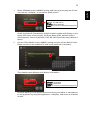
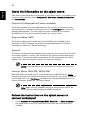
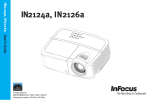
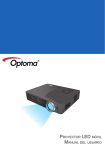
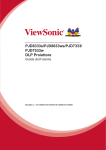
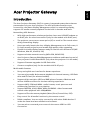
1
Introduction
The Acer Projector Gateway (APG) is a smart, integrated system that enhances
presentations via your Acer projector. The APG provides versatile source
connectivity, the latest eDisplay Management tools for networking display,
supports for media contents playback via the built-in decoder and more.
Networking APG features
•
With high-performance wireless projection via an acer USB WiFi adapter or
an RJ-45 port for wired connections (only for the models with RJ-45 port).
•
The projector can act as an access point (AP) or work in Client mode when
doing networking display.
•
Users can easily launch the Acer eDisplay Management to do Full screen, L/
R, 4-split screen projection and enable high quality video streaming.
•
Powerful wireless display features ready for devices with different OS (MS
Windows, Mac OS, Android, iOS)
•
Supports wireless network security (WPA-PSK, WPA2-PSK).
•
Acer Projector Gateway Web Management enables a web-based control of
Acer projector for Windows NB/PC (only when the projector is in AP mode).
•
Supports firmware upgrade via USB flash drive.
•
Crestron compliant (only for the models with RJ-45 port).
Multi-media features
•
Fancy and stylish user interface for better experience.
•
You can enjoy media & documents playback via internal memory, USB flash
drive and SD card (for selected models).
•
Supports high resolution JPEG and BMP picture formats, slideshow and
various slideshow effects for the best viewing experience.
•
Supports MP3, PCM and WMA...audio formats, music spectrum and
random play function for your pleasing.
•
Supports MPEG4, H.264, WMV, MKV and RMVB...video formats and
smooth video playback with 1080p@30Hz.
•
Supports office documents playback (Word, Excel, PowerPoint, PDF).
•
Easy control for all media functions by the remote control.
•
DLNA compliant. You can enjoy connectivity with other DLNA devices if
under the same local area network environment.
•
You can mirror or extend your screen via the source USB B or USB
Connection.
English
Acer Projector Gateway
English
2
Getting Started
Connecting multi-media device to the projector
1
2
3
4
USB B
#
Component
Description
1
LAN port
Connects to an Ethernet 10/100-based network.
2
Mini USB
Projects NB/PC screen via mini USB (USB B or USB
Connection).
NOTE: USB Type A is for USB display (K1
series).
3
USB Type A
Connects to USB flash drive for multimedia playback.
Or connects to a USB WiFi adapter (optional).
NOTE: To enable wireless function, the
USB Wireless Adaptor must be plugged
into the USB A1 port if the projector is
equipped with 2 USB Type A ports.
4
SD card slot (for
selected models)
Insert the SD card for multimedia playback.
To switch between different inputs,
press SOURCE on the projector or
remote control to open the Source
menu that allows you to select an
input signal source.
3
Changes may be made periodically to the information in this publication
without obligation to notify any person of such revisions or changes.
Such changes will be incorporated in new editions of this manual or
supplementary documents and publications.
This company makes no representations or warranties, either expressed or
implied, with respect to the contents hereof and specifically disclaims the
implied warranties of merchantability or fitness for a particular purpose.
English
Copyright © 2013. Acer Incorporated.
All Rights Reserved.
English
4
Control Panel and Remote Control
Control Panel
3
4
1
5
2
#
Function
Description
1
MENU
Launches the projector Onscreen Display (OSD) menu.
2
BACK
Stop
Cancels your selection, or goes back to previous page.
Stops the playing media files.
3
SOURCE
Press to open the Source
menu that allows you to select
an input signal source.
4
Four directional
selection keys
Selects the media files in four directions.
5
ENTER
Play/Pause
Confirms your selection of items.
Plays/Pauses the playing media files.
5
11
12
8
9
10
#
1
Function
ENTER
Description
Confirms your selection of items.
2
BACK
Cancels your selection, or goes back to previous page.
3
MEDIA HOME
Goes to MEDIA HOME page.
NOTE: This button is only available when
the input signal is MEDIA.
4
5
Selects the media files in four directions.
Four
directional
select pad
VOL +/-
Increases/decreases the volume.
English
Remote Control
English
6
#
Function
6
Description
Rewind
•
•
Play/Pause
Plays/Pauses the playing media files.
Stop
Stops the playing media files.
Fast-forward •
•
Goes to the previous file.
Rewinds the playing media files with a long press
for 1 second.
Goes to the next file.
Fast-forwards the playing media files with a long
press for 1 second.
Previous
Goes to the previous file.
Next
Goes to the next file.
Rewind
Rewinds the playing media files.
Fast-forward Fast-forwards the playing media files.
7
SOURCE
Press to open the Source
menu that allows you to
select an input signal source.
8
MENU
Launches the projector Onscreen Display (OSD) menu.
9
MEDIA SETUP
10 PAGE ^/v
PgUp/PgDn
Opens MEDIA SETUP page.
For computer mode only. Use the button to select the
next or previous page. This function is only available
when connected to a computer via a USB cable.
11 INFO
Displays information of the selected file.
12 A/a
Launches the projector OSD subtitle menu during video
playback.
7
English
Media Mode
Main Home page
Main features
Content
sources
This mode allows you to browse media files stored in different devices, such as
RAM (internal memory), USB flash drive, USB hard drive and SD card (for
selected models) when connected to the projector. No matter where you are,
you can always press MEDIA HOME to go back to MEDIA HOME page.
Adjust projector source to MEDIA.
NOTE: Document mode is an optional function.
NOTE: Supported capacity for USB flash drive: up to USB 3.0 64GB,
for USB hard drive: up to 1TB.
NOTE: Supported capacity for SD/SDHC/MicroSD: up to 64GB Class
2-10.
NOTE: Some external USB hard drives may not be supported due
to lack of USB power.
NOTE: Disks with partitions are not supported.
English
8
Music
When viewing music files
Title image/
source
Total
events/
files
Sidebar
Thumbnail
sorting
Goes back to previous page
Goes to the Music Setting in the
Media Setup page
You can press the four directional selection keys to select the album and press
ENTER to access. To use the sidebar, press
repeatedly until it displays and you
can browse files by albums/artists/genres/songs.
When playing music
Song
information
Control bar
Music playback
status
Goes back to previous page
Goes to the Music Setting in the
Media Setup page
You can press
/
to adjust the volume. To select the backward/forward
speed, press the Rewind/Fast-forward key repeatedly. For details on the Music
setting, see "Music Setting".
9
Photo
When viewing photos
Title
image/
source
Total
events/
files
Sidebar
Thumbnail
sorting
Goes back to previous page
Goes to the Photo Setting in
the Media Setup page
You can press the four directional selection keys to select the file and press
ENTER to access. To use the sidebar, press
repeatedly until it displays and you
can browse files by events/photos.
When playing photos
Selected
photo
Control bar
Goes back to previous page
Goes to the Photo Setting in
the Media Setup page
English
NOTE: Only MP3 files with ID3 tags can be sorted in the sidebar.
English
10
You can press
to start a slideshow in full screen. Music playback is allowed
during a slideshow. You can press
/
to adjust the volume. For details on
the Photo Setting, see "Photo Setting".
Video
When viewing video files
Title image/
source
Total
events/
files
Sidebar
Thumbnail
sorting
Goes back to previous page
Goes to the Video Setting in
the Media Setup page
You can press the four directional selection keys to select the file and press
ENTER to access. To use the sidebar, press
repeatedly until it displays and you
can browse files by collections/videos.
When playing videos
Video
playback
status
Control bar
Goes back to previous page
Goes to the Video Setting in
the Media Setup page
You can press
/
to adjust the volume. To select the backward/forward
speed, press the Rewind/Fast-forward key repeatedly. To display the subtitle,
11
Document (optional)
When viewing document files
Title image/
source
Total
events/
files
Sidebar
list sorting
Goes back to previous page
Goes to the Document Setting
in the Media Setup page
You can press / to select the file and press ENTER to view it. To use the
sidebar, press
repeatedly until it displays and you can browse files by
document file formats. Button operations are different when viewing different
types of documents.
For details on the Document Setting, see "Document Setting".
NOTE: Office Reader:
1
2
3
All IPR, including but not limited to copyright, in the Picsel Products is
owned by Picsel suppliers.
The End User may not:
•
Make copies of the Picsel Products or make them available for
use by third parties.
•
Reverse engineer, disassemble, reverse translate, or in any way
decode the Picsel Products or any copy or part of it in order to
derive any source code, save only as is permitted by any
applicable law.
Picsel make no representations or warranties whether express or
implied (by statute or otherwise) relating to the performance, quality,
English
you can press A/a on the remote control (if available) to trigger the projector
OSD subtitle menu. For details on the Video Setting, see "Video Setting".
English
12
merchantability or fitness for a particular purpose of the Picsel
Products or otherwise and all such representations or warranties are
specifically disclaimed and excluded.
4
Picsel agrees and acknowledges that Picsel and the Picsel Products will
not be specifically mentioned in the end user license agreement.
NOTE: No support for advanced settings, such as Microsoft Word
drawing plug-in or table background settings.
NOTE: Contents outside the defined borders in Microsoft Word
will not be displayed.
NOTE: Microsoft PowerPoint slide effects not supported.
NOTE: Worksheets are displayed individually and sequentially
when the workbook has multiple worksheets.
NOTE: Page layout and numbering may be changed during
decoding.
NOTE: Objects embedded in files cannot be activated or viewed.
NOTE: Decoding may take a while for large files with complex
contents.
13
English
Media Setup
Media setup page allows you to adjust settings for file listing and playing. To
use the media setup page:
Press MEDIA SETUP when listing or playing media files to access individual menu
items for different types of media files.
Or you can follow below steps to access all menu items.
1
Adjust projector source to MEDIA.
2
Press
/
3
Press
/
4
Press /
values.
5
To exit, press BACK.
Main menu
to select Setup and press ENTER.
to select a main menu item and press ENTER to enter.
to select a submenu item and press
/
to change setting
Setting
Sub menu
Goes back to previous page
English
14
Video Setting
Use this function to choose your desired aspect ratio.
•
Auto: Keeps the image with original width-height
ratio and maximizes the image to fit native horizontal
or vertical pixels.
•
1:1: Keeps the image with original width-height
aspect ratio.
Display Ratio
Play Mode
Adjusts the play mode.
Auto Play
Automatically plays video files when selecting "Video" in
the MEDIA HOME page.
Subtitle
Use this function to choose your desired subtitle.
Subtitle Size
Adjusts the subtitle size.
Subtitle Position
Adjusts the subtitle position.
Photo Setting
Use this function to choose your desired aspect ratio.
•
Auto: Keeps the image with original width-height
ratio and maximizes the image to fit native horizontal
or vertical pixels.
•
1:1: Keeps the image with original width-height aspect
ratio.
Display Ratio
Slideshow
Duration
Use this function to set the time that each photo on a slide
is displayed.
Slideshow Repeat Decides whether you want to repeat the slideshow.
Slideshow Effect
Slideshow
Background
Music
Chooses a slideshow effect that you want.
Plays music files stored in the same input during a
slideshow.
•
On: Plays all the music files in sequence.
•
Shuffle: Randomly plays music files.
Music Setting
Play Mode
Adjusts the play mode.
Show Virtual
Effect
Decides whether you want to show the virtual effect.
Auto Play
Automatically plays music files when selecting "Music" in
the MEDIA HOME page.
15
Adjusts the play mode.
Play Mode
•
Fit Height: Scales the file vertically to fill the height of
the window. This is the default setting for PowerPoint
files. For 16:9 PowerPoint files, adjust the setting to
"Fit Width".
•
Fit Width: Scales the file horizontally to fill the width
of the window.
Adjusts the display view.
Display View
•
List: The files are displayed in a list of filenames.
•
Thumbnail: The files are displayed in thumbnail
previews.
Firmware Upgrade
Select Yes to do firmware upgrade by USB flash drive.
1
Download new media FW files by one compressed file from acer global
website.
2
Copy all uncompressed files in USB flash drive (XXXX.bin as released and
UPGRADEINFO.INI), and plug in projector.
3
Check projector source upto USB A.
4
Media Gallery > Setup > Firmware Upgrade.
5
Confirm to go.
6
Projector will show welcome screen automatically when upgrade finishes.
NOTE: When upgrading the firmware, remove all cables and other
USB devices.
NOTE: To utilize the Mirroring Display function (optional), make
sure you have updated the firmware to the latest version from
www.acer.com, and use the acer USB WiFi adapter, UWA2.
English
Document Setting
English
16
About
This page displays the general information about this projector.
17
1
JPEG Decode
Supports JPEG picture formats
Thumbnails preview
Supports BMP picture formats
2
Video Decode and
Movie Formats
Supports MJPEG
Supports H263, H264
Supports AVI, MOV movie formats
Supports 3gp movie format
Supports SRT Subtitle format.
3
Music Formats
Supports PCM, ADPCM audio formats
Supports WMA/OGG/MP3
4
5
Card Reader
Interface (for
selected models)
Supports SD memory card
USB Interface
Supports mass storage class
Supports SDHC memory card
Supports USB2.0
NOTE: The video clip and its SRT subtitle file must be located in
the same folder and with same filename (ex. Abcde.avi &
Abcde.srt).
NOTE: Some user-made subtitles may not work properly.
NOTE: Video clips produced with some encoders may not be
played correctly. Detail is to follow format supported table.
NOTE: The media mode supports max. 999 directories and max.
9999 files for USB devices/disks.
English
Supported multi-media formats
English
18
Supported photo formats
Image type (ext
name)
Sub type
Encode type
Max pixels
Jpeg / Jpg
Baseline
YUV420
No Limitation
YUV422
YUV440
YUV444
Progressive
YUV420
5120 X 3840
YUV422
YUV440
YUV444
BMP
No Limitation
NOTE: JPEG header size must be under 512 Kbytes.
Supported music formats
Music type (ext name)
Sample rate (KHz)
Bit rate (Kbps)
MP3
8-48
8-320
WMA
22-48
5-320
OGG
8-48
64-320
ADPCM-WAV
8-48
32-384
PCM-WAV
8-48
128-1536
AAC
8-48
8-256
19
File
format
Video
format
MAX
res
MAX bit
rate
Frame
rate
Audio
format
Remark
AVI
MKV
XVID
MPEG-2/4
H.264
M-JPEG
WMV3
1080P
30Mbps
30fps
AC3
DTS
MPEG1/2/3
PCM
ADPCM
AAC
No support VC-1 AP
H. 264 support less
than 6 reference
frames
No Support AC3HD,DTS-HD
TS
MPEG-2
H.264
1080P
30Mbps
30fps
AC3
DTS
MPEG1/2/3
LPCM
AAC
H. 264 support less
than 6 reference
frames
No Support AC3HD,DTS-HD
DAT
VOB
MPG
MPEG
MPEG-1
MPEG-2
1080P
30Mbps
30fps
MPEG1/2/3
AC3
DTS
LPCM
No Support AC3HD,DTS-HD
MOV
MP4
3GP
MPEG-4
H.264
1080P
30Mbps
30fps
AC3
PCM
AAC
H. 264 support less
than 6 reference
frames
RM
RMVB
RV3
RV4
720P
5Mbps
30fps
Cook
(RA6)
AAC (RA9)
RACP
(RA10)
-
WMV
WMV3
1080P
25Mbps
30fps
WMA2
WMA3
No Support VC-1
AP
NOTE: B-Frame function is not supported.
Supported subtitle formats
Format
Font
Subtitle Size
Standard SRT
UTF-8/ UTF-16
4bits up to 448x200
2bits up to 896x200
NOTE: Mixed code in subtitle files is not supported.
English
Supported video formats
English
20
Supported document formats
File format
Support
version
Pages/lines
limitation
Size
limitation
Adobe PDF
PDF 1.0
Up to 1000 pages
(One File)
Up to
75MB
-
Because office
viewer does not load
all pages of MS
Word file at the
same time, there are
no obvious
limitations of page
and line.
Up to
100MB
Not
support
Bold Text
in Simple
Chinese
font
Remark
PDF 1.1
PDF 1.2
PDF 1.3
PDF 1.4
MS Word
British
Word 95.
Word 97,
2000, 2002,
2003.
Word
2007(.docx),
2010(.docx)
21
MS
PowerPoint
British Excel
5, 95.
Row Limit: up to 595
Excel 97,
2000, 2002,
2003.
Column Limit: up to
256
Excel
2007(.xlsx),
2010(.xlsx).
Sheet up to 100
Office XP
Excel
Note: Any one of
three limitations
above can not
appear on one excel
file simultaneously.
British
PowerPoint
97.
Up to 1000 pages
(One File)
PowerPoint
2000, 2002,
2003.
PowerPoint
2007(.pptx).
PowerPoint
2010(.pptx),
.
Office XP
PowerPoint.
PowerPoint
presentatio
n-2003 and
earlier(.ppx)
PowerPoint
presentatio
n-2007 and
2010(.ppsx)
Up to
15MB
Not
support
passwordprotected
sheets
Up to
19MB
No
support
SlideShow
order
English
MS Excel
English
22
DLNA Mode
This function allows you to project the media files stored on all DLNA devices
under the same local network area wirelessly. Before using this function, please
consider your network bandwidth and decide if you want to use the AP mode
or Client mode.
NOTE: Only Video/Photo/Music files are supported for this
function.
NOTE: DLNA only works under AP mode and Client mode.
NOTE: Make sure to finish network setup before using the DLNA
mode.
23
•
Setting up the AP Mode
1
Connect the WiFi adapter to the USB jack of the projector.
2
Adjust projector source to DLNA.
3
Press
/
displays.
to select Setup and press ENTER. The Network Settings page
4
Press
to select AP Mode.
5
Highlight Projector ID and press
/
to decide if you want to enable
Projector ID. If enabled, 4 digit random number will display on the upperleft corner of the splash screen when your NB/PC is connected to the
projector.
6
If you would like to change the Projector SSID, highlight Projector SSID and
press
to modify.
7
If you would like to secure wireless networks, highlight Security and press
/
to select a preferred scheme. For details on Security settings, please
see "Security settings".
8
After finishing adjustment, press Apply / Enter.
/
English
Network Setup
English
24
•
Setting up the Client Mode
1
Connect the WiFi adapter to the USB jack of the projector.
2
Adjust projector source to DLNA.
3
Press
/
displays.
to select Setup and press ENTER. The Network Settings page
4
Press
to select Client Mode.
5
Select a network you want to join. If you select a secured network, a
dialogue will pop up asking you to enter the username and password.
/
NOTE: The projector cannot be connected to a network that
requires you to enter the username and password on a webpage.
Media Console (DMP)
The projector works as a Digital Media Player (DMP) to browse and play media
from other DLNA compliant devices or NB/PCs under the same local area
network. The function works either when the projector is in AP mode or Client
mode.
25
1
Adjust projector source to DLNA.
2
Press
/
to select Media Console (DMP) and press
3
Press
/
to select a device and press ENTER.
4
Shared files will appear. For how to view and play the files, see "Music",
"Photo"and "Video".
.
NOTE: The maximum number of files can be viewed or played is
1,000.
Media Display (DMR)
The projector works as a Digital Media Renderer (DMR) and waits for display
media content from other DLNA compliant devices under the same local area
network. The function works either when the projector is in AP mode or Client
mode.
To use this function:
1
Adjust projector source to DLNA.
2
Press
/
to select Media Display (DMR) and press ENTER. Now you can
use a DLNA compliant device to choose the photos, music or videos and
play the content to the projector wirelessly.
English
To use this function:
English
26
Supported DLNA media formats
Supported photo formats
Image format
Profile
Color space
Size limitation
JPEG
Baseline
YUV400
8000*6000
YUV420
YUV422
YUV440
YUV444
Progressive
YUV400
YUV420
Width < 8000 &
height < 6000
YUV422
YUV440
YUV444
Supported music formats
Audio format
Sample rate (KHz)
Bit rate (Kbps)
MP1/MP2/MP3
16-48
8-320
WMA BaseLine Profile
22-48
5-320
27
File
extensions
Audio/
video
Codec
.mpg
Video
MJPEG1
Main profile,
Low and Main
Levels (1080P
30fps 16Mbps)
Not support Dpicture
MJPEG2
Main profile,
Low and Main
Levels (1080P
30fps 16Mbps)
Not support 1080i
Audio
Profile/level
support
Remark
MPEG-1
Layer I, II
MPEG-1
Layer III
(mp3)
AC3
Not support AC3HD
DTS
Not support DTSHD
LPCM
.mp4
Video
Audio
MPEG4
Advanced Simple
Profile (frame
picture), Levels
0-5 (1080P 30fps
16Mbps)
H.264/AVC
Up to High
Profile, Levels 14.1 (1080P 30 fps
16Mbps)
AAC
PCM
ADPCM
Supports less than 6
reference frames.
Level Prefix
parameter of
CAVLC should be <
15
English
Supported video formats
English
28
.wmv
Video
WMV3
(WMV Ver
9)
Audio
WMA2
(WMA Ver
9 & 9.1)
Up to Main
Profile; Low,
Medium Level
(1080P 30fps
16Mbps)
Not support WMA
Ver 9 Pro
29
Adjust projector source to LAN/WiFi. Select eDisplay.
NOTE: To utilize the Mirroring Display function (optional), make
sure you have updated the firmware to the latest version from
www.acer.com, and use the acer USB WiFi adapter, UWA2.
System Requirements:
•
Windows
Minimum requirement
Component
Requirement
CPU
Dual Core Intel Core i 1.6 GHz or ATOM and Celeron are not
higher
supported
Remark
Graphic card
Intel, nVIDIA or ATI graphic card
with 64MB VRAM or above
Operating
System
Windows XP SP3, Vista SP2, Win 7 Not support Starter version
SP1 and Win 8
HDD
40MB free space
40MB free space
Recommend system settings
CPU
Dual Core Intel Core i5 2.4Ghz
Memory
DDR 4GB and above
Graphic card
256MB VRAM or above
Operating System
Windows 7 SP1
English
WiFi Display for Windows/Mac OS
English
30
•
Mac OS
CPU
Dual Core Intel Core i 1.4 GHz or higher (PowerPC not
supported)
Graphic card
Intel, nVIDIA or ATI graphic card with 64MB VRAM or above
OS
Mac OS X 10.7 and above
WiFi
802.11n
Recommended Mac Book series and iMac series after E/2011
models
Connect to the projector
Before you begin projecting, you will need to do the following things:
Turn on and connect to the network
Press the Power button on the bundled remote control or the device to turn on
your Acer projector and enable the WLAN. Connecting the projector to the LAN
for a wired connection is also recommended.
Cable/ADSL
Modem
Internet
APG / AP
DHCP Server
Select the source "LAN/WiFi", you will see the WiFi Display welcome screen. You
can set the projector to play 2 kinds of roles: AP Mode (Default) or Client Mode
by going to the Settings > LAN/WiFi menu.
31
Select AP Mode in the LAN/WiFi setting, and the projector plays an AP role.
You can tap "eDisplay" to see below splash screen.
Projector Name(SSID) : AcerProjector001
WiFi IP : 192.168.100.10
Security : None (default)
LAN IP : 0.0.0.0 (if no LAN cable plugged in)
Check Projector ID (if enabled, a 4-digit random number will display on the
upper-left corner of the screen), Projector Name (SSID, default name is
AcerProjector), Server IP (default is 192.168.100.10) and Security (default is
None).
2
Choose Client Mode in the LAN/WiFi setting and you will see below items.
Please connect to an available AP and input password if necessary.
Then splash screen displays with below information.
Connected AP Name(SSID) : Depended
Client IP : Depended
Security : Depended
LAN IP : 0.0.0.0 (if no LAN cable plugged in)
In Client Mode, you can project the screen from your tablet or smartphone
to the projector by using the application "eDisplay" and access to Internet
as well.
English
1
English
32
Check the information on the splash screen
Take note of the important information on the splash screen. The splash screen
consists of the following items: Projector ID, Acer logo, network information
and instructions.
Projector ID (displayed only when available)
The 4-digit number will not be displayed on the top left of the splash screen
until this option is enabled by the supervisor in the Configure tab under Acer
eDisplay Management. The four digits are given randomly for projector
identification. For more information, please see "Projector ID".
Projector Name (SSID)
The Projector Name and initial Service Set ID (SSID) can be added by the
supervisor on the Configure tab of Acer eDisplay Management. For more
information, please see "Network settings".
Server IP
The Server IP indicates the IP address your projector uses to connect to a wired
or wireless network. It will be 192.168.100.10 for general wireless and wired
connections. The Server IP will be assigned by the wired network with DHCP
enabled. For more information, please see "Network settings".
NOTE: If a RJ-45 cable is not connected, the LAN IP will be 0.0.0.0.
Security: (None, WPA-PSK, WPA2-PSK)
WPA-PSK (WiFi Protected Access - pre-shared key) and WPA2-PSK are other
individual encryption methods with higher level security. The option is enabled
by the supervisor in the Configure tab under Acer eDisplay Management. For
more information, please see "Security settings".
Note: Make sure the LAN/WiFi setting in the projector OSD is On
when using the WiFi Display and DLNA functions.
Follow the instructions on the splash screen to
connect and project
1
Check Projector ID, Projector Name (SSID), Server IP and Security option on
the splash screen. Ask your supervisor to set safer key when Security is
enabled.
33
Enable your WLAN and select the access point labeled AcerProjector or
AcerProjectorXXXX to connect wirelessly. Connect the projector to your
LAN for a wired connection.
Internet
3
Open the Internet browser (see note). Click on Download Acer eDisplay
Management on the welcome page, and then click Run to launch the
Welcome to the Acer Projector Gateway Setup Wizard. The installation will
proceed automatically. Make sure the installation is complete.
Note: If you do not see the welcome page or cannot connect to
the wired network, please enter the Server IP address (the second
item listed under the Acer logo on the splash screen) into your
browser's address bar.
Note: Ensure that you have administrator-level permission on your
NB/PC so that you can install the software.
English
2
English
34
Note: If you receive any security warnings, click OK to proceed
with the installation procedure.
Note: The Acer eDisplay Management shortcut will be created in
desktop when the installation is complete.
4
Acer eDisplay Management will execute automatically and the window
shown below will pop up to search for your Acer projector.
Note: Make sure your personal firewall does not block the Acer
eDisplay Management application.
Note: If your NB/PC cannot allow auto-run function, please
execute AcerProjectorGatewayW7.exe manually.
5
When the search is complete, a login dialog box will pop up to ask you to
enter the User name and Projector ID (if needed) to log in to your acer
Projector.
6
The UI will look as it does below when your source successfully connects
and begins projecting in 1024 x 768 mode.
Note: For the best projection performance, Acer recommends
adjusting your resolution to 1024 x 768.
35
Acer eDisplay Management helps users connect to, and control Acer projectors.
Acer eDisplay Management includes the following features:
For first time installation
The utility can be downloaded directly from the projector using a wireless or
wired network connection.
The software will be set up on any NB/PC in just a few minutes, without disks.
Security
Acer eDisplay Management supports PIN code security, protecting the Acer
projector from unauthorized access and use.
Wireless communications between the Acer projector and NB/PC are protected
using unique, image-based encryption to prevent eavesdropping or
modification of the video signal.
Simple GUI for one-click projection
The easy-to-use GUI enables one-click usability in finding and connecting to the
wireless projector, changing display settings, and controlling the projector.
It also supports up to four simultaneous presentations.
Onscreen remote
An onscreen remote utility gives any user the ability to control functions of the
projector without the owner worrying about the loss of or damage to the
projector's remote handset or worn-out batteries.
English
Acer eDisplay Management
English
36
Compact user interface
The compact user interface (UI) provides a solid look and feel.
(a)
(e)
(c)
(b)
(d)
(f)
NOTE: The Freeze and Hide are optional functions.
• Allows you to change the projection resolution (a) (optional).
To change the projection resolution, click on the resolution below the projector
icon to reveal a list of choices.
37
To project from multiple sources, click a number to display by split screen in
corresponding location.
• Starts projecting or stops projecting (c).
• Mirroring or extending your screen (d).
NOTE: You cannot extend your screen while playing video files.
NOTE: You cannot extend your screen in Windows 8 operating
system.
• Changes to video playing (e).
You can also select video clips to display from the compact window by clicking
the arrow on the left of the screen.
Select a video clip, and click the Play icon
the playback.
to load and Stop icon
to stop
NOTE: The video formats supported are MPEG2/MPEG4/H.264.
Connect via the LAN for better performance if playing video. The
full rate will be 30 fps depending on the video format.
NOTE: You cannot extend your screen while playing video files.
English
• Projects in split-screen or full-screen (b).
English
38
NOTE: Audio files are not supported.
• Changes to full user interface (f).
Full user interface
You can click the down arrow to reveal the full UI from the compact UI.
(a)
(b)
(c)
(d)
(e)
(f)
The Main tab of the full UI displays Projector ID, Projector IP and User name
information (a), and gives you the option to select a different wireless projector
(b). Change other NB/PCs who connected this projector by Switch presenter (c).
You may also do real installation in hard disk via P&P token by clicking Install (d)
or make another token via Save P&P (Plug & Play) Program to (e). About (f)
displays version information of Acer eDisplay Management.
Note: To enjoy extension display, you must finish real installation
in hard disk. You cannot extend the screen if you are using
eDisplay via P&P token.
39
NOTE: Settings on the webpage can only be adjusted when the
projector is in AP mode.
Open the Internet browser, it will redirect to "Acer Projector Gateway Web
Management" main page automatically, or you can enter the Server IP address
to access that.
The default IP address is 192.168.100.10 for general wireless connections.
Download
Download the client software.
You can download installation program for different platforms to execute •
Acer eDisplay Management application for Windows NB or PC
•
Mac Utility Client for Mac OS
•
Crestron RoomView
After installing the program, the shortcut will come out on the screen.
English
Acer Projector Gateway Web
Management
English
40
Note: You also can download it from installation CD.
Note: If using IE V 8.0, please disable SmartScreen Filter before
executing download process.
Network Status
Shows IP address of this connection and projector status.
Conference
You can initiate conference by webpage.
Clicking on Initiate Conference
gives you control over who is
projecting at any time, deciding the display location for the participant(s), and
prevents the current presenter from being disconnected inadvertently. You can
select from L/R split-screen or 4 split-screen patterns.
Once a conference has been initiated, all the persons connected to the projector
are displayed in a list. The active user is indicated by a shallow in his display
41
Click End of Conference
to end the conference.
Note: Please remember to log out if you want to end conference.
Note: Up to 8 users in same conference room are allowed.
Note: Video playback is not supported during a conference.
Advance
Login Admin password is default by 123456 to access the advanced setting
page.
English
location. To activate a user, click on the play this user icon next to the user's
name.
English
42
Console (optional)
The Console page gives you access to a variety of status and control features to
adjust best projection settings. From this page, you can get projection status,
adjust brightness, contrast and aspect ratio, as well as change source and
several advanced setting. You can also turn off the projector directly from this
page.
Configure
The Configure tab allows you to change a variety of settings.
43
You can check Enter the projector ID to start projecting to ensure that only
people in the room are able to access the projector. You can also select who can
connect to the Internet via the projector's WLAN router - either all the meeting
attendees, or only the person currently projecting.
Note: The APG needs to reboot to apply changes made in
Configure mode. Please connect to the projector again if you
want to continue to use it.
Network settings
Click Network settings to adjust other network settings.
English
Projector ID
English
44
Security settings
If you're projecting sensitive information, you may want to set up a WPA-PSK
key by clicking Security settings.
The WPA-PSK/WPA2-PSK encryption key should be entered as 8 to 63 ASCII
characters. This feature can be set and enabled by the supervisor.
Note: ASCII (American Standard Code for Information
Interchange) is a code for representing characters as “0-9, a-z, A-Z,
!, @, #, $, %, &, *, -, _, +,=, /, ?“are allowed. Hexadecimal digits
consist of the numbers 0-9 and the letters A-F/a-f.
Note: If your OS is Windows XP, additional hotfixes/patches may
need to be updated from Microsoft website for WPA2-PSK.
Note: Please be noted that enabling WPA-PSK/WPA2-PSK will
increase computing loading and projection performance may be
subjected to it.
45
Change the password to login Advance webpage by clicking Admin password
setup. The default supervisor password is 123456.
Firmware upgrade
Ensure the projector is connected to the LAN and the Internet, and click on
Firmware upgrade
and then click the Upgrade… button
. The projector will access the Internet to automatically download and
install any available upgrades.
English
Admin password setup
English
46
Alert Setting (optional)
Logout
After tapping "logout", you will return to the download page.
Note: If using IE V8.0, please adjust setting in Compatibility view
settings to make sure display normally.
47
You can project Mac screen via EZWifi.
1 You can get installation program from CD or download from webpages (See
"Acer Projector Gateway Web Management").
2 Install the software by double clicking on EZWifi.dmg.
3 Make sure you have turned on and connected to the projector. See "Connect
to the projector".
4 Execute EZWifi.
5 Select the projector you want to display.
6 You will see below screen and you can select the display mode and decide if
you would like to mirror or extend your screen.
English
Mac Utility for Mac OS
English
48
7 If you want to switch to Split screen for other people to join your display,
select "Change Layout".
8 You can allow maximum 4 different sources to display by the layout change.
49
NOTE: This function is only available for the models equipped
with a RJ45 port.
Open the Internet browser, You can find Crestron link in the mainpage of "Acer
Projector Gateway Web Management". Tape Crestron to popup extra
interactive FLASH webpage and start to use.
Mainpage
You can control projector by easy-to-use interface as Crestron tool, like volume
control, source change and projector setting. For more information, please visit
http://www.crestron.com & www.crestron.com/getroomview.
English
Crestron Control Tool (optional)
English
50
Tools
You can get projector IP information here, also can modify networking setting
manually and set up password as wish.
Info
You can find projector information easily by this page and also can add
additional information to help you manage each projector.
51
If you encounter any problem about projector, you can use this message
window in upper-right of page to do real-time communication with IT people.
English
Contact IT Help
English
52
WiFi Display for iOS/Android
(Tablet/Smartphone)
By installing the Acer eDisplay on your iOS/Android tablet/smartphone, you can
display documents/photo/web contents to the projector. Take Android eDisplay
to be an example.
1
Set the projector in AP or Client mode.
2
Plug in acer USB WiFi adapter - UWA2 into the USB A/USB A1 port of the
projector.
3
Adjust projector source to LAN/WiFi and the projector is now ready for
projection.
4
Download the application "Acer eDisplay" from Google play or Apple App
store.
5
After executing Acer eDisplay, connect the found projector with your
smart device.
6
This application contains the following functions: Document, Dropbox,
Internet, Photo, Camera, Video, Split control and Sketch functions.
Android
NOTE: The Internet and Dropbox functions are only available
when the projector is in Client mode.
53
iOS
System requirements
•
iOS
Phone
iOS 5 above.
iPhone 3GS, iPhone 4, iPhone 4S, iPhone 5
Pad
iOS 5 above.
iPad 2, the new iPad 3rd gen, new iPad 4th gen, iPad mini
•
Android
Phone
Android 4.0 ICS model with 1GB RAM
Pad
Android 4.0 ICS model with 1GB RAM
English
NOTE: The result of viewing documents via Acer eDisplay depends
on the hardware ability of your smart device. When the memory
of your smart device is insufficient, some documents may not
display correctly.
English
54
Mirroring Display (optional)
Adjust projector source to LAN/WiFi, choose "Mirroring Display", you can enjoy
mirroring projection from your smartphone to the projector (Android V4.2 and
above).
NOTE: To utilize the Mirroring Display function (optional), make
sure you have updated the firmware to the latest version from
www.acer.com, and use the acer USB WiFi adapter, UWA2.
NOTE: This function is only available for Windows 8.1. The default
PIN code is 12345670.
55
English
Using the USB Modes
Accessing internal memory (RAM)
1
Adjust projector source to USB B or USB Connection.
2
Connect the USB cable to both projector and NB/PC, plug the type B host to
Projector side and type A host to NB/PC side.
3
Press
4
The projector can be seen as a portable device with a capacity of up to 1
GB on your NB/PC. You can now transfer media files to the projector.
/
to select USB Storage (RAM) and press
.
USB Display
Introduction
You can connect the USB cable to both projector and NB/PC and adjust
projector source to USB B to display the content in your NB/PC.
Compatible with Windows XP/ Vista/ 7/ Mac OS
The USB Display projection function can be performed under Windows XP with
Service Pack 2 and above / Windows Vista 32 bits and 64 bits environments /
Windows 7 32bits and 64 bits, and under Mac OS X 10.7 and above.
Note: only support one NB/PC to one projector (1-to-1 screen
projection) by USB Display connection.
English
56
How to start USB Display
•
Under Windows OS
1
Adjust projector source to USB B or USB Connection.
2
Press
3
Connect the USB cable to both projector and NB/PC, plug the type B host to
Projector side and type A host to NB/PC side.
4
Execute the "Acer_USB.exe" and follow the on-screen instructions to
complete the installation.
/
to select USB Display and press
.
Note: If the autorun feature has been disabled on our NB/PC,
please browse to the CD ROM and execute the "Acer_USB.exe"
manually.
5
System will start to install the software on your NB/PC. (For the first time.)
6
Reboot your NB/PC.
7
Double click the icon on your NB/PC.
8
Below screen will be projected along with your NB/PC's screen through USB
cable. And you can decide if you would like to mirror or extend your
screen, check Compatible Mode if you find your projected screen
incomplete, and decide if you would like to start audio streaming.
57
9
Unplug the USB cable or quit the application to stop displaying over USB.
•
Under Mac OS
1
Adjust projector source to USB B or USB Connection.
2
Press
3
Connect the USB cable to both projector and NB/PC, plug the type B host to
Projector side and type A host to NB/PC side.
4
Execute the "EZUSBInstaller.dmg" and follow the on-screen instructions to
complete the installation. (For the first time.)
5
Reboot your NB/PC.
6
Execute the application "EZUSB"
projected.
7
The default setting is "Mirror" after eDisplay is successfully executed. Go to
System Preference\Display to select Mirror/Extension mode if you would
like to change the setting.
8
Unplug the USB cable or quit the application to stop displaying over USB.
/
to select USB Display and press
.
and your NB/PC’s screen will be
English
NOTE: You cannot extend your screen while using the Microsoft
Media Player.
NOTE: You cannot extend your screen in Windows 8 operating
system.
English
58
Troubleshooting
•
Use the source list well to switch source for different media functions.
Select the MEDIA source to play the multi-media contents; Select the
DLNA source to play the multi-media contents from other DLNA-compliant
devices; Select the LAN/WiFi source for WiFi display; Select the USB B
source for USB display.
•
It may take a little more time to play the contents in the USB hard drive
with lots of multi-media contents and make sure enough USB power is fed
to the USB hard drive.
•
Before using the eDisplay or DLNA function, make sure networking setup
is complete. AP Mode is recommended because of better bandwidth.
Check if your devices has connected to the correct AP (Access Point) SSID,
IP address and the correct password has been input (if the security
function is enabled). For wired display, check LAN IP address (if no LAN
cable plugged in, LAN IP is 0.0.0.0).
Projector Name(SSID) : AcerProjector001
WiFi IP : 192.168.100.10
Security : None
LAN IP : 0.0.0.0
•
Before setting up for the WiFi Display or DLNA function, make sure to
plug in acer USB WiFi adapter (optional) first.
•
When you use WiFi display function, check status icon (like AP Mode,
Client Mode or LAN disabled or enabled) on the upper right corner of the
splash screen in the projector and wait a while for the network settings in
the projector to take effect.
•
When you enjoy USB projection, make sure to plug in the USB cable to
your NB/PC and projector well. Then execute acer USB tool.
•
This projector allows firmware upgrade via the USB flash drive (select the
MEDIA source and go to the Setup > Firmware Upgrade menu).
*** Design and specifications are subject to change without notice.