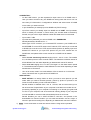
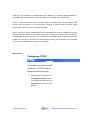
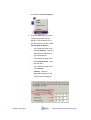
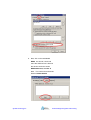
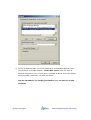
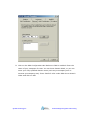
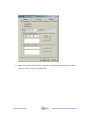
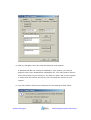
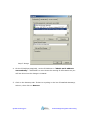
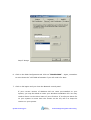
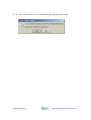
1
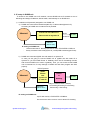
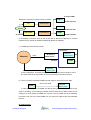
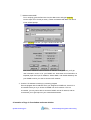
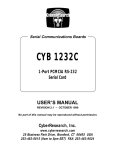
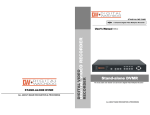
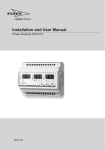
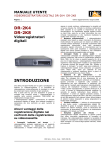
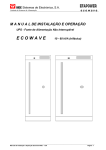
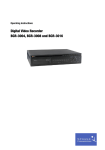
Manual for Remote Viewer Software(TCP/IP)
General description : TCP/IP option of 1 ch DVMR and 4 ch DVMR enables users to view live
pictures, search recorded pictures, or control PTZ camera via Internet line, far apart from the
DVMR unit, and users can store selected recorded pictures on HDD of client PC. Our standalone DVMR did not use web browser for access to DVMR unit via Internet line, and you must
install Remote Viewer program included in the package on client PC before you try to access to
DVMR unit over IP network.
We provides purchasers of our stand-alone DVMRs, 1 ch DVMR and 4 ch DVMR, including
TCP/IP option with Remote Viewer Software free of charge, and even open source program for
professional customers who want to upgrade our remote viewer program to include special
functions for own use in addition to basic functions of live viewing, searching, storing selected
pictures on client PC, and PTZ control.
1. TCP/IP SETUP in DVMR unit
Before you install Remote Viewer software, be sure to input IP address and others in
TCP/IP SETUP of DVMR unit. Then, execute SETUP.exe on Remote Viewer software CD
included in the package of our stand-alone DVMR with TCP/IP option, to install remote viewer
program.
PTZ
LAN, WAN, Internet
DVMR
Install client software(Remote viewer) to access to DVMR unit via Internet line!
Client PC
System Technology Inc.
All about Image Recognition & Processing
1
2. IP setup in DVMR unit
To access to our DVMR unit via IP network, connect DVMR unit to IP network as one of
followings and assign IP address, Subnet mask, and Gateway to our DVMR unit.
1) Conditions of IP(network) assigned to our DVMR unit
a) DVMR unit connected to leased line(static IP) or cable modem(dynamic IP)
Accessing to DVMR unit via Internet line is possible.
Leased line with static IP or
Internet
Cable modem w/ dynamic IP
Direct
connection
DVMR
Client PC
(Remote viewer)
IP setting on DVMR unit :
-
Leased line with static IP : Manually input known IP data in TCP/IP SETUP in DVMR unit
Directly connected to cable modem(dynamic IP) : DHCP(DVMR automatically gets IP data)
b) DVMR unit connected (A)DSL line with static IP or dynamic IP
In case you are going to connect DVMR unit to (A)DSL line with static IP or
dynamic IP, you first install Router or Gateway which has IP forwarding function
and connect DVMR unit to router or gateway. Then, you can access to this DVMR
unit via Internet line, if every settings in DVMR unit and client program are done
properly.
PPPoE protocol
Internet
(A)DSL
(A)DSL
modem
with
dynamic IP
or static IP
Router
or
DVMR
Gateway
Settings in website of Router or Gateway
Client PC
(Remote viewer)
: IP Forwarding(IP Bounding, Port Forwarding,
Port Bounding, or Port Routing)
IP setting on DVMR unit :
Input IP data manually in TCP/IP SETUP of DVMR unit
We recommend to refer to manual of router for details of IP forwarding.
System Technology Inc.
All about Image Recognition & Processing
2
IP setup in DVMR
Example of IP Forwarding in website of Router or Gateway
DVM0-16
192.168.1.165:8015
PC
Client program
DVMR-2
Internet
192.168.1.151:8001
ADSL Modem
Router/Gateway
DVMR-1
211.100.16.8
192.168.1.150:8000
IP forwarding is what we have to set in web site of Router or Gateway to connect
external Port to internal IP address assigned by Router or Gateway.
c) DVMR unit connected to Intranet
LAN network
IP sharer or
ADSL
Internet
Client PC
(Remote viewer)
DHCP server
Intranet
Intranet
DVMR
Client PC
(Remote viewer)
In this configuration, accessing to DVMR unit via Internet line from client PC not in
the same Intranet is not possible, and it is just possible in the same Intranet.
d) Direct connection between DVMR unit and client PC using cross over cable
Cross over cable
DVMR
Client PC
(Remote viewer)
In case you connect PC to DVMR unit directly using cross over cable, there is two
ways of IP setting, one is setting on DVMR unit as IP data on PC and the other one is
setting in PC as IP setting in DVMR unit. Just set in PC or DVMR unit as per following
procedure, and you can access DVMR unit via cross over cable to see and download
pictures.
IP setting on PC :
System Technology Inc.
All about Image Recognition & Processing
3
Leave default IP data on DVMR unit as they are set by manufacturer and change IP
data of PC as DVMR unit :
IP data
IP
Default IP data set by supplier
New IP setting PC
1 ch DVMR
192.168.1.110
Example) 192.168.1.115
4 ch DVMR
192.168.1.150
192.168.1.118
Subnet Mask
255.255.255.0
255.255.255.0
Gateway
192.168.1.1
192.168.1.1
For details of IP configuring in different Windows OS, refer to from attachment-1 to attachment-4
at the end of this manual.
Attachemnt-1 : For Window XP
Attachemnt-2 : For Window 2000
Attachemnt-3 : For Window ME
Attachemnt-4 : For Window 95/98
IP setting on DVMR unit :
Leave current IP data on PC as they are set and change IP data of DVMR unit as
PC. To check IP data of PC where remote viewer is installed,
-
Click START
-
Input [command] in dialog box
-
Input [ipconfig] in COMMAND PROMPT window
-
IP address, Subnet mask, and Gateway shall be displayed in sequence
-
Write down IP address, Subnet mask, and Gateway on separate paper
-
In TCP/IP SETUP in DVMR unit, input IP, Subnet mask and Gateway you
got from PC. 3 group of numbers for IP address shall be same as PC and
the 4th one must be different(not used one), and Subnet mask and gateway
shall be just same as PC.
-
Turn of DC power switch off and and on again. Then execute ping
test(example : input [ping 192.168.1.155]) in COMMAND PROMPT window.
-
If [request timeout] message is displayed, check cable(cross over) or check
PORT number of IP address are protected by firewall.
IP data
IP
Subnet Mask
IP data on PC
New IP data on DVMR unit
Check IP data(IP, Subnet
Mask, Gateway) as per
procedure from Attachment-1
System Technology Inc.
IP : First 3 same as PC, and
the 4th one different with
PC(not used one)
All about Image Recognition & Processing
4
to Attachment-4 according to
Windows OS.
Gateway
Subnet Mask and Gateway :
Same as PC
3. How to get IP for DVMR unit
1) Automatic assignment
If IP DETECT MODE in SETUP menu of DVMR unit is set at DHCP, DVMR unit
automatically connects to the network in the process of booting and shows IP
information. FACTORY DEFAULT mode is MANUAL, not DHCP, and you have to
change setting of IP DETECTION MODE in the SETUP menu to get IP information
automatically.
a) During the process of booting, DVMR with latest version of EPROM program
automatically connect to the network and get IP information, if it is connected to
the network specified in from ⓐ to ⓓ of 1)-b).
b) When booting process is started, DVMR unit displays followings one by one and
enter into display and recording mode.
VER 2.4
DVR BOOTING -------------------------------------------------------OK
CODEC/AD/DA SETUP --------------------------------------------OK
HDD INFO INITIALIZE ---------------------------------------------OK
IN-DVMR
HDD DETECTED
HDD-20
HDD DETECTED
TOTAL
HDD DETECTED
DVR HDD DETECTION --------------------------------------------OK
SETUP MENU LOADING ------------------------------------------OK
MOTION FILTER SETUP ------------------------------------------OK
DHCP SEPUP ---------------------------------------------------------OK
CHANGE LOSS CHECK -------------------------------------------OK
c) When it arrives at DHCP SETUP, it first display “SEARCHING” until DVMR unit
gets IP information and connects to the network, and then finally changes to “OK”.
If DHCP SEPUP is completed and “OK” is displayed, DVMR unit successfully
connected to the network. Then enter into SYSTEM SETUP/TCPIP SETUP/IP
ADDRESS. You will see DVMR unit already got IP ADDRESS automatically
Assigned by DHCP server, Cable modem, IP sharer, or ADSL modem.
Write down this IP address and port number, and enter them into System Setting of
System Technology Inc.
All about Image Recognition & Processing
5
Remote viewer program to be installed into client PC. Port number is set at 8000
automatically by DVMR system. If your network is protected by firewall, and port
number 8000 is protected by firewall, change port number from 8000 to other
number not protected by firewall.
Notice : If IP DETECT MODE is set at MANUAL, DVMR unit does not get IP information
automatically during the process of booting, and you have to get IP information
manually as described in following process.
If you set at FACTORY DEFAULT in SETUP menu, IP DETECT MODE is
MANUAL.
2) Manual assignment
If automatic assignment is not done successfully or if you set IP DETECT MODE at
MANUAL in the DHCP SETUP, you have to get IP information for DVMR unit as following
process in the client PC from which you want to access to DVMR unit via IP network.
If you connect DVMR unit to leased line with static IP already known, it is not necessary to
follow following process to get IP information.
a) “ipconfig” or “winipcfg”
Execute “ipconfig” command in the client PC with Windows 2000 and Windows XP,
and “winipcfg” command in the client PC with Windows 98 and ME, and you will get IP
informations, that are IP Address, Gateway, Subnet Mask. Write down those numbers
and input into DVMR unit to which you are going to access via IP network. As far as
DVMR is in operation without turning off, it is considered that this IP Address is assigned
just to this DVMR unit.
Then, restart the client PC to get different dynamic IP address for client PC after you get
IP information for DVMR unit.
Derail procedure to get IP information in different Windows is as follows.
ⓐ Window 2000
First you need to get to the command prompt using the command shell. The
best way is from the run menu. Start--> Run --> and type in Command. Then
either hit enter or click OK.
At the command prompt, type in ipconfig. This will pull up the information that
you need to find IP Address for DVMR unit.
ⓑ Windows XP
If you want to get IP Address for your DVMR in Windows XP, you can run
ipconfig in one easy step. Open Run and type "cmd /k ipconfig" without
the quotes. This will open the command prompt and start ipconfig the easy
way. Assign IP Address you get to DVMR unit.
System Technology Inc.
All about Image Recognition & Processing
6
ⓒ Windows 98 and ME
To run winipcfg, grab the Run item from the Start menu and type winipcfg
into the Open: box. Hit OK (or return). Those comfortable with DOS can launch
it from a DOS prompt.
When winipcfg launches, you'll get a window like this one:
Now, hit the "Release" button and then hit "Renew". If all goes well, you'll get
new information, and it is for your DVMR unit. Write down this information on
separate paper and input IP Address, Subnet Mask, and Default Gateway into
your DVMR to which you want to access via IP network.
⒝ Confirm if IP Address is working by executing pingtest
Execute pingtest with IP Address which you assigned to DVMR unit, check if it is
successful before you try to access to DVMR unit via IP network. If it is not
successful, you may not be able to access to DVMR unit via IP network, and we
recommend you to get help from your network administrator.
4. Insertion of logo in live window and scan window
System Technology Inc.
All about Image Recognition & Processing
7
You can insert logo of your company in live window and scan window, if you want.
When you install our client program, it automatically create folder named logo under
DVMRRemoteViewer folder. Prepare logo to be inserted in live window in the resolution of
85x55 in bmp format and in resolution of 165x65 in bmp format, respectively, and put them in
logo folder under DVMRRemoteViewer folder with name of blogo (to be shown in live window)
and slogo (to be shown in scan window).These logos will be shown on the right side of
POWER switch in live window and scan window, respectively. if you do not assign blogo and
slogo, no logo will be shown on the right side of POWER switch.
5. Live view via IP network
Click Remote Viewer icon to view live pictures via IP network. You will see then following
window.
System Technology Inc.
All about Image Recognition & Processing
8
Function of each button in live-view window :
1
: Power switch. Press power switch to quit. Before press power switch button, press
disconnect button first.
2
: Connect button. Press connect button to connect to DVMR unit via IP network to see live
pictures of DVMR unit. You will see the same live pictures, which are displayed on monitor
of DVMR unit with a certain time delay depending on transfer rate of IP network.
3
: Disconnect button. Press disconnect button to cut connection to DVMR unit via IP network.
4
: Screen division button. You can select to see pictures of any single channel or 4 channels
at the same time. You can select channel number from 1 to 4 to see pictures of selected
channel. If you selected 4, you swill see channel number from 1 to 4 are all activated.
5
: Channel number button. You can select channel number to see live pictures from selected
channel.
6
: Status window. It shows Date and Time. Further it displays “Connection established” and
a circular fan on the left bottom is rotating when connection button is activated, or “Waiting
for connection” when disconnection button is activated.
7
: Set button. 3 different set buttons
a) Rotate : Press rotate button to see live pictures from channel 1 to 4 in rotation.
Screen division must be set at 1 to see live pictures one after another in
rotation. Speed of rotation shall be as per settings of circular monitoring interval.
b) Setting : It is in the middle of 3 buttons. Press this button to input IP Address and
others and to set circular monitoring interval and scan rate, as following dialog box.
System Technology Inc.
All about Image Recognition & Processing
9
CONNECTION :
-
On the LABE column, you are requested to input name of 4 ch DVMR units, in
case you want to access to any one DVMR unit among more than a unit. You can
save many IP information in Configurations Window and select name of DVMR
unit to which you want to access.
-
In put IP Address you already input into DVMR unit(TCP/IP setup).
-
Input Port number you already input into DVMR unit in PORT. Just input 8000,
which is default port number. In some cases, port number 8000 is blocked by
firewall, and you have to input different number like 8090 which is not blocked.
-
Input “admin” in ID.
-
Input the same password you set into DVMR unit in PASSWORD.
Default password of DVMR unit is “1”.
-
Select type of PTZ camera if you connected PTZ camera to your DVMR unit in
the PT TYPE. To control PTZ camera via IP network, PTZ camera you connected
to DVMR unit must be one of PTZ camera whose protocol is already input as a
default PTZ camera or you input PTZ protocol for your PTZ camera into our
DVMR units, and please refer to user manual of our DVMR unit for details.
OPTION :
-
Select circular monitoring interval ranging from 0.1 sec to 10 sec. The smaller
it is, the faster picture of each channel rotates. The absolute circulation interval is
a little different from set value depending on data transfer rate of IP network.
-
Select scan rate ranging from 1x to 64x. The larger it is, the faster search speed
is. The absolute search speed is a little different from set value depending on data
transfer rate of IP network.
-
“Run in full screen mode” is to make window of live or search run in full screen.
-
Check “Receive Event” to get event list of DVMR unit.
SAVE OPTION :
-
SAVE OPTION is to assign folder on which you want to save pictures you will
select while you search recorded pictures, picture by picture or pictures in avi
format for time duration you set in Record Duration.
Record duration is available from 3 sec to 1 minute, and we recommend you to
set at lower level if specification of your computer is not latest one to take care of
processing capability of your computer. Processing in avi format give great load
on CPU of your computer, and we recommend memory (RAM) of your computer
must be 256 MB or more than that to download pictures in avi format.
Record Duration you set in SAVE OPTION is real time, and pictures to be
downloaded for Record Duration you set shall be between 20 sec longer or
shorter in practical recording time, depending on data transfer rate via IP network.
c) Scan. : Press scan button to enter into search window. Using various operation
System Technology Inc.
All about Image Recognition & Processing
10
buttons, you can search recorded pictures, save selected pictures on client PC, or
print pictures. Refer to following paragraph “3. Search recorded pictures over IP
network” for details
8
: PTZ control. You can control Zoom, Focus, and Pan/Tilt of camera while you see live
pictures via IP network. Of course, you must connect PTZ camera whose protocol is
already incorporated into DVMR unit by manufacturer (default PTZ camera like PELCO_D
or HMC250) or you have to input protocol by yourself in USER DEFINE menu in case you
connect PTZ camera which is not one of default PTZ cameras.
In case you connect one of default PTZ camera, set camera ID using
and
buttons
under PanTilt direction button (circular graphics on right bottom of live window).
In case case you connect PTZ camera which is not default PTZ camera, set ch number
from 1 to 4, using
and
buttons under PanTilt direction button (circular graphics on
right bottom of live window).
When you press corresponding buttons for Pan/Tilt control, press a couple of second every
time you press to take care of data transmission speed through IP network. Otherwise,
there is a possibility that given protocol is transmitted repeatedly, regardless of your
intention.
Notice : From time to time, connection shall be cut unexpectedly due to conditions of network
line, and you will see disconnect button(3) is activated. Just press connect button(2) again, and
you can continue to see live pictures.
6. Search recorded pictures via IP network
System Technology Inc.
All about Image Recognition & Processing
11
Function of each button in search window :
1
: Power switch. Press power switch to quit.
2
: Full screen button. Press full screen button to search recorded picture channel by channel
in full screen.
3
: Quad button. Press Quad button to search recorded pictures in quad screen, 4 pictures
from 4 channels at the same time.
4
: Time of recording. It indicates when the pictures you see recorded.
5
: Channel selection button. Press any one from 1 to 4 to see picture of corresponding
channel, if you first chose full screen button(2).
6
: Time selection button. You can set time to search by dragging yellow mover to the left or
right. See time displayed in green color and find an exact time from which you search.
7
: Start and end of recording. It shows time from which recording started and recording
ended. Further it show time from which search will start.
8
: Search operation button. You can search recorded data using various buttons useful for
searching effectively as follows.
System Technology Inc.
All about Image Recognition & Processing
12
: Play fast backward
: Move to start of recording
(Speed set in SYSTEM SETTING(5-7))
(Press stop button first before this button)
: Play backward(x1)
: Move to previous hour(on the hour)
(Press stop button first before this button)
-
: Stop
: Play forward(x1)
: Move to next hour(on the hour)
(Press stop button first before this button)
: Play fast forward
: Move to end of recording
(Speed set in SYSTEM SETTING(5-7))
(Press stop button first before this button)
Upper row
Bottom row
Speed of playback in DVMR unit according to scan rate set in 5-7-b).
Scan rate set in 5-7-b)
or
or
1x
1x
1x
2x
1x
2x
4x
1x
4x
8x
1x
8x
16x
1x
16x
32x
1x
30x
64x
1x
60x
Maximum playback speed of DVMR is 60x.
9
: Command button. We have 3 different buttons, that are, save, print, and event, and those
buttons work only when stop button is pressed.
a) Save
System Technology Inc.
All about Image Recognition & Processing
13
During searching recorded pictures, you can save pictures one by one in the folder in
client PC by pressing save button. Press Save button while you see recorded picture,
and picture you selected by pressing Save button shall be save on the folder you
already assigned under the file name of year-month-day-hour-minute-second in jpg
format.
b) Print
During searching recorded pictures, you can print picture, one by one, you see, by
pressing Print button.
c) Event
Press event button to see alarm list saved in DVMR unit, and you can search
recorded pictures based on event list by clicking any one of list.
d) Record
This button enables you to download pictures while you search recorded pictures for
a time duration (Record Duration) you already set in SYSTEM SETTING. While you
search recorded pictures, press Record button and you can save series of pictures for
Record Duration in avi format. If you set Record Duration at 30 sec, our client
program download pictures in avi format for 30 sec and save in the file name of YearMonth-Day-Hour-Minute-Second, and continue to download and save again after 30
seconds, and so on. Every 30 seconds, it creates file in the name of Year-Month-DayHour-Minute-Second until you press Stop button or Record button again. Then you
can see using Media Player later or you can put those pictures on CD or on other
type of storage media to show somebody who are in other place.
Size of file downloaded for 30 sec, for example, shall be 100MB, more or less,
depending on pictures taken, and we recommend you to download and save on your
computer whenever it is necessary, and delete those files if it is not necessary to save
for a long time, to take care of storage space of hard disk drive in your computer.
10 : Calendar. You can select date and time to search pictures recorded at selected time and
date. You can refer to start and end of recording in 7.
Notice : From time to time, connection shall be cut unexpectedly due to conditions of network
line. Whenever it is cut, quit search window by pressing power switch(1), and then press
connect button in live-view window and scan button to enter into search window again, to
continue searching.
Notice : Compatibility of Remote Viewer Software with different kinds of operating systems and
PC hardware may not be simply specified due to the characteristics of network that it is much
related with not only PC hardware and operating system but also other software installed on the
System Technology Inc.
All about Image Recognition & Processing
14
client PC and conditions of network(internet) line. Basically, our Remote Viewer Software is
compatible with typical Windows operating system from Windows 98 to Windows XP.
Notice : To see continuous live view, we recommend not to select motion recording in RECORD
SETUP menu of DVMR. If it is set at motion recording in SETUP menu of DVMR, image
transmission is done only there is motions detected.
Notice : While you search recorded data using client software in client PC, DVMR unit to which
you access via IP network is in playback mode, and no recording is done as far as you search
recorded data. However, while you are in connection with DVMR unit via IP network for live view,
DVMR unit continues to record but at a little lowered recording rate. Therefore we recommend
you to access to DVMR unit only when it is necessary.
Attachment-1 :
Configuring TCP/IP
To configure your Windows XP
computer for TCP/IP support,
follow the directions below:
1. Click the right mouse button on
the My Network Places icon on
your desktop and select the item
Properties from the menu that
appears.
System Technology Inc.
All about Image Recognition & Processing
15
2. In the window that appears,
labeled Network and Dial-up
Connections, right-click on the
icon titled Local Area
Connection and select the item
Properties from the menu that
appears.
3. A window titled Local Area
Connection Properties will now
appear. In the window below,
select the item called Internet
Protocol (TCP/IP) and then click
System Technology Inc.
All about Image Recognition & Processing
16
on the button labeled Properties.
4. A window titled Internet Protocol
(TCP/IP) Properties will now
appear. In this window, click on
the radio button to the left of Use
the following IP address:
o
In the field to the right of the
words IP address: enter the
appropriate IP address that
you were assigned.
o
In the field to the right of the
words Subnet mask: enter
255.255.254.0
o
In the field to the right of the
words Default
gateway: enter the
appropriate gateway for the
IP that you were assigned.
System Technology Inc.
All about Image Recognition & Processing
17
5. In the same window near the
bottom , make sure the radio
button to the left of Use the
following DNS server
addresses: is filled.
o
In the field to the right of the
words Preferred DNS
server: enter 144.92.12.24
o
In the field to the right of the
words Alternate DNS
server: enter 128.104.180.2
6. On the bottom of the same
window, click on the button
labeled Advanced... This will
bring up a new window called
Advanced TCP/IP Settings.
7. In this window, click on the tab
labeled DNS. Near the bottom of
this screen you will see a field
labeled DNS suffix for this
connection:. Enter
caenn.wisc.edu in this field.
System Technology Inc.
All about Image Recognition & Processing
18
8. Now, click on the tab labeled
WINS. On this tab, check and
see if the WINS server is listed in
the window under the words
WINS addresses, in order of
use:. The number that should be
listed is 144.92.240.240
System Technology Inc.
All about Image Recognition & Processing
19
If that number does not appear,
click on the button Add... that is
under the above window. In the
window that appears, titled
TCP/IP WINS Server, enter the
number 144.92.240.240 in the
field below the words, WINS
server: and then click on Add.
9. After you have confirmed that the
WINS server has been added to
your settings, click on the button
OK at the bottom of the window
titled Advanced TCP/IP Settings.
10. This will bring you back to the
window titled Internet Protocol
(TCP/IP) Properties. Click on the
button titled OK at the bottom of
this window to save the changes
to the TCP/IP settings and to
bring you back to the window
Local Area Connection Properties.
11. In the window titled Local Area
Connection Properties, click on
OK to save the changes. This
should close the Properties
windows and your computer
should now be working with
TCP/IP.
System Technology Inc.
All about Image Recognition & Processing
20
Attachment-2 :
Configuring your network settings for DHCP:
Windows 2000
1. From your desktop, click with the right mouse button on My Network Places
and select the Properties menu item.
Step 1. Image:
If you cannot find Network Neighborhood, you can go to the Start Menu,
then look under Settings for Network and Dial-up Connections.
2. Locate and double-click on your LAN connection.
Step 2. Image:
3. You should see the Status dialog for this connection. You will not need to
change anything here. Click on the Properties button.
System Technology Inc.
All about Image Recognition & Processing
21
Step 3. Image:
4. Under the list of components, select Internet Protocol (TCP/IP) and click on
the Properties... button.
System Technology Inc.
All about Image Recognition & Processing
22
Step 4 Image:
5. Now that you've reached the Internet Protocol (TCP/IP) Properties dialog,
select “Obtain an IP address automatically”.
address automatically”.
Also select “Obtain DNS server
You will lose any static IP information you may
have so make sure you copy this information down if it is needed for later.
6. Click on OK to get out of the Internet Protocol (TCP/IP) Properties dialog,
again to get out of the connection's Properties dialog, and again to get out of
its Status dialog.
Attachment-3 :
Setting or Changing Your IP Address:
System Technology Inc.
All about Image Recognition & Processing
23
Windows Millennium Edition
1. If Windows Me did not come pre-installed on your computer, locate your
Windows Me installation CD. You may be asked to insert it at the end of the
update process.
2. From your desktop, click with the right mouse button on My Network Places
and select the Properties menu item.
If you cannot find My Network Places, you can go to the Start Menu, then
look under Settings for the Control Panel. Find the Network icon in the
Control Panel and open it.
3. You should see the Configuration page of the Network control panel. If you
have a modem or more than one network card, there may be more items
listed. Find the entry for TCP/IP associated with your network card, select
it, and click on the Properties button.
System Technology Inc.
All about Image Recognition & Processing
24
4. On the IP Address page, set the IP Address to an available address from
your IP block or private network. (Home DSL users: enter the new IP
address assigned to you.) If you have a routable IP block, enter the Subnet
Mask provided; otherwise, use 255.255.255.0.
Use the IP Address (or range) provided to you, not the one in this
example!
System Technology Inc.
All about Image Recognition & Processing
25
5. Click on the Gateway tab. If there is anything in the list of Installed
Gateways, select it, then click on Remove.
System Technology Inc.
All about Image Recognition & Processing
26
6. Now type in the IP address of your router in the New Gateway box and click
on Add. (Home DSL users: use the Gateway IP address provided.)
Be sure to use the IP address of your router or gateway, not the one
in this example!
System Technology Inc.
All about Image Recognition & Processing
27
7. You should now see your router's IP address (or your gateway) in the list of
installed gateways.
System Technology Inc.
All about Image Recognition & Processing
28
8. Click on the DNS Configuration tab. Make sure DNS is enabled. Enter the
name of your computer for Host. You can leave Domain blank, or you can
enter your fully-qualified domain name (such as yourcompany.com or
intranet.yourcompany.com). Enter 204.212.42.4 under DNS Server Search
Order and click on Add.
System Technology Inc.
All about Image Recognition & Processing
29
9. Now enter 204.212.42.2 under DNS Server Search Order and click on Add.
Click on OK to close the TCP/IP panel.
System Technology Inc.
All about Image Recognition & Processing
30
10. Click on OK again until you close the Network control panel.
If Windows Me did not come pre-installed on your system, you may be
asked to insert your Windows Me installation CD. You may need to direct it
to the drive letter of your CD drive. If it tells you that a file on your system
is newer than the version on the CD, tell it to keep the version on your
system.
11. You may need to restart your computer for the settings to take effect.
System Technology Inc.
All about Image Recognition & Processing
31
Attachment-4 :
Setting or Changing Your IP Address:
Windows 95 or Windows 98
1. If your current Windows version did not come pre-installed on your computer,
locate your Windows installation CD. You may be asked to insert it at the end of
the update process.
2. From your desktop, click with the right mouse button on Network Neighborhood
and select the Properties menu item.
Step 2a Image:
If you cannot find Network Neighborhood, you can go to the Start Menu,
then look under Settings for the Control Panel. Find the Network icon in the
Control Panel and open it.
…or Step 2b Image:
3. You should see the Configuration page of the Network control panel. If you have
a modem or more than one network card, there may be more items listed. Find
the entry for TCP/IP associated with your network card, select it, and click on
the Properties button.
System Technology Inc.
All about Image Recognition & Processing
32
Step 3 Image:
4. On the IP Address page(tab), set the IP Address to “Obtain an IP address
automatically”… Remember to write down the existing IP information as you
will lose this once the change is initiated.
5. Click on the Gateway tab. If there is anything in the list of Installed Gateways,
select it, then click on Remove.
System Technology Inc.
All about Image Recognition & Processing
33
Step 5 Image:
6. Click on the DNS Configuration tab. Click on “Disable DNS”.
Again, remember
to write down the “old” DNS information if you will need it for later.
7. Click on OK again until you close the Network control panel.
If your current version of Windows did not come pre-installed on your
system, you may be asked to insert your Windows installation CD. You may
need to direct it to the drive letter of your CD drive. If it tells you that a file
on your system is newer than the version on the CD, tell it to keep the
version on your system.
System Technology Inc.
All about Image Recognition & Processing
34
8. You may need to restart your computer for the settings to take effect.
System Technology Inc.
All about Image Recognition & Processing
35