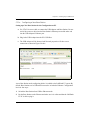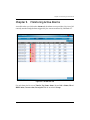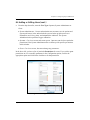
1
GE
Measurement & Control
Validation
Kaye LabWatch® LT
User’s Manual
M4580 Rev. B
January 2013
GE
Measurement & Control
Kaye LabWatch® LT
Monitoring System
User’s Manual
M4580 Rev. B
January 2013
http://www.ge-mcs.com/en/validation-and-environmental-monitoring.html
©2013 General Electric Company. All rights reserved.
Technical content subject to change without notice.
Contents
Chapter 1. The GE Kaye LabWatch LT Monitoring System
Chapter 2. Installing Kaye LabWatch LT
2.1 System Requirements. . . . . . . . . . . . . . . . . . . . . . . . . . . . . . . . . . . . . . . . . . . . . . . . . . . . . . . . . 3
2.1.1 Peripherals . . . . . . . . . . . . . . . . . . . . . . . . . . . . . . . . . . . . . . . . . . . . . . . . . . . . . . . . . . . 4
2.1.2 Computer Software. . . . . . . . . . . . . . . . . . . . . . . . . . . . . . . . . . . . . . . . . . . . . . . . . . . . . 4
2.1.3 Application Software . . . . . . . . . . . . . . . . . . . . . . . . . . . . . . . . . . . . . . . . . . . . . . . . . . . 4
2.2 Setting up RF ValProbe Hardware . . . . . . . . . . . . . . . . . . . . . . . . . . . . . . . . . . . . . . . . . . . . . . . 5
2.2.1 Setting Up the Base Station . . . . . . . . . . . . . . . . . . . . . . . . . . . . . . . . . . . . . . . . . . . . . . 5
2.2.1aConfiguring a New Base Station. . . . . . . . . . . . . . . . . . . . . . . . . . . . . . . . . . . . . . . . 7
2.2.2 Connecting an External Sensor and Auxiliary Inputs . . . . . . . . . . . . . . . . . . . . . . . . . 13
2.2.3 Setting up the Loggers . . . . . . . . . . . . . . . . . . . . . . . . . . . . . . . . . . . . . . . . . . . . . . . . . 14
2.2.4 Logger Installation Guidelines . . . . . . . . . . . . . . . . . . . . . . . . . . . . . . . . . . . . . . . . . . . 16
2.3 Installing Kaye LabWatch LT Software. . . . . . . . . . . . . . . . . . . . . . . . . . . . . . . . . . . . . . . . . . 17
2.3.1 User Registration . . . . . . . . . . . . . . . . . . . . . . . . . . . . . . . . . . . . . . . . . . . . . . . . . . . . . 19
2.3.2 Discovering Base Stations and Loggers . . . . . . . . . . . . . . . . . . . . . . . . . . . . . . . . . . . . 20
2.3.3 Associate Sensors with Tags. . . . . . . . . . . . . . . . . . . . . . . . . . . . . . . . . . . . . . . . . . . . . 23
2.3.4 Configure Tags . . . . . . . . . . . . . . . . . . . . . . . . . . . . . . . . . . . . . . . . . . . . . . . . . . . . . . . 26
2.3.5 Create Tag Groups . . . . . . . . . . . . . . . . . . . . . . . . . . . . . . . . . . . . . . . . . . . . . . . . . . . . 31
2.3.6 Associating Users with Tag Groups . . . . . . . . . . . . . . . . . . . . . . . . . . . . . . . . . . . . . . . 33
2.3.7
Defining and Modifying User Schedules . . . . . . . . . . . . . . . . . . . . . . . . . . . . . . . . . . 34
2.3.8 Defining and Modifying User Schedules (cont.) . . . . . . . . . . . . . . . . . . . . . . . . . . . . . 35
2.3.9 Defining Alarm Notifications. . . . . . . . . . . . . . . . . . . . . . . . . . . . . . . . . . . . . . . . . . . . 36
Chapter 3. Monitoring Sensors with Kaye LabWatch LT
3.1 The Monitoring Screen . . . . . . . . . . . . . . . . . . . . . . . . . . . . . . . . . . . . . . . . . . . . . . . . . . . . . . 40
3.2 Views on the Monitoring Screen . . . . . . . . . . . . . . . . . . . . . . . . . . . . . . . . . . . . . . . . . . . . . . . 44
3.2.1 The List View . . . . . . . . . . . . . . . . . . . . . . . . . . . . . . . . . . . . . . . . . . . . . . . . . . . . . . . . 44
3.2.2 The Graph View . . . . . . . . . . . . . . . . . . . . . . . . . . . . . . . . . . . . . . . . . . . . . . . . . . . . . . 46
3.2.3 The Floor View. . . . . . . . . . . . . . . . . . . . . . . . . . . . . . . . . . . . . . . . . . . . . . . . . . . . . . . 47
3.3 Viewing Tag Data in Detail — The Tag Maintenance Screen . . . . . . . . . . . . . . . . . . . . . . . . . 49
3.3.1 The Trending Tab . . . . . . . . . . . . . . . . . . . . . . . . . . . . . . . . . . . . . . . . . . . . . . . . . . . . . 49
3.3.2 Tabular Data for a Tag . . . . . . . . . . . . . . . . . . . . . . . . . . . . . . . . . . . . . . . . . . . . . . . . . 50
3.3.3 The Alarm Configuration Tab . . . . . . . . . . . . . . . . . . . . . . . . . . . . . . . . . . . . . . . . . . . 51
Kaye LabWatch® LT User’s Manual
iii
Contents
Chapter 4. Graphing Tag Data
4.1 Configuring the Graph — the Chart Configuration Screen . . . . . . . . . . . . . . . . . . . . . . . . . . . 55
4.1.1 Entering Content. . . . . . . . . . . . . . . . . . . . . . . . . . . . . . . . . . . . . . . . . . . . . . . . . . . . . . 55
4.1.2 Determining the Graph Appearance — Chart Configuration. . . . . . . . . . . . . . . . . . . . 56
4.1.3 The Y Axis Tab. . . . . . . . . . . . . . . . . . . . . . . . . . . . . . . . . . . . . . . . . . . . . . . . . . . . . . . 57
4.1.4 Marker Properties . . . . . . . . . . . . . . . . . . . . . . . . . . . . . . . . . . . . . . . . . . . . . . . . . . . . . 58
4.1.5 Limit Lines . . . . . . . . . . . . . . . . . . . . . . . . . . . . . . . . . . . . . . . . . . . . . . . . . . . . . . . . . . 59
4.1.6 Graph Template . . . . . . . . . . . . . . . . . . . . . . . . . . . . . . . . . . . . . . . . . . . . . . . . . . . . . . 60
4.1.7 Plotting a Graph for Multiple Y-Axis . . . . . . . . . . . . . . . . . . . . . . . . . . . . . . . . . . . . . . 60
4.2 Basic Chart Controls . . . . . . . . . . . . . . . . . . . . . . . . . . . . . . . . . . . . . . . . . . . . . . . . . . . . . . . . 61
Chapter 5. Monitoring Active Alarms
5.1 Acknowledging Alarms . . . . . . . . . . . . . . . . . . . . . . . . . . . . . . . . . . . . . . . . . . . . . . . . . . . . . . 67
5.2 Viewing the Alarm History . . . . . . . . . . . . . . . . . . . . . . . . . . . . . . . . . . . . . . . . . . . . . . . . . . . 69
Chapter 6. Viewing the Audit Trail
Chapter 7. Creating Reports
7.1 Report Types . . . . . . . . . . . . . . . . . . . . . . . . . . . . . . . . . . . . . . . . . . . . . . . . . . . . . . . . . . . . . . 76
7.2 Reporting Operation and Benefits . . . . . . . . . . . . . . . . . . . . . . . . . . . . . . . . . . . . . . . . . . . . . . 77
7.3 Creating a Daily Report . . . . . . . . . . . . . . . . . . . . . . . . . . . . . . . . . . . . . . . . . . . . . . . . . . . . . . 78
7.4 Creating a Historical Report . . . . . . . . . . . . . . . . . . . . . . . . . . . . . . . . . . . . . . . . . . . . . . . . . . 79
7.5 Creating a MKT Report . . . . . . . . . . . . . . . . . . . . . . . . . . . . . . . . . . . . . . . . . . . . . . . . . . . . . . 81
7.6 Creating an Alarm Report for a Single Tag . . . . . . . . . . . . . . . . . . . . . . . . . . . . . . . . . . . . . . 82
7.7 Creating an Audit Trail Report . . . . . . . . . . . . . . . . . . . . . . . . . . . . . . . . . . . . . . . . . . . . . . . . 83
7.8 Creating a Calibration Report . . . . . . . . . . . . . . . . . . . . . . . . . . . . . . . . . . . . . . . . . . . . . . . . . 84
7.9 The Report Viewer Toolbar . . . . . . . . . . . . . . . . . . . . . . . . . . . . . . . . . . . . . . . . . . . . . . . . . . . 85
7.10Deleting a Report Template . . . . . . . . . . . . . . . . . . . . . . . . . . . . . . . . . . . . . . . . . . . . . . . . . . . 86
iv
Kaye LabWatch® LT User’s Manual
Contents
Chapter 8. Configuring Kaye LabWatch LT
8.1 Configuring Email Contacts. . . . . . . . . . . . . . . . . . . . . . . . . . . . . . . . . . . . . . . . . . . . . . . . . . . 89
8.1.1 Email Server Tab . . . . . . . . . . . . . . . . . . . . . . . . . . . . . . . . . . . . . . . . . . . . . . . . . . . . . 89
8.1.2 The Authentication Tab . . . . . . . . . . . . . . . . . . . . . . . . . . . . . . . . . . . . . . . . . . . . . . . . 90
8.1.3 The Message Format Tab . . . . . . . . . . . . . . . . . . . . . . . . . . . . . . . . . . . . . . . . . . . . . . . 91
8.2 Configuring Telephone Contacts . . . . . . . . . . . . . . . . . . . . . . . . . . . . . . . . . . . . . . . . . . . . . . . 92
8.2.1 The Voice Tab . . . . . . . . . . . . . . . . . . . . . . . . . . . . . . . . . . . . . . . . . . . . . . . . . . . . . . . . 92
8.2.2 The Control Tab . . . . . . . . . . . . . . . . . . . . . . . . . . . . . . . . . . . . . . . . . . . . . . . . . . . . . . 93
8.2.3 The Dialout Codes Tab . . . . . . . . . . . . . . . . . . . . . . . . . . . . . . . . . . . . . . . . . . . . . . . . . 93
8.3 Managing User Schedules . . . . . . . . . . . . . . . . . . . . . . . . . . . . . . . . . . . . . . . . . . . . . . . . . . . . 94
8.4 Adding Predefined Acknowledgement Comments . . . . . . . . . . . . . . . . . . . . . . . . . . . . . . . . . 95
8.5 Configuring Alarm Colors . . . . . . . . . . . . . . . . . . . . . . . . . . . . . . . . . . . . . . . . . . . . . . . . . . . . 96
8.6 Adding or Editing Users . . . . . . . . . . . . . . . . . . . . . . . . . . . . . . . . . . . . . . . . . . . . . . . . . . . . . 98
8.7 Establishing User Account Settings . . . . . . . . . . . . . . . . . . . . . . . . . . . . . . . . . . . . . . . . . . . . 101
8.8 Scheduling User Vacations. . . . . . . . . . . . . . . . . . . . . . . . . . . . . . . . . . . . . . . . . . . . . . . . . . . 103
8.9 Maintaining Calibration Records . . . . . . . . . . . . . . . . . . . . . . . . . . . . . . . . . . . . . . . . . . . . . . 104
8.10Configuring Tags and Groups . . . . . . . . . . . . . . . . . . . . . . . . . . . . . . . . . . . . . . . . . . . . . . . . 106
8.10.1 Entering the Tag Configurator . . . . . . . . . . . . . . . . . . . . . . . . . . . . . . . . . . . . . . . . . . 106
8.10.2 Locating Base Stations and Loggers . . . . . . . . . . . . . . . . . . . . . . . . . . . . . . . . . . . . . 107
8.10.3 Modifying Tag Groups . . . . . . . . . . . . . . . . . . . . . . . . . . . . . . . . . . . . . . . . . . . . . . . . 110
8.11Establishing Basic Display Parameters . . . . . . . . . . . . . . . . . . . . . . . . . . . . . . . . . . . . . . . . . 112
8.12Locking and Unlocking Kaye LabWatch LT . . . . . . . . . . . . . . . . . . . . . . . . . . . . . . . . . . . . . 113
8.12.1 Locking the System . . . . . . . . . . . . . . . . . . . . . . . . . . . . . . . . . . . . . . . . . . . . . . . . . . 113
8.12.2 Unlocking the System. . . . . . . . . . . . . . . . . . . . . . . . . . . . . . . . . . . . . . . . . . . . . . . . . 113
8.13Sensor Calibration Reminder Screen . . . . . . . . . . . . . . . . . . . . . . . . . . . . . . . . . . . . . . . . . . . 114
8.14Back Up and Restore Database . . . . . . . . . . . . . . . . . . . . . . . . . . . . . . . . . . . . . . . . . . . . . . . 115
8.15Monitoring RF Signal Strength . . . . . . . . . . . . . . . . . . . . . . . . . . . . . . . . . . . . . . . . . . . . . . . 116
Appendix A. Configuring Telephone Notifications
A.1 Prerequisites . . . . . . . . . . . . . . . . . . . . . . . . . . . . . . . . . . . . . . . . . . . . . . . . . . . . . . . . . . . . . . 121
A.2 Installing Diva Analog 2p Board . . . . . . . . . . . . . . . . . . . . . . . . . . . . . . . . . . . . . . . . . . . . . . 122
A.2.1 Inserting Your Diva Media Board into Your Computer . . . . . . . . . . . . . . . . . . . . . . . 122
A.2.2 Connecting Your Dialogic® Diva® Analog Media Board . . . . . . . . . . . . . . . . . . . . 124
Kaye LabWatch® LT User’s Manual
v
Contents
A.2.2aDialogic® Diva® Analog-2 Media Boards . . . . . . . . . . . . . . . . . . . . . . . . . . . . . 124
A.3 Configuring the Diva Board. . . . . . . . . . . . . . . . . . . . . . . . . . . . . . . . . . . . . . . . . . . . . . . . . . 126
A.4 Testing Diva Board . . . . . . . . . . . . . . . . . . . . . . . . . . . . . . . . . . . . . . . . . . . . . . . . . . . . . . . . 127
A.5 Configuring Telephone Settings. . . . . . . . . . . . . . . . . . . . . . . . . . . . . . . . . . . . . . . . . . . . . . . 130
A.6 Configuring a User Account for Receiving Alarms. . . . . . . . . . . . . . . . . . . . . . . . . . . . . . . . 132
A.7 Telephone Alarm Notification Process . . . . . . . . . . . . . . . . . . . . . . . . . . . . . . . . . . . . . . . . . 135
A.7.1 Steps in a Call . . . . . . . . . . . . . . . . . . . . . . . . . . . . . . . . . . . . . . . . . . . . . . . . . . . . . . . 135
A.7.2 The Telephone Notification Process. . . . . . . . . . . . . . . . . . . . . . . . . . . . . . . . . . . . . . 135
Appendix B. Configuring Email Notifications
B.1 Requirements . . . . . . . . . . . . . . . . . . . . . . . . . . . . . . . . . . . . . . . . . . . . . . . . . . . . . . . . . . . . . 137
B.2 Configuring Email Settings . . . . . . . . . . . . . . . . . . . . . . . . . . . . . . . . . . . . . . . . . . . . . . . . . . 138
B.3 Configuring the User Account for Receiving Alarms . . . . . . . . . . . . . . . . . . . . . . . . . . . . . . 140
Appendix C. Battery Count Reset
C.1 Logger Battery Change and Battery Count Reset . . . . . . . . . . . . . . . . . . . . . . . . . . . . . . . . . 143
Appendix D. Glossary
vi
Kaye LabWatch® LT User’s Manual
Chapter 1. The GE Kaye LabWatch LT Monitoring System
Chapter 1.
The GE Kaye LabWatch LT Monitoring
System
The GE Kaye LabWatch LT monitoring software system integrates RF ValProbe sensors,
measurement hardware and networked PCs into a comprehensive solution for laboratory,
warehouse and stability monitoring. Customers can incorporate wireless sensors for
differential pressure, relative humidity, temperature, contact closure, CO2, and any
wireless device that outputs an analog or digital signal. They can also add, replace or
delete sensors as a facility expands or changes.
LabWatch LT software combines three functions. The system monitoring software allows
users to perform real-time monitoring of groups of sensors, with color coding to indicate
alarm levels. Users can click on individual sensors for more detailed information on
trending, tabular data and alarm configuration, or to change the sensor tag description. The
Alarms screen provides lists of recent alarms, and the Audit screen allows users to record
and check the audit trail. For system administration, the Configuration screen enables
system administrators to manage alarm contacts (e-mail and telephone) and
acknowledgements, user accounts, calibration records, tag and group configurations, and
basic system display parameters. All comments are held in a secure database that becomes
part of the permanent record, archived to a secure audit trail in compliance with 21 CFR
Part 11.
To signal personnel immediately when alarm events occur, LabWatch LT provides alarm
notification via telephone and e-mail contacts:
•
A flashing area on main screen shows the alarm location and details the alarm
condition
•
Automatic dialing/emailing from a priority list that calls personnel via telephone or
e-mail
•
User dial-in from a remote site to inquire about system status.
Kaye LabWatch® LT User’s Manual
1
Chapter 1. The GE Kaye LabWatch LT Monitoring System
Automatic dialing for remote personnel allows LabWatch LT to deliver a message using
text to speech messaging to notify the recipient of the alarm description and condition. An
administrator can arrange the calling list in a cascading fashion to ensure the most efficient
response to alarm situations.
Report creation allows you to create reports from a secure database. Users can generate six
types of reports: Real-time, History, Single Tag Alarm, Mean Kinetic Temperature
(MKT), Audit Trail and Calibration reports. A query function provides access to any type
of Audit Trail reporting, from complete reports over any time period to specific reports
focused on a particular system point or event.
To control user access, a system administrator grants access privileges and maintains the
operator list. Each user receives an individual user ID and password combination that
allows entry at the appropriate security level.
2
Kaye LabWatch® LT User’s Manual
Chapter 2. Installing Kaye LabWatch LT
Chapter 2.
Installing Kaye LabWatch LT
Installing and setting up LabWatch LT is fairly straightforward. However, you must first
be sure that your PC meets the necessary requirements.
2.1 System Requirements
•
OS compatibility (MS Windows 7 32 bit and 64 bit, MS Windows XP SP3 32 bit, MS
Windows Server 2008R2-Standard). English, German, French, Italian, Spanish,
Portuguese and Chinese language version of above mentioned operating systems are
supported.
•
Minimum P4 or equivalent PC/Server design capable of running the required MS
Operating System (OS).
•
Memory – Minimum 4 GB of RAM
•
Hard Drive – Minimum 40 GB free space
•
CD or DVD Writable Drive
•
Internet access
•
IP address (assigned by customer’s IT department) for each Base Station used
•
One direct-connect USB (hubs or expansion cards do not work)
•
One PCIe (1x or greater) slot for telephony media board
•
101-key standard Keyboard and mouse (can be used with KVM switching)
•
Graphics – 1024x768, 256 color resolution
•
SVGA flat screen or LCD monitor (17-inch recommended, can be used with KVM
switching)
•
10/100/1000 Network Interface
Kaye LabWatch® LT User’s Manual
3
Chapter 2. Installing Kaye LabWatch LT
2.1.1 Peripherals
•
Networked black and white or color laser printer for all reports and printouts.
(Optional, recommended)
•
Local color ink jet/laser printer for all reports and printouts. (Optional)
2.1.2 Computer Software
•
OS compatibility (MS Windows 7 32 bit and 64 bit, MS Windows XP SP3 32 bit, MS
Windows Server 2008R2-Standard)
English, German, French, Italian, Spanish, Portuguese and Chinese language versions
of above mentioned operating systems are supported.
Hot Fixes is optional but strongly recommended.
Note: LabWatch LT software package will be installed based on language OS (Windows
7 German, Windows 7 English, etc.) instead of regional and language option
selection in operating system. For any language OS which is not supported, the
English version will be installed by default.
•
Anti-Virus and anti-Spyware/Spam software (Optional, highly recommended)
•
Word processing, spreadsheet software and Adobe Reader (Optional; export of reports
to Word, Excel and PDF format not possible in absence of MS Office, no other impact
on the system)
2.1.3 Application Software
•
LabWatch LT 1.0 software package
IMPORTANT: RF ValProbe, LabWatch Pro and LabWatch LT cannot run on the same
machine. GE recommends using the LabWatch LT machine only for
LabWatch LT.
GE cannot test with all applications that could possibly be installed and
cannot guarantee how the system will react with other software on the same
machine.
4
Kaye LabWatch® LT User’s Manual
Chapter 2. Installing Kaye LabWatch LT
2.2 Setting up RF ValProbe Hardware
Before you install LabWatch LT, be sure your RF ValProbe Base Station (s) and Loggers
are transmitting and receiving in a network linked to the PC in which you have installed
LabWatch LT.
Setting up an RF ValProbe hardware system for operation involves three steps:.
1. Setting up the Base Station.
2. Connecting any External Sensors or Auxiliary Inputs.
3. Setting up and positioning the Loggers.
2.2.1 Setting Up the Base Station
Starting the Base Station requires plugging in the power supply and the USB or Ethernet
connections. The rear of the Base Station appears similar to Figure 1 below.
Power
USB
Ethernet
Figure 1: Base Station Connections
•
To power the Base Station, insert the round barrel connector into the power input jack
of the Base Station (the input at the left shown in Figure 1 on the previous page).
Attach the power supply to the power cord.Then insert the power cord into a standard
100-240 VAC outlet. A green light next to the power outlet on the Base Station
indicates that the station is powered up.
•
For USB use, a separate USB-adapter-cable plugs into a USB socket on the user's PC.
The other end of the USB-adapter-cable fits into the 10bT Ethernet socket on the Base
Station. Use only ONE USB-adapter-cable on a PC.
IMPORTANT: The external power supply included with your RF ValProbe is fitted with an
AC power cord suitable for the country of destination.
Kaye LabWatch® LT User’s Manual
5
Chapter 2. Installing Kaye LabWatch LT
2.2.1 Setting Up the Base Station (cont.)
A new Base Station needs configuring before it is added to the LabWatch LT system. By
default, Base Stations are in USB mode but must be switched to Ethernet. Configuration
involves four steps:
1. Switch the Base Station from USB to Ethernet mode.
2. Put the Base Station on the Ethernet and make sure it is online and that the LabWatch
LT PC is able to ping it.
3. Assign an RF network ID to Base Station, All Loggers intended for the Base Station
should also be set with same Network ID manually; all loggers will communicate with
the Base Station on that Network ID. However, be sure no two Base Stations have
same network ID.
4. Perform the Base Station’s Time Synchronization against the PC Time on which Lab
watch Lite Software is running.
Note: While performing this step, make sure the “Windows Time” service is running on
the PC.
Be sure you have installed LabWatch LT and entered users (see page 17). To begin
configuration, proceed to the second tab (page 20) and click on Configure New Base
Station.
6
Kaye LabWatch® LT User’s Manual
Chapter 2. Installing Kaye LabWatch LT
2.2.1a
Configuring a New Base Station
Setting up a New Base Station for the Configuration on PC
a. Use CTA5 Crossover cable to connect the USB-Adapter and Base Station. Put one
end of the crossover cable into the Base Station's Ethernet port and the other end
into the USB-Adapter's Ethernet port.
b. Plug-in the USB-Adapter into the PC's USB Port.
c. The USB Adapter will be detected and Network properties will show a new
connection as shown in Figure 2 below.
Figure 2: Network Properties with New Base Station
A new Base Station needs configuring before it is added to the LabWatch LT system. By
default, Base Stations are in USB mode but must be switched to Ethernet. Configuration
involves four steps:
1. Switch the Base Station from USB to Ethernet mode.
2. Put the Base Station on the Ethernet and make sure it is online and that the LabWatch
LT PC is able to ping it.
Kaye LabWatch® LT User’s Manual
7
Chapter 2. Installing Kaye LabWatch LT
2.2.1a Configuring a New Base Station (cont.)
3. Assign an RF network ID to Base Station. All Loggers intended for the Base Station
should also be set with same Network ID manually; all loggers will communicate with
the Base Station on that Network ID. However, be sure no two Base Stations have the
same network ID.
4. Perform the Base Station’s Time Synchronization against the PC Time on which Lab
watch Lite Software is running.
Note: While performing this step, make sure the “Windows Time” service is running on
the PC.
1. Use the link Click Here to find Base Station on USB to detect the Base Station on
the USB-Ethernet Adapter.
Figure 3: Switch Base Station Tab
8
Kaye LabWatch® LT User’s Manual
Chapter 2. Installing Kaye LabWatch LT
2.2.1a Configuring a New Base Station (cont.)
Figure 4: Scanning USB Ports
If a Base Station is connected through the USB port, then the Base Station IP address will
appear in the “Detected at” text box after “Click Here to find Base Station on USB” is
clicked.
Figure 5: Detected Base Station
Kaye LabWatch® LT User’s Manual
9
Chapter 2. Installing Kaye LabWatch LT
2.2.1a Configuring a New Base Station (cont.)
2. Enter the new “Base Station Static IP” which has to be assigned to the Base Station
Your business IT department may need to assign this unique Static/Fixed-address/
Reservation IP address using their network configuration tools. Click Configure to
Ethernet. Once successful, the “IP Address Switched Successfully” message will
appear.
Figure 6: Configure to Internet
3. Click Next to configure the Base Station’s RF Network ID.
Figure 7: Network ID Configuration
10
Kaye LabWatch® LT User’s Manual
Chapter 2. Installing Kaye LabWatch LT
2.2.1a Configuring a New Base Station (cont.)
4. Enter the Base Station's Static IP. Enter the new RF Network ID, and click Change
Network ID. Current Network ID of the Base station is detected and a confirmation
message is prompted. For easy identification and future use, please affix a tag to the
Base Station noting the selected Base Station IP address and the RF Network ID.
Figure 8: Confirmation Message
5. Click Proceed to confirm you want to change the ID. Once done, the “Network ID
Changed Successfully” message appears.
6. Click Next to proceed to Time Synchronization of the Base Station with the LabWatch
LT PC.
Kaye LabWatch® LT User’s Manual
11
Chapter 2. Installing Kaye LabWatch LT
2.2.1a Configuring a New Base Station (cont.)
Figure 9: Time Synchronization
Now you must synchronize the Base Station’s time with that of the PC on which
LabWatch LT is running. The IP address of the PC is displayed; a user needs to enter the
Base Station IP address.
Make sure the “Windows Time” is running on the PC and then click Apply Time
Synchronization. Once done, the message “Base Station Time Synchronization is
Successful” appears.
Loggers on the Base Station also need their times synchronized with that of the Base
Station; do this manually by power resetting all the loggers. Please follow the steps below
to sync the logger time with Base Station Time:
1. Power OFF the logger, and change the Base Station ID, to anything other than the
original ID.
2. Power ON the Logger.
3. Power OFF the logger, and change the Base Station ID back to the original.
4. Power ON the Logger.
Once you have added the Base Station to the network and synchronized the time, continue
with setting up the LabWatch LT system as shown on page 20.
12
Kaye LabWatch® LT User’s Manual
Chapter 2. Installing Kaye LabWatch LT
2.2.2 Connecting an External Sensor and Auxiliary Inputs
If any of your Loggers are designed for use with an external sensor, that sensor will have
been shipped in the same package as your Logger.
•
To connect the sensor to the Logger, simply slide the connection end of the sensor into
the hole on the right side of the Logger.
•
To disconnect the sensor from the Logger, pull back the connection sleeve (the
grooved part visible outside the connection) and you can pull out the sensor.
CAUTION!
When handling external sensors, avoid bending the sensor near
either the tip or connector ends. Repeated bending will damage the
sensor.
You connect auxiliary inputs (4-20 mA, 0-10V or contact closure) via the terminal at the
top of the Logger shown in Figure 10 below. Figure 11 below illustrates wiring
connections for the auxiliary inputs.
Figure 10: Auxiliary Input Terminal
User Interface Connector
X
X
X
-
X
+
4-20 mA
XTMR
+
_
+
_
External
Power
Supply
External Switch Dry Contact
Figure 11: Interface Connector Wiring Diagram
Kaye LabWatch® LT User’s Manual
13
Chapter 2. Installing Kaye LabWatch LT
2.2.2 Connecting an External Sensor and Auxiliary Inputs (cont.)
Note: For a 2 or 5-channel Logger, the sensors are prewired to terminal blocks inside
the Logger. To replace or reattach a sensor, you must remove the cover and
retaining bar, remove the terminal block for the existing sensor, attach the
terminal block of the new sensor, and replace the retaining bar and cover.
2.2.3 Setting up the Loggers
When you are setting up the Loggers, you must first be sure that they are switched on, and
that they have the same network ID (from 0 to 9 or A to F) as the Base Station. (For
instance, all Loggers must have the network ID “5” if the Base Station has the ID “5”.)
IMPORTANT: If you have more than one Base Station, each one must be configured with a
unique network ID.
To switch on the Logger, see the back of the Logger above the battery panel, as shown in
Figure 12. Slide the switch below the network ID wheel to the right to turn on the logger.
Network ID Wheel
Power Switch
Battery
+
+
Compartment
Figure 12: Logger Battery Compartment, Power Switch and Network ID Wheel
14
Kaye LabWatch® LT User’s Manual
Chapter 2. Installing Kaye LabWatch LT
2.2.3 Setting Up the Loggers (cont.)
Be sure the network ID for both Base Station and Loggers is set up as shown on page 15.
If you need to adjust the Logger’s network ID, use a small screwdriver to turn the arrow in
the middle of the network ID wheel in Figure 12 on page 14. Be sure the arrow points to
the appropriate ID number. (You can choose from numbers 0 through 9, and letters A
through F.)
Note: You must change the Logger network ID before you switch on the Logger. If you
have already switched the Logger on, switch it off and then turn it back on so the
Logger can read the correct ID.
Kaye LabWatch® LT User’s Manual
15
Chapter 2. Installing Kaye LabWatch LT
2.2.4 Logger Installation Guidelines
You can now position the Loggers. Each Logger must be no more than 300 ft. distant from
the Base Station and the other Loggers. GE offers several recommendations for logger
placement:
•
Install the Loggers at least one to two feet above the ground or floor. For better RF
transmission, place them as high as possible. If possible, raise or lower the Base
Station and Loggers above or below walls or any obstruction.
•
•
Point the Logger antenna upwards for best results.
•
If Loggers are placed at different heights, make sure that they are within antenna range
(within 300 ft. from the Base Station or another logger). The RF signal is transmitted
in an arc, with maximum signal strength occurring in the area 45° above and below
the tip of the antenna.
•
Be aware that metal surroundings can interfere with RF transmission; the Logger may
transmit, but the signal will be weaker. Shorten the transmission distance accordingly.
•
Do not install Loggers next to a cordless phone base or other 2.4 GHz transmission
device.
•
•
Do not install Loggers on a vibrating surface.
Do not position the Loggers directly above or below each other. Stagger their
positions for better transmission.
Do not place Loggers where the temperature is outside their rated operating range.
IMPORTANT: If you are using Loggers with internal sensors, be sure the vents on the side
remain uncovered. If the vents are covered, the sensors cannot provide
correct readings.
16
Kaye LabWatch® LT User’s Manual
Chapter 2. Installing Kaye LabWatch LT
2.3 Installing Kaye LabWatch LT Software
To begin installation, insert the LabWatch LT CD into the CD drive. Follow the steps in
the LabWatch LT Startup Guide to install the software.
Once you have installed LabWatch LT, click on Start >Programs>LabWatch LT to open
the program. The Login window opens.
Figure 13: Login Window
Kaye LabWatch® LT User’s Manual
17
Chapter 2. Installing Kaye LabWatch LT
2.3 Installing Kaye LabWatch LT (cont.)
The Configuration Wizard will open before you launch LabWatch LT if the following
conditions are met:
1. No users have been created
2. No tags have been defined
Through the Configuration Wizard you can create user accounts, discover Base Stations/
Loggers, associate a sensor with a tag, set tag properties, create tag groups, associate users
with tag groups, and associate schedules with users.
The following sections describe configuration steps.
18
Kaye LabWatch® LT User’s Manual
Chapter 2. Installing Kaye LabWatch LT
2.3.1 User Registration
In a newly installed system, no user accounts exist for LabWatch LT. So when you start
LabWatch LT for the first time, a Registration window appears in which you can create
new users. For each user, enter the relevant data in the fields.
Figure 14: User Creation Screen
Users can be one of three types, each with specific permissions:
System Administrator - Creates and maintains user accounts, locks and unlocks the
system, sets site options and system preferences, backs up and restores user information,
and views, prints, and maintains the audit trail. The System Administrator also performs
Logger calibration.
Operator - Can view screens and create reports, Operators can also have particular
permissions if the System Administrator has set them up with specific permissions in this
window.
Guest - Can view screens, but cannot change any parameters.
IMPORTANT: Whenever new users are created, they are assigned default passwords that
are the same as their User IDs. A user must change the default password at
first log in.
After creating the required number of user accounts, click Next to configure the base
station and loggers, as explained on the following pages.
Kaye LabWatch® LT User’s Manual
19
Chapter 2. Installing Kaye LabWatch LT
2.3.2 Discovering Base Stations and Loggers
In the next window, click on Discover Base Stations to determine what Base Stations are
on your network, and click on Get Loggers to find the Loggers for each of the selected
Base Stations. You can also Enter an IP Address to locate a particular Base Station.
Figure 15: Configure Base Station Window
Figure 16: Discovering Base Stations
20
Kaye LabWatch® LT User’s Manual
Chapter 2. Installing Kaye LabWatch LT
2.3.2 Discovering Base Stations and Loggers (cont.)
Figure 17: Getting Loggers
When a user clicks on GET LOGGERS, it toggles to a STOP GET LOGGERS button.
Clicking on STOP GET LOGGERS will stop LabWatch LT from searching for Loggers
from selected Base Stations.
After the Loggers have been received and displayed, a user can select/unselect Base
Stations and Loggers by clicking the corresponding check boxes. Click Next when you
have finished.
Figure 18: Screen Populated with Base Stations
Kaye LabWatch® LT User’s Manual
21
Chapter 2. Installing Kaye LabWatch LT
2.3.2 Discovering Base Stations and Loggers (cont.)
Figure 19: Populated Screen with Selected Loggers
Note: You can configure four (4) Base Stations. Two Base Stations can have 40 loggers
per Base Station; overall, you can configure no more than 100 loggers.
22
Kaye LabWatch® LT User’s Manual
Chapter 2. Installing Kaye LabWatch LT
2.3.3 Associate Sensors with Tags
IMPORTANT: Tags cannot be generated without license info, so to generate the license
key, click on the License Key button and enter a valid license key as shown
below. Once a valid key is entered, tags can be generated, otherwise a
message will pop up if it exceeds the limit. Even if the number of tags
exceeds the limit, a user can still generate the tags but can only generate up
to the license key provided.
Once the license key is entered, clicking on the Evaluate key will connect to the product
key evaluation server to generate the license information. On receiving the license info,
the license to number of tags will be listed and a user can proceed further for tag
generation; otherwise appropriate messages will be displayed on unsuccessful product key
entry.
Figure 20: License Key Evaluation
When you have populated the list, click on the Next button to proceed to the Assign Tags
tab (Figure 21 on the next page). In the Enabled column, clear the checkbox for any tag
you do not want to enable. In the Tag and Tag Description columns, you can enter your
own tag IDs and descriptions. To create automatic tags, click the Generate Tag button. If
you need to reassign a tag, click the REASSIGN Tag button. By default, “Group By” will
list all the base stations. Selecting a particular base station will list sensors related to that
selected base station.
Kaye LabWatch® LT User’s Manual
23
Chapter 2. Installing Kaye LabWatch LT
2.3.3 Associate Sensors with Tags (cont.)
Figure 21: Assign Tags Tab
By default, tags are generated with prefix “T”, but you can change the tag prefix by
selecting the required letter from the Prefix drop-down box. Then click on Update Tag
Prefix to update the tag prefix for all tags. Remember that the option to change tag
prefixes is a one-time activity, and that clicking Next will save tags into the database.
Once a tag is saved into the database, the option to change tag prefix becomes invisible, so
users will not be able to change the tag prefix anymore.
Clicking ENABLE ALL will enable all sensors.
Clicking DISABLE ALL will disable all sensors.
Figure 22: Reassigning Tags
24
Kaye LabWatch® LT User’s Manual
Chapter 2. Installing Kaye LabWatch LT
2.3.3 Associate Sensors with Tags (cont.)
When you have completed sensor and tag association, click Next to configure tags.
Kaye LabWatch® LT User’s Manual
25
Chapter 2. Installing Kaye LabWatch LT
2.3.4 Configure Tags
Figure 23: Configure Tags Tab
Click on any single tag, and the window for that tag opens at the Configuration tab. It
includes text boxes for the Tag Description, Spoken Description (for telephone contacts)
and Measurement Unit (C or F for temperature, % for relative humidity)
Click the Alarm tab, and you can enter alarm limits and delay times. Click the Enable box
to apply the values you have entered for alarm limits.
26
Kaye LabWatch® LT User’s Manual
Chapter 2. Installing Kaye LabWatch LT
2.3.4 Configure Tags (cont.)
Figure 24: Alarm Tab
The tag window differs slightly for analog and digital auxiliary inputs. For analog inputs, a
third tab, Scaling, appears.
Figure 25: Configure Tags Tab (for Analog Inputs)
Kaye LabWatch® LT User’s Manual
27
Chapter 2. Installing Kaye LabWatch LT
2.3.4 Configure Tags (cont.)
Figure 26: Configure Tags (Analog Inputs)—Alarm Tab
Figure 27: Configure Tags —Scaling Tab
On the Scaling tab, click Enable to enable scaling. Two windows display the current raw
low and raw high values. Enter the Scale Low and Scale High values in the text boxes.
The tag window for a digital input has two tabs, but the inputs differ.
28
Kaye LabWatch® LT User’s Manual
Chapter 2. Installing Kaye LabWatch LT
2.3.4 Configure Tags (cont.)
Figure 28: Configure Tags—Digital Inputs
Figure 29: Mode Selection
On the Configuration tab, three modes are available in the drop-down list: Open/Close, I/
O and On/Off. Click on the desired mode. On the Alarm tab, besides enabling alarms and
setting a delay time, you can select an Alarm Mode of Open or Close from the drop-down
list.
Kaye LabWatch® LT User’s Manual
29
Chapter 2. Installing Kaye LabWatch LT
2.3.4 Configure Tags (cont.)
Figure 30: Alarm Mode Selection
If you select one/more tag (of type Temperature, Humidity, Auxiliary), the Multi Tag
Settings button is enabled. Click this button, and you can apply common Lo, LoLo, Hi,
and HiHi alarm limits and delays to the selected tags.
IMPORTANT: For Multi Tag Settings to work, a user should uncheck any DI tag within
the list.
Figure 31: Multi Tag Settings Window
30
Kaye LabWatch® LT User’s Manual
Chapter 2. Installing Kaye LabWatch LT
2.3.4 Configure Tags (cont.)
Click Enable to enable these limits, and then click OK to apply the limits and delays to
the selected alarms.
2.3.5 Create Tag Groups
Clicking Next opens the Create Tag Groups tab in which a user can create/modify tag
groups; by default, the battery group opens, as shown below.
Figure 32: Create Tag Groups
The left pane of this tab lists the currently available groups. Click on the arrow button
beside any group, and a list of associated sensors appears below the group name. (The
same list appears in the “Selected” pane at the right.) When you select a group, the
Available Tags list and Selected Tags list are updated to show the specific group. You can
move tags between the Available and Selected lists.
To create a new group, click the Add Group folder icon in the upper list of tag groups.
You can then create the group by entering the group name and description, and selecting
tags. Then click Save to save group information. Clicking on the arrow (up/down) buttons
allows you to set the order of tags.
Kaye LabWatch® LT User’s Manual
31
Chapter 2. Installing Kaye LabWatch LT
2.3.5 Create Tag Groups (cont.)
Figure 33: Adding a Group
To delete a group, select the group and click on the cross icon appearing on top right
corner of the group folder icon.
Click Next to proceed to the Assign Users tab, where you can associate users with groups.
32
Kaye LabWatch® LT User’s Manual
Chapter 2. Installing Kaye LabWatch LT
2.3.6 Associating Users with Tag Groups
Figure 34: Assign Users Tab
Upon selecting a group, the Assigned User list is updated appropriately. You can also
move users between the Available and Assigned Users lists. Clicking on the arrow (up/
down) buttons allows you to set priority of users in a group.
To create a user, click on the Add User icon located on top right corner of the Available
Users listbox. Clicking Next will display the Define Schedule tab, where you can
associate schedules with a specific user of a group.
Kaye LabWatch® LT User’s Manual
33
Chapter 2. Installing Kaye LabWatch LT
2.3.7
Defining and Modifying User Schedules
Figure 35: Define Schedules Tab
The Define Schedule tab displays all the available schedules. You can also create a new
schedule or modify existing schedules here:
1. To create a schedule, click on the NEW button.
Figure 36: New Schedules Window
34
Kaye LabWatch® LT User’s Manual
Chapter 2. Installing Kaye LabWatch LT
2.3.8 Defining and Modifying User Schedules (cont.)
2. To edit a schedule, select the required schedule and click on the EDIT button.
Figure 37: Edit Schedules Window
3. To delete a schedule, select the required schedule and click on the DELETE button.
Figure 38: Delete Schedules Window
Clicking on the Yes button deletes the selected schedule.
Kaye LabWatch® LT User’s Manual
35
Chapter 2. Installing Kaye LabWatch LT
2.3.9 Defining Alarm Notifications
Figure 39: Defining Alarm Notifications
To associate a schedule with a user of a particular group:
1. Select a group.
2. Select a user from the selected users list.
3. Select a schedule. You can also create a new schedule by clicking on the Add icon
located at the top left corner of the Schedule Details grid.
4. Select the notification type as needed.
You can also change the priority of users by clicking on the arrow (up/down) buttons.
These up/down buttons allow you to set the priority of users in a group.
36
Kaye LabWatch® LT User’s Manual
Chapter 2. Installing Kaye LabWatch LT
2.3.9 Defining and Modifying User Schedules (cont.)
Click Next to display the Review tab, where you can see a detailed report of activities
performed in the last seven tabs.
Figure 40: Review Tab
Click Finish to exit the Configuration Wizard and launch LabWatch LT.
Kaye LabWatch® LT User’s Manual
37
Chapter 2. Installing Kaye LabWatch LT
[no content intended for this page - proceed to next page]
38
Kaye LabWatch® LT User’s Manual
Chapter 3. Monitoring Sensors with Kaye LabWatch LT
Chapter 3.
Monitoring Sensors with Kaye
LabWatch LT
Once you have installed and set up LabWatch LT, you can begin to monitor your sensors.
If this is your first use of LabWatch LT, the Log In screen will ask you for your User ID
and password. (For the first use only, enter the User ID in both columns.) The system will
then ask you to enter and confirm a new password. Enter a new password with a minimum
of six characters.
Once you have entered your new password, LabWatch LT opens at the System Monitoring
screen. Click on a button for one of the groups you have created in Chapter 2, and the
screen will appear similar to Figure 41 below.
Figure 41: Monitoring Tab
Kaye LabWatch® LT User’s Manual
39
Chapter 3. Monitoring Sensors with Kaye LabWatch LT
3.1 The Monitoring Screen
The Monitoring screen, the first screen to appear once you have logged onto LabWatch
LT, provides a concise overview of the various groups of sensors that make up a LabWatch
LT system. As with the other major screens, the header lists the number of current
unacknowledged alarms.
At the bottom of the screen, the Area series of buttons offers a scrolling list of the userassigned alarm areas (groups). Any group with at least one unacknowledged alarm will
flash red, while the others will remain blue. Users can create any number of individual
alarm areas with any number of tags. (GE recommends defining areas with up to 30 tags
for better and clearer depiction on a full screen view.)
When you click on any of these buttons, you can survey the status of the alarms assigned
to this group in the center of the screen. Users can display all areas, or up to four groups on
the screen at any one time, in three different views — List (tabular data, as shown in
Figure 41 on the previous page), Graph (a color-coded graph of the individual tags), and
Floor (displaying tag icons superimposed over a map of the facility floor plan). To
determine the number of areas displayed on the monitor at any one time (from one to
four), click on the appropriate button in the Display View option.
For example, if you click on the two-pane button, a two-area screen appears, with the right
screen empty. Click on the second group, and, with the mouse held down, pull the second
group onto the window. The screen now appears similar to Figure 42 below.
Figure 42: Two-View Monitoring Screen
40
Kaye LabWatch® LT User’s Manual
Chapter 3. Monitoring Sensors with Kaye LabWatch LT
3.1 The Monitoring Screen (cont.)
A three-area screen opens a third window. . .
Figure 43: Three-View Screen
and the four-area screen supports four different groups and/or views.
Figure 44: Four-View Screen
Kaye LabWatch® LT User’s Manual
41
Chapter 3. Monitoring Sensors with Kaye LabWatch LT
3.1 The System Monitoring Screen (cont.)
For RF ValProbe loggers, if a sensor is OPEN CIRCUIT, OVER range or UNDER range,
the value will show up as ?? on the System Monitoring screen and it will have a COMM
alarm.
Users can rearrange a List by clicking on the Column Layout drop-down list. They can
then click or unclick checkboxes to show or hide particular alarm columns. In addition,
they can click on the Status or Description drop-down lists to select particular tags to
display, or the tags that are less than, equal to, or greater than a particular value.
To alter the description or status of a given tag, click on the tag to open the Tag
Maintenance screen. Here you can review trends and tabular data, and edit the alarm data.
At the top of the screen, six tabs enable navigation among the major areas of LabWatch LT
(Figure 45 below).
Figure 45: Navigation Tabs
•
The Graphing tab allows you to select groups and tags to create graphs, as well as to
determine the parameters, limits and appearance of the graph.
•
The Alarms tab opens the Alarms window, in which you can review and acknowledge
alarms. You can also view the alarm history for a particular tag since midnight of the
current day (up to a maximum of 24 hours) by expanding the alarm row in the list.
•
The Audit tab provides a running list of audit trail events.
•
The Reports tab enables you to create daily, historical and Mean Kinetic Temperature
(MKT) reports, along with single tag reports, audit trail reports and calibration reports,
from the monitored data.
•
The Configuration tab equips the Administrator to add and edit users and user
passwords, set up telephone and e-mail contact configurations, enable and disable
alarms, and access the Tag Configurator.
•
From these other screens, the Monitor tab enables returning to the Monitoring screen.
42
Kaye LabWatch® LT User’s Manual
Chapter 3. Monitoring Sensors with Kaye LabWatch LT
3.1 The System Monitoring Screen (cont.)
At the right, the Comments button allows you to add comments at any time. When you
click on this button, it turns yellow and the Comments window (Figure 46 below) opens.
Figure 46: Comments Window
When you have finished, click OK to save the comments and close the window, or Cancel
to close the window without saving the comments.
Kaye LabWatch® LT User’s Manual
43
Chapter 3. Monitoring Sensors with Kaye LabWatch LT
3.2 Views on the Monitoring Screen
3.2.1 The List View
When you first open the Monitoring screen, the default view will be the List View,
(Figure 41 on page 39), a list of tags and values in table format. As with other views, you
can select up to four groups to display on the screen at one time — or you can display one
or more groups in other views (graph or floor). In the List view, the alarm columns include
Tag, Status, Lo and LoLo Limits, Hi and HiHi Limits, Value (the current value for the
alarm), Is Alarm Enabled (indicating whether a given alarm is enabled) and the
Description.
Note: You cannot enable an alarm in this window. To enable an alarm, go to page 51.
Users can rearrange a List by clicking on the Column Layout drop-down list. They can
then click or unclick checkboxes to show or hide particular alarm columns. Users can
navigate to other screens and tabs by click on the List View grid header. For example, if
the Status column header is clicked, then the user will be taken to the Alarm tab. Clicking
on Limit columns and Is Alarm Enabled column will launch the Alarm Configuration
tab of the Tag Management screen. Clicking on the Tag Name and Value column will
launch Trending and Tabular Data in the Tag Management Screen.
Various alarm statuses are color-coded:
•
•
•
•
•
•
red for Hi (High)
burgundy for HiHi (High High)
aqua for Lo (Low) sensor alarm and low battery alarm
blue for LoLo (Low Low)
yellow for loss of communication (COMM).
green for the normal condition.
Note: If necessary, you can change the color code for the above alarm conditions. See
page 96.
For RF ValProbe loggers, if a sensor is OPEN CIRCUIT, OVER range or UNDER range,
the value will show up as “??” on the Monitoring screen and it will have a COMM alarm.
44
Kaye LabWatch® LT User’s Manual
Chapter 3. Monitoring Sensors with Kaye LabWatch LT
3.2.1 The List View (cont.)
You can rearrange a List by clicking on the Column Layout drop-down list. Then you can
click or unclick checkboxes to show or hide particular alarm columns. You can also
rearrange the order of the columns by dragging the column headers, and sort the columns
on the list in ascending or descending order by clicking on column headers. If you click on
arrows alongside the Status or Description drop-down lists, you can select particular
units to display, or the tags that are less than, equal to, or greater than a particular value.
To add or subtract screens with other views or groups, click on the Display View button
with the desired number of views. To switch to another view, go to the View By drop
down list in the upper left corner, and click on another view option.
Kaye LabWatch® LT User’s Manual
45
Chapter 3. Monitoring Sensors with Kaye LabWatch LT
3.2.2 The Graph View
To access a Graph view of a selected group on the Monitoring screen, go to the View By
drop down list in the upper left corner, and click on the Graph View option. The screen
converts to a view of the data in graphical format.
Figure 47: Graph View of Monitoring Screen
Each graphed tag is designated by a particular colored line, with the key in the upper right
corner. Clicking on a given line opens a popup box with the sensor name, time/date stamp
and current reading.
You can zoom into an area on the graph by selecting the area with the mouse and the
scrollbars that appear. To zoom out, click on the - (minus) button on the scrollbars.
Note: The graph view displays only the readings of the past hour.
You can view up to four groups by clicking on the number of views in the Display View
button in the upper right.
46
Kaye LabWatch® LT User’s Manual
Chapter 3. Monitoring Sensors with Kaye LabWatch LT
3.2.3 The Floor View
Figure 48: Floor View, Sensors Only
To access a Floor view of a selected group on the Monitoring screen, go to the View By
drop down list in the upper left corner, and click on the Floor View option. The screen
(Figure 48 above) converts to a view of the sensor data for the specified group, with tag
name and current reading in blinking icons. However, you can add more specific floor
information by importing a floor plan onto the screen and superimposing the tag data
icons. Click on the Floor Plan Settings button. The Floor Plan Settings window
(Figure 49 below) opens.
Figure 49: Floor Plan Settings Window
Kaye LabWatch® LT User’s Manual
47
Chapter 3. Monitoring Sensors with Kaye LabWatch LT
3.2.3 The Floor View (cont.)
To import the floor plan, click on the Browse button and locate the desired plan (in bmp or
jpeg format). When you have added the plan, click OK. The screen now appears similar to
Figure 50 below.
Figure 50: Floor Plan with Sensors
Click and drag the tag icons to the desired locations. When you have finished, click Save
Floor Plan. Now you can view the tag data in its approximate location on the floor.
As with the List and Graph Views, you can view up to four groups by clicking on the
number of views in the Display View button in the upper right.
48
Kaye LabWatch® LT User’s Manual
Chapter 3. Monitoring Sensors with Kaye LabWatch LT
3.3 Viewing Tag Data in Detail — The Tag Maintenance Screen
When you click on the tag line of a particular tag in the System Monitoring window, the
Tag Maintenance screen opens. This screen offers three tabs for viewing the most current
alarm data:
3.3.1 The Trending Tab
Figure 51: Trending Tab
The tab that initially appears, Trending, opens a live trend of the selected point. It appears
blank when first opened, but then updates at 10-minute intervals. At the top of the screen,
it displays the tag name, description and current value. If the tab remains open, it
continues to collect and display data, allowing scrolling in the predetermined minutes. If
you move the cursor to a particular point on the graph, a popup displays the date, time and
value for a specific point.
Note: Trending data only covers readings for the past hour.
Kaye LabWatch® LT User’s Manual
49
Chapter 3. Monitoring Sensors with Kaye LabWatch LT
3.3.2 Tabular Data for a Tag
Figure 52: The Tabular Data Tag
The second tab, Tabular Data, presents the real-time data for the tag in a Date/Time and
Value table for the tag data. A drop-down list at the bottom of the tab enables you to
display data over the following past durations in 1-minute increments (only):
•
5, 10 and 30 minutes
•
1, 2 and 12 hours
•
1 day, 2 days
•
1 week
•
1 month
50
Kaye LabWatch® LT User’s Manual
Chapter 3. Monitoring Sensors with Kaye LabWatch LT
3.3.3 The Alarm Configuration Tab
Figure 53: The Alarm Configuration Tab
Kaye LabWatch® LT User’s Manual
51
Chapter 3. Monitoring Sensors with Kaye LabWatch LT
3.3 The Alarm Configuration Tab (cont.)
The third tab in the Tag Maintenance screen, Alarm Configuration, equips you to enable,
or specify alarms for a specified tag. Click (or clear) the Enable check box at the top to
enable (or disable) alarms for a specific tag.
The Group line below identifies the group to which the tag belongs.
Eight text boxes below allow you (if you have appropriate permissions) to enter the
Alarm Limits and Alarm Delays (in minutes) for the LOLO, LO, HI and HIHI alarms.
However, if the tag type is a digital input, then you will be able to enter only the delay and
alarm mode fields. When you have completed entering changes, click the Save Changes
button.
52
Kaye LabWatch® LT User’s Manual
Chapter 4. Graphing Tag Data
Chapter 4.
Graphing Tag Data
When you click on the Graphing tab from the Main Menu, you can set up a graph with
specified groups and tags, and then establish the duration, appearance and limits of the
graph. You can display one or two graphs at any one time, as shown in Figure 54 below
and Figure 55 on the next page.
Figure 54: Single Graph View
A Graph Tooltip (shown above) allows users to review sensor readings that appear at a
given point in time on the graph. To display the Tooltip, click on the graph at a particular
point on the X-axis. A red vertical line will appear next to the Tooltip, which lists the tags
and their readings for that particular time.
Kaye LabWatch® LT User’s Manual
53
Chapter 4. Graphing Tag Data
Figure 55: Dual Graph View
54
Kaye LabWatch® LT User’s Manual
Chapter 4. Graphing Tag Data
4.1 Configuring the Graph — the Chart Configuration Screen
On the Chart Configuration screen, you can enter the criteria and options (tags and groups,
multiple Y axes, and limit lines) required for generating a single or double graph.
4.1.1 Entering Content
The first tab, Tags, displays the Groups and their tags you can select to generate a single
graph or double graph. Click the checkbox for the groups and/or tags you need on the
graph, and then select a template from the drop-down list.
Figure 56: Groups and Tags
Click on the expansion box (+) to open the list of tags associated with each group. Click
on the checkboxes for each group or tag you want to plot. Follow the same procedure to
select each group and/or tag for comparison. When you have finished, click OK.
Note: Only 20 tags can be selected for each type of graph, i.e., Single Graph, Graph1
and Graph2.
Kaye LabWatch® LT User’s Manual
55
Chapter 4. Graphing Tag Data
4.1.2 Determining the Graph Appearance — Chart Configuration
Figure 57: The Chart Configuration Tab
On the Chart Configuration tab, you can specify the basic parameters of one or two charts
that will appear on the Graphing screen.
1. First, select the Data Retrieval mode: click on either the Real-time or Historical
option button.
2. Next, click on the Calendar button to open a calendar and select the Start Date/Time
for either or both charts. You can click on the date on the calendar or enter the date/
time in the text box.
3. In the same manner, select the End Date/Time for either or both charts.
4. Click on the Sampling Mode drop-down list to enter one of four sampling modes:
Sample/Lab, High Value, Low Value or Average.
d. Sample/Lab: The graph will plot the sample value every minute for the selected
duration. You can select chart duration for this mode to define the number of hours
the chart will cover on the x-axis.
e. High Value: The graph will display the maximum sample values. The maximum
value to be plotted depends on the duration selected. For example, if the duration
(determined by Start Date and End Date) is 3 days, then the maximum value out of
every 3 samples for 3 days is considered and plotted on the graph. Similarly, if the
duration is 7 days, then the maximum value out of every 7 samples for 7 days is
considered and plotted on the graph.
56
Kaye LabWatch® LT User’s Manual
Chapter 4. Graphing Tag Data
4.1.2 Determining the Graph Appearance — Chart Configuration (cont.)
f. Low Value: The graph will display the minimum sample values.
g. Average: The graph will display the average sample values.
5. Finally, pull down the Chart Duration drop-down list and click on the number of
hours the chart (s) will cover.
4.1.3 The Y Axis Tab
Figure 58: The Y Axis Tab
Click on the Y-Axis tab to set up the parameters for each of three Y axes.
1. For each axis, click the checkbox Enable if you want to apply that particular axis.
2. In the Axis Name text box, enter the name that will appear on the chart.
3. Click on the Sensor Type drop-down list to click on the type of sensor that will be
displayed (temperature, humidity or auxiliary).
4. In the Min and Max text boxes, type in the lower and upper limits for the y axis.
Kaye LabWatch® LT User’s Manual
57
Chapter 4. Graphing Tag Data
4.1.4 Marker Properties
Use the Marker Properties tab to select the appearance of data markers on the chart.
Figure 59: The Marker Properties Tab
5. Pull down the Shape drop-down list to select the shape of the marker (circle, square or
triangle).
6. Pull down the Size drop-down list to click on the size of the marker (from 1 to 10).
7. Open the Color drop-down list and select the marker color.
8. Open the Border Color drop-down list and select the border color.
9. Pull down the Border Width drop-down list to click on the size of the border (from 1
to 10).
58
Kaye LabWatch® LT User’s Manual
Chapter 4. Graphing Tag Data
4.1.5 Limit Lines
Figure 60: The Limit Lines Tab
The Limit Lines tab allows you to set the values and appearance of the alarm limits on the
chart. For each of up to three axes, enter the following parameters:
1. Click the checkbox Enable to enable any of the Y axis limit lines.
2. For each of the alarm limits (HI-HI, HI, LO-LO and LO), type in the desired value.
3. From the Type drop-down list, click on the line type required (solid, dash, etc.)
4. From the Width drop-down list, click on the desired width (from 1 to 10).
5. From the Color drop-down list, click on the desired color.
When you have completed entering parameters on the four tabs, click OK.
Kaye LabWatch® LT User’s Manual
59
Chapter 4. Graphing Tag Data
4.1.6 Graph Template
The chart configuration details can be saved and deleted. However, there is no provision
for modifying a template.
To create a new template:
1. Fill all configuration details.
2. Click ON.
3. Click Save.
After successful saving, LabWatch LT displays a success message and the Chart
Configuration window closes. The graph is drawn using these configurations.
To delete a template:
1. Select a template from the Template dropdown menu.
2. Click Delete from the dropdown menu.
4.1.7 Plotting a Graph for Multiple Y-Axis
In case of multiple Y axes, each axis gets a color based on the sensor type selected on the
axis. The trend line has shades of color based on the type of sensor. In this way users can
determine which trend line belongs to which axis.
Tag Type
60
Color Shade
Temperature
Blue
Humidity
Green
Auxiliary
Red
Digital Input
Yellow
Battery
Brown
Kaye LabWatch® LT User’s Manual
Chapter 4. Graphing Tag Data
4.2 Basic Chart Controls
Figure 61: Graph Controls
Below each chart, a series of buttons allows you to further customize the chart appearance.
•
The Zoom buttons
the chart.
allow you to zoom in and out of particular locations on
•
The Refresh button
allows you to update the chart with the most recent data.
•
The Save button
allows you to save the graph as a jpeg or bmp image file.
•
The Print button
allows you to print out the graph on your default printer.
Kaye LabWatch® LT User’s Manual
61
Chapter 4. Graphing Tag Data
4.2 Basic Chart Controls (cont.)
•
The Color button
allows you to apply one of a number of basic colors as a
gradient background to the chart. For example, if you want a green background, click
on the button, and a pull-down palette opens. Click on a shade of green, and the
background changes color, as shown below.
Figure 62: Graphing Screen with Changed Gradient
•
The Annotation buttons
enable you to add or remove annotations (titles
and comments) to the chart or to individual data points. The first annotation is
normally the title, and subsequent annotations are comments.
•
62
Click on the Show Marker checkbox
to enable the chart to display
the marker. A graph without markers appears similar to Figure 63 on the next page.
Kaye LabWatch® LT User’s Manual
Chapter 4. Graphing Tag Data
4.2 Basic Chart Controls (cont.)
Figure 63: Graph without Markers
When you click Show Markers, the markers pinpoint the data readings (Figure 64
below).
Figure 64: Graph with Markers)
Click on the Limits button
to display the LOLO, LO, HI and HIHI limits as lines
on the graph for a single tag.
Note: The Limits button remains disabled if you select two or more tags in the Legends
and Statistics list. It is enabled only if a single tag is selected.
Kaye LabWatch® LT User’s Manual
63
Chapter 4. Graphing Tag Data
4.2 Basic Chart Controls (cont.)
At the bottom of the screen, click on the Legends and Statistics arrow to open a list of
tags, along with their time stamps, associated colors, descriptions and most recent
readings.
Figure 65: Legends and Statistics
Click on another tab at the top of the screen to exit the Graphing screen.
64
Kaye LabWatch® LT User’s Manual
Chapter 5. Monitoring Active Alarms
Chapter 5.
Monitoring Active Alarms
Accessible when you click on the Alarms tab, the Alarms screen provides a list view of all
currently unacknowledged alarms triggered by the sensors monitored by LabWatch LT.
Figure 66: The Alarms Tab
For each alarm, the list covers Time In, Tag Name, Status, Lo and LoLo Limits, Hi and
HiHi Limits, Current value, Description and the associated Group.
Kaye LabWatch® LT User’s Manual
65
Chapter 5. Monitoring Active Alarms
If you click on the arrows alongside Status, Description or Group, a window opens in
which you can click on the particular tag (status, or description) to display; you can also
select particular specifications for values displayed, as shown in Figure 67 below.
Figure 67: Filter Window
To remove or rearrange columns, click on the Column Layout arrow. The Column Layout
window opens.
Figure 68: Column Layout Window
66
Kaye LabWatch® LT User’s Manual
Chapter 5. Monitoring Active Alarms
Clear the checkbox for any column you do not wish to view. To move a column further to
the left or right, highlight the parameter in the list, and then click the Move Up or Move
Down buttons to reposition the column. When you are satisfied, click OK. The Alarms
screen reopens, with the highest column in the list at the far left, and other columns in
descending order from left to right.
To acknowledge the current alarms, click the Acknowledge button at the bottom of the
screen. Then follow the instructions below.
5.1 Acknowledging Alarms
When you click on the Acknowledge button from the Alarms window, the Acknowledge
Alarms window opens.
Figure 69: The Acknowledge Alarms Screen
Kaye LabWatch® LT User’s Manual
67
Chapter 5. Monitoring Active Alarms
5.1 Acknowledging Alarms (cont.)
Click on the checkbox for the group and/or tags you need to acknowledge. (You can also
click on the Select All or Deselect All buttons.) To reset the alarms, click Reset. To
acknowledge the alarms, click Acknowledge Alarms. A second window opens alongside
the first.
[no content intended for this page - proceed to next page]
Figure 70: Acknowledge Alarms Windows
1. First, click the check box for the “Please confirm that you want to acknowledge the
alarms for the below tag.”
2. Next, enter your User ID and Password.
3. Finally, enter your Comments, either from the drop-down list or in the text box below.
4. Click the OK button to acknowledge the alarm.
Note: If you do not have authorization to acknowledge this alarm, a popup window
informs you that the entered user does not have authorization to acknowledge the
alarm. Click OK to close the window, and Cancel to close the Acknowledge
Alarms window.
68
Kaye LabWatch® LT User’s Manual
Chapter 5. Monitoring Active Alarms
5.2 Viewing the Alarm History
To view the alarm history of a particular tag, click the + button for that tag in the far left
column, as shown in Figure 71 below.
Figure 71: Alarm History
Note: The screen displays the alarm history for a particular tag since midnight of the
current day (for a maximum of up to 24 hours).
Kaye LabWatch® LT User’s Manual
69
Chapter 5. Monitoring Active Alarms
[no content intended for this page - proceed to next page]
70
Kaye LabWatch® LT User’s Manual
Chapter 6. Viewing the Audit Trail
Chapter 6.
Viewing the Audit Trail
Figure 72: The Audit Screen
The Audit screen provides a list view of all audit events entered into the LabWatch LT
audit trail. For each event, the list covers User ID, Date, Audit Event, Description,
Comments and Tag Name. If you click on the arrows alongside some of the columns, a
Filter window opens in which you can click on the particular item(s) you wish to display.
Kaye LabWatch® LT User’s Manual
71
Chapter 6. Viewing the Audit Trail
Figure 73: Filtered Events
You can also select particular limits for values displayed, as shown in Figure 74 below.
Figure 74: Audit Trail Events
72
Kaye LabWatch® LT User’s Manual
Chapter 6. Viewing the Audit Trail
To remove or rearrange columns, click on the Column Layout arrow. The Column Layout
window opens.
Figure 75: Column Layout Window on Audit Screen
Clear the checkbox for any column you do not wish to view. When you are satisfied, click
OK.The Audit screen reopens, with the highest column in the list at the far left, and other
columns in descending order from left to right.
Note: The screen displays audit events since midnight of the current day, for a maximum
of up to 24 hours. To create a detailed Audit Trail report, go to “Creating an Audit
Trail Report” on page 83.
Kaye LabWatch® LT User’s Manual
73
Chapter 6. Viewing the Audit Trail
[no content intended for this page - proceed to next page]
74
Kaye LabWatch® LT User’s Manual
Chapter 7. Creating Reports
Chapter 7.
Creating Reports
Figure 76: The Reports Tab
The LabWatch™ Lite Reporting System, available from the Reports tab of LabWatch LT,
is a reporting and analysis tool that allows you to create reports from a secure database.
Note: Entering the reporting system requires re-entry of a User ID and password.
Kaye LabWatch® LT User’s Manual
75
Chapter 7. Creating Reports
7.1 Report Types
LabWatch LT also lets you create the following reports from secure historical data:
Daily Report — LabWatch LT can be configured to automatically generate a Daily
Report covering 24 hours of the day. The Daily Report contains each tag name, description
and its hourly minimum, maximum, and average values over a specific 24-hour period.
Historical Data —The software creates an Historical Data Report using information from
a secure database. Four types of Historical Data Reports are available: Values, Period
Summary, Min/Max/Avg and Alarm. You can request a Values report that includes all
values for selected tags at specified intervals over a defined period of time. You can also
filter tag values by defining upper and lower limits. Values that exceed the specified upper
limit and those values that fall below the specified lower limit are included in the report
and marked with High or Low.
With a Min/Max/Avg report, you obtain the minimum, maximum, and average values for
selected tags at specified intervals over a defined period of time. These can be used to
produce daily or weekly reports.
The Alarm report displays the Alarm and Audit history for the selected tag(s).
Mean Kinetic Temperature (MKT)* — MKT is the isothermal temperature that
corresponds to the kinetic effects of a time temperature distribution. The MKT calculation
produces a single value that characterizes the effect of fluctuating temperatures on longterm product storage by weighing higher temperatures more heavily than lower ones. This
is appropriate because product degradation occurs at an accelerated rate at higher
temperatures.
LabWatch LT extracts data from the historical data files, performs an MKT calculation on
the selected inputs, and reports the result in an MKT Report.
Single Tag Alarm Report— LabWatch LT can also create an alarm report for a single tag
for a specified single day. It contains Alarm and Audit history for a selected tag for the
selected day.
Audit Trail Report —You can create an Audit Trail report for specified groups or tags,
including all audit trail events or those you specify.
76
Kaye LabWatch® LT User’s Manual
Chapter 7. Creating Reports
7.1 Report Types (cont.)
Calibration Report — LabWatch LT also enables creation of current or historical
calibration reports for specified groups or tags.
7.2 Reporting Operation and Benefits
LabWatch LT provides the following benefits:
•
Secure encrypted audit trails, which meet FDA guidelines for electronic records and
data (FDA Regulation 21 CFR part 11)
•
An alarm log that chronologically records every event and operator action
•
Ability to quickly sort or query the alarm data by tags and tag descriptors over a
defined time period
•
User name and password controlled access
•
User can select only 100 tags for a report
•
If the criteria for generating report results in a large set of records, the system prompts
the user to tweak the criteria (e.g., a large date range).
Kaye LabWatch® LT User’s Manual
77
Chapter 7. Creating Reports
7.3 Creating a Daily Report
To create a Daily Report, first click on the LabWatch LT Reports tab at the top of the
screen, and then on the Daily Report button. The Generate Daily Report window opens
(Figure 77 below).
Figure 77: Generate Daily Report
1. Select a template from the drop-down List of Saved Templates (based on previous
reports that have been saved as templates).
2. Click on the Group(s) and Tag(s) that you need to include. You can include
individual tags within a group by clicking on the expansion box, clearing the Group
checkbox, and clicking the checkboxes alongside the individual tags. To simplify
selection, you can also click the Select All or Deselect All buttons.
3. Click on the Start Date calendar and select the desired date and time. Repeat this
procedure for the End Date.
4. If you want a graph at the end of the report, click the Add Graph checkbox.
5. In the associated text boxes, enter the text that will appear as the Report Header, the
Report Page Header and the Report Page Footer.
6. Click on Generate Report to create the report, or on Reset to clear the entered data
and all checkboxes. If you want to save this report as a template (adding it to the List
of Saved Templates), click Save Template.
78
Kaye LabWatch® LT User’s Manual
Chapter 7. Creating Reports
7.4 Creating a Historical Report
Generating historical reports is very similar to generating daily reports. Click on the
LabWatch LT Reports tab at the top of the screen, and then on the Historical Report
button. The Historical Report window opens.
Figure 78: Historical Reports Window
1. Select a template from the drop-down List of Saved Templates (based on previous
reports that have been saved as templates).
2. Click on the Group(s) and Tag(s) that you need to include. You can include individual
tags within a group by clicking on the expansion box, clearing the Group checkbox,
and clicking the checkboxes alongside the individual tags. To simplify selection, you
can also click the Select All or Deselect All buttons.
3. Click on the Start Date calendar and select the desired date and time. Repeat this
procedure for the End Date.
Kaye LabWatch® LT User’s Manual
79
Chapter 7. Creating Reports
7.4 Creating a Historical Report (cont.)
4. From the Report drop-down list, click on the desired report type: Min/Max/Avg,
Period Summary, Values or Alarm.
5. For a Value report, if you want the report to remain within value limits, click the
Upper Limit and/or Lower Limit checkboxes. Then enter the Upper and Lower
Limit values in the associated text boxes. The generated Value report will show High
or Low next to the value if they are not within given limits.
6. In the associated text boxes, enter the text that will appear as the Report Header, the
Report Page Header and the Report Page Footer.
7. Click on Generate Report to create the report, or on Reset to clear the entered data
and all checkboxes. If you want to save this report as a template (adding it to the List
of Saved Templates), click Save Template.
80
Kaye LabWatch® LT User’s Manual
Chapter 7. Creating Reports
7.5 Creating a MKT Report
Click on the LabWatch LT Reports tab at the top of the screen, and then on the MKT
Report button. The Mean Kinetic Temperature Report window opens (Figure 79 below).
Figure 79: Mean Kinetic Temperature Report Window
1. Select a template from the drop-down List of Saved Templates (based on previous
reports that have been saved as templates).
2. Click on the Group(s) and Tag(s) that you need to include. You can include individual
tags within a group by clicking on the expansion box, clearing the Group checkbox,
and clicking the checkboxes alongside the individual tags. To simplify selection, you
can also click the Select All or Deselect All buttons.
3. Click on the Start Date calendar and select the desired date and time. Repeat this
procedure for the End Date.
4. Enter the number of Periods you need the report to cover.
5. In the associated text boxes, enter the text that will appear as the Report Header, the
Report Page Header and the Report Page Footer.
6. Click on Generate Report to create the report, or on Reset to clear the entered data
and all checkboxes. If you want to save this report as a template (adding it to the List
of Saved Templates), click Save Template.
Kaye LabWatch® LT User’s Manual
81
Chapter 7. Creating Reports
7.6 Creating an Alarm Report for a Single Tag
To create a report for a Single Tag Alarm, click on the Single Tag Alarm Report button.
The Single Tag Alarm Report window opens (Figure 80 below).
Figure 80: Single Tag Alarm Report
1. Select a template from the drop-down List of Saved Templates (based on previous
reports that have been saved as templates).
2. Click on the Group(s) and Tag(s) that you need to include. You can include individual
tags within a group by clicking on the expansion box, clearing the Group checkbox,
and clicking the checkboxes alongside the individual tags. To simplify selection, you
can also click the Select All or Deselect All buttons.
3. Click on the Start Date calendar and select the desired date on which the report
begins.
4. To display a graph, click on the Display Graph checkbox. You can then select a color
for the HIHI, HI, LO and LOLO alarms by opening the drop-down list and clicking
the desired color.
5. In the associated text boxes, enter the text that will appear as the Report Header, the
Report Page Header and the Report Page Footer.
6. Click on Generate Report to create the report, or on Reset to clear the entered data
and all checkboxes. If you want to save this report as a template (adding it to the List
of Saved Templates), click Save Template.
82
Kaye LabWatch® LT User’s Manual
Chapter 7. Creating Reports
7.7 Creating an Audit Trail Report
To create an audit trail report, click on the Audit Trail Report button. The Audit Trail
Report window opens.
Figure 81: Audit Trail Report Window
1. Select the particular Audit Events that you need to include. First, click on the Audit
Events option button. Then click on particular event types from the list window.
2. Click on the Group(s) and Tag(s) option button, and then on the groups and/or tags
that you need to include. You can include individual tags within a group by clicking
on the expansion box, clearing the Group checkbox, and clicking the checkboxes
alongside the individual tags.
3. Click on the Start Date calendar and select the desired date. Repeat this procedure for
the End Date.
4. Click on Generate Report to create the report, or on Cancel to clear the entered data
and all checkboxes.
Kaye LabWatch® LT User’s Manual
83
Chapter 7. Creating Reports
7.8 Creating a Calibration Report
The Calibration report tells the user when the user calibration was performed on tags and
the current calibration settings for the tags. On the Calibration Report screen, you can
generate either current or historical calibration reports.
Figure 82: Calibration Report Window
1. First, click on the Groups and Tags that you need to include in the report. You can
click on individual boxes, or use the Select All and Deselect All buttons.
2. To display the current calibration of the tags, leave the Calibration History box
unchecked.
3. To display the calibration history of the tags, check the Calibration History box.
4. Click on Generate Report to create the report, or on Cancel to leave the window
without creating a report.
84
Kaye LabWatch® LT User’s Manual
Chapter 7. Creating Reports
7.9 The Report Viewer Toolbar
Figure 83: The Report Viewer Toolbar
LabWatch LT displays reports in the Report Viewer window, which has the toolbar shown
above. The buttons may be disabled if not required (e.g., if the report is of one page, then
the navigation buttons will be disabled).
The buttons are described below.
The navigation buttons enable a user to navigate to a desired
page of the report.
The Stop button
The Refresh button
The Print button
permits a user to stop rendering the report.
refreshes the report with the newest data.
enables users to print the report.
The Print Preview button
allows users to view the report in a print layout.
The Page Setup button
opens the Page Setup window, where users can set the page
size and page margin for the current report.
The Zoom drop-down menu
the selected percentage.
Kaye LabWatch® LT User’s Manual
enables users to zoom the report as per
85
Chapter 7. Creating Reports
7.9 The Report Viewer Toolbar (cont.)
The Export drop-down menu enables users to export a report to the desired format.
1. Audit Report - This report can be exported to Word, Excel and PDF file format.
2. Other reports - All the other reports can be exported to Excel and PDF file format.
IMPORTANT: MS-Office and PDF reader software should be installed, to view the
exported file.
7.10 Deleting a Report Template
To delete a template:
1. Open the Report criteria screen
2. Select a template from the Template list.
3. Click the Delete Template button
4. The appropriate success message is displayed.
IMPORTANT: All report criteria screens having a Report Template have the Delete
feature.
86
Kaye LabWatch® LT User’s Manual
Chapter 8. Configuring Kaye LabWatch LT
Chapter 8.
Configuring Kaye LabWatch LT
Figure 84: The Configuration Tab
On the Configuration screen (available by clicking on the Configuration tab), you can set
up and manage alarm contacts (e-mail and telephone) and acknowledgements, user
accounts, calibration records, tag and group configurations, and basic system display
parameters.
Kaye LabWatch® LT User’s Manual
87
Chapter 8. Configuring Kaye LabWatch LT
Refer to the sections listed below for specific information on a configuration procedure.
•
Email Configuration —page 89
•
Telephony Configuration —page 92
•
Schedules — page 94
•
Alarm Acknowledgement Comments —page 95
•
Alarm Color Configuration — page 96
•
User Creation/Modification — page 98
•
User Account Settings —page 101
•
User Vacations —page 103
•
User Calibration —page 104
•
Tag/Group Configuration — page 106
•
System Configuration — page 112
•
Locking and Unlocking LabWatch LT — page 113
•
Exit/Shutdown -- Click on Close and then log in to exit or close your session with
LabWatch LT.
88
Kaye LabWatch® LT User’s Manual
Chapter 8. Configuring Kaye LabWatch LT
8.1 Configuring Email Contacts
8.1.1 Email Server Tab
In the Email Configuration window, the first tab, Email Server, equips you to set up the
outgoing and incoming mail servers to transmit alarm messages.
Figure 85: Email Server Tab
For the Outgoing Mail Server:
1. Enter the SMTP Server Name in the associated text box.
2. Enter the SMTP Port Number (25 by default) in the text box.
3. Enter the Source Email Address and the Subject in the text boxes.
4. Check Use SSL option for Gmail and Yahoo mail accounts
For the Incoming Mail Server, enter the IMAP Server Name and the IMAP Port
Number (143 by default).
Kaye LabWatch® LT User’s Manual
89
Chapter 8. Configuring Kaye LabWatch LT
8.1.2 The Authentication Tab
The next tab, Authentication, sets up the Name and Password by which a user can log
into LabWatch LT to acknowledge alarms.
Figure 86: The Authentication Tab
Enter the Login Name and Password that will access the account.
90
Kaye LabWatch® LT User’s Manual
Chapter 8. Configuring Kaye LabWatch LT
8.1.3 The Message Format Tab
The final tab establishes the Message Format for alarm messages.
Figure 87: The Message Format Tab
At the left, select the Email Body Contents by clicking on the checkbox next to the
parameter: Tag, TagDesc, Tag Value, Event Type, Priority, Units, and Group. You can
also use the Move Up and Move Down buttons to arrange the order of the contents.
At the right, the Formatting pane enables you to Label Fields (by clicking the checkbox)
and to select a Delimiter for Email Body Contents (semicolon, comma or slash) from the
pull down menu.
When you have finished, click OK to save the entries and close the window, or on Cancel
to close the window without entering the data.
Kaye LabWatch® LT User’s Manual
91
Chapter 8. Configuring Kaye LabWatch LT
8.2 Configuring Telephone Contacts
If you need to configure telephone dialing for LabWatch LT, click on Telephony
Configuration in the Alarm Management section. The Telephone Dialer Configuration
window opens.
8.2.1 The Voice Tab
Figure 88: Voice Tab in Telephone Dialer Configuration
92
Kaye LabWatch® LT User’s Manual
Chapter 8. Configuring Kaye LabWatch LT
8.2.2 The Control Tab
Figure 89: The Control Tab
The Control tab permits selection of the outbound line for sending phone messages, and
the volume setting for these messages. In the Outbound Line box, click on the Line 1 or
Line 2 option button to specify the telephone line. Use the sliding scale to set the
appropriate Volume Setting (over a range from -10dB to +10dB).
8.2.3 The Dialout Codes Tab
Figure 90: Dialout Codes
If you need dialout prefixes or suffixes to access outside lines, the Dialout Code tab
enables you to record them. To add a Prefix Code or Suffix Code, click on the appropriate
checkbox and enter the code in the text box.
When you have finished, click OK to save the entries and close the window, or on Cancel
to close the window without entering the data.
Kaye LabWatch® LT User’s Manual
93
Chapter 8. Configuring Kaye LabWatch LT
8.3 Managing User Schedules
To set up, edit or delete a user schedule (that is, a time period during which LabWatch LT
can contact specific users with messages), click on the Schedule option under Alarm
Management. The Schedule window opens with the list of current schedules
Figure 91: The Schedule Window
•
To create a new schedule, click New. The New Schedule window opens.
Figure 92: New Schedule Window
In the text box, enter the schedule name. Then use the drop-down hourly lists to specify
the Start and the End Time, and the checkboxes to enter the days. When you have
completed editing the schedule, click OK.
•
•
•
94
To edit an existing schedule, highlight the schedule and click Edit.
To delete an existing schedule, highlight the schedule and click Delete.
To close the window, click Cancel.
Kaye LabWatch® LT User’s Manual
Chapter 8. Configuring Kaye LabWatch LT
8.4 Adding Predefined Acknowledgement Comments
You can add a list of up to five predefined comments to aid in easily classifying
acknowledged alarms. To define these comments, click on Alarm Acknowledgement
Comments under Alarm Management. The Alarm Acknowledgement Comments window
opens.
Figure 93: Alarm Acknowledgement Comments
Click on one of the five available comments. In the Enter Comments text box above,
replace the “Predefined Comment” text with the desired text. When you have finished
editing comments, click OK to save the new comments and close the window.
Kaye LabWatch® LT User’s Manual
95
Chapter 8. Configuring Kaye LabWatch LT
8.5 Configuring Alarm Colors
LabWatch LT has a standard set of colors to designate various types of alarms:
•
red for Hi (High)
•
burgundy for HiHi (High High)
•
aqua for Lo (Low) sensor alarm and low battery alarm
•
blue for LoLo (Low Low)
•
magenta for an open circuit (disconnected sensor).
•
yellow for loss of communication (COMM).
•
green for the normal condition.
However, you can also substitute another color for any or all of the above. Under Alarm
Management, click on Alarm Color Configurations. The Alarm Color Configurations
window opens.
Figure 94: Alarm Color Configuration Window
To change any alarm color, click the arrow next to the color. A palette of available colors
(Figure 95 on the next page) opens.
96
Kaye LabWatch® LT User’s Manual
Chapter 8. Configuring Kaye LabWatch LT
8.5 Configuring Alarm Colors (cont.)
Figure 95: Palette of Alarm Colors
Click on the desired color to change the alarm color. When you have finished:
•
Click Reset to return to the default colors.
•
Click OK to save the changes and close the window.
•
Click Cancel to close the window without saving any changes.
Kaye LabWatch® LT User’s Manual
97
Chapter 8. Configuring Kaye LabWatch LT
8.6 Adding or Editing Users
If you need to add or edit a user, click on User Creation/Modification under the User
Account Modification heading. The User Creation/Modification window opens.
Figure 96: User Creation Window
On this screen, you can enter or change a user ID and user name, determine the user type,
and select Permissions for the particular user.
The entire list of available users appears on the left. To edit an existing user, select the user
from the list on the left.
To create a user:
•
Enter a User Id and User Name in the appropriate text boxes.
•
You can add comments for the created user.
•
You can reset the password for a particular user (in cases where a password has been
forgotten).
•
You can disable a particular user. For a disabled user, all the controls except the
comments and disable user checkbox are disabled. When a user is enabled, his or her
password is also reset.
98
Kaye LabWatch® LT User’s Manual
Chapter 8. Configuring Kaye LabWatch LT
8.6 Adding or Editing Users (cont.)
•
From the drop-down list, enter the User Type: Operator, System Administrator or
Guest.
•
System Administrator - Creates and maintains user accounts, sets site options and
system preferences, locks and unlocks the system, backs up and restores user
information, and views, prints, and maintains the audit trail. The System
Administrator also performs Logger calibration.
•
Operator - Can view screens and create reports. Operators can also have particular
permissions if the System Administrator has set them up with specific permissions
in this window.
•
Guest - Can view screens, but cannot change any parameters.
In the lower left, you have a list of particular Permissions for a user. If you wish to grant
permissions to view or modify parameters in the Configuration option, scroll to the
appropriate option and click on the checkboxes for that permission.
Figure 97: Adding Contact Details
Kaye LabWatch® LT User’s Manual
99
Chapter 8. Configuring Kaye LabWatch LT
8.6 Adding or Editing Users (cont.)
For alarm communications, you can enter up to five email IDs and telephone numbers in
the text boxes, as well as an access code and an acknowledgement code.
Clicking on the plus icon (green) enables you to enter a new email ID or telephone
number, and clicking on the minus icon (red) deletes the respective email ID or telephone
number.
Click New to create a new user, Save to save the changes and close the window, or close
the window without saving any changes.
To delete a user, a Close button appears at the top right corner of the user image if you
mouse over a user in the list displayed on the left. Click the Close button to delete the user.
If you have selected a disabled user in the Users list, then only the Disable User checkbox
and the Comments textbox are editable; the other controls are disabled. To enable the
controls, uncheck the Disable User checkbox, enter comments in the Comments box and
click Save. When the user is enabled, the password of the user is also reset to the default
password.
IMPORTANT: Whenever new users are created, they are assigned default passwords that
are the same as their User IDs. A user must change the default password at
first log in.
100
Kaye LabWatch® LT User’s Manual
Chapter 8. Configuring Kaye LabWatch LT
8.7 Establishing User Account Settings
The User Account Settings window (available under User Account Management) allows
you to adjust basic account parameters applicable to all users.
Figure 98: User Account Settings
•
You can disable an account after it has been unused for a specified number of days. In
the Disable Account After box, scroll to (or type in) the desired number of days, from
1 up to 366.
•
You can also specify the minimum length of the password, from 6 to 16 characters. In
the Minimum Password box, scroll to (or type in) the desired number of password
characters; the default number is 6.
•
You can Disable Accounts after a specified number of unsuccessful login attempts.
(The default number is 3.) This option will disable a user account if there are three
consecutive PC login failures for the same user User ID. If a user's account is disabled,
the System Administrator must enable the account and assign a new temporary
password. Enter the number of Failed Attempts, after which the account will be
disabled.
Kaye LabWatch® LT User’s Manual
101
Chapter 8. Configuring Kaye LabWatch LT
8.7 Establishing User Account Settings (cont.)
•
If needed, you can also require a Strong Password by clicking the associated
checkbox.For a strong password, please enter a valid password with first letter as
upper case, at least one lower case letter, one digit and one special character.
Note: Valid special characters for a strong password are: @#$%^&+=
•
You can require a Password Reset -- that is, replace the password with a different one
-- after a specified number of days. Enter the desired number of days in the text box.
The password will be reset to the default one and user will need to change the default
password at first log in.
•
Each user account can be associated with a specified number of Schedules. (The
default is 2.) Enter the number in the text box.
When you have finished entering settings:
•
Click Reset to return the settings to default,
•
OK to save the changes and close the window,
•
or Cancel to close the window without saving any changes.
102
Kaye LabWatch® LT User’s Manual
Chapter 8. Configuring Kaye LabWatch LT
8.8 Scheduling User Vacations
Figure 99: User Vacations
The User Vacations window enables each user to enter dates and times of user vacations
into the database, so that LabWatch LT will not send messages to those particular contacts
during their vacation periods.
1. Enter the Vacation Name in the associated text box.
2. From the drop-down calendars, click on the vacation Start Time and End Time.
3. In the text box, enter any appropriate Comments.
4. Click the Enable Vacation checkbox to enter the vacation into the database.
When you have finished, click New to enter another vacation, Delete to delete an existing
vacation, Cancel to close the window without saving data, or OK to save the vacation and
close the window.
Kaye LabWatch® LT User’s Manual
103
Chapter 8. Configuring Kaye LabWatch LT
8.9 Maintaining Calibration Records
When you click on Calibration under the User Calibration heading on the Configuration
screen, the User Calibration window is launched.
Figure 100: User Calibration Window
This window allows users to calibrate the sensors. It also keeps record of the calibration
status and data of the various tags. Columns include:
•
Calibrate — Click the checkbox to enable calibration of a tag, or clear it to disable
calibration.
•
Tag — displays the tag name.
•
Description — provides the tag description.
•
Type — valid values are Temp and RH. The sensor calibration screen displays the
temperature and RH sensors, but not AI/DI sensors.
•
Standard Low — value entered by user.
104
Kaye LabWatch® LT User’s Manual
Chapter 8. Configuring Kaye LabWatch LT
8.9 Maintaining Calibration Records (cont.)
•
Actual Low — latest tag value, which fluctuates according to the values being read.
(This field is not editable by the user.)
•
Lock – Clicking this checkbox will freeze the value of “Actual Low”, i.e., the value
will not change.
•
Standard High — value entered by user.
•
Actual High — latest tag value, which fluctuates according to the values being read.
(This field is not editable by the user)
•
Lock — Clicking this checkbox will freeze value of “Actual High” i.e. value will not
change.
•
Pre Calibrate Value — the tag value before calibration.
•
Calibrated Value — tag value after calibration, displayed after both “Lock” boxes are
checked by the user.
•
Expiration Date — date on which user calibration will expire. Tag rows will appear
in red upon the expiry of calibration date.
•
User Calibration Date — date on which user calibration was performed.
When you have finished, click Save to save the changes, or Cancel to exit the window
without saving the changes.
Kaye LabWatch® LT User’s Manual
105
Chapter 8. Configuring Kaye LabWatch LT
8.10 Configuring Tags and Groups
8.10.1 Entering the Tag Configurator
When you click on the Tag/Group Config option under Tag Configuration, the Tag
Configurator window is launched.
Figure 101: Tag Configurator Window
You have three options:
•
To reconfigure Base Stations and Loggers, the communication between a Base Station
and LabWatch LT will be stopped. Tag Configurator GUI will be launched. LabWatch
LT will not record data until you exit the Tag Configurator.
•
You can Modify Tag Groups. If you select this option, you will enter the Assign Tags
tab of the Configurator, but will not be able to access the Configure Base Stations tab.
In this option, LabWatch LT will continue to record data.
•
You can exit the Configurator without making any changes.
Click on the desired option button and click OK.
106
Kaye LabWatch® LT User’s Manual
Chapter 8. Configuring Kaye LabWatch LT
8.10.2 Locating Base Stations and Loggers
If you have clicked on the Configure Base Stations and Loggers option button, the
Configure Base Stations tab (Figure 102 below) of the Configurator opens. Click on
Discover Base Stations to determine what Base Stations are on your network, and click
on Get Loggers to find the Loggers for each of the selected Base Stations. You can also
Enter an IP Address to locate a particular Base Station.
Figure 102: Configure Base Station Window
Figure 103: Discovering Base Stations
Kaye LabWatch® LT User’s Manual
107
Chapter 8. Configuring Kaye LabWatch LT
8.10.2 Locating Base Stations and Loggers (cont.)
Figure 104: Getting Loggers
When a user clicks on Get Loggers, it toggles to a Stop Get Loggers button. Clicking on
Stop Get Loggers will stop LabWatch LT from searching for Loggers from selected Base
Stations.
After the Loggers have been received and displayed, a user can select/unselect Base
Stations and Loggers by clicking the corresponding check boxes. Click Next when you
have finished.
Figure 105: Screen Populated with Base Stations
108
Kaye LabWatch® LT User’s Manual
Chapter 8. Configuring Kaye LabWatch LT
8.10.2 Discovering Base Stations and Loggers (cont.)
Figure 106: Populated Screen with Selected Loggers
Kaye LabWatch® LT User’s Manual
109
Chapter 8. Configuring Kaye LabWatch LT
8.10.3 Modifying Tag Groups
Note:
If you selected Modify Tag Groups in the Tag Configurator, you will enter the
Configurator at this point.
When you have populated the list, you will proceed to the Assign Tags tab (Figure 107
below). In the Enabled column, clear the checkbox for any tag you do not want to enable.
In the Tag and Tag Description columns, you can enter your own tag IDs and descriptions.
To create automatic tags, click the Generate Tag button. If you need to reassign a tag,
click the REASSIGN Tag button. By default, “Group By” will list all the base stations.
Selecting a particular base station will list sensors related to that selected base station.
Figure 107: Assign Tags Tab
•
Clicking ENABLE ALL will enable all sensors.
•
Clicking DISABLE ALL will disable all sensors.
110
Kaye LabWatch® LT User’s Manual
Chapter 8. Configuring Kaye LabWatch LT
8.10.3 Modifying Tag Groups (cont.)
Figure 108: Reassigning Tags
When you have completed sensor and tag association, click Next if you need to enter more
data, or click the Review tab and click Finish to close the Tag Configurator and return to
LabWatch LT.
Kaye LabWatch® LT User’s Manual
111
Chapter 8. Configuring Kaye LabWatch LT
8.11 Establishing Basic Display Parameters
Figure 109: System Configuration Window
The System Configuration window allows you to set up basic display parameters: Date
and Time format, temperature units, measurement precision, etc.
•
From the boxed list, select the desired Date Format: Day-Month-Year or Month-DayYear, separated either by hyphens or slashes.
•
Click on the option button to select the Temperature Units: either Celsius or
Fahrenheit.
•
From the drop-down list, click on the desired level of Temperature Precision. You
can choose from whole integers, one decimal place or two decimal places.
•
Repeat this selection for RH Precision. The choice is between whole integers and one
decimal place.
•
Select 12 hour or 24-hour Time Format.
112
Kaye LabWatch® LT User’s Manual
Chapter 8. Configuring Kaye LabWatch LT
8.11 Establishing Basic Display Parameters (cont.)
•
In the Calibration reminder advance notification, enter the number of days during
which the system reminds you about the calibration due date for a particular tag before
expiration of calibration is due date.
•
REALARM TIME will determine the time to re-alarm if there is no change in the
alarm state after acknowledgement until re-alarm time is elapsed. The Valid times for
re-alarm are 1 hour, 2 hours, 4 hours, and 24 hours. The default is 2 hours.
When you have finished, click Save to save the entries and close the window, or Cancel to
exit the window without saving any entries.
8.12 Locking and Unlocking Kaye LabWatch LT
To lock or unlock LabWatch LT, click on Lock in the System section.
8.12.1 Locking the System
Only Administrator users have permission to lock the system. A locked system will not let
users perform the following operations:
•
They cannot launch Task Manager.
•
They cannot see the Windows Start icon and task bar.
•
They cannot access the system by any kind of Windows key combination (Alt + Tab,
etc.)
Note: Clicking LOCK will toggle the caption to UNLOCK.
8.12.2 Unlocking the System
Only Administrator users can unlock the system. Clicking UNLOCK toggles the caption
to LOCK, and now users can access the system through any Windows key combination.
IMPORTANT: LabWatch LT cannot be shut down as long as the system is locked.
Kaye LabWatch® LT User’s Manual
113
Chapter 8. Configuring Kaye LabWatch LT
8.13 Sensor Calibration Reminder Screen
The Sensor Calibration Reminder screen indicates that the calibration has reached the
expiration date.
Figure 110: Calibration Reminder Screen
It appears whenever the number of reminder days before the expiration date is set. On the
screen you can click either Snooze or Dismiss.
•
Snooze will pop up according to the time you set.
•
Dismiss will dismiss the operation.
If the user clicks on Snooze, LabWatch LT requests login information; after the user has
logged in, it will store the revised snooze information. If the user clicks on Dismiss,
LabWatch LT requests login information and then stores the dismissal information to the
database.
You can set the number of reminder days in the System Configuration option.
114
Kaye LabWatch® LT User’s Manual
Chapter 8. Configuring Kaye LabWatch LT
8.14 Back Up and Restore Database
Figure 111: Backup and Restore Database
This screen allows users to back up and restore the database.
•
When you click Back Up, the program backs up the LabWatch LT database to a
specific path that has been selected through the Browse button.
•
When you click Restore, the program will restore the database on the path selected
through the Browse button.
Kaye LabWatch® LT User’s Manual
115
Chapter 8. Configuring Kaye LabWatch LT
8.15 Monitoring RF Signal Strength
RF strength depicts the strength of the wireless connection between a Base Station and
logger and also between loggers. To view and graph the various RF strengths of signal
paths, click LabWatch LT RF Signal Strength Graph, a separate utility available from
the Start menu. The Logger Network Strength Graph screen opens. From the File menu,
click on Connect.
Figure 112: Logger Network Strength Graph
The Connect to Base Station window opens. Click Discover Base Stations to find a list
of Base Stations available on the network.
Figure 113: Connect to Base Station Window
116
Kaye LabWatch® LT User’s Manual
Chapter 8. Configuring Kaye LabWatch LT
8.15 Monitoring RF Signal Strength (cont.)
When the list of Base Stations in the upper pane is populated, highlight the Base Station
you need and click Connect.
Figure 114: Connecting a Base Station
The main Logger Network Strength Graph window reopens. After up to 15 minutes, the
graph of Base Stations, Loggers and signal strength paths appears.
Kaye LabWatch® LT User’s Manual
117
Chapter 8. Configuring Kaye LabWatch LT
8.15 Monitoring RF Signal Strength (cont.)
Figure 115: Signal Strength Graph
The Legend option in the Main Menu enables users to interpret the graph. It shows the
color codes for signal strength, and the symbols for Base Stations and Loggers.
Connection strength >-60 is considered good; -70 < and <-60 as OK; and <-70 is Bad.
Figure 116: Legend Window
118
Kaye LabWatch® LT User’s Manual
Chapter 8. Configuring Kaye LabWatch LT
8.15 Monitoring RF Signal Strength (cont.)
In the Background option, you can add (or clear) a background diagram or photo on
which the software will superimpose the signal path graph. You can also show the signal
strength as a number, and display the Logger by ID or by serial number.
Figure 117: The Background Option Menu
Kaye LabWatch® LT User’s Manual
119
Chapter 8. Configuring Kaye LabWatch LT
8.15 Monitoring RF Signal Strength (cont.)
The Graph option allows you to reconfigure the colors and line appearance of the graph.
You can click on a color to open palettes of color for the Background, Signal Strengths,
Direction, Logger ID/SN and Strength. You can also select the signal path line format
from three dashed line selections.
Figure 118: Graph Color Settings
Finally, you can return to the File menu to Print the graph on a selected printer, or to Exit
the Logger Network Strength Graph.
120
Kaye LabWatch® LT User’s Manual
Appendix A. Configuring Telephone Notifications
Appendix A. Configuring Telephone Notifications
This appendix defines the steps needed for installation of the LabWatch LT Telephony
Notification for alarms. It focuses on:
1. Dialogic Diva Analog 2p Hardware installation
2. Configuring and testing the Diva board
3. Configuring and using LabWatch telephone service
A.1 Prerequisites
•
LabWatch LT, installed and configured
•
Dialogic Diva Analog 2p PCIe Board
•
Dialogic Diva 64 bit (for 64 bit OS), 32 bit (for 32 bit OS) drivers.
•
OS: Windows XP or Windows 7 (32 bit or 64 bit)
•
System with PCIe (1x or greater) slot.
Kaye LabWatch® LT User’s Manual
121
Appendix A. Configuring Telephone Notifications
A.2 Installing Diva Analog 2p Board
This section will assist you in installing your Dialogic® Diva® Media Board and
connecting it to an analog line.
You need to complete the following three procedures to use your Diva Media Board
properly:
1. Insert your Diva Media Board into your computer as described below.
2. Connect your Diva Media Board.
3. Install your Dialogic® Diva® System Release.
Note: You may need to consult your computer's manual during the installation of your
Diva Media Board.
A.2.1 Inserting Your Diva Media Board into Your Computer
1. For your safety, disconnect all technical and peripheral devices and all energy sources
from the computer.
2. Drain static electricity from your body by touching the metal chassis (the unpainted
metal at the back of your computer).
3. Remove the cover of the computer as described in your computer's manual.
4. Locate the PCIe slot in your computer.
5. If there is a metal plate at the end of the slot, remove the screw or loosen the clip and
remove the metal plate. Keep the screw for fastening your Diva Media Board.
6. If your Diva Media Board comes with a retainer, and space does not permit the use of
the retainer, simply remove it before you insert the Diva Media Board. The retainer is
only an installation aid, and does not add functionality to the board.
122
Kaye LabWatch® LT User’s Manual
Appendix A. Configuring Telephone Notifications
A.2.1 Inserting Your Diva Media Board into Your Computer (cont.)
Figure 119: Retainer on PCI Board
7. Before you insert your Diva Media Board, read the following safety instruction:
CAUTION!
To avoid damaging your hardware, insert the Diva Media Board only
into a PCI or PCIe slot, according to your board type. Inserting the
Diva Media Board into any other type of slot can damage your board,
your computer, or both.
8. Firmly insert the Diva Media Board into the selected slot. Make sure that the Diva
board does not touch the CPU, memory modules, or other parts on the motherboard.
Screw
Screw
or Clip
or Clip
PCIe Slots
PCI Slots
Figure 120: PCI Slots with Screw or Clip
9.
Firmly secure the Diva Media Board with the screw or clip.
Kaye LabWatch® LT User’s Manual
123
Appendix A. Configuring Telephone Notifications
A.2.1 Inserting Your Diva Media Board into Your Computer (cont.)
WARNING! For your safety, make sure that the Diva Media Board's bracket is
properly secured to the PC's chassis by fastening the Diva Media
Board with the screw or clip. This will ensure proper grounding and
avoid personal injuries and damage to your computer, your Diva
board, or both.
10. Replace the cover of the computer as described in your computer's manual.
A.2.2 Connecting Your Dialogic® Diva® Analog Media Board
Use the cables included with the Diva Analog Media Board.
A.2.2a
Dialogic® Diva® Analog-2 Media Boards
Diva Analog-2 Media Boards have two RJ10 ports for connecting two separate analog
lines. You can use any port; typically, you must specify the port number during software
configuration. The port numbers are shown in Figure 121 below. The diagram is oriented
with the edge connector pointing downwards.
Port 1
Port 2
Figure 121: RJ10 Ports
124
Kaye LabWatch® LT User’s Manual
Appendix A. Configuring Telephone Notifications
A.2.2 Connecting Your Dialogic® Diva® Analog Media Board (cont.)
Connect your Dialogic® Diva® Analog-2 Media Board as follows:
1. Take the two cables included with the Diva Media Board and plug the RJ10
connectors into the board.
Wall Jack or PBX
Diva Analog
Media Board
Figure 122: Connecting Media Board
2. Plug the RJ11 connectors into the wall jack or PBX.
Table 1: Contact Assignments (Plugs and Jacks)
RJ10
Signals
RJ11
Pin 2
Ring
Pin 3
Pin 3
Tip
Pin 4
Note: Looking at the RJ10 and RJ11 connector with the exposed connector pins facing
you, the pins are numbered from 1 to 4 and 1 to 6 from left to right as shown
below.
RJ10 connector
RJ11 connector
Figure 123: RJ10 and RJ11 Connectors
Kaye LabWatch® LT User’s Manual
125
Appendix A. Configuring Telephone Notifications
A.3 Configuring the Diva Board
To configure the Diva board (for caller ID), run Configuration Manager from:
Start->All Programs->Dialogic Diva
1. Select the lines.
Figure 124: Line Selection
2. Set Caller ID option as On.
Figure 125: Caller ID Options
126
Kaye LabWatch® LT User’s Manual
Appendix A. Configuring Telephone Notifications
A.4 Testing Diva Board
To test the Diva board, run Line Test utility from: Start->All Programs->Dialogic Diva.
1. (Line connection check) Select the device and click on Start to check\test the line.
Figure 126: Line Check Tab for Diva Test
If everything is configured properly, the test result will be Line Check Passed.
Figure 127: Line Check Passed
Kaye LabWatch® LT User’s Manual
127
Appendix A. Configuring Telephone Notifications
A.4 Testing Diva Board (cont.)
2.
(Out Call Test) Type the number in the Called Party Number field (along with
Prefix and Suffix code if needed).
Click on the Call button. It will show the call progress in the Status box. If the call is
connected, it will play a default system prompt.
Figure 128: Testing Outbound Calls
3. (Incoming Call Test) Select the Enable incoming calls option.
Figure 129: Enable Incoming Calls
128
Kaye LabWatch® LT User’s Manual
Appendix A. Configuring Telephone Notifications
A.4 Testing Diva Board (cont.)
4. Then dial the number of the analog line which is physically connected to the board's
port. It will show the following text after receiving the call and will play a default
prompt.
Figure 130: Text After Receiving Call
Kaye LabWatch® LT User’s Manual
129
Appendix A. Configuring Telephone Notifications
A.5 Configuring Telephone Settings
Please follow the steps below for configuring telephone settings
1. Open the LabWatch LT application.
2. Click on the Configurations tab and then on the Telephony Configuration option.
Figure 131: Telephony Configuration Option
3. On the Voice tab, the Analog Dialogic Diva Card button is selected by default.
Figure 132: Analog Dialogic Diva Card Option Button
4. Click on the Dialout Codes tab. Set the Prefix and Suffix Code, if needed for making
a call.
•
Prefix code is the code needed to dial to access an outside line before dialing an actual
number.
•
Suffix code is the code that can be needed after keying the actual number to make a
call.
130
Kaye LabWatch® LT User’s Manual
Appendix A. Configuring Telephone Notifications
A.5 Configuring Telephone Settings (cont.)
Figure 133: Prefix and Suffix Codes
Kaye LabWatch® LT User’s Manual
131
Appendix A. Configuring Telephone Notifications
A.6 Configuring a User Account for Receiving Alarms
Follow the steps below to configure a user account to receive telephone notifications.
1. Open the LabWatch LT application.
2. Click on the Configurations tab and then on the Tag/Group Config option. The Tag
Configurator window (Figure 134 below) opens.
Figure 134: Tag Configurator Window
3. Select Modify Tag Groups and click OK.
132
Kaye LabWatch® LT User’s Manual
Appendix A. Configuring Telephone Notifications
A.6 Configuring a User Account for Receiving Alarms (cont.)
4. The Assign Tags tab opens. Click on the Create Tag Groups tab. Then create a new
group and assign the tags from the Available Tags list.
Figure 135: Creating a New Group with User
5. Click Next to enter the Assign Users tab. Then select the user for the group.
Figure 136: Assign Users Tab
6. Click Next to proceed to the Define Schedules tab. Create the Schedule as needed that
will be assigned to the user in the next step.
Kaye LabWatch® LT User’s Manual
133
Appendix A. Configuring Telephone Notifications
A.6 Configuring a User Account for Receiving Alarms (cont.)
Figure 137: Define Schedules Tab
7. Click Next to enter the Define Alarm Notifications tab.
a. Select Group.
b. Select Group User.
c. Select Schedule for the User.
d. Select the notification type as needed.
Figure 138: Define Alarm Notifications
8. Click Next to enter the Review tab and click Finish to close the Tag Configurator and
return to LabWatch LT.
134
Kaye LabWatch® LT User’s Manual
Appendix A. Configuring Telephone Notifications
A.7 Telephone Alarm Notification Process
A.7.1 Steps in a Call
1. A user receives the call, but must enter the 4-digit access code.
2. The user enters the access code; if the access code is not valid, the telephone system
tries three (3) times and then disconnects.
3. If the access code is valid, the message covers alarms for Tags for which the user is
responsible. A user can request message replay.
4. The system asks for an acknowledgement code.
5. If the acknowledgement code is invalid, the call is disconnected. If the
acknowledgement code is correct, the user acknowledges all alarms, and confirms.
6. The call ends.
A.7.2 The Telephone Notification Process
•
Users assigned to a group will have priority and will be notified based on their
priority.
•
Users will also have schedule defined and, within that schedule, only the user will be
notified.
•
If user1 is unable to take the call, the system will try three times.
•
If the system cannot connect after 3 retries, the call will go to next user in priority list.
•
This cycle will repeat until any one of the users acknowledges the alarms.
•
Each user will have only one number.
•
If any user of the group acknowledges the call, the system will stop calling, and the
next user in the priority list will not receive a call.
Kaye LabWatch® LT User’s Manual
135
Appendix A. Configuring Telephone Notifications
[no content intended for this page - proceed to next page]
136
Kaye LabWatch® LT User’s Manual
Appendix B. Configuring Email Notifications
Appendix B. Configuring Email Notifications
This appendix defines the steps needed to configure the LabWatch Email Service. Topics
covered include:
•
Configuring Email Settings
•
Configuring User account for receiving Alarm
B.1 Requirements
•
LabWatch LT is installed and configured.
•
Email account with IMAP and SMTP support.
•
Required IMAP and SMTP port should not be blocked.
•
Required IMAP and SMTP server should not be blocked.
Kaye LabWatch® LT User’s Manual
137
Appendix B. Configuring Email Notifications
B.2 Configuring Email Settings
To configure your email settings, follow the steps below:
1. Click the Configuration tab and click the Email Configuration option.
Figure 139: Email Configuration Option
2. On the Email Server tab, set Outgoing and Incoming mail server details for the Mail
server.
Figure 140: Email Server Tab
138
Kaye LabWatch® LT User’s Manual
Appendix B. Configuring Email Notifications
B.2 Configuring Email Settings (cont.)
3. Select the Authentication tab and provide the email account credentials.
Figure 141: Authentication Tab
Kaye LabWatch® LT User’s Manual
139
Appendix B. Configuring Email Notifications
B.3 Configuring the User Account for Receiving Alarms
Follow the steps below to configure a user account for receiving an email notification.
1. Open the LabWatch LT application.
2. Click on the Configurations tab and then on the Tag/Group Config option. The Tag
Configurator window (Figure 142 below) opens.
Figure 142: Tag Configurator Window
3. Select Modify Tag Groups and click OK.
140
Kaye LabWatch® LT User’s Manual
Appendix B. Configuring Email Notifications
B.3 Configuring a User Account for Receiving Alarms (cont.)
4. The Assign Tags tab opens. Click on the Create Tag Groups tab. Then create a new
group and assign the tags from the Available Tags list.
Figure 143: Creating a New Group with User
5. Click Next to enter the Assign Users tab. Then select the user for the group.
Figure 144: Assign Users Tab
Kaye LabWatch® LT User’s Manual
141
Appendix B. Configuring Email Notifications
B.3 Configuring a User Account for Receiving Alarms (cont.)
6. Click Next to proceed to the Define Schedules tab. Create the Schedule as needed that
will be assigned to the user in the next step.
Figure 145: Define Schedules Tab
7. Click Next to enter the Define Alarm Notifications tab.
a. Select Group.
b. Select Group User.
c. Select Schedule for the User.
d. Select the notification type as needed.
Figure 146: Define Alarm Notifications
8. Click Next to enter the Review tab and click Finish to close the Tag Configurator and
return to LabWatch LT.
142
Kaye LabWatch® LT User’s Manual
Appendix C. Battery Count Reset
Appendix C. Battery Count Reset
C.1 Logger Battery Change and Battery Count Reset
Please follow the steps below to reset the battery count of a logger after batteries are
changed:
1. Power off the logger and change the battery.
2. While holding the Status button, power on the logger.
3. While holding the Status button, wait 15 seconds.
4. Five (5) blinks on the Power light will confirm the battery reset.
5. Release the Status button.
Kaye LabWatch® LT User’s Manual
143
Appendix C. Battery Count Reset
[no content intended for this page - proceed to next page]
144
Kaye LabWatch® LT User’s Manual
Appendix D. Glossary
Appendix D. Glossary
Alarm Acknowledgement: If a user acknowledges an alarm, there are two possible
changes in the system.
1. If the alarm is acknowledged, the value stabilizes to an OK state, then the alarm is
cleared from the Alarm Tab. Also, the flashing of the alarm for the tag stops at the
monitoring screen.
2. If the alarm is acknowledged, the value does not reach an OK state (still retains in an
alarm condition), then the flashing of the alarm is stopped, but the alarm state is still
retained. Usually the alarm state at Alarm tab and at the monitoring screen refreshes
every minute.
Alarm Delay: Along with values, users can set a delay period for an alarm (in hours,
minutes and seconds, up to 23 hours, 59 minutes and 59 seconds), before triggering an
alarm on the screen
Comm Alarms: Comm alarm indicates loss of communication with a particular tag. It
may be because of several reasons; for example, the RF logger is out of range and not able
to communicate with the system, or there is a loose sensor in the logger.
IMPORTANT: Open Circuit, Over Range and Under Range alarms are all reported under
Comm alarms in LabWatch LT.
Hi and HiHi Alarms: Two high alarms, HI and HIHI, create an alarm on the screen that
appears in the audit trail, if a value rises above the preset value. Since they are independent
limits, a user has two different thresholds for alarming. (Typically, the HIHI value is set
higher than the HI value to indicate that a condition has become worse.) User can apply
any one condition or combination of alarm limits.
Lo and LoLo Alarms: Two low alarms, LO and LOLO, create an alarm on the screen that
appears in the audit trail if a value drops below the preset value. Since they are
independent limits, a user has two different thresholds for alarming. (Typically, the LOLO
value is set lower than the LO value to indicate that a condition has become worse. For
certain input types, (i.e., 4-20 mA), the limit may also indicate an open circuit alarm.
Kaye LabWatch® LT User’s Manual
145
Appendix D. Glossary
Example: If the Hi alarm limit is set at 20.1°C for a tag, the alarm triggers as soon as value
of the tag crosses 20.1°C.
IMPORTANT: LabWatch LT requires the tag alarm state to clear before it institutes a new
alarm delay. If the alarm delay has been set, changing the delay will not go
into effect until that alarm clears.
Open Circuit: Open Circuit means there is no sensor present or the sensor is broken.
Open/Close, On/Off and 1/0: For Digital tags (Contact switches), an open condition can
be represented by Open, On or 1 and close condition can be represented by Close, Off or
0.
RSSI: RSSI is an abbreviation of Received Signal Strength Indicator. It's a measurement
of the power present in a received radio signal. It tells the user how good or bad the RF
signal is.
RSSI >-60 Connection Strength is considered good; -70 < and <-60 as OK; and <-70 is
considered Bad
Under Range and Over Range: For 0-10v auxiliary input, any value less than 0 is Under
Range and any value greater than 10 is Over Range. Similarly for 4-20mA auxiliary input,
any value less than 4 is Under Range and any value greater than 20 is Over Range.
IMPORTANT: Open Circuit, Over Range and Under Range alarms are all reported under
Comm alarms in LabWatch LT.
146
Kaye LabWatch® LT User’s Manual
Index
A
Add Graph
for Daily Report . . . . . . . . . . . . . . . . . . . . . . . . . . . . . . . . . . . . . . . . . . . . . . . . . . . . . . 78
Alarm Acknowledgement Comments. . . . . . . . . . . . . . . . . . . . . . . . . . . . . . . . . . . . . . . . 95
Alarm Colors
Configuring . . . . . . . . . . . . . . . . . . . . . . . . . . . . . . . . . . . . . . . . . . . . . . . . . . . . . . . . . . 96
Alarm Configuration in Tag Maintenance . . . . . . . . . . . . . . . . . . . . . . . . . . . . . . . . . . . . 51
Alarms
Monitoring . . . . . . . . . . . . . . . . . . . . . . . . . . . . . . . . . . . . . . . . . . . . . . . . . . . . . . . . . . 65
Alarms tab . . . . . . . . . . . . . . . . . . . . . . . . . . . . . . . . . . . . . . . . . . . . . . . . . . . . . . . . . . . . . 65
Annotation buttons . . . . . . . . . . . . . . . . . . . . . . . . . . . . . . . . . . . . . . . . . . . . . . . . . . . . . . 62
Area buttons . . . . . . . . . . . . . . . . . . . . . . . . . . . . . . . . . . . . . . . . . . . . . . . . . . . . . . . . . . . 40
Audit Events button . . . . . . . . . . . . . . . . . . . . . . . . . . . . . . . . . . . . . . . . . . . . . . . . . . . . . 83
Audit Trail. . . . . . . . . . . . . . . . . . . . . . . . . . . . . . . . . . . . . . . . . . . . . . . . . . . . . . . . . . . . . 71
Audit Trail Events . . . . . . . . . . . . . . . . . . . . . . . . . . . . . . . . . . . . . . . . . . . . . . . . . . . . . . . 72
Audit Trail Report, Creating An . . . . . . . . . . . . . . . . . . . . . . . . . . . . . . . . . . . . . . . . . . . . 83
Authentication Tab . . . . . . . . . . . . . . . . . . . . . . . . . . . . . . . . . . . . . . . . . . . . . . . . . . . . . . 90
B
Background option . . . . . . . . . . . . . . . . . . . . . . . . . . . . . . . . . . . . . . . . . . . . . . . . . . . . . 119
Base Station
Powering . . . . . . . . . . . . . . . . . . . . . . . . . . . . . . . . . . . . . . . . . . . . . . . . . . . . . . . . . . . . . 5
Setting Up . . . . . . . . . . . . . . . . . . . . . . . . . . . . . . . . . . . . . . . . . . . . . . . . . . . . . . . . . . . . 5
Base Stations, Locating. . . . . . . . . . . . . . . . . . . . . . . . . . . . . . . . . . . . . . . . . . . . . . . . . . 107
Kaye LabWatch® LT User’s Manual
147
Index
C
Calibration History . . . . . . . . . . . . . . . . . . . . . . . . . . . . . . . . . . . . . . . . . . . . . . . . . . . . . . 84
Calibration Records, Editing . . . . . . . . . . . . . . . . . . . . . . . . . . . . . . . . . . . . . . . . . . . . . . 104
Calibration Report, Creating a . . . . . . . . . . . . . . . . . . . . . . . . . . . . . . . . . . . . . . . . . . . . . 84
Chart Configuration Tab . . . . . . . . . . . . . . . . . . . . . . . . . . . . . . . . . . . . . . . . . . . . . . . . . . 56
Color button for charts . . . . . . . . . . . . . . . . . . . . . . . . . . . . . . . . . . . . . . . . . . . . . . . . . . . 62
Column Layout
for Alarms Screen . . . . . . . . . . . . . . . . . . . . . . . . . . . . . . . . . . . . . . . . . . . . . . . . . . . . . 66
for Audit Screen . . . . . . . . . . . . . . . . . . . . . . . . . . . . . . . . . . . . . . . . . . . . . . . . . . . . . . 73
Column Layout option . . . . . . . . . . . . . . . . . . . . . . . . . . . . . . . . . . . . . . . . . . . . . . . . . . . 42
Comments
Adding Predefined. . . . . . . . . . . . . . . . . . . . . . . . . . . . . . . . . . . . . . . . . . . . . . . . . . . . . 95
Comments button . . . . . . . . . . . . . . . . . . . . . . . . . . . . . . . . . . . . . . . . . . . . . . . . . . . . . . . 43
Configuration Screen. . . . . . . . . . . . . . . . . . . . . . . . . . . . . . . . . . . . . . . . . . . . . . . . . . . . . 87
Connect to Base Station Window . . . . . . . . . . . . . . . . . . . . . . . . . . . . . . . . . . . . . . . . . . 116
Control Tab . . . . . . . . . . . . . . . . . . . . . . . . . . . . . . . . . . . . . . . . . . . . . . . . . . . . . . . . . . . . 93
D
Dialout Codes Tab . . . . . . . . . . . . . . . . . . . . . . . . . . . . . . . . . . . . . . . . . . . . . . . . . . . . . . . 93
Discover Base Stations . . . . . . . . . . . . . . . . . . . . . . . . . . . . . . . . . . . . . . . . . . . . . . . . . . 116
Display Graph
for Single Tag Report . . . . . . . . . . . . . . . . . . . . . . . . . . . . . . . . . . . . . . . . . . . . . . . . . . 82
Display Parameters, Setting . . . . . . . . . . . . . . . . . . . . . . . . . . . . . . . . . . . . . . . . . . . . . . 112
Diva Analog 2p Board
Installing . . . . . . . . . . . . . . . . . . . . . . . . . . . . . . . . . . . . . . . . . . . . . . . . . . . . . . . . . . . 122
Diva Board
Configuring . . . . . . . . . . . . . . . . . . . . . . . . . . . . . . . . . . . . . . . . . . . . . . . . . . . . . . . . . 126
Testing . . . . . . . . . . . . . . . . . . . . . . . . . . . . . . . . . . . . . . . . . . . . . . . . . . . . . . . . . . . . . 127
Diva® Analog Media Board
Connecting . . . . . . . . . . . . . . . . . . . . . . . . . . . . . . . . . . . . . . . . . . . . . . . . . . . . . . . . . 124
148
Kaye LabWatch® LT User’s Manual
Index
E
Email Contacts, Configuring. . . . . . . . . . . . . . . . . . . . . . . . . . . . . . . . . . . . . . . . . . . . . . . 89
Email Server Tab . . . . . . . . . . . . . . . . . . . . . . . . . . . . . . . . . . . . . . . . . . . . . . . . . . . . . . . . 89
Email Service
Requirements. . . . . . . . . . . . . . . . . . . . . . . . . . . . . . . . . . . . . . . . . . . . . . . . . . . . . . . . 137
Email Service, Installing . . . . . . . . . . . . . . . . . . . . . . . . . . . . . . . . . . . . . . . . . . . . . . . . . 137
Email Settings
Configuring . . . . . . . . . . . . . . . . . . . . . . . . . . . . . . . . . . . . . . . . . . . . . . . . . . . . . . . . . 138
End Date
for Audit Trail Report . . . . . . . . . . . . . . . . . . . . . . . . . . . . . . . . . . . . . . . . . . . . . . . . . . 83
for Historical Report . . . . . . . . . . . . . . . . . . . . . . . . . . . . . . . . . . . . . . . . . . . . . . . . . . . 79
F
Filter Window . . . . . . . . . . . . . . . . . . . . . . . . . . . . . . . . . . . . . . . . . . . . . . . . . . . . . . . . . . 66
Floor Plan Settings window . . . . . . . . . . . . . . . . . . . . . . . . . . . . . . . . . . . . . . . . . . . . . . . 47
Floor View. . . . . . . . . . . . . . . . . . . . . . . . . . . . . . . . . . . . . . . . . . . . . . . . . . . . . . . . . . . . . 47
G
Graph Color Settings. . . . . . . . . . . . . . . . . . . . . . . . . . . . . . . . . . . . . . . . . . . . . . . . . . . . 120
Graph Option in RF Signal Strength Graph . . . . . . . . . . . . . . . . . . . . . . . . . . . . . . . . . . 120
Graph View . . . . . . . . . . . . . . . . . . . . . . . . . . . . . . . . . . . . . . . . . . . . . . . . . . . . . . . . . . . . 46
Graphing Screen . . . . . . . . . . . . . . . . . . . . . . . . . . . . . . . . . . . . . . . . . . . . . . . . . . . . . . . . 53
Group(s) and Tag(s)
for Audit Trail Report . . . . . . . . . . . . . . . . . . . . . . . . . . . . . . . . . . . . . . . . . . . . . . . . . . 83
for Historical Report . . . . . . . . . . . . . . . . . . . . . . . . . . . . . . . . . . . . . . . . . . . . . . . . . . . 79
for MKT Report . . . . . . . . . . . . . . . . . . . . . . . . . . . . . . . . . . . . . . . . . . . . . . . . . . . . . . 81
for Single Tag Report . . . . . . . . . . . . . . . . . . . . . . . . . . . . . . . . . . . . . . . . . . . . . . . . . . 82
Groups and Tags
for Calibration Report . . . . . . . . . . . . . . . . . . . . . . . . . . . . . . . . . . . . . . . . . . . . . . . . . . 84
Groups, Configuring . . . . . . . . . . . . . . . . . . . . . . . . . . . . . . . . . . . . . . . . . . . . . . . . . . . . 106
H
Historical Report, Creating a. . . . . . . . . . . . . . . . . . . . . . . . . . . . . . . . . . . . . . . . . . . . . . . 79
I
Installation. . . . . . . . . . . . . . . . . . . . . . . . . . . . . . . . . . . . . . . . . . . . . . . . . . . . . . . . . . . . . . 3
Kaye LabWatch® LT User’s Manual
149
Index
L
LabWatch Lite
Configuration . . . . . . . . . . . . . . . . . . . . . . . . . . . . . . . . . . . . . . . . . . . . . . . . . . . . . . . . 87
Installation . . . . . . . . . . . . . . . . . . . . . . . . . . . . . . . . . . . . . . . . . . . . . . . . . . . . . . . . . . . . 3
LabWatch Lite Monitoring System . . . . . . . . . . . . . . . . . . . . . . . . . . . . . . . . . . . . . . . . . . . 1
LabWatch Lite RF Signal Strength Graph . . . . . . . . . . . . . . . . . . . . . . . . . . . . . . . . . . . 116
Legend Option in RF Signal Strength Graph . . . . . . . . . . . . . . . . . . . . . . . . . . . . . . . . . 118
Legends and Readings. . . . . . . . . . . . . . . . . . . . . . . . . . . . . . . . . . . . . . . . . . . . . . . . . . . . 64
Limits button . . . . . . . . . . . . . . . . . . . . . . . . . . . . . . . . . . . . . . . . . . . . . . . . . . . . . . . . . . . 63
List of Saved Templates
for Historical Report . . . . . . . . . . . . . . . . . . . . . . . . . . . . . . . . . . . . . . . . . . . . . . . . . . . 79
for MKT Report . . . . . . . . . . . . . . . . . . . . . . . . . . . . . . . . . . . . . . . . . . . . . . . . . . . . . . 81
for Single Tag Report . . . . . . . . . . . . . . . . . . . . . . . . . . . . . . . . . . . . . . . . . . . . . . . . . . 82
List View . . . . . . . . . . . . . . . . . . . . . . . . . . . . . . . . . . . . . . . . . . . . . . . . . . . . . . 40, 144, 145
Loggers
Setting Network ID . . . . . . . . . . . . . . . . . . . . . . . . . . . . . . . . . . . . . . . . . . . . . . . . . . . . 14
Setting Up . . . . . . . . . . . . . . . . . . . . . . . . . . . . . . . . . . . . . . . . . . . . . . . . . . . . . . . . . . . 14
Switching On or Off . . . . . . . . . . . . . . . . . . . . . . . . . . . . . . . . . . . . . . . . . . . . . . . . . . . 14
M
Marker Properties
in Graphing Screen . . . . . . . . . . . . . . . . . . . . . . . . . . . . . . . . . . . . . . . . . . . . . . . . . . . . 58
Message Format for Alarm Messages. . . . . . . . . . . . . . . . . . . . . . . . . . . . . . . . . . . . . . . . 91
Minimum Password. . . . . . . . . . . . . . . . . . . . . . . . . . . . . . . . . . . . . . . . . . . . . . . . . . . . . 101
MKT Report, Creating a . . . . . . . . . . . . . . . . . . . . . . . . . . . . . . . . . . . . . . . . . . . . . . . . . . 81
Monitoring Screen. . . . . . . . . . . . . . . . . . . . . . . . . . . . . . . . . . . . . . . . . . . . . . . . . . . . . . . 39
Monitoring Sensors . . . . . . . . . . . . . . . . . . . . . . . . . . . . . . . . . . . . . . . . . . . . . . . . . . . . . . 39
O
Open Circuit . . . . . . . . . . . . . . . . . . . . . . . . . . . . . . . . . . . . . . . . . . . . . . . . . . . . . . . . . . . 42
Over Range . . . . . . . . . . . . . . . . . . . . . . . . . . . . . . . . . . . . . . . . . . . . . . . . . . . . . . . . . . . . 42
P
PCI Slot . . . . . . . . . . . . . . . . . . . . . . . . . . . . . . . . . . . . . . . . . . . . . . . . . . . . . . . . . . . . . . 123
PCIe Slot . . . . . . . . . . . . . . . . . . . . . . . . . . . . . . . . . . . . . . . . . . . . . . . . . . . . . . . . . . . . . 123
Periods
for MKT Report . . . . . . . . . . . . . . . . . . . . . . . . . . . . . . . . . . . . . . . . . . . . . . . . . . . . . . 81
150
Kaye LabWatch® LT User’s Manual
Index
R
Refresh button . . . . . . . . . . . . . . . . . . . . . . . . . . . . . . . . . . . . . . . . . . . . . . . . . . . . . . . . . . 61
Report Header
for Daily Report . . . . . . . . . . . . . . . . . . . . . . . . . . . . . . . . . . . . . . . . . . . . . . . . . . . . . . 78
for Historical Report . . . . . . . . . . . . . . . . . . . . . . . . . . . . . . . . . . . . . . . . . . . . . . . . . . . 80
for MKT Report . . . . . . . . . . . . . . . . . . . . . . . . . . . . . . . . . . . . . . . . . . . . . . . . . . . . . . 81
for Single Tag Report . . . . . . . . . . . . . . . . . . . . . . . . . . . . . . . . . . . . . . . . . . . . . . . . . . 82
Report Page Footer
for Daily Report . . . . . . . . . . . . . . . . . . . . . . . . . . . . . . . . . . . . . . . . . . . . . . . . . . . . . . 78
for Historical Report . . . . . . . . . . . . . . . . . . . . . . . . . . . . . . . . . . . . . . . . . . . . . . . . . . . 80
for MKT Report . . . . . . . . . . . . . . . . . . . . . . . . . . . . . . . . . . . . . . . . . . . . . . . . . . . . . . 81
for Single Tag Report . . . . . . . . . . . . . . . . . . . . . . . . . . . . . . . . . . . . . . . . . . . . . . . . . . 82
Report Page Header
for Daily Report . . . . . . . . . . . . . . . . . . . . . . . . . . . . . . . . . . . . . . . . . . . . . . . . . . . . . . 78
for Historical Report . . . . . . . . . . . . . . . . . . . . . . . . . . . . . . . . . . . . . . . . . . . . . . . . . . . 80
for MKT Report . . . . . . . . . . . . . . . . . . . . . . . . . . . . . . . . . . . . . . . . . . . . . . . . . . . . . . 81
for Single Tag Report . . . . . . . . . . . . . . . . . . . . . . . . . . . . . . . . . . . . . . . . . . . . . . . . . . 82
RF Signal Strength Graph . . . . . . . . . . . . . . . . . . . . . . . . . . . . . . . . . . . . . . . . . . . . . . . . 116
RF Signal Strength, Monitoring . . . . . . . . . . . . . . . . . . . . . . . . . . . . . . . . . . . . . . . . . . . 116
RF ValProbe . . . . . . . . . . . . . . . . . . . . . . . . . . . . . . . . . . . . . . . . . . . . . . . . . . . . . . . . . . . . 1
RF ValProbe, Operating . . . . . . . . . . . . . . . . . . . . . . . . . . . . . . . . . . . . . . . . . . . . . . . . . . . 5
RJ10 Connector . . . . . . . . . . . . . . . . . . . . . . . . . . . . . . . . . . . . . . . . . . . . . . . . . . . . . . . . 125
RJ10 Ports . . . . . . . . . . . . . . . . . . . . . . . . . . . . . . . . . . . . . . . . . . . . . . . . . . . . . . . . . . . . 124
RJ11 Connector . . . . . . . . . . . . . . . . . . . . . . . . . . . . . . . . . . . . . . . . . . . . . . . . . . . . . . . . 125
Kaye LabWatch® LT User’s Manual
151
Index
S
Schedules
Managing. . . . . . . . . . . . . . . . . . . . . . . . . . . . . . . . . . . . . . . . . . . . . . . . . . . . . . . . . . . . 94
New . . . . . . . . . . . . . . . . . . . . . . . . . . . . . . . . . . . . . . . . . . . . . . . . . . . . . . . . . . . . . . . . 94
Selection of Telephone Line . . . . . . . . . . . . . . . . . . . . . . . . . . . . . . . . . . . . . . . . . . . . . . . 93
Single Tag Alarm Report. . . . . . . . . . . . . . . . . . . . . . . . . . . . . . . . . . . . . . . . . . . . . . . . . . 82
Start Date. . . . . . . . . . . . . . . . . . . . . . . . . . . . . . . . . . . . . . . . . . . . . . . . . . . . . . . . . . . . . . 79
for Audit Trail Report . . . . . . . . . . . . . . . . . . . . . . . . . . . . . . . . . . . . . . . . . . . . . . . . . . 83
for MKT Report . . . . . . . . . . . . . . . . . . . . . . . . . . . . . . . . . . . . . . . . . . . . . . . . . . . . . . 81
for Single Tag Report . . . . . . . . . . . . . . . . . . . . . . . . . . . . . . . . . . . . . . . . . . . . . . . . . . 82
System Configuration . . . . . . . . . . . . . . . . . . . . . . . . . . . . . . . . . . . . . . . . . . . . . . . . . . . 112
System Monitoring . . . . . . . . . . . . . . . . . . . . . . . . . . . . . . . . . . . . . . . . . . . . . . . . . . . . . . 39
System Monitoring Screen . . . . . . . . . . . . . . . . . . . . . . . . . . . . . . . . . . . . . . . . . . . . . . . . 40
System Requirements . . . . . . . . . . . . . . . . . . . . . . . . . . . . . . . . . . . . . . . . . . . . . . . . . . . . . 3
T
Tabular Data Tab . . . . . . . . . . . . . . . . . . . . . . . . . . . . . . . . . . . . . . . . . . . . . . . . . . . . . . . . 50
Tag Configurator . . . . . . . . . . . . . . . . . . . . . . . . . . . . . . . . . . . . . . . . . . . . . . . . . . . . . . . 106
Tag Groups, Modifying . . . . . . . . . . . . . . . . . . . . . . . . . . . . . . . . . . . . . . . . . . . . . . . . . . 110
Tag Maintenance option . . . . . . . . . . . . . . . . . . . . . . . . . . . . . . . . . . . . . . . . . . . . . . . . . . 42
Tag Maintenance Screen . . . . . . . . . . . . . . . . . . . . . . . . . . . . . . . . . . . . . . . . . . . . . . . . . . 49
Tags, Configuring . . . . . . . . . . . . . . . . . . . . . . . . . . . . . . . . . . . . . . . . . . . . . . . . . . . . . . 106
Telephone Alarm Notification Process . . . . . . . . . . . . . . . . . . . . . . . . . . . . . . . . . . . . . . 135
Telephone Contacts, Configuring . . . . . . . . . . . . . . . . . . . . . . . . . . . . . . . . . . . . . . . . . . . 92
Telephone Service
Installing . . . . . . . . . . . . . . . . . . . . . . . . . . . . . . . . . . . . . . . . . . . . . . . . . . . . . . . . . . . 121
Telephone Settings
Configuring . . . . . . . . . . . . . . . . . . . . . . . . . . . . . . . . . . . . . . . . . . . . . . . . . . . . . . . . . 130
Trending Tab . . . . . . . . . . . . . . . . . . . . . . . . . . . . . . . . . . . . . . . . . . . . . . . . . . . . . . . . . . . 49
152
Kaye LabWatch® LT User’s Manual
Index
U
Under Range . . . . . . . . . . . . . . . . . . . . . . . . . . . . . . . . . . . . . . . . . . . . . . . . . . . . . . . . . . . 42
User Account
Configuring for Alarms . . . . . . . . . . . . . . . . . . . . . . . . . . . . . . . . . . . . . . . . . . . . . . . . 132
Configuring for Receiving Alarms . . . . . . . . . . . . . . . . . . . . . . . . . . . . . . . . . . . . . . . 140
User Account Settings. . . . . . . . . . . . . . . . . . . . . . . . . . . . . . . . . . . . . . . . . . . . . . . . . . . 101
User Calibration . . . . . . . . . . . . . . . . . . . . . . . . . . . . . . . . . . . . . . . . . . . . . . . . . . . . . . . 104
User Creation/Modification Window . . . . . . . . . . . . . . . . . . . . . . . . . . . . . . . . . . . . . . . . 98
User Vacations, Scheduling. . . . . . . . . . . . . . . . . . . . . . . . . . . . . . . . . . . . . . . . . . . . . . . 103
Users, Adding . . . . . . . . . . . . . . . . . . . . . . . . . . . . . . . . . . . . . . . . . . . . . . . . . . . . . . . . . . 98
Users, Editing . . . . . . . . . . . . . . . . . . . . . . . . . . . . . . . . . . . . . . . . . . . . . . . . . . . . . . . . . . 98
V
Voice Tab. . . . . . . . . . . . . . . . . . . . . . . . . . . . . . . . . . . . . . . . . . . . . . . . . . . . . . . . . . . . . . 92
Y
Y-Axis tab . . . . . . . . . . . . . . . . . . . . . . . . . . . . . . . . . . . . . . . . . . . . . . . . . . . . . . . . . . . . . 57
Z
Zoom buttons. . . . . . . . . . . . . . . . . . . . . . . . . . . . . . . . . . . . . . . . . . . . . . . . . . . . . . . . . . . 61
Kaye LabWatch® LT User’s Manual
153
Index
154
Kaye LabWatch® LT User’s Manual
Customer Support Centers
U.S.A.
For Sales and Services
(Repair/Calibration):
GE Measurement & Control
St Marys Center
967 Windfall Road
St Marys, Pennsylvania 15857
U.S.A.
T: 814-834-9140
F: 814-781-7969
[email protected]
U.S.A.
For Technical Support:
The Boston Center
1100 Technology Park Drive
Billerica, MA 01821
U.S.A.
T: 800-833-9438 (toll-free)
T: 978-437-1242
E-mail: [email protected]
Europe, Asia and Middle East
Sales and Service:
GE Sensing & Inspection Technologies
GmbH
Sinsheimer Strasse 6
D-75179 Pforzheim
Germany
T: +49(0)7231-14335 0
F: +49(0)7212 391 035
E-mail: [email protected]
China:
GE Sensing & Inspection Technologies
Building 10, Jintong International
Industrial Park
No. 8 Xihu Road, Wujin High-Tech
Industrial Zone
Changzhou, China 213164
T:+86 519 8831 8080 ext. 50087
F:+86 519 8831 2601
www.ge-mcs.com/en/about-us/quality.html
www.ge-mcs.com
©2013 General Electric Company. All rights reserved.
Technical content subject to change without notice.
M4580 Rev. B