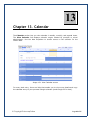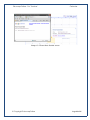
1
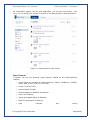
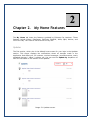
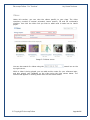
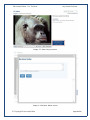
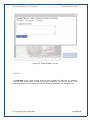
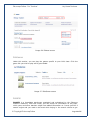
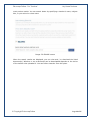
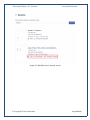
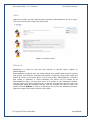
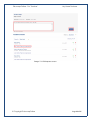
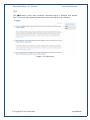
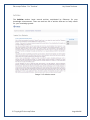
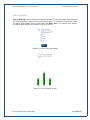
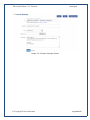
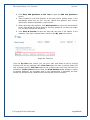
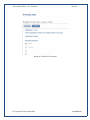
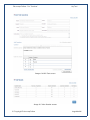
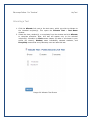
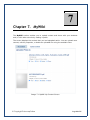
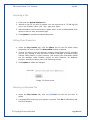
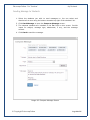
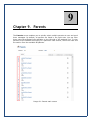
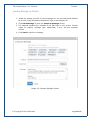
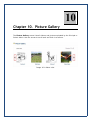
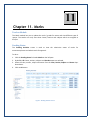
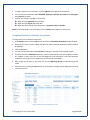
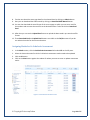
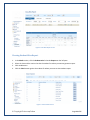
User Manual - For ‘Teacher’ Table of Contents Chapter 1. EducompOnline – Overview.......................................................3 Introduction to EducompOnline ....................................................................... 3 Best Configuration ........................................................................................ 3 Getting Started ............................................................................................ 4 Logging In .................................................................................................4 Major Features ...........................................................................................6 Chapter 2. My Home Features ..................................................................7 Updates ..................................................................................................... 7 Videos ....................................................................................................... 8 Edutest ..................................................................................................... 10 EduGames ................................................................................................. 11 EduWiki .................................................................................................... 11 Jokes ....................................................................................................... 14 Eduxpress.................................................................................................. 14 Q&A ......................................................................................................... 16 Articles ..................................................................................................... 17 Poll of the Day ............................................................................................ 18 Chapter 3. My School Features ............................................................... 19 Chapter 4. Announcements ................................................................... 20 Chapter 5. Messages ............................................................................ 22 Creating a New Message ................................................................................ 22 Chapter 6. My Test.............................................................................. 24 Creating a Test ........................................................................................... 24 Allocating a Test ......................................................................................... 28 Chapter 7. MyWiki .............................................................................. 29 Uploading a File .......................................................................................... 30 Editing Share Properties................................................................................ 30 Deleting an Uploaded File.............................................................................. 30 Chapter 8. My Students ........................................................................ 31 Sending Message to Students .......................................................................... 32 Chapter 9. Parents .............................................................................. 33 Sending Message to Parents ........................................................................... 34 Chapter 10. Picture Gallery .................................................................... 35 Chapter 11. Marks ................................................................................ 36 Pending Activities........................................................................................ 39 Assigning Marks to Scholastic Assessment........................................................... 40 Assigning Marks to Co-Scholastic Assessment....................................................... 40 Assigning Marks to Standard Assessment............................................................. 40 Chapter 12. Attendance ......................................................................... 43 Marking Attendance ..................................................................................... 43 Viewing Reports .......................................................................................... 44 Chapter 13. Calendar ............................................................................ 47 1 Chapter 1. EducompOnline – Overview Introduction to EducompOnline EducompOnline is a virtual school for Educomp Smartclass schools. As part of Educomp Smartclass schools, EducompOnline gives schools an institutional online presence to schools where they can perform a dynamic range of activities that empower them to deliver more value to students, parents, teachers, and principals. With activities like send a message and, send an important announcement, the schools can inform the teachers, parents, and students about the upcoming events or updates. They can customize their website to match the identity of the school with a logo and use several services offered by EducompOnline. From a single access point, the schools can manage the accounts of teachers and students accounts by adding them into the system, tracking their activities, and viewing content and tests. They can share photos and videos of all the school events by uploading them on the website. For each school, these activities are performed by a school administrator. As a teacher, you can perform certain useful activities specific to your needs, for example, creating tests for students, uploading informative content, contacting students and their parents through messages, assigning marks and marking student attendance. Best Configuration The EducompOnline Web application is best used on Internet Explorer versions higher than 7.0 or Firefox versions 4.x or above, with a resolution of 1024 X 768 and colour depth of 16 bit or higher. The browser settings should be set to default for best performance. These settings ensure optimum user-friendliness of the user interface as well as easy maintenance of the application. EducompOnline - For ‘Teacher’ EducompOnline – Overview Getting Started The following information will help you quickly get started with the EducompOnline application. Logging In The EducompOnline web application Login screen authenticates your identity and lets you in to use the provided functionality. Fill up the User ID and Password provided to you to log into the application. Image 1.1 Member Login screen The Remember me on this computer option preserves your login credentials into computer cache to make them available to you at your next login. © Copyright EducompOnline Page 4 of 47 EducompOnline - For ‘Teacher’ EducompOnline – Overview If you come across any login related problems, such as forgot password or User ID, or you are facing another error, click the Are you experiencing login problem? link to open the following screen. Select the problem you are facing and click Continue to find some suggestion / resolution. Image 1.2 Login problems screen © Copyright EducompOnline Page 5 of 47 EducompOnline - For ‘Teacher’ EducompOnline – Overview On successfully logging into the Web application, you see the main screen. From here, you can perform all operations specific to the EducompOnline Web Application. Image 1.3 EducompOnline main screen Major Features A teacher can use the following major features offered by the EducompOnline website: • Access features provided by EducompOnline: Videos, EduGames, EduWiki, Jokes, Q&A, Articles, and Poll of the Day • Create / Preview Tests • Upload MyWiki Content • Send Messages to Students and Parents • View Picture Gallery • Assign and Update Marks to Students • Mark the attendance of students • View © Copyright EducompOnline Calendar and events Page 6 of 47 2 Chapter 2. My Home Features The My Home tab hosts the features provided by Educomp for teachers. These features include Videos, EduGames, EduTests, EduWiki, Jokes, Q&A, Articles, and Poll of the Day. Let’s have a look at these one by one: Updates The first section, which also is the default home screen for your login is the Updates section. This screen displays the notifications about all changes made in the application that affect you, for instance, received messages / announcements, newly uploaded pictures / videos / articles, etc. You can use the Update by dropdown to filter the list based on the sender of the updates. Image 2.1 Updates screen EducompOnline - For ‘Teacher’ My Home Features Videos Under this section, you can view the videos specific to your class. The video repository consists of several animated, lesson specific, 3D and 2D multimedia modules. Just click the Video link you wish to watch and it loads into its inbuilt player. Image 2.2 Videos screen You can also search for videos using the top right corner. search box on the While a video is being played, you can add revision notes for your reference later, and also submit your feedback on the video using the links shown below. The screens that appear on clicking these links are also shown below. © Copyright EducompOnline Page 8 of 47 EducompOnline - For ‘Teacher’ My Home Features Image 2.3 Video Playing screen Image 2.4 Revision Notes screen © Copyright EducompOnline Page 9 of 47 EducompOnline - For ‘Teacher’ My Home Features Image 2.5 Video Feedback screen Edutest The Edutest section hosts several practice tests uploaded by Educomp for students. You can view a test, share it with one or more of classes you teach or share it with students selectively. You can also view the details of students’ test attempts here. © Copyright EducompOnline Page 10 of 47 EducompOnline - For ‘Teacher’ My Home Features Image 2.6 Edutest screen EduGames Under this section, you can play the games specific to your kid’s class. Click the game link you wish to play and it gets loaded. Image 2.7 EduGames screen EduWiki EduWiki is a knowledge warehouse populated and maintained by the Educomp teachers’ fraternity. From this screen, you can search for information on any topic, which yours and other teachers might have added information on. It acts just like a search engine and you need to be smart while keying in the search criteria to get © Copyright EducompOnline Page 11 of 47 EducompOnline - For ‘Teacher’ My Home Features most precise results. You can search better by specifying a teacher’s name, subject title, or your school or class name. Image 2.8 EduWiki screen When the search results are displayed, you can view and / or download the listed document(s). Whether or not a document can be downloaded depends on the choice of the teacher who uploaded it. You can follow a teacher from this place. © Copyright EducompOnline Page 12 of 47 EducompOnline - For ‘Teacher’ My Home Features Image 2.9 EduWiki Search Results screen © Copyright EducompOnline Page 13 of 47 EducompOnline - For ‘Teacher’ My Home Features Jokes Under this section, you can read the jokes posted by EducompOnline for all to enjoy. Click any archive link to access the older jokes. Image 2.10 Jokes screen Eduxpress Eduxpress is a place to view and post articles on specific topics created by EducompOnline. EducompOnline creates a topic for article posting for a specific date range for various user groups, like teachers, students and parents. These user groups can create and submit an article on the topic active on the current date. EducompOnline reviews it and rejects or publishes it. Once published, the article can be viewed by all EducompOnline users. You can view such list of articles in your Eduxpress window. You can share your liking or disliking for an article, and can also report an article as inappropriate using the available controls. Use the available text box to write your article and click Submit to send it to Educomp for review and publishing thereon. Maximum length of the article can be 1000 words. © Copyright EducompOnline Page 14 of 47 EducompOnline - For ‘Teacher’ My Home Features Image 2.11 Eduxpress screen © Copyright EducompOnline Page 15 of 47 EducompOnline - For ‘Teacher’ My Home Features Q&A The Q&A section hosts many generally discussed topics in question and answer form. There are many questions that have been archived for your reference. Image 2.12 Q&A screen © Copyright EducompOnline Page 16 of 47 EducompOnline - For ‘Teacher’ My Home Features Articles The Articles section hosts several articles contributed by Educomp for your knowledge enhancement. There are archives full of articles that can be really useful for your knowledge growth. Image 2.13 Articles screen © Copyright EducompOnline Page 17 of 47 EducompOnline - For ‘Teacher’ My Home Features Poll of the Day Poll of the Day section hosts the questions posted by school principal and Educomp for some statistical surveys done from time to time. To respond to a question, select an option that appeals you the most and click Save. When you submit your answer, the same area displays the results for the poll so far. Image 2.14 Poll of the Day screen Image 2.15 Poll Results screen © Copyright EducompOnline Page 18 of 47 3 Chapter 3. My School Features The My School tab provides you the following links to perform the various functions: Image 3.1 Features under My School tab The following chapters explain how to perform the above listed functions using the links available under the My School tab. 4 Chapter 4. Announcements The Announcements section lists all the school announcements sent by Principal and School Admin. Image 4.1 Announcements Screen EducompOnline - For ‘Teacher’ Announcements Click any entry to open its details. The following screen will get displayed. Image 4.2 Announcement Details Screen © Copyright EducompOnline Page 21 of 47 5 Chapter 5. Messages The Messages section allows you to create and read messages. From the links available on the main Messages screen, you can view All, Read, or Unread messages. You can also view your inbox and sent items from this screen. Image 5.1 Main Messages Screen Creating a New Message 1. Click Write Message to open the Compose Messages screen. Here, you can provide inputs for the recipients, subject, message type, attachments, if any, and the message content. 2. Select the Send SMS on Mobile checkbox if you wish the message subject to be sent to the recipients’ registered mobile numbers as well. 3. Click Send to send the message. EducompOnline - For ‘Teacher’ Messages Image 5.2 Compose Message Screen © Copyright EducompOnline Page 23 of 47 6 Chapter 6. My Test The My Test section lists the tests you create for your class students. You can create new tests from this section easily. Creating a Test 1. Click Create Test to open the Create Test screen. 2. Select and provide details, required on this screen, such as the Board, Class, Subject, Chapter, Topic, Level, Title, Description, and Instructions for taking the test. Image 6.1 Create Test Screen EducompOnline - For ‘Teacher’ My Test 3. Click Next, Add Questions to this Test to open the Add Test Questions screen. 4. Enter content for your first question of the test here by putting cursor in the appropriate areas one by one. You can specify the question text, choice, choice text, answer explanation on this screen. 5. When done with this question, click Next Question to open the next question screen and repeat the above steps for as many questions you want to create. You can also preview the questions. 6. Click Save & Preview to save the test and view how it will appear to the students. Your test is created and is listed on the My Test main screen. Image 6.2 Tests List From the My Test main screen, you can view, edit, and delete a test by clicking relevant links for any particular test. View Test opens the test in preview mode (the way a student sees it), Edit Test opens a test in edit mode (very much the way you created it), Delete Test deletes the test and View Results button displays a report of student attempts. An important step in test management is allocating the test. Unless you allocate a test, students can’t see the test in their accounts. © Copyright EducompOnline Page 25 of 47 EducompOnline - For ‘Teacher’ My Test Image 6.3 Preview Test screen © Copyright EducompOnline Page 26 of 47 EducompOnline - For ‘Teacher’ My Test Image 6.4 Edit Test screen Image 6.5 View Results screen © Copyright EducompOnline Page 27 of 47 EducompOnline - For ‘Teacher’ My Test Allocating a Test 1. Click the Allocate link next to the test name, which you wish to allocate to the intended recipient(s). This opens the Allocate Test – Test Name window. 2. Select the class, student(s), or everybody from the window and click Allocate to complete allocation. Now, this test will appear only to the selected recipient(s). Allocation to Class means classes you take or all classes in your school (as chosen), Student mean individually selected students, and Everybody means that every Educomp user can take this test. Image 6.6 Allocate Test Screen 7 Chapter 7. MyWiki The MyWiki section enables you to upload content and share with your students and/ or with other schools by making it public. The screen displays the content that you had uploaded earlier. You can upload more content, edit its properties, or delete an uploaded file using the available links. Image 7.1 MyWiki My Content Screen © Copyright EducompOnline Page 29 of 47 EducompOnline - For ‘Teacher’ MyWiki Uploading a File 1. Click open the Upload Content tab. 2. Browse to the file you wish to upload. You can support up to 7.5 MB big files only in the formats: .docx, .pdf, .xlsx, .pptx, and .ppsx. 3. Add information like file description, grade, and if it can be downloaded, then whom to share it with, and search tags. 4. Click Upload to upload the selected document. Editing Share Properties 1. Under the My Content tab, click the Share link for the file whose share properties you wish to edit. The Share With window is opened. 2. Change the sharing level as required. Keeping private keeps the file available only to you; sharing it with My School makes it available to students under Teacher Notes section in their accounts, and sharing with Everybody makes the file available under EduWiki section to other teachers, all students, principal, and school admin users of all Educomp schools. 3. Click Update to effect the changes. Image 7.2 Share Levels Deleting an Uploaded File 1. Under the My Content tab, click the delete. link for the file you wish to 2. A message box confirming your actions is opened. Click OK in affirmation and the file is deleted. © Copyright EducompOnline Page 30 of 47 8 Chapter 8. My Students The My Students screen enables you to quickly select the students and send them messages. By default, all students are listed in the right area. You can filter them using the alphabet links available on the left side of the students list. To view students specific to a particular class section, select the class and the section from the available dropdowns. Image 8.1 My Students main screen EducompOnline - For ‘Teacher’ My Students Sending Message to Students 1. Select the students you wish to send messages to. You can select and deselect all at once using the buttons towards top right of the students’ list. 2. Click Send Message to open the Compose Message screen. 3. The selected students are included in the To: field on this screen. Provide inputs for subject, message type, attachment, if any, and the message content. 4. Click Send to send the message. Image 8.2 Compose Message Screen © Copyright EducompOnline Page 32 of 47 9 Chapter 9. Parents The Parents screen enables you to quickly select multiple parents at once and send them messages. By default, all parents are listed in the right area. You can filter them using the alphabet links available on the left side of the students’ list. To view parents for the students belonging to a particular class section, select the class and the section from the available dropdowns. Image 9.1 Parents main screen EducompOnline - For ‘Teacher’ Parents Sending Message to Parents 1. Select the parents you wish to send messages to. You can select and deselect all at once using the buttons towards top right of the students list. 2. Click Send Message to open the Compose Message screen. 3. The selected students are included in the To: field on this screen. Provide inputs for subject, message type, attachment, if any, and the message content. 4. Click Send to send the message. Image 9.2 Compose Message Screen © Copyright EducompOnline Page 34 of 47 10 Chapter 10. Picture Gallery The Picture Gallery screen lists all albums and pictures uploaded by the Principal or School Admin. Use the arrows to scroll back and forth in an album. Image 10.1 Album view 11 Chapter 11. Marks Teacher Module The Marks module lets you to update the marks / grades for exams and view different types of reports. The teacher can only view those classes, sections and subjects which are assigned to him/her. Pending Status The Pending Activities screen is used to view the submission status of marks for assessments/exams and submit marks for approval. To do so: 1. Click the Pending Status link under Marks on the left pane. 2. By default, All classes, sections, subjects and Overdue status are selected. 3. Select the class, section, subject and status from the Class, Section, Subject and Status dropdown boxes. 4. Click on Go button. Figure 1: Pending Activities screen 5. To submit marks for an assessment, click the Submit button against an assessment. 6. You can view the assessment data submitted, approved, rejected, not started and in progress using status drop down. 7. Teacher also receives messages in three cases: When Principal approves the exam data. When Principal rejects the exam data. When any exam type or exam assessment’s completion date is overdue. Note: To view the details of an assessment, click the View button against an assessment Assigning Marks for Scholastic Assessment To assign marks for a scholastic assessment: 1. In the Marks section, click the CCE section and then on Scholastic Assessment on the left pane. 2. Select the CCE class, section, subject and exam for which scholastic assessment marks needs to be updated. 3. Click on Go button. 4. You can view the description about FA/SA by clicking on ‘?’ button on the header control. 5. If you had selected a Formative exam type, select a technique tab such as Class Work, Unit test etc. Update or enter marks for all the sub categories in the technique. If you had selected a summative exam type, enter or update the total marks for each student. 6. Here saving can be done in two ways first by just switching the tab on particular page for FA/SA. 7. Second one is by clicking the Save button. A confirmation message will be displayed on the top of the main screen. Figure 2: Scholastic Assessment Marks screen © Copyright EducompOnline Page 37 of 47 8. Teacher can submit the exam type data for the selected class by clicking on Submit button. 9. Here you can download the CBSE manual by clicking on Download CBSE Manual button. 10. You can also download the excel format of the current page on which you can enter mark for the students and can save that excel file to the desired location. To do this click on Download Excel. 11. After then you can use the Upload Excel button to upload the data saved in pre-saved excel file format. 12. These Download Excel and Upload Excel buttons are visible on the FA/SA screens till you do not submit the marks for that class and section. Assigning Marks for Co-Scholastic Assessment 1. In the Marks section, click the Co-Scholastic Assessment link under CCE on the left pane. 2. Select the class and section for which Co-Scholastic assessment marks needs to be updated. 3. Click on Go button. 4. Click on the View button against the student for whom you want to enter or update assessment marks. Figure 3: Co-Scholastic Assessment screen © Copyright EducompOnline Page 38 of 47 5. Following page will display on the screen. Figure 4: Student Co-Scholastic Assessment Marks screen 6. Select the Applicable check box against the descriptors that are applicable to the student. Specify grade for all applicable descriptors. 7. Click the Save button. A confirmation message will be displayed. 8. Teacher can also submit Co-Scholastic 9. You can also view the description about any descriptor by clicking on ‘?’ button present on every descriptor. Assigning Marks for Standard Assessment 1. In the Marks section, click the Standard link under CCE on the left pane. 2. Select the class, section and subject for which exam marks needs to be updated. 3. Click on Go button. 4. Select an exam type from Category drop down - either Major or Minor. 5. Then again select exam from Exam drop down. 6. Update or enter marks for exams in the selected exam type. 7. Click the Save button. A confirmation message will be displayed. 8. Teacher can submit the marks for that class and section using Submit button. © Copyright EducompOnline Page 39 of 47 Figure 5: Standard Assessment Marks screen Viewing Class-Wise Report 1. In the Marks section, click the Class-wise link under Reports on the left pane. 2. Select class and section for which you want to view report. 3. Select one of the following tabs: Overall, Marks Wise and Grade Wise. 4. To specify whether you want the report to be generated based on subject or exam type, select an option from the Plot Graph on drop-down box. 5. Also you can filter the search on the basis of FA/SA exam types, but this feature is enabled with Graph View only. 6. Select appropriate options from the drop-down boxes next to the Plot Graph on drop-down box. 7. Select a view for the report from the Mode drop-down box. Data view – Report shows only data. Graph view – Report shows only graph. Mixed view – Report shows the graph at the top followed by data at the bottom. © Copyright EducompOnline Page 40 of 47 Figure 6: Class-Wise Report screen Viewing Student-Wise Report 1. In the Marks section, click the Student-wise link under Reports on the left pane. 2. Select the class and the section that has the student for whom you want to generate report. 3. Click on Go button. 4. Click the View button against the student for whom you want to view student report. Figure 7: Select Student screen © Copyright EducompOnline Page 41 of 47 5. Following page will display on the screen. Figure 8: Student-Wise Report screen © Copyright EducompOnline Page 42 of 47 12 Chapter 12. Attendance The Attendance section enables you to mark student attendance and view useful data reports about student presence / absence in the class in a specified period. Given below are the steps on how to mark attendance and view reports. As a teacher you will be able to mark the attendance of those sections only for which you are designated as class teacher by the school admin. Marking Attendance 1. Click Mark Attendance Attendance screen. link from the left pane to open the Mark 2. Click the class name from the top panel. The section names drop down. 3. Click the section name for which you wish to mark attendance. The list of students under the selected class section appears in the center area. 4. Select date for which you wish to mark attendance for the selected class section. By default, the current date is displayed. Click Go if you change date from the default date. Note: Here, you can click the View link next to a student record to view the attendance records for that particular student in another window. It’s a small but useful report that shows number of school days and number of days the student was present and absent. 5. Select P or A from the Attendance column to mark a student Present or Absent. Note: The students marked absent get listed in the list of absentees in extreme right. You have the facility to selectively send a message to the parents of these absentees provided their mobile number is registered with our portal. Just select the absentees whose parents you wish to send messages to and click Send Message. 6. Click Save to save the attendance record for the selected date. EducompOnline - For ‘Teacher’ Attendance Image 12.1 Mark Attendance screen Viewing Reports You can view attendance report per class from the Reports screen. To do so: 1. Click the Reports tab to open the Reports screen. 2. Select class and the date range from the fields available in the right pane. 3. Click Go to bring results in the area below. © Copyright EducompOnline Page 44 of 47 EducompOnline - For ‘Teacher’ Image 12.2 Attendance Report screen Attendance 13 Chapter 13. Calendar The Calendar section lets you view calendar in weekly, monthly, and agenda views. The View Calendar link displays calendar events created by principal or school administrator. Use the date dropdown to shuffle across to the calendar for the chosen date. Image 13.1 View Calendar screen For every task entry, there are links that enable you to view more details and copy the calendar entry to your personal Google calendar (need Google ID for that). © Copyright EducompOnline Page 46 of 47 EducompOnline - For ‘Teacher’ Calendar Image 13.2 Event More Details screen © Copyright EducompOnline Page 47 of 47