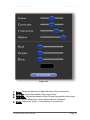
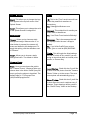
1
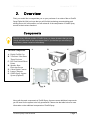
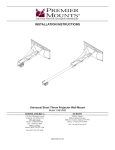
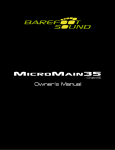
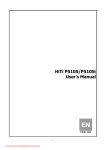
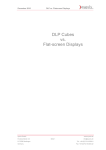
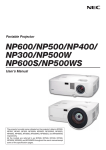
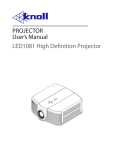
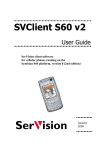
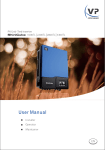
Audio Extremes Entertainment
Revision Sheet
[Version 2.6]
John Heck
[ Graffiti Spray User Manual]
[In this manual you will find everything you need to run the Graffiti Spray digital art wall. Included
are detailed instructions on how to use the Software as well as its various components.]
Graffiti Spray User Manual
Page i
Revision Sheet
Revision History
Version
1.0
2.5
2.6
Date
03/06/2012
11/29/2012
12/17/2012
Revision Description
Document Creation
Added software guide and troubleshooting tips
Updated for Graffiti Spray Version 2.6
Graffiti Spray User Manual
Page ii
Table of Contents
Contents
Revision History ................................................................................................................................................... ii
Table of Contents .................................................................................................................................. 0
1.
Introduction ...................................................................................................................................... 1
Purpose .................................................................................................................................................. 1
Related Docum ents .......................................................................................................................... 1
Problem Reporting Instructions .................................................................................................. 1
2.
Overview ........................................................................................................................................... 2
Com ponents ................................................................................................................................... 2
Functional Description .................................................................................................................... 3
3.
Instruction ......................................................................................................................................... 5
Procedures ........................................................................................................................................... 5
4.
Software ............................................................................................................................................ 7
The Toolbar .......................................................................................................................................... 7
Stam ps and Stencils ........................................................................................................................ 9
Splash Screen .................................................................................................................................. 10
Chrom a Key ....................................................................................................................................... 11
Back End (Right-Click) M enu .................................................................................................... 13
5.
Adding Stamps, Stencils, and Backgrounds ................................................................... 15
6.
Troubleshooting ........................................................................................................................... 16
Graffiti Spray Com ponents ......................................................................................................... 16
Common Problems .......................................................................................................................................... 16
“Off The Shelf” Com ponents ...................................................................................................... 17
Graffiti Spray User Manual
Page 0
Graffiti Spray User Manual
1.
November 29, 2012
Introduction
The Graffiti Spray Digital Art Wall is a revolutionary interactive product that can provide
hours of entertainment for all ages. With a simple set-up and easy-to-use components,
virtually anyone can use and manage this great product. Our implementation of
advanced features gives Graffiti Spray many advantages over our competition, which will
be outlined in this manual. Graffiti Spray gives your clients the ability to become Graffiti
artists without the mess, and there truly is no experience like it!
Purpose
The purpose of this document is to train technicians how to use the Graffiti Spray Digital
Art Wall and all of its components.
Related Documents
•
•
•
Graffiti Spray Training PowerPoint Presentation
ViewSonic PJD7583wi Manual (Click To View)
HiTi P510s Manual (Click To View)
Problem Reporting Instructions
To report any problems with the Graffiti Spray software or spray can, please contact our
technical support department by email or phone using the following information:
Monday-Friday, 9am - 5pm EST
Toll-Free: 888-898-5286
Email: [email protected]
If you are experiencing problems with your projector, printer or camera, please use the
following information to contact the vendors directly:
ViewSonic US and Canada
Monday-Friday, 6am - 5pm PST
Toll-Free: 800-688-6688
HiTi Digital America, Inc.
Phone: 909-594-0099
Email: [email protected]
Canon US and Canada
Toll-Free: 800-652-2666
Graffiti Spray User Manual
Page 1
Graffiti Spray User Manual
2.
November 29, 2012
Overview
Firstly, we would like to congratulate you on your purchase of our state of the art Graffiti
Spray Digital Art Wall; we hope that you will find this technology as entertaining and
exciting as we do! In this section, we will review all of the components of Graffiti Spray
as well as their various functions.
Components
We offer many different models of Graffiti Spray, so please be aware that you may
or may not have some of the components listed. If you feel that you are missing a
component, please contact us immediately.
The Main Components
A. Digital Graffiti Can
B. ViewSonic Ultra ShortThrow Projector
C. HiTi Professional Photo
Printer
D. Spandex RearProjection Screen
E. Canon Digital Camera
F. Laptop Computer
G. Graffiti Spray Support
System (Optional)
B.
A.
G.
C.
E.
F.
D.
Along with the main components of Graffiti Spray, there are some additional components
you will need for the system to be fully operational. Please view the table below for more
information on the additional components of Graffiti Spray.
Graffiti Spray User Manual
Page 2
Graffiti Spray User Manual
Component
Quantity
Camera Tripod
1
2 Can Charging
Dock
1, Charges 2 Cans
Wireless SD Card
(8 GB)
1 Per Camera
Extra Digital Graffiti
Cans
N/A
November 29, 2012
Use(s)
To assist in photo
stability
Used to charge
internal Li-Ion
battery in canisters
To transfer photos
wirelessly from the
camera to the
laptop PC
To allow multiple
users*
Included?
If requested, at an
additional cost
With each Graffiti
Spray can
(Optional)
NO; Unless Laptop
AND Camera are
purchased through
GS
2 are included with
the system,
however more can
be purchased by
contacting us
For the
transportation of the At an additional
Carrying Case
1
Graffiti Spray
charge
system
*NOTE: Only ONE user is able to draw on the Graffiti Spray wall at a time.
Functional Description
Now that all of the main components of Graffiti Spray have been introduced, we will now
begin to explore, in detail, what each individual component is used for.
Component
Digital Graffiti
Can
ViewSonic
Projector
Use(s)
The Graffiti Can is essentially what “Makes
The Magic Happen”, without it, the Graffiti
spray wall would not function properly. Using
the advanced technology we’ve developed
and placed inside each can, the projector is
able to track the movement and position of
the can in real time. The can is synced to the
projector and this makes calibration
unnecessary, it’s real Plug-N-Play
technology!
Using our choice of ViewSonic projector, we
are able to project extremely large images at
Graffiti Spray User Manual
Features
• Made out of an
authentic graffiti can
• Built-in rechargeable
Li-Ion battery with
capacity for 24
hours of continuous
use!
• Ultra light weight
design
•
•
Ultra portable
WXGA native
Page 3
Graffiti Spray User Manual
HiTi
Professional
Photo Printer
Canon Digital
Camera
RearProjection
Screen
Aluminum
Support
System
(Optional)
very short distances. We chose this projector
because we know what its like to be confined
to a small performing space. This projector
also features an abundance of menu options
that allow us to tune the projector just right for
our software, each of these options are
preset by Graffiti Spray technicians before
each system is shipped off to our clients. For
more information on your projector, please
visit the ViewSonic website.
The HiTi Professional Series photo printer is
used to communicate with the laptop PC and
print the artwork your clients create using
Graffiti Spray. These printers also have the
ability to cut each print to your desired size.
November 29, 2012
•
•
•
resolution
3000 Lumens
Low power
consumption
Ultra Short-Throw
technology
•
300 x 300 DPI
resolution
Using wireless SD card technology, you are
able to take pictures of your clients/guests
and they will be uploaded to the Graffiti Spray
PC in real time. This eliminates the need for
messy cords running to the computer, and
when used along with the wireless printer,
creates a very appealing presentation.
•
With the use of a rear-projection screen and
short throw projector, you are able to create a
projected image with no shadows. Also,
because the projector is in-front of the Graffiti
Spray user the can movements are much
more accurate. Since we are using a
spandex material, the screen can be
stretched up to 10 feet. Bungee cords are
used to hold the material in place, which
makes for a quick and convenient set-up and
teardown.
Depending on when you ordered your Graffiti
Spray system, you either received an
aluminum crank system or and aluminum
piping system; both provide excellent
support, an easy set-up, and a clean look.
These supports are used to erect the rearprojection screen, and create the surface of
the Digital Graffiti Wall.
•
Built in flash for low
light conditions
Extremely easy to
use, hardly any
training necessary
Superior photo
quality you would
expect from Canon
No shadows on
projected image
Can be stretched to
10’x10’ for a large
surface
Use of bungee cords
allows for speedy
set-up
Graffiti Spray User Manual
•
•
•
•
•
•
•
•
Potable
Sturdy
Easy to erect
Provides a clean
and professional
look
Page 4
Graffiti Spray User Manual
3.
November 29, 2012
Instruction
Procedures
This next section will be the most important, as we will describe how to set-up and
operate the Graffiti Spray Digital Art Wall. Although all of the components may make it
seem complicated, it really is a simple process and, with the provided training, can be
done in 20 minutes or less!
When you first receive your Graffiti Spray Digital Art Wall, be sure to go over all
of the components and instructions with your employees/technicians so your first
event is flawless!
For visual learners and group training we have created a Power Point presentation
as well as several videos, which can be found on GraffitSpray.com under your
account.
The following are step-by-step instructions on setting up, operating, and tearing down
the Graffiti Spray Digital Art Wall. For more information on the Graffiti Spray software
features, please visit the “Software Features” section immediately after the instructions.
1. First, begin by unpacking all of the Graffiti Spray components in the area, which
you will be performing. If you are installing a Graffiti Spray Digital Art Wall
permanently, be sure you are in a safe and secure location. DO NOT
permanently install the Graffiti Spray outdoors, as its components will become
damaged in certain weather conditions.
a. If you are temporarily setting up the Graffiti Spray outdoors, we
recommend you choose an area with even ground as well as gravel or
cement. Graffiti Spray works best at night or in low light conditions.
2. Once all of Graffiti Spray’s components are unpacked, begin by constructing the
aluminum support system. You should have received an additional set of
instructions based on the support system you have; if you DID NOT receive
additional instructions, please contact Graffiti Spray directly.
a. Once your support system as been constructed, you may now prepare
the rear-projection screen by attaching the top of it the middle of the
upmost support beam using the provided bungee cords.
i. The label/tag should be in the top left corner facing AWAY from
the audience
b. Continue to attach the screen to the support system using the multiple
connection points sewn in to the fabric.
Graffiti Spray User Manual
Page 5
Graffiti Spray User Manual
November 29, 2012
3. Now that the Graffiti Spray support and screen has been erected, you will set-up
the projector and laptop PC.
a. Place your ViewSonic projector on the ground behind the screen and
relative to the size of the image you desire.
b. Plug the provided power cable, VGA cable, and USB cable into their
designated spots in the rear of the projector, and then proceed to plug
your projector into a power outlet and power it on.
c. Power on your laptop PC that has Graffiti Spray loaded on it and attach
the VGA cable coming from the projector to the PC’s display out.
d. Take the USB cable coming from the projector and plug it into an open
USB port on the PC. NOTE: The projector should now be projecting the
Graffiti Spray program on to the rear projection screen; if that is not the
case, please refer to the “Troubleshooting” section below.
e. Once you have your image adjusted to the size you desire, you may
move on to step 4.
4. Begin setting up the printer by attaching the provided IEC power cable and
plugging it into a power source. Flip the power switch on the back of the printer to
the ON position and wait for it to power up. The printer will automatically connect
to the laptop PC’s Graffiti Spray network.
5. Bes sure your Canon digital camera has fresh batteries in it and power it on.
Take a few test photos so that the wireless SD card can sync up with the laptop
PC. NOTE: If you’ve tried taking multiple test shots and if after 5 minutes they
have not been automatically transferred to the laptop PC, please refer to the
“Troubleshooting” section!
6. Once your test photos have uploaded, you can now power up the Digital Spray
Can by removing the cap and pushing the nozzle once. After a few seconds the
cursor on the screen should begin following the movement of the can, if it is not,
please refer to the “Troubleshooting” section.
7. Perform a test print in the Graffiti Spray software to insure the printer is
connected and working.
8. You are now ready to take your guest/client’s photos and let them create their
own masterpieces using the Graffiti Spray Digital Art Wall!!
Make sure you have both the VGA and USB cables coming from the projector to
the laptop computer. Also, be sure your computer is connected to the “Graffiti
Spray” wireless network for Eye-Fi card transfers.
WARNING: The Graffiti Spray cans are susceptible to over-charging. Please do
not charge your Graffiti Cans for more than 4 HOURS!!
Graffiti Spray User Manual
Page 6
Graffiti Spray User Manual
4.
November 29, 2012
Software
In this section we will go over the basic functions of the Graffiti Spray software and how
to use it to its full potential. The Graffiti Spray software is very versatile and has FIVE
main components.
The Toolbar
Located on the left-hand side of the screen, the toolbar is where the user selects the
different options they want for their photos. Please see Figure 4.01 below for some
more information!
1. Solid Brush- Use this brush for standard writing. Once the solid brush is clicked,
you are also able to adjust the “Alpha”, or the transparency of the font.
2. Gradient Brush- This brush has a spray look to it around the edges. The more you
go over something with the gradient brush, the darker the strokes get.
3. Dripping Paint- The Drip brush gives the effect of spray paint dripping out of the
can.
4. Calligraphy Left- The calligraphy brushes allow you to paint slanted strokes.
5. Calligraphy Right- Offers the same function of the previous, but this time in the
“right” direction.
6. Increase Size- This allows the user to increase the brush size for larger strokes.
Each press increases the size of the dot.
7. Decrease Size- This allows the user to decrease the brush size for smaller
strokes. Each press decreases the size of the dot.
8. Color Picker- Using the color picker, the user is able to select any color in the
spectrum. Using the slider, the user chooses their hue and shade. There are also
some preloaded color options.
9. Clear Screen- Clears the screen and restores the background to the default
setting. The default background setting can be changed in the right click menu.
10. Stam ps/Stencils- Allows the user to choose between different stamps and
stencils. Please see the “Stamp/Stencil” section.
11. Redo- This allows the user to redo something they deleted or un-did.
12. Undo- This allows the user to delete a mistake they made.
Graffiti Spray User Manual
Page 7
Graffiti Spray User Manual
November 29, 2012
13.
Photo Selector- The Photo Selector
enables the technician to pull open any photos taken
of guests and display them to be edited.
14.
Save- Saves the finished product to the event
folder you specified at start-up in “My Pictures”.
15.
*Print- This will print and save the finished
photo simultaneously, that way there’s no need to
save the photo then print it. You can accomplish both
of these tasks with one click! The Graffiti Spray
software will use your “Default” printer which is
specified under “Devices and Printers” in the Windows
7 start menu. If a save dialogue pops up, this means
that you DID NOT specify an event name at the start
of Graffiti Spray.
16.
Eraser- With the Eraser tool users can
remove stray marks layer by layer anywhere on the
canvas.
17.
*Em ail- A quick email feature that allows the
user to send their drawing to any email address. If
your computer is not connected to the internet or
internet is not accessible at your event, the Graffiti
Spray software will archive the emails and batch send
them when an internet connection becomes available
again.
18.
*Text- The text function allows users to place
text anywhere on the Graffiti Spray canvas using a
Bluetooth keyboard or touchscreen.
19.
*Background Im age- Using this option, the
technician can apply a new background the canvas
(default is blank white). All backgrounds are
categorized in a folder based tree format. To add,
remove, or reorganize backgrounds just go to the
“backgrounds” folder located in “C:\\Program Files
(x86)\GraffitiSpray\backgrounds\”. To add a new
background category, simply just create a new folder
in the “backgrounds” folder.
Figure 4.01
20.
M inim ize/M axim ize- If you find yourself
needing to minimize Graffiti Spray to make some adjustments but do not wish to
create a new event, simply just use the minimize/maximize feature.
21.
*Background Color- This allows the technician to choose the canvas’
background color using the same color picker as the brush. The default is white.
* Marks the ability to toggle this option on and off by entering the right-click menu.
Graffiti Spray User Manual
Page 8
Graffiti Spray User Manual
November 29, 2012
Stamps and Stencils
Using the Graffiti Spray Stamps and Stencils, users are able to add creative
customizations to their photos! Master this feature with the following instructions:
Figure 4.02
1. Magnification- Use this to make
the Stamp/Stencil bigger or smaller.
Just click the icon and drag up or
down to zoom in or out,
respectively.
2. Rotation- Using this will allow the
user to rotate the Stamp/Stencil
clockwise or counter-clockwise.
Just click the icon and swing to the
left or right.
3. Flip- Allows the user to flip the
orientation of the Stamp/Stencil 180
degrees.
Graffiti Spray User Manual
4. Move- Click and drag to move
the Stamp/Stencil anywhere
on the canvas.
5. Close- This closes the toolbar
for Stamps and for Stencils it
removes the Stencil once you
have filled it in.
Page 9
Graffiti Spray User Manual
November 29, 2012
Splash Screen
When the Graffiti Spray program is first started the Splash Screen is the first thing you
will see. Possibly one of the most essential tools in Graffiti Spray, the Splash Screen
gives you and your clients a custom user experience.
1. Banner Im age- Enables you to provide a custom banner for each event. Using
a .PNG will allow you to use transparencies and works best when using different
backgrounds and Chroma Key. This image will print and save on every photo for
marketing purposes.
2. Event Nam e- This is where you name your event. Whatever is put in this box is
where all of the finished, saved, and printed photos will be located. Graffiti Spray
takes the text you input in here and creates a new sub-folder in the “My Pictures”
folder.
3. Em pty Photos- Clicking this will delete all of the raw images stored in “C:\\Program
Files (x86)\GraffitiSpray\photos\”. Be sure to click this before each new event or you
may slow the program down. Also, you don’t want to get events mixed up.
4. Close/Save- Clicking this will close the Splash Screen and save your options.
Graffiti Spray User Manual
Page 10
Graffiti Spray User Manual
November 29, 2012
Chroma Key
Chroma Key is the ability to remove the background of a specific image and replace it
with a new one. Commonly referred to as a “Green Screen”, the Chroma Key function
allows for very creative works of art. By implementing this feature, we are able to give
our users a very unique experience unlike anything they’ve ever seen before.
Graffiti Spray’s Chroma Key feature will work with the white projection screen, however
for the best results we recommend that you use a Green Screen kit. Please see
Figures 4.04 and 4.05 below to understand this feature better.
In the top right corner of every picture you will find the following
toolbar (Figure 4.04). Using this toolbar you can enable
Chroma Key and make adjustments to the displayed image.
1.
Chrom a Key- Clicking on this icon will change the
cursor to a transparent pencil; this is your “Color Picker”. Using
the pencil tool, click on the color you would like to eliminate. Be
sure to ONLY click on the background, otherwise you may
eliminate parts of the user’s face or body.
2.
Chrom a Adjustm ents- Please see Figure 4.05.
All of the other settings are the same as in Figure 4.02.
F igur e 4 .0 4
Graffiti Spray User Manual
Page 11
Graffiti Spray User Manual
November 29, 2012
Figure 4.05
1. Color- Allows the technician to adjust the color of the current photo.
2. Contrast- Adjusts the contrast of the current photo.
3. Tolerance- Adjusts the tolerance of the Chroma Key applied to the current
photo. This will allow more or less background color elimination.
4. Alpha- Adjusts the “Alpha” or transparency of current photo.
Graffiti Spray User Manual
Page 12
Graffiti Spray User Manual
November 29, 2012
Back End (Right-Click) Menu
The Back End user menu allows you to tweak many different features of Graffiti Spray,
and is very powerful. Using this menu, you can customize the software on a per-event
basis and enhance the overall user experience. Please see Figure 4.06 to fully
understand the Right-Click menu’s functionality.
As you can see, there are quite a few options. Here are their uses in detail:
Graffiti Spray User Manual
Page 13
Graffiti Spray User Manual
November 29, 2012
Sp lash Scree n
Em a il
Lo go: This allows you to change the logo
that appears in the top left corner of the
Splash Screen.
ID: This is the “From” email users will see
when they email their creations to
themselves.
Ex. [email protected].
C olo r: This allows you to change the color
of the Splash Screen’s background.
Ba ckg roun d
Im age : Allows you to choose a static
background image. Whenever the ‘X’ or
clear button is pressed, the screen will
erase and default to this background. To
apply this setting, click the checkbox next
to “Browse”.
C olo r: Allows you to choose a static
background color. The default is White.
Su bject: This subject line for emails your
users send to themselves.
Ex. Your Photo From Jessica’s Birthday!
M es s age : This is the message that will
be displayed after the user’s image is
posted.
Ex. If you’d like Graffiti Spray at your
event, give us a call at (888) 898-5286!
T ools - This will toggle the listed settings
on and off, which is very useful if you are
doing an event that does not include prints,
emails, or Chroma Key.
C am e ra Pho to
Au to
Pa th : Here you can choose the path to
the “Camera Photos”. Whatever folder you
choose here is the folder Graffiti Spray will
use to pull up the photos to be edited. The
default folder is “C:\\Program Files
(x86)\GraffitiSpray\photos\”.
Lo ad Ph oto s: Check this box if you’d like
to Auto-Load the photos from the “Camera
Photos” folder on to the screen. The most
recent photo will automatically pop-up.
Sa ve P hotos: Check this box if you’d like
to Auto-Save the user’s creations every 2
minutes. These drawings will be saved in
the “Graffiti-Temp” folder on the Desktop.
Graffiti Spray User Manual
Page 14
Graffiti Spray User Manual
November 29, 2012
5. Adding Stamps, Stencils,
and Backgrounds
Graffiti Spray makes it very easy to add Stamps, Stencils, and backgrounds to the
software. This is extremely useful if you want to design custom Stamps, Stencils, or
Backgrounds for each event. Also, Graffiti Spray comes out with new material almost
every month, which is available in the “Downloads” section of your Client Area.
The process is the same for adding Stamps, Stencils, and Backgrounds; the only thing
that changes is the destination folder. We have also made it extremely easy to create
your own custom categories, all you have to do is create a new folder in the “Stamps”,
“Stencils”, or “backgrounds” folder! In this guide we will show you how add Stamps.
Step 1- Unpack the "Stamps" file to your desktop
Step 2- Drag and drop the "stamps" folder into C:\\Program Files(x86)\GraffitiSpray\.
Step 3- Windows will then ask you if you want to merge the two folders, choose "Yes”.
Graffiti Spray User Manual
Page 15
Graffiti Spray User Manual
6.
November 29, 2012
Troubleshooting
Graffiti Spray Components
Graffiti Spray components include the cans, the software, and the Da-Lite Frame
Enclosure. If you have any issues with these components, please contact your support
representative or email Support@ GraffitiSpray.com.
Common Problems
•
•
•
•
M y can is rapidly blinking green!
− Firstly, be sure that the Indicator Lights on the can are blinking. A
rapid-blinking green LED means that the can is searching for
connection. If this is the case, make sure that both the USB and
VGA cables from the projector are plugged into your PC. Also, be
sure that the projector is in “VGA 1” mode, not USB!
M y can is slowly blinking green but the cursor isn’t m oving.
− First, let’s be sure that the cans are enabled in the projector
settings. Hit “Menu” on the projector’s remote, go right three times
until you see “Point Blank” as an option. Click on “Point Blank” and
select “Enable”. If your can is still not working after this, be sure
you are in “VGA 1” mode on the projector and now “USB” mode!
Finally, place the can on the charger for a few minutes and then
try again.
− DO NOT USE GS WITH A USB EXTENSION OR DONGLE IT
WILL NOT WORK.
− If you are still having problems, please call or email our support
team.
M y can is blinking green twice then am ber once.
− This is most likely due to over-charging. Please contact a member
of the Graffiti Spray Support Team.
The Eye-Fi card will not upload photos to m y PC!
− First, be sure that your computer is connected to the Graffiti Spray
wireless network. This is a direct network connection to the Eye-Fi
card.
− If that doesn’t help, open Eye-Fi center, click on the setting wheel
next to your Eye-Fi card, go to the “Geo Tagging” section, and
Graffiti Spray User Manual
Page 16
Graffiti Spray User Manual
•
•
November 29, 2012
ensure that the checkbox is NOT checked! Geo Tagging will not
work without an active Internet connection!!
− Lastly, plug your Eye-Fi card into your computer and try to change
the photos destination folder. This can be found in the Eye-Fi
card’s settings under the second tab. Choose/Create a folder in
My Pictures, as this seems to work best. Now, start the Graffiti
Spray software, right-click, go to the “Camera Photo” option, hit
“Browse” and select the new folder for uploads in “My Pictures” or
wherever you created it.
− It is always recommended that you have a cable tether as back-up
as Graffiti Spray cannot be liable for errors with the Eye-Fi card.
W hen a user is done and I click on the “Print” button, a
W indows save dialogue pops up!
− This is because you did not define an “Event Name” on the Splash
Screen when you first started the software, so Graffiti Spray
doesn’t know where to save! You will need to re-start the software
and be sure to type in an event name. Graffiti Spray will then
create a new folder with whatever you typed in as the title in the
“My Pictures” folder.
W hen a user is done and I click on the “Print” button, a
W indows print dialogue pops up!
− This is because you do not have a default printer set in “Devices
and Printers”, or the default printer is not available.
− To fix this hit the ESC key, click on the Windows “Start” icon, click
on the “Devices and Printers” title on the right hand side, go to the
printer you’re using, right-click on it and choose “Make Default”!
“Off The Shelf” Components
This includes any camera, printers, computers, projectors, SD cards, and anything else
that is not listed as a Graffiti Spray component.
For service and support on these items please contact that product’s manufacturer.
Graffiti Spray is not authorized to service these components and will be little to no help in
repairs and troubleshooting.
Graffiti Spray CANNOT be held liable for any hardware or software failures encountered
by any of these components, however, we will do our best to help and support you.
Graffiti Spray User Manual
Page 17