1
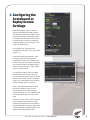
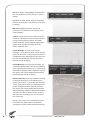
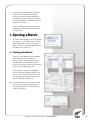
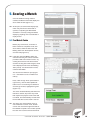
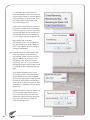
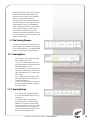
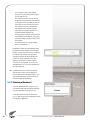
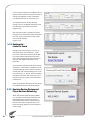
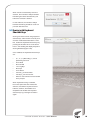
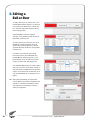
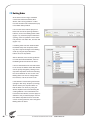
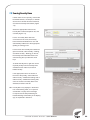
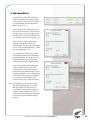
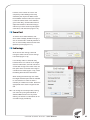
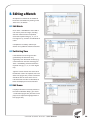
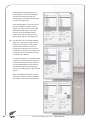
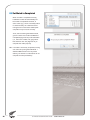
STADIUM SCORING EDITION
USER MANUAL
Notes to the Stadium
Scoring Edition
User Manual
This user manual follows the format of the Live Scoring
Edition User Manual, but a few explanatory notes are
made here to help the reader use the Stadium Scoring
Edition with their particular scoreboard or replay screen,
which will obviously vary from venue-to-venue.
The term ‘scoreboard’ refers to an electronic screen that
acts mainly as a scoreboard, but which may also be used
to display static player profiles, advertisements, or other
images. In contrast, the term ‘replay screen’ refers to an
electronic screen that acts as both a scoreboard and a
television screen, with live action and replays available,
in addition to having the ability to display static (or indeed
video) player profiles, advertisements, or other content.
Generally, most electronic screens will be scoreboards at
non-televised domestic, district, and tournament matches
but replay screens at televised international and domestic
matches.
The Stadium Scoring software will output in HDMI to both
scoreboards (usually directly into the scoreboard control
computer) and replay screens (via a mixing desk that is
controlling the television and other inputs), but this will
depend on the match level and the system being used,
which will vary from game-to-game and venue-to-venue.
For new operators, the scoring and editing sections of
this manual (Sections 4 to 8) should be read thoroughly
first, in order to become familiar with the scoring process.
Then, the means to select different display slides for the
scoreboard or replay screen (Section 3) should be re-read,
to understand what information can be accessed during a
match.
Finally, New Zealand Cricket’s system administrator will
occasionally advise that updates to the Feedback Cricket
Stadium Scoring Edition software client and display app
are available over the internet for downloading, which is an
automated process that only takes a few seconds.
2
S TA D I U M S C O R I N G E D I T I O N - U S E R M A N U A L
> Contents
1.
Setting-Up the Laptop and Software
4
2.
Configuring the Scoreboard or Replay Screen Settings
5
3.
Displaying Slides on the Scoreboard or Replay Screen
7
4.
Opening a Match
4.1 Starting a New Match
4.2 Opening an Incomplete Match
4.3 Opening a Completed Match
5.
Scoring a Match
5.1 Pre-Match Tasks
5.2 The Scoring Process
5.2.1 Scoring Runs
5.2.2 Scoring Extras
5.2.3 Entering a Dismissal
5.2.4 Ending an Over
5.2.5 Duckworth – Lewis Par Score
5.2.6 Decision Review System and Player Reviews Remaining
5.3 Scoring with Keyboard Shortcut Keys
13
13
15
15
15
16
17
18
18
19
6.
Editing a Ball or Over
20
7.
Innings Buttons
7.1 Break in Play
7.2 Batting Order
7.3 Scoring Penalty Runs
7.4 Retired Batsmen
7.5 Shortened Match
7.6 New Ball
7.7 Power Play
7.8 Score Card
7.9 End Innings
7.10 Completing a Match
21
21
22
23
24
25
26
26
27
27
28
8.
Editing a Match
8.1 Edit Match
8.2 Set Batting Time
8.3 Edit Teams
8.4 Edit Match Scorers
8.5 Edit Match Officials
8.6 Edit Match Result
8.7 Edit Innings Last Over
8.8 Set Match to Completed
29
29
29
29
32
32
32
33
34
9.
Exiting and Shutting Down
35
S TA D I U M S C O R I N G E D I T I O N - U S E R M A N U A L
9
9
12
12
3
1.Setting-Up
the Laptop and
Software
Set-up the laptop as standard, plugging-in
the power adaptor and mouse (Figure 1:1).
Also plug-in the HDMI cable that will output
to the scoreboard or replay screen
(Figure 1:2).
Push the power button at the top left of the
keyboard to start the laptop. If a password
is required, this will have been supplied by
the system administrator.
From the Desktop, open both the NZC
Stadium Scoring Edition software client
and the NZC Replay Screen display app by
double-clicking on each icon (Figure 1:3).
When the NZC Replay Screen display
app is opened, it will send data to the
scoreboard or replay screen via the HDMI
cable – check that this data is being
received by the scoreboard or replay
screen control unit.
Section 2 explains how to configure the
display app to display correctly on the
scoreboard or replay screen.
Figure 1:1
Figure 1:2
Figure 1:3
4
S TA D I U M S C O R I N G E D I T I O N - U S E R M A N U A L
2.Configuring the
Scoreboard or
Replay Screen
Settings
Because the display app can output to
various scoreboards and replay screens,
with different physical sizes, aspect ratios,
and pixel dimensions, its settings need to
be configured for the specific scoreboard
or replay screen to which it is outputting.
As these settings can be saved, they only
need to be entered once.
In the display app, click the Screen
Configuration tab, which is circled in yellow
(Figure 2:1).
If the initial output (from Section 1, when
the display app is first opened) to the
scoreboard or replay screen has text that
is either too big or too small for its physical
size, it will be because the display output
is set on the incorrect type – either Large
Screen or Small Screen.
To change this setting, click on the Back
to Menu button at the bottom, then Yes,
then select the alternative option to what is
already selected and click the Load button
(Figure 2:2). This change will be saved for
when the display app is re-opened.
Next, under Window Dimensions, select
the screen resolution of the ‘second
monitor’ that the scoreboard or replay
screen effectively is; in most cases this will
be the Fill Screen option of 1920 x 1080
(HD).
However, in some cases – particularly with
more rectangular scoreboard or replay
screens with unknown screen resolutions –
the Fill Width option should be used, which
will then calculate the height based on the
Aspect Ratio selected (see below).
S TA D I U M S C O R I N G E D I T I O N - U S E R M A N U A L
Figure 2:1
Figure 2:2
5
In cases where the scoreboard or replay
screen is neither 16:9 nor 4:3 but the pixel
dimensions are known, use the Custom
Width and Custom Height boxes to enter
the appropriate pixel numbers.
If the Aspect Ratio and/or Window
Positioning need to be changed, click on
the required setting for each and then click
Save and Refresh Screens. The current
setting will be highlighted in green.
The font sizes for the three types of manual
text message that can be displayed can be
changed by using the up or down arrows
alongside each of the three Message Font
boxes. These settings can also be saved
by clicking Save and Refresh Screens, but
they may need to be adjusted depending
on the length of the messages typed into
each of the three boxes on the Current
Display tab (See Section 3).
On some scoreboards or replay screens,
especially those without a mixing desk or
scalar equipment, it may be necessary to
adjust the margins of the display to best fit
their physical size. To do this, use the up
or down arrows alongside each of the four
Screen Margins boxes, and click Save and
Refresh Screens.
It is also possible to change the colours
of seven different themes within the
scoreboard slide designs, as listed under
Colours. Click on the already selected
colour next to each theme to open the
colour palette to re-select from the basic
colours (Figure 2:3).
6
Figure 2:3
If a more specific colour is required, click
on Define Custom Colours to open the
more detailed colour palette and enter
the specific Red, Green, and Blue digital
colour values. Click Add to Custom Values
to save this colour into the Custom Colours
section of the colour palette (Figure 2:4)
S TA D I U M S C O R I N G E D I T I O N - U S E R M A N U A L
Once all of these settings have been
correctly entered, ensure that Save and
Refresh Screens is clicked so that these
settings are saved for future use of the
display app with this particular scoreboard
or replay screen. Therefore, these settings
should only need adjusting if a different
scoreboard or replay screen is used with
this installation of the display app.
If any setting is saved that is incorrect
and the previous setting cannot be
remembered or otherwise obtained, click
Restore Default Settings to revert all
settings back to their original value.
Figure 2:4
3.Displaying Slides
on the Scoreboard
or Replay Screen
Once the screen configuration has been
completed, the display app is ready to
output various slides to the scoreboard or
replay screen.
Click on the Current Display tab, circled in
yellow, to view a small output window and
the buttons for the various slides (Figure
3:1).
These slides include:
Innings: current or previous Innings 1-4
(click on the down arrow and select from
the dropdown menu).
Summary: Main scoreboard, Batting card,
Fall Of Wicket, Bowling card, and Video for
the L-overlay used only when outputting
limited overs matches to a replay screen
(click required button to display).
Updates: current Partnership details and
match Innings summary (click to display).
Target: Target Balls, Target Overs, Target
countdown, and innings Comparison slides
(click to display).
S TA D I U M S C O R I N G E D I T I O N - U S E R M A N U A L
Figure 3:1
7
Events 1: Maiden, Wicket Maiden, and Dismissal
key, only available on the ball they occur (click to
display).
Events 2: Possible Hattrick, Hattrick, and Double
Hattrick, only available on the ball they occur (click
to display).
Milestones: Batsman, Bowler, and Innings
milestones, only available on the ball they occur
(click to display).
History: Use the down arrow to select a previous
milestone or dismissal from the currently selected
innings, and click Show to display. Thereafter,
further milestones or dismissals will automatically
display when selected. Click Main to exit the
History dropdown menu.
Figure 3:2
Simple Message: for a one-colour simple
message, e.g. ‘Please stay off the oval at all times’
(type text into the box, if required go to the Screen
Configuration tab to adjust the font size, then back
to the Current Display tab and click the Simple
Message header to display).
Double Message: for a two-colour message, e.g.
‘World Record Partnership: McCullum and Watling
352*’ (type text into the two boxes, if required go to
the Screen Configuration tab to adjust the font size,
then back to the Current Display tab and click the
Double Message header to display).
8
Baseline Message: for a simple baseline message
to display at the bottom of a coordinated video
grab or camera shot, e.g. ‘Brendon McCullum 302
not out’ (type text into the box, if required go to the
Screen Configuration tab to adjust the font size,
then back to the Current Display tab and click the
Baseline Message header to display. Note that the
maximum font size will depend on the number of
characters in the message, as it can only be one
line of text long).
During a Test, 4-Day, or non-international limited
overs match the default slide will be the Main
scoreboard, and other slides selected as required.
S TA D I U M S C O R I N G E D I T I O N - U S E R M A N U A L
Figure 3:3
Figure 3:4
During international limited overs matches
(One Day or Twenty20) with full replay
screen production the default slide will be
the Video slide, with other full-screen slides
selected as possible in coordination with the
replay screen director.
Section 4 details the scoring process of the
Feedback Cricket Stadium Scoring Edition
software client.
4.Opening a Match
To open a match, double-click on the desktop
icon (Figure 1:3), click File, and then select
either a New Match, Open an Incomplete
Match, or Open a Completed Match from the
dropdown menu (Figure 4:1).
Figure 4:1
4.1 Starting a New Match
Click File -> New Match to open the Match
Setup window, which allows the two
teams, players (including captains and
wicketkeepers), match officials (referee,
umpires, and scorers), match type and match
venue to be selected (Figure 4:2).
From the Team 1 and Team 2 dropdown
arrows, select the two teams playing in the
match. If one or both teams are not on this
list, click New Team and type in the Team
Name in CAPITALS (Figure 4:3).
NB: A Short Name does not have to be entered,
but can be, although at this stage it does
not display anywhere on the scoreboard or
replay screen slides.
Figure 4:2
Figure 4:3
S TA D I U M S C O R I N G E D I T I O N - U S E R M A N U A L
9
After the two teams have been selected,
the Playing XIs for both teams from the last
time these teams played a match scored
on this laptop will be displayed (Figure
4.4). This list will be empty for a New
Team.
To make changes to these Playing XIs,
highlight a player who is not playing in
the current match and click Remove.
Then click on the down arrow just below
the team lists to select the player who is
playing from the dropdown list of all players
who have previously played for this team,
and click Add. Repeat this step for all
player changes.
If the required player has not played for
this team before, click List All Players,
select the appropriate player(s) from all the
players in the database, click OK, and then
Add for each required player.
If the required player is not in the database
(i.e., the player is making their stadium
scoring debut), click on the New Player
button to display the Add Team Player
window (Figure 4:5).
Create a new player by typing in their
surname only in capitals, e.g. JONES, and
click OK. The debut player will appear in
the box just below the team list, so click
Add as above to include them in the team.
Figure 4:4
Figure 4:5
NB: Leave the Left Handed Batsman checkbox
un-checked, even if the player is lefthanded, as this is no longer required in the
player database.
10
If a player is a “Mc” or a “Mac”, use a
lower-case “c” or “ac” when typing their
name. If there are two players with the
same surname in the match (whether on
the same or different teams), include the
first initial for each player to distinguish
them (e.g., B McCULLUM and N
McCULLUM).
S TA D I U M S C O R I N G E D I T I O N - U S E R M A N U A L
When all the Match Setup details are
complete, click OK to create the stadium
scoring match. Scoring can now begin, as
detailed in Section 5.
NB: If the start of a game is delayed by bad
weather, a New Match should not be setup until a start time is confirmed and the
toss made. If the scoring system needs
to be used to communicate updates
regarding pitch or ground conditions and
possible start times, this information can
be displayed using the Simple Message
or Double Message function within the
Display App, as explained in Section 3.
4.2 Opening an Incomplete Match
To continue scoring a match-in-progress
(i.e., on any day after the first day in a
multi-day match or a current match during
which Feedback Cricket has been closed),
click File -> Open Incomplete Match.
Figure 4:10
Feedback Cricket will display a list of
incomplete matches – as with opening a
new match, highlight the required match
and click OK (or double-click on the match
line) to open the match (Figure 4:10).
4.3 Opening a Completed Match
12
To open a match that has been completed
(i.e., to edit a match after it has finished),
click File -> Open Completed Match,
highlight the required match, and click OK
(or double-click on the match line) to open
the match (Figure 4:11).
Figure 4:11
The process for editing a completed match
is detailed in Section 6 and 8, but as any
changes to a match after the crowd has
dispersed will be immaterial, both Opening
a Completed Match and editing it will be
rarely used functions.
S TA D I U M S C O R I N G E D I T I O N - U S E R M A N U A L
5.Scoring a Match
Once the stadium scoring match is
created, Feedback Cricket will display the
Score Card window (Figure 5:1).
NB: At this point, check that the Display App,
which may need to be closed and reopened, is outputting the New Match
and that it is correctly configured before
displaying anything on the scoreboard or
replay screen.
Figure 5:1
5.1 Pre-Match Tasks
Before play commences, a number of
tasks need to be completed. First, click
Score Panel, select the Won Toss and
Batting Team from the dropdown arrows,
and click OK (Figure 5:2).
Figure 5:2
NB: If the Won Toss and Batting Team are
entered incorrectly, this can be rectified –
provided a ball has not been scored – by
clicking Score Card on the Score Panel
and then clicking Score Panel again, which
will re-display the Won Toss and Batting
Team prompt. If a ball has been scored,
create a New Match.
The Score Panel will then open (Figure
5:3 – note that this is for a limited overs
match).
Next, under Innings Timer (at the bottom
right corner), click the Auto Update Off
button to turn on the timing for batsmen’s
and innings minutes, highlighted in green
(Figure 5:4).
Figure 5:3
This clock will automatically start when the
first ball is scored, stop when any break
that requires the players to leave the field
is entered, and automatically re-start when
the first ball after such a break is scored.
NB: This timer runs off the laptop clock, so
check that this is correct. If not, doubleclick on the clock at the right hand side of
the Taskbar to update. This will also update
the clock in the centre of the Score Panel.
S TA D I U M S C O R I N G E D I T I O N - U S E R M A N U A L
Figure 5:4
13
In a multi-day match, there will be an
Overs Remaining box below the Overs Per
Hour box (as this does not currently display
on the scoreboard or replay screen, leave
this text box blank) in the centre of the
Score Panel (Figure 5:5).
Click on Enter Overs Remaining and enter
the minimum number of Overs Remaining
for the day’s play (e.g., 90 in a Test match),
and click OK. When the 4th innings of the
match starts, enter the Overs Remaining
for Last Innings, and click OK (Figure 5:6).
Both numbers will count down
automatically as each over is ended, but
they will need to be manually changed if
there is any reduction due to a change of
innings or bad weather.
Figure 5:5
Figure 5:6
NB: If the 4th innings of a match begins with
more than a full day’s play remaining,
the minimum number of overs on the full
day(s) is added to the minimum Overs
Remaining on the day the 4th innings
begins (e.g., 90 + 20 = 110), as the Overs
Remaining for Last Innings number is used
to calculate the 4th innings Required Run
Rate.
At the bottom right-hand corner of the
Score Panel, there is a Decision Review
System (DRS) text box. Click on Update
and enter the appropriate number of Player
Reviews for each innings (currently two in
Tests and one in ODIs), using a three letter
abbreviation, in CAPITALS, for both teams
(Figure 5:7).
Figure 5:7
Update this text box each time a team has
an unsuccessful Player Review (minus
one), a new ball is taken in a Test match
and at each change of innings, when both
are re-set to the maximum number for
each innings (Figure 5:8).
Figure 5:8
14
S TA D I U M S C O R I N G E D I T I O N - U S E R M A N U A L
Finally, just as play is about to commence,
check that the Striker, Non-Striker, and
Bowler are correct in the Current Players
section. If any of these need to be
changed, click on the relevant dropdown
arrow and select from the player lists that
will be displayed. Then, use the Batting
Order function (see Section 7.2) to make
these changes display correctly on the
scoreboard or replay screen; e.g. the
batsman who faces the first ball is number
one on the batting card. The system is now
ready for play to begin.
5.2 The Scoring Process
To score the match, use the buttons in the
Runs (Figure 5.9), End Ball or Over (Figure
5.10), Extras (Figure 5.11), and Dismissals
(Figure 5.12) boxes on the Score Panel.
Figure 5:9
Scoring Runs
5.2.1
•
•
•
•
•
For a dot ball, click 0 (Figure 5:9) then
End of Ball (Figure 5:10);
For any runs scored off the bat, click
the appropriate Runs (Figure 5:9) then
End of Ball (Figure 5:10);
For a boundary 4 or 6 off the bat, click
Boundary 4 or Boundary 6 then End of
Ball. If the batsmen run 4, click 4 then
End of Ball;
For a single with 4 overthrows, click 5
then End of Ball. Also use 6 and 7 for
overthrow situations;
For any runs scored off a no-ball, click
the appropriate Runs button, No Ball,
then End of Ball.
Figure 5:10
Scoring Extras
5.2.2
•
•
For a single wide, click Wide (Figure
5:11) then End of Ball (Figure 5.10) to
add one run;
For multiple wides, click the Runs
(Figure 5:9 above) completed by the
batsmen (4 if it goes to the boundary,
which will show as 5 in the runs column
of the current over box, to signify the
correct total wides), Wide (Figure 5:11),
then End of Ball (Figure 5:10);
S TA D I U M S C O R I N G E D I T I O N - U S E R M A N U A L
Figure 5:11
15
•
•
•
•
For a single no ball, click No Ball
(Figure 5.11) then End of Ball (Figure
5:8) to add one run;
For multiple no-balls, click the Runs
(Figure 5:9) completed by the batsmen
(4 if it goes to the boundary, which will
also show as 5 in the runs column of
the current over box), No Ball then,
depending on the umpire’s signal,
either Bye or Leg Bye (Figure 5:11),
and End of Ball (Figure 5:10);
For leg bye(s) or bye(s), click the Runs
completed by the batsmen (4 if it goes
to the boundary), Leg Bye or Bye, then
End of Ball;
For instructions on scoring Penalty
Runs, see Section 7.3.
Feedback Cricket will automatically swap
the Striker and Non-Striker when singles,
threes, or fives are scored (runs or extras),
and at the end of each over. However,
changes to Striker and Non-Striker will
need to be made manually when the
batsmen cross when a catch is taken,
a ‘one short’ is signalled, or a run out is
affected with a run (or runs) completed on
the same delivery.
Figure 5:10
NB: As each delivery is scored, its relevant
data for the current over will appear in
the box below the Edit Mode section. The
scorecards below this Current Over box
will also update automatically.
Entering a Dismissal
5.2.3
16
From the Dismissals box (Figure 5:12),
click Wicket and select the Dismissal type
from the dropdown list (Figure 5:13).
If the Non-Striker has been dismissed
(e.g., in Run Outs) use the dropdown arrow
to change the Batsman.
Figure 5:12
S TA D I U M S C O R I N G E D I T I O N - U S E R M A N U A L
If a dismissal involves a fielder or
wicketkeeper (i.e., Caught, Stumped,
and Run Out), select the player from the
dropdown arrow for Fielder 1. For Run Outs
involving multiple fielders/wicketkeeper,
select all additional players from the Fielder
2, Fielder 3, etc dropdown arrows.
If a substitute fielder is involved in a
dismissal, type their name into the SubFielder box and click Add – they will now
appear at the bottom of the Fielder dropdown
lists and can be selected from there.
Once all dismissal data has been entered,
click OK and then End of Ball to complete
the dismissal.
Figure 5:13
Ending an Over
5.2.4
After the 6th (legitimate) ball of each over is
scored, click End of Over (Figure 5:14) then
Yes (Figure 5:15). If End of Over is clicked
accidentally or a 7th ball is bowled, click No
to continue the over.
If Yes is clicked accidentally, see Section 6 to
Add a New Ball to an over. After completing
an over, a New Over window will appear
identifying the Current Batsman (striker) and
Current Bowler (Figure 5:16).
This window prompts a visual check that the
correct Current Players are selected at the
start of each over.
If it is not the prompted Current Batsman
who is actually on strike, then it is likely
a scoring error has been made – unless
the batsmen have somehow illegitimately
changed ends, which is extremely unlikely.
In this situation, immediately change the
Striker so that scoring can continue correctly
while the error is resolved by clicking on the
Striker dropdown arrow and selecting the
correct player (Figure 5:17).
Figure 5:14
Figure 5:15
Figure 5:16
S TA D I U M S C O R I N G E D I T I O N - U S E R M A N U A L
17
If it is not the prompted Current Bowler who is
about to bowl, then there has been a bowling
change as Feedback Cricket ‘remembers’
who bowled the last over from each end.
Figure 5:17
To change the bowler at each bowling
change, click on the Bowler dropdown arrow
and select the new bowler from the list
(Figure 5:18).
Figure 5:18
Also use this function if a bowler is injured
during an over and another bowler completes
the over. This occurrence will result in part
overs for both bowlers
(Figure 5:19).
Duckworth –
5.2.5
Lewis Par Score
Figure 5:19
During the second innings of a 50-over or
Twenty20 match, the Duckworth – Lewis
Par Score needs to be entered into the text
box at the bottom right hand corner of the
Score Panel (Figure 5:20) at the start of the
first over and updated in-between overs
thereafter.
Figure 5:20
The Par Score should be read off the official
Duckworth – Lewis sheet, supplied by the DL
or Match Manager, for the relevant number of
wickets lost and overs bowled plus one in the
second innings; i.e., the Par Score on display
should be that for the end of the next (if it is
between overs) or current (if a ball has been
bowled) over.
When a wicket falls, the DL Par Score should
be updated before the next ball is bowled.
Figure 5:21
Decision Review System and
5.2.6
Player Reviews Remaining
18
When the Decision Review System (DRS)
is in operation at international matches, the
abbreviated team names and number of
Player Reviews should be entered into the
text box at the bottom right hand corner of
the Score Panel (Figure 5:22) at the start of
each innings.
S TA D I U M S C O R I N G E D I T I O N - U S E R M A N U A L
Figure 5:22
When a team unsuccessfully reviews a
decision, their number of Player Reviews
Remaining should be decreased by one
before the next ball is bowled.
In Test matches, the number of Player
Reviews Remaining should be re-set to 2
per team after 80 overs.
Figure 5:23
5.3 Scoring with Keyboard
Shortcut Keys
Scoring can also be done using keyboard
shortcut keys, rather than the mouse pointand-click method described above. To do
this, enable the keyboard shortcut keys by
pressing the K button when on the Score
Panel – the heading will display Keyboard
Scoring Enabled (Figure 5:20).
Once enabled, the keyboard shortcut keys
are:
•
•
•
•
•
•
•
•
•
Figure 5:24
0, 1, 2, 3, 4 (Boundary), 5, and 6
(Boundary) for Runs
W for Wide
N for No Ball
L for Leg Bye
B for Bye
X for Wicket
Comma (,) for End of Ball
Full stop (.) for End of Over
Enter for Yes to End of Over and New
Over prompts
When keyboard scoring is enabled,
the mouse point-and-click method will
still work, and will be required to select
batsmen, bowlers, and fielders from
dropdown lists. Disable the keyboard
shortcut keys by pressing the K button
again.
S TA D I U M S C O R I N G E D I T I O N - U S E R M A N U A L
19
6.Editing a
Ball or Over
To edit a delivery in the current over, click
the Edit Mode button (Figure 6:1), left-click
on the ball to be edited in the current over
box, and then right-click anywhere along
this line (Figure 6:2).
Select Edit Ball, make the required
changes, click Update (usually the End of
Ball button) and then Yes.
To edit a delivery in a previous over, click
Edit Mode, use the dropdown arrow to
Select Over to Edit (Figure 6:3), edit the
required deliveries as above, click Update
and then Yes.
If a whole over has been scored with
the wrong bowler, click Edit Mode then
the Edit Bowler button (Figure 6:1), use
the dropdown arrow to select the correct
bowler, and then click OK (Figure 6:4).
The Add New Ball function is used to add a
ball to an over when it has been missed, or
after the Delete Last Ball function has been
used to correct the order of deliveries in an
over. Exit Edit Mode by re-clicking the red
button.
Figure 6:1
Figure 6:2
Figure 6:3
NB: After exiting Edit Mode, check that the
correct Striker, Non-Striker, and Bowler are
selected – sometimes Feedback Cricket
will retain the Current Players from the
edits just completed.
Figure 6:4
20
S TA D I U M S C O R I N G E D I T I O N - U S E R M A N U A L
7.Innings Buttons
The collection of Innings Buttons at the
top right-hand corner of the Score Panel
enables other important information related
to each innings, in both multi-day and
limited over matches, to be recorded.
7.1 Break in Play
When a scheduled or unscheduled Break
in Play occurs, click this button (Figure
7:1), select the appropriate Break from the
below window (Figure 7:2), and click OK:
For the stadium scoring, it is critical that all
breaks where the players leave the field
are entered, as this is the only way to stop
the batsmen’s and innings minutes, and
thus keep them as accurate as possible.
Therefore, ensure that Lunch, Tea, End of
Day, Rain and Bad Light breaks are always
entered. The batsmen’s and innings timer
will re-start automatically when the next
ball is scored as play resumes.
Breaks for when the players do not leave
the field, e.g. Drinks or another Break
in Play (such as a serious injury), are
less critical because they do not require
the batsmen’s or innings minutes to be
stopped.
Figure 7:1
NB: These breaks do not display on the
scoreboard or replay screen. To do this,
use the Simple Message or Double
Message functionality in the Display App,
as explained in Section 3.
To delete a Break, right-click on the
required break in the Previous Breaks list
and click Delete Break.
S TA D I U M S C O R I N G E D I T I O N - U S E R M A N U A L
Figure 7:2
21
7.2 Batting Order
22
At the start of each innings, Feedback
Cricket auto-selects the Striker, NonStriker, and incoming batsmen in order
from the two team lists created before play
in the Match Setup window.
If one or both of the first two players on
these lists are not the opening batsman/
batsmen, click on the Batting Order button
(Figure 7:3), select the player/s that is/are
opening, use the Up button to move them
into positions one and/or two, and click OK
(Figure 7:4).
If a batting order has been obtained after
the Match Setup was completed, make
any other required changes to the Batting
Order by using the Up and/or Down
buttons as soon as possible.
After a dismissal, if the incoming batsman
is not the auto-selected Striker, return to
the Batting Order and amend as above.
If time is limited before the next ball needs
to be scored, the Striker and/or Non-Striker
can be quickly changed by clicking on the
respective dropdown arrows and selecting
the correct batsman for one or both. The
Batting Order can then be changed after
the next ball, or at the end of the over.
If the batsmen crossed during a dismissal
(Caught or Run Out), swap the (incoming)
Striker and the (not out) Non-Striker so
that the latter is on strike, by using the
Striker dropdown arrow and selecting the
existing batsman. The new batsman will
become the Non-Striker, but if this player is
different to the pre-selected player use the
Non-Striker dropdown arrow to select the
correct incoming batsman, then change the
Batting Order as above.
S TA D I U M S C O R I N G E D I T I O N - U S E R M A N U A L
Figure 7:3
Figure 7:4
7.3 Scoring Penalty Runs
If either team incurs a penalty, confirm with
the Match Referee, 3rd Umpire, or Official
Scorers the Law that has been breached,
and click the Penalty Runs button (Figure
7:5).
Select the appropriate Law from the
Penalty Runs Offence dropdown list, and
click OK (Figure 7:6).
For the 12 Penalty Runs Offences
on the list from the Laws, the Penalty
Runs Awarded will default to 5 runs and
automatically add these to the appropriate
(batting or bowling) team.
For the three other Penalty Runs Offences
(Slow Over Rate, Other Penalty – Batting,
and Other Penalty – Bowling) on the list,
the Penalty Runs Awarded needs to be
entered using the Up and Down arrow
keys.
To delete Penalty Runs, right-click on the
required penalty from the Penalty Runs
awarded for this match list, and click
Delete Penalty.
Figure 7:5
Figure 7:6
If the appropriate Law is not known at
the time of the penalty, select either the
Other Penalty – awarded to batting side or
Other Penalty – awarded to bowling side,
enter the number of Penalty Runs to be
Awarded, and then click OK.
NB: Penalty Runs only displays in the Extras
line of the Bowling Card, so if a specific
scoreboard or replay screen message
is required use the Simple Message or
Double Message functionality in the display
app, as explained in Section 3.
S TA D I U M S C O R I N G E D I T I O N - U S E R M A N U A L
23
7.4 Retired Batsmen
If a batsman retires, confirm whether they
are ‘retiring out’ and will not return or are
‘retiring hurt’ and may return later in the
innings, and click the Retired Batsmen
button (Figure 7:7).
On the Retire Batsman tab, the Striker will
be pre-selected as the retiring batsman – if
it is the Non-Striker who is retiring, use the
Batsmen dropdown arrow to select them
instead. Select whether the batsman is
Retired Out or Retired Hurt (Not Out will be
highlighted initially) and click OK (Figure
7:8).
A Retired Out batsman cannot be ‘unretired’, so this option is only to be
used when it is certain a batsman will
not resume their innings later. If there
is uncertainty when they retire, use the
Retired Hurt function.
Figure 7:7
Figure 7:8
NB: Retired Out is usually only used in preseason warm-up or tour matches with
more than 11 players.
When a Retired Hurt batsman returns to
the crease, click Retired Batsman, select
the Retired Hurt tab, click Un-Retire for the
selected batsman, and then Yes to confirm
(Figure 7:9).
Figure 7:9
24
S TA D I U M S C O R I N G E D I T I O N - U S E R M A N U A L
7.5 Shortened Match
If a limited overs (50-over or Twenty20)
match is reduced by bad weather (before
or during play), confirm the overs lost and
the revised target, and click Shortened
Match (Figure 7:10).
If the overs per team are reduced before
the end of the first innings, under the First
Innings question select Yes and enter the
Revised Overs in the box (each time there
is a reduction), then click OK (Figure 7:11).
As the second innings will be similarly
reduced, under the Second Innings
question select Yes and enter the Revised
Target – Runs and Revised Target – Overs,
then click OK (Figure 7:12).
This information is critical as it is used to
re-calculate the Target, Overs Remaining,
Required Run Rate, and length of Power
Play(s) displayed on the scoreboard or
replay screen during the second innings.
Figure 7:10
Figure 7:11
If the overs per team are reduced again,
either during the innings break or the
second innings, repeat this process by
entering the newly Revised Target – Runs
and Revised Target – Overs. Updating this
information each time there is a reduction
in overs and a revised target is set is
critical to the accuracy of the scoreboard.
NB: The Duckworth Lewis Par Score Table
should be supplied by the DL or Match
Manager whenever the DL system is
re-calculated. If the DL system does not
produce a different target than one run
more than the team batting first’s total, still
enter this target in the Revised Target ->
Runs box.
S TA D I U M S C O R I N G E D I T I O N - U S E R M A N U A L
Figure 7:12
25
7.6 New Ball
When the second (or subsequent) New
Ball is taken in a multi-day match, clicking
this button will highlight the 0 button while
awaiting any other scoring data and End of
Ball (Figure 7:13).
Figure 7:13
NB: New Ball does not currently display on the
scoreboard or replay screen, so it is not
critical if it is not used. Instead, use the
Simple Message function in the Display
App to produce a new ball message.
7.7 Power Play
In 50-over matches, the first (or
compulsory) Power Play is built-in to the
system and a First Power Play of 10 overs
will display on the scoreboard and count
down as each delivery is scored.
When the batting team takes their power
play, click Power Play (Figure 7:14), then
click the Start Second button and Yes to
confirm the start of the second Power Play
(Figure 7:15).
If the Power Play information is not entered
when it begins, click on the Power Play
button again, then Edit to adjust the Start
Over, and click Save.
As above, the compulsory Power Play
for both innings is pre-set at 10 overs.
However, if a match is reduced before
play starts, or the second innings is
reduced before 10 overs have been
bowled, the Shortened Match data will be
used to re-calculate the number of overs
in the compulsory and/or batting Power
Play according to an in-built table that
automatically displays on the scoreboard
or replay screen.
Figure 7:14
Figure 7:15
Figure 7:16
26
S TA D I U M S C O R I N G E D I T I O N - U S E R M A N U A L
However, if the number of overs in the
compulsory and/or batting Power Play
advised by the umpires is different from
the Feedback Cricket number, the umpires’
number should be used. In this situation,
go to Power Play, use the Edit function to
adjust the Duration of the Power Play(s)
with the up or down arrow keys alongside
each value, and click Save (Figure 7:16).
7.8 Score Card
To exit the Score Panel window, click
Score Card to display all Match Innings (1
& 2 on one tab and in multi-day matches 3
& 4 on a second tab) and access the Tools
(Section 8) menu (Figure 7:17).
Figure 7:17
7.9 End Innings
At the end of each innings, click End
Innings to select how the current innings
has ended (Figure 7:18).
If a multi-day match is ‘called off early’
because there is no chance of an outright
result for either team, use End of Overs to
end the last innings of the match. Also use
this option at the end of the first innings in
a limited overs match (Figure 7:19), unless
the batting team has been dismissed.
When ending the last innings of a match,
the Target Reached option will be available
for a successful run chase in either a
multi-day or limited overs match. Select the
appropriate end to each innings and click
OK.
NB: If an innings is incorrectly ended, scoring
can continue by using the Edit Mode ->
Add New Ball function for every future
delivery, but as this is cumbersome do not
end and innings prematurely.
S TA D I U M S C O R I N G E D I T I O N - U S E R M A N U A L
Figure 7:18
Figure 7:19
27
7.10 Completing a Match
28
When the last ball of a match is bowled,
the Double Message function in the display
app should be used as quickly as possible
to produce a Match Result slide; e.g.
BLACKCAPS won by 23 runs. This message
should be displayed on the scoreboard or
replay screen as the players walk from the
field.
Once the players have exited, the last
innings of the match can be ended, when this
window will appear (Figure 7:20). Click OK to
return to the Score Card window.
Section 8 explains how a match can be
edited during play or after it has been
completed.
S TA D I U M S C O R I N G E D I T I O N - U S E R M A N U A L
Figure 7:20
8.Editing a Match
All aspects of a match can be edited via
the Score Card window by clicking on the
Tools menu, as follows:
8.1 Edit Match
Go to Tools -> Edit Match to edit a ball or
over from a previous innings, including
after the match has been completed,
select the required Innings (1, 2, 3, or 4
from Figure 8:1), and turn on Edit Mode as
usual.
Figure 8:1
Complete the necessary edits as per
Section 6 to update the match scorecards.
8.2 Set Batting Time
If the batsmen’s and innings minutes
generated by the auto-timer vary
significantly from the actual minutes (e.g.,
a Tea break has not been entered) go to
Tools -> Set Batting Time and select the
required Innings (1, 2, 3, or 4 from Figure
8:2).
Type the correct minutes into each cell of
the Minutes column as required, then click
Save Time (Figure 8:3). These corrections
should be done as soon as the error is
noticed and the minutes re-calculated, as
these are displayed on the scoreboard.
Figure 8:2
Figure 8:3
8.3 Edit Teams
If a player has been incorrectly entered in
the team list at Match Setup, go to Tools
-> Edit Teams (Figure 8:4) and click on the
player to be replaced to highlight them in
blue (Figure 8:5).
Figure 8:4
S TA D I U M S C O R I N G E D I T I O N - U S E R M A N U A L
29
Under Replace Selected Player, click
Existing Player for the full list of players
who have previously played for the
selected team, select the required player,
and click OK (Figure 8:6).
If the required player is not on this list (i.e.,
they are making their stadium scoring
debut), click Cancel and then, still under
Replace Selected Player, click Debut
Player to go to the Add Team Player
window and create a new player, as in
Match Setup, and click OK (Figure 8:7).
NB: This function is for errors made at Match
Setup (i.e., replacing a wrongly selected
player), but can also be used to create
an abbreviated surname to replace a
full surname if it displays too long on the
scoreboard. As above, this is most likely in
4:3 aspect ratios on the Video/L-Overlay
for limited overs matches.
If ‘replacement players’ are allowed to take
a full part in a multi-day match after it has
started, then perform the above edits but
use the Add Substitute to Team buttons,
instead of the Replace Selected Player
buttons, for Existing Player or Debut Player
options.
When the Replacement Player has been
selected or created, click OK to add them
to the bottom of the team list (Figure 8:8).
Figure 8:5
Figure 8:6
Figure 8:7
30
S TA D I U M S C O R I N G E D I T I O N - U S E R M A N U A L
Return to the Score Panel and use
the Batting Order function to move the
Replacement Player into the correct batting
position. Also shift the Replaced Player to
the lowest position, which will remove them
from the current innings’ batting scorecard.
Now check the scorecard(s) to ensure
that the Replaced Player’s name is still
associated with their batting and bowling
performances in previous innings, prior
to the Replacement Player joining the
match. Also check that the Replacement
Player’s batting and bowling performances
are correctly associated with them in the
current and future innings.
Finally, if an error has been made
naming the two Captains and/or the two
Wicketkeepers at Match Setup, these can
also be changed under Edit Teams by
clicking Change and selecting the correct
player(s) from the corresponding dropdown
lists (Figure 8:9).
Figure 8:8
Click OK after the changes have been
made for each team and then Done to exit
the Edit Teams window.
NB: As the Captains and Wicketkeepers are
not identified on the scoreboard it is not
essential that these are specified correctly,
but as they may be in the future it is best to
do so.
Figure 8:8
S TA D I U M S C O R I N G E D I T I O N - U S E R M A N U A L
31
8.4 Edit Match Scorers
To Edit the Match Scorers (Figure 8:10),
simply type the required name(s) into the
Scorer 1 and/or Scorer 2 text boxes and
click OK (Figure 8:11).
NB: The Match Scorers also do not currently
display on the scoreboard.
Figure 8:10
Figure 8:11
8.5 Edit Match Officials
If any of the Match Officials have been
incorrectly entered at Match Setup, go to
the Tools -> Edit Match Officials window
(Figure 8:12) and select the correct onfield Umpire(s), TV Umpire, 4th Umpire,
or Match Referee from the respective
dropdown arrows and click OK (Figure
8:13).
Figure 8:12
NB: The Match Officials also do not currently
display on the scoreboard.
8.6 Edit Match Result
The Tools -> Edit Match Result (Figure
8:14) option is currently redundant, as
it does not display on the scoreboard.
Instead, use the Simple Message or
Double Message function on the Display
App to generate a match result message
(see Section 3).
Figure 8:13
32
S TA D I U M S C O R I N G E D I T I O N - U S E R M A N U A L
However, after this match result message
has been displayed on the scoreboard, it
can be re-entered into the Tools -> Edit
Match Result window (Figure 8:15) if
desired for match completeness.
NB: If a Twenty20 match finishes as a Tie
and the One Over Per Side Eliminator
(OOPSE) is to be played, setup another
game as per Section 4, obviously with the
same players, match officials, and venue.
The team that batted second in the main
game will bat first in the OOPSE. Score the
first Eliminator Over as usual, End Innings
using the End of Overs option, then score
the second Eliminator Over as usual and
display the Match Result message as per
Section 3.
NB: In Duckworth Lewis matches, the Match
Result message will need to include ‘(DL
Method)’ after the winning team and
margin, e.g. ‘BLACKCAPS won by 23 runs
(DL Method)’.
Figure 8:14
Figure 8:15
8.7 Edit Innings Last Over
If an innings ends part-way through an
over but End of Over is accidentally clicked
before the innings is ended, the current
bowler’s and innings total overs will be
incorrectly rounded-up to a complete over.
Figure 8:16
To correct both errors, go Tools -> Edit
Innings Last Over (Figure 8:16), select the
required Innings using the dropdown arrow
(Last Over will then display the number of
the incorrectly completed last over for that
innings), click Un-End Over (Over Status
will change from Over Ended to Over Not
Ended), then click OK (Figure 8:17).
The scorecard will revert back to the
correct part-over for the bowler of the last
over and innings overs.
Figure 8:16
NB: Edit Innings Last Over will un-end other
overs if it is done before the first ball of
the next over is scored, otherwise Edit
Mode -> Add New Ball must be used to
add additional ball(s) to an incorrectly
completed over (see Section 6).
S TA D I U M S C O R I N G E D I T I O N - U S E R M A N U A L
33
8.8 Set Match to Completed
When a match is completed correctly,
Feedback Cricket will automatically set
the match to completed. However, in
some cases (e.g., when a multi-day match
is ‘called off early’ as a draw and some
innings have not even been started) this
completion may not occur correctly.
Thus, after confirming the Match Result,
go to the Tools menu and if Set Match to
Completed (Figure 8:18) is still selectable
(i.e., the text is in black, not grey) select
this and then click Yes (Figure 8:19) to
complete the match properly.
NB: If a match is incorrectly completed, scoring
can continue by using the Edit Mode ->
Add New Ball function for every future
delivery, but as this is cumbersome do not
complete a match prematurely.
34
Figure 8:18
S TA D I U M S C O R I N G E D I T I O N - U S E R M A N U A L
Figure 8:19
9.Exiting and
Shutting Down
When the day’s play is finished and all
edits have been completed:
Exit the Feedback Cricket Stadium Scoring
software by clicking File -> Exit
(Figure 9:1).
Exit the Replay Screen Display App by
clicking the white cross in the top righthand corner (Figure 9:2).
Figure 9:1
Figure 9:2
Shutdown the laptop and pack away all
equipment.
S TA D I U M S C O R I N G E D I T I O N - U S E R M A N U A L
35
New Zealand Cricket (Inc.)
Level 3, 8 Nugent Street Grafton, Auckland, 09 972 0605
Calder Drive, Lincoln University, Lincoln, 03 366 2964
w w w. b l a c k c a p s . c o . n z