1
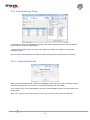
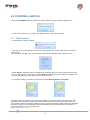
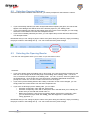
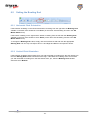
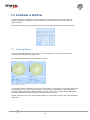
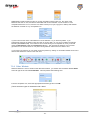
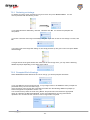
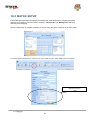
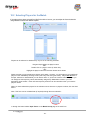
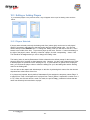
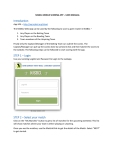
` USER GUIDE Version 2.0.0.8 August 2012 Congratulations on your selection of Statsmaster Cricket. The purpose of this document is a reference guide to explain the basic usage and functionality of this version of the application and to get you operational as quickly as you. Gundars Mantinieks Executive Director ProWess Sports o o o StatsMaster “Cricket” is exclusively owned and licenced by ProWess Sports – all rights reserved. Weet-Bix MyCricket is exclusively owned and licenced by Cricket Australia – all rights reserved. Windows is a trademark of the Microsoft Corporation. Disclaimer rd ProWess Sports provides no warranty or support for 3 Party products outside StatsMaster. Best endeavors will rd used to attempt to assist users in the operation, however and direct support or updates for the 3 party products rd are responsibility of the owner of the 3 party products and the user. Information in this document is subject to change without notice. No part of this document may be reproduced or transmitted in any form of by any means, electronic or mechanical, for any purpose, without the express written permission of ProWess Sports 14 Stenson Road, Kealba VIC 3021 Telephone: 1300 859 921 Email: [email protected] Webiste: www.prowess.com.au © 2012 -1- Table of Contents 1.0 INTRODUCTION............................................................................................................................................... 4 1.1 Available Modules ................................................................................................................................... 4 1.2 Proposed Future Modules ....................................................................................................................... 5 1.3 System Requirements............................................................................................................................. 5 2.0 OVERVIEW ....................................................................................................................................................... 6 2.1 Screen Layout ......................................................................................................................................... 6 2.2 Menus and Buttons ................................................................................................................................. 7 2.2.1 File Menu .......................................................................................................................................... 7 2.2.2 Edit Menu .......................................................................................................................................... 7 2.2.3 Event Control .................................................................................................................................... 7 2.2.4 Match Analysis & Reports ................................................................................................................. 8 2.2.5 Preferences ....................................................................................................................................... 8 2.2.6 Masterfile Admin ............................................................................................................................... 8 2.2.7 House Keeping.................................................................................................................................. 8 2.2.8 Help ................................................................................................................................................... 8 3.0 GETTING STARTED WITH STATSMASTER .................................................................................................. 9 4.0 SCORING PREFERENCES .......................................................................................................................... 12 5.0 MYCRICKET UTILITY .................................................................................................................................. 13 5.1 Logging In .............................................................................................................................................. 13 5.2 Main Screen .......................................................................................................................................... 13 5.2.1 Downloading a Game ............................................................................................................................ 14 5.2..2 Uploading Results ............................................................................................................................... 14 6.0 STARTING A MATCH ................................................................................................................................... 15 6.1 Ball Position .......................................................................................................................................... 15 6.2 Selecting Opening Batsmen ................................................................................................................. 16 6.3 Selecting the Opening Bowler .............................................................................................................. 16 6.4 Selecting the Wicketkeeper .................................................................................................................. 17 6.5 Setting the Bowling End ....................................................................................................................... 18 6.5.1 Horizontal Pitch Orientation.......................................................................................................... 18 6.5.2 Vertical Pitch Orientation .............................................................................................................. 18 7.0 SCORING A MATCH .................................................................................................................................... 19 7.1 Scoring Runs ......................................................................................................................................... 19 7.3 7.2 Wides and No Balls ...................................................................................................................... 20 Wickets .................................................................................................................................................. 20 7.3.1 Bowled, LBW and Hit Wicket ....................................................................................................... 20 7.3.2 Stumpings ..................................................................................................................................... 21 7.3.3 Catches ......................................................................................................................................... 21 © 2012 -2- 7.3.5 Run Outs ....................................................................................................................................... 21 7.3.6 Other Wickets ............................................................................................................................... 22 7.4 End of Over ........................................................................................................................................... 23 7.5 7.4.1 Normal over .................................................................................................................................. 23 7.4.2 Long over ...................................................................................................................................... 23 7.4.3 Short over...................................................................................................................................... 23 End of Innings ....................................................................................................................................... 23 7.6 7.5.1 Declaring an Innings ..................................................................................................................... 24 7.5.2 Prompted End of Innings ............................................................................................................... 24 Revised Overs ...................................................................................................................................... 25 7.7 Revised Target ...................................................................................................................................... 25 7.8 End of Match ......................................................................................................................................... 25 7.9 Undo or Edit a Scoring Entry ................................................................................................................ 26 7.9.1 7.9.2 7.9.3 7.9.4 Undo .............................................................................................................................................. 26 Editing a Ball ................................................................................................................................. 26 Inserting a dot ball ........................................................................................................................ 26 Deleting a Ball ............................................................................................................................... 26 7.10 A n c i l l a r y Features ............................................................................................................................... 27 7.10.1 Pitch Maps .................................................................................................................................. 27 7.10.2 Recording Notes during Match .................................................................................................. 27 8.0 MATCH ANALYSIS ....................................................................................................................................... 28 8.1 Wagon Wheels and Scoring Zones ...................................................................................................... 29 8.2 Match Analysis ...................................................................................................................................... 30 8.3 Partnership Analyses ............................................................................................................................ 30 8.4 Scoreboard............................................................................................................................................ 31 8.5 Scorecards ............................................................................................................................................ 32 8.6 Worm Graphs ........................................................................................................................................ 32 8.7 Manhattan Graphs ................................................................................................................................ 33 8.8 Partnership Graphs ............................................................................................................................... 33 9.0 9.2 MASTER DATA MAINTENANCE & HOUSEKEEPING .......................................................................... 35 9.1 Player Database ........................................................................................................................... 35 Building a Rules Database ................................................................................................................... 36 9.2.1 Fields ............................................................................................................................................. 36 9.2.2 Description of Buttons on Rule Form .............................................................................................. 39 10.0 MATCH SETUP ........................................................................................................................................... 40 10.1 Match Details ........................................................................................................................................ 41 10.2 Selecting Players for the Match ............................................................................................................ 42 10.3 Editing or Adding Players ..................................................................................................................... 43 10.3.1 Players Selected: .......................................................................................................................... 43 11.0 11.0 RESTORE A MATCH ............................................................................................................................... 44 HELP ......................................................................................................................................................... 44 13.0 TIPS, TRICKS & TROUBLESHOOTING ............................................................................................... 444 © 2012 -3- 1.0 INTRODUCTION StatsMaster Cricket is a fully featured match scoring, reporting and analysis system suitable for all forms and levels of cricket and also has a wide range of reports over and above traditional scorecards. It is currently the only scoring system available that has a direct and seamless interface to the Weet-Bix MyCricket system. All modules are designed to be as intuitive and easy to uses as possible with a minimum amount of clicks/taps is required to achieve full scorecard recording and reporting with the added bonus of more detail if required. The scorer will be prompted throughout the match based on the natural flow of the game of cricket and the rules that have been set in MyCricket. There will be some optional modules on offer in the future that will further enhance and complete the package from a domestic club cricket user‟s perspective. The systems are available as software only, purchased and downloadable from the web or as a hardware/software package pre-installed and ready to use. 1.1 Available Modules There are essentially two main modules for the MyCricket version of Statsmaster: StatsMaster Scoring, Analysis and Reporting module Capable of scoring used on its own or to compliment traditional scoring methods. The increased data capture can be used for enhanced match analysis, Statsmaster Cricket is also packed with statistics, graphics and analysis to allow players, teachers, coaches and managers to review the progress of any match in real time through: Worm, Manhattan and partnership graphs; Wagon wheels, scoring zones and ball by ball pitching length Required run rates Over by over analysis; Current score cards; and Traditional scoreboard. MyCricket Sync Utility This sync utility allows you to login and download pre-game match information (selected players, match type and parameters, etc) from the MyCricket website and also to upload match results and detailed batting and bowling score data at any stage of the match whether it be the end of a session, stumps or upon game completion. It will save a lot of time, effort and potential errors in updating MyCricket and provide the additional benefit of fully functional computerised scoring and reporting. © 2012 -4- 1.2 Proposed Future Modules Also, there will be optional modules available for those clubs that would find useful. Video Analysis (Optional extra) If the is available video footage of the game, an upgrade is available to utilize this video in digital form for use in DVCoach digital video analysis package which will allow efficient editing of any aspect of the game to be visually analysed and generate edited highlights for coaching and archival purposes. Custom Venue Scoreboard interfacing (Optional extra) If there is interest in providing real-time score updates on electronic and compatible venue scoreboards, custom interfaces can be developed. 1.3 System Requirements StatsMaster is designed for Windows® PCs running Microsoft .NET 4.0 on computers with following minimum specifications: Processor: Pentium, Celeron, Core Duo PC Display: SVGA (1024 X 768) or higher resolution (256 colors) O/S: Microsoft Windows 98, NT, XP Pro, XP Home, Vista, 2000, Win 7 MicroSoft .net 4.0 or greater Network enabled Multiple USB ports Needless to say those higher specified computers with faster processors and more memory will perform more efficiently and faster, particularly for graphics, database updating and internet connectivity. © 2012 -5- 2.0 OVERVIEW StatsMaster Cricket is launched by double clicking the desktop icon Each time StatsMaster Cricket is loaded, it will re-open the current match at the exact point at which the match was left. There is, therefore, no reason why you can‟t close and re-open Statsmaster Cricket during a match. Each ball is written to the match database immediately the relevant scoring button is clicked. 2.1 Screen Layout When you launch StatsmasterCricket for the first time and until the product is licensed, you will be presented with the following screen: To remain in trial status simply click Continue Evaluation. You can purchase a license at any time by going to the shopping cart: http://cricketshop.prowess.com.au/ and purchasing a licence key. If you already have a licence, key it into the text box and click purchase, this will register the software and take you to the main screen. This screen shows the summary match information on the left, the scoring buttons in the middle/right and the match/over status in the middle/right at the bottom. © 2012 -6- 2.2 Menus and Buttons The menu bar contains 1 button and 8 tabs, all of which perform different tasks. 2.2.1 File Menu Allows you to create a new match Loads an existing match that has been previously saved Re-initializes the match and clears all the match data Finalise the current innings in progress st Proceed to the next innings in preparation for 1 ball Saves the match as a file on your computer which can then be re-opened Closes the program 2.2.2 Edit Menu Undo the last ball/transaction entered Swaps Striker/Non -Striker at crease Modify or delete logged balls Changes Wicketkeeper Create/Modify or Delete Grades in the Database Changes nonstriker to another batsman Changes current bowler Changes striker to another batsman Maintain Bowling Paces info Maintain fixtures Change run chase total Changes the total of over‟s to be bowled for that innings Create/Modify or Delete Bowling Styles in the Database Shows all the available players registered Maintain Leagues (Not used in this version) Maintain Weather Types 2.2.3 Event Control To set a warning against a team Set interval (ie; drinks, lunch, stumps) Swaps the end the bowler is bowling from Add penalty runs Forces a closure to the current innings Notification (eg; batsman using runner) © 2012 -7- Forces a closure to the current over 2.2.4 Match Analysis & Reports Displays summary or detailed Scoring Zones To display the match scorecard Displays wagon wheels Displays either a Wagon Wheel or Scoring Zone for Parnerships Displays a Scoring Worm of either Innings 1 or Innings 2 Full analysis of either Innings Manhattan graphs of either Innings Prints standard Reports Partnerships breakdown of either Innings 2.2.5 Preferences General Program Settings Create a new Rule set Switch between Indoor/ Outdoor Customize the Match Details Switch scoring formats Recalculate statistical data Not really used in this version Create/Modify Keyboard shortcuts Edit a Rule set Change Pitch orientation Set defaults for Leagues, Grades & Rules 2.2.6 Masterfile Admin Create, Modify or delete Teams in local database Create, Modify or delete Players in local database Change players selected in the current match 2.2.7 House Keeping Manually set the folder path of StatsmasterCricket if default is not okay Restore the scoring data to previous point in the innings 2.2.8 Help General Program Information Remote Desktop Support Display StatsmasterCricket User Guide StatsmasterCricket Twitter page StatsmasterCricket Facebook © 2012 -8- To edit the match result settings 3.0 GETTING STARTED WITH STATSMASTER The following provides a step by step guide through logging in, downloading a match and then uploading a match into Weet-Bix MyCricket via StatsMaster. Once you have successfully downloaded and installed StatsMaster, you will have two shortcuts created on your desktop as follows: This is the MyCricket Utility, which allows you to login, download & upload matches to Weet-Bix MyCricket. *Requires an internet connection This is the StatsMaster scoring program which allows you to score a cricket match *Does not require an internet connection 1. Open the Utility, you will be prompted to submit your details to ProWess Sports, you will then receive an email back from them with your Unlock Key which will allow you to proceed 2. Prior to a match both clubs should login to MyCricket http://mycricketadmin.cricket.com.au and select their teams via Matches > Select Teams 3. Once you have unlocked the Utility in Step 1, then login using your MyCricket Admin login details on the screen below – please contact your organisation‟s Principal User for assistance with logins 4. Once logged in select the “Download Game” link 5. Find the match you want to download into StatsMaster to score using the season and grade drop down boxes. Click on the relevant match which will populate the match details and selected teams sections on the right of the screen. Select the “Import into Statsmaster” button as below © 2012 -9- 6. You will then be asked to confirm, importing a match will remove any current matches you have in StatsMaster, so make sure you save any current matches as well as uploading them into MyCricket before proceeding. 7. Once you have imported a match, you can close the Utility and open StatsMaster, you will first need to enter your Licence Number and hit “Purchase” to proceed, to remain in trial status simply click “Continue Evaluation”. 8. Then you‟ll be asked if you would like to prepare the match, select „Yes‟ and follow the prompts to setup the match, e.g. who won toss, team batting first, opening batsmen and bowlers etc. 9. Score the match using the relevant buttons for runs, wickets, extras as well as all the various other functions, please refer to the StatsMaster User Guide for assistance 10. When you‟re ready to upload the scorecard (this can be done at any stage of the match provided you have an internet connection), open the MyCricket Utility and login © 2012 -10- 11. Select the “Upload Results” button, you will then be given a summary of the results that will be uploaded to MyCricket, select the “Update Website” button and hit “Yes”, ensure that you see confirmation that the match has been uploaded as below. 12. View your scorecards on Weet-Bix MyCricket http://mycricket.cricket.com.au © 2012 -11- 4.0 SCORING PREFERENCES Statsmaster Cricket allows the scorer to customise the way they score through the Preferences tab. To set preferences, click this tab which will display the following options: Record wagon wheels? Check this box to be prompted to record the position of the ball. You will also need to set the Pitch Orientation, Starting End and whether to Record dot balls through the settings on the right. If Left-Right is selected the pitch orientation that will appear after each scoring stroke will be as it is shown on the left below. Conversely, if Top-Bottom is selected the pitch orientation will appear as it is on the right (NB: you will not see these screens at this time)). To record the position of dot balls, check the box labeled Record position of dot balls. Score with ball map? Check this box to display the ball map pad to record the ball‟s first bounce. Record match notes each ball? Check this box to be prompted to type a note for each ball. Indoor game? Check if game is played indoors. (Not relevant in this version) Bowl in pairs? Check if bowlers bowl in pairs (rather than each player in sequence). (Not relevant in this version) Bowl from one end only? Check if only one end of the wicket is being used or if used to record net training. Remove Green from Wagon Wheels? Check this box to show black and white wagon wheels / scoring zones for match analysis © 2012 -12- 5.0 MYCRICKET UTILITY The MyCricket Utility provides a seamless exchange of game scoring data to and from Weet-Bix MyCricket. See section 3.0 Getting Started with StatsMaster for an overview of how to use the Utility, this section provides a more detailed description of how to use each aspect of the Utility to login, download and upload a match from and to MyCricket. 5.1 Logging In To log into the utility, simply put your username and password (supplied by MyCricket) into the ID and Password text boxes and press “Login”. It should come up and say Login Completed once successful. Note: If you receive an error then check to make sure you have the login details and that you have a working internet connection. For assistance with login details, please contact your club‟s Principal User. 5.2 Main Screen This is the main screen in the Utility, you‟ll need to select either “Download Game” or “Upload Results” from here. This choice is dependent on what stage of the process you are up to. initiates a match download from MyCricket directly into your StatsMaster Cricket program. will transfer updated results and scores from the StatsMaster program onto MyCricket. © 2012 -13- 5.2 .1 Downloading a Game To download a match into StatsMaster Cricket you will need to find the match in the list you want to import and click “Import into Statsmaster”. To filter out the desired match, you may need to select the “Grade” and “Season” from the filter dropdown menus. Once the match is downloaded, it will bring up a prompt saying “Match downloaded successfully” 5.2. .2 Uploading Results When you have finished scoring a match on StatsMaster Cricket, then you need to upload the scores and results to MyCricket. You can do so in the “Upload Results” part of the Utility. All you need to do is click “Upload Results” and then “Update Website” and the scorecard will then be on MyCricket. Note: If you receive an error then check to make sure you have an active internet connection. © 2012 -14- 6.0 STARTING A MATCH When the Start Match button is pressed you will be presented with the following dialogue box: To start a new match then you should click Yes to continue. Otherwise, click No. 6.1 Ball Position The following form will then appear: If you wish to record the position of the ball on scoring strokes (for wagon wheel charts and scoring zones) click Yes, otherwise click No. If you clicked Yes you will then be presented with the following form: If Left – Right is selected the pitch orientation that will appear after each scoring stroke will be as it is shown on the left below. Conversely, if Top – Bottom is selected the pitch orientation will appear as it is on the right (NB: you will not see these screens at this time). To record the position of dot balls, check the box labelled Record position of dot balls. You should select the orientation that mostly closely relates to your position relative to the cricket field. This orientation is solely designed to make the scorer‟s job easier and does not alter the presentation of the final wagon wheels. When the final wagon wheels and scoring zones are calculated, all ball positions are „remapped‟ and all shots are shown as if the batsman had faced all deliveries from the left hand side of the wicket on a horizontal orientation (i.e. as shown above left). (Height is not relevant in this version) © 2012 -15- 6.2 Selecting Opening Batsmen Once the ball position variables have been set, you will be prompted for the batsmen‟s names: If you have already selected your team in MyCricket before importing the game, the names that appear in this dialogue box will be those of the first two players in your „batting order‟. If you have selected your team but the batting order was not set or has changed, you can simply select the correct batsmen from the above dropdown boxes. If you have not already selected your team, you can replace temp names with the actual names or a descriptive alias. Remember that you can change a player‟s name at any time during the match by simply overwriting the player‟s name in the batting line up. You can access this at any time through: 6.3 Selecting the Opening Bowler The next form that appears allows you to select or input the bowler‟s name. Otherwise: If you have already input the fielding side on MyCricket, the name that will be prompted for the nd first over of the innings will be the first player in the fielding side‟s „batting‟ order. For the 2 over, it will be the second player in the batting order. You can, of course, select any player from the dropdown list. Once the first two overs have been completed, Statsmaster Cricket will prompt and rotate the current bowlers selected until changed If you have input the fielding side but the „batting‟ order was not set or has changed, you can simply select the correct bowler from the above dropdown box. If you have not already input the fielding side, you can either: o Overwrite a temporary name with the actual name o Overwrite a temporary name with a „descriptive name‟ that will allow you to identify the bowler until you are told their actual name, or o Retain the temporary name for the time being (please note that any temporary name you use will become pre-fixed with Temp_ such that Opponent 1 would become Temp_Opponent 1). Remember that you can change a player‟s name at any time during the match by simply overwriting the player‟s name in the batting line up. You can access this at any time through: © 2012 -16- Note that the bowler’s name cannot be blank. If you do not know the bowler‟s name you will need to use a temporary name for the time being. These temporary names simply act as „place holders‟ in the Statsmaster Cricket database. They can either be a default name (like Player 1) or a descriptive name that you assign. Any player name you set now can be updated later. If you haven‟t input the fielding side then you can simply type in a new name at any time. The bowler form will then be followed by a similar form for the wicketkeeper (see below). 6.4 Selecting the Wicketkeeper If you have named the wicketkeeper, then this will be the default name prompted in the dialogue box. Unlike the batsmen and bowlers, Statsmaster Cricket does allow this field to be blank but if you do not set the wicketkeeper‟s name, a label of „Not Recorded‟ is used. It needs to be clear that Statsmaster Cricket records the wicketkeeper for each ball bowled. You can manually set the Wicketkeeper at any stage by clicking Edit > Wicketkeeper. Once the Batsmen, Bowler and Wicketkeeper have been selected you should check that the bowling end is set correctly on the bottom of the main form. This is discussed below: © 2012 -17- 6.5 Setting the Bowling End 6.5.1 Horizontal Pitch Orientation If the batsman is batting on the left and the bowler is bowling from the right then the Bowling from variable on the Main form should be set to End 1 (or the name of that bowling end set in the Set Match Details form). If the bowler is batting on the right and the bowler is bowling from the left then the Bowling from variable on the main form should be set to End 2 (or the name of that bowling end set in the Set Match Details form). To change the Bowling from value, simply click the Preferences tab and click the appropriate Starting End. Left and Top correspond to End 1 and Right and Bottom correspond to End 2. 6.5.2 Vertical Pitch Orientation If the batsman is batting furthest away from you and the bowler is bowling from the end nearest you then the Starting End variable should be set to Top. If the batsman is batting at the end nearest you and the bowler is bowling from the end furthest from you, then the Bowling from variable should be set to Bottom. © 2012 -18- 7.0 SCORING A MATCH Scoring a match is as simple as clicking the buttons to reflect the activity in the field. We have tried (and hopefully succeeded) to cover virtually every conventional „scoring‟ event within the game of cricket. Runs, byes and leg byes are scored by simply clicking the appropriate button on the main screen. 7.1 Scoring Runs If you set „Record Ball Position‟ to true when you set the match up, each scoring stroke will be followed by the ball position prompt/screen. The following ball position screen (left) will then appear: (Height not required in this version) To record the position of the ball, you should click the position on the field (or over the boundary) where the ball stopped. If you click in the wrong place, you should simply click again in the correct place (which will replace the original position with the new one). When you are happy with the ball position, click OK. Statsmaster Cricket records the last position that you clicked. Please note that you can only record the ball position by clicking within the form above the height drop down menu © 2012 -19- 7.2 Wides and No Balls Depending on the match rules you have set, a wide or no ball may give rise to an extra ball in the over. Where this is the case, Statsmaster Cricket will automatically take the extra ball into account when calculating the remaining balls in the over. Wides and No Balls will be scored at the value of the penalty set in your match rules. Where additional runs are scored off a wide you should click screen: button which will load the following You should input the additional scored (over and above the standard penalty) for the wide. For example if the batsmen ran 2 runs off a wide ball, you would input 2 in the above field. If the standard wide penalty was 1, then 3 wides would be added to the total. Runs scored off no-balls are similarly scored by clicking the button labeled . If the additional runs are scored as extras (e.g. byes or leg byes), then you should click the Extras option on the form. If the additional runs are scored as runs, you should click the Runs option. Runs scored off a no ball will be credited to the batsman. Conversely, no ball extras will not be credited to the batsman. 7.3 Wickets When a wicket falls, you will need to click the appropriate button on the main form. There are two main Scenarios that Statsmaster Cricket caters for. The first is conventional cricket where, when a batsman is out, they leave the field. The second is where the batsman is has left the field for various reasons other than dismissal (retired, hurt, absent etc.) These are dealt with separately below: 7.3.1 Bowled, LBW and Hit Wicket On clicking the appropriate button from , Statsmaster Cricket will prompt for the name of the incoming batsman. The batsman‟s name can be selected from the drop down list The incoming batsman will replace the batsman previously „on-strike‟. © 2012 -20- 7.3.2 Stumpings Stumpings may occur off either a legal delivery or a wide ball. Stumped off a wide ball Where the dismissal occurs off a wide ball, you should click the button labelled Wide + Wicket in the wides row. Stumped off a legal delivery If a stumping occurs off a legal delivery you should click the button labelled Stump’d in the wickets row. Stumpings are credited to the both the bowler and wicketkeeper (where the wicketkeeper has been named). 7.3.3 Catches To record a catch, click the button labelled You will then be prompted for the catcher‟s name and asked whether the batsmen have crossed: If you do not know the catcher‟s name at this time, select any fielder and then use the edit ball feature to correct the catcher (see section 8.9.2). If the batsmen have crossed during the catch then you should check the Crossed? box. This will swap the batsmen over such that (provided it is not the last ball of an over) the incoming batsmen will be at the non-striker‟s end. If you forget to do this then you can easily correct the position by selecting “Swap Striker” under edit. If you set Record Ball Position to true during match set up, you will then be prompted to record the position on the field where the catch was taken. 7.3.5 Run Outs Run Outs can occur off legal deliveries, wides or no balls. For legal deliveries, click the button labelled . If a run out occurs off a wide ball click Wide + Run Out in the wides row. If a run out occurs off a no ball click No Ball + Run Out in the no balls row. © 2012 -21- Statsmaster Cricket will then prompt you for the information shown below e.g. the name of the batsman that was run out, the name of the fielder that ran the batsman out, the number of runs completed before the run out, how the runs were scored (runs, byes, leg byes or wides) and whether the batsmen crossed on any uncompleted run. If you do not know the name of the fielder that ran the batsman out, you select any fielder. If you subsequently discover the fielder‟s name and wish to record it later, you can do so by editing the relevant ball later (see section 8.9.2). If the batsmen have crossed during an uncompleted run, then you should check the Did batsmen cross on uncompleted run? box. This will swap the batsmen over such that (provided it is not the last ball of an over) the incoming batsmen will be at the non-striker‟s end. If you forget to do this then you can easily correct the position by clicking on the double-headed arrow next to the left of the batsmen‟s names on the main form. 7.3.6 Other Wickets Where a batsmen is out for reasons other than those above, you should click the button labelled Other at the far right of the row labelled Wickets. This will present the following form: From the dropdown box, select the appropriate dismissal type and click OK. (These are all the types of dismissals under “Other” © 2012 -22- 7.4 End of Over 7.4.1 Normal over After the prescribed number of legal (i.e. not wides or no balls) deliveries (as specified in your match rules) have been bowled, Statsmaster Cricket will prompt you for the end of the over as follows: Click Yes, if the over has concluded. If you click No the over will continue. 7.4.2 Long over If the umpires do not declare the end of the over at the Statsmaster Cricket prompt, you should click No. By clicking No, the current over will continue. Unless your rules stipulate otherwise, the batsmen will swap the strike at the end of each over and you will be prompted for the next bowler‟s name (as before). 7.4.3 Short over If the umpires declare the end of an over before the prescribed number of legal deliveries has been bowled, you can force the end of the over by simply clicking the button labelled bottom right of the main form. 7.5 at the End of Innings The end of an innings will be prompted by Statsmaster Cricket on the first to occur of: • Batting out the required number of overs for an innings in a limited overs match • Where each side bats once, the number of runs scored by the team batting second exceeds the total runs scored by the team batting first • Where each side bats twice, the number of runs scored by the team batting last exceeds the total runs scored by the opposing team • Declaring the innings © 2012 -23- 7.5.1 Declaring an Innings To declare an innings, simply click the top left green button and press Decla re/Next . You will then be presented with the following screen: If you clicked the button deliberately, click Yes. Otherwise click No. You will then be prompted with the question: If you wish to start the next innings immediately, click yes. If you wish to start the next innings in a while, click No. If you wish to start next innings after clicking no, then simply click the top left green button and press Start next Innings In longer formats of the game where each team bats for two innings each, you may see the following additional prompts depending on the stage of the match: 7.5.2 Prompted End of Innings When StatsmasterCricket detects the end of an innings, you will be prompted as follows: If you click Yes the current innings will end. If any innings remain to be batted the same prompts will presented as they were for the first innings. If the conclusion of the innings also concludes the match then the following additional prompts (or similar will appear as explained in section 7.8): You will need to drop down the “End Inning Status” drop down menu and select the appropriate option for upload to the MyCricket Website. If none are selected then no inning result will be uploaded. You can also use this chance to enter Innings Notes if required. © 2012 -24- 7.6 Revised Overs If the number of over‟s to be batted change during a match (e.g. due to bad light, rain etc.) the number of over‟s to be batted can be changed by clicking This will display the following form: on Main Screen: You should input the TOTAL number of overs for that innings, including those already bowled, rather than the residual or remaining overs in the innings. 7.7 Revised Target Where a side is batting second and the runs required to tie (the Target) has changed (e.g. Duckworth/Lewis etc.) the revised Target can be changed by clicking on Main Screen: This will display the following form: This total should be set to the number of runs that the side batting first is deemed to have scored under the relevant calculation (e.g. Duckworth/Lewis). 7.8 End of Match If, at the end of an innings, the match has been won, tied, drawn or lost, you will be prompted as follows: If you click Yes the Match Result dialogue box will be presented as follows: Statsmaster Cricket will suggest what it believes the result of the match is. However, you can overwrite this text as you wish. You will need to drop down the Result and Result Team drop down lists and select the appropriate option for upload to MyCricket (Note: If these aren‟t selected, no result type will be uploaded to MyCricket) © 2012 -25- 7.9 Undo or Edit a Scoring Entry 7.9.1 Undo To undo an entry at any time simply click on the main form. This will delete the last entry you made. You can repeat deletions right to the beginning of a match. 7.9.2 Editing a Ball To edit a ball click on the main screen. This will present the following screen: This form will show the last over bowled. To navigate to the ball you wish to edit, you should use the left hand window entitled Select over. From here, first select (by clicking on) the Innings and then the Over Number. Once you have done this, the over will be shown in the right hand window. You should then select the ball you wish to edit by clicking on the relevant row. The „editable‟ details of the ball will then be shown in the fields below the main window. You can edit these fields by clicking on them and overtyping the existing values. When you have corrected the desired field, click Replace to re-save the ball with the new values. 7.9.3 Inserting a dot ball To insert a dot ball, navigate to the ball you wish to use as a reference point. Once selected, a new dot ball can be inserted either before or after this ball (always in the same over as the selected ball) by clicking Insert Before or Insert After, respectively. Once a dot ball has been inserted, it can be edited record the correct event (see section 8.9.2 above). 7.9.4 Deleting a Ball To delete a ball, navigate to the ball you wish to delete and click Delete and click Yes at the following prompt. © 2012 -26- 7.10 An c i l l a r y Features 7.10.1 Pitch Maps Statsmaster Cricket allows you record where the ball first pitched for each delivery using the wicket to the left of the bank of buttons (you will need to have checked the „Score with ball map?‟ check box on the Preferences tab as below: To record the position of the ball‟s first bounce, simply click the wicket in the appropriate place. A red ball will then appear in that location. If it is not correct, simply repeat the process until the ball appears in the correct location and then click the event button for that delivery (e.g. 1 run, 1 bye etc.). Each ball will turn from red to grey after the delivery has been scored. At the end of the over, the ball map is cleared in preparation for the new over. 7.10.2 Recording Notes during Match To record notes on each delivery simply click after the delivery has been scored. All notes are added to the immediately preceding delivery (including when an end of over event has occurred). To add a note, simply type the note in the note dialogue box (below) and click OK. © 2012 -27- 8.0 MATCH ANALYSIS Statsmaster Cricket allows the progress of the any match to be reviewed „on-the-fly‟ through a number of in-built analysis tools. These include wagon wheels, scoring zones, the traditional scoreboard, scorecards, worm graphs, Manhattan graphs and Partnership graphs. The simplest way of accessing most of these is to right click anywhere on the main form which will present the following menu: Wagon Scores Wagon Wheel Scorecard Worm Graph Manhattan Graph Partnership Graph Change Match Rules Change Match Details Simply select the desired analysis of the menu. Equally, you can select any of the analyses off the Match Analysis & Reports tab as follows: © 2012 -28- 8.1 Wagon Wheels and Scoring Zones In addition to the above menu, summary wagon wheel and scoring zone analyses can also be accessed through the following menu selections. These selections will display (as applicable) the following forms: Wagon Wheels Scoring Zones Both forms operate in an identical manner. You can review the analysis at a team or individual player level by changing any or all of the batting side, batsman, bowler and/or innings. Aside from its entertainment value, these analyses can provide useful coaching insights to aid the development of both batsmen and bowlers. You can also view detailed wagon wheels through the menu selection: These analyses allow wheels and zones to be viewed for particular bowling spells or overs in addition to any batsman/ bowler combination for any innings. © 2012 -29- 8.2 Match Analysis Detailed match analyses are available through the following menu selection: These selections will display (as applicable) the following form: This form is designed to allow an innings to be analyzed in depth, any batsman against any bowler, bowler analyses by spells, overs etc. You can also step through the match by checking the Step box and then clicking the Step button. This takes you graphically through the match ball by ball. 8.3 Partnership Analyses To review a partnership graphically, select the menu option: © 2012 -30- This screen allows each partnership to be analyzed in detail showing runs scored off the bat by each player, the total added by the partnership, the respective % contributions, balls faced, strike rates etc. To interpret a number, simply hold the mouse over the number to display a pop-up explanatory note. To change the pairing, simply select a new pairing from the Pairing drop down list. You can also change Innings and innings no. by the drop down boxes immediately below the Pairing drop down box. Similar analyses can be accessed through the menu selection: This analysis shows the runs by zone or the balls bowled by zone (simply select the option at the bottom left). These can be displayed as values or percentages (again you will need to select the relevant option). 8.4 Scoreboard The traditional scoreboard sits on the second tab of the main form (labeled „Score Board‟). This can be accessed at any time by simply hovering over the “Scoreboard” tab: This „tab‟ is used to present the score in the layout that players are used to. © 2012 -31- 8.5 Scorecards The on-screen scorecard presents the summary statistics of the selected innings (as shown below). You can specify which innings you wish to review through the „Innings‟ and „Innings No‟ dropdown boxes at the top of the form. The complete (and more detailed) scorecard can be accessed through the command: To print the scorecard, click the printer icon on the form. To export the scorecard to PDF or other file formats, click the envelope icon. The PDF format can be e-mailed to all interested parties (in conjunction with the scoring zone report in section 9.1 above). To export to html (for websites) click the button labelled Export to HTML. 8.6 Worm Graphs Worm graphs plot the cumulative runs scored against the number of balls bowled. The side batting first is plotted in red whilst the side batting second is plotted in green. In matches of two innings (per side), two graphs are plotted. The first plots each team‟s first innings scores whilst the second plots their respective second innings. Worm graphs can through the following menu selection: or the context menu described in section 9.0 above. © 2012 -32- 8.7 Manhattan Graphs Manhattan graphs plot the total runs scored off each over. The side batting first is plotted in red whilst the side batting second is plotted in grey. This graph can be accessed through the menu selection: or the context menu described in section 9.0 above. 8.8 Partnership Graphs Partnership graphs plot the number of runs scored during each batting partnership. Separate graphs are produced for each innings. These graphs can be accessed through the context menu described in section 9.0 above or the following menu selection: © 2012 -33- © 2012 -34- 9.0 MASTER DATA MAINTENANCE & HOUSEKEEPING 9.1 Player Database You can set up full player details for both your teams and the teams you play against (if you know them). The „Known As‟ field is the name that Statsmaster Cricket will use to identify players on scorecards and forms when they participate in any match. By recording players in this table you will be able to select your players from lists rather than having to re-key them for each match. Players that are input during a match – and that were not already present in this database before the match – will be added to this table when the match is archived. However, only the player‟s „Known As‟ and „Club‟ fields will be populated. Additional information about the player can be added (subsequently) at any time. The additional information stored in this table is, hopefully, self explanatory. The „dropdown‟ boxes used on this form are populated from the Master data tables described above. However, you are not limited to the items in the dropdown boxes. You can add new Leagues, Grades etc. by over typing the dropdown box. Please note that, for each field, you should click once to select the field and a second time to begin editing it or inputting data. To delete a row, click the row and press the „Delete‟ key. © 2012 -35- 9.2 Building a Rules Database Statsmaster Cricket follows „User Defined‟ rules to score your cricket matches. We have included a number of predefined rules but you can build your own additional rules at any time. To do this, you can either customise the predefined rules provided (saving the result to a new „Rule Tag‟) or build new rules from scratch. The process for creating and editing rules is described below: 9.2.1 Fields To create a new rule, use: This will load the screen below: Rule Tag: The first task on this form is to assign a meaningful – and unique – „Rule Tag‟. This is the rule name that will appear in the relevant dropdown list on the Match Details form. The Rule Tag must not duplicate an existing rule tag. No. Of Innings Per Side If each side will bat once, this should be set to 1. Similarly, if each side will bat twice, this should be set to 2. No other values are permitted in this field. Number of Players This field holds the number of players that will actually bat (it should not include substitutes etc.). © 2012 -36- Balls in Over This field holds the number of legal deliveries that will comprise each over. Starting Total In some forms of the game, each team begins each innings with a starting total e.g. 100 or 200 runs before the first ball of the relevant innings is bowled. If this rule applies to your match, you should set this field the relevant starting total. If you leave this field blank the standard rules will apply and each innings will start from zero. Batsmen out Unlimited Times If a batsman is to remain at the crease and continue batting even when they „out‟ (i.e. when they have lost their wicket one or more times), this checkbox should be checked. When this option is set, Statsmaster Cricket will record the batsman as „out‟ but will not prompt for a new batsman after the fall of any wicket. Instead batsmen will (subject to confirmation from the scorer) be retired either automatically (after a set number of overs or runs scored) or manually (by the scorer). Penalty for Wicket This field sets the „runs lost‟ by the batting side per fallen wicket. Statsmaster Cricket deducts the specified number of runs from the current inning‟s total (as negative Extras) on the fall of each wicket. This field will normally be set to zero. It is typically used in indoor and youth cricket in conjunction with „unlimited outs‟ and/or „pairs cricket‟. Batsmen Retire at Where the rules require batsmen to retire after they have scored a specific number of runs, that run total should be specified in this field e.g. if this field was set to 25, Statsmaster Cricket would prompt the scorer to confirm that the batsman was retiring when the batsman had scored 25 runs (or greater). Statsmaster Cricket would then (assuming that the scorer confirmed the batsman‟s retirement) prompt the scorer to select the incoming batsman. Batting in Pairs This option should be set to true (by checking the check box) if the batsmen are required to arrive at and leave the crease as a pair. This will normally be applicable in rules where each pair of batsmen will bat for a prescribed number of overs and will then be replaced by a new pair (regardless of how many times either batsman within a pair may lose their wicket). This form of the game is normally associated with the batsmen remaining at the crease after a wicket has been lost. Overs per Batsman/Pair This field sets the number of overs to be faced by a batsman or pair of batsmen (as the case may be) before Statsmaster Cricket prompts the scorer to confirm their replacement by a new batsman or pair of batsmen. Batsmen Retain Strike This field should be set to true if each batsman is required to remain on strike even where an odd (rather than even) number of runs have been scored. This option is set to true by checking the box. © 2012 -37- Wide Penalty This field sets the standard penalty to be conceded by the bowler to the batting side‟s extras for each wide delivery. Normally, this value will be 1. However, in several forms of the game it may be 2 or higher. No Ball Penalty This field sets the standard penalty to be conceded by the bowler to the batting side‟s extras for each no ball. Normally, this value will be 1. However, in several forms of the game it may be 2 or higher. Standard Penalty This field sets the number of penalty runs to be conceded to the other side resulting from such events as the ball striking a fielder‟s helmet, other obstructions in the outfield or infringements of the rules. Normally, this field would be set to 5 runs. Show Wides as Balls Faced This option will normally be set to false. When it is false, all batting statistics (e.g. balls faced, strike rate, balls to 50 etc.) will exclude the number of wide balls faced by the batsman. Thus, if a batsman were to score 6 runs off 3 balls but one ball was a wide, the strike rate would be computed as 300 (being 6 divided by 2 multiplied by 100) rather than 200. In pairs cricket, this will normally be set to true (or wherever, there are no extra balls bowled for illegal deliveries). Extra balls For . . . This option establishes whether additional balls are to be bowled to replace illegal deliveries (wides and no balls) in an over. Normally, this will be set to „All Wides and No Balls‟. However, in some forms of the game, wides and no balls will not give rise to extra balls except in the last over of an innings. Where this is the case the option „Last Over Wides and No Balls‟ should be set to true by checking the box. No Ball/Wide Penalty reduces by . . . This option allows the penalty for a wide or no ball to be varied according to the number of illegal deliveries bowled in an over. For example, if the standard penalty for a wide is 2 runs and this option is set to reduce the penalty by 1 run after 2 wides/no balls have been bowled (in the same over), then the third wide will attract a penalty of 1 run rather than 2. If the penalty reduction is greater than the standard penalty then the penalty will be reduced to zero (but not below zero) once the specified number of illegal deliveries have been bowled. Rule Description Describes the rule for future use. © 2012 -38- 9.2.2 Description of Buttons on Rule Form Clear Form: This button will erases/resets the values in each field on the form. It will not delete the rule unless you subsequently re-save the rule. Delete Rule: This button deletes the selected rule from the master table. You should only click this button where you will never need the rule again. Once deleted a rule will not be available for future selection. Update Master Rules: This button saves the current rule (the one on the form) to the master rules‟ table. To be available for future matches a rule must be saved to the master table. Normally, you should use this button whenever you have modified or created a rule. To avoid overwriting an existing rule you will need to change the „Rule Tag‟. This button will also write the updated rule to the current rule table. Update for This Match: Click this button to use this rule for this match only. If this rule has not previously been saved to the master table then it will not be available for future matches. Normally, you will use this button to select a rule from the master table (see below) rather than to save a modified or newly created rule. To modify and save a new rule: You should then use the „Browse rules‟ buttons to navigate to the rule you wish to modify. Once you have completed the desired changes you can either save this as a new rule or simply update the previous one. To save the modified rule as a new rule, change the Rule Tag to a new and unique name and click . To update the existing rule, simply click you see the following dialogue box: © 2012 -39- and click Yes when 10.0 MATCH SETUP If the match was downloaded successfully from MyCricket, most details will be completed and there would be no necessity to use this function, except for “Toss won by” and “Batting First” fields and optionally scores/umpires. Once the initial setup is complete, matches are scored using the panel of buttons on the main sheet: To edit the imported match click on Preferences then match details and main match details screen will display: These are only fields that may be required to be entered © 2012 -40- 10.1 Match Details For the benefit of users, the fields are explained: Note : To reset the form (erase the field values), click ‘Clear’. Downloaded from MyCricket website: Team 1: Name of your team. Team 2: Name of the visiting opposition team/club League: Name of the league or competition Grade: Description of the match grade or level, e.g. First XI, A Grade, etc Start Date: Date match commencement Home Team: The home team selected using the dropdown box. Played At: The ground or venue name where match is being played. Match Rules: Please select the match rule to be applied to this match from the dropdown list. Entered once toss is decided: Toss Won By: Team that won the toss. Batting First: Team that is batting first. The names of the scorers, umpires, weather can also be entered in the boxes provided. © 2012 -41- 10.2 Selecting Players for the Match If the players have been selected from MyCricket with no issues, you can adjust the list and selection using Masterfile Admin then Match Squads Players can be selected or deselected by any one of the following methods: Drag and drop highlight the player‟s name -OR Double click on a player‟s name (in either box). -OR Highlight the player‟s name and click the relevant arrow button Please note that you cannot add more players at this stage. However, you will be able to input additional players on the immediately following screen (and at any time during the match). Players do not have to be input, selected or named before you can start a match. If you do not know the names of players you can simply use the temporary names automatically assigned by Statsmaster Cricket or your own descriptive „place holders‟. Either of these temporary solutions can be overwritten when you know the players‟ names. When you have selected the players for the relevant team or there are no players to select, click the „Next‟ button. Note: This form can be re-loaded later (if required) through the menu selection: or through the button labeled Input Teams on the Match Set Up page of the main form. © 2012 -42- 10.3 Editing or Adding Players If you selected players in the previous screen, they will appear at the top of the batting order as shown below. 10.3.1 Players Selected: If players were selected previously the batting order form (above right) can be used to edit players‟ names (if necessary), add players to the team and/or alter the default batting order. You can type names directly into the Batsman field. To change the „batting‟ order you will need to use the „+‟ and „-‟ buttons in the middle of the form. To promote a player up the order, click the „+‟ button immediately to the right of the player‟s name. Similarly, to demote a player, click the corresponding „-„ button. NB: This should be the only method you use to change the „batting‟ order. The „batting‟ order is used by Statsmaster Cricket to determine the default prompt for the incoming player(s) at the fall of a wicket or when batsmen retire. However, it is also used to determine the order in which players are presented for the bowling line up. In youth matches or games where all players bowl, you could set the player orders to reflect the batting line up for the batting side and the bowling order for the fielding side. You can also set the captain and wicketkeeper on this form by selecting their names from the relevant dropdown lists at the bottom of the form. If no players are imported, then by default, Statsmaster Cricket assigns the temporary names Player X to players from Team 1 and Opponent X to players from Team 2 (where X represents a number from 1 to 15). When one of these names is used in a match, the pre-fix Temp_ is added to indicate that the name has effectively been ascribed to a player. © 2012 -43- 11.0 RESTORE A MATCH You can restore the match to any earlier point in the game by selecting this function and choosing when you want to restore to and press ok 12.0 HELP About: Displays the basic information about the software version your using Support: Opens up the runtime file for TeamViewer Desktop Support if you have it installed (www.prowess.com.au/downloads/TeamViewer7.exe) User Guide: Opens the Statsmaster Cricket User Guide Facebook: Opens the Statsmaster Cricket Facebook page Twitter: Opens the Statsmaster Cricket Twitter page © 2012 -44- 13.0 TIPS, TRICKS & TROUBLESHOOTING 1) Experiencing network connection errors while uploading or downloading If you receive a message that “network connection is lost” (or similar), the module will retry a number of times. If it fails, you will be prompted with a dialog box advising you of a network error. In this case, please consult your technical support person(s) as this relates to an external problem outside that application. Some suggestions of rectifying the fault are: Check all cables are connected securely properly If wireless connection, check that your wireless signal is strong or adequate (less bars then less signal) It may be a problem with internet service provider and you may need to register a support call It could be your network router, so simply power off for 10 seconds and restart Ensure there are no viruses on the computer Try a warm restart of the computer or do a shutdown and cold restart 2) What happens if the team player selection is not downloaded prior to game commencement ? If the team player selections for one of both sides is not done prior to the start of the match, you can still use Statsmaster to score, however you need to manually set up the match details and players. After the game you can print out a scorecard and manually enter the details on MyCricket or if player names are exactly as listed on the website. If you want to automate the upload process then you will need to go into the Player Squads Menu in StatsmasterCricket and use the “Change Selected Player” feature to change each of the temporary players to the actual player listed in the database. 3) I’ve made a mistake in scoring, how do I fix it ? If it was the very last ball, simply click undo. If it was earlier then click on “Edit Ball” and make the necessary changes to the ball (If it was a previous over you will need to select that over from the left over’s panel first). Once done, press close and the software will recalculate the stats & scores in the database 4) The system has crashed during the game and I need to restart – how do I get back on track ? Firstly if the system does crash (eg. windows error, power fail) for whatever reason, you will need to score manually (using a log sheet – sample found in appendices) until it is back up and running. If the database is corrupted or data lost, you need to go to the backup function and “restore” to the last saved database (usually last ball logged successfully). Once this is done, from your log sheet, record the balls bowled and result in order as they occurred to catch up © 2012 -45-