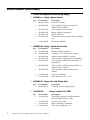
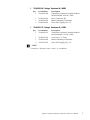
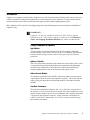
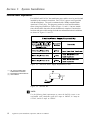
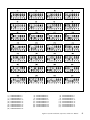
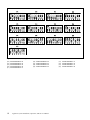
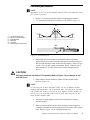
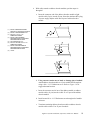
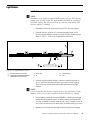
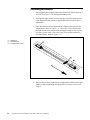
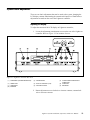
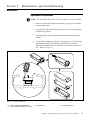
1
Installation, Operation &
Service Manual
Lightworx System
March 2006 / 84-900027-000
Lightworx System Installation, Operation & Service manual
© March 2006 by the Brunswick Bowling and Billiards Corporation. All rights reserved.
Past Revisions: July 1998, August, 1998, October 1998
Lightworx is a registered trademark of the Brunswick Bowling and Billiards Corporation.
Reorder Part No. 84-900027-000
Notice: If available, updates to this manual can be found on-line at www.brunswickbowling.com.
Confidential proprietary information. All information contained in this document is subject to change without notice.
Brunswick Bowling & Billiards Corporation
525 West Laketon Avenue
P.O. Box 329
Muskegon, MI 49443-0329
U.S.A.
231.725.3300
2
Lightworx System Installation, Operation, and Service Manual
Table of Contents
SAFETY ........................................................................................................... 4
SAFETY NOTICE TO USERS OF THIS MANUAL ................................ 5
Brunswick Lightworx System Packaging ......................................................... 6
Warranty and Service Policy ............................................................................ 8
Replacement Parts Under the Warranty ....................................................... 8
Introduction ....................................................................................................... 9
Primary Components of Lightworx ............................................................... 9
System Overview ............................................................................................ 11
Section 1: System Installation ..................................................................... 12
Electrical Power Requirements .......................................................................12
Transformers ................................................................................................13
Address Decoder Module ...............................................................................14
DIP Switch Settings .....................................................................................14
Cable Routing and Termination ....................................................................17
Light Modules ..................................................................................................23
Installation ....................................................................................................23
Cable Routing and Termination ....................................................................24
Cosmetic Covers .............................................................................................25
Installation ....................................................................................................25
Section 2: System Operation ....................................................................... 26
Initial System Setup and Self-Diagnostic Test .................................................26
Selecting Lighting Patterns ..............................................................................28
Customizing Lighting Patterns .........................................................................28
System Control Adjustments ............................................................................29
Adjusting LCD Display ................................................................................29
Adjusting Audio Input Level .........................................................................30
Section 3: Maintenance and Troubleshooting .......................................... 31
Maintenance ....................................................................................................31
Light Module PCB Replacement .................................................................31
Troubleshooting ................................................................................................32
Appendix A ...................................................................................................... 33
Cables ..............................................................................................................33
Lightworx System Installation, Operation, and Service Manual
3
SAFETY
Throughout this publication, “Warnings”, and “Cautions” (accompanied by one of
the International HAZARD Symbols) are used to alert the mechanic to special
instructions concerning a particular service or operation that may be hazardous if
performed incorrectly or carelessly. They are defined below. OBSERVE
AND READ THEM CAREFULLY!
These “Safety Alerts” alone cannot eliminate the hazards that they signal. Strict
compliance to these special instructions when performing the service, plus
training and “Common Sense” operation are major accident prevention measures.
NOTE or IMPORTANT!:
Will designate significant informational notes.
WARNING!
Will designate a mechanical or nonelectrical alert which could potentially cause personal injury or death.
WARNING!
Will designate electrical alerts which could potentially cause personal injury or death.
CAUTION!
Will designate an alert which could potentially cause product damage.
Will designate grounding alerts.
4
Lightworx System Installation, Operation, and Service Manual
SAFETY NOTICE TO USERS OF THIS MANUAL
This manual has been written and published by the Service Department of
Brunswick Bowling and Billiards to aid the reader when servicing or installing the
products described.
It is assumed that these personnel are familiar with, and have been trained in, the
servicing or installation procedures of these products, which includes the use of
common mechanic’s hand tools and any special Brunswick or recommended
tools from other suppliers.
We could not possibly know of and advise the reader of all conceivable procedures by which a service might be performed and of the possible hazards and/or
results of each method. We have not attempted any such wide evaluation.
Therefore, anyone who uses a service procedure and/or tool, which is not
recommended by Brunswick, must first completely satisfy himself that neither his
nor the products safety will be endangered by the service procedure selected.
All information, illustrations and specifications contained in this manual are based
on the latest product information available at the time of publication.
It should be kept in mind, while working on the product, that the electrical system
is capable of violent and damaging short circuits or severe electrical shocks.
When performing any work where electrical terminals could possibly be
grounded or touched by the mechanic, the power to the product should be
disconnected prior to servicing and remain disconnected until servicing is complete.
Lightworx System Installation, Operation, and Service Manual
5
Brunswick Lightworx System Packaging
1 L2-600070-xxx Lightworx Kit with existing capping
1
84-860605-xxx Package, Lightworx Controller
Qty.
1
1
1
1
1
1
6
1
84-200331-000
84-900027-000
84-200295-000
84-200341-000
1
11-680180-000
6
Description
Lightworx Controller
Cable Assembly, Lightworx Controller to
Address Decoder Module
Cable Assembly, Power Adapter
Manual, Lightworx Installation
Module, Lightworx
Terminator Assembly, Address Decoder Module
Line
Plug, Power, Miniature
84-860608-000 Package - Light Kit with Accessories
Qty.
20
20
1
19
1
Part Number
84-200295-000
84-200299-000
84-200292-000
84-200287-000
84-200298-000
1
84-200288-000
1
84-200332-000
1
2
11-680180-000
11-081201-000
Description
Module Assembly, Lightworx
Cosmetic Cover, Clear, Division Capping
Address Decoder Module, Assembly
Cable Assembly, Light Module to Light Module
Cable Assembly, Address Decoder Module to
Light Module
Cable Assembly, Address Decoder Module to
Address Decoder Module
Cable Assembly, Address Module Power
Adapter
Plug, Power, Miniature
Screw, Robertson, #10 x 1-1/2"
84-860609-301 Package, Color Strip, Division (Clear)
Qty.
6
1
Part Number
84-200330-4XX
84-200289-000
Part Number
84-200242-301
*53-860326-230
Qty.
1
Part Number
53-600180-230
1
1
4
53-860326-001
53-860326-002
53-860326-003
Lightworx System Installation, Operation, and Service Manual
Description
Color Strip, Division Capping (clear)
Package, Transformer Kit, 230VAC
Description
Transformer, Lightworx Controller/Address
Decoder Module 230VAC, 50Hz
Connector, IEC Power
Bracket, Mounting, Transformer
Screw, Self Tapping, #8 x 3/4"
1
1
*53-860326-100 Package, Transformer Kit, 100VAC
Qty.
1
Part Number
53-600180-100
1
1
4
53-860326-001
53-860326-002
53-860326-003
Description
Transformer, Lightworx Controller/Address
Decoder Module, 100VAC, 50Hz
Power Connector, IEC
Bracket, Mounting, Transformer
Screw, Self Tapping, #8 x 3/4"
*53-860327-115 Package, Transformer Kit, 115VAC
Qty.
1
Part Number
53-600180-115
1
1
4
53-860327-001
53-860326-002
53-860327-003
Description
Transformer, Lightworx Controller/Address
Decoder Module, 115VAC, 60Hz
Cord, Power, 7.5' Long
Bracket, Mounting, Transformer
Screw, Self Tapping, #8 x 3/4"
* NOTE:
Transformer dependent upon country of installation.
Lightworx System Installation, Operation, and Service Manual
7
Warranty and Service Policy
If any defects in material or workmanship appear during the first three months
after installation, the defective part will be repaired or replaced, at Brunswick’s
option, with no charge to the Customer.
If any defects in material appear during the nine months following the initial three
month warranty period, the defective part will be repaired or replaced, at
Brunswick’s option, with no charge to the Customer for parts. The Customer
must assume all other costs in making the repair or replacement.
All service calls during the first three months of the warranty period, resulting
from the inability of the Customer’s mechanics to perform required adjustments
or maintenance, will be billed directly to the Customer.
Brunswick reserves the right to change the design of any product, but assumes
no responsibility to incorporate such design changes on products already sold.
The warranty applies only to new products installed by Brunswick and extends
only to the original purchaser. Repairs or replacements made by anyone not
approved by Brunswick void the warranty.
Under no circumstances shall the Seller or Manufacturer be liable for loss of
profits or other direct or indirect costs, expenses, losses, or damages arising out
of defects in or failure of parts.
Replacement Parts Under the Warranty
All service parts are F.O.B. the installation site both during and after the warranty period. The price of parts includes delivery by standard means, such as
United Parcel Service (UPS). Any expense resulting from expedited delivery,
such as air freight, will be billed to the Customer.
During the one year period, parts which are faulty due to material or workmanship will be replaced or repaired free of charge only if the old part is properly
identified and turned in for credit. Identify the defective part by attaching a tag
containing the part name and part number. Light bulbs are not covered by the
warranty.
Service parts are ordered through the Brunswick Bowling and Billiards Corporation toll free number: 1-800-323-1812 or in Michigan,
1-800-626-5963. Refer to the “General Information” section of the Bowling
Service Parts Catalog for address and order information. When ordering
service parts, specify part numbers and descriptions to simplify handling. Use
only Genuine Brunswick Replacement Parts.
8
Lightworx System Installation, Operation, and Service Manual
Introduction
Lightworx is a computer controlled show designed for use with Cosmic bowling. Bowling centers can now present a
colorful, coordinated, computerized light show to bowlers during the Cosmic experience. A music interface feature
included with the system, allows an external audio signal to dictate what the lighting pattern will be.
Basic additions to PVC style division capping along with required cabling and a control unit make the installation of
Lightworx easy.
IMPORTANT!:
Lightworx can only be installed on Brunswick PVC division capping.
Installation of the PVC division capping is addressed in the Frameworx
Gutter and Capping Installation Manual part number 84-900026-000.
Primary Components of Lightworx
Light Modules
Twenty modules are installed within the PVC division capping. Each light
module contains a green, a blue, and a red LED. Seven different light combinations are possible; red, green, blue, red-blue, blue-green, red-green, and redgreen-blue.
Lightworx Controller
This unit is placed at the front desk and contains the on/off control of the system.
A computerized chip within the unit initiates and synchronizes the lighting patterns and color combinations. The proprietor can choose from multiple predesigned lighting patterns and set the time that each pattern repeats.
Address Decoder Modules
The modules are placed near the ball lifts, and provide address (location) input/
output signals of each division to the Lightworx controller. The electrical power
supply is also provided to the individual light modules via the address decoder
modules.
Step-Down Transformers
The step-down transformers adapt the 100, 115, or 230 VAC center power to
the required 12 VAC power necessary to operate the system components. Each
address decoder module requires its own transformer and a separate transformer
is required for the Lightworx controller. An IEC connector is included with
100VAC and 230VAC transformers. For 115VAC a power cord will be supplied with the transformer.
Lightworx System Installation, Operation, and Service Manual
9
Required Cabling
There are five basic cable assemblies provided with the Lightworx system.
• Control Module Interface Cable - used for signal input/output (I/O)
between the Lightworx controller and the first address decoder
module on either end of the center.
• Address Decoder Module to Address Decoder Module Cable connects the individual address decoder modules together.
• Light Module to Light Module Cable - connects the light modules
within a division to each other.
• Address Decoder Module to Light Module Interface Cable - used for
signal I/O and power from the division address decoder module to the
light module nearest the foul line.
• Power Supply Adapter Cables- adapts transformer output power to
the Lightworx controller and address decoder modules.
10
Lightworx System Installation, Operation, and Service Manual
System Overview
The following System Overview shows the basic layout and components of the
Lightworx system. It is intended for general purposes only and is not meant to
replace the step-by-step instructions contained in this manual.
System Overview
(1) LIGHT MODULE
(2) TRANSFORMER
(3)
(4) ADDRESS DECODER MODULE
(5) LIGHTWORX CONTROLLER
(6)
IEC CONNECTOR FOR 100V AND
230V AND POWER CORD FOR 115V
ALTERNATE LOCATION FOR
ADDRESS DECODER MODULE
Lightworx System Installation, Operation, and Service Manual
11
Section 1: System Installation
Electrical Power Requirements
For 100VAC and 230 VAC the transformer power cables are to be provided and
installed by the customer's electrician. For 115VAC a power cord is provided
with the transformer. The cord is terminated with a NEMA standard North
American 115VAC plug. This plug may need to be cut off and discarded to
allow wiring into junction box. Refer to Figure 1-1 and 1-2. On new installations, this should be done after the lane foundation is completed. Junction box
locations and power cable routings for both new and modernizations installations
are shown in Figures 1-2 and 1-3.
Figure 1-1. Electrical Power Supply Responsibility Chart
(1) TEL-E-FOUL POWER CABLE
FURNISHED BY CUSTOMER
(2) INCOMING ELECTRICAL SERVICE
(3) JUNCTION BOX
Figure 2-2. Junction Box
NOTE:
Use the following load requirements to ensure the ball lift circuit is not
overloaded; each transformer pulls 0.35 amps at 100VAC, 0.3 amps at
115VAC, and 0.15 amps at 230VAC.
12
Lightworx System Installation, Operation, and Service Manual
Transformers
1.
For 100VAC and 230VAC, hardwire the IEC connector (provided with
transformer) to a cord from the ball lift junction box or other suitable
power source. Refer to Figure 1-3. For 115VAC, cut plug from power
cord and hardwire into ball lift junction box.
Figure 1-3. Supply Power to Transformer
(1) BRUNSWICK SUPPLIED TRANSFORMER
AND IEC 320 CONNECTOR
(4) MOUNTING SCREW
(2) CUSTOMER SUPPLIED POWER
SOURCE (CORD INCLUDED ON
115VAC ONLY)
2.
(1)
(2)
(3)
(4)
(3)
TRANSFORMER MOUNTING
BRACKET
Attach the transformer to the ball lift underlayment or other suitable
location using hardware provided. Refer to Figure 1-4.
TRANSFORMER
MOUNTING BRACKET
SCREW
BALL LIFT ANCHOR PLATE
Figure 1-4. Attach Transformer
3.
Repeat steps 1 and 2 above to install all of the power supply transformers for the address decoder modules.
Lightworx System Installation, Operation, and Service Manual
13
Address Decoder Module
DIP Switch Settings
NOTE:
Prior to mounting the address decoder modules, the DIP switches must be
set to a designated address as shown in Figures 1-6a and 1-6b.
IMPORTANT!:
The maximum number of unique addresses for the address decoder modules
is 41. If more than 41 divisions exist, the center should be divided into two
sections so that some address decoder modules share the same DIP switch
setting. Example: 100 lane center (51 divisions), divisions 1-26 =
addresses 1-26. At division 27, set addresses to 25, 24, 23, etc.
1.
Starting with the address decoder module being installed at the left-most
division, set the DIP switches on the address decoder PCB. Refer to
Figure 1-5. Refer to Figures 1-6a and 1-6b for DIP switch settings.
The address decoder module being installed at the left-most division is
assigned as address #1.
(1) ADDRESS DECODER MODULE
(2) DIP SWITCHES
(3) #6-32 X 1-1/4" PAN HEAD SCREW
Figure 1-5. DIP Switch Location
2.
After properly setting the DIP switches as listed in Figures 1-6a and
1-6b, install the address decoder module cover using two #6-32 x 1-1/4"
pan head C.R. screws. Reference Figure 1-5.
3.
Label the cover of the module enclosure with the address setting of
internal DIP switches. This will aid in easy identification of the unit.
4.
Repeat steps 1 through 3 above to set DIP switches for all of the
address decoder modules.
IMPORTANT!:
The address decoder modules are attached to the return I-joist after the
cables are routed and terminated at the ports of the address decoder
module. If address decoder modules are attached at this time, cable
connections become difficult.
14
Lightworx System Installation, Operation, and Service Manual
Figure 1-6a. DIP Switch Settings
(1)
(4)
(7)
(10)
(13)
(16)
(19)
(22)
(25)
(28)
STRING ADDRESS = 1
STRING ADDRESS = 4
STRING ADDRESS = 7
STRING ADDRESS = 10
STRING ADDRESS = 13
STRING ADDRESS = 16
STRING ADDRESS = 19
STRING ADDRESS = 22
STRING ADDRESS = 25
STRING ADDRESS = 28
(2)
(5)
(8)
(11)
(14)
(17)
(20)
(23)
(26)
STRING ADDRESS = 2
STRING ADDRESS = 5
STRING ADDRESS = 8
STRING ADDRESS = 11
STRING ADDRESS = 14
STRING ADDRESS = 17
STRING ADDRESS = 20
STRING ADDRESS = 23
STRING ADDRESS = 26
(3)
(6)
(9)
(12)
(15)
(18)
(21)
(24)
(27)
STRING ADDRESS = 3
STRING ADDRESS = 6
STRING ADDRESS = 9
STRING ADDRESS = 12
STRING ADDRESS = 15
STRING ADDRESS = 18
STRING ADDRESS = 21
STRING ADDRESS = 24
STRING ADDRESS = 27
Lightworx System Installation, Operation, and Service Manual
15
Figure 1-6b. DIP Switch Settings
(29)
(32)
(35)
(38)
(41)
16
STRING ADDRESS = 29
STRING ADDRESS = 32
STRING ADDRESS = 35
STRING ADDRESS = 38
STRING ADDRESS = 41
(30)
(33)
(36)
(39)
STRING ADDRESS = 30
STRING ADDRESS = 33
STRING ADDRESS = 36
STRING ADDRESS = 39
Lightworx System Installation, Operation, and Service Manual
(31)
(34)
(37)
(40)
STRING ADDRESS = 31
STRING ADDRESS = 34
STRING ADDRESS = 37
STRING ADDRESS = 40
Cable Routing and Termination
NOTE:
Appendix A in the rear of this manual contains cable and component prints
for reference purposes.
1.
(1)
(2)
(3)
(4)
(5)
(6)
Drill a 3/4" (19 mm) access hole in division capping approximately
3" (76 mm) behind the division reflector cover. Refer to Figure 1-7.
PVC DIVISION CAPPING
DRILL 3/4" THROUGH HOLE
SUPPORT STRIP
END VIEW
TOP VIEW
DIVISION REFLECTOR COVER
Figure 1-7. Drill Cable Access
2.
Route address decoder module to light module cables beneath the
approach from the selected location of the address decoder modules to
the first light modules located on each division capping. Refer to Figure
1-8 for a view of cable routing /termination. Route connector end of
cable through 3/4" (19 mm) access hole on division capping (step 1
above).)
CAUTION!
Only plug cable into the front of first module (Refer to Figure 1-8) or damage to system will occur!
3. Route address decoder module to address decoder module cables.
Refer to Figure 1-8.
NOTE:
For the first pair of lanes and lane breaks, two sets of address decoder
modules and transformers will be installed under one ball return trap door.
Lane breaks will make it necessary to place address decoder modules in
such a way as to keep them within reach of each other using the 16' address decoder module cable.
4.
Route power supply adapter cables from transformers to address
decoder modules.
5.
Route a control module interface cable assembly from the Lightworx
controller to the address decoder module located on either of the outside
lanes. Refer to Figure 1-8 for cable/termination view.
Lightworx System Installation, Operation, and Service Manual
17
Intentionally Blank
18
Lightworx System Installation, Operation, and Service Manual
Insert 11 x 17 Page Here
Lightworx System Installation, Operation, and Service Manual
19
Back of 11x17 Page
20
Lightworx System Installation, Operation, and Service Manual
6.
With cables routed to address decoder modules, perform steps 6a
through 6f:
a. Insert the connector end of the address decoder module to light
module cable (5-pin), into the J2 port. Insert the miniature RCA plug
of power supply adapter cable into J4 port of address decoder
module.
(1) INSTALL ADDRESS DECODER
MODULE TO LIGHT MODULE CABLE
(2) INSTALL TRANSFORMER PLUG
(3) INSTALL A #10 X 1-1/2"
ROBERTSON SCREW
(4) INSTALL FIRST ADDRESS
DECODER MODULE TO ADDRESS
DECODER MODULE CABLE
(5) ROTATE MODULE 180 °
(6) INSTALL SECOND #10 X 1-1/2"
ROBERTSON SCREW
(7) INSTALL SECOND ADDRESS
DECODER MODULE TO ADDRESS
DECODER MODULE CABLE
(8) I-JOIST
Figure 1-9. Address Decoder Module Location/Cable Terminations
b. Using extreme caution not to bend or damage pins of module.
Attach address decoder module to a I-joist within ball lift trap door
using a #10 x 1-1/2" Robertson screw. Refer to Figure 1-9 for
suggested mount location.
c. Insert the connector end of one of the address module to address
module cables (11-pin) into the visible J1 or J3 port of the address
decoder module.
d. Install second #10 x 1-1/2" Robertson screw through tab of module
enclosure.
e. Terminate remaining address decoder module to address decoder
module cable at either J1 or J3 port of module.
Lightworx System Installation, Operation, and Service Manual
21
f. Repeat steps 6a through 6e for each of the address decoder modules.
7.
Insert 11-pin connector end of control module interface cable assembly
into last unused J1 or J3 port of the address decoder module located on
either of the outside lanes.
8.
Insert the two terminal ends of the power supply adapter cable assembly
into the corresponding receptacles attached to transformer leads.
9.
Insert the 15-pin connector end of control module interface cable
assembly into the J4 port on rear of Lightworx controller.
10.
Install a line terminator into the last address decoder module. Refer to
Figure 1-8.
NOTE:
Line terminators may cause occasional interference with light module
operation. If this occurs, remove line terminator and check system again.
22
Lightworx System Installation, Operation, and Service Manual
Light Modules
Installation
NOTE:
Installation of the Lightworx light modules requires the new PVC division
capping with the clear strips. The Light modules CANNOT be installed in
UOS/VOS capping. Do not proceed with the following steps unless PVC
division capping is installed.
1.
If installed, remove the clear strips on top of PVC division capping.
2.
From the foul line, measure 24" (610 mm) along the center line of
division capping and place a mark on capping for light module location.
Refer to Figure 1-10 for view of light module placement.
Figure 1-10. Light Module Location
(1) DIVISION REFLECTOR COVER
(4) LIGHT MODULE/ADDRESS MODULE
CABLE PREVIOUSLY ROUTED.
(2) FOUL LINE
(5) IN
3.
(3)
(6)
LIGHT MODULE
OUT
From the original marked location, continue to measure and mark in
35-1/4" (895 mm) increments all the way down the division capping.
These will be the locations for leading edge placement of the light
modules.
NOTE:
If screws attaching the division capping interfere with placement of light
modules, remove screws and reinstall in alternate location on capping.
4.
Peel off adhesive backing on bottom of module. Carefully position light
module into the alignment groove of capping making sure that the foul
line edge of module is on mark made in step 3 above. Align the scoop to
face evenly forward and press down firmly on module housing to secure.
5.
Repeat step 4 to install all of the light modules in the division capping.
Lightworx System Installation, Operation, and Service Manual
23
Cable Routing and Termination
1.
Route light module to light module cables between the light modules on a
division. See Figure 1-8 for routing/termination points.
2.
Starting at the light module closest to foul line, insert the connector end
of the address decoder module to light module cable into the J2 port of
light module.
3.
Insert the connector ends of light module to light module cable into the
light modules. Refer to Figure 1-11. Move any excess slack toward
the light module nearest the foul line and apply a length of PVC electrical tape to secure cable. This is necessary to keep cable centered in
division capping. Refer to Figure 1-11.
(1) APPROACH
(2) LIGHT MODULE
(3) PVC ELECTRICAL TAPE
Figure 1-11. Route Light Module Cables
4.
24
Insert connector ends of light module to light module cables into the light
modules while straightening and taping cables to remove excess slack
(step 3).
Lightworx System Installation, Operation, and Service Manual
Cosmetic Covers
Installation
1.
(1)
(2)
(3)
(4)
Install cosmetic covers between all light modules as shown in
Figure 1-12.
LIGHT MODULE
CLEAR STRIP
COSMETIC COVER
LIGHT MODULE TO LIGHT
MODULE CABLE
Figure 1-12. Cosmetic Cover
2.
Smooth edges of cover down to fit snugly within the bottom corners of
capping to conceal light module cabling.
NOTE:
If cosmetic covers are too long between modules, place overlapping end on
module nearest the foul line.
3.
Reinstall clear strips on top of division capping. Refer to Figure 1-12.
Lightworx System Installation, Operation, and Service Manual
25
Section 2: System Operation
Initial System Setup and Self-Diagnostic Test
IMPORTANT!:
After installation of the Lightworx system, it is necessary to perform the
following steps to identify the number of divisions (light strings) installed
and to verify proper system operation.
At the Lightworx controller, perform the following:
1.
Place toggle switch on rear of Lightworx controller to ON (up ) position,
the word "READY" appears when the self-diagnostic test is complete.
Refer to Figure 2-1.
Figure 2-1. Lightworx Controller Face Plate
(1) LCD SCREEN
(4) RUN/STOP KEY
(7) CUSTOM KEY
26
(2) SCROLL UP KEY
(5) TOGGLE "ON/OFF" SWITCH
Lightworx System Installation, Operation, and Service Manual
(3)
(6)
SCROLL DOWN KEY
SETUP KEY
2.
Press and hold the SETUP key for ten seconds.
3.
At the prompt, "No. of divisions", use the s and t keys to indicate the
number of divisions with Lightworx.
4.
Press SETUP key when the correct number of divisions is displayed.
5.
Use the s and t keys to select diagnostic pattern(s) to be activated.
NOTE:
Diagnostic patterns are currently designed to verify that light strings/
modules have consistent flashing of colors and color combinations and that
address decoder modules are properly sequenced. Diagnostics may also
be done to assist in troubleshooting the system.
6.
To exit SETUP mode, place toggle switch to OFF (down) position.
7.
Place toggle switch to the ON (up) position and press the RUN/STOP
key for normal system operation. The default lighting will begin with
name of lighting pattern listed on the LCD display.
Lightworx System Installation, Operation, and Service Manual
27
Selecting Lighting Patterns
1.
With system power on (step 1 above), press the s key to scroll up
through patterns or press the t key to scroll down through patterns.
Refer to Figure 2-1.
2.
When desired pattern is listed on LCD display, press RUN/STOP key to
activate new pattern.
1.
Press CUSTOM key on front desk control center. Refer to Figure 2-1.
2.
Press SETUP key and use the s and t keys to select program designator ; A, B, or , C.
3.
Press SETUP again and use the s and t keys to choose the desired
lighting pattern.
4.
Press SETUP and use the s and t keys to select pattern running time.
5.
Press SETUP and use the s and t keys to set the time delay between
programs.
6.
Now press SETUP to enter data for program "B" and repeat steps 3, 4,
and 5.
7.
Press CUSTOM key when finished selecting customized lighting patterns.
Customizing Lighting Patterns
28
Lightworx System Installation, Operation, and Service Manual
System Control Adjustments
There are two basic adjustments that can be made to the system; changing the
LCD display contrast and trimming the external audio input level. Both of these
adjustments are made on the rear of the Lightworx controller.
Adjusting LCD Display
To adjust the contrast of the LCD display on Lightworx controller;
1.
Locate the adjustment potentiometer screw on the rear of the Lightworx
controller. Refer to Figure 2-2 for location of screw.
Figure 2-2. Lightworx controller Rear View
(1) POWER INPUT (TRANSFORMER JACK)
(4) SERIAL PORT
(7) AUDIO RIGHT
(10) INCREASE
(2) POWER ON/OFF
(3)
(5) DISPLAY CONTRAST (LCD)
(8) AUDIO INPUT LEVEL
(6)
(9)
2.
CONTROL MODULE INTERFACE
CABLE PORT
AUDIO LEFT
DECREASE
Rotate adjustment screw clockwise to increase contrast; counterclockwise to decrease contrast.
Lightworx System Installation, Operation, and Service Manual
29
Adjusting Audio Input Level
If an external music interface (i.e., CD player, FM tuner) is being used, the audio
input signal may be too weak to adequately drive the lighting pattern. To compensate for a weak audio input signal:
30
1.
Locate the adjustment potentiometer screw on the rear of the Lightworx
controller. Refer to Figure 2-2 for location of screw.
2.
Rotate adjustment screw clockwise to increase (amplify) the audio input
signal. Continue to increase signal strength until lighting patterns operate
as desired.
Lightworx System Installation, Operation, and Service Manual
Section 3: Maintenance and Troubleshooting
Maintenance
Light Module PCB Replacement
NOTE: The individual LEDs within the light modules are not replaceable.
1.
Remove the clear strip from division capping to gain access to module
needing replacement.
2.
As needed, lift end and slide adjacent cosmetic covers away from light
module being replaced.
3.
Unplug the light module to light module cables from both ends of the
module.
4.
Using a small, straight tip screwdriver, gently push on two tabs of lower
light module enclosure while lifting up on front edge of enclosure.
When both front hooks are free, slide back top enclosure until cover is
free. Refer to Figure 3-1.
Figure 3-1. Replace LED PCB
(1) UNLOCK TAB WITH SCREWDRIVER
(4) REPLACE PCB AND REINSTALL COVER
(2) LIGHT MODULE
(3)
SLIDE COVER BACK
Lightworx System Installation, Operation, and Service Manual
31
5.
Remove defective PCB and place new PCB into lower housing.
6.
Install top enclosure of light module.
7.
Reverse procedures in steps 1, 2, and 3 to complete module replacement.
Troubleshooting
32
Lightworx System Installation, Operation, and Service Manual
Appendix A
Cables
Light Module to Light Module Cable 35.5" (902 mm) - 84-200287-000
(1) TO "J1" OR "J2" ON LIGHT MODULE
(4) BROWN
(2) BLACK
(5) YELLOW
(3)
(6)
RED
ORANGE
Address Decoder Module to Address Decoder Module Cable 16' (4.8 m) - 84-200288-000
(1) TO "J1" OR "J3" ON ADDRESS
DECODER MODULE
(4) ORANGE
(7) WHITE/YELLOW
(10) BLACK
(2) RED
(3)
(5) WHITE/ORANGE
(8) BROWN
(11) WHITE/BLACK
(6)
(9)
(12)
WHITE/RED
YELLOW
WHITE/BROWN
DRAIN
Control Module Interface Cable 300' (91.4 m) - 84-200289-000
(1) TO LIGHTWORX CONTROLLER
(4)
(7)
(10)
(13)
WHITE/RED
YELLOW
WHITE/BROWN
DRAIN
(2) TO "J1" ON ADDRESS DECODER
MODULE
(5) ORANGE
(8) WHITE/YELLOW
(11) BLACK
(14) NO CONNECTION
(3)
(6)
(9)
(12)
RED
WHITE/ORANGE
BROWN
WHITE/BLACK
Lightworx System Installation, Operation, and Service Manual
33
Address Decoder Module to Light Module Cable 22' (6.7 m) - 84-200298-000
(1) TO "J2" ON LIGHT MODULE OR "J2"
ADDRESS DECODER MODULE
(4) BROWN
(2) BLACK
(3)
RED
(5) YELLOW
(6)
ORANGE
Lightworx Controller Power Adapter Cable 10' (3 m) 84-200331-000
(1) TO TRANSFORMER
(2) TO LIGHTWORX CONTROLLER
Address Decoder Module Power Adapter Cable 1' (305 mm) 84-200332-000)
(1) TO TRANSFORMER
34
(2) TO ADDRESS MODULE
Lightworx System Installation, Operation, and Service Manual