1
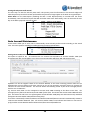
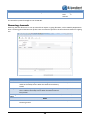
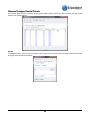
Volume 4 Expedient User Manual – General Ledger Gavin Millman & Associates Pty Ltd 281 Buckley Street Essendon VIC 3040 Phone 03 9331 3944 • Web www.expedientsoftware.com.au Table of Contents Expedient Accounting Periods ..............................................................................................................................................................3 Start New Period ...............................................................................................................................................................................3 End of Period Process........................................................................................................................................................................3 Post General Ledger – All Months ....................................................................................................................................................4 Check for all Postings.........................................................................................................................................................................4 Chart of Accounts ..................................................................................................................................................................................5 Creating/Viewing Chart of Accounts ................................................................................................................................................5 Maintain Sub Revenue Codes ...........................................................................................................................................................6 Job Journals ...........................................................................................................................................................................................7 Set Bulk Criteria .................................................................................................................................................................................7 Posting Job Journals ..........................................................................................................................................................................9 Job Only Auto Profit ............................................................................................................................................................................10 Creating a Job Only Auto Profit Journal .........................................................................................................................................10 Posting Job Only Auto Profit Journal ..............................................................................................................................................12 Auto Journal Maintenance .................................................................................................................................................................12 Reassign Account Maintenance .....................................................................................................................................................12 Job Only Auto Journals Maintenance.............................................................................................................................................13 Recurring Journals...............................................................................................................................................................................14 Journal Entries .....................................................................................................................................................................................15 Posting General Journal ..................................................................................................................................................................16 Transaction References.......................................................................................................................................................................16 General Ledger Period Totals .............................................................................................................................................................18 Options.............................................................................................................................................................................................18 Work In Progress (WIP).......................................................................................................................................................................19 WIP + Profit Enquiry (Import & Export)..........................................................................................................................................19 WIP – Cost Code ..............................................................................................................................................................................23 WIP – Job .........................................................................................................................................................................................24 WIP – Job Balances ..........................................................................................................................................................................25 WIP – Consol Balances ....................................................................................................................................................................26 WIP – Statistics Summary ...............................................................................................................................................................27 WIP – Statistics Detailed .................................................................................................................................................................29 WIP + Profit – Export .......................................................................................................................................................................30 WIP + Profit – Import ......................................................................................................................................................................30 GENERAL LEDGER INTRODUCTION E Xpedient software contains an Accounting Module, one of which is the General Ledger function. The General Function allows users to take up profits/losses against shipments (jobs) or directly to the General Ledger. It also allows users to amend any errors that have taken place when assigning costs to jobs. Reporting functions also exist in this module. After you have logged in, click on the General Ledger Folder. Doing this will display the following Functions. 2 Expedient Accounting Periods Accounting Periods are used to ‘close off’ financial transactions to gain a picture of the overall financial status of the company at the end of any given period. Accounting Periods are utilised in the following areas of the system: Bank Reconciliation Profit Reporting / End of Period Reports User warning when entering invoices in a previous period Please Note: Transactions can still however be back-dated. This can be stopped if the site chooses to do so. See Administration – Company Details Masterfile (oldest Journal Date – Enforce?) Start New Period Please Note: At the end of a year, once the new period is started, the system automatically creates the new year. See below screen: End of Period Process Below is the recommended process for ending a period in Expedient. 1. Check for All Postings a. Post where applicable 2. Post General Ledger – All Months a. If no transactions for new period have been posted, and not using the Batch Print Statement Process, then i. Print Statements ii. Start New Period b. If there have been transactions posted in the new period and a new period has already been started, then i. Prepare Debtors ii. Print Statements Please Note: Anytime users wish to print a Debtors Aged Trial Balance, Creditors Aged Trial Balance or End of Period WIP at the end of any Period, firstly Prepare each in the End of Period Reports Menu 3 Post General Ledger – All Months This function is used for reporting purposes only. This updates all of the data to be current and up to date for viewing of: Debtors Aged Trial Balance Creditors Aged Trial Balance General Ledger Aged Trial Balance Profit and Loss Balance Sheet Bank reconciliation Check for all Postings This function gives the user a snapshot of any postings that have not been performed across the system. 4 Chart of Accounts This screen holds the Chart of Accounts Masterfile. The Account Codes are numerical. The structure and headings of accounts should assist in consistent posting of transactions. Each nominal ledger account is unique to allow its ledger to be located. The list is typically arranged in the order of the customary appearance of accounts in the financial statements, profit and loss accounts followed by balance sheet accounts. This allows users to add/view general ledger codes. Creating/Viewing Chart of Accounts Once you have selected the Chart of Accounts, you will be presented with the following screen. By clicking the Add button or typing A will place the cursor in the input screen in Add Mode. See below: Field Name Account Number Account Type Description Group Heading Description This is the account number of the General Ledger Code you wish to create. Account numbers are categorised in the following number sequences: 1000 – 1799 = Current Assets 1800 – 1899 = Fixed Assets 1900 – 1999 = Intangible Assets 2000 – 2299 = Current Liabilities 2300 – 2799 = Disbursement Liabilities 2800 – 2999 = Long Term Liabilities 3000 – 3999 = Capital 4000 – 4999 = Income 6000 – 9999 = Expenses Please Note: If you are adding an account type of Disbursement Liabilities, for example FREIGHT, the system automatically adds the corresponding Income Account Type (+2000) E.g.: Account Number 2310 – FREIGHT – CUR LIABILITIES Account Number 4310 – INCOME – FREIGHT - INCOME This is the Type of account. As per above, based on the number you enter, will display the above types. Display only This is the full description of the General Ledger Code. This will appear on invoices, balances sheets etc… This defaults to the same as the description, this is used to group the accounts when printing out Profit and Loss and Balance Sheets 5 Validation Default Mandatory Blank N/A Based on Account Number Mandatory Blank Mandatory Blank Field Name BAS Indicator FXC Indicator Description This allows you to categorise this into Capital or Other, or No if it is not a BAS Indicator This indicates whether this General Ledger code can be used when billing in Foreign Currency Active Set the active status on this General Ledger Code, setting this to Account active will allow users to utilised this code immediately FXC This is used to portion money to Foreign Currency Variation Variation Account Code. This is used in the Foreign Contra Payment / Acct Receipt Program. No Mark Up This is used to remove the ability for users to alter the Expected Allowed Cost when Billing. During the billing process if the Charge Code (only if Exp has this set to YES then the Expected Cost will default to the Local Cost turned Amount representing No Profit. This is used for Charge Codes on) where not profit is taken up like Duty and GST. Revenue This refers to which revenue stream this is to be assigned to, Group either Customs or Freight Forwarding. This is only used for Revenue Codes Sub Revenue Sub Revenue Group is for reporting purposes and allows you to Group group code within the revenue group. For example, you can group Freight Forwarding Revenue Groups into Sub Revenue group such as Agency, Cartage, Disbursements Validation N/A Default Blank N/A “N” N/A “Y” N/A Blank N/A Blank Mandatory Blank for Revenue Codes only Mandatory Blank for Revenue Codes only Maintain Sub Revenue Codes This option allows the addition, update and viewing of Sub Revenue Codes. Use the button in the toolbar Please Note: Once you have added a code to the Chart of Accounts Screen, users will need to add a corresponding Alpha Code in Administration Menu - Alpha Charge Code Masterfile for those accounts that are to be used when invoicing. This is used so users can use a short code when invoicing, i.e.: CA for Cartage. See below: 6 Job Journals Job Journals are performed when users need to: Transfer costs from one job to another o This occurs when users have assigned costs to a job in error and need to back it out and assign it to another job. To successfully add Journals the total transaction needs to balance. Money from one cost code to another on the same job Bulk Profit Uptake for: o Customer(s) o Department(s) o Account Number(s) Job Journals are used when users which to move money from one 1 charge By clicking the Add button or typing A will place the cursor in the input screen in Add Mode. See below: Field Name Description Validation Default Header Document This is the date in which you are creating the job journal Mandatory Today’s Date Date Description This is a short description of what is being performed Optional Blank Source This is the action being performed; this is a no entry field and N/A JP is set to Job Journal Adjustments. Detail Job No Enter the job no in which you wish to journal Mandatory Null Account No Department This is the Charge Code in which you wish to journal for the Mandatory job. This is the department of the job. This is a display only field N/A Client This is the Client for which the job was performed Description This is the description of the Charge Code that you wish to N/A journal Amount This is the amount in which you wish to journal. To take the N/A money off the charge code then enter a negative amount, To put money on the charge code then enter a positive amount. This is the balance between the negative and positive N/A amounts, this needs to be 0 in order to save the Job Journal Balance N/A Set Bulk Criteria This function allows users to take up bulk profits for: o Customer(s) o Department(s) o Account Number(s) When the user enters the screen, they first click on the Set Bulk Job Criteria button: 7 Data pulled from Job Data pulled from Job Data pulled from Account No Blank Blank The below Screen will then display. The user then can enter a customer code, department code, or Account Number. In the below case the user wishes to display all Work In Progress Jobs where the Account Number 2430 (Delivery Order Fee) falls within the value range and needs profit to be taken up. Once the user hits OK, the user then hits the Add Button and the system will display all jobs in that date range for Delivery Order Fee. 8 Posting Job Journals The next step is to Post the Job Journal. This process posts job journal to the General Ledger This is performed in the General Ledger Menu, under the Post Job Journals Function. 9 Job Only Auto Profit Job only Auto Profit is used to take up profit on jobs. This draws information from the General Ledger on the Work In Progress Jobs (i.e.: jobs with a balance not equal to $0) on what has been billed and what the cost has been on selected jobs, the result being profit. Please Note: if the Expected Cost feature is turned on at your site, this function is performed at the time of posting the debtors invoice. This action will only need to be performed when the Expected Cost entered does not match the actual cost and the job does not balance. Creating a Job Only Auto Profit Journal By clicking the Add button or typing A will place the cursor in the input screen in Add Mode. See below: Consol Number, system displays all open jobs for that consol. Allows for quicker profit take up. Field Name Document Date Description Source Job/Consol No Description Validation Header This is the date of the Job Only Auto Profit Mandatory Today’s Date This is the description of what is being performed Optional Auto Journal JP This is the action being performed; this is a no entry field and N/A is set to Job Journal Adjustments. This is the job or consol number in which users wish to take Mandatory profit up on. If users enter a valid consol then the screen displays all jobs against that consol where the jobs are still in progress. Please Note: if this job/consol number is already balanced a system message will appear telling you so. 10 Default Blank Profit Field Name GL Code Department Account Description Previous Bill Previous Journal Previous Cost Total Journal + Total Cost Amount Description Validation Detail This is the General Ledger code you wish to debit /credit. Mandatory Clicking on the will bring up a lookup from the Chart of Accounts master file, which is found in General Ledger Menu, and is split be Balance Sheet , Income and Expense Items. This is the Department in which the payment is to be Blank attributed This is the description of the General Ledger Code N/A This is the amount that has already been billed This is the amount that has already been journaled Default Null Null Defaults from Cost Code N/A N/A This is the cost that has already been loaded against the N/A charge code N/A This is the amount left over, Previous Bill minus previous cost. N/A This is the profit/loss amount 11 Previous bill minus Previous cost Posting Job Only Auto Profit Journal The next step is to Post the Job Only Auto Profit. This process posts the information to the General Ledger and takes the profit up. Once this has been performed these jobs will no longer appear in the Work In Progress Report. Please Note: For the WIP Reports (excluding the WIP + Profit Reports/Screen) to coincide with the above immediately, users will need to Prepare the WIP. See below menu item. Alternatively, users can wait until the next day as the WIP is prepared overnight as well. Auto Journal Maintenance These screens allow you to store rules to automatically create Job Only Profit Journals according to the stored rules. The menu option is available from Administration>Company Details Menu Reassign Account Maintenance This option is helpful in AU. AU Customs Fees are received into Expedient on Account Number 2305 (ACS Processing Fees) but may be billed to your client on Account Number 2300 (Duty GST and Customs Fees) Expedient can find all negative values for the Account Number in the screen matching positive values for the Reassignment Account Number and create Journals as part of the automatic overnight process to reassign the values to the new Account Number. The Journals will be automatically posted as part of the overnight process with the user ‘AUTO DUTY’. E.g. Account Code 2305 is to be reassigned to Account Code 2300 according to the above screen shot. The overnight process finds a Job with Account Code 2305 of value -$95. The Job also has Account Code 2300 with value $95. This means the Job has a cost of $95 against Account Number 2300 (Duty GST and Customs Fee) and billed $95 against Account Number 2305 (ACS Processing Fees). A Journal is automatically created to debit Account Number 2305 with $95 and a Journal is automatically created to credit Account Number 2300 with -$95. The Account Number 2300 is now balanced and shows no costs and no profit, and the Account Number 2305 is balanced with $95 Costs and $95 Billed out. 12 Job Only Auto Journals Maintenance This screen allows you to add and maintain rules to automatically create Job Only Profit Journals from WIP. The automatic Job Only Profit Journals are created and posted every night. Field Name Account Number Import/Export Air/Sea Job Class Active? Department Start% Description This is the Account Number to be automatically journaled Validation Optional Default Blank Select if the rule applies to Import or Export Jobs, or Both Select if the rule applies to Air or Sea Cargo Jobs, or Both Select a specific Job Class or ALL if the rule only applies to Jobs on a Consol. If the rule applies to all Jobs regardless of Consol select ‘Not Applicable’. Select if the rule should be included in the overnight generation of the journal Select if the rule applies only to a specific Department. Leave blank to apply the rule to all Departments The rule can be applied to profits that fall within a specified % Profit range. Expedient will calculate the % value for the profit amount against the total sum of the Account Code billed for the Job. E.g. a Job has account 2700 that must be within %10 and %50 profit range to be auto profit journaled. The account code 2700 total value in credit for the job number in the journal is $20. The total value of account code 2700 billed for the job across multiple invoices was $200. Therefore the % profit is 10% and falls within the range and can be auto profit journaled. Enter the start of the % Profit range Mandatory Mandatory Mandatory Both Both Not Applicable Mandatory Yes Optional Blank 13 Mandatory if Blank an End % entered Field Name End% Description Enter the end of the % Profit range Validation Default Mandatory if Blank Start % entered The Journals are posted overnight as user ‘AUTO JNL’. Recurring Journals Recurring Journals allow users to set up Journals that require on going allocation, such as Monthly Depreciation. Once a recurring journal has been set up then users can select this journal in the Journal Entries Screen for ongoing use. Field Name Jnl Ref No Description Recurring Group Acct No Description Validation Header The number you assign to this Recurring Journal. This is Mandatory visible in the lookup screen within the General Journal Entry Screen The short description you assign to this Recurring Journal. Mandatory This is visible in the lookup screen within the General Journal Entry Screen N/A N/A Detail This is the Acct No Code that will be used as the Standard Mandatory Recurring Journal 14 Default Blank Blank N/A Null Field Name Dept Description Validation This is the Department in which the Journal will be assigned Mandatory to Default Null Amount This is the amount of money in which the Recurring Journal Mandatory will be assigned Null Journal Entries This function gives the user the ability to create a Journal Entry that is not Job related. I.e.: Depreciation of Assets. You can also use this screen to perform a fix to a Journal Entry that was entered in Error. This is performed by entering a positive amount on one line and a negative amount on the subsequent line. See below: Field Name Description Validation Header Date of This is the date in which you are creating the general journal Journal Journal This is a short description of what is being performed Description Detail G/L Code Enter the job no in which you wish to journal 15 Default Mandatory Today’s Date Optional Blank Mandatory Null Account No Department This is the Charge Code in which you wish to journal for the Mandatory job. This is the department of the job. This is a display only field N/A Client This is the Client for which the job was performed Description This is the description of the Charge Code that you wish to N/A journal Amount This is the amount in which you wish to journal. To take the N/A money off the charge code then enter a negative amount, To put money on the charge code then enter a positive amount This is the balance between the negative and positive N/A amounts, this needs to be 0 in order to save the Job Journal Balance N/A Data pulled from Job Data pulled from Job Data pulled from Account No Blank Blank Posting General Journal The next step is to Post the General Journal. Transaction References This function is used for users to view any transaction that has occurred and the user that performed this function 16 Browse (Button) Any information that is displayed in the Browse window will be shown in Excel when the data is extracted. Any modifications that are applied by the user in the Browse window (remove or reposition column headings) will be shown in the output to CSV. Please see below screenshots for your reference. 17 General Ledger Period Totals This function gives the user a snapshot of the general ledger codes by period and the movement for that period and the year to date balances. Options In the Options Menu, there is a View Summary screen. This screen summarises the transactions that have occurred during the selected period. See below: 18 Work In Progress (WIP) The WIP Menu is used to view financial information against each Job. To know when to take up the Profit and which Jobs still need to be finalised. WIP + Profit Enquiry (Import & Export) This screen allows the user to take up the profit and view the Job Financials for each Import and Export Job. NOTE: This screen has the same conditions as the WIP + Profit Import & Export Reports. Therefore, you don’t need to run these reports to view the Jobs that you need to Balance. Field Name Search Description Search Criteria Group Allows the user to search by WIP + Profit Import and Export. Filter By Default WIP + Profit (Import) Date of Reg Allows the user to search by the following: Date of Reg (Import & Export) Arrival Date (Import) Departure Date (Export) NOTE: Any ETD that is blank in the Export Job will not appear in the search results. Date Range The Date Range cannot be greater than 3months. Look It defaults to look back 2 months, for 1 week. back 2 mths Job Financial Allows the user to search by the following: ALL Status Not Billed, but Paid Out Paid Out > Billed (Loss) Billed but Not Paid Out Profit Not Billed / Not Paid Out NOTE: The ‘Not Billed, but Paid Out’ & ‘Paid Out > Billed’ Job Financial Status’ are highlighted in red. Only with WIP Allows the user to search by WIPs only or ALL. WIP Balance 19 Field Name Department Client Code Load Port Sales Person Shipper House PPD House CCX Destin Code # Consol No Job No Dept Date Of Reg Client/Shipper ETA/ETD Billed Paid Out Journal WIP Actual Profit WIP + Profit EST. Profit Profit Var Description Import / Export Criteria Group (Optional) This is the Department Code that is assigned to the Job. Use the Zoom on this field to match the Air or Sea Mode. (Import & Export) This is the Customer Code that is associated with the Job. Use the Zoom on this field to search the Customer Masterfile. (Import Only) This is the Loading Port of the Shipment. Use the Zoom on this field to search the ISO Port Codes. (Import Only) This is the Person responsible for the sale on the Job. Use the Zoom on this field to search the User Masterfile. (Import & Export) The Party that requested the Shipment of Goods. (Export Only) This is the Party that is billed for the Shipment. (Prepaid) Use the Zoom on this field to search the Customer Masterfile. (Export Only) That is the Party that is billed for the Shipment. (Collect) Use the Zoom on this field to search the Customer Masterfile. (Export Only) This is the Destination Port of the Shipment. Use the Zoom on this field to search the ISO Port Codes. (Export Only) Search Results Group NOTE: You can increase and decrease the size of this group by hovering over the bottom line that outlines the Search Results Group and dragging it up and down the screen. Line Number. Unique Number automatically generated by Expedient upon creation of the Consol. This is the Job No attached to the Consol No. This is an automatically generated Internal Reference Number. This is the Department Code that is assigned to the Job. This is the date the Job was registered in the System. Client – This is the Customer Code that is associated with the Job. (Shown when WIP + Profit Import is selected) Shipper – The Party that requested the Shipment of Goods. (Shown when WIP + Profit Export is selected) ETA – Estimated Date of Arrival. (Shown when WIP + Profit – Import is selected) ETD – Estimated Date of Departure. (Shown when WIP + Profit – Export is selected) This figure represents the amount that has been invoiced against the Job in the Debtors Invoice screen. This figure is the amount on the Creditor Invoice that has been raised against the Job. This shows any Journal Entries that have been created and posted against the Job. This figure shows what is still outstanding to be balanced against the Job. This figure is the difference between what has been Billed and Paid / Journal. Applies to the 4000 series Charge Codes. Calculation: WIP Amount + Actual Profit Amount. This figure is what has been billed (excluding GST). WIP + Profit column minus EST. Profit column. 20 Default Blank Blank Blank Blank Blank Blank Blank Blank Field Name Description Default Job Financial Job Financial Status of the Job. This is based on specific calculation: Status If Billed = 0 & Paid Out > 0 (Not Billed But Paid Out) If Billed < Paid Out (Paid Out > Billed) If Paid Out = 0 & Billed > 0 (Billed but Not Paid Out) If Billed > Paid (Profit) If Billed = 0 & Paid Out = 0 (Not Billed / Not Paid Out) WIP Note This information is from the WIP Tab in the Job Note. Job Type This column is only shown if WIP + Profit Export is selected and if DOMESTIC is turned ON. ShipCo. This is the Shipping Company that is used to Ship the freight. Sales Person This is the Person responsible for the sale on the Job. Job Financial Group Acct No GL (General Ledger) Account Number that is associated with the Job. Acct Code Account Code that is associated with the Job. Description Account Code Description that is associated with the Account Code. Paid This figure is the amount on the Creditor Invoice that has been raised against the Job. Journal This shows any Journal Entries that have been created and posted against the Job. Total Costs Calculation: Paid Column + Journal Column Billed This figure represents the amount that has been invoiced against the Job in the Debtors Invoice screen. Balance Calculation: Totals Costs Column – Billed Column Action Buttons Hide Criteria Hides the Search Criteria Group & Import/Export Criteria Group and the Search Results group becomes larger, showing more rows. When this button is selected the button label changes to ‘Show Criteria’ – when the button is selected again these groups re-appear. New Search Clears the current search and shows the default Search Criteria. Refresh Re-runs the query that has been selected in the Search Criteria. Job Financial Once a Job is selected, this button directs the user to the Job Financial Screen. 21 Field Name Description Default Job Only Auto Once a Job is selected, this button directs the user to the Job Only Auto Profit Profit in ADD Mode with the Account Codes pre-populated. NOTE: The above behavior is the same when you double click the Job No. When you close this window the following message is shown: “You are about to Post xxxxxx Job Only Journal. Do you wish to Proceed?” YES – The record in this screen is posted and the user is directed back to the WIP + Profit Screen. If the full amount was posted then the Job will be removed automatically from this screen. (If sorted by WIP Only) NO – The entry saves in the Job Only Auto Profit screen and you are then directed back to the WIP + Profit Screen. The Job is still shown in this screen. IF System option AUTOJRLDOCDT is turned on, the Doc Date in the Job Only Auto Profit defaults: - ETD for export shipments - ETA for import shipments * Please Note: if either date is prior to the Oldest Date in the Company Details Masterfile, or the dates are null, the Doc Date will default to today's Date Output to CSV Extracts the data that is shown on the screen to Excel in CSV format. 22 WIP – Cost Code The Cost Code Report shows the Job Financial information for each Job No and is sorted by the Account Code and Department Code. Please see below screenshot for the PDF Version. Please see below screenshot for the XLS Version. 23 WIP – Job The Job Report shows the Job Financial information for each Job No and is sorted by the Department Code. This also includes Job WIP Notes. Report Parameter - ‘Include Totals?’ Defaults to NO. If YES, includes the Job Total & Department Total. If NO, it does not include the Job Total & Department Totals. It only includes a Totals at the end of the Report. This applies against the PDF and XLS Versions of the WIP Job Report. If CSV is selected, then it defaults the 'Include Totals?' field to YES and cannot be changed. Therefore, the CSV Version will always include the Job Total & Department Totals. Please see below screenshot for the PDF Version. Please see below screenshot for the XLS Version. 24 WIP – Job Balances The Job Balances Report shows the Job Financial information for each Job No and is sorted by the Department Code. This also includes Job WIP and Account Notes. Please see below screenshot for the PDF Version. Please see below screenshot for the XLS Version. 25 WIP – Consol Balances The Consol Balances Report shows the financial information for each Consol No and is sorted by the Department Code. It also includes Consol WIP and Account Notes. Please see below screenshot for the PDF Version. Please see below screenshot for the XLS Version. 26 WIP – Statistics Summary This Statistics Report provides a summary of Jobs for WIP Debits that have been ‘Paid Out & Not Billed’ or WIP Credits that have been Billed & Not Paid Out. It is filtered by Department. Please see below screenshot for the PDF Version. 27 Please see below screenshot for the XLS Version. 28 WIP – Statistics Detailed This Statistics Report provides a detailed outline of Jobs for WIP Debits that have been ‘Paid Out & Not Billed’ or WIP Credits that have been Billed & Not Paid Out. It is filtered by Branch and Department. Please see below screenshot for the PDF Version. Please see below screenshot for the XLS Version. 29 WIP + Profit – Export The WIP + Profit Export Report shows the Job Financial information for each Job No & Consol, that have not been balanced. NOTE: This report is the same as the WIP + Profit Enquiry Screen. Please see below screenshot for the XLS Version. WIP + Profit – Import The WIP + Profit Import Report shows the Job Financial information for each Job No & Consol, that have not been balanced. NOTE: This report is the same as the WIP + Profit Enquiry Screen. Please see below screenshot for the XLS Version. 30