1
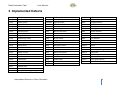
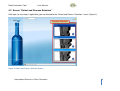
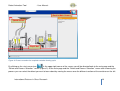
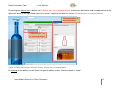
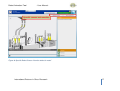
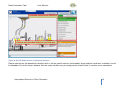
User Manual – PC Version
Defect
Animation
Tool
Causes and Remedies Compendium
Version 1.0, July 2013
Defect Animation Tool
- User Manual -
Content
1
Introduction ........................................................................................................................................................................................ 3
2
General Description ........................................................................................................................................................................... 4
3
Implemented Defects ......................................................................................................................................................................... 5
4
Structure and usage of the program .................................................................................................................................................. 6
4.1
Login Screen................................................................................................................................................................................ 6
4.2
Screen “Defect and Process Selection” ....................................................................................................................................... 8
4.3
Specific Defect Screen “How the defect is made” ...................................................................................................................... 13
4.4
Specific Defect Screen “How to avoid the defect” ...................................................................................................................... 15
4.5
Specific defect screens “Operational Solutions” and “Design Engineering” ............................................................................... 16
4.5.1
Operational Solutions .......................................................................................................................................................... 18
4.5.2
Design Engineering ............................................................................................................................................................. 20
5
Disclaimer ........................................................................................................................................................................................ 20
6
Impressum ....................................................................................................................................................................................... 21
7
Acknowledgements.......................................................................................................................................................................... 21
International Partners in Glass Research
2
Defect Animation Tool
- User Manual -
1 Introduction
Welcome to the IPGR Defect Animation Tool (DAT), an easy-to-use computer animated Causes and Remedies Compendium.
The goal of this tool is to allow easy operator training, especially when training new employees as IS machine operators and to provide
a compendium for defect avoidance strategies. The tool was generated together with the IPGR member companies during a period of
three years and has been now made available for the glass-container industry.
This Glass-Container Defect Animation is an illustration of common defects that can occur during glass container manufacturing. The
intention of the tool is to provide an updated alternative to the known “causes & remedies” books with computer animations on how a
respective defect is generated and how it can be avoided.
Like all available causes and remedies books, the DAT does neither claim completeness nor absolute correctness. It certainly has
been engineered and revised with utmost care to assure a high quality and high completeness of information.
Nevertheless, IPGR does not take responsibility on the correctness and completeness of the data. The implementation of any remedy
from the DAT into practice is on the sole responsibility of the company or person who uses the DAT. IPGR does not take any liability
on yield loss or any other damage that might occur as a consequence of the usage of the DAT.
The DAT is constructed as an open database. This means additional defects can be implemented and the tool can be expanded.
These expansions will be available with future versions.
International Partners in Glass Research
3
Defect Animation Tool
- User Manual -
2 General Description
The program is intended to simplify operator training (especially for new employees) and is widely used in IPGR member companies
for education and on the machine floor as compendium. Structure and details of this program are different to the common known
books. In difference to “Causes and Remedies”-books, this program provides text and animations on how defects are generated and
how they can be avoided.
The program provides descriptions on:
1. How a certain defect is made in general
2. How a certain defect can be avoided in general
3. What are specific causes for a certain defect and what are specific remedies to avoid this defect
Currently over 60 defects are implemented. On purpose, defects and their generations are exaggerated and often slowed down in the
animations to make them clearly visible. In real work-life, the defects can be smaller and more difficult to observe and processes can
be faster.
As defect origin might be different for the three different forming processes, namely Narrow-Neck Press & Blow (NNPB), Blow & Blow
(BB) and Press & Blow (PB), for each forming process the defects are listed separately. Furthermore, as not all defects occur in all
processes, there might be some defects not listed in all three processes.
It has to be mentioned that the same container defects might have different names in different countries or sometimes even in different
plants in the same country, for example “Rocker”, “Uneven bottom” or “Rock-bottom” for a container which does not stand evenly on a
surface because of a bottom that has sacked down. The names given to the defects in this tool are the names which IPGR internally
has agreed upon. There might be variations to the defects names at other companies or other countries.
The DAT is available in a Flash version and a HTML-5 version. There are different advantages of both systems. For details please
contact your IT administration staff.
International Partners in Glass Research
4
Defect Animation Tool
- User Manual -
3 Implemented Defects
Location
Finish
Finish
Finish
Finish
Finish
Finish
Finish
Finish
Finish
Finish
Finish
Finish
Finish
Finish
Finish
Finish
Finish
Finish
Finish
Neck
Neck
Neck
Neck
Defect
Blown back finish / hollow finish
Broken finish
Bulged finish
Check under finish
Checked bead
Checked finish
Crizzled finish
Flanged finish
Inside finish check
Line over finish
Neck ring seam
Offset finish
Out of round finish
Overpress
Rolled in finish
Saddle finish
Split finish
Tilted finish
Unfilled finish
Bent neck
Choked neck
Pinched neck
Seam on neck ring parting
Location
Shoulder
Shoulder
Shoulder
Shoulder
Body
Body
Body
Body
Body
Body
Body
Body
Body
Body
Body
Body
Body
Body
Body
Body
International Partners in Glass Research
Defect
Danny Check
Light shoulder
Shoulder check
Sunken shoulder
Bird swing
Blank mold seam
Blow mold seam
Body mark
Bruise check
Bulged side
Cold appearance
Hot panel check
Lap marks
Leaner
Out of roundness
Plunger mark
Pressure check
Settle wave
Sunken side
Washboards
Location
Base
Base
Base
Base
Base
Base
Base
Base
Base
Base
Others
Others
Others
Others
Others
Others
Others
Others
Others
Defect
Baffle mark
Flanged bottom
Heavy bottom
Heel check
Knurling check
Rocker bottom
Shear marks
Swung baffle
Thin bottom
Wedge bottom
Black specks
Blister
Broken ware
Centering and engraving checks
Dirty ware
Out of height
Spikes
Stuck glass particle
Uneven distribution
5
Defect Animation Tool
- User Manual -
4 Structure and usage of the program
The DAT is structures mainly in six screens.
1.
2.
3.
4.
5.
6.
Login Screen
Defect and Process Selection screen
Specific defect screen “How the defect is made”
Specific defect screen “How to avoid the defect”
Specific defect screen “How to avoid the defect” “Operational Solutions”
Specific defect screen “How to avoid the defect” “Design Engineering”
4.1 Login Screen
If you do not have a license with auto log-in (static IP or software dongle based), after accessing the DAT you will enter the loginscreen (Figure 1) and you will be requested to enter your user login and your password. After doing so, by pressing <Login> you will
be directed to the main page of the DAT.
At the login screen and later in the program you can also select a language for the DAT via a drop-down menu in the upper screen.
The default language is English; translation-option to other languages is optionally available.
International Partners in Glass Research
6
Defect Animation Tool
- User Manual -
Language Selection
Log-in area
Figure 1: Login Screen
Where applicable, at each subsequent screen a log-out button
log-out of the DAT.
International Partners in Glass Research
will appear in the upper right corner which allows you to properly
7
Defect Animation Tool
- User Manual -
4.2 Screen “Defect and Process Selection”
After login (or auto-login if applicable) you are directed to the “Defect and Process Selection” screen (Figure 2).
Process Selection
Figure 2: Defect and Process Selection Screen
International Partners in Glass Research
8
Defect Animation Tool
- User Manual -
In the area “Process Selection” you can chose the process you want to investigate by clicking on the respective process window on
the right hand side of the screen. The container on the left hand side will change color according to the selected process. Available are
•
•
•
Blow & Blow (BB) (dark blue)
Press & Blow (PB) (blue)
Narrow-Neck Press & Blow (NNPB) (light blue)
By clicking on the
icon in the lower right corner of each process you get a process overview of a complete container forming cycle
(Figure 3). To avoid distractions due to too much details, one section with a single gob is shown in the process.
If you move your mouse pointer across the process overview delineation, below this overview a player bar will appear with a
play/pause button as well as a time bar with run-time indicator and a full-screen button on the right side of the player bar (not available
in Flash version). Now you can view the selected container forming cycle by clicking on the play button on the left side of the player
bar. The animation can be paused at any time by clicking on the play/pause button in the player bar. The animation can also be set to
a specific position by moving the time indicator on the play bar to a desired position of the animation. Animations can be replayed as
often as it is desired.
There is a speed button in the upper left corner of the IS machine delineation. By clicking this button, the speed of the animation can
be changed in the following sequence: 1 x
¾x
½x
¼x
1x
International Partners in Glass Research
9
Defect Animation Tool
- User Manual -
Back to Main Screen
Speed button
Player bar
Figure 3: Process overview for complete container forming cycle
By clicking on the start-screen icon
in the upper right corner of the screen you will be directed back to the main page and the
“Defect and Process Selection” screen (Figure 2). At the main page and the “Defect and Process Selection” screen after choosing the
process you can select the defect you want to learn about by moving the mouse over the different sections of the container on the left
International Partners in Glass Research
10
Defect Animation Tool
- User Manual -
hand side (“Container for area selection”). When moving over the container, the respective area will pop-up in the middle of the screen
revealing icons of all defects which are available for this selected container area (“Defects available for selected area”)(Figure 4).
Container for area selection
Defects available for
the selected area
Figure 4: Defect and Process Selection Screen
International Partners in Glass Research
11
Defect Animation Tool
- User Manual -
By moving the mouse over a defect icon (“Mouse over” on a selected defect), a definition, delineation and example picture of the
defect will occur at the right hand side of the screen, replacing the process choice (Characteristics of selected defect).
Characteristics of
selected defect
“Mouse over” on
a selected defect
Figure 5: Defect and Process Selection Screen, mouse-over a selected defect
By clicking on the defect you will enter the specific defect screen “How the defect is made”.
International Partners in Glass Research
12
Defect Animation Tool
- User Manual -
4.3 Specific Defect Screen “How the defect is made”
After accessing the specific defect screen “How the defect is made”, the screen changes to a simplified delineation of an IS machine
section (Figure 6).
When moving over this delineation below there is again a player bar with a play/pause button as well as a time bar with run-time
indicator and a full-screen button on the right side of the player bar (not available in Flash version). For details of usage of the player
bar and the speed button, please refer to section 4.2.
Now you can view by clicking on the play button how the selected defect is generated in general. You will see an animation which
explains how the defect is generated without giving any specific causes for the defect. When clicking play, first you will see a red
square which illustrates where in the process the defect is generated. Then the animation follows.
The animation can be paused at any time by clicking on the play/pause button below the screen and can also be set to a specific
position by moving the time indicator on the play bar to a desired position of the animation. Animations can be replayed as often as it
is desired. In the info-box at the right hand side of the screen a short description of the content of the animation is given (info-box).
This explanation is a helpful addition to the animation. Both, animation and info-box text should be observed.
There might be more animations available to explain the general origin of the selected defect. In this case you will see in the lower
right corner of the screen the number of causes that are available for viewing (number of causes). When accessing the screen, the
animation is set on “Cause 1”. For selection of the next cause, simply press the button and then press play at the play bar under the IS
machine delineation for starting the animation.
By clicking on the defect icon
in the upper left corner of the screen, the right side changes and the explanation, delineation and
picture of the defect will be shown, similar to the previous screen seen in Figure 5 (Characteristics of selected defect).
International Partners in Glass Research
13
Defect Animation Tool
- User Manual -
By clicking on the start-screen icon
in the upper right corner of the screen you will be directed back to the main page and the
“Defect and Process Selection” screen (Figure 2) which allows you to choose a new defect and process.
Info-box
Number of causes
Figure 6: Specific Defect Screen “How the defect is made”
International Partners in Glass Research
14
Defect Animation Tool
- User Manual -
4.4 Specific Defect Screen “How to avoid the defect”
By clicking on the “how to avoid the defect” button in the upper right area of the screen, you will be directed the Specific Defect Screen
“How to avoid the defect” (Figure 7). The structure and usage of this screen is similar to the previous screen in section 4.3, so please
refer to paragraph 4.3 for a detailed usage description.
How to avoid selection
Specific causes and remedies
Number of remedies
Figure 7: Specific Defect Screen “How the defect is made”
International Partners in Glass Research
15
Defect Animation Tool
- User Manual -
In this screen you can view how the selected defect is avoided in general. You will see animations which explain how the defect is
avoided without giving any specific remedies for the defect.
There might be more animations available to explain the general avoidance of the selected defect. In this case you will see in the
lower right corner of the screen the number of causes that are available for viewing (number of remedies). When accessing the
screen, the animation is set on “Remedy 1”. For selection of the next remedy, simply press the button and then press play at the play
bar under the IS machine delineation for starting the animation.
Also, as soon as you have accessed the Specific Defect Screen “How to avoid the defect”, there will be two additional selections
possible: “Operational Solutions” and “Design Engineering” (Specific causes and remedies), the next chapter.
4.5 Specific defect screens “Operational Solutions” and “Design Engineering”
When you have accessed the “How to avoid the defect” screen you can chose between specific defect causes and remedies
descriptions. These descriptions are structured in two areas:
1. Operational Solutions
2. Design Engineering
You can access these areas by clicking on the respective button in the upper right corner just below the “How to avoid the defect”
button (see Figure 8, Specific causes and remedies).
It is important to notice that the tool does not imply any prioritization of listed remedies. The remedies are listed in alphabetical order.
The decision which remedy to apply at which defect is solely in the responsibility of the operator. This is important because many
strategies are available to produce a glass container and therefore no general strategy on defect avoidance can be given.
International Partners in Glass Research
16
Defect Animation Tool
- User Manual -
Specific causes and remedies
Figure 8: Specific Defect Screen “How the defect is made”
International Partners in Glass Research
17
Defect Animation Tool
- User Manual -
4.5.1 Operational Solutions
You can access the Operational Solutions by clicking on the respective button in the upper right corner just below the “How to avoid
the defect” button (see Figure 8, Specific causes and remedies).
In this screen, specific causes and remedies of the selected defect which can be applied at the machine floor are listed (see Figure 9).
You will find a list of specific reasons for a defect at the right hand side of the screen (Available Operational Solutions) with a general
description in the info-box.
Below the info-box it is indicated how many causes or remedies are available for this specific case. “Cause 1” is always selected as
default. By starting the animation you will see how this cause generates the defect. And by selecting the available remedy / remedies
in the lower right corner you can start the animation(s) which explain(s), how this specific defect cause can be eliminated (Causes and
remedies Selection and info-box).
When clicking play, first you will again see a red square(s) which illustrates where in the process the defect is generated. Then the
animation follows. In the info-box an explanation to the animation is given. This explanation is a helpful addition to the animation. Both,
animation and info-box text, should be observed.
International Partners in Glass Research
18
Defect Animation Tool
- User Manual -
Available Operational Solutions
Causes and remedies Selection and info-box
Figure 9: Specific Defect Screen “Operational Solutions”
Please note that for the operational solutions well as for the specific causes and remedies there might be scroll bars available if not all
listed options fit into the screen window. Also for some solutions only a remedy can be listed if there is no clear cause connected.
International Partners in Glass Research
19
Defect Animation Tool
- User Manual -
4.5.2 Design Engineering
You can access the Design Engineering by clicking on the respective button in the upper right corner just below the “How to avoid the
defect” button (see Figure 8, Specific causes and remedies). In this screen, specific causes and remedies of the selected defect which
can be applied at the mould shop are listed. The usage of the screen is the same as in section 4.5.1 Operational Solutions, so please
refer to this previous section for a detailed usage description.
5 Disclaimer
No assurance / No guarantee / Liability waiver
Although IPGR exercises maximum diligence to ensure that the information in this manual is accurate at the time of publication, IPGR
does not provide any guarantee or assume any responsibility for correctness, reliability or completeness. The information appearing in
this manual may be changed at any time without prior notice. No guarantee - either explicit or implicit - is given for the accuracy of the
information published in this manual. IPGR shall not be liable in any way (including negligence) for damage or subsequent damage
arising from the use of this manual or elements of it.
International Partners in Glass Research
20
Defect Animation Tool
- User Manual -
6 Impressum
IPGR - International Partners in Glass Research
Schützenmattstr. 46
CH-8180 Bülach
Switzerland
IPGR c/o Emhart Glass
Hinterbergstrasse 22
CH-6330 Cham
Switzerland
Phone : +41 43 928 2912
Fax: +41 44 863 3122
[email protected]
www.ipgr.com
7 Acknowledgements
The support of all IPGR member companies is highly appreciated.
Copyright by IPGR, All rights reserved, IPGR 2013
International Partners in Glass Research
21