1
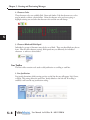
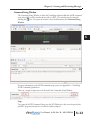
CREATING AND
PREVIEWING MESSAGES
CHAPTER
5
In This Chapter...
Creating and Previewing Messages . . . . . . . . . . . . . . . . . . . . . . . . . . . . . . . . . . . . .5–2
The Software Workspace . . . . . . . . . . . . . . . . . . . . . . . . . . . . . . . . . . . . . . . . . . . . .5–3
Select the ViewMarq Size . . . . . . . . . . . . . . . . . . . . . . . . . . . . . . . . . . . . . . . . . . . . .5–3
Saving the Message . . . . . . . . . . . . . . . . . . . . . . . . . . . . . . . . . . . . . . . . . . . . . . . . .5–4
Open a Saved Message . . . . . . . . . . . . . . . . . . . . . . . . . . . . . . . . . . . . . . . . . . . . . . .5–5
Text Editor Overview . . . . . . . . . . . . . . . . . . . . . . . . . . . . . . . . . . . . . . . . . . . . . . . .5–6
Software Purpose . . . . . . . . . . . . . . . . . . . . . . . . . . . . . . . . . . . . . . . . . . . . . . . . . . .5–6
Supported Characters . . . . . . . . . . . . . . . . . . . . . . . . . . . . . . . . . . . . . . . . . . . . . . .5–6
Message Length . . . . . . . . . . . . . . . . . . . . . . . . . . . . . . . . . . . . . . . . . . . . . . . . . . .5–6
Message Formatting . . . . . . . . . . . . . . . . . . . . . . . . . . . . . . . . . . . . . . . . . . . . . . . . .5–7
Character Toolbar . . . . . . . . . . . . . . . . . . . . . . . . . . . . . . . . . . . . . . . . . . . . . . . . . .5–7
Line Toolbar . . . . . . . . . . . . . . . . . . . . . . . . . . . . . . . . . . . . . . . . . . . . . . . . . . . . . . .5–8
Scrolling Multiple Lines Together . . . . . . . . . . . . . . . . . . . . . . . . . . . . . . . . . . . . . .5–10
Other Tools . . . . . . . . . . . . . . . . . . . . . . . . . . . . . . . . . . . . . . . . . . . . . . . . . . . . . .5–10
LED Display ID . . . . . . . . . . . . . . . . . . . . . . . . . . . . . . . . . . . . . . . . . . . . . . . . . . . .5–11
Message Simulator . . . . . . . . . . . . . . . . . . . . . . . . . . . . . . . . . . . . . . . . . . . . . . . . .5–12
Command String Window . . . . . . . . . . . . . . . . . . . . . . . . . . . . . . . . . . . . . . . . . . .5–13
Chapter 5: Creating and Previewing Messages
1
2
3
4
5
6
7
8
9
10
11
12
13
14
A
B
C
D
Creating and Previewing Messages
The Text Editor is designed to make message creation easy by allowing users to simply start
typing. As a message is entered, the software converts the formatted message into an ASCII
string that is displayed in the Command String window located at the bottom of the
workspace. This ASCII String can then be copied and used in control devices such as a PLC
that can be connected to the ViewMarq display. These devices will send the command string
to the ViewMarq display. This ASCII string contains the text and format that is to be
presented. This software basically reduces the need for users to learn or type the ASCII
command strings needed to control messaging.
One key item you will notice when you first begin to type is that the text being entered will
immediately appear in the Simulator window located directly above the Text Editor window.
This WYSIWYG (an acronym for “what you see is what you get”) simulator will display the
text being edited precisely as it will appear on the ViewMarq display. The Simulator reduces
the need to send the message to the display for testing purposes. You don’t need hardware
connected to see what your message will look like. You will quickly find that the Simulator
greatly reduces the time needed to create and test messages.
As you enter your message, try using the format tools located on the toolbars above and below
the Text Editor. Try changing the font color, blink rate, scroll settings, and position and see
how it appears in the Simulator. You can then continue reading on to get a more detailed
understanding of how to use the features in this chapter.
5–2
User Manual, 1st Ed. Rev. B – MD-USER-M
Chapter 5: Creating and Previewing Messages
The Software Workspace
Select the ViewMarq Size
Before creating a message, you should determine which size of ViewMarq display you wish to
simulate. The display size will affect your decisions on the character set and text position that
you may want to use. For example, if you have a single line display then the larger size
characters will not be legible.
NOTE: Selecting the Simulator size does not affect the ASCII string, only the way it will look in the Simulator.
User Manual, 1st Ed. Rev. B – MD-USER-M
5–3
1
2
3
4
5
6
7
8
9
10
11
12
13
14
A
B
C
D
Chapter 5: Creating and Previewing Messages
1
2
3
4
5
6
7
8
9
10
11
12
13
14
A
B
C
D
Saving the Message
Once the message is created and it simulates as intended, it may be saved for use or editing
later. To save the message, open the File drop down menu and click Save, or click on the Save
toolbar button.
If the message has not been saved already, the Save As dialog will open.
Enter a unique name for the message and click Save.
5–4
User Manual, 1st Ed. Rev. B – MD-USER-M
Chapter 5: Creating and Previewing Messages
Open a Saved Message
Messages that have been previously saved may be opened, edited and saved again. To open a
saved message open the File drop down menu and click Open, or click on the Open toolbar
button.
The Open dialog will open.
Select the desired message file and click Open. The selected message will open, ready for
editing or sending to a ViewMarq display.
User Manual, 1st Ed. Rev. B – MD-USER-M
5–5
1
2
3
4
5
6
7
8
9
10
11
12
13
14
A
B
C
D
Chapter 5: Creating and Previewing Messages
1
2
3
4
5
6
7
8
9
10
11
12
13
14
A
B
C
D
Text Editor Overview
In the Text Editor you simply select a line and start typing. The Simulator displays the text
and helps you to understand how it will look on the ViewMarq display. There are a few basic
guidelines to learn that will help you when creating a message.
Software Purpose
The primary purposes of the software are:
• Create and Preview Messages
• Display messages on the ViewMarq
• Configure the ViewMarq LED display
• Create ASCII String Commands that may be used in a PLC to control the LED message display
Supported Characters
The Text Editor supports 94 of the 95 ASCII characters: standard keyboard characters. The
exception is the back apostrophe ( ` ). It is reserved to indicate the degree symbol ( ° ).
Message Length
A maximum of 299 text characters can be typed into each line of the Text Editor. The entire
ASCII string may only be 500 charcters long including the commands and formatting
characters.
The character size and the screen width of the hardware will determine the number of
characters viewable. The Text Editor does not truncate the text that is not displayed on the
screen. Text is entered from left to right when left justified and will continue off the screen.
See the example below:
Example of a message with the 1x12 character ViewMarq display with the 2-inch character set.
Example of a message with the 1x24 character ViewMarq display with the 2-inch character set.
5–6
User Manual, 1st Ed. Rev. B – MD-USER-M
Chapter 5: Creating and Previewing Messages
Message Formatting
Message formatting is accomplished on three different levels:
1) Character
2) Line
3) Message
Character Toolbar
The character toolbar contains tools used to format individual or multiple characters much
like your common word processors. The character toolbar has three functions:
1. Character Set
You may choose from 11 available character sets. Individual characters can be mixed to get
the desired effect as shown below. Select the character set and start typing, or highlight
existing text and select the character set and the text will change.
User Manual, 1st Ed. Rev. B – MD-USER-M
5–7
1
2
3
4
5
6
7
8
9
10
11
12
13
14
A
B
C
D
Chapter 5: Creating and Previewing Messages
1
2
3
4
5
6
7
8
9
10
11
12
13
14
A
B
C
D
2. Character Color
Three character colors are available; Red, Green and Amber. Like the character sets, colors
may be mixed to achieve a desired effect. Select the character color and start typing, or
highlight existing text and select the character color and the text will change.
3. Character Blink and Blink Speed
Individual or groups of characters may also be set to blink. There are three blink rates choose
from. Like the other character settings, blink speeds may set differently for individual
characters to achieve a desired effect.
Line Toolbar
The line toolbar contains tools used to add justification or scrolling to each line.
1. Line Justification
Line justify determines which starting position on the line the text will appear, Left, Center,
or Right. This setting affects the entire line. Justify defaults to the left side. If scrolling is
enabled, it will override any justification setting.
5–8
User Manual, 1st Ed. Rev. B – MD-USER-M
Chapter 5: Creating and Previewing Messages
2. Line Scroll
Line scroll is a line based setting. It is used to animate messages to grab the viewer’s attention.
3. Line Scroll Pause
When enabled on an individual line, the line will scroll across the viewable area of the display.
The ViewMarq supports scroll left, scroll right, scroll up and scroll down. Click any Line
Justification button to stop the scroll and set the static position of the text.
4. Scroll Speed
The scroll speed is a message based setting and determines the rate at which the lines in a
message will scroll; slow, medium, or fast. The default speed is slow. The speed selection tool
is disabled until the scroll has been enabled.
NOTE: There can be only one scroll speed per message. All scrolling lines will scroll at the same rate no
matter what direction they scroll. If the speed is changed for one line, all line scroll speeds will be changed.
Format Options
Option
Character Size
Character Color
Blink
Blink Rate
Justify Left
Justify Center
Justify Right
Scroll Left
Scroll Right
Scroll Up
Scroll Down
Scroll Speed
Effects
Character
Based
Line
Based
Message Based
User Manual, 1st Ed. Rev. B – MD-USER-M
5–9
1
2
3
4
5
6
7
8
9
10
11
12
13
14
A
B
C
D
Chapter 5: Creating and Previewing Messages
Scrolling Multiple Lines Together
1
2
3
4
5
6
7
8
9
10
11
12
13
14
A
B
C
D
Sometimes it is desirable to have multiple lines scroll together. If adjacent lines are selected to
scroll in the same direction, they will scroll in a synchronized manner. For example, if text is
entered on all four lines and Scroll Up is selected for all four lines, then all four lines will
scroll up together across the entire viewable area of the screen. If line 3 is selected to be
Justified Left, then the text on Lines 1 and 2 will Scroll together up the area of Lines 1 and 2
while the text on Line 4 will scroll up the area of line 4.
Other Tools
There are additional tools available in the ViewMarq software to aid in formatting and editing
text. There are also some ASCII string editor tools.
New Message and Clear Text Editor
The New Message and Clear Text Editor Toolbar buttons both will clear the Text Editor and
reset all formatting options back to their default settings.
New Message
Clear Text Editor
Variables
ViewMarq has 16 String and 32 Numeric Variables available that may be updated using
ASCII string commands or by writing directly to slave Modbus registers. See Chapter 8 for
more details on inserting and updating variables.
NOTE: The display format options such as color or character set for variables is set in the static text
string where the <DEC> and <STR> commands are used; that is, color or character set commands do not
work with, <SETS> or <SETV> commands.
5–10
User Manual, 1st Ed. Rev. B – MD-USER-M
Chapter 5: Creating and Previewing Messages
LED Display ID
LED Display ID adds the <ID#> command to the ASCII string. This identifies the target
LED display.
LED Display ID
Type
Format
Example
Broadcast
(Default)
<ID 0>
<ID 0>
All ViewMarq displays on the network will process the
commands in the ASCII string.
Single
<ID n>
<ID 1>
The ViewMarq display on the network with the designated ID
will process the ASCII commands.
Multiple
Range
Description
ViewMarq displays on a serial RS-485 network with the
<ID a,c,e,g> <ID 1,3,5,7> The
designated ID’s will process the ASCII commands.
<ID a - g>
<ID 1-8>
The ViewMarq displays on a serial RS-485 network with ID’s
within the designated range will process the ASCII
commands.
Combination <ID a,c,e-h> <ID 1,3,5-8> Both Multiple and Range formats may be combined.
NOTE: The factory default ID number for all ViewMarq LED displays is 1. It is recommended that multiple
panels on the same network each have different ID numbers.
ATTENTION
Attention!: When communicating by the Modbus protocol, this number must match the Modbus Node
Address of the display.
User Manual, 1st Ed. Rev. B – MD-USER-M
5–11
1
2
3
4
5
6
7
8
9
10
11
12
13
14
A
B
C
D
Chapter 5: Creating and Previewing Messages
Message Simulator
One of the most helpful features in the ViewMarq software is the message Simulator. It helps
give the user an accurate representation of how the message will look on the ViewMarq LED
display.
1
2
3
4
5
6
7
8
9
10
11
12
13
14
A
B
C
D
Here are some key points about the Simulator:
• By default, the Simulator is active when the software starts.
• The user should select the correct ViewMarq display hardware on which the messages will be
displayed; otherwise there will not be a true representation of the message on the Simulator.
• The Simulator can be started, stopped, or paused with the control toolbar located in the Simulator
window.
• The Simulator is designed to accurately represent how the message will operate on the ViewMarq
hardware; however the performance of some PC’s running the software may affect the Simulator
speed.
1) Select the proper LED display size.
2) Start typing text.
3) If you wish to pause scrolling or blinking text, select the Pause button
. To continue
scrolling or blinking, deselect Pause.
4) When Stop
is selected Play
must be selected to start again. Any scrolling will start
from the beginning.
5–12
User Manual, 1st Ed. Rev. B – MD-USER-M
Chapter 5: Creating and Previewing Messages
Command String Window
The Command String Window is where the ViewMarq software builds the ASCII command
string that will be used by another device such as a PLC. This window may be closed by
selecting the
icon. To reopen the window, select the View menu then Command String
Window.
For more information on the ASCII command string syntax, see Appendix A – ViewMarq
ASCII Command Specification.
There are a couple of important tools located in the Command String Window.
Copy
Copy puts the ASCII Command String onto the PC Clipboard so that it can be pasted into
your PLC program instruction or text file for archive purposes.
User Manual, 1st Ed. Rev. B – MD-USER-M
5–13
1
2
3
4
5
6
7
8
9
10
11
12
13
14
A
B
C
D
Chapter 5: Creating and Previewing Messages
Character Count
The maximum number of characters in an ASCII Command String that the ViewMarq can
accept is 500. This includes the text and all formatting characters and commands. If the
string becomes more than 500 characters, the Character Count will turn RED and a warning
message will be displayed.
1
2
3
4
5
6
7
8
9
10
11
12
13
14
A
B
C
D
NOTE: The software will not prevent you from creating a message that is too long. It is up to the user to
remove the extra characters to shorten the string to 500 characters or less.
5–14
User Manual, 1st Ed. Rev. B – MD-USER-M