1
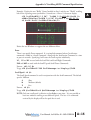
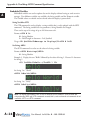
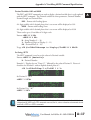
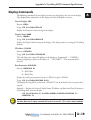
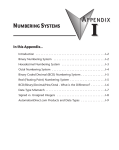
VIEWMARQ ASCII
COMMAND
SPECIFICATIONS
APPENDIX
A
In This Appendix...
ViewMarq Commands . . . . . . . . . . . . . . . . . . . . . . . . . . . . . . . . . . . . . . . . . . . . . . .A–2
ASCII String Commands . . . . . . . . . . . . . . . . . . . . . . . . . . . . . . . . . . . . . . . . . . . . . .A–3
ASCII String format . . . . . . . . . . . . . . . . . . . . . . . . . . . . . . . . . . . . . . . . . . . . . . . . .A–3
Basic Commands . . . . . . . . . . . . . . . . . . . . . . . . . . . . . . . . . . . . . . . . . . . . . . . . . . . .A–5
Embedded Variables . . . . . . . . . . . . . . . . . . . . . . . . . . . . . . . . . . . . . . . . . . . . . . .A–16
Advanced Commands . . . . . . . . . . . . . . . . . . . . . . . . . . . . . . . . . . . . . . . . . . . . . . .A–18
Display Commands . . . . . . . . . . . . . . . . . . . . . . . . . . . . . . . . . . . . . . . . . . . . . . . . .A–19
Non Display Commands . . . . . . . . . . . . . . . . . . . . . . . . . . . . . . . . . . . . . . . . . . . . .A–20
Appendix A: ViewMarq ASCII Command Specifications
A
2
3
4
5
6
7
8
9
10
11
12
13
14
A
B
C
D
ViewMarq Commands
ViewMarq Commands
Format
Description
<ID #>
Specifies the SystemID of the displays that should process the command, always first
command in a command string
Clear display
<CLR>
Text Display – Cause information to be displayed
<T>Text</T>
<STR N L>
<DEC N L DP>
<DECZ N L DP>
Put Text on the display at the current position
Put String Variable N on the display L characters wide
Put Numeric Variable N on the display using L digits with implied decimal place DP digits
with leading spaces
Put Numeric Variable N on the display using L digits with implied decimal place DP digits
with leading zeros
Text Parameters – Changes the way Text is displayed
<WIN ox oy sx sy>
<POS x y>
<OFF x y>
<CS n>
<GRN>
<RED>
<AMB>
<BL x>
<S x>
<LJ>
<CJ>
<RJ>
<SL>
<SR>
<SU>
<SD>
<SE PP n>
Define a window position and size
Set Position to X Y from Upper Left Corner of display
Set Position to X Y from Upper Left Corner of window
Select Character Set n (0-9)
Set color to Green
Set color to Red
Set color to Amber
Blink Rate x – S=Slow, M=Medium, F=Fast, N=None
Scroll Speed x – S=Slow, M=Medium, F=Fast
Text Effect - Left Justify
Text Effect - Center Justify
Text Effect - Right Justify
Text Effect - Scroll Left
Text Effect - Scroll Right
Text Effect - Scroll Up
Text Effect - Scroll Down
SE = Scroll Direction, PP = Pause Position, n = Pause time
Example: <SL LJ 1> = Scroll Left and Pause Left Justified for 1 sec.
Variable Update
<SETS n>value</SETS> Set String Variable N to ‘value’
Set Numeric Variable N to value
<SETV n value>
Advanced Commands
Put FirmwareVersion on display at current position
<VER>
Put Display Name on display at current position
<NAME>
Put Ethernet Port IP Address on display at current position
<IPADDR>
Put Serial Port Paramters for Port n on display at current position
<PORTPAR n>
Return the status of the last command executed on the current Port
<STATUS>
Return current Version String on the current Port
<VERSION>
Used to Test LEDs: n = 0) Green, 1) Red, 2) Amber 3) Pattern
<MTN n>
A–2
User Manual, 1st Ed. Rev. B – MD-USER-M
Appendix A: ViewMarq ASCII Command Specifications
ASCII String Commands
The ViewMarq LED message display utilizes ASCII Strings. The ASCII String contains text
to be displayed and commands and parameters that determine how the text will be formatted
such as the Character Set/Size, Color, Scrolling, Blinking, etc. The format of the text,
commands and parameters are described in this section.
The ViewMarq receives these ASCII strings from an external device such as a PC or a PLC
through one of the serial ports or the Ethernet port.
External Device
The ViewMarq is a slave device. It does not request data from other devices, it only receives
it. So when a properly formatted string is detected on one of the communication ports and
the <ID #> of the message matches the ID of the particular ViewMarq display, then the
message in the ASCII String that follows will be displayed as formatted by the ASCII String.
ASCII String format
In order for the ViewMarq message display to understand the ASCII String, it must be
formatted as described below.
One line format:
The one line format is the way the string is sent to the ViewMarq. The order of the
formatting commands does not matter so long as they precede the text or variable (<T>, STR,
DEC)commands.
<ID #><CLR><WIN OX OY EX EY><POS X Y><LJ><BL #><CS
#><GRN><T>Message to Display</T>CRBreakdown
<ID #>
;Display ID
<CLR>
;Clear Display
<WIN OX OY EX EY>
;Display Window
<POS X Y>
;Position
<LJ>
;Effect
<BL #>
;Blink speed
<CS #>
;Character Set
<GRN>
;Color
<T>Message to Display</T>
;Text Block
CR
;0x0D Carriage Return
User Manual, 1st Ed. Rev. B – MD-USER-M
A–3
A
2
3
4
5
6
7
8
9
10
11
12
13
14
A
B
C
D
Appendix A: ViewMarq ASCII Command Specifications
Defaults
Each command or parameter has an implied default. Every String must have at least the
<ID> and text (<T></T>) or set variable (<SETV> or <SETS>)commands. There is
no default for <CLR>.
A
2
3
4
5
6
7
8
9
10
11
12
13
14
A
B
C
D
Window
Position
Effect
Blink
Character Set
Color
<WIN 0 0 287 31>
<POS 0 0>
<LJ>
<BL N>
<CS 0>
<GRN>
Short Format with implied defaults:
The two command strings below will display the same message.
<ID #><CLR><WIN 0 0 287 31><POS 0 0><LJ><BL N><CS
0><GRN><T>Message to Display</T>
<ID #><CLR><T>Message to Display</T>
A–4
User Manual, 1st Ed. Rev. B – MD-USER-M
Appendix A: ViewMarq ASCII Command Specifications
Basic Commands
Module ID: ID
The Module ID command is used to identify the display that the ASCII string is targeting. If
the string is received by a display that has an ID different from what is in the ID command,
that display will ignore the string until it receives another ID command.
Multiple displays may be specified by listing multiple ID’s.
Format: <ID #> or <ID#>
Required: Yes
Usage: <ID #><T>Message to Display</T>CR
Single Display
Example: Send “Hello World” to Display with ID = 1
<ID 1><CLR><T>Hello World</T>
Multiple Displays
Example: Send “Hello World” to displays with ID = 1, 3, 8, 9, 10
NOTE: The ID numbers can be in any order.
<ID 1 3 8 9 10><CLR><T>Hello World</T>
Or send “Hello World” to a range of displays, 1 through 10
NOTE: Ascending order only
<ID 1-10><CLR><T>Hello World</T>
Broadcast to all displays
Example: Send “Hello World” to all displays on the network, use ID = 0
<ID 0><CLR><T>Hello World</T>
NOTE: This is only useful using the ASCII protocol over RS-485.
User Manual, 1st Ed. Rev. B – MD-USER-M
A–5
A
2
3
4
5
6
7
8
9
10
11
12
13
14
A
B
C
D
Appendix A: ViewMarq ASCII Command Specifications
A
2
3
4
5
6
7
8
9
10
11
12
13
14
A
B
C
D
Clear: CLR
It is good practice to clear the display first to prevent overlapping text. The Clear command
is used to clear an entire display.
Format: <CLR>
Required: No
Usage: <ID #><CLR>CR
Example 1: To clear a single display designate a single panel with the ID command
<ID 1><CLR>
Example 2: To clear all signs, use the ID broadcast
<ID 0><CLR>
NOTE: If the CLR command is not used, the display buffer will eventually fill and no new message will be
displayed. If “Display Syntax Error” is enabled a syntax error E6 will be displayed.
Text: T
The Text commands are used to define the text for the string. Everything between the begin
text and end text commands will be displayed on the message display.
Format:
Begin Text:
<T>
End Text:
</T>
Required: Yes
Usage: <ID #><T>Message to Display</T>CR
Example 1: Display the text “Hello World” on a 1 x 12 character display.
<ID 1><CLR><T>Hello World</T>
ATTENTION
A–6
Attention!: <T> is a display command. There is a maximum of 31 display commands that can be used
on the ViewMarq display at one time. More than 31 display commands will result in an error E6.
Additional display commands are listed on Page A-19
User Manual, 1st Ed. Rev. B – MD-USER-M
Appendix A: ViewMarq ASCII Command Specifications
Window: WIN
The WIN command defines the display area of the text blocks that follow. The WIN
command may be used to create multiple display areas on the message display.
The Window corners are designated in pixels, or LED’s. In the example below, of a 2 x 12
character display...
OX = 0
OY = 0
EX = 71
EY = 15
Format: <WIN OX OY EX EY>
Required: No
Default: <WIN 0 0 X’ Y’>
X’ and Y’ are the extreme End of Line and Bottom of the display respectively. When EX and
EY are set to 31 and 287 respectively, the display will use the extreme far right edge and
bottom respectively. In this way, a string meant to cover the entire display will work with any
size message display without changing the string.
Usage: <ID #><WIN OX OY EX EY><POS X Y><T>Message to
Display</T>CR
User Manual, 1st Ed. Rev. B – MD-USER-M
A–7
A
2
3
4
5
6
7
8
9
10
11
12
13
14
A
B
C
D
Appendix A: ViewMarq ASCII Command Specifications
Single Window
Example 1: Display the text “Hello World” in a Window that covers the entire display area.
Note that because the EX and EY are set to extreme values, this will work with any size
message display.
<ID 1><CLR><WIN 0 0 287 31><POS 0 0><LJ><BL N><CS
0><GRN><T>Hello World</T>
A
2
3
4
5
6
7
8
9
10
11
12
13
14
A
B
C
D
Window for each line
Example 2: Display the text “Line One” on Line 1 Scrolling Right and the text “Line Two”
on Line 2 Scrolling Left. This is accomplished in the ViewMarq Software.
NOTE: A window may contain only one scrolling “Effect”, i.e. Scroll Left <SL>, Scroll Right <SR>,
Scroll Up <SU>, Scroll Down <SD>. To have two different effects for the two different lines, they must
reside in two different Windows.
<ID 1><CLR><WIN 0 0 287 7><POS 0 0><SR><S S><BL N><CS
0><GRN><T>Line One</T><WIN 0 8 287 15><POS 0 8><SL><S
S><BL N><CS 0><GRN><T>Line Two</T>
A–8
User Manual, 1st Ed. Rev. B – MD-USER-M
Appendix A: ViewMarq ASCII Command Specifications
Windows side by side
Example 3: Display the text “Right” Scrolling Right in a display window that covers the left
half of the display and the text “Left ” Scrolling Left in a display window that covers the right
half of the display.
NOTE: A window may contain only one scrolling “Effect”, i.e. Scroll Left <SL>, Scroll Right <SR>,
Scroll Up <SU>, Scroll Down <SD>. To have two different effects for the two different lines, they must
reside in two different Windows.
<ID 1><CLR><WIN 0 0 35 31><POS 0 0><SR><S S><BL N><CS
3><GRN><T>Right</T><WIN 36 0 287 31><POS 32 0><SL><S
S><BL N><CS 3><GRN><T>Left </T>
User Manual, 1st Ed. Rev. B – MD-USER-M
A–9
A
2
3
4
5
6
7
8
9
10
11
12
13
14
A
B
C
D
Appendix A: ViewMarq ASCII Command Specifications
Position: POS
The Position command is used to assign the starting point of the Text Block on the display.
The position is designated in pixels, or LED’s. Below is an example of the LED positions on
a 1 x 12 character display.
A
2
3
4
5
6
7
8
9
10
11
12
13
14
A
B
C
D
The default position if XY is not specified is (0 0). Notice this is the physical upper left
corner of the display. Also, characters are anchored at their upper left corner.
Format: <POS X Y>
Required: No
Default: <POS 0 0>
Usage: <ID #><POS X Y><T>Message to Display</T>CR
Example 1: Display the text “Hello World” 12 pixels to the right of 0 on a 1 x 12 character
display.
<ID 1><CLR><POS 12 0><T>Hello World</T>
Example 2: Display the text “Hello World” 12 pixels to the right of 0 and 4 pixels down from
0 on a 2 x 12 character display.
<ID 1><CLR><POS 12 4><T>Hello World</T>
Negative XY values
The X and Y values may be negative in order to position a text block off the edge of the
display. This would be handy when used with scrolling text.
Example: Display the text “Hello World” 2 pixels up from 0 on a 1 x 12 character display.
<ID 1><CLR><POS 0 -2><T>Hello World</T>
A–10
User Manual, 1st Ed. Rev. B – MD-USER-M
Appendix A: ViewMarq ASCII Command Specifications
Multiple POS commands
Multiple POS commands within a ID block are used to make multiline messages.
Example 1: Display the two lines of text “Hello” and “World” a 2 x 12 character display.
<ID 1><CLR><POS 0 0><T>Hello</T><POS 0 8><T>World</T>
Or
<ID 1><CLR><T>Hello</T><POS 0 8><T>World</T>
Example 2: Display the two lines of text “Hello” and “World” on a 1 x 12 character display.
<ID 1><CLR><POS 0 0><T>Hello</T><POS 36 0><T>World</T>
Offset: OFF
The Offset command is very similar to the Position command. It is the relative starting point
of the Text Block in a Window designated by the WIN command. The upper left corner of
the window serves as the origin, instead of the upper left corner of the physical display. The
offset is designated in pixels, or LED’s. The default position if XY is not specified is (0 0).
Format: <OFF X Y>
Required: No
Default: <OFF 0 0>
Usage: <ID #><WIN 0 0 71 31><OFF X Y><T>Message to
Display</T>CR
Example: Display the text “Hello World” on a 2 x 12 character display in window 2, 3, 71, 31
with an offset of 2, 2. The text is positioned at 4, 5 (2+2, 3+2).
<ID 1><CLR><WIN 2 3 71 31><OFF 2 2><T>Hello World</T>
User Manual, 1st Ed. Rev. B – MD-USER-M
A–11
A
2
3
4
5
6
7
8
9
10
11
12
13
14
A
B
C
D
Appendix A: ViewMarq ASCII Command Specifications
Character Set: CS
The Character Set command is used to select any of 11 character sets that are loaded in the
display. The default character sets loaded are all English in each size as shown below.
A
2
3
4
5
6
7
8
9
10
11
12
13
14
A
B
C
D
Character Set No.
0
1
2
3
4
5
6
7
8
9
10
Size
Description
5x7
5x8
5x5
5x14
10x14
10x16
10x21
15x21
15x28
20x28
23x32
2 inch - 1 line
2 inch - 1 line - Full Line
1-1/4 inch - Compact
4 inch - 2 line Narrow
4 inch - 2 line
4 inch - 2 line - Full Line
6 inch - 3 line Narrow
6 inch - 3 line
8 inch Narrow
8 inch - 4 line
8 inch - 4 line - Full Line
Format: <CS #>
Required: No
Default: <CS 0>
Usage: <ID #><CLR><CS #><T>Message to Display</T>CR
The Character Set is retentive within one ID command across multiple Text Blocks until
changed. In order to have a different font used within the same string, it must be specified.
Example: Display the text “Hello World” in two different fonts on a 2 line x 12 character
display.
<ID 1><CLR><CS 3><T>Hello</T><CS 0><T> World</T>
A–12
User Manual, 1st Ed. Rev. B – MD-USER-M
Appendix A: ViewMarq ASCII Command Specifications
Color:
The Color command is used to select one of three colors for the text to be displayed. The
default color is green.
Format: <GRN>, <RED>, <AMB>
Required: No
Default: <GRN>
Usage: <ID #><CLR><RED><T>Message to Display</T>CR
The Color is retentive within one ID command across multiple Text Blocks until changed. In
order to have a different color used within the same string, it must be specified.
Example: Display the text “Hello World” in two colors on a 1 x 12 character display
<ID 1><CLR><RED><T>Hello</T><GRN><T> World</T>
Blink: BL
The Blink command can be used to attract attention to the displayed message. It is used to
cause the text to blink or not and also to select the rate at which it blinks. The default is
None.
N
None
S
Blink Slow
M
Blink Medium
F
Blink Fast
Format: <BL #>
Required: No
Default: <BL N>
Usage: <ID #><CLR><BL #><T>Message to Display</T>CR
Like Font and Color, Blink is retentive within one ID command across multiple Text Blocks
until changed. In order to have a portion of the text blinking and the following text not, the
Blink must be turned off.
Example: Display the text “Hello World” with “Hello” blinking slow and “World” not
blinking on a 1 x 12 character display
<ID 1><CLR><BL S><T>Hello</T><BL N><T> World</T>
User Manual, 1st Ed. Rev. B – MD-USER-M
A–13
A
2
3
4
5
6
7
8
9
10
11
12
13
14
A
B
C
D
Appendix A: ViewMarq ASCII Command Specifications
Effects
The Effect commands determine how the text will be aligned in the display and/or how it will
enter the display area. The default is Left Justified <LJ>.
A
2
3
4
5
6
7
8
9
10
11
12
13
14
A
B
C
D
NOTE: Each Window can have only one scrolling effect.
Format:
<LJ> Left Justify
<CJ> Center Justify
<RJ> Right Justify
<SL> Scroll Left
<SL LJ #>
Scroll Left and Pause for # seconds Left Justified
<SL CJ #>
Scroll Left and Pause for # seconds Center Justified
<SL RJ #>
Scroll Left and Pause for # seconds Right Justified
<SR> Scroll Right
<SR LJ #>
Scroll Right and Pause for # seconds Left Justified
<SR CJ #>
Scroll Right and Pause for # seconds Center Justified
<SR RJ #>
Scroll Right and Pause for # seconds Right Justified
<SU> Scroll Up
<SU TOP #> Scroll Up and Pause for # seconds Top Justified
<SU BOT #> Scroll Up and Pause for # seconds Bottom Justified
<SD> Scroll Down
<SD TOP #> Scroll Down and Pause for # seconds Top Justified
<SD BOT #> Scroll Down and Pause for # seconds Bottom Justified
Required: No
Default: <LJ>
Usage: <ID #><CLR><LJ><T>Message to Display</T>CR
A–14
User Manual, 1st Ed. Rev. B – MD-USER-M
Appendix A: ViewMarq ASCII Command Specifications
Example: Display the text “Hello” Center Justified on line 1 and the text “World” scrolling
left on line 2 pausing center justified for 5 seconds on a 2 line x 12 character display.
<ID 1><CLR><WIN 0 0 287 7><POS 0 0><CJ><BL N><CS 0>
<GRN><T>Hello</T><WIN 0 8 287 31><POS 0 8><SL CJ 5>
<S S><BL N><CS 0><GRN><T>World</T>
Notice the two Windows to support the two different effects.
Pause
There is no specific Pause command. It is an implied command when a Justification
command is added to a Scroll Command. Along with the Justification Command is a time
to pause in seconds. Specifying 0 will cause the scroll to pause indefinitely.
LJ, CJ and RJ are used with the Scroll Left and Scroll Right Commands.
TOP and BOT are used with the Scroll Up and Scroll Down Commands
Format: <SL LJ #>
Usage: <ID #><CLR><SU TOP 5><T>Message to Display</T>CR
Scroll Speed: <S #>
The Scroll Speed command is used in conjunction with the Scroll commands. The default
speed is Medium.
S
Slow
M
Medium (default)
F
Fast
Format: <S #>
Usage: <ID #><CLR><SL><S #><T>Message to Display</T>CR
NOTE: Only one scroll speed is effective on the display at one time. It is not possible to
have two windows scrolling at two different speeds. The last <S #> command
received by the display will be the speed that is used.
User Manual, 1st Ed. Rev. B – MD-USER-M
A–15
A
2
3
4
5
6
7
8
9
10
11
12
13
14
A
B
C
D
Appendix A: ViewMarq ASCII Command Specifications
Embedded Variables
Embedded variables are used to update data on the display without having to send an entire
message. Two different variables are available, the String variable and the Numeric variable.
The Variable values are volatile and are cleared when the display is powered off.
A
2
3
4
5
6
7
8
9
10
11
12
13
14
A
B
C
D
String Variables: STR
The STR command is used to display a string variable that is easily updated with the SETS
command. The String variable has two parameters, String Number and Length.
There can be up to 16 strings of up to 100 characters each.
Format: <STR N L>
N – String Number
L – Field Length in characters – Left Justified
Usage: <ID #><CLR><T>Message to Display</T><STR N L>CR
Set String: SETS
The SETS command is used to set the value of a String variable.
Format: <SETS N>string</SETS>
N – String Number
Example 1: Display the text “Hello” followed by the value of String 1. Reserve 12 characters
for String 1.
<ID 1><CLR><T>Hello </T><STR 1 12>
Set String 1 to “ World”
<SETS 1>World</SETS>
Set String 1 to “ Dolly”
<SETS 1>Dolly</SETS>
NOTE: The display format options such as color or character set for variables is set in the static text
string where the <DEC> and <STR> commands are used; that is, color or character set commands do not
work with, <SETS> or <SETV> commands.
A–16
User Manual, 1st Ed. Rev. B – MD-USER-M
Appendix A: ViewMarq ASCII Command Specifications
Decimal Variables: DEC and DECZ
The DEC and DECZ commands are used to display a decimal variable that is easily updated
with the SETV command. The Decimal variable has three parameters; Decimal Number,
Decimal Length and Decimal Place.
DEC – Format with Leading Spaces
A 4 digit variable with 2 decimal places that is set to zero will be displayed as 0.00
DECZ – Format with Leading Zeros
A 4 digit variable with 2 decimal places that is set to zero will be displayed as 00.00
There can be up to 32 variables of 16 digits each.
Format: <DEC N L DP>
<DECZ N L DP>
N – String Number (1 – 32)
L – Number of Digits to Display (1 – 11)
DP – Decimal Place (0 – 10)
Usage: <ID #><CLR><T>Message to Display</T><DEC N L DP>CR
Set String: SETV
The SETV command is used to set the value of a Decimal variable.
Format: <SETV N [decimals]>
N – Decimal Number
Example 1: Display the text “Temp °C: ” followed by the value of Decimal 1. Reserve 4
characters for Decimal 1 with an implied decimal place of 1.
<ID 1><CLR><T>Temp`C:</T><DEC 1 4 1>
Set Decimal 1 “5678”
<SETV 1 5678>
Set Decimal 1 to “ 987”
<SETV 1 987>
NOTE: The display format options such as color or character set for variables is set in the static text
string where the <DEC> and <STR> commands are used; that is, color or character set commands do not
work with, <SETS> or <SETV> commands.
User Manual, 1st Ed. Rev. B – MD-USER-M
A–17
A
2
3
4
5
6
7
8
9
10
11
12
13
14
A
B
C
D
Appendix A: ViewMarq ASCII Command Specifications
A
2
3
4
5
6
7
8
9
10
11
12
13
14
A
B
C
D
Advanced Commands
Maintenance: MTN
The Maintenance Command is used to test the LEDs on the display. The four different
commands give you the ability to run four different test patterns.
Format: <ID #><MTN N>CR
0)
Display Test Green
1)
Display Test Red
2)
Display Test Amber
3)
Advanced Test Pattern
Turn off by using the CLR command
Advanced format: <ID #><MTN # X Y SizeX SizeY>
Display test in a portion of the display starting at X,Y SizeX wide and SizeY High.
Error: If an invalid option is selected the Command Status “Invalid Option must be 0-3” will
be returned.
Serial Diagnostics: DIAG
Format: <ID #><DIAG N>CR
If N is 1 it will toggle the lower left LED each time a string it received as an ASCII
command, via Serial or Modbus.
A–18
User Manual, 1st Ed. Rev. B – MD-USER-M
Appendix A: ViewMarq ASCII Command Specifications
Display Commands
The following commands do not display text messages designed by the user on the display.
They display other information on the display that may be helpful to the user.
Version Display: VER
Format: <VER>
Usage: <ID #><CLR><VER>CR
Display the Firmware Version String on the display
Display Name: NAME
Format: <NAME>
Usage: <ID #><CLR><NAME>CR
Display the Display-Name String on the display. The display name is set using the ViewMarq
Software.
IP Address: IPADDR
Format: <IPADDR>
Usage: <ID #><CLR><IPADDR>CR
This will display the current IP Address of the display or “Acquiring IP…” if DHCP is
actively attempting to obtain an IP address or “ ** NO LINK ** “ if no network cable is
inserted.
Port Parameters: PORTPAR
Format: <PORTPAR #>
1 – RS232 Port
2 – RS485 Port
Display the serial port parameters for port 1 (RS232) or port 2 (RS485).
Usage: <ID #><CLR><PORTPAR #>CR
The displayed string will be in the form “38400 8N1” for 38.4k baud, 8 bits, no parity and 1
stop bit.
Example 1: Display the Version, Display Name, IP Address and both Serial Port’s Parameters
all Scrolling Slow across the display.
<ID #><CLR><SL><S S><VER><NAME><IPADDR><PORTPAR 1>
<PORTPAR 2>
ATTENTION
Attention!: There is a maximum of 31 display commands that can be used on the ViewMarq display at
one time. More than 31 display commands will result in an error E6. <T> is also a display command.
User Manual, 1st Ed. Rev. B – MD-USER-M
A–19
A
2
3
4
5
6
7
8
9
10
11
12
13
14
A
B
C
D
Appendix A: ViewMarq ASCII Command Specifications
A
2
3
4
5
6
7
8
9
10
11
12
13
14
A
B
C
D
Non Display Commands
The following commands do not cause any text to be displayed on the message display. They
cause data to be transmitted out the serial port on which they were received.
Command Status <STATUS>
Format: <STATUS>
If issued via a serial port the reply will be the reply that was generated due to the previous
command that was processed. This can be used at any time, but most likely to be used after a
command is sent to many displays to make sure it was received correctly.
The reply on the Serial Port will be ”NULL”, or “NO MESSAGE” if the Command Status
buffer is empty or the Command Status will be sent. (“OK” etc)
Firmware Version <VERSION>
Format: <VERSION>
This command will cause the current Version String to be sent out on the serial port if the
request came in on the serial port.
A–20
User Manual, 1st Ed. Rev. B – MD-USER-M