1
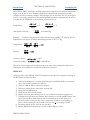
TECHNICAL ASSOCIATES OPERATION AND MAINTENANCE MANUAL TBM-IC-X-RAY X-RAY COMPLIANCE TEST METER Direct Scientific www.drct.com tel 310 589 0601 fax 310 919 2981 email: [email protected] 1 TECHNICAL ASSOCIATES www.drct.com [email protected] OPERATION AND MAINTENANCE MANUAL TBM-IC-X-RAY TABLE OF CONTENTS 1 2 3 4 5 5a 5b 5c 5d 6 7 8 9 10 10a 11 12 13 14 General Range Principle Of Operation Preamplifier Digital Readout Integrate Feature Display Units Changing Display Units Unit Equivalencies Count Pulses Led Battery Test Battery Replacement Ion Chamber Calibration Calibration Correction Factors Zero Set Maintenance And Trouble Shooting Programming Recommended Parts List Page 3 3 3 3 4 4 4 4 5 5 5 5 5 6 7 8 9 10 11 DRAWINGS B 9704 A 10679 A 12933 Top View (lid removed) (2 Pages) Electrometer Box Lid Labeling Front Panel Artwork Red Lion Ratemeter Manual Model # CUB5 TBM-IC-XRAY 080722 2 TECHNICAL ASSOCIATES www.drct.com [email protected] GENERAL The TBM-IC-XRAY is a small Ion Chamber Radiation Monitor. It has a removable stainless steel shield which fits over the ion chamber. The shield has a 10 cm2 circular window for XRay equipment compliance testing to the specifications of 21 CRF 1020.40 (c) (1) (i) & (ii), the section of the Code of Federal Regulations covering Cabinet X-Ray equipment. The TBM-IC-XRAY has been calibrated with the shield installed, with the 10 cm2 window pointing toward the source. When used without the shield as a general purpose radiation detector it will read higher than the actual field strength. See the Test Data shipped with the instrument for a correction factor. For use in testing Cabinet X-Ray equipment, preliminary testing should be done with an instrument giving wide area coverage. The TA P-8 NEON is ideal, or use the TBM-ICXRAY with the shield removed. When a suspect area is discovered, recheck it with the TBM-IC-XRAY by reinstalling shield with the 10 cm2 aperture. Check at the specified distance from the X-Ray generator. The TBM-IC-XRAY may be ordered with a display calibrated in µSv instead of mR, and it may be converted between the two by simple reprogramming of the display parameters. RANGE Dose Rate: Dose: 0.1 mR/hr to 10,000.0 mR/hr (1 µSv/hr to 100,000 µSv/hr) 0.01 mR to 99,999.99 mR (0.1 µSv to 999,999.9 µSv) Display time constant: 12 seconds from 0 to 2mR/h and 2 – 3 seconds above 2 mR/h. PRINCIPLE OF OPERATION Ionizing radiation such as X-Rays, Gamma Rays and mid to high energy Beta particles enter the Ion chamber. The air in the Ion Chamber becomes ionized. The chamber wall is at a negative potential, and the antenna on the chamber axis is positive. Ionization generates a small current across the chamber. This very small chamber current is amplified and converted to pulses which are counted by the display module and shown on the front panel readout as Dose-Rate. The pulses are also accumulated and may be displayed instead as an Integrated Dose. When the shield is in place radiation entering the 10 cm2 window dominates the reading. PREAMPLIFIER The pre-amplifier is a current to voltage amplifier. This is a very high input impedance amplifier with high meg feedback resistors. The input current starts from sub picoampere range. The input is susceptible to noise pick-up, static charge, etc. if the metal cover is removed from the internal metal E-Box. The amplified voltage drives a pulse generator which in turn feeds into the LCD counter/display module. TBM-IC-XRAY 080722 3 TECHNICAL ASSOCIATES www.drct.com [email protected] DIGITAL READOUT The front panel is an 8 digit LCD digital readout. The meter is a Red Lion CUB5 with programmable parameters. The user manual is included at the end of this manual. See page 10 for programming instructions and the settings as shipped for operation in both mR and µSv. Integrate Feature • The front panel display has both Rate (Dose Rate) and Integrate (Accumulated Dose) data buffers in operation all the time. You can look at either (without disturbing the other) by pressing the left Select button (SEL) on the meter. • To reset the Integrate buffer, push right hand button (RST). The user can disable this button if required. (See programming section of manual.) This is useful if you wish to prevent inadvertent or unauthorized reset during a long integration measurement. • The integrate function is “free running”, so please use a stop watch or wrist watch to determine how long the TBM-IC-XRAY has been integrating. Display Units The pulse rate is factory set to equal 1.0 counts per second in a radiation field of 1 mR/h (10 Sv/h). This is the dose rate display, updated every few seconds. The update rate is a programmable parameter of the meter. See page 10. If the TBM-IC-XRAY is placed in a 1 mR/h (10 Sv/h) field and left there for exactly one hour, the raw counts in the Integrate buffer will be: 1.0 count/sec X 3600 sec/hour = 3600 counts. This is scaled within the meter by the Integrate Mode Scale Factor ( = 0.0028) and the Integrate Mode Decimal Point ( = 0.00) parameter settings. See page 10. This decimal place setting is equivalent to one digit left shift. 3600 total counts X .0028 = 10.08 left one decimal place = 1.008 So that after the one hour period the meter displays 1.01, read as 1.01 mR total dose. The meter reading at other time spans is the dose accumulated since the last reset. Changing Display Units The display units may be changed between mR to Sv by changing the Integrate Mode Decimal Point and the Rate Input parameters of the CUB5 meter. See page 10 for programming instructions and the values to use. Unit Equivalencies TBM-IC-XRAY 080722 4 TECHNICAL ASSOCIATES www.drct.com MODE Rate Rate Total Dose Total Dose [email protected] UNITS mR/hr µSv/hr mR µSv 0.1 1 0.0016 0.016 RADIATION FIELD 1.0 10 100 10 100 1000 0. 016 0.16 1.6 0.16 1.6 16 1000 10,000 16 160 Total Dose in this table is that dose accumulated during one minute of exposure to the radiation field of the table column. COUNT PULSES LED This LED is near the battery LED. It flashes green, increasing in intensity as count rate increases. This is a two (2) color LED, GREEN for normal counts, RED (and Green together) for Over Range (above 10 R/hr). The Over Range condition is at 10 R/hr when the meter is in either Dose Rate or Total Dose mode. BATTERY TEST Press the button labeled TEST. The red LED labeled BAT OK will go on if the battery supply is 4 Volts or above. BATTERY REPLACEMENT To replace the 6 AA batteries: 1) Unscrew the 2 thumbscrews which hold the rear cover plate on to the instrument. 2) Remove this cover plate with its attached battery holder. 3) Remove the old batteries, and slide the 6 new batteries into place. 4) Be careful to use the correct polarity for each cell. 5) Reinstall battery holder and battery cover plate. 6) You may wish to tape batteries into holder if rough handling or shipping is expected. Use any manufacturer’s 1.5 Volt AA batteries as replacements. All six batteries should be identical, of the same manufacturer, and of close to the same purchase date. Do not use cells of other than 1.5 Volts (e.g.NiCd which are 1.2 Volt). See the Maintenance and Trouble Shooting section regarding the chamber bias battery cells. They should last for their rated 7 year shelf life. ION CHAMBER WARNING: Ion Chamber should not be opened unnecessarily. A temporary zero shift may occur and unit will read too high for several days. The TBM-IC-XRAY ion chamber consists of: • A white plastic 3" by 3" diameter cylinder • Sealed on the outer end with a light tight mylar window (the Alpha window) TBM-IC-XRAY 080722 5 TECHNICAL ASSOCIATES www.drct.com • • [email protected] • Coated with conductive graphite inside and on the mounting threads A red plastic cap (the Beta cap) which slides onto the front of the cylinder A separate stainless steel shell which slips on over the cylinder • Installed as shipped. • A black plastic cover protects the Alpha window. The Alpha window is 0.5 mg / cm2. It is made integrally with the cylinder, and the whole chamber must be replaced if it breaks. The Beta Cap must be removed: • To allow measurement of Alpha, low energy Betas and very low energy X-Rays. • To slide on the shielding sleeve for measurement through a 10 cm2 window WARNING: When the Alpha window is exposed it can be very easily damaged. Do not contact the exposed mylar window. Do not cover the air holes when removing or installing the beta cap. The air pressure difference may rupture the Alpha window. To remove the red Beta cap, be sure the air vents are not covered then gently pull it off the ion chamber. To reinstall the Beta cap, slide it gently and slowly over the end of the ion chamber. In the event that the Alpha window becomes torn or damaged, turn the instrument off. The chamber will need to be replaced with a new one. Leave the chamber on until a new one is on hand to minimize discharge of the bias batteries. Please see the section on Maintenance and Trouble shooting for further information. CALIBRATION The TBM-IC-XRAY should be checked periodically for accuracy, at least annually. Verify that the reading is within plus or minus 10% at 2 points on each decade. Please note the section below on calibration correction factors when checking or recalibrating the unit. Calibration of this instrument is accomplished by adjusting how much chamber current is needed to produce each pulse. The number of pulses accumulated is one count/sec for 1 mR/hr. Thus 100 counts accumulated in 1 second will read out correctly as 100 mR/hr. If one count is recorded every 10 seconds, then the display will read 0.1 mR/hr. Calibrate the TBM-IC-XRAY with the shield installed and the 10 cm2 window pointing toward the source. Use the distance from about an inch behind the front face of the shield to the source to determine the field strength at the meter. Calibration Procedure: 1) Turn on instrument, wait 4 minutes. 2) Use front panel button to test batteries. TBM-IC-XRAY 080722 6 TECHNICAL ASSOCIATES www.drct.com [email protected] 3) Place TBM-IC-XRAY at highest available (calibrated) radiation field point – but not exceeding 10 R/hr and no less than 100 mR/hr. 4) Loosen the 2 thumbscrews on instrument panel and lift-up front panel. Do Not disconnect any wires or the ribbon cable. 5) This exposes E-box lid (See Drawing # B10679 at back of this manual). 6) Rotate the recessed RANGE potentiometer counter clockwise to increase display reading or clockwise to decrease reading as needed until the display shows correct radiation field value within desired error limits. 7) Place TBM-IC-XRAY at 0.2 mR/hr or other low field, but not exceeding 2 mR/hr. 8) Adjust the front panel 10 turn dial to achieve correct meter reading. (clockwise turn increases readings). 9) Repeat steps 6 through 8. 10) Move to location where field is low. Preferably 10-20 micro R/hr. 11) Verify that display reads zero most of the time. It may occasionally read higher due to counting statistics or shot noise in the pre-amp. 12) Press SET button on the top instrument panel. Hold button down for 15 seconds, if display reads 2.0* the calibration procedure is finished. 13) If it does not read 2.0*, continue holding the SET button and slowly adjust recessed pot marked SET ( on E-box lid, just to the left of the ribbon cable) until 2.0* reading is achieved. 14) Recheck the unit at 2 points on each decade. *This reading is 20 when the instrument is set to read in µSv. To use the TBM-IC-XRAY without the shield, as a general purpose Gamma ray and X-ray detector, calculate a correction factor: 1) Remove the shield. 2) Install the Beta Cap. 3) Place the unit in a known field, with the ion chamber axis perpendicular to the direction of the calibration source, and the axis on the distance mark for the known field strength. 4) Record the field strength and meter reading. 5) Repeat for two points in each decade. 6) Divide each field strength by the corresponding meter reading. Use the average of these values as the correction factor. The following measurements were made in a field of 100 mR/hr. Front to Source Side to Source Sleeve installed 100 130 No Sleeve 132 138 Calibration Correction Factors These instruments are calibrated in international roentgens corrected to 71.6 o F (22 o C) and 29.92 inches Hg. TBM-IC-XRAY 080722 7 TECHNICAL ASSOCIATES www.drct.com [email protected] The TBM-IC-XRAY electronics are fully temperature compensated in ambient temperature range. As in all free air Ion Chambers, thermal air expansion and atmospheric pressure variations result in sensitivity changes. These changes are on the order of 0.4% per degree C and 3.5 % per in.Hg, which meets all standard portable instrument requirements. However, even this may be eliminated by the following correction factors. Temperature: Atmospheric Pressure: in oF or in oC , P in inches Hg. Example: A radiation measurement is taken and the meter reading is 25 mR/hr. The air temperature is 90 degrees F and the barometric pressure is 29.13 in. Hg. Temperature: Pressure: Correction factor = Corrected reading = = 1.063 = 26.6 mR/hr The effects of air temperature and pressure must be taken into consideration when these instruments are re-calibrated or when the calibration is checked. ZERO SET On the left side of the TBM-IC-XRAY front panel are the Zero-Set Controls consisting of the SET button and ten turn dial. 1) Take the instrument to a location where background radiation field is not elevated above the normal. (nominal .015 mR/h). 2) Turn on TBM-IC-XRAY and wait 2 minutes. 3) Rotate the thumb lock to unlock the ten turn dial. 4) Press and hold SET button. 5) Hold button down for 20 seconds. 6) Display will show the number given on your calibration certificate (usually 2.0*). 7) If display does not show this number, then continue to hold down SET button, and adjust ten-turn dial a small amount until correct number is shown. Note: The physical rotation of the pot may cause a temporary overshoot in the reading, so please observe reading for 20 seconds to be sure 2.0* + 0.1 reading is stable. 8) Rotate the thumb lock to lock the ten turn dial. 9) Release SET button and wait 10 seconds for Rate display to settle. TBM-IC-XRAY 080722 8 TECHNICAL ASSOCIATES www.drct.com [email protected] *This reading is 20 when the instrument is set to read in µSv. MAINTENANCE AND TROUBLE SHOOTING When calibrating the instrument, if reading is low: 1) Check the meter programming (see page 10). 2) Check wiring. 3) Calibrate the TBM-IC-XRAY by adjusting RANGE pot on the E-Box and zero adjust dial on the front panel. See the section on Calibration above. If the readings are still low, check the bias voltage. The bias batteries should last in service for the full 7 years of their rated shelf life. To check the 45 Volt bias batteries: 1) Loosen the screws on the ring at the base of the chamber. 2) Unscrew the ion chamber and set it aside. 3) Use the side of the positive meter probe along the side of the antenna, and the negative probe on the gray graphite area on the face of the unit. 4) If the voltage has fallen below 30, the bias batteries need to be replaced. 5) Call TA for bias battery replacement instruction sheet. TBM-IC-XRAY 080722 9 TECHNICAL ASSOCIATES www.drct.com [email protected] PROGRAMMING NOTE: TBM-IC-XRAY is shipped in Program Lock Out Mode. Model TBM-IC-XRAY incorporates a programmable display. The program parameters are in non-volatile memory and are retained when unit is turned on or off and even if the 6 AA batteries are removed. To make changes in the programming parameters: Ref. CUB5 user manual included at the back of this manual. 1. Loosen thumb screws and remove top panel. Move slide switch to the right to the OP position. 2. Hold SEL button for 2 seconds. 3. Press RST button once to enter module #1, twice for module #2 etc. 4. Press SEL to scroll through the settings in that module. 5. If display is correct, press SEL. If not, and you wish to change that parameter, press RST instead. Then make the needed changes, and when ready, press and hold SEL to store the value. Programming Screens Module - Step # 1-1 1-2 1-3 1-4 1-5 2-1 2-2 2-3 2-4 2-5 2-6 3-1 3-2 3-3 3-4 3-5 4-1,2…9 Function Count Modes ( ) Integrate Mode Decimal Point ( ) Integrate Mode Scale Factor ( ) Counter Reset At Power Up User Input ( ) Rate Enable ( ) Rate Decimal Point ( ) Rate Display ( ) Rate Input ( ) Min. Display Refresh Seconds ( ) Max Display Refresh Seconds ( ) Select Enable ( ) Reset Enable ( ) Display Scroll ( ) Program Security Code Fact Set Alarm Set, See CUB 5 Instructions As Shipped mR µSv cnt ud cnt ud 0.00 0.0 calibrate calibrate No pro-loc Yes 0.0 10000.0 10000.0 02.0 No pro-loc Yes 0 10000 1000 02.0 12.0 Yes Yes No 000 No 12.0 Yes Yes No 000 No Programming modules 4 and 5 deal with the optional Alarm and Serial accessories. Move the slide switch back to the left to lock the program and operate the instrument. Replace the top panel and tighten the thumb screws. TBM-IC-XRAY 080722 10 TECHNICAL ASSOCIATES www.drct.com [email protected] RECOMMENDED PARTS LIST DESCRIPTION Beta Cap Ion Chamber Shell (Includes Alpha Window) Ion Chamber Base Center Electrode (Graphite coated) Spring for Center Electrode Digital Display Battery Holder for six (6) AA cells Battery cover plate with (Holder for 6 AA) Thumb Screws to hold lid or battery cover Batteries Number of Cells Voltage per Cell Type Capacity Size Manufacturer Part Number Service Life Main Battery Pack 6 1.5 V Alkaline 2850 mAh AA: 2" X 0.55" Energizer* E91 1000 Hours PART # A9926/VC2500-16 A9705 A9706 A9911 SP-IC3V 53300-405 BHGAA A9946 58-28-506-24 # USED 1 1 1 1 1 1 1 1 4 Bias Battery Stack 15 3V Lithium 38 mAh 0.450" X 0.075" Renata CR 1220 7 Years *Or equivalent TBM-IC-XRAY 080722 11