1
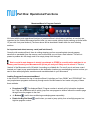
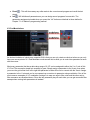
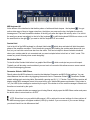
monstrumWave1 Cross-Platform software editor for the Waldorf Microwave synthesizer. monstrumWave1 User Manual (Sept 2013) MonstrumWave1 is a cross-platform standalone editor for the original Microwave wavetable synthesizer, originally released by Waldorf in 1989. The monstrumWave1 editor provides easy access to nearly every under-the-hood setting and parameter which would otherwise only be available by scrubbing through pages of submenus on the synth’s tiny LCD screen. The design and layout of monstrumWave1 takes cues from the design and styling of this now classic wavetable synth to provide what I hope you see as a clear easy to use interface which expands on the usability and enjoyment of this excellent synthesizer from Waldorf. Hardware / Software Requirements: Since monstrumWave1 is authored in a cross-platform environment it is capable of running on almost any computer (old or new) on either OS X, Windows or Linux. Before You start: ● monstrumWave1 does not yet support multimode, all edits are made either to a sound program, a waveform or wavetable. ● Your synth must be set to Device ID 0. You do not need to change this setting on your synth unless you have multiple Microwaves MIDI chained together. Future updates to monstrumWave1 will feature a variable Device ID setting ● monstrumWave1 supports up to Waldorf Microwave’s 2.0 system software. If you have an earlier OS on your Microwave be aware some parameters and values will not be available to you. User Manual Conventions: ● ● ● When the manual refers to “the panel” it means the monstrumWave1. When the manual refers to “the synth”, it means the Waldorf Microwave hardware. When the manual refers to a “program” it means what also is sometimes called a sound, Basic Sound Program or patch in Waldorf’s documentation. ● When the manual refers to a “Wavetable” it means what also is sometimes called a Wave Controltable or Control Table in Waldorf’s documentation. ● To serve the largest audience possible, monstrumWave1 is a 32 bit application. Application files for OS X, Windows and Linux are supplied. ● - This symbol indicates something crucial which you should be sure to review. Installation The monstrumWave1.(xxx).zip file will contain a number of files and folders. it is recommended you keep these files someplace safe on your hard drive. Included in the zip package are three folders: APPLICATION - Contains the monstrumWave1 application for every operating system DOCUMENTATION - Contains current release notes, end user license agreement and this manual FONTS - Contains the free fonts referenced by monstrumWave1. Install the fonts provided within the "fonts" folder to your system. These fonts are truetype fonts and will install on any modern operating system. Mac OS 10.6 and up: ● Drag the monstrumWave1<releaseNumber>.app into your system's /Applications folder. ● Program permissions and resources will be stored in /Users/<yourUserName>/Library/Preferences/monstrumWave1.x. ● ALWAYS trash the contents of this monstrumWave1 preferences folder after upgrading to a new release version! Windows XP and up: ● Drag the monstrumWave1<releaseNumber>.exe file into your system's /Program Files folder. ● Program permissions and resources will be stored in your user's application data folder in a folder called monstrumWave1. ● ALWAYS trash the contents of this monstrumWave1 preferences folder after upgrading to a new release version! Setup Simply run the application from where you installed above. When the interface appears, select “MIDI” from the top menu bar to get to the MIDI Device setup options. ● ● ● Set the Input Device to whichever MIDI port is connected to the synth’s “MIDI OUT” port. Set the output device to whichever MIDI port is connected to the synth’s “MIDI IN” port. You also want to verify your MIDI settings are set up on your Microwave to ensure it will send and receive all the MIDI messages you’re expecting it to receive. ● Ensure the Waldorf Microwave you are intending to control is set to device ID 0. IMPORTANT NOTE: It may be preferable if your MIDI interface allows it to simply route any MIDI keyboard controller through your interface’s software (ie clockworks for MOTU devices) to the port that connects to your synth’s MIDI IN. Otherwise, select the MIDI keyboard you’d like to use to control your XT from MIDI>Controller Device. Line Check! You should now be all set up. To verify: 1. Move a knob or slider on the panel. You should see the synth’s MIDI activity LED illuminate. If it does, you have successfully set monstrumWave’s MIDI Out device. 2. Next, rotate a knob on the synth. You should see the corresponding knob or slider move on the panel. If it does, you’re probably not reading any more. If you’ve failed either one of these two line check steps, go back to the start of the manual, review and verify. If you continue to have issues please email me and you’ll see I respond as soon as humanly possible. General Operation The panel can receive sound programs from the synth, and send sound programs to the synth’s edit buffer. When you edit a program from the panel you are editing the program’s edit buffer on the synth. MonstrumWave1 currently supports loading, editing and storing of sound programs, wavetables and waveforms. A multi-arranger with arrangement parameter editing is in the works, but the current functionality should give you plenty to wrap your head around until then. The basic approach was to provide a balance between an easy to use interface that does not clutter the screen while providing access to every editable parameter on the synth. Waldorf broke new ground in 1989 with the Microwave, providing a sound never before heard in such a small package. Several attempts have been made to provide extensive control over all of the parameters packed in such a small 2 RU synth but many of those solutions have fallen to the wayside as they are no longer supported on modern computer operating systems. Although monstrumWave1’s layout should be relatively familiar and straightforward to navigate, the next few pages of this manual will offer an in-depth overview on every section of the interface so you can make the best use of the monstrumWave1 software editor. Even if you are intimately familiar with the Waldforf Microwave, you’re encouraged to read the next few sections as monstrumWave1 features many usability enhancement that might not be immediately recognized. Part One: Operational Functions ● ● ● ● ● ● ● ● ● ● ● An important note about memory cards (and lack thereof)! Loading programs from monstrumWave1 Edit Program Names Parameter/Value Display Double-Click Parameters to Reset Value Store/Compare/Recall/Init Programs XY Modulator MIDI Keyboard UI Sustain Hold Modulation Wheel Parameter Globals / MIDI Filters Part Two: Sound Parameters ● ● ● ● Wave 1/Wave 2 Position Wavetable Selection & Visualizer Envelopes Modulation Matrix Part Three: The Wavetable and Waveform Editors ● ● Wavetables: In Depth ○ Loading a wavetable ○ Editing a wavetable ○ Storing a wavetable Waveforms: In Depth ○ Loading a waveform ○ Editing a waveform ○ Shaping a waveform ■ Generate Shaper Waveform ■ Mix Shaper Waveform ○ Storing a waveform ○ “Hearing” changes made to waveforms/wavetables Part Four: Troubleshooting & Support ● ● Frequently Asked Questions Support & Feature Requests Part One: Operational Functions MonstrumWave1’s Program Controls We’ll start with the main operational functions of monstrumWave1 which laid out similiarly to how they are organized on the Waldorf Microwave itself but offer you more control (without further wearing out those brittle 15 year old+ front panel buttons!) The items above will be described in detail within the next following sections. An important note about memory cards (and lack thereof) Currently with monstrumWave1 there is nothing stopping you from requesting data (sound program, waveform or wavetable) from the memory card, even should you not have a card inserted. This will not present a problem but will simply result in an empty dump from the synth. What’s crucial to note however is should you attempt to STORE to a card location and there is no memory card inserted, your Microwave will quit on you and you’ll likely need to reboot it. This is a “feature” of the Microwave unit’s OS which I’m working on a failsafe for. For now if you do not have a card inserted you’ll want to pay special attention to the destination location you are attempting to store to when you want to save edited programs, waveforms and wavetables back to your Microwave! Loading Programs from monstrumWave1 In the mock LCD screen at the top of monstrumWave1’s interface you’ll see “BANK” and “PROGRAM”. You can jump between programs continuously through each of the Microwave’s four banks using any of these three methods: ● Dropdown List - The displayed Bank / Program number is actually a fully interactive dropdown list. Click the up/down arrows to quickly jump from one program to another without the need to page through from one program to the next. ● -/+ Buttons ● Rotate the Big Red Knob high/low program number. - useful when auditioning sounds/programs sequentially. - useful when you want to jump quickly from a low/high program to a NOTE: As with any dropdown selector in monstrumWave1’s interface -- once you make a selection through the dropdown list,, you can arrow up/down with the computer keyboard to quickly go up or down the contents of the dropdown parameters. When you change programs from one to another, the monstrumWave1 interface will update to reflect all current parameter settings of the newly selected program. The name of the program will also be displayed on the top line of the panel’s mock LCD screen . You can also change programs from your Waldorf Microwave itself, then retrieve that sound to the monstrumWave1 editor by hitting the red “Request Program” button to the left of the big red knob. Be aware however that this function will NOT currently update monstrumWave89’s program/bank assignment to match the Microwave! Immediately to the left of the current program name is a “Inst No” selector . This is a building block for the future implementation of multi-arrangement editing capabilities in monstrumWave1: The ability to select which instrument number you are selecting within monstrumWave’s sound parameter editing GUI. Edit Program Names Each character of a program’s name can be changed by simply double-clicking on the text of the program name and retyping in a new name. After hitting Enter/Return on your computer keyboard, the name is sent to the synth. To cancel the name change simply click outside of the program name field. Parameter/Value Display Immediately below the Program Name in the mock LCD screen is a readout that will display the parameter name and it’s associated value of the last changed parameter . Any parameter’s value while being edited will be displayed here with the parameter name being edited. Double-Click Parameters to Reset Value All sliders and knobs can be reset to their default value by double clicking the parameter knob/slider. Bi-polar knobs will be reset to 64, full range (0-127) parameters will be reset to 0. Store/Compare/Recall/Init To the right of the big red knob you will see several buttons: Store, Compare, Recall and Init. ● Store - Pressing the store button will display a “Destination” combobox and a “Confirm” button. Select a destination program by pressing the - or + buttons, then finally confirm by pressing the “Confirm” button. ● Compare - When this button is enabled, the microwave will temporarily swap the edit buffer with the originally stored program you are editing. Pressing it again will return you back to your edited sound ● Recall stored - This will throw away any edits made to the current sound program and recall the last ● Init - Will initialize all parameters so you can design sound programs from scratch. The parameter assignments loaded when you press the “Init” button are identical to those defined in Chapter 7.1 of Waldorf’s programming manual. X-Y Pad Modulations An obvious limitation of a knob on a computer GUI is that you can only rotate one knob at a time as you only have one mouse pointer! X-Y Pad Modulator works around this to allow you to control two paramters at once with the mouse. Most every parameter that has a data value range of 0-127 can be assigned to either the X or Y axis of this X-Y Pad. The concept is simple but versatility is great. Simply assign a parameter to the X-axis, then when you move the grid center from left to right that parameter’s value will move in concert with the X-axis. Assign a parameter to the Y-axis and you’ve now opened up a new door to parameter value modulation. One of the most common examples of X-Y modulation routings is to map one axis to filter cutoff and the other axis to filter resonance as visualized above. Since the two parameter play off each other you can get some wild filter sweeps when moving both parameters in tandem! MIDI keyboard UI At the bottom of the interface is that familiar pattern of white and black shapes - the keyboard . You get quite a wide range of keys to trigger notes from, the higher you press on the key, the lighter the velocity message sent. The lower towards the bottom of the key you press the higher the velocity value. You can hit the small grey arrow immediately to the left of the keyboard the small arrow to the right to shift the keyboard DOWN one octave, or hit if you want to shift the keyboard UP one octave. Sustain Hold Just to the left of the MIDI keyboard is a Sustain Hold button which when activated will hold the sustain phase of the amp/filter envelope. This is identical to pressing and holding the sustain pedal down with your foot, but you have this control now also from the editor. This can be helpful in those inevitable situations where your sustain pedal is not connected and you want a simple button to hold out or “latch” a note. This comes very much in handy when sound designing! Modulation Wheel To the left of the Sustain Hold button is a graphic Mod Wheel which works just as you would expect. Typically you will be using a real modwheel you can touch of course but this allows more on screen control for the sound designing process. Paramater Globals / MIDI Filters Directly above the MIDI keyboard is a section that displays Parameter and MIDI Global settings. You can chose between the two menus by triggering the arrows next to “Parameter Globals” . Parameter Globals contain settings such as tuning table, Stereowidth, panning and W, X, Y, Z knobs. The MIDI filters section will display which MIDI messages are set to be received by your Waldorf Microwave synthesizer. If the button is “on” (red LED lit) the message is received by the synth. If the button is off the control message is filtered and therefore not received by the synth. Should you question whether a message type is being filtered, simply open the MIDI filters section and press the button twice to return back to a lit LED. NOTE: Since there is no way with the Microwave’s OS to retrieve the current settings for these options all the MIDI message types will appear enabled (LED lit) by default. If you are unsure of your current settings you should check from the Microwave itself. Part Two: Sound Parameters Just like when editing programs with the synth alone, all program edits and actions take place inside an edit buffer. No data will be lost on the synth until you store the program from the synth. The following is a description of each sound parameter which monstrumWave1 controls. Wave 1 / Wave 2 Position Both Wave 1 and 2’s position parameter have a knob 0-60 and a combobox associated with the parameter. You can only adjust the value of the “Position” parameter through either one of the controls. If you select either Tri (Triangle), Sq (Square) or Saw (Sawtooth) as the Wave Position, the Position knob will dim. Similarly if you select one of the wavetable positions 0-60 from the Position knob, the Position combobox will dim. This dimming is just to give visual indication as to which of the two controls the Wave Position is set with. With the Position knob you can only scan through the 61 editable positions (0-60) of the wavetable. Since positions 62, 63 and 64 are always Triangle, Square and a Saw waveform, these are selectable via the combobox to give you more precise control than a single knob for this one parameter. With the Wave Position knobs, you can scan through the 61 user definable wavetable locations and see this visualized in the wavetable visualizer at the top of the interface by a small blue square on the left of the wavetable cell. Wave 1’s position is visualized in the top left corner, Wave 2’s position is visualized in the bottom right corner. Pay attention to the fact that the last three positions of the wavetable are not visualized in the wavetable visualizer at the top of the interface as they are not editable. If you’ve never really fully understood how waveforms and wavetables as a whole work with the Microwave, get ready to have the clouds and mist part! Simply turn down the Noise and Wave 2 Level in the “Mixer” section so you are working with only 1 oscillator. Osc 1 drives the pitch of Wave 1, Osc 2 drives the pitch of Wave 2. Change wavetables and notice the blue boxes appear over certain positions of the wavetable which is visualized on the top of the interface. Now adjust the Wave 1 “Position” knob. Watch the top of the interface and take note of the little blue box that “travels” as you rotate the “Position” knob. When you get closer to a wave position that has a waveform assigned to it, you’ll hear the timbre of the sound get closer and closer to the waveform assigned to the position in the wavetable you are moving towards.Try this out with several of the Microwave’s wavetables. This is one area of monstrumWave’s interface that gives a wonderful visualization of what the parameters you adjust are doing in context. Wavetable Selection and Visualizer In this section up at the top left of the interface you can select the timbre of your current sound program, which is referred to as the wavetable. Algorithmically generated wavetables are indicated in the wavetable selection box with an “*” before the wavetable’s name. These wavetables are not editable, so when you select them, the wavetable visualizer strip along the top of the interface will not indicate any definable waveform positions. When any of the other wavetables are selected however you will notice along the top of the interface in the wavetable visualizer a blue outline around any position that has a waveform currently assigned. Below the position will appear a selectable combobox which displays and controls the currently assigned waveform at that position. Although it may be tempting to click around, lets continue covering the basics. Next to the wavetable selection box are two buttons, “Init” and “Store”. ● ● Press “Init” to initialize to a simple wavetable with only position 1 and 61 enabled. Press the “Save” button to save any edits you’ve made to the wavetable to a user preset. For detailed information on editing Wavetables with monstrumWave1, see Part Three of the manual, “The Wavetable and Waveform Editors”. Envelopes The Filter and Amp Envelopes are controllable using vertical sliders, which gives accurate control for tracking and editing traditional ADSR type envelopes. The Wave envelope however is treated somewhat differently. Wave Envelope Level and Time values can either be set individually using the small knobs under the envelope, or by dragging the envelope points to adjust both level and time parameters simultaneously. The more steep the slope between two points, the darker blue the envelope is filled in. This is a unique visualization which is intended to assist in the sound design process. Above the Wave Envelope you see a Loop section where you can enable/disable and set the start and end loop points. The loop start/end times are then visually represented in the wave envelope. Modulation Matrix The Modulation Matrix section gives visual control over assigning any source and destination parameters as well as bi-polar sliders to adjust modulation amounts for all 16 slots of the synth’s mod matrix. This is a fairly complex aspect of the synth but the controls are very simple. Since not all parameters offer identical modulation control the layout differs from section to section. The parameter being modulated is labeled on the far left, the modulation source is located in the left column with the modulation amount being controlled by a horizontal bipolar (neg to pos value) slider, with additional controls if any to the right of the horizontal modulation amount slider. Part Three: The Wavetable and Waveform Editor Before starting this section I suggest reading this excerpt from Waldorf’s Sysex manual for the Microwave synthesizer. I’ve taken artistic liberty to edit the audience towards the user instead of a software programmer: A Wavetable can be thought of as being created by two different entities: 1. The 64 Waves of a Wavetable The Waves contain the actual sound-information, the spectrum that shall be played by the MicroWaves oscillators. 2. The Wave-Controltable (AKA Wavetable) The Controltable governs how the Waves are ordered. It takes, so to say, the administrative part of the Waves. Therefore, in order to make your own Wavetables, you must: 1. Create/edit waveforms store them to a specific, valid location to the Microwave. (slots 246-367). 2. Set up a Wavetable that incorporates your waveforms and store it to a specific, valid to the MicroWave. Creating a Waveform: You must create 64 Bytes of sample-data per Wave. This sample data will represent the positive cycle of your desired spectrum. These bytes may origin from whatever you like, additive synthesis, samples, random functions etc. The MicroWave will perform all necessary functions to set pitch and create a valid spectrum out of your sample-data all by itself. Creating a Wavetable: The Wavetable is defined by the Wave Control Table. Basically, it states to what positions of the Wavetables which Waves must be loaded. This way, you could load up to 61 distinct Waves into a single Wavetable. Remember. though, the last three positions of a Wavetable (61,62,63) are predefined and will always be tri, sqr and saw. The numbers of the Waves that shall be loaded to the table-positions are sent as the data-bytes of the WCOD. You can, but by no means must assign a valid waveform to each table position. Rather, you can specify a couple of positions of the Wavetable and leave the others 'free' or unassigned. In that case the Microwave will perform some additional magic and fill these positions by interpolating between the two adjacent spectra. This means that you only must specify the extremes of your Wavetable as Waves, send those few Waves to the MicroWave at the correct positions and have the MicroWave fill the 'empty' positions by itself. Great, isn't it? There is a good deal of useful information in both the Microwave Programming manual and Performance manual, as well as the os update documentations which is all available from Waldorf Music’s web site. I suggest reading what you can get your hands on if there are any grey areas after reading this manual, but let’s continue now with the details on loading, editing and storing waveforms and wavetables using monstrumWave1! Wavetables: In Depth Each program is assigned one single wavetable, which is shared by both Osc 1 and Osc 2. It is from this wavetable that the timbre of the current program originates from. Instead of just selecting a Sawtooth or a Triangle as your oscillator (which of course you can still do!) you can select a 61 step (preset or custom) wavetable. Each wavetable is nothing more than a selection of 61 of the Microwave’s 505 available waveforms assigned to any one of the 61 wavetable positions. It is the waveform located at the position assigned from the “Wave 1 Position” and “Wave 2 Position” parameters that each Oscillator derives it’s timbre from. You might think of a wavetable like you would a seating chart. Some seats are reserved, some seats are vacant. The wavetable contains "assigned seating" for any of the microwave's user or ROM stored waveforms. The wavetable itself doesn't make any sound, its the waveforms assigned to any of the positions within the wavetable that the sound comes from. While holding a note you can either be pulling your timbre from just one wavetable position at a time or you can scan through the wavetable positions, changing the sound’s tibre as you scan. This scanning is done with the startwave parameter. You can do cool things like assign an LFO to modulate the startwave parameter through time, or if you just want to be traditional you can select one of the last three steps in the wavetable which are traditional triangle, square and saw waveforms. There are a variety of different types of wavetables on the Waldorf Microwave synthesizer. Here’s an overview of what they are and a bit about them: ROM Wavetable Presets: Wavetable 001 (Resonant 1) - Wavetable 028 (Fmnt Vocal) Wavetable 077 (Wavetrip 1) - Wavetable 088 (Chorus 2) These ROM presets will always exist on the XT;; you can not save over them or destroy them in any way as they are stored on the synth's ROM (Read Only Memory) which by definition can’t be edited. You never have to worry that you’ll accidentally save over these presets. Algorithmically generated wavetable presets: Wavetable 029 (MicroSync) - Wavetable 032 (Square HP) Wavetable 057 (Saw Sync 1) - Wavetable 076 (19/20) These wavetables are algorithmically generated (also referred to in the Microwave documentation as “arithmetically generated”). These wavetables are calculated quite differently than the typical wavetable as they are defined with mathematical formulas, contrary to the aforementioned “seating chart” method of assigning waveforms to designated positions in the wavetable. Currently there is no method within monstrumWave1 to visualize or edit algorithmically genereated wavetables. Algorithmically generated wavetables are indicated as such in monstrumWave1's wavetable selection box with an asterisk before the wavetable name. You will not be able to edit these wavetables, and this will be indicated in the wavetable visualizer with a blue gradation over the entire strip from 01 to 61. Internal User wavetable presets: Wavetable 033 - Wavetable 044 These wavetables are located in RAM which means you can store to them and retrieve from them. They are stored internally on the Microwave’s internal memory. If you do not have a memory card inserted, this is where you want to store your custom user wavetables to. Card User wavetable presets: Wavetable 045 - Wavetable 056 These wavetables are located on the inserted memory card. Provided you have a memory card inserted into your Microwave, you can load and store from/to these card user wavetable presets. If you do not have a memory card inserted, do not make any attempt to save wavetables to these locations! To review, within each wavetable there are 64 positions. The last three positions will always be triangle, square and saw. These last three positions are not editable. The first 61 positions are fully assignable. The only requirement is that there must be a waveform assigned to step 01 and a waveform assigned to step 61 of the wavetable. Some wavetables are defined by magical mathematical formulas and can not be visualized or edited. You can store and load edited wavetables to either card or internal memory. Loading a Wavetable On the far left of monstrumWave1’s interface above Osc 1 is the Wavetable selection box. You select your program’s wavetable here. Upon making a selection you will see the strip across the top of the interface update. This is called the Wavetable visualizer because it visualizes which positions within the wavetable are assigned waveforms. A wavetable position that is assigned a waveform will be indicated by a blue outline around the position number. Directly below the position number of any assigned position will be a small selection box. The contents of this box will display the waveform preset currently assigned to that position in the wavetable. Editing a Wavetable ● To begin with, you might prefer to initialize the wavetable you have loaded. You can do this by hitting the red “Init” button next to the Wavetable selection box. Hitting this button will clear all assignments but you will need to then assign a waveform at least to position 1 and 61 in order to successfully complete the requirements for a valid wavetable. ● You can assign a waveform to a position in the wavetable just by clicking on the desired position in the wavetable visualizer. By default there will be no specific assignment, so you’ll need to then select a waveform to assign at that position by clicking on the words “none” in the selection box directly below the designated position. ● Similarly, you can disable any assignment (besides position 1 or 61) by double-clicking within any blue outline of positions currently assigned a waveform. The blue outline and the selection box displaying the assigned waveform will go away as there will no longer be a waveform assigned at that position. Storing a Wavetable Below the Wavetable selection box where you load a wavetable is a “Store” button. Press this button to store your wavetable to a user preset onto the synth. Upon hitting the “Store” button you will be presented with a selection box of all the possible user wavetables as well as a blue confirm button. Select a destination in the selection box and hit confirm to confirm the save. Remember the fact that if you attempt to store the edited wavetable to a card preset and there is no memory card inserted your Microwave will “take a break”. It should be ok again after rebooting the synth. Waveforms: In Depth Just like there are User and ROM preset wavetables there are also User and Rom preset waveforms. MonstrumWave1 provides a variety of tools to help you effectively take advantage of not only visualizing and editing Wavetable assignments but also the ability to visualize and edit waveforms, including the ability to import waveforms from files stored on your hard drive. Although full cycle waveforms on the Microwave are 128 samples, Waveforms are stored and edited on the Microwave as 64 sample 8 bit chunks of data. This is simply because of the fact that full cycle waveforms on the Microwave are symmetrical. Since with all waveforms on the Waldorf Microwave, the second cycle of the waveform is just the first 64 samples in reverse order with their values negated there is no need to store or transmit that data. Take for example ROM waveform 029’s first cycle, the data stored and transmitted: This same waveform is handled and turned into sound from its full cycle: Loading a waveform You may have already noticed the waveform editor appear, say after clicking once on one of the assigned positions of a wavetable. It is generally assumed that if you are loading waveforms into a custom wavetable you would also like to be able to see what those waveforms look like, and possibly edit and store a new version back to a user waveform preset. We’ll get there but first lets look at all the different ways to load a waveform into monstrumWave1’s waveform editor. There are two ways to bring up the waveform editor if it is not already visible: ● Click within any wavetable position’s blue outline in the wavetable visualizer. ● Select “Waveform Editor” under the blue “ModMatrix & Modifiers” above the ModMatrix. Note: If you click an assigned wavetable position (outlined in blue) within the wavetable visualizer, the waveform assigned to that position will be displayed in the editor grid under “Edit Waveform” on the right of the interface. This is an example of one of ways you can load a waveform into monstrumWave’s waveform editor. Once you’ve loaded a waveform into the editor you can edit with a number of various tools that will be described later, then of course you can save your edited waveforms not only back to the synth but to a small file that can be stored on your computer’s hard drive and loaded back within monstrumWave’s interface. Here is a description of the various ways you can load waveforms into monstrumwave1’s waveform editor: ● Wavetable Visualizer Position: Click within any wavetable positions’s blue outline in the wavetable visualizer. The assigned waveform will appear in the waveform editor. ● Load From Sound File: monstrumWave1 is capable of importing a wide variety of sound files. The rule of thumb here is that you typically want to stick with full-cycle 1024 sample (length) 48khz 8 bit wav file that ends in a zero crossing. These audio files can be created in any sound editing program. ● Load From Bin - In addition to allowing you to save and load waveforms to/from the Microwave you also can store waveforms to small binary files that can be kept and organized on your computer’s hard drive. You can then load these files back from disk. You do not need to be connected to any synth to load, edit or store waveforms to binary files. ● Load From Synth - Of course you can also load waves into the waveform editor from the presets stored on the synth or a memory card. If you don’t have a memory card inserted requesting from the card will give you nothing. ● Print from “Generate Shaper” (see later section on “Shaping a waveform”) ● Print from “Shape Mix” (see later section on “Shaping a waveform”) Now you’ve got a wave into waveform editor. In some cases this all you want - just to visualize the waveform, but monstrumWave provides you with a number of fairly interesting ways to edit your waveforms, so why stop here? Let’s explore editing waveforms in monstrumWave1! Editing a waveform There are a lot of controls here, let’s get the overview: Just above the waveform are two boxes, “Source” and “Wave”. These will update to reflect where the waveform you are currently editing came from, either a position in the current wavetable, a ROM or User preset or from a file. Directly to the right of these read-outs are two small knobs labeled “Main Grid” and Sub Grid”. These two knobs give you brightness controls for two overlapping grid outlines which can be of help when editing waveforms. The top right corner there is an “Init button which will initialize the waveform in the editor grid. The X axis of the waveform editor’s grid visualizes the 64 samples of the waveform. The Y axis visualizes the 128 data bits which define the waveform amplitude. The “Waveform Grid” will display the current edit buffer as a blue waveform. Directly below the waveform is a “Negate” button which allows you to negate the order of the waveform samples. When you hit this button you’ll notice the “Full Waveform Preview” update at the bottom of the waveform editor’s panel. This preview visualizes the full cycle of the waveform in real-time while we edit the half cycle visualized in the waveform editor. Go ahead now and click/drag slowly over the large half-cycle waveform in the waveform editor. You are editing each sample of the waveform by hand drawing their values. This calculation requires a steady hand with a mouse or trackball yet works exceptionally well with a pen/tablet like an intuos. Continuing the tour of waveform editing tools, look to the right of the waveform grid. You’ll see a “Limit High” and “Limit Low” button along the upper and lower right edges of the grid. When these toggle buttons are enabled any value that exceeds the upper or lower boundaries of the grid after making any edits will be “limited”. If the limit button is not enabled the value will retain outside the boundries of the grid which may be desirable for continued editing and mixing of waveforms to come to a final result. Be aware that should you edit a waveform outside of the current grid, those values will be limited when stored back to the Microwave in order to build a valid wave dump the Microwave will recognize. Also along the right of the grid is a “Negate” button which will negate the amplitude values of all 64 samples. Shift Up and Shift Down will shift the amplitude of the waveform up or down respectively. Shaping a waveform Below the Waveform Editor grid is the Shaper section. You can use shapers to generate new waveforms from scratch. You currently can only create multi-cycled sine waves in this section but there are a number more shapers in the works. You can also use the shaper waveform you create within the “Generate Shaper” section to mix with your waveform’s edit buffer (the waveform displayed in blue). Since every waveform can be made from any number of combination of sine waves (Bookmark & Research: Fourier Transforms!) the results of mixing waveforms are limitless and can be mystifying. Source shaper waveforms appear as white waveforms and mixed transform waveforms in a green waveform. This may seem confusing so lets go through both the “Generate Shaper” section and the “Shape Mix” section. Generate Shaper Waveform Within “Generate Shaper” you can currently create one of either two shaper types: a Sine wave or a “shelf”. A sine wave is a basic building block of sound synthesis. A “shelf” can be used in a number of clever ways to shift amplitude of a mixed source waveform. Rotate the “Sin” knob and watch what happens. A white sine wave shaper appears in the grid. As the “Sin” value increases the amplitude of the shaper waveform increases. To change the number of cycles within this shaper waveform, adjust the “Cycles” knob. Pressing the red “Commit” button will render your waveform to your waveform edit buffer. That might be what you want if you’re intending to save the generated waveform back to the Microwave, but you can also use these generated waveforms to mix with your waveform edit buffer, which can yield some incredibly awesome results both sonically and visually! Mix Shaper Waveform To demonstrate how this works lets just do it from scratch. 1. First, Initiate the waveform editor by hitting the red “Init” button at the top right of the waveform editor panel. 2. Rotate the “Sin” knob under the Generate Shaper section up to a value of 127. 3. Hit the red “Commit” button in the Generate Shaper section. Now you’ve got a simple sine wave you can store to the Microwave. Great but lets continue to show how the Mix Shaper Waveform works 4. Rotate the “Cycles” knob to a value of “42”. 5. Rotate the “Mix Amount” knob under “Shape Mix”. You’ll see a green colored waveform appear in the waveform editor which is the resulting Shaper Mix. When you get a shape you want to store, hit the red “Print” button under “Shape Mix” and proceed to the next section! Storing a waveform At the bottom of the Waveform editor panel is the “Save Waveform” section. This is where you do your storing of waveforms edited with monstrumWave. The “Full Waveform Preview” box will show you the complete waveform in real-time while you make your edits in the waveform editor grid. When you go to save a waveform, what you will be saving is visualized fully here in the “Full Waveform Preview”. To Store the Waveform back to a user preset on the synth, press the “Store” button under “Save Waveform”. You will then be presented with a selection box in which you designate the user wave number to save over. The destination waveform will be visualized to give you a chance to inspect the user preset’s visual single cycle waveform before saving over it with your new waveform. Once you’ve selected the destination user waveform preset, press the “Confirm” button and your waveform will be stored to the Microwave. Again, like the wavetable presets there are ROM preset waveforms and User preset waveforms. You can not store in ROM, that’s why it’s called “Read Only Memory”. You can only store waveform data to User waveform presets. When you go to save an edited waveform, the destination waveform selection box will only present you with possible user presets. These destination names are prefixed to identify whether the selected destination preset is stored internally to a user preset or to a memory card. Like when saving wavetables if you attempt to store to a card that does not exist, your Microwave will take a little break and need to be rebooted. If you do not have a memory card inserted, do not make any attempt to save waveforms to the memory card! “Hearing” changes made to waveforms and wavetables You will NOT hear any changes to any sound until you save your waveform and/or save your wavetable back to the Microwave. Future updates to monstrumWave1 will allow you to predetermine where to save edits to and allow real-time editing but for now be aware of the necessary steps which need to be taken in order to hear changes. After you have edited what waveforms are assigned at given positions, added or deleted assignments within the 61 steps of the wavetable you will not actually hear any changes until that wavetable is stored then loaded by the Microwave synthesizer. It is during the wavetable load process that the Microwave does all of the internal calculations and processing needed in order to create sound from the wavetable’s timbres at every position within the wavetable. If no waveform is assigned to any number of positions the available positions are interpolated. This all takes about a second for the microwave to calculate. Be aware that this also applies to edits made to waveforms. Even after you have stored a waveform back to a preset on the synth, you will not actually hear the results of that edit until you load a wavetable that utilizes that waveform you just edited. Part Four: Troubleshooting & Support Frequently Asked Questions: Q. The GUI for monstrumWave does not seem to look right at all. How do I fix this? A. What’s going on is somehow your preferences have become corrupt and need to be trashed. The fix is just to simply locate and delete your monstrumWave1.settings file which should be stored in your user’s application data/preferences folder. The location of this folder varies between OS versions, but if you are unaware of where this folder is simply google search your OS name, release version and “application preferences location”. NOTE: From time to time you will get emails containing links to new monstrumWave updates. Before you install and run any new monstrumWave1 updates it is highly recommended you first backup then remove your existing preference settings file. Also worth mentioning here that the interface is intended to work with the font included with the monstrumWave1 zip file you obtained through your software download link. If you do not install this font, the interface will not display as it is intentionally designed. Q. I’m having trouble getting things connected and I’m totally confused! Where do I start? A. The best place to start is with a simple set up. If you have multiple MIDI interfaces networked or connected to multiple ports on your system, just cut down to a simple set up with one computer, one midi interface. Turn anything else connected to your MIDI device (besides a MIDI controller keyboard!) turned off. Do you use your Microwave with any other software? How is it working for you there? Q. I’m a little confused with the GUI for Loading a .wav file from disk to the Waveform Editor Grid. How does this work? A. Either right-click in the “tennis court” looking rectangle below “Load From Sound File” or drag a .wav/.aiff file from your file browser into this rectangle. The first 1024 samples of the waveform will be visualized in this rectangle. You must next press the “Load” button below the waveform to load the data that makes up that waveform into monstrumWave1’s Wave Grid should you wish to edit the waveform. Future updates will address this but for now monstrumWave1 will ONLY grab the first 512 samples of the waveform you load with this method, so be sure to fit your half-cycle waveform (with a crossing at zero!) into the first 512 bytes. Many popular waveform sample libraries (galbanum, adventureKid, etc) are 1024 samples long but the last 512 bytes are simply the first 512 negated in reverse order. Q. What is the difference between “Load from Sound File” and “Load from Bin”? A. This is a great question as the current implementation is a stepping stone for future functionality. Currently monstrumWave1 does not have the ability to store waveforms to an actual sound file that can be opened and edited in any sound editing application. In the interim I enabled a method to store and load the waveform data as monstrumWave1 deals with it -- binary data, hence the ability to save that data to a .bin file. Since I gave you the ability to store the binary data file you also need a method to load the binary data file! As this data can not be loaded (YET) the same way as a typical .wav or .aiff sound file you are given two methods for loading a sound from disk. Use “Load from Sound File” to load your 48khz audio file (preferably .wav or .aiff but other formats work). Use “Load from Bin” to load the binary files you presumably have saved to your hard drive with the “Save To File” button at the bottom of the waveform editor. Q. What is happening when I “Load” a file or preset to the waveform editor? A. Another great question. This is loading data to visualize a waveform into monstrumWave1’s “Wave Grid” in the Waveform Editor. Nothing is being loaded to the Waldorf Microwave until you confirm a user waveform preset destination on the synth at the bottom of the Waveform Editor under “Store Waveform” after pressing the red “Store” button. Q. Doesn’t this also work as a VST? How do I set that up? A. Yes. There is also a beta VST plugin version of monstrumWave1. It is BETA. This means you should backup all work before using it and you should not rely on it for prime-time projects of yours. All the details are included in the monstrumWave1 VST Documentation, which is a separate document from this one. The beta VST plugin version will be distributed shortly after the initial monstrumWave1 launch. Support & Feature Requests: To report a bug, suggest a feature or some support on an issue you’ve uncovered all you need to do is send an email back to the address that monstrumWave1 was distributed to you from. You’ll get a follow up as soon as possible and the case will be handled from there. Please be sure to edit the subject of the email to something specific! Something like: monstrumWave1 bug report: receiving Osc 1 Semitone is a perfect example of a good subject format that will help me track the issue you’re reporting. Emails with a subject like “MIDI problem” will not help me help you as efficiently as I’d like to be able to. This concludes the monstrumWave1 Manual! Please contact monstrumMedia should you have any support requests, questions, suggestions or feedback of any kind. monstrumMedia can be reached for such inquires easily at www.monstrummedia.com. monstrum media chicago | san francisco www.monstrummedia.com Special thanks: My wife Anna, Jessie Goodpasture, Ken Siegel, Bill Claghorn, Tim Scott, Nathan Wilson, Roman Kubiak(Ctrlr), Jules (JUCE/Raw Material Software Ltd.) and Michael Fielitz (12decode).