1
InkCenter
Ink preset calculation for InfraLogic ControlCenter
User and Installation Manual
www.infralogic.dk
CONTROLCENTER INKCENTER USER MANUAL
INFRALOGIC APS
2
CONTROLCENTER INKCENTER USER MANUAL
Copyright and Trademarks
ControlCenter InkCenter User Guide
Version 1.6
April 2009
Part number: CCPROF INKCENTER 16
Copyright © 2009 by InfraLogic Aps.
All Rights Reserved. No part of this publication may be reproduced, stored in a retrieval system, or transmitted,
in any form or by any means, electronic, mechanical, photocopying, recording, or otherwise, without the
prior written permission of InfraLogic ApS
The information in this publication is provided for information only and is subject to change without notice.
InfraLogic ApS and its affiliates assume no responsibility or liability for any loss or damage that may
arise from the use of any information in this publication. The software described in this book is furnished
under license and may only be used or copied in accordance with the terms of that license.
PostScript are registered trademarks and PostScript 3 is a trademark of Adobe Systems Incorporated.
Other brand or product names are the registered trademarks or trademarks of their respective holders.
http://www.infralogic.dk
InfraLogic ApS
Lautruphøj 1-3
DK-2750 Ballerup
Denmark
Telephone +45 4420 9875
INFRALOGIC APS
3
CONTROLCENTER INKCENTER USER MANUAL
Table of Content
Table of Content .......................................................................................... 4 1 Introduction .......................................................................................... 6 1.1 Dataflow ................................................................................................ 8 1.2 Requirements........................................................................................ 8 1.3 About this manual ................................................................................. 8 2 Installation............................................................................................ 9 2.1 First time installation ............................................................................. 9 2.1.1 Installing InkCenter........................................................................... 9 2.1.2 Stand-alone database installation (Enterprise version only) ......... 11 2.1.3 PlateViewer installation (Enterprise version only) ......................... 12 3 InkCenter usage ................................................................................ 13 3.1 Introduction ......................................................................................... 13 3.2 Basic usage ........................................................................................ 14 3.2.1 Input folder panel............................................................................ 14 3.2.2 Progress panel ............................................................................... 15 3.2.3 Log-list panel .................................................................................. 15 3.3 Error handling ..................................................................................... 15 3.4 PlateViewer client (Enterprise version only) ....................................... 16 4 Configuration ..................................................................................... 19 4.1 General setting.................................................................................... 19 Ink Configurations ...................................................................................... 23 4.1.1 Format page ................................................................................... 23 4.1.2 Zone configuration page ................................................................ 26 4.1.3 CIP3 format configuration .............................................................. 31 4.1.4 Output destination page ................................................................. 33 4.1.5 Output name page ......................................................................... 34 4.1.6 Output name translation page........................................................ 36 4.1.7 Output Linearization page .............................................................. 37 4.2 Input queue configuration ................................................................... 38 4.2.1 Input source page........................................................................... 38 4.2.2 Input naming page ......................................................................... 40 4.2.3 Filename pre-processing ............................................................... 41 INFRALOGIC APS
4
CONTROLCENTER INKCENTER USER MANUAL
4.3 Soft-proof generation configuration (Enterprise version only) ........... 42 4.3.1 Soft-proof folders ............................................................................ 43 4.3.2 Soft-proof image shapening ........................................................... 45 4.3.3 ICC Configuration ........................................................................... 46 4.3.4 Output Linearization ....................................................................... 48 4.4 Configuration of PlateViewer .............................................................. 49 4.5 Log files ............................................................................................... 49 Appendix A – Regular expression ............................................................. 50 A.1 Regular expression syntax.................................................................. 50 A.2 File name renaming examples using regular expressions................. 54 Appendix B - External scripts .................................................................... 55 B.1 Script calling convention ................................................................. 55 INFRALOGIC APS
B.2
Script example.................................................................................. 55 B.3
Scripting languages......................................................................... 56 5
CONTROLCENTER INKCENTER USER MANUAL
1 Introduction
InkCenter is an ink zone preset calculator based on TIFF-file or CIP3-file input.
InkCenter is normally part of the ControlCenter workflow system, but may also
operate as stand-alone as ink preset calculator for other systems.
Input files often come as copies of plate image files - typically TIFF 1-bit files.
However, InkCenter also accepts contone TIFF (8-bit) files as well as CIP3 files. For
a complete list of valid input file formats, see section 3.1.
InkCenter is based on hot-folders and naming conventions for detecting files. The
output of InkCenter depends on the press control system – many different formats
exist for ink zone information.
The following output formats are currently supported by InkCenter:
EAE (various versions)
ABB MPS (requires CTP-interface from ABB)
ScanDrive Orrke
Honeywell Printa
Rockwell PlantView (e.g. for GOSS)
CIP3/CIP4 (eg for. MAN Roland Pecom, EPG, Heidelberg, Peretta)
Monigraf RP2
InputCenter
OutputCenter
(output)
Output device
RIPs
InkCenter
Press Control
System
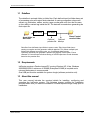
System diagram showing a typical ControlCenter application with InkCenter at the
printing site. InkCenter receives a copy of each final bitmap generated by
OutputCenter. Upon calculation the ink zone data is transferred to the press control
system
INFRALOGIC APS
6
CONTROLCENTER INKCENTER USER MANUAL
InkCenter includes the following configurable options for ink zone data generation:
Zone calculation based on number of zones, zone width and offset to first
zone
Optional split of panorama data into two broadsheet files.
Handling of odd-sized gutter zone for panorama plates.
Template-based output format (‘skeleton-files’) ensures easy adaptations to
changes in ink-format.
Plate bend data (e.g. ID-texts and graybars) may be omitted in calculations
Linearization of output data per process color (‘color curves’).
Preview files (typical JPEG) may be generated for visual inspection of zone
data
Backup of incoming and outgoing files for quick re-transmission or regeneration of zone data.
Reports status to MonitorCenter application.
The Enterprise version of InkCenter further allows color soft-proofs of the full flats
in the press-room. The flats (paired pages) are viewed in a dedicated
PlateViewer application with product navigation (tree).
Soft-proofs of flats allow electronic page check in the press room, eliminating
paper proofs for content and color checks.
PlateViewer
PlateViewer
InkCenter
PlateViewer
Ink files
Press Control
System
InkCenter Enterprise version allows plate softproofs to be viewed in the press
rooms with dedicated PlateViewer client applications
INFRALOGIC APS
7
CONTROLCENTER INKCENTER USER MANUAL
1.1 Dataflow
The dataflow is a simple folder-to-folder flow. Each defined input hot-folder has a set
of processing rules and output folder attached. A naming recognition scheme will
extract e.g. publication, edition, section, page number and color from the file name
or from within a certain tag inside the file. The data will be used when generating the
final output file.
Input setup
Input folder on
InkCenter
Ink setup
Optional
Optional
preview file backup
Press Control
receive folder
Data flow from InkCenter input folder to press control. Each input folder has a
naming convention and ink generator method attached. This allows multiple input
folders with different processing rules, e.g. for different plate formats.
Optionally InkCenter can generate a preview file (jpg/pdf) of each plate. Future
releases of ControlCenter will allow viewing of ink zone previews in web browsers
based on the preview files.
1.2 Requirements
InkCenter requires a Pentium-based PC running Windows XP, Vista, Windows
2000/2003/2008. A minimum of 256MB (Enterprise 512MB) is required and a
mirrored disk system is recommended.
One USB port must be available for system dongle (software protection unit).
1.3 About this manual
This user manual includes the required details for installing, configuring and
operating the InkCenter system. The following chapter outlines the installation
process. Make sure you have the installation CD and required dongle ready prior to
installation.
INFRALOGIC APS
8
CONTROLCENTER INKCENTER USER MANUAL
2 Installation
2.1 First time installation
InkCenter ships with an installation CD and a USB dongle. Insert the CD and wait
until the main installation program pops up. If nothing happens it is because your PC
is configured not to autorun CDs. In this case browse to the CD and double-click on
the Autorun.exe file.
Auto-start install welcome screen. Note that Stand-alone DB and
PlateViewer applications are only available in the Enterprise version.
2.1.1 Installing InkCenter
The InkCenter application must be installed at the printing site with network access
to the press control system.
INFRALOGIC APS
9
CONTROLCENTER INKCENTER USER MANUAL
Select if InkCenter is to be installed as stand-alone or integrated
application.
The installation program will present a set of default options which are
recommended. The location of the executable files is in the folder .\Program
Files\InfraLogic\InkCenter.
In case InkCenter is part of the ControlCenter system the location of the system
server and data root folder must be entered. You will be prompted for the servername (or IP address) and the share name of the data root folder on the server
(CCdata is default).
In stand-alone mode database access is required only for the Enterprise version.
Enterprise ships with a small MSDE (SQL server Desktop Edition) required for the
plate view system.
After successful installation a shortcut to InkCenter is placed on the desktop. By
default the installation program creates an input folder (c:\inkinput) and two input
configurations (called Broadsheet and Panorama) with EAE ink generation. The
configuration of the input queues and ink calculation method is handled within the
InkCenter program (see section 3)
The last step in the installation will automatically install the HASP dongle driver (USB
version).
INFRALOGIC APS
10
CONTROLCENTER INKCENTER USER MANUAL
In case InkCenter is part of ControlCenter, the installation program prompts for the
server name and data root folder share which was defined during the installation of
the database. Contact the system administrator if these settings are not known.
2.1.2 Stand-alone database installation (Enterprise version only)
Systems running without ControlCenter page management requires a small
database to keep track of preview files. Click Install Stand-alone DB to launch the
MSDE database installer. Click Install MSDE and then the
Go button to install the database with default settings
INFRALOGIC APS
11
CONTROLCENTER INKCENTER USER MANUAL
database installer. InkCenter Stand-alone Enterprise may use an exsiting SQL
Server if available. In such case check the option Use existing SQL Server and
Press Go to create database and tables on the SQL Server.
2.1.3 PlateViewer installation (Enterprise version only)
PlateViewer must be installed on PCs in the press-room (typically). Simply click the
INFRALOGIC APS
12
CONTROLCENTER INKCENTER USER MANUAL
3 InkCenter usage
3.1 Introduction
InkCenter absorbs the ripped flats (digital plates) or other input files by monitoring
one or more output folders. The input files are usually obtained as copies of files
used for final plate/film exposure. The following file formats are accepted by
InkCenter:
- 1-bit TIFF in any resolution – uncomressed, Packbits (RLE), LZW, G3 or G4
compressed
- 8-bit TIFF in any resolution - uncomressed, Packbits or LZW compressed
- CIP3 files with data encoded AsciiHex, Ascii85 or binary. Data may be
uncompressed or Packbits (RLE) compressed. CIP3 files may come one color
per file or as files with all colors combined.
The source of the files is usually other workflow systems or RIPs. Each input source
folder is a hot-folder for InkCenter with an associated configuration known as the
Input Queue Configuration. This configuration dictates the input folder location,
expected file naming convention and – most importantly – the ink preset output
configuration to use for calculating ink zones and delivery to the press control
system.
InkCenter may be configured to store all incoming files in a central file folder and
store optional ink preview files (jpegs) in separate folders as well. Moreover
InkCenter may also store a backup of the resulting ink zone files for quick retransmission.
Any ink file produced will be transferred to the press control system. The
transmission is normal LAN file copy (NetBIOS) or FTP transfer.
INFRALOGIC APS
13
CONTROLCENTER INKCENTER USER MANUAL
3.2 Basic usage
InkCenter is meant to run unattended on a PC with network access to the file
sources (e.g. RIPs). The program is capable of auto-starting the folder scans when
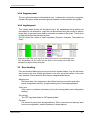
InkCenter main user interface with the folder panel (top left), the progress panel (top
right), the file log (middle) and the error file log (bottom).
the application is launched. However, the scan can be manually started and stopped
also. Each monitored folder can be enabled/disabled in order to allow input from
certain sources to be held back if required.
Once started two processes goes on continuously – the input folder search and the
ink zone calculation. The latter will resample and analyze incoming tiff files.
The main user interface is divided in three parts – the folder panel, the log list and
the error list.
3.2.1 Input folder panel
On the top left hand side the hot-folders are shown. Clicking on a hot-folder icon will
enable/disable folder from the scanning process. A red stop sign indicates that the
folder is not used.
INFRALOGIC APS
14
CONTROLCENTER INKCENTER USER MANUAL
3.2.2 Progress panel
The top right hand panel is informational only. It shows the current job in progress,
the last ink preview made and some general statistics on files stored in the system.
3.2.3 Log-list panel
The middle panel shows the list-based log of file separations being polled and
processed for ink information. Log lines can be selected using the mouse in order to
purge files, re-generate zone data or re-transfer zone data to the press. This is done
by right-clicking on the selected log lines.
The list shows the status of each separation (Queued, Analyzed, Transmitted or
Error).
Select and right click in the log list to bring up the menu for manipulating jobs.
The ‘Re-generate ink file’ option may be used in case another ink profile must
be applied to pages already analyzed.
3.3 Error handling
Files are checked before they are moved into the system folders. Any file with errors
are moved to the error folders and shown in the error log at the bottom of the main
user interface. Errors related to files may be categorized as follows:
Naming error
File name does not correspond to the defined naming convention (see Input
queue configuration section). A typical naming error is missing separators.
Color error
Color name is unknown according to the color naming table (see configuration
section)
File corrupt
The TIFF-tag check failed or CIP3 parsing failed
File error
File cannot be moved into storage directory. This is a severe error that may stem
from bad configuration, network problems or disk problems.
INFRALOGIC APS
15
CONTROLCENTER INKCENTER USER MANUAL
Errors may be corrected manually by right-clicking in the error list. The pop-up menu
gives the options to rename the file manually, re-try the polling, showing a preview of
the file or deleting the file.
3.4 PlateViewer client (Enterprise version only)
PlateViewer is the client used for inspection of plate soft-proofs generated by
InkCenter. Plate soft-proofs are color combined (composite) view files in a userdefined resolution and color configuration. The soft-proofs are viewed as combined
colors and as plate separations. Also, bar charts generated by the ink zone
In the error log window, select and right-click on a job to show the error-handling
menu. A given file name may be corrected and re-input manually using the popup
Rename dialog.
INFRALOGIC APS
PlateViewer has product navigation on the left hand side and plate thumbnails on the
right hand side. Click a thumbnail to view it in full screen mode.
16
CONTROLCENTER INKCENTER USER MANUAL
generator can also be viewed.
The PlateViewer user interface is divided in a product navigation view on the left
hand side (tree structure) and a thumbnail gallery on the right hand side. Select a
date in the date filter and the product to view in the tree and the available plate view
files will be shown as a thumbnail gallery. Click a thumbnail to view the actual plate
image in an image zoom dialog.
View of a sheet (here front). Click the tabs above the image to view individual separations.
By default the preview is fit to the screen size. To view details click the left mouse
button in the image to zoom in and click the right button to zoom out again.
Hold down the left mouse button to enable drag mode (showing a hand-like cursor).
Drag the image to pan around.
The quality of the previews is dictated by the soft-proof settings (see section 4.3). By
default the resolution is 100dpi using bi-cubic re-sampling.
On top of the plate image preview, tabs exist to view the individual color separations.
Each available separation may be viewed in its original color (e.g. cyan) or as black.
Each color can be configured to be shown as original process color or black
INFRALOGIC APS
17
CONTROLCENTER INKCENTER USER MANUAL
Zoomed in plate preview. Use left/right mouse buttons to zoom in/out. Hold down button
to pan around (drag mode).
Ink bar charts are accessed using the top tab
At the very top select Plateview or InkView to view the plate image or the ink zone
bar charts.
INFRALOGIC APS
18
CONTROLCENTER INKCENTER USER MANUAL
4 Configuration
InkCenter can be configured as stand-alone module or as integrated part of the
ControlCenter workflow system. In stand-alone mode database connections are not
required. As integrated part of ControlCenter, InkCenter can automatically lookup
detailed job properties in the ControlCenter database, such as publication, edition,
section, page numbers, page orientations etc. This greatly simplifies naming
schemes. I simple unique plate ID number is the key to the plate identifications.
In the integrated configuration the TIFF file will be a copy of the plate file generated
by OutputCenter. Enable the Copy TIFF option for each template in the
OutputCenter template configuration. The target folder for the tiff copy will be the
input folder of InkCenter
OutputCenter
Copy of plate
image file
InkCenter
Integration with ControlCenter. ExposeCenter can generate a copy of the final
plate image as a TIFF file to InkCenter. Each ExposeCenter template has a
separate copy option so that files for different presses can be sent to separate
InkCenter input folders.
The system is configured using three different configuration dialogs: general
settings, input queue definition and ink generation definition.
4.1 General setting
System critical settings are accessed in the File->General Settings.. menu. The
configuration is stored and retrieved in the InkCenter.ini file and in the system
database.
INFRALOGIC APS
19
CONTROLCENTER INKCENTER USER MANUAL
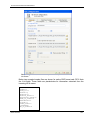
When InkCenter is installed using the Setup program, a set of default folder
locations and a default ODBC data source are given and stored in the database (for
non-stand alone setup type). The folders and the data source can be changed in the
configuration dialog.
Configuration Folder
Folder for setup information (required).
Keep files
Enable to keep backup of input files in original folder.
Originals folder
File storage of all incoming tiff files. This folder function as work folder and backup
folder
(required).
Ink file backup
Backup folder for already generated ink files. Backup copies are saved for easy
re-transmission to the press.
Ink Preview folder
Re-sampled per-plate jpeg files are stored here. These files are typically 72 dpi
files for visual ink zone inspection.
INFRALOGIC APS
20
CONTROLCENTER INKCENTER USER MANUAL
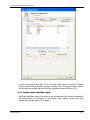
Error folder
Any files not matching the input naming convention are moved to this folder
Work folder
Temporary folder holding intermediate files for combined preview generation. The
work folder is cleaned regularly using the Purging option (see below)
Generate log
Enable to log progress to an XML log file. This is required if ink logging is to be
shown in iMonitorCenter.
Log folder
Folder used for log xml files
General housecleaning is performed at intervals set by the Purging options:
Autodelete job older than..X days
Enter age in days for jobs to be deleted automatically. This will ensure that very
old jobs do not accumulate. Set to 0 days to disable autodelete. Autodelete will be
performed at a given time every day (usually outside hot hours). Enter time of day
as hour interval where auto-purging may be performed.
Perform autodelete between …
Set the time interval where purging must occur. This interval should be in nonproduction
hours
Excel report generation (ControlCenter integrated InkCenter only)
Summarized reports of ink zone calculations can be generated using an external
windows service with connection to the ControlCenter database. Excel sheets may
be generated after the last plate file has been processed (default) or after each plate
file received (partial report generation).
The database connection is required for most ControlCenter Basic installation. The
configuration in InkCenter assumed the presents of an ODBC connection to the
database (see section 2).
ODBC DSN
InkCenter uses an ODBC connection for status communication. Make sure the
MSDE database1 is installed and an ODBC source is created on the database.
Username
ODBC user name
Password
1
Described in section 2 Installation
INFRALOGIC APS
21
CONTROLCENTER INKCENTER USER MANUAL
ODBC password
Keep conn. open
Recommended for installations where the database is located near the InkCenter
application (same LAN).
INFRALOGIC APS
22
CONTROLCENTER INKCENTER USER MANUAL
Ink Configurations
The ink configurations (templates) are managed through the File->Configure ink
generation menu.
New ink calculation templates can be defined here and existing ink templates are
listed and can be copied, edited or deleted. To change an existing proof click on the
setup in the list and press the Edit button
The ink template configuration consists of six dialog pages.
4.1.1 Format page
The Format-tab describes the ink file format. Enter a unique setup name
(mandatory) and select ink format.
InkCenter is prepared for any ink file format because it is based on template files.
There are three template files:
1. Header template
2. Zone data template
3. Trailer template (optional)
Each of these templates is skeletons used for final ink file generation. InkCenter will
substitute identifiers in the ink template files and combine them for the final result.
Note that in case a panorama-file is to be split (see later), an optional header
template may be chosen for the second half (right half) file. This is required if e.g.
pagenumbers inside the inkfile are different for left and right side.
For CIP3/CIP4 output only the header template file is used.
INFRALOGIC APS
23
CONTROLCENTER INKCENTER USER MANUAL
Basic setting includes the name of the profile and the parameters for
ink format.
Below two example-header files are shown for native EAE format and CIP3. Note
the %-id fields. These fields are placeholders for information extracted from the
incoming tiff file name.
[PAGEIDENTIFIKATION]
TITLE=%t
FORM_ID=%f
OBJECT=%p
EDITION=%e
EDITION_GROUP=%i
PRODUCTION_STAGE=%s
DATE_OF_ISSUE=%d
PAGINATION=%1
COLOUR=%c
PLATE_TYPE=%a
[ZONEDATA]
NR_OF_ZONES=%n
INFRALOGIC APS
24
CONTROLCENTER INKCENTER USER MANUAL
CIP3BeginSheet
/CIP3NewspaperPlateType /Broadsheet def
/CIP3NewspaperPageInfo
[ << /AbsoluteBroadsheetPage %1
/PageType /Broadsheet
/PageSection (%S)
/PageNumber (%1)
>> ] def
/CIP3AdmJobName (%P-%E-%S-%1-%C) def
/CIP3AdmSheetName (%G) def
/CIP3AdmCreationTime (%Y) def
/CIP3AdmMake (InfraLogic ApS) def
/CIP3AdmSoftware (InkCenter) def
/CIP3AdmSheetLay /Left def
/CIP3AdmPSExtent [%( cm %) cm] def
/CIP3TransferFilmCurveData [ 0.0 0.0 1.0 1.0 ] def
/CIP3TransferPlateCurveData [ 0.0 0.0 1.0 1.0 ] def
Header-file identifiers are as follows:
ID
%p
%i
%e
%s
%t
%d
%c
%a
%f
%#
%1-%8
%j
%n
%h
%g
%y
%x
%k
%z
%q
%(
Description (from input file)
Publication name
Issue
Edition
Section
Title
Publication date (format specified separately)
Color
Plate type ID
FormID1
FormID2
Page number fields
Complete input job name
Number of ink zones
Sheet side
Sheet number
Event time in format YYYYMMDDhhmmss
For CIP3 format is DD-MM-YYYY hh:mm:ss
Message sequence number – incremented on
every message
Total number of pages in product (Orrke only)
Lowest page number in product (Orrke only)
Highest page number in product (Orrke only)
Head direction (Orrke only)
Plate width in cm
%)
%b
Plate height in cm
FileTitle (filename without extension)
%w
INFRALOGIC APS
25
CONTROLCENTER INKCENTER USER MANUAL
%<
%>
%^
%{
%+
%m
%=
ProductionName (from ControlCenter DB)
InkComment (from ControlCenter DB)
Press section number
Press time
Plate name (from ControlCenter DB)
Press Comment (From ControlCenter DB)
Ink System ID (from ControlCenter DB)
NOTE: If the receiving system accepts only a maximum number of characters for
publication, section, edition etc. the number of characters can be restricted using a
angle-bracketed digit between %-sign and identifier symbol – example: %[3]p will
truncate long publication names to three letters only. Publication names less than
three digits will remain so.
Note that the abbreviation system can be used for identifier length control also
(translation of known incoming names to fixed size names).
For non-CIP3 formats the actual ink zone values are regulated by the zone template
file. Below is the standard EAE format for ink zone data. Note than only one line is
required. This line is repeated for each zone in the final output.
ZONE%z=%3v
Zone-file format is as follows:
ID
%z
%2z
%3z
%3v
%2v
%2.1v
%2.2v
Description (from input file)
Zone number as 1, 2,…
Zone number as 01,02,…
Zone number as 001,002,…
Zone value as number between 0 and 999 (EAE
standard)
Zone value as number between 0 and 100
Zone value as number between 0.0 and 100.0
Zone value as number between 0.00 and 100.00
The trailer-template does not include any id-strings.
In case incoming files are rotated, inverted to mirrored, the ink analyzer can revert
this for the calculation. Select the appropriate input processing parameters.
4.1.2 Zone configuration page
The zone configuration determines the calculation result (not used for CIP3/CIP4)
Set the Plate format to Broadsheet or Panorama and enter the press side plate type
identifier. Default is B or N for broadsheet and P for panorama.
INFRALOGIC APS
26
CONTROLCENTER INKCENTER USER MANUAL
The physical number of zones and zone width must be set.
INFRALOGIC APS
27
CONTROLCENTER INKCENTER USER MANUAL
Panorama gutter
For certain presses the gutter zone between plate halfs must be set for panoramas.
The gutter zone typically is narrower than the real zones. Set the Gutter Zone to
reflect this.
Note that even if there is a gutter zone defined, it may or may not be part of the
result. Check the option Ignore gutter zone in output file if the gutter should be
omitted.
Even if this option is selected make sure the total number of zones entered includes
the gutter (e.g. 13 zones resulting in 2 times 6 plus the gutter).
Zone offsets
When the plate is not aligned to a zone edge, it is necessary to enter an offset value.
This offset may be a positive or a negative number – see figure below.
For certain presses running broadsheet plates the offset to the first zone may be
different for the left and the right plate. InkCenter allows two offsets to be entered:
Offset for ‘odd’ plate and offset for ‘even’ plate. The terms odd and even refers to the
lowest page number on the plate.
INFRALOGIC APS
28
CONTROLCENTER INKCENTER USER MANUAL
Metric mode
Certain press control systems (e.g. EAE v. 2.1.x) allow zone data to be supplied
independent from the actual zone geometry. The ‘zone’ data can be supplied as
one-zone-per-millimeter with respect to the plate width. So if the plate is 330 mm
wide 330 zones may be supplied – one per millimeter. If the option One Zone per
millimeter (METRIC mode) is selected, the number of zones will be determined
automatically based on the plate image file.
Panorama split option
Certain presses will not accept panorama sized ink information because the control
system is based on broadsheet plate information only. In these cases panorama
plates must be fed as two broadsheet ‘plates’ instead. Set the Split option to perform
panorama-to-two-broadsheet conversion.
INFRALOGIC APS
29
CONTROLCENTER INKCENTER USER MANUAL
Using the panorama split option affects the naming of ink files. The two files must
have unique names, usually by using different page numbers (reflecting left and right
side of the plate). Make sure to set the output names accordingly (on the output
name tab page – see later). Also make sure a header template for the right plate half
is selected (see section 4.2.1)
Plate
Offset
(positive)
Plate
Zone width
Offset
(negative)
Two different ink zone definitions illustrating the offset to first (left) zone.
Note that positive and negative values are allowed for offset
Plate
Zone width
Zone width
Gutter zone
A panorama plate may have a gutter zone which is not to be included in the
INFRALOGIC APS
30
CONTROLCENTER INKCENTER USER MANUAL
If panorama split is enabled, a potential gutter zone must still be ignored (skipped).
This can be done by setting the offset of the right plate half (usually to half the gutter
zone width).
Some presses expect the zone numbers to grown from the outside in from both
sides. The option Revert values on right half will reverse the ink zone numbers for
right half so that zone 1 is on the right hand side and the last zone is to the left..
Plate bends
Due to plate furniture the data on the plate image may include barcodes, ID-texts or
other marks which are not to be included in the zone calculation. Enter the ‘margins’
(top,bottom,left,right) as distance from the edge of the plate to ignore in the
calculation.
Note that if the panorama split option is selected, the left and right margin is not
applied on the ‘inner sides’ (right side of left plate and left side of right plate).
Threshold and minimum value
Certain ink systems requires a threshold value to open an ink valve. Enter minimum
value causing a zone ink valve to open and enter the minimum value this valve can
have. Any calculated value above the threshold will be at least the minimum value
specified.
4.1.3 CIP3 format configuration
The CIP3/CIP4 Print-Production-Format (PPF) ink file is a separated preview
wrapped in a postscript-like structure. Even if this format is standardized though the
CIP4 organization a number of vendor-specific variations exist. Variations are mainly
related to the identification of the jobs (page numbers, publications etc) and to the
way colors are sent.
Newspaper presses generally expect one file per plate, that is, one per color
separation. Sheet fed presses requires one file holding all the color separations.
Some presses require that both front and back is combined in the same file.
The way colors are sent to the press can be controlled by the Colors per file setting.
The settings for media extend includes dimensions of the plate, press and paper.
For the majority of systems the media extends can be deducted from the incoming
file size (digital plate image). Check the As job, As plate and As press to use the
incoming size for all media extends.
INFRALOGIC APS
31
CONTROLCENTER INKCENTER USER MANUAL
Apart from the generic formats controlled by the template header file, the following
special CIP3 formats can be selected:
Man Roland PECOM: The file is delivered to the target system with an optional
synchronization file (.syc extention).
GMI: Special coding using the CIP3 newspaper addendum standard.
EPG (Essex Printing Group): The file is delivered in a subfolder with the product and
publication date as name.
INFRALOGIC APS
32
CONTROLCENTER INKCENTER USER MANUAL
4.1.4 Output destination page
The transfer of the resulting ink files are defined by selecting target folder. The
transfer may be standard windows file copy or FTP transfer. Set login parameters
and test the connection.
If certain actions are required for transfer or registration of the ink files, a Post
processing command can be issued. This is used e.g. for communication with the
ABB MPS database.
For visual representations of the ink data, select the Generate preview.. option and
select format (JPEG, PS or PDF) and enter path for the preview folder.
In case previews are to be printed out, this can be obtained using the post
processing command for previews (e.g. copy to printer).
InkCenter Enterprise allows press soft-proofs to be generated from the high
resolution TIFF separation files. Enable the feature Generate composite preview
files of flats and configure the softproof generation in the Config softproof
generation menu (see section 4.3)
INFRALOGIC APS
33
CONTROLCENTER INKCENTER USER MANUAL
4.1.5 Output name page
The naming scheme for the ink files may be of prime importance in order for the
press system to recognize the plate reference.
Set the output name using the %-parameters (e.g. publication, section, edition etc.)
Page numbers
Page numbers may be mapped from input file name to output file name.
INFRALOGIC APS
34
CONTROLCENTER INKCENTER USER MANUAL
For direct mapping enter %1 for using the first page number from the input file, %2
for the second etc.
In case the press system requires only e.g. the lowest page number an expression
can be entered for the particular output page number. Valid expressions are:
INFRALOGIC APS
Syntax
Description
Example
min(list of numbers)
The lowest page number
max(list of numbers)
The highest page number
min2(list of numbers)
The second lowest
number
max2(list of numbers)
The second highest
number
min(%1,%2)
where %1=16,%2=1
max(%1,%2)
where %2=15, %2=2
min2(%1,%2,%5,%6)
where %1=8, %2=5,
%3=1, %4=4
max2(%1,%2,%5,%6)
where %1=8, %2=5,
%3=1, %4=4
Result
1
15
4
5
35
CONTROLCENTER INKCENTER USER MANUAL
In case of panorama split (see 4.2.2) a second output name is required. Typically
the two output names will differ by page numbers used. The page numbers used in
the file name are usually also set in the two template header files (see 4.2.1).
4.1.6 Output name translation page
Often the identifiers used in file name do not correspond to the names accepted by
the press system. A translation of publication, issue, edition, section and color
names can be made prior to final output.
INFRALOGIC APS
36
CONTROLCENTER INKCENTER USER MANUAL
Use the New button to add a name translation and select the name type. Enter input
name and enter the translated name. Apply the changes.
4.1.7 Output Linearization page
Most modern press system will map incoming ink zone values to real values by
applying a cylinder-specific mapping. In case a simple manipulation is required the
linearization option can be enabled.
The linearization method a simple color-by-color lookup tables applied to pixels. The
filter consists to a curve per color which can be manipulated by dragging the anchor
points with the mouse.
The linearization dialog allows simple mapping for each color.
INFRALOGIC APS
37
CONTROLCENTER INKCENTER USER MANUAL
4.2 Input queue configuration
Input folders needs to be defined and the action required for each file must be
determined.
Use the menu File->Configure input queues to get to the input queue manager.
Here the list of already defined queues is maintained
The definition of input queues are divided in three steps (tab-bars): Input source,
Input naming and Filename pre-processing.
4.2.1 Input source page
The basic settings include the Queue name, Input Folder and Color name location in
filename.
Queue name Enter a unique name for the queue (mandatory)
File source
The file source may be a shared network folder on a RIP or an FTP
server directory (e.g. for UNIX RIP access). Select Shared network
folder or Remote FTP Server and enter folder name.
Search mask An overall search mask can be defined as the first file sorting
criteria. Specifying e.g. *.tif will only analyze files with extension .tif.
This may be required for certain RIPs which build up the ripped files
with temporary extensions.
INFRALOGIC APS
38
CONTROLCENTER INKCENTER USER MANUAL
Stable time
Certain RIPs (e.g. polled via a FTP folders or UNIX Samba share)
build up the ripped files by opening and closing the file many times.
To ensure that a file is fully written, InkCenter may want to observe
the file size and file modification time and only poll a given file if
these attributes are stable for a period of time. The required stable
time largely depend on the source system. Value between 1-10
seconds are usually recommended.
Ink configuration Any files entering the input folder will be analyzed using this ink
configuration (set up as described in section 4.2).
Make copy of incoming file allows the incoming tiff file to be archived or copied to
INFRALOGIC APS
39
CONTROLCENTER INKCENTER USER MANUAL
an additional input folder. This comes handy if two different ink files must be
generated from the same input (e.g. in case of parallel press runs).
4.2.2 Input naming page
Expected input file name is entered here. The isolation and extraction of parameters
like publication name, edition name, color and page numbers can be defined here.
The identifiers picked up in the file name will be used when generating the final
output name(s). Construct the expected file name mask using the listed %identifiers. In case a publication date is part of the file name, enter the date format
used using DD, MM, YY letters.
INFRALOGIC APS
40
CONTROLCENTER INKCENTER USER MANUAL
Note that for CIP3 input, the file recognition may be picked up from within the file
instead of the actual file name. Choose CIP3 naming source as filename,
/CIP3AdmJobName tag or /CIP3AdmSheetName tag.
For half web panorama plate files there must be an indication of which half holds
page data and which is blank. The blank half is usually identified using dummy page
numbers or names. Enter the list of page ‘numbers’ (separated by comma) which
are to be treated as dummy pages.
Example: News-6-100-C.tif and News-101-5-C.tif are half web plates using page
numbers 100 and 101 as dummy numbers.
Oftentimes the incoming file is generated by ControlCenter or EskoNet. To ease the
naming recognition, a ‘renamer-plugin’ can be used to extract full information about
a file from the workflow database. The plug-in requires to unique plate-ID to be part
of the filename (%!).
To make use of the plug-in, Click the Config button and set the database login
parameters for the connection to the workflow system.
4.2.3 Filename pre-processing
There are circumstances where the standard file name definitions are not adequate
for file name recognition. Not all input file names are fitting the standard naming
conventions InkCenter can tolerate directly. Regular expressions or an external
script may be required to rename the incoming file to a form which fits the standard
file mask definitions.
Regular expressions
A number of regular expressions and formats can be applied on the incoming file
names to rename these to fit the scheme. The regular expressions use a standard
Perl syntax to define matching expressions and format expressions.
A number of expressions may be defined which will be evaluated in a ranked order
until a match is defined. When a hit is found the associated format expression is
applied to form the final file name (handed to the standard name parser defined in
the Input source dialog)
See appendix A for an overview of regular expressions.
External script
For very irregular filenames with many special cases and defaults it may be needed
to run an external renaming program (eg. A Perl script, VB script or exe-file). If
script-renaming is enabled, each file in the input folder is passed to the script
together with a foldername to be used for the renamed file. After the script has
INFRALOGIC APS
41
CONTROLCENTER INKCENTER USER MANUAL
Pre-processing of file names using both regular expression and/or an
external script. The script will rename the file and move it to a pick-up
folder known by the system.
executed, InkCenter picks up the renamed file in the dedicated folder and parses the
file according the defined naming convention. See appendix B for scripting
examples.
4.3 Soft-proof generation configuration (Enterprise version only)
Soft-proofs are color combined preview files representing one side of the press
sheet. Soft-proofs may be generated in various qualities and color characteristics
depending on needs.
To allow soft-proofs first enable the generation in the Ink setup (see section 4.1.4).
INFRALOGIC APS
42
CONTROLCENTER INKCENTER USER MANUAL
The section describes the configuration of the soft-proof generation. The actual
PlateViewer is described in section 4.4
In the main File menu select Config Softproof Generation.
4.3.1 Soft-proof folders
All generated soft-proofs are stored centrally in a folder structure with separate
folders for preview files (typ. 72-100 dpi jpegs), thumbnail files and ink bar charts.
Select destination folders making sure the folders are shared to the network so that
Soft-proof configuration. Set output destination and quality of
softproof files (JPEGs)
INFRALOGIC APS
43
CONTROLCENTER INKCENTER USER MANUAL
PlateViewer clients can access the files.
Optionally each color separation can be viewed also. Enable option Write colors
separately also.
Images may be rotated using Rotate Incoming setting so they can be viewed in the
natural orientation in PlateViewer. Note that if InkCenter is used together with
ControlCenter the orientation is detected automatically. Here InkCenter will autorotate each sheet side according to layout template settings (meaning e.g. rotate
back only if required).
Be aware that a high Output resolution will require more network bandwidth for the
PlateViewer clients. Remember that file size grows with the square of the resolution
change.
Different Re-sampling methods exists allowing different trade-offs between resampling speed and quality. Bi-cubic combined with image sharpening (see below)
is recommended for most configurations.
Each available separation may be viewed in its original color (e.g. cyan) or as black.
At the very bottom of the soft-proof generation configuration dialog, each color can
be configured to be shown as original process color or black.
INFRALOGIC APS
44
CONTROLCENTER INKCENTER USER MANUAL
4.3.2 Soft-proof image shapening
Bicubic, bilinear, Blackman and Hamming filters provides a smoothing effect on
images in order to kill moiré. Potentially this will affect the text sharpness also.
Applying a sharpness filter will compensate this. The filter is examining each pixel
Sharpness-filter setup. The filter may be applied to the black
separation only (text separation). Make sure all coefficients in the
matrix adds up to 1.00 or else the color densities will change
dramatically
and creating a new pixel based on the original value and weighted result of the 24
INFRALOGIC APS
45
CONTROLCENTER INKCENTER USER MANUAL
neighbouring pixels. To keep the color densities, make sure the 5x5 coefficients
adds up to 1.00.
4.3.3 ICC Configuration
InkCenter can apply profiles to the re-sampled plate images. There are several
transformation methods between color spaces which can be applied.
Transformation mode depends on which profiles are attached.
ICC profile setup. The input profile is usually a standard neutral
filter because the input is pre-ripped CMYK separations. The
printer profile is not used for soft-proofing.
For InkCenter soft-proofing, we want to recover the separated CMYK image to RGB
(e.g. sRGB). For hard-proofing we want to re-map from already separated image to
INFRALOGIC APS
46
CONTROLCENTER INKCENTER USER MANUAL
proofing device. For advanced press-emulated proofs we must set a third profile
characterizing the press.
Input-output-transformation
Input and output device profiles will be used. For standard InkCenter
installations, where input comes from Rips or ControlCenter ExposeCenter, the
input profile will be the one used by the RIP (plate/press profile). If only dot gain
compensation is used in the RIP, we must attach a linearization curve for each
color (below) to 'reverse' this process and use Device-link transformation
instead.
Device-link transformation
Rather than having two single device profiles, this mode assumes the presents
of only one (output) profile, describing the whole transformation. Use this if no
output profile is done in the Rip. Leave the input profile field blank to enable
device-link profile processing
Input-output-proof transformation
Three profiles will be used - input, output and a profile emulation the color of
another device (usually the press). This will only work if a proper gamut tag is
present in proofing profile.
The standard rendering intents used by the transformation are handled by
InputCenter:
Perceptual (Default)
Mainly intended for images only. Hue hopefully maintained (but not required),
lightness and saturation sacrificed to maintain the perceived color. White point
changes to result in neutral grays.
Relative colorimetric
Within and outside gamut; same as absolute colorimetric (see below). White
point changed to result in neutral grays. If adequate table is present in profile,
then it is used. Else reverts to perceptual intent.
Saturation
Mainly intended for graphics. Hue and saturation maintained with lightness
sacrificed to maintain saturation. White point changed to result in neutral grays. If
adequate table is present in profile, then it is used. Else reverts to perceptual
intent.
Absolute colorimetric
Within the destination device gamut; hue, lightness and saturation are
maintained. Outside the gamut; hue and lightness are maintained, saturation is
sacrificed. White point for source and destination; unchanged. Intended for spot
colors (Pantone, TruMatch, logo colors, ...)
INFRALOGIC APS
47
CONTROLCENTER INKCENTER USER MANUAL
4.3.4 Output Linearization
The linearization filter is simple color-by-color lookup tables applied to pixels prior to
color merging (and ICC processing). The filter consists to a curve per color which
can be manipulated by dragging the anchor points with the mouse. Certain predefined curve shapes exist: Linear, cubic and logarithmic (press these buttons to
reset to any of these curves.
The linearization can be used as a ‘poor-mans’ color processing tool where ICC
profiles are not available.
The linearization dialog allows simple mapping for each color.
This can be used with or without ICC processing to correct the
output on a per-color basis.
INFRALOGIC APS
48
CONTROLCENTER INKCENTER USER MANUAL
4.4 Configuration of PlateViewer
To be written..
4.5 Log files
InkCenter communicates with the outside world be maintaining xml-based log files
of its activities. Log files may be (re-)loaded and purges from the Log menu.
The formal syntax (DTD) of the log file may be found in the document InktCenter log
specification
INFRALOGIC APS
49
CONTROLCENTER INKCENTER USER MANUAL
Appendix A – Regular expression
The InkCenter naming recognition may use regular expressions for pre-processing
of the file names. To utilize the full potential of the very powerful regular expression
methodology takes some practice. Recommended reading is Mastering Regular
Expressions (O’Reilly).
Make sure to understand the meaning of the terms match expression and format
expression. Match expressions holds the actual pattern for name recognition.
Format expressions are the definitions used for the generation of the renamed file
names.
The first part of this appendix sums up the formal syntax of regular expressions. In
the last part of the section a number of relevant examples are shown. These
examples may serve as relevant starting points for building your own expressions.
A.1 Regular expression syntax
Literals
All characters are literals except: ".", "|", "*", "?", "+", "(", ")", "{", "}", "[", "]", "^", "$" and
"\".
These characters are literals when preceded by a "\". A literal is a character that
matches itself
Wildcard
The dot character "." matches any single character
Repeats
A repeat is an expression that is repeated an arbitrary number of times. An
expression followed by "*" can be repeated any number of times including zero. An
expression followed by "+" can be repeated any number of times, but at least once.
An expression followed by "?" may be repeated zero or one times only. When it is
necessary to specify the minimum and maximum number of repeats explicitly, the
bounds operator "{}" may be used, thus "a{2}" is the letter "a" repeated exactly twice,
"a{2,4}" represents the letter "a" repeated between 2 and 4 times, and "a{2,}"
represents the letter "a" repeated at least twice with no upper limit. Note that there
must be no white-space inside the {}, and there is no upper limit on the values of the
lower and upper bounds.
All repeat expressions refer to the shortest possible previous subexpression: a
single character; a character set, or a sub-expression grouped with "()" for example.
Examples:
"ba*" will match all of "b", "ba", "baaa" etc.
INFRALOGIC APS
50
CONTROLCENTER INKCENTER USER MANUAL
"ba+" will match "ba" or "baaaa" for example but not "b".
"ba?" will match "b" or "ba".
"ba{2,4}" will match "baa", "baaa" and "baaaa".
Non-greedy repeats
Whenever the "extended" regular expression syntax is in use (the default) then nongreedy repeats are possible by appending a '?' after the repeat; a non-greedy repeat
is one which will match the shortest possible string. For example to match html tag
pairs one could use something like:
"<\s*tagname[^>]*>(.*?)<\s*/tagname\s*>"
In this case $1 will contain the text between the tag pairs, and will be the shortest
possible matching string.
Parenthesis
Parentheses serve two purposes, to group items together into a sub-expression,
and to mark what generated the match. For example the expression "(ab)*" would
match all of the string "ababab".. In the example the matching engine would contain
a pair of iterators denoting the final "ab" of the matching string. It is permissible for
sub-expressions to match null strings. If a sub-expression takes no part in a match for example if it is part of an alternative that is not taken - then both of the iterators
that are returned for that sub-expression point to the end of the input string, and the
matched parameter for that sub-expression is false. Sub-expressions are indexed
from left to right starting from 1, sub-expression 0 is the whole expression.
Non-Marking Parenthesis
Sometimes you need to group sub-expressions with parenthesis, but don't want the
parenthesis to spit out another marked sub-expression, in this case a non-marking
parenthesis (?:expression) can be used. For example the following expression
creates no sub-expressions:
"(?:abc)*"
Forward Lookahead Asserts
There are two forms of these; one for positive forward lookahead asserts, and one
for negative lookahead asserts:
"(?=abc)" matches zero characters only if they are followed by the expression "abc".
"(?!abc)" matches zero characters only if they are not followed by the expression
"abc".
Alternatives
Alternatives occur when the expression can match either one sub-expression or
another, each alternative is separated by a "|". Each alternative is the largest
possible previous subexpression; this is the opposite behaviour from repetition
operators.
INFRALOGIC APS
51
CONTROLCENTER INKCENTER USER MANUAL
Examples:
"a(b|c)" could match "ab" or "ac".
"abc|def" could match "abc" or "def".
Sets
A set is a set of characters that can match any single character that is a member of
the set. Sets are delimited by "[" and "]" and can contain literals, character ranges,
character classes, collating elements and equivalence classes. Set declarations that
start with "^" contain the compliment of the elements that follow.
Examples:
Character literals:
"[abc]" will match either of "a", "b", or "c".
"[^abc] will match any character other than "a", "b", or "c".
Character ranges
"[a-z]" will match any character in the range "a" to "z".
"[^A-Z]" will match any character other than those in the range "A" to "Z".
Note that character ranges are highly locale dependent: they match any character
that collates between the endpoints of the range, ranges will only behave according
to ASCII rules when the default "C" locale is in effect. For the US localization
model, then [a-z] will match the ASCII characters a-z, and also 'A', 'B' etc, but not 'Z'
which collates just after 'z'.
"[[:space:]]" is the set of all whitespace characters.
The available character classes are:
\w in place of [:word:]
\s in place of [:space:]
\d in place of [:digit:]
\l in place of [:lower:]
\u in place of [:upper:]
alnum
Any alpha numeric character.
alpha
Any alphabetical character a-z and A-Z.
Other characters may also be included depending upon the locale.blank Any blank
character, either a space or a tab.
cntrl
digit
graph
lower
INFRALOGIC APS
Any control character.
Any digit 0-9.
Any graphical character.
Any lower case character a-z.
52
CONTROLCENTER INKCENTER USER MANUAL
print
punct
space
upper
Any printable character.
Any punctuation character.
Any whitespace character.
Any upper case character A-Z.
xdigit
word
underscore.
unicode
Any hexadecimal digit character, 0-9, a-f and A-F.
Any word character - all alphanumeric characters plus the
Any character whose code is greater than 255
Collating elements take the general form [.tagname.] inside a set declaration, where
tagname is either a single character, or a name of a collating element, for example
[[.a.]] is equivalent to [a], and [[.comma.]] is equivalent to [,]. Multi-character collating
elements can result in the set matching more than one character, for example [[.ae.]]
would match two characters, but note that [^[.ae.]] would only match one character.
Equivalence classes take the general form [=tagname=] inside a set declaration,
where tagname is either a single character, or a name of a collating element, and
matches any character that is a member of the same primary equivalence class as
the collating element [.tagname.]. An equivalence class is a set of characters that
collate the same, a primary equivalence class is a set of characters whose primary
sort key are all the same (for example strings are typically collated by character,
then by accent, and then by case; the primary sort key then relates to the character,
the secondary to the accentation, and the tertiary to the case). If there is no
equivalence class corresponding to tagname, then [=tagname=] is exactly the same
as [.tagname.].
To include a literal "-" in a set declaration then: make it the first character after the
opening "[" or "[^", the endpoint of a range, a collating element.
Line anchors
An anchor is something that matches the null string at the start or end of a line: "^"
matches the null string at the start of a line, "$" matches the null string at the end of
a line.
Back references
A back reference is a reference to a previous sub-expression that has already been
matched, the reference is to what the sub-expression matched, not to the
expression itself. A back reference consists of the escape character "\" followed by a
digit "1" to "9", "\1" refers to the first subexpression, "\2" to the second etc. For
example the expression "(.*)\1" matches any string that is repeated about its midpoint for example "abcabc" or "xyzxyz". A back reference to a sub-expression that
did not participate in any match, matches the null string: NB this is different to some
other regular expression matchers. Back references are only available if the
expression is compiled with the flag regbase::bk_refs set.
Characters by code
This is an extension to the algorithm that is not available in other libraries, it consists
of the escape character followed by the digit "0" followed by the octal character code.
INFRALOGIC APS
53
CONTROLCENTER INKCENTER USER MANUAL
For example "\023" represents the character whose octal code is 23. Where
ambiguity could occur use parentheses to break the expression up: "\0103"
represents the character whose code is 103, "(\010)3 represents the character 10
followed by "3". To match characters by their hexadecimal code, use \x followed by
a string of hexadecimal digits, optionally enclosed inside {}, for example \xf0 or \x{aff},
notice the latter example is a Unicode character.
A.2 File name renaming examples using regular expressions
Typically the regular expressions are used to split up a filename into a well defined
separated filename. In the following simple examples the match/format expression
pair is used to streamline incoming file names. Note the brackets around partial
match expressions. These are used to form the output name using the format
expression. The first bracket set is mapped to format id $1 etc.
Match
expression
[a-zA-Z]*([0-9]+).*
.*([0-9]+)[.].*
([0-9]+).*
([0-9]+)[-_]([09]+).*
(.*)[_]([a-zAZ]+)[_](.*)
INFRALOGIC APS
Format
expression
myname-$1
Incoming filenames
Renamed filenames
AbC01xyz.tif
Cdcdcdc02
myothername-$1 abcXyZ123.ext
xxyy_zz124
anothername-$1 56xYzsD.x.y.z
57edfr123
myname-$1-$2-1 12_98dsdf_a_b_c
12-99xyz
$1-$2-$3
x_y_z_01_black_1.tif
myname-01
myname-02
myothername-123
myothername-124
anothername-56
anothername-57
myname-12-98-1
myname-12-99-1
x_y_z_01-black-01.tif
54
CONTROLCENTER INKCENTER USER MANUAL
Appendix B - External scripts
Under special circumstances it is necessary to use an external application for file
renaming so that the file can be parsed according to the options given by InkCenter
(the file mask).
Even if the external program is referred to as a script it may also be a dedicated
console program (exe-file) with argument inputs.
B.1
Script calling convention
The script is called using a blocking win32 CreateProcess() command. The
command takes the following form:
Scriptfile PathToInputFile PathToTempFolder
where
ScriptFile is the full file name path to the script,
PathToInputFile is the full file name path to the input file to rename
PathToTempFolder is a path to a (temporary) destination folder for the renamed
file
The script is expected to move the renamed file from the input folder to the temp
folder (PathToTempFolder) where InkCenter will pick up the renamed file.
Important note: Because InkCenter blocks the polling when the scripts executes
make sure to script is not blocking too long. As a safety valve InkCenter has a
timeout counter which is defined in InkCenter.ini file in seconds.
[System]
ScriptTimeout=60
ShowScript=0
You may want to set the ShowScript=1 for diagnostics purposes. This will show the
command prompt window while executing the script.
B.2
Script example
Input file:
c:\input\SomeNameThatStinks01-K.tof
InkCenter configuration:
File mask: %j-%c.tif
Script file: c:\utils\renamer.bat
Resulting command: “c:\utils\renamer.bat” “c:\input\SomeNameThatStinks01.tof”
“c:\temp”
INFRALOGIC APS
55
CONTROLCENTER INKCENTER USER MANUAL
Batch file
echo Running external renamer batch using Perl script
perl renamer.pl %1 %2
Batch file parameter transfer
If you are using batch files as scripts to parameters are passed as %1 and %2 as
normal. Note that the parameters can be modified by the batch file processor, e.g.
for extracting path from filename:
Modifier
%~1
%~f1
%~d1
%~p1
%~n1
%~x1
%~s1
%~a1
%~t1
%~z1
Description
Expands %1 and removes any surrounding quotation marks ("").
Expands %1 to a fully qualified path name.
Expands %1 to a drive letter.
Expands %1 to a path.
Expands %1 to a file name.
Expands %1 to a file extension.
Expanded path contains short names only.
Expands %1 to file attributes.
Expands %1 to date and time of file.
Expands %1 to size of file.
Searches the directories listed in the PATH environment variable
and expands %1 to the fully qualified name of the first one found.
%~$PATH:1
If the environment variable name is not defined or the file is not
found, this modifier expands to the empty string.
The following table lists possible combinations of modifiers and qualifiers that
you can use to get compound results.
Modifier
%~dp1
%~nx1
Description
Expands %1 to a drive letter and path.
Expands %1 to a file name and extension.
Searches the directories listed in the PATH environment
%~dp$PATH:1 variable for %1 and expands to the drive letter and path of the
first one found.
Expands %1 to a dir-like output line.
%~ftza1
B.3
Scripting languages
Using Perl
Perl is an excellent language the modifying filenames because of its regular
expression capabilities. The description on how to use Perl for renaming files is
INFRALOGIC APS
56
CONTROLCENTER INKCENTER USER MANUAL
beyond the scope of this manual. It is recommended to obtain the latest Perl
distribution from www.ActivePerl.com.
Using Windows Scripting Host with VBScripts
Like Perl, Visual Basic Scripting has regular expression support using the RegExp
object. Make sure the scripting engine is version 5.6 or later (download from
www.microsoft.com).
You invoke scripts from batch files using the cscript //nologo <filename> command.
See msdn.microsoft.com/scripting
INFRALOGIC APS
57
CONTROLCENTER INKCENTER USER MANUAL
ICC, 41, 43
InputCenter, 42
INFRALOGIC APS
Linearization, 43
RIP, 42
58