1
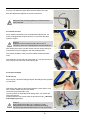
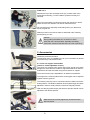
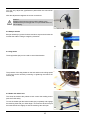
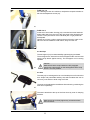
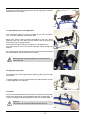
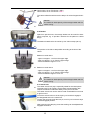
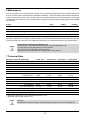
FLUX walking aid
user manual
- partnering together to mobilize kids
User manual for the FLUX walking aid
Contend
page
1
Common Information
1.1 Preface ___________________________________________________________________ 2
1.2 Application _________________________________________________________________ 2
1.3 Declaration of conformity______________________________________________________ 2
1.4 Terms of warranty ___________________________________________________________ 2
1.5 Servicing and repairs_________________________________________________________ 2
2
Safety Instructions ______________________________________________________________ 3
2.1 Meaning of symbols _________________________________________________________ 3
2.2 Common safety instructions ___________________________________________________ 3
3
Delivery and Preparing for Use ____________________________________________________ 4
4
Adjusting and Adaptation Possibilities _____________________________________________
4.1 Grab rail height and depth adjustment ___________________________________________
4.2 Grab rail standard ___________________________________________________________
4.3 Grab rail with universal handle _________________________________________________
4.4 reverse-roll lock _____________________________________________________________
4.5 fold for transport ____________________________________________________________
5
Accessories ____________________________________________________________________ 9
5.1 Lower arm support with handles ________________________________________________ 9
5.2 Bumper wheels ____________________________________________________________ 10
5.3 Drag brake________________________________________________________________ 10
5.4 Brake with wheel lock _______________________________________________________ 10
5.5 Anti-tips __________________________________________________________________ 11
5.6 Seat _____________________________________________________________________ 11
5.7 Hip-/bottom pads, multi adjustable _____________________________________________ 12
5.8 Dynamic hip control _________________________________________________________ 12
5.9 Carrier ___________________________________________________________________ 12
5.10 Basket ___________________________________________________________________ 13
5.11 Swivel lock________________________________________________________________ 13
6
Maintenance __________________________________________________________________ 14
7
Technical Data _________________________________________________________________ 14
1
7
7
7
7
8
8
1 Common Information
1.1 Preface
Thank you for selecting the FLUX walking aid. We have designed this high-quality product to make
your life safer and easier, and we have included this manual to help you use and maintain the product.
Please read the following instructions to make sure you use this product as recommended. If
you have any further questions or if you have any problems, please contact your health care provider.
We hope that FLUX walking aid meets your expectation.
The design, as described in these instructions for Use are subject to technical alterations without notice.
1.2 Application
FLUX walking aid is a so called “posterior walker” which is used in the reversed direction. This provides an
optimum freedom for the legs in the forward direction.
The FLUX walking aid helps children or adolescents use the strength and support of their upper extremities
to assist their compromised lower extremities in walking. The walker is to be used to aid the child in learning
the sequence of movements involved in walking and thus increase their range of mobility.
It is indicated for walking training in the case of diseases or injuries that involve both a disturbance in the
locomoter system and imbalance / asynergia.
The design promotes an upright posture when standing or walking and thereby differs from traditional
walkers in that it requires the user to employ more natural movements and can greatly simplify the user‘s
ability to stand, establish a sense of balance and walk.
1.3 Declaration of Conformity
HOGGI® GmbH as manufacturer with sole responsibility declares that the FLUX walking aid
conforms to the requirements of the 93/42/EEC Guidelines.
1.4 Terms of Warranty
Warranty applies only when the product is used according to the specified conditions and for the
intended purposes, following all manufacturer’s recommendations.
1.5 Service and Repairs
Service and repairs on the FLUX walking aid should only be carried out by authorized HOGGI dealers.
Should any problems arise, please contact the dealer who supplied your FLUX. Authorized dealers only fit
original HOGGI spare parts.
For repair and service, the following tools are required:
Allen wrenches, sizes: 4 mm, 5 mm and 6 mm
Wrenches, sizes: 8 mm, 10 mm and 19 mm
Philips screw driver, size: 2
Your authorized provider:
2
2
2.1
Safety instructions
Meaning of symbols
Caution!
Warning of possible danger of accident and injury. Warning of possible technical damage.
Information!
about use of product.
Information!
for service-personnel.
Caution!
Therapy product for indoor use only.
Caution!
Therapeutic appliance may be used under supervision only!
Attention!
Read manual before use!
2.2
Common safety instructions
Read manual completely before use!
Familiarize yourself with handling and functions of the product before use and practice the
handling.
You are responsible for the safety of your child. The safety of your child could be
affected if you do not follow the instructions of this manual. Nevertheless not all possible
circumstances and unpredictable situations can be covered by this manual. Reason, care
and circumspection are not features of the product, they are required of persons who use
the product. The person who is using the product and its accessories should understand
all instructions and should explain them to every person using the product and its
accessories.
If instructions are not clear and further explanations become necessary or if you have
further questions please contact your HOGGI dealer.
Attention!
The product may be used only on solid level ground.
Attention!
FLUX is a therapeutic appliance and may be used indoor and under supervision only!
FLUX size 4 can be used outdoors providing the optional brake with wheel lock has been
installed.
Caution!
While folding the walker, do not hold on to other parts than the ones described, especially
the folding mechanism, because otherwise there is a risk of pinching!
Caution!
All adjusting levers are fastened finger-tight without using tools.
Caution!
Observe the maximum load for each model (refer to Technical Data)!
3
Caution!
The maximum load capacity of the storage basket and the carrier is 5 kg.
Caution!
Attaching heavy bags or other weight can affect the stability adversely .
Caution!
The pull out stop determines the maximum possible height of the grip bar; no adjustments
may be made beyond this area.
Caution!
Check sufficient clamping by loading the grab rail according to the maximum load capacity.
(see 7 technical data)
Caution!
The depth of the grip bar must be checked and possibly corrected after every adjustment in
height otherwise there is a risk of tipping forward. (see picture 10)
Caution!
Adjusting the lower arm support with handles to the outside beyond the grip bar is not
permitted since then there is a risk of tipping.
Caution!
Make sure that your child does not lean too far out of the walker in order to reach objects in
front to the side or to the rear of the FLUX walking aid. A shift in the centre of gravity might
cause the FLUX to tip over.
Caution!
The grip bar may not be used as a seat surface since otherwise there is a risk of tipping.
Caution!
Frame parts and the carrier may not be used as a seat surface or to stand on otherwise
there is a risk of tipping.
Caution!
Do not expose the FLUX walking aid to sun or other heat sources (oven, radiator, sauna,
etc.) frame parts and handle grips could be heated up and cause burn injuries.
Caution!
Please keep packaging material away from children. Plastic packaging presents the
danger of suffocation.
Information!
Clean all frame components and plastic parts using only standard household cleaning
agents.
Information!
Notice the maximum width of the FLUX walking aid (door clearance).
See also 7 technical data and type label attached to the product.
Information!
Should any defects become obvious, please contact your authorized HOGGI dealer to
eliminate them. We also recommend that you should service your FLUX by your authorized
dealer every twelve months.
Information!
Whenever you change any settings on the FLUX walking aid make sure that you
firmly tighten any screws that have been loosened.
4
3 Delivery and Preparing for Use
The original package contains the following components:
• base frame folded;
• grab rail folded;
• instructions for use and list of tools required;
• accessories as ordered.
1
Carefully remove the transport safety items and packaging material.
Proceed in the following manner to assemble the FLUX walking
aid:
FLUX size 1-3
• Take hold of the base frame behind the front wheels (2) and unfold
the basic frame as shown.
2
• Push the folding lever (3) until the lock pins engage.
3
FLUX size 4
• Take hold of the base frame behind the front wheels (4) and unfold
the basic frame as shown.
4
• Push down the sliders (5) until the red safety hooks lock with an
audible click.
5
5
• Unfold grab rail as shown (6).
6
• Open the eccentric lever (9) and place the grab rail into the
unfolded base frame (7).
7
• Press the snap buttons (pull out stop) to the inside when placing
the grab rail into the frame (8). Insert the grab rail as far as
possible into the frame, until the pull out stops (9) engage on the
left and right side.
Caution!
The pull out stop determines the maximum possible
height of the grab rail; no adjustment may be made
beyond this area.
8
• Slide the grab rail to the desired height and close the eccentric
lever (9) on both sides of the basic frame.
Caution!
Check sufficient clamping by loading the grab rail
according the maximum load capacity.
(see 7 technical data)
9
• When the lever is opened you can set the closure strength of the
eccentric lever by adjusting the knurled nuts (10).
Be sure to tighten any screws you have undone
previously.
• Finally, you may adjust the depth of the grab rail evenly on both
sides and tighten the hexagon socket head cap screw on both
sides (11).
6
10
FLUX size 1-3: The depth of the grab rail must be set so that the
anterior edge of the grip or the lower arm support pads on the grab
rail lies behind the caster forks by at least the length of A. If bumper
wheels are used the measurement of A must be increased with one
centimetre. It is best to check this (12) by placing the castor forks of
the FLUX against a smooth door and measuring the space from the
door leaf to the grip, i.e. forearm pad.
FLUX size 4: no adjustment needed.
11
A
Minimum length of A when using:
FLUX
size 1
FLUX
size 2
FLUX
size 3
Grab rail standard
14 cm
17 cm
20 cm
Grab rail with universal handle
12 cm
17 cm
20 cm
Grab rail with lower arm support
14 cm
15 cm
20 cm
Caution!
The depth of the grab rail must be checked and possibly
corrected after every adjustment in height otherwise there
is a risk of tipping forward.
12
4 Adjusting and Adaptation Possibilities
4.1 Grab rail height and depth adjustment (all versions)
The height (13 and 14) and depth (11) of the grab rail can be adjusted to meet individual needs.
Refer to „3 Delivery and Preparing for Use”
13
4.2 Grab rail standard
The standard grab rail is shown here in figures 13 and 14 above.
14
4.3 Grab rail with universal handle
By loosening the screw connections, you can rotate both grips (15),
thereby adjusting the distance between grips as well as the grip
height (refer to 7 Technical Data).
15
7
You may only adjust the grips within the area shown here (16).
After the adjustment retighten the screw connections.
Make sure that you firmly tighten any screws that have
been loosened.
16
4.4 reverse-roll lock
Since children instinctively want to fall backward all the time, the
FLUX is equipped with reverse-roll locks (17) and thus provides
optimum support.
Caution!
Regularly check for proper function and correct if
necessary. Worn-out or damaged tires must be replaced.
17
After pulling the lock pin (18) the reverse-roll lock can be swung forward until the lock pin engages in the deactivated position.
This makes possible to freely move the walker forward and backward.
To activate the reverse-roll lock just pull the pin. The reverse-roll lock
will be swung onto the wheel under spring load.
18
4.5 fold for transport
FLUX size 1-3
Pull lock pins (19) before folding and push the folding levers upwards
on both sides.
Take hold of the walker´s base frame behind the front wheel‘s and
lift it or tilt the walker onto the rear wheels.
The anterior frame will fold in (20).
You will achieve an especially small folding size if you detach and
fold in the grab rail.
Please proceed in the reverse order as described under „3 Delivery
and Preparing for Use”
Caution!
During folding the walker, do not hold on to other
parts than the ones described, especially the folding
mechanism because otherwise there is a risk of pinching !
8
19
20
FLUX size 4
Depress the top of the red safety hooks (21) on both sides of the
frame before unfolding. Push the sliders upwards until they are
unlocked.
Take hold of the walker´s grab rail as shown (22) and lift it or tilt the
walker onto the rear wheels. The anterior frame will fold in.
21
You will achieve an especially small folding size if you detach and
fold in the grab rail.
Please proceed in the reverse order as described under “Delivery
and Preparing for Use”
Caution!
During folding the walker, do not hold on to other
parts than the ones described, especially the folding
mechanism because otherwise there is a risk of pinching !
22
5 Accessories
All accessories which are not installed by the manufacturer must be
installed by trained technicians.
The following notes on installation are for your information but should
be performed by trained technicians.
23
5.1 Lower arm support with handles
(2-axial or 3-axial adjustable version)
The lower arm supports with vertical hand grips (23-26) have been
designed for users who are unable to support themselves on their extended arms and who feel safer using their forearms for support.
The 3-axial version (23) is adjustable in an aditional vertikal axle.
The height of the forearm pads and the vertical grips can be adjusted
together with the grab rail
The forearm pads (24) can be connected with the handle in three different positions. The distance between forearm pad and grip should be
adjusted in order to avoid pressure points and cramped postures.
24
With the clamping brackets (25) the forearms pad and handle can be
adjusted to the desired position.
Make sure that you firmly tighten any screws that have
been loosened.
25
9
You may only adjust the grips/forearm pads within the area shown
here (26).
After the adjustment retighten the screw connections.
Caution!
Adjusting the lower arm support with handles to the
outside and beyond the grip bar is not permitted there is a
risk of tipping.
26
5.2 Bumper wheels
Bumper wheels (27) protect furniture and door ways and minimise the
risk that the walker could get caught by obstacles.
27
5.3 Drag brake
The drag brakes (28) can be used to control deceleration.
28
The pressure of the drag brakes on the hub and thus the rolling speed
of the tires can be varied by loosening or tightening the interior set
screws (29)
29
5.4 Brake with wheel lock
The wheel lock allows the patient to both control the braking and to
park the FLUX safely.
To lock the brakes pull the brake handle (30) completely and engage
the retaining claw with your index finger. To loosen the wheel lock pull
the brake handle out slightly so that the retaining claw will open.
30
10
FLUX size 1-3
If the braking function is insufficient, readjust the respective brake cable with the adjustment screw (31).
31
FLUX size 4
At the exit of each brake housing (32) a cranked set screw leads the
brake cable away from the tyre of the rear wheel. After loosening the
counter nut the pre tension of the individual (left or right) brake can
be adjusted.
Tighten the counter nut firmly again and ensure that the crank of the
set screw shows towards the rear frame, away from the tire.
32
5.5 Anti-tips
The anti-tippers (33) increases stability against tipping backward.
The anti-tippers are inserted into the anti-tippers holder and secured
with the snap button against turning. The anti-tippers can be swung
upwards.
Caution!
Make sure that the snap butttons are fully engaged.
Check with a sharp push on the anti-tippers that the snap
button is securely located.
33
5.6 Seat
The seat (34) is not designed to be a comfortable piece of furniture but
as a simple and practicable auxiliary seat which enables the user to
rest every now and then while using the FLUX.
34
The seat can be adjusted to the different frame sizes by positioning the
tube arms respectively.
The seat is attached to the top of the front frame by a set of clamping
brackets.
Make sure that you firmly tighten any screws that have
been loosened.
35
11
The seat is located in the upright position during walking and could be
folded down for use simply.
36
5.7 Hip-/bottom pads, multi adjustable
The Hip-/bottom pads (37) make it possible for the user to position
him- or herself superbly in the push bar area.
Many users tend to want to support themselves to the rear. These
pads bring the user once again into the anterior area of the grip bar
and thereby into an upright position.
The width and angle of the pelvic supports can be adjusted too.
The centre support can be removed if especially narrow settings are
desired.
37
By combining two sets of clamping brackets (38) the Hip-bottom pads
can be adjusted to various positions and angles.
Make sure that you firmly tighten any screws that have
been loosened.
38
5.8 Dynamic hip control
The Dynamic hip control supports free walking by fixing the user with
the hip belt.
It is also possible to use a custom made body shaped fixation (corset
or belt) supplied by an orthotest.
39
5.9 Carrier
The carrier (40) is attached to the top of the front frame in the same way
as the seat (36) and can be used together with the mounted seat . To
achieve a compact folding package the carrier can be folded away.
Caution!
The carrier may be used together with ant-tips only.
40
12
Carrier size 1 fits on FLUX size 1 and 2
Carrier size 3 fits on FLUX size 3 and 4
The carrier will deliver with a tension strap to fix school bags and similar.
Caution!
The maximum load capacity of the storage basket and the
carrier is 5 kg.
41
5.10 Basket
Apart from practical use, the storage basket can be used for therapeutic purposes, e.g. to provide a stimulus for the patient to collect
things.
The basket is attached to the carrier by four Velcro straps (42-44).
42
The position of the Velcro straps differ according to the size of the
carrier.
Basket on carrier size 1
- upper row approx. 4 cm from the upper edge
- lower row approx. 17 cm from the upper edge
- horizontal distance approx.17 cm
43
Basket on carrier size 3
- upper row approx. 5 cm from the upper edge
- lower row approx. 17 cm from the upper edge
- horizontal distance approx. 20-21 cm
Caution!
The maximum load capacity of the storage basket and the
carrier is 5 kg.
44
5.11 Swivel lock
The caster swivel lock (45) is especially suited for the initial phase
of therapy with FLUX models, since greater manoeuvrability also
requires increased coordination ability on the part of the user.
The caster swivel lock can be used to make a swiveled front end into
a rigit front end.
To lock the swivel lock turn the lock pin by 90° and let it engage in
the designated hole in the castor fork.
To open the swivel lock pull the lock pin, turn it by 90° so that it stays
in the disengaged position.
After loosening the clamping screw the tracking can be adjusted with
engaged swivel lock.
45
13
6 Maintenance
Your FLUX walking aid is CE approved. Herewith the manufacturer guarantees that this medical product as
a whole conforms to the requirements of 93/42/EEC Guideline. The FLUX walking aid should be checked for
correct function before every use. The items listed in the following table must be checked by the user at the
indicated intervals. Failure to carry out these simple checks may lead to problems arising that could invalidate
the warranty.
Check
daily
Function test of the brake and the reverse roll lock
X
Check of screw connections
weekly
monthly
X
Visual inspection of wearing parts such as wheels and bearings
X
Contamination on bearings
X
Should any defects become obvious, please contact your authorized HOGGI dealer to eliminate them. We also
recommend that you have your FLUX walking aid serviced by your authorized dealer every twelve months.
Instructions for Cleaning and Maintenance
- Clean all frame components and plastic parts using mild detergents only.
- In most cases, wiping with a damp cloth is sufficient.
- Do not use your FLUX walking aid in salt water.
- Keep sand or other particles from damaging the wheel bearings.
7 Technical Data
Measures (cm) and weight (kg)
grab rail standard
grip height
grip width
grab rail with universal grips
grip height
grip width
grip diameter
forearm supports with hand grips
height from floor
distance (forearms)
frame
total length*
total width**
load capacity
front / rear wheel dia
seat height
weight
Turning diameter (without accessories)
FLUX size 1
48-61
41
FLUX size 2
57-81
46
FLUX size 3
69-87
51
FLUX size 4
82-102
51
43-68
29-41
3
51-88
34-46
3
62-94
39-51
3
75-102
39-51
3
48-69
29-41
65
64
60 kg
15 / 20
37
6,5 kg
57-89
34-46
81
69
75 kg
15 / 20
44
6,8 kg
69-95
39-51
88
74
75 kg
15 / 20
54
7,1 kg
82-110
39-51
91
78
100 kg
20 / 30
58
9 kg
92 cm
106 cm
120 cm
175 cm
* total length with anti-tip +10 cm, with bumper wheels +1 cm
** total width with bumper wheels +2 cm
Attention!
Accessories and add-ons reduce the remaining load capacity of the FLUX walking aid.
14
HOGGI GmbH
Eulerstrasse 27
56235 Ransbach-Baumbach
GERMANY
Fon: (+49) 26 23 / 92 499-0 · Fax: (+49) 26 23 / 92 499-99
e-mail: [email protected] · Internet: http://www.hoggi.de
© HOGGI GmbH 1910-0007-GB_04-2012
Manufacturer: