1
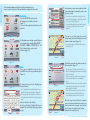
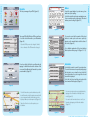
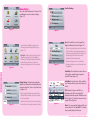
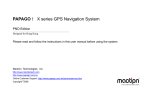
www.mactiontech.com
HandyMap
User Manual
In this example no region was specified and all the
streets in the database containing the word ox was
returned as a result.
Destination
Tap on the DESTINATION icon to specify
the destination you would like to travel to.
(Figure 1.1)
You can select the preferred destination from a list
of options.
Figure 1.5
- This result can be refined by selecting the house’s
number and then making the selection from the list
on the correct address (Figure 1.5)
- The result will display street name number as well
as the province in which the street is located
(Figure 1.5)
Getting Started*
Getting Started*
This section will explain each of the icons in the destination menu.
How to set up the route to be Followed will also be explained in this section.
If you tap on your Street name the screen will
change to map mode and will display the selected
location as in this scenario. (Figure 1.6)
Figure 1.1
The Destination menu will give you the following
user selectable options namely, HOME , RECENT,
FAVOURITES, ADDRESS, INTERSECTION or POI
(Place of Interest) which can be set as the
destination. (Figure 1.2)
- Tap on my favourites to add this position as your
home (Figure 1.6)
Figure 1.6
Figure 1.2
The following screen will open where you edit your
favourite positions (Figure 1.7)
Home
This is a preset coordinate for your home. Tap on
the HOME icon to set this as your destination point.
(Figure 1.3)
Figure 1.3
To set an point as your home the following Steps
should be followed
Figure 1.7
- Tap on the address Icon in the Destination menu
and the following screen will appear. (Figure 1.4)
- As you enter your Home address you will see that
below the text box it will show the user the search
result.
In this case there are 100 possibilities.
tap on the next button if satisfied with the road
displayed. This can be further refined by specifying
a region.
Figure 1.4
Figure 1.8
- Select the type of favourite you would like to save
this point as by tapping on the arrows and changing
the type of favourite
- Tap on the name if you wish to change the name
that is currently displayed to a user-definable
name.
- Additional information can be saved in the same as
in the step above by tapping in the centre of the
screen adjacent to the name.
- When all the information which is to be saved for
this point, is entered in the relevant fields tap
on the OK button at the bottom of the screen.
When the steps has been followed as explained
above the position would have been saved as your
Home’s position in the favourites menu and will
open the map screen with the Home’s position
displayed on the map (Figure 1.8).
© 2007, Mobile Locator Manufacturers cc MobiTrak
When you tap on the Recent icon from the
Destination menu a list if the recently searched for
places will be displayed. (Figure 2.1)
- At the Recent menu the user can either Delete all
of the recently searched for places from the list.
Figure 2.1
Figure 1.9
The Favourite that has just been created will be
displayed as in (Figure 1.10)
Figure 2.2
Figure 1.10
Tap on the newly created favourite and the point
created will be displayed as in (Figure 1.11)
For a more accurate history view tap FILTER to sort
by type ranging from All, By Map View,
Set Destination and MY POI. If you set the FILTER to
All this will display all the history and destination points
set before. By Map View displays all the searches
and destinations done in MAP VIEW. Set
Destination displays all destinations points set
before and MY POI displays all the recent POIs that
were created. You can also sort the RECENT list by
Distance, Name and Time. (Figure 2.2)
From the Recent list you can set the destination you
would like to travel to by tapping on the relevant
name. (Figure 2.3)
- Tap on the little Home Icon and this position Will
be set as your home (Figure 1.11)
Figure 2.3
Figure 1.12
Set this position as your destination by tapping on
Navi Icon if no destination has been set. (Figure 2.4)
- To set this point as your Destination tap on the
Navi Icon (Figure 1.12). This will set the Home as
the final destination to be traveled to.
Figure 1.11
Getting Started*
Getting Started*
Recent
Tap on the back button until you are at the
Destination menu again (Figure 1.9)
Tap on the Favourites Icon to access the Favourite
that has just been created.
- From this screen you can also add the point as one
of your favourite’s or delete the point.
Figure 2.4
© 2007, Mobile Locator Manufacturers cc MobiTrak
Search the map database by road name, please
make sure of your spelling.
Select this option from the main navigation menu.
For more accurate results set the region of the street
address you are looking for. (Figure 4.1)
This lets you manage all your POI’s. (Figure 3.1)
Figure 3.1
Figure 4.1
Tap on any POI to Edit, Delete, set POI as your Home,
or set the selected favourite as your Destination.
(Figure 3.2)
You can also search by the number of the street
address to make your search more specific by
tapping on the number button at the bottom of
the screen. (Figure 4.2)
- If you edit a POI you can only change it’s details,
the co-ordinates of the POI cannot be changed.
Figure 3.2
For a detailed explanation of the street address
function please refer to page 3-4. (Figure 1.4 – 1.6)
Figure 4.2
Intersection
It is also possible to filter the recent favourites by
tapping on the filter button at the bottom of the
screen and then filtering the favourites by certain
preset variables. (Figure 3.3)
Figure 3.3
Select this if you wish to search for an intersection.
To search for an intersection point by first typing in
the first street, once you tap the street a list of all
streets that intersect or pass trough the selected
street will be displayed.
Select the 2nd street and the point where both
streets meet will be displayed. (Figure 5.1)
Figure 5.1
- You can set an intersection as your destination by
tapping on the Navi button in the Map Screen
mode. (Figure 5.2)
- To set the favourite as your destination tap on the
desired favourite on the favourites menu and it will
open in map mode with the favourites position
displayed with a pin in the map mode. (Figure 3.4)
- You can also add an intersection as one of you
favourites by tapping on the favorites button.
(Figure 5.2)
- Tap on the Navi Icon to set the point as your
destination.
Figure 3.4
Getting Started*
Getting Started*
Address
Favourites
Figure 5.2
© 2007, Mobile Locator Manufacturers cc MobiTrak
Getting Started*
Navigation
POI
Once you have selected a destination, midway
point or start point, the GPS will go into the
Navigation screen mode and will show the
navigation screen. (Figure 8.1)
Select from categories of POIs divided into Petrol
Station, Airport, Bank, Restaurant, Hotel/Motel,
Shopping Centre, Traffic Facilities, Amusement,
Government Offices, Hospital/Medical, Education
and Others. (Figure 6.1) (Figure 6.2)
Choose this option from the main Destination
menu by tapping on the POI menu Icon.
Figure 8.1
- All this information can be displayed in different
screen view screen views by tapping on the Page
button at the bottom of the screen. (Figure 8.1)
- When you tap on any categories you can search
for a key word by selecting Name Filter and you
can also set the region to narrow the search.
Figure 6.2
- You may switch between 5 available views(3D, 2D,
3D/Route Result, 2D/Route Result, Trip Computer)
in the navigation screen by tapping Page button.
(Figure 8.2)
Figure 8.2
To set the starting point for the route follow the
exact same steps as you did to set the destination,
as explained in this manual until it shows you the
starting point with a little pin on the relevant point
as in (Figure 7.1).
Figure 7.1
If a lock with a question mark displays in the
navigation screen this means that no destination
has been set or the GPS signal is not fixed so
cannot calculate the route information. (Figure 9.1)
- Tap on the top of the screen to go directly to routing
options from the navigation screen.
This shortcut only works if the top ¼ of the screen is
tapped.
Figure 9.1
- To simply view a route without having a destination
set simply tap on the top ¼ of the screen and then
select Routing.
On selecting End Navi in the routing menu the last
chosen route will be cancelled and you can now
view your journey without navigating to a
destination. (Figure 9.2)
- Tap and hold on the pins position until a menu
shows allowing you to set the point as the
starting point for you journey. (Figure 7.2)
Figure 7.2
Navigation*
Figure 6.1
- Please make sure there is an indication of GPS
signal strength before you start your journey. This
is shown in the top right hand corner next to
the Battery Icon. (Figure 8.1)
Figure 9.2
© 2007, Mobile Locator Manufacturers cc MobiTrak
Routing
- Avoidance : With this feature you can avoid the set
route which is defined in kilometres but you can
also cancel the avoidance and go back to you
original set route. The avoidance is set in 1km
Avoidance, 3km Avoidance, 4km Avoidance, 10km
Avoidance and 30km Avoidance. (Figure 10.4)
Tap on the Routing Icon from the Main Menu to
view the route result and manage the points.
The various options allow to view, change or end
the route you have set. (Figure 10.1)
Figure 10.1
Figure 10.4
- End Navi : Only tap this if you want to delete the
current route that has been set-up.
This function clears the route and all off the points
set. (Figure 10.2)
- Delete Midway Point : Deletes all midway points
set within the route.
This function will remove all your midway points in
the route setup. (Figure 10.2)
Figure 10.2
Routing*
Routing*
- Route Options : This determines the way your
route is calculated. We suggest you leave the
setting on Recommended but you can choose
from Recommended, Highway Preferred, Highway
Avoided, Shortest and Walking. You can also select
to avoid all toll roads. (Figure 10.5)
Figure 10.5
Re-Computing Route : Tap on the Re-Computing
Route Icon once any changes have been made to
the route. This function recalculates the route you
have setup. (Figure 10.2)
Figure 10.3
- Route Result : Displays the route that has been
setup Figure 10.3 turn-by-turn in a list format.
This function gives the summary of the route giving
information on how far your destination is and the
average time it will take you to arrive at your
destination. By selecting Simulation you can run
a Figure 10.3 simulation of the route turn-by-turn
with voice navigation. (Figure 10.3)
© 2007, Mobile Locator Manufacturers cc MobiTrak
Advanced Settings
View Port Settings:
Tap on the Advanced Button at the bottom of the
main Navigation screen for advanced settings.
(Figure 11.1)
Figure 11.1
Figure 11.4
Voice : The default voice can be changed from
English to Afrikaans, Zulu, French. (Figure 11.5)
- Once the Advanced Button is tapped on the
following screen will be displayed to the user.
(Figure 11.2)
Figure 11.2
Day/Night : This Menu function Allows the user to
change between Day Mode and Night Mode.
Switching The Day/Night setting to Automatic the
display will change from day to night mode
automatically depending on the systems current
time.
- When the Speeding Warning is selected with a red
dot there will be an aural warning saying that you
are Exceeding the speed limit for the specific road
currently being used if driven faster than the
allowed limit for that particular road.
Figure 11.5
- If the Speed Camera option is selected aural
information will be given on speed cameras in the
Map Database.
Safety Mode : Select this mode if the user Wishes
not to interact with the system when driving in a
vehicle.
Display Settings : The display setting allows the
application to change the scale automatically in the
map mode when Auto Scale is selected with a red
dot. (Figure 11.3)
GPS : When the User taps on the GPS icon
information on the GPS connectivity will be
displayed as well as the amount of satellites in view.
(of the) (Figure 11.6) It will also determine if it can
acquire a 2D or 3D position.
- By selecting the North Up option with a red dot,
the Map will be orientated so that North is always
at the top of the Map.
Figure 11.3
- When the Track Log is selected it creates a track log
which will be shown as bread crumbs on the Map.
Figure 11.6
Advanced Setting*
Advanced Setting*
Switch Map : The Switch Map Icon allows the user
of the system to switch the current map with
another G12 map. (Figure 11.2)
About : Pop up prompt that displays all info and
version number of the HandyMAP G12 software
that is currently installed on the device.
© 2007, Mobile Locator Manufacturers cc MobiTrak
MEMO*
MEMO*
Welcome to the
Voice Navigation System
Copyright © 2007, Maction Technologies, Inc.