1
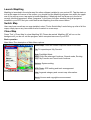
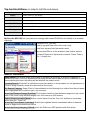
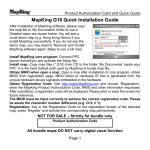
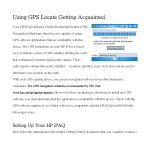
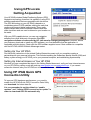
Using GPS Locate
Getting Acquainted
Your HP iPAQ includes Global Positioning System (GPS)
Navigation technology; therefore it is capable of using GPS
software applications that are compatible with this device.
The GPS technology on your HP iPAQ is based on a
worldwide system of GPS satellites orbiting the earth that
continuously transmit digital radio signals. These radio
signals contain data on the satellites’ locations and their
exact clock time and are used to determine your location on
the earth.
With your GPS capable device, you can use navigation
software from other third-party companies. For GPS
navigation solutions recommended by HP, visit www.hp.com/go/gpsnavigation. However, before
you purchase, download or install any GPS software, you must determine that the application is
compatible with this device. Check with the GPS software supplier to see if their software is compatible
with the HP iPAQ HW6515 Mobile Messenger series.
Setting Up Your HP iPAQ
First follow the instructions in the printed Getting Started document until you complete creating a
partnership with your personal computer. This includes installing the Subscriber Identity Module (SIM) and
battery, synchronizing your HP iPAQ you’re your personal computer, and establishing a partnership.
Setting Up Internet Access on Your HP iPAQ
Now that you have completed the steps in the Getting Started document, verify you have Internet access
on your HP iPAQ by visiting a web site such as www.google.com or www.yahoo.com . If you cannot
access the Internet, take your HP iPAQ out of the cradle and use a GPRS connection.
Using HP iPAQ Quick GPS
Connection Utility
To improve GPS hardware performance, you need to
enable the HP iPAQ Quick GPS Connection Data Utility
and download the latest data file.
It is recommended to set the default to “enable
updates” and “initiate GPRS connection for update” in
order to download GPS file automatically.
TO CHANGE THE DEFAULT SETTINGS:
1. From the Start menu, tap Settings > Connections > Quick GPS Connection icon.
2. In the Settings tab:
Enable updates—This setting allows you to enable the Quick GPS Connection capability. If you
disable it, then your HP iPAQ will no longer receive Quick GPS Connection updates and your GPS
start-up times could be longer.
Initiate GPRS Connection for updates—This setting allows Quick GPS Connection updates to
your device over the air via GPRS.
Show expiration reminders and warnings—This setting reminds you by notification when your
satellite location file is out-of-date.
Show tray icon on today screen—This setting turns on a Quick GPS Connection icon in the
Command bar. It is in green color if your satellite location file is up-to-date.
DOWNLOADING THE QUICK GPS CONNECTION DATA FILE
1. Verify the correct date and time on your HP iPAQ. Tap the Clock icon to adjust time.
2. Access your Quick GPS Connection status by tapping Start > Settings > Connections > Quick
GPS Connection icon.
3. If your HP iPAQ shows that the file has expired, again verify the date and time on the HP iPAQ is
correct and press Download Now.
4. Tap OK to close the program.
TIP: In the future, you can access the Quick GPS Connection Utility by tapping in the Command bar >
Download Now.
After the GPS Quick Connection data file has been downloaded, GPS performance Improves. We
recommend to set default to automatically download GPS file.
TIPS
1. Update GPS file every 48 hours manually or allow auto download
2. Auto download by “Enable Updates” & “Initiate GPRS for update”
3. Update GPS data file before using MapKing
NOTE: If you are going to use GPS Navigation in your vehicle for an extended period of time,
connect your HP iPAQ to an Auto adapter to save battery power. If you don’t have an Auto
adapter, you can order one at http://www.hp.com/apac/ipaq/accessories
For GPS Hardware support and service
ON HP iPAQ Quick GPS Utility:
Please refer to website at http://ap.compaq.com.sg
GPS connection problem –Testing with GPS Viewer please refer to full manual 48
MapKing 3D ™
Pocket PC Quick Guide
For Windows PPC 2003 or above
IMPORTANT MESSAGE CONCERNING THE USE OF MAPKING BY
VEHICLE DRIVER:
TO ENSURE SAFETY DRIVING, WE STRONGLY ADVISE THAT A DRIVER SHOULD NOT
OPERATE MAPKING WHILE DRIVING THE VEHICLE SIMULTANEOULSY. A DRIVER SHOULD
NEVER FOCUS HIS OR HER ATTENTION ON THE MAPKING DISPLAY WHILE DRIVING.
IMPORTANT MESSAGE CONCERNING ROUTE PLANNING:
The route planning function of MapKing is ONLY meant to be and should ONLY be used as a crude
reference. IT SHOULD NEVER BE USED TO DETERMINE ACTUAL DRIVING DIRECTIONS. The
Route Planning function of MapKing is subject to the following limitations:
- Whilst we have taken great care and endeavors in developing the product, we CANNOT guarantee
that the road network data and routing calculations of MapKing are free of any omission or defect.
- The road network and traffic conditions in the real world are ever changing; MapKing being a
pre-packaged product cannot reflect all these changes on a constant basis.
Road network parameters specifically required for route planning, like one-way traffic indicator or turn
restrictions at street crossing, are difficult or almost impossible to obtain for China or some other Asian
countries. The lack of these data would significantly affect the performance of route planning. Routing
function
Installation and Registration
Follow the procedure properly on the Product Authorization Card
Register in Pocket PC
1) Install MapKing
2) Get the MK ID from registration page
3) Get the REG. code from
http://www.mapking.com/hplink/ with MK ID,
Product authorization code
4) Open the right map, make sure you’re doing
registration for right product.
5) Input the 16 digits registration code to register
Launch MapKing
MapKing is launched in the similar way like other software installed in your pocket PC. Tap the start-up
icon at the upper left corner of the screen, you should find the MapKing program icon within the upper
row of the pop-up menu, tap again to launch MapKing. If Mapking does not show up in the list of
recently launched programs, select ”programs” in the menu will open another listing all programs
installed in your PPC and you could then launch MapKing from this second Menu
Switch Map
User may have more than one map installed, select ”Tools> Switch Map” would bring up a list of all the
maps, simply tap on any item within the list to switch to a new map. .
Close Map
Press ‘Tool’->’Close Map’ to close MapKing 3D. Please be remind ‘MapKing 3D” will run on the
background if you do not exit the program, which occupied resource of your PPC.
Basic operation
Main-Menu The description of Main Menu options
Switch Map: Close the current map and switch to another.
File: To import/export ‘My Favorite’
Style: Day/Night Mode
More: Enter the advanced functions, Search mode, Routing
page, My Favorite and Travel book functions.
Options: System setting.
GPS/ Track: GPS setting and track management.
Help: Legends category and current map information.
About: License and copyright announcement.
Tap-And-Hold-Menu on map to call the sub-menu.
My Favorite:
Home:
Add the stroke to ‘My Favorite’
Set the stroke to ‘My Home’
Remove My Favorite: remove the self define POI from map if any.
Add as Start:
Set as starting point
Add as End:
Set as destination
Remove:
Remove Start/End if any.
Routing:
after Start/ End have been setup
Simulate:
after routing result achieved you may press simulate to start simulation in GPS mode.
My Favorite (MY POI) lets you place and manage self-created POI(Point of interest) in an overlaid
map layer.
To setup a POI, you may:
Build by tap-and-hold menu from main map.
Build from tap-and-hold the search result
Tap and hold POI to all the submenu from further actions.
To import/ Export the ‘My favorite’ contents. Press ‘Tools’->
‘File’ ->’Import /my
Search Functions
Index SearchThis search mode is equivalent to browsing a dictionary or directory organized in
alphabetical order. Enter any alphanumerical string and all records with the first X characters of their
name matching the input text string will be listed as the search result.
Keyword Search “Keyword” is equivalent to wild card search. It would search for the appearance of
the input string anywhere within the name field of the record
POI Search Category Select Point of interest based on the following four criteria from the pull-down
menu highlighted with conditions type, city and area.
Search by Distance Range (Position) Find locations within a fixed distance range from the center
point of the current map window ranges from 100 meters to 2500 meters.
District Centre Location (Area) Select a main district from the “City List” and then a secondary
district from the “Town List”.
Search by Co-ordinates (Lat/Long) Search the longitude latitude coordinates either in decimal
format or degree-minute-second format
Search by Group Category (Q-find) check the POIs from GPS position with 2km radius.
Routing Functions
You must setup the routing point before start using routing
function.
There’re several options you can adjust the results.
use arrow to change the sequence of destination
use bin to eliminate section
use option to change the preferably type.
use avoid to avoid roads in from result.
Routing result. After adjustment you must press routing again to
achieve the change.
Simulate to start simulation by result of routing.
Browser turn by turn result by Summary.
GPS/ Track setting
.
Disable--- stop any track playing or GPS real-time tracking.
Auto-detect--- can detect most brands of GPS in the market.
By User--- user specify the Baudrate and COM Port. This is
for advanced user, please reference to GPS device
manufacturer user manual for designated model of GPS
device.
Track--- Open, Save and replay the track records. The track
record will be store until you start a new trip or press ‘Clean
log’ from here
GPS mode
Open GPS will lead you to ‘GPS mode’ in MapKing 3D which contains the following displays.
Close Map--- Close GPS, switch to Rerouting--- Activate the
Switch Map--- Switch to other
‘Map View’ mode
Rerouting based on actual position Map file.
Destination--- Change destination Day/Night--- Switch Day/Night
or Stop GPS and routing options. mode
Exit--- Close MapKing 3D
2D/3D view--- Switch between 2D Mute--- Disable vocal assistance
and 3D GPS view
M.O.B.--- Mark point of GPS
position, only work when GPS
is on.
GPS Status--- View the GPS signal Start/Stop Simulation--status
Re-start simulation from the
beginning.
Option--- Enter the general
setting.
GPS Failure
You can install a program name GPS viewer from CD-ROM
(technical support page) to check the GPS hardware and software
status..
1. Install GPS viewer
2. set COM7, Baudrate 57600
3. Press open GPS
4. Check the GPS status
Following condition indicate GPS error:
1. No GPS found
2. Continuous weak GPS signal (red)
Recommendation:
1. Update Quick GPS connection data, reference to First chapter
2. Press reset and try again, make sure you’re in open area
3. Contact HP GPS Hardware support
HP GPS Hardware support
FOR TECHNICAL SUPPORT on HP iPAQ Quick GPS Utility:
Please refer to website at http://ap.compaq.com.sg
MapKing Software Support
Countries / Cities
PRC
Hong Kong
India
Indonesia
International
Japan, Korea, Malaysia, Thailand
Philippine
Singapore
Taiwan
USA
Email
[email protected]
[email protected]
[email protected]
[email protected]
[email protected]
[email protected]
[email protected]
[email protected]
[email protected]
[email protected]