1
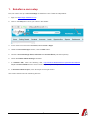
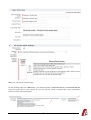
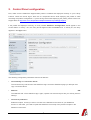
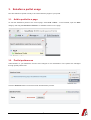
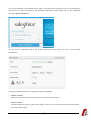
Salesforce Opportunities Portlet
Documentation v2
From
| ACA IT-Solutions
Ilgatlaan 5C
3500 Hasselt
[email protected]
Date
| 29.04.2014
This document will describe how the Salesforce Opportunities portlet can be configured and used in your
portal. The configuration consists of three steps:
1. Create and configure a Connected App in your Salesforce.com account
2. Configure the Salesforce Configuration portlet in the Control Panel of Liferay
3. Let your users change the appearance of their Salesforce portlet instance using portlet preferences.
These steps are also carefully described in the instruction video available on http://www.acait.be/portal/marketplace/salesforce-portlet. However, some of the screens and settings in the video are
outdated, so please use this document as the main reference for the actual configuration.
2
1. Salesforce.com setup
First, we need to set up a Connected App on Salesforce.com. Follow the steps below:
1. Sign in to https://login.salesforce.com.
2. Click on the Setup link next to your name in the header.
3. In the menu bar on the left under Build, select Create > Apps.
4. Under the Connected Apps section, click the New button.
5. Choose a Connected App Name, API Name and Contact Email (not that important).
6. Check the Enable OAuth Settings checkbox.
7. In Callback URL, enter the following URL: http://localhost:8080/salesforce-portlet/oauth2callback.
Replace localhost:8080 with the server name and port of your Liferay instance.
8. In Selected OAuth Scopes, move all scopes to the right column.
The screen should now look something like this:
3
Save your changes to create the app.
On the resulting page, in the API section, you should see both a Consumer Key and a Consumer Secret.
Leave this page open in your browser, so you can copy the values of these codes in the configuration
portlet in Liferay (see next chapter).
4
2. Control Panel configuration
First, make sure the Salesforce Opportunities portlet is installed and deployed correctly on your Liferay
instance. Check the server logs if there are no unexpected errors while deploying the portlet or while
accessing the portlet's configuration. If you're having issues while deploying the portlet, please contact our
support team at http://www.aca-it.be/portal/marketplace/salesforce-portlet#gpl-support.
If the portlet was deployed correctly, an entry named Salesforce Configuration should appear in the
Control Panel. In Liferay < 6.2, the entry should appear under the Portal menu. In Liferay 6.2, the entry
appears in the Apps menu.
The following configuration parameters need to be filled out:
•
ConsumerKey and Consumer Secret
The Consumer Key and Secret of the Salesforce app. Check the Salesforce page you left open and
copy over these values.
•
Redirect
URI
The Callback URL of the Salesforce app. Again, replace host name and port with your Liferay server's
settings.
•
Connect to production
Enable this option, unless you want to connect to the Sandbox environment of your Salesforce
account. In that case, you need to repeat the Salesforce.com setup of the previous chapter in the
Sandbox environment.
5
•
Currency
Optional. All money amounts will be prefixed with this string value. This is necessary because the
Salesforce API doesn't expose the currency to its clients.
Click Save to persist your changes.
6
3. Salesforce portlet usage
Now the Salesforce portlet is ready to be used inside the pages of your portal.
3.1.
Add to portlet to a page
To add the Salesforce portlet to the current page, select Add > More... in the Dockbar, open the ACA
category and drag the Salesforce Portlet to an available column on the page.
3.2.
Portlet preferences
Authentication to your Salesforce account and changes to the visualisation of the portlet are managed
through portlet preferences.
Click the Authorize button to start the OAuth authentication process.
7
You will be redirected to the Salesforce login page. If the portlet was configured to connect to the Sandbox
environment, you will be redirected to the Sandbox authentication page instead. Fill out your credentials
and click Login to Salesforce.
You will now be redirected back to the portlet's preferences page where you can do some further
configuration.
Change the portlet's behaviour by setting the following properties:
•
Visible columns
Select the columns that should be present in the opportunities overview.
•
Filter on values
Pre-filter opportunity owners, types and/or stages. This way, the overview will only show opportunities
that match these values.
8
•
Results per page
Sets the amount of opportunities per page. If there are more opportunities, pagination will be visible.
Don't forget to press Save to persist your changes.
To terminate the connection between the Salesforce portlet and Salesforce.com, click the Revoke button.
This will revoke the necessary tokens.
3.3.
Portlet view
Click Return to Full Page to go to the base view of the portlet. The portlet consists of a sortable, filterable
and pageable data table:
•
Click on a column to sort on that column in ascending order. Click again to sort on the column in
descending order.
•
Start entering a value into the filter box of a column to filter that column. The filter mode is always a
"contains" or "like" filter, so the entered string can appear anywhere in the value for that column.
•
Click on an opportunity to go to the detail of that opportunity in Salesforce. This detail will open in a
new tab of your browser.
•
Use the pagination to browse through the list. If there is only one page, no pagination is visible.
9
4. Conclusion
This document explained how to configure and use the Salesforce Opportunities portlet. If you have further
questions, don't hesitate to contact our support team at http://www.aca-it.be/portal/marketplace/salesforceportlet#gpl-support.
Thanks again for using the Salesforce Opportunities portlet. If you like the portlet, please leave a comment
at https://www.liferay.com/marketplace/-/mp/application/35395988.
10
Contact
ACA IT-Solutions
Ilgatlaan 5C
B-3500 Hasselt
P +32(0)11 26.50.10
E: [email protected]
Contact hours: 09:00 - 17:30
11