1
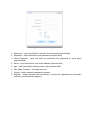
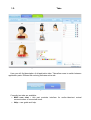
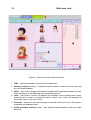
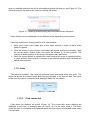
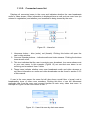
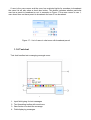
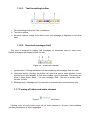
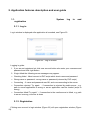
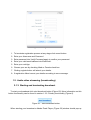
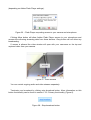
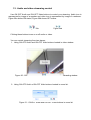
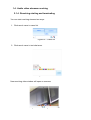
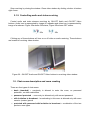
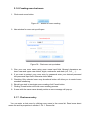
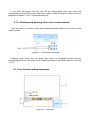
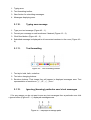
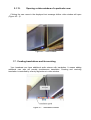
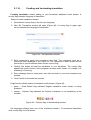
User manual
1. Graphical user interface (GUI) description
1.1.
Login – register
Log into the application or register a new user.
1.1.1. Login
Figure 1 – System login
1. Username – text field for entering user name (required field)
2. Password - input text field for user password (required field)
3. Login – button for verifying login details
4. New account – button for creating a new user account
1.1.2. Registration
Figure 2 – New user registration
1. Username – input text field for new user account name (required field).
2. Password - input text field for user password (required field).
3. Verify Password - input text field for reentering user password to avoid typos
(required field).
4. Email – input text field for user email address (required field).
5. Age - input text field for entering user’s age (required field).
6. Sex (Male, Female) – choosing user sex.
7. Cancel – button cancels registration process.
8. Register – button submits new user details. if correct the registration is successful
and user is automatically logged in.
1.2.
Tabs
Figure 3 – Multi user chat user interface
Here you will find description of all application tabs. Tabs allow users to switch between
application parts. Different tab coloring indicates active tab.
Figure 4 - Tabs
Currently two tabs are available:
•
Multi user chat – this part provides interface for audio-video-text mutual
communication of connected users.
•
Help – user guide and help.
1.3.
Multi user chat
Multi-user chat interface is divided into six sections (Figure 5):
Figure 5 – Multi-user chat interface sections
1. Tabs – switching between various parts of application.
2. Primary controls (buttons) – start/terminate broadcast, create new chat room, log
out, and send feedback.
3. Video – this section displays all received streams and broadcasted stream as well.
Video windows can be displayed in three predefined sizes.
4. Lists – lists section. Rooms list displays all available rooms including their types,
properties and number of connected users in each room. Users list displays all
connected users in the active room.
5. Text chat – section for text chat amongst connected users in the room. Also system
messages get displayed here.
6. Audio and video controls (mute) – stop video and audio streams of all open video
windows.
1.1.3. Section primary functionality buttons
Figure 6 – Primary buttons
1.1.3.1. Start broadcast
The button can indicate three statuses:
Figure 7a
Figure 7b
Figure 7c
•
start broadcast (Figure 7a) - clicking this button launches broadcasting (video
stream) from connected webcam and microphone
•
stop broadcast (Figure 7b) - stops broadcasted stream
•
start broadcast (Figure 7c) – this status indicates that user in order to start his/her
broadcast needs the room owner/creator entry permit. Once permit granted the
button changes into start broadcast status (Figure 7a.
1.1.3.2. Create room
Use create room button to create a new room and set its properties.
Figure 8 – Create room button
For more information on chat room creating see section 2.4.1 of this manual.
1.1.3.3. Send us your feedback
Clicking Send us your feedback button will launch user’s local email client. The
feedback email destination address is set to [email protected].
Figure 9 – Feedback button
1.1.3.4. LogOut
Use LogOut button in order to terminate chat session and disconnect from the server.
Figure 10 – System log out button
1.1.4. Video windows
Video windows display video streams of other users in the chat room and video stream
of the user her/him self. Clicking start broadcast button or clicking your own name in the
users list will open new broadcasting window. Clicking other room user names will open
new receiving video window in next available position.
Figure 11 - Video window
Video window consists of four sections:
1. Title – name of video stream owner.
2. Control icons toolbar – offers buttons to control receiving of audio and video
streams (more in section 2.2.2. of this manual) and button x to close the window.
3. Translations toolbar – offers buttons (flags) which control translations audio
streams for defined languages. Read more on translations functionality in
broadcasting window in section 2.6.1., and for the receiving window in section 2.6.2.
of this manual.
4. Moving video window - this part enables window moving to another position.
New window will not open only in case the stream is already open or in case no
available positions are left. Or in case no other users broadcast neither video nor audio
stream. In case stream is already open a red border will blink around the open window. In
case no available positions are left a informational window will pop up, see Figure 12. The
informational pop up window will close by clicking OK button.
Figure 12 – Warning window saying all video positions are occupied
Video window can be displayed in three different sizes depending on its position.
Use Drag and Drop to change position of a video window:
1. Move your cursor over middle part of the video window in order to Move video
option to appear.
2. Click left button on your mouse (red border will appear around the window), keep
the mouse button clicked down and move the window to its new position. The
nearest available position to the cursor will appear with red border.
3. Once the mouse button is released the video window will move to chosen position.
In case another video window is already in the desired position both windows will
switch their positions.
1.1.5. Lists
Two lists are available. The users list shows all users connected to the chat room. The
rooms list shows all created rooms. Both lists are viewable in the form of tabs. The name
of the room the user is connected to is displayed below list tab names.
Figure 13 – Lists tabs
1.1.5.1. Chat rooms list
Chat rooms list displays all rooms (Figure 14). The rooms with active chatting are
displayed in red color. In example seen on Figure 14 it is the room room_3. The room
name the user is connected to is displayed above the first room in the list and under users
a rooms tabs.
There are four types of chat rooms:
•
basic (standard) – everybody is allowed to enter the room, no password
protection, no other restrictions
•
password protected – room entry is allowed only with correct password
•
with invitation to broadcast – broadcasting in this room is allowed only with room
owner’s (creator) permit
•
protected with password with invitation to broadcast – combination of the two
previous room types
Figure 14 – Chat rooms list
1. room name
2. number of connected users in the room
3. room access is restricted by password
4. room users can broadcast only after room owner’s (creator) permit
1.1.5.2. Connected users list
Displays all connected users in the room and indicates whether the user broadcasts
audio or video stream. Other information is displayed here as well such as users’ sex (as
entered in registration) and whether your broadcast is being viewed by the user.
Figure 15 – Users list
1. Username button – blue (male), red (female). Clicking this button will open the
user’s video window.
2. Cam and Speaker buttons – indicate audio and video streams. Clicking the buttons
turns stream on/off.
3. This icon indicates that the user is receiving your broadcast. Icon never shows next
to your own name. In this example (Figure 15) we see that user demo is not
receiving our broadcast. User 3 does.
4. These icons indicate whether room user broadcasts audio and video streams or
not. More information on audio and video broadcasts can be found in section 2.2.2
of this manual.
If user is the room owner the users list will also show a small blue x (cross) next to
broadcasting icons of other room members. Clicking this blue x icon will disconnect
particular user from the room and connect him/her to main entry video chat room. In
example on Figure 16 the room owner is user 1.
Figure 16 – Users list seen by chat room owner
If user is the room owner and the room has restricted rights for members to broadcast
the users list will also show a check box button. This button indicates whether particular
user has a permit to broadcast or not. In example on Figure 17 the room owner is user 1,
user demo does not have permit to broadcast and user 2 can broadcast.
Figure 17 – List of users in chat room with broadcast permit
1.1.6.Text chat
Text chat handles text messaging amongst users.
Figure 18 – Text chat
1. Input field typing for text messages
2. Text formatting toolbar with emoticons
3. Send button to submit the message
4. Field displaying messages
1.1.6.1. Text formatting toolbar
Figure 19 – Text formatting toolbar
1. Text formatting tools: bold, italic, underscore
2. Text color options
3. Emoticon options. Image form shows once text message is displayed in text chat
area
1.1.6.2. Received messages field
This area is designed to display text messages of connected users in open room.
System messages get displayed here as well.
Figure 20 – Received message
1. Ignore button. Clicking this button will stop displaying all messages from the user.
2. Username button. Clicking this button will open this user’s video window if such
window is not open already. A free video window must be available. The button can
show in three colors. Black – it is your message. Red – the user is female. Blue the user is male.
3. Message body. Message body is restricted to formatted text and emoticons only.
1.1.7.Turning off video and audio streams
Figure 21 – Mute all audio button
Clicking mute all audio button turns off all audio streams in all open video windows
including translations in other languages.
Figure 22 – Stop all video steams button
Clicking stop all cameras button terminates receiving of all video streams in all open
windows.
2. Application features description and user guide
1.1.
registration
System
log
in
and
2.1.1. Log in
Log in window is displayed after application is launched, see Figure 23.
Figure 23 – Log in window
Logging in guide:
1. If you are not registered yet click new account button else enter your username and
password and click login button.
2. If login failed the following errors messages may appear:
•
Checking failed - failed connect to PHP script which check name and password
•
Wrong name or password - wrong name or password (returned by PHP script)
•
Connecting - if name and password was OK, and now connecting to the server
•
Connection rejected. Try again. - if connection is rejected by media server , e.g.
path to server application is wrong or server application cant be loaded (script is
wrong)
•
Connection failed! Try again" -: if connection to the media server is failed, e.g. path
to server is wrong, or server is down
2.1.2. Registration
Clicking new account in login window (Figure 23) will open registration window (Figure
24).
Figure 24 – Registration window
1. To terminate registration process at any stage click cancel button.
2. Enter your Username and Password.
3. Enter password into Verify Password again to confirm your password.
4. Enter your valid email address into Email field.
5. Enter your real Age.
6. Choose your sex by checking Male or Female check box.
7. Clicking register button will submit your details.
8. If registration failed correct your details according to error message.
1.2. Audio-video streaming (broadcasting)
2.1.3. Starting and terminating broadcast
To start your broadcast click start broadcast button (Figure 25). More information on this
button functionality can be found in section 1.3.2. Primary functionality (Figure 6).
Figure 25 – Start broadcast button
When starting your broadcast a Adobe Flash Player (Figure 26) window should pop up
(depending on Adobe Flash Player settings).
Figure 26 – Flash Player requesting access to your camera and microphone
Clicking Allow button will allow Adobe Flash Player access to your microphone and
camera thus allowing streaming data from these devices. Deny button will not allow any
broadcasting.
If access is allowed the video window will open with your username on the top and
captured video from your camera.
Figure 27– Video window
You can control ongoing audio and video streams separately.
Terminate your broadcast by clicking stop broadcast button. More information on this
button functionality can be found in section 1.3.2. Primary functionality (Figure 6).
Figure 28 – Stop broadcast button
1.3. Audio and video streaming control
Use ON-OFF Audio and ON-OFF Video buttons to control your steaming. Audio icon is
represented by image of a speaker and video icon is represented by image of a webcam.
Figure 29a shows ON status, Figure 29b shows OFF status.
Figure 29a
Figure 29b
Clicking these buttons turns on or off audio or video.
You can control streaming from two places:
1. Using ON-OFF Audio and ON-OFF Video buttons located in video window.
Figure 30 - ON-OFF Audio and ON-OFF Video button in broadcasting window
2. Using ON-OFF Audio a ON-OFF Video buttons located in users list.
Figure 31 - ON-OFF Audio and ON-OFF Video buttons in users list
1.4. Audio video streams receiving
2.1.4. Receiving starting and terminating
You can start receiving streams two ways:
1. Click user’s name in users list.
Figure 32 – Users list
2. Click user’s name in text chat area.
Figure 33 – Text chat
New receiving video window will open on success.
Figure 34 – Receiving video window
Stop receiving by closing the window. Close video window by clicking x button in bottom
right corner.
2.1.5. Controlling audio and video receiving
Control audio and video streams receiving by ON-OFF Audio and ON-OFF Video
buttons. Audio icon is represented by image of a speaker and video icon is represented by
image of a webcam. Figure 35a shows ON status, Figure 35b shows OFF status.
Figure 35a
Figure 35b
Clicking any of these buttons will turn on or off video or audio receiving. These buttons
are located in receiving video window.
Figure 36 - ON-OFF Audio and ON-OFF Video buttons in receiving video window
1.5. Chat rooms description and room creating
There are four types of chat rooms:
•
basic (standard) – everybody is allowed to enter the room, no password
protection, no other restrictions
•
password protected – room entry is allowed only with correct password
•
with invitation to broadcast – broadcasting in this room is allowed only with room
owner’s (creator) permit
•
protected with password with invitation to broadcast – combination of the two
previous room types
2.1.6.Creating new chat room
1. Click create room button.
Figure 37 – button for room creating
2. New window for room set up will open.
Figure 38 - Chat room set up window
3. Give your new room name using room name input field. Allowed characters are
lower case and upper case letters, digits, underscore and dash (a-Z, 0-9, _, -).
4. If you want to protect your room entry by password enter your desired password
into password input field. Otherwise leave blank.
5. Checking Only selected users may broadcast button will allow you to control room
members streaming.
6. Should you wish to terminate room creating click Cancel button.
7. Clicking Create button will finish room creating process.
8. If room with the same name already exists an error message will pop up.
2.1.7. Chat room entry
You can enter a chat room by clicking room name in the rooms list. Read more about
rooms list and its properties in section 1.3.4.1. Rooms list.
Figure 39 - rooms list will all types of rooms
If room entry is protected by password a window will pop up.
Figure 40 – Room entry password window
1. Enter the room entry password.
2. Click Join button. Wrong password will generate error message.
3. Click Cancel button to terminate room entry.
2.1.8. Disconnecting other user from your room
If you are a room owner or creator you can disconnect any user from your room.
Figure 41- Disconnect button
If you click disconnect icon the user will be disconnected from your room and
automatically reconnected to main chat room (lobby). Read more about users list and its
properties in section 1.3.4.2. Connected users list.
2.1.9. Allowing and banning other room user broadcast
If you are owner or creator of room with broadcast permit needed you can allow or ban
users’ streams.
Figure 42 – Allow streaming button
Checking allow check box will grant user permit to broadcast his/her streams.
Unchecking the button will result in ban. Read more about Connected users list in section
1.3.4.2.
1.6. Text chat and writing messages
Figure 43 – Text chat
1. Typing area.
2. Text formatting toolbar.
3. Send button for submitting messages.
4. Messages displaying area.
2.1.10.
Typing new message
1. Type your text message (Figure 43 – 1).
2. Format your message or add emoticons if desired (Figure 43 – 2).
3. Click Send button (Figure 43 – 3).
4. Submitted message is displayed to all connected members in the room (Figure 43 –
4).
2.1.11.
Text formatting
Figure 44 – Text formatting toolbar
1. Text style: bold, italic, underline.
2. Text color changing buttons.
3. Emoticon buttons. Their image form will appear in displayed messages area. Text
representation of emoticons: „:)“, „:D“, „:(“, „:love:“.
2.1.12.
Ignoring (banning) particular user’s text messages
If for any reason you do not want to see any text messages from a particular user click
x ignore button (Figure 45 – 1) displayed messages area.
Figure 45 – Displayed message parts
2.1.13.
Opening a video window of a particular user
Clicking the user name in the displayed text message his/her video window will open
(Figure 45 – 2).
Figure 46 – Video window
1.7. Creating translations and its receiving
Your broadcast can have additional audio stream with translation. It means adding
additional user who will provide simultaneous translation. Creating and receiving
translation is controlled by country flag buttons in video window.
Figure 47 – Translations toolbar
2.1.14.
Creating and terminating translation
Creating translation means adding to your broadcast additional audio stream. A
country flag indicates language of translation.
Steps to create translation stream:
1. Click desired country flag to choose your language.
2. New Set Translation window will open (Figure 48). A country flag in upper right
corner indicates the language of translation.
Figure 48 – Set translation window
3. Enter interpreter’s name into username input field. The interpreter must be a
connected user displayed in the users list. The interpreter’s audio stream will be
connected to your broadcast under chosen country flag.
4. Clicking Set button will add the translation to your broadcast. The country flag
appear with green border if the interpreter streams audio stream. Or orange if no
streaming is occurring.
5. Error message shows in case given user does not exist or your own username was
entered.
6. Click Cancel to terminate the process.
Flags border indicate status of translation audio stream (Figure 49):
•
green – Great Britain flag indicates English translation audio stream is being
streamed
•
orange – German flag indicated the Germen interpreter is not translating at the
moment
Figure 49 – Country flags in broadcasting window
Set languages always have one of the mentioned borders. To terminated translation
click country flag icon with border.
2.1.15.
Translation receiving and terminating translation
receiving
County flag buttons can with its border color indicate three statuses:
•
No border – translation to this language is not available (it was not created).
•
Green border – translation to this language is being streamed at the very moment.
•
Orange border – translation to this language is available however no audio stream
is being broadcasted at the moment.
Figure 50 – Country flags in receiving window
Country flag buttons in the receiving video window can indicate two situations:
•
Flag is highlighted – translation stream is not being received.
•
Flag highlight is blinking – translation audio stream is being received
Clicking highlighted flag will start translation receiving. Information window shows up
(Figure 51).
Figure 51 – Information window indicating start of translation receiving
Clicking blinking flag will terminate translation receiving. Information window shows
up (Figure 52).
Figure 52 – Information window indicating termination of translation receiving