1
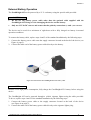
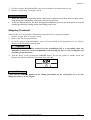
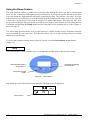
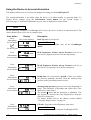
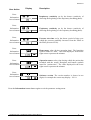
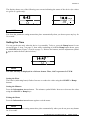
GoodKnight® 425 GoodKnight® 425ST Patient Manual Ref. : M-145DFU00-40 Revision C Revision C List of Patient Manual Revisions GoodKnight® 425 / GoodKnight® 425ST The pages below are included in the American version of the patient manual Ref. M-145DFU00-40, Revision C. Current pages Revision Cover B List of revisions B Table of contents A Introduction B 1 – 2 ; 4 − 5 ; 12 − 15 ; 17 − 18 ; 21 − 22 ; 24 A 8 ; 26 B 3 ; 7 ; 9 − 11 ; 16 ; 19 − 20 ; 23 ; 25 C Reference or Revision Description Date M-145DFU00-40 Revision A. Creation of the manual July 2004 Revision B. Implementation of CE mark symbol (symbols section) June 2005 Revision C. Modification of the manual (“Installing a Humidifier”, “External Battery Operation”, “List of authorized accessories” sections), for GoodKnight 425 / GoodKnight 425ST, Nellcor Puritan Bennett trademark. July 2005 © 2004 − 2005 Nellcor Puritan Bennett Inc. All rights reserved. ii GoodKnight 425 / GoodKnight 425ST Patient Manual Revision C The Puritan Bennett GoodKnight 425 / GoodKnight 425ST device (GK425/GK425ST) is intended for the treatment of patients suffering from Obstructive Sleep Apnea Syndrome (OSAS). The main characteristic of this pathology is the occurrence of multiple respiratory events during the night, caused by closure of the upper airways, that disturbs sleep. The GK425/GK425ST delivers two pressure levels (one inspiratory, one expiratory) that prevent the upper airways from becoming obstructed and thus eliminate respiratory events. On the GoodKnight 425ST, a Back-Up rate can be adjusted. It is essential for you to understand the limitations on the use of this device. Therefore, please read this manual carefully before using the GoodKnight 425 / GoodKnight 425ST device. This manual provides information on the safe and effective operation of this device. For any questions relative to the equipment and its use, contact your medical team or your home service provider. Your doctor has prescribed the GoodKnight 425 / GoodKnight 425ST as a method of treatment. This method includes specific device parameter values that are set by the hospital or home service provider. Do not adjust these parameter settings yourself. the information contained in this manual is valid for models GoodKnight 425 and GoodKnight 425ST, unless stated otherwise. CAUTION Federal (U.S.A.) law restricts this device to sale by or on the order of a physician. ® GoodKnight is a registered trademark of Nellcor Puritan Bennett Inc. GoodKnight 425 / GoodKnight 425ST Patient Manual iii This page is left blank intentionally iv GoodKnight 425 / GoodKnight 425ST Patient Manual Revision A TABLE OF CONTENTS BEFORE STARTING............................................................................................................................................................1 SAFETY INSTRUCTIONS .........................................................................................................................................................1 INDICATIONS FOR USE ..........................................................................................................................................................2 PRECAUTIONS FOR USE .........................................................................................................................................................2 MODEM TRANSMISSIONS ......................................................................................................................................................2 CHECKING THE COMPONENTS ...............................................................................................................................................3 DEVICE DESCRIPTION......................................................................................................................................................4 INSTALLATION....................................................................................................................................................................7 STANDARD INSTALLATION....................................................................................................................................................7 FITTING AN OXYGEN ADAPTER ............................................................................................................................................8 INSTALLING A HUMIDIFIER ...................................................................................................................................................9 EXTERNAL BATTERY OPERATION .......................................................................................................................................11 USING THE GOODKNIGHT 425 .....................................................................................................................................12 STARTING TREATMENT .......................................................................................................................................................12 STOPPING TREATMENT .......................................................................................................................................................13 USING THE RAMP FEATURE ................................................................................................................................................14 USING THE DEVICE TO ACCESS INFORMATION....................................................................................................................16 SETTING THE TIME ..............................................................................................................................................................18 LIST OF AUTHORIZED ACCESSORIES .......................................................................................................................19 INTERFACES ........................................................................................................................................................................19 TUBING ...............................................................................................................................................................................19 OTHER ACCESSORIES ..........................................................................................................................................................19 MAINTENANCE AND CLEANING INSTRUCTIONS ...................................................................................................21 GOODKNIGHT 425 ..............................................................................................................................................................21 AIR INLET FILTERS .............................................................................................................................................................21 BREATHING CIRCUIT ...........................................................................................................................................................21 NASAL INTERFACE ..............................................................................................................................................................22 HUMIDIFIER ........................................................................................................................................................................22 OXYGEN ADAPTER .............................................................................................................................................................22 TROUBLESHOOTING .......................................................................................................................................................23 TECHNICAL SPECIFICATIONS .....................................................................................................................................25 DEVICE PERFORMANCE ......................................................................................................................................................25 PHYSICAL CHARACTERISTICS .............................................................................................................................................25 ENVIRONMENTAL CONDITIONS ...........................................................................................................................................25 POWER SUPPLY MODULE ELECTRICAL CHARACTERISTICS .................................................................................................25 DEVICE ELECTRICAL CHARACTERISTICS ............................................................................................................................26 SYMBOLS ............................................................................................................................................................................26 DISPOSAL OF THE GOODKNIGHT 425..................................................................................................................................26 GoodKnight 425 / GoodKnight 425ST Patient Manual v This page is left blank intentionally vi GoodKnight 425 / GoodKnight 425ST Patient Manual Revision A BEFORE STARTING Safety Instructions To ensure that you use your device safely and efficiently, please read all the information contained in this user manual. Contact your doctor or your home service provider for further information. Please pay special attention to the passages preceded by the following terms: WARNING Warnings alert the user to potential serious outcomes (death, injury, or adverse events) to the patient or user. CAUTION Cautions alert the user to exercise care necessary for the safe and effective use of the GoodKnight 425. NOTE Notes indicate information of particular interest for more efficient and convenient operation. WARNINGS 1. Before using your GoodKnight 425 device, refer to the chapter section titled “Checking the Components” on page 3. 2. When using an additional oxygen supply, carefully observe the safety instructions for oxygen in the section titled “Starting Treatment” on page 12. 3. Use only the accessories that have been given to you by your home care provider. Check that you have all the instructions for using these accessories and read them carefully. 4. Use only the specific power supply module provided with the device. 5. Do not use the device in the presence of flammable anaesthetics. 6. Follow the device’s installation instructions as specified in this manual in the chapter entitled “Installation” on page 7. In particular, keep the machine away from water. 7. Do not accidentally or intentionally obstruct the air outlet or any other opening in the device or the respiratory circuit. 8. Do not introduce liquids or objects into the air outlet. 9. Contact the medical team if, when using the GoodKnight 425, the following symptoms appear: dryness in your airways or nose, skin sensitivity, running nose, earache, sinus trouble, daytime drowsiness, mood changes, disorientation, irritability or memory loss. 10. If the GoodKnight 425 malfunctions, contact your home care provider. Maintenance of this equipment should only be performed by trained and authorised personnel. Do not attempt to open the device. 11. The air flow produced by the GoodKnight 425 can be as much as 7 °F higher than the room temperature. Exercise caution if the room temperature is warmer than 90 °F. GoodKnight 425 / GoodKnight 425ST Patient Manual 1 Revision A Indications for Use The Puritan Bennett GoodKnight 425 is indicated for use in treating Obstructive Sleep Apnea (OSA) in spontaneous breathing patients weighing over 30 kg (66 lb) within a homecare or hospital environment. Precautions for Use The GoodKnight 425 device must be used with caution for patients with the following conditions. If you are affected by one of the conditions listed below, contact your doctor at the beginning of your treatment. • Pneumothorax or pneumomediastinum • Severe bullous emphysema or previously complicated by pneumothorax • Massive epistaxis or previous massive epistaxis • Pneumoencephalus, traumatism or recent surgery with the after-effect of a cranio-nasopharyngeal fistula • Acute sinusitis, otitis media or perforation of the tympanic membrane. Modem Transmissions When it is time to review the information stored in your GoodKnight 425, your home care provider may set up a modem connection. The modem translates computer signals into telephone signals that are then sent over telephone lines and converted to a format suitable for computer input. Finally, the data is fed to a computer that features special software to assist in the analysis and review of the data. NOTE Your home care provider will set up the modem connection and instruct you in its use. 2 GoodKnight 425 / GoodKnight 425ST Patient Manual Revision C Checking the Components In order to use the GoodKnight 425, you must have the following items: • A breathing circuit • A non-invasive patient interface (mask), and all related accessories as specified in the instructions for using it. In addition to these accessories, your doctor may have prescribed the use of a humidifier. If so, check that you have all the accessories required for the humidifier specified in the operating instructions. If supplemental oxygen is required, you will also need an adapter (unless the oxygen supply connects directly onto the interface). See the section titled “Fitting an Oxygen Adapter” on page 8 of this manual. Carefully check the device and each accessory. Check especially the tubings for damage. The interface should not have any cracks or distortion in the mask or pillows (the part of the mask coming in contact with the face). Carefully check the device and the specific power supply module and verify that there is no obvious fault. Plug the device into the power outlet using the power supply module, referring to steps 4 and 5 of the section entitled “Standard Installation” on page 7. The device type is displayed temporarily, then the following standby screen appears that displays the time in the 24-hour format (the value displayed is given as an example only): Flashing Colon 10:34 Standby Indicator Figure 1 – Display in Standby Mode If the device is disconnected and then power restored, the screen displays the pressure. The device’s pressure settings remain the same as those used when the power supply cord was disconnected. . See item 4 in Figure 2 – Top View on page 5. Start the device by pressing the ON/OFF button You should hear the turbine start and increase speed to deliver the set pressure. Stop the device by pressing the ON/OFF button power outlet. and unplug the power supply cord from the WARNING If you encounter any problems with the device, contact your home service provider and do not start treatment. GoodKnight 425 / GoodKnight 425ST Patient Manual 3 Revision A DEVICE DESCRIPTION The GoodKnight 425 device is powered from an external power supply and equipped with specific accessories. The device consists of the following primary components, as described below. See figures 2, 3 and 4 on page 5. 1. Display Information such as pressures, device settings, or the time of day is shown on the display. For further information, refer to the section titled “Using the Device to Access Information”, page 16. 2. Information Access button The information access button allows you to scroll through the device settings. For further details, refer to the section titled “Using the Device to Access Information”, page 16. 3. Ramp button Used for starting or stopping the pressure increase ramp (for further information, refer to the section titled “Using the Ramp Feature” on page 14). It is also used to decrease the value of the parameters when changing device settings. 4. ON/OFF button Used for switching the device on or off. It is also used to increase the value of the parameters during the device settings. 5. Pressure port This is the connector onto which the breathing circuit pressure tube is connected. For further information, refer to the chapter titled “Installation” on page 7. 6. Outlet connector This is the air outlet onto which the breathing circuit is connected. For further information, refer to the chapter titled “Installation” on page 7. 7. Serial link connector This connector is intended for use solely by your doctor or your home service provider. Do not connect anything to it. 8. Supply connector Used for powering the device from the specific power supply module or from an external battery. For further information, refer to the section titled “External Battery Operation” on page 11. 9. Air inlet filters These filters prevent dust from entering the device and contaminating the air flow. Please refer to the chapter titled “Maintenance and cleaning instructions” on page 21 for further information on maintaining these filters. 4 GoodKnight 425 / GoodKnight 425ST Patient Manual Revision A The items in the Figures below are described on page 4. 1 2 Figure 2 – Top View 3 4 6 5 Figure 3 – General View 7 8 9 GoodKnight 425 / GoodKnight 425ST Patient Manual Figure 4 – Rear View 5 This page is left blank intentionally 6 GoodKnight 425 / GoodKnight 425ST Patient Manual Revision C INSTALLATION This chapter shows you how to connect the different accessories and cables to your device. Before starting the installation, please check your device and its accessories by referring to the section titled “Checking the Components” on page 3. CAUTION Place the device on a stable surface. Avoid placing it too near a wall or any other obstacle which could obstruct the intake of air into the machine. Standard Installation 1. Connect the breathing circuit to the device. To do this, connect the pressure tube to the pressure port (Figure 3, item 5 on page 5). Connect the breathing circuit to the outlet connector of the device (Figure 3, item 6 on page 5). Breathing circuit Pressure tube Figure 5 – Breathing Circuit Connection WARNING Take care that the pressure tube is not kinked or blocked. 2. 3. 4. Prepare the interface as described in its instructions for use. Connect the interface (mask) to the breathing circuit’s free end. Connect the power supply module cable to the supply connector located on the back of the device (Figure 4, item 8 on page 5). CAUTION 5. Use only the specific power supply module provided with the device. Connect the power supply module plug to the mains. The device type is displayed temporarily, then the following standby screen appears that shows the time: The colon is flashing 6. 10:29 The device is ready to operate. Proceed to the chapter titled “Using the GoodKnight 425” on page 12. GoodKnight 425 / GoodKnight 425ST Patient Manual 7 Revision B Fitting an Oxygen Adapter Replace step 1 of the standard installation procedure on page 7 with the following instructions: • Connect the oxygen adapter onto the device’s outlet connector and connect the other end of the adapter onto the end of the breathing circuit. (see Figure 6). Connect the pressure tube to the pressure port (Figure 3, item 5 on page 5). Figure 6 – Oxygen Adapter Connection Perform steps 2 through 6 of the standard installation procedure. WARNINGS • When using oxygen, strictly follow the instructions of your physician or home care provider. • Never smoke in the presence of oxygen. • Never inject oxygen through the air inlet of the device. • Carefully follow all instructions contained in the chapter titled “Using the GoodKnight 425” on page 12. • If supplemental oxygen is used, the oxygen flow must be turned off when the GoodKnight 425 is not operating. If the oxygen flow is left on when the device is not operating, oxygen delivered to the interface circuit may accumulate within the GoodKnight 425. Oxygen accumulated in the device could create a fire hazard. CAUTION If the supplemental oxygen flow rate is fixed, the inhaled oxygen concentration will vary, depending on the pressure settings, patient breathing pattern, interface selection and the leak rate. 8 GoodKnight 425 / GoodKnight 425ST Patient Manual Revision C Installing a Humidifier Please refer to the instructions for using your humidifier for installation instructions and safety precautions. WARNING The humidifier must be filled before being connected to the device. CAUTION To avoid water damage, always ensure that the humidifier is placed lower than the GoodKnight 425 device. Replace step 1 of the standard installation procedure on page 7 with the steps below: WARNING The following instructions are general instructions for connecting the GoodKnight H2O humidifier. Always follow specific instructions supplied with your humidifier for correct and safe operation. 1. Remove the water chamber. 2. Carefully fill the water chamber with water through the outlet connector opening (refer to the “Installation” section of the GoodKnight H2O user’s manual). Do not fill past the maximum water level mark. 3. Place the GoodKnight H2O heated humidifier onto a flat, even surface. 4. Equip the GoodKnight 425 device with the connection adapter provided with the GoodKnight H2O heated humidifier. 5. Position the GoodKnight 425 device onto the GoodKnight H2O heated humidifier, as shown in Figure 7. • The front of the GoodKnight 425 device must be turned towards the connections of the GoodKnight H2O heated humidifier. • The base of the GoodKnight 425 device must be inserted into the recessed area of the humidifier. CAUTION • • Install the humidifier and bi-level device onto a flat, stable surface and keep them out of contact with flammable materials. Never place the GoodKnight H2O on top of the bi-level device. Doing so could allow water into the device, potentially causing damage. GoodKnight 425 / GoodKnight 425ST Patient Manual 9 Revision C Patient circuit Pressure tube Figure 7 – Connection of the GoodKnight 425 to the GoodKnight H2O heated humidifier 6. Replace the water chamber, being careful to avoid spillage, and ensure that the inlet connector of the humidifier reaches the thrust on the connection adapter. 7. Connect the pressure tube from the breathing circuit to the GoodKnight 425 pressure port. 8. Connect the breathing circuit to the outlet connector of the humidifier located on the water chamber. Perform steps 2 to 6 of the standard installation described on page 7 to continue installing the equipment. CAUTION Disconnect the GoodKnight 425 from the humidifier and empty the water chamber before moving the assembly. Failure to do so risks introducing water into the device, which could cause irreversible damage. 10 GoodKnight 425 / GoodKnigh 425 ST - Patient manual Revision C External Battery Operation The GoodKnight 425 can be powered by a 12-V car battery using the special cable provided. CAUTION • Do not use any battery power cable other than the optional cable supplied with the GoodKnight 425. Doing so risks damaging the device and the battery. • Only use 12-Volt DC sources and ensure that the polarity connections (+ and -) are correct. The device can be used for a minimum of eight hours with a fully charged car battery in normal operation conditions. To connect the battery cable, replace steps 4 and 5 of the standard installation by the following steps: 1. Connect the battery power cable onto the supply connector located at the back of the device (see Figure 4, page 5). 2. Connect the other end of the battery power cable directly to the battery. Figure 8 − Connection of the GoodKnight 425 to the battery cable NOTE Because of its high power consumption, fully charge the GoodKnight 425's battery before using the device. The GoodKnight 425 can be powered through a vehicle cigarette lighter using the cable provided. To do so, replace steps 4 and 5 of the standard installation by the following steps: 1. Connect the battery power cable to the supply connector located at the back of the device (see Figure 4 on page 5). 2. Connect the other end of the battery power cable directly to the cigarette lighter plug. GoodKnight 425 / GoodKnight 425ST Patient Manual 11 Revision A USING THE GOODKNIGHT 425 This chapter shows you how to use the GoodKnight 425 after installing it as described in the previous chapter. It also shows you how to use the pressure increase (ramp) function and how to access information on device settings. NOTE You will not be able to alter the device’s settings; you can only view them. WARNING In the sections “Starting Treatment” and “Stopping Treatment” below, carefully follow the order given. Failure to do so could increase the potential for fire in cases where oxygen is used. Refer to the general warning on using oxygen on page 1. Starting Treatment Once the device has been installed, follow the instructions below to start treatment: 1. Start the device by pressing the ON/OFF button . The display shows the pressure measured as well as the operation and compliance indicators (see Figure 9). 9.0 Compliance operation indicator 0 - 1 : compliance is on - 0 : compliance is off Device operation indicator cmH2O Indication of a: - Positive Inspiratory Pressure - Positive Expiratory Pressure Indicator of patient respiratory cycle detection (on the GK425ST only) Figure 9 - Display When Device is Running NOTES • The units of measure displayed for pressure (hPa or cmH2O) can be modified by the Practitioner. • The compliance operation indicator is not displayed until the device has been operating for at least 15 minutes. 2. Put the patient interface (nasal mask) in place according to its instructions for use. If an interface with an exhalation vent is used, it includes a hole by which the exhaled gases will be flushed out, preventing them from being rebreathed. If an interface without an exhalation vent is used, your ™ doctor must provide you with a Pirouette silent leak or equivalent adapter, allowing gases to be flushed out as close as possible to the nose. NOTE When using this device, always remember to breathe normally for best results. WARNING The vent hole associated with the interface should never be blocked. This CPAP device is intended for use with interfaces (or connectors) that have vent holes to allow a continuous flow of air out of the interface. When the CPAP device is turned on and is operating properly, fresh air from the CPAP device flushes the exhaled air out through the interface vent hole. However, when the CPAP device is not functioning, adequate fresh air will not be provided through the interface, and exhaled air may be rebreathed. Rebreathing exhaled air for longer than several minutes could, in some circumstances, lead to suffocation. 12 GoodKnight 425 / GoodKnigh 425 ST - Patient manual Revision A 3. If you are using a heated humidifier, turn it on according to its instructions for use. 4. Start the oxygen flow (if oxygen is used). WARNINGS • • When the device is in operation mode, check that it delivers an air flow. If no air flow exists, stop the device immediately and contact the service provider. At lower CPAP pressures, the flow through the exhalation port may be inadequate to clear all exhaled gas from the tubing. Some rebreathing may occur. Stopping Treatment When the device is in operation, follow the instructions below to stop the treatment: 1. Stop the oxygen flow (if oxygen is used). 2. Remove the interface (nasal mask). 3. If you are using a heated humidifier, turn it off as described in its instructions for use. Always disconnect the humidifier from the unit. CAUTION Do not leave the humidifier connected to the GoodKnight 425 or to the tubing when the humidifier is not in use, to prevent humidity from entering the device or the sensing line and degrading its performance. 4. Turn the device off by pressing the ON/OFF button. The device returns to standby mode and displays the following standby screen that shows the time: 6:24 CAUTION Check that no humidity appears in the tubing, particularly in the sensing line. If so, let the tubing dry before you use it again. GoodKnight 425 / GoodKnight 425ST Patient Manual 13 Revision A Using the Ramp Feature The ramp function enables a gradual rise in pressure after turning the device on; that is, the pressure levels are low at the start of the night to help you fall asleep. You can also use this function if you have to get up during the night and have difficulty going back to sleep. The pressure “rise time” up to the final pressures is prescribed by your medical team and the setting carried out by your service provider is between 0 (no progressive rise) and 30 minutes in 5-minute increments. The ramp may have been preset to 0 according to the prescription provided by your medical team. In this case, the ramp function is disabled and pressing the Ramp button on the front panel of the machine has no effect (Figure 2, item 3 on page 5). The initial ramp pressure can be set to a value between 3 cmH2O and the Positive Expiratory Pressure level prescribed by your physician. This function allows you to set the starting pressure level that enables you to fall asleep. To access the parameter setting menu, just press for one second the Information Access button (Figure 10). NOTE This function can be used when the device is in either the standby mode or the operation mode. Increases the starting ramp pressure Decreases the starting ramp pressure Information Access button Figure 10 – Control buttons Repeatedly press the information button until the following screen is displayed: 3.0 cmH2O P Ramp indicator 14 GoodKnight 425 / GoodKnigh 425 ST - Patient manual Revision A The starting ramp pressure value can then be increased or decreased using the following keys: ON/OFF for UP Ramp for DOWN 1. To start the ramp, press the Ramp button when the device is on. The pressure will fall to a low value, then increase progressively up to the prescribed pressure levels, so as not to wake you. The device will run normally, delivering treatment pressures throughout the night. 2. To end the ramp, press the Ramp button again and the function will be disabled. It is possible to reset the ramp time by reactivating the ramp function (the ramp indicator is displayed when this is enabled). Figure 11 – Pressure Changes and the Ramp Function GoodKnight 425 / GoodKnight 425ST Patient Manual 15 Revision C Using the Device to Access Information The display enables you to view (but not change) the settings on the GoodKnight 425. The setting information is accessible when the device is in either standby or operation mode. To display device settings, press the Information Access button for one second (Figure 2 item 2 on page 5). With each additional key press, data is displayed as shown below. NOTE On the following examples of GoodKnight 425 screens, the device is shown in operation mode. The values shown below are for use as examples only. User Action Press Information Access button Description Display The screen displays: F 10 NOTE This function is accessible only on the GoodKnight 425ST. for one second Press Information P Access button 15.0 cmH O Press Information P Access button 5.0 cmH O Press Information Access button Press Information Access button Press Information Access button 16 2 2 15 3.0 P IE 1:2.0 Back-Up rate of your device. min cmH2O IPAP Inspiratory Positive Airway Pressure level set on your device (high pressure level for the inspiration). EPAP Expiratory Positive Airway Pressure level set on your device (low pressure level for the expiration). Ramp time set by the doctor (period of time over which the pressure gradually increases from the starting ramp pressure to the prescribed pressure levels). Starting ramp pressure (pressure level at the beginning of ramp). This parameter is adjustable and visible only if the ramp time is other than 0. The symbol shows that the parameter is adjustable. You can increase or decrease the value displayed by using the ON/OFF or Ramp key. For further details, refer to the chapter section entitled “Using the Ramp Feature” on page 14. I/E ratio (Inspiratory time/Expiratory time ratio). NOTE This function is accessible only the GoodKnight 425ST. GoodKnight 425 / GoodKnigh 425 ST - Patient manual Revision A DIsplay User Action Press Information Access button Press Information Access button Press Information Access button IS : 5 Inspiratory sensitivity set by the doctor (sensitivity of detecting the beginning of the inspiratory breathing phase). ES : 5 Expiratory sensitivity set by the doctor (sensitivity of detecting the beginning of the expiratory breathing phase). rt : 3 Press Information Access button 540 h Press Information Access button 396 h Press Information Access button Description Pressure rise time set by the doctor (period of time over which the pressure gradually increases from the EPAP to the IPAP pressure levels). 46 24 Id *.* XX Hour meter value (device operating time). The hourglass symbol stands for “time”. The value displayed in the lower right corner represents the minutes. Operation meter value (time during which the patient has breathed with the mask). Hourglass and human symbols stand for “patient time”. The value displayed in the lower right corner represents the minutes. Software version. The version number is shown in two digits; for example the screen may display : Id 1.0. Press the Information Access button again to exit the parameter setting menu. GoodKnight 425 / GoodKnight 425ST Patient Manual 17 Revision A The display shows one of the following two screens indicating the status of the device (the values are given as a guide only). 9:42 10.0 cmH O 2 1 The device is on standby. The device is running. NOTE Exit from the parameter setting menu takes place automatically when you do not press any key for 30 seconds. Setting the Time You can set the time only when the device is on standby. To do so, press the Ramp button for one second (Figure 2, item 3 on page 5), then while continuing to hold the Ramp button down, press the ON/OFF button (Figure 2, item 4 on page 5). Release the buttons, and the adjustment symbol appears under the hour (shown below): 14:47 h NOTE The time will only be displayed in a 24-hour format. Thus, 14:47 represents 2:47 P.M. Setting the Hour The letter h (indicating hours) flashes. Increase or reduce the value using the ON/OFF or Ramp buttons. Setting the Minutes Press the Information Access button. . The minutes symbol blinks. Increase or decrease the value using the ON/OFF or Ramp keys. Exiting the Menu Press the Information Access button again to exit the menu. NOTE Exit from the parameter setting menu takes place automatically when you do not press any button for 30 seconds. 18 GoodKnight 425 / GoodKnigh 425 ST - Patient manual Revision C LIST OF AUTHORIZED ACCESSORIES The accessories listed below can be used with the GoodKnight 425. Interfaces Adam Pillows (7 sizes): P/N’s S-616323-00A, S-616324-00C, S-616325-00A, S-616355-00C, S-616356-00C, S-616357-00C, Y-101969-00. Adam CPAP systems: P/N’s Y-100871-00, Y-100872-00, Y-100873-00, Y-100874-00. SoftFit Interface System: P/N’s S-133335-00, S-133336-00, S-133337-00, S-133338-00, S-133339-00, S-133340-00. SoftFit Ultra Interface System: P/N’s Y-233335-00, Y-233336-00, Y-233337-00, Y-233338-00, Y-233339-00, Y-23334000. Nasal interface Breeze: P/N Y-101400-00. DreamSeal™ mask: P/N Y-103074-00A ; Y-102616-00 ; Y-103059-00A. DreamFit mask (3 sizes): P/N DF301, DF302, DF303. Tubing 6 ft long patient tubing (with internal pressure line): P/N Y-261000-27. 8 ft long patient tubing (with internal pressure line): P/N Y-261000-30. Other Accessories Oxygen adapter: P/N Y-616155-03. Heated humidifier: Fisher & Paykel HC100 and HC150. GoodKnight 425 / GoodKnight 425ST Patient Manual 19 Revision C Heated humidifier GoodKnight H2O: P/N M-114600-US. Air inlet filter: P/N M-413950-02. Thin optional filter: P/N M-413950-04. Serial connection cable: P/N M-213930-04. Battery cable: P/N M-214530-00. Battery cable/cigarette lighter plug: P/N M-214530-01. Carrying case: P/N M-214531-01. Modem kit P/N M-213930-12 includes modem cable and adapter – modem cable P/N M-213530-11 – modem adapter P/N M-213930-05 20 GoodKnight 425 / GoodKnight 425ST Patient Manual Revision A MAINTENANCE AND CLEANING INSTRUCTIONS To ensure that you use your GoodKnight 425 safely and efficiently, observe the maintenance instructions specified below. GoodKnight 425 The hard plastic case protecting the internal components of the device does not require any special maintenance. When necessary, clean the device by using a soft cloth dampened with warm soapy water. Dry the device thoroughly. WARNINGS • • • • • • Always unplug the device before cleaning it. Do not use a spray, because chemical residues may lodge in the air outlet, foam filter, or inside the device. These residues could cause irritation of the patient’s airways. Never submerge the device in water. Never allow water to run onto the GoodKnight 425, or drip into any of its openings. Never use the GoodKnight 425 without verifying that the filter has been installed. Contact your service provider to have the device output pressure checked at least once per year. Air Inlet Filters Change the filters as soon as they are torn or dirty (Figure 4, item 9 on page 5). Clean the outer foam filter at least once a week, or more often if necessary, by following these steps: 1. Remove the filter and wash it with warm mild soapy water. 2. Rinse it thoroughly to remove all traces of soap. 3. Pat the filter dry with a towel. 4. Let the filter air dry completely before replacing it. 5. Replace the filter at the back of the device. The optional white fabric filter cannot be washed; instead, it must be changed at least once a month― more often if it is visibly dirty. WARNING Never use the GoodKnight 425 without an air inlet filter. Breathing circuit Please refer to the cleaning instructions that were supplied with your breathing circuit. GoodKnight 425 / GoodKnight 425ST Patient Manual 21 Revision A Nasal Interface Please refer to the instructions for use that were supplied with your nasal interface. Humidifier Please refer to the instructions for use that were supplied with your humidifier. Oxygen Adapter Please refer to the instructions for use that were supplied with your oxygen adapter. 22 GoodKnight 425 / GoodKnight 425ST Patient Manual Revision C TROUBLESHOOTING Problem Probable Cause Recommended Action Discomfort due to a feeling of excessive pressure. Air flow pressure of the GoodKnight 425. • Adapting to the nasal pressure takes a while. Try to use the ramp feature when you go to sleep (see the section titled “Using the Ramp Feature” on page 14). Device is not delivering correct pressures (display). • • • • Pressure port disconnected. hose Relax and breathe slowly through your nose. • Check that the pressure tube is properly connected to the device. Moisture entering pressure port tube. • Dry the pressure tube. To do this, connect the breathing circuit to the device, leaving the pressure tube disconnected. Block the breathing circuit outlet with your hand and turn the device on so that air is forced out through the pressure tube. Repeat if necessary. Ramp enabled. • Check whether the ramp indicator is displayed. Press the Ramp button to cancel the function (Figure 2, item 3 on page 5). NOTE: The pressure levels were prescribed by your doctor and can be modified only under medical prescription. Dry or irritated nose or throat. Air is too dry. Humidify the delivered air using a humidifier. Ask the medical team to obtain a humidifier. Cold nose. Room temperature is too low. • Increase the temperature of the room • Place the breathing circuit under blankets to reduce heat loss. Reaction to air flow and pressures. • Stop treatment. • Try high efficiency filter if problem persists. • Contact your physician. • Clean or replace filters (refer to the chapter titled “Maintenance and cleaning instructions” on page 21). • Move any linen, bedding or clothing away from the GK425. • Lower the thermostat for the room. • Ensure that heat source. • Remove the breathing circuit from under the blankets. Runny nose. Device air temperature too hot. • Air inlet filters dirty. • Air inlet clogged. • Room high. temperature too the device is away from any Pain in nose, sinuses, or ears. Sinus infection or nasal congestion. Stop treatment and contact your physician or home care provider immediately. Dryness or irritation of the eyes. Air leak around interface. • Reposition the interface. • Ask the attending doctor or the service provider to try different sized masks. Redness of skin in contact with interface. • Headgear too tight or too small. • • Allergic reaction interface components Adjust the harness. Contact the attending physician or the service provider to try on harnesses or masks of different sizes. • Stop using the interface. Contact your physician or home care provider. GoodKnight 425 / GoodKnight 425ST Patient Manual to 23 Revision A Problem Probable Cause Recommended Action Recurrence of sleep apnea symptoms. • Device not set to correct pressures or not operating correctly. • Ask the home care provider to check operation of the GK425. • Contact the ordering physician or home care provider. • Your physical condition or pressure needs have changed. • Verify that power supply module is properly connected. • Check the connections between power supply module, GK425 and electric outlet. • • No AC power. Use another appliance (e.g.: lamp, radio etc.) to check that the a.c. power supply is present at the outlet. • Device fuse has blown. • Contact your physician or home care provider. Device display inoperative. The GoodKnight 425 is not running properly and seems to be subject to interference. Excessive electromagnetic interference. Move the device away from sources of interference such as halogen lamps and cell telephones, etc. In 1 displayed. Major leak (disconnection) detected in patient circuit for over 30 seconds. This message disappears as soon as the interface is connected or if you press the ON/OFF button twice. Otherwise, check patient circuit connection. In 2 displayed. Over pressure detected by device for over 10 seconds. Check the connection of the pressure tube. Check that it is not trapped and that it is properly clean and dry (see the instructions for use of the breathing circuit). In 3 displayed. Reduction of power supply voltage. • Check connections between power supply module, device and power outlet. • Unplug supply module, then connect it again to the power outlet. • Check the battery and replace it, if necessary. If the problem remains, contact the homecare provider. • Press the GK425 ON/OFF button twice. • Check breathing circuit connection. • If the problem remains, contact the service provider. In 4 displayed. Er XX displayed. Detected frequency too high. Operating fault detected Contact your home care provider. (XX = 2 digit code). 24 GoodKnight 425 / GoodKnight 425ST Patient Manual Revision C TECHNICAL SPECIFICATIONS Device Performance Pressure range: 3 cmH2O to 25 cmH2O +/- 1 cmH2O Adjustable by increments of 0.5 cmH2O Maximum achievable pressure at the patient connection port under single fault condition: Ramp time: Sound level measured in accordance with ISO 17510-1 :2002 : Maximum sound level warrantied at one meter: Internal battery life: (according to the manufacturer's data) 36 cmH2O 0 minutes to 30 minutes +/- 1 minute Device adjustable by increments of 5 minutes 25.5 dB(A) 31 dBA to 10 cmH2O 5 years Physical Characteristics Dimensions (W x H x L ): Weight: 5.6 in x 2.9 in x 7.7 in (without power supply) 1.55 lb (without power supply module) Environmental Conditions Transport and Storage Temperature: Relative humidity: Relative pressure range: -20 °C to +60 °C (-4 °F to +140 °F) Up to 95 % without condensation 500 hPa to 1060 hPa (1 hecto-Pascal ∼ 1 cmH2O) Operation Temperature: Relative humidity: Relative pressure range: +5 °C to +40 °C (+41 °F to +104 °F) Between 15 % and 95 % without condensation 700 hPa to 1060 hPa (1 hecto-Pascal ∼ 1 cmH2O) 0 to approximately 7,800 ft (0-2400 m) Altitude range: Power Supply Module Electrical Characteristics Class II power supply: Input voltage: 100 – 240 VAC (-15%, +10%), 50 / 60 Hz (+/-1 Hz) Input current: 1.5 A Output voltage: 13 V Output current: 4 A Power supply provided with the device: ONTOP type SA165A – 125OU–3. GoodKnight 425 / GoodKnight 425ST Patient Manual 25 Revision B CAUTION • • Use only the specific power supply module provided with the device. The power supply module is not intended to be repaired. In case of failure, please contact your service provider for replacement. Device Electrical Characteristics Input voltage: 13 V Input current: 3A Maximum power consumed: 40 W (without humidifier) Current consumed at 25 cmH2O with a 4 mm leak: 1.1 A. Direct current 13 V power supply / battery connector Symbols ON/OFF Information access Ramp PC connection Increases setting values Reduces setting values Output connector Drip-proof. Type B device Consult the instructions for use before using this device. 0459 Device complies with the requirements of the directive 93/42/CEE relating to medical appliances. For USA only: Federal law restricts this device for sale by or on the order of a physician. Disposal of the GoodKnight 425 In order to protect the environment, various parts of the equipment and its accessories must be disposed of in conformity with the local regulations. 26 GoodKnight 425 / GoodKnight 425ST Patient Manual Details of your Service Provider 0459 Corporate Headquarters: Manufacturer: Tyco Healthcare Group LP Nellcor Puritan Bennett Division 4280 Hacienda Drive Pleasanton, CA 94588 USA Toll Free: 1.800.635.5267 Tel. +1.800.255.6774 Mallinckrodt Développement France Parc d’activités du bois St-Julien 10, Allée Pelletier-Doisy F – 54601 VILLERS-LES-NANCY CEDEX Telephone : (33) 3.83.44.85.00 Fax : (33) 3.83.44.85.01