1
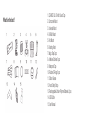
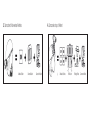
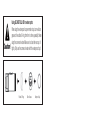
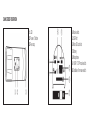
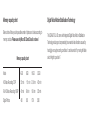
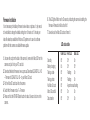
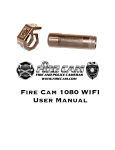
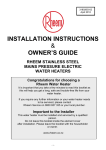
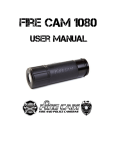
// English
QCAMZ FULL HD 1080p
170° Fisheye Waterproof // Action Cam
Introduction
Thank you for purchasing the QCAMZ FULL HD! Record your limits with this waterproof full HD
action cam!
It is highly recommended for you to read this user manual carefully in order to fully understand how
to operate the QCAMZ FULL HD correctly.
Table of Contents
What’s in the box?
How to use
Camcorder Overview
Initial set up
Charging the battery
Power ON/OFF
Taking a video
Taking snapshot photos
Memory capacity chart
Digital Video Motion Stabilisation Technology
Playback on your computer
On a Mac
Date & time setting
Webcam setting
Firmware Installation
LED status table
Removing/Installing battery
Repairs
Technical specifications
Warranty
Warning
What’s in the box?
1. QCAMZ FULL HD with Sound Cap
2. Camcorder Mount
3. Universal Mount
4. Roll Bar Mount
5. Pad Mount
6. Rotating Kitset
7. Magic Tape 2pcs
8. Adhesive Stickers 8 pcs
9. Waterproof Cap
10. Rubber O-Rings 6 pcs
11. Silicon Grease
12. Hand Safety Strap
13. Rechargeable Lithium-Polymer Batteries 2 pcs
14. USB Cable
15. User Manual
How to use the QCAMZ FULL HD
2. Camcorder on Vented Helmets
1. Camcorder on Handlebar
Roll Bar Mount
Camcorder Mount
Magic Tape 2pcs
Universal Mount
Camcorder Mount
4. Camcorder on top of Helmet
3. Camcorder for Non-vented Helmets
Adhesive Sticker Universal Mount Camcorder Mount
Adhesive Stickers Pad Mount
Rotating Kitset
Camcorder Mount
6. Camcorder on Surfboard or any curved surface
5. Camcorder on Front Helmet
Adhesive Stickers 4pcs
Pad Mount Rotating Kitset
Camcorder Mount
Adhesive Stickers 4pcs
Pad Mount Rotating Kitset
Camcorder Mount
Using QCAMZ FULL HD for water sports
When using the waterproof cap remember to put some silicon
grease to the rubber O-ring from time to time, especially before
using the camera in water. Make sure to close the rear cap ③
tightly. Only use the camera in water with the waterproof cap!
Rubber O-Rings
Silicon Grease
Waterproof Cap
CAMCORDER OVERVIEW
1. LED
2. Power / Shutter
3. Rear cap
4. Mode switch
5. USB Port
6. Micro SD card slot
7. Battery
8. Microphone
9. 1080P / 720P mode switch
10. Stabiliser / firmware switch
Initial set up
1. Make sure the camera is OFF before inserting in or removing the Micro SD card!
2. Unscrew the rear cap from the back of the camera ③.
3. Put your Micro SD card (max up to 32GB) into the slot with the card label facing
down (contacts up). Use your fingernail to do this. You will hear a click sound once
the Micro SD card is in place. Then screw the rear cap back on tightly.
Only use Micro SD cards Class 6 or above.
4. If no Micro SD card is inserted into the camera, the LED light on top of the camera will start flashing red and blue for approx. 30 secs and then auto shut-off.
5. The Micro SD card must be blank; meaning without images from other sources
on it. If you are using a Micro SD card previously used with other cameras, please
make sure you format the Micro SD card in your computer before using it with
your QCAMZ FULL HD. New cards can be used straight from the packaging.
Charging the battery
Power on/off
Unscrew the cap located at the back of the camera ③ and connect the camera
with the USB cable to your PC ⑤ or charger (optional). The LED light will glow
green while charging and goes off once the battery is fully charged.
Turn on the camera // Press and hold the POWER/Shutter button for approx. 3
seconds until the blue LED turns on and the red LED flashes once. The camera
will beep and vibrate once long, indicating it is now in stand-by mode.
Before the first use charge the battery for 10 hours! You can record
approx. up to 90 minutes with one charge.
Turn off the camera // Press the POWER/Shutter button again for approx.
3 seconds. The LED light will go off and the camera will short vibrate twice,
indicating it switches off.
Standby mode // If the camera is in standby mode without activity, it will auto
switch off after approx. 3 mins to conserve battery power.
Taking a video
Take Snapshot Photos
To take a video the camera must be set to video mode. To check unscrew the cap
located at the back of the camera ③. The video/photo switch ④ must be set to the
right for the video recording standby mode, screw the cap back on tightly.
Unscrew the cap from the back ③, set the video/photo switch ④ to left for the
photo standby mode and screw the cap back on tightly. Press the Power/shutter
button to turn on the camera. Press the Power/shutter button ② to start taking
photos.
The camera will beep and vibrate one short time and the LED will flash red. The
camera automatically takes a photo every 3 seconds until the battery is empty or
the Micro SD card full. Press the Power/shutter button again to stop the recording.
The camera will beep once and vibrate two short times and the red LED light will
stop flashing.
Press the Power/shutter button ② to turn on the camera. Press the Power/shutter
button again once shortly to start video recording. The camera will beep and
vibrate one short time and the LED will flash red while the video is recording.
Press the Power/shutter button again to stop recording. The camera will beep
once and vibrate two short times and the red LED will stop flashing.
Memory capacity chart
Digital Video Motion Stabilisation Technology
Below chart will show you the possible number of photos and videos according to
memory card size. Please use only Micro SD Cards Class 6 or above!
The QCAMZ FULL HD comes with integrated Digital Video Motion Stabilisation
Technology reducing and compensating for unwanted video vibrations caused by
hand jiggle or rough recording conditions. It can be turned off by moving the Mode
switch ⑩ right to position F.
Memory capacity chart
Mode
4GB
8GB
16GB 32GB
55 min
115 min
230 min
450 min
Full HD Video Recording 1080P
45 min
90 min
180 min
350 min
Digital Photos
450
850 1700
3500
HD Video Recording 720P
Playback on your computer
On a MAC
Turn off the QCAMZ FULL HD! Unscrew the cap at the back ③, plug the USB
cable into the USB Port ⑤ of the camera and connect it to your computer. Turn on
the camera! The camera will automatically be recognized as USB device. You can
now download the files directly from the Micro SD card inside your camera.
Alternatively you can take out the Micro SD card while the camera is turned off (!),
put it into a card reader and connect it to your PC
Using the provided USB cable, connect the camera to your Mac. Turn on the camera and the MAC OS will recognize it as an external hard drive.
The camera must be turned on after it has been connected to the PC in order to download the files. Do not remove the battery!
Trying to watch a video at the same time can lead to disruptions and unknown outcome!
IMPORTANT TIP FOR MAC USERS:
When deleting files from your Micro SD cards you must empty the rubbish bin of
your computer before removing it or unplugging the camera. If you do not follow
these instructions, photos and videos will not be completely erased from your
card.
Date & time setting
Download the time.txt file from
www.qcamz.us\Downloads\QCAMZ FULL HD
Date & Time Quick Setup for QCAMZ FULL HD:
Open the file “time.txt” and change the date & time as follows:
YYYY.MM.DD hh:mm:ss
Y = year
M= month
D= date
h = hour
m = minutes
s = second
1. Unscrew the cap from the back of the camera ③, remove the Micro SD from the
camera and put it into your PC card slot.
2. Copy the “time.txt” file to your Micro SD. Then put the card back into your
camera and screw the rear cap back on tightly.
3. Press the Power button and now date and time has been updated
automatically!
*Once you format your Micro SD card the time and date settings will be lost!*
Webcam Setting
Pls go to www.qcamz.us\Downloads\QCAMZ FULL HD if you like to use the
QCAMZ FULL HD as a webcam.
Firmware Installation
It is not necessary to install any firmware to view videos or pictures. It only needs
to be installed to change the default settings from 5 minutes to 15 minutes per
video file selection, available for Windows OS systems or in case of a software
problem with the camera or available firmware update.
1. Unscrew the cap from the back of the camera ③, remove the Micro SD from the
camera and put it into your PC card slot.
2. Download the latest firmware at www.qcamz.us\Downloads\QCAMZ FULL HD – Firmware for QCAMZ FULL HD – to your Micro SD card.
3. Put the Micro SD card back into the camera
4. Switch ⑩ to firmware mode. F = Firmware
5. Press and hold the POWER/Shutter button for about 3 seconds to turn on the camera.
6. The LED light will flash red for 20 seconds, indicating the camera is installing the firmware. Afterwards it will shut itself off.
7. Now take out the Micro SD card and format it.
Standby
Battery charging
Taking a video
Taking a photo
No Micro Sd card
Micro SD card full
Data transfer
LED status table
Green LED
Off
On
Off
Off
Off
Off
Off
Red LED
Blue LED
Off
On
Off
Off
Flashing
On
Flashing
On
Asynchronous flashing
On
On
Off
On
Removing/Installing battery
The battery is designed to have a tight fit to maximize reliability in highly active
situations. To remove the battery, pull it out of the battery holder.
It is intentionally not easy to do, but the battery will come out.
Additional batteries and mount packages are available at www.qcamz.us
Repairs
Most helmet cameras are used for recording extreme sports and outdoor activities. This increases the danger of damaging the camera. The warranty does not
cover any damage that has occurred during sporting activities.
Before giving up on your QCAMZ FULL HD, contact us to see if we can help.
Technical Specifications
Optics:
Video:
Audio:
• 170° FISHEYE view @ 1080p Mode
Super Wide Angle view @720p Mode
• f/2.4, fixed focus glass lens
• Full HD Resolution: 1920x 1080 @30fps
• HD Resolution: 1280x 720 @ 60fps
• Digital Video Motion Stabilization Technology
• Light Sensitivity: 960mV / (Lux-sec)
• Video Format: H.264 (avc1) / MOV
• Exposure control: Auto
• White Balance: Auto
• Built-in microphone
Photo:
Memory:
• 20.0 Mega Pixel (5296x3968)
• HD Image Sensor CMOS 9Mega Pixel 1/ 2.3”
• Format: JPEG
• Capture mode: Auto snapshot every 3 seconds
• Micro SD card, up to 32GB capacity
(Minimum Class 6 or above)
• Avg. recording time: 10-15min/GB
Product size: 104 x 32 mm // Weight: 105g (without battery)
Operating Systems (for USB Drive): Win ME, 2000, XP, Vista; Win7; Mac OS X 10.6+
Charger (optional): Input: AC 110 ~ 240V 50/60Hz
Output: DC 5.0 - 5.5V ....450 - 550mA
Warranty:
This product is covered by a Limited Warranty on parts and labour from the date
of original purchase. The warranty period depends on the legislation of the country
you reside in. The warranty covers defects in workmanship and materials.
The warranty does not apply to units which have been damaged or abused intentionally or unintentionally. The warranty does not apply to units where the rear caps
were incorrectly used or closed, to cosmetic damage, to units that have been
modified or have modified parts on them.
Tampering with or altering the unit will void the warranty. Any unauthorized service
will void the warranty. Purchase from individuals or unauthorised internet websites
voids the warranty. The original sales receipt must be produced for any warranty
service. The warranty does not cover any damage that may occur during sports
activity. It is the user’s responsibility to securely attach the QCAMZ FULL HD to
any sports equipment.
WARNING:
The form and functions of QCAMZ FULL HD, accessories, logos, and all graphics
are the patented, protected property of Alvission Group Ltd.
Thank you very much for purchasing QCAMZ FULL HD and we are sure
you will enjoy this product!!
Any attempt by anyone other than our authorised dealers to copy or reproduce
any of the above without permission of Alvission Group Ltd. or its appointed local
dealers will be met with legal action. Alvission products are available for purchase
only from authorised dealers.
This manual is subject to technical changes without prior notice.
www.qcamz.us