1
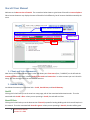
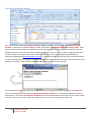
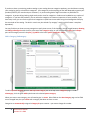
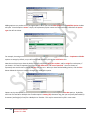
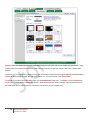
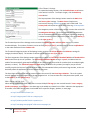
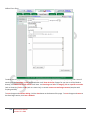
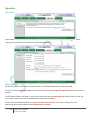
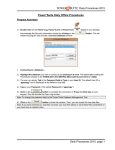
Store32 Beta
User Manual
1
Store32 User Manual
Revision 12.2.2009
Contents
1.
Client and Sales Summaries ............................................................................................................................................ 3
2.
Header Links .................................................................................................................................................................... 3
Cart32 .................................................................................................................................................................................. 3
Store32 Beta........................................................................................................................................................................ 3
Cart32 Gateway .................................................................................................................................................................. 4
3.
Tabs ................................................................................................................................................................................. 4
Store32 ................................................................................................................................................................................ 4
Uploading Images............................................................................................................................................................ 5
Upload a Store Manager Database ................................................................................................................................. 6
Categories ........................................................................................................................................................................... 7
Add a Category/Subcategory .......................................................................................................................................... 8
Edit a Category/Subcategory .......................................................................................................................................... 9
Delete a Category/Subcategory .................................................................................................................................... 10
Products ............................................................................................................................................................................ 10
Add a Product................................................................................................................................................................ 11
Edit a Product ................................................................................................................................................................ 16
Delete a Product ........................................................................................................................................................... 16
Layout/Design ................................................................................................................................................................... 16
Store Settings ................................................................................................................................................................ 16
Themes .......................................................................................................................................................................... 17
Extra Pages .................................................................................................................................................................... 22
Upload Site ........................................................................................................................................................................ 25
Upload Site .................................................................................................................................................................... 25
Upload Settings ............................................................................................................................................................. 25
View Store ......................................................................................................................................................................... 26
2
Store32 User Manual
Revision 12.2.2009
Store32 User Manual
Welcome to the Beta version of Store32. The screenshot below shows a typical view of Store32 in Internet Explorer.
Other internet browsers may display elements of Store32 a little differently, but all content should be essentially the
same.
Client and Sales Summaries
Header Links
Tabs
1. Client and Sales Summaries
Near the top of the administrative page is a bar that shows your client name (here, “LYNDEV3”) on the left and the
summary of sales on the right, including today’s sales totals and new orders. In order to access your cart’s Store32
setup, you must be logged into the cart administrative site.
2. Header Links
Just below the summary bar are three links: Cart32, Store32 Beta, and Cart32 Gateway.
Cart32
Clicking this link will take you to the usual cart setup page, with all the associated administrative tools. The color
associated with Cart32 is blue—when you are operating in Cart32, the tabs will turn blue.
Store32 Beta
Clicking this link will take you to the beta version of Store32, a powerful catalog-building tool which we will explore in
this manual. The color associated with Store32 is green—when you are operating in Store32, the tabs will be green.
3
Store32 User Manual
Revision 12.2.2009
Cart32 Gateway
Clicking this link will take you to the credit card processing setup for your store.
3. Tabs
The Store32 page is split into tabs, just like the Cart32 cart setup page. Store32 has a total of six tabs.
Store32
This is the tab that shows by default when you click the Store32 link at the top of the administrative page. More
specifically, the section of the Store32 page that shows by default is the Getting Started page, which shows the four
easy steps to getting your store’s catalog up and running.
4
Store32 User Manual
Revision 12.2.2009
Uploading Images
If you already have images ready for your catalog, you can upload them by going to the Import Data section of the
Store32 tab and clicking the Upload images link. The image uploader will open in a new window.
In the Choose Folder section on the upper left, navigate to the folder you wish to use as the destination folder—clicking
on a plus symbol [+] will expand parts of the folder tree, and clicking on a minus symbol [-] will collapse them again.
When you have selected a destination folder, the path will be displayed at the top of the window in the Current Folder
section.
If there are already image files in the current folder, a list of them will appear in the Choose Image section. If you’re
uploading a new image, you don’t need to do anything in this part of the page.
In the Or Upload An Image section, click the Browse… button to navigate to the image file you wish to upload, then click
the Upload Now button. If the upload is successful, the image will appear in the Image View section. Once you have
uploaded an image, you can access the store32images folder via FTP to the cart templates folder. If you have several
images to upload, you can organize them into folders (e.g. “cartimages”), zip them, and upload them at once. Select the
store32images folder when you upload.
5
Store32 User Manual
Revision 12.2.2009
Upload a Store Manager Database
First, make sure you have a Store Manager Database ready for uploading. Store Manager uses a Microsoft Access
database. In particular, the product catalog is stored in three tables: CATEGORIES, PRODUCTS, and CAT_PROD. These
tables must be maintained under strict guidelines for Store Manager to function properly and to properly import the
database to Store32. Users of E-Store may be eligible for a product import as well. In an effort to upgrade these users,
we have created a semi-automated process to convert E-Store data. Contact our development department for
information regarding this ([email protected]). Custom imports from text files, Excel files, and other databases
are often available/possible. An import’s eligibility is assessed on a per situation basis in order to accommodate as many
customers as possible. Please contact our Development department for a free import quote
If you already have a Store Manager Database of your product catalog, you can upload it by going to the Import Data
section of the Store32 tab and clicking the Upload Store Manager database link. The database uploader will open in a
new window. If you have a Store Manager Database but are concerned about the import process for any reason, please
contact us. We can review your system and provide you with an estimate to perform this step for you.
6
Store32 User Manual
Revision 12.2.2009
Click the Browse… button to navigate to the database file you wish to upload, then click the Upload Now button.
If the upload process is successful, the window will display a message saying that the import is complete. You can now
close the upload window.
Uploading a Store Manager database will not overwrite any product catalog information you have already entered
through Store32.
Categories
All controls for Categories can be found in the Categories tab. This includes the controls to add, edit, and delete
categories or subcategories. A subcategory is any category which belongs to another category (for instance, the
category “high heels” could be a subcategory for “shoes”).
After importing existing data or uploading images, you should review the category list. We recommend adding
categories first, so that products can be assigned to them at the time of creation and so that you have access to your
products as you view your new site.
7
Store32 User Manual
Revision 12.2.2009
If you do not have a pre-existing product catalog or your catalog does not categorize products, you should start creating
your catalog by giving it at least basic categories. Your categories can be anything you feel will adequately organize your
products (both for your needs and your customers’). A person selling books might use authors or publishers for
categories. A person selling clothing might use brands or sizes for categories. Products can be added to any number of
categories—if you have few products, you can utilize the categories to create an impression of more products; if you
have many items, you can use the upper-level categories to upsell some items while using the subcategories to display
the remainder of the catalog. The built-in search may also include “by category” searching (this feature is templatedependent).
You may find that you have too many categories to easily view at once; if this happens, you can toggle between showing
and hiding subcategories with the links at the top of the Categories page, or you can manually expand and collapse
parts of the category tree with the plus [+] symbols to the left of parent categories’ names.
Add a Category/Subcategory
To add a top level category, click the Add Top Level Category link at the top of the Categories page. To add a
subcategory, click the green Add symbol next to the desired parent category.
When you create a new category, you will need to give it a name. Other fields on the New Category page can be filled
out or changed later, but you cannot edit a category that does not have a name.
Categories are automatically assigned a Category ID upon creation—you cannot change this number.
8
Store32 User Manual
Revision 12.2.2009
Categories can be given Category Images to show in place of their names in certain key sections of your store. To assign
an image to a category, click the picture icon to the right of the Image field. The image uploader will appear in a new
window, just as if you were uploading an image from the Store32 tab. Navigate to the folder which contains the desired
image, select the image file from the Choose Image section, visually confirm that it is the image you wanted in the
Image View section, and click the link that says Click Here To Select. The image uploader will close, and the path to the
image file will automatically be entered in the Image field of the New Category page.
Categories can be given descriptions. You do not need to give your categories descriptions, but the description can be
used in several ways, including as an alt tag for any links to the category—alt tags are very important to Search Engine
Optimization (SEO) and Screen Readers (programs which read the contents of a computer screen aloud for the visually
impaired). Many templates use the category description as a generalized summary above the product listings on the
category page. The category image may be used here as well; again, this depends on how the selected template utilizes
the information you provide. Category descriptions can also be used as callouts and sale notifications (e.g. “All shoes
30% off!”).
Meta fields in general are mainly used for SEO purposes. However, the Title is also the text that will appear in the
browser’s menu bar (where you would normally see text like “Cart32 v7.0 Web Admin – Windows Internet Explorer”).
Edit a Category/Subcategory
9
Store32 User Manual
Revision 12.2.2009
To edit a category or subcategory, click its name in the Categories tab. If you don’t see the subcategory you want to
edit, either expand its parent category by clicking the plus symbol [+] to the left of the parent category’s name or show
all subcategories by clicking the Show All Subcategories link at the top of the Categories page.
You can change anything about a category except its Category ID, which is automatically assigned. You can also delete
the contents of any field—be careful when doing this, because categories need names. For some templates, all of a
category’s subcategories will be listed on its Edit Category page.
Note that you cannot change a category’s level or parent category—a subcategory must be added under the correct
parent category. The reason for this is to help keep you from losing entire categories and all their products when
moving a category. It’s best to get into the habit of planning your category layout in advance.
Delete a Category/Subcategory
To delete a category or subcategory, click the delete icon next to its name in the Categories tab. If you don’t see the
subcategory you want to delete, either expand its parent category by clicking the plus symbol [+] or show all
subcategories by clicking the Show All Subcategories link at the top of the Categories page.
Products
At the top of the Products page is a group of tools for searching through and paginating your products. You can show
ten, twenty-five, or fifty products per page, or you can show all products at once. You can choose to display them by
Page, Part Number, Name, or Price order. You can also choose to look at products by category.
10
Store32 User Manual
Revision 12.2.2009
Any time one of the sorting or pagination options is changed, the search results will reload—if you have not entered any
text in the Product Search field, Store32 will apply the sorting and pagination options to all of your products. To search
by new text (or to unapply a search by deleting text), first type some or all of the text into the Product Search field, then
click the Go button to the right. The results will display according to the sorting and pagination options currently
displayed.
Add a Product
We recommend adding a subset of your products to begin with. This will allow you to try different option types and
choose what you prefer before you go to the trouble of manually entering your full catalog.
To add a product, click the Add a Product link at the top of the Products page. Just like categories, all products
automatically receive ID numbers.
If you chose to import an existing product catalog, then the option types were imported from Store Manager or
selected for you based on our expertise.
Basic Fields
You’ll need to give your new product a Name, Part Number, and Price when you create it. Everything else can be added
or changed later by editing the product.
11
Store32 User Manual
Revision 12.2.2009
Adding options to a product is fairly straightforward. When you click the Add Option link, the Add/Edit Option window
will open. Give the option a name—simple, self-explanatory option names are recommended—and select the option
type that will suit it best.
For example, choosing one out of a list of colors would be simplest with a Drop Down List option. Dropdown and Radio
options are empty by default, so you will need to add choices by clicking the Add Choices link.
Note that at this point you have the ability to specify a different price, part number, and/or weight for each option, if
you choose—this can be important for things like size differences and costs of materials. You must choose to
separately save each choice by clicking the Save link next to it. When you have finished adding choices, click the Save
button below the choices to save the changes you made to the option.
Options such as inscriptions or custom cards are best suited to Text Box or Multiple Line Text Box options. By default,
each line of a Text Box or Multiple Line Text Box option is twenty (20) characters long, but you can specify both width (in
characters) and height (in lines) for a Multiple Line Text Box. This may be overwritten by CSS in some cases.
12
Store32 User Manual
Revision 12.2.2009
As you add options to a product, they will appear in a list inside the Options box.
Adding images to products works the same way as uploading images from the Store32 tab. When you click the Add
Image link, the Add/Edit Product Image window will open. It is important to make sure that the image is assigned to
the appropriate image type. If your store relies exclusively on thumbnails, for instance, you would only need to choose
an image for the thumbnail setting. To see where a type of image is used in your store and your cart, hover your cursor
over the blue help icon to the left of the image type. Click the image type or the choose link next to it in order to open
the image uploader in the Add/Edit Product Image window.
As you add images to a product, they will appear in a list inside the Images box. Once you have more than one image for
a product, images can be dragged up and down in the list. The image in the first row will be used for the thumbnail,
default closeup, and Cart Images. If multiple images are used, Store32 will create small thumbnail images below the
closeup image to allow you to view more than one—the size and number of these per row are controlled with the
layout settings.
A Product’s Short Description is the description that will show up on the Products page, and may show up in parts of
your store like the thumbnail page. The Long Description is more likely to appear in the close up view of a product. One
use of the distinction between descriptions is to make general and specific descriptions, such as describing a packaged
item and then enumerating its contents.
The Manufacturer field is useful for further separating items of the same type that are made by different companies.
Products can belong to multiple categories. If you want a product to appear in more than one category, Ctrl + click on
each subsequent category. You can also use Ctrl + click to deselect a category. To clear the category selections, click the
Clear Selections link below the category list. Note that if a product belongs more specifically to a subcategory, you may
not want it to also appear in the parent category, as this can make parent categories needlessly cluttered. At the same
time, don’t feel that you need to limit the number of categories to which a product belongs—some of your customers
may expect a product to appear in a different category than others, and being as complete as possible is the best way to
make sure that your customers can find everything they want. Remember that a product will not appear in your store if
it does not belong to at least one category.
To save your changes and continue editing the new product, click the Save button. To save your changes and return to
the Products page, click the Save + Go Back button. To discard your changes and return to the Products page, click the
Cancel button. To save your changes and make a new copy based on the current product, click the Save + Copy to New
Product button. You will not be able to save changes if the product is missing its Name, Part Number, or Price.
13
Store32 User Manual
Revision 12.2.2009
Extra Fields
By clicking the Show Extra Fields link at the bottom of the New Product page, you will gain access to nineteen (19) more
product fields.
Active/Inactive status for a product determines whether or not it displays in your store.
A product’s Search Keywords are keywords by which it can be found through an in-store search. It is recommended that
you use commas (,) to separate the list of keywords. You may want to copy this list into the Meta Keywords field as
well.
A product’s Order refers to the sequence in which products appear in your store’s pages, with one (1) being first and
higher numbers coming after. Rather than altering this number, use the product list, select a category, and drag items
up and down to reorder them within that category.
A product’s Weight is needed for ship-by-weight calculations. If you use shipping methods that do not rely on weight,
this field is less important to you. As with cart form code, weight should be provided as a number in pounds. There are
sixteen (16) ounces in a pound, so an eight ounce item would be “0.5” (i.e. half a pound).
The Discount field is where you can use Cart32 form code to specify any discounts such as reduced prices for higher
quantities. These can be specified as absolute prices or relative prices, for several ranges of quantities. You can split a
quantity discount into as many ranges as you like, but be careful not to overlap the ranges or leave any quantities out—
quantities that do not have specified discounts will be given the default price, and quantities that have more than one
specified discount may behave unpredictably. Quantity discounts in a list are separated by semicolons (;). A range of
14
Store32 User Manual
Revision 12.2.2009
quantities in a quantity discount is denoted with the smaller number followed by a hyphen (-), followed by the bigger
number, followed by a colon (:). That is, “1-4:” refers to quantities greater than or equal to one but less than or equal to
four. There is also an end range, which is denoted by a number followed by a plus sign (+), followed by a colon (:). So
“5+:” refers to all quantities greater than or equal to five. As a general rule, you should always have an end range as the
last entry in your quantity discount list. An absolute price is specified with a number that has no more than two digits to
the right of the decimal. For example, “1-3:4.95;4+:3.95” means that when a customer orders three or fewer of the
item, each unit costs $4.95, but when the customer orders four or more of the item, each unit costs only $3.95. A
relative price is specified with a plus (+) or minus sign (-), followed by a number that has no more than two digits to the
right of the decimal. For example, “1-3:-0;4+:-1” means that when a customer orders three or fewer of the item, each
unit costs the default price, but when the customer orders four or more of the item, each unit costs $1 less than the
default price. If the price of an item changes often, it is a good idea to choose a relative price adjustment rather than an
absolute price adjustment.
You can specify an Item URL for a product in order to make its name a clickable link from the shopping cart. This page
may open in a new window, or it may open in the current window; create a test before adding off-site links.
If a product has a specific amount of shipping that differs from a standard rate, you can specify it with the Shipping
field.
If a product has a specific amount of tax that differs from standard rates, you can specify it with the Tax field.
If a product has a tax rate that differs from the standard rate, you can use the Tax Code field to look up a tax rate from
the tax grid inside your Cart32 Administration. For example, if you are selling products in the state of Illinois, you might
keep a grid that contains the Low Tax rate, the High Tax rate, and the Liquor Tax rate—then you could change any or all
of these rates as needed. These codes will also have to be set up in the tax grid of the Cart32 Administration. In the tax
grid, you can detail rates out for each of these (even per region).
The Ships in Own Box field lets you set options for whether the item can, must, or cannot ship in a separate box from
the rest of the order.
The Qty On Hand field is for inventory tracking. Enter the quantity of the item that you have in stock. Using the
invengory management system is optional and can prevent ordering for out of stock items, but it doesn’t have to.
The Reorder Point field is another inventory tracking field. It will indicate that an item needs to be reordered when
quantities on hand reach the specified reorder point. This is displayed on a “report” in the reports tab, which may
require an additional purchase.
The Accounting Category field lets you specify the category under which a product will be listed in QuickBooks
accounting software.
The Max Qty field is particularly helpful if you have difficulty in getting enough supply to meet demand (or anticipate
that you will). With it, you can make sure that each customer can only purchase the maximum quantity you specify.
Retail Price is a field that can be great for stores that sell at discounts, as it can let you display the regular retail price for
a product in order to illustrate the difference.
15
Store32 User Manual
Revision 12.2.2009
You can give each product its own Meta Title, Description, and Keywords. This will help more people find the exact
product for which they’re searching. The easier it is for customers to find your product when they want to buy it, the
more likely they are to buy from you.
Edit a Product
To edit a product, click the Edit link to the left of its name in the Products page. You can change any product setting
except the Product ID, which is automatically generated. If you did not specify an Order for the product, this will also be
automatically generated. If you did not specify Weight, Shipping, Tax, Qty On Hand, Max Qty, or Retail Price, these
fields will default to zero (0).
To save your changes and continue editing the new product, click the Save button. To save your changes and return to
the Products page, click the Save + Go Back button. To discard your changes and return to the Products page, click the
Cancel button. To save your changes and make a new copy based on the current product, click the Save + Copy to New
Product button. You will not be able to save changes if the product is missing its Name, Part Number, or Price.
Delete a Product
To delete a product, click the Del link to the left of its name in the Products page. You will be prompted for
confirmation. Click OK to delete the product or Cancel to keep the product. Note that the confirmation window will not
specify the product, so use caution when deleting.
Layout/Design
The Layout/Design tab contains all the basic controls for the appearance of your site. We recommend choosing one of
the themes that comes packaged with Store32 to use as a base and tweaking the appearance from there, rather than
starting from scratch. When changing settings in the Layout/Design tab, you should save often to avoid losing any
work. The save button is located to the upper right of the page content, just under the tab bar.
Store Settings
16
Store32 User Manual
Revision 12.2.2009
The Store Settings page contains general store settings like the store’s title and logo. The logo can be uploaded like any
other image by clicking the image button to the right of the Store Logo field. You can set your cart to match your store
by clicking the Match cart templates with Store32 theme checkbox; you can set it to show or hide in the category list
from this page. You can also turn the Inventory Management feature on and off from this page. If a product is out of
stock, it will display an Out of stock message, which you can set to any text you like (such as “Sold out!” or “Temporarily
unavailable…”). Default image sizing here is separated into width and height for Close Up, Thumbnail, and Cart images,
and should be specified in pixels.
Themes
A theme comprises all of the style settings for your store, including font, color, and background image settings.
17
Store32 User Manual
Revision 12.2.2009
Store32 comes with twenty-five (25) pre-made themes that you can either use as-is or modify to fit your needs. Some
of these themes are plain and minimalistic, others are more complex, to give you a better idea of the customization
options.
In the future, if you already have a theme set up, you will be able to upload it by clicking the Upload Your Own Custom
Theme link at the top of the page, just above the themes list. This functionality is not yet available.
To expand any section of the Edit Theme page, click the double down arrow icon. To collapse it, click the double up
arrow icon. The first section is the Settings section, which contains general Theme settings, and the second section is
the HTML Code section, which contains more direct controls over the site’s appearance.
18
Store32 User Manual
Revision 12.2.2009
Edit a Theme’s Settings
To expand the Settings section, click the double down arrow button
in the section’s title bar. To collapse it again, click the double up
arrow button.
The Layout portion of the Settings section contains the Main Font
and Primary Color settings. The Main Font will replace any
occurrence of the tag <!MainFont> in your site’s HTML code. The
Primary Color will replace any occurrence of the tag <!PrimaryColor>.
The Navigation portion of the Settings section contains the control for
the Navigation Delimiter. This is the symbol that will separate the
links in the breadcrumb trail at the top of each page during shopping.
It is best to make this a fairly distinctive symbol, such as the bullet (•)
or the right arrow (>).
The Thumbnail portion of the Settings section contains the Column Number and Sort Order settings for product
thumbnail display. The number of columns can be set from one (1) to five (5), and the order can be set to alphabetical
or the order determined in the Products tab.
The Thumbnail Categories portion of the Settings section contains the Column Number and Delimiter settings for
category thumbnail display. The number of columns can be set from one (1) to five (5).
The Close Up portion of the Settings section contains the controls for Extra Image Thumbnail Width and Thumbnails Per
Row for the Close Up view of a product. The Extra Image Thumbnail Width setting is in pixels, and determines the
width of the automatically generated thumbnails for any extra images you provide of a product (such as multiple angles,
patterns, or colors). The Thumbnail Images Per Row setting can be set to any number you require, but you should
carefully consider the layout of your site and the width of the thumbnails before you choose a large number, as this can
drastically affect the appearance and visual appeal of your store.
The Extra Pages portion of the Settings section contains the control for the Extra Pages Delimiter. This is the symbol
that will separate the Extra Pages links in the top navigation bar. It is best to make this a fairly distinctive symbol, such
as the bullet (•) or the right arrow (>).
Edit a Theme’s HTML Code
When editing a theme with HTML code, there are several helpful link tags you can use with Store32: home, category,
product, extrapage, and cartaction. Use these tags as you would any relative link in HTML. Substitute the appropriate
ID number in the HREF field to make a hard-coded link to a specific category, product, or extra page.
<a href=“home”>link to home</a>
<a href=“category:catid”>link to a category</a>
<a href=“product:prodid”>link to a product</a>
<a href=“extrapage:extrapageid”>link to an extra page</a>
19
Store32 User Manual
Revision 12.2.2009
<a href=“cartaction:itemlist”>view cart</a>
To hard-code an image tag that refers to one of your uploaded Store32 images, use the following tag style.
<!img:store32images\foldername\filename.jpg>
To expand any portion of the HTML Code section, click the double down arrow button next to the portion’s title. To
collapse it again, click the double up arrow button. To expand a code box, simply click somewhere in the box; it will
collapse again automatically when you click somewhere else on the page.
The Layout portion of the HTML Code section of the Edit Theme page contains controls for the layout and styling of the
site in general, including its header and footer. The content box here will let you determine the site’s layout and any
content that should appear across all pages, such as in the navigation areas. The footer section here is a good place to
put contact or copyright information.
The Home Page portion of the HTML Code section contains the controls for styling and scripting your store’s Home
page, as well as adding content.
The Categories portion of the HTML Code section contains the controls for styling and adding content to your store’s
category navigation (i.e. left navigation) menu. You can change the way the first five (5) levels of category titles appear.
20
Store32 User Manual
Revision 12.2.2009
The Navigation portion of the HTML Code section contains the controls for styling and adding content to your store’s
top navigation menu.
The Thumbnail portion of the HTML Code section contains the controls for styling, scripting, and adding content to your
store’s thumbnail view. There are controls here for separate header and footer sections that will appear at the top and
bottom of thumbnail pages (within the main content area)—that is, they appear in addition to the site’s main header
and footer sections.
The Thumbnail Categories portion of the HTML Code section contains the controls for styling and adding content to the
Category Thumbnails in your store’s thumbnail view.
The Close Up portion of the HTML Code section contains the controls for styling, scripting, and adding content to your
store’s close up view. There are controls here for separate header and footer sections that will appear at the top and
21
Store32 User Manual
Revision 12.2.2009
bottom of close up pages (within the main content area)—that is, they appear in addition to the site’s main header and
footer sections.
The Extra Pages portion of the HTML Code section contains the controls for styling and adding content to your store’s
extra pages. Remember that the content here will appear across all extra pages. To change an individual extra page’s
content, click the Extra Pages tab.
The Search portion of the HTML Code section contains the controls for styling and adding content to your store’s search
box area.
Just below the HTML Code section of the Edit Theme page are the save buttons. To save your changes and continue
editing the theme, click Save. To save your changes and return to the theme list, click Save + Go Back. To discard all
customizations to the theme, click Revert Back To Original Content From Theme File. To simply cancel the changes you
have made, click away from the Themes tab.
Extra Pages
Any page beyond your store’s product and home pages is an Extra Page. You can use Extra Pages for content like
shipping information, directions to your store’s street address, company history, and frequently asked questions.
22
Store32 User Manual
Revision 12.2.2009
Add an Extra Page
To add an Extra Page, just click the Add Extra Page link in the Extra Pages section of the Layout/Design tab. You will
need to give the Extra Page a name, decide whether it will show in the list of pages for your site or will be linked to
directly, and choose the kind of content it will have. An Extra Page can link to a category, link to a specific cart action
(such as View Cart), link to a URL (such as a sister site), or contain custom text and image content (complete with
scripting and CSS).
To save changes and continue editing, click the Save button at the bottom of the page. To save changes and return to
the Extra Pages section, click Save + Go Back.
23
Store32 User Manual
Revision 12.2.2009
Edit an Extra Page
To edit an Extra Page, click the Edit link next to the page’s name in the Extra Pages section of the Layout/Design tab.
You can change anything about an Extra Page except its ID (which is automatically assigned upon its creation). You can
even change the type of content for a page—from custom content to an external URL, for instance, if a section of your
store grew large enough to need its own site.
To save changes and continue editing, click the Save button at the bottom of the page. To save changes and return to
the Extra Pages section, click Save + Go Back.
Delete an Extra Page
To delete an Extra Page, click the Del link next to the page’s name in the Extra Pages section of the Layout/Design tab.
You will be prompted for confirmation. Click OK to delete the extra page or Cancel to keep the extra page. Note that
the confirmation window will not specify the extra page, so use caution when deleting.
24
Store32 User Manual
Revision 12.2.2009
Upload Site
Upload Site
As the website instructions say, this tab allows you to upload a static version of your website to your own webhost,
using the FTP information you provide in the Upload Settings section.
Upload Settings
The FTP Host Address field is where you need to enter the FTP address where your site will be hosted.
The FTP User Name and Password fields are where you need to provide the login information with which you access the
FTP host.
The FTP Default Folder is the folder on your FTP host where you want the front pages and default content for your site
to be stored. Other content will be uploaded within appropriate subfolders.
The Use FTP Passive Mode checkbox will set the connection to Passive FTP. This may be necessary if you are
experiencing issues with the data transfer being blocked by a firewall.
25
Store32 User Manual
Revision 12.2.2009
The Store Domain field is where you will specify the store’s domain name.
The Store Folder is the folder on your FTP host to which all store files will be moved. This is especially important if your
store is only one part of your site.
The Search Page Extension dropdown lets you choose whether your search page will be in ASP or PHP format,
depending on what your host server can support. If your host server cannot support either, you will not be able to use
search functionality on your site.
The Confirm Blank FTP Folder checkbox will make sure that you are uploading to a blank folder to prevent overwriting
any critical files.
View Store
You can preview your store at any time by clicking this link. It will appear exactly as it would on a live server. If you
make any changes, you will need to save them and reload the preview window in order to see them.
26
Store32 User Manual
Revision 12.2.2009