1
KDevelop User Manual
Bernd Gehrmann, Caleb Tennis, Bernd Pol, and
Volker Paul
KDevelop User Manual
2
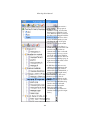
Contents
1
What This Manual Contains
1
2
Getting Started with KDevelop — a Guided Tour
3
2.1
A Very First Look at KDevelop . . . . . . . . . . . . . . . . . . .
4
2.1.1
2.1.2
On the Surface . . . . . . . . . . . . . . . . . . . . . . . .
How to Get Some Help . . . . . . . . . . . . . . . . . . .
4
5
2.1.3 What is in the menus? . . . . . . . . . . . . . . . . . . . .
2.1.4 What are those tool views for? . . . . . . . . . . . . . . .
A Bit of Configuration . . . . . . . . . . . . . . . . . . . . . . . .
6
8
10
2.2.1
Some General Settings . . . . . . . . . . . . . . . . . . . .
10
2.2.2
Initializing Documentation Search Indexes . . . . . . . .
12
Starting a New Project . . . . . . . . . . . . . . . . . . . . . . . .
14
2.3.1
How to Create a New Project . . . . . . . . . . . . . . . .
15
2.3.2
Initial Project Files . . . . . . . . . . . . . . . . . . . . . .
17
2.3.2.1
Copyright Issues . . . . . . . . . . . . . . . . . .
18
2.3.2.2
2.3.2.3
Initial Source Files . . . . . . . . . . . . . . . . .
Initial Application Documentation . . . . . . .
19
20
2.3.2.4
Project and Auxiliary Files . . . . . . . . . . . .
20
Additional Tool Views . . . . . . . . . . . . . . . . . . . .
2.3.3.1 Navigation and Selection Tools (left side) . . . .
21
22
2.3.3.2
Messages (bottom) . . . . . . . . . . . . . . . . .
22
2.3.3.3
Source Management (right side) . . . . . . . . .
22
Some Tips About Dealing With Documents . . . . . . . . . . . .
23
2.4.1
Switching Between Header and Implementation Files . .
23
2.4.2
How to Access Declarations and Definitions . . . . . . .
24
2.2
2.3
2.3.3
2.4
KDevelop User Manual
2.4.2.1
2.4.2.2
2.4.3
2.4.4
2.5
External Declarations and Definitions . . . . . .
Project Internal Declarations and Definitions . .
25
26
Arranging Editor Windows . . . . . . . . . . . . . . . . .
29
2.4.3.1
Cleaning up the Tabs Row . . . . . . . . . . . .
29
2.4.3.2
How to Rearrange Edit Window Tabs . . . . . .
30
2.4.3.3
Viewing Several Files Simultaneously . . . . . .
31
2.4.3.4
Edit C++ Source and Header Files Simultaneously 32
2.4.3.5
Grouping Source Files Into Development Sessions 34
Keeping an Eye on Common Problems . . . . . . . . . .
36
How to Compile a Project . . . . . . . . . . . . . . . . . . . . . .
38
2.5.1
The Basic Build Cycle . . . . . . . . . . . . . . . . . . . .
39
2.5.1.1
Initialize the Project for the Build . . . . . . . .
39
2.5.1.2
Initial Hello Configuration . . . . . . . . . . . .
41
2.5.1.3
Build the Project . . . . . . . . . . . . . . . . . .
43
2.5.1.4
2.5.2
Run the Application . . . . . . . . . . . . . . . .
44
Configuring the Project . . . . . . . . . . . . . . . . . . .
45
2.5.2.1
Build Configurations . . . . . . . . . . . . . . .
45
2.5.2.2
Project Configure Options . . . . . . . . . . . .
47
2.5.2.2.1
General Configuration Settings . . . .
49
2.5.2.2.2
Compiler Specific Settings . . . . . . .
49
How Make Should Build the Program . . . . .
51
2.5.2.4 How to Run the Executable . . . . . . . . . . . .
How to Extend a Project — the Automake Manager . . . . . . .
52
54
2.6.1
A Short Look at the Automake Machinery . . . . . . . .
55
2.6.2
How to Place Icons in a Separate Directory . . . . . . . .
55
2.6.3
2.6.4
How to Add New Classes . . . . . . . . . . . . . . . . . .
What is in a Subproject? . . . . . . . . . . . . . . . . . . .
55
55
2.6.5
2.6.4.1 Concentrate on Your Work — the Active Target
Some Steps to Restructure a Project . . . . . . . . . . . .
55
55
2.7
2.8
How to Debug . . . . . . . . . . . . . . . . . . . . . . . . . . . . .
A Note on Your Project Documentation . . . . . . . . . . . . . .
55
55
2.9
Last But Not Least, Keyboard Shortcuts . . . . . . . . . . . . . .
56
2.10 Where to go from here . . . . . . . . . . . . . . . . . . . . . . . .
56
2.10.1 Frequently Encountered Problems . . . . . . . . . . . . .
56
2.10.2 Working With Projects . . . . . . . . . . . . . . . . . . . .
56
2.10.2.1 Using Existing KDevelop Projects . . . . . . . .
56
2.10.2.2 Importing External Projects . . . . . . . . . . .
57
2.5.2.3
2.6
4
KDevelop User Manual
3
Overview of KDevelop Features
58
3.1
Available User Interface Modes . . . . . . . . . . . . . . . . . . .
3.1.1 How to Switch User Interface Modes . . . . . . . . . . .
3.1.2 How to Maximize the Work Space Area . . . . . . . . . .
59
60
60
3.2
Elements of the User Interface . . . . . . . . . . . . . . . . . . . .
3.2.1 The Workarea . . . . . . . . . . . . . . . . . . . . . . . . .
3.2.2 The KDevelop Titlebar . . . . . . . . . . . . . . . . . . . .
61
61
61
3.2.3
The KDevelop Statusbar . . . . . . . . . . . . . . . . . . .
61
3.2.4
3.2.5
3.2.6
3.2.7
The menubar . . . . . .
The Toolbars . . . . . . .
The Tree Tool Views . .
The Output Tool Views
.
.
.
.
61
61
61
62
Project Management Systems . . . . . . . . . . . . . . . . . . . .
62
3.3.1
Automake Projects . . . . . . . . . . . . . . . . . . . . . .
62
3.3.2
QMake Projects . . . . . . . . . . . . . . . . . . . . . . . .
62
3.3.3
CMake Projects . . . . . . . . . . . . . . . . . . . . . . . .
62
3.3.4
ANT Projects (JavaTM Projects) . . . . . . . . . . . . . . .
63
3.3.5
Custom Projects . . . . . . . . . . . . . . . . . . . . . . . .
63
3.3.6
How to Distribute Your Application . . . . . . . . . . . .
63
3.3
4
.
.
.
.
.
.
.
.
.
.
.
.
.
.
.
.
.
.
.
.
.
.
.
.
.
.
.
.
.
.
.
.
.
.
.
.
.
.
.
.
.
.
.
.
.
.
.
.
.
.
.
.
.
.
.
.
.
.
.
.
.
.
.
.
.
.
.
.
.
.
.
.
Configuring KDevelop
64
4.1
General Configuration . . . . . . . . . . . . . . . . . . . . . . . .
66
4.1.1
General Setup . . . . . . . . . . . . . . . . . . . . . . . . .
66
4.1.2
Selecting the User Interface . . . . . . . . . . . . . . . . .
70
4.1.3
File Templates . . . . . . . . . . . . . . . . . . . . . . . . .
75
4.1.4
Selecting an Editor . . . . . . . . . . . . . . . . . . . . . .
75
4.1.5
Abbreviations for the Word Completion . . . . . . . . . .
77
4.1.6
Scripting . . . . . . . . . . . . . . . . . . . . . . . . . . . .
77
4.1.7
Adding KDE Standard Applications to the Tools Menu .
77
4.1.8
Adding External Applications to Menus . . . . . . . . . .
77
4.1.8.1
Adding to the Tools Menu . . . . . . . . . . . .
77
4.1.8.2
Adding to the File Context Menu . . . . . . . .
77
4.1.8.3
Adding to the Directory Context Menu . . . . .
77
Selecting a Source Format Style . . . . . . . . . . . . . . .
77
4.1.9
5
KDevelop User Manual
4.2
4.3
5
4.1.9.1
General Formatting Setup . . . . . . . . . . . .
78
4.1.9.2
Indentation Style Setup . . . . . . . . . . . . . .
79
4.1.9.3
Other Formatting Setup . . . . . . . . . . . . . .
82
4.1.10 Setting Up the Code Snippets Tool . . . . . . . . . . . . .
84
4.1.11 File List . . . . . . . . . . . . . . . . . . . . . . . . . . . .
4.1.12 Configuring the File Selector . . . . . . . . . . . . . . . .
85
85
4.1.13 C++ Class Generator . . . . . . . . . . . . . . . . . . . . .
4.1.14 Formatting . . . . . . . . . . . . . . . . . . . . . . . . . . .
89
89
4.1.15 C++ Parsing . . . . . . . . . . . . . . . . . . . . . . . . . .
89
Configuring the Documentation . . . . . . . . . . . . . . . . . . .
89
4.2.1
Setting Up Documentation Collections . . . . . . . . . .
91
4.2.1.1
Common Documentation Setup Structure . . .
92
4.2.1.2
QtTM
Documentation Collections . . . . . . . .
93
4.2.1.3
Setting Up the CHM Documentation Collection
95
4.2.1.4
Documentation Generated by Doxygen . . . . .
95
4.2.1.5
Handling Structured Documentation (KDevelopTOC Files) . . . . . . . . . . . . . . . . . . . .
98
4.2.1.6
KDevelop TOC Files . . . . . . . . . . . . . . . .
100
4.2.1.7
DevHelp Documentation . . . . . . . . . . . . .
101
4.2.1.8
Setting Up Custom Documentation Collections
102
4.2.2
Setting Up Text Search Indexes . . . . . . . . . . . . . . .
103
4.2.3
Other Documentation Configuration Settings . . . . . . .
104
Advanced Configuration . . . . . . . . . . . . . . . . . . . . . . .
104
4.3.1
104
Plugin Tools . . . . . . . . . . . . . . . . . . . . . . . . . .
Getting Started — the Application Wizard
105
5.1
New Projects . . . . . . . . . . . . . . . . . . . . . . . . . . . . . .
105
5.1.1
106
Initial Steps . . . . . . . . . . . . . . . . . . . . . . . . . .
5.1.1.1
Select Programming Language and Application
Type . . . . . . . . . . . . . . . . . . . . . . . . .
107
5.1.2
5.1.1.2 Provide General Information . . . . . . . . . . .
Supply Version System Information . . . . . . . . . . . .
108
111
5.1.3
Supply Header/Source Templates . . . . . . . . . . . . .
115
5.1.3.1
How to Edit the Templates . . . . . . . . . . . .
116
Build the Initial Project Files . . . . . . . . . . . . . . . . .
118
Configuring Projects . . . . . . . . . . . . . . . . . . . . . . . . .
119
5.1.4
5.2
6
KDevelop User Manual
6
Editing Tools
120
6.1
Code Snippets . . . . . . . . . . . . . . . . . . . . . . . . . . . . .
120
6.2
Keyboard Mapping . . . . . . . . . . . . . . . . . . . . . . . . . .
120
6.3
The Problem Reporter . . . . . . . . . . . . . . . . . . . . . . . .
121
6.4
Searching and Grepping . . . . . . . . . . . . . . . . . . . . . . .
121
6.4.1
Searching for Text . . . . . . . . . . . . . . . . . . . . . . .
121
6.4.2
6.4.3
ISearch . . . . . . . . . . . . . . . . . . . . . . . . . . . . .
Grep . . . . . . . . . . . . . . . . . . . . . . . . . . . . . .
121
122
6.5
Code Completion . . . . . . . . . . . . . . . . . . . . . . . . . . .
123
6.6
Creating New Files and Classes . . . . . . . . . . . . . . . . . . .
123
6.6.1
123
Editing the Templates . . . . . . . . . . . . . . . . . . . .
7
The File Browsers
124
8
The Class Browsers
8.1 Class View . . . . . . . . . . . . . . . . . . . . . . . . . . . . . . .
8.2 Class Tools . . . . . . . . . . . . . . . . . . . . . . . . . . . . . . .
8.3 Class Hierarchy . . . . . . . . . . . . . . . . . . . . . . . . . . . .
126
126
128
128
9
Documentation
9.1 The Documentation Browser . . . . . . . . . . . . . . . . . . . .
129
129
10 Building and Project Management
131
10.1 Summary of Automake Manager . . . . . . . . . . . . . . . . . .
131
10.1.1 The Need for an Automated Build System . . . . . . . .
132
10.1.2 Tutorials on Autoconf/Automake/Libtool . . . . . . . .
133
10.1.3 What does Automake Manager Do? . . . . . . . . . . . .
133
10.1.4 Summary of What Automake Manager Does . . . . . . .
135
10.1.5 Contents of Automake Files . . . . . . . . . . . . . . . . .
10.2 Automake Manager Operation . . . . . . . . . . . . . . . . . . .
135
136
10.2.1 The Automake Manager Window . . . . . . . . . . . . .
137
10.2.2 The Overall View Window . . . . . . . . . . . . . . . . .
10.2.3 The Detail View Window . . . . . . . . . . . . . . . . . .
10.2.3.1 Targets . . . . . . . . . . . . . . . . . . . . . . .
139
139
140
10.2.4 Navigating in the Automake Manager . . . . . . . . . . .
140
10.2.5 Popup Menus in the Automake Manager . . . . . . . . .
141
7
KDevelop User Manual
10.2.5.1 The Popup Menu for a File . . . . . . . . . . . .
141
10.2.5.2 The Popup Menu for a Target . . . . . . . . . .
142
10.2.5.3 The Popup Menu for a Subproject . . . . . . . .
143
10.3 Automake Projects . . . . . . . . . . . . . . . . . . . . . . . . . .
145
10.3.1 Autoconf . . . . . . . . . . . . . . . . . . . . . . . . . . . .
10.3.2 Automake . . . . . . . . . . . . . . . . . . . . . . . . . . .
10.3.3 KDevelop’s Automake Manager . . . . . . . . . . . . . .
145
145
145
10.3.4 Building and Installing Libraries . . . . . . . . . . . . . .
145
10.4 Custom Makefiles and Build Scripts . . . . . . . . . . . . . . . .
147
10.5 Compiler Options . . . . . . . . . . . . . . . . . . . . . . . . . . .
147
10.6 Make Options . . . . . . . . . . . . . . . . . . . . . . . . . . . . .
147
11 Advanced Build Management
148
11.1 Multiple Build Configurations . . . . . . . . . . . . . . . . . . . .
148
11.2 Cross-Compiling . . . . . . . . . . . . . . . . . . . . . . . . . . .
148
11.3 Qt/Embedded . . . . . . . . . . . . . . . . . . . . . . . . . . . . .
149
12 The Debugger Interface
150
12.1 Setting Breakpoints . . . . . . . . . . . . . . . . . . . . . . . . . .
152
12.2 Options . . . . . . . . . . . . . . . . . . . . . . . . . . . . . . . . .
152
13 Using CVS
153
13.1 CVS Basics . . . . . . . . . . . . . . . . . . . . . . . . . . . . . . .
13.2 CVS Commands in KDevelop . . . . . . . . . . . . . . . . . . . .
153
154
13.3 Behind the Scenes . . . . . . . . . . . . . . . . . . . . . . . . . . .
13.3.1 What CVS Records in the Working Directory . . . . . . .
154
154
14 Credits
14.1 Contributions . . . . . . . . . . . . . . . . . . . . . . . . . . . . .
155
155
A Installing KDevelop
156
A.1 How to Obtain KDevelop . . . . . . . . . . . . . . . . . . . . . .
156
A.1.1 Get Daily KDevelop Snapshots from svn . . . . . . . . .
156
A.1.1.1
A.1.1.2
Initial svn Checkout . . . . . . . . . . . . . . . .
Keeping Your svn Copy up to Date . . . . . . .
157
157
A.2 KDevelop Requirements . . . . . . . . . . . . . . . . . . . . . . .
158
8
KDevelop User Manual
A.3 KDevelop Compilation and Installation . . . . . . . . . . . . . .
159
A.3.1 Preliminary Steps . . . . . . . . . . . . . . . . . . . . . . .
160
A.3.1.1
Setting the Environment for the bash Shell . . .
160
A.3.1.2
Setting the Environment for the tcsh Shell . . .
160
A.3.2 Compile KDevelop . . . . . . . . . . . . . . . . . . . . . .
160
A.3.2.1
Special svn Compilation Considerations . . . .
161
A.3.2.2
Basic make Command Sequence . . . . . . . . .
161
A.3.3 Some Notes on configure Options . . . . . . . . . . . . .
163
A.3.3.1
Non-default Installation Directory . . . . . . . .
163
A.4 How to Obtain a KDevelop API Documentation . . . . . . . . .
164
B In a Nutshell — Tips and Tricks
165
C Development on UNIX
168
C.1 Some Historical Remarks . . . . . . . . . . . . . . . . . . . . . . .
C.2 Contemporary Scripting Languages . . . . . . . . . . . . . . . .
168
169
C.2.1 Perl . . . . . . . . . . . . . . . . . . . . . . . . . . . . . . .
C.2.2 Python . . . . . . . . . . . . . . . . . . . . . . . . . . . . .
169
169
C.2.3 PHP . . . . . . . . . . . . . . . . . . . . . . . . . . . . . .
C.3 Higher-level Scripting . . . . . . . . . . . . . . . . . . . . . . . .
169
169
C.3.1 The CORBA Protocol . . . . . . . . . . . . . . . . . . . . .
C.3.2 The DCOP Interface . . . . . . . . . . . . . . . . . . . . .
C.4 Build Systems . . . . . . . . . . . . . . . . . . . . . . . . . . . . .
170
170
170
C.4.1 The Make Process . . . . . . . . . . . . . . . . . . . . . . .
C.5 GUI Development . . . . . . . . . . . . . . . . . . . . . . . . . . .
171
172
C.6 Integrating Concepts and Tools – the IDE . . . . . . . . . . . . .
172
C.6.1 Basic Features of KDevelop 3.3.91 . . . . . . . . . . . . .
173
D Configuration Files Used by KDevelop
174
D.1 KDevelop Default Configuration . . . . . . . . . . . . . . . . . .
174
D.1.1 Default KDevelop Configuration . . . . . . . . . . . . . .
174
D.1.2 Application Specific Defaults . . . . . . . . . . . . . . . .
175
D.2 User Oriented Configuration . . . . . . . . . . . . . . . . . . . .
179
D.2.1 Application Specific Configuration . . . . . . . . . . . . .
179
D.2.2 Resource Configuration Files . . . . . . . . . . . . . . . .
181
D.3 Project Dependent Configuration . . . . . . . . . . . . . . . . . .
183
D.3.1 Persistent Code Store Files . . . . . . . . . . . . . . . . . .
183
9
KDevelop User Manual
E Plugin Tools
185
F KDevelop User Interface Mode Examples
191
F.1
F.2
F.3
IDEAl Mode . . . . . . . . . . . . . . . . . . . . . . . . . . . . . .
Child Frame Windows Mode . . . . . . . . . . . . . . . . . . . .
Tabbed Pages Mode . . . . . . . . . . . . . . . . . . . . . . . . . .
191
192
193
F.4
Toplevel Windows Mode . . . . . . . . . . . . . . . . . . . . . . .
194
G Command Reference
G.1 The Menubar . . . . . .
G.1.1 The File Menu . .
G.1.2 The Edit Menu .
G.1.3 The View Menu .
G.1.4 The Project Menu
.
.
.
.
.
196
196
196
197
198
199
G.1.5 The Project Menu . . . . . . . . . . . . . . . . . . . . . . .
199
G.1.6 The Project Menu . . . . . . . . . . . . . . . . . . . . . . .
200
G.1.7
G.1.8
G.1.9
G.1.10
.
.
.
.
200
200
201
202
G.1.11 The Help Menu . . . . . . . . . . . . . . . . . . . . . . . .
202
H Further Information
H.1 Getting Information . . . . . . . . . . . . . . . . . . . . . . . . . .
203
203
H.2 Reporting Bugs . . . . . . . . . . . . . . . . . . . . . . . . . . . .
203
H.3 Licensing . . . . . . . . . . . . . . . . . . . . . . . . . . . . . . . .
203
Changes
204
I.1
204
I
J
.
.
.
.
.
.
.
.
.
.
.
.
.
.
.
The Bookmarks Menu
The Window Menu . .
The Tools Menu . . . .
The Settings Menu . .
.
.
.
.
.
.
.
.
.
.
.
.
.
.
.
.
.
.
.
.
.
.
.
.
.
.
.
.
.
.
.
.
.
.
.
.
.
.
.
.
.
.
.
.
.
.
.
.
.
.
.
.
.
.
.
.
.
.
.
.
.
.
.
.
.
.
.
.
.
.
.
.
.
.
.
.
.
.
.
.
.
.
.
.
.
.
.
.
.
.
.
.
.
.
.
.
.
.
.
.
.
.
.
.
.
.
.
.
.
.
.
.
.
.
.
.
.
.
.
.
.
.
.
.
.
.
.
.
.
.
.
.
.
.
.
.
.
.
.
.
.
.
.
.
.
.
.
.
.
.
.
.
.
.
.
.
.
.
.
.
.
.
.
.
.
.
.
.
.
.
.
Changes to This Document . . . . . . . . . . . . . . . . . . . . .
Bibliography
205
J.0.0.0.0.1
Bibliography . . . . . . . . . . .
K Index
205
207
10
KDevelop User Manual
List of Figures
7.1
A Screenshot of the File Tree . . . . . . . . . . . . . . . . . . . . .
125
8.1
A Screenshot of the Class View . . . . . . . . . . . . . . . . . . .
127
9.1
A Screenshot of the Documentation Tree . . . . . . . . . . . . . .
130
10.1 A screenshot of the automake manager . . . . . . . . . . . . . .
146
11
KDevelop User Manual
List of Tables
E.2 Project Management Plugins in KDevelop . . . . . . . . . . . . .
188
E.4 Language Support Plugins in KDevelop . . . . . . . . . . . . . .
188
12
Abstract
KDevelop is an Integrated Development Environment to be used for a wide
variety of programming tasks.
KDevelop User Manual
Chapter 1
What This Manual Contains
This user manual is intended to describe the contents and use of the KDevelop
3.3.91 Integrated Development Environment (IDE) from a user’s point of view.
It is not a programming manual, nor does it describe the development process
in detail. Its only aim is to guide you in the handling of the IDE.
Here you will find information on the following topics:
Getting Started with KDevelop — a Guided Tour Gives you a quick start on
the use of this IDE, introducing the basic steps of how to work on a
project.
Overview of the Features of KDevelop Extends the guided tour in the previous chapter, giving an overall view of what is built-in within KDevelop
and gets you acquainted with the look and feel of this IDE.
Configuring KDevelop Shows how you can tailor the IDE to suit your needs.
Getting started: the Application Wizard Describes the basics of how to set up
a new project in KDevelop using the built-in Application Wizard.
Editing tools All you need to write your source files: using the editor, searching for text both locally and project-wide, up to integrating new files and
classes into the project.
The File Browsers Demonstrates various tools to look at the structure of your
project and how to access the files you want to work with.
The Class Browsers Describes one of the most powerful tools of KDevelop
which lets you navigate through class dependencies and allows you to
easily create and access the classes and methods you need.
Documentation Shows how to access the rich built-in documentation KDevelop provides and tells you how to create documentation of your project,
concise and powerful API documentation providing you an overall view
of all your project sources as well as docbook-based user documentation.
1
KDevelop User Manual
Building and Project Management Deals with the creation and management
of your project; describing the basics of autoconf and automake as well
as how to set up custom make files and how to use compiler or make
options to tailor your application to suit your needs.
Advanced Build Management Looks at ways to keep multiple build configurations, to cross-compile for diverse platforms, or to make an embedded
system using the Qt/embedded library.
The Debugger Interface Describes how to use the integrated gdb debugger
interface so you can hunt down bugs without leaving KDevelop.
Using CVS Tells you how you can maintain your project using the CVS versioning system; a must, especially if many developers work on the same
project.
Some commonly used information has been put into the appendix. Amongst
others this consists of:
Installing KDevelop Tells you where to obtain KDevelop and how to get it up
and running.
In a Nutshell — Tips and Tricks A quick reference to commonly used commands and actions. And a short guide to solve common problems when
working with KDevelop.
R program developDevelopment on UNIX A historical overview of UNIX
ment, the main tools necessary and why you need an IDE.
Configuration Files Used by KDevelop Lists the files KDevelop uses to save
its internal information. This is particularly useful in case something
went wrong with your setup.
Plugin Tools Lists the pluggable tools you can use to taylor the capabilities
of KDevelop to your needs.
KDevelop User Interface Mode Examples Shows user interface modes.
Further Information Getting Information, reporting Bugs etc.
Changelog Shows the history of this documentation.
Bibliography Bibliography
2
KDevelop User Manual
Chapter 2
Getting Started with
KDevelop — a Guided Tour
Bernd Pol Now that you have got your new KDevelop IDE, how are you going
to make good use of it? As this is a complex application, the learning curve
may be somewhat steep, especially if you are not already used to this type of
an Integrated Development Environment.
We will try to soften this learning curve a bit by stepping through the makings
of a simple KDE C++ application. Thereby we will have a (cursory) look at:
A first look — the user interface elements of the KDevelop IDE.
Doing some initial configuration.
How to create a new project.
Some tips about dealing with documents.
How to compile the application in this project.
How to add classes and other detail to your project.
What to do to debug the application.
Some basic tools to build program or user documentation.
Last but not least, keyboard shortcuts
Before we start, one important concept should be made clear.
What to expect? As said, KDevelop is an Integrated Development Environment.
That means in essence that KDevelop is no development tool by itself but
rather a graphical front end to easily access a wide range of development tools,
many of which actually would require complex keyboard commands run from
a text console.
While KDevelop eases many of those programming tasks, much of the complexity from this bundle of tools still remains which means that in order to
fully understand the KDevelop IDE you will still need to comprehend these
tools actually running beneath the surface.
3
KDevelop User Manual
Hence, we cannot teach you how to build software, but rather introduce you
to some of the ways KDevelop was designed to ease such a software building
process. If you want to learn more about what an Integrated Development
Environment is meant for, you might want to have a look at the Development
on UNIX historical overview and there especially at the Integrating Concepts
and Tools chapter.
N OTE
The following discussions apply to the default case, where KDevelop starts up in the
Simplified IDEAl Window Mode. If you already did switch to another user interface
mode some items may not be there as described or will behave slightly different. If
in doubt which user interface mode your KDevelop currently uses, check with the
Settings → Configure KDevelop... → User Interface dialog.
2.1
A Very First Look at KDevelop
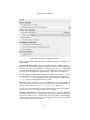
This is all about what you will see when you first started KDevelop. You will
find preliminary information about:
What is there on the surface?
How to get some help.
What is in the menus?
What are those tool views for?
2.1.1
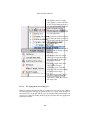
On the Surface
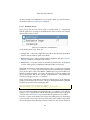
When you start KDevelop for the first time you will get a display similar to this
one:
4
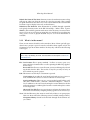
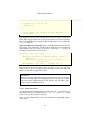
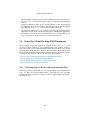
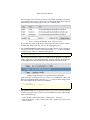
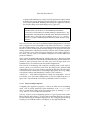
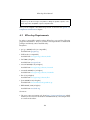
KDevelop User Manual
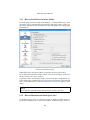
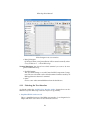
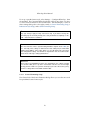
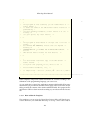
The KDevelop initial layout(Actually the initial KDevelop window will be
larger, but the elements you see are the same.)
Workspace Area and Tool View Tabs In this initial case KDevelop uses the socalled IDEAl user interface mode. A workspace area of maximum possible size
is surrounded left, bottom, and right by a series of buttons which act similar to
tabs on a tabbed display. If you click on one of those tabs, a so-called tool view
window will open which allows you to work on a specific task.
Menu and Toolbars On top there is the usual menubar, followed by several
rows of toolbars, some being initially empty. They will get populated once
there is a project open for actual work.
Status Bar Finally, there is a status bar on the bottom of the window where
short informations on several tasks will be shown.
2.1.2
How to Get Some Help
Besides the Help menu which offers answers to specific questions, the status
bar and two kinds of tool tips provide some quick information.
What Does This Menu Entry Do? When you place the mouse cursor on a
menu entry, there will usually some short information be displayed in the status bar. While in most cases this repeats just the name of the selection, in some
cases it will provide additional information about the purpose of the menu
command.
5
KDevelop User Manual
What Is the Name of This Item? On many items a short function name tool tip
will pop up when you place the cursor on it for a few seconds. This is useful
for quick orientation on toolbar or tool view tabs in IDEAl mode when the IDE
has been set up to display icons only on these buttons.
What Does This Item Do? More information is available through expanded
tool tip help for many items on the IDE. Select Help → What’s This? or press
Shift-F1, then with the question mark cursor select the item you want to know
more of. You can as well open any menu this way and click on a specific menu
entry (active as well as greyed disabled ones) to see if more information is
available.
2.1.3
What is in the menus?
There are ten menus selectable on the menubar. Most of them get fully populated once a project is open for actual work while others require at least one
document be open in an editor window. In short, they will allow the following
action types.
N OTE
This is only a preliminary overview. For a detailed menu description see the Command Reference.
File Usual Actions This is pretty standard. It allows to create, open, save,
print, and close document files as well as quitting the KDevelop application as usual.
Revert All This allows to revert all recent, yet unsaved changes by reloading the file from the disk. This works on any file you edit, not only on
those which are part of a project.
Edit This menu is useful only if a document is opened.
Usual Actions It provides the usual undo/redo and cut/copy/paste actions. Furthermore it allows to select text blocks in various ways.
Search and Replace There are two very powerful search facility available, Edit → Find in Files..., and Edit → Find-Select-Replace.... These allow, in addition to the usual search and replace actions limited to the the
current document, to conduct global search or search-and-replace actions
in one single turn.
Advanced Text Edit There are provisions to reformat the current document and to automatically complete partially typed texts in various ways.
View Like the Edit menu, this menu is useful only if there is an open project.
I this case there will be the following actions available (amongst others):
Navigation History Switch back and forth through the documents etc.
you visited.
6
KDevelop User Manual
Error Tracking Navigate to the source lines of the errors encountered in
the most recent compilation/build process.
Editor Related Actions Some entries in the View menu control the look
and view of the editor you use. In case of the Kate Part (Embedded Advanced Text Editor) there will be the following controls available:
• Control the word wrap behavior in the document window.
• Show or hide several border displays in the document windows: line
numbers, icons, and, additionally, bookmark marks in the scroll bar.
• Control the display of folded (temporarily hidden) sections in a source
text.
Project All work of KDevelop is based on projects which basically collect source
files, build management files, and other information in one project directory. In this menu you control which project to use, which properties it
has, and some other managing actions. In particular:
Open a Project Allows to create new projects, open existing ones, and
import projects from other environments.
Project Options Allows to define a whole bunch of different project properties.
Classes Management Add new classes to the project and traverse the
inheritance tree of a class.
Distribute Project Helps to build distribution packages of the project.
Build This menu is all about compiling and documenting the project. Thus it
is of use only when a project is actually open. In this case it provides the
following actions:
Compile, Link, Execute Allows to compile and link the whole project or
parts of it as well as run the application from within the IDE.
Prepare Build Operations This actually depends on the make system
you use for this project. In the case of automake projects it allows to
run Makefile.cvs and configure on their own. There are also provisions
to remove translated files from the project in various stages of intensity.
Install the Application Allows to install the application both in local directories as well as in system directories only accessible to the root user.
API Documentation Build or remove a doxygen-based API documentation of the project as defined in the project options.
Debug Although this menu will be filled once a project is active, it of course
is useful only if the actual project has been previously compiled with
debugging information (this is basically set up in Project → Project Options..). There are the following actions available in this case:
Usual Debugger Actions The first section in the Debug provides a graphical interface to the GDB GNU symbolic debugger. It allows to start and
stop your application in the debugger and step through it in various
ways.
7
KDevelop User Manual
Breakpoints KDevelop provides several means to set breakpoints in your
application sources. One is through the use of the Toggle Breakpoint
menu entry.
Advanced Debugging Other Debug menu entries allow more sophisticated program analysis. Use Shift-F1 to get more information about their
purpose.
Scripts You can call various scripts from this menu to more easily accomplish
tedious actions on the text in the currently selected editor window. The
available actions depend on the selected script, however.
Window This is fairly standard. You may select any open document window
as well as close one or more documents windows in here. You may even
select a set of document windows to be closed in one single turn.
Depending on the editor plugin you use may there be other menu items
as well. So will the default Kate editor plugin additionally allow to split
the editor window horizontally as well as vertically.
Tools KDevelop is highly customizable. You may select a favorite editor for
your documents as well as provide external and plugged-in tools to extend the basic IDE capabilities. The Tools menu reflects most of this setup.
Advanced Editing The upper set of Tools menu entries will be provided
by the editor plugin which is in use. You may select your favorite editor via Settings → Configure KDevelop...+Editor. Once an editable document file is selected, the upper part of the Tools menu will provide advanced editing commands specific to the editor part in use.
Web Side Handling In case the active document window contains a HTML
page (e.g. displayed from a Documentation selection), the Tools will
show additional menu entries which provide various means to handle
Web pages.
Other Tools Usually there will be a bunch of other entries according to
the currently available tools. Use Shift-F1 to get more information about
their purposes.
Settings This menu allows you to show and hide menubar, toolbars and statusbar. Also, you can configure shortcuts, toolbars, notifications, the editor and KDevelop’s general behavior.
Help Here you can open this KDevelop manual, look up terms in various documentation files, open man pages (the traditional UNIX manual format)
and info pages (the GNU manual format). Furthermore you can report
bugs here or get some info about your current KDevelop version and its
authors.
2.1.4
What are those tool views for?
In the IDEAl user interface mode the workspace will be surrounded by three
areas of buttons, so-called tool view tabs. They provide access to tool view windows which accomplish main tasks during software development. Each of
these three tool view areas serves a different main purpose.
8
KDevelop User Manual
• Left Side Provides access to navigation and selection tools
• Bottom These views display messages produced by various tools.
• Right Side Provides access to documentation and source management tools.
The number of tool view tabs shown will change once a project is open for actual work. More tools to work on that project will be available then. The actual
number of tool views depends on the Plugin Tools being currently available
to KDevelop. You will find more on this topic in the Configuring KDevelop
chapter.
Currently, with no project open and the default number of plugin tools loaded,
you will find the following tool views. Clicking on a tab will open respectively
close its tool view window.
Navigation and Selection File Selector Provides a panel to navigate the directory tree and select files for work just like you do in the Konqueror. Clicking a file will open it in an appropriate editor window in the workspace
area. A right click in the file selector area will pop up a navigation and
file manipulation menu.
File List Lists the currently open files. Clicking on a file will usually select
its editor window in the workspace area. Use this to quickly navigate in
a large number of open files. Furthermore this view provides a means to
organize the open files into different sessions. This is particularly useful
in very large and complex projects to help the developer concentrate on
different tasks. Right clicking a file will pop up a file manipulation menu.
Messages Displays Application Displays the output from an application started
from within KDevelop.
Diff Used to display patch file contents. Displays the output from the difference viewer tool started from the Tools → Difference Viewer... menu.
Messages Displays messages produced by the build tools called from
within KDevelop, usually from the Build menu.
Find in Files Displays the list of items found by the global search operation started from the Edit → Find in Files... menu. Clicking on a line
here will automatically open that file at the specified position in an editor
window.
Replace Lists the results of the global search-and-replace operation issued from the Edit → Find-Select-Replace... menu. In this view you can
decide on every found item whether you really want it be replaced or
not.
N OTE
This global search-and-replace facility is actually available only after a project
has been loaded into KDevelop. Otherwise the global replace tool in the Edit
→ Find-Select-Replace... menu will in fact be be disabled.
9
KDevelop User Manual
Konsole Opens a KDE Konsole like terminal emulator window where
R command line
you can use keyboard commands in a traditional UNIX
interface.
Documentation and Source Manipulation Documentation KDevelop provides
access to a whole bunch of documentation through this tool. You may
here access document files, usually online from remote locations, in a
structured way. And there are several ways available to directly access
valuable information from KDE or QtTM manuals.
See the Documentation and Configuring the Documentation chapters for
more details.
Code Snippets This tool allows you to permanently store selected texts
for later use in other editing cycles. It is a very flexible tool, as any text
snipped stored here may contain a set of variables which will get their
actual values at the time when you insert such a snippet in some other
text.
More information on this is available in the Code Snippets and Setting
Up the Code Snippets Tool chapters.
2.2
A Bit of Configuration
Before we actually start a first example project, we should tailor the KDevelop
behavior to our needs. Although most of the default settings will be appropriate for now, there are a few places which better should be adjusted.
N OTE
If you want to know more about KDevelop configuration, have a look at the Configuring KDevelop chapter.
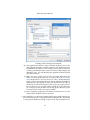
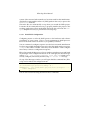
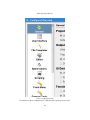
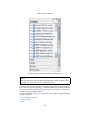
2.2.1
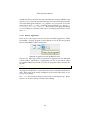
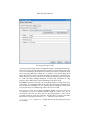
Some General Settings
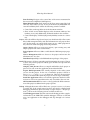
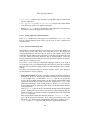
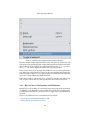
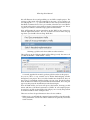
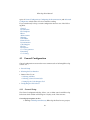
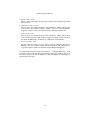
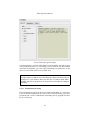
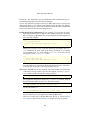
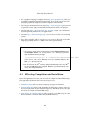
To configure KDevelop, click the Settings menu and select Configure KDevelop.... The Configure KDevelop dialog will pop up, showing the following
General settings page to the right.
10
KDevelop User Manual
The KDevelop general configuration dialog
Most of the defaults will be o.k. But you will probably want to change two of
those settings.
Default projects directory At first start of KDevelop this will most likely be
preset to your home directory. Most people however prefer a dedicated projects
directory for software development. Change the text box to your preferred
parent development directory. You may select it from the directory tree if you
press the Open file dialog button labeled with a folder icon to the right of it.
In our examples we will assume a (somewhat artificial) user called devel. Thus
always replace this ‘devel’ by your user name. Our devel user will utilize the /home/devel/projects parent directory for actual development. Again, replace
projects with your development directory name.
KDevelop will by default set up an own subdirectory below this parent for
every new project you create. So will e.g. all files of a project named ‘Hello’ in
our case be located in the /home/devel/projects/hello directory.
You may of course temporarily override these directory settings if you need to.
See the Application Wizard chapter for more info on this.
Compiler output Whenever KDevelop compiles some source, it will display
the messages of the make, etc. build tools in the Messages window in the lower
part of the workspace area. Usually these messages will be overwhelmingly
wordy. To keep a better overview of what happens, KDevelop has some means
of shortening those messages built in.
11
KDevelop User Manual
Depending on the KDevelop version you use, the Compiler output selection
may be preset to ‘Long’, which will cause all message contents be fully shown.
You may probably want to change this to the far more convenient ‘Very Short’
setting. Just select this from the drop down box.
C AUTION
Be aware that only most basic information will be shown in the Messages window
this way. In case of errors during e.g. a build run you will most likely want to see
more, if not all, of the message texts. They are not lost, however. Just right click
into the Messages window and select e.g. ‘Full Compiler Output’ from the popup
menu.
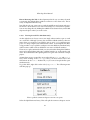
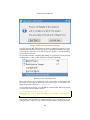
2.2.2
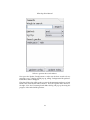
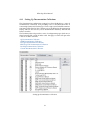
Initializing Documentation Search Indexes
There is another, not so obvious, item which preferably should be initialized
before you start actual development work. This is because you will want to
perform documentation search regularly during development. KDevelop requires some search indexes be created before such search operations can be
performed. So let’s initialize them before we attempt our first steps toward
actual KDevelop work.
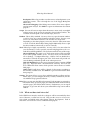
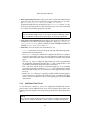
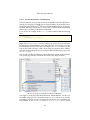
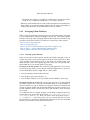
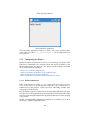
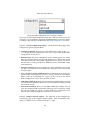
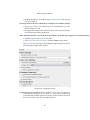
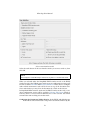
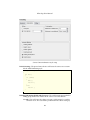
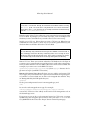
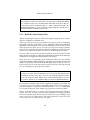
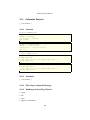
Open the Documentation tool view at the right side of the KDevelop main
window. There open the Search dialog page.
12
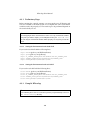
KDevelop User Manual
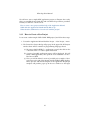
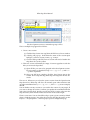
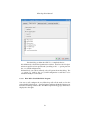
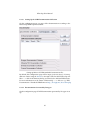
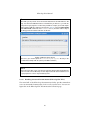
Where to generate the search indexes.
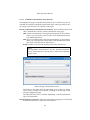
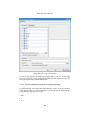
Now press the Update Config button to make sure the basic search tools are
properly set up. A dialog should pop up, telling ‘Configuration file updated’.
Click OK to make it disappear.
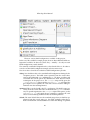
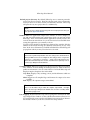
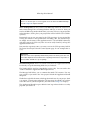
This done, KDevelop will be ready to parse the documentation it knows of and
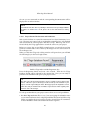
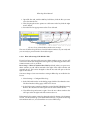
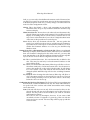
build some useful search indexes from it. Press the Update Index button to
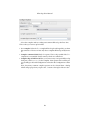
the right. Now the Generating Search Index dialog will pop up showing the
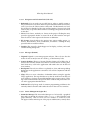
progress of the index build operations.
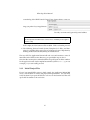
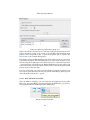
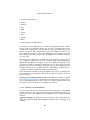
13
KDevelop User Manual
KDevelop is generating documentation search indexes.
This will take some time depending on the size of documentation and the
speed of your machine. But finally the Cancel will make place to OK. Just
press this button to proceed.
N OTE
• This usually should work out of the box. In some cases the htdig application
KDevelop uses to perform its full text searches might not be properly set up.
Refer to the Setting Up Text Search Indexes chapter for more help in this case.
• To be able to look up KDE and QtTM specific API documentation, it is mandatory
that the KDELibs Apidocs were present when KDevelop was installed. If you experience problems building the indexes or perform the identifier lookup examples
later in this chapter, make sure that this documentation exists and is accessible
to KDevelop. See Installing KDevelop fore more detail.
2.3
Starting a New Project
Almost any application will consist of dozens, hundreds, even thousands of
files which need kept structured and maintainable. To accomplish this, KDevelop organizes software development tasks in projects. Thus the first practical
step to develop software in KDevelop usually is to create a new project.
Fortunately this is fairly easily accomplished. KDevelop provides the so-called
Application Wizard tool for this. (See the Getting Started — the Application
Wizard chapter for more.)
14
KDevelop User Manual
We will now start a simple KDE application project to illustrate how easily
this is accomplished and which files and tools KDevelop will have provided.
Thereby we will have a short look at:
How to create a new project with the help of the Application Wizard.
Which files the Application Wizard initially did set up.
What about the additional tool view shown with the project?
2.3.1
How to Create a New Project
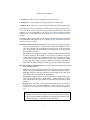
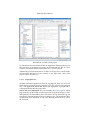
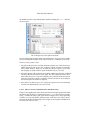
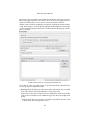
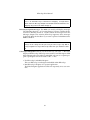
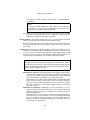
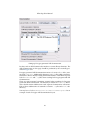
Let us create a rather simple ‘Hello World’ KDE project. Just follow these steps.
1. To start the Application Wizard click the Project → New Project... menu.
2. The Create New Project dialog will pop up. In the upper left All Projects
window there will be a number of programming languages listed.
(a) We want to build a KDE C++ application as usual, thus click on the
+ label left of the C++ label to open this branch.
(b) A series of possible application targets will be displayed. We will
build a KDE application, thus open the next sub-branch via the +
label next to KDE
(c) Now you will be offered a series of possible project templates. Navigate down to the end of this branch and click Simple KDE Application.A preview and short description of the application this project
template will produce pops up in the two windows to the right.
15
KDevelop User Manual
Selecting a Hello World project template
(d) Our application will need a name. Find the Properties area on the
dialog bottom and enter a suitable name into the Application name
input field.We use ‘Hello’ in our example, but you can use whatever
you like, provided the name consists of letters, number digits, and
underlines only. You will find that the Application Wizard rejects
any other character.
(e) Make sure the Location text box below the input field shows the
name of your top project directory as set up in the A Bit of Configuration chapter above. If it does not do so, enter a suitable directory
name or select one from the directory list provided by the folder labeled button to the right.If all went well, the Final location line at
the bottom will show the directory path your new project will use.
In case there was an ‘(invalid)’ suffix appended, try another name
for your project and/or make sure the top project directory in the
Location text box really exists and is writable.
(f) Once everything is right, the Next button in the bottom row of the
dialog will be enabled. Click it to proceed.
3. This will lead you to the Project Options dialog page. Make sure the Author and Email text boxes are properly filled in. Usually they will default
to your general KDE user settings as given in the Password & User Ac-
16
KDevelop User Manual
count dialog of the KDE Control Center. If not, change them to some set-
tings you prefer for your application.
Provide your name and (optionally) email address.
N OTE
You must provide an Author name at least. This is mandatory for the application files setup.
If all is right, the Next button will be enabled. Click it to further proceed.
4. The following Version Control System, Template for .h Files, and Template for .cpp Files dialog pages are not of interest for now. Skip them by
clicking the Next buttons and, finally, the Finish button.
That was all! The Application Wizard will take over and construct a series of
initial files in the Final location directory you provided in step 2c above.
Once this file creation phase is finished, KDevelop will open an editor window
for the application main window implementation file (which is hello.cpp in our
example), so you can readily proceed.
2.3.2
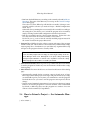
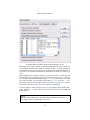
Initial Project Files
Even if our sample Hello project is fairly simple, the Application Wizard did
create a whole bunch of source and project management files. You will most
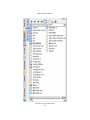
easily list them if you open the File Tree tool view on the bottom left. This will
open a file list similar to the one below.
17
KDevelop User Manual
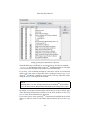
Initial files in our Hello World project
To demonstrate the main bunch of files the Application Wizard produced, we
did open most of the directory branches in the left-hand File Tree tool view
window. Just click the branch names in the tree to see for yourself.
Additionally, just for demonstration, we did as well open most of the branches
the Automake Manager tool view window to the right where some of the
project sources are listed, too.
2.3.2.1
Copyright Issues
All GNU conformant applications must be copyrighted. There are two levels
which require copyright notices, individual source files and run-time application
level. The Application Wizard did already put appropriate copyright and licensing information into the project files.
Source File Level Copyrights Do you remember the Project Options dialog
page in the new project setup? You had to provide your (the developer’s) name
and optionally an email address there. Now refer to the top of the hello.cpp editor window currently displayed in the workspace area. The Application Wizard did enter these statements on top of the licensing header of every source
file it created.
18
KDevelop User Manual
/*************************************************************************** ←*
*
*
Copyright (C) 2006 by Joe User
joe@user . com
*
←-
*
←*
*
This program is free software ; you can redistribute it
and / or modify *
←-
You will find exactly the same text headers in every source file you will create
inside KDevelop (provided you use the proper built in tools for file creation).
KDevelop remembers these settings in some template files you may find in the
templates directory.
Application Run-Time Copyrights Once your KDE application runs, the user
may display some About data, usually from the Help menu. The Application
Wizard did also take care of this. If you have a look at the main.cpp file, you
will find an entry similar to the one below.
int main ( int argc , char ** argv )
{
KAboutData about (" hello ", I18N_NOOP (" Hello ") , version , ←description ,
KAboutData :: License_GPL , "( C) 2006 Joe User ", 0, 0,
" joe@user . com ") ;
about . addAuthor ( " Joe User ", 0, " joe@user . com " );
This will put the main developer’s name (‘Joe User’ in our case) and email
address into the About copyright page in the display and list this name and
address on the Authors page there as well.
I MPORTANT
Whenever you make substantial changes to an existing project, be sure to enter
your name and email address to the copyright notices on every file you changed
and to the run-time copyright display as well. Don’t be shy, you help the open
source society considerably if you do so.
2.3.2.2
Initial Source Files
The Application Wizard did put the source files into the src sub-directory of
the project’s directory. You will find the main.cpp, hello.h, and hello.cpp files
there as you may have possibly expected.
There are some additional files you usually will find in a typical KDE application, namely
19
KDevelop User Manual
• hello.desktop contains some meta data used by KDevelop to maintain and
start the application.
• hi16-app-hello.png, and hi32-app-hello.png contain some initial default
icons, KDevelop will use for application display.
• Finally, helloui.rc contains a description of the application’s user interface,
currently the menus the application will provide.
2.3.2.3
Initial Application Documentation
In the doc/en subdirectory of the project you will find the index.docbook file.
This is a default template from where you can start to write a suitable user
documentation.
2.3.2.4
Project and Auxiliary Files
You will have noted that the files we introduced so far are listed in boldface in
the File Tree tool view while most of the other files are not. This depicts the
substantially different tasks these files are used for. The contents of those bold
listed files directly influence the application. Source files will produce the code
to be run, others will provide necessary data or documentation. These files
must be maintained and orderly processed in the build stages by the project,
hence they are called project files.
If you have a look at the lower Automake Manager window to the right of
the workspace area you will find all project files listed as well. The Automake
Manager tool uses this knowledge to take care of the build control as we shortly
will see.
The other, non-bold listed files are of more auxiliary nature. They belong to
several distinctive classes as follows:
• Project Build Control These files control the compile, install, documentation
building, etc. processes. If the project utilizes the GNU autotools machinery
as our example does, you will find a Makefile.am file in each project directory. These are kind of basic make core files which contain build control
commands and will be processed in conjunction with various configure files
during the build stages. Such a build produces a final Makefile in every directory. And from these in turn the make utility will finally build the binaries
of the application.
Those Makefile.am files need to be maintained throughout the development
process. Luckily, KDevelop relieves you of most of this burden by the Automake Manager tool, which basically is a graphical front end to maintain
Makefile.am contents.
Other project build control files currently listed are configure.in.in and subdirs in the project root directory. They will be processed by some of the
files in the admin KDE specific administration directory to produce more configure and Makefile type files and finally the application’s binaries.
20
KDevelop User Manual
• KDevelop Control Files KDevelop needs some control and administration
data on its own. These are located in the project root directory, in our example hello.kdevelop, hello.kdevelop.pcs, and hello.kdevses.
Of particular importance in each project is the xxx.kdevelop (where ‘xxx’ denotes the project name) file. It is the main KDevelop 3 Project File and needed
if you later want load this project into the IDE.
WARNING
Never do manually modify, rename, or even delete any of these KDevelop control
files! The IDE will most likely not function properly on your project afterwards.
• GNU Project Description Files Some files in the project root directory are
mandatory in any GNU conformant application. These are: AUTHORS, ChangeLog, INSTALL, COPYING (which contains the GNU GENERAL PUBLIC LICENSE), INSTALL, NEWS, README, and TODO.
• Other Files A few more files, not mentioned yet, are:
– Doxyfile controls the creation of the project specific API internal programming interface documentation.
– The templates directory containes file templates the IDE uses as stubs to
create new source files. You may at any time edit these templates. The new
contents will be reflected in the next source files you create of the related
types.
You may e.g. want to realign the right hand stars in the copyright lines
the Application Wizard inserted into the cpp and h template files, so the
source files created from them will look less awkward.
– The po directory will be used for localization purposes. It is essentially
part of the project files (contains a Makefile.am) but will mainly be used in
translation processing. Not of main interest to the application developer,
however.
– Finally, the admin directory is specially needed in KDE oriented applications. It provides a whole bunch of files necessary to maintain the application’s sources and binaries so they will integrate properly into the KDE
environment.
2.3.3
Additional Tool Views
As you will have noticed, as soon as the Application Wizard had the new
project ready, several additional tool views were provided. These make sense
during project development only and, in short, provide the following functionality.
N OTE
The tool views actually visible depend on the plugins currently loaded into KDevelop. There are ways to control this. See the Plugin Tools chapter for instructions.
21
KDevelop User Manual
2.3.3.1
Navigation and Selection Tools (left side)
• Bookmarks You can mark any text file line in order to quickly return to
this position from everywhere. KDevelop will remember all those bookmarks,
even if you close the editor window afterwards. The Bookmarks tool view
lists all those bookmarks by file name and line number. You need only click
such an entry to open the editor window accordingly and position the cursor
on that line.
• Classes Lists classes, methods, etc. known in the project. Clicking the entry
opens the appropriate header or source file in an editor window and positions the cursor at the respective declaration or definition.
• File Groups Sorts the files in the projects into various utility groups, i.e.
Sources, User Interface, Icons, Translations, and Others. Clicking an entry
opens that file in an editor window.
• Variables This is used by the debugger tool to display, evaluate, and watch
variables during debug runs.
2.3.3.2
Messages (bottom)
• Valgrind Valgrind is a run-time program analyzer. This tool view lists the
results of such an analyze run. It is used e.g. to find memory leaks.
• Security Problems There is a Security Checker plugin tool for KDevelop. It
analyzes the currently edited source file for several common security problems which may occur in the application and notifies the user in this tool
view window.
• Breakpoints This tool view allows to explicitly set, clear, and manage debug
breakpoints in the application source files. It is used in conjunction with the
debugger.
• CTags Allows to create a database of identifier indexes using the popular
CTags application. This tags database may then be used from out this tool
view window to look up any needed identifier in the project sources. Clicking a thus found item line will open an editor window and position the cursor on the appropriate identifier there.
• Problems KDevelop keeps track of common programming problems in the
currently edited source file and notifies the user in this tool view window.
2.3.3.3
Source Management (right side)
• Automake Manager The Automake Manager tool is basically a graphical
front end to maintain the contents of the Makefile.am files located in each
project directory. This tool view uses two windows to control its work.
The upper window mirrors part of the project subdirectories, namely those
22
KDevelop User Manual
which explicitly contain project files. Each subdirectory of this kind must contain a Makefile.am file and is termed a subproject in the Automake Manager
context.
Clicking a subproject entry opens a suitable display of the project files in
this subproject in the lower window. The files listed there will be grouped
according to their Makefile.am functionality in this subproject.
The Automake Manager is a very powerful tool to manage the project and its
subprojects as well as the roles project files play in building the application.
We will have a short look at a few major details below. See the Building and
Project Management chapter for a more extensive description.
2.4
Some Tips About Dealing With Documents
In our example project the Application Wizard did leave the hello.cpp file
open in an editor window, so you can immediately start working. Now, we
may well assume your are knowledgeable about using an editor, so we do not
need talk much about this here. But there are some handy KDevelop specifics
about dealing with such tabbed editor windows and the documents you are
working on. We will have a short look at some of them, namely:
How to easily switch between header and implementation files.
How to quickly access declarations and definitions.
How to arrange editor windows to your current needs.
How to keep an eye on common problems.
2.4.1
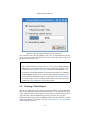
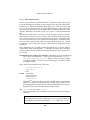
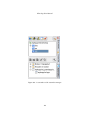
Switching Between Header and Implementation Files
KDevelop provides a quick and easy way to switch from a given implementation (.cpp) file to the corresponding header (.h) file and vice versa. Just right
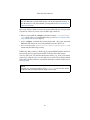
click into the editor window you want to switch. A menu similar to the following will pop up.
23
KDevelop User Manual
How to switch between implementation and header files.
Find the Switch header/implementation entry and select it. KDevelop will
look up the corresponding header or implementation file and open it in another
editor window. In our example, if you did right click into the hello.cpp source,
the hello.h file will be displayed and the cursor positioned there.
There is even more. If you do right click inside the text of a class implementation, KDevelop will position the cursor on the corresponding declaration line
in the header file. And vice versa, right clicking on a declaration line will bring
you to the corresponding class implementation.
If the editor window with the file to be switched to already exists, KDevelop
will of course activate this one and reposition the cursor there if necessary.
2.4.2
How to Access Declarations and Definitions
But what if you are working on a source file and want to look up the declaration
or definition of an identifier you just found there? Well, this is equally easily
accomplished. Basically all you need to do is to right click on the identifier in
question.
There are two different cases to consider, however, namely:
Accessing externally defined identifiers, and
dealing with project internal text items.
24
KDevelop User Manual
2.4.2.1
External Declarations and Definitions
In a most common case you want to look up an identifier which was defined externally to your project. In KDE projects such identifiers are most likely documented in various KDE or QtTM libraries. If KDE and KDevelop were properly
installed, KDevelop will be able to access such so-called API documentation
and be able to search it for identifiers of this kind.
Let us look at an example. In the hello.cpp editor window find the following
lines.
Hello :: Hello ()
: KMainWindow ( 0, " Hello " )
{
Right click on KMainWindow. A menu will pop up. There select the Search in
Documentation: KMainWindow entry and release the mouse button. Now the
Documentation tool view will open, showing the KMainWindow entry as search
item on the Search sub-page. And a short while after another editor window
will open in the workspace area, showing the KDE API Reference page of the
KMainWindow class.
This all will look like the following. (We deliberately opened the Documentation, Search page already to illustrate the result of the menu selection.)
How to look up an externally documented identifier.
You might as well select Find Documentation: KMainWindow. In this case
the Finder sub-page of the Documentation tool view will show up, usually
providing a selection of pages containing the search term. (In our example this
will probably be the KMainWindow and KMainWindowInterface classes. Select
25
KDevelop User Manual
the one you are interested in and the corresponding documentation will be
displayed in an editor window.
N OTE
If this did not work, then there is probably no documents index yet. Did you initialize
the indexes as shown above? If not, please do so, then come back here and try
again.
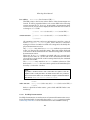
2.4.2.2
Project Internal Declarations and Definitions
Such search facilities in external documentation have their limitations, however. Of course one cannot look up an identifier externally if it is only defined
and used inside the current project. But there is help. KDevelop can use indexes built by the CTags application to search the sources in your project.
Before we can use this on our Hello example project, we must however first
generate a suitable index. This is done by the CTags tool view at the bottom of
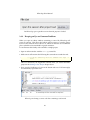
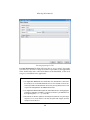
the workspace area.
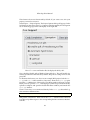
When you click the CTags tab, a dialog window will open where you will find
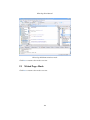
the following key in the lower right corner.
Build a CTags index with the Regenerate key.
Press the Regenerate button and wait a few seconds. Then the No CTags
Database Found will be replaced by the current date. Now you are ready to
perform some identifier look ups in your project source.
T IP
The date next to the Regenerate button is there to remind you of possibly too old
indexes. Whenever you are obviously not able to look up some identifier in your
project, consider regenerating the index. On large projects this might take considerable time, but you should make it a habit to regenerate the index regularly after
extensive source file changes.
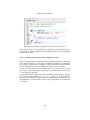
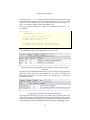
To look up an identifier in your project sources there are several possibilities.
• Use the CTags tool view This is easy. Just start typing the identifier name
you are interested in into the Lookup input field in the bottom left. KDevelop
will try to complete the word you have typed so far and show all occurrences
of those identifiers which start with this character sequence.
26
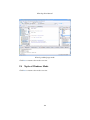
KDevelop User Manual
If for example you want to know wherever the ‘Hello’ identifier was used in
our example project, type an "H" into the Lookup input field. KDevelop will
immediately start working and present you a result like this:
How to look up an identifier in the CTags tool view.
If you click one of the listed entries, KDevelop will open an editor window
with this file and position the cursor on the appropriate place.
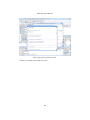
• Use a context menu in a source file This is handy while you are working on
a certain source file. Assume you are studying the main.cpp file of our Hello
example project. There you find the following line
Hello * mainWin = 0;
and wonder whatever the ‘Hello’ was used for in the program. To find out,
simply right click on this Hello identifier. A menu will pop up in response
to this right mouse click, featuring the following lines near the bottom.
Getting CTags information on a project internal identifier.
Click what you are interested in, say CTags - Go to Definition: Hello, and
KDevelop will immediately open the hello.cpp editor window and position
the cursor right in front of this class definition:
Hello :: Hello ()
: KMainWindow ( 0, " Hello " )
{
• Do a global search This is especially useful if you want to look up arbitrary
text in your project source. There are two possibilities to start a global search
from within KDevelop.
– Start a global search from the Edit → Find in Files... menu. Or
– Directly make use of the context menu with a right mouse click in the
editor window.
27
KDevelop User Manual
We will illustrate the second possibility on our Hello example project. The
outcome of the menu call will essentially be the same. Let us assume you
are studying the hello.cpp source file and have the cursor positioned on the
first Hello occurrence there. Now you wonder, where this one word ‘Hello’
was used in the project source and how many occurrences there are. This is
a typical case where to use KDevelop’s global search facilities.
Now, still keeping the cursor somewhere on this ‘Hello’ in the source text,
click the right mouse button. The now well known context menu will pop
up, where you should select the Grep: Hello line.
Initiating a global search from within an editor window.
This will pop up the following Find in Files dialog (exactly the same as if
you did use the Edit → Find in Files... menu).
A versatile graphical front end to perform global searches in the project.
As you see, this is a very versatile tool to initiate find-and-grep searches
throughout your project. We won’t delve further into details here, but you
may want to experiment with this facility on your own. For the moment,
there should be our ‘Hello’ be preselected in the Pattern field. If it is not, just
type it in, then press the Search button at the bottom right.
Now the Find in Files tool view will open at the bottom, showing you file
names and lines of all literal occurrences of ‘Hello’ in our example project.
As usual, if you click an entry, KDevelop will get you to exactly that position
in an editor window in the workspace area.
There are two lines of special interest in the tool view window.
– Right on top you will find the command sequences KDevelop did actually
use to perform the search. This will be useful to more precisely control the
search outcome.
28
KDevelop User Manual
– On bottom the number of occurrences found in these search run will be
listed. In our example this should read ‘*** 11 matches found ***’.
KDevelop will remember these search results throughout the currently running session. If you initiate another global search, its results will display in
another tabbed window in the Find in Files tool view window.
2.4.3
Arranging Editor Windows
When your work with large complex projects you will often end up with quite
a lot of tabbed editor windows residing on the tab bar. This makes specific
facilities to clean up, order, and group all those editor tabs necessary. KDevelop
provides several means for this. We will have a short look at some of them.
How to remove unneeded tabs.
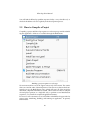
How to rearrange the tabs.
How to view several files simultaneously in the workspace area.
How to edit C++ source and header files simultaneously
How to group source files into development sessions.
2.4.3.1
Cleaning up the Tabs Row
If the vast amount of editor window tabs becomes badly arranged at all, you
usually may want to close all those tabs you really do not need any more. KDevelop provides several facilities to do so, the usual way of bulk closing open
editor windows and a more specific approach where you can expressly command which ones to close and which to keep open.
Closing Several Tabs At Once This is kind of a bulk approach to close unnecessarily open tabs which you may find in other KDE applications as well. You
can use the Window menu or right click on a tab to either
• close the currently selected editor window,
• close all other open editor windows, or
• close all editor windows at once (available from the Window menu only).
Closing Selected Sets of Tabs The step-by-step approach of closing individual editor window tabs can become awkward if there are a great number of
tabs from which you want to still keep several open. Instead of searching and
closing one editor window tab after another KDevelop provides a means to select the candidates from a list and close those, and only those, with one single
mouse click.
Let us illustrate this on a simple example. In our Hello example project let us
assume there were several files open for edit: hello.cpp, hello.h, helloui.rc,
hello.desktop, and main.cpp. Now you want to close all of them except hello.cpp and hello.h. The easiest way to do so is with the File List tool view.
Because this list of open files is alphabetically ordered you can more easily find
the ones you want to be closed. Proceed as follows:
29
KDevelop User Manual
1. Open File List and, with the Ctrl key held down, click the files you want
to be closed in the list.
2. Then, keeping the mouse pointer on a file name in the list, click the right
mouse button.
3. From the File List popup menu select Close Selected.
How to close selected editor windows in one step.
That was all. KDevelop will have closed all editor windows at your wish, and
you are ready to proceed with a clean tab bar again.
2.4.3.2
How to Rearrange Edit Window Tabs
Even if you have only the really necessary editor windows open you may still
want to have their tabs arranged in some logical way. KDevelop provides some
common means to do so, in short:
Basic Setup — Where to Position New Tabs By default, when you open a new
editor window, its tab will be inserted to the right of the editor window tab
currently in use. This can be changed so that the new tab will open to the far
right on the tab bar.
You must change a basic user interface setting in KDevelop to enable this behavior.
1. Select Settings → Configure KDevelop...
2. In the left hand icon bar on the dialog popup click the User Interface icon.
The User Interface dialog page will be now shown.
3. In the left bottom corner there find the section labeled Tabbed Browsing.
Remove the check mark on the Open new tab after current tab line.
4. Close KDevelop and restart it again. Now the new editor window tabs
will open at the far right end of the current tabs row.
Unfortunately, this setting cannot be changed on the fly during a development
session. You must make up your mind which behavior you prefer in the long
run and then stick to it, at least until the next start of KDevelop.
30
KDevelop User Manual
How to Rearrange the Tabs As development tasks do vary over time, the need
to rearrange the tabbed editor windows will more or less often arise. This is
easily accomplished in KDevelop.
Just click the tab you want to move with the middle mouse button and move
the mouse a short distance. The cursor will change to a crossed-arrow pattern.
You can now drag this tab, holding the middle mouse button down, until it did
skip into the place where you want it to be.
2.4.3.3
Viewing Several Files Simultaneously
At first sight there is always at most one single editor window open to work
on a source file. Although you may fast switch the tabbed windows, there are
times where you want have several files open at once, e.g. for reference purposes or to keep complex tasks under better control. To accomplish this, KDevelop provides a way to split the workspace area into different, simultaneously
visible sections which each can hold their own series of tabbed windows.
There are two split commands which you can reach either through the Window
menu or by right clicking either into a tabbed window or on the window tab
itself. We will illustrate this splitting behavior again with our Hello example
project.
Assume there are two source files open on the tab bar, hello.cpp and hello.h.
Now, while working on the hello.cpp source, you often need to refer to the
declarations in the hello.h headers file, so you want to keep both files open
simultaneously.
To get this done, right click on the tab of, say, hello.h. The following menu
will then pop up.
How to split the current workspace area into two parts.
Select the Split Horizontal entry. This will split the current workspace area in
31
KDevelop User Manual
the middle and move the tabbed editor window holding the hello.h file into
the lower part.
The workspace has been split horizontally.
Note the dotted separator line between both windows. You can grab it with the
mouse and adjust the heights of the editor windows according to your needs.
There are a few points to note.
• The split workspace areas are fully functional at their own. This means, new
tabbed windows will open in the workspace which contains the currently
active editor window. And you can split any sub-area again to your wish,
thus keeping as much windows open simultaneously as you need.
• Any split will move the currently active editor window into the new workspace
sub-area, either downward or to the right. The other tabbed windows all remain where they were. You cannot directly move tabbed windows between
split areas, instead you need to explicitly close the window in one workspace
area and reopen it in another to regroup.
• Also, there is no direct way to close a split area again. It closes automatically,
once the last tabbed window in it was closed.
2.4.3.4
Edit C++ Source and Header Files Simultaneously
There is a neat application of the above mentioned workspace split feature built
into KDevelop. It allows to automatically keep a .cpp source and its accompanying .h header file side by side open in the workspace area. And, optionally,
it allows to work on both files synchronously, such that if you select a declaration in the header file KDevelop will navigate to the respective definition in
the source file and vice versa.
32
KDevelop User Manual
This feature is however deactivated by default. If you want to use it in your
project you need to activate it.
Select Project → Project Options. The Project Options dialog will pop up. In the
left hand icon bar there select C++ Support and subsequently the Navigation
tab on the dialog page which will display on the right side.
Have C++ source and header files be displayed side by side.
Now check the Enable split of Header/Source files box. This will enable Automatic Synchronize and Vertical by default. Keep these settings for now and
press OK.
To illustrate this feature, now close in our example Hello project both the hello.cpp and hello.h editor windows, if necessary. Then select hello.cpp again
from the src subdirectory of the project. The editor window will open as usual.
But if you now open the hello.h belonging to it, KDevelop will automatically
split the workspace and open this header file editor window just beneath the
hello.cpp window.
There is even more, as we mentioned already. In the hello.cpp editor find e.g.
this constructor definition line:
Hello :: Hello ()
and put the cursor there. Then look at the hello.h window below and note
how KDevelop did navigate to the corresponding default constructor declaration line.
33
KDevelop User Manual
KDevelop automatically navigated to the constructor declaration.
This works vice versa as well. Whenever you put the cursor somewhere into a
construct in one editor window, KDevelop will navigate to the corresponding
construct in the other.
2.4.3.5
Grouping Source Files Into Development Sessions
When your project grows larger, and the development tasks become more and
more complex and force you to often switch between different, even distinct
sets of files, it is about time to organize your development work into distinct
sessions. The File List tool view of KDevelop allows you do to just this.
On top of the File List tool view window there is a tool bar where you can
create, save, select, and remove such sessions. Or alternatively use the View
→ View Sessions sub-menu.
We will illustrate this facility again with our Hello example project. Assume
you want to always open the hello.cpp, hello.h, and main.cpp files all in one
step, no matter what development task you just did perform in the project. To
accomplish this, you first need to create a new development session named,
say, ‘sources’.
34
KDevelop User Manual
Use development sessions to remember groups of files.
This is a multiple step approach as follows.
1. Create a new session
(a) Click the New Session icon top left in the File List tool view window.
(b) A dialog will pop up. In the Enter the name of the session input
field give your new session a name, e.g. ‘sources’.
(c) Close the dialog with OK. The new session will now be listed in the
drop down box on the toolbar.
2. This new session will initially be empty. You must populate it with the
files you want to be kept there.
(a) Open all files you want to be grouped in this development session.
In our example we decided to keep hello.cpp, hello.h, and main.cpp there as planned.
(b) Once your file list is complete, click the Save Session icon in the
toolbar. Do not skip this step, KDevelop will forget the file list otherwise.
That was it. Whenever you select the sources session from the Open Session
drop down box, KDevelop will close all currently open editor windows and
open the remembered ones (hello.cpp, hello.h, and main.cpp in our example)
instead.
You can define as many sessions as you wish in the context of your project. If
you want to change the session’s contents, just update the remembered file list
with a Save Session click. And if you want get rid of a session, select it in the
drop down box, then click the Delete Session icon in the toolbar right.
There is even more. You can force KDevelop to open a given session by default
when it loads the project. Just select the session in the drop down box on the
Projects → Project Options → File List project options configuration page.
35
KDevelop User Manual
Let KDevelop open a specific session when the project is loaded.
2.4.4
Keeping an Eye on Common Problems
When you open an editor window containing a source file, KDevelop will
parse its contents. This allows the built in problem reporter to scan the source
text for some common errors it knows of. And it can alert the user of different
places which have been marked for special treatment.
Let us illustrate this facility with our Hello example project.
• Open an editor window with the main.cpp source file.
• Make sure it still contains the following line somewhere towards the end:
/// @todo do something with the command line args
here
←-
This was inserted by the Application Wizard when you created the Hello
project in the Starting a New Project chapter above.
• Now open the Problems tool view in the bottom tabs row. If all went right,
it will currently report this todo:
KDevelop is alerting a source code line containing a todo mark.
36
KDevelop User Manual
The format of the /// @todo command is for special treatment by the Doxygen
code documenter, which we will look at briefly in the Documentation section
below. It is not mandatory that you use this format, the more common TODO
and FIXME comment marks will be recognized as well.
If you e.g. insert the following TODO and FIXME comment lines in our hello.cpp
example file
Hello :: Hello ()
: KMainWindow ( 0, " Hello " )
{
// set the shell ’s ui resource file
// TODO check the user interface
setXMLFile (" helloui . rc ") ;
// FIXME change to a better suited greeting
new QLabel ( " Hello World ", this , " hello label " );
}
you will find them listed in the Problems tool view as well:
The problem reporter listing lines which require attention in the currently
edited file.
Note the other tabs in the Problem reporter tool view window, especially Fixme,
and Todo. If you open them, you will find all FIXME and TODO marked lines,
KDevelop has found so far in this session. For example the TODO alerts will
currently look thus:
The problem reporter has collected the TODO alerts.
The Errors tab will however not list every coding error you make. This is the
job of other tools in e.g. the build process. But you will find here alerts of some
common programming mistakes which would likely go unnoticed otherwise
and probably be catched with difficulties during complex debugging session.
37
KDevelop User Manual
You will find the KDevelop problem reporter facility a very valuable tool, so
check the Problems tool view regularly in the development process.
2.5
How to Compile a Project
Compiling a project in KDevelop requires several setup steps and then building the application. All these are available through the Build menu.
Building a project requires several steps.
We are interested for now in the upper section only of this menu. The entries
there are sorted in order of their importance. Thus the most often needed command is on top, the Build Project entry, which will cause all of the project be
initialized, compiled and linked as needed. Other entries are there to compile
selected project portions or a single file only, to perform several initialization
sequences, or to install the completed application binaries.
For now we will concentrate on several facilities which KDevelop provides for
project setup, initializing, building, and running an application. In general,
this includes:
38
KDevelop User Manual
Looking briefly at the basic build cycle.
Looking at some basic means to configure a project.
2.5.1
The Basic Build Cycle
Once you created a new project you usually want to check if everything went
right so far. This implies a first build and test run of the application, which we
will do now. In order to initially compile a project there are several steps to
perform, which we will briefly look at.
How to initialize the project for a first build.
How to do the initial configuration.
How to build the project.
How to run the application from within KDevelop.
N OTE
This discussion implies that your project is based on the GNU autotools, which enabled the Automake Manager tool in KDevelop as our example Hello project does.
If you created another type project, e.g. for the QtTM based QMake project manager, there will be other facilities available in the menus or perhaps even none of
them. You will have to consult the respective vendor documentation on project
management and application building in these cases.
2.5.1.1
Initialize the Project for the Build
When the Application Wizard created our Hello example project, it left it in a
sort of raw, ‘virgin’ state. The GNU autotools chain dictates several initialization steps to be performed before the application could be actually compiled
and linked. If you try to build a project in such a raw state, e.g. by selecting the
Build → Build Project menu or pressing the F8 function key, you will get the
following warning.
39
KDevelop User Manual
Trying to build a raw automake based project.
You may press the Run Them button in which case KDevelop will try to automatically run all required setup steps prior to compiling and linking the application. But we will look at those initial steps in sequence, so cancel the dialog
by pressing Do Not run.
As mentioned already, compiling and linking the application is done through
the Build menu. Call it up and select Run automake and friends.
Initiating a basic initialization run.
KDevelop will now open the Messages tool view window at the bottom and
list a series of messages produced by several make tools. If everything went
right, the final line will read ‘*** Success ***’.
If you scroll back to the top, you will find the command line, KDevelop issued
to call up the tools beneath the surface:
cd ’/ home / devel / projects / hello ’ && \
WANT_AUTOCONF_2_5 ="1" WANT_AUTOMAKE_1_6 ="1" gmake -f Makefile ←. cvs
This basically tells that KDevelop first switched to the root directory of our
example project. Then it set up a dedicated environment, advising the make
40
KDevelop User Manual
system of the autoconf and automake tool revisions used for this initialization.
And finally it instructed the make tool (GNU gmake in this case) to process the
Makefile.cvs make file.
This make file was automatically set up when you created the Hello project.
It contains all the commands necessary to properly initialize the project so the
resulting application will run under KDE. Especially this will create the configure skript file necessary to perform the next setup step.
2.5.1.2
Initial Hello Configuration
Configuring means to tailor the build process to the hardware and software
peculiarities of your system. This is a basic requirement in build processes
based on the GNU autotools scheme as you probably will know.
You can command a configure sequence once the basic automake initialization
has been successfully finished because only after this initial run the necessary
configure files will be available. This done, select the Build → Run Configure
menu entry to initiate a configuration sequence.
KDevelop opened the Messages tool view window again if necessary and listed
the messages of the configure run therein. If all went right, the final messages
will be ‘Good - your configure finished. Start make now’ (which was issued by configure) followed by the KDevelop ‘*** Success ***’ message.
On top of the Messages window you will again find the command line, KDevelop used to initiate this configuration run:
mkdir ’/ home / devel / projects / hello / debug ’ && \
cd ’/ home / devel / projects / hello / debug ’ && \
CXXFLAGS =" - O0 -g3 " "/ home / devel / projects / hello / configure " -- ←enable - debug = full
You can tell several interesting details from these commands.
41
KDevelop User Manual
• First, KDevelop uses a dedicated
subdirectory in the project
directory tree for the build
process. This debug build
directory (shown to the left)
mirrors the basic project
structure and contains some set
of build related files, such as
several configure based files
and additionally a Makefile in
each subdirectory.
• In the Configuring the Project
section shortly below we will
have a brief look at the
motivations why KDevelop uses
separate build directories in
cases like this one. For the
moment it is enough to know
that KDevelop created this
debug directory — if
necessary — prior to the
configure call and that the
configure script did build the
sub structure and all the
Makefiles in there.
• Next, from within the debug
build directory, KDevelop called
the configure script in the root
directory of our project using a
dedicated environment, where
the CXXFLAGS="-O0 -g3" flags
will later signal the gcc compiler
that it should not optimize the
resulting binaries and include
full debugging information with
them.
• Finally the configure script was
called with the
--enable-debug=full option
which instructs it to create each
Makefile so that later
compilation and linking will
have all necessary debugging
information be built in and
42 usable.
KDevelop User Manual
All these settings are configurable on a per project basis. You will learn more
about this in the Project Management chapter.
2.5.1.3
Build the Project
Once you got this far you will be ready to actually build, i.e. compile and
link the application. Looking at the Build menu, there are three such compile
options from which to select.
KDevelop commands to build binaries.
Going from bottom to top, there are:
• Compile File — This will compile the source file in the currently open editor
window. Mostly used for quick error checks.
• Build Active Target — This is mainly used in conjunction with the Automake
Manager which we will briefly look at below.
• Build Project — Now this is what we currently are interested in. It will iterate
over the whole project, compiling and linking all files as necessary.
It might be interesting to watch what happens to the Debug directory created in
the former configure run. So best keep it open with all subdirectories unfolded
just as shown above. Then select Build → Build Project (or press the F8 key) to
initiate the build sequence. As before, the Messages tool view window will
open at the bottom and list the outcome of this build run. And additionally
some files will appear on the Debug subtree.
There are not many source files in our Hello example project, so the Messages
window will contain only a few lines. On top of them again find the command
line KDevelop issued to the underlying shell.
cd ’/ home / devel / projects / hello / debug ’ && \
WANT_AUTOCONF_2_5 ="1" WANT_AUTOMAKE_1_6 ="1" gmake -k
Not very surprisingly, KDevelop switched to the Debug subtree root in order to
run the Makefile located there. A dedicated sub-environment was set up again
as before in the Initialization step in which then the gmake tool was called.
Note the -k option in the gmake call. It forces the build process to continue up
to its very end, even if errors will occur. This makes sense as KDevelop will list
all error messages in the Messages window. If there are any, use the virtues of
43
KDevelop User Manual
an IDE: Just click on the error message in the Messages window and KDevelop
will take you to exactly the position where the error occurred in the source file.
And what did happen inside the Debug subtree? Not very much. A few files
showed up on the doc/en and src branches, most notably the hello file in /home/devel/projects/hello/debug/src/. This, finally, is the application binary
we were looking for. All what is left to do in our initial project check is to run
this hello.
2.5.1.4
Run the Application
There are no extra steps involved to run this new Hello application. Either
select Build → Execute Program or press Shift-F9 or use the Execute program
button on the Build Toolbar shown below.
Running an application form the Build Toolbar.
That was all. KDevelop will now start the new application in the dedicated
console window which opens as Application tool view on the bottom. There
the command KDevelop issued to execute the program will be shown in the
top line:
./ hello
showing that the IDE has a notion about where the executable it shall run resides. This notion can be widely configured. See more about this in the Project
Management chapter.
The ./hello line will most likely be followed by a warning message. Ignore
this for now. It does not keep our Hello form running.
44
KDevelop User Manual
Our initial Hello application.
Close the Hello application window as usual. If no errors occurred, KDevelop will report this as ‘*** Exited normally ***’ in the Application tool
view window.
2.5.2
Configuring the Project
In KDevelop there are numerous ways how you can manage your project. This
behavior is configurable on a per-project basis and mostly of interest to the
advanced developer. Yet there are a few project specific settings you should
know of right from the beginning.
Of what use are build configurations?
Where to the define the behavior of the configure script.
Some considerations how make should run.
Where should the executable be and how should it be called?
2.5.2.1
Build Configurations
When we did a first run of the configure script in the Initial Hello Configuration section above, we noted that KDevelop had set up a dedicated debug
subdirectory for this purpose. In this section we will briefly consider some
consequences of this feature.
First of all, KDevelop does not necessarily use dedicated build directories apart
from the source. The preparations to automatically use dedicated build configurations is done through templates the Application Wizard uses when creating
a new project.
To find out which build configurations currently are available, have a look at
the Project → Build Configuration menu.
45
KDevelop User Manual
There are various build configurations available for this project.
In this case, like our Hello example project, there are three different build configurations available. In other cases, there may — initially — be only one such
build configuration, namely default.
The currently used build configuration has a check mark left to it. In order to
switch to another build configuration simply select its menu entry.
Now let us have a brief look at what these build configurations provide.
debug You should use this as the standard build configuration during the development process. The build occurs separately from the source directories in the dedicated debug subdirectory, i.e. all object, auxiliary, and
executable files will be put in the subdirectories there instead of their
counterparts in the project root. The configure script will be given the
--enable-debug=full option and the CXXFLAGS="-O0 -g3" will signal the
gcc compiler to not optimize the code and to insert extensive debug information into the resulting binaries.
optimized This is used to build a final C++ application. The build occurs separately from the source directories in the dedicated optimized subdirectory. No specific arguments to the configure script will be preset, yet the
CXXFLAGS="-O2 -g0" will signal the gcc compiler to optimize the code
and to not insert debug information into the resulting binaries.
default The term ‘default’ denotes the standard setup when you build an application from the console using e.g. the GNU configure and make/gmake command line oriented build tools. Other than debug or optimize
46
KDevelop User Manual
no dedicated build directory will be used. The application will by default
be built in the sources directories instead. There are no special configuration switches predefined. Building and running the application will use
the default settings of the underlying tools (e.g. gcc, etc.).
WARNING
Think twice before you decide to use the default build environment!
It cannot be used in parallel to the dedicated debug or optimized ones. Any
build operation using default will render both of the other build environments
unusable. This is caused by some peculiarities of the Makefile construction process using the automake/autoconf machinery, which cannot be easily
overcome.
Now, why does one one want to use different build configurations at all, when
they even appear to be not compatible to each other? The answer is — it simplifies edit-compile-debug cycles. The extra debug instructions inserted into the
binaries as well as all those subtle structure changes to the program code made
during optimizations will effect the run time behavior of the resulting application. So in many cases, when the logical structure of some routine appears to
be correct, you may want to test whether it still behaves correctly under more
practical conditions.
This is where the build configurations of KDevelop step in. Because the built
object and executable files in each dedicated build directory and the build commands are kept separately from each other only source changes need to be
handled when you switch between these build configurations.
Thus instead of cleaning up and recompile everything from scratch with alternate options, you need only switch from the debug to the optimize build
configuration, have the source changes compiled in and then retest the application under these circumstances. If anything inappropriate shows up, simply
switch back to debug and immediately continue your work there.
A final note — many build configuration settings are configurable. You can
even define your own build configurations if your development process requires some. We will briefly look at these possibilities in the next section.
2.5.2.2
Project Configure Options
Configuring the application properly is vital in the GNU autotools building
chain. This is usually guided by option definitions to the configure script
and/or specific flags settings in the environment prior to running configure
as e.g. the CXXFLAGS in our previous discussions.
You may set most of the configuring options for a given project from within
KDevelop GUI. Select Project → Project Options and then from the icon bar on
the left of the dialog the Configure Options icon. The Configure Options dialog
featuring several tabbed windows will display on the right handed side.
47
KDevelop User Manual
Most configure options can be defined here.
As you see, there are quite a lot of options you can set up in this dialog. For
now we will briefly look at only a few of them with regard to our Hello example
project. For detailed instructions see the Configuring Projects chapter. If you
want to know more about the meaning of the various flags which can be set,
look up info make from the console (or info:make from within Konqueror)
and there the Implicit Rules → Implicit Variables section.
There are several tabbed dialog setup windows from which the first one, General, refers to commonly used settings, while the others are rather compiler
specific. In all cases, however, will the actual contents of those dialogs be governed by the given build configuration.
You select the build configuration whose configuration settings have to be defined from the Configuration combo box on top of the Configure Options dialog.
48
KDevelop User Manual
Select the build configuration whose settings to define.
Now select another build configuration from this combo box and note how the
contents of e.g. the Configure arguments and Build directory text boxes change
according to the settings we mentioned in the build configurations list above.
2.5.2.2.1 General Configuration Settings
configuration options can be defined:
On the General dialog page, these
• Configure arguments These are the options KDevelop assigns to the configure script call in the build process. See the example in the ‘Initial Hello
Configuration’ section above.
• Build directory This is the subdirectory in the current project root, where
KDevelop will put all files created in the build process. Ideally, this should
correspond to the name of the build configuration in use, but you are free to
use any name you like, provided it is different from any other build configuration directory.
• Top source directory You won’t need this one often. It defaults to the project
root directory and needs only be redefined if your project sources are located
in another place.
• C/C++ preprocessor flags (CPPFLAGS) Put specific instructions for the preprocessor here. KDevelop will use this to set up a temporary environment
before it calls the actual build tool. Again, see the example in the ‘Initial
Hello Configuration’ section above how this is done.
• Linker flags (LDFLAGS) This is extra information for the ld linker tool where
it should look for additional libraries. It is used to build the temporary build
environment as well.
• Environment Variables Here you may define additional variables to be set
up in the temporal build environment, KDevelop will set up before calling
the respective build tool. Again, you must define these environment variables for every build configuration where they are to be used.
2.5.2.2.2 Compiler Specific Settings The other tabs on the Configure Options dialog page are for compiler specific settings. They are similarly structured, so it suffices to have a brief look at the C++ page.
49
KDevelop User Manual
Select the compiler and its working environment KDevelop shall use here.
This is what you can set up from here:
• C++ compiler Select the C++ compiler KDevelop should regularly use from
this combo box. It however lists only those compilers KDevelop really knows
of.
• Compiler command (CXX) Only for experts. This is only needed if the C++
compiler is not standard. Put the name by which it is called here.
• Compiler flags (CXXFLAGS) Here you can enter any extra option KDevelop
shall pass (via the Makefile) to the compiler. Some option values will be preset according to the build configuration selected in the Configuration combo
box.
Note, that many common compiler options can be selected from a dialog
which will pop up when you press the ... button to the right of the text box.
50
KDevelop User Manual
Use this dialog to define the GNU C++ compiler behavior.
We deliberately selected the Optimization tab here. Note how the No Optimization option has been preselected (according to the -O0 option preset in
the debug build configuration).
Unfortunately you cannot currently select all options from this dialog. The
-g3 option e.g. used by the debug build configuration would have to be
altered manually if ever needed.
2.5.2.3
How Make Should Build the Program
You can as well configure the way KDevelop will call the make tool in the
project build. Select Project → Project Options and then the Make Options icon
from the left dialog window side. The Make Options dialog page will then be
displayed to the right.
51
KDevelop User Manual
Define how KDevelop will call the make tool.
There is not much to do here for now. The only setting of interest in most cases
will be the Abort on first error switch. You will find it deactivated in most
projects. This corresponds to the -k option in the gmake call we found in the
initial build of our example Hello project.
This makes sense in an IDE like KDevelop which will protocol any error message during the build. After the build process you may easily navigate to any
error message in the Messages tool window. Use View → Next Error and View
→ Previous Error or respectively the F4 and Shift-F4 keys for this. KDevelop
will automatically activate the editor window of the source file in question and
put the cursor on the error line.
If on the other hand you rather want the build be stopped on whenever an
error occurs, check the Abort on first error option in this dialog. KDevelop will
then call gmake without the -k option.
2.5.2.4
How to Run the Executable
Once the build is complete, you can easily run the application from within
KDevelop. Use either Build → Execute Program, the Shift-F9 keys, or the Execute program button in the Build Toolbar of KDevelop.
Run the program from here.
52
KDevelop User Manual
But where is the executable located which should be run? How does one have
KDevelop append options to the call? Or, how can I have the application executed in a terminal by its own to test its console interactive behavior?
All this can be solved by configuring some project oriented run options in KDevelop. Select Project → Project Options and then the Run Options icon from the
icon bar on the left dialog window side. The Run Options dialog page will display to the right.
Define where and how your program shall be run.
Now, there is quite a lot which can be set up from this dialog. Basically there
are four groups of configuration items.
• Directory This tells KDevelop where it basically shall assume the executable
to be called. There are three possibilities you can select from.
Note however that only root directories are defined here. KDevelop usually
looks for the executable in some subdirectory given in the next configuration
group.
– Run from the directory, where the executable was build the last time. This
is the default. You can keep this for now.
53
KDevelop User Manual
– Run from the build directory according to the currently selected build configuration. The name of this directory was set up on the General Configuration dialog page.
This is the root where KDevelop will find the executable. It changes automatically with the selection you made in Project → Build Configurations
menu. Try it.
Other than always running the most recently built executable according to
the setting above, this allows you to switch the program to be executed by
simply selecting another build configuration from the Project menu.
– Run the executable found in a fixed custom directory. Again this is the
root only from where the actual executable is to be found.
Use this if you e.g. want to run the actually installed program instead of
the version located in the project directories.
• Program This tells KDevelop the relative position and name of the program
it shall actually call. This is relative to the root directory defined in the configuration group above. Furthermore you can define any argument KDevelop
will pass to the program when it is actually called.
N OTE
If leave the Main program text box empty, the active target settings of the Automake Manager will be used. Although this is an expert setting, inadvertently
leaving this input field blank is a common cause of problems. Check this setting
if KDevelop appears not to call the executable you wanted.
• Environment Variables KDevelop will set up a dedicated shell environment
to run the program in. Define any extra environment variable in this configuration group.
• Miscellaneous Two more check boxes are located at the bottom of this dialog
page.
– Automatically compile before execution comes in handy most of time.
KDevelop will check the project for changes and perform necessary configure and build steps for you any time you command it to run the program.
Uncheck this in case you want to run the program version prior to the last
change.
– Start in external terminal is interesting if you want to test the input/output
behavior of non-GUI programs in a console terminal. This is unchecked
by default, so KDevelop does start the program in a window of its own
without console terminal I/O capabilities.
2.6
How to Extend a Project — the Automake Manager
(- to be written -)
54
KDevelop User Manual
2.6.1
A Short Look at the Automake Machinery
(- to be written -)
2.6.2
How to Place Icons in a Separate Directory
(- to be written -)
2.6.3
How to Add New Classes
(- to be written -)
C AUTION
Be careful when you select your class file names. It is extremely difficult to change
them later.
2.6.4
What is in a Subproject?
(- to be written -)
2.6.4.1
Concentrate on Your Work — the Active Target
(- to be written -)
2.6.5
Some Steps to Restructure a Project
(- to be written -)
2.7
How to Debug
(- to be written -)
2.8
A Note on Your Project Documentation
The KDE project uses docbook for generating your project handbook (i.e. the
user manual). The user manual is available through your application menubar
by choosing Help → YourApplication Handbook when your KDE GUI application is running. After building your project, the user manual is displayed in
55
KDevelop User Manual
KDE KHelpCenter. It should explain to the user how your application works,
what are the main features and how to configure it. It should also explain the
advanced features if any.
All KDE based templates in KDevelop have a doc subdir which contains a index.docbook template in the en folder to get you started in writing the user
manual. You should edit this index.docbook in KDevelop and start changing
personal details such as name, email, etc.. Look at the comments in this file
and try following these indications to start your application documentation.
Rebuild your project to see the changes in KHelpCenter.
N OTE
You need to install your project using Build → Install or Install (as root user) in
KDevelop to see the user manual in KHelpCenter.
You can find more about the docbook syntax on the KDE documentation website.
2.9
Last But Not Least, Keyboard Shortcuts
(- to be written -)
2.10
Where to go from here
(- to be written -)
2.10.1
Frequently Encountered Problems
The nutshell chapter
FAQ pages
Forum
Mailing lists
2.10.2
Working With Projects
(- to be written -)
2.10.2.1
Using Existing KDevelop Projects
(- to be written -)
56
KDevelop User Manual
2.10.2.2
Importing External Projects
(- to be written -)
57
KDevelop User Manual
Chapter 3
Overview of KDevelop
Features
Bernd Pol KDevelop integrates a lot of tools, scripts, and templates in a common user interface. Basically it consists of
• several user interface modes from which you can select the look and feel of
the workspace,
• an Application Wizard which aids you in setting up a new project,
• several project management systems which aid in building and managing
your project,
• some editing tools to easily work on your program texts
• various file browsers providing you different views on your file system,
• various class browsers to aid you in maintaining the classes and their relationships of your object-oriented programming project,
• a debugger interface to find and remove program errors from within KDevelop, and
• several plugin tools, extensible modules which can be loaded at runtime and
on demand. This allows you to only turn on those features you really need.
• a set of other diagnosis, documentation, and optimization helper tools.
58
KDevelop User Manual
N OTE
In fact there are three KDevelop-based applications:
• The KDevelop IDE — this is the place where you will usually work.
• The stand-alone KDevelop Assistant documentation browser — isolates all the
powerful documentation facilities of the KDevelop IDE in a separate tool. This
comes in handy when you want to look up some programming documentation
but do not want to start the full IDE.
• The KDevelop Designer — enhances the QtTM User Interface Designer by KDE
specific elements and integrates nicely in the KDevelop IDE.
3.1
Available User Interface Modes
KDevelop offers developers four separate user interface modes (click on the
mode name to view an example):
• IDEAl
This is a novel user interface approach optimizing both work space and intuitive handling of the tools.
– All tool views are docked in a tabbar fashion around the mainframe area.
They are grouped left, bottom, and right according to the services provided.
– Editor and browser views will be stacked in a big sized tabbed window
inmidst the mainframe area.
• Child Frame Windows
– All tool views are initially docked to the mainframe.
– Editor and browser views will live like toplevel windows within a view
area of the mainframe.
• Tabbed Pages
– All tool views are initially docked to the mainframe.
– Editor and browser views will be stacked in a tabbed window.
• Toplevel Windows
– All editor, browser, and tool views will be toplevel windows directly on
the desktop.
– The main widget only contains the menu, toolbars, and statusbar.
59
KDevelop User Manual
3.1.1
How to Switch User Interface Modes
To switch the user interface mode select Settings → Configure KDevelop... from
the menus. The Customize KDevelop dialog will pop up, where you have to
select User Interface in the left hand tree. This will display the settings page
shown below.
Select a user interface mode
(Older KDevelop versions provide the top mode selection section only.)
In the Major User-Interface Mode section select the radio button of the user
interface mode you want to work in.
Dependent on the user interface mode you selected, other configuration sections will become available where you can taylor more details of the look and
feel to your preferences. See the Selecting the User Interface chapter for more
detail.
N OTE
Do not forget to restart KDevelop in order to let your selections take effect.
3.1.2
How to Maximize the Work Space Area
To maximize space, there is a full-screen window mode available which expands the mainframe area to the screen borders. Additional space can be re60
KDevelop User Manual
claimed by hiding the menubar. And you can of course hide any toolbar as
usual in KDE applications.
Full Screen Mode To switch to or from full screen mode select View → FullScreen Mode from the menus or press Ctrl-Shift-F. There is also a FullScreen Mode icon in the Browse Toolbar available.
Hide/Unhide the Menubar To hide the menubar select Settings → Show Menubar
from the menus or press Ctrl-M. You may also include a Show Menubar
icon in a suiting toolbar, e.g. the Browse Toolbar for that purpose. To unhide the menubar you must press Ctrl-M or use the Show Menubar icon
if available.
3.2
Elements of the User Interface
(... to be written ...)
3.2.1
The Workarea
(... to be written ...)
3.2.2
The KDevelop Titlebar
(... to be written ...)
3.2.3
The KDevelop Statusbar
(... to be written ...)
3.2.4
The menubar
(... to be written ...)
3.2.5
The Toolbars
(... to be written ...)
3.2.6
The Tree Tool Views
(... to be written ...)
61
KDevelop User Manual
3.2.7
The Output Tool Views
(... to be written ...)
3.3
Project Management Systems
Globally, a project will rely on some form of project management system. KDevelop offers four project management systems the programmer can select from
when creating a new project.
• Automake projects use the GNU standard development tools.
• QMake projects use the trolltech QMake project manager.
• ANT projects use the Apache ANT project manager for JavaTM development.
• Custom projects require you to maintain your own Makefiles.
3.3.1
Automake Projects
Projects created with KDevelop’s Automake Manager make it very easy for
developers to use the GNU standard development tools. They provide
• a better way of Makefile generation and
• a good and safe way for fast adaption towards different systems by autoconfgenerated configure scripts.
3.3.2
QMake Projects
For developers who enjoy the flexibility and feel of QtTM ’s qmake system, KDevelop offers the ability to handle qmake based projects (.pro files) within the
GUI.
For more information on the QMake project manager see the ‘qmake User
Guide’ which should be included in your distribution or have a look at the
TROLLTECH Documentation home page where you may find the QMake documentation of your ‘Qt C++ GUI Application Development Toolkit’ version.
3.3.3
CMake Projects
CMake will be the KDE build system for KDE 4 and KDevelop already provides you some CMake based templates in C and C++. You only need the
cmake program in your $PATH to build them.
To set up a new C or C++ project in KDevelop select Project → New Project...
→ C or C++ → CMake based projects → A shared library template or Hello
world program.
62
KDevelop User Manual
3.3.4
ANT Projects (JavaTM Projects)
JavaTM developers may want to use the Apache ANT project manager for
their projects. To set up a new Ant project in KDevelop select Project → New
Project... → Java → Ant Project → Application.
For more information see The Apache Ant Project home page.
3.3.5
Custom Projects
If you prefer to maintain your own Makefiles for your project you may use the
custom project option of KDevelop. This may be feasible in unusually structured projects or if you want to retain full control over the make process.
Yet, if you do not really need the extra flexibility and control of the custom
project manager you should consider Automake Manager or one of the other
project managers, because they considerably ease the program building and
distribution processes.
3.3.6
How to Distribute Your Application
The distribution of your applications does not require the end-user to have
anything different installed other than
• an appropriate compiler,
• a linker, and
• the appropriate development libraries,
which at least for C++ applications is most often the case. But you can as well
distribute binary packages of your application. In either way, the end-user of
your product does not need KDevelop installed.
For giving away your sources, we advise to include the project file of KDevelop as well. This makes it very easy for other developers—if they use KDevelop—to work with your sources.
For projects where several developers, maybe working on different places, are
involved, this should be the case anyway. So you can ensure consistency of the
Makefiles to not run into trouble.
Especially on multi language applications, translators won’t actually work with
the source code, except in cases that require correction for enabling translation
support.
63
KDevelop User Manual
Chapter 4
Configuring KDevelop
Bernd Pol KDevelop is a very powerful and flexible IDE which offers many
ways to tailor it to your needs. To start configuration select Settings → Configure
KDevelop.... This will cause the configuration dialog to pop up consisting of
a selection window to the left and the configuration dialog on the right hand
side whose contents will vary upon the configuration item you did select.
64
KDevelop User Manual
Select a configuration item
We will discuss these configurations in a different order, split up into the main
65
KDevelop User Manual
topics of General Configuration, Configuring the Documentation, and Advanced
Configuration which makes for a more intuitive reading.
If you want directly look up a certain configuration item use one of the following links.
General
User Interface
File Templates
Editor
Abbreviations
Scripting
Tools Menu
External Tools
Documentation
Code Snippets
File List
File Selector
C++ Class generator
Formatting
C++ Parsing
4.1
General Configuration
General configuration concerns the more common tasks of tailoring KDevelop
as there are:
• General Setup
• Selecting the User Interface
• S OURCE E DIT TASKS
– Selecting an Editor
– Selecting a Source Format Style
– Setting Up the Code Snippets Tool
• Configuring the File Selector
4.1.1
General Setup
The General configuration dialog allows you to define some basic KDevelop
behaviour which seldom will change in everyday work. This concerns:
General project options such as
• defining a default parent directory KDevelop shall use for new projects.
66
KDevelop User Manual
• deciding whether you want KDevelop to automatically load the project
you last worked on.
Selecting a font for the most commonly used output view windows, namely:
• the Messages Output View KDevelop uses to communicate e.g. compilation progresses, and
• the Application Output View which will show error and state information concerning a running application.
Some common behaviour concerning the displayed lines in the Messages Output View window, namely:
• whether long lines will wrap around, and
• if directory entry and exit messages issued by make will be shown.
The level of detail of messages concerning the compilation process shown
in the Messages Output View window.
The general configuration dialog
Load last project on startup Mark this checkbox if you want to continue to
work with the last project you worked on. This will cause KDevelop
to automatically load this project on start-up. It will usually be shown in
the state you left work so you can readily proceed.
67
KDevelop User Manual
Default projects directory: By default, KDevelop uses a common parent directory for all new projects. Enter the absolute path of this common directory in the box or select it from your directory structure. KDevelop
will place the any new project here as a subdirectory.
N OTE
You may of course change the directory path of a new project at the time you
set it up in the Application Wizard.
Window font: The Application Output View window is used to display error and state information from applications which are run from inside
KDevelop. These are informations the applications usually sends to the
console when run stand-alone. So you do not need to leave the IDE when
testing the application you currently work on.
To select a font suitable for the Messages Output View window click the
Window Font button showing the currently selected font (it says ‘Luxi
Sans’ in the above illustration). The KDE standard Select Font dialog will
pop up from which you may select the font to be used.
N OTE
On first start-up, KDevelop initializes this font setting to the standard font for
which your KDE user has been configured. This setting is fixed, so if you alter
Preferences → Appearances & Themes → Fonts in the Control Center, this
will not effect this KDevelop font selection. You will have to explicitely reselect
the Messages Output View window font.
Compiler Output KDevelop preprocesses the messages the Messages Output
View window receives during the build processes in order to filter superfluous information. You can control the level of detail KDevelop will
display using the dropdown box in this field.
Very Short Displays only warnings, errors, and the filenames which are
compiled.
Short Suppresses all compiler flags and formats the output to be more
readable.
Full Displays all output messages unmodified.
T IP
There is an alternative way to switch the compiler output detail. Just right
click in the Messages Output View window and select the according detail
level from the popup menu.
Line wrapping By default, KDevelop will wrap long lines around in the Messages Output View window so that valuable information will not be easily overlooked. In some cases this will clutter long message lists. Remove
the checkbox mark if you do not want the lines wrap around.
68
KDevelop User Manual
T IP
There is an alternative way to switch the line wrapping. Just right mouse
button click in the Messages Output View window and mark/unmark the Line
Wrapping entry in the menu which will pop up.
Directory navigation messages The make tool usually will display messages
like ‘Entering directory’, or ‘Leaving directory’ when it switches the directories it currently works in. As this clutters the messages list in the
Messages Output View window, KDevelop suppresses those messages
by default. Mark the checkbox if you want to protocol which directories
make worked in.
N OTE
Changes in this setting effect the processing of new messages only. Old directory navigation messages will be kept visible when you switch this feature
off.
UI Designer Integration This let you choose the way you want .ui files to be
displayed in KDevelop. KDevelop comes with its own UI designer called
KDeveDesigner that can either be embedded or be run as a separate program. Qt Designer can also be used to edit .ui files.
• Use KDevelop’s embedded designer
This uses KDevelop own designer embedded within KDevelop
• Run KDevelop’s designer as a separate application
The KDevDesigner application will be run separately in its own window.
69
KDevelop User Manual
KDevDesigner in its own window
• Run Qt Designer
Qt Designer from your Qt installation will be started externally whenever you click on a .ui file in KDevelop.
Terminal Emulation You choose here which terminal you want to be integrated within KDevelop.
• Use KDE setting
This uses KDE setting as set in KControl in KDE component Component Chooser tab which sets the default terminal emulator used by all
KDE applications that need a terminal.
• Other
Choose some other terminal different from the default one.
4.1.2
Selecting the User Interface
As already said in the Available User Interface Modes chapter there are five
different ways the KDevelop work area may be set up, namely:
• Simplified IDEAl window mode
This is a simplified version of the IDEA user interface. It is designed to be
simple and clean. It also does not uses docked toolviews.
70
KDevelop User Manual
• IDEAl window mode
This is a clone of the IDEA user interface, similar to the Tabbed pages mode
and is default.
• Childframe window mode
All tool views are initially docked to the mainframe. Editor and browser
views will live like toplevel windows within a view area of the mainframe.
A typical example of this user interface mode is MS Visual Studio 6.0.
• Tabbed pages mode
All tool views are initially docked to the mainframe. Editor and browser
views will be stacked in a tab window. A typical example of this user interface mode is KDEStudio, our friend C++-IDE in the world of KDE.
• Toplevel window mode
All editor, browser and tool views will be toplevel windows (directly on
desktop). The main widget contains the menu, toolbars and statusbar only.
A typical example of this user interface mode is Borland Delphi 6.0.
To switch the user interface mode select Settings → Configure KDevelop... from
the menus. The Customize KDevelop dialog will pop up, where you have to
select User Interface in the left hand tree. This will display the following settings dialog to the right.
71
KDevelop User Manual
Select a user interface mode
Select the radio button of the user interface mode you want to switch to, then
click OK.
N OTE
Do not forget to restart KDevelop in order to let any of these selections take effect.
When you selected either the Simplified IDEAl window mode or the IDEAl
window mode or the Tabbed pages mode two more configuration sections will
become available: Use Tabs and Use Close On Hover. These allow to configure
under which circumstances tabs will be shown on top of the document windows and whether you may close the document by a click on the tab icon.
In Simplified IDEAl window mode and in IDEAl window mode only yet another configuration section will be available, Toolview Tab Layout which effectively allows to select between different sizes of the toolview tabs which
surround the main working area in this mode.
Configuring the Documents Tab Bar Display In the IDEAl and tabbed pages
modes there will be named tabs on top of the document windows by de72
KDevelop User Manual
fault, so you can easily select different documents with a left mouse button click. If you prefer to provide more space for the document windows
in the KDevelop main work area, you may change to another behaviour
in the Use Tabs configuration section.
Always This is the default — show a tab comprising an icon and the
document name on top of any document window in the KDevelop
main area display.
When more than one Do not show a tab when only one document is displayed. If there is more than one document, however, KDevelop will
display an according tab bar as in the Always selection above. You
may want to select this mode if you work on a single document most
of the time as this provides more vertical space.
Never Never show any document selection tab. You may prefer this
mode if you seldom use the mouse to switch between documents.
It provides more vertical space for all document windows. To select
another the document window or to close any, use the KDevelop
Window menu.
Setting Up to Close a Document by a Click On Its Tab When you configured
KDevelop to display the documents tab bar, either always or when more
than one document is displayed in the main work area, you may add
more functionality to the tabs beyond their document selection capability. Use the Use Close On Hover coniguration section for this.
No This is standard behaviour. No extra functionality is added to the
tabs. They may be used only to select document windows on left
mouse button clicks.
Yes When you selected this radio button, KDevelop will allow to close a
document window by a left mouse button click. Use the mouse to
point at the small icon on the on the left tab border. It will change
to a close symbol. Now click with the left mouse button on this
changed symbol and KDevelop will close the according document
window.
Yes, Delayed After selecting this radio button, KDevelop will allow to
close a document window as shown in the Yes case above. The icon
will not change instantly, however, but there will be a short delay
before the close icon shows up.
Configuring the Toolview Tab Layout The Toolview Tab Layout configuration
section will be available in IDEAl mode only. Use these radio buttons to
set up the look of the toolview tabs which surround the main working
area in this mode.
Icons Each tab will show an icon only. If the associated toolview is displayed, the tab will open and a descriptive text for this toolview be
shown. You may want to use this mode if you work on a monitor
with limited resolution.
The icons are not very descriptive, however. If you want to find
out which toolview is assigned to a given tab, point at it with the
mouse and wait a second. A short tooltip will then pop up with the
toolview name.
73
KDevelop User Manual
Text This is the default toolview tab display mode. Each tab displays the
name of its associated toolwiew.
Text and Icons If the standard text toolview display looks too flat to you
and you are working on a high-resolution monitor you may want
to select this radio button. It will cause the name of the associated
toolview be displayed on each tab plus an icon to the left of it, making the tabs easier to distinguish. See the Folded Toolview Tabs illustration below for an example.
Folded Toolview Tabs If you selected the IDEAl mode toolview tabs to display texts (with or without accompanying icons) you need not worry
about them being hidden behind some toolview window. If one of the
bottom toolview windows occupies more space than is available to display all (vertical) tabs, they will fold around as this illustration shows:
Toolview tabs fold to not be hidden behind another view window
74
KDevelop User Manual
N OTE
The active toolview window must be shown fixed (non-overlap mode), sharing the work area with the other windows, to force such tab folding. Press
the small square in the window border to accomplish this as shown in the
example.
4.1.3
File Templates
Configure File Templates
4.1.4
Selecting an Editor
KDevelop allows you to select your favorite text editor tool. Mark the Editor
entry in the left hand side selections tree of the Configure KDevelop window.
The following dialog will be displayed to the right.
75
KDevelop User Manual
Select an editor
To select a new editor, click on the arrow on the drop down list field. Depending on the editor parts interfaces your KDE version has compiled in you will
be provided with a list of editors you may select from (see the Important note
below for this). Click on the editor of your liking and click OK. Currently there
are two possibilities:
Embedded Advanced Text Editor This is the KDE standard Kate editor part.
Qt Designer Based Text Editor This is the editor QtTM provides in its Designer
component.
These editor interfaces are fully integrated in the KDevelop IDE concept. Particularly the possibility to jump to the offending source code line by just clicking on an error message in the Messages Output View window has been provided.
N OTE
Changing the editor will not effect already open files. There are two possibilities to
proceed. Either close all open text windows and reopen them one by one. Or simply
close the whole project and reopen it again. The windows will then automatically
open under the new text editor interface.
I MPORTANT
KDevelop lets you use editor interfaces which have registered with KDE and that
provide a KatePart interface. If you miss one one of the selections shown above
check your KDE installation if the corresponding KPart was correctly installed.
What to do if the file has been changed externally:
Do nothing The file will be marked as externally changed and the user will be
asked to verify any attempt to overwrite it.
Alert the user A dialog will alert the user that a file has changed and offer the
user to reload the file.
Automatically reload the file if safe, alert the user if not Any files that are not
modified in memory are reloaded and an alert is shown for any conflicts.
76
KDevelop User Manual
4.1.5
Abbreviations for the Word Completion
(... to be written ...)
4.1.6
Scripting
(... to be written ...)
4.1.7
Adding KDE Standard Applications to the Tools Menu
(... to be written ...)
4.1.8
Adding External Applications to Menus
(... to be written ...)
4.1.8.1
Adding to the Tools Menu
(... to be written ...)
4.1.8.2
Adding to the File Context Menu
(... to be written ...)
4.1.8.3
Adding to the Directory Context Menu
(... to be written ...)
4.1.9
Selecting a Source Format Style
KDevelop automatically formats a source text in a predefined style. This style
is highly configurable.
N OTE
The reformat source feature is currently available for C, C++, and JavaTM only.
Especially you cannot use it for scripting languages like e.g. PHP. This is because
KDevelop uses the astyle application to implement this feature.
77
KDevelop User Manual
To set up a specific format style, select Settings → Configure KDevelop.. from
the menubar. The Customize KDevelop dialog will pop up, where you have
to select Source Formatter in the left hand tree. This will display a series of
three settings dialog tabs to the right, namely a General Formatting Setup, a
Indentation Style Setup, and a Other Formatting Setup.
T IP
Any style changes apply to newly entered text only. If you want to change the
formatting style of an already existing source text you will have to explicitely use the
Edit → Reformat Source command.
N OTE
The exact outcome of these style formatting definitions depends on the editor you
use. Currently, most settings are tailored to the Kate editor part (the ‘Embedded
Advanced Text Editor’). Some other editors (e.g. the Qt editor) may rely on their
own configuration settings. You will have to experiment in this case to find out the
exact effects of the style settings provided here.
WARNING
There may be incompatibilities between the configuration style settings provided
here and the editor you use up to the extent that in extreme cases it even might
destroy your files. Make sure you have a backup of your source files before you try
out these settings with an none KDE standard editor.
4.1.9.1
General Formatting Setup
The General tab of the Source Formatter dialog allows you to select one out of
five predefined source format styles.
78
KDevelop User Manual
Source format style general setup
A formatted source example will be displayed in the field to the right. If none
of the predefined styles is to your liking, you may click the top User defined
radio button and define your own source formatting style preferences on the
other two tabs which will become available then.
N OTE
Currently only the predefined source formatting styles will be demonstrated by an
example text. If you decide to define your own style, no example display will be
available. You have to experiment on an actual source text to tailor the settings to
your liking.
4.1.9.2
Indentation Style Setup
Proper indentation is the main means to enhance readability of a source text.
I you selected the Indentation tab of the Source Formatter dialog you will be
presented with a series of indentation formatting choices grouped into three
boxes as following.
79
KDevelop User Manual
Source format indentation style setup
Default Settings The preset format choices will cause the source text to resemble the ANSI formatting style:
namespace foospace
{
int Foo ()
{
if ( isBar )
{
bar () ;
return 1;
}
else
return 0;
}
}
Defining Indentation Width and Characters The radio buttons grouped in the
Filling group define how indents in the source text will be drawn.
Use tabs This will cause the editor to insert a tab character for each indentation level. The tab width is predefined in the editor settings (8
80
KDevelop User Manual
or 4 character columns usually). Use Settings → Configure Editor...
to redefine it.
N OTE
The actual tab width definition procedure depends on the editor you
selected in the Selecting an Editor configuration step. You will have to
look up the corresponding editor help to find out.
Use spaces If you select this radio button, the editor will enter a number
of spaces for each indentation level. Change the number from the
default 2 to the indentation width you prefer.
Indented Entities This defines which of the (C/C++) entities will be formatted
with an extra indent beyond the current indentation level.
By default only namespaces and labels will be extra indented. You may
want to experiment with various settings to tailor those extra indents to
your liking.
Continuation The settings grouped here apply to those cases where the source
formatter automatically wraps around long source lines. It takes two special cases in account, namely that in deeply nested indents there should
remain enough room for the source and that conditionals should get extra
indent levels on continuation to make them stand out properly.
N OTE
This applies to static word wrap cases only where a fixed maximum line width
is used in the source text. If you set up your editor to dynamically wrap around
long lines in display only (which is possible in the Kate editor part) the effects
of these settings usually will not show.
Maximum in statement This setting limits the maximum possible indentation for the continuation lines so that enough space will remain to
keep the text readable. No continuation line will ever be indented
beyond the number of columns you selected in this field.
The default is set to 40 character columns (half a standard 80 column
page). You may want to increase this value to account for wider paper (e.g if you use landscape printing for your sources). Or decrease
the value accordingly to take larger margin settings of your printouts into account.
Minimum in conditional Conditionals or source following e.g. an assignment operator should usually get an extra indent on continuation lines in order to keep the text readable. The amount of this extra
indent is defined here.
The default is set to ‘Twice current’ which means that continued conditionals will get an extra indent level of the standard indentation
size you selected in the Filling group. You may change this extra
indent to another fixed width (including zero) using the arrows or
by entering the value directly.
81
KDevelop User Manual
4.1.9.3
Other Formatting Setup
Other source format style settings
Controlling the position of braces The radio buttons the (somewhat misnamed)
Brackets group control the position of block delimiting braces in a (C/C++)
source text. There are three possibilities from which you can select.
Break This inserts a line break before each opening brace. Both delimiting braces of any block will be put at the same indentation level as
the block head statement.
namespace foospace
{
int Foo ()
{
if ( isBar )
{
bar () ;
return 1;
}
else
return 0;
}
82
KDevelop User Manual
}
Attach This will keep the opening brace of a block in line with the block
head statement. Closing braces will be on the same indentation level
as the block head statement. The else of an if statement will be kept
in line with the closing brace of the preceding block.
namespace foospace {
int Foo () {
if ( isBar ) {
bar () ;
return 1;
} else
return 0;
}
}
Linux Style This is a compromise of the above listed styles. Functional
block delimiting braces will be put on extra lines. Braces opening a
block in a conditional or loop statement will be kept in line.
namespace foospace
{
int Foo ()
{
if ( isBar ) {
bar () ;
return 1;
} else
return 0;
}
}
Controlling Extra Spaces By default KDevelop does minimize the use of spaces
in source texts.
if ( isBar ( fooArg ) == barValue )
You may enhance readability if you force the source formatter to insert
extra spaces in special positions.
Add spaces around parentheses In fact what is meant is to add spaces
around the text put in parentheses. This enhances the readabilitiy of
function arguments and conditionals.
if ( isBar ( fooArg ) == barValue )
Add spaces around operators This will put spaces around assignment
and comparison operators to enhance the readability.
if ( isBar ( fooArg ) == barValue )
83
KDevelop User Manual
Controlling the formatting of one-line constructs There are a few cases where
you don’t want the source formatter to split a long line apart. For C/C++
code this can be controlled here.
Keep one-line statements This keeps single line statements together in
some situations even if they exceed a fixed maximum line length.
Keep one-line blocks This keeps single line blocks together in some situations even if they exceed a fixed maximum line length.
4.1.10
Setting Up the Code Snippets Tool
When editing in KDevelop you can store often used parts of code as Code
Snippets. To configure the capabilities of the code snippets part select Settings
→ Configure KDevelop.. from the menubar. The Customize KDevelop dialog
will pop up, where you have to select Code Snippets in the left hand tree. This
will show the following dialog in the right hand side.
Configuring the Code Snippets tool
Activate Snippet Preview Mark the Show snippet’s text in tooltip checkbox if
you want to view the stored text in a tooltip window whenever you keep
the mouse cursor over the title of that snippet.
Working with Snippet Variables The Code Snippets tool allows for a variable
text in predefined places any time you insert a snippet into a file. To
accomplish this Code Snippets provides its own variables’ mechanism.
You can set up it’s behaviour in the Variables group.
84
KDevelop User Manual
Delimiter The Code Snippets tool distinguishes variables in the text by
surrounding the variable name with special delimiter symbols. To
use your own delimiter symbol, change the predefined $ character
in the Delimiter field.
Input method for variables
• Single dialog for each variable within a snippet – will in turn pop
up a separate dialog for each variable which the tool finds when
inserting the selected code snippet.
• One dialog for all variables within a snippet – will pop up a common dialog where the user has to fill in the values of all variables
before the snippet will be inserted
4.1.11
File List
(... to be written ...)
4.1.12
Configuring the File Selector
KDevelop provides a File Selector plugin which, when loaded at start-up, allows to navigate to any file or directory in the system.
85
KDevelop User Manual
The file selector (IDEAl mode)
86
KDevelop User Manual
The behaviour of the File Selector can be highly configured. Select Settings
→ Configure KDevelop.. from the menubar. The Customize KDevelop dialog
will pop up, where you have to select File Selector in the left hand tree. This
will show the following dialog in the right hand side.
Configuring the file selector
Configuring the Toolbar There is a toolbar on top of the File Selector which
can be configured as usual in the Toolbar group.
1. Select an item in the right hand Selected actions list after which the
new action should be inserted.
2. Select the action to be inserted in the left hand Available actions list.
3. Click the right (upper) arrow between both lists. The action will
be removed from the Available actions list and inserted into the Selected actions list below the selected item.
1. Select the item to be removed in the right hand Selected actions list.
2. Click the left (lower) arrow between both lists. The selected item
will be removed from the Selected actions list and put back into the
Available actions list.
1. Select the action to be moved in the right hand Selected actions list.
2. Click the up or down arrow to the right of this list. The selected item
will be moved up or down the Selected actions list.
87
KDevelop User Manual
Defining When the Contents Should Change Updating the contents in the File
Selector window takes time and resources, esp. when changing to another directory. Therefore File Selector is set up by default in such a way
that its contents change only on demand, i.e. when you select another
directory or when you explicitely want to refresh its contents.
N OTE
Click the Reload button in the toolbar to update the contents of the File Selector. This toolbar button is not available by default, however. You must insert it
there first.
You can configure the File Selector to immediately reflect certain changes
in your work. The settings in the Auto Synchronization group of the
configuration dialog are responsible for this.
When a document becomes active If you select this checkbox, the contents in the File Selector window will be updated whenever you go
to another already open document, e.g. when you click on the tab
of the according edit window in IDEAl mode. If necessary the File
Selector will switch to the directory this file belongs to and update
the display to show the actual contents in there.
When a document is opened If you select this checkbox, the contents in
the File Selector window will be updated whenever a document will
be opened, e.g. by the File → Open menu. If necessary the File Selector will switch to the directory this file belongs to and update the
display to show the actual contents in there.
When the file selector becomes visible If you select this checkbox, the
contents in the File Selector window will be updated whenever it
gets visible again. If necessary it will switch to the directory the actual document belongs to and update the display to show the actual
contents in there.
You may freely combine these settings to tailor the actualization behaviour
of the File Selector to your liking.
Controlling the History in the Comboboxes There are two comboboxes on top
and bottom of the File Selector contents window which control the directory to be displayed (top combobox) and the filters to be applied to the
file display (bottom combobox). A history of the most recent settings is
kept in the selection field of each combobox. You can configure the number of history entries as follows.
Remember locations Enter here the maximum number of directory selections the upper combobox shall remember.
Remember filters Enter here the maximum number of filter definitions
the lower combobox shall remember.
Controlling What Should be Remembered Between Sessions By default
the File Selector is set up so that it shows the display of the most recent session again at the next KDevelop start-up. You may change
this behaviour in the Session configuration group.
88
KDevelop User Manual
N OTE
If KDevelop was automatically restarted by the KDE session manager
the changes in these settings will have no effect. In this case location and filter settings of the most recent KDE session will always be
restored.
Restore location Remove the checkbox mark here if you don’t want the
displayed location be remembered between sessions.
N OTE
If you selected one of the automatic update settings the displayed location might automatically change regardless what has been remembered
from the recent session.
Restore filters Remove the checkbox mark here if you don’t want the
filters applied to the display be remembered between sessions.
4.1.13
C++ Class Generator
(... to be written ...)
4.1.14
Formatting
(... to be written ...)
4.1.15
C++ Parsing
(... to be written ...)
4.2
Configuring the Documentation
KDevelop contains a very powerful documentation facility which provides access to several kinds of extensive documentation. In e.g. IDEAl mode you find
a Documentation tab at the right border of the work area.
89
KDevelop User Manual
The KDevelop documentation window (IDEAl mode)
N OTE
KDevelop must have loaded the Documentation plugin in order to view the documentation tree. See the Plugin Tools section for more info.
You may set up contents and behaviour of the various parts of this documentation window if you select Settings → Configure KDevelop.. from the menubar.
The Customize KDevelop dialog will pop up, where you have to select Documentation in the left hand window.
The thus displayed configuration page shows three tabbed configuration dialog pages, namely:
Documentation Collections
Full Text Search
Other
90
KDevelop User Manual
4.2.1
Setting Up Documentation Collections
The documentation configuration settings have been divided into a series of
documentation collections, each providing access to documentation files of
some unique format and content type. These setups control which documentation items will be listed on the Contents page of the KDevelop Documentation
facility, and how the user may access documentation details by indexed and
full text searches.
The Documentation tab provides a series of configuration pages which are ordered vertically like a stack of index cards. One page at a time will open after
a click on its index card title:
Qt Documentation Collection
CHM Documentation Collection
Doxygen Documentation Collection
KDevelop TOC Documentation Collection
Devhelp Documentation Collection
Custom Documentation Collection
Setting up documentation collections
91
KDevelop User Manual
4.2.1.1
Common Documentation Setup Structure
All configurations pages on the Documentation tab use a common layout. You
will find the currently available documentation items of this type listed on the
open page to the left and a set of buttons to the right.
Buttons to Maintain Documentation List Contents There are three buttons available to maintain the contents of the documentation setup pages:
Add Opens a Documentation Catalog Properties dialog as shown below
where you can select the source location of the documentation item
to be added and name it.
Edit Opens a Documentation Catalog Properties dialog as shown below
where you can change the source location of the documentation item
previously selected in the list and rename it.
Remove Removes the selected documentation entry from the list.
N OTE
The entry will be removed from the list only. Actual documentation
sources remain untouched. You will have to remove them explicitely
by other means.
Add or change a documentation item
The button to the right of the Location field opens a directory dialog
whose entries usually will be filtered according to the file type of the
selected configuration page.
The Title field may not be accessible, depending on the documentation
type to be maintained.
Documentation List Structure Every documentation setup page shows the listed
documentation items in a table with four columns:
92
KDevelop User Manual
TOC If this check box is marked, this documentation item will show up
on the Contents page of the KDevelop Documentation facility.
N OTE
Unchecking the TOC check box will in turn disable the Index and Search
check boxes (see below). Thus you cannot have documentation collection items indexed but not shown in the contents.
Index If this check box is marked, an internal index will be built of this
documentation item. This provides fast access to the documentation by the use of the Index and (optionally) Finder pages of the
KDevelop Documentation facility.
N OTE
The internal index will be built the first time the user selects the Index
page. This will delay the first access noticeably, because the index will
be read from disk and then cached.
All subsequent indexed searches will however use this chache and thus
work significally faster.
Search If this check box is marked, the contents of this documentation
item will be included in the full text search path of the Search page
of the KDevelop Documentation facility.
N OTE
KDevelop utilizes the htdig application collection to perform full text
searches. This search is done over an internal index, the htdig machinery has to build before it can be used.
Any change of the Search check box marks will thus effect the search
runs only after you rebuilt the index on the Search page of the KDevelop
Documentation facility.
Title This is the name of the Documentation item as it will be shown on
the Contents page of the KDevelop Documentation facility.
N OTE
Former KDevelop versions allowed to select the documentation items to be
displayed on a per-project basis. This is not available any more.
4.2.1.2
QtTM Documentation Collections
On this configuration page all QtTM documentation is set up.
93
KDevelop User Manual
Setting up the Qt documentation collection
Normally KDevelop will fill this in on its first start-up. It looks for standard *.xml, or *.dcf documentation files in the QtTM installation directory. The table
to the left lists the files KDevelop found by their standard titles.
If you have a non-standard installation, either there will be no information
listed at all or the entries will possibly refer to improper locations (e.g. to another QtTM installation available in your system). You may adjust the entries
using the buttons to the right of the list field.
N OTE
KDevelop will use the titles already provided by the installed QtTM documentation.
Hence the Title field in the Documentation Catalog Properties dialog is inaccessible.
By default, not all QtTM documentation will be shown on the Contents page
of the KDevelop Documentation facility. Use the TOC check box in the setup
table to select the documentation to be shown.
If you want to have some specific QtTM documentation included in the search
indexes or full text search use the Index and Searchcheck boxes in the setup
table.
94
KDevelop User Manual
4.2.1.3
Setting Up the CHM Documentation Collection
On this configuration page you may collect documentation according to the
R CHM help file standard.
Microsoft
Setting up Microsoft CHM standard documentation files
By default, this configuration page will be empty (as shown above). You may
add new entries using the buttons to the right of the list field. KDevelop will
filter *.chm files in the directory dialog associated to the Add and Edit buttons.
R *.chm files see e.g. PHP:
For more information on the format of Microsoft
Documentation - Extended CHM Format at http://de2.php.net/docs-echm.php.
4.2.1.4
Documentation Generated by Doxygen
On this configuration page all API documentation generated by Doxygen is set
up.
95
KDevelop User Manual
Setting up Doxygen generated API documentation
In short, such an API documents the interface to certain library functions. The
API documentation on this page should be produced by the externally provided Doxygen tool.
Doxygen generated API documentationconsists of a series of html files, starting with index.html. Additionally there may exist tag files which contain information to link to already existing API documentations. Thus KDevelop will
look for index.html and *.tag files when seaching for Doxygen generated API
documentation.
There are some structural constraints assumed when searching for Doxygen
generated API documentation. The directory in which the index.html file resides should contain subdirectories with separate documentation collections.
Each of these subdirectories is assumed to contain a .tag file and a html/ subdirectory.
You may have a look at $KDEDIR/share/doc/HTML/en/kdelibs-apidocs for an
example of such a Doxygen API documentation layout.
96
KDevelop User Manual
N OTE
The older KDE KDoc generated API format is not directly supported any more. If
you still want to use such documentation, you may add it on the Custom Documentation Collection page.
KDevelop will have filled in a link to the current KDE Libraries API, provided
it found one. There are several ways for KDevelop to find out:
• Either you provided the configure command with the --with-kdelibsdoxy-dir option when you compiled KDevelop (see the How to Obtain a KDevelop API Documentation chapter).
• Or the configure command did automatically find a Doxygen generated
KDE Libraries API in one of several standard locations it knows of.
• Or as a last resort the $KDEDIR/share/doc/HTML/en/kdelibs-apidocs/ was
found at the first KDevelop startup.
If KDevelop did not find a valid Doxygen generated KDE Libraries API at its
first start-up the Doxygen Documentation Collection list will be empty.
You may add your own API documentation entries (e.g. from your current
projects) by using the buttons to the right. If you want to have them included
in the indexed and/or full text search mark the Index or Search check boxes in
the setup table.
N OTE
KDevelop uses the title information from the index.html. Hence the Title field in
the Documentation Catalog Properties dialog is inaccessible.
97
KDevelop User Manual
T IP
The KDE system provides more API documentation than the KDE Libraries API
only. You will need additional interfaces information if you want to e.g. include the
Kate part into you programs. For this Kate part API for example you should compile
and install the KDE Base Libraries API from the sources (using the make apidox
and make install commands on the kdebase sources) and then add an entry to
the Doxygen Documentation Collection list like this:
Adding a KDE Base API to the list
(Of course you should replace the /home/dev/mykde-system/ directory in the
Location field example with the path to your KDE installation.)
N OTE
You must put the API of your current project into this Doxygen Documentation Collection as well. Former KDevelop versions did put it into the documentation tree on
a per-project basis. This is not provided any more.
4.2.1.5
Handling Structured Documentation (KDevelopTOC Files)
The main bulk of the KDevelop documentation facility provides immediate
access to structured documentation, local as well as remote ones. You can configure this on the KDevelopTOC Documentation Collection page.
98
KDevelop User Manual
Providing KDevelopTOC structured documentation access
KDevelop comes with a bunch of predefined KDevelopTOC files which are
automatically entered in the table at installation time. To keep the display
manageable only the most often used will initially be marked for display. If
you want to see another documentation, mark the TOC check box in the setup
table.
KDevelopTOC files cannot be indexed to perform a full text search because
they usually point to a remote location. On the other hand, such a .toc file can
have an index manually defined, using the <index> tag. Thus the Index check
box will be enabled ony when KDevelop finds an <index> tag in the .toc file.
(For more detail see the description below in the KDevelop TOC Files section.)
The Search check box in the setup table will alway be disabled.
You may add new entries using the buttons to the right of the list field. KDevelop will filter *.toc files in the directory dialog associated to the Add and
Edit buttons.
N OTE
Other than former KDevelop versions will the Remove button not change the *.toc
files on disk, so the remove operation is safe now.
99
KDevelop User Manual
4.2.1.6
KDevelop TOC Files
There is a special feature associated with this. To illustrate, follow these steps:
In the documentation tree find an entry shortly below the QtTM /KDE documentation (e.g. ‘KDE2 Development Book (kde.org)’). Click on the plus sign
next to it. A tree will open where you can quickly navigate to subsequent chapters nested several levels deep, all offline. But if you finally select one of the
chapters, KDevelop will in many cases try to access a remote documentation
file.
The rationale behind this is not only to locally navigate remote documentation without wasting net access ressources, but to provide the developer with
easy, structured access to the documentation he/she needs. Using these tools
one can access almost any local or remote documentation in a structured fashion even if the original is laid out flat or structured in another way. All that
is needed is access to files and/or parts of files which are displayable by the
Konqueror.
Such structured access is made possible through the use of special ‘table of
content’ files, which are denoted by .toc filename extensions. Any such KDevelop TOC file contains an XMLTM structured description of the document to
be accessed.
Standard Directory of KDevelop TOC Files When KDevelop was installed usually a series of predefined .toc files has been put into the $KDEDIR/share/apps/kdevdocumentation/tocs directory. These are fairly simple,
structured text files. You may look at them using a text editor or other
text display facility.
B ASIC S TRUCTURE OF KD EVELOP TOC F ILES
header
<!DOCTYPE kdeveloptoc>
<kdeveloptoc>
(title)
(base address)
(content structure)
(index structure)
</kdeveloptoc>
This XMLTM structure will be parsed by the KDevelop Documentation
plugin to set up the documentation tree contents and to guide the user
in navigating the documentation. It contains all information necessary to
display titles and access the documentation file contents.
title
<title> (some title string) </title>
This is the title KDevelop will display at the basic levels in the documentation tree.
N OTE
This displayed title cannot be changed by the user. If you want another text
be displayed, you must manually change the <title> entry in the .toc file.
100
KDevelop User Manual
base address
<base href=" (base document URL) "/>
This URL points to the location where all files of this documentation are
located. It will be prepended before each section URL in the following
content structure list. So, if you e.g. downloaded a documentation from
a remote server, all you need to display the files from this new location is
to change its <base> URL.
content structure
<tocsect1 name=" (section title) " url=" (section URL) ">
...
<tocsectn name=" (section title) " url=" (section URL) "/>
...
</tocsect1>
All remaining navigation and access information is stored in a series of
nested <tocsecti> ... </tocsecti> pairs. Each i denotes a consecutive
nesting level down to number n which will correspond to the finally displayed documentation section.
Any <tocsecti> entry must have a name="xxx" attribute associated with
it (the "xxx" denotes the actual title string). This name will be displayed
as level title in the documentation tree. It should correspond to an actual
documentation section.
There may be an url="" attribute associated with any i nesting level.
When the user clicks on a section title in the documentation tree KDevelop will try to access the file at the location pointed to by the combined
base and section URL.
The <tocsectn/> entry must have an url="" attribute whatsoever. This
final nested <tocsectn/> does not come in pairs but will immediately be
closed by a / before the > bracket.
N OTE
Any address combined of base and section URL must point to some displayable text file. Usually this will be an HTML-structured file. It is possible to
link to anchor marks within such an HTML file using the standard # notation
of the format: /base-url/section-url#anchor-mark.
index structure
<index>
<entry name=" (index entry title) " url=" (index section URL) "/>
</index>
Index is a plain list of index entries - pairs of title and URL. Index is not
mandatory.
4.2.1.7
DevHelp Documentation
DevHelp documentation is another means of structured documentation access.
It uses structured table of content files denoted by a .devhelp extension similar
to KDevelop TOC files to access documentation for the GNOME 2 desktop.
101
KDevelop User Manual
You can control which DevHelp files should be accessible on the DevHelp Documentation Collection configuration page.
Providing DevHelp documentation
DevHelp files originally were accessible on the LiDN website, but this seems
to be not maintained for some time now. More recent DevHelp documentation
is available at the DevHelp Books Download web page.
When KDevelop is installed it will attempt to find all .devhelp files in some
standard places in the system, e.g. in the subdirectories of /opt/gnome/share/.
Initially these files will not be marked for display. If you want to see another
documentation, mark the TOC check box in the setup table.
You may add new entries using the buttons to the right of the list field. KDevelop will filter *.toc files in the directory dialog associated to the Add and
Edit buttons.
4.2.1.8
Setting Up Custom Documentation Collections
This is for your own purpose. You may add almost any documentation files
here, provided they can be displayed by the Konqueror plugins.
102
KDevelop User Manual
Providing custom documentation
Usually this collection will be empty at first KDevelop startup. We have filled
in a deliberate item to show the entry structure.
Handling is straightforward here. Use the buttons to the right of the list field
to add, edit or remove the document items. KDevelop will not filter anything
in the directory dialog associated to the Add and Edit buttons.
You will have to explicitely select the items for display in the KDevelop documentation facility. Mark the TOC check box of the entry in the setup table.
N OTE
Custom documention cannot be indexed or searched. Thus the Index and Search
check boxes have no effect here as shown above.
4.2.2
Setting Up Text Search Indexes
(... to be written ...)
103
KDevelop User Manual
Setting up text search indexes
4.2.3
Other Documentation Configuration Settings
(... to be written ...)
4.3
Advanced Configuration
(... to be written ...)
4.3.1
Plugin Tools
(... to be written ...)
104
KDevelop User Manual
Chapter 5
Getting Started — the
Application Wizard
Bernd Pol In KDevelop software development work is organized in projects.
Such a project keeps everything together which belongs to a complete programming task: source files, additional data files, any actually needed management facilities as the make system as well as access to all components and
any additional tools needed to get the application up and running.
Organizing all development work in projects allows you to easily switch between the global tasks at hand. This is quite handy if you e.g. work on several
applications at the same time as is often the case. Tell KDevelop to open the
project you want to work at and you may proceed in the environment just
where you left.
5.1
New Projects
Whenever you want to initiate a new programming project quite a lot of formal
setup procedures need to be done. An initial directory structure has to be set
up, initial header and source files must be provided, the make system has to be
initialized, etc.
KDevelop provides an easy way to initiate a new programming project—the
Application Wizard. You will find the Application Wizard at menu entry Project
→ New Project.
Only a short series of steps is necessary to start a new programming project,
using the Application Wizard:
1. Select the programming language you want to use and the type of the
application you want to build from a set of predefined templates.
105
KDevelop User Manual
2. Supply some general information as application name, directory where
the application shall be built, etc.
3. Decide whether you want to use a version control system, like e.g. CVS,
and supply the necessary data if needed.
4. Set up some templates for initial header and source files (if applicable).
5. Finally tell Application Wizard to set up all initial stuff, directory structure, starting header/source file templates, and management tools, like
e.g. an initial make skeleton, etc.
Voilà—that’s all. Application Wizard will have provided you with a primary
functional set of programming files, where you can readily start working.
Let’s look at all this in more detail now ...
5.1.1
Initial Steps
To create a new project in KDevelop, select New Project from the Project menu.
The Create New Project dialog will pop up showing an initial General page:
106
KDevelop User Manual
Initial dialog to set up a new project
As you see, this dialog is divided into an upper and a lower part. In the upper
part you can decide on the programming language and application type, the
lower part holds some general information.
5.1.1.1
Select Programming Language and Application Type
The left hand side of the upper part in this dialog is where you do the selection
work. When it shows up, you’ll find there a list of folders each labeled with a
programming language, as there are:
• Ada
• C
• C++
107
KDevelop User Manual
• Database (SQL Projects)
• Fortran
• Haskell
• Java
• PHP
• Pascal
• Perl
• Python
• Ruby
• Shell (Scripts for the Bash Shell)
To be precise, these folders do not contain real programming tools actually.
They do lead to pre-defined templates you can use as a starting point for development in that language. To get an idea of what is provided, just open the
folders one after the other. There will be a series of subfolders on some, one or
more simple entries only on others. The subfolders you see organize the available templates according to some tasks, the simple entries name the templates
you may select.
We cannot go into detail here on which tasks each template provides, but it’s
easy to find out. Whenever you select a template entry some information is
displayed in the fields to the right. In the lower field you will find a short
description on what the template is supposed to do. In the field above that a
picture will be shown, if available, about the outcome of the application this
template produces if you compile and run it unmodified. Usually this is a
screenshot of the main window the application will display.
Select the template which best fits your application’s goals as a starting point.
Then enter the general properties information in the lower field as shown in
the next chapter.
Selecting a Project Management System Each template is bound to a specific
Project Management System. Currently there is no direct means to freely select
such a Project Management System. You have to find a template which suits
your needs or alter your project accordingly after creation.
5.1.1.2
Provide General Information
The lower part of the Create New Project dialog General page is a framed field
labeled Properties. You must provide some general information about your
project here so that the Application Wizard knows how to build the initial
structure.
Application Name Your application needs a name of course. Enter this in the
uppermost Properties field, called Application Name. We use ‘MyApp’ as an
example.
108
KDevelop User Manual
When you do so, you will notice that the Application Wizard refuses to accept
special characters of any kind. The only characters accepted are:
• upper and lower case characters
• numbers
• the underline character
One prominent cause of this restriction is that the Application Wizard will use
this application name as the basis of some class names it will construct when it
sets up an initial project. Thus the name of the application must stick to the
rules of the programming language you use.
The Project Directory The other prominent cause of this restriction you can see
at the bottom line of the Properties area. It is labeled Final location and shows
the directory where the Application Wizard will create the application.
As you type the application name you will notice that the Application Wizard
repeats your input at the end of the Final location line, using lower case only
characters.
Thus you must select the name of your new application with care. If you end
up with an already used directory the Application Wizard will not allow you
to continue to the next step, keeping the Next > button deactivated (grayed).
Yet, it will warn you in this case by appending ‘(dir/file already exist)’ to the
Final location line.
The Starting Path There are two ways to select another path for your new
application. One is to select another name. Yet, this is not always feasible (you
might e.g. set up for another version of an already existing application). As an
alternative you may select another path to the application directory.
This is done in the second row input field of the Properties, named Location.
What you enter here is the starting path of the new application development
directory. The Application Wizard appends the application name to this path
when it initializes the new project. The result is shown in the Final location line
to give you better control on what is going on.
Application Wizard will copy an initial value to the Location field on start-up.
This is taken from what you have chosen in the Default projects directory field
during the general configuration steps. In our case we have KDevelop set up
to use /home/devel/projects/ as initial path for new projects.
Alter the Location field contents so that the application development directory
shown in the Final location line will be unique.
N OTE
Take care that the path you enter in the Location field already exists. Otherwise you
will not be able to continue to the next step. The Application Wizard will warn you
about non-existing paths by appending ‘(invalid)’ to the Final location line.
109
KDevelop User Manual
Set new project up for CVS
Personal Information The fields following this are not so critical. Just supply
your name (i.e. the name of the person who is responsible for the application)
in the Author field, and a valid e-mail address in the Email field, so that users
can give you feedback on the application.
N OTE
1. The Application Wizard fills these fields with some default values, taken from
the Email presets in the KDE Control Center. If these defaults in the Create
New Project Author and Email fields do not suit, you may want to have a look
at your mail configuration in the KDE Control Center.
2. The Application Wizard will integrate this information into the starting program
templates if applicable. In KDE C++ programs for instance you will find it near
the beginning of the main.cpp source file.
3. Of all fields, the Email is optional, reflecting the fact that not every developer
may have access to the internet. You may keep this field empty if you wish
and proceed nevertheless.
110
KDevelop User Manual
Version and License Info Finally enter a starting version number for your new
application in the Version field, and select the license under which you want
your application be put from the License tab.
If you select an application type for which the Application Wizard provides
common source template texts (e.g. C/C++), you may view the license notification text on the third page of this Create New Project dialog (see the Supply
header/source templates chapter below).
If you selected ‘Custom’ from the License tab you must provide a license text
on your own.
N OTE
Both version and license information will as well be integrated into the starting templates in a suiting format the application type you selected does provide.
Once you have correctly entered all this information stuff, press the Next >
button to proceed as shown in the following chapters.
5.1.2
Supply Version System Information
In a second step the Application Wizard will lead you to the Version Control
System page where you can decide which version control system you want to
use.
N OTE
This discussion concentrates on the needs for project creation only. For more information on CVS see the Using CVS chapter below.
No Version Control System Wanted Initially there is ‘None’ selected in the
Version control system tab, and the page will be empty otherwise. If you don’t
want to use a version control system, just click the Next > button and go on.
Using CVS Otherwise you must reselect the version control system you want
to use from the Version control system tab. We use ‘CVS’ for our example. If
you select this, the Application Wizard will redisplay the page, now showing
a series of fields you must fill in.
111
KDevelop User Manual
Set new project up for CVS
A version control system such as CVS (which means ‘Concurrent Versions System’) stores copies of selected project files in some sort of a database. If you use
CVS you can amongst others upload (‘commit’) those files or load them back
into your project directory (‘checkout’, or ‘update’). The special thing about
this is that the files in the versioning database are stored in a structured way
which allows you to always revert to an earlier development state if you need
so. And CVS allows multiple designers to fairly easily collaborate on a big
project (such as KDevelop) without disturbing each others work.
CVS Root CVS needs to manage the versioning database it keeps from your
project files. To accomplish this it keeps some special database information in
an own directory, called the CVS root. The first step on setting up CVS for your
new project thus is to tell KDevelop where this root is located.
Local CVS root. There are two basic possibilities. Either you want to use a local
CVS database or you use a database which is held on a remote server. If you
develop for your own, you may want use the CVS database as some sort of
a backup system on your own computer. Usually this is set up in your home
directory root and given the name cvsroot. This may look as follows:
/home/devel/cvsroot (where devel simply denotes the ‘developing’ user, just
for example)
112
KDevelop User Manual
N OTE
In fact, this is a short form. Exactly, the local CVS root should be addressed using
the :local: prefix. The short form is only allowed in cases where the filename
starts with a slash (/). The full name for our example local CVS root would exactly
look like: :local:/home/devel/cvsroot
Enter the name of the CVS root directory your system has been set up for in the
CVS root field. In principle you can select any name, even use multiple CVS
databases, but it is advisable that you stick to the CVS root once set up.
Initialize a new CVS root. If there does not exist a CVS root yet, KDevelop can
command the CVS system to create one for you in the given directory. Just
check the Init root checkbox below the CVS root field.
N OTE
As said, KDevelop only commands the CVS system to initialize a new CVS root. It
does nothing by itself to this directory. Fortunately CVS is clever enough to check
whether the CVS root directory already exists. Hence it does no harm if you should
have inadvertently checked Init root on an already existing CVS root directory.
Remote CVS root. There are occasions where the CVS database is to be kept on
a remote server, especially when several developers work at the same project.
Then you must enter the CVS root URL of this server in the CVS root field. For
example, if you want access to the KDE CVS server:
:pserver:[email protected]:/home/kde (where mylogin denotes the login name set up in your KDE CVS account)
Remote CVS Server Types Basically there are two widely used remote CVS
server types, the pserver which uses a password-secured non-encrypted protocol, and the ext server which uses an rsh or ssh encrypted data transfer. They
are distinguished by the URL prefix they use:
:pserver:
for the ‘password protected server’ non-encrypted type, and
:ext:
for an rsh or ssh encrypted server type. For example
:ext:[email protected]:/cvsroot/cervisia
accesses the CVS root of the widely used Cervisia CVS management tool on
the SourceForge server.
If you want to use an rsh or ssh encrypted server for CVS access you must
tell KDevelop the encryption protocol to be used. Just enter rsh or ssh in the
CVS_RSH field of the Create New Project Version Control System page.
113
KDevelop User Manual
N OTE
There is a caveat if you use an encrypted server for CVS from within KDevelop.
See the Using CVS chapter for details.
The CVS Repository So far you have told KDevelop where the CVS root resides which manages the versioning database and how to access it. Now you
need to tell KDevelop under which name you want CVS save your project files
in that database. Such a place your project files will be held in CVS is called a
repository.
In principle you can use any name for the CVS repository of your project files
as long as it adheres to the specifications of naming a file. Yet, most developers simply use the name of the application itself. CVS will build a directory
with this name in the CVS root, hence it is more easily found if you keep the
application name for it.
Just enter the repository name you want to use in the CVS repository field of
the Create New Project Version Control System page. In our example this is:
MyApp
WARNING
Take care not to use a repository which already exists! The CVS system does not
warn about duplicate files but will shovel everything in which does not produce a
formal conflict. You will mess up everything!
The Remaining Fields There is not much work left to do. Application Wizard
has already set up the remaining fields for you. In detail:
The Vendor field is used for compatibility reasons only. You can stick to the
‘vendor’ default the Application Wizard puts in here.
The Message field allows you to comment the initial CVS contents. Use any
text you like or just stick to the ‘new project’ default the Application Wizard
did put in.
The Release tag holds the name which tags the initial state of your project. Such
a tag names a certain point within the CVS repository by which you can later
access this state of your development. (See more in the Using CVS chapter.)
The Application Wizard has put a default ‘start’ tag in here which is a worthy
proposal. Just stick to it.
114
KDevelop User Manual
N OTE
When any information of all these is wrong KDevelop usually will not know about
until project construction time. It is the CVS system which will figure out those errors
when it tries to build the repository. Hence you must keep an eye to the Messages
window of KDevelop when the project is created in the final setup step. If anything
was in error with CVS you will in most cases see an error message like this:
* cd ’/ home / devel / test ’ && cvs -d ’/ home / devel / mycvsroot ’ ←\
import -m ’new project ’ ’’ ’vendor ’ ’start ’ &&\
sh / opt / kde3 / share / apps / kdevcvs / buildcvs . sh . ’’ \
’/ home / devel / mycvsroot ’
* cvs [ import aborted ]: / home / devel / mycvsroot / CVSROOT : No ←such file or
directory
* *** Exited with status : 1 ***
If this happens you will have to either manually set up CVS (KDevelop should have
successfully initialized your project files at this time) or delete the project directory
and start over again with New Project from the Project menu.
After you have entered all CVS related information, click the Next > to go on.
N OTE
If you want to correct an error on the previous Create New Project page, just press
the < Back button. The Application Wizard will remember your settings on the
current page, so you can easily proceed when you come back.
5.1.3
Supply Header/Source Templates
The next step brings you to a series of pages where you can set up common
information you want to include in your source and header files, if the task at
hand allows.
Both header and source templates are provided for C and C++ applications,
each on its own page. For other languages there may be source templates only.
And in some cases you will even find this template page empty.
If the page is used, Application Wizard will fill in some common header comment which for a C++ based application might look like:
/*************************************************************************** ←*
Copyright (C) 2003 by Your Name
*
you@you . com
←*
←←-
*
115
KDevelop User Manual
*
←←-
*
*
*
*
*
*
This program is free software ; you can redistribute it ←and / or modify *
it under the terms of the GNU General Public License as ←published by *
the Free Software Foundation ; either version 2 of the ←License , or
*
( at your option ) any later version . ←*
←←-
*
*
*
*
*
*
This program is distributed in the hope that it will be ←useful ,
*
but WITHOUT ANY WARRANTY ; without even the implied ←warranty of
*
MERCHANTABILITY or FITNESS FOR A PARTICULAR PURPOSE .
←See the
*
GNU General Public License for more details . ←*
←-
←*
*
You should have received a copy of the GNU General ←Public License
*
*
along with this program ; if not , write to the ←*
*
Free Software Foundation , Inc ., ←*
*
59 Temple Place - Suite 330 , Boston , MA 02111 -1307 , USA ←.
*
***************************************************************************/ ←-
Other templates will provide similar information in a format according to the
definitions of the programming language you want to use.
As you might have noticed, the applications manager did readily fill in some
information you provided on the first General page of the Create New Project
dialog, namely the contents of the Author and Email fields. Also proper license
information will have been inserted according to your selection in the License
tab.
5.1.3.1
How to Edit the Templates
The templates you set up in the Create New Project dialog will later be processed whenever you command KDevelop to set up a new source and/or
116
KDevelop User Manual
header file. The information you provided here will be included at top as a
documentation header, before the code parts begin.
You are not restricted to plain text however. KDevelop knows of several variables which allow you to include actual information in the file. The Application Wizard did in fact use some such variables to insert the Author, Email, and
License informations into the initial template text.
Include Doxygen File Information If, for example, you want the Doxygenbuilt API documentation to display some further information about the
file’s contents in its filenames list, you may include the following lines in
the source file template:
/**
* \ file $MODULE$ . cpp
* \ brief ( put some short descripion here ).
**/
Whenever you create a new source file, KDevelop will replace the $MODULE$ variable by the name body of the newly created file. For example,
if you created a new C++ class named ASimpleTest you will see the following lines in the asimpletest.cpp file:
/**
* \ file asimpletest . cpp
* \ brief ( put some short descripion here ).
**/
You will still have to provide the short description after the ‘\brief’ keyword, but part of the job is automatically done for you.
The License Text File As another example you could include an explicit hint
to the license text you want to use into the template. Use the $LICENSEFILE$ variable for this and add for example this line:
//
See $LICENSEFILE$ for the full license text .
The Application Wizard will replace the $LICENSEFILE$ with the name of
the file where the full license text is to be found, namely:
//
See COPYING for the full license text .
for the GPL license, or
//
See LICENSE . BSD for the full license text .
if you decided to put your application under the BSD license.
Thee are of course more variables KDevelop knows of. See the Editing
the templates section in the Editing tools chapter for what is possible.
117
KDevelop User Manual
N OTE
The templates you define here will come in effect only after the Application Wizard
has created the new project. You will find this information on top of the files you
created yourself in the development process. When creating the initial files the
Application Wizard will use some predefined standard templates. You will have to
manually adapt those initial files to your needs.
5.1.4
Build the Initial Project Files
Almost everything is done now. On the last templates page the Next > button
will have changed to read Finish now.
Think twice before you click on it! You still have the option to revise everything by
repeatedly using the < Back button. As the Application Wizard remembers all
information you did input so far, it may be advisable for you to take the time
and look back once again. In case you use local CVS, do not forget to doublecheck the CVS repository name (there should be no subdirectory with that name
in the CVS root directory already—if it does, try another repository name).
If ever you don’t want the new project be built, abort the Create New Project
dialog by the Cancel button. Otherwise click Finish and watch in the Messages
window how the Application Wizard initiates the project.
If you want to use a versioning system (CVS) there will be two runs actually.
Application Wizard will first build the project directories and files and then call
up the CVS program which restarts the Messages window with its own contents. If any error occurs in either of these runs, the process will stop showing
you an according error message in the window.
N OTE
In many cases when your new project has been set up this way, KDevelop will
automatically load the source file(s) of one or more basically important modules
so you can readily start work. (Which source modules will be displayed—if any at
all—however depends on the template initially selected in the Application Wizard.)
Do not forget to initially check what the Application Wizard has provided. For
example you may want to change the initial heading informations according to
your own templates. Usually you will find these in a templates subdirectory
in your project directory. Some simple copy operations will mostly suffice.
Then it is advisable that you compile the initial project before you attempt to
change any code. In most cases this initial compilation should be possible.
Thus you can make up whether the project really was set up according to your
needs. If it was not, simply remove the project directory (in your local CVS
root as well if you use one) and start over again.
118
KDevelop User Manual
WARNING
Before you compile your new project the first time, have a look at Project → Build
Configuration. If there are three selections displayed: default, optimized, and debug, with debug selected, by all means stick to this, or use optimized instead.
Due to some limitations in the current autoconf/automake setup you should by no
means build in the default configuration. This will corrupt some internal directory
settings, thus making configure complain when you try to use it in the optimized,
or debug build configuration afterwards.
(This applies to these multiselection capabilities only. If the application type you
selected provides a default build configuration only, you should of course use this
one.)
5.2
Configuring Projects
(... to be written ...)
119
KDevelop User Manual
Chapter 6
Editing Tools
6.1
Code Snippets
F EATURES ( PRELIMINARY OVERVIEW )
• SnippetPart adds a tool-view which by default docks to the right
• Adding, editing and removing of snippets is available via a popup-menu
• Double-clicking a snippet form the list inserts it into to the active view at the
current cursor position
• Tool tips show the content of a snippet
• Snippets are stored in the users home-directory, so every user can have his
own snippets
• Snippets can contain variables in the style of $VARNAME$. On using the snippet the user is prompted to enter replacement value for the variables
6.2
Keyboard Mapping
In the following, we will list the default keybindings of the default editor. You
can configure them as you like (how?)
Left
Right
Ctrl- Left
Ctrl- Right
Up
Moves one character left
Moves one character right
Moves one word left
Moves one word right
Moves up one line
120
KDevelop User Manual
Down
Page Up
Page Down
Ctrl- Page Down
Ctrl- Page Down
Home
End
Moves down one line
Moves up one page
Moves down one page
Moves to the beginning of the file
Moves to the end of the file
Moves to the beginning of the line
Moves to the end of the line
For all the keys above, the Shift key can be pressed additionally, to mark from
the current cursor position to the one afterwards.
Backspace
Delete
Ctrl- C
Ctrl- V
Ctrl- X
Ctrl- Z
Shift-Ctrl- Z
6.3
Deletes one character left
Deletes the character under the
cursor
Copies the selected text to the
clipboard
Pastes the selected text from the
clipboard
Deletes the selected text and puts
it into the clipboard
Undo
Redo
The Problem Reporter
(... to be written ...)
6.4
6.4.1
Searching and Grepping
Searching for Text
Ctrl-F- Find Ctrl-R- Replace
6.4.2
ISearch
The conventional search with Edit → Find requires you to specify the full search
term before starting. Most of the time, it is much faster to search incrementally.
121
KDevelop User Manual
If you click into the edit field labeled ISearch in the toolbar, the search is performed as you type. You will find that often the desired term is already found
after typing in 3 or 4 letters.
6.4.3
Grep
Both search mechanisms described above are restricted to searching within one
source file. An additional tool which allows you to search through a (possibly
large) number of files is available through the Search in Files... item in the Edit
menu. It is basically a frontend for the grep(1) program.
In the dialog, you can specify which files are searched. There is a number of
wildcard patterns available in a combobox. In this way, you can easily restrict
the find mechanism to header files. Furthermore, you specify a directory where
the search is started. If you check the Recursive box, the search iterates through
all directories in the hierarchy below this one.
The search term is in general a regular expression following POSIX syntax. For
example, you can use the term "\<K.*" if you want to find all words which
begin with the letter K. The following characters are interpreted in a special
way:
.
ˆ
$
\<
\>
?
*
+
{n}
{n,}
{,n}
{n,m}
Matches any character
Matches the beginning of a line
Matches the end of a line
Matches the beginning of a word
Matches the end of a word
The preceding item matches less
than once
The preceding item is matched
zero or more times
The preceding item is matched
once or more times
The preceding item is matched
exactly n times
The preceding item is matched n
or more times
The preceding item matches less
than n times
The preceding item matches at
least n times but less than m times
Backreferences to bracketed subexpressions are also available by the notation
\n.
122
KDevelop User Manual
For C++ programmers, as special bonus there are some search templates available for typical patterns. These allow you to search for example all calls of
member functions of a certain object.
Once you start the search by clicking on the Search button, it will be performed
by an external, asynchronous process. All found items will appear in the view
called Grep. You can then jump to the found items by clicking on them. Note
that grep scans the files as they stored in the file system. If you have modified versions of them in your editor, you may get some mismatches in the line
number, or some found items will be invalid. You can avoid this by saving all
files beforehand.
6.5
Code Completion
(... to be written ...)
6.6
Creating New Files and Classes
(... to be written ...)
6.6.1
Editing the Templates
(... to be written ...)
123
KDevelop User Manual
Chapter 7
The File Browsers
On the left side of the main window, KDevelop can display various kinds of
lists and trees for the selection of files:
File Tree This shows a tree view of the file hierarchy below the project directory. If you click on a file, it is loaded into the editor. For files which
do not contain text, KDevelop starts an application that can handle the
respective MIME type.
The file tree is regularly updated whenever something changes in the file
system. For example, if you create new files or directories (even outside
R this
KDevelop), this is immediately reflected in the file list. On Linux,
feature makes use of the FAM library. On other operating systems or over
NFS, the directories shown are polled in small intervals.
The file tree hides files which are usually not interesting, like object files.
In the Project options under File views, you can configure (as a comma
separated list of wildcards) which patterns are used to filter out irrelevant
files.
Furthermore, you can decide to restrict the file tree to show only files
which belong to the currently loaded project. This can be toggled by
clicking with the right mouse button on the root item of the tree.
File Groups This shows the files belonging to the project, grouped by their
file name extension. As in the file tree, you can edit a file by clicking on it
with the left mouse button.
The groups shown in this view can be configured under File views in
the Project options dialog. In order to customize the view to your needs,
it is helpful to understand how files are distributed on the groups. For
each file, KDevelop goes through all groups from top to bottom. In each
group, it looks whether the file name matches one of the patterns. If there
is a match, the file is shown in this group and the iteration is aborted.
This makes it clear that more general patterns should be put below more
specific ones. For example, an asterisk for the Other group should be the
last pattern.
124
KDevelop User Manual
125 of the File Tree
Figure 7.1: A Screenshot
KDevelop User Manual
Chapter 8
The Class Browsers
When working on a project in an object-oriented language, your emphasis
when working on a project is not on the source files and their names, but on
the classes and their relationships. In order to help you navigating in the space
of defined classes and symbols, KDevelop includes various class browsers that
visualize the class structure in different ways.
8.1
Class View
This view is shown on the left side of the main window and contains a linear
list of all classes, variables and functions in your project. It is designed as a
tree view. If you open a class node by clicking on it, a list with all methods and
attributes of the respective class is shown.
The class view works in two different modes. By default, all symbols are
grouped into ‘Classes’, ‘Structs’, ‘Functions’, ‘Variables’ and ‘Namespaces’. In
the context menu of the view, you can choose List by Namespaces. In this
mode, the namespace hierarchy is shown and the symbols grouped into the
respective namespace where they are defined. This may be more useful in
projects which make heavy use of (nested) namespaces. It is less useful in
projects without namespaces.
You can also change the way in which class names are displayed. Normally, the
names of the classes are shown, without the namespace in which they are defined. This means, you cannot immediately distinguish classes with the same
name in different namespaces. If you rest for a while with the mouse over an
item, the full scoped name is shown as a tooltip though. You can decide to
always display the fully scoped class name by choosing Full Identifier scopes
from the context menu.
Clicking on a class or method in the class view brings you to its definition. You
can also jump to the declaration of a method by choosing Go to declaration
from the context menu. In the context menu for classes are also the items Add
method... and Add attribute.... This opens dialogs where you can generate
126
KDevelop User Manual
127 of the Class View
Figure 8.1: A Screenshot
KDevelop User Manual
new method and variable declaration in the respective class, together with an
empty implementation.
8.2
Class Tools
The class tool dialog is activated by right clicking on a class in the class view
and choosing Class tool....
8.3
Class Hierarchy
(... to be written ...)
128
KDevelop User Manual
Chapter 9
Documentation
Documention unfortunately belongs to the most-overlooked programming issues. Yet, once properly set up and maintained internal and external documentation provides most valuable help.
Documentation has multiple facets. There is
• project internal documentation, mainly consisting of
– comments in header/source files
– internal API documentation of your project generated from the program file
by special tools, e.g. Doxygen
• project external documentation, comprising among others
– external API documentation of e.g. common system libraries (KDE, QtTM ,
etc.)
– any other documentation (programming language manuals, general system information, how-to articles and the like)
All this documentation should be easily maintainable and ready at hand whenever you need it. KDevelop has provisions for just this.
9.1
The Documentation Browser
129
KDevelop User Manual
Figure 9.1: A Screenshot130
of the Documentation Tree
KDevelop User Manual
Chapter 10
Building and Project
Management
Bernd Pol and Ian Wadham This chapter deals only with compiled projects,
such as C++, JavaTM or Fortran projects. Projects for scripting languages like
Python and PHP work very differently.
You will find here information on:
• Summary of Automake Manager containing an initial overall view of Automake Manager,
• Automake Manager Operation describing the basics of how to work with
Automake Manager,
10.1
Summary of Automake Manager
In the Build systems chapter we have given a rough overview of the build
R systems. In the following sections we
systems commonly in use on UNIX
will look at this in more detail.
There is some confusion about how to name such things. GNU calls them
‘build systems’ when it describes Automake, Autoconf and Libtool. QMake
calls itself ‘a tool to write Makefiles for different compilers and platforms’. In
KDE often the term ‘project management systems’ is used. We will use this
term in a broader sense to describe the built-in environments in KDevelop
which are used to organize and build your projects. In the context of this section, however, we will mostly talk about ‘automated build systems’.
131
KDevelop User Manual
10.1.1
The Need for an Automated Build System
If you have a simple ‘Hello World’ program, written in C, you can compile and
link it using gcc -o hello hello.c and execute it using the command ./hello,
so you do not even need a Makefile.
If you have a C application with several modules and header files and you are
only going to run it on your own machine (i.e. it is an in-house application),
you will only need a simple Makefile, which is fairly easy to write by hand
(use info make to find out more).
The complications begin when:
• Your source-code, documentation, graphics, sounds, translations, data files,
etc. are located in more than one directory,
• You have a hierarchy of directories and sub-directories,
R set, such
• You are using libraries that are not part of the traditional UNIX
as the QtTM Object Library or the KDE Desktop libraries,
• You are using a pre-processor to generate some of your source-code, such as
Qt’s MOC pre-compiler,
• You aim to distribute your application worldwide, to people who may not
R
R system, software and hardware as you,
have the same UNIX/Linux
• You require an automated Install and Uninstall facility,
• You aim to make your application part of the KDE Desktop set.
If you have some or all of the above situations, you probably need a build system. In the example above we used gcc to compile and build the ‘Hello World’
program, but not all C compilers are called ‘gcc’. So if you distribute your application to someone who is using some other C compiler, your Makefile must
somehow use the name of that person’s compiler, otherwise your application
will fail to compile—and that is just simple example of what can go wrong.
A build system will iron out these differences for you.
• It will check that the libraries you need are present on each receiving machine,
• will automatically scan all your application directories for files to pre-process,
compile or install and
• will install the components of your application in the correct receiving directories, making sure that
• the directories are created in the receiving machine as required.
132
KDevelop User Manual
In brief, a build system offers safe and secure methods for your application to
be compiled and installed correctly on any receiving machine. As we have
shown before in the Project Management Systems survey, KDevelop offers
three automated build systems and the option of creating your own Makefile,
in short (click on the project names to get more information):
• Automake projects which use the GNU standard development tools.
• QMake projects which use the trolltech QMake project manager.
• ANT projects which use the Apache ANT project manager for JavaTM development.
• Custom projects which require you to maintain your own Makefiles.
I MPORTANT
One of these four alternatives must be chosen when you create a project and the
choice is difficult to change later, so you should give it some thought before you
start.
10.1.2
Tutorials on Autoconf/Automake/Libtool
There are several tutorials available on the GNU Build System (Autoconf, Automake and Libtool) of which the Automake Manager makes use.
• A short autoconf tutorial written by Christopher W. Curtis available on the
KDevelop home page. It concentrates on some basic steps to modify a Makefile.
• A more detailed tutorial can be found in a greater set of tutorials on Developing software with GNU.
• And there is the famous Goat Book, titled ‘Autoconf, Automake, and Libtool’.
This is an easily readable, yet concise, introduction in all main aspects of the
GNU Autotools.
10.1.3
What does Automake Manager Do?
The Application Wizard will have set up some initial Makefile.am files when
you created a New Project of a type that uses the GNU Build System, such as
C++ → KDE → Application framework. During development Automake Manager creates any other Makefile.am files for projects that use the GNU Build
System and maintains them all, Application Wizard and Automake Manager
created alike.
There will be one Makefile.am file in each directory of your project that contains files to be compiled or installed. It will contain your specifications for
133
KDevelop User Manual
compiling, building and installing files and a reference to any subdirectories
that also have a Makefile.am file and possibly some files to compile, build and
install.
N OTE
Your project’s directories and source files may be structured to any depth, or you
may prefer a flat project-structure with all subdirectories at the top level.
The aim of the GNU Build System is to produce source-code file structures
R or Linux
R system by
that can be compiled, built and installed on any UNIX
using the simple commands:
./ configure
make
make install
# Usually as " root ".
and can be uninstalled by the command make uninstall (usually as root).
How does this work? Well configure is a script that
• works out the details of whatever system it is in, such as what compiler and
libraries to use and where they are located, and then
• creates recursive Makefile files by filling in the substitutions in the corresponding Makefile.in files.
The Makefile.in are ‘input’ files—templates which provide basic information
for the Makefiles to be produced from them by filling in some system dependent information. They are generated by the Automake utility from the Makefile.am files.
The process of going from Makefile.am (.am denotes ‘Automake’ template
files) to Makefile files is handled automatically by the KDevelop Project Manager, using the Autoconf utility, M4 macros and other arcana we need not go
into here.
So when make runs, it automatically picks up the correct pieces from the current environment, such as compilers and libraries. Similarly, make install puts
your application components, such as executables, documentation and data
files in the correct places for that environment.
If you distribute your application as a ‘tarball’ (a single compressed file that
KDevelop can create for you), it will include the Makefile.in files and the configure script file, so the recipient can compile, build and install your application without having Automake, Autoconf or KDevelop on their machine. The
Makefile.am files are also included, just in case the receiver needs to do any
source-code modifications.
N OTE
The rules are rather different if you distribute via a web-based source-code repository such as KDE CVS.
134
KDevelop User Manual
10.1.4
Summary of What Automake Manager Does
• Generates Makefile.am files in subdirectories it knows as ‘subprojects’.
• Updates Makefile.am files as the project structure changes.
• Updates Makefile.am files as files are added to or removed from the project.
• Accepts definitions of how the various files are to be built or installed and
modifies the Makefile.am accordingly.
• Accepts parameters used in building or installing (e.g. library names) and
ensures that they are used in the required compilation and build steps.
10.1.5
Contents of Automake Files
A Makefile.am file has lines containing variable-names followed by an equals
sign and a list of files or parameter values. The ‘variables’ have two-part
names, such as bin_PROGRAMS, myapp_SOURCES or kdelnk_DATA. The second part
is called the primary and represents something from which to build or install.
The first part is called the prefix and represents:
• A directory in which to do installation (e.g. bin),
• A qualifier for the primary (e.g. myapp for SOURCES, indicating that the source
files listed after myapp_SOURCES go into building myapp),
• A special prefix noinst (short for ‘no installation’), usually used to list program header files (.h),
• Or the special prefix EXTRA, for configuration-dependent stuff.
For more information on Automake and Makefile.am files, look up info Automake.
Basically, Automake Manager creates and updates the variable-names and lists
of files or parameters. See the following example of a Makefile.am for a typical
application, called myapp.
## Makefile . am for myapp
# this is the program that gets installed .
for all
# of the other Makefile . am variables
bin_PROGRAMS = myapp
it ’s name is used ←-
# set the include path for X , qt and KDE
INCLUDES = $( all_includes )
# the library search path .
myapp_LDFLAGS = $( KDE_RPATH ) $( all_libraries )
135
KDevelop User Manual
# the libraries to link against .
myapp_LDADD
= $( LIB_KFILE ) $( LIB_KDEPRINT )
# which sources should be compiled for myapp
myapp_SOURCES = main . cpp myapp . cpp myappview . cpp
# these are the headers for your project
noinst_HEADERS = myapp .h myappview .h
# let automoc handle all of the meta source files ( moc )
METASOURCES = AUTO
KDE_ICON = myapp
# this is where the kdelnk file will go
kdelnkdir = $( kde_appsdir )/ Utilities
kdelnk_DATA = myapp . desktop
# this is where the XML - GUI resource file goes
rcdir = $( kde_datadir )/ myapp
rc_DATA = myappui . rc
AM_CXXFLAGS = - DMY_C ++ _PREPROCESSOR_OPTION
As you can see, many of the items on the right hand side are symbols of the
form $(xxx). These are environment variables which are defined in the actual
KDE environment and are substituted with real values when ./configure generates the final Makefile files in the receiving machine.
Also, sometime after you have started with KDevelop, it is a good idea to run
the command ./configure --help, which will show you the range of things you
can change at build and installation time, such as for a test environment. In
particular, the command:
./ configure -- prefix =/ where / you / wish
will re-direct the entire installation to a directory structure of your choice, by
changing the internal variable $(prefix) to value /where/you/wish.
10.2
Automake Manager Operation
In this chapter you will find a basic description of the Automake Manager elements and how to use them. This covers:
• The Automake Manager Window describes the basic structure of the Automake Manager main window.
• The Overall View Window describes the elements of the upper subwindow.
136
KDevelop User Manual
• The Detail View Window describes the elements of the lower subwindow.
• Navigating in the Automake Manager lists some basic operations you can
perform in the Automake Manager.
• Popup Menus in the Automake Manager describes the windows which will
pop up when you select an action in the Automake Manager.
10.2.1
The Automake Manager Window
137
KDevelop User Manual
• Automake Manager runs in a
split window. The top part is
called the Overall View and the
bottom part is called the Detail
View. Between them is a narrow
bar that can be dragged with the
mouse to adjust the sizes of the
views. In IDEAl mode you can
also drag the side of the split
window to change the width.
• On top of each view there is a
toolbar, the buttons in which will
become activated when an
element in this view is selected.
This provides one way you can
access the actions provided for
that view element. The other are
context menus which pop up on
right mouse button click as will
be discussed below.
• In IDEAl mode there are two
additional small buttons in the
Automake Manager window
titlebar left hand side – a
triangular shaped right arrow,
and a dot button. The arrow
button is used to close the
window. The dot button on the
other hand will keep the window
open even if another KDevelop
window has been selected.
(Otherwise the Automake
Manager window will
automatically close whenever
another window gets the input
focus.)
138
KDevelop User Manual
10.2.2
The Overall View Window
The overall view window contains a tree-list of all the directories in your project
that contain program files, documentation or data. Each such directory contains a Makefile.am file and is known in Automake Manager as a subproject.
There are three typical subprojects in a KDE-based project as shown in the
above illustration:
• src – source-code files for your application,
• doc – your user manual or Handbook,
• po – extracts of strings in your source-code files that require translation into
other human languages (e.g. window titles, menu names, button labels, dialog box text and messages of various kinds).
Note that the doc subproject always has an en subproject, which you can see
if you click on the + symbol next to the word doc. That is because the base
language of all documentation in KDE is United States English (en). If your application becomes part of KDE, the KDE translation teams may translate your
documentation from United States English into other languages and the translations will go into other subprojects, such as de (German) or fr (French). The
strings in the po subproject may also be translated and stored in other files in
po, thus allowing your application to be operated by people who do not know
English.
N OTE
The doc and po subprojects serve different purposes. doc contains documentation
like a user manual, po contains translatable text strings of the user interface which
is integrated in the source code of this application.
The overall view window serves—amongst other things—as a navigation tool.
If you select a subproject in the overall view window, the corresponding details
will be shown in the detail view window.
10.2.3
The Detail View Window
The detail view contains a tree-list of all the files in the subproject currently
selected in the overall view as well as the compilation, build and installation
rules for this subproject. Thus the two views together can give you access to all
the components of your application and all the information on how to compile,
build and install it.
139
KDevelop User Manual
10.2.3.1
Targets
The tree-list in the detail view has two levels. The top level consists of so-called
Automake Manager targets and the next level contains lists of files that go to
make up each target.
This concept of an Automake Manager target differs somewhat from what a
Makefile target usually is. In short:
• The definition of how a set of files is to be compiled, built or installed is
known as a target in Automake Manager, but as a variable in Automake itself.
• A target in make is often something quite different, being the parameter of a
make command (e.g. make install, make clean).
However some Makefile.am variables do represent an underlying sub-target
in make.
10.2.4
Navigating in the Automake Manager
In both the overall and the detail view you can left-click on the + or - next to
a subproject or target name to expand or contract the tree view. If you do that
with a subproject in the overall view, it shows or hides the subprojects at the
next level down (if any). If you do it with a target in the detail view, it shows or
hides the list of files that go into that target.
Opening a file for Edit If you left mouse button click on a file name in the detail
view, the corresponding file opens up in KDevelop’s editing window.
Activating the Automake Manager Toolbar Buttons If you left mouse button
click on the name of a subproject in the overall view or target in the detail
view, the name is highlighted and some toolbar buttons become active in
the top part of that view.
N OTE
It is recommended that you use the right mouse-button and popup menus,
rather than the toolbar buttons, because it is then much easier to see and
understand what you are doing.
Operations on subprojects and targets have far-reaching effects on the structure, compilation, building and installation of your application.
Selecting Actions/Popup Menus If you right mouse button click on the name
of a subproject, target or file, a menu pops up and you can then select
actions to perform on the subproject, target or file, such as add a target to
the subproject, add a file to a target or logically remove the selected file
from its target.
140
KDevelop User Manual
10.2.5
Popup Menus in the Automake Manager
The following sections explain in short terms which operations the menus
make available which will pop up on right mouse button clicks in the Automake Manager window. They are meant for overall view only. You will find
detailed descriptions of most operations in a later chapter.
10.2.5.1
The Popup Menu for a File
When you right mouse button click on a file name in the detail view the following menu will pop up allowing you to select one of several operations to
be performed on that file. In the illustration below the hi-16app-myapp.png icon file was selected from the Icon data in myapp target of the myapp/src
subproject.
141
KDevelop User Manual
• The main popup-menu item for
a file is to Remove the file from
its target (i.e. it will no longer be
used to compile, build or install
that target).
• The CVS item offers a variety of
CVS operations on the file.
• The Open With item allows you
to open the file with a variety of
editors or with any application
at all (e.g. you can open the icon
file in our example with KIcon).
• The Perforce item is used for
similar operations as in CVS
using the commercial ‘Perforce’
version control system.
10.2.5.2
The Popup Menu for a Target
When you right-click on a target in the detail view the following menu will
pop up allowing you to select one of several operations to be performed on it.
In the illustration below the myapp (Program in bin) target of the myapp/src
subproject was selected.
142
KDevelop User Manual
• The Options item for a target
only applies to source code files.
In the corresponding dialog box
you can specify linker flags and
paths on which to locate
libraries and you can give a list
of actual libraries to be linked in
to your application.
• The Create New File item brings
up a dialog in which you can set
the file name and the type of file
to be generated (from a
drop-down list).
• The Add Existing Files item
brings up a dialog box in which
you can add an already existing
file to this target.
• The Remove item for a target
allows you to logically remove
the target and all its files from
the project structure.
• The Make Target Active item
only applies to targets
containing source code files.
New files will always be added
to such an active target.
• The Build Target item calls all
necessary compile and make
operations to build the code for
this target only.
10.2.5.3
The Popup Menu for a Subproject
When you right mouse button click on a subproject in the overall view window
the following menu will pop up which allows you to make major changes to
the structure of your project and the way it is compiled, built and installed. You
can use it to expand or modify the basic project structure that the Application
Wizard has created.
143
KDevelop User Manual
• The Options item for a
subproject controls the way that
the subproject will be compiled,
built and installed. The dialog
box that pops up has tabs for
Compiler, Includes, Prefixes and
Build Order.
• The Add Subproject item creates
a new directory and skeleton
Makefile.am file.
• The Add Target item pops up a
dialog in which you can set the
rules for compiling, building or
installing a group of files within
your subproject.
• Add Service (... to be written ...)
• Add Application (... to be
written ...)
• Add Existing Subprojects (... to
be written ...)
• The Remove Subproject item in
the popup menu for a
subproject is the proper way to
remove a subproject. It will
adjust the Makefile.am files
accordingly. You will also be
offered the option to delete all
the files (or links) in the
corresponding subdirectory.
Obviously, this feature should
be used with caution.
• The Build item calls all
necessary compile and make
operations to build the code for
this subproject only.
• Force Reedit (... to be written ...)
• Clean (... to be written ...)
• Install (... to be written ...)
• Install (as root user) (... to be
144 written ...)
KDevelop User Manual
10.3
Automake Projects
(... to be written ...)
10.3.1
Autoconf
Makefile.in into Makefile
prefix = @prefix@
INSTALL = @INSTALL@
build_triplet = @build@
CXX = @CXX@
prefix = / home / bernd / kde3
INSTALL = / usr / bin / ginstall -c -p
build_triplet = i686 -pc - linux - gnu
CXX = g ++
config.h.in into config.h
/* Define if you have libz */
# undef HAVE_LIBZ
/* The size of a ‘int ’, as computed by sizeof . */
# undef SIZEOF_INT
/* Define if you have libz */
# define HAVE_LIBZ 1
/* The size of a ‘int ’, as computed by sizeof . */
# define SIZEOF_INT 4
10.3.2
Automake
(... to be written ...)
10.3.3
KDevelop’s Automake Manager
10.3.4
Building and Installing Libraries
• -rpath
• PIC
• static
• plugins: no-undefined
145
KDevelop User Manual
Figure 10.1: A screenshot of the automake manager
146
KDevelop User Manual
10.4
Custom Makefiles and Build Scripts
(... to be written ...)
10.5
Compiler Options
(... to be written ...)
10.6
Make Options
(... to be written ...)
147
KDevelop User Manual
Chapter 11
Advanced Build Management
11.1
Multiple Build Configurations
(... to be written ...)
11.2
Cross-Compiling
When you have suitable cross compilers available, you can cross compile your
programs for processors and operating systems different from the system where
KDevelop and the compiler is running. The GNU compiler collection gcc can
be configured and compiled as a cross compiler if you compile it yourself. ConR distributions also
sult the GCC info pages for more information. Some Linux
provide binary packages.
An automake based package can easily be cross-compiled by specifying the --host option to the configure script and setting the CC and CXX environment
variables to the respective cross compiler binaries. Often you want to switch
between a the cross-compiled version of your application and one compiled
for your development system. For this, it is advantageous to use KDevelop
capability of creating multiple build configurations, as explained in Section
11.1. Once you have created a new build configuration for cross-compiling in
the Project → Project Options... dialog, add the option
-- host = platform
to the configure options. The platform name is a tuple of the form
cpu - vendor - os
or
148
KDevelop User Manual
cpu - vendor - kernel - os
For many combinations, you can use a short form, for instance i386-linux or
arm-elf.
11.3
Qt/Embedded
Qt/embedded is a version of the QtTM library that does not use the X winR systems. It is
dow system, but draws directly to the framebuffer on Linux
therefore interesting for embedded systems which have tight restrictions on
the memory usage of the whole system. Its API is fully compatible with the
one of the X11 version.
Developing an application for Qt/embedded with KDevelop is not very different from developing a program for the X11 version of QtTM . In fact, you can use
the same codebase for both versions. If you use the autoproject project management, you switch to the embedded version by passing the argument --enable-embedded to the configure script. You can set this in the Project → Project
Options... dialog under Configure Options. With the option --with-qt-dir=DIR you set the directory in which Qt/embedded is installed.
After configuring and compiling your application with these options, it will
link with the libqpe.so library. This version of your application will not normally run when you use X11. In order to test it, run it under the control of the
program qvfb (QtTM Virtual Frame Buffer). This is done by starting qvfb and
then starting your application with
app -qws - display QVFb :0
Naturally, when you have a working version of your application, you will want
to use it on the target processor. For this, it will probably be convenient to create multiple build configurations, as explained above, so that you can quickly
switch between the version running on your development system and the version running on the target system.
Applications for Qt/embedded normally run as single applications on the device they are designed for. Trolltech also supports Qtopia, which is a collection
of applications for PIM, web browsing and various other areas that work together in a consistent manner. It is the standard environment for instance on
the Sharp Zaurus. You can write applications that integrate into this environment by using the Qtopia SDK. This implies making your application class a
subclass of QPEApplication and linking to the library libqpe.so. If you develop your application with the autoproject project management, you have to
add --enable-qtopia to the configure options.
149
KDevelop User Manual
Chapter 12
The Debugger Interface
For C and C++, KDevelop contains an internal debugger that is directly integrated with the editor. Technically, it is implemented as a frontend that uses
the portable GNU debugger gdb through a pipe. The debugger can be started
in several ways:
• With Debug → Start, the main program of your project is loaded into the
debugger.
• Using Debug → Start (other) → Examine core file you load a core file into
memory, which is generated by the operating system kernel when the program has crashed (The generation of core files may be switched off on your
system, see ulimit(1)). This is useful for a post-mortem analysis of a program.
• With Debug → Start (other) → Attach to process you invoke the debugger on
an already running program. You will be shown a process list where you can
select the process which the debugger should take over.
• Note that debugging is only possible if your project has been compiled with
debugging information enabled. It can be activated in the Compiler options
dialog. When this option is switched on, the compiler generates additional
data which allows the debugger to associate file names and line numbers
with addresses in the executable.
The debugger frontend offers several views ‘into’ the process:
If you try to debug a project without debugging information, you get the message No source... in the status bar.If you try to set a breakpoint, it is shown
as Pending (add) in the breakpoint window (see below).
Variables This window lists the values of all local variables at the current execution point of the program. It covers the variables in the complete call
stack, i.e. the function where the process was interrupted, the function
that called this function, and so on up to main() function.
150
KDevelop User Manual
Another branch in the variables contains watch variables. You can configure yourself which variables are shown here. Both local and global
variables can be watched. You can add variables either by clicking on the
Add button or pressing Return while the Watch item is selected. They
can be removed again via the context menu.
Frame Stack (... to be written ...)
Breakpoints This window allows you to see and manipulate the breakpoints.
Remember that KDevelop uses GDB, so to fully understand the KDevelop debugging features, you should know a little bit about the GDB.
If you want to look at the source code, breakpoints are defined in kdevelop/languages/cpp/debugger/breakpoint.h.
At the left edge, the window has buttons to:
•
•
•
•
Add an empty breakpoint
Edit the selected breakpoint
Delete the selected breakpoint
Remove all breakpoints
The main part of the window is a table with 7 columns. Each line in the
table is a breakpoint. The columns are:
1. Selection checkbox
2. Type: one of: Invalid, File:Line, Watchpoint, Address, Function
3. Status. Values are:
• Active
• Disabled: Each breakpoint may be ‘enabled’ or ‘disabled’; if disabled, it has no effect on your program until you enable it again.
• Pending (add): a breakpoint is marked like this if no debugging
information is available. From GDB Info page:
If a specified breakpoint location cannot be found, it may
be due to the fact that the location is in a shared library
that is yet to be loaded. In such a case, you may want GDB
to create a special breakpoint (known as a ‘pending breakpoint’) that attempts to resolve itself in the future when an
appropriate shared library gets loaded.
4. Pending (clear)
5. Pending (modify)
6. Location in the format filename:linenumber
7. Condition
8. Ignore Count: If this is a number COUNT greater than zero, the next COUNT times the breakpoint is reached, your program’s execution does
not stop; other than to decrement the ignore count, gdb takes no
action.
9. Hits: counts how many times a breakopint has been hit.
Disassemble (... to be written ...)
151
KDevelop User Manual
12.1
Setting Breakpoints
(... to be written ...)
12.2
Options
Display Mangled Names In C++, function names in the executable are ‘mangled’, i.e. the function names include information about the argument
types. This is necessary in order to support overloading of functions.
The mangling algorithm is not standardized and differs even between
different versions of the GNU C++ compiler.
In the disassembling window, normally unmangled names are displayed,
so function signatures appear in the similar way as in the source code, so
they are easily readable. Alternatively, you can decide to see mangled
names.
Try Setting Breakpoints on Lib Load The debugger backend gdb does not allow to set breakpoints within code that is not currently loaded. In a
highly modular application, where often code is only loaded on demand
as a plugin (using the libc function dlopen(3)), this can be inconvenient.
Therefore, KDevelop rolls its own support for breakpoints in shared libraries. If you set this option, it allows you to set breakpoints in libraries which are not loaded. Then, whenever gdb notifies that a library
is loaded, KDevelop tries to set the pending breakpoints.
Enable Floating Toolbar (... to be written ...)
152
KDevelop User Manual
Chapter 13
Using CVS
13.1
CVS Basics
CVS is the revision control system which many open source projects - including
KDE — are using. It stores all sources codes in a central place, called the repository. From the repository, developers can check out a current version of the
project or snapshots of it at arbitrary points of time. In contrast to some other
revision control systems, it is not necessary to lock files one wants to work on.
So development can be highly parallelized.
Whenever a developer has finished a task, he commits his code (accompanied
by a log message). CVS takes the job to merge the changes made by several
developers. It can of course happen that developers work on the same piece of
code, resulting in a conflicting set of changes (in practice this occurs seldom,
and is often a sign of a lack of communication). In this case CVS rejects a
commit; only after all conflicts are resolved, a file can be committed.
So far, this has been a description of the basic features of CVS one usually has to
cope with. But CVS can provide a lot more: One can maintain several branches
of a project (e.g. KDE 1.1.2 and KDE 2 were branches in KDE’s development
tree), merge changes from one branch to another, ask for differences between
revisions, the revision history of files etc.
CVS is implemented as a client-server system. As a user, all communication
with the repository goes through the command line program CVS. A higher
level user interface is available through frontends like Cervisia (http://cervisia.
sf.net) or TkCVS (http://tkcvs.sf.net). In KDevelop, only a small part of
the CVS functionality which is important for your daily work can be used directly.
Basic knowledge of CVS usage is assumed. In particular, you should know
how to checkout a given project from the repository. We recommend the book
‘Open Source Development With CVS’ by Karl Fogel which is freely distributed
(except for the non-technical chapters). See http://cvsbook.red-bean.com/
cvsbook.html.
153
KDevelop User Manual
13.2
CVS Commands in KDevelop
In the file views, the following context menu items are available:
Add to Repository Prepares the marked file for addition to the repository. The
file is transferred to the repository when you commit it (or the containing
directory) the next time.
Remove from Repository Prepares a file for removal from the repository. This
also deletes the file on the local file system, so use this feature with care!
Update Runs cvs update to merge any changes from other users into your
working directory. When you use this menu item over a directory, the
update normally happens recursively, except if you have disabled this in
the configuration file .cvsrc.
Commit Runs cvs commit to upload any locally made changes to the repository. Note that you should update before doing this. Otherwise, when
another user has committed his own changes before, CVS may give you
an error message.
All these commands are invoked as subprocesses by KDevelop without any
further command line options or environment variables. This may be a problem when the connection with the CVS server goes through a ssh connection
and requires that you enter your password each time you commit or update.
This is for instance necessary when your project is hosted on sourceforge.net.
Workarounds for this problem are described on the CVS/SSH FAQ which you
can find in the SourceForge documentation.
13.3
Behind the Scenes
13.3.1
What CVS Records in the Working Directory
(... to be written ...)
154
KDevelop User Manual
Chapter 14
Credits
14.1
Contributions
• The initial contents of this manual were witten by Bernd Gehrmann [email protected]
and Caleb Tennis [email protected].
• The Summary of Automake Manager and Automake Manager Operation
chapters were written by Ian Wadham, [email protected]).
155
KDevelop User Manual
Appendix A
Installing KDevelop
In this chapter we will discuss the steps necessary to compile and install the
KDevelop IDE:
• How to obtain KDevelop mainly concentrates on downloading the most recent KDevelop sources from svn.
• KDevelop requirements lists the programs and libraries which you need installed to successfully compile the IDE.
• KDevelop compilation and installation leads you through all the steps of
compilation and installation of the application.
• How to obtain a KDevelop API documentation tells what an API is and how
you get such a useful tool for navigating the KDevelop sources.
A.1
How to Obtain KDevelop
R distribuKDevelop is available in binary form from many different Linux
tions such as SuSE, RedHat and others. These binaries are packed in some
convenient format, mostly RPM, for easy installation. To install, follow the
standard instructions given in your distribution.
You may as well obtain the KDevelop sources, compile and install them by
yourself. These sources can be found via the project home page at http://www.kdevelop.org
or via the KDE ftp site.
A.1.1
Get Daily KDevelop Snapshots from svn
If you want to be in front of current development, anonymous svn repository
snapshots are available.
156
KDevelop User Manual
The module name is kdevelop at svn co svn://anonsvn.kde.org/home/kde/branches/KDE/3.5/kdevelop.
A.1.1.1
Initial svn Checkout
To obtain an initial version of KDevelop you must download it from anonymous svn. For this so-called checkout operation follow these steps.
N OTE
We assume you want to put your KDevelop copy into the kde3src subdirectory of
your home directory ( ).
# Create the destination directory, if necessary:
> mkdir kde3src
> cd kde3src
/kde3src> svn co svn://anonsvn.kde.org/home/kde/branches/KDE/3.5/kdevelop
/kde3src> cd kdevelop
N OTE
Once you have successfully checked out your KDevelop version, you may keep up
with the changes using the update procedure shown in the next section.
I MPORTANT
Keep the server load low. Please do not checkout every time you want to keep your
KDevelop up to date! Use svn update for this purpose.
Now you may compile your KDevelop version as shown in the KDevelop
Compilation and Installation section.
A.1.1.2
Keeping Your svn Copy up to Date
After you checked out (and successfully compiled) KDevelop from svn as shown
above, you’ll want to keep it up to date in order to get all the patches. Follow
these steps. (We again assume you have put your KDevelop copy into the kde3src directory.)
Note the up (= update) command instead of the co (which stands for checkout).
> cd kde3src
/kde3src> cd kdevelop
/kde3src> svn up
157
KDevelop User Manual
N OTE
Keep an eye on the messages svn produces during the update sequence. The
exact steps in the compilation sequence depend on this.
Now you can compile a new KDevelop version as shown in the Special svn
compilation considerations chapter.
A.2
KDevelop Requirements
In order to successfully compile and use KDevelop, you need the following
programs and libraries. They are available on most platforms as distribution
packages and thereby can be installed easily.
R EQUIRED :
• gcc/g++ ≥ 2.95.3 (or compatible)
Available from gcc.gnu.org
• GNU make (or compatible)
Available from www.gnu.org/software/make
• Perl 5.004 (or higher)
Available from www.perl.com
• autoconf ≥ 2.52 (or higher)
Available from www.gnu.org/software/autoconf
• automake ≥ 1.6 (or higher)
Available from www.gnu.org/software/automake
• flex 2.5.4 (or higher)
Available from www.gnu.org/software/flex
• QtTM ≥ 3.3.0 (or higher)
Available from www.trolltech.com/products/qt
• KDE ≥ 3.4.0 (or higher)
Available from www.kde.org
O PTIONAL :
• The ctags source navigation tool, from http://ctags.sourceforge.net, which
enables you fast access to declarations and definitions by a few simple clicks
on a name in the editor.
158
KDevelop User Manual
• dot, a graphics language compiler, from http:/www.graphviz.org. This tool
is needed in conjunction with Doxygen below if you want to have class relationships graphically displayed (which is highly recommended).
• The Doxygen documentation tool, from http://www.doxygen.org if you want
to generate concise and powerful API documentation from your projects.
• valgrind from http://developer.kde.org/ sewardj/ helps you to find memory management problems in your applications.
• svn from http://subversion.tigris.org/ if you want to use the svn versioning
system.
• Any other compiler and/or tool in case you want to develop for another
language/platform than C++/KDE or use some special facility.
N OTE
1. You can, to a certain extent, circumvent the need for autoconf ≥ 2.52
and automake ≥ 1.6. Just remove the admin directory in your KDevelop installation directory and type
(your-kdevelop-directory)> ln -s $KDEDIR/share/apps/kdelibs/admin admin
at the console. This causes KDevelop to use the standard settings in the
KDE admin directory instead.
2. Be careful not to mix QtTM versions. Always link KDevelop to the same QtTM
version your KDE library was compiled. Otherwise you will most likely experience very strange behaviours.
A.3
KDevelop Compilation and Installation
Once all requirements are met, you are ready to compile and install KDevelop.
This appendix will discuss the necessary steps to do so.
• Preliminary Steps tells you about setting up a proper environment.
• Compile KDevelop deals with obtaining the KDevelop sources from svn,
how to prepare them for the installation process, and finally shows the steps
necessary to compile and install KDevelop.
• Some Notes on configure Options tells you how to run KDevelop if it has
been installed in a location other than the KDE directory.
159
KDevelop User Manual
A.3.1
Preliminary Steps
Before entering the compile sequence you must make sure all libraries and
tools are available to the make system. To accomplish this some environment
variables need to be properly set. The actual steps to be performed depend on
the console shell you use.
N OTE
To avoid typing in all the statements that set the necessary environment variables
every time you want to compile, you should put them into your .bashrc or .cshrc
file. This way the environment variables will be properly set every time you start the
shell.
A.3.1.1
Setting the Environment for the bash Shell
If you use the bash shell add the following lines:
export
export
export
export
export
A.3.1.2
KDEDIR=(path to your KDE installation)
QTDIR=(path to your Qt library)
LD_LIBRARY_PATH=$QTDIR/lib:$KDEDIR/lib:$LD_LIBRARY_PATH
LIBRARY_PATH=$QTDIR/lib:$KDEDIR/lib:$LIBRARY_PATH
PATH=$QTDIR/bin:$KDEDIR/bin:$PATH
Setting the Environment for the tcsh Shell
If you use the tcsh shell add the following lines:
setenv
setenv
setenv
setenv
setenv
A.3.2
KDEDIR (path to your KDE installation)
QTDIR (path to your Qt library)
LD_LIBRARY_PATH=$QTDIR/lib:$KDEDIR/lib:$LD_LIBRARY_PATH
LIBRARY_PATH $QTDIR/lib:$KDEDIR/lib:$LIBRARY_PATH
PATH $QTDIR/bin:$KDEDIR/bin:$PATH
Compile KDevelop
N OTE
In the following discussion we assume that you have put your KDevelop sources in
the /kde3src/kdevelop directory.
160
KDevelop User Manual
A.3.2.1
Special svn Compilation Considerations
In case you use a KDevelop snapshot from svn the initial compilation steps depend on whether you just did a complete checkout or only updated the source.
After a svn Checkout You must initialize the make system after a fresh checkout.
The same is true every time you need to start over from scratch. Type:
/kde3src/kdevelop> make -f admin/Makefile.common svn-clean
and then all of the following steps.
N OTE
You might need access to the svn repository for the clean-up if any corrupted
or missing files must be reconstructed.
I MPORTANT
The svn-clean command will remove every file not in svn from the directory!
Make sure to back up any valuable information before you issue this clean-up
command.
After a svn Update The next step depends on the output of the svn update
sequence. If you got something like (there may be a U or a P marker in
the leftmost column, both denoting the file has been changed):
U / some_directory_path / Makefile . am
or if you just did a full checkout, you must enter:
/kde3src/kdevelop> make -f Makefile.svn
before you proceed with all of the following steps.
A.3.2.2
Basic make Command Sequence
Once the basic make system is set up you must decide which type of the KDevelop system you want to use. This is done in the following configure step
which builds the actual Makefiles the make command will use.
N OTE
You may drop the --prefix option in the following configure command lines if you
want KDevelop be installed in the default KDE directory. See the Some notes on
configure options chapter for this.
161
KDevelop User Manual
A Debug-Compiled Version If you want to keep track of what your KDevelop
application does at run-time you may build a debug-compiled version.
Just command configure to do so:
/kde3src/kdevelop> ./configure --enable-debug=full --prefix=(where-your-kde3-is)
A Release-Compiled Version If you only want to use KDevelop as-is a (smaller
and faster running) release version suffices. configure defaults to this.
/kde3src/kdevelop> ./configure --prefix=(where-your-kde3-is)
N OTE
If you want to build your own API documentation for KDevelop you must include yet another option in the configure command:
/kde3src/kdevelop> ./configure --(options-as-above) \
--with-kdelibsdoxy-dir=$KDEDIR/share/doc/HTML/en/kdelibs-apidocs
Make and Install KDevelop configure will check the system and build some
Makefiles according to what it found. The make command will use the
main Makefile by default. Thus
/kde3src/kdevelop> make
suffices. If necessary, now gain root user rights using the command
/kde3src/kdevelop> su
and entering the root password. Then install the application:
/kde3src/kdevelop> make install
That’s all. If you installed KDevelop in the default KDE directory you
may now run the IDE. Otherwise some additional steps will be necessary
as shown in the Non-default installation directory section below.
N OTE
In fact there usually will have been three KDevelop-based applications installed:
• The KDevelop IDE — this is the place where you will usually work.
• The stand-alone KDevelop Assistant documentation browser — isolates
all the powerful documentation facilities of the KDevelop IDE in a separate
tool. This comes in handy when you want to look up some programming
documentation but do not want to start the full IDE.
• The KDevelop Designer — enhances the QtTM User Interface Designer by
KDE specific elements and integrates nicely in the KDevelop IDE.
162
KDevelop User Manual
A.3.3
Some Notes on configure Options
A.3.3.1
Non-default Installation Directory
By default configure prepares the IDE to be installed in the default KDE directory. This is necessary because KDevelop assumes direct access to some tools
and parts which reside there. If want to use your own installation directory,
you must tell configure this by the --prefix option:
/kde3src/kdevelop> ./configure --prefix=(where-your-kde3-is)
There is a caveat if you do so. You must provide a means for KDevelop to
access the needed tools and parts in the KDE directory when running. (You
can still use the IDE without doing so, but with very restrained capabilities.)
Call up a shell and have the following commands executed before you start
KDevelop at the shell prompt.
N OTE
Take care to use the plural: It is ‘KDEDIRS’, not just ‘KDEDIR’)
> export KDEDIRS=/usr/local/kde:/opt/kde3
> kbuildsycoca
(Now start KDevelop:)
> kdevelop
N OTE
The KDEDIRS environment variable must be set to the list of active KDE directories in your system. We use
/usr/local/kde:/opt/kde3
as an example only.
The /usr/local/kde directory may for instance contain an incomplete KDE version you compiled for debug purpose
In a tcsh shell you must set the environment variables using:
> setenv KDEDIRS /usr/local/kde:/opt/kde3
The kbuildsycoca command (‘build system control cache’) looks around for
libraries and caches their location and version, so that KDevelop can find them.
The caveat is that it takes noticeable time—and it has to be run any time you
call up the shell to start KDevelop from a non-default directory. You may want
to put the above commands into a shell script to reduce the typing effort.
(You could as well put the lines in your .bashrc or .cshrc file, but this is not
advisable as kbuildsycoca will then be run any time you call up the shell.)
N OTE
The kbuildsycoca command does not run from within the root. You must call it from
a non-root user. (But is not a very good idea after all to do software development
from within the root!)
163
KDevelop User Manual
A.4
How to Obtain a KDevelop API Documentation
API is the short form of ‘Application Program Interface’. Actually such an
API cotains a series of descriptions (i.e. calling conventions) by which an application program can access the operating system and other services. In our
context, however, a broader definition was adopted. The API of a KDE or QtTM
application is an abstract of the classes and methods interfaces, a synopsis to
be used like a dictionary to navigate the sources.
There is a version of the most current API available at the KDevelop-Home
website. It will be automatically updated every 24 hours so you can keep up.
Alas, this version is best used read-only over the internet. If you do not always
have internet access you may as well build your own API documentation from
the KDevelop sources. To do so, you must tell the automake system where
to find the KDELIBS API in your system. This is accomplished by the special
option --with-kdelibsdoxy-dir in the configure command when you prepare
to compile the KDevelop sources:
/kde3src/kdevelop> ./configure --(options-as-usual)\
--with-kdelibsdoxy-dir=$KDEDIR/share/doc/HTML/en/kdelibs-apidocs
(make will replace the global $KDEDIR variable with the actual KDE directory
setting recorded therein.) Then issue a make command as usual. After the
KDevelop IDE has been built you have the option to build the API as well. For
this you must issue
/kde3src/kdevelop> make apidocs
This will build a Doxyfile in your KDevelop base directory which in turn will
be processed by the Doxygen application to build quite a lot of .html API files.
When this rather lengthy API building process (may last more than an hour on
a slow system) finally comes to an end, you must install the API just like you
have to install the KDevelop IDE itself. If necessary obtain superuser rights by
/kde3src/kdevelop> su
and entering the root password. Then install the API files:
/kde3src/kdevelop> make install-apidox
Once this is done, make will inform you about the directory where you can
finally look at the API documentation’s contents. Note this address, you can
use it from Konqueror as well as from inside KDevelop, in case you have set
up the KDevelop sources themselves as a project to work on.
N OTE
You will most probably see a lot of warning and/or error messages during the API
build run by Doxygen. It is best to ignore them, they are of interest to the KDevelop
developers only. If the API generation ever comes to a successful end, the .html
API files will be usable.
164
KDevelop User Manual
Appendix B
In a Nutshell — Tips and
Tricks
The information in this chapter is meant as a quick reference for a head start
or if you (momentarily) forgot about some basic concept. There are also short
hints on how to solve some common problems when working with KDevelop.
If you want more information on a topic, just follow the link in the title starting
that advice.
Information on these topics is availabe:
Look and Feel
Projects
Compilation
Automake Manager
Compile/Make Problems
Other Topics
L OOK AND F EEL
Force smaller tool view tabs in IDEAl Mode By default KDevelop starts with
large text-based tool tip tabs around the work area. You may change this
look to e.g. save space in the KDevelop configuration dialog (Settings
→ Configure KDevelop... → User Interface).
If you use an older KDevelop 3 version, this configuration dialog may
not be available. To change the toolview tabs display manually, place a
MDIStyle entry under the [UI] tag in your $KDEHOME/share/config/kdeveloprc configuration file as follows:
MDIStyle=0: icons only
MDIStyle=1: text only (default)
MDIStyle=3: icons and text
165
KDevelop User Manual
Weird colored characters and/or display style If you notice random colored
letters everywhere (i.e. on tabs, on tool bars, etc.) and the KDevelop
window seemingly uses a wrong display style, this may help:
• In your $KDEHOME/share/config/kdeveloprc configuration file find the
line containing ‘Style=Checked’ and remove it. Then restart KDevelop.
(This behaviour does sometimes occur after you left clicked a .ui file in
one of the file navigators and KDevelop did load KUIViewer to show the
GUI which was produced from this file.)
Full screen mode Select View → Full-Screen Mode from the menus or press
Ctrl-Shift-F.
Hide/Unhide the menubar To hide the menubar select Settings → Show Menubar
from the menus or press Ctrl-M. To redisplay the menubar only Ctrl-M is
available.
P ROJECTS
Create New Project Project → New Project... will start the Application Wizard.
Create a custom project There is no direct way to create a custom project (i.e. a
project which does use its own makefiles). Use Project → Import Existing
Project instead. Remember to set the appropriate Project Type, labeled by
an additional ‘(Custom Makefiles)’, in the dialog.
Use project options early Whenever you start a new project do not forget to
set the Project → Project Options... to your needs.
C OMPILATION
Missing detail in compilation messages If during compilations you notice some
valuable information is missing in the Messages Output View window, it
may be that the level of message detail is set too low. right mouse button click in the window and select another detail level from the context
menu.
A UTOMAKE M ANAGER
Create new files in a project Select the sub-project in the upper half of the Automake Manager, then right mouse button click in the lower half on the
groups title you want to have the files added and select Create New File....
Add existing files to a project Select the sub-project in the upper half of the
Automake Manager, then right mouse button click in the lower half on
the groups title you want to have the files added and select Add Existing
Files....
Remove a file from a project Select the sub-project in the upper half of the Automake Manager, then in the lower half open the groups list you want to
have the file removed from, right mouse button click on the file in this
list and select Remove.
166
KDevelop User Manual
C OMPILE /M AKE P ROBLEMS
Project does not build again after switching to/from default target There is a
problem with the automake/autoconf machinery. If Project → Build Configuration provides to select from three build directories: default, optimized, and debug, by all means stick to either the default or the debug/optimized targets.
• Once you configured your project with default it will no longer build
with debug or optimzed.
• Once you configured your project with debug or optimzed it will no
longer build with default.
‘Wrong autoconf version’ etc. Error There are several error messages concerning too old versions of autoconf etc. prohibiting configure to work properly. Run autoreconf in the directory tree where the configure.in files
in question are. This command will try to update the information in the
GNU Build System files. See man autoreconf for more information.
O THER T OPICS
Configuration Files used by KDevelop Usually you should not need to care,
but this is very useful to know in case something went wrong with your
setup.
167
KDevelop User Manual
Appendix C
Development on UNIX
C.1
Some Historical Remarks
R has maintained two very different development
From the beginning, UNIX
paradigms. One is the world of system and application programming languages,
where some source code is translated to machine code by a translation program, usually a compiler or an interpreter. The programming language C is an
R was the first operating system kernel to be written in such a
example. UNIX
high level language instead of tightly machine-oriented assembler which was
common before that time. (In fact, the C language once even was invented
R kernel and associated programs on a DEC PDP-11 comto write the UNIX
puter.)
The other paradigm is the world of scripting languages. This world evolved
R shell which was the user’s interface to the
with the invention of the UNIX
operating system—and at the same time a very high level programming language. A shell script is built from a set of small utility programs like e.g. grep,
sed, or find. Each such utility is designed for some tightly defined job. The
trick is that any such utility can be connected to another one via a simple transport mechanism, called a pipe, which directs the output of the foregoing utility
into the input of the next processed one. This makes for a very powerful and
highly flexible programming tool.
As time has gone by, both worlds have evolved. While C is still used mainly
as a system programming language, C++ as a variant of C enriched by objectoriented and generic extensions has found its place for the development of
complex applications in the 1990’s. There are numerous other programming
languages, even older ones keep their place—FORTRAN77 and Ada e.g. still
have their stronghold in numerical applications.
168
KDevelop User Manual
C.2
Contemporary Scripting Languages
In the scripting area, there has been a shift away from the shell, which suffers from portability concerns, to languages which unify all commonly needed
functionality in their standard libraries, while still being able to interface to the
outside through pipes when necessary.
All these scripting languages have in common that they are widely portable beR variants, Microsoft Windows,
R Mac
R OS or even VMS. Also,
tween UNIX
they all have implementations that are freely distributable.
C.2.1
Perl
Perl has become popular as a text processing and system administration language. In the beginning of the World Wide Web, CGI scripts written in Perl
were a widely used method to create dynamic web pages from databases. Today, this method has been replaced mostly by the mod_perl plugin for the
Apache web server. Among Perl’s strengths are its built-in support for advanced regular expression matching and its rich archive of freely distributed
modules.
For more information see the Comprehensive Perl Archive Network (CPAN)
website.
C.2.2
Python
Python shines by the elegance of its class system and the ease and flexibility
with which external libraries can be wrapped in a way that they appear like
standard Python classes and functions. In contrast to Perl, Python has a clear
and concise embedding API, which makes it the language of choice for making
C and C++ programs scriptable.
C.2.3
PHP
PHP was invented as a language directly embeddable into HTML pages and
consequently has its main uses in delivering dynamic content on the web.
C.3
Higher-level Scripting
R applications usually miss the speed and flexibility of the
Higher-level UNIX
traditional character-oriented shell scripting mechanisms. This is especially
true in the world of graphical user interfaces (GUI) such as e.g. KDE.
There have been attempts to provide similar mechanisms which will work on
a higher application level, most notably CORBA and, in the KDE environment,
DCOP.
169
KDevelop User Manual
C.3.1
The CORBA Protocol
CORBA (Common Object Request Broker Architecture) is an attempt to let computer applications work together over networks. It was devised by the private,
vendor independent OMG (Object Management Group) standards comittee.
CORBA-based programs use the IIOP standard protocol to communicate. Implementations based on IIOP are available on a wide variety of operating systems, programming languages, and networks and are thus highly portable.
The main drawback of CORBA is its rather low speed. While this may be tolerable in networks, it is a real hindrance for inter-application communications
in a non-networked environment such as KDE running on a single computer.
C.3.2
The DCOP Interface
R
Another evolution on UNIX-like
scripting is the DCOP protocol which was
devised for communication between KDE applications to overcome the limitations of CORBA.
DCOP stands for Desktop Communication Protocol and is implemented as a simple IPC/RPC mechanism built to operate over sockets. In effect this provides
R pipe mechanism.
facilities similar to the traditional UNIX
Traditional shell scripting is based on fairly small tool programs which were
designed to work on a strictly textual basis. DCOP allows elaborate graphical
programs to communicate with each other in a quite similar way. This enables
e.g. a KDE program to send messages to another KDE program, or receive data
from it for its own purposes.
There are drawbacks, however. To use DCOP a program must be designed to
contain a special DCOP interface. And the DCOP communication process runs
somewhat slowly (although a lot faster than CORBA). But it returns much of
R scripting to high-level programs which are
the power and flexibility of UNIX
based on a graphical user interface.
For more information, see the DCOP: Desktop COmmunications Protocol paper or The DCOP Desktop Communication Protocol library API reference of
the KDE dcop library.
C.4
Build Systems
Except in very simple cases a programming project will consist of a lot of building blocks of source code each put into a separate file for easier maintenance.
To make this running one has to effectively translate all this stuff into a few
machine language units in a suiting format which allows the operating system
to load and execute the program.
To accomplish this, the basic tools needed are
170
KDevelop User Manual
• a text editor to write the source code files,
• a translating program, usually a compiler to turn the source code into object
files,
• a librarian which collects object files into libraries to reuse them easily without the need to recompile,
• a linker which binds several object files and libraries together into one executable,
• a make system which provides some means to manage all this stuff and—not
to forget
• a debugger to (hopefully) find all errors in the program and possibly some
other diagnostic tools to get everything running smoothly.
When you have a large project consisting of possibly hundreds of source code
files, the process of compiling may become quite laborsome. You do not want
to recompile all files each time you have changed only some of them. Instead,
you only want to compile those files which are affected by the changes. In
general, it is not always easily obvious which of the files have to be recompiled.
When you e.g. change a function prototype in a header file, you need to compile every file which includes this header file. If your project contains many
such files you may easily miss one or two of them if you have to do the job
manually. Thus some means of automization is necessary.
C.4.1
The Make Process
A tool which takes care of recompilations is make. It keeps track of all work
using a set of rules which describe what to do in case some piece of information
(usually a source or object code file) was changed. All rules belonging to a
certain project are stored in a so-called Makefile which is processed by make
any time you want to update your work.
Each rule consists of several building blocks, namely
• a target, i.e. the file to be built
• a set of dependencies, basically the names of those files the target depends on
(e.g. the name of a source file, where then the target will be the name of the
object file to be built) and
• the commands which are to be executed to ‘make’ the target (i.e. to compile it
or to link other object files together to build an executable progam file).
Basically the make command will read the rules one after another, check each
file in the dependency list of a given target and make this target anew if any
one of these files has changed, using the commands listed in that rule.
171
KDevelop User Manual
There are several additional possibilities to control such a make process, and
a Makefile can thus grow very complex. We cannot go into the details here.
However, we recommend that you make yourself accustomed to the syntax of
make. Even if you do not normally use it directly, an understanding of the
fundamentals of the build system can be useful. See the GNU Make Manual
for more information.
For more KDevelop specific detail see the Building and Project Management
chapter of this manual.
There are several tutorials available, see the references in the Building and
project management chapter.
C.5
GUI Development
Application developers become even more encumbered by having not only to
create program libraries and logic, but also to provide an easy to use custom
built user interface that is both intuitive and functional. Most programmers
receive little to no training in GUI development, and as a result user interfaces
often are poorly designed.
During the years some common design principles have evolved. It is strongly
advised to adhere to them. This way your user interfaces will retain a common
look and feel that the users of your application will gratefully appreciate.
For KDE GUI development there is a style guide available. It is found in the
KDE User Interface Guidelines on the KDE Developer’s Corner page.
A short introduction to common GUI design principles can be found here.
C.6
Integrating Concepts and Tools – the IDE
There are separate tools available for almost any step in the programming process—planning, editing, managing files and compilation processes, debugging,
documentation and the like. But once the projects grow the programming processes will most likely become quite cumbersome.
Much repetitive work has to be done when designing, compiling, and debugging a program. A lot of such work can be saved through the use of templates
and scripts. And another lot by keeping these tools easily available and able to
communicate with each other under a common GUI.
For example—would it not be convenient if a debugger were able to open the
source file in question in an editor and place the cursor directly at the position
of that bug just found?
To more easily accomplish such a scheme, Integrated Development Environments
(IDEs) were devised. Such an IDE integrates all templates, tools, and scripts
which are commonly needed in the development process into one single environment.
172
KDevelop User Manual
For the KDE platform KDevelop is such an IDE. It provides a wide range of
tools which ease program development and maintenance, even for different
programming languages and across platforms.
C.6.1
Basic Features of KDevelop 3.3.91
• Manages all development tools needed for C++ programming, such as compiler, linker, debugger and build system.
• Provides an Application Wizard which generates complete, ready-to-go sample applications.
• Allows the user to select an integrated editor based on the KDE programmer’s
editor KWrite, Trolltec’s QEditor, or others.
• A class generator, for creating new classes and integrating them into the current project.
• File management for sources, headers, documentation etc. to be included in
the project.
• Assistance in creating application user manuals written with KDE tools.
• Automatic HTML based API documentation for a project’s classes with crossreferences to the used libraries.
• Internationalization support, allowing translators to add their target language
to a project easily, including support for KBabel.
• Support for managing a project via one of several versioning systems (e.g.
CVS) by providing an easy-to-use frontend for the most needed functions.
• An integrated debugger frontend.
• An integrated shell console emulator.
• Syntax highlighting in source texts.
• An auto-code completion facility for class variables, class methods, function
arguments and more.
• Templates for creating various projects (KControl modules, Kicker (panel) applets, KIOSlaves, Konqueror plugins and desktop styles).
• Four navigation tree views for easily switching between source files, header
files, classes and documentation, obviating the need for an external file manager.
• Cross-compiling support, with the ability to specify different compilers, compiler flags, target architecture, etc.
• Support for Qt/Embedded projects (such as the Zaurus and iPAQ).
• Inclusion of any other program you need for development by adding it to the
Tools menu according to your individual needs.
173
KDevelop User Manual
Appendix D
Configuration Files Used by
KDevelop
KDevelop uses a series of configuration files which are distributed amongst
several directories. There are two main groups of configuration files to distinguish:
KDevelop Default Configuration — files set up when KDevelop was installed.
User Oriented Configuration — files which contain user modifications of the defaults as well as settings mad
D.1
KDevelop Default Configuration
On installation, KDevelop writes some default information files for setup and
configuration purposes into subdirectories of the $KDEDIR installation directory
(usually something like /opt/kde, /usr/local/kde, or some other user-defined
installation directory, see Installing KDevelop).
D.1.1
Default KDevelop Configuration
There is only one KDevelop specific default configuration file in the $KDEDIR/share/config/ directory:
kdeveloprc This file contains the basic settings KDevelop needs to start. It
will be copied to the user’s $KDEHOME/share/config directory when KDevelop does not find a kdeveloprc file there on startup.
174
KDevelop User Manual
D.1.2
Application Specific Defaults
Most KDevelop features are provided by KParts. These are basically applications specially designed to run in the KDevelop framework (see the overview
in the Plugin Tools appendix). Each KPart application has its own set of configuration files whose defaults will be stored in several subdirectories of the
$KDEDIR/share/apps/ installation directory.
There are quite a lot of default configuration subdirectories in $KDEDIR/share/apps/
whose names all start with a kdev sequence. Most of them are for KDevelop
internal use only. They might be deliberately grouped for readability as:
Stand-alone Applications
Task Specific Parts
Project Generation Parts
Language Specific Parts
• S TAND - ALONE A PPLICATIONS
– kdevelop/ — contains files to configure the KDevelop IDE:
∗ licenses/ — contains various licenses texts.
∗ pics/ — contains the picture files used for the KDevelop, KDevelop
Assistant, and KDevelop Designer splash screens.
∗ profiles/ — contains default plugin profile settings. (Currently there
is only a tiny profile provided which defines a minimum set of active
KDevelop plugins.)
∗ eventsrc — holds a lot of ‘Process successful’ localization strings.
∗ kdevelopui.rc — provides the basic menu and tool bar entries KDevelop uses.
∗ kdevhtml_partui.rc — provides a Print... entry in the File menu, a
Copy entry in the Edit menu, and Back and Forward arrows in the
Browser Toolbar in case a HTML file is browsed from the Documentation plugin.
– kdevassistant/ — provides the menu and tool bars of the stand-alone
KDevelop Assistant documentation browser.
– kdevdesigner/ and kdevdesignerpart/ — provide menu bar and tool bars
of the stand-alone KDevelop user interface designer.
• TASK S PECIFIC PARTS
– kdevabbrev/ — contains files used by the Abbreviation Expansion plugin:
∗ sources/ — contains keyword definition files used by the Expand Text
command.
∗ templates/ — contains template definition files used by the Expand Abbreviation command.
∗ kdevabbrev.rc — provides the Expand Text and Expand Abbreviation
entries in the Edit menu.
– kdevappwizard/ — contains files used by the Application Wizard part:
175
KDevelop User Manual
–
–
–
–
–
–
–
–
–
–
–
–
∗ importfiles/ — contains .kdevelop project files which control the initialization of a new project.
∗ imports/ — contains templates to set up project specific .desktop files.
∗ template-common/ — contains various files commonly included in the
project source directories.
∗ templates/ — contains configuration files which describe the information to be included in a given project source directory.
∗ *.png — project preview images used by the Application Wizard.
∗ *.tar.gz — tarballs containing the source files to be included in a new
generated project directory.
kdevastyle/ — provides the Reformat Source entry in the Edit menu.
kdevautoproject/ — provides most of the entries in the Build menu and
the Build Toolbar (KDevelop) toolbar.
kdevclassview/ — contains files used by the Class View project plugin:
∗ pics/ — contains the icons used in the Classes classview tree.
∗ kdevclassview.tc — provides the Class Inheritance Diagram entry in
the Projects menu as well as the classes navigation combo box in the
Browser Toolbar.
kdevcloser/ — provides the Windows menu close entries.
kdevctags/ — provides the CTags entry in the Tools menu for the CTags
Frontend project plugin.
kdevcvsservice/ — provides the icon used by the CvsService tab and a
short shell script used to add a new entry to the CVS repository, both used
by the CVS Integration project plugin.
kdevdebugger/ — provides the Debug menu entries for the Debugger Frontend project plugin.
kdevdiff/ — provides the Difference Viewer entry in the Tools menu.
kdevdistpart/ — provides the Distribution & Publishing entry in the Project
menu for the Final Packaging Support project plugin.
kdevdocumentation/ — contains files used by the Documentation plugin:
∗ en/ and pics/ — contain files used by the htdig search tool.
∗ tocs/ — contain the default KDevelop documentation content description files (see the description in Basic Structure of KDevelop TOC Files).
∗ kdevpart_documentation.rc — provides the search related entries in
the Help menu.
kdevdoxygen/ — provides the menu entries for the Doxygen Support project
plugin.
kdevfilecreate/ — contains files used by the New File Wizard:
∗ file-templates/ — provides the initial text contents to be put into the
new source file of a given type.
∗ kdevpart_filecreate.rc — provides the New entry in the File menu.
∗ template-info.xml — contains descriptions of the available file types
to be displayed in the New File tool view.
176
KDevelop User Manual
– kdevfilter/ — provides the Execute Command... and Filter Selection
Through Command... entries in the Tools menu used by the Shell Filtering
and Insertion plugin.
– kdevfullscreen/ — provides the Full Screen Mode entry in the View menu
and the according tool bar icon.
– kdevgrepview/ — provides the Find in Files...entry in the Edit menu used
by the Grep Frontend plugin.
– kdevhistory/ — provides the Back and Forward entries in the View menu.
– kdevjavadebugger/ — provides a Java Debug menu in order to debug a
JavaTM application.
– kdevoutputviews/ — provides the Next Error and Previous Error entries
in the View menu.
– kdevpartexplorer/ — provides the Part Explorer entry in the Tools menu
used by the Part Explorer Tool plugin.
– kdevquickopen/ — provides the Quick Open File.. entry in the File menu
and the Quick Open Class... and Quick Open Method entries in the Tools
menu used by the Quick Open project plugin.
– kdevregexptest/ — provides the Debug Regular Expression... entry in the
Tools menu used by the Regular Expression Tester plugin.
– kdevreplace/ — provides the Find-Select-Replace... entry in the Edit menu
used by the Replace Part plugin.
– kdevtipofday/ — provides the Tip of the Day entry in the Help menu as
well as a HTML-File containing the available tips.
– kdevtools/ — controls various menu entries ceated by Tools Menu and
External Tools Menu settings provided by the Tools Menu Addition plugin.
– kdevvalgrind/ — provides the Valgrind Memory Leak Check and Profile
with KCachegrind entries in the Debug menu used by the Valgrind Frontend plugin.
• P ROJECT G ENERATION PARTS
– kdevadaproject/ — provides entries for the Build menu and according
tool bar icons to build an Ada application.
– kdevantproject/ — provides entries for the Build menu when the Ant
project generator is used.
– kdevautoproject/ — provides entries for the Build menu and according
tool bar icons when working with the GNU Tools based automake project
generator. Additionally provides the Add Translation and Build Configuration entries to the Project menu.
– kdevcustomproject/ — provides entries for the Build menu and according
tool bar icons when the project is based on custom Makefils.
– kdevgenericproject/ — contains menu definitions for an experimental
generic project generator. Currently (version 3.1.0) unused.
177
KDevelop User Manual
– kdevhaskellproject/ — provides entries for the Build menu and according tool bar icons to build a Haskell application.
– kdevpascalproject/ — provides entries for the Build menu and according
tool bar icons to build a Pascal application.
– kdevtrollproject/ — provides entries for the Build menu and according
tool bar icons to build an application using the QtTM QMake project manager.
• L ANGUAGE S PECIFIC PARTS
– kdevadasupport/ — provides entries in the Tools menu and according tool
bar icons needed to develop Ada applications.
– kdevbashsupport/ — provides entries in the Build menu and according
tool bar icons needed to develop Bash scripts.
– kdevcppsupport/ — contains files used by the Application Wizard to build
C++ applications:
∗ newclass/ — contains header and source templates from which the Application Wizard builds the according source files.
∗ subclassing/ — contains templates which the Application Wizard uses
to set up initial class declarations/definitions in the source files.
∗ templates — contains templates from which the Application Wizard
sets up the default header and source template files to be used by the
New File Wizard.
∗ configuration — dummy template to add macros.
∗ kdevcppsupport.rc — provides the Complete Text and Make Member
entries fo the Edit menu, the Switch Header/Implementation entry for
the View menu, and the New Class entry for the Project menu as well as
a New Class icon for the Browser Toolbar.
– kdevfortransupport/ — provides entries in the Build menu needed to develop Fortran applications.
– kdevhaskellsupport/ — provides entries in the Build menu and according tool bar icons needed to develop Haskell applications.
– kdevjavasupport/ — contains the UI definition needed to develop JavaTM
applications.
– kdevpascalsupport/ — contains the UI definition needed to develop Pascal applications.
– kdevperlsupport/ — provides Project and Help menu entries needed to
develop Perl scripts.
– kdevphpsupport/ — contains UI and PHP function definition files needed
to develop PHP scripts.
– kdevpythonsupport/ — provides Build and Help menu entries and according tool bar icons needed to develop Python scripts.
– kdevrubysupport/ — provides Build menu entries and according tool bar
icons needed to develop Ruby scripts.
– kdevscriptproject/ — provides th UI definitions needed to develop custom projects. Currently (version 3.1.0) unused.
– kdevsqlsupport/ — provides th UI definitions needed to develop SQL
projects. Currently (version 3.1.0) unused.
178
KDevelop User Manual
D.2
User Oriented Configuration
All information about user defined settings is kept in two subdirectories of $KDEHOME, namely:
Application Specific Configuration in the $KDEHOME/share/apps/ directory, and
Resource Configuration File in the $KDEHOME/share/config/ directory.
D.2.1
Application Specific Configuration
Any user changes to the KDevelop Default Configuration settings as well as
user specific settings which are not kept in any of the Resource Configuration
Files are found in kdev... subdirectories of the $KDEHOME/share/apps/ directory.
Most of these configuration files are however used by various KDevelop plugins in order to provide some specific menu and/or toolbar entries. Thus they
are of interest only in case something went really wrong with the user interface.
N OTE
In case the contents of these directories mirror those of the Default Configuration
settings, KDevelop will have copied them from $KDEDIR/apps/ into the $KDEHOME/apps/ directory on its initial start. Any subsequent changes will be made to these
copies only. The Default Configuration settings remain unchanged in any case.
• kdevabbrev/ — contains files used by the Abbreviation Expansion plugin:
– sources/ — currently empty; KDevelop uses the default keyword definition files for Expand Text commands.
– templates/ — contains the user modified template definition files used by
the Expand Abbreviation command.
– kdevabbrev.rc — provides the Expand Text and Expand Abbreviation entries in the Edit menu.
• kdevappwizard/ — only provides the New Project... and Import Existing
Project... entries in the Projects menu. The Application Wizard will use the
default configuration settings for its actual works.
• kdevastyle/ — provides the actual Reformat Source entry in the Edit menu.
• kdevautoproject/ — provides the actual entries in the Build menu and the
Build Toolbar (KDevelop) toolbar.
• kdevclassview/ — provides the Class Inheritance Diagram entry in the Project
menu and the class browser combo box in the Browser Toolbar by the Class
View project plugin.
179
KDevelop User Manual
• kdevcloser/ — provides the Close Selected Windows... entry in the Windows menu.
• kdevcppsupport/ — holds the acual configuration used by the Application
Wizard to build C++ applications. The Application Wizard however uses its
main bulk of configuration information directly from the default configuration directory. See there for more detail.
– newclass/ — contains the actual header and source templates from which
the Application Wizard builds the according source files.
– pcs/ — contains database files KDevelop uses build the actual Persistent
Code Store (.pcs) file of a KDE C++ project.
– kdevcppsupport.rc — provides the Complete Text and Make Member entries fo the Edit menu, the Switch Header/Implementation entry for the
View menu, and the New Class entry for the Project menu as well as a
New Class icon for the Browser Toolbar.
• kdevctags/ — provides the CTags entry in the Tools menu for the CTags
Frontend project plugin.
• kdevdebugger/ — provides the Debug menu entries for the Debugger Frontend project plugin.
• kdevdiff/ — provides the Difference Viewer entry in the Tools menu.
• kdevdocumentation/ — contains the actual files used by the Documentation
plugin in addition to the default configuration files. See there for more detail.
The directories in kdevdocumentation/ mainly hold actual bookkeeping information. The actually set up documentation files are kept in doc...pluginrc
files in the $KDEHOME/share/config/ directory.
– bookmarks/ — maintains the entries in the Bookmarks tab of the KDevelop
Documentation plugin.
– index/ — holds various cache files KDevelop uses to speed up indexed
documentation searches in the Index tab of the Documentation plugin.
– search/ — contains files used by the htdig search tool which serves search
calls from the Search tab of the Documentation plugin.
– kdevpart_documentation.rc — provides the search related entries in the
Help menu.
• kdevdoxygen/ — provides the menu entries for the Doxygen Support project
plugin.
• kdevelop/ — contains some actual settings KDevelop uses for its basic setup:
– profiles/ — provides actual plugin profile setting. (Initially there is only
a FullIDE profile which defines a full set of initially active KDevelop plugins.)
– kdevelopui.rc — provides the basic menu and tool bar entries KDevelop
uses.
180
KDevelop User Manual
• kdevfilecreate/ — contains files used by the New File Wizard:
– file-templates/ — provides the actually used text contents to be put into
the new source file of a given type. More file templates are found in the
default configuration files directory.
– kdevpart_filecreate.rc — provides the New entry in the File menu.
– template-info.xml — contains descriptions of the available file types to
be displayed in the New File tool view.
• kdevfilter/ — provides the Execute Command... and Filter Selection Through
Command... entries in the Tools menu used by the Shell Filtering and Insertion plugin.
• kdevfullscreen/ — provides the Full Screen Mode entry in the View menu
and the according tool bar icon.
• kdevgrepview/ — provides the Find in Files...entry in the Edit menu used by
the Grep Frontend plugin.
• kdevoutputviews/ — provides the Next Error and Previous Error entries in
the View menu.
• kdevpartexplorer/ — provides the Part Explorer entry in the Tools menu
used by the Part Explorer Tool plugin.
• kdevquickopen/ — provides the Quick Open File.. entry in the File menu
and the Quick Open Class... and Quick Open Method entries in the Tools
menu used by the Quick Open project plugin.
• kdevregexptest/ — provides the Debug Regular Expression... entry in the
Tools menu used by the Regular Expression Tester plugin.
• kdevreplace/ — provides the Find-Select-Replace... entry in the Edit menu
used by the Replace Part plugin.
• kdevtipofday/ —provides the Tip of the Day entry in the Help menu. The
HTML-File containing the available tips is provided as a default configuration file only.
• kdevtools/ — controls various menu entries ceated by Tools Menu and External Tools Menu settings provided by the Tools Menu Addition plugin.
• kdevvalgrind/ — provides the Valgrind Memory Leak Check and Profile
with KCachegrind entries in the Debug menu used by the Valgrind Frontend
plugin.
D.2.2
Resource Configuration Files
There are two groups of KDevelop configuration files in the $KDEHOME/share/config/
directory, distiguished by their surrounding character sequences:
181
KDevelop User Manual
‘doc...pluginrc’ denotes files used by the documentation plugin.
‘kdev...rc’ denotes configuration files used by KDevelop itself and its available plugins.
C ONFIGURATION F ILES U SED BY KD EVELOP
• kdevabbrevrc — holds the current state of the Abbreviations configuration
provided by the Abbreviation Expansion plugin.
N OTE
This only records whether the abbreviations will be used or not.
The
actual definitions of new abbreviations will go into the $KDEHOME/share/apps/kdevabbrev/templates/templates file.
• kdevassistantrc — holds some configuration states specific of the standalone KDevelop Assistant documentation browser.
N OTE
Most common configuration settings are shared with the KDevelop IDE kdeveloprc file.
• kdevassistantuimode4rc — holds the current MDI configuration states (dock
positions etc.) of the stand-alone KDevelop Assistant documentation browser.
• kdevclassviewrc — holds the View Mode setting of the Classes class browser
tab provided by the Class View project plugin.
N OTE
This is a global setting, although the Class View plugin may be disabled on a per
project basis. Any change in this setting will be globally updated whenever the
current project is closed and thus affect all subsequently loaded projects.
• kdevcppsupportrc — holds some settings used to set up CPP source files.
In particular you will find the settings made on the C++ Class Generator
configuration dialog in here.
• kdevdocumentationrc — holds actual settings the Documentation plugin uses.
• kdeveloprc — holds the global settings the KDevelop IDE and the KDevelop
Assistant stand-alone documentation browser will use.
• kdevelopuimode4rc — holds the current MDI configuration states (dock positions etc.) of the KDevelop IDE.
• kdevfileselectorrc — holds actual settings the File Selector plugin uses.
• kdevfileviewrc — holds the actual filename color settings the CVS Integration (Cervisia) project plugin uses for display.
• kdevfilterrc — holds actual settings the Shell Filtering and Insertion plugin
uses.
182
KDevelop User Manual
• kdevgrepviewrc — holds actual settings the Grep Frontend plugin uses.
• kdevsnippetrc — holds actual settings the Code Snippets plugin uses.
• kdevtoolsrc — holds actual settings the Tools Menu Addition plugin uses.
C ONFIGURATION F ILES U SED BY THE D OCUMENTATION P LUGIN
R CHM
• docchmpluginrc — holds information about the actual Microsoft
help files as defined on the CHM Documentation Collection configuration
page.
• doccustompluginrc — holds information about any custom documentation
file defined on the Custom Documentation Collection configuration page.
• docdevhelppluginrc — holds information about the actual GNOME 2 DevHelp documentation files as defined on the Devhelp Documentation Collection configuration page.
• docdoxygenpluginrc — holds information about the actual Doxygen generated API documentations as defined on the Doxygen Documentation Collection configuration page.
• dockdevtocpluginrc — holds information about the actual KDevelopTOC
structured documentation files as defined on the KDevelopTOC Documentation Collection configuration page.
• docqtpluginrc — holds information about the QT documentation files actually included on the Documentation CollectionQt configuration page.
D.3
Project Dependent Configuration
Most project dependend configuration is kept in the <project-name>.kdevelop and <project-name>.kdevses KDevelop project configuration files rather
than in separate files as the other, more global, configuration settings. In short,
those files are meant for:
<project-name>.kdevelop — global project configuration information.
<project-name>.kdevses — configuration information needed to restore the specific behaviours of the runn
Both are XMLTM coded files. They can be viewed and (cautiously) altered using
any text editor.
D.3.1
Persistent Code Store Files
There is a third project dependend configuration file, the <project-name>.kdevelop.pcs Persistant Code Store. This is a binary coded file holding an internal
parser cache for the most part in order to speed up the loading sequence of the
project. Additionally, this Persistant Code Store keeps information use by the
Code Completion facility of KDevelop.
183
KDevelop User Manual
N OTE
There can be additional Persistant Code Store files be set up on the
Code Completion tab of the C++ Specific project configuration page.
Information about these additional .pcs is kept globally in the $KDEHOME/share/apps/kdevcppsupport/pcs/ directory.
184
KDevelop User Manual
Appendix E
Plugin Tools
KDevelop contains a large number of little tools that help you to perform certain task. Most of them are realized as plugins. That means, if you do not need
a plugin, you can disable it.
That also means, if you are looking for a functionality that should be there and
isn’t, then maybe it’s implemented in a plugin and that plugin is disabled. For
example, in the file menu there is a Quick Open feature, but only if it’s enabled
in the Project - Project Options dialog.
Technically, plugins are based on the KDevPlugin class defined in lib/interfaces/kdevplugin.h. The following is taken from a comment from there.
KDevPlugin is the base class for all KDevelop plugins. A plugin is a component which is loaded into KDevelop shell at startup or by request. A plugin
has a scope that can be either:
• Core
• Global
• Project
Core plugins are global plugins which offer some important "core" functionality and thus are not selectable by user in plugin configuration pages.
Global plugins are plugins which require only shell to be loaded and do not
operate on KDevProject interface and/or do not use project wide information.
For example, the uimode plugin allows a developer to select which user interface they wish to use.
Project plugins require a project to be loaded and are usually loaded/unloaded
along with the project. If a plugin operates on project-related information then
it is a project plugin. The Automake Manager, for example, only needs to be
active when an Automake based project is currently loaded.
185
KDevelop User Manual
As stated above, core plugins cannot be disabled. Global plugins can be enabled/disabled in Settings → Configure KDevelop... under Plugins. Project
plugins can be enabled/disabled in Project → Project Options... under Plugins. Active plugins can have many effects on KDevelop. Depending on their
function, they may add extra menus, extra menu items, extra tool buttons, etc.
Plugins which are disabled do not clutter your menus and are not loaded into
memory.
The following plugin list is generated by a small script (listplugins.sh) written
by Volker Paul. All plugins have a .desktop file where information such as
name and comments are written. If in the following these comments are not
very useful, it is because the plugin authors made them this way.
The plugins are grouped by scope (Core, Global, Project).
Scope: Core
• Application Wizard Application Wizard
• Difference Viewer Difference Viewer
• FileCreate FileCreate
• FullScreen FullScreen
• Tip of the Day Tip of the Day
• User-Interface Selection Provides a dialog for UI-mode selection.
• VCSManager Version Control System Manager
Scope: Global
• Abbreviation Expansion Provides support for customizable abbreviations short words which expand into commonly needed code structures.
• Documentation The Documentation plugin offers browsing and searching
in local and online documentation with support for multiple documentation
systems.
• FileList Provides a list of all currently open files. (Handy when the tab bar
is not quite wide enough.)
• File Selector Powerful network transparent file browser utility.
• Shell Filtering and Insertion Provides a way of manipulating editor text
using commandline tools. Appears in the Tools menu.
• Grep Frontend Integrates "find|grep" in KDevelop - allows fast searching of
multiple files using patterns or regular expressions.
• Embedded Konsole This plugin gives KDevelop an embedded konsole for
quick and easy command line access.
186
KDevelop User Manual
• "Open with" Menu Addon This plugin provides additional "open" alternatives for various context menus in KDevelop.
• Part Explorer Tool A Graphical tool for performing KTrader-like queries
about registered services
• Regular Expression Tester Tool to design and test regular expressions against
common regexp syntaxes.
• Replace Part This plugin is an interactive projectwide "Search and Replace"
tool. Search using string or regexp matching, and select the replacements
to be made from a preview before the action is finalized. When loaded it
appears in the Edit menu.
• Scripting The Scripting plugin offers KScript based scripting of the KDevelop application
• Code Snippets This plugin allows you to store code snippets and add them
to your code
• Text Structure Provides a structure overview and navigation for HTML and
TEX files
• Tools Menu Addition This plugin provides an easy way to add external
applications to the Tools menu and toolbar.
• Valgrind Frontend Valgrind is a tool that helps you find memory management problems in programs. http://developer.kde.org/ sewardj/
Scope: Project
• annotation Plugin annotation Description
• Source Code Formatter A plugin for formatting of sourcecode according to
a specified set of rules. When loaded it is found in the Tools menu.
• Bookmarks Plugin that provides navigation and overview of active source
bookmarks and persists them between sessions.
• Class View This plugin displays a graphical view of all the classes in the
project, complete with methods and attributes, and provides a way of direct
source navigation.
• CopyTo Simple file uploader plugin. It does a file copy over any KIO supported protocol.
• CTags Frontend CTags is a source navigation tool with support for many
languages. When loaded it provides a context menu for finding type declarations/definitions and also a query dialog. http://ctags.sourceforge.net/
• Final Packaging Support Aids in building and publishing the final project.
Only RPM package format is supported for now.
187
KDevelop User Manual
• Doxygen Support The doxygen plugin provides a way to specify and control
generation of documentation for a project, based on source code content.
You need to have doxygen installed to be able to use this. For more info goto
http://www.doxygen.org
• QuickOpen Provides an efficient way of finding/opening files, classes and
methods in a large project. Appears in the File and Tools menus when
loaded.
• Security Checker Code security checker
So far the generated plugin list.
antproject
autoproject
customproject
trollproject
ANT Project Manager (JavaTM
applications)
Automake Project Manager
Custom Project Manager
QMake based Project Manager
Table E.2: Project Management Plugins in KDevelop
The above plugins are currently (May 2005) empty. Maybe project management support will be implemented as plugins in the future.
cppsupport
fortransupport
javasupport
perlsupport
phpsupport
pythonsupport
Support for C/C++
Support for Fortran
Support for JavaTM
Support for Perl
Support for PHP
Support for Python
Table E.4: Language Support Plugins in KDevelop
In the following, some of the plugins will be discussed in detail.
• The abbrev Plugin This plugin expands abbreviations into frequently used
code snippets. It is activated by pressing Ctrl-Space. For example, when
you enter "ife" into a C++ in the editor and press Ctrl-Space, you obtain
an if-else code template and save some key strokes. The set of supported
abbreviations depends on the programming language of the edited file. For
example, for PHP you will obviously be interested in other code templates
than for JavaTM .
188
KDevelop User Manual
The set of code templates is configurable. If the plugin is enabled, you can
see which ones are available in the Settings → Configure KDevelop... dialog
under Abbreviations.
• The filter Plugin This offers two features. If you select Tools → Execute command, you can enter a shell command. The output of this command is inserted into the editor buffer when you hit the Start button.
A related feature is available under Tools → Filter selection through command.... In order to use this, you must select a text area in the editor. If you
now enter a shell command and hit the Start button, the command is started
and the selection used as the standard input for it. The standard output of
the command is then inserted into the editor, replacing the selection.
For example, if you write documentation, you frequently have to refer to
menu items. To do this correctly for e.g. the Copy command in the Edit
menu, you have to write:
< menuchoice >< guimenu > Edit </ guimenu >< guimenuitem > Copy </ ←guimenuitem > </ menuchoice >
This is cumbersome, so you’d rather just write "Edit - Copy" and let the computer do the tagging. Here is how you can do it. You write a little shell script
called mef you put e.g. in your home’s bin directory:
sed s /"^\(.*\) - \(.*\) \$ "/" < menuchoice >< guimenu >\1 <\/ ←guimenu >< guimenuitem >\2 <\/ guimenuitem > <\/ menuchoice >"/
Don’t forget to make it executable. That’s all. Now, in your documentation
.docbook source, you write "Edit - Copy". You select this text you just wrote,
choose Tools → Filter selection through command... and call /bin/mef. Instantly "Edit - Copy" is replaced by
< menuchoice >< guimenu > Edit </ guimenu >< guimenuitem > Copy </ ←guimenuitem > </ menuchoice >
• The Doxygen Plugin This one helps you to use the Doxygen API documentation tool (http://www.doxygen.org). You can select Project → Run Doxygen to generate API documentation for your current project, based on the
configuration given by the file Doxyfile in your project directory.
Furthermore, you can configure Doxygen in the Project → Project options...
dialog. This dialog is very similar to the doxywizard tool.
• The ctags Plugin Although the class browser gives you extensive insight
into the symbols and classes of your project, you may also want to use the
ctags tool. In particular, this one supports a lot more language than the class
browser.
You activate this plugin under Tools → CTags.... When you start it the first
time, you will be asked to generate a search database first. When you accept
this, the ctags program will be started and will create a file named tags in
your project directory. This is a text file containing all symbols of your source
files.
189
KDevelop User Manual
You can search in the symbol database in two ways: when the Regular expression match box is checked, the text you enter will be interpreted as a
regular expression (POSIX flavor) and matched with the existing symbols.
For example, the text .*Widget will search for all symbols ending with Widget. If the box is not checked, the search will be verbatim.
When searching, you will get a list of the matched symbols, accompanied
with the line numbers where they are defined. You jump to the respective
point by clicking on the list.
For some languages, ctags distinguishes different kinds of symbols. For example, Python has classes and functions. You can selectively search only for
classes by checking the respecting kinds in the dialog.
The symbol database is normally not updated when your sources change.
Consequently, after a while the line numbers will not be correct anymore and
newly added classes and functions will be missing. Therefore you should
update the tags file in regular intervals by pressing the button Regenerate.
• The astyle Plugin Astyle is a plugin for formatting of sourcecode according
to a specified set of rules.
• The regexptest Plugin Designing with regular expressions can be hard work.
Often the first try at an expression matches too many strings. In particular,
when working with a compiled language, the turnaround times when debugging a regular expression can be awkward. The regexptest plugin allows
you to directly explore the changes in a regular expression. It is activated by
choosing Tools → Debug Regular Expression....
In the flavor group box, you can choose the flavor of the regular expression
engine used. Currently supported is the flavor defined in the POSIX standard, which is used by the grep program, and the extended POSIX syntax
used by the program egrep.
When you enter an expression, you get immediate feedback about any syntax errors in it. By entering a text under Test string, you can see whether
the expression matches this string. In particular, if your regular expression
includes groups, such as ([a-z]), the content of the matched subgroups will
be shown in a list box.
190
KDevelop User Manual
Appendix F
KDevelop User Interface
Mode Examples
F.1
IDEAl Mode
Click here to return to the modes overview.
KDevelop IDEAl mode
Click here to return to the modes overview.
191
KDevelop User Manual
KDevelop IDEAl mode, closed tabs
This example screenshot demonstrates one of the main virtues of IDEAl mode.
There is a maximum workspace available. Yet any tool view is readily available
by clicking on the according tab.
You will most probably need some time to get accustomed to the icons in the
tab bar. If you got lost, just position the mouse over a tab and wait a few
seconds. A short tool tip description will pop up. In this screenshot the ‘Automake Manager’ tool tip is shown as an example. It describes the lower tab in
the right tab bar.
Click here to return to the modes overview.
F.2
Child Frame Windows Mode
Click here to return to the modes overview.
192
KDevelop User Manual
KDevelop child frame windows mode
Click here to return to the modes overview.
F.3
Tabbed Pages Mode
Click here to return to the modes overview.
193
KDevelop User Manual
KDevelop tabbed pages mode
Click here to return to the modes overview.
F.4
Toplevel Windows Mode
Click here to return to the modes overview.
194
KDevelop User Manual
KDevelop toplevel windows mode
Click here to return to the modes overview.
195
KDevelop User Manual
Appendix G
Command Reference
Volker Paul 2005-04-03
N OTE
The shortcut key combinations shown in this chapter are the default ones. They
can be changed.
G.1
The Menubar
Note that some menu entries only appear when they are applicable. Especially,
some entries are linked to plugin functionality which is only available when the
plugin is enabled.
G.1.1
The File Menu
File → New (Ctrl+N) Create a new file. The user is prompted to select the directory (default: the current project’s source directory) and enter a file
name. The file type can be selected from a list. Also, the user can choose
whether the file is to be added to the project. Then the Automake Manager asks which target to add the new file to.
File → Open (Ctrl+O) Open an existing file in a simple dialog box.
File → Open Recent (Ctrl+O) Displays a submenu showing the files recently
opened. Selecting one of these will make KDevelop open that file.
File → Quick Open (Alt+Ctrl+O) Presents a list of files in the current project’s
source directory. The user can select from this list or type a filename. That
file is then opened.
196
KDevelop User Manual
File → Save (Ctrl+S) Saves the current file.
File → Save As... (Ctrl+S) Uses the Save As... dialog box to let you save a copy
under a new name.
File → Save All Saves all open files.
File → Reload (F5) Reloads current file to show changes made by different
programs. (Note that such changes are normally detected automatically
and the user is prompted whether the file is to be reloaded.) .
File → Revert all Reverts all changes in opened files. Prompts to save changes
so the reversion can be canceled for each modified file.
File → Print... (Ctrl+P) Print.
File → Export Export
File → Close (Ctrl+F4) Closes current file.
File → Close All Closes all open files.
File → Close All Others Closes all files except the current one. Very useful if
you opened a lot of files and you want to concentrate on the current one.
Without this, you would have to close them all and re-open the current
one.
Note there is a similar command in the Window menu.
File → Quit (Ctrl+Q) Close KDevelop.
G.1.2
The Edit Menu
Edit → Undo (Ctrl+Z) Undo
Edit → Redo (Ctrl+Shift+Z) Redo
Edit → Cut (Ctrl+X) Cut
Edit → Copy (Ctrl+C) Copy
Edit → Paste (Ctrl+V) Paste
Edit → Select All (Ctrl+A) Select All
Edit → Deselect (Ctrl+Shift+A) Deselect
Edit → Block Selection Mode (Ctrl+Shift+B) Block Selection Mode
Edit → Overwrite Mode (Insert) Overwrite Mode
Edit → Find (Ctrl+F) Find
Edit → Find Next (F3) Find Next
Edit → Find Previous (Shift+F3) Find Previous
Edit → Replace (Ctrl+R) Replace
197
KDevelop User Manual
Edit → Go to Line (Ctrl+G) Go to Line
Edit → Find in Files (Alt+Ctrl+F) Find in Files
Edit → Find-Select-Replace (Shift+R) Find-Select-Replace
Edit → Reformat Source Reformat Source
Edit → Expand Text (Ctrl+J) Expand Text
Edit → Expand Abbreviation (Ctrl+L) Expand Abbreviation
Edit → Complete Text (Ctrl+Space) Complete Text
Edit → Make Member (F2) Make Member
G.1.3
The View Menu
View → Back Back
View → Forward Forward
View → Switch to... (Ctrl+/) Switch to...
View → Raise Editor (Alt+C) Raise Editor
View → Next Error (F4) Next Error
View → Previous Error (Shift+F4) Previous Error
View → Full Screen Mode (Shift+F) Full Screen Mode
View → Switch Header/Implementation (Ctrl+F12) Switch Header/Implementation
View → Tool Views Tool Views
View → Tool Docks Tool Docks
View → Switch to Command Line (F7) Switch to Command Line
View → Schema Schema
View → Dynamic Word Wrap (F10) Dynamic Word Wrap
View → Dynamic Word Wrap Indicators Dynamic Word Wrap Indicators
View → Show/Hide Static Word Wrap Marker Show/Hide Static Word Wrap
Marker
View → Show/Hide Icon Border (F6) Show/Hide Icon Border
View → Show/Hide Line Numbers (F11) Show/Hide Line Numbers
View → Show/Hide Scrollbar Marks Show/Hide Scrollbar Marks
View → Show/Hide Folding Marks (F9) Show/Hide Folding Marks
View → Code Folding Code Folding
View → Set Encoding Set Encoding
198
KDevelop User Manual
G.1.4
The Project Menu
Project → New Project... New Project...
Project → Open Project... Open Project...
Project → Open Recent Project Open Recent Project
Project → Active Language Active Language
Project → Import Existing Project... Import Existing Project...
Project → New Class... New Class...
Project → Class Inheritance Diagram Class Inheritance Diagram
Project → Add Translation... Add Translation...
Project → Build Configuration Build Configuration
Project → Distribution & Publishing Distribution & Publishing
Project → Project Options... Project Options...
Project → Close Project Close Project
G.1.5
The Project Menu
Build → Build Project (F8) Build Project
Build → Build Active Target (F7) Build Active Target
Build → Compile File Compile File
Build → Run Configure Run Configure
Build → Run automake & friends Run automake & friends
Build → Install Install
Build → Install (as root user) Install (as root user)
Build → Clean project Clean project
Build → Distclean Distclean
Build → Make Messages & Merge (Shift+F9) Make Messages & Merge
Build → Execute Program Execute Program
Build → Build API Documentation Build API Documentation
Build → Clean API Documentation Clean API Documentation
Build → Stop (Escape) Stop
199
KDevelop User Manual
G.1.6
The Project Menu
Debug → Start Start
Debug → Stop Stop
Debug → Interrupt Interrupt
Debug → Run to Cursor Run to Cursor
Debug → Step Over Step Over
Debug → Step over Instruction Step over Instruction
Debug → Step Into Step Into
Debug → Step into Instruction Step into Instruction
Debug → Step Out Step Out
Debug → Toggle Breakpoint Toggle Breakpoint
Debug → Viewers Viewers
Debug → Examine Core File... Examine Core File...
Debug → Attach to Process Attach to Process
Debug → Valgrind Memory Leak Check Valgrind Memory Leak Check
Debug → Profile with KCachegrind Profile with KCachegrind
G.1.7
The Bookmarks Menu
Bookmarks → Set Bookmark (Ctrl+B) Add current selection to your bookmarks.
Bookmarks → Clear All Bookmarks Clear All Bookmarks.
G.1.8
The Window Menu
Window → Close Selected Windows... (Alt+W) Close Selected Windows...
Window → Close (Ctrl+F4) Close
Window → Close All Close All
Window → Close All Others Close All Others
200
KDevelop User Manual
G.1.9
The Tools Menu
Tools → Read Only Mode Read Only Mode
Tools → Filetype Mode Filetype Mode
Tools → Highlight Mode Highlight Mode
Tools → End of Line End of Line
Tools → Spelling Spelling
Tools → Indent (Ctrl+I) Indent
Tools → unindent (Ctrl+Shift+I) unindent
Tools → Clean Indentation Clean Indentation
Tools → Align (Ctrl+Tab) Align
Tools → Comment (Ctrl+D) Comment
Tools → Uncomment (Ctrl+Shift+D) Uncomment
Tools → Uppercase (Ctrl+U) Uppercase
Tools → Lowercase (Ctrl+Shift+U) Lowercase
Tools → Capitalize (Alt+Ctrl+U) Capitalize
Tools → Join Lines (Ctrl+J) Join Lines
Tools → Word Wrap Document Word Wrap Document
Tools → Difference Viewer... Difference Viewer...
Tools → Execute Command... Execute Command...
Tools → Filter Selection Through Command... Filters selection through external command using the Filter plugin.
Tools → Debug Regular Expression... Debug Regular Expression...
Tools → Part Explorer Part Explorer
Tools → Quick Open Class... (Alt+Ctrl+C) Quick Open Class...
Tools → Quick Open Method... (Alt+Ctrl+M) Quick Open Method...
Tools → Preview Doxygen Output (Alt+Ctrl+P) Preview Doxygen Output
Tools → Document Current Function (Ctrl+Shift+S) Document Current Function
201
KDevelop User Manual
G.1.10
The Settings Menu
Settings → Show/Hide Menubar (Ctrl+M) Show/Hide the menubar.
Settings → Toolbars Opens a sub menu where you can choose to show or hide
the various Toolbars.
Settings → Show Statusbar Show the Statusbar.
Settings → Configure Shortcuts... Configure Shortcuts...
Settings → Configure Toolbar... Configure Toolbar...
Settings → Configure Notifications... Configure Notifications...
Settings → Configure Editor... Configure Editor...
Settings → Configure KDevelop... Configure KDevelop...
G.1.11
The Help Menu
Help → KDevelop Handbook View this document.
Help → What’s This? (Shift+F1) Draws a question mark (?) beside the mouse
pointer, clicking on a window item such as the Stop button will then display a brief explanation.
Help → Tip of the Day Tip of the Day
Help → Look in Documentation Index... (Alt+Ctrl+I) Look in Documentation
Index...
Help → Search in Documentation... (Alt+Ctrl+S) Search in Documentation...
Help → Man Page... Man Page...
Help → Info Page... Info Page...
Help → Report Bug... Report bug.
Help → About KDevelop... Display some brief information about KDevelop’s
version number, authors and license agreement.
Help → About KDE... Show some information about the version of KDE that
you are running.
202
KDevelop User Manual
Appendix H
Further Information
H.1
Getting Information
(... to be written ...)
H.2
Reporting Bugs
(... to be written ...)
H.3
Licensing
This documentation is licensed under the terms of the GNU Free Documentation License.
This program is licensed under the terms of the GNU General Public License.
203
KDevelop User Manual
Appendix I
Changes
I.1
Changes to This Document
• 2003-01-03 Bernd Gehrmann, Caleb Tennis
– initial manual layout
– many chapter contents sketched
• 2004-08-01 Bernd Pol, Ian Wadham
– manual slightly reorganized
– some missing chapters written
• 2005-05-02 Volker Paul — Many changes, including:
– split into one file per chapter/appendix
– added command reference sorted by menu (descriptions not yet complete)
– AppWizard tutorial in getting-started.docbook
– reorganized chapters, guided by Konqueror manual
– moved installation, Unix development, ‘In a Nutshell’ to the appendix
– rewrote plugin appendix, incl. plugin list generator listplugins.sh
Still far from complete, but a small step forward.
• 2006-05-20 Bernd Pol — Filling in some more ‘to be written’ holes:
204
KDevelop User Manual
Appendix J
Bibliography
(... to be written ...)
J.0.0.0.0.1
Bibliography
[1] Richard M. Stallman and Roland McGrath, GNU Make Manual
[2] David MacKenzie and Tom Tromey, GNU Automake
[3] David MacKenzie and Ben Elliston, GNU Autoconf
[4] Richard M. Stallman, Using the GNU Compiler Collection
[5] Gordon Matzigkeit, Alexandre Oliva, Thomas Tanner, and
Gary V. Vaughan, GNU Libtool
[6] Gary V. Vaughan, Ben Elliston, Tom Tromey, and Ian Lance
Taylor, GNU Autoconf, Automake, and Libtool, 1st edition, October 2000, New Riders Publishing, ISBN 1578701902.
R En[7] W. Richard Stevens, Advanced Programming in the UNIX
vironment, 1st edition, June 1992, Addison-Wesley Pub Co,
ISBN 0201563177.
[8] Bruce Eckel, Thinking in C++, Volume 1: Introduction to Standard C++, 2nd Edition, April 15, 2000, Prentice Hall, ISBN
0139798099.
[9] Karl Fogel and Moshe Bar, Open Source Development with CVS,
2nd Edition, October 12, 2001, The Coriolis Group, ISBN
158880173X.
[10] Rasmus Lerdorf and Kevin Tatroe, Programming PHP, 1st edition, March 2002, O’Reilly & Associates, ISBN 1565926102.
205
KDevelop User Manual
[11] Mark Lutz, Programming Python, 2nd Edition, March 2001,
O’Reilly & Associates, ISBN 0596000855.
[12] Boudewijn Rempt, Gui Programming With Python : Using the
Qt Toolkit, Bk&Cd-r edition, January 2002, Opendocs Llc, ISBN
0970033044.
[13] Larry Wall, Tom Christiansen, and Jon Orwant, Programming
Perl, The Camel book, 3rd Edition, July 2000, O’Reilly & Associates, ISBN 0596000278.
[14] Randal L. Schwartz and Tom Phoenix, Learning Perl, The Lama
book, 3rd Edition, July 15, 2001, O’Reilly & Associates, ISBN
0596001320.
206
KDevelop User Manual
Appendix K
Index
default build warning, 119
multiple, 148
build.xml, 147
_
–host, 148
:ext:, 113
:local:, 112
:pserver:, 113
C
C
A
abbrev, 188
Ada
new project, 107
ant
projects, 63
API
KDevelop, 164
API documentation, 189
application
distribution, 63
name, 108
type, 107
Application Wizard, 105
Artistic Style, 190
astyle, 190
author, 108
autoconf, 145
circumvent version need, 159
requirements, 158
automake, 145, 148
circumvent version need, 159
projects, 62
requirements, 158
autoproject, 145
C++
new project, 107
new project, 107
checkout, 157
Child Frame Windows, 59
class browser, 126
cmake
projects, 62
commands, 171
communication
CORBA, 170
DCOP, 170
compiling
cross, 148
KDevelop, 160
API, 164
config.h.in, 145
config.status script, 145
configure
KDevelop API, 164
configure script, 145
CORBA, 170
cross compiling, 148
ctags, 158, 189
custom projects, 63
CVS, 153
:ext:, 113
:local:, 112, 113
:pserver:, 113
local, 112
new project, 111
remote, 112
repository, 114
B
Bash
new project, 108
binary packages, 63
breakpoints, 151
lazy, 152
build configurations
207
KDevelop User Manual
graphical user interface, 172
GUI, 172
root, 112
D
Database
new project, 108
database
CVS, 111
DCOP, 170
debugger, 150
debugger toolbar, 152
debugging
regular expressions, 190
default build configuration
warning, 119
dependencies, 171
development, 168
IDE, 172
Java, 63
dialog
create new project, 106
directory
project, 108
disassemble, 151
distribution, 63
documentation tool, 189
dot, 159
Doxygen, 189
doxygen, 159
H
Haskell
new project, 108
hide menubar, 60
history, 168
I
IDE, 172
IDEAl, 59
incremental search, 121
indentation, 190
installation, 156
integrated development environment,
172
isearch, 121
J
Java
K
kbuildsycoca, 163
KDE
requirements, 158
KDEDIR, 160
KDEDIRS, 163
KDevelop
API, 164
compilation, 159
features, 173
installation, 159
non-default directory, 163
maximize work space, 60
obtain, 156
requirements, 158
survey, 58
svn
checkout, 157
update, 157
user interface modes, 59
work space, 60
keybindings, 120
E
email, 108
embedded
Qt, 149
environment
IDE, 172
F
features, 173
filter, 189
finding, 121
flex
requirements, 158
Fortran
new project, 108
frame stack, 151
framebuffer, 149
full screen mode, 60
L
language, 107
lazy breakpoints, 152
LD_LIBRARY_PATH, 160
LIBRARY_PATH, 160
libtool, 145
license, 108
local CVS, 112
G
g++
gcc
new project, 108
projects, 63
requirements, 158
requirements, 158
GNU
requirements, 158
208
KDevelop User Manual
templates, 106
edit, 116
project management, 62
projects
ant, 63
automake, 62
cmake, 62
custom, 63
Java, 63
qmake, 62
properties, 108
Python, 169
new project, 108
M
main.cpp, 108
make, 171
KDevelop installation, 160
requirements, 158
Makefile, 147, 171
custom projects, 63
Makefile.in, 145
mangling
name, 152
menubar
hide/unhide, 60
N
name
application, 108
name mangling, 152
non-default directory, 163
Q
qmake
projects, 62
Qt
requirements, 158
Qt/Embedded, 149
QTDIR, 160
Qtopia, 149
O
obtain KDevelop, 156
overall view, 58
P
Pascal
new project, 108
PATH, 160
path
new project, 108
Perl, 169
new project, 108
requirements, 158
PHP, 169
new project, 108
plugins, 185
preliminaries
KDevelop installation, 160
programming language, 107
project
application type, 107
author, 108
create new project
dialog, 106
CVS, 111
directory, 108
email, 108
initial build, 118
language, 107
license, 108
main.cpp, 108
new, 105
build, 118
programming language, 107
properties, 108
R
recompilations, 171
regexptest, 190
regular expressions
debugging, 190
remote CVS, 113
repository
CVS, 114
requirements, 158
revision control, 153
root
CVS, 112
Ruby
new project, 108
rule, 171
S
scripting languages, 168
CORBA, 170
DCOP, 170
Perl, 169
PHP, 169
Python, 169
search
in files, 122
incremental, 121
searching, 121
shell
new project, 108
UNIX, 168
SQL
209
KDevelop User Manual
new project, 108
survey, 58
svn, 156
requirements, 159
switch UI modes, 60, 70
T
Tabbed Pages, 59
target, 171
templates
project, 106
edit, 116
toolbar
debugger, 152
Toplevel Windows, 59
U
UI modes, 59
unhide menubar, 60
UNIX
development, 168
history, 168
pipe, 168
shell, 168
update, 157
user interface
full screen mode, 60
GUI, 172
KDevelop modes, 59
menubar, 60
switch modes, 60, 70
work space, 60
V
valgrind, 159
version
CVS, 111
database, 111
version need
circumvent for autoconf/automake,
159
W
warning
default build configuration, 119
watch variables, 150
210