1
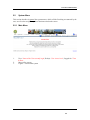
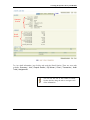
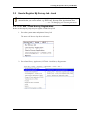
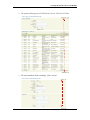
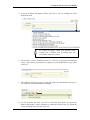
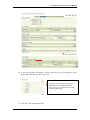
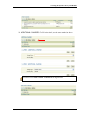
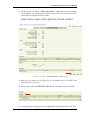
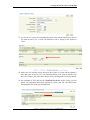
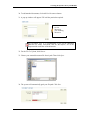
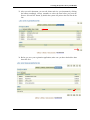
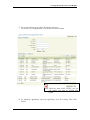
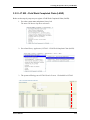
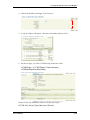
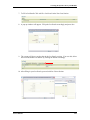
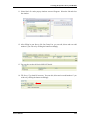
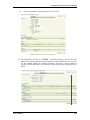
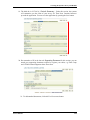
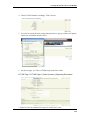
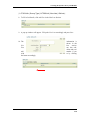
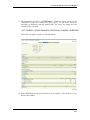
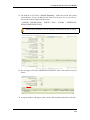
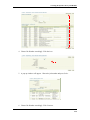
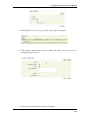
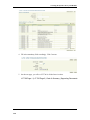
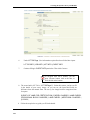
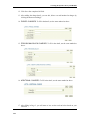
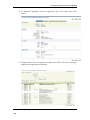
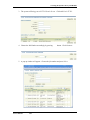
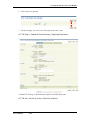
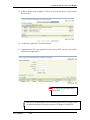
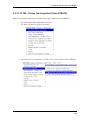
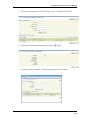
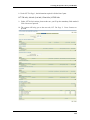
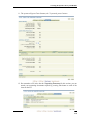
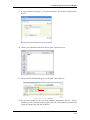
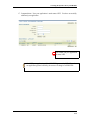
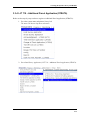
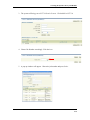
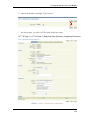
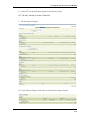
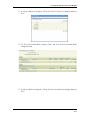
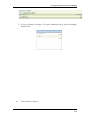
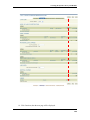
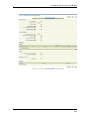
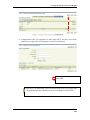
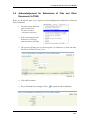
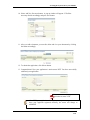
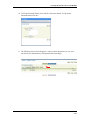
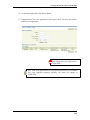
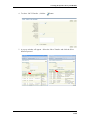
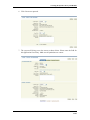
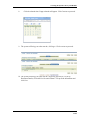
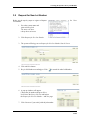
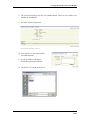
1.0 General Information
1.0
GENERAL INFORMATION
1.1
Introduction
This manual has been written mainly as a reference manual for eLJT System, testing version. The
current release version for the system is alpha version 1.0. With the new requirements coming up
and with each release, the release versions are likely to change.
1.1.1
Purpose of the manual
This manual contain information guide to use eLJT System. Use this manual as a selflearning textbook. It describes the various functions that will be provided in the
application and the general requirement to use the system.
1.1.2
How to use this document
This manual is designed to get you up and using the eLJT System. If you are new to the
system, we suggest you read this manual with the software. It gives steps-by-steps
description as to how the whole application works and new term for some of current
form. ( e.g. LJT 1 = LJT 800 )
1.1.2.1 Icons used in this manual
While reading this manual, you will notice some icons for your attention. Do not ignore
them. These icons point out useful information for do and do not in using the system.
This icon indicates information that will help you use this system more easily. It
also gives you an icebreaker at the other page
This icon is a green flag. Some action you might do while working with the
system.
This icon is a warning. Notice these warning, or else the system may show its
ugly side.
This icon is a reminder of things that already mentioned.
User’s Manual
1-1
1.0 General Information
1.2
Overview of the System
eLJT is an online e-application system to upgrade the Board current work processes and delivery
system. The system is currently in development phase. In order to up the system, a team has been
build to act as tester to ensure the system meet all the requirements.
Due to the status of the system, an error page and some technical error messages might appear as
you start using the system. This is because the system stability is not fully tested. This manual
might assist you to work out when the error appears.
The tester team’s comment and testing result would help the system improvement.
1.2.1 General system issues
1.2.1.1 System Performance
eLJT is a web-based system. The System required internet connection. Level of time
loading page will be base on the server runtime as well as the user internet line.
1.2.1.2 System Requirement
The system interface is set for Microsoft internet explorer with 1024 by 768 display
mode and text size = smaller type. Other than, this setting might result in difference look.
1.2.1.3 Terminology
Session
Register new Job – Land
LJT 800
LJT 1
Claim for Fieldwork completed – Land (60%)
LJT 802
LJT 14
Claim for Job completed – Land (81%)
LJT 804
LJT 2
Additional – Land
LJT 810
LJT 1
Register new Job – Strata
LJT 700
LJT 12
Claim for Fieldwork completed – Strata (60%)
LJT 702
LJT 13
Claim for Job completed – Strata (81%)
LJT 704
LJT 13A
Additional – Strata
LJT 710
LJT 12
User’s Manual
1-2
Each time you login, you will be in a
session
1.0 General Information
GETTING STARTED
This section provides a general walkthrough of the system from initiation through exit.
2.1
Logging On
Open your internet browser and go to the URL
http://www.eljt.org.my/app/faces/pub/login.jspx.
Login into the system by using User ID and password given.
Remember to set your browser as
the best setting for system best
quality look.
The system does not allow user
to use enter button to move from
one field to another.
User’s Manual
2-1
1.0 General Information
2.2
System Menu
This section describes in general the system menus, which will the first thing encountered by the
user, as well as the navigation paths to functions noted on the screen.
2.2.1 Main Menu
1.
2.
3.
User : Name of the User currently login | Role(s) : User Access level | Logged On : Time
& Date
Menu of the system.
Logout – exit from the system
User’s Manual
2-2
1.0 General Information
2.2.2 System menu pathway
The design of the system menu is a drop down menu.
______________________________________________________________________________
Main | Registration | Survey Job
Survey Job
My Survey Job | Land Survey Application | Strata Survey Application | Acknowledgement
for Submission of Plans and Other Documents (LJT600) | Time Extension Application
(LJT602) | Change of Client Application (LJT604) | Transfer Job List (LJT606) | Assign
Job | Request for New Lot Number | Reports.
Land Survey Application
LJT 800 – Land Survey Registration
LJT 802 – Field Work Completed (LAND)
LJT 804 – Survey Job Completed Claim (LAND)
LJT 810 – Additional Lot Application (LAND)
LJT 812 – Change of Layout Application (LAND)
User’s Manual
2-3
1.0 General Information
Strata Survey Application
LJT 700 – Strata Survey Registration
LJT 702 – Subdivision of Building Application
LJT 704 – Survey Job Completed Claim (STRATA)
LJT 710 – Additional Parcel Application (STRATA)
User’s Manual
2-4
1.0 General Information
2.3
System Security
The e-LJT System is integrated with the iVEST Smartcard.
Environment for Secure Transactions
iVEST stands for "Virtual
Its initial offering allows users to create digital signatures, and produces extremely reliable user
identification on an open system such as the Internet. It contributes tremendously towards secure
communications of a world class standard.
2.3.1 How to apply for iVEST
Below are the ways to apply for iVEST Smartcard.
Step 1:
Self register at iVEST™ Smartcard Pre-registration page. Complete all sections of the
form.
Step 2:
Physically present at iVEST RA Counter, Jaring INTAC Building, MIMOS BERHAD,
Technology Park Malaysia, Kuala Lumpur to complete the registration process and to get
your iVEST™ Smartcard. Things to bring along with:
•
•
•
Recent passport size colour photograph
Photocopy both sides of NRIC (for Malaysian)
o Or Photocopy of passport (for non-Malaysian)
Payment in form of Cash, Credit Card, Cheque, Bank Draft and Money Order
You may also physically present at Anjung Internet Jaring (AIJ) nationwide with all the
above documents, plus you have to fill and submit manual form to complete the
registration process. [Download form]. State on top of the form that you have
successfully done iVEST Smartcard Pre-registration
Kindly take note that there will be no immediate processing at AIJ Counters. We will
inform you via email once your iVEST™ Smartcard is ready for collection.
Email to [email protected] to request for iVEST Smartcard quotation and for other
inquires.
User’s Manual
2-5
1.0 General Information
2.3.2 Digital Certificate
Digital certificates
are electronic
format of
any
physical or paper certificates.
Some examples of physical certificates are driver's licenses, passports or membership cards.
Certificates serve as an identity token for an individual for certain purposes, e.g. a driver's license
identifies someone who can legally drive in a particular country. Likewise, a digital certificate
can be presented electronically to prove your identity and rights to access information and
services on intended web site.
Digital Signature will be used as an added security feature to enhance non-repudiation for
important documents and information.
During digital signing, the user’s Smart Card or MyKad must be present in the card reader. Once
initiated by the user, the system will automatically read the details of the Smart Card or MyKad
and initiate the signing transaction. The details of the signature will be kept together with the
record or document in the system.
The Digital Signature can be verified using the generated signature by comparing the details and
validity of the signature store in the signature file and checking whether the record or document
has been changed.
2.4
Exit System
To exit from the system, users have to click logout item at the top right of the page. See item
2.2.1
User’s Manual
2-6
3.0 Using the System: Survey Job Module
3.0
USING THE SYSTEM
Survey Job module
3.1
USING THE SYSTEM: SURVEY JOB MODULE
There are ten main sub-modules under Survey Job Module.
My Survey Job | Land Survey Application | Strata Survey Application | Acknowledgement
for Submission of Plans and Other Documents (LJT600) | Time Extension Application
(LJT602) | Change of Client Application (LJT604) | Transfer Job List (LJT606) | Assign
Job | Request for New Lot Number | Reports.
3.1.1 My Survey Job Profile
My Survey Job Profile is a sub-module that views particulars about Job. As we know, My
Survey Job will view all details about jobs that have been registered in LJT.
Under this sub-module, the screen is separated into two sections: Summary Section and Detail
Section.
User’s Manual
3-1
3.0 Using the System: Survey Job Module
TABS
Summary
Section
Detail
Section
To view detail information, just click the tab under the Detail Section. There are seven tabs
available: Summary | Lots | Deposit Details | Sijil Akuan | Client | Transaction | Audit
Trails | Assignments.
You can use the link at the bottom of Detail
Section besides using the tabs to navigate each
of the information.
User’s Manual
3-2
3.0 Using the System: Survey Job Module
3.2
How to Register My Survey Job - Land
Before you start to register your survey job, you must scan all related supporting
documents that you want to submit. e.g. PBN Letter, Precomp Plan, Appointment letter
…….see 7.0 Managing your scanning document
3.2.1 LJT 800 – Land Survey Registration
Below are the steps-by-steps ways to register a Land Survey Job.
1. Go to the system menu and point to Survey Job.
The menu will show a drop down sub-menu
2. Go to Land Survey Application | LJT 800 – Land Survey Registration.
User’s Manual
3-3
3.0 Using the System: Survey Job Module
3. The system will bring you to LJT 800 Search Screen. Click New LJT 800.
3. Fill in the mandatory field accordingly. Click Continue.
User’s Manual
3-4
3.0 Using the System: Survey Job Module
5. On the next page, you will see LJT 800 that been divided into 4 tabs.
LJT 800 Page 1 | LJT 800 Page 2 | Claim & Summary | Supporting Documents
Under LJT 800 Page 1, the information required is divided into 5 parts.
LJT 800 INFO | SURVEY JOB GROUP INFO | SURVEY TYPE | ORIGINAL LOT |
QUERIES |
6. To fill in the SURVEY TYPE, Click Add New Survey Type in the Survey Type
Section.
User’s Manual
3-5
3.0 Using the System: Survey Job Module
7. A pop up windows will appear. Choose your Survey Type by clicking one of the
drops down item.
If it does not appear, check your browser. Some
browser has a windows pop up blocker that will
prevent this windows to pop up
8. Set your Survey Type as Default by select Yes. Click Save. If you have more than one
survey’s type, choose your major survey purpose as your Default Survey Type. Then
click Save.
9. After filling in your survey type, you can edit, delete even add another survey type if
you wish to by clicking the button accordingly.
10. To edit or delete the item, you have to select the item before you press the
Remove/Edit button. Always remember to check the selected item, by default the
system will point to the first item in the list.
User’s Manual
3-6
3.0 Using the System: Survey Job Module
11. For Lot Details Particulars, go to LOT DETAILS Section, Click Add New Lot button.
12. A pop up windows will appear. Fill in the particulars accordingly.
13. After adding your Lot Details, you can edit, delete even add another Lot Details if
you wish to. To edit or delete the item, you have to select the item before you press
the Remove Selected Row / Edit button. Always remember to check the selected item,
by default the system will point to the first item in the list.
14. Continue to fill in CLIENT’S INFO particulars. Then click Continue.
link
User’s Manual
3-7
3.0 Using the System: Survey Job Module
To navigate from tab to another, you can
press Continue button, click at the tabs, or
click the link at the bottom.
15. The second tab in LJT 800 is | LJT 800 Page 2 |. Under this section, you have to fill
in the details of your survey charge as in [ LJT 1 1, page 2 ] . As you can see, the
layout and fields are difference from the manual form. The survey fee charge has
been categorized into four parts.
LJT800 CHARGE | LOT CHARGES | OTHER CHARGE | ADDITIONAL CHARGES
| QUERIES |
Follow the steps below to guide you fill in the details.
16. BASIC CHARGE .As you can see, the system will automatically show RM 1,000
for your basic charge. For this charge, the system does not allow editing.
17. LOT CHARGES. For Lot Charges Detail, click Add New Lot Charges button as
shown.
1
User’s Manual
3-8
3.0 Using the System: Survey Job Module
18. A pop pup windows will appear. Choose your Survey type by clicking the drops
down item. Then follow by the Usage Type.
System will only display survey type
that has been chosen under the first
page. Usage type will be based on your
selected survey type.
19. Click Save after completed all field.
User’s Manual
3-9
3.0 Using the System: Survey Job Module
20. After adding lot charges, you can edit, delete even add another lot charges by
clicking the button accordingly.
21. OTHER CHARGES. To fill in the detail, use the same method as above.
You have to use OTHER CHARGES for Pre-Computational Plan
User’s Manual
3-10
3.0 Using the System: Survey Job Module
22. ADDITIONAL CHARGES. To fill in the detail, use the same method as above.
You have to use ADDITIONAL CHARGES for Digital Data.
User’s Manual
3-11
3.0 Using the System: Survey Job Module
23. The third tab in LJT 800 is | Claim & Summary |. Under this section, the systems
will summaries you, the Deposit and Claim of your survey fee. As you can see, the
section has been categorized into five parts.
SERVEY FEES | CLAIMS | LEVIES | DEPOSITS | REFUND | QUERIES
24. Make sure you choose Yes/No option for 5% Government Service Tax (GST) and
claim for 10% of survey fee.
25. Do not forget to fill in the DEPOSIT INFO detail. Click Add New Deposit button.
26. A pop up windows will appear. After completing fill in all the particulars, click Save.
User’s Manual
3-12
3.0 Using the System: Survey Job Module
27. As you can see, system will automatically check if the amount deposited is more or
less than the survey fee. If more, the difference will be display in the Refund to
Client.
28. Make sure you enter the correct amount of the Cheque. If correct and the amount is
more than your survey fee, LJT will refund the money to the client as stated. If you
have two Cheques, just in the other Cheque info by clicking Add New Deposit button.
29. Do remember to fill in the last tab: Attached Document. In this section, you can
attach your supporting documents required to register your job, like PBN Letter,
Precomp Plan and Client Appointment letter.
User’s Manual
3-13
3.0 Using the System: Survey Job Module
30. To add attached documents, click Add New Documents button.
31. A pop up windows will appear. Fill in all the particulars required.
See 4.0
Managing
your scanning
document
For Document Title, it is recommended if you put the document
reference for future convenient, and for Description, fill in the
important info such Date of the document.
32. For the File To Upload, click Browse
33. Choose your scanned document file from it path. Then click Open.
34. The system will automatically grab your file path. Click Save.
User’s Manual
3-14
3.0 Using the System: Survey Job Module
35. After you add a document, you can edit, delete and view you documents by clicking
the button accordingly. Always remember to select the item before you press the
Remove Selected Row button, by default the system will point to the first item in the
line.
36. Before you save your registration application, make sure you have checked the data
then click Save
User’s Manual
3-15
3.0 Using the System: Survey Job Module
37. The system will bring you to the LJT 800 Search Screen.
As you can see, your application is list out in DATA ENTRY status.
Under the status DATA ENTRY, you can
still modify your data by clicking Edit
button.
38. To submit the application, select the application, click View button. Then Click
Submit.
User’s Manual
3-16
3.0 Using the System: Survey Job Module
39. Congratulations. Now you application is under status NEW. You have successfully
submitted your application for AP Registration to the Board.
User’s Manual
3-17
3.0 Using the System: Survey Job Module
You
cannot
edit
your
application in status NEW.
After NEW, your application will be VERIFIED (process) by LJT Officer.
Once your applicant registered officially, the status will change to
APPROVED.
User’s Manual
3-18
3.0 Using the System: Survey Job Module
3.2.2 LJT 802 – Field Work Completed Claim (LAND)
Below are the steps-by-steps ways to register a Field Work Completed Claim (LAND).
1. Go to the system menu and point to Survey Job.
The menu will show a drop down sub-menu
2. Go to Land Survey Application | LJT 802 – Field Work Completed Claim (LAND).
3. The system will bring you to LJT 802 Search Criteria. Click Add New LJT 802.
User’s Manual
3-19
3.0 Using the System: Survey Job Module
4. Choose Job Number accordingly. Click Continue.
5. A pop up windows will appear. Choose the job number and press Select.
6. On the next page, you will see LJT802 being divided into 4 tabs.
LJT 802 Page 1 | LJT 802 Page 2 | Claim Summary |
LJT802A&Supporting Documents|
Under LJT 802, the information required is divided into 4 parts.
LJT 802 Info | Survey Type | New Lots | Old Lots |
User’s Manual
3-20
3.0 Using the System: Survey Job Module
7. To fill in Lot Details Click Add New Lot Details in the New Lots Section.
8. A pop up windows will appear. Fill up the Lot Details accordingly and press Save.
9. The system will show you the data in the Lot Details section. You can edit, delete
and even add another Lot Details by clicking the button accordingly.
10. After filling in your Lot Details, proceed with Lot Claims Section.
User’s Manual
3-21
3.0 Using the System: Survey Job Module
11. Select Batch No. and a pop up windows screen will appear. Select the Job and close
the window.
12. After filling in your Survey Job Lot Group List, you can edit, delete and even add
another if you wish to by clicking the button accordingly.
13. You can also see the old lot in OLD LOT details.
14. Fill Survey Type detail if necessary. You can edit, delete and even add another if you
wish to by clicking the button accordingly.
User’s Manual
3-22
3.0 Using the System: Survey Job Module
15.
Fill in the mandatory field accordingly. Click Continue.
18. The second tab in LJT 802 is | LJT 802A |. Under this section, you have to fill in the
details of your date of approval and presentation. See the attachment below. You can
use the calendar function by pressing the button. Then Press Continue button to
proceed with the application. You can also save the application by pressing the Save
button.
User’s Manual
3-23
3.0 Using the System: Survey Job Module
19. The third tab in LJT 802 is | Claim & Summary |. Under this section, the systems
will summaries you the claim of your survey fee. Then Press Continue button to
proceed the application. You can save the application by pressing the Save button.
20. Do remember to fill in the last tab: Supporting Document. In this section, you can
attach your supporting documents required to register your claim, e.g. Final Comp
and LJT802/Acknowledgement letter from client.
21. To add attached documents, click Add New Documents button.
User’s Manual
3-24
3.0 Using the System: Survey Job Module
22. A pop up windows will appear. Fill in all the particulars required.
…see 4.0
…….see 4.0 Managin
Managing your
Scanning document
For Document Title, it is recommended if you put the document
reference for future convenient, and for Description, fill in the
important info such Date of the document.
23. For the File To Upload, click Browse.
24. Choose your scanned document file from it path. Then click Open.
User’s Manual
3-25
3.0 Using the System: Survey Job Module
25.
The system will automatically grab your file path. Click Save.
26. After you add a document, you can edit, delete and view you documents by clicking
the button accordingly. Always remember to select the item before you press the
Edit, Delete or Add New button, by default the system will point to the first item in
the line.
27. Before you save your registration application, make sure you have checked the agree
statement, then click Save.
28. You can submit the application by clicking the Submit button. Your application will
be in New Status. You can save the application by clicking the Save button, then it
will appear as Date Entry status.
Under the status DATA ENTRY, you
still can modify your data by clicking
Edit button.
User’s Manual
3-26
3.0 Using the System: Survey Job Module
29. Congratulations. Now you application is under status NEW. You have successfully
submitted your application.
You cannot edit your application
in status NEW
.
After NEW, your application will be VERIFIED (process) by LJT Officer.
Once your applicant registered officially, the status will change to
APPROVED
User’s Manual
3-27
3.0 Using the System: Survey Job Module
3.2.3 LJT 804 – Survey Job Completed Claim (LAND)
Below are the steps-by-steps on how to register a Survey Job Completed Claim (LAND).
Remember to submit LJT600 – Acknowledgement for submission of Plan and other documents
which is known as LJT3 first before you do the application of LJT 804.
1. Go to the system menu and point to Survey Job.
The menu will show a drop down sub-menu
2. Go to Land Survey Application | LJT 804 – Survey Job Completed Claim (LAND).
3. The system will bring you to LJT 804 Search Criteria. Click Add New LJT 804.
User’s Manual
3-28
3.0 Using the System: Survey Job Module
4. Choose LTJ600 Number accordingly. Click Continue.
5. You also can search the job by using lookup function. A pop up windows will appear.
Choose the job number and press Select.
6. On the next page, you will see LJT804 being divided into 4 tabs.
LJT 804 Page 1 LJT 804 Page 2 | Claim Summary | Supporting Documents
7. Under LJT 802, the information required is divided into 3 parts.
User’s Manual
3-29
3.0 Using the System: Survey Job Module
| LJT 804 Info | Survey Type | LJT600 Info | New Lots | Old Lots |
8. To fill in Lot Details, click Add New in the New Lots Section.
9. A pop up windows will appear. Fill up the New Lots accordingly and press Save.
10. The
New
You
add
wish
the button accordingly
information is
shown in the
Lots
section.
can also edit,
delete and even
another if you
to by clicking
User’s Manual
3-30
3.0 Using the System: Survey Job Module
11. The second tab in LJT 804 is | LJT 804 Page 2 |. Under this section, you have to fill
in the details of your survey charge as in [ LJT, page 2 ] . As you can see, the layout
and fields are difference from the manual form. The survey fee charge has been
categorized into four parts.
.
| LOT CHARGES | OTHER CHARGES | ADDITIONAL CHARGES | SUBSIDIES |
Follow the steps below to guide you fill in the details.
12. Select ADD NEW and a pop up windows screen will appear. Select the Survey Type
and save the window.
User’s Manual
3-31
3.0 Using the System: Survey Job Module
13. After filling in your Survey Job Lot Group List, you can edit, delete and even add
another if you wish to by clicking the button accordingly.
14. Fill Other Charges detail if necessary.
15. You can also edit, delete and even add another if you wish to by clicking the button
accordingly.
16. Fill New Additional Charges detail if necessary. You can also edit, delete and even
add another if you wish to by clicking the button accordingly.
User’s Manual
3-32
3.0 Using the System: Survey Job Module
17. The last part is about subsidy information. Click Continue to proceed with the form.
User’s Manual
3-33
3.0 Using the System: Survey Job Module
18. The third tab in LJT 804 is | Claim & Summary |. Under this section, the systems
will summaries for you, the Deposit and Claim of your survey fee. As you can see,
the section has been categorized into 6 parts.
| DEPOSIT INFORMATION | SURVEY FEES | CLAIMS | ADDITIONAL
DEPOSITS|REFUND|LEVIES||
ADDITIONAL DEPOSITS will be displayed if the deposits need to be top up.
19. Do not forget to fill in the ADDITIONAL DEPOSIT detail. Click Add New Deposit
button.
20. A pop up windows will appear. After you have filled in all the particulars, click Save.
User’s Manual
3-34
3.0 Using the System: Survey Job Module
21. Do remember to fill in the last tab: Supporting Document. In this section, you can
attach your supporting documents required to register your claim.
22. To add attached documents, click Add New Documents button.
23. A pop up windows will appear. Fill in all the particulars required.
…see 4.0 Managing your
scanning document
User’s Manual
3-35
3.0 Using the System: Survey Job Module
For Document Title, it is recommended if you put the document
reference for future convenient, and for Description, fill in the
important info such Date of the document.
24. For the File To Upload, click Browse.
25. Choose your scanned document file from it path. Then click Open.
26. The system will automatically grab your file path. Click Save.
User’s Manual
3-36
3.0 Using the System: Survey Job Module
27. After you add a document, you can edit, delete and view you documents by clicking
the button accordingly. Always remember to select the item before you press the Edit
/ Delete button, by default the system will point to the first item in the line.
28. You can submit the application by clicking the Submit button. Your application will
be in New Status. You also can save the application by clicking the Save button, then
it will appear as Date Entry status.
Under the status DATA ENTRY, you can
still modify your data by clicking Edit
button.
29. Congratulations. Now you application is under status NEW. You have successfully
submitted your application.
You cannot edit your application in
.
status
NEW
User’s Manual
3-37
3.0 Using the System: Survey Job Module
After NEW, your application will be VERIFIED (process) by LJT Officer. Once
your applicant registered officially, the status will change to APPROVED
3.2.4 LJT 810 – Additional Lot Application (LAND)
Below are the steps-by-steps on how to register a Survey Job Completed Claim (LAND).
1. Go to the system menu and point to Survey Job.
The menu will show a drop down sub-menu
2. Go to Land Survey Application | LJT 810 – Additional Lot Application (LAND).
3. The system will bring you to LJT 810 Search Criteria. Click Add New LJT 810.
User’s Manual
3-38
3.0 Using the System: Survey Job Module
4. Choose Job Number accordingly. Click the icon.
5. A pop up windows will appear. Choose the job number and press Select.
6. Choose Job Number accordingly. Click Continue.
User’s Manual
3-39
3.0 Using the System: Survey Job Module
7. On the next page, you will see LJT810 being divided into 4 tabs.
LJT 810 Page 1 | LJT 810 Page 2 | Deposit & Claim Summary | Supporting Documents
User’s Manual
3-40
3.0 Using the System: Survey Job Module
8. Under LJT 810, the information required is divided into 5 parts.
LJT 810 Info | Deposit Confirmation Info | Job Info | Survey Type | Lot Info
9. To fill in Survey Type Click Add New Lot Details in the Lot Details Section.
10. A pop up windows will appear. Fill up the Survey Type accordingly and press Save.
User’s Manual
3-41
3.0 Using the System: Survey Job Module
11. After filling in your Survey Type, proceed with Original Lots Section.
12. Click Add New button, then a pop up windows will appear. Fill up the New Lots
accordingly and press Save.
13. Click Continue button and the next page will appear.
User’s Manual
3-42
3.0 Using the System: Survey Job Module
`
14. To fill in Lot Chargers Click Add New in the Lot Chargers section.
15. A pop up windows will appear. Fill up the Lot Chargers accordingly and press Save.
User’s Manual
3-43
3.0 Using the System: Survey Job Module
16. To fill in Other Chargers Click Add New in the Other Chargers section.
17. A pop up windows will appear. Fill up the Other Chargers accordingly and press
Save.
18. To fill in Additional Chargers Click Add New Additional Chargers in the Additional
Chargers section.
19. A pop up windows will appear. Fill up the Additional Chargers accordingly and
press Save.
User’s Manual
3-44
3.0 Using the System: Survey Job Module
20. Click Continue, then the next page will displays.
21. Click whether Yes or No at GST field in Survey Fees section.
22. Choose Yes or No at 10% Survey Fee field in Claim section.
23. To fill in Deposit Info, Click Add New Deposit in the Deposit section.
User’s Manual
3-45
3.0 Using the System: Survey Job Module
24. A pop up windows will appear. Fill up the Deposit Details accordingly and press
Save.
25. Click the Calendar icon and the pop up calendar window will appear. Choose and
click the date.
26. Click Continue and the next page will be displayed.
27. To fill in Attached Documents, Click Add New in the Supporting Documents
Section.
User’s Manual
3-46
3.0 Using the System: Survey Job Module
28. A pop up windows will appear. Fill up the Attached Documents details.
29. To upload file, click Browse button. A pop up windows will appear then choose the
file.
User’s Manual
3-47
3.0 Using the System: Survey Job Module
30. To complete the application, click Submit button.
31. Congratulations. Now you application is under status NEW. You have successfully
submitted your application for Additional Lot and Fee to the Board.
You cannot edit your application in
.
status
NEW
After NEW, your application will be VERIFIED (process) by LJT Officer. Once
your applicant registered officially, the status will change to APPROVED
User’s Manual
3-48
3.0 Using the System: Survey Job Module
How to Register My Survey Job - Strata
Before you start to register your survey job, you must scan all related supporting
documents that you want to submit. e.g. PBN Letter, Precomp Plan, Appointment letter
…….see 7.0 Managing your scanning document
LJT 700 – Strata Survey Application
Below are the steps-by-steps ways to register a Strata Survey Application.
1. Go to the system menu and point to Survey Job.
The menu will show a drop down sub-menu
2. Go to Strata Survey Application | LJT 700 – Strata Survey Registration.
3. The system will bring you to LJT 700 List Search Screen. Click New LJT 700.
User’s Manual
3-49
3.0 Using the System: Survey Job Module
4. Fill in the mandatory field accordingly. Click Continue.
5. On the next page, you will see LJT 700 is divided into 4 sections
LJT 700 Page 1 | LJT 700 Page 2 | Claim & Summary | Supporting Documents
User’s Manual
3-50
3.0 Using the System: Survey Job Module
Under LJT 700 Page 1, the information required has been divided into 4 parts.
6.
LJT 700 INFO | JOB INFO | LOT INFO | CLIENT INFO
Continue filling in CLIENT INFO particulars. Then click Continue.
7.
To navigate from tab to another, you can
press Continue button, click at the tabs, or
click the link at the bottom.
8. The second tab in LJT 700 is | LJT 700 Page 2 |. Under this section, you have to fill
in the details of your survey charge. As you can see, the layout and fields are
difference from the manual form. The survey fee charge has been categorized into
four parts.
SURVEY OF LAND FOR CERTIFICATION | PARCEL CHARGES | LAND PARCEL
|PROVISIONAL BLOCK CHARGES | LAND PARCEL | ADDITIONAL CHARGES |
QUERIES |
9.
Follow the steps below to guide you fill in the details.
User’s Manual
3-51
3.0 Using the System: Survey Job Module
10. SURVEY OF LAND FOR CERTIFICATION . Click Add New button as shown.
11. A pop pup windows will appear. Choose your Survey Item by clicking the drop down
item.
User’s Manual
3-52
3.0 Using the System: Survey Job Module
12. Click Save after completed all field.
13. After adding the charge detail, you can edit, delete even add another lot charges by
clicking the button accordingly.
14. PARCEL CHARGES. To fill in the detail, use the same method as above.
15. PROVISIONAL BLOCK CHARGES. To fill in the detail, use the same method as
above.
16. ADDITIONAL CHARGES. To fill in the detail, use the same method as above.
17. After filling in Page 2, you will more or less see the result as below based on your
selection.
User’s Manual
3-53
3.0 Using the System: Survey Job Module
18. The third tab in LJT 700 is | Claim & Summary |. Under this section, the systems
will summaries you, the Deposit and Claim of your survey fee. As you can see, the
section has been categorized into five parts.
SURVEY CHARGES SUMMARY | CLAIM SUMMARY | LEVIES | DEPOSIT |
REFUNDS & TOP UP | QUERIES |
User’s Manual
3-54
3.0 Using the System: Survey Job Module
19. Make sure you choose Yes/No option for 5% Government Service Tax (GST) and
claim for 10% of survey fee.
20. Do not forget to fill in the DEPOSIT detail. Click Add New Deposit button.
21. A pop up windows will appear. After completing fill in all the particulars, click Save.
User’s Manual
3-55
3.0 Using the System: Survey Job Module
22. As you can see, system will automatically check if the amount deposited is more or
less than the survey fee. If more, the difference will be display in the Amount to Be
Refund column.
23. Make sure you enter the correct amount of the Cheque. If correct and the amount is
more than your survey fee, LJT will refund the money to the client as stated. If you
have two Cheques, just in the other Cheque info by clicking Add New Deposit button.
24. Do remember to fill in the last tab: Supporting Document. In this section, you can
attach your supporting documents required to register your job, like PBN Letter,
Precomp Plan and Client Appointment letter.
25. To add attached documents, click Add New Document button.
26. A pop up windows will appear. Fill in all the particulars required.
For Document Title, it is recommended if you put the document
reference for future convenient, and for Description, fill in the
important info such Date of the document.
27. For the File To Upload, click Browse.
User’s Manual
3-56
3.0 Using the System: Survey Job Module
28. Choose your scanned document file from it path. Then click Open.
29.. The system will automatically grab your file path. Click Save.
30. After you add a document, you can edit, delete and view you documents by clicking
the button accordingly. Always remember to select the item before you press the
Remove Selected Row button, by default the system will point to the first item in the
line.
31. The system will bring you to the LJT 700 Search Screen.
As you can see, your application is listed out in DATA ENTRY status.
Under the status DATA ENTRY, you still can
modify your data by clicking Edit button.
User’s Manual
3-57
3.0 Using the System: Survey Job Module
32. To submit the application, select the application, click View button. Then Click
Submit.
33. Congratulations. Now you application is under status NEW. You have successfully
submitted your application to the Board.
User’s Manual
3-58
3.0 Using the System: Survey Job Module
You
cannot
edit
your
application in status NEW.
After NEW, your application will be VERIFIED (process) by LJT Officer.
Once your applicant registered officially, the status will change to
APPROVED.
User’s Manual
3-59
3.0 Using the System: Survey Job Module
LJT 702 – Subdivision of Building Application
Below are the steps-by-steps ways to register Subdivision of Building Application.
1. Go to the system menu and point to Survey Job.
The menu will show a drop down sub-menu
2. Go to Strata Survey Application | LJT 702 – Subdivision of Building Application.
User’s Manual
3-60
3.0 Using the System: Survey Job Module
3. The system will bring you to LJT 702 Search Screen. Click Add New LJT 702.
4. Choose the Job Number accordingly by pressing
button. Click Continue.
5. A pop up window will appear. Choose the job number and press Select.
User’s Manual
3-61
3.0 Using the System: Survey Job Module
6. Click Continue to proceed.
7. On the next page, you will see LJT702 being divided into 3 tabs.
LJT 702 Page 1 | Deposit & Claim Summary | Supporting Documents
8. Under LJT 702 Page 1, the information required is divided into 4 parts.
LJT 702 Info | Job Info | Lot Info | Client Info | Queries |
User’s Manual
3-62
3.0 Using the System: Survey Job Module
9. Under Job Info section, please make sure you fill up the mandatory field marked *.
Click Continue to proceed.
User’s Manual
3-63
3.0 Using the System: Survey Job Module
10. The system will bring you to the next tab, Deposit & Claim Summary.
Continue to proceed.
Press
11. To fill in Supporting Documents, Click Add New in the Attached Documents section.
12. A pop up windows will appear. Fill up the mandatory field and press Save.
User’s Manual
3-64
3.0 Using the System: Survey Job Module
13. Continue filling up the mandatory field for each of the document in the Attached
Document List.
14. To submit the application, click Submit button.
15. Congratulations! Now your application is under status NEW. You have successfully
submitted your application.
You cannot edit your application in
.
status NEW
After NEW, your application will be VERIFIED (process) by LJT Officer. Once
your applicant registered officially, the status will change to APPROVED
User’s Manual
3-65
3.0 Using the System: Survey Job Module
3.3.3 LJT 704 – Survey Job Completed Claim (STRATA)
Below are the steps-by-steps ways to register Survey Job Completed Claim (STRATA).
1. Go to the system menu and point to Survey Job.
The menu will show a drop down sub-menu
2. Go to Strata Survey Application | LJT 704 – Survey Job Completed Claim (STRATA).
User’s Manual
3-66
3.0 Using the System: Survey Job Module
3. The system will bring you to LJT 704 Search Screen. Click Add New LJT 704.
4. Choose the Job Number accordingly by pressing
button.
5. A pop up window will appear. Choose the job and press Select button.
User’s Manual
3-67
3.0 Using the System: Survey Job Module
6. Click Continue to proceed.
7. On the next page, you will see LJT704 being divided into 4 tabs.
LJT 704 Page 1 | LJT 704 Page 2 | Claims Summary | Supporting Documents
User’s Manual
3-68
3.0 Using the System: Survey Job Module
8. Under LJT 704 Page 1, the information required is divided into 5 parts.
LJT 704 Info | Job Info | Lot Info | Client Info | LJT600 Info
9. Under LJT704 Info section, please make sure you fill up the mandatory field marked *.
Click Continue to proceed.
10. The system will bring you to the next tab, LJT 704 Page 2. Press Continue to
proceed.
User’s Manual
3-69
3.0 Using the System: Survey Job Module
11. The system will go to Claim Summary tab. To proceed, press Continue.
12. Do remember to fill in the last tab: Supporting Document. In this section, you can
attach your supporting documents required by pressing Edit button to each of the
items on the list.
User’s Manual
3-70
3.0 Using the System: Survey Job Module
13. A pop up window will appear. Fill in the description. For the file to Upload, Click
Browse.
14. Choose your scanned document file from its path. Then click Open.
15. The system will automatically grab your file path. Then click Save.
16. Do the same method for the rest of the attached documents in the list. Always
remember to select the item before you press the Edit / Delete button, by default, the
system will point to the first item on the list.
User’s Manual
3-71
3.0 Using the System: Survey Job Module
17. Congratulations. Now your application is under status NEW. You have successfully
submitted your application.
You cannot edit your application
in. status NEW
After NEW, your application will be VERIFIED (process) by LJT Officer. Once
your applicant registered officially, the status will change to APPROVED
User’s Manual
3-72
3.0 Using the System: Survey Job Module
3.3.4 LJT 710 – Additional Parcel Application (STRATA)
Below are the steps-by-steps on how to register a Additional Parcel Application (STRATA).
1. Go to the system menu and point to Survey Job.
The menu will show a drop down sub-menu
2. Go to Land Survey Application | LJT 710 – Additional Parcel Application (STRATA).
User’s Manual
3-73
3.0 Using the System: Survey Job Module
3. The system will bring you to LJT 710 Search Criteria. Click Add New LJT 710.
4. Choose Job Number accordingly. Click the icon.
5. A pop up windows will appear. Choose the job number and press Select.
User’s Manual
3-74
3.0 Using the System: Survey Job Module
6. Choose Job Number accordingly. Click Continue.
7. On the next page, you will see LJT710 being divided into 4 tabs.
LJT 710 Page 1 | LJT 710 Page 2 | Deposit & Claim Summary | Supporting Documents
User’s Manual
3-75
3.0 Using the System: Survey Job Module
8. Under LJT 710, the information required is divided into 4 parts.
LJT 710 Info | Job Info | Lot Info | Client Info
9. The next page will appear.
10. To fill in Parcel Chargers Click Add New in the Parcel Chargers Section.
User’s Manual
3-76
3.0 Using the System: Survey Job Module
11. A pop up windows will appear. Fill up the Parcel Chargers accordingly and press
Save.
12. To fill in Provisional Block Chargers Click Add New in the Provisional Block
Chargers Section.
13. A pop up windows will appear. Fill up the Provisional Block accordingly and press
Save.
User’s Manual
3-77
3.0 Using the System: Survey Job Module
14. To fill in Azimuth Chargers Click Add New Row in the Provisional Block Chargers
Section.
15. A pop up windows will appear. Fill up the Additional Chargers accordingly and
press Save.
16. To fill in Additional Chargers Click Add New in the Additional Chargers Section.
User’s Manual
3-78
3.0 Using the System: Survey Job Module
17. A pop up windows will appear. Fill up the Additional Charge Details accordingly
and press Save.
18.
Click Continue to proceed.
User’s Manual
3-79
3.0 Using the System: Survey Job Module
19. Click Continue, then the next page will be displayed.
User’s Manual
3-80
3.0 Using the System: Survey Job Module
User’s Manual
3-81
3.0 Using the System: Survey Job Module
20. Click whether Yes or No at Tax field in Deposit Section.
21. Choose Yes or No at 10% Claim for Advance field in Claim Section.
22. To fill in Deposit Info, Click Add New Deposit in the Deposit Info Section.
23. A pop up windows will appear. Fill up the Deposit Details accordingly and press
Save.
User’s Manual
3-82
3.0 Using the System: Survey Job Module
24. Click the Calendar icon and the pop up calendar window will appear. Choose and
click the date.
25. Click Continue to proceed.
User’s Manual
3-83
3.0 Using the System: Survey Job Module
26. The next page will displayed.
User’s Manual
3-84
3.0 Using the System: Survey Job Module
27. To fill in Attached Documents, Click Add New in the Attached Documents Section.
28. A pop up windows will appear. Fill up the Attached Documents details.
29. To upload file, click Browse button. A pop up windows will appear then choose the
file.
30. To complete the application, click Submit button.
User’s Manual
3-85
3.0 Using the System: Survey Job Module
31. Congratulations. Now you application is under status NEW. You have successfully
submitted your application for Additional Lot and Fee to the Board.
You cannot edit your application in
.
status
NEW
After NEW, your application will be VERIFIED (process) by LJT Officer. Once
your applicant registered officially, the status will change to APPROVED
User’s Manual
3-86
3.0 Using the System: Survey Job Module
3.4
Acknowledgement for Submission of Plan and Other
Documents (LJT600)
Below are the steps-by-steps way to register an Acknowledgement for Submission of Plan and
Other Documents.
1. Go to the system menu and
point to Survey Job.
The menu will show
a drop down sub-menu
2. Click Acknowledgement for
Submission of Plan and
Other Documents (LJT600).
3. The system will bring you to Acknowledgement for Submission of Plan and Other
Documents (LJT600) Search Screen
4. Click Add New button.
5. Key-in Job Number accordingly or Click
to search for other Job Number.
User’s Manual
3-87
3.0 Using the System: Survey Job Module
6. A pop up windows will appear.
Choose the job number and press Select.
7. Click Continue if you satisfy with the job number.
8. The system will bring to Plan details. There are two sections: Plan and other
document’s details & Supporting Documents
9. Fill in the Plan and other document’s details
User’s Manual
3-88
3.0 Using the System: Survey Job Module
10. Click Add New if you want to attach
all documents required.
11. A pop up windows will appear.
Fill in all the particulars required.
12. For the File To Upload, click Browse.
13. Click Save or Cancel button to return the Request for New Lot Number : Add New
page.
14. Click Save button to continue editing or Submit button to send the form to LJT.
You cannot edit your application
in status NEW.
After NEW, your application will be VERIFIED (process) by LJT Officer.
Once your applicant registered officially, the status will change to APPROVED.
User’s Manual
3-89
3.0 Using the System: Survey Job Module
3.5
Time Extension Application (LJT602)
Below are the steps-by-steps ways to register Time Extension Application (LJT602).
1. Go to the system menu and point to Survey Job.
The menu will show a drop down sub-menu.
2. Go to the system menu and point to Time Extension Application.
3. The system will bring you to this screen. To proceed, click the New Extension
Request button.
4. To select Job No., click
button.
User’s Manual
3-90
3.0 Using the System: Survey Job Module
5. A pop up windows will appear. Select the Job No. for your application and click
Select button to proceed.
6. Click Continue to proceed.
7. The system will bring you to the screen as shown below.
8. Please enter the request for duration in Duration (Month) field. The Extend Date will
appear automatically after you enter the duration. Click Continue to proceed.
9. The following screen will be displayed.
User’s Manual
3-91
3.0 Using the System: Survey Job Module
10. Select Add New Document button. A pop up window will appear. Fill all the
necessary details accordingly and press Save button.
11. After you add a document, you can edit, delete and view your documents by clicking
the button accordingly.
12. To submit the application, click Submit button.
13. Congratulations! Now your application is under status NEW. You have successfully
submitted your application.
You
cannot
edit
your
application in status NEW.
After NEW, your application will be VERIFIED (process) by LJT Officer.
Once your applicant registered officially, the status will change to
APPROVE
User’s Manual
3-92
3.0 Using the System: Survey Job Module
3.6
Change of Client Application (LJT604)
Below are the steps-by-steps ways to register Change of Client Application (LJT604).
1. Go to the system menu and point to Survey Job.
The menu will show a drop down sub-menu.
2. Go to the system menu and point to Change of Client Application.
3. The system will bring you to this screen. To proceed, click the Add New LJT604
button
User’s Manual
3-93
3.0 Using the System: Survey Job Module
4. To select Survey Job No., click the
button.
5. A pop up window will appear. Select the Job No. and click the Select button to
proceed.
6. Click Continue to proceed.
User’s Manual
3-94
3.0 Using the System: Survey Job Module
7. The system will bring you to the screen as shown below.
User’s Manual
3-95
3.0 Using the System: Survey Job Module
8. Please enter the required field for this application. Click Continue to proceed.
9. The system will bring you to the next tab, Supporting Documents.
User’s Manual
3-96
3.0 Using the System: Survey Job Module
10. To fill up Document Details, click Add New Document button. Fill up all the
information and click Save.
11. The following screen will be displayed. After you add a document, you can view ,
edit, delete your documents by clicking the button accordingly.
User’s Manual
3-97
3.0 Using the System: Survey Job Module
12. To submit the application, click Submit button.
13. Congratulations! Now your application is under status NEW. You have successfully
submitted your application.
You cannot edit your application in
status NEW.
After NEW, your application will be VERIFIED (process) by LJT Officer.
Once your applicant registered officially, the status will change to
APPROVED.
User’s Manual
3-98
3.0 Using the System: Survey Job Module
3.7
Transfer Job List (LJT606)
Below are the steps-by-steps ways to register Transfer Job List (LJT606)
1. Go to the system menu and point to Survey Job.
The menu will show a drop down sub-menu.
2. Go to the system menu and point to Transfer Job List.
3. The system will bring you to this screen. To proceed, click the Add New LJT606
button
User’s Manual
3-99
3.0 Using the System: Survey Job Module
4. To select Job To Transfer. , click the
button.
5. A pop up window will appear. Select the Job to Transfer. and click the Select
button to proceed.
User’s Manual
3-100
3.0 Using the System: Survey Job Module
6. Click Continue to proceed.
7. The system will bring you to the screen as shown below. Please enter the field for
this application if necessary. Make sure all particulars are correct.
User’s Manual
3-101
3.0 Using the System: Survey Job Module
8.
Click the calendar icon. Popup calendar will appear. Click Continue to proceed.
9. The system will bring you to the next tab, Job Stages. Click continue to proceed.
10. The system will bring you to the next tab, Supporting Documents. To fill up
Document Details, click Add New Document button. Fill up all the information and
click Save.
User’s Manual
3-102
3.0 Using the System: Survey Job Module
11. Fill up all the information and click Save.
12. The following screen will be displayed. After you add a document, you can edit,
delete and view your documents by clicking the button accordingly.
13. To submit the application, click Submit button.
User’s Manual
3-103
3.0 Using the System: Survey Job Module
14. Congratulations! Now your application is under status NEW. You have successfully
submitted your application.
You cannot edit your application in
status NEW.
After NEW, your application will be VERIFIED (process) by LJT Officer.
Once your applicant registered officially, the status will change to
APPROVED.
User’s Manual
3-104
3.0 Using the System: Survey Job Module
3.8
Request for New Lot Number
Below are the steps-by-steps to register a Request
Lot Number.
for
New
1. Go to the system menu and
point to Survey Job.
The menu will show
a drop down sub-menu
2. Click Request for New Lot Number.
3. The system will bring you to a Request for New Lot Number Search Screen
4. Click Add New button.
5. Key-in Job Number accordingly or Click
to search for other Job Number.
6. A pop up windows will appear.
Choose the job number and press Select.
It will close the Survey Job List and back to
the Request for New Lot Number : Add New page
7. Click Continue if you satisfy with the job number.
User’s Manual
3-105
3.0 Using the System: Survey Job Module
8. The system will bring to the New Lot Number details. There are two sections: Lot
Number & Attachments
9. Fill in the Total Lot Requested
10. Click Add New if you want to attach
document required.
11. A pop up windows will appear.
Fill in all the particulars required.
12. For the File To Upload, click Browse.
User’s Manual
3-106
3.0 Using the System: Survey Job Module
13. Click Save or Cancel button to return the Request for New Lot Number : Add New
page.
14. Click Save button to continue editing or Submit button to submit your application.
15. Congratulations! Now your application is under status NEW. You have successfully
submitted your application.
You cannot edit your application in
status NEW.
After NEW, your application will be VERIFIED (process) by LJT Officer.
Once your applicant registered officially, the status will change to
APPROVED.
User’s Manual
3-107
3.0 Using the System: Survey Job Module
3.9
Reports
Reports profile is a sub-module that views reports about Job.
1. In order to view all the reports, click on the required links.
2. The steps to view all the reports are similar. Therefore, in this section we have
chosen List of Jobs in Progress.
User’s Manual
3-108
3.0 Using the System: Survey Job Module
3. Click on the link to List of jobs in Progress. The screen on reports parameters will be
shown.
4. Then, click Submit Query button to proceed with the report.
User’s Manual
3-109
3.0 Using the System: Survey Job Module
4.0
MANAGING YOUR SCANNING DOCUMENT
4.1
Prepare your document
1. Make sure you have compile all supporting documents required for your application.
e.g
Application for FA Registration.
- Identification Card
- Education Certificates
Application for Survey Job Registration
- PBN Letter
- Precomp Plan
- Appointment letter by Client
4.2
Prepare your folder
1. Create new folder in your Computer under My Document.
File | New | Folder
2. Rename the folder using your File Reference.
e.g.
JBD/SEL/192 ( survey job ),
Ahmad Bin Saud ( AP/FA/FT registration )
How to rename folder
Click on the New Folder you create. Go to File | Rename. Type your file name
User’s Manual
4-1
3.0 Using the System: Survey Job Module
4.3
Scan Your Document
1. Scan your document.
2. Save the scan file into your created folder accordingly.
3. Rename the file using the document reference.
e.g. PTDUL1/8/131-2004 – PBN Letter.
User’s Manual
4-2