Transcript
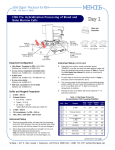
METHODS
Little Dipper™ Processor for Illumina® BeadChips
Pub. 106 Rev.A 0907
Washing and Coating Illumina® BeadChips for Genotyping
INFINIUM II ASSAY, SINGLE AND MULTI-SAMPLE PROCEDURES
Low volume baths
Bath 1
PB1 Buffer
200 ml
Bath 2
XC4 Buffer
200 ml
Stir bars and Glass inserts
Table 1. Wash and Coat Protocol (WshCoat).
Equipment Configuration
•
Little Dipper Processor for BeadChips, 115v/220v.
(SciGene cat. #1080-30-1/1080-30-2)
• 2x Low volume baths*.
(SciGene cat. #1080-10-2)
• Slide Rack, 12-Position for 3.25 inch slides*.
(SciGene cat. #1080-20-2)
• 2x Glass inserts for baths*.
(Fisher cat. #08-812)
• 2x Stir bars for baths*.
(SciGene cat. #1080-21-1, 25/pk)
*Supplied with the Little Dipper Processor for BeadChips.
Buffer Preparation
WASH and COAT (following extension and stain)
• PB1 Buffer (Illumina), 200 ml
•
XC4 Buffer (Illumina), 200 ml, Prepare the day prior to use,
following the Illumina protocol.
Step
Bath Position
Buffer
Agitation
(cpm)
Time
(sec)
1
1
PB1
250
15
2
1
PB1
250
15
3
1
PB1
250
15
4
1
PB1
0
300
5
2
XC4
250
15
6
2
XC4
250
15
7
2
XC4
250
15
8
2
XC4
0
300
Total Time: 11.5 minutes
Load Arrays / Run Protocol
1.
2.
Instrument Setup
1.
2.
3.
4.
5.
Wash two low volume (200 ml) removable baths and a
processing rack with warm water, rinse with DI water and
dry with lint-free towels. Do not use detergent.
Insert one clean bath into position 2 on the unit and place
the second one on the bench. Put a glass insert and stir
bar into each bath.
Turn on main power to the instrument. Using the touch
screen, create a protocol named WshCoat entering the
steps, agitation rates and times as shown in Table 1.
Consult the Little Dipper User Manual for details on how to
create and edit protocols.
Fill bath in position 2 with 200 ml XC4 and the bath on the
bench with 200 ml PB1. Ensure buffers are at room
temperature. Do not let the XC4 sit for more than 10 minutes.
Activate and set rotation speed of stir bars to achieve a
smooth vortex.
Slide rack, 12-position
3.
4.
5.
6.
Place a 12 position slide rack into the low volume bath
containing PB1 on the bench (not inserted onto the
instrument).
Remove BeadArrays from the flow-through chambers as
specified in the Infinium II Assay Lab Setup and
Procedures Guide.
Place each chip into the 12-position rack keeping the rack
submerged. Place the chips in the rack with the barcodes
facing in one direction.
Move the bath with submerged rack to position 1 on the
processor. Start the WshCoat protocol using the touch
screen and load the rack on the gripper as described in the
Little Dipper Operations Guide.
At the completion of the protocol, the gripper arm will
slowly remove the arrays from the coating solution and
stop. Open the gripper via the control panel on the touch
screen and remove the rack. Place rack on its side in a
vacuum dessicator with arrays facing up. Dry under
vacuum for 50 to 55 minutes before scanning.
Clean the back of each BeadChip using a Kimwipe and
ethanol to remove the coating layer before scanning.
— End Protocol —
SciGene ◊ 306 Potrero Avenue ◊ Sunnyvale, California 94085 USA ◊ (408) 733-7337 [email protected]