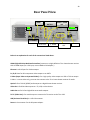
1
1 Building SMART COMMUNITIES with our Fiber RICH network Set Top Box & Remote Control User’s Manual Guide Bushland 349-1000 Hereford 360-9000 Bovina / Friona 250-5555 2 Table of Contents Remote Control Guide ................................................................................................................................. 6 Setting up your Remote Control .................................................................................................................. 7 Quick Search Set-Up ..................................................................................................................................... 7 Manual Set-Up.............................................................................................................................................. 7 Powering Devices ......................................................................................................................................... 7 Remote Control Guide ................................................................................................................................. 8 Adjusting Volume ..................................................................................................................................... 8 Frequently Used Commands .................................................................................................................... 8 Changing Channels ................................................................................................................................... 8 Finding Programming ............................................................................................................................... 9 Using the Guide Button ............................................................................................................................ 9 Using the Info Button ............................................................................................................................... 9 Blocking Channels (For added protection) ............................................................................................ 10 Using Menu................................................................................................................................................. 10 Using the Menu Button .......................................................................................................................... 10 Using the Guide Option .......................................................................................................................... 11 Using the DVR Option ............................................................................................................................ 11 Using the My Library Option .................................................................................................................. 12 Using the Settings Option ...................................................................................................................... 13 Preferences ......................................................................................................................................... 13 Users ................................................................................................................................................... 13 Using the Favorites Option .................................................................................................................... 13 Using the Search Option ........................................................................................................................ 14 Using the Sign In/Out Option................................................................................................................. 14 Setting up Parental Controls (For added protection)................................................................................ 14 Establishing New Password & PIN ......................................................................................................... 14 Setting up Parental Controls .................................................................................................................. 15 Unlocking/Reactivating Parental Controls ............................................................................................ 16 Creating Users ........................................................................................................................................ 17 Signing Users In ...................................................................................................................................... 18 3 Editing Users Settings ............................................................................................................................. 18 Editing User Information ........................................................................................................................ 19 Editing Parental Controls ....................................................................................................................... 19 Setting up Favorites ................................................................................................................................... 19 Creating Favorites Folders ..................................................................................................................... 19 Choose ................................................................................................................................................ 20 Edit ...................................................................................................................................................... 20 Create.................................................................................................................................................. 20 Delete.................................................................................................................................................. 21 TV & Movie Ratings Guide ......................................................................................................................... 21 TV Parental Guidelines Ratings .............................................................................................................. 21 TV – Y (All Children) ............................................................................................................................ 21 TV – 7 (Directed to Older Children) ................................................................................................... 21 TV-Y7-FV (Directed to Older Children - Fantasy Violence)................................................................ 21 TV – G (General Audience) ................................................................................................................. 22 TV – PG (Parental Guidance Suggested) ............................................................................................ 22 TV – PG14 (Parents Strongly Cautioned) ........................................................................................... 22 TV – MA (Mature Audience Only) ...................................................................................................... 22 Motion Picture Association of America Ratings .................................................................................... 23 General Audience .................................................................................................................. 23 Parental Guidance Suggested ..................................................................................... 23 Parents Strongly Cautioned ........................................................................................ 23 Restricted ............................................................................................................................... 23 NC – 17 No One 17 and Under Admitted ......................................................................................... 24 Purchasing Events....................................................................................................................................... 24 Purchasing PPV (Pay per View) Events .................................................................................................. 24 Purchase a LIVE Event ........................................................................................................................ 24 Purchase a FUTURE Event .................................................................................................................. 25 4 Canceling PPV (Pay per View) Events ................................................................................................ 25 Canceling a FUTURE event ................................................................................................................. 25 Viewing a history of PPV (Pay per View) Events ............................................................................... 26 View a history of PPV Events ............................................................................................................. 26 Using Advanced Features ........................................................................................................................... 26 Using the Reminder & Autotune Features ............................................................................................ 26 Schedule Event ................................................................................................................................... 26 Record Program & Record Series ....................................................................................................... 27 Set Reminder ...................................................................................................................................... 27 Set Autotune....................................................................................................................................... 27 Expanded Info ..................................................................................................................................... 27 Viewing a History of Reminders ............................................................................................................ 27 Enabling/Disabling Caller ID................................................................................................................... 28 Viewing a History of Incoming Calls ...................................................................................................... 28 Using DVR ................................................................................................................................................... 29 Digital Video Recorder (DVR) ................................................................................................................. 29 Controlling LIVE Programs ..................................................................................................................... 29 Recording Programs ............................................................................................................................... 29 Revise the Recording of a LIVE Program................................................................................................ 30 Stop the Current Recording ............................................................................................................... 30 Extend the Current Recording Time ...................................................................................................... 30 Record a FUTURE Program ..................................................................................................................... 30 Edit a SERIES of Programs ...................................................................................................................... 31 Cancel a Recording of a SERIES of Programs ......................................................................................... 31 Skip the Recording of a Single Show in a SERIES of Programs .............................................................. 32 Viewing a Recorded Program ................................................................................................................ 33 View a Program That You Have Recorded ......................................................................................... 33 Play Recording .................................................................................................................................... 33 Resume Play (if the program has been paused during playback) .................................................... 33 Lock ..................................................................................................................................................... 33 Delete Recording ................................................................................................................................ 34 Scheduling an Event ............................................................................................................................... 34 5 ADB 2500W Set Top Box Guide.................................................................................................................. 35 Rear Panel View ..................................................................................................................................... 36 ADB 3800 Set Top Box Guide ..................................................................................................................... 37 Front Panel View ........................................................................................................................................ 37 Rear Panel View ..................................................................................................................................... 38 ADB 5810 Set Top Box Guide ..................................................................................................................... 39 Front Panel View ........................................................................................................................................ 39 Rear Panel View ..................................................................................................................................... 40 ADB 5721WNX ............................................................................................................................................ 41 Set Top Box Guide ...................................................................................................................................... 41 ADB 5721WNX ........................................................................................................................................ 42 Rear Panel View ..................................................................................................................................... 42 ADB 2721W ................................................................................................................................................. 43 Set Top Box Guide ...................................................................................................................................... 43 Front Panel ................................................................................................................................................. 43 ADB 2721W ............................................................................................................................................. 44 Rear Panel View ..................................................................................................................................... 44 Troubleshooting Guide............................................................................................................................... 45 6 Remote Control Guide 7 Setting up your Remote Control Before you can use your Remote Control for additional functions such as your TV or DVD Player, you will need to insert a programmable code into the Remote by doing either the Quick Search or a Manual Entry. These codes are located in the Remote Control User’s Guide that was included in the packaging of the Remote Control and are listed by brand and model of your device. Quick Search Set-Up Use the following steps to program your TV into your Remote Control. 1. 2. 3. 4. Turn on your TV. Press the TV button once. Press the RCU SETUP button until the TV button blinks twice. Enter 991 by using the number pad. (The TV button should flash two times. If the TV button emits one long flash, repeat steps 2 through 4.) 5. Press and release the CH + button continuously until your TV turns off. 6. Press the POWER button and then the RCU SETUP button once to lock in the code. 7. To make sure your device has been programmed correctly, point the Remote Control at your TV and press the POWER button once. Manual Set-Up Use the following steps to program your Remote Control. 1. 2. 3. 4. 5. Turn on the device that you wish to program into the Remote Control. Find the 4-digit code found in the Remote Control User’s Guide. Press the button (TV, AUD, DVD, AUX, or STB) on the Remote Control Press the RCU SETUP button until the device button blinks twice. Enter the 4-digit code by using the Number Pad (The selected button should flash two times. If the selected button emits one long flash, repeat steps 2 through 6.) 6. To make sure your device has been programmed correctly, point the Remote Control at your device and press the POWER button once. 7. Once you have successfully programmed your device, note the code for future reference. 8. Repeat process to program another device. Powering Devices 1. Is your device programmed into your Remote Control? (If so, continue to step 2. If not, refer to the above steps in Programming your Remote Control.) 8 2. 3. 4. 5. Press the button of your selected device (TV, AUD, DVD, AUX, or STB) Press the power button Your device should now be on Every button that is pressed on the Remote Control will now control your selected device until another device is activated Additional Info: Multiple devices can be powered at the same time using the same Remote Control. If the STB is selected and the power button is pushed both the TV & the Set Top Box will power down, if the TV is programmed into your Remote Control. Remote Control Guide Adjusting Volume In order to adjust the volume using your Remote Control, you will need to first program your TV into the remote. If you have not done so already, refer to programming your Remote Control above. Once it is programmed you can: 1. Press the volume + or - button to adjust the sound 2. Press mute to turn the sound off, pressing mute again will turn the sound back on Frequently Used Commands There are a number of controls that you will use on a daily basis. Below is a brief description of what they are used for: MENU: The menu button allows you to access all of the features that are available to you such as parental controls. OK: The OK button allows you to make selections including activating channels and options. GUIDE: The Guide button allows you to view current and future programs in a time-line based display. (For more information on the Using the Guide Option see page 6) INFO: The Info button shows you basic information about current and future programs including channel name and number, a brief description of the program, ratings, start and end times and date. EXIT: The Exit button will always return you to programming. This button can be pressed at any time, in any function. Changing Channels There are a number of different ways to change the channel you are currently viewing. 9 1. Using the channel button, press the + or - to view the next or previously numbered channel. 2. Using the number pad, simply press the numbers of your desired channel. You will see the numbers entered displayed in the upper right hand corner of your screen, within seconds the channel will change. 3. Using the directional arrows, press the up and down arrows to view channel info and press OK to select channel. 4. Using the last button will take you to the last channel viewed. Finding Programming Using the Guide and Info buttons will allow you to find information on current and future programming. Using the Guide Button 1. Press the Guide button on your Remote Control. 2. On the left hand side of the screen, under the live picture, you will see with the text ALL next to it. This option will show you ALL the channels, both those you are subscribed to and those that you are not. You can change the tab to view different tabs such as: a. Subscribed (which will only show the channels you have access to) b. SD (Standard Definition) c. HD (High-Definition)(if applicable) d. Favorites (if applicable) (To set up Favorites see page 19) 3. To change the tabs, simply press the Guide button until you find the listing you would like to view. 4. Once you have the desired tab view set, using the directional arrows, press the up, down, left, and right arrows to view channel and program info. Tip: To scroll by page, use the channel + or - button. 5. If you find a program that you would like to view, press OK to select the channel. 6. If you do not find a program, pressing the Exit button will return you to current programming. Using the Info Button 1. To make the Info bar appear, simply press the Info button or press the up, down, left and right directional arrows. This will provide you with channel and program information. To view extended program information including the director and the actors, press the Info button again. 2. If you find a program that you would like to view, press OK to select the channel. 3. If you do not find a program, the Info bar will automatically disappear after a few seconds of inactivity or you can press the Exit button. 10 Blocking Channels (For added protection) If there is a channel that you do not want to be viewed, instead of activating the parental controls, you can block it from the listings using the following steps: 1. 2. 3. 4. 5. 6. 7. 8. 9. 10. 11. 12. 13. Press the Menu button on your Remote Control Using the directional arrows, highlight Settings and press OK Using the number pad enter your password and press OK Using the directional arrows place a checkmark in the box next to channel blocking After checking the box, a box will appear with the text, “Save Changes?” Yes, will be highlighted, press OK A box will appear with the text “Settings Successfully Updated”, press OK Highlight Edit and press OK Using the directional arrows highlight the channel you would like to block and press OK You will now see a sign next to the channel If you selected the wrong channel, pressing OK will remove the sign Once you have the channels you want to block, press the left directional arrows to get out of the channel listing Using the directional arrows, highlight update and press OK Pressing the Exit button will return you to programming Using Menu Using the Menu Button The Menu is an easy way to access any features you may have. Pressing the Menu button will provide you the following options: Settings The Settings option allows you to create/edit preferences and create/edit users. Favorites The Favorites option allows you to view and edit current channels listed under each Favorites folder that have been created. Search The Search option allows you to enter keywords and retrieve any programs that may include that keyword. Sign In/Out The Sign In/Out option allows you to log users in and out. Guide The Guide option allows you to view program listings of what’s on now and what will be on in the future. 11 DVR The DVR option allows you to record programs on your Set Top Box to view at a later time as well as pausing, fast forwarding, playing, or rewinding current programs. My Library The My Library option provides you with a history of Videos, PPV Events, Pay per Block, Sports Packages, Reminders, Messages, and Caller ID. Control On/Off The Control option allows you to turn your parental controls on and off. Using the Guide Option The Guide option allows you to view information on current and future programming including channel name & number, a brief description of the program, rating, start and end times, and date. To access the Guide feature you can: 1. Simply press the Guide button or press the Menu button on your Remote Control. 2. If pressing Menu, highlight Guide or and press OK. 3. The program listing will default to show the text ALL in the tab above the channel info, which will list all of the programs whether you are subscribed to them or not. You have the ability to change the tab to a different view by pressing Guide. Each time you press the Guide button the text in the tab should change. Some examples may be: Subscribed & Favorites 4. After you have selected the view you would like, using the directional arrows you can highlight programs and retrieve the program information. If the program has an in front of it, it’s a new program, not a re-run. 5. To leave the Guide press the Exit button on your Remote Control at any time. 6. If you find a program that you would like to view, press OK to make the selection. If the program isn’t currently being shown and you would like to view it at that time, you can set a reminder or have the program switched automatically. Using the DVR Option The DVR (Digital Video Recorder), which is also known as a PVR (Personal Video Recorder) allows you to record programs on your Set Top Box to view at a later time as well as pausing, fast forwarding, playing, or rewinding current programs. This feature is only available if you have a DVR Set Top Box. If you are unsure if you have a DVR Set Top Box, press the Menu button. If DVR is listed then you have the feature. If you do not have the feature and would like it, please contact us at (806)360-9000 and ask to be upgraded to the DVR Set Top Box. To access the DVR menu you can: 1. Simply press the Menu button on your Remote Control. 12 2. Using the directional arrows, highlight DVR or and press OK. You will see the following options: Recording The Recording option is a listing of all programs that have been and currently are being recorded. To Record The To Record option is a list of all the programs that have been scheduled to be recorded. Schedule Priority The Schedule Priority option allows you to determine which show is to be recorded if there is more than one scheduled to record at the same time. Schedule Event The Schedule Event option allows you to set up recordings for programs that will be airing in the future. Record History The Record History option displays a list of the recording information such as when the recording started, was completed, or was cancelled. Using the My Library Option The My Library option provides you with a history of information such as PPV purchases. To access the My Library feature: 1. Press the Menu button on your Remote Control. 2. Using the directional arrows, highlight My Library or and press OK. 3. You will see the following options: Videos The Videos option will provide you with a history of Video On Demand purchases, which is a service that will be available in the future. PPV Events The PPV Events option will provide you with a history of PPV purchases. Pay per Block The Pay per Block option will be available in the future. Sports Packages The Sports Packages option will provide you with a list of Sports Packages that you subscribe to. Reminders The Reminders option will provide you with a list of Reminders that have been scheduled. Messages The Messages option will provide you with a list of messages that citizens has sent to your Set Top Box. Caller ID 13 The Caller ID option will provide you with a list of incoming Caller’s information. Using the Settings Option The Settings option allows you to create/edit preferences and create/edit users. To access the Settings feature: 1. 2. 3. 4. Press the Menu button on your Remote Control. Using the directional arrows, highlight Settings or and press OK. Using the number pad enter your password and press OK. You will see the following menu under Settings on the left hand side: a. Preferences b. Users Preferences The Preferences tab allows you to activate and deactivate the following features: a. b. c. d. e. Share Rentals Require Login Enable Caller ID Channel Blocking Parental Controls Note: To activate any of these features, using the directional arrows highlight the box next to the text of each feature and press OK to place a checkmark. The feature can be deactivated by removing the checkmark. To require login see page 11 under Creating Users. To enable Caller ID see page 20. To set up Channel Blocking see page 4. To set up Parental Controls see page 9. Users The Users tab allows you to edit current users as well as create new users and administer their unique settings. Using the Favorites Option The Favorites option allows you to edit channel lists that you have created. 14 Using the Search Option The Search feature allows you to enter keywords and then scan through the channels to find matches. To use the feature: 1. Press the Menu button on your Remote Control. 2. Using the directional arrows, highlight Search or and press OK. 3. The ENTER TEXT field will be highlighted. To delete the existing text, press the Last button located just below the channel up & down button on the right side. 4. Press OK to show the alpha/numeric pad. To choose a letter or number, using the directional arrows, highlight the character of choice and press OK to select. 5. Once you have entered the desired text, using the directional arrows, highlight done and press OK. 6. Using the directional arrows, highlight Search Guide and press OK. Using the Sign In/Out Option The Sign In/Out option allows you to change users once multiple users are available. Setting up Parental Controls (For added protection) Establishing New Password & PIN As the main user, you will have administrative access to features such as parental controls. In order for you to have complete control over such features we recommend that you create a new password and PIN. This can be done by: 1. 2. 3. 4. 5. Pressing the Menu button on your Remote Control. Using the directional arrows, highlight Settings or and press OK. Using the number pad enter your password (default password is 0000) and press OK. Using the directional arrows press the right arrow to highlight the users tab and press OK. A list of users that have been created will appear. Using the directional arrows, highlight the main user and press OK. 6. Using the directional arrows, highlight Edit and press OK. You will see fields for: a. Password b. New Password c. Confirm Password d. PIN e. New PIN f. Confirm PIN g. Enable PIN 7. Using the directional arrows highlight the Password field. Enter the default password, 0000 15 8. Press the down arrow to highlight the New Password field. Enter the desired new numerical password and press OK. 9. Press the down arrow to highlight the Confirm Password field and enter the new password exactly as it was entered in the New Password field (If you receive an error, there is conflicting information) 10. Using the directional arrows highlight the PIN field and enter the default PIN, 0000 11. Press the down arrow to highlight the New PIN field and enter the desired new numerical PIN 12. Press the down arrow to highlight the Confirm PIN field and enter the new PIN exactly as it was entered in the New PIN field (If you receive an error, there is conflicting information) 13. Make sure that the new password and PIN are written down and stored in a safe place 14. Press the down arrow to highlight the box next to Enable PIN and press OK to place a checkmark 15. Press the down arrow to highlight Submit and press OK Setting up Parental Controls To set up parental controls follow these steps: 1. 2. 3. 4. Press the Menu button on your Remote Control Using the directional arrows highlight Settings and press OK Using the number pad enter your password and press OK Using the directional arrows place a checkmark in the box next to parental controls Note: If this box does not have a checkmark in it - the parental controls WILL NOT work 5. 6. 7. 8. 9. 10. 11. 12. 13. 14. Using the directional arrows, highlight Submit and press OK You will see a box that says “Settings Successfully Updated” press OK to continue You can now go to users (see page 13 for Creating Users) Press the Menu button on your Remote Control Using the directional arrows highlight Settings and press OK Using the number pad enter your password and press OK Press the down arrow to highlight users Using the directional arrows, highlight the desired users name and press OK to select user Using the directional arrows, highlight parental controls and press OK You can now select the Movie, TV, & Content Ratings that you do not want your child/children viewing: a. (See page 17 for explanation of Movie & TV Ratings) b. To set the Movie Rating, using your directional arrows highlight the Movie Rating field and press OK. c. c. You will now see a left and right arrow on the sides of the field, using the directional arrows press the left and right arrows to set the ratings (The Movie Rating that is 16 15. 16. 17. 18. 19. 20. 21. selected will be viewable. For example, if you do not want your child to view PG13 rated movies, make sure that the rating is set at PG. This will allow your child/children to view only G & PG rated movies.) d. Once you have selected the Movie Rating, press the down arrow to see the TV Rating selection and press OK. e. You will now see a left and right arrow on the sides of the field, using the directional arrows press the left and right arrows to set the ratings (The TV Rating that is selected will be viewable. For example, if you do not want your child to view PG rated TV shows, make sure that the rating is set at G. This will allow your child/children to view only Y, Y7, & G rated TV shows.) f. For additional content blocking, using the directional arrows place a checkmark in the box next to each rating. Once you have selected the Rating criteria, using your directional arrows highlight Submit and press OK. Clicking the Exit button on your Remote Control will return you to programming. To make sure the parental controls are in place, press the Guide button to view the channel information. If the channel has been blocked you will see the word RESTRICTED. Once you have found a channel that has been RESTRICTED, press OK. You should now see the text “This channel is currently playing restricted content” scrolling across the screen. If there is a Movie or TV rating that is not blocked and you do not want your child/children being able to view it, return to step 1 and adjust your ratings or you can set up another user with unique settings. If there is a Movie or TV show that is blocked and you as the main user would like to be able to view it, you have the ability to unlock the parental controls Unlocking/Reactivating Parental Controls If under the main user settings you have blocked PG13 movies, and you find one that you would like to watch, you can unlock the parental controls while you are on that channel with the following steps: 1. 2. 3. 4. 5. 6. 7. 8. Press OK This will bring up a blue BLOCKED box Highlight the Unlock Parental Controls options and press OK Enter your password You will now be able to view the program To reactivate Parental Controls, press Menu Using the directional arrows highlight Parental Controls - off and press OK The channel should now be blocked - Parental Controls are now on 17 Creating Users The following steps will allow you to create unique settings for multiple users. For example, you could have one setting for your 15 year old child and another for your 7 year old child. 1. 2. 3. 4. 5. 6. 7. 8. 9. 10. 11. 12. 13. 14. 15. 16. 17. 18. 19. Press the Menu button on your Remote Control. Using the directional arrows highlight Settings and press OK. Using the number pad enter your password and press OK. Using the directional arrows, highlight the Require Login and press OK to place a checkmark in the box. Using the directional arrows press the left arrow to highlight users and press OK. Press the down arrow to highlight Add and press OK. Enter a Login such as a name or number - pressing OK twice will display the alphanumeric pad on the screen allowing you to enter both letters and numbers. To select a character, using the directional arrows, highlight the desired character, and press OK. Once you have your desired login entered highlight Done and press OK. Press the down arrow to highlight the New Password field. Enter a new password which should be different than the password that you use to set controls. Press the down arrow to highlight the Confirm Password field. Reenter the new password exactly as it was entered in the New Password field (If you receive an error, there is conflicting information). Press the down arrow to the Allowance $ field (This field will allow you to set a limit on the dollar amount that can be spent per month on PPV events. If this field is left blank the limit will default to zero.) Check Enable Caller ID, if you’d like it to be displayed Press the down arrow to the Enter PIN field. Enter your PIN. (This is saying that you as the main user are creating this user) Press the down arrow to continue and press OK. A box with the text “Now Continue by setting Parental Controls” should flash on the screen. Press OK. You can now select the Movie, TV, & Content Ratings that you do not want your child/children viewing: a. To set the Movie Rating, using your directional arrows highlight the Movie Rating field and press OK. b. You will now see a left and right arrow on the sides of the field, using the directional arrows press the left and right arrows to set the ratings. (Remember: The Movie rating that is selected will be viewable.) c. Once you have selected the Movie Rating, press the down arrow to see the TV Rating selection and press OK. 18 d. You will now see a left and right arrow on the sides of the field, using the directional arrows press the left and right arrows to set the ratings. (Remember: The TV rating that is selected will be viewable.) e. For additional content blocking, using the directional arrows place a checkmark in the box next to each rating. 20. Once you have selected the Rating criteria, using your directional arrows highlight Submit and press OK. 21. A box with the text “Account Created” should flash on screen, Press OK. 22. Clicking the Exit button on your Remote Control will return you to programming. Signing Users In Once you have created an additional user, the Sign In option will appear when the Menu button on your Remote Control has been pressed. To switch to a different user’s settings: 1. 2. 3. 4. 5. 6. 7. 8. 9. Press the Menu button on your Remote Control. Using the directional arrows highlight Sign In or and press OK. You will see a blue screen that requires you to enter a name and password to sign in. Using the directional arrows highlight the Name field and press OK. You will now see an arrow on the top and an arrow on the bottom of the field, using the directional arrows press the down arrow to see the available users. Once you have found the desired user press OK to select. Using the directional arrows press the down arrow to highlight the Password field. Enter the password assigned to the user in the Name field Press OK to activate the user’s settings. Now when you press Menu the Sign In option will read Sign Out. At any time you can switch to different users settings by highlighting the Sign Out option, pressing OK, and repeating steps 3 through 9. Editing Users Settings At any time, you can edit current settings for each user by: 1. Pressing the Menu button on your Remote Control. 2. Using the directional arrows highlight Settings or and press OK. (If you do not see the Settings option, see Signing Users In above and sign in as the main user) 3. Using the number pad enter your password and press OK. 4. Using the directional arrows, press the right arrow and highlight users. From here you can either edit the user Information or edit the parental controls you have set up. 19 Editing User Information 1. Using the directional arrows, highlight the desired user and press OK to place a dot in the circle next to the username. 2. Using the directional arrows, highlight Edit and press OK. 3. Using the number pad on the Remote Control, enter your password and press OK. 4. Using the directional arrows, you can highlight and edit the Login Name, Password, Theme, Dollar Allowance, and whether the Caller ID is enabled or not. 5. Using the number pad on the Remote Control, enter the main user PIN number 6. When changes are complete, highlight Submit and press OK. Editing Parental Controls 1. Using the directional arrows, highlight the desired user and press OK to place a dot in the circle next to the username. 2. Press the down arrow to highlight parental controls and press OK. 3. Using the directional arrows, you can highlight and edit the Movie Rating, TV Rating, and additional content restrictions. 4. When changes are complete, highlight Submit and press OK. Setting up Favorites Creating Favorites Folders If there are several channels that you seem to watch repeatedly, you can create Favorites tabs that will be available on the Program Guide so you do not have to flip through all of the channels trying to find the ones you like. Set up your Favorites folders by doing the following: 1. Press the Menu button on your Remote Control. 2. Using the directional arrows, highlight Favorites or and press OK. 3. You will see the following options: a. Choose b. Edit c. Create d. Delete e. Cancel Note: Each user can have their own Favorites folders. Be sure that you are under the user you want to be. 20 Choose The Choose option will allow you to set which guide you would like to see when you press the Guide button. For example, if you selected the Choose option you will see a field with an up and down arrow, using the directional arrows, you may see the following options: 1. 2. 3. 4. All Subscribed SD HD Using the directional arrows, highlight the desired guide and press OK, then using the directional arrows, highlight OK and press OK. Edit The Edit option allows you to add or remove channels from the Favorites folder(s) by: 1. 2. 3. 4. 5. 6. Using the directional arrows, highlight Edit and press OK. It will automatically show the folder that is currently selected as the Guide list. Using the directional arrows, find the Guide that you want to edit and press OK to select it. Using the directional arrows, highlight OK and press OK. Using the directional arrows, find the channels you would like to add or remove and press OK. If adding a channel a blue heart should appear alongside those channels that are included on the list. If removing a channel the blue heart should disappear. 7. Once all channels are selected, press the right directional arrow to highlight the Update button. 8. Press OK and you will be returned to programming. Create The Create option allows you to add favorite’s folders. You can create up to 5 folders by: 1. Using the directional arrows, highlight Create and press OK. 2. The folder will automatically be named as Favorites1, Favorites2, etc. The folder name can be changed by: a. With the Favorites1, Favorites2, etc. being highlighted, press the Last button, located just above the directional arrows on the right side will delete the text. b. Once deleted press OK and the number pad will appear. c. Enter desired name. d. Using the directional arrows go to Done and press OK 3. Using the directional arrows, find the channels you would like to add and press OK. 4. A blue heart should appear alongside the channel information. If you accidentally selected the wrong channel, pressing the OK button will remove the blue heart. 21 5. Once all of the channels are selected, press the right directional arrow to highlight the Update button and press OK. 6. Your folder is now created and will be available for future use. 7. To create more folders return to step 1 and repeat. Delete The Delete option allows you to delete Favorites folders that have been created by: 1. 2. 3. 4. 5. 6. Using the directional arrows, highlight Delete and press OK. Using the directional arrows, highlight the desired folder and press OK to select it. Using the directional arrows, highlight OK and press OK. You will see a pop-up that says: “Are you sure you want to delete Favorites?” If yes, press OK. If no, using the directional arrows highlight No and press OK. TV & Movie Ratings Guide TV Parental Guidelines Ratings TV – Y (All Children) This program is designed to be appropriate for all children. Whether animated or live-action, the themes and elements in this program are specifically designed for a very young audience, including children from ages 2 - 6. This program is not expected to frighten younger children. TV – 7 (Directed to Older Children) This program is designed for children age 7 and above. It may be more appropriate for children who have acquired the developmental skills needed to distinguish between make-believe and reality. Themes and elements in this program may include mild fantasy, violence or comedic violence, or may frighten children under the age of 7. Therefore, parents may wish to consider the suitability of this program for their very young children. TV-Y7-FV (Directed to Older Children - Fantasy Violence) For those programs where fantasy violence may be more intense or more combative than other programs in this category, such programs will be designated TV-Y7-FV. 22 TV – G (General Audience) Most parents would find this program suitable for all ages. Although this rating does not signify a program designed specifically for children, most parents may let younger children watch this program unattended. It contains little or no violence, no strong language and little or no sexual dialogue or situations. TV – PG (Parental Guidance Suggested) This program contains material that parents may find unsuitable for younger children. Many parents may want to watch it with their younger children. The theme itself may call for parental guidance and/or the program may contain one or more of the following: some suggestive dialogue (D) infrequent coarse language (L) intense sexual situations (S) intense violence (V) TV – PG14 (Parents Strongly Cautioned) This program contains some material that many parents would find unsuitable for children under 14 years of age. Parents are strongly urged to exercise greater care in monitoring this program and are cautioned against letting children under the age of 14 watch unattended. This program may contain one or more of the following: intensely suggestive dialogue (D) strong coarse language (L) intense sexual situations (S) intense violence (V) TV – MA (Mature Audience Only) This program is specifically designed to be viewed by adults and therefore may be unsuitable for children under 17. This program may contain one or more of the following: crude indecent language (L) explicit sexual activity (S) graphic violence (V) This information was obtained from the TV Parental Guidelines website at www.tvguidelines.org & the Motion Picture Association of America’s website at www.mpaa.org 23 Motion Picture Association of America Ratings General Audience A G-rated motion picture contains nothing in theme, language, nudity, sex, violence, or other matters that, in the view of the Rating Board, would offend parents whose younger children view the motion picture. The G rating is not a “certificate of approval,” nor does it signify a “children’s” motion picture. Some snippets of language may go beyond polite conversation, but they are common everyday expressions. No stronger words are present in G-rated motion pictures. Depictions of violence are minimal. No nudity, sex scenes, or drug use are present in the motion picture. Parental Guidance Suggested A PG-rated motion picture should be investigated by parents before they let their younger children attend. The PG rating indicates, in the view of the Rating Board, that parents may consider some material unsuitable for their children, and parents should make that decision. The more mature themes in some PG-rated motion pictures may call for parental guidance. There may be some profanity and some depictions of violence or brief nudity. But these elements are not deemed so intense as to require that parents be strongly cautioned beyond the suggestion of parental guidance. There is no drug use content in a PG-rated motion picture. Parents Strongly Cautioned A PG-13 rating is a sterner warning by the Rating Board to parents to determine whether the children under age 13 should view the motion picture, as some material might not be suited for them. A PG-13 motion picture may go beyond the PG rating in theme, violence, nudity, sensuality, language, adult activities or other elements, but does not reach the restricted R category. Restricted An R-rated motion picture, in the view of the Rating Board, contains some adult material. An Rrated motion picture may include adult themes, adult activity, hard language, intense or persistent violence, sexually-oriented nudity, drug abuse or other elements, so that parents are counseled to take this rating very seriously. Children under 17 are not allowed to attend R-rated motion pictures accompanied by a parent or adult guardian. Parents are strongly urged to find out more about R-rated motion pictures in determining their suitability for their children. Generally, it is not appropriate for parents to bring their young children with them to R-rated motion pictures. 24 NC – 17 No One 17 and Under Admitted An NC-17 rated motion picture is one that, in the view of the Rating Board, most parents would consider patently too adult for their children 17 and under. No children will be admitted. NC-17 does not mean “obscene” or “pornographic” in the common or legal meaning of those words, and should not be construed as a negative judgment in any sense. The rating simply signals that the content is appropriate only for an adult audience. An NC-17 rating can be based on violence, sex, aberrational behavior, drug abuse or any other element that most parents would consider too strong and therefore off-limits for viewing by their children. Purchasing Events Purchasing PPV (Pay per View) Events If there is an event on the PPV channels, you can purchase them at any time, for an additional cost that may vary per program. Note: There are two types of PPV Events: PPV and ADT. PPV is a single event and only lasts until the event is completed. ADT is an ALL Day Ticket, which allows you to view the same event throughout the day. To find out what the event you would like to view is, press the Info button, and either PPV or ADT will show up under the channel number. Purchase a LIVE Event 1. Once you have found the event you would like to view, press OK 2. You will be able to preview the event for 10 minutes 3. If you decide at any time during the preview that you would like to watch the entire event, you can purchase it by: a. Pressing OK b. You will see the following options: i. Add to Favorites ii. Expanded Info iii. Buy PPV iv. Cancel c. Highlight Buy PPV and press OK d. To purchase, highlight Buy and press OK e. To cancel, highlight Cancel and press OK f. If you would like to allow other users to view this same event, highlight the field next to share and press OK to place a checkmark (See Creating Users on page 11.) 4. After 10 minutes the preview will end and a pop-up will appear on the screen that allows you to buy or cancel the event. 25 5. To purchase, highlight Buy and press OK or To cancel, highlight Cancel and press OK 6. If you would like to allow other users to view this same event, highlight the field next to share and press OK to place a checkmark (See Creating Users on page 11.) Purchase a FUTURE Event 1. Once you have found the event you would like to view, press OK 2. You will be see the following options: a. Expanded Info b. Buy PPV c. Cancel 3. Highlight Buy PPV and press OK 4. To purchase, highlight Buy and press OK or To cancel, highlight Cancel and press OK 5. If you would like to allow other users to view this same event, highlight the field next to share and press OK to place a checkmark (See Creating Users on page 11.) When you purchase a FUTURE event, you can set up a reminder that will pop-up on the screen while you are viewing other programs or set it to automatically change to the event. Canceling PPV (Pay per View) Events If for some reason, you are not able to or do not want to view the scheduled PPV event at this time, you have the option of canceling the purchase. You cannot cancel the event once it has started; this includes All Day Tickets (ADT). Canceling a FUTURE event 1. Press the Guide button on your Remote Control 2. Using the directional arrows, highlight the event that you would like to cancel and press OK 3. You will see the following options: a. Record Program b. Set Reminder c. Set Autotune d. Cancel PPV Purchase e. Expanded Info f. Buy Next PPV g. Cancel 4. Using the directional arrows, highlight Cancel PPV Purchase and press OK 5. Your purchase is now canceled 26 Viewing a history of PPV (Pay per View) Events If you have purchased any of the PPV Events, you can view a history of the purchases by: 1. Pressing the Menu button on your Remote Control 2. Using the directional arrows, highlight My Library or and press OK 3. You will see the following options: a. Video b. PPV Events c. Pay per block d. Sports Packages e. Reminders f. Messages g. Caller ID View a history of PPV Events 1. Using the directional arrows, highlight PPV Events and press OK 2. In the area to the right of the PPV Events you will now see a history of all PPV purchases Using Advanced Features Using the Reminder & Autotune Features If in the process of scrolling through the channels, you find a program that will be showing at a later time or date you can use the reminder or Autotune features to make sure you don’t miss it. Once you have found the program you would like to view at a later time or date press OK to select an action and you will see the following options: 1. 2. 3. 4. 5. 6. 7. Schedule Event Record Program (if applicable) Record Series (if applicable) Set Reminder Set Autotune Expanded Info Cancel Schedule Event Using the Schedule Event option will allow you to set the criteria for your reminder or autotune event. 27 Record Program & Record Series The Record Program and Record Series options are only available if you have a DVR Set Top Box. These options allow you to record the programs and will be available for you to watch at a later time. Set Reminder Using the Set Reminder option will prompt a box to pop-up on your screen at the start time of the desired program. To set a Reminder: 1. Using the directional arrows, highlight Set Reminder and press OK. 2. In the Guide next to the program you will see an icon. 3. At the time the program begins you will see a box moving on your screen with the following information: PROGRAM REMINDER. (Station Name) press info to view details. 4. Pressing the info button will give you a brief description on the programming Set Autotune Using the Set Autotune option will automatically transfer you to the desired program. To set Autotune: 1. Using the directional arrows, highlight Set Autotune and press OK. 2. In the Guide next to the program you will see an icons. 3. When the program begins you will see a box pop-up on your screen with the program name as well as the channel number. You will be able to tune in to the program or Cancel the Autotune. Expanded Info Using the Expanded Info option will provide you with the channel information. Viewing a History of Reminders If you have set any reminders for programs, you can view them by: 1. Pressing the Menu button on your Remote Control. 2. Using the directional arrows, highlight My Library or press OK. 3. You will see the following options: a. Video b. PPV Events c. Pay Per Block d. Sports Packages e. Reminders f. Messages g. Caller ID 28 4. Using the directional arrows, highlight reminders and press OK Enabling/Disabling Caller ID If you have the Caller ID feature from WT Services you are able to allow the Caller ID to show up on the TV screen when you receive an incoming call. If you do not have the Caller ID feature and would like it please contact our Office at (806)360-9000 to get it added on your account. To enable Caller ID: 1. 2. 3. 4. 5. 6. 7. 8. 9. 10. Press the Menu button on your Remote Control. Using the directional arrows, highlight Settings and press OK. Using the number pad enter your password and press OK. Using the directional arrows place a checkmark in the box next to Enable Caller ID. Using the directional arrows, highlight Caller ID Timeout located second from the bottom of the menu on the right side. This allows you to set how long you would like the Caller ID information to remain on the TV screen. To select, highlight the field and press OK. You will see two arrows, one on each side of the field. Using the directional arrows press the left or right arrows to set the time. Time ranges from 5 second up to 45 seconds in 5 second increments. Once you have found your desired time press OK. Using the directional arrows, highlight Submit and press OK. Your Caller ID is now enabled! To disable Caller ID, follow steps 1 through 3 and remove the checkmark from the box. Viewing a History of Incoming Calls If you have received any incoming calls, you can view the caller’s information by: 1. Pressing the Menu button on your Remote Control. 2. Using the directional arrows, highlight My Library and press OK. 3. You will see the following options: a. Video b. PPV Events c. Pay Per Block d. Sports Packages e. Reminders f. Messages g. Caller ID 4. Using the directional arrows, highlight Caller ID and press OK. 29 Using DVR Digital Video Recorder (DVR) The DVR, which is also known as a PVR, allows you to record programs on your Set Top Box to view at a later time as well as pause, fast forward, play, or rewind LIVE programs. This feature is only available if you have a DVR Set Top Box. If you are unsure if you have a DVR Set Top Box, press the Menu button. If DVR is listed then you have the feature. If you do not have the feature and would like it, please contact us at (806)360-9000 and ask to be upgraded to the DVR Set Top Box. Controlling LIVE Programs With the DVR feature you will be able to pause, fast forward, play, or rewind the program that you are currently watching by using the VCR/DVD/DVR Controls buttons (Pause, Rewind, Fast Forward, Play, or Stop) on your Remote Control. Any time one of the Control buttons is pressed, a bar will appear on the top part of your screen allowing you to see which control is being used and where the program is in the timeline. Once you have selected the channel, the DVR starts recording the programming and will continue to do so until you switch to another channel. When you switch to the other channel, the DVR will begin recording that programming until you switch channels again. Note: Returning to the previous channel will not restore the recordings for that channel. The recording then starts over. Recording Programs To record a LIVE program: 1. Once you have found a program that is currently playing that you would like to record, press OK. 2. You will see the following options: a. Record Program b. Record Series c. Expanded Info d. Cancel 3. Using the directional arrows, highlight Record Program or Record Series and press OK. 4. Your program is now being recorded and will automatically stop when program ends. 5. You can make sure that the program is being recorded by: a. Pressing Guide and seeing a red dot next to the program name or b. Pressing the Menu button on your Remote Control. c. Using the directional arrows, highlight DVR and press OK. 30 d. Using the directional arrows, highlight Recording. You should see the name of the program that is being recorded along with a red dot. Revise the Recording of a LIVE Program 1. With the program that is currently being recorded on the screen, press OK. 2. You will see the following options: a. Stop Recording b. Expanded Info c. Cancel Stop the Current Recording 1. Using the directional arrows, highlight Stop Recording and press OK. 2. A pop-up box with the question “Would you like to stop recording?” To exit, select no. To stop recording, select yes. Extend the Current Recording Time 1. Press the Menu button 2. Using the directional arrows, highlight DVR and press OK. 3. Using the directional arrows, highlight Schedule Event and press OK 4. You will now be able to extend the minutes of recording from 1 minute up to 60 minutes by: a. Using the directional arrows, highlight the minute’s field and press OK. b. You will now see one arrow on each side of the field, using the directional arrows, press the right or left arrow to select the number of minutes to extend recording. c. To keep the number of minutes, using the directional arrows, highlight OK and press OK. d. To cancel, using the directional arrows, highlight Cancel and press OK. Record a FUTURE Program 1. Once you have found a program that will be shown in the future that you would like to record, press OK. 2. You will see the following options: a. Schedule Event b. Record Program c. Record Series d. Set Reminder e. Set Autotune f. Expanded Info 31 g. Cancel 3. Highlight Record Program to record a single program or Record Series to record the entire series and press OK. 4. Your program will automatically be recorded when it starts and will stop when the program ends. 5. You can make sure that the program will be recorded by: a. Pressing the Guide button and you will see a red dot next to the program name. b. Pressing the Menu on your Remote Control. c. Using the directional arrows, highlight DVR and press OK. d. Using the directional arrows, highlight To Record and press OK. You should see the name of the program that will be recorded along with a red dot. If you are recording a series, you will see a red dot with a plus sign next to it. Edit a SERIES of Programs 1. In the Guide, highlight the program and press OK 2. You will see the following options: a. Edit Recording b. Edit Series Recording c. Skip Episode d. Cancel Series Recording e. Set Reminder f. Set Autotune g. Expanded Info h. Cancel 3. Highlight Edit Series Recording and you will see the following options: channels, preference, episodes, start, end, and limit to. To change the default simply highlight the box and press OK. View your options by using the directional arrows. 4. When completed adjusting fields, highlight OK and press OK. Cancel a Recording of a SERIES of Programs 1. In the Guide, highlight the show and press OK 2. You will see the following options: a. Edit Recording b. Edit Series Recording c. Skip Episode d. Cancel Series Recording e. Set Reminder f. Set Autotune g. Expanded Info 32 h. Cancel 3. Highlight Cancel Series Recording and press OK. 4. You will see a box asking “Would you like to cancel this series?” Using the directional arrows, highlight yes and press OK. 5. Your series of programs will no longer be recorded. Skip the Recording of a Single Show in a SERIES of Programs 1. In the Guide, highlight the show and press OK. 2. You will see the following options: a. Edit Recording b. Edit Series Recording c. Skip Episode d. Cancel Series Recording e. Set Reminder f. Set Autotune g. Expanded Info h. Cancel 3. Highlight Skip Episode and press OK. 4. The selected episode will no longer be recorded and a gray button with a plus sign next to it will appear in front of the program title 5. If you decide at a later time that you would like to record that episode again: a. Press the Guide button on your Remote Control b. Using the directional arrows, highlight the program and press OK c. You will see the following options: i. Edit Recording ii. Edit Series Recording iii. Record Episode iv. Cancel Series Recording v. Set Reminder vi. Set Autotune vii. Expanded Info 6. Cancel a. Using the directional arrows, highlight Record Episode and press OK. b. Your selected episode will resume being recorded and a red button with a plus sign will appear in front of the program title. 33 Viewing a Recorded Program View a Program That You Have Recorded 1. Press the Menu button on your Remote Control 2. Using the directional arrows, highlight DVR and press OK. 3. Using the directional arrows, highlight Recording and press OK. 4. Press the right directional arrow to highlight the first program listed. If there are multiple episodes of the same program, you will see a red folder with a plus sign. 5. Once you have found the program that you would like to view press OK. 6. You will see the following options: a. Play Recording b. Resume Play (if the program has been paused during playback) c. Lock d. Delete Recording e. Cancel Play Recording The Play Recording option will allow you to view the recording from the beginning. To play the recording: 1. Make sure the Play Recording option is highlighted and press OK. 2. Your selection will begin playing. 3. At any time you can adjust the play back by using the VCR/DVD/DVR controls. Resume Play (if the program has been paused during playback) The Resume Play option allows you to start the program where you left off in the event that you had to stop viewing the program once you selected Play Recording. To resume play: 1. Using the directional arrows, highlight Resume Play and press OK. 2. Your selection will begin playing from the point it was stopped. Lock The Lock option allows you as the main user to block the other users from viewing or deleting your recorded program. To lock the program: 34 1. 2. 3. 4. 5. 6. Make sure the program you would like to lock is highlighted. Using the directional arrows, highlight Lock and press OK. You will now see a lock pad next to your selected program. Your program is now locked. To unlock the program, simply press OK. Using the directional arrows, highlight Unlock and press OK. The padlock should no longer be there. Your program is now unlocked. Delete Recording The Delete Recording option will allow you to delete the recorded program from the recordings option. To delete a program from the recordings display: 1. Make sure the program you would like to delete is highlighted. 2. Using the directional arrows, highlight Delete Recording and press OK. Scheduling an Event At any time you can schedule a reminder, plan a recording, or have your screen automatically switch to the program of your choice by: 1. 2. 3. 4. Press the Menu button on your Remote Control Using the directional arrows, highlight DVR and press OK Using the directional arrows, highlight Schedule Event and press OK. A pop-up box will appear on your screen and will include information from the current program. From here you have the ability to select the channel, length of time, the date, the start time, type of event, and frequency. To edit any of the criteria: a. Using the directional arrows, highlight the desired field and press OK. b. An arrow above the field and one below the field will appear, using the directional arrows, press the up or down arrow to change the information. c. Once you have the criteria adjusted the way you would like press OK. d. Repeat steps a - c until all the criteria has been set. e. When all the criteria has been set, using the directional arrows, highlight OK and press OK. 5. Your event has now been scheduled. 35 ADB 2500W Set Top Box Guide Below is an explanation for each of the connections listed above. Power light is green when the Set Top Box is on. Link light is red when the Set Top Box is receiving a channel. Status light is yellow when the Set Top Box is rebooting 36 Rear Panel View USB POWER COAXIAL ETHERNET S-VIDEO VIDEO / AUDIO OUT TO TV / VIDEO OUT Below is an explanation for each of the connections listed above. #1 - Power is the connector for the DC power adapter. #2 - USB (Universal Serial Bus) is a USB 2.0 connector. #3 - Ethernet is a RJ-45 port for IP video output. #4 - Coaxial is for a BNC-to-RCA adapter (S/PDIF) audio output to a digital home theater receiver. #5 - S-Video (Super Video or Separated Video) is for a high quality video output to a VCR or TV that accepts S-Video. It carries video only; you must also connect to the TV or home theater receiver for audio. #6 Video Out (Yellow) is for RCA video outputs to a TV, VCR, or other device. #6 Audio Out (Red & White) are for left and right RCA stereo audio outputs. #7 To TV (Video Out) is for coaxial output to connect the TV receiver to the TV or VCR. 37 ADB 3800 Set Top Box Guide Front Panel View DIRECTIONAL ARROWS POWER USB MENU OK HD Below is an explanation for each of the controls and lights listed above. Power button, if held for less than five seconds, turns the Set Top Box on or off. If held for five seconds longer, it restarts the TV receiver. When the Set Top Box is on the light is green. USB (Universal Serial Bus) is a USB 2.0 connector. HD (High-Definition) light is green when the Set Top Box is receiving a high-definition program. Call our office at (806)360-9000 to find out if you can receive HD programming as it is not available in all areas. Menu button displays the Menu. Directional Arrows allow you to change the channels and move through the program guide. OK button allows you to select channels or Menu options. 38 Rear Panel View TO TV VIDEO OUT POWER ETHERNET OPTICAL PrPbY HDMI VIDEO OUT S - VIDEO AUDIO OUT USB Below is an explanation for each of the connections listed above. To Wall (Video In) is for coaxial input for digital signal. HDMI (High-Definition Multimedia Interface) connects to a high-definition TV or home theater receiver with an HDMI input (for a DVI input, use an HDMI-to-DVI adapter.) Ethernet is a RJ-45 port for IP video output. Pr, Pb, & Y are for RCA component video outputs to an HDTV. S-Video (Super Video or Separated Video) is for a high quality video output to a VCR or TV that accepts S-Video. It carries video only; you must also connect to the TV or home theater receiver for audio. Optical is for a Toslink (S/PDIF) audio output to a digital home theater receiver. Video Out is for RCA video outputs to a TV, VCR, or other device. Audio Out are for left and right RCA stereo audio outputs. To TV (Video Out) is for coaxial output to connect the TV receiver to the TV or VCR. USB (Universal Serial Bus) is a USB 2.0 connector. Power is the connector for the DC power adapter. 39 ADB 5810 Set Top Box Guide Front Panel View MENU OK POWER HD USB RECORD DIRECTIONAL ARROWS Below is an explanation for each of the controls and lights listed above. Power button, if held for less than five seconds, turns the Set Top Box on or off. If held for five seconds longer, it restarts the TV receiver. When the Set Top Box is on the light is green. USB (Universal Serial Bus) is a USB 2.0 connector. HD (High-Definition) light is green when the Set Top Box is receiving a high-definition program. Call our office at (806)360-9000 to find out if you can receive HD programming as it is not available in all areas. Menu button displays the Menu. Directional Arrows allow you to change the channels and move through the program guide. OK button allows you to select channels or Menu options. Record button allows you to record channels. 40 Rear Panel View HDMI COMPONENT OUTPUT AUDIO – VIDEO OUT S - VIDEO USB ETHERNET RF OUTPUT S - VIDEO AUDIO / VIDEO OUT POWER Below is an explanation for each of the connections listed above. HDMI (High-Definition Multimedia Interface) connects to a high-definition TV or home theater receiver with an HDMI input (for a DVI input, use an HDMI-to-DVI adapter.) Ethernet is a RJ-45 port for IP video output. Pr, Pb, & Y are for RCA component video outputs to an HDTV. S-Video (Super Video or Separated Video) is for a high quality video output to a VCR or TV that accepts S-Video. It carries video only; you must also connect to the TV or home theater receiver for audio. Optical is for a Toslink (S/PDIF) audio output to a digital home theater receiver. Video Out is for RCA video outputs to a TV, VCR, or other device. Audio Out are for left and right RCA stereo audio outputs. To TV (Video Out) is for coaxial output to connect the TV receiver to the TV or VCR. USB (Universal Serial Bus) is a USB 2.0 connector. Power is the connector for the DC power adapter. 41 ADB 5721WNX Set Top Box Guide ON MENU USB RECORDING HD Directional Arrows POWER Below is an explanation for each of the controls and lights listed above. Power button, if held for less than five seconds, turns the Set Top Box on or off. If held for five seconds longer, it restarts the TV receiver. When the Set Top Box is on the light is green. USB (Universal Serial Bus) is a USB 2.0 connector. HD (High-Definition) light is green when the Set Top Box is receiving a high-definition program. Call our office at (806)360-9000 to find out if you can receive HD programming as it is not available in all areas. Menu button displays the Menu. Directional Arrows allow you to change the channels and move through the program guide. OK button allows you to select channels or Menu options. 42 ADB 5721WNX Rear Panel View To TV Audio / Video Out HCNA S - Video COAX TO TV ETHERNET Component Output HDMI USB DC POWER HCNA HDMI (High-Definition Multimedia Interface) connects to a high-definition TV or home theater receiver with an HDMI input (for a DVI input, use an HDMI-to-DVI adapter.) HCNA (HomePNA over Coax) is the technology, which allows to utilize existing coaxial cable as the network’s physical wiring to connect PCs and Ethernet enabled devices, such as STB, to a LAN, thereby eliminating the need to install new wiring. Ethernet is a RJ-45 port for IP video output. Pr, Pb, & Y are for RCA component video outputs to an HDTV. S-Video (Super Video or Separated Video) is for a high quality video output to a VCR or TV that accepts S-Video. It carries video only; you must also connect to the TV or home theater receiver for audio. Video Out is for RCA video outputs to a TV, VCR, or other device. Audio Out are for left and right RCA stereo audio outputs. To TV (Video Out) is for coaxial output to connect the TV receiver to the TV or VCR. USB (Universal Serial Bus) is a USB 2.0 connector. Power is the connector for the DC power adapter. 43 ADB 2721W Set Top Box Guide Front Panel POWER HD USB SD CARD SLOT Below is an explanation for each of the controls and lights listed above. Power light when the Set Top Box is on the light is green. USB (Universal Serial Bus) is a USB 2.0 connector. HD (High-Definition) light is green when the Set Top Box is receiving a high-definition program. Call our office at (806)360-9000 to find out if you can receive HD programming as it is not available in all areas. SD Card Slot is a slot for an SD card to allow users to pause, play, and rewind current shows. 44 ADB 2721W Rear Panel View Audio / Video out Ethernet SPDIF Audio Out HDMI Component Video Out USB Power Off / On Switch Below is an explanation for each of the connections listed above. Video/Audio Out (RCA Yellow, White, Red) – These connections are ideal for VCRs and older TVs. The audio ports can be used independently if other video connections have been used. Component Video Out (Y,Py,Pb) – Component video cables can be used for high quality signals to either HD or non-HD TVs. HDMI Out – HDMI is the highest fidelity HD connection that contains both audio and video signal. Use for HDTVs. Ethernet – Connects the Ethernet cable from your home network or modem. USB – Port for a USB device to allow for users to pause, play, and rewind current shows. SPDIF Audio Out - Connects optical cables to send a digital audio signal to a surround sound receiver or other digital audio devices. Power In – Connects to the supplied adapter to power unit. ON/OFF Switch – Power switch to power cycle or reboot device manually. 45 Troubleshooting Guide Here are some solutions to problems you may encounter. If you need further assistance, please contact our office at (806)360-9000. PROBLEM: LED light on the remote blinks, but the component doesn’t respond. POSSIBLE SOLUTIONS: 1. Try replacing the batteries. You will need two AAs. 2. The component may not be programmed into your remote. 3. The component may not be selected. To do so, simply press the STB, TV, DVD, or AUX button. PROBLEM: No Power. POSSIBLE SOLUTIONS: The Power cord may be disconnected. Make sure that the Set Top Box is plugged into a live electrical outlet. PROBLEM: No Sound. POSSIBLE SOLUTIONS: The Mute button may have been pressed on the Remote Control. Press the Mute button to restore the sound and volume. PROBLEM: No Picture. POSSIBLE SOLUTIONS: 1. Check all cables. 2. If your TV is hooked up to coax cable, the TV may be on the wrong channel. Try going to Channel 3 or 4. PROBLEM: No Picture or Sound. POSSIBLE SOLUTIONS: 1. The signal may not be reaching your TV. Make sure all the cables are connected properly on the back of your Set Top Box and your TV. 2. Make sure your Set Top Box is turned on and displays a green light. 3. The TV may not be on the right channel to display input. Using the Remote Control for the TV or if your TV has been programmed into the Set Top Box Remote Control, using the Remote Control for the Set Top Box, make sure the TV is on the correct channel. 4. After trying solutions 1 & 2 and still no picture, you will need to reboot your system. To do this, unplug the Set Top Box and plug it back in. It will take up to 5 minutes for your system to restart. PROBLEM: Picture is distorted. POSSIBLE SOLUTIONS: The TV cable may be disconnected or loose. Make sure the cable is tightened or reconnected. PROBLEM: VCR will not record. 46 POSSIBLE SOLUTIONS: 1. The signal may not be reaching your TV. Make sure all the cables are connected properly on the back of your VCR and your TV. 2. The TV may not be on the right channel to display input. Make sure the TV is on the correct channel. 3. Make sure you are using the correct Remote Control. PROBLEM: Parental Controls are not working. POSSIBLE SOLUTIONS: 1. You will need to activate Parental Controls by pressing the Menu button 2. You need to make sure there is a checkmark next to Parental Controls in the Settings option. 3. You need to make sure that the Movie & TV Ratings are listed to your desired content. PROBLEM: Can’t adjust the recorded program that I am watching. POSSIBLE SOLUTIONS: 1. You will need to use the VCR/DVD/PVR Controls on your Set Top Box Remote Control. 2. To stop the program, press the Stop button instead of the Exit button. PROBLEM: Can’t get the Menu, Guide, or Info button to work. POSSIBLE SOLUTIONS: Press the STB button located in the upper right hand corner of your Remote. Make sure that it lights up when pushed. PROBLEM: TV says “No Signal” and it’s on the right channel. POSSIBLE SOLUTIONS: Most likely the TV is on the wrong input. To correct this, do the following: 1. With the TV and the set top box on, hit the TV button on your remote 2. The Input button on your remote. (Keep pushing the Input button on your remote until it goes through all the options or until your picture comes back on). 3. If the Input button does not do anything, you can change the input or source button on your TV by physically changing the channel using the up or down button on your TV box. PROBLEM: Some channels are in Spanish and others don’t have any sound at all. POSSIBLE SOLUTIONS: The language in the set top box has been set to Spanish. To correct this, do the following: 1. Press the Menu button on your remote control; 2. Select the Settings icon; a. Using the directional arrows, highlight Hardware Settings and press OK; b. Using the directional arrows, highlight Audio and press OK; (Both the primary and secondary languages should say English), if both or either one do not say English, 47 c. Highlight primary and/or secondary language and press the down arrow until English is in the field then press OK. d. Pressing the Red button on your remote control twice to get back to your program.