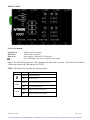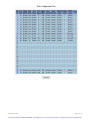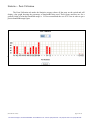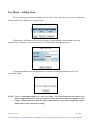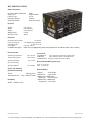
1
9000 Series Industrial Gigabit Ethernet Switch User Manual & Installation Guide (Revised 2011-07-20) page 1 of 145 For Sales and Support, Contact Walker EMD • www.walkeremd.com • Toll-free: (800) 876-4444 • Tel: (203) 426-7700 • Fax: (203) 426-7800 Industrial Gigabit Ethernet Switch Installation Guide ................................................................................................. 7 Safety Warnings ........................................................................................................................................................... 8 INSTALLATION ....................................................................................................................................................... 10 SERVICING .............................................................................................................................................................. 10 CAT5 CABLE SPECIFICATIONS ........................................................................................................................... 17 CONNECTING THE UNIT ...................................................................................................................................... 18 Overview of Advanced Features ................................................................................................................................ 20 Mode of Operation .................................................................................................................................................................. 20 Port Security ............................................................................................................................................................................ 20 Port Mirroring ......................................................................................................................................................................... 20 Port Trunking .......................................................................................................................................................................... 20 Priority Tagging (QoS)............................................................................................................................................................ 20 Virtual LAN ............................................................................................................................................................................ 21 Rapid Spanning Tree Protocol ................................................................................................................................................ 21 SNMP Traps ............................................................................................................................................................................ 21 IGMP Snooping ...................................................................................................................................................................... 22 N-Ring ..................................................................................................................................................................................... 22 Web Software Configuration ..................................................................................................................................... 24 Web Management ................................................................................................................................................................... 24 Administration – System ......................................................................................................................................................... 27 Administration – SNMP .......................................................................................................................................................... 28 Administration – Slots ............................................................................................................................................................. 29 Ports – Configuration .............................................................................................................................................................. 30 Ports – Intrusion Log ............................................................................................................................................................... 34 Ports – Mirroring ..................................................................................................................................................................... 35 Ports – Trunking ...................................................................................................................................................................... 36 Statistics – Port Statistics ........................................................................................................................................................ 38 VLAN – Ingress Filter............................................................................................................................................................. 40 VLAN – Port Based ................................................................................................................................................................ 41 Bridging – Aging Time ........................................................................................................................................................... 44 Bridging – Unicast Addresses ................................................................................................................................................. 45 Bridging – Multicast Addresses .............................................................................................................................................. 47 RSTP – RSTP Configuration .................................................................................................................................................. 49 IGMP – Configuration ............................................................................................................................................................ 53 IGMP – Show Group and Show Router .................................................................................................................................. 54 IGMP – RFilter ....................................................................................................................................................................... 55 N-Ring – Configuration .......................................................................................................................................................... 57 N-Ring – Status ....................................................................................................................................................................... 61 NView – Configuration ........................................................................................................................................................... 65 NView – Ports ......................................................................................................................................................................... 66 EventLog – Log Statistics ....................................................................................................................................................... 68 EventLog – Show Events ........................................................................................................................................................ 69 Firmware/Config – TFTP ........................................................................................................................................................ 70 Firmware/Config – FTP .......................................................................................................................................................... 71 Support – Web Site and E-mail ............................................................................................................................................... 72 BPCL – Broadcast Packet Count Limit Configuration ........................................................................................................... 73 User Mgmt – Adding Users .................................................................................................................................................... 74 User Mgmt – Removing Users ................................................................................................................................................ 75 Logical View ........................................................................................................................................................................... 76 Configuration – Save or Reset................................................................................................................................................. 77 Help – Overview ..................................................................................................................................................................... 78 Help – Administration ............................................................................................................................................................. 79 Help – Ports ............................................................................................................................................................................. 80 Help – Statistics....................................................................................................................................................................... 81 Help – VLAN .......................................................................................................................................................................... 82 Help – BPCL ........................................................................................................................................................................... 83 Help – IGMP ........................................................................................................................................................................... 84 Help – Bridging ....................................................................................................................................................................... 85 Help – RSTP ........................................................................................................................................................................... 86 (Revised 2011-07-20) page 2 of 145 For Sales and Support, Contact Walker EMD • www.walkeremd.com • Toll-free: (800) 876-4444 • Tel: (203) 426-7700 • Fax: (203) 426-7800 Help – Event Log .................................................................................................................................................................... 87 Help – Firmware/Config ......................................................................................................................................................... 88 Help – Logical View ............................................................................................................................................................... 89 Help – User Mgmt ................................................................................................................................................................... 90 Help – N-View ........................................................................................................................................................................ 91 Help – N-Ring ......................................................................................................................................................................... 92 Help – Others .......................................................................................................................................................................... 93 CLI Commands .......................................................................................................................................................... 94 Clear ........................................................................................................................................................................................ 94 “?” (HELP) .............................................................................................................................................................................. 94 Top .......................................................................................................................................................................................... 95 Up ............................................................................................................................................................................................ 95 Logout ..................................................................................................................................................................................... 95 History ..................................................................................................................................................................................... 95 “!” ............................................................................................................................................................................................ 96 “$” ........................................................................................................................................................................................... 97 Whoami ................................................................................................................................................................................... 97 Ping ......................................................................................................................................................................................... 97 System Configuration Commands ............................................................................................................................. 98 Set Mode IP config .................................................................................................................................................................. 98 Set IP/Subnet/Gateway Addresses of the system .................................................................................................................... 98 Get IP Address of the system .................................................................................................................................................. 98 Set System Name .................................................................................................................................................................... 98 Get System Name .................................................................................................................................................................... 98 Get Gateway Address of the System ....................................................................................................................................... 99 Get Mac Address of the System .............................................................................................................................................. 99 Get Netmask of the System ..................................................................................................................................................... 99 Get System Contact ................................................................................................................................................................. 99 Set System Contact ................................................................................................................................................................. 99 Get System Location ............................................................................................................................................................... 99 Set System Location .............................................................................................................................................................. 100 Get System Uptime ............................................................................................................................................................... 100 Get Number of Ports present in the System .......................................................................................................................... 100 Set IP Address of an SNMP Management Stations ............................................................................................................... 100 Set SNMP Get Community name ......................................................................................................................................... 100 Set SNMP Set Community name .......................................................................................................................................... 101 Set SNMP Trap Community name ........................................................................................................................................ 101 Show all configuration parameters ........................................................................................................................................ 101 Show all configuration parameters related to SNMP manager ............................................................................................. 102 System Restart ....................................................................................................................................................................... 102 User Management Commands ................................................................................................................................. 103 Show System Users ............................................................................................................................................................... 103 Add a System User ................................................................................................................................................................ 103 Modify a User‟s Access Permissions .................................................................................................................................... 103 Modify a User‟s Password .................................................................................................................................................... 103 Remove a System User ......................................................................................................................................................... 104 Download Image through COM port .................................................................................................................................... 105 TFTP Commands ..................................................................................................................................................... 105 Set the TFTP configuration parameter .................................................................................................................................. 105 Show TFTP configuration parameters................................................................................................................................... 105 Download file from TFTP server .......................................................................................................................................... 105 FTP Commands........................................................................................................................................................ 106 Set Username ........................................................................................................................................................................ 106 Set Password ......................................................................................................................................................................... 106 Set IP Address of FTP server ................................................................................................................................................ 106 Set Name of the Remote File ................................................................................................................................................ 106 Display FTP related configuration parameters ...................................................................................................................... 107 Perform the configuration file transfer action ....................................................................................................................... 107 Perform the image file transfer action ................................................................................................................................... 107 Port Manager Commands ......................................................................................................................................... 108 Get the link state of a given port ........................................................................................................................................... 108 (Revised 2011-07-20) page 3 of 145 For Sales and Support, Contact Walker EMD • www.walkeremd.com • Toll-free: (800) 876-4444 • Tel: (203) 426-7700 • Fax: (203) 426-7800 Get admin status of the port .................................................................................................................................................. 108 Set admin status of a port ...................................................................................................................................................... 108 Show port statistics ............................................................................................................................................................... 109 Get total number of good frames received ............................................................................................................................ 109 Get port speed ....................................................................................................................................................................... 109 Set Port Speed ....................................................................................................................................................................... 109 Get the port duplex mode ...................................................................................................................................................... 109 Set the port duplex mode ....................................................................................................................................................... 110 Set the Lockstate of a given port ........................................................................................................................................... 110 Get Lock State ....................................................................................................................................................................... 110 Get Auto-negotiation State .................................................................................................................................................... 110 Set Auto-negotiation State .................................................................................................................................................... 111 Set Priority State ................................................................................................................................................................... 111 Set Flow Control ................................................................................................................................................................... 111 Set Name ............................................................................................................................................................................... 111 Set PVID ............................................................................................................................................................................... 111 Set Backpressure ................................................................................................................................................................... 112 Set Intruderstate .................................................................................................................................................................... 112 Set Priority Level .................................................................................................................................................................. 112 Show Configuration .............................................................................................................................................................. 112 Show Intruders ...................................................................................................................................................................... 112 Show Link Utilization ........................................................................................................................................................... 113 Get Flow Control................................................................................................................................................................... 113 Get Name .............................................................................................................................................................................. 113 Get State Of Priority............................................................................................................................................................. 113 Get Intruder State .................................................................................................................................................................. 113 Get Priority Level .................................................................................................................................................................. 113 Get STP Status ...................................................................................................................................................................... 114 Get Back Pressure ................................................................................................................................................................. 114 Get PVID............................................................................................................................................................................... 114 Clear Counters ....................................................................................................................................................................... 114 Clear Intruder Log ................................................................................................................................................................. 114 Trunk related commands .......................................................................................................................................... 115 Enable or Disable Trunking .................................................................................................................................................. 115 Modify Trunk ........................................................................................................................................................................ 115 Create Trunk.......................................................................................................................................................................... 115 Delete Trunk.......................................................................................................................................................................... 116 Show Trunk Information ....................................................................................................................................................... 116 Mirroring related commands .................................................................................................................................... 117 Set Mirror config ................................................................................................................................................................... 117 Enable or Disable Port Mirroring .......................................................................................................................................... 117 Show Mirror config ............................................................................................................................................................... 117 VLAN Related Commands ...................................................................................................................................... 118 Add VLAN Entry .................................................................................................................................................................. 118 Show List of Configured VLANs ......................................................................................................................................... 118 Display Information of a particular VLAN ........................................................................................................................... 118 Modify an existing VLAN .................................................................................................................................................... 119 Delete VLAN ........................................................................................................................................................................ 119 Set VLAN as a management VLAN ..................................................................................................................................... 119 Set VLAN to defaults ............................................................................................................................................................ 120 Set VLAN Ingress Filter ....................................................................................................................................................... 120 Get VLAN Ingress Filter ....................................................................................................................................................... 120 Get VLAN info ..................................................................................................................................................................... 120 Eventlog Related Commands ................................................................................................................................... 121 Get Eventlog count ................................................................................................................................................................ 121 Get Eventlog level ................................................................................................................................................................. 121 Get Eventlog size .................................................................................................................................................................. 121 Set Eventlog level ................................................................................................................................................................. 121 Set Eventlog size ................................................................................................................................................................... 121 Show Eventlog events ........................................................................................................................................................... 122 Bridging Related Commands ................................................................................................................................... 123 (Revised 2011-07-20) page 4 of 145 For Sales and Support, Contact Walker EMD • www.walkeremd.com • Toll-free: (800) 876-4444 • Tel: (203) 426-7700 • Fax: (203) 426-7800 Add Multicast MAC Address ................................................................................................................................................ 123 Delete Multicast MAC Address ............................................................................................................................................ 123 Add a Unicast MAC Address ................................................................................................................................................ 123 Delete Unicast MAC Address ............................................................................................................................................... 123 Display List of Configured Static MAC Addresses .............................................................................................................. 124 Set Aging Time ..................................................................................................................................................................... 124 Display Current Aging Time ................................................................................................................................................. 124 Display Mac Address by port ................................................................................................................................................ 124 Display port by Mac Address ................................................................................................................................................ 124 Display Mac count ................................................................................................................................................................ 125 IGMP Related Commands ....................................................................................................................................... 126 Enable IGMP ......................................................................................................................................................................... 126 Disable IGMP........................................................................................................................................................................ 126 Show IGMP config ............................................................................................................................................................... 126 Show IGMP group ................................................................................................................................................................ 126 Show IGMP router ................................................................................................................................................................ 127 Set IGMP query mode ........................................................................................................................................................... 127 Set IGMP router port ............................................................................................................................................................. 127 Set IGMP router mode .......................................................................................................................................................... 127 Show IGMP rfilter mode ....................................................................................................................................................... 128 Set IGMP rfilter mode ........................................................................................................................................................... 128 N-Ring Related Commands ..................................................................................................................................... 129 N-Ring get agingtime ............................................................................................................................................................ 129 N-Ring set agingtime ............................................................................................................................................................ 129 N-Ring get webfault .............................................................................................................................................................. 129 N-Ring set webfault .............................................................................................................................................................. 129 N-Ring get interval ................................................................................................................................................................ 129 N-Ring set interval ................................................................................................................................................................ 130 N-Ring get mode ................................................................................................................................................................... 130 N-Ring set mode ................................................................................................................................................................... 130 N-Ring show status ............................................................................................................................................................... 131 N-Ring show switch .............................................................................................................................................................. 131 N-Ring set keepalive ............................................................................................................................................................. 132 N-Ring get keepalive ............................................................................................................................................................. 132 Configuration Related Commands ........................................................................................................................... 133 Save Configuration ................................................................................................................................................................ 133 Load Default Configuration .................................................................................................................................................. 133 Configuration Upload ............................................................................................................................................................ 133 Server-IpAddress .................................................................................................................. 133 File-Name ............................................................................................................................. 133 Configuration Download ....................................................................................................................................................... 133 Server-IpAddress .................................................................................................................. 133 File-Name ............................................................................................................................. 133 Rapid Spanning Tree Protocol Related Commands ................................................................................................. 134 Set RSTP Admin Edge .......................................................................................................................................................... 134 Get RSTP Admin Edge ......................................................................................................................................................... 134 Set RSTP Auto Edge ............................................................................................................................................................. 134 Get RSTP Auto Edge ............................................................................................................................................................ 134 Set RSTP Bridge Admin Status............................................................................................................................................. 135 Get RSTP Bridge Admin Status ............................................................................................................................................ 135 Set RSTP Bridge Forward Delay .......................................................................................................................................... 135 Get RSTP Bridge Forward Delay .......................................................................................................................................... 135 Set RSTP Bridge Hello Time ................................................................................................................................................ 136 Get RSTP Bridge Hello Time ............................................................................................................................................... 136 Set RSTP Bridge Max Age ................................................................................................................................................... 136 Get RSTP Bridge Max Age ................................................................................................................................................... 136 Set RSTP Bridge Priority ...................................................................................................................................................... 137 Get RSTP Bridge Priority ..................................................................................................................................................... 137 Set RSTP Port Path Cost ....................................................................................................................................................... 137 Get RSTP Port Path Cost ...................................................................................................................................................... 137 (Revised 2011-07-20) page 5 of 145 For Sales and Support, Contact Walker EMD • www.walkeremd.com • Toll-free: (800) 876-4444 • Tel: (203) 426-7700 • Fax: (203) 426-7800 Set RSTP Port Priority .......................................................................................................................................................... 138 Get RSTP Port Priority.......................................................................................................................................................... 138 Broadcast Packet Count Limit Commands .............................................................................................................. 139 Get the Broadcast Packet Count Limit for one port .............................................................................................................. 139 Get the Broadcast Packet Count Limit for all ports............................................................................................................... 139 Set the Broadcast Packet Count Limit ................................................................................................................................... 139 VLAN Configuration Examples .............................................................................................................................. 140 Example 1 – Basic understanding of port based VLANs ...................................................................................................... 140 Example 2 – Basic understanding of tagged VLANs (Admit – Tagged Only) ..................................................................... 140 Example 3 – Basic understanding of tagged VLANs (Admit – All) ..................................................................................... 141 Example 4 – Basic understanding of Hybrid VLANs ........................................................................................................... 141 Example 5 – Basic understanding of Overlapping VLANs................................................................................................... 142 Example 6 – Basic understanding of VLANs with Multicast Filtering ................................................................................. 142 KEY SPECIFICATIONS ......................................................................................................................................... 143 N-TRON Limited Warranty ..................................................................................................................................... 145 (Revised 2011-07-20) page 6 of 145 For Sales and Support, Contact Walker EMD • www.walkeremd.com • Toll-free: (800) 876-4444 • Tel: (203) 426-7700 • Fax: (203) 426-7800 Industrial Gigabit Ethernet Switch Installation Guide 9000 Series The N-TRON 9000 Series Gigabit Ethernet Capable Industrial Ethernet Switch offers outstanding performance and ease of use. It is ideally suited for connecting Ethernet enabled industrial and or security equipment and is a fully managed switch. PRODUCT FEATURES MODULE / SLOT OPTIONS • Full IEEE 802.3 Compliance • Full IEEE 1613 Compliance (Electric Power Stations) • NEMA TS1/TS2 Compliance (Traffic Control systems) • ABS Type Approval (Maritime and Offshore Applications) • Scaleable Switch with 4 I/O Slots • Up to Twenty-four 10/100 BaseTX RJ-45 Ports • Two Optional 1000BaseSX Ports, LC style • Extended Environmental Specifications • Autosensing 10/100BaseTX, Duplex, and MDIX • Offers Rapid Spanning Tree Protocol • Trunk with other N-Tron trunking capable switches • Store & Forward Technology • Plug and Play IGMP Support • Rugged Din-Rail Enclosure • Redundant Power Inputs (10-30 VDC) • Full SNMP • Web Browsing and N-View Switch Monitoring • 9000 CPU Module – Standard CPU Module • 9002 CPU Module – CPU Module with 2 Gigabit Fiber Ports • 9006 TX – 6 Port 10/100 Base-TX Copper Module • 9004 FX – 4 Port 100 Base-FX Fiber Module • 9002 FX – 2 Port 100 Base-FX Fiber Module (Revised 2011-07-20) MANAGEMENT FEATURES • IGMP Snooping • VLAN • QoS • Trunking • Mirroring • 802.1D-2004 Rapid Spanning Tree page 7 of 145 For Sales and Support, Contact Walker EMD • www.walkeremd.com • Toll-free: (800) 876-4444 • Tel: (203) 426-7700 • Fax: (203) 426-7800 Copyright, © N-Tron Corp., 2008-2010 820 S. University Blvd., Suite 4E Mobile, AL 36609 USA All rights reserved. Reproduction, adaptation, or translation without prior written permission from N-Tron Corp. is prohibited, except as allowed under copyright laws. Ethernet is a registered trademark of Xerox Corporation. All other product names, company names, logos or other designations mentioned herein are trademarks of their respective owners. The information contained in this document is subject to change without notice. N-Tron Corp. makes no warranty of any kind with regard to this material, including, but not limited to, the implied warranties of merchantability or fitness for a particular purpose. In no event shall N-Tron Corp. be liable for any incidental, special, indirect, or consequential damages whatsoever included but not limited to lost profits arising out of errors or omissions in this manual or the information contained herein. Warning Do not perform any services on the unit unless qualified to do so. Do not substitute unauthorized parts or make unauthorized modifications to the unit. Do not operate the unit with the top cover removed, as this could create a shock or fire hazard. Do not block the air vents on the sides or the top of the unit. Do not operate the equipment in the presence of flammable gasses or fumes. Operating electrical equipment in such an environment constitutes a definite safety hazard. Do not operate the equipment in a manner not specified by this manual. Safety Warnings GENERAL SAFETY WARNING: If the equipment is used in the manner not specified by N-Tron Corp., the protection provided by the equipment may be impaired. LASER SAFETY (FXE Models -40, -80 and 9002CPU-LX -40, -80) CAUTION: CLASS 1 LASER PRODUCT. Do not stare into the laser! Contact Information N-Tron Corp. 820 South University Blvd. Suite 4E Mobile, AL 36609 TEL: (251) 342-2164 FAX: (251) 342-6353 Website: www.n-tron.com Email: [email protected] (Revised 2011-07-20) page 8 of 145 For Sales and Support, Contact Walker EMD • www.walkeremd.com • Toll-free: (800) 876-4444 • Tel: (203) 426-7700 • Fax: (203) 426-7800 ENVIRONMENTAL SAFETY WARNING: Disconnect the power and allow to cool 5 minutes before touching. ELECTRICAL SAFETY WARNING: Disconnect the power cable before removing any modules, or any enclosure panel. WARNING: Do not operate the unit with the any cover removed. WARNING: Properly ground the unit before connecting anything else to the unit. Units not properly grounded may result in a safety risk and could be hazardous and may void the warranty. See the grounding technique section of this user manual for proper ways to ground the unit. WARNING: Do not work on equipment or cables during periods of lightning activity. WARNING: Do not perform any services on the unit unless qualified to do so. WARNING: Do not block the air vents. WARNING: Observe proper DC Voltage polarity when installing power input cables. Reversing voltage polarity can cause permanent damage to the unit and void the warranty. 9000 Series Hazardous Location Installation Requirements 1. WARNING: Explosion hazard, do not disconnect while circuit is live, unless area is known to be non-hazardous. 2. WARNING: Install only in accordance with Local & National Codes of Authorities Having Jurisdiction. 3. WARNING: This equipment is suitable for use in Class I, Div. 2, Groups A, B, C, D or Non-Hazardous Locations Only. 4. WARNING: Explosion Hazard – Substitution of Components May Impair Suitability For Class I, Div. 2. 5. Power must be supplied by an isolating source, and a 5.0 A max rated UL recognized fuse must be installed immediately before the unit. 6. Class I, Div 2 installations require that all devices connected to this product must be UL listed for the area in which it is installed. 7. Only UL listed wiring with temperature ratings greater than 90°C permitted for Class I, Div 2 installations operating at temperatures up to 70°C ambient. 8. Limited Operating Voltage: 12-30V for Class I, Div 2 installations. 9. Maximum operating voltage of power source shall not exceed 60 VDC including battery charging float voltage. (Revised 2011-07-20) page 9 of 145 For Sales and Support, Contact Walker EMD • www.walkeremd.com • Toll-free: (800) 876-4444 • Tel: (203) 426-7700 • Fax: (203) 426-7800 PACKAGE CONTENTS Please make sure the 9000 Series Gigabit Ethernet Switch package contains the following items: 1. 9000 Series Gigabit Ethernet Switch with modules or filler panels 2. Product CD Contact your carrier if any items are damaged. INSTALLATION Read the following warning before beginning the installation: WARNING Never install or work on electrical equipment or cabling during periods of lightning activity. Never connect or disconnect power when hazardous gasses are present. Disconnect the power cable before removing any enclosure panel. Do not operate the unit with any covers removed UNPACKING Remove all the equipment from the packaging, and store the packaging in a safe place. File any damage claims with the carrier. CLEANING Clean only with a damp cloth. SERVICING The 9000 Series is a modular based Gigabit Ethernet Switch with up to 4 slots for ports and one slot for the CPU module. Please follow the steps below for adding, removing, or swapping modules in the 9000 series switch. Technicians performing the following steps should wear proper anti-static equipment to protect the circuit boards. WARNING: The 9000 series switch is NOT hot swappable. Removing or adding modules while the power is still on can damage the equipment. Adding or Replacing a Module: 1. Remove power from the switch. 2. Unscrew the two thumb screws for the filler panel or module that you are replacing. 3. Using both hands pull on both thumb screws to slide the filler panel or module you are replacing off the 9000BP. 4. Align the new module such that it slides on the rails and firmly push it into the unit. 5. Screw both thumb screws down till they are finger tight. 6. Reapply the power and configure the slots on the 9000 either through the web management interface or the serial management interface. 7. In order to verify the settings have been configured and saved correctly, you may want to view the Logical View page in the found in the web browser interface. The dynamic illustration displayed on the Logical View page must match the physical switch configuration respectively in order for the switch to function correctly. If not, please repeat the steps listed above. 8. Validation of the configuration and each physical cable segment may be obtained by using 9. N-ViewOPC Server software. The software is freely distributed on the ProductCD and our web site (http://www.ntron.com/pdf/setup_nviewopc.zip). Once N-ViewOPC is installed, you should view the Ports Counter page view each connected port. You may find it helpful to copy [Alt]+[PrintScreen] the Port Counter information for each port and paste [Control]+[V] into a Windows document for further review. Please consult your N-View OPC Server manual for additional information. NOTE: Modules should be installed in slot order (from left to right). So in a 2 slot configuration Slots A and B are populated. Empty slots must be covered with a 9000-FP to meet emission standards. (Revised 2011-07-20) page 10 of 145 For Sales and Support, Contact Walker EMD • www.walkeremd.com • Toll-free: (800) 876-4444 • Tel: (203) 426-7700 • Fax: (203) 426-7800 Replacing a CPU Module: 1. Remove power from the switch. 2. Unscrew the two thumb screws for the CPU module that you are replacing. 3. Using both hands pull on both thumb screws to slide the CPU module out of the 9000BP. 4. Align the new CPU Module such that it slides on the rails and firmly push it into the unit. 5. Screw both thumb screws down till they are finger tight. 6. Reapply the power to the switch. NOTE: All configuration settings are saved to the NVRAM which is stored locally on the CPU Module. If you replace the CPU Module all settings will move with the CPU Module. You can save and download a custom configuration to a TFTP or an FTP server. The switch‟s MAC Address and IP Address will also move with the CPU Module. (Revised 2011-07-20) page 11 of 145 For Sales and Support, Contact Walker EMD • www.walkeremd.com • Toll-free: (800) 876-4444 • Tel: (203) 426-7700 • Fax: (203) 426-7800 DIN-Rail Mounting Install the unit on a standard 35mm Din-Rail. Recess the unit to allow at least 5” of horizontal clearance for fiber cable bend radius. To mount the unit to the 35mm din-rail, place top edge of the bracket on the back of the unit against the din-rail at a 45° upward angle. Lower the bottom of the unit until it snaps into place. To remove the unit from the 35mm din-rail, place a flat head screwdriver into the release clip at the bottom of the unit, and push down on the clip until it disengages from the bottom of the unit from the din-rail. Lift the bottom of the unit up at an approximate 45° upward angle to completely remove the unit. Most N-Tron™ products are designed to be mounted on industry standard 35mm DINRail. However, DIN-Rail mounting may not be suitable for all applications. Our Universal Rack Mount Kit (P/N: URMK) may be used to mount the 9000 Series to standard 19" racks as an option. (Revised 2011-07-20) page 12 of 145 For Sales and Support, Contact Walker EMD • www.walkeremd.com • Toll-free: (800) 876-4444 • Tel: (203) 426-7700 • Fax: (203) 426-7800 Panel Mount Mounting Install the unit directly on a wall or sturdy panel such as a bulkhead. Recess the unit to allow at least 5” of horizontal clearance for fiber cable bend radius. To bulkhead mount the unit, place top edge of the bracket on the back of the unit against two screws at a 45° upward angle. Lower the bottom of the unit until it is flush with the wall, and secure the bottom of the unit with two more screws. To remove the unit from a wall, remove the bottom two screws that secure it to the wall and slide the unit up until the top two screws will fit through the larger holes on the unit. The switch should then freely come away from the wall. (Revised 2011-07-20) page 13 of 145 For Sales and Support, Contact Walker EMD • www.walkeremd.com • Toll-free: (800) 876-4444 • Tel: (203) 426-7700 • Fax: (203) 426-7800 FRONT PANEL From Top to Bottom: Gigabit Ports Fiber Ports RJ45 Ports 1000 Base-SX Connections 100 Base-FX Connections Auto sensing 10/100 Base-TX Connections Green LED lights when Power is supplied to the module NOTE: The RJ45 data port has two LED‟s located at the side of the connector. The bottom LED indicates LINK status, and the top LED indicates ACTIVITY. LED’s: The table below describes the operating modes: LED Color Description GREEN Power is Applied OFF Power is OFF GREEN 10/100/1000Mb Link between ports OFF No Link between ports GREEN Data is active between ports OFF Data is inactive between ports LNK ACT (Revised 2011-07-20) page 14 of 145 For Sales and Support, Contact Walker EMD • www.walkeremd.com • Toll-free: (800) 876-4444 • Tel: (203) 426-7700 • Fax: (203) 426-7800 APPLYING POWER (Side View) Unscrew & Remove the DC Voltage Input Plug from the Power Input Header Install the DC Power Cables into the Plug (observing polarity). Plug the Voltage Input Plug back into the Power Input Header. Tightening torque for the terminal block power plug is 0.5 Nm/0.368 Pound Foot. Verify the Power LED stays ON (GREEN). Note: Only 1 power supply must be connected to power for minimal operation. For redundant power operation, V1 and V2 inputs must be connected to separate DC Voltage sources. This device will draw current from both sources simultaneously. Use 16-28 gauge wire when connecting to the power supply. Recommended 24V DC Power Supplies, similar to: N-Tron‟s P/N NTPS-24-5 Input AC 100V…240V Power 120W Output DC 24V…28V Peak Power 180W (max 4 sec.) Output Current 5A 35 mm DIN-Rail Mountable Peak Current 7.5A for 4 sec. Dimensions: 1.57”W x 4.88”H x 4.61”D (Revised 2011-07-20) page 15 of 145 For Sales and Support, Contact Walker EMD • www.walkeremd.com • Toll-free: (800) 876-4444 • Tel: (203) 426-7700 • Fax: (203) 426-7800 N-TRON SWITCH GROUNDING TECHNIQUES The grounding philosophy of any control system is an integral part of the design. N-Tron switches are designed to be grounded, but the user has been given the flexibility to float the switch when required. The best noise immunity and emissions (i.e. CE) are obtained when the N-Tron switch chassis is connected to earth ground via a drain wire. Some N-Tron switches have metal din-rail brackets that can ground the switch if the din-rail is grounded. In some cases, N-Tron switches with metal brackets can be supplied with optional plastic brackets if isolation is required. Both V- legs of the power input connector are connected to chassis internally on the PCB. Connecting a drain wire to earth ground from one of the V- terminal plugs as shown here will ground the switch and the chassis. The power leads from the power source should be limited to 3 meters or less in length. As an alternate, users can run a drain wire & lug from any of the DinRail screws or empty PEM nuts on the enclosure. When using an unused PEM nut to connect a ground lug via a machine screw, care should be taken to limit the penetration of the outer skin by less than 1/4 in. Failure to do so may cause irreversible damage to the internal components of the switch. Note: Before applying power to the grounded switch, you must use a volt meter to verify there is no voltage difference between the power supply‟s negative output terminal and the switch chassis grounding point. If the use of shielded cables is required, it is generally recommended to only connect the shield at one end to prevent ground loops and interfere with low level signals (i.e. thermocouples, RTD, etc.). Cat5e cables manufactured to EIA-568A or 568B specifications are required for use with N-Tron Switches. In the event all Cat5e patch cable distances are small (i.e. All Ethernet devices are located the same local cabinet and/or referenced to the same earth ground), it is permissible to use fully shielded cables terminated to chassis ground at both ends in systems void of low level analog signals. (Revised 2011-07-20) page 16 of 145 For Sales and Support, Contact Walker EMD • www.walkeremd.com • Toll-free: (800) 876-4444 • Tel: (203) 426-7700 • Fax: (203) 426-7800 CAT5 CABLE SPECIFICATIONS Please reference the illustration below for your Cat5 cable specifications: (Revised 2011-07-20) page 17 of 145 For Sales and Support, Contact Walker EMD • www.walkeremd.com • Toll-free: (800) 876-4444 • Tel: (203) 426-7700 • Fax: (203) 426-7800 CONNECTING THE UNIT For FX/FXE units, remove the dust cap from the fiber optic connectors and connect the fiber optic cables. The TX port on the FX/FXE models should be connected to the RX port of the far end station. The RX port on the FX/FXE versions should be connected to the TX port of the far end station. For 10/100 Base-TX ports, plug a Category 5E twisted pair cable into the RJ45 connector. Connect the other end to the far end station. Verify that the LNK LED‟s are ON once the connection has been completed. To connect any other port to another Switch or Repeater, use a standard Category 5 straight through or crossover cable. N-Tron recommends the use of pre-manufactured Cat5E cables to ensure the best performance. If this is not an option and users must terminate their own ends on the Cat5E cables; one of the two color coded standards shown to the right should be utilized. If a user does not follow one of these two color code standards then the performance and maximum cable distance will be reduced significantly, and may prevent the switch from establishing a link. Warning: In absence of RSTP or Proprietary Ring control on the specific ports connected, creating a port to port connection on the same switch (i.e. loop) is an illegal operation and will created a broadcast storm which will crash the network! SERIAL INTERFACE The 9000 series switches provide an EIA-232 interface accessed via a 9 pin female connector (labeled „COM‟ on the unit). This is used to access the Command Line Interpreter (CLI). The pin-outs are shown below: (Revised 2011-07-20) page 18 of 145 For Sales and Support, Contact Walker EMD • www.walkeremd.com • Toll-free: (800) 876-4444 • Tel: (203) 426-7700 • Fax: (203) 426-7800 Serial Cable Connect the serial COM port of your PC and the 9000 Series Switch using a standard straight through cable. You will require a cable with a 9-pin or 25-pin sub-D female connector for the PC end, and a 9-pin male sub-D connector for the 9000 Series end. The following table shows the pin-out and the connections for both types of cable: PC Port Signal Name TXD RXD GND 25-Pin Female Pin # 2 3 7 9-Pin Female Pin # 3 2 5 9000 series 9-Pin Male Pin # Signal Name 3 RXD 2 TXD 5 GND Shielded cables and null modems are readily available from Radio Shack or a variety of computer stores. HyperTerminal The following configuration should be used in HyperTerminal: Port Settings: Data Bits: Parity: Stop bits: Flow Control: (Revised 2011-07-20) 115200 8 None 1 None page 19 of 145 For Sales and Support, Contact Walker EMD • www.walkeremd.com • Toll-free: (800) 876-4444 • Tel: (203) 426-7700 • Fax: (203) 426-7800 Overview of Advanced Features Mode of Operation Each port on the switch can be configured into different modes of operation as shown below: Copper Ports: 100Base Fiber Ports: 1000Base Fiber Ports: - Half Duplex - Full Duplex - Full Duplex - Full Duplex - Auto Negotiation Half Duplex In half duplex mode, the CSMA/CD media access method is the means by which two or more stations share a common transmission medium. To transmit, a station waits (defers) for a quiet period on the medium (that is, no other station is transmitting) and then sends the intended message in bit-serial form. If, after initiating a transmission, the message collides with that of another station, then each transmitting station intentionally transmits for an additional predefined period to ensure propagation of the collision throughout the system. The station remains silent for a random amount of time (backoff) before attempting to transmit again. Full Duplex Full duplex operation allows simultaneous communication between a pair of stations using point-topoint media (dedicated channel). Full duplex operation does not require that transmitters defer, nor do they monitor or react to receive activity, as there is no contention for a shared medium in this mode. Auto Negotiation In Auto Negotiation mode the port / hardware detects the mode of operation of the station that is connected to this port and sets its mode to match the mode that of the station. Port Security Port Security provides a mechanism to detect any intruder in the network. When security is enabled on the port, the port stops learning new MAC addresses on that port and if it receives any packet with a source MAC address that is not in the address table, the packet will be discarded. Port Mirroring A Mirroring Port is a dedicated port that is configured to receive the copies of Ethernet frames that are being transmitted out and also being received in from any other port that is being monitored. Port Trunking Port Trunking is the ability to group one or more network ports to increase the bandwidth between two machines (switch or any work station). This feature allows grouping of high-speed connectivity and provides redundant connection between switches, so that trunk can act as a single link between the switches. Priority Tagging (QoS) IEEE 802.1p priority tagging is supported for two classes of services along with bandwidth support per priority level. Transparent mode is supported through configuration wherein if the field is set, the tag bits are ignored. The User can configure up to 8 different priority levels per port. Also priority overriding (overriding the tagged filed) can be enabled or disabled by the user. (Revised 2011-07-20) page 20 of 145 For Sales and Support, Contact Walker EMD • www.walkeremd.com • Toll-free: (800) 876-4444 • Tel: (203) 426-7700 • Fax: (203) 426-7800 Virtual LAN The switch provides support for setting up both tagged Virtual LANs and port based Virtual LANs. A port may belong to any number of Virtual LANs. The VLAN membership of a station is determined by the VLAN(s) that have been defined for the port to which the station is connected. If a station should move from one port to another, it loses its current VLAN membership and inherits that of the new port it is connected to. A Default Virtual LAN exists to which a port, which is not a member of any other Virtual LAN, will belong. This allows the switch to operate as a „normal‟ Bridge when it is used in a network. A port is automatically removed from the Default VLAN when it is reconfigured to belong to another Virtual LAN. Using Tagged VLANs the switch has the ability to take non-tagged packets in some ports, add a VLAN tag to the packet and send it out tagged ports on the switch. The VLANs can also be configured to accept tagged packets in tagged ports, strip the tags off the packets, and send the packets back out other untagged ports. This allows a network administrator to set up the switch so he can support devices on the network that do not support VLAN Tagged packets. The administrator can also set up the ports to discard any packets that are tagged or to discard any packets that are untagged based on a hybrid VLAN of both tagged and untagged ports, and using the VLAN Ingress Filter on the switch. The 9000 Series switch also has the ability to allow overlapping VLANs. Overlapping VLANs gives the user the ability to have one or more ports share two or more VLAN groups. For more information and examples on how this could be implemented please see our website‟s technical documents. Rapid Spanning Tree Protocol The rapid spanning tree protocol as specified in IEEE 802.1D-2004 is supported. One Spanning Tree per a unit is supported. Besides a Spanning Tree per VLAN is also supported. The Rapid Spanning Tree Protocol (RSTP) supersedes the Spanning Tree Protocol (STP) which was described in IEEE 802.1D-1998. The RSTP is used to configure a simply connected active network topology from the arbitrarily connected bridges of a bridged network. Bridges effectively connect just the LANs to which their forwarding ports are attached. Ports that are in a blocking state do not forward frames. The bridges in the network exchange sufficient information to automatically derive a spanning tree. RSTP allows for much quicker learning of network topology changes than the older STP. RSTP supports new and improved features such as rapid transition to forwarding state. RSTP also sends out new BPDUs every hello time instead of just relaying them. RSTP interoperates with older STP switches by falling back to the older STP when the older BPDUs are detected on bridge ports. The user can also manually configure bridge ports to use the older STP when desired. SNMP Traps The 9000 Series switch supports up to 5 SNMP Trap Stations to which SNMP Traps will be sent. The switch supports three standard traps; Link Up, Link Down, and Cold Start. SNMP Traps will be sent to all the stations configured on the switch if a port Link goes up or down, and when the switch first powers up. (Revised 2011-07-20) page 21 of 145 For Sales and Support, Contact Walker EMD • www.walkeremd.com • Toll-free: (800) 876-4444 • Tel: (203) 426-7700 • Fax: (203) 426-7800 IGMP Snooping IGMP Snooping is enabled by default, and the switch is Plug and Play for IGMP. IGMP snooping provides intelligent network support for multicast applications. In particular, unneeded traffic is reduced. IGMP Snooping is configured via the console and if enabled, then operates dynamically upon each power up. Also, there can be manual only or manual and dynamic operation. Note that “static multicast group address” can be used whether IGMP Snooping is enabled or not. IGMP Snooping will function dynamically without user intervention. If some of the devices in the LAN do not understand IGMP, then manual settings are provided to accommodate them. The Internet Group Management Protocol (IGMP) is a protocol that provides a way for a computer to report its multicast group membership to adjacent „routers‟. In this case N-Tron 9000 series switches provide router-like functionality. Multicasting allows one computer to send content to multiple other computers that have identified themselves as interested in receiving the originating computer's content. Multicasting can be used to transmit only to an audience that has joined (and not left) a multicast group membership. IGMP version 2 is formally described in the Internet Engineering Task Force (IETF) Request for Comments (RFC) 2236. IGMP version 1 is formally described in the Internet Engineering Task Force (IETF) Request for Comments (RFC) 1112. The 9000 series supports v1 and v2. N-Ring N-Ring is enabled by default, and the switch is Plug and Play for N-Ring except that initially one must enable an N-Ring enabled device to be the N-Ring Manager for a given N-Ring. Subsequently, N-Ring operates dynamically upon each power up. Using N-Tron's proprietary N-Ring technology offers expanded ring size capacity, detailed fault diagnostics, and a standard healing time of 30ms. The N-Ring Manager periodically checks the health of the N-Ring via health check packets. If the N-Ring Manager stops receiving the health check packets, it times out and converts the N-Ring to a backbone within 30ms. When using all N-Ring enabled switches in the ring, a detailed ring map and fault location chart is also provided on the N-Ring Manager‟s web browser. N-Ring status is also sent from the N-Ring Manager to the N-View OPC Server to identify the health status of the ring. Up to 250 N-Ring enabled switches can participate in one N-Ring topology. Switches that do not have N-Ring capability may be used in an N-Ring, however the ring map and fault location chart cannot be as detailed at these locations. (Revised 2011-07-20) page 22 of 145 For Sales and Support, Contact Walker EMD • www.walkeremd.com • Toll-free: (800) 876-4444 • Tel: (203) 426-7700 • Fax: (203) 426-7800 TROUBLESHOOTING 1. Make sure the (Power LED) is ON. 2. Make sure you are supplying sufficient current for the version chosen. Note: The Inrush current will exceed the steady state current by ~ 2X. 3. Verify that Link LED‟s are ON for connected ports. 4. Verify cabling used between stations. 5. Verify that cabling is Category 5E or greater for 100Mbit Operation. SUPPORT Contact N-Tron Corp. at: TEL: 251-342-2164 FAX: 251-342-6353 www.n-tron.com FCC STATEMENT This product complies with Part 15 of the FCC-A Rules. Operation is subject to the following conditions: (1) This device may not cause harmful interference (2) This device must accept any interference received, including interference that may cause undesired operation. (Revised 2011-07-20) page 23 of 145 For Sales and Support, Contact Walker EMD • www.walkeremd.com • Toll-free: (800) 876-4444 • Tel: (203) 426-7700 • Fax: (203) 426-7800 Web Software Configuration Web Management Enter the switch‟s IP address in any web browser and login to the web management feature of the 9000 Series. Default: User Name: admin Password: admin (Revised 2011-07-20) page 24 of 145 For Sales and Support, Contact Walker EMD • www.walkeremd.com • Toll-free: (800) 876-4444 • Tel: (203) 426-7700 • Fax: (203) 426-7800 Web Management - Home When the administrator first logs onto a 9000 Series switch the default home page will be displayed. On the left hand side of the screen there is a list of configurable settings that the 9000 Series switch will support. This section of the manual will go through each and every choice listed on the left hand side of the screen and explain how to configure those settings. In the center of the main home page the administrator can see some basic information like what firmware revision the switch is running. The firmware can be upgraded at a later time in the field using TFTP or FTP. (Revised 2011-07-20) page 25 of 145 For Sales and Support, Contact Walker EMD • www.walkeremd.com • Toll-free: (800) 876-4444 • Tel: (203) 426-7700 • Fax: (203) 426-7800 Web Management – Menu Structure To the left, there is a menu which is shown fully opened below. The pages opened by each of the individual selections are described in the rest of this section. The use of each of these pages is also described in this section. In most of the descriptions, only the right side of the page is shown. (Revised 2011-07-20) page 26 of 145 For Sales and Support, Contact Walker EMD • www.walkeremd.com • Toll-free: (800) 876-4444 • Tel: (203) 426-7700 • Fax: (203) 426-7800 Administration – System The System tab under the Administration category lists the following information about the switch: IP Address Subnet Mask Default Gateway MAC Address System Up Time Name Contact Information Location By selecting the modify button you will be able to change the switch‟s IP Address, Subnet Mask, Default Gateway, Name, Contact information, and the Location of the switch through the web management features. It is recommended to change the TCP/IP information through the Command Line Interface (CLI) initially, but it defaults to the following: IP Address – 192.168.1.201 Subnet Mask – 255.255.255.0 Default Gateway – 192.168.1.1 NOTE: The Gateway must belong to the network as described by the IP Address and the Subnet Mask. (Revised 2011-07-20) page 27 of 145 For Sales and Support, Contact Walker EMD • www.walkeremd.com • Toll-free: (800) 876-4444 • Tel: (203) 426-7700 • Fax: (203) 426-7800 Administration – SNMP The SNMP tab under the administration category shows a list of IP Addresses that act as SNMP Traps. The Get, Set, and Trap Community Names are also shown here. By selecting the modify button you will be able to change any of the fields listed. This allows the user to set an IP address for an SNMP Trap or change the Community Names. Systems that are listed as an SNMP Trap will be sent basic networking changes made to the switch such as ports going down or being linked. To restore a Trap to “Value Not Configured”, enter „0.0.0.0‟. (Revised 2011-07-20) page 28 of 145 For Sales and Support, Contact Walker EMD • www.walkeremd.com • Toll-free: (800) 876-4444 • Tel: (203) 426-7700 • Fax: (203) 426-7800 Administration – Slots The Slots tab under the administration category allows users to change the configuration of the slots that are populated in the 9000 Back Plane. The switch may not operate correctly if the slots are not configured properly. You must click Update if you wish to keep the changes. Following the Update button, the user may be prompted to Save and Restart the switch in order for changes to take effect. The switch will save the running configuration into the NVRAM and then cycle power automatically. Once the switch comes back online the settings will be updated. (Revised 2011-07-20) page 29 of 145 For Sales and Support, Contact Walker EMD • www.walkeremd.com • Toll-free: (800) 876-4444 • Tel: (203) 426-7700 • Fax: (203) 426-7800 Ports – Configuration The Configuration tab under the Ports category will show a detailed overview of all the active ports on the switch. The overview will display the following information: Port Number Port Name Admin Status Link Status Auto Negotiation State Port Speed Duplex Mode Flow Control State Back Pressure State Priority State Priority Level RSTP State PVID (Revised 2011-07-20) page 30 of 145 For Sales and Support, Contact Walker EMD • www.walkeremd.com • Toll-free: (800) 876-4444 • Tel: (203) 426-7700 • Fax: (203) 426-7800 (Revised 2011-07-20) page 31 of 145 For Sales and Support, Contact Walker EMD • www.walkeremd.com • Toll-free: (800) 876-4444 • Tel: (203) 426-7700 • Fax: (203) 426-7800 Ports – Configuration, Continued… The User can click on the Port Number to configure each port individually. This will allow the user to change the port‟s settings for the following fields: Admin Status Speed and Duplex Flow Control Back Pressure State of Priority Priority Level PVID (Revised 2011-07-20) page 32 of 145 For Sales and Support, Contact Walker EMD • www.walkeremd.com • Toll-free: (800) 876-4444 • Tel: (203) 426-7700 • Fax: (203) 426-7800 Ports – Security The Security tab under the Ports category will show a list of all the active ports and the security Lock State for each port. Administrators can change the Port Security by a per port basis. If the Port is enabled through this the port will be locked and will only allow known MAC addresses to communicate through the port. Unknown MAC addresses will be logged in the Intrusion Log. (Revised 2011-07-20) page 33 of 145 For Sales and Support, Contact Walker EMD • www.walkeremd.com • Toll-free: (800) 876-4444 • Tel: (203) 426-7700 • Fax: (203) 426-7800 Ports – Intrusion Log The Intrusion Log tab under the Ports category will show a list of intruders along with their MAC addresses. The log will show what Port the intruder attempted to access your network on and log the system time when it occurred. The log can be easily cleared. (Revised 2011-07-20) page 34 of 145 For Sales and Support, Contact Walker EMD • www.walkeremd.com • Toll-free: (800) 876-4444 • Tel: (203) 426-7700 • Fax: (203) 426-7800 Ports – Mirroring A mirroring port is a dedicated port that is configured to receive the copies of Ethernet frames that are being transmitted out and also being received in from any other port that is being monitored. The Mirroring tab under the Ports category displays the status including the list of Source Ports and the Destination Port that the Sources are being mirrored to. Following the Configure button, you can enable the status of port mirroring and select source ports and the destination port that the source ports will be mirrored to. NOTE: Since the gigabit ports cannot be destination ports, they are not available on the pulldown menu. (Revised 2011-07-20) page 35 of 145 For Sales and Support, Contact Walker EMD • www.walkeremd.com • Toll-free: (800) 876-4444 • Tel: (203) 426-7700 • Fax: (203) 426-7800 Ports – Trunking The Trunking tab under the Ports category displays a list of trunks configured on the switch and the following details regarding each trunk: Trunk ID Trunk Name Trunk Ports Trunk State By selecting the Create button, you can add a trunk group. NOTE: RSTP must be disabled in order to use the Trunking Feature. N-Ring Managers cannot have trunking enabled. A maximum of 4 ports of the same speed can constitute a valid trunk. Only 1 Trunk per switch can be created. All trunk ports must be at the same speed and duplex mode. If a port is not linked, there could be difficulty as to similar speed and duplex mode. It is best to hard code speed and duplex mode for each trunking link, at both ends. (Revised 2011-07-20) page 36 of 145 For Sales and Support, Contact Walker EMD • www.walkeremd.com • Toll-free: (800) 876-4444 • Tel: (203) 426-7700 • Fax: (203) 426-7800 Ports – Trunking, Continued… Once the Trunk Group is created you will see detailed information for that trunk group, but it should have a disabled state by default. In order to enable the Trunk Group you need to click on the State Button above. The following page should load asking for the Trunk ID and what the Trunk State is. NOTE: RSTP must be disabled in order to use the Trunking Feature. N-Ring Managers cannot have trunking enabled. A maximum of 4 ports of the same speed can constitute a valid trunk. Only 1 Trunk per switch can be created. All trunk ports must be at the same speed and duplex mode. If a port is not linked, there could be difficulty as to similar speed and duplex mode. It is best to hard code speed and duplex mode for each trunking link, at both ends. (Revised 2011-07-20) page 37 of 145 For Sales and Support, Contact Walker EMD • www.walkeremd.com • Toll-free: (800) 876-4444 • Tel: (203) 426-7700 • Fax: (203) 426-7800 Statistics – Port Statistics The Ports Statistics tab under the Statistics category displays a list of MIB Parameters. Each port has a separate counter for each parameter. This gives users the ability to see what kind of packets are going over which ports. At the bottom of each page for each port there are two buttons. Refresh will update the statistics for that port number and Clear will reset all the counters for that port number. (Revised 2011-07-20) page 38 of 145 For Sales and Support, Contact Walker EMD • www.walkeremd.com • Toll-free: (800) 876-4444 • Tel: (203) 426-7700 • Fax: (203) 426-7800 Statistics – Ports Utilization The Ports Utilization tab under the Statistics category shows all the ports on the switch and will display a bar graph showing the percentage of bandwidth being used. These figures and bars are for a general feeling of what the bandwidth usage is. N-Tron recommends the use of N-View in order to get a precise bandwidth usage figure. (Revised 2011-07-20) page 39 of 145 For Sales and Support, Contact Walker EMD • www.walkeremd.com • Toll-free: (800) 876-4444 • Tel: (203) 426-7700 • Fax: (203) 426-7800 VLAN – Ingress Filter The Ingress Filter tab under the VLAN category shows all the ports on the switch and if the Ingress Filter Rule is enabled or disabled for each port. To change the Ingress Filter Rule simply click on the Modify button on the page above, select the port number from the pull-down menu that you wish to modify and then choose to either enable or disable the Ingress Filter Rule. NOTE: The Ingress Filter will automatically be turned on for respective ports when tagged VLANs are created, but may not automatically turn off if you change a tagged VLAN to a port based VLAN. (Revised 2011-07-20) page 40 of 145 For Sales and Support, Contact Walker EMD • www.walkeremd.com • Toll-free: (800) 876-4444 • Tel: (203) 426-7700 • Fax: (203) 426-7800 VLAN – Port Based The Port Based tab under the VLAN category shows all the VLANs that are configured on the switch and details about the VLANs such as port numbers and tagged VLAN settings. To add a VLAN simply click on the Add button on the page above and fill in the desired fields. The example below would set up a basic port based VLAN for ports A1-A6. (See VLAN Configuration Examples on Page 140) Note: When implementing overlapping VLANs, RSTP can only be enabled on one of the VLANs that is overlapping others. RSTP can not be implemented on a VLAN that contains other VLANs within that one. Changing anything on a VLAN will turn on RSTP on all VLANs as a precautionary measure. (Revised 2011-07-20) page 41 of 145 For Sales and Support, Contact Walker EMD • www.walkeremd.com • Toll-free: (800) 876-4444 • Tel: (203) 426-7700 • Fax: (203) 426-7800 VLAN – Port Based, Continued… Now the page will display the new VLAN and moved ports A1-A6 from the default VLAN down to vlan2 that was just created. To delete or remove VLANs that are no longer wanted simply click on the Delete button on the main Port Based VLAN page. That button will load the page where the user can enter the VLAN ID that he or she wishes to delete. (See VLAN Configuration Examples on Page 140) Note: When implementing overlapping VLANs, RSTP can only be enabled on one of the VLANs that is overlapping others. RSTP can not be implemented on a VLAN that contains other VLANs within that one. Changing anything on a VLAN will turn on RSTP on all VLANs as a precautionary measure. (Revised 2011-07-20) page 42 of 145 For Sales and Support, Contact Walker EMD • www.walkeremd.com • Toll-free: (800) 876-4444 • Tel: (203) 426-7700 • Fax: (203) 426-7800 VLAN – Port Based, Continued… Once the VLAN is deleted it will no longer appear on the main page and all the ports are now back under the default VLAN. When a port based VLAN is created the PVID (Port VLAN ID) will change automatically to be members of the new VLAN they are a part of. If you delete this VLAN the PVIDs will not automatically return to the default VLAN. Users should keep this in mind when removing VLANs, and may need to manual change the PVIDs for any affected ports. (See VLAN Configuration Examples on Page 140) Note: When implementing overlapping VLANs, RSTP can only be enabled on one of the VLANs that is overlapping others. RSTP can not be implemented on a VLAN that contains other VLANs within that one. Changing anything on a VLAN will turn on RSTP on all VLANs as a precautionary measure. (Revised 2011-07-20) page 43 of 145 For Sales and Support, Contact Walker EMD • www.walkeremd.com • Toll-free: (800) 876-4444 • Tel: (203) 426-7700 • Fax: (203) 426-7800 Bridging – Aging Time The Aging Time tab under the Bridging category will display the currently configured Aging Time. This page allows users to modify this variable to meet their needs. After selecting the Modify button the user will be presented with a page that allows the number to be entered into and updated. The default aging time is 20 seconds. (Revised 2011-07-20) page 44 of 145 For Sales and Support, Contact Walker EMD • www.walkeremd.com • Toll-free: (800) 876-4444 • Tel: (203) 426-7700 • Fax: (203) 426-7800 Bridging – Unicast Addresses The Unicast Addresses tab under the Bridging category will display a list of MAC addresses that are associated with each respective port number. This can be used to statically assign a MAC address access to a single port on the switch. Following the Add button on the page above, the administrator must enter a valid MAC address and associate it with a port number on the switch. Once the administrator hits the Update button the changes will take effect instantly. Once a static MAC address has been added, it will be displayed in a list on the main page under Unicast MACs tab. (Revised 2011-07-20) page 45 of 145 For Sales and Support, Contact Walker EMD • www.walkeremd.com • Toll-free: (800) 876-4444 • Tel: (203) 426-7700 • Fax: (203) 426-7800 Bridging – Unicast Addresses, Continued… Following the Delete button on the page above, an administrator can select a static MAC address from the list using a pull-down menu. After selecting the MAC address the administrator needs to press the Delete button on this page to remove the entry . (Revised 2011-07-20) page 46 of 145 For Sales and Support, Contact Walker EMD • www.walkeremd.com • Toll-free: (800) 876-4444 • Tel: (203) 426-7700 • Fax: (203) 426-7800 Bridging – Multicast Addresses The Multicast Addresses tab under the Bridging category will display a list of Multicast Group Addresses that are associated with respective port numbers. This may be used to statically assign a Multicast Group Address access to a group of ports on the switch. These are egress filters. Following the Add button on the page above, the administrator must enter a valid Multicast Group Address and associate it with a port number or list on the switch. Once the administrator clicks on the Update button, the changes will take effect instantly. Note: If there are multiple ports on different VLANs, the 9000 will apply the static multicast address to the lowest VLAN-ID that is associated with one of the ports assigned to the static multicast address. So if the lowest VLAN-ID contains all the ports assigned to the static multicast address (an umbrella VLAN), it will function for all those ports with no problems. This can be achieved with overlapping VLANs. (Revised 2011-07-20) page 47 of 145 For Sales and Support, Contact Walker EMD • www.walkeremd.com • Toll-free: (800) 876-4444 • Tel: (203) 426-7700 • Fax: (203) 426-7800 Bridging – Multicast Addresses, Continued… After adding a Multicast Group Address it will appear on the main list and will show the associated ports that go along with that address. Following the Delete button on the page above, the administrator will be presented with a list of Multicast Group Addresses that are configured on the switch. Using the pull-down menu the administrator should select the desired port to be removed. Then click on the Delete button at the bottom of the page. Note: If there are multiple ports on different VLANs, the 9000 will apply the static multicast address to the lowest VLAN-ID that is associated with one of the ports assigned to the static multicast address. So if the lowest VLAN-ID contains all the ports assigned to the static multicast address (an umbrella VLAN), it will function for all those ports with no problems. This can be achieved with overlapping VLANs. (Revised 2011-07-20) page 48 of 145 For Sales and Support, Contact Walker EMD • www.walkeremd.com • Toll-free: (800) 876-4444 • Tel: (203) 426-7700 • Fax: (203) 426-7800 RSTP – RSTP Configuration The RSTP Configuration tab under the RSTP category will display the RSTP information for the first VLAN. Using the pull-down menu at the top of the page an administrator can choose which VLAN to configure RSTP on. Once the VLAN is selected the administrator may configure the bridge by clicking on the Configuration button in the middle of the page. The configuration screen for the VLAN that was previously selected will look like the example below. Here the administrator can make changes such as the Hello Time, the Forward Delay, the Max Age, the priority, and the Status of RSTP on that VLAN. Following the link for the view RSTP Port Configuration at VLAN# the administrator or user can see the current RSTP status of the ports on that VLAN. NOTES: 1. Trunking must be disabled in order to use RSTP. 2. N-Ring Manager cannot have RSTP enabled. 3. RSTP & N-Ring are different modes and cannot have redundant links along those lines. See the examples on the following sheet. (Revised 2011-07-20) page 49 of 145 For Sales and Support, Contact Walker EMD • www.walkeremd.com • Toll-free: (800) 876-4444 • Tel: (203) 426-7700 • Fax: (203) 426-7800 RSTP – RSTP Configuration, Continued… It is valid to have RSTP rings linked to non-N-Ring ports of active N-Ring Members, as above. As marked above, it is not valid to expect RSTP to block redundant N-Ring links nor for N-Ring to block redundant RSTP links. (Revised 2011-07-20) page 50 of 145 For Sales and Support, Contact Walker EMD • www.walkeremd.com • Toll-free: (800) 876-4444 • Tel: (203) 426-7700 • Fax: (203) 426-7800 RSTP – RSTP Configuration, Continued… Following the link for the view RSTP Port Configuration at VLAN# the administrator or user can see the current RSTP status of the ports on that VLAN. This will show information such as the Path Cost and the Port State. If the switch sees a redundant path it will put the port with the highest Path Cost into Blocking mode where it will discard packets coming in on that port. In the below example, B1 is a redundant port with port A2, therefore A2 is forwarding and B1 is discarding. (Revised 2011-07-20) page 51 of 145 For Sales and Support, Contact Walker EMD • www.walkeremd.com • Toll-free: (800) 876-4444 • Tel: (203) 426-7700 • Fax: (203) 426-7800 RSTP – RSTP Configuration, Continued… If the administrator selects one of the ports on the previous screen he or she can change the Port‟s Path Cost, Port‟s Priority and the status of Admin Edge and Auto Edge. (Revised 2011-07-20) page 52 of 145 For Sales and Support, Contact Walker EMD • www.walkeremd.com • Toll-free: (800) 876-4444 • Tel: (203) 426-7700 • Fax: (203) 426-7800 IGMP – Configuration The Configuration tab under the IGMP category will display the IGMP basic configuration settings. By default IGMP is enabled. Following the Modify button on the previous page, the administrator will see a list of configurable fields for the IGMP configuration. Once these fields are filled in to meet the needs of the administrator‟s network the changes may be saved by clicking the Update button at the bottom of the page. (Revised 2011-07-20) page 53 of 145 For Sales and Support, Contact Walker EMD • www.walkeremd.com • Toll-free: (800) 876-4444 • Tel: (203) 426-7700 • Fax: (203) 426-7800 IGMP – Show Group and Show Router The Show Group tab under the IGMP category will display a list of IGMP groups based on the Group IP and the port number that it is associated with. The Show Router tab under the IGMP category will display a list of Auto-detected Router IPs and the port numbers that they are associated with. (Revised 2011-07-20) page 54 of 145 For Sales and Support, Contact Walker EMD • www.walkeremd.com • Toll-free: (800) 876-4444 • Tel: (203) 426-7700 • Fax: (203) 426-7800 IGMP – RFilter The „rfilter‟ (Router Multicast Data Filter) function allows you to choose whether or not DATA frames with KNOWN group multicast addresses are sent to the „router‟ ports (links to other switches). Control packets (Join, Leave) will be sent to the router(s) regardless of this setting. “KNOWN” is known from dynamic IGMP Snooping operations. The factory default is that the Router Multicast Data Filter is enabled for all ports, so any router ports do NOT get DATA frames with KNOWN multicast destination addresses unless a join to a specific multicast address has been received on that port. Joins override an rfilter. If rfilter is disabled router ports do get DATA frames with KNOWN multicast destination addresses Rfilter can be set for individual ports: any, all, or none. For each port, rfilter will have an impact only if that port is manually or dynamically chosen as a router port. Default configuration: (Revised 2011-07-20) page 55 of 145 For Sales and Support, Contact Walker EMD • www.walkeremd.com • Toll-free: (800) 876-4444 • Tel: (203) 426-7700 • Fax: (203) 426-7800 Modifying rfilter port settings: (Revised 2011-07-20) page 56 of 145 For Sales and Support, Contact Walker EMD • www.walkeremd.com • Toll-free: (800) 876-4444 • Tel: (203) 426-7700 • Fax: (203) 426-7800 N-Ring – Configuration The Configuration tab under the N-Ring category will display the N-Ring basic configuration settings. By default N-Ring is in AutoMember mode and the N-Ring Agingtime is 20 seconds. Following the Modify button, the administrator will see a list of configurable fields for the N-Ring configuration, as below. The N-Ring Agingtime has a default of 20 seconds and is separate from the Bridging Aging Time. N-Ring Aging time is used for the whole switch if the switch is an N-Ring Manager or becomes an active N-Ring Member, and in either case N-Ring status includes for example: “Switch is currently using N-Ring Aging Time = 20 Seconds” Once these fields are filled in to meet the needs of the administrator‟s network the changes may be saved by clicking the Update button at the bottom of the page. NOTES: 1. N-Ring Manager cannot have RSTP or Trunking enabled. 2. RSTP & N-Ring are different modes and cannot have redundant links along those lines. See the examples in the RSTP configuration section. 3. Do not use Trunking on a switch that is directly in an active N-Ring. 4. Any one 9000 can only participate in one N-Ring. 5. N-Ring copper ports must be run at 100Mb full duplex, including the default ‘autonegotiate’ as long as all switches in the ring support 100Mb full duplex. (Revised 2011-07-20) page 57 of 145 For Sales and Support, Contact Walker EMD • www.walkeremd.com • Toll-free: (800) 876-4444 • Tel: (203) 426-7700 • Fax: (203) 426-7800 N-Ring Configuration (continued) The “N-Ring Mode” is one of three, as below: If N-Ring Mode is “Manager”, then a pull-down allows selection as available of ports A1 and A2, or E1 and E2 as N-Ring ports. (Revised 2011-07-20) page 58 of 145 For Sales and Support, Contact Walker EMD • www.walkeremd.com • Toll-free: (800) 876-4444 • Tel: (203) 426-7700 • Fax: (203) 426-7800 N-Ring Configuration (continued) If N-Ring Mode is “Manager”, then a pull-down allows selection of displaying N-Ring Summary Status on all web pages or on N-Ring pages only: (Revised 2011-07-20) page 59 of 145 For Sales and Support, Contact Walker EMD • www.walkeremd.com • Toll-free: (800) 876-4444 • Tel: (203) 426-7700 • Fax: (203) 426-7800 N-Ring Configuration (continued) If N-Ring Mode is “Manager”, then VLAN ID can be set to a unique vlan id (1 ~ 4094). Default is 3333. If N-Ring Mode is “Manager”, then a pull-down allows selection as to whether the N-Ring ports are members of the VLANs Tagged or Untagged ports. Default is Tagged. Once these fields are filled in to meet the needs of the administrator‟s network the changes may be saved by clicking the Update button at the bottom of the page. NOTES: 1. Since VLANs are implemented for security reasons as well as traffic flow, N-Ring only makes minimal changes. It is up to the administrator to ensure that VLANs are configured correctly on the N-Ring manager and all N-Ring members. 1.2. When the N-Ring manager and all N-Ring Members are in defaults, changing the N-Ring manager to use a Tagged VLAN requires no user interaction to allow non-ring traffic to pass through the ring. This works because changing to a Tagged VLAN does not remove the ring ports from the default VLAN. 2.3. When the N-Ring manager and all N-Ring Members are in defaults, changing the N-Ring manager to use an Untagged VLAN other than VID 1, requires the administrator to add non-ring ports to the N-Ring VLAN to allow non-ring traffic to pass through the ring. This occurs because the N-Ring ports must be removed from VID 1 because an untagged port may only be a member of one VLAN. (Revised 2011-07-20) page 60 of 145 For Sales and Support, Contact Walker EMD • www.walkeremd.com • Toll-free: (800) 876-4444 • Tel: (203) 426-7700 • Fax: (203) 426-7800 N-Ring – Status The Status tab under the N-Ring category will display the N-Ring status. Below is an example of N-Ring Status from a switch in defaults (N-Ring Auto Member) that is not an NRing Manager and has not become an “Active” N-Ring Member: Below is an example of N-Ring Status from an “Active” N-Ring Member: (Revised 2011-07-20) page 61 of 145 For Sales and Support, Contact Walker EMD • www.walkeremd.com • Toll-free: (800) 876-4444 • Tel: (203) 426-7700 • Fax: (203) 426-7800 Below is an example of N-Ring Status from an N-Ring Manager with a healthy N-Ring: N-Ring OK N-Ring Status View Switch is an N-Ring Manager, using N-Ring Aging Time = 20 Seconds Refresh every 6 secs. Update Pause Print... 12 Active Members Detected In Current N-Ring (12 reporting) Switch No MAC Address (Revised 2011-07-20) IP Address Subnet Mask Name Ports RM 00:07:af:ff:e4:a0 192.168.1.227 255.255.255.0 N-TRON Switch A2 A1 1 00:07:af:ff:ef:60 192.168.1.224 255.255.255.0 N-TRON Switch A2 A1 2 00:07:af:ff:e6:a0 192.168.1.217 255.255.255.0 N-TRON Switch A2 A1 3 00:07:af:ff:ef:80 192.168.1.221 255.255.255.0 N-TRON Switch A2 A1 4 00:07:af:ff:e4:c0 192.168.1.241 255.255.255.0 N-TRON Switch A2 A1 5 00:07:af:ff:d5:e0 192.168.1.229 255.255.255.0 N-TRON Switch A2 A1 6 00:07:af:ff:d7:00 192.168.1.228 255.255.255.0 N-TRON Switch A2 A1 7 00:07:af:ff:e6:c0 192.168.1.223 255.255.255.0 N-TRON Switch A2 A1 8 00:07:af:ff:d5:20 192.168.1.231 255.255.255.0 N-TRON Switch A2 A1 9 00:07:af:ff:e5:e0 192.168.1.238 255.255.255.0 N-TRON Switch A2 A1 10 00:07:af:ff:e3:c0 192.168.1.239 255.255.255.0 N-TRON Switch A2 A1 11 00:07:af:ff:d5:40 192.168.1.230 255.255.255.0 N-TRON Switch A2 A1 12 00:07:af:ff:e3:e0 192.168.1.215 255.255.255.0 N-TRON Switch A2 A1 page 62 of 145 For Sales and Support, Contact Walker EMD • www.walkeremd.com • Toll-free: (800) 876-4444 • Tel: (203) 426-7700 • Fax: (203) 426-7800 Below is an example of N-Ring Status from an N-Ring Manager with a faulted N-Ring. The red fields on the N-Ring Map show problems. Ports that are red indicate that the port is not linked. MAC addresses that are red indicate that there is no communication to that switch. The red “Ring Broken” line shows where the N-Ring is broken. N-Ring Fault N-Ring Status View Switch is an N-Ring Manager, using N-Ring Aging Time = 20 Seconds Refresh every 6 secs. Update Pause Print... The total number of Active N-Ring Members is unknown. (11 reporting) Switch order may be incorrect and all switches may not be shown. Switch No MAC Address IP Address Subnet Mask Name Ports RM 00:07:af:ff:e4:a0 192.168.1.227 255.255.255.0 N-TRON Switch A2 A1 1 00:07:af:ff:ef:60 192.168.1.224 255.255.255.0 N-TRON Switch A2 A1 2 00:07:af:ff:e6:a0 192.168.1.217 255.255.255.0 N-TRON Switch A2 A1 3 00:07:af:ff:ef:80 192.168.1.221 255.255.255.0 N-TRON Switch A2 A1 4 00:07:af:ff:e4:c0 192.168.1.241 255.255.255.0 N-TRON Switch A2 A1 5 00:07:af:ff:d5:e0 192.168.1.229 255.255.255.0 N-TRON Switch A2 A1 6 00:07:af:ff:d7:00 192.168.1.228 255.255.255.0 N-TRON Switch A2 A1 7 00:07:af:ff:e6:c0 192.168.1.223 255.255.255.0 N-TRON Switch A2 A1 8 00:07:af:ff:d5:20 192.168.1.231 255.255.255.0 N-TRON Switch A2 A1 9 00:07:af:ff:e5:e0 192.168.1.238 255.255.255.0 N-TRON Switch A2 A1 10 00:07:af:ff:e3:c0 192.168.1.239 255.255.255.0 N-TRON Switch A2 A1 11 00:07:af:ff:d5:40 192.168.1.230 255.255.255.0 N-TRON Switch A2 A1 N-TRON Switch A2 A1 ~~~~~ Ring Broken ~~~~~ 12 (Revised 2011-07-20) 00:07:af:ff:e3:e0 192.168.1.215 255.255.255.0 page 63 of 145 For Sales and Support, Contact Walker EMD • www.walkeremd.com • Toll-free: (800) 876-4444 • Tel: (203) 426-7700 • Fax: (203) 426-7800 In rare cases an N-Ring can have a “Partial Fault”. An example of this is to have a break in just one fiber in a duplex channel fiber pair. The screenshot below shows N-Ring Manager Status when a „Higher‟ N-Ring Port (A2 or E2) is not receiving self health frames all the way around the N-Ring, though the other (low A1/E1) N-Ring port is: N-Ring Partial Fault (A2 is not receiving self health from A1) N-Ring Status View Switch is an N-Ring Manager, using N-Ring Aging Time = 20 seconds Refresh every 6 secs. Update Pause Print... 0 Active Members Detected In Current N-Ring (0 reporting) Switch No MAC Address RM IP Address Subnet Mask Name Ports 00:07:af:00:b1:40 192.168.1.135 255.255.255.0 N-TRON Switch A2 A1 The screenshot below shows N-Ring Manager Status when a „Lower‟ N-Ring Port (A1 or E1) is not receiving self health frames all the way around the N-Ring, though the other (high A2/E2) N-Ring port is: N-Ring Partial Fault (A1 is not receiving self health from A2) N-Ring Status View Switch is an N-Ring Manager, using N-Ring Aging Time = 20 seconds Refresh every 6 secs. Update Pause Print... 0 Active Members Detected In Current N-Ring (0 reporting) Switch No MAC Address RM (Revised 2011-07-20) IP Address Subnet Mask Name 00:07:af:00:b1:40 192.168.1.135 255.255.255.0 N-TRON Switch Ports A2 A1 page 64 of 145 For Sales and Support, Contact Walker EMD • www.walkeremd.com • Toll-free: (800) 876-4444 • Tel: (203) 426-7700 • Fax: (203) 426-7800 NView – Configuration The Configuration tab under the NView category will display two basic variables for NView, the status and the interval between packets. Following the Modify button on the above example, the administrator can modify the variable to change the frequency with which NView reports information. Increasing the interval will slow the update rate. Decreasing the interval will allow NView to report more frequently. Additionally, you may Disable or Enable NView altogether. (Revised 2011-07-20) page 65 of 145 For Sales and Support, Contact Walker EMD • www.walkeremd.com • Toll-free: (800) 876-4444 • Tel: (203) 426-7700 • Fax: (203) 426-7800 NView – Ports The Ports tab under the NView category will display a list of all the configured ports on the 9000 unit along with the ports transmitting multicast packets and MIB stats respectively. (Revised 2011-07-20) page 66 of 145 For Sales and Support, Contact Walker EMD • www.walkeremd.com • Toll-free: (800) 876-4444 • Tel: (203) 426-7700 • Fax: (203) 426-7800 NView – Ports, Continued… Following the Modify button on the previous example, the administrator can modify these two variables to enable or disable multicast out of the port and if MIB stats are sent out for those ports. (Revised 2011-07-20) page 67 of 145 For Sales and Support, Contact Walker EMD • www.walkeremd.com • Toll-free: (800) 876-4444 • Tel: (203) 426-7700 • Fax: (203) 426-7800 EventLog – Log Statistics The Log Statistics tab under the EventLog category will show a list of how many times a type of event took place. On the bottom of the page it should also list the maximum log size which can be modified. There are 5 types of events that the 9000 will categorize messages in. If the log level is set to 1, the 9000 will log all 5 types of events. If the log level is set to 5 it will only record the Critical types (the 5th level). Following the Modify button on the previous example, the administrator can modify these two variables to adjust for how large he or she wants the log file to be and the log level. (Revised 2011-07-20) page 68 of 145 For Sales and Support, Contact Walker EMD • www.walkeremd.com • Toll-free: (800) 876-4444 • Tel: (203) 426-7700 • Fax: (203) 426-7800 EventLog – Show Events The Show Events tab under the EventLog category will show a list of events that have occurred in the order in which they occurred. There is a time stamp for each event and they are categorized by the severity of the event. (Revised 2011-07-20) page 69 of 145 For Sales and Support, Contact Walker EMD • www.walkeremd.com • Toll-free: (800) 876-4444 • Tel: (203) 426-7700 • Fax: (203) 426-7800 Firmware/Config – TFTP The TFTP tab under the Firmware/Config category gives the administrator the ability to upload or download a config file for a 9000 Series switch. This gives administrators the ability to backup their configurations to a server offsite in case they need to reload their custom configurations at a later time. Administrators are also given the ability to flash the switch in the field allowing them to update the firmware in the field without losing their current configurations and without having to send the unit back in to N-Tron for updates in the future. It is important not to cycle power on the switch or interrupt the data connection between the TFTP server and the switch while you are flashing or uploading or downloading a config file. The switch will not stop working if this does occur, but the administrator will have to retransfer the file. (Revised 2011-07-20) page 70 of 145 For Sales and Support, Contact Walker EMD • www.walkeremd.com • Toll-free: (800) 876-4444 • Tel: (203) 426-7700 • Fax: (203) 426-7800 Firmware/Config – FTP The FTP tab under the Firmware/Config category gives the administrator the ability to upload or download a config file for a 9000 Series switch. This gives administrators the ability to backup their configurations to a server offsite in case they need to reload their custom configurations at a later time. Administrators are also given the ability to flash the switch in the field allowing them to update the firmware in the field without losing their current configurations and without having to send the unit back in to N-Tron for updates in the future. It is important not to cycle power on the switch or interrupt the data connection between the FTP server and the switch while you are flashing or uploading or downloading a config file. The switch will not stop working if this does occur, but the administrator will have to retransfer the file. (Revised 2011-07-20) page 71 of 145 For Sales and Support, Contact Walker EMD • www.walkeremd.com • Toll-free: (800) 876-4444 • Tel: (203) 426-7700 • Fax: (203) 426-7800 Support – Web Site and E-mail If at any point in time you get confused or would like additional support directly from N-Tron, you may visit N-Tron‟s web site, or e-mail N-Tron directory with the links provided for more information. (Revised 2011-07-20) page 72 of 145 For Sales and Support, Contact Walker EMD • www.walkeremd.com • Toll-free: (800) 876-4444 • Tel: (203) 426-7700 • Fax: (203) 426-7800 BPCL – Broadcast Packet Count Limit Configuration The BPCL link will display all the ports that are installed in the 9000 Series unit and will list the BPCL Percentage for each port. These are egress filters. A modify button is provided to change these fields. Following the Modify button on the previous example, the administrator can modify the BPCL Percentage for each port. The default BPCL is 3% for all ports. (Revised 2011-07-20) page 73 of 145 For Sales and Support, Contact Walker EMD • www.walkeremd.com • Toll-free: (800) 876-4444 • Tel: (203) 426-7700 • Fax: (203) 426-7800 User Mgmt – Adding Users The User Management link will display a list of all the users who have access to the management features of the switch and their access permissions. Following the Add button on the previous example, the administrator can add another user and assign the user a username, a password, and the user‟s permissions (user/administrator). A page should display after the administrator clicks the Add button stating that the user was successfully added. NOTE: There is a maximum number of 5 users per switch. User permissions have the right to view switch configurations and to view current port settings, but cannot make any changes to these settings. Admin permissions have the right to change and view any switch configuration and to change and view any current port settings. (Revised 2011-07-20) page 74 of 145 For Sales and Support, Contact Walker EMD • www.walkeremd.com • Toll-free: (800) 876-4444 • Tel: (203) 426-7700 • Fax: (203) 426-7800 User Mgmt – Removing Users In order to remove a user, simply click on the Remove button at the bottom of the page. Following the Remove button on the last page, the administrator can remove a user by entering in the user‟s name and clicking the Remove button. A page should follow stating that the user was successfully removed from the list. (Revised 2011-07-20) page 75 of 145 For Sales and Support, Contact Walker EMD • www.walkeremd.com • Toll-free: (800) 876-4444 • Tel: (203) 426-7700 • Fax: (203) 426-7800 Logical View The 9000 Web Management offers a logical view of the switch. Here a user or administrator can see a graphical depiction of the 9000 switch with the installed modules that have been configured in it. Ports that are linked will turn green, while ports that are not linked will show up as black. The example below shows only port 4 on the 9006TX module is linked. The other ports are currently in the down state (not being used). (Revised 2011-07-20) page 76 of 145 For Sales and Support, Contact Walker EMD • www.walkeremd.com • Toll-free: (800) 876-4444 • Tel: (203) 426-7700 • Fax: (203) 426-7800 Configuration – Save or Reset The Configuration section of the web management gives an administrator the ability to save a running configuration into the NVRAM. This step is needed in order for the switch to remember any changes after a power cycle. The Reset Configuration button will reload N-Tron‟s factory default configuration settings. Doing so will re-configure the 9000 Series switch to factory defaults. In many cases it is desirable to restore factory defaults but retain the IP, Slot Configuration, Subnet Mask, and Gateway Address settings. A choice is provided to this end. (Revised 2011-07-20) page 77 of 145 For Sales and Support, Contact Walker EMD • www.walkeremd.com • Toll-free: (800) 876-4444 • Tel: (203) 426-7700 • Fax: (203) 426-7800 Help – Overview When the Help link is clicked on, you will see the Overview page that will have some basic definitions and more specific choices at the top of the screen. Although this page is not as detailed as the manual is, it gives you a basic feel for different features the 9000 offers. (Revised 2011-07-20) page 78 of 145 For Sales and Support, Contact Walker EMD • www.walkeremd.com • Toll-free: (800) 876-4444 • Tel: (203) 426-7700 • Fax: (203) 426-7800 Help – Administration Selecting the Administration link on the help page, the administrator or user can see some information regarding the configuration options in the Administration category on the left side of the web management. (Revised 2011-07-20) page 79 of 145 For Sales and Support, Contact Walker EMD • www.walkeremd.com • Toll-free: (800) 876-4444 • Tel: (203) 426-7700 • Fax: (203) 426-7800 Help – Ports Following the Ports link on the help page, the administrator or user can see some information regarding the configuration options in the Ports category on the left side of the web management. (Revised 2011-07-20) page 80 of 145 For Sales and Support, Contact Walker EMD • www.walkeremd.com • Toll-free: (800) 876-4444 • Tel: (203) 426-7700 • Fax: (203) 426-7800 Help – Statistics Following the Statistics link on the help page, the administrator or user can see some information regarding the configuration options in the Statistics category on the left side of the web management. (Revised 2011-07-20) page 81 of 145 For Sales and Support, Contact Walker EMD • www.walkeremd.com • Toll-free: (800) 876-4444 • Tel: (203) 426-7700 • Fax: (203) 426-7800 Help – VLAN Using the VLAN link on the help page, the administrator or user can see some information regarding the configuration options in the VLAN category on the left side of the web management. (Revised 2011-07-20) page 82 of 145 For Sales and Support, Contact Walker EMD • www.walkeremd.com • Toll-free: (800) 876-4444 • Tel: (203) 426-7700 • Fax: (203) 426-7800 Help – BPCL Using the BPCL the link on the help page, the administrator or user can see some information regarding the configuration options in the BPCL category on the left side of the web management. (Revised 2011-07-20) page 83 of 145 For Sales and Support, Contact Walker EMD • www.walkeremd.com • Toll-free: (800) 876-4444 • Tel: (203) 426-7700 • Fax: (203) 426-7800 Help – IGMP Following the IGMP link on the help page, the administrator or user can see some information regarding the configuration options in the IGMP category on the left side of the web management. (Revised 2011-07-20) page 84 of 145 For Sales and Support, Contact Walker EMD • www.walkeremd.com • Toll-free: (800) 876-4444 • Tel: (203) 426-7700 • Fax: (203) 426-7800 Help – Bridging Using the Bridging link on the help page, the administrator or user can see some information regarding the configuration options in the Bridging category on the left side of the web management. (Revised 2011-07-20) page 85 of 145 For Sales and Support, Contact Walker EMD • www.walkeremd.com • Toll-free: (800) 876-4444 • Tel: (203) 426-7700 • Fax: (203) 426-7800 Help – RSTP Using the RSTP link on the help page, the administrator or user can see some information regarding the configuration options in the RSTP category on the left side of the web management. (Revised 2011-07-20) page 86 of 145 For Sales and Support, Contact Walker EMD • www.walkeremd.com • Toll-free: (800) 876-4444 • Tel: (203) 426-7700 • Fax: (203) 426-7800 Help – Event Log Using the Event Log link on the help page, the administrator or user can see some information regarding the configuration options in the Event Log category on the left side of the web management. (Revised 2011-07-20) page 87 of 145 For Sales and Support, Contact Walker EMD • www.walkeremd.com • Toll-free: (800) 876-4444 • Tel: (203) 426-7700 • Fax: (203) 426-7800 Help – Firmware/Config Using the Firmware/Config link on the help page, the administrator or user can see some information regarding the configuration options in the Firmware/Config category on the left side of the web management. (Revised 2011-07-20) page 88 of 145 For Sales and Support, Contact Walker EMD • www.walkeremd.com • Toll-free: (800) 876-4444 • Tel: (203) 426-7700 • Fax: (203) 426-7800 Help – Logical View Using the Logical View link on the help page, the administrator or user can see some information regarding the configuration options in the Logical View category on the left side of the web management. (Revised 2011-07-20) page 89 of 145 For Sales and Support, Contact Walker EMD • www.walkeremd.com • Toll-free: (800) 876-4444 • Tel: (203) 426-7700 • Fax: (203) 426-7800 Help – User Mgmt Using the User Mgmt link on the help page, the administrator or user can see some information regarding the configuration options in the User Mgmt category on the left side of the web management. (Revised 2011-07-20) page 90 of 145 For Sales and Support, Contact Walker EMD • www.walkeremd.com • Toll-free: (800) 876-4444 • Tel: (203) 426-7700 • Fax: (203) 426-7800 Help – N-View Using the N-View link on the help page, the administrator or user can see some information regarding the configuration options in the NView category on the left side of the web management. (Revised 2011-07-20) page 91 of 145 For Sales and Support, Contact Walker EMD • www.walkeremd.com • Toll-free: (800) 876-4444 • Tel: (203) 426-7700 • Fax: (203) 426-7800 Help – N-Ring Using the N-Ring link on the help page, the administrator or user can see some information regarding the configuration options in the N-Ring category on the left side of the web management. (Revised 2011-07-20) page 92 of 145 For Sales and Support, Contact Walker EMD • www.walkeremd.com • Toll-free: (800) 876-4444 • Tel: (203) 426-7700 • Fax: (203) 426-7800 Help – Others Following the Others link on the help page, the administrator or user can see some information regarding other links or categories on the left hand side of the web manager, as above. (Revised 2011-07-20) page 93 of 145 For Sales and Support, Contact Walker EMD • www.walkeremd.com • Toll-free: (800) 876-4444 • Tel: (203) 426-7700 • Fax: (203) 426-7800 CLI Commands Clear Command Name Description Syntax Parameters Examples clear Clears the screen. The cleared screen shows only the command-line prompt and the cursor. clear None N-TRON/Admin#[1]> clear The entire screen will be cleared… … … … … N-TRON/Admin#[2]> NOTES “?” (HELP) Command Name Description “?” Without <keywords>, this command will list all the available commands. This is the same as the default behavior of the help command. If <keywords> is specified and if they match a specific command, the usage of the command will be displayed; otherwise, if <keywords> matches the prefix of a command(s), the name of the command(s) will be listed. Syntax Parameters Examples If ? is preceded by another ?, the usage and description of this command will be displayed. ? <matched keywords> ? <command> ? matched keywords Prefixes of the command. command Name of the any command supported by CLI N-TRON/Admin#[1]> ? The above command displays all the available commands. N-TRON/Admin#[2]> abcd ? Unknown command supplied as parameter. N-TRON/Admin#[3]> clear ? Usage: clear N-TRON/Admin#[4]> system ? System/ N-TRON/Admin#[5]> ? ? This displays the usage of “?” as shown below [<keywords>] ? NOTES (Revised 2011-07-20) page 94 of 145 For Sales and Support, Contact Walker EMD • www.walkeremd.com • Toll-free: (800) 876-4444 • Tel: (203) 426-7700 • Fax: (203) 426-7800 Top Command Name Description Syntax Parameters Examples top Changes the context to the topmost (global) level. If already at the topmost context, the command is simply ignored top None N-TRON/Admin#[1]system> show N-TRON/Admin#[2]system/show> top N-TRON/Admin#[3]> top N-TRON/Admin#[4]> NOTES Up Command Name Description Syntax Parameters Examples up Changes the context to the next higher level. If already at the topmost context, the command is simply ignored up None N-TRON/Admin#[1]> system show N-TRON/Admin#[2]system/show> up N-TRON/Admin#[3]system> up N-TRON/Admin#[4]> up N-TRON/Admin#[5]> NOTES Logout Command Name Description Syntax Parameters Examples logout Logs out the user from a CLI session. In case of a remote session, the session will be terminated after the user is logged out. logout None N-TRON/Admin#[1] logout Hit <ENTER> to login: NOTES History Command Name Description Syntax Parameters Examples history Lists all the commands in the history list for the current session, identifying each command with a reference number. history –reverse reverse the order of display to be the most recent entry first. –maxsize set the maximum no. of entries that will be maintained in the list to the given value. –clear remove all entries in the command history list. N-TRON/Admin#[1]> history The above command displays previously entered commands. NOTES (Revised 2011-07-20) page 95 of 145 For Sales and Support, Contact Walker EMD • www.walkeremd.com • Toll-free: (800) 876-4444 • Tel: (203) 426-7700 • Fax: (203) 426-7800 “!” Command Name Description Syntax Parameters Examples ! Repeats the command in the history list identified by <commandreference>. !! – repeats the last command executed. !<n> – repeats the command in the history list associated with reference number <n>. !<str> – repeats the most recent command that begins with the string <str>. Any non-whitespace characters that follow are appended to the referenced command prior to its execution. !<n> !<str> N It is the reference number of the command from history list that has to be repeated. str The most recent command from the history list that begins with keyword str. N-TRON/Admin#[1]> !! Referenced command is not in the history list. N-TRON/Admin#[2]> !1 Referenced command is not in the history list. N-TRON/Admin#[3]> !s Referenced command is not in the history list. N-TRON/Admin#[4]> whoami admin with privilege of Administrator here comes the usage of “!” command N-TRON/Admin#[5]> !w whoami admin with privilege of Administrator N-TRON/Admin#[6]> !2 The above command will execute the second command, which is available in history list. N-TRON/Admin#[7]> !system The above command will execute the latest command in the history list that starts with system. NOTES (Revised 2011-07-20) page 96 of 145 For Sales and Support, Contact Walker EMD • www.walkeremd.com • Toll-free: (800) 876-4444 • Tel: (203) 426-7700 • Fax: (203) 426-7800 “$” Command Name Description Syntax Parameters $ This command copies the command identified by reference number <command no> from the history list into the next command line allowing the user to edit the command for corrections or changes. $<n> n The reference number of the command in the history list that has to be edited. Examples N-TRON/Admin#[1]> whoaim As shown above the command whoaim was entered instead of whoami. To edit the already entered command do as follows. N-TRON/Admin#[2]> $1 N-TRON/Admin#[2]> whoaim NOTES Whoami Command Name Description Syntax Parameters Examples Now we can edit the command at the command prompt. After entering „$1‟ at the prompt, it displays the previously entered command. whoami This command displays the current operating mode of the user. whoami None eg.1 N-TRON/Admin#[5]>whoami admin with privilege of Administrator eg.2 N-TRON/User#[5]> whoami user with privilege of User NOTES Ping Command Name Description Syntax Parameters Example ping To issue the ping request to a specified host. ping <hostip-address> [count] hostip-address IP Address of the host to give the ping request. count Count the number of times to give the ping request (range 5-50). ping 10.1.6.15 ping 10.1.6.15 10 Notes (Revised 2011-07-20) page 97 of 145 For Sales and Support, Contact Walker EMD • www.walkeremd.com • Toll-free: (800) 876-4444 • Tel: (203) 426-7700 • Fax: (203) 426-7800 System Configuration Commands Set Mode IP config Command Name Description Syntax Parameters Example NOTES system set modeipconfig To set the IP address mode of the system system set modeipconfig <manual|dhcp|bootp> manual Uses a static IP address scheme (default mode) dhcp Pulls an IP address from a DHCP server on the LAN bootp Pulls an IP address from a Bootp server on boot up N-TRON/Admin#[1]> system set modeipconfig dhcp Bootp is an older version of DHCP, DHCP is recommended for a dynamic address scheme. Set IP/Subnet/Gateway Addresses of the system Command Name system set ip Description To set the IP address of the system Syntax system set ip <IP-address> <subnet>[ <gateway>] Parameters IP Address The IP address of the system in dotted decimal notation Subnet The subnet of the above specified IP Address Gateway The gateway address of the system. N-TRON/Admin#[1]> system set ip 10.1.1.158 255.0.0.0 Example N-TRON/Admin#[2]> system set ip 10.1.6.150 255.255.255.0 10.1.6.150 NOTES Get IP Address of the system Command Name Description Syntax Parameters Example NOTES Set System Name Command Name Description Syntax Parameters The IP address should be a valid IP address (excluding Class D & Class E type) system get ip To display the IP/Subnet/Gateway addresses of the device system get ip None N-TRON/Admin#[1]> system get ip system set sysname To set the system name system set sysname <Name-of-the-system> Name-of-the-system The system name to be used Example N-TRON/Admin#[1]> system set sysname N-Tron N-TRON/Admin#[2]> system set sysname “N-Tron Switch” Notes Please ensure to use “ “ for supplying arguments with spaces Get System Name Command Name Description Syntax Parameters Example system get sysname To display the name of the system system get sysname None N-TRON/Admin#[1]> system get sysname System Name : N-TRON Switch Notes (Revised 2011-07-20) page 98 of 145 For Sales and Support, Contact Walker EMD • www.walkeremd.com • Toll-free: (800) 876-4444 • Tel: (203) 426-7700 • Fax: (203) 426-7800 Get Gateway Address of the System Command Name system get gateway Description To display the gateway address of the system Syntax system get gateway Parameters None N-TRON/Admin#[4]> system get gateway Example System Gateway Address : 192.168.1.1 Notes Get Mac Address of the System Command Name Description Syntax Parameters Example system get sysmac To display the mac address of the device system get sysmac None N-TRON/Admin#[1]> system get sysmac System MAC Address : 00:07:af:00:00:00 Notes Get Netmask of the System Command Name Description Syntax Parameters Example system get netmask To display the netmask/subnet of the device system get netmask None N-TRON/Admin#[8]> system get netmask System Subnet : 255.255.255.0 Notes Get System Contact Command Name Description Syntax Parameters Example system get syscontact To get the contact person name of the device. system get syscontact None N-TRON/Admin#[10]> system get syscontact System Contact : N-TRON Admin Notes Set System Contact Command Name Description Syntax Parameters system set syscontact To set the contact details for the system system set syscontact <Contact-for-the-system> Contact-for-the-system The details of the person to be contacted for this system in case of any queries or problems Example N-TRON/Admin#[1]> system set syscontact [email protected] N-TRON/Admin#[2]> system set syscontact “Support Team” Notes Please ensure to use “ “ for supplying arguments with spaces Get System Location Command Name Description Syntax Parameters Example Notes (Revised 2011-07-20) system get syslocation To display the system location details. system get syslocation None N-Tron/Admin#[1]> system get syslocation page 99 of 145 For Sales and Support, Contact Walker EMD • www.walkeremd.com • Toll-free: (800) 876-4444 • Tel: (203) 426-7700 • Fax: (203) 426-7800 Set System Location Command Name Description Syntax Parameters system set syslocation To set the location details of the system system set syslocation <Location-of-the-system> Location-of-the-system The details of where the system is located Example N-TRON/Admin#[1]> system set syslocation “San Jose” N-TRON/Admin#[2]> system set syslocation Hyderabad Notes Please ensure to use “ “ for supplying arguments with spaces Get System Uptime Command Name Description Syntax Parameters Example system get sysuptime To get the uptime of the device. system get sysuptime None N-TRON/Admin#[1]> system get sysuptime System Up Time : 9 days:17 hours:8 mins:40 secs Notes Get Number of Ports present in the System Command Name system get portcount Description To get the number of ports present in the device. Syntax system get portcount Parameters None N-TRON/Admin#[1]> system get portcount Example Notes Set IP Address of an SNMP Management Stations Command Name system set snmpmgmtip Description To set the IP address of an SNMP management station Syntax system set snmpmgmtip <Station-number, IP-address> Parameters Station-number The SNMP management station number IP-Address The IP address of the SNMP management station in dotted decimal notation N-TRON/Admin#[1]> system set snmpmgmtip 2 10.1.5.100 Example N-TRON/Admin#[2]> system set snmpmgmtip 5 10.1.6.150 NOTES The IP address should be a valid IP address (excluding Class D & Class E type). To restore a Station Trap to “Value Not Configured”, enter „0.0.0.0‟. Set SNMP Get Community name Command Name system set snmpgetcommunity Description To set the community name for performing snmpget operation Syntax system set snmpgetcommunity <Community-Name> Parameters Community-Name The name of the community to be used for performing snmpget operation N-TRON/Admin#[1]> system set snmpgetcommunity public Example N-TRON/Admin#[1]> system set snmpgetcommunity “N-Tron Systems” Notes (Revised 2011-07-20) Please ensure to use “ “ for supplying arguments with spaces page 100 of 145 For Sales and Support, Contact Walker EMD • www.walkeremd.com • Toll-free: (800) 876-4444 • Tel: (203) 426-7700 • Fax: (203) 426-7800 Set SNMP Set Community name Command Name system set snmpsetcommunity Description To set the community name for performing snmpset operation Syntax system set snmpsetcommunity <Community-Name> Parameters Community-Name The name of the community to be used for performing snmpset operation N-TRON/Admin#[1]> system set snmpsetcommunity private Example N-TRON/Admin#[1]> system set snmpsetcommunity “NTron_Systems” Notes Arguments cannot have spaces. You can use an underscore („_‟) instead of a space. Set SNMP Trap Community name Command Name system set snmptrapcommunity Description To set the community name for raising snmp trap Syntax system set snmptrapcommunity <Community-Name> Parameters Community-Name The name of the community to be used for raising snmp trap N-TRON/Admin#[1]> system set snmptrapcommunity private Example N-TRON/Admin#[1]> system set snmptrapcommunity “NTron_Systems” Notes Arguments cannot have spaces. You can use an underscore („_‟) instead of a space. Show all configuration parameters Command Name system show config Description Displays the software version, the MAC address, status of gigabit ports, and other switch information Syntax system show config Parameters None N-TRON/Admin#[32]system/show> system show config Example System Configuration Product Configuration Software Version MAC Address IP Configuration Mode System IP Address Subnet Mask Gateway Address System Name System Contact System Location System Up Time : : : : : : : : : : : : Total Number of Ports Port # 1 – 24 : 26 : 10/100 Mbps Copper and/or 100 Mbps Fiber : 1000 Base LX Transceiver : 1000 Base LX Transceiver Port # 25 Port # 26 9002CPU 4.1.1 00:07:af:ff:d8:80 manual 192.168.1.220 255.255.255.0 192.168.1.1 N-TRON Switch N-TRON Admin Mobile, AL 36609 0 days:0 hours:55 mins:59 secs Notes (Revised 2011-07-20) page 101 of 145 For Sales and Support, Contact Walker EMD • www.walkeremd.com • Toll-free: (800) 876-4444 • Tel: (203) 426-7700 • Fax: (203) 426-7800 Show all configuration parameters related to SNMP manager Command Name system show snmpinfo Description To show all the configuration parameters related to snmp manager Syntax system show snmpinfo Parameters None Example N-TRON/Admin#[33]system/show> snmpinfo System SNMP Configuration : IP Address - Trap Station#1 IP Address - Trap Station#2 IP Address - Trap Station#3 IP Address - Trap Station#4 IP Address - Trap Station#5 SNMP Get Community Name SNMP Set Community Name SNMP Trap Community Name : : : : : : : : 192.168.1.2 Value Not Configured Value Not Configured Value Not Configured Value Not Configured public private public Notes System Restart Command Name Description Syntax Parameters Example system restart To restart (reboot) the device system restart None N-TRON/Admin#[1]> system restart Do you Want to Restart the System Now: Do you Want to Save the Configuration: [y/n]y [y/n]y ................ ................ Notes (Revised 2011-07-20) page 102 of 145 For Sales and Support, Contact Walker EMD • www.walkeremd.com • Toll-free: (800) 876-4444 • Tel: (203) 426-7700 • Fax: (203) 426-7800 User Management Commands Show System Users Command Name Description Syntax Parameters Example system show users Shows a list of users and their permissions on the system system show users None N-TRON/Admin#[1]> system show users Serial -----1 2 Username -------admin ntron Access Permissions -----------------admin user NOTES Add a System User Command Name Description Syntax Parameters system add user To add a user to the system system add user <username> [access permission] Username A string of at least 3 characters and no more then 15 characters Access permission “user” or “admin” permission rights Password Administrator will be prompted for a password of 3 to 15 characters in length. Example N-TRON/Admin#[1]> system add user ntron user Enter User Password :**** NOTES Users with User permissions can not make changes to the switch, but can view configuration settings and port settings. Users with admin permissions have the ability to change settings on the switch and can add more users. There is a limit of 5 users per switch with any combination of permissions. Modify a User’s Access Permissions Command Name system modify useraccess Description To change a user‟s permissions Syntax system modify useraccess <username> <access permission> Parameters Username The user‟s username that is to be modified. Access permission “user” or “admin” permission rights N-TRON/Admin#[1]> system modify useraccess ntron admin Example NOTES User must have admin permissions to use this command Modify a User’s Password Command Name Description Syntax Parameters system modify userpassword To change a user‟s password system modify userpassword <username> Username The user‟s username that is to be modified Password The new password for the user Example N-TRON/Admin#[1]system/modify> userpassword ntron Enter New Password :***** Confirm New Password :***** Password has been modified successfully Notes A user with user permissions can operate this command, but will be prompted for the old password before being prompted for the new password. (Revised 2011-07-20) page 103 of 145 For Sales and Support, Contact Walker EMD • www.walkeremd.com • Toll-free: (800) 876-4444 • Tel: (203) 426-7700 • Fax: (203) 426-7800 Remove a System User Command Name Description Syntax Parameters system remove user To remove a user from the users list system remove user <username> username The user‟s username that is to be removed Example N-TRON/Admin#[1]> system remove user ntron Do you really want to delete the above user: User successfully deleted Notes Only users with admin permissions can operate this command. (Revised 2011-07-20) [y/n]y page 104 of 145 For Sales and Support, Contact Walker EMD • www.walkeremd.com • Toll-free: (800) 876-4444 • Tel: (203) 426-7700 • Fax: (203) 426-7800 Image Loader Commands Download Image through COM port Command Name image download Description To download new firmware image through the serial port on the switch. Syntax image download Parameters None N-TRON/Admin#[1]> image download Examples NOTES Uses XModem protocol when transferring the file. N-Tron recommends that you use TFTP or FTP when updating the firmware. TFTP and FTP are both much faster. TFTP Commands Set the TFTP configuration parameter Command Name tftp set Description To set the TFTP configuration parameters TFTP Server IP Address and Remote File name. Syntax tftp set serverparam <ip-address> <remote-file-name> Parameters ip-address TFTP Server IP Address in dotted decimal notation for establishing the connection to transfer the file. remote-file-name Name of the remote file (including complete path) to be retrieved from the TFTP Server. Examples eg.1 N-TRON/Admin#[1]> tftp set serverparam 10.1.1.151 flash eg.2 N-TRON/Admin#[1]> tftp set serverparam 10.1.1.151 /usr/local/tftp/flash NOTES Please ensure that TFTP ServerIP is a valid IP Address by pinging it. Show TFTP configuration parameters Command Name tftp show Description To display the present values of all the TFTP related configuration parameters. Syntax tftp show Parameters None N-TRON/Admin#[1]> tftp show Examples NOTES Displays the Server IP Address and Filename. Download file from TFTP server Command Name tftp action get Description To download a specified file from the TFTP server. Syntax tftp action get Parameters None N-TRON/Admin#[1]> tftp action get Examples NOTES Check whether the server is up or not Check that the connection is established. Check if the file exists or not. Check the number of bytes downloaded (Revised 2011-07-20) page 105 of 145 For Sales and Support, Contact Walker EMD • www.walkeremd.com • Toll-free: (800) 876-4444 • Tel: (203) 426-7700 • Fax: (203) 426-7800 FTP Commands Set Username Command Name Description Syntax Parameters Example ftp set username To set the user name which will be used to log into the FTP server ftp set username <Username> Username The user name for logging on to the FTP server eg.1 N-TRON/Admin#[1]> ftp set username ntron eg.2 N-TRON/Admin#[1]> ftp set username admin Notes Set Password Command Name Description Syntax Parameters The user name should be a valid one; else logging into FTP server will fail. ftp set password To set the password for the above user name ftp set password Password Password for the above user required to log into the FTP server Example N-TRON/Admin#[1]> ftp set password Enter the password : ****** Notes The password should be a valid one for the user; else logging into the FTP server will fail. Set IP Address of FTP server Command Name Description Syntax Parameters Example ftp set serverip To set the IP address of the FTP server to be used for establishing the FTP connection for transfer of files/data ftp set serverip <Server-IP-address> Server-IP-address The IP address of the FTP server in decimal dotted notation for establishing a FTP connection eg.1 N-TRON/Admin#[1]> ftp set serverip 10.1.1.100 eg.2 N-TRON/Admin#[1]> ftp set serverip 15.1.1.150 Notes Set Name of the Remote File Command Name Description Syntax Parameters Example The IP address of the FTP server should be a valid IP address (excluding Class D & Class E types). The IP address should also be a valid FTP server IP in order to ensure successful connection establishment. ftp set remotefile To set the name of the remote file which has to be retrieved from the FTP server ftp set remotefile <Remote-file-name> Remote-file-name Name of the file to retrieved from the FTP server including the complete path eg.1 N-TRON/Admin#[1]> ftp set remotefile Flash eg.2 N-TRON/Admin#[1]> ftp set remotefile /usr/local/ftp/flash Notes (Revised 2011-07-20) The file name (including the complete path) should be a valid name else retrieval of the file would fail. page 106 of 145 For Sales and Support, Contact Walker EMD • www.walkeremd.com • Toll-free: (800) 876-4444 • Tel: (203) 426-7700 • Fax: (203) 426-7800 Display FTP related configuration parameters Command Name ftp show Description To display the present value of all the FTP related configuration parameters Syntax ftp show Parameters None N-TRON/Admin#[1]> ftp show Example Notes Perform the configuration file transfer action Command Name ftp <get|put> config Description To perform the desired File Transfer action (either get or put). Get retrieves a remote file from the FTP server and put stores a local file at the FTP server Syntax ftp get config ftp put config Parameters Action-command The desired File transfer action (either get or put) Example eg.1 N-TRON/Admin#[1]> ftp get config eg.2 N-TRON/Admin#[1]> ftp put config Notes The action name should be either get or put Perform the image file transfer action Command Name ftp get image Description To perform the desired File Transfer action. Get retrieves a remote file from the FTP server Syntax ftp get image Parameters None N-TRON/Admin#[1]> ftp get image Example Notes Can only get an image from a server (Revised 2011-07-20) page 107 of 145 For Sales and Support, Contact Walker EMD • www.walkeremd.com • Toll-free: (800) 876-4444 • Tel: (203) 426-7700 • Fax: (203) 426-7800 Port Manager Commands Get the link state of a given port Command Name port get linkstate Description This command is used to get the present link state of a given port. Whenever there is an active connection, link state (operational state) is up; else link state is down. Syntax port get linkstate <port-no> Parameters port-no Port number. (1 ~ 26). N-TRON/Admin#[1]> port get linkstate 3 Examples Link state of [3] port is: [down] N-TRON/Admin#[2]> port get linkstate 1 Link state of [1] port is: [up] NOTES Get admin status of the port Command Name Description Syntax Parameters Examples Check whether port-no is in the valid range. (1 ~ 26) port get adminstatus This command is used to the get present adminstatus of a given port. Adminstatus is used to enable or disable the port operations even though there are active connections. port get adminstatus <port-no> port-no Port number. (1 ~ 26). N-TRON/Admin#[1]> port get adminstatus Admin state of [4] port is: [enable] 4 N-TRON/Admin#[2]> port get adminstatus 9 Admin state of [9] port is: [disable] NOTES Set admin status of a port Command Name Description Syntax Parameters Examples Check whether port-no is in the valid range. (1 ~ 26) port set adminstatus This command is used to set the adminstatus of a given port to enable or disable. If the adminstatus is disabled, the port cannot process the received packets. port set adminstatus <port-no><enable | disable> 1. port-no Port number. (1 ~ 26). 2. adminstatus adminstatus is either enable or disable. N-TRON/Admin#[1]> port set adminstatus 4 enable N-TRON/Admin#[2]> port set adminstatus 8 disable NOTES (Revised 2011-07-20) Check whether port-no is in the valid range. (1 ~ 24) page 108 of 145 For Sales and Support, Contact Walker EMD • www.walkeremd.com • Toll-free: (800) 876-4444 • Tel: (203) 426-7700 • Fax: (203) 426-7800 Show port statistics Command Name Description Syntax Parameters Examples NOTES port show stats This command is used to get the port statistics of a given port for all available counters. port show stats <port-no> port-no Port number. (1 ~ 26). N-TRON/Admin#[1]> port show stats 5 -------------------------------------------COUNTER TYPE :[] -------------------------------------------COUNTER NAME COUNTER VALUE -------------------------------------------byteFrames 28072 64 byte Frames 272 64-127 byte Frames 24 128-255 byte Frames 43 256-511 byte Frames 43 512-1023 byte Frames 0 1024-1518 byte Frames 0 1519-1522 byte Frames 0 ………… Check whether port-no is in the valid range. (1 ~ 26) Get total number of good frames received Command Name port get totalgoodframes Description Gets the total number of good frames received on the switch. Syntax port get totalgoodframes Parameters None Examples eg.1 N-TRON/Admin#[1]> port get totalgoodframes Total no of good frames: [12456] NOTES Get port speed Command Name Description Syntax Parameters port get speed Gets the port speed in megabits. port get speed <port-no> port-no Port number. (1 ~ 26). Examples N-TRON/Admin#[1]> port get speed 4 port speed of port no [4] is : [10] N-TRON/Admin#[2]> port get speed 5 port speed of port no [5] is : [100] NOTES Check whether port-no is in the valid range. (1 ~ 26) Set Port Speed Command Name Description Syntax Parameters Examples port set speed Sets the port speed of a given port. port set speed <port-no><speed> port-no Port number. (1 ~ 26) speed Speed of the port. Speed must either 10, 100, 1000 megabits per sec. N-TRON/Admin#[1]> port set speed 5 10 N-TRON/Admin#[2]> port set speed 9 100 NOTES Get the port duplex mode Command Name Description (Revised 2011-07-20) port get duplexmode Gets the port Duplex mode (FULL_DUPLEX / HALF_DUPLEX) for a page 109 of 145 For Sales and Support, Contact Walker EMD • www.walkeremd.com • Toll-free: (800) 876-4444 • Tel: (203) 426-7700 • Fax: (203) 426-7800 Syntax Parameters given port number . port get duplexmode <port-no> port-no Port number. (1 ~ 26) Examples N-TRON/Admin#[1]> port get duplexmode 4 Duplex mode of [4] port is: [half] N-TRON/Admin#[2]> port get duplexmode 23 Duplex mode of [23] port is: [full] NOTES Check whether port-no is in the valid range. (1 ~ 26) Set the port duplex mode Command Name Description Syntax Parameters port set duplexmode Sets the port duplex mode (HALF_DUPLEX / FULL_DUPLEX) for a given port number. port set duplexmode <port-no> <full | half> port-no Port number. (1~24) full | half Duplex mode of the port. Duplex mode must be either FULL_DUPLEX or HALF_DUPLEX. Examples N-TRON/Admin#[1]> port set duplexmode 4 full N-TRON/Admin#[2]> port set duplexmode 4 half NOTES Check whether port-no is in the valid range. (1 ~ 24) Set the Lockstate of a given port Command Name port set lockstate Description Sets the lock state of a given port to either enable or disable. If the port lock is enabled, the switch can process the data packets only from locked MAC addresses. Other data packets will not be processed. Syntax port set lockstate <port-no> <enable | disable> Parameters port-no port number (1 ~ 26) enable | disable Lock enable or disable N-TRON/Admin#[1]> port set lockstate 5 disable Examples N-TRON/Admin#[2]> port set lockstate 8 enable NOTES Get Lock State Command Name Description Syntax Parameters Once the port is locked, all the MACs that are learned on that port are treated as static MACs. This means the switch can process the packets from those MACs only. It will discard all packets from other MACs. Because the MAC is set for that port, it will only be addressable via that port. port get lockstate Gets the lock state for a given port. port get lockstate <port-no> port-no port number (1 ~ 26). Examples N-TRON/Admin#[1]> port get lockstate 6 LockState : [enable] N-TRON/Admin#[2]> port get lockstate 24 LockState : [disable] NOTES Check whether port-no is in the valid range. (1 ~ 26) Get Auto-negotiation State Command Name Description Syntax Parameters port get autonego Gets the auto negotiation mode for a given port. port get autonego<port-no> port-no (Revised 2011-07-20) page 110 of 145 For Sales and Support, Contact Walker EMD • www.walkeremd.com • Toll-free: (800) 876-4444 • Tel: (203) 426-7700 • Fax: (203) 426-7800 Port number (1 ~ 24). Examples N-TRON/Admin#[1]> port get Auto negotiation mode is : N-TRON/Admin#[2]> port get Auto negotiation mode is : NOTES Check whether port-no is in the valid range. (1 ~ 24) Set Auto-negotiation State Command Name Description Syntax Parameters autonego 6 [enabled] autonego 24 [disabled] port set autonego Sets the auto negotiation mode of a given port to either enable or disable. If the port auto negotiation mode is enabled, the switch can automatically adjusts it speed and duplex mode to the incoming speed and duplexmode. port set autonego <port-no><enable | disable> port-no port number (1 ~ 24) enable | disable Auto negotiation enable or disable Examples N-TRON/Admin#[1]> port set autonego 6 enable Auto negotiation mode of port[6] is : [enabled] N-TRON/Admin#[2]> port set autonego 24 disable Auto negotiation mode of port[6] is : [disabled] NOTES Check whether port-no is in the valid range. (1 ~ 24) Set Priority State Command Name Description Syntax Parameters Examples NOTES Set Flow Control Command Name Description Syntax Parameters Examples NOTES Set Name Command Name Description Syntax Parameters Examples NOTES Set PVID Command Name Description Syntax Parameters (Revised 2011-07-20) port set prioritystate Enables or Disables the Priority State on a per port basis. port set prioritystate <enable | disable><port-no> port-no port number (1 ~ 26) enable | disable Priority State enable or disable N-TRON/Admin#[1]> port set prioritystate enable 6 Check whether port-no is in the valid range. (1 ~ 26) port set flowcontrol Enable or Disable flow control (typically refers to 100Base). When enabled a pause frame will be sent to help control the flow. port set flowcontrol <port-no><enable | disable> port-no port number (1 ~ 24) enable | disable Flow Control enable or disable N-TRON/Admin#[1]> port set flowcontrol 6 enable Check whether port-no is in the valid range. (1 ~ 24) port set name Changes the name of the port. This change will only be visible in the CLI. port set name <port-no><name> port-no port number (1 ~ 26) name A string that describes the port N-TRON/Admin#[1]> port set name 6 waterplant This will be reset if you change a slot configuration. port set pvid Set a port‟s VLAN-ID. port set pvid <port-no><pvid-number> port-no port number (1 ~ 26) page 111 of 145 For Sales and Support, Contact Walker EMD • www.walkeremd.com • Toll-free: (800) 876-4444 • Tel: (203) 426-7700 • Fax: (203) 426-7800 pvid-number The VLAN-ID number of the VLAN that this port will be a member of Examples NOTES Set Backpressure Command Name Description Syntax Parameters Examples NOTES Set Intruderstate Command Name Description Syntax Parameters Examples NOTES Set Priority Level Command Name Description Syntax Parameters Examples NOTES Show Configuration Command Name Description Syntax Parameters Examples NOTES Show Intruders Command Name Description Syntax Parameters Examples NOTES (Revised 2011-07-20) N-TRON/Admin#[1]> port set pvid 6 2 A port can be a member to several VLANs, but can only have one PVID port set backpressure Enables or disables backpressure on a given port. This is normally used on 10Base setups and is a controlled by the hardware. port set backpressure <port-no><enable | disable> port-no port number (1 ~ 24) enable | disable Backpressure enable or disable N-TRON/Admin#[1]> port set backpressure 6 enable Check whether port-no is in the valid range. (1 ~ 24) port set intruderstate Enables or Disables the intruder log. port set intruderstate <enable | disable> enable | disable Enable or disable the intruder log N-TRON/Admin#[1]> port set intruderstate enable This must be enabled for the intruder log to log anything. port set prioritylevel Sets the priority level of a given port. port set prioritylevel <port-no><level> port-no port number (1 ~ 26) level priority level (0 ~ 7) N-TRON/Admin#[1]> port set prioritylevel 6 7 Priority State should be enabled to use this feature. port show config Displays basic configuration settings on given ports. port show config <port-no | all> port-no | all port number (1 ~ 26), you may enter all to see all the ports at once. N-TRON/Admin#[1]> port show config all Check whether port-no is in the valid range. (1 ~ 26) port show intruder Displays a list of MAC addresses that were not allowed on the network. port show intruder None N-TRON/Admin#[1]> port show intruder Intruder log must be enabled before this will log anything. page 112 of 145 For Sales and Support, Contact Walker EMD • www.walkeremd.com • Toll-free: (800) 876-4444 • Tel: (203) 426-7700 • Fax: (203) 426-7800 Show Link Utilization Command Name Description Syntax Parameters Examples NOTES Get Flow Control Command Name Description Syntax Parameters Examples NOTES Get Name Command Name Description Syntax Parameters Examples NOTES Get State Of Priority Command Name Description Syntax Parameters port show linkutilization Shows the utilization statistics for all the ports including %bandwidth, %in, %out, RX bytes, and TX bytes for each port. port show linkutilization None N-TRON/Admin#[1]> port show linkutilization %Bandwidth is the %in or %out value that is higher, not the average value. port get flowcontrol Displays the current flow control settings on a given port. port get flowcontrol <port-no> port-no port number (1 ~ 24) N-TRON/Admin#[1]> port get flowcontrol 6 Check whether port-no is in the valid range. (1 ~ 24) port get name Displays the name of a given port. port get name <port-no> port-no port number (1 ~ 26) N-TRON/Admin#[1]> port get name 6 Check whether port-no is in the valid range. (1 ~ 26) port get stateofpriority Displays the priority state of a given port number. port get stateofpriority <port-no> port-no port number (1 ~ 26) Examples N-TRON/Admin#[1]> port get stateofpriority 6 Priority State of Port[6] is : [disabled] NOTES Check whether port-no is in the valid range. (1 ~ 26) Get Intruder State Command Name Description Syntax Parameters Examples port get intruderstate Displays whether the intruder log is enabled or disabled. port get intruderstate None N-TRON/Admin#[1]> port get intruderstate Intruder Log : Disabled NOTES Get Priority Level Command Name Description Syntax Parameters port get prioritylevel Displays the priority level on a given port. port get prioritylevel <port-no> port-no port number (1 ~ 26) Examples N-TRON/Admin#[1]> port get prioritylevel 6 Priority Level of Port[6] is : [1] NOTES Check whether port-no is in the valid range. (1 ~ 26) (Revised 2011-07-20) page 113 of 145 For Sales and Support, Contact Walker EMD • www.walkeremd.com • Toll-free: (800) 876-4444 • Tel: (203) 426-7700 • Fax: (203) 426-7800 Get STP Status Command Name Description Syntax Parameters port get STP Status Displays the Spanning Tree Protocol Status on a given port. port get stpstatus <port-no> port-no port number (1 ~ 26) Examples N-TRON/Admin#[1]> port get stpstatus 6 Stp state of [6] port is : [Forward] NOTES STP states include: Listening, Learning, Blocking, & Forwarding Get Back Pressure Command Name Description Syntax Parameters port get backpressure Displays the backpressure information on a given port number (enabled or disabled). port get backpressure <port-no> port-no port number (1 ~ 24) Examples N-TRON/Admin#[1]> port get backpressure 6 Back Pressure is DISABLED NOTES Check whether port-no is in the valid range. (1 ~ 24) Get PVID Command Name Description Syntax Parameters port get pvid Displays a given port‟s VLAN-ID. port get pvid <port-no> port-no port number (1 ~ 26) Examples N-TRON/Admin#[1]> port get pvid 6 PVID of port 6 is 4. NOTES Check whether port-no is in the valid range. (1 ~ 26) Clear Counters Command Name Description Syntax Parameters port clear counters Clears all the numbers in the counters for a given port. These are counters for RX bytes and TX bytes and so on. port clear counters <port-no> port-no port number (1 ~ 24) Examples N-TRON/Admin#[1]> port clear counters 6 Counters of Port[6] are : [cleared] NOTES This will clear all data in the port specific counters. This data cannot be recovered after this step. Clear Intruder Log Command Name Description Syntax Parameters Examples NOTES (Revised 2011-07-20) port clear intruderlog This command will clear all intruders out of the intruder log. port clear intruderlog None N-TRON/Admin#[1]> port clear intruderlog This will clear all data from the intruder log. This data can not be recovered after this step. page 114 of 145 For Sales and Support, Contact Walker EMD • www.walkeremd.com • Toll-free: (800) 876-4444 • Tel: (203) 426-7700 • Fax: (203) 426-7800 Trunk related commands Enable or Disable Trunking Command Name Description Syntax Parameters Examples NOTES Modify Trunk Command Name Description Syntax Parameters Examples NOTES Create Trunk Command Name Description Syntax Parameters Examples NOTES (Revised 2011-07-20) trunk set <enable | disable> To enable or disable the trunk that is already created. trunk set enable trunk set disable N-TRON/Admin#[1]> trunk set enable Trunking is activated. N-TRON/Admin#[1]> trunk set disable Trunking is deactivated. RSTP must be disabled in order to use Trunking. All trunk ports must be at the same speed and duplex mode. It is best to hard code speed and duplex mode for each trunking link, at both ends. trunk modify To add new required ports to the trunk in order to withstand high traffic. trunk modify <port-list> [-name <trunk-name>] port-list Port numbers to be in the trunk. trunk-name Name given to a trunk N-TRON/Admin#[1]> trunk modify 1-4 -name trunk1 A maximum of 4 ports can be in a trunk. All trunk ports must be at the same speed and duplex mode. If a port is not linked, there could be difficulty matching similar speed and duplex mode. It is best to hard code speed and duplex mode for each trunking link, at both ends. trunk create To create a trunk. A trunk is used to get more bandwidth to withstand high traffic. trunk create <port-list> [-name <trunk-name>] port-list Port numbers to be added to the trunk. trunk-name Name given to a trunk N-TRON/Admin#[1]> trunk create 4-7 –name trunk1 RSTP must be disabled in order to use Trunking. Only 1 trunk can be created per switch. A maximum of 4 ports can be in a trunk. All trunk ports must be at the same speed and duplex mode. If a port is not linked, there could be difficulty matching similar speed and duplex mode. It is best to hard code speed and duplex mode for each trunking link, at both ends. page 115 of 145 For Sales and Support, Contact Walker EMD • www.walkeremd.com • Toll-free: (800) 876-4444 • Tel: (203) 426-7700 • Fax: (203) 426-7800 Delete Trunk Command Name Description Syntax Parameters Examples trunk delete To delete the trunk . trunk delete N-TRON/Admin#[1]> trunk delete Trunk has been deleted. NOTES Show Trunk Information Command Name Description Syntax Parameters Examples trunk show To show all the trunks information. trunk show None N-TRON/Admin#[1]> trunk show ------------------------------------|TRUNK NAME|TRUNK PORTS|TRUNK STATE | ------------------------------------|trunk1 | 2-4 | DISABLE | ------------------------------------- NOTES (Revised 2011-07-20) page 116 of 145 For Sales and Support, Contact Walker EMD • www.walkeremd.com • Toll-free: (800) 876-4444 • Tel: (203) 426-7700 • Fax: (203) 426-7800 Mirroring related commands Set Mirror config Command Name Description Syntax Parameters Examples NOTES mirror set config To the mirroring feature of the switch, for specified ports. mirror set config <dest-port> <src-ports> dest-port Destination port is the snooper port onto which the selected source ports traffic is to be mirrored. The gigabit ports cannot be destination ports. src-ports List of ports to be monitored. N-TRON/Admin#[1]> mirror set config 1 2-5 A mirroring port is a dedicated port that is configured to receive the copies of Ethernet frames that are being transmitted out and also being received in from any other port that is being monitored. Enable or Disable Port Mirroring Command Name mirror set <enable | disable> Description Enables or disables network monitoring or port mirroring. It treats source port as the Ethernet port and the destination port as a monitoring port. Syntax mirror set enable Parameters None N-TRON/Admin#[1]> mirror set enable Examples mirror enabled N-TRON/Admin#[1]> mirror set disable mirror disabled NOTES Show Mirror config Command Name Description Syntax Parameters Examples mirror show To show all the mirror information. mirror show None N-TRON/Admin#[1]> mirror show ------------------------------------------| DEST PORT | SOURCE PORTS | MIRROR STATE | ------------------------------------------| 5 | 2-4 | ENABLED | ------------------------------------------- NOTES (Revised 2011-07-20) page 117 of 145 For Sales and Support, Contact Walker EMD • www.walkeremd.com • Toll-free: (800) 876-4444 • Tel: (203) 426-7700 • Fax: (203) 426-7800 VLAN Related Commands Add VLAN Entry Command Name Description Syntax Parameters vlan add To create a Port based Virtual LAN vlan add <vlan id> <mgmt port> -untagged <port mask> | -tagged <port mask> [-name <vlan name>] [-admit <tagged-only|all>] [-mirror <port-no>] vlan-id Unique vlan id (2 ~ 4094). mgmt port Either 1 or 0. „1‟ sets this vlan as a management vlan. vlan name Unique vlan name, which can be used to identify the group. The name may include characters and numbers, but should start with an alphabetic. Maximum number of characters must not exceed 25. -untagged port mask List of ports that are to be included under this VLAN. Commas can be used to separate individual ports (2,5,9) and the range can be specified using a hyphen (10-15). The port numbers cannot exceed the maximum number of ports on the board. -tagged port mask Tagged port mask values can be specified in the same way as that of an untagged port mask. -admit Allow tagged-only or all (untagged and tagged) packets. port-no Optional parameter. Port number that data should be mirrored to. Examples N-TRON/Admin#[1]> vlan add 2 1 –untagged 1-12 –name vlan2 –admit all N-TRON/Admin#[2]> vlan add 3 1 –tagged 13-24 –name “vlan 3” –admit tagged-only NOTES Ensure that the ports included in the tagged port list do not exist in the untagged ports-list field. Changing anything on a VLAN will turn on RSTP on all VLANs as a precautionary measure. Show List of Configured VLANs Command Name vlan show config Description Displays the list of configured VLANs Syntax vlan show config Parameters None N-TRON/Admin#[1]> vlan show config Examples NOTES It displays the information of the default vlan if no vlan is configured. Display Information of a particular VLAN Command Name vlan get info Description Displays the details of a particular VLAN. Syntax vlan get info <vlan-id> Parameters vlan-id Vlan id of the existing vlan whose individual configuration is required. N-TRON/Admin#[1]> vlan get info 2 Examples vlan ID : vlan Name : port list : tagged port mask: management port : 2 “vlan 2” 1-4,11 10-15 NO NOTES (Revised 2011-07-20) page 118 of 145 For Sales and Support, Contact Walker EMD • www.walkeremd.com • Toll-free: (800) 876-4444 • Tel: (203) 426-7700 • Fax: (203) 426-7800 Modify an existing VLAN Command Name Description Syntax Parameters Examples vlan modify Modifies an existing VLAN. vlan modify <vlan id> <mgmt port> -untagged <port mask> | -tagged <port mask> [-name <vlan name>] [-admit <tagged-only|all>] [-mirror <port-no>] vlan-id unique vlan id ( 2 ~ 4094). mgmt port Management Port, yes or no (1 or 0). -untagged port mask List of ports that are to be included under this VLAN. Commas can be used to separate individual ports (2,5,9) and the range can be specified using a hyphen (10-15). The port numbers cannot exceed the maximum number of port on the board. -tagged port mask Tagged port list values can be specified in the same way as that of -untagged port mask. vlan name unique clan name, which can be used to identify. admit tagged-only or all. Type of packets can enter the port. port-no Optional parameter. Port number that data should be mirrored to.. N-TRON/Admin#[1]> vlan modify 2 1 –tagged 11-12 –name “newvlan2” N-TRON/Admin#[2]> vlan modify 3 1–untagged 1-10 –name “vlan 3” –admit all NOTES Delete VLAN Command Name Description Syntax Parameters Examples NOTES Changing anything on a VLAN will turn on RSTP on all VLANs as a precautionary measure. vlan delete Removes an existing VLAN from the list of configured VLANs. vlan delete <vlan-id> vlan-id Vlan id of the existing vlan which has to be deleted N-TRON/Admin#[1]> vlan delete 2 Please ensure that a port based vlan with the given vlan id exists. Changing anything on a VLAN will turn on RSTP on all VLANs as a precautionary measure. Set VLAN as a management VLAN Command Name vlan set mgmtvlan Description Enable or disable a Vlan as a management vlan. User can connect and monitor the device activity of this VLAN. Syntax vlan set mgmtvlan <vlan-id> <enable|disable> Parameters vlan-id Vlan id of the vlan enable|disable Enable or Disable management of the specified vlan. N-TRON/Admin#[1]> vlan set mgmtvlan 2 disable Examples NOTES Please ensure that the vlan with that vlan id already exists. Changing anything on a VLAN will turn on RSTP on all VLANs as a precautionary measure. (Revised 2011-07-20) page 119 of 145 For Sales and Support, Contact Walker EMD • www.walkeremd.com • Toll-free: (800) 876-4444 • Tel: (203) 426-7700 • Fax: (203) 426-7800 Set VLAN to defaults Command Name Description Syntax Parameters Examples NOTES Set VLAN Ingress Filter Command Name Description vlan set default Removes all the configured vlans and add all the ports under the Default vlan. vlan set default None N-TRON/Admin#[1]> vlan set default Changing anything on a VLAN will turn on RSTP on all VLANs as a precautionary measure. Syntax Parameters vlan set ingressfilter Enables or Disables an inbound filter on specified ports that will throw out any packet with the wrong VID in the VLAN tag on the packet. vlan set ingressfilter <enable|disable> <port-list|all> enable|disable Enable or Disable the filter on the specified port. port-list|all Enter a specific port number list or specify all ports Examples N-TRON/Admin#[1]> vlan set ingressfilter enable 1-6 N-TRON/Admin#[2]> vlan set ingressfilter enable all NOTES The ingressfilter will automatically be turned on for tagged ports. Get VLAN Ingress Filter Command Name Description Syntax Parameters Examples NOTES Get VLAN info Command Name Description Syntax Parameters Examples NOTES (Revised 2011-07-20) vlan get ingressfilter Gets inbound filter info on specified ports. vlan get ingressfilter <all|port-list> all|port-list Enter a specific port number list or specify all ports N-TRON/Admin#[1]> vlan get ingressfilter 1-6 vlan get info Displays the current state of the configured vlans. vlan get info <vlanid> vlanid Enter a specific VLan ID N-TRON/Admin#[1]> vlan get info 1 page 120 of 145 For Sales and Support, Contact Walker EMD • www.walkeremd.com • Toll-free: (800) 876-4444 • Tel: (203) 426-7700 • Fax: (203) 426-7800 Eventlog Related Commands Get Eventlog count Command Name Description Syntax Parameters Examples eventlog get count To display the logged events count eventlog get count None N-TRON/Admin#[1]> eventlog get count No. of events logged : 14 NOTES Get Eventlog level Command Name Description Syntax Parameters Examples NOTES Get Eventlog size Command Name Description Syntax Parameters Examples eventlog get loglevel To display the present log level eventlog get loglevel None N-TRON/Admin#[1]> eventlog get loglevel Present log Level: 1 There are 5 levels or categories that events are classified as. Level 1 will log all 5 types into the event log. Level 5 will log on the highest level “Critical” in the event log. The log levels in order from least severe to most critical are: Informational, Warning, Minor, Severe, & Critical. eventlog get logsize To display the present log size eventlog get logsize None N-TRON/Admin#[1]> eventlog get logsize Present Log Size: 100 NOTES Set Eventlog level Command Name Description Syntax Parameters eventlog set loglevel To set the log-level to a specified value for filter out the raised events. eventlog set loglevel <level> level The log level. The value is ranging from 1-5 Examples N-TRON/Admin#[1]> eventlog set loglevel 3 N-TRON/Admin#[2]> eventlog set loglevel 1 N-TRON/Admin#[3]> eventlog set loglevel 2 NOTES There are 5 levels or categories that events are classified as. Level 1 will log all 5 types into the event log. Level 5 will log on the highest level “Critical” in the event log. The log levels in order from least severe to most critical are: Informational, Warning, Minor, Severe, & Critical. Set Eventlog size Command Name Description Syntax Parameters Examples eventlog set logsize To set the maximum number of events to be stored in the list. eventlog set logsize <size> size The log size. Maximum number of events that can be stored. N-TRON/Admin#[1]> eventlog set logsize 100 N-TRON/Admin#[2]> eventlog set logsize 20 NOTES (Revised 2011-07-20) page 121 of 145 For Sales and Support, Contact Walker EMD • www.walkeremd.com • Toll-free: (800) 876-4444 • Tel: (203) 426-7700 • Fax: (203) 426-7800 Show Eventlog events Command Name Description Syntax Parameters Examples NOTES (Revised 2011-07-20) eventlog show events To display the logged events eventlog show events None N-TRON/Admin#[1]> eventlog show events page 122 of 145 For Sales and Support, Contact Walker EMD • www.walkeremd.com • Toll-free: (800) 876-4444 • Tel: (203) 426-7700 • Fax: (203) 426-7800 Bridging Related Commands Add Multicast MAC Address Command Name Description Syntax Parameters Examples NOTES Delete Multicast MAC Address Command Name Description Syntax Parameters Examples NOTES Add a Unicast MAC Address Command Name Description Syntax bridge add multicastmac Adds a multicast mac address which is associated with a vlan. bridge add multicastmac <mac-address> <port-list> mac-address Multicast group address to be added to the bridge port-list Port numbers to which the multicast group is associated N-TRON/Admin#[1]>bridge add multicastmac 01:00:5e:03:01:18 4 If there are multiple ports on different VLANs, the 9000 will apply the static broadcast address to the lowest VLAN-ID that is associated with one of the ports assigned to the static multicast address. So if the lowest VLAN-ID contains all the ports assigned to the static multicast address (an umbrella VLAN), it will function for all those ports with no problems. This can be achieved with overlapping VLANs. bridge delete multicastmac Removes an existing multicast mac address. bridge delete multicastmac <mac-address> mac-address Multicast group address to be removed to the bridge N-TRON/Admin#[1]> bridge delete multicastmac 01:00:5e:03:01:18 Parameters bridge add unicastmac Adds a unicast mac address. bridge add unicastmac <mac address> <port number> [-mirror <disable|enable>] mac-address Unique unicast mac address. port number port number on which this mac is learned. The port number must range between 1 and maximum port numbers in switch. Examples N-TRON/Admin#[1]> bridge add unicastmac 00-a0-ae-60-3a-70 3 N-TRON/Admin#[2]> bridge add unicastmac 00-10-a1-33-49-b5 6 NOTES Delete Unicast MAC Address Command Name Description Syntax Parameters Examples NOTES (Revised 2011-07-20) bridge delete unicastmac Delete an existing unicast mac address. bridge delete unicastmac <mac-address> mac-address Unique unicast mac address. N-TRON/Admin#[1]> bridge delete unicastmac 00-a0-ae-60-3a-70 page 123 of 145 For Sales and Support, Contact Walker EMD • www.walkeremd.com • Toll-free: (800) 876-4444 • Tel: (203) 426-7700 • Fax: (203) 426-7800 Display List of Configured Static MAC Addresses Command Name bridge show staticmac Description To view the list of configure static mac addresses Syntax bridge show staticmac <all|multicast|unicast> Parameters <all|multicast|unicast> which set of static mac addresses to show N-TRON/Admin#[1]> bridge show staticmac all Examples N-TRON/Admin#[2]> bridge show staticmac multicast N-TRON/Admin#[3]> bridge show staticmac unicast NOTES Set Aging Time Command Name Description Syntax Parameters Examples NOTES Display Current Aging Time Command Name Description Syntax Parameters Examples NOTES Display Mac Address by port Command Name Description Syntax Parameters Examples NOTES Display port by Mac Address Command Name Description Syntax Parameters Examples NOTES (Revised 2011-07-20) These are egress filters. bridge set agingtime Sets the aging time for dynamically learned MAC addresses of the chipset. bridge set agingtime <aging-time> aging-time aging time to be set for stp. Minimum aging time can be 5 seconds. Default aging time is 20 seconds. Maximum aging time is 1000000 seconds. N-TRON/Admin#[1]> bridge set agingtime 200 bridge show agingtime Displays the current aging time. bridge show agingtime None N-TRON/Admin#[1]> bridge show agingtime bridge show macbyport Displays all the MAC addresses associated with a port. bridge show macbyport <port-number|all> port-number The port number must range between 1 and the maximum number of ports on the switch. all Display MAC addresses for all ports N-TRON/Admin#[1]> bridge show macbyport 6 bridge show portbymac Display the port number to which the mac is associated. bridge show portbymac <mac-address> mac-address Unique unicast mac address. N-TRON/Admin#[1]> bridge show portbymac 00-a0-ae-60-3a-70 page 124 of 145 For Sales and Support, Contact Walker EMD • www.walkeremd.com • Toll-free: (800) 876-4444 • Tel: (203) 426-7700 • Fax: (203) 426-7800 Display Mac count Command Name Description Syntax Parameters Examples NOTES (Revised 2011-07-20) bridge show maccount Displays the total count of the static mac addresses. bridge show maccount None N-TRON/Admin#[1]> bridge show maccount page 125 of 145 For Sales and Support, Contact Walker EMD • www.walkeremd.com • Toll-free: (800) 876-4444 • Tel: (203) 426-7700 • Fax: (203) 426-7800 IGMP Related Commands Enable IGMP Command Name Description Syntax Parameters Examples igmp set enable The igmp status is made to enable igmp set enable None NOTES The status can be viewed through the igmp show config command Disable IGMP Command Name Description Syntax Parameters Examples igmp set disable The igmp status is made to disable igmp set disable None N-TRON/Admin#[1]> igmp set enable igmp status is Enabled N-TRON/Admin#[2]> igmp show config Igmp : Enabled Query Mode : auto Router Mode : auto Router Ports (Manual) : N-TRON/Admin#[1]> igmp set disable igmp status is Disabled N-TRON/Admin#[2]> igmp show config Igmp : Querier : Query Mode : Router Mode : Router Ports (Manual) : Disabled Enabled auto auto NOTES The status can be viewed through the igmp show config command Show IGMP config Command Name Description Syntax Parameters Examples igmp show config The igmp configuration is displayed igmp show config None NOTES This command is used to see the config previously set by the user Show IGMP group Command Name Description Syntax Parameters Examples NOTES (Revised 2011-07-20) N-TRON/Admin#[1]> igmp show config Igmp : Disabled Querier : Enabled Query Mode : auto Router Mode : auto Router Ports (Manual) : igmp show group The igmp show group command is used to display the groups present in the group list igmp show group None N-TRON/Admin#[1]> igmp show group GroupIp PortNo VlanID --------------------------------------224.0.0.2 6 1 224.0.1.24 6 1 The group display is used to check that the group ip, port no & vlan id were received correctly. page 126 of 145 For Sales and Support, Contact Walker EMD • www.walkeremd.com • Toll-free: (800) 876-4444 • Tel: (203) 426-7700 • Fax: (203) 426-7800 Show IGMP router Command Name Description Syntax Parameters Examples NOTES Set IGMP query mode Command Name Description Syntax Parameters Examples NOTES Set IGMP router port Command Name Description Syntax Parameters Examples NOTES Set IGMP router mode Command Name Description Syntax Parameters Examples NOTES (Revised 2011-07-20) igmp show router The igmp show router command is used to display the auto-detected routers at present. igmp show router None N-TRON/Admin#[1]> igmp show router RouterIp PortNo -----------------------192.168.1.150 5 The router display is used to check that the router ip & port number was received correctly. igmp set qmode Set the query mode of the switch to either on, off, or automatic. igmp set qmode <off | on | auto> off | on | auto There are three different query modes; off, on, and auto. N-TRON/Admin#[1]> igmp set qmode auto Default: Auto igmp set rtrport Enable or disable a router port based on a port-range. igmp set rtrport <port-range> <enable | disable> port-range enter a range of port numbers. enable | disable enable or disable the router port. N-TRON/Admin#[1]> igmp set rtrport 1-4 enable igmp set rtrmode The igmp show router command is used to display the router group present in the group list igmp set rtrmode <none | manual | auto> none | manual | auto There are three different router modes available; none, manual, and auto. N-TRON/Admin#[1]> igmp set rtrmode auto Default: Auto page 127 of 145 For Sales and Support, Contact Walker EMD • www.walkeremd.com • Toll-free: (800) 876-4444 • Tel: (203) 426-7700 • Fax: (203) 426-7800 Show IGMP rfilter mode Command Name Description Syntax Parameters Examples igmp show rfilter The igmp show rfilter command is used to display the rfilter status by port(s). Usage: igmp show rfilter <all|port-list> port-list|all Enter a specific port number list or specify all ports N-TRON/Admin#[22]> igmp show rfilter all N-TRON/Admin#[22]igmp/show> igmp show rfilter 5 Port No. IGMP RFilter ---------------------------5 DISABLE N-TRON/Admin#[6]igmp/show> igmp show rfilter 5-7 Port No. IGMP RFilter ---------------------------5 DISABLE 6 DISABLE 7 DISABLE N-TRON/Admin#[7]igmp/show> NOTES Set IGMP rfilter mode Command Name Description Default: enable Syntax Parameters igmp set rfilter The igmp set rfilter command is used to enable or disable rfilter based on a port-range. Usage: igmp set rfilter <enable|disable> <port-list|all> enable|disable Enable or Disable the filter on the specified port. port-list|all Enter a specific port number list or specify all ports Examples N-TRON/Admin#[35]igmp/set> igmp set rfilter enable 5 IGMP RFilter enabled for port 5. N-TRON/Admin#[36]igmp/set> NOTES (Revised 2011-07-20) Default: enable page 128 of 145 For Sales and Support, Contact Walker EMD • www.walkeremd.com • Toll-free: (800) 876-4444 • Tel: (203) 426-7700 • Fax: (203) 426-7800 N-Ring Related Commands N-Ring get agingtime Command Name Description Syntax Parameters Example n-ring get agingtime To display the N-Ring Agingtime of the device n-ring get agingtime None N-TRON/Admin#[1]> n-ring get agingtime N-Ring Aging Time NOTES N-Ring set agingtime Command Name Description Syntax Parameters Examples NOTES N-Ring get webfault Command Name Description Syntax Parameters Example : 20 Default: 20 seconds and is separate from the Bridging Aging Time. N-Ring Aging time is used for the whole switch if the switch is an N-Ring Manager or becomes an active N-Ring Member. n-ring set agingtime Sets the aging time for dynamically learned MAC addresses of the chipset when in N-Ring Manager or Active N-Ring Member modes. n-ring set agingtime <aging-time> aging-time aging time to be set for N-Ring. Minimum N-Ring agingtime can be 5 seconds. Default N-Ring aging time is 20 seconds. Maximum aging time is 1000000 seconds. N-TRON/Admin#[1]> n-ring set agingtime 200 Is separate from the Bridging Aging Time. N-Ring Aging time is used for the whole switch if the switch is an N-Ring Manager or becomes an active N-Ring Member. n-ring get webfault To display the browser N-Ring fault reporting mode. n-ring get webfault None N-TRON/Admin#[1]> n-ring get webfault N-Ring faults will be shown on N-Ring Web Pages only NOTES N-Ring set webfault Command Name Description Syntax Parameters Examples n-ring set webfault Sets the browser N-Ring fault reporting mode. n-ring set webfault <ring|all> Ring or all N-TRON/Admin#[1]> n-ring set webfault all N-Ring faults will be shown on All Web Pages NOTES N-Ring get interval Command Name Description Syntax Parameters Example n-ring get interval To display the Self-Health Packet interval and missed threshold. n-ring get interval None N-TRON/Admin#[1]> n-ring get interval Self Health Packet interval is 1 Maximum Missed Packets is 2 NOTES (Revised 2011-07-20) Default: interval=1, missed=2 page 129 of 145 For Sales and Support, Contact Walker EMD • www.walkeremd.com • Toll-free: (800) 876-4444 • Tel: (203) 426-7700 • Fax: (203) 426-7800 N-Ring set interval Command Name Description Syntax Parameters Examples n-ring set interval Sets the Self-Health Packet interval and missed threshold. n-ring set interval <interval> [missed] interval and missed N-TRON/Admin#[36]n-ring/set> n-ring set interval 1 3 Self Health Packet interval set to 1 Maximum Missed Packets set to 3 NOTES N-Ring get mode Command Name Description Syntax Parameters Example The interval is in 10 millisecond increments. The missed threshold sets how many missed Self-Health Packets constitute a fault. n-ring get mode To display the current N-Ring Mode. n-ring get mode None N-TRON/Admin#[1]> n-ring get mode N-Ring Mode Port Set : VLAN ID : Tagging : : AutoMember 100 3333 Untagged NOTES N-Ring set mode Command Name Description Syntax Parameters Examples n-ring set mode Sets the current N-Ring Mode. Sets ring ports, vlanid and tagging, if manager mode. n-ring set mode <manager|automember|disable> [-rp <A|E>] [-vlanid <id>] [-tagging <tagged|untagged>] manager|automember|disable N-Ring mode A|E N-Ring ports, A for ports A1 and A2, while E for ports E1 and E2 id Unique vlan id (1 - 4094). Default is 3333. tagged|untagged Determines whether the N-Ring ports are members of the VLANs Tagged or Untagged ports. N-TRON/Admin#[3]> n-ring set mode automember N-Ring Mode set to automember ................ ................ Device is Going for Reboot.... N-TRON/Admin#[3]> n-ring set mode manager -rp A N-Ring Mode set to manager Port Set to be used is Slot A N-Ring VLAN ID is set to: 3333 N-Ring Tagging is set to: Tagged ................ ................ Device is Going for Reboot.... NOTES (Revised 2011-07-20) NOTE: N-Ring Manager cannot have RSTP or Trunking enabled. page 130 of 145 For Sales and Support, Contact Walker EMD • www.walkeremd.com • Toll-free: (800) 876-4444 • Tel: (203) 426-7700 • Fax: (203) 426-7800 N-Ring show status Command Name Description Syntax Parameters Examples n-ring show status Shows the current N-Ring status of the switch. If Manager, shows ring members. Shows if Automember or active member. If active (manager or member) shows N-Ring ports. n-ring show status None On an N-Ring Manager: N-TRON/Admin#[1]> n-ring show status Switch is in N-Ring Manager Mode N-Ring OK Port 1 | Port 2 ================= 1 | 2 No: | MAC Address | IP Address | Subnet Mask | Port 1 | Port 2 =============================================================================== 1 | 00:07:af:ff:f6:40 | 192.168.1.233 | 255.255.255.0 | 1 | 2 On an N-Ring Active Member: N-TRON/Admin#[1]> n-ring show status Switch is a N-Ring Member N-Ring Manager is 00:07:af:ff:f6:c0 Port 1 | Port 2 ================= 1 | 2 ------------------------------------------------------------------------------On an N-Ring AutoMember (not active): N-TRON/Admin#[2]n-ring/show> n-ring show status Switch is in Auto Member Detection Mode NOTES N-Ring show switch Command Name Description Syntax Parameters Examples n-ring show switch From the N-Ring Manager, shows info about a switch on the N-Ring. n-ring show switch <MAC ADDRESS> <MAC ADDRESS> N-TRON/Admin#[12]n-ring/show> switch 00:07:af:ff:f6:40 Information for 00:07:af:ff:f6:40 Name Location Product Name Product Version IP Address Subnet Mask N-Ring Port 1 N-Ring Port 2 : : : : : : : : N-TRON Switch Mobile, AL 36609 N-TRON 9000 Series 4.1.1 192.168.1.233 255.255.255.0 1 2 N-TRON/Admin#[13]n-ring/show> NOTES (Revised 2011-07-20) page 131 of 145 For Sales and Support, Contact Walker EMD • www.walkeremd.com • Toll-free: (800) 876-4444 • Tel: (203) 426-7700 • Fax: (203) 426-7800 N-Ring set keepalive Command Name Description Syntax Parameters Examples n-ring set keepalive Set timeout after which an N-Ring member will drop back to RSTP mode on the N-Ring ports after loosing communication with the N-Ring manager. n-ring set keepalive <timeout> timeout Timeout in seconds N-TRON/Admin#[10]n-ring/set> n-ring set keepalive 40 Keep-Alive Timeout set to 40 NOTES N-Ring get keepalive Command Name Description Syntax Parameters Examples Default is 31 seconds n-ring get keepalive Get timeout after which an N-Ring member will drop back to RSTP mode on the N-Ring ports after loosing communication with the N-Ring manager. n-ring set keepalive None N-TRON/Admin#[10]n-ring/get> n-ring get keepalive Keep-Alive Timeout is 31 NOTES (Revised 2011-07-20) page 132 of 145 For Sales and Support, Contact Walker EMD • www.walkeremd.com • Toll-free: (800) 876-4444 • Tel: (203) 426-7700 • Fax: (203) 426-7800 Configuration Related Commands Save Configuration Command Name Description Syntax Parameters Examples NOTES Load Default Configuration Command Name Description Syntax Parameters Examples config save The configuration will be saved to the flash. config save None N-TRON/Admin#[1]> config save config erase This command is useful to erase the configuration data config erase None N-TRON/Admin#[1]> config erase Load Factory Default Setting. [y/n]y Factory Default Configuration Successfully loaded Restart the switch to effect this change NOTES Configuration Upload Command Name Description Syntax Parameters Examples NOTES Configuration Download Command Name Description Syntax Parameters Examples NOTES (Revised 2011-07-20) This command will reset all configurable fields back to the default settings that the switch shipped with. This will change the IP address back to 192.168.1.201 and will change the slot configurations of the 9000 to all 9006TX modules and no gigabit fiber ports. config send The configuration on the flash is grouped into a file and sent to the tftp server. config send <Server-IpAddress> <File-Name> Server-IpAddress IP Address of the TFTP Server, to where the switch configuration data will be uploaded. File-Name Name of the file to be saved as. N-TRON/Admin#[1]> config send 10.1.6.151 config The ip address should be the valid tftp server ip address ,and the target tftp server should be running. config receive The file name mentioned will be downloaded from the server and the same configuration is overwritten to the flash. config receive <Server-IpAddress> <File-Name> Server-IpAddress IP Address of the TFTP server, from where the configuration data to be retrieved. File-Name Name of the file to be retrieved. N-TRON/Admin#[1]> config receive 10.1.6.151 config The ip address should be the valid tftp server ip address, and the target tftp server should be running. page 133 of 145 For Sales and Support, Contact Walker EMD • www.walkeremd.com • Toll-free: (800) 876-4444 • Tel: (203) 426-7700 • Fax: (203) 426-7800 Rapid Spanning Tree Protocol Related Commands Set RSTP Admin Edge Command Name Description Syntax Parameters Examples rstp set adminedge Sets the Adminedge value of a port in a Vlan. rstp set adminedge <vlan id> <port no> <status> vlan id Vlan Id containing the port for which the adminedge is to be set. port no Port number in the Vlan to be set. status Status of the adminedge of the port to be set. Values of “enable” and “disable” are valid N-TRON/Admin#[1]> rstp set adminedge 1 1 disable N-TRON/Admin#[2]> rstp set adminedge 2 2 enable NOTES Get RSTP Admin Edge Command Name Description Syntax Parameters Examples rstp get adminedge Gets the Adminedge value of the given port in the given Vlan-Id. rstp get adminedge <vlan id> <port> vlan id Vlan Id containing the port for which the adminedge is to be viewed . port Port for which the adminedge value is to be viewed . N-TRON/Admin#[1]> rstp get adminedge 1 1 N-TRON/Admin#[2]> rstp get adminedge 2 2 NOTES Set RSTP Auto Edge Command Name Description Syntax Parameters Examples rstp set autoedge Sets the Autoedge value of a port in a Vlan. rstp set autoedge <vlan id> <port-no> <status> vlan id Vlan Id containing the port for which the autoedge is to be set. port-no Port number in the Vlan to be set. status Status of the autoedge of the port to be set. Values of “enable” and “disable” are valid N-TRON/Admin#[1]> rstp set autoedge 1 1 disable N-TRON/Admin#[2]> rstp set autoedge 2 2 enable NOTES Get RSTP Auto Edge Command Name Description Syntax Parameters Examples rstp get autoedge Gets the Autoedge value of the given port in the given Vlan-Id. rstp get autoedge <vlan id > <port> vlan id Vlan Id containing the port for which the autoedge is to be viewed . port Port for which the autoedge value is to be viewed . N-TRON/Admin#[1]> rstp get autoedge 1 1 N-TRON/Admin#[2]> rstp get autoedge 2 2 NOTES (Revised 2011-07-20) page 134 of 145 For Sales and Support, Contact Walker EMD • www.walkeremd.com • Toll-free: (800) 876-4444 • Tel: (203) 426-7700 • Fax: (203) 426-7800 Set RSTP Bridge Admin Status Command Name Description Syntax Parameters Examples rstp set bridgeadminstatus Sets the Bridge Admin Status of the given Vlan-ID. rstp set bridgeadminstatus <vlan id > <bridge adminstatus > vlan id Vlan Id for which the priority to be set. bridge adminstatus Status of the Bridge to be set. Values of “fast”, “forcestp” and “disable” are valid N-TRON/Admin#[1]> rstp set bridgeadminstatus 1 disable N-TRON/Admin#[2]> rstp set bridgeadminstatus 2 fast NOTES Get RSTP Bridge Admin Status Command Name Description Syntax Parameters Examples rstp get bridgeadminstatus Gets the Bridge Admin Status of the given Vlan-Id. rstp get bridgeadminstatus <vlan-id > vlan-id Vlan Id for which the admin status is to be viewed. N-TRON/Admin#[1]> rstp get bridgeadminstatus 1 N-TRON/Admin#[2]> rstp get bridgeadminstatus 2 NOTES Set RSTP Bridge Forward Delay Command Name rstp set bridgeforwarddelay Description To set the forward delay time for a given Vlan-Id. Forward Delay in STP is the time a switch waits after connecting to a root bridge, before he changes the port state to forwarding from the listening and learning states. RSTP only uses this as a backup feature for legacy STP device support. Syntax rstp set bridgeforwarddelay <vlan-id > <forwarddelay > Parameters vlan-id Vlan Id for which the forward delay time to be set. forwardelay Forward delay Time to be set. The valid range of the Forward delay time is (4.0 – 30.0) secs. N-TRON/Admin#[1]> rstp set bridgeforwarddelay 1 6 Examples N-TRON/Admin#[2]> rstp set bridgeforwarddelay 2 10 NOTES Please ensure that the forwarddelay time and vlan id values are valid. STP switches can take up to 2x this figure before both the root switch and the STP switch changes the port modes into forwarding states. Get RSTP Bridge Forward Delay Command Name rstp get bridgeforwarddelay Description To get the Forward Delay Time of a given Vlan Id. Syntax rstp get bridgeforwarddelay <vlan-id> Parameters vlan-id Vlan Id for which the forward delay time is to be viewed. N-TRON/Admin#[1]> rstp get bridge forwarddelay 1 Examples N-TRON/Admin#[2]> rstp get bridge forwarddelay 2 NOTES (Revised 2011-07-20) Please supply a valid Vlan Index ( being greater than zero) page 135 of 145 For Sales and Support, Contact Walker EMD • www.walkeremd.com • Toll-free: (800) 876-4444 • Tel: (203) 426-7700 • Fax: (203) 426-7800 Set RSTP Bridge Hello Time Command Name Description Syntax Parameters rstp set bridgehellotime To set the HelloTime for a given Vlan-Id. With STP, Hello Time is the time intervals that the root bridge sends out new BPDUs to the rest of the network. Other STP capable switches will forward these BPDUs along. With RSTP every RSTP capable switch will generate new BPDUs and send them out on every Hello Time Interval. rstp set bridgehellotime <vlan-id> <hellotime> vlan-id Vlan Id for which the priority is to be set. hellotime Hello Time to be set. The valid range of the Hello Time is (1.0-10.0)secs. Examples N-TRON/Admin#[1]> rstp set bridgehellotime 1 2 N-TRON/Admin#[2]> rstp set bridgehellotime 2 5 NOTES Please ensure that the hellotime and vlan id values are valid Get RSTP Bridge Hello Time Command Name Description Syntax Parameters rstp get bridgehellotime To get the Hello Time of a given Vlan Id. rstp get bridgehellotime<vlan-id> vlan-id Vlan Id for which the hellotime is to be viewed. Examples N-TRON/Admin#[1]> rstp get bridge hellotime 1 N-TRON/Admin#[2]> rstp get bridge hellotime 2 NOTES Please supply valid Vlan Index ( being greater than zero) Set RSTP Bridge Max Age Command Name Description Syntax Parameters rstp set bridgemaxage To set the Max Age for a given Vlan-Id. RSTP Max Age is the time the switch waits after receiving a BPDU from the root bridge before declaring that there is no longer a valid path to the root bridge (therefore he attempts to become the new root bridge on the network). RSTP will only use this as a backup feature, and to allow compatibility with older STP devices. rstp set bridgemaxage <vlan-id> <maxage> vlan-id Vlan Id for which the priority is to be set. maxage The Max Age to be set. The valid range for maxage is 6.0-40.0 secs. (IEEE 802.1D) Examples N-TRON/Admin#[1]> rstp set bridgemaxage 1 7 N-TRON/Admin#[2]> rstp set bridgemaxage 2 40 NOTES Please ensure that the max age and vlan-id are valid. Get RSTP Bridge Max Age Command Name Description Syntax Parameters rstp get bridgemaxage Gets the Bridge max age of the given Vlan-Id. rstp get bridgemaxage <vlan-id > vlan-id Vlan ID for which the maxage is to be viewed. Examples N-TRON/Admin#[1]> rstp get bridgemaxage 1 N-TRON/Admin#[2]> rstp get bridgemaxage 2 NOTES Please supply valid vlan Index ( being greater than zero) (Revised 2011-07-20) page 136 of 145 For Sales and Support, Contact Walker EMD • www.walkeremd.com • Toll-free: (800) 876-4444 • Tel: (203) 426-7700 • Fax: (203) 426-7800 Set RSTP Bridge Priority Command Name Description Syntax Parameters rstp set bridgepriority Sets the Bridge Priority. The root bridge on the network will be the one with the lowest bridge priority, or the lowest MAC address if the priorities are the same (as per IEEE 802.1D specification). rstp set bridgepriority <vlan-id> <bridge priority> vlan-id Vlan Id for which the priority to be set. bridge priority Priority of the Bridge to be set. The value should range between 0 and 65535. (as per IEEE 802.1D specification) Examples N-TRON/Admin#[1]> rstp set bridgepriority 1 1000 N-TRON/Admin#[2]> rstp set bridgepriority 2 2000 NOTES Ensure to use a valid range of Bridge priority and Vlan Index (being greater than zero) Get RSTP Bridge Priority Command Name Description Syntax Parameters Examples rstp get bridgepriority Gets the Bridge Priority of the given Vlan-Id. rstp get bridgepriority <vlan-id> vlan-id Vlan Id for which the priority is to be viewed . N-TRON/Admin#[1]> rstp get bridgepriority 1 N-TRON/Admin#[2]> rstp get bridgepriority 2 NOTES Set RSTP Port Path Cost Command Name Description Syntax Parameters rstp set portpathcost To set the port path cost for a given port in the given vlan id. STP and RSTP use the path cost to determine which path to use when there are 2 or more available paths that both have the same port priority. rstp set portpathcost <vlan-id> <port no> <pathcost> vlan-id Vlan Id for which the pathcost is to be set. port no The portnumber for which the path cost is to be set. pathcost The path cost value to be set (1-200000000). Examples N-TRON/Admin#[1]> rstp set portpathcost 1 4 100 N-TRON/Admin#[2]> rstp set portpathcost 2 6 200 NOTES Please supply a valid Vlan Index (being greater than zero), a valid Port Number, and a valid path cost. Get RSTP Port Path Cost Command Name Description Syntax Parameters rstp get portpathcost To get the port path cost for a given port in the given vlan id rstp get portpathcost <vlan-id> <port no> vlan-id Vlan Id to which the port belongs. port no The portnumber for which the path cost is to be viewed. Examples N-TRON/Admin#[1]> rstp get port pathcost 1 4 N-TRON/Admin#[2]> rstp get port pathcost 2 6 NOTES Please supply a valid Vlan Index (being greater than zero)and Port Number (Revised 2011-07-20) page 137 of 145 For Sales and Support, Contact Walker EMD • www.walkeremd.com • Toll-free: (800) 876-4444 • Tel: (203) 426-7700 • Fax: (203) 426-7800 Set RSTP Port Priority Command Name Description Syntax Parameters rstp set portpriority To set the priority of the port for a given port in the given vlan-id. STP and RSTP use the port priority to determine which port to place into forwarding mode when there are 2 or more ports to choose from. rstp set portpriority <vlan-id> <port no> <port priority> vlan-id Vlan Id to which the port belongs. port no The portnumber for which the port priority is to be set. port priority The Port priority value to be set. The valid port priority is 0-255. Examples N-TRON/Admin#[1]> rstp set portpriority 1 4 100 N-TRON/Admin#[2]> rstp set portpriority 2 6 50 NOTES Please supply a valid Vlan Index (being greater than zero)and Port Number. If the port priority is the same on both ports then the switch will resort to the path cost to determine the best path. Get RSTP Port Priority Command Name Description Syntax Parameters rstp get portpriority To get the priority of the port for a given port in the given vlan-id rstp get portpriority <vlan-id> <port no> vlan-id Vlan Id to which the port belongs. port no The portnumber for which the port priority is to be set. Examples N-TRON/Admin#[1]> rstp get portpriority 1 4 N-TRON/Admin#[2]> rstp get portpriority 2 6 NOTES Please supply a valid Vlan Index (being greater than zero)and Port Number (Revised 2011-07-20) page 138 of 145 For Sales and Support, Contact Walker EMD • www.walkeremd.com • Toll-free: (800) 876-4444 • Tel: (203) 426-7700 • Fax: (203) 426-7800 Broadcast Packet Count Limit Commands Get the Broadcast Packet Count Limit for one port Command Name broadcast get percentage Description Displays the broadcast packet percentage for a particular port. Syntax broadcast get percentage <port-number> Parameters port-number The port number must range between 1 and the maximum port number in the switch. N-TRON/Admin#[1]> broadcast get percentage 6 Examples The BPCL for port number 6 is : 100 NOTES Get the Broadcast Packet Count Limit for all ports Command Name broadcast show percentage Description Displays the broadcast packet percentage for all ports. Syntax broadcast show percentage Parameters None N-TRON/Admin#[1]> broadcast show percentage Examples Broadcast Port # 1 Port # 2 Port # 3 Port # 4 Port # 5 Port # 6 Port # 7 Port # 8 Port # 9 Port # 10 Port # 11 Port # 12 Port # 13 NOTES Percentage Value for Ports : 100 Port # 14 : 100 : 100 Port # 15 : 100 : 100 Port # 16 : 100 : 100 Port # 17 : 100 : 100 Port # 18 : 100 : 100 Port # 19 : 100 : 100 Port # 20 : 100 : 100 Port # 21 : 100 : 100 Port # 22 : 100 : 100 Port # 23 : 100 : 100 Port # 24 : 100 : 100 Port # 25 : 100 : 100 Port # 26 : 100 These are egress filters. Set the Broadcast Packet Count Limit Command Name broadcast set percentage Description Sets the broadcast packet percentage for a particular port Syntax broadcast set percentage <port-number> <%> Parameters port-number The port number must range between 1 and the maximum port number in the switch. % The count limit should be in the range 0 to 100 and represents the percentage. N-TRON/Admin#[1]> broadcast set percentage 4 100 Examples NOTES Default is 3. (Revised 2011-07-20) page 139 of 145 For Sales and Support, Contact Walker EMD • www.walkeremd.com • Toll-free: (800) 876-4444 • Tel: (203) 426-7700 • Fax: (203) 426-7800 VLAN Configuration Examples Example 1 – Basic understanding of port based VLANs VLAN Configuration View Ports Configuration View VLAN Status : Enable Port Port PVID No Name VLAN ID VLAN Name Untagged Port(s) Tagged Port(s) Mgmt Port Admit Mirror Port 1 Default VLAN A3-A6,B1-B6,C1-C6,D1-D6 -YES All 0 2 VLAN -2 A1-A2 -- YES All 0 Receiving Port # Tagged VID in packet Destination Address Transmitting Port #s Notes Port A1 Port A1 Port A1 Port A3 Port A3 Port A3 Untagged Untagged VID 4 Untagged Untagged VID 4 MAC on port 2 Unknown MAC MAC on port 2 MAC on port 5 Unknown MAC MAC on port 6 Port A2 Port A2 Port A2 Port A5 Port A4-D6 Port A6 Unicast Traffic Floods VLAN 2 Strips VID off packet Unicast Traffic Floods VLAN 1 Strips VID off packet 1 A1 2 2 A2 2 3 A3 1 ... … … 23 D5 1 24 D6 1 Example 2 – Basic understanding of tagged VLANs (Admit – Tagged Only) VLAN Configuration View Ports Configuration View VLAN Status : Enable VLAN ID VLAN Name Untagged Port(s) Tagged Port(s) Mgmt Port Admit Mirror Port 1 Default VLAN -- A3-A6,B1-B6,C1-C6,D1-D6 YES Tagged Only 0 2 VLAN -2 -- A1-A2 YES Tagged Only 0 Receiving Port # Tagged VID in packet Destination Address Transmitting Port #s Notes Port A1 Port A1 Port A1 Port A1 Port A3 Port A3 Port A3 Port A3 Untagged VID 2 VID 4 VID 2 Untagged VID 1 VID 1 VID 4 MAC on port A2 MAC on port A2 MAC on port A2 MAC on port A5 MAC on port A1 MAC on port A6 Unknown MAC MAC on port A8 -Port A2 -Port A2 -Port A6 Port A4-D6 -- Packet Discarded Unicast Traffic Packet Discarded Floods VLAN 2 Packet Discarded Unicast Traffic Floods VLAN 1 Packet Discarded (Revised 2011-07-20) Port Port PVID No Name 1 A1 ** 2 A2 ** 3 A3 ** ... … … 23 D5 ** 24 D6 ** page 140 of 145 For Sales and Support, Contact Walker EMD • www.walkeremd.com • Toll-free: (800) 876-4444 • Tel: (203) 426-7700 • Fax: (203) 426-7800 Example 3 – Basic understanding of tagged VLANs (Admit – All) VLAN Configuration View Ports Configuration View VLAN Status : Enable VLAN ID VLAN Name Untagged Port(s) Tagged Port(s) Mgmt Port Admit Mirror Port 1 Default VLAN -- A3-A6,B1-B6,C1-C6,D1-D6 YES All 0 2 VLAN -2 -- A1-A2 YES All 0 Port Port PVID No Name 1 A1 ** 2 A2 ** 3 A3 ** ... … … 23 D5 ** 24 D6 ** Receiving Port # Tagged VID in packet Destination Address Transmitting Port #s Notes Port A1 Port A1 Port A1 Port A1 Port A3 Port A3 Port A3 Port A3 Untagged VID 2 VID 4 VID 2 Untagged VID 1 VID 1 VID 4 MAC on port A2 MAC on port A2 MAC on port A2 Unknown MAC Unknown MAC MAC on port A6 Unknown MAC MAC on port B2 Port A2 Port A2 -Port A2 Port A4-D6 Port A6 Port A4-D6 -- Adds VID 2 to packet Unicast Traffic Packet Discarded Floods VLAN 2 Adds VID 1 to packet & Floods VLAN 1 Unicast Traffic Floods VLAN 1 Packet Discarded Example 4 – Basic understanding of Hybrid VLANs VLAN Configuration View Ports Configuration View VLAN Status : Enable VLAN ID VLAN Name 1 Untagged Port(s) Tagged Port(s) Mgmt Port Admit Mirror Port Default VLAN A3-A6,B1-B6,C1-C6,D1-D6 2 VLAN -2 A1-A2 -- YES All 0 A3-A4 YES All 0 Receiving Port # Tagged VID in packet Destination Address Transmitting Port #s Notes Port A1 Port A1 Port A1 Port A1 Port A1 Port A3 Port A3 Port A3 Port A3 Port A3 Port A3 Untagged Untagged VID 4 VID 4 VID 2 Untagged Untagged VID 4 VID 4 VID 2 VID 2 MAC on port A2 MAC on port A3 MAC on port A2 MAC on port A3 MAC on port A2 MAC on port A6 Unknown MAC MAC on port A5 MAC on port A4 MAC on port A4 MAC on port A1 Port A2 Port A3 --Port A2 Port A6 Port A4-D6 --Port A4 Port A1 Unicast Traffic Adds VID 2 in the packet Packet Discarded Packet Discarded Strips VID off packet Unicast Traffic Floods VLAN 1 Packet Discarded Packet Discarded Strips VID off packet Strips VID off packet (Revised 2011-07-20) Port Port PVID No Name 1 A1 2 2 A2 2 3 A3 1 … … … 23 D5 1 24 D6 1 page 141 of 145 For Sales and Support, Contact Walker EMD • www.walkeremd.com • Toll-free: (800) 876-4444 • Tel: (203) 426-7700 • Fax: (203) 426-7800 Example 5 – Basic understanding of Overlapping VLANs VLAN Configuration View Ports Configuration View VLAN Status : Enable VLAN ID VLAN Name Untagged Port(s) Tagged Port(s) Mgmt Port Admit Mirror Port Port Port PVID No Name 1 Default VLAN -- -- YES All 0 2 VLAN -2 A1-A6,B1-B6,C1-C6,D1-D6 -- YES All 0 1 A1 4 3 VLAN -3 A2-A6,B1-B6,C1-C6,D1-D6 -- YES All 0 2 A2 2 4 VLAN -4 A1-A2 -- YES All 0 3 A3 3 ... … … 23 D5 3 24 D6 3 Receiving Port # Tagged VID in packet Destination Address Transmitting Port #s Notes Port A1 Port A1 Port A1 Port A1 Untagged Untagged VID 4 VID 4 MAC on port A2 MAC on port A3 MAC on port A2 Unknown MAC Port A2 -Port A2 Port A2 Port A2 Port A2 Port A2 Port A2 Port A3 Port A3 Port A3 Port A3 Untagged Untagged VID 2 or 3 Untagged Untagged Untagged Untagged VID 2 or 3 MAC on port A1 MAC on port A5 MAC on port A5 Unknown MAC MAC on port A1 MAC on port A2 MAC on port A5 MAC on port A2 Port A1 Port A5 Port A5 Port A1,B1-D6 -Port A2 Port A5 Port A2 Unicast Traffic Packet Discarded Strips VID off packet Strips VID off packet & Floods VLAN 4 Unicast Traffic Unicast Traffic Strips VID off packet Floods VLAN 2 Packet Discarded Unicast Traffic Unicast Traffic Strips VID off packet Example 6 – Basic understanding of VLANs with Multicast Filtering VLAN Configuration View Ports Configuration View VLAN Status : Enable VLAN ID VLAN Name Untagged Port(s) Tagged Port(s) Mgmt Port Admit Mirror Port 1 Default VLAN -- -- YES All 0 2 VLAN -2 A1-A6,B1-B6,C1-C6,D1-D6 -- YES All 0 3 VLAN -3 A2-A6,B1-B6,C1-C6,D1-D6 -- YES All 0 4 VLAN -4 A1-A2 -- YES All 0 Display Static Multicast Group Address(es) Multicast Address Port List 01:00:00:00:00:01 1-24 01:00:00:00:00:02 1,6,8 Receiving Port # Tagged VID in packet Destination Address Transmitting Port #s Port 1 Untagged 01:00:00:00:00:01 Port 2 Port 1 Untagged 01:00:00:00:00:02 -- Port 2 Untagged 01:00:00:00:00:01 Port 1,3-24 Port 2 Untagged 01:00:00:00:00:02 Port 1,6,8 Port 3 Untagged 01:00:00:00:00:01 Port 2,4-24 Port 3 Untagged 01:00:00:00:00:02 Port 6,8 Port Port PVID No Name 1 A1 4 2 A2 2 3 A3 3 ... … … 23 D5 3 24 D6 3 Notes Goes to Ports 1-24, but port 1 can only send to Port 2 (VLAN 4) Packet Discarded Goes to Ports 1-24, but won‟t go back out the port it came in on Goes to ports 1,6,8 Goes to Ports 1-24, but can‟t talk to Port 1 since it is on a different VLAN Goes to Port 1,6,8, but can‟t talk to Port 1 since it is on a different VLAN Note: If there are multiple ports on different VLANs, the 9000 will apply the static multicast address to the lowest VLAN-ID that is associated with one of the ports assigned to the static multicast address. If the lowest VLAN-ID contains all the ports assigned to the static multicast address (an umbrella VLAN), it will function for all those ports with no problems. This can be achieved with overlapping VLANs. (Revised 2011-07-20) page 142 of 145 For Sales and Support, Contact Walker EMD • www.walkeremd.com • Toll-free: (800) 876-4444 • Tel: (203) 426-7700 • Fax: (203) 426-7800 KEY SPECIFICATIONS Switch Properties Number of MAC Addresses: Aging Time: Latency Type: Backplane Speed: Switching Method: 4,096 Programmable 2.9 µs 6.6Gb/s Store & Forward Physical Height: Width: Depth: Weight (max): Din-Rail mount: 5.2" (13cm) 9.0" (22.8cm) 5.6" (14.2cm) 5.0 lbs 35mm Electrical Redundant Input Voltage: 10-30 VDC Input Current (max): 2.5 A@24V (fully populated) Inrush @ 24VDC: 16.0 A for 7.5 ms Input Ripple: Less than 100 mV N-TRON Power Supply: NTPS-24-5 (5 Amp@24VDC) (NOTE: Not appropriate for use with M12, POE, and HV models.) Environmental Connectors Operating Temperature: Storage Temperature: -20°C to 70°C -40°C to 85°C Operating Humidity: (Non Condensing) 10% to 95% Operating Altitude: 0 to 10,000 ft. Recommended Wiring Clearance: Shock and Vibration (bulkhead mounting) Shock: Vibration/Seismic: 200g @ 10ms 50g, 5-200Hz,Triaxial Reliability MTBF: >1Million Hours (Revised 2011-07-20) 10/100BaseTX: Up to Twenty-four (24) RJ-45 Copper Ports 100BaseFX: Up to Sixteen (16) SC or ST Duplex Ports 1000BaseSX/LX: Two (2) LC Duplex Ports as an option Front: 4" (10.16 cm) Side: 1" (2.54 cm) Network Media 10BaseT: >Cat3 Cable 100BaseTX: >Cat5 Cable 100BaseFX, 1000BaseSX: Multimode: 50-62.5/125µm 100BaseFXE, 1000BaseLX: Singlemode: 7-10/125µm page 143 of 145 For Sales and Support, Contact Walker EMD • www.walkeremd.com • Toll-free: (800) 876-4444 • Tel: (203) 426-7700 • Fax: (203) 426-7800 Gigabit Fiber Transceiver (SFP) Characteristics 550m* with 50/125 µm 275m @ 62.5/125μm 10km** 40km** 80km** TX Power Min -9.5dBm -9.5dBm -2dBm 0dBm RX Sensitivity Max -17dBm -20dBm -22dBm -24dBm Wavelength 850nm 1310nm 1310nm 1550nm 3.5 to 3.75 dB/km 0.45 dB/km 0.35 dB/km 0.25 dB/km VCSEL FP DFB DFB Fiber Length Assumed Fiber Loss Laser Type *SX Fiber Optic Cable ** LX Fiber Optic Cable 100 Mb Fiber Transceiver Characteristics 2km* Fiber Length -19dBm TX Power Min -31dBm RX Sensitivity Max 1310nm Wavelength Min/Max * Multimode Fiber Optic Cable ** Singlemode Fiber Optic Cable 15km** -15dBm -31dBm 1310nm 40km** -5dBm -34dBm 1310nm 80km** -5dBm -34dBm 1550nm Regulatory Approvals: Safety: Suitable for use in Class I, Division 2, Groups A, B, C and D Hazardous Locations, or Nonhazardous Locations only. EMI: EMS: EN61000-6-4, EN55011 – Class A FCC Title 47, Part 15, Subpart B - Class A EN61000-6-2 EN61000-4-2 (ESD) EN61000-4-3 (RS) EN61000-4-4 (EFT) EN61000-4-5 (Surge) EN61000-4-6 (Conducted Disturbances) Conducted Low Frequency: IEC60533 Shock: Vibration: Cold: Dry Heat: Damp Heat: IEEE 1613 (250 mm) IEEE 1613 (V.S.3 20 mm/s) IEC60068-2-6 (Test Fc) IEC60068-2-1 IEC60068-2-2 IEC60068-2-30 (Test Db) GOST-R Certified. Warranty: Effective January 1, 2008, all N-TRON products carry a 3 year limited warranty from the date of purchase. (Revised 2011-07-20) page 144 of 145 For Sales and Support, Contact Walker EMD • www.walkeremd.com • Toll-free: (800) 876-4444 • Tel: (203) 426-7700 • Fax: (203) 426-7800 N-TRON Limited Warranty N-TRON, Corp. warrants to the end user that this hardware product will be free from defects in workmanship and materials, under normal use and service, for the applicable warranty period from the date of purchase from N-TRON or its authorized reseller. If a product does not operate as warranted during the applicable warranty period, N-TRON shall, at its option and expense, repair the defective product or part, deliver to customer an equivalent product or part to replace the defective item, or refund to customer the purchase price paid for the defective product. All products that are replaced will become the property of N-TRON. Replacement products may be new or reconditioned. Any replaced or repaired product or part has a ninety (90) day warranty or the remainder of the initial warranty period, whichever is longer. N-TRON shall not be responsible for any custom software or firmware, configuration information, or memory data of customer contained in, stored on, or integrated with any products returned to N-TRON pursuant to any warranty. OBTAINING WARRANTY SERVICE: Customer must contact N-TRON within the applicable warranty period to obtain warranty service authorization. Dated proof of purchase from N-TRON or its authorized reseller may be required. Products returned to N-TRON must be pre-authorized by N-TRON with a Return Material Authorization (RMA) number marked on the outside of the package, and sent prepaid and packaged appropriately for safe shipment. Responsibility for loss or damage does not transfer to N-TRON until the returned item is received by N-TRON. The repaired or replaced item will be shipped to the customer, at N-TRON‟s expense, not later than thirty (30) days after N-TRON receives the product. N-TRON shall not be responsible for any software, firmware, information, or memory data of customer contained in, stored on, or integrated with any products returned to N-TRON for repair, whether under warranty or not. ADVANCE REPLACEMENT OPTION: Upon registration, this product qualifies for advance replacement. A replacement product will be shipped within three (3) days after verification by N-TRON that the product is considered defective. The shipment of advance replacement products is subject to local legal requirements and may not be available in all locations. When an advance replacement is provided and customer fails to return the original product to N-TRON within fifteen (15) days after shipment of the replacement, N-TRON will charge customer for the replacement product, at list price. WARRANTIES EXCLUSIVE: IF AN N-TRON PRODUCT DOES NOT OPERATE AS WARRANTED ABOVE, CUSTOMER'S SOLE REMEDY FOR BREACH OF THAT WARRANTY SHALL BE REPAIR, REPLACEMENT, OR REFUND OF THE PURCHASE PRICE PAID, AT N-TRON'S OPTION. TO THE FULL EXTENT ALLOWED BY LAW, THE FOREGOING WARRANTIES AND REMEDIES ARE EXCLUSIVE AND ARE IN LIEU OF ALL OTHER WARRANTIES, TERMS, OR CONDITIONS, EXPRESS OR IMPLIED, EITHER IN FACT OR BY OPERATION OF LAW, STATUTORY OR OTHERWISE, INCLUDING WARRANTIES, TERMS, OR CONDITIONS OF MERCHANTABILITY, FITNESS FOR A PARTICULAR PURPOSE, SATISFACTORY QUALITY, CORRESPONDENCE WITH DESCRIPTION, AND NON-INFRINGEMENT, ALL OF WHICH ARE EXPRESSLY DISCLAIMED. NTRON NEITHER ASSUMES NOR AUTHORIZES ANY OTHER PERSON TO ASSUME FOR IT ANY OTHER LIABILITY IN CONNECTION WITH THE SALE, INSTALLATION, MAINTENANCE OR USE OF ITS PRODUCTS. N-TRON SHALL NOT BE LIABLE UNDER THIS WARRANTY IF ITS TESTING AND EXAMINATION DISCLOSE THAT THE ALLEGED DEFECT OR MALFUNCTION IN THE PRODUCT DOES NOT EXIST OR WAS CAUSED BY CUSTOMER'S OR ANY THIRD PERSON'S MISUSE, NEGLECT, IMPROPER INSTALLATION OR TESTING, UNAUTHORIZED ATTEMPTS TO OPEN, REPAIR OR MODIFY THE PRODUCT, OR ANY OTHER CAUSE BEYOND THE RANGE OF THE INTENDED USE, OR BY ACCIDENT, FIRE, LIGHTNING, POWER CUTS OR OUTAGES, OTHER HAZARDS, OR ACTS OF GOD. LIMITATION OF LIABILITY: TO THE FULL EXTENT ALLOWED BY LAW, N-TRON ALSO EXCLUDES FOR ITSELF AND ITS SUPPLIERS ANY LIABILITY, WHETHER BASED IN CONTRACT OR TORT (INCLUDING NEGLIGENCE), FOR INCIDENTAL, CONSEQUENTIAL, INDIRECT, SPECIAL, OR PUNITIVE DAMAGES OF ANY KIND, OR FOR LOSS OF REVENUE OR PROFITS, LOSS OF BUSINESS, LOSS OF INFORMATION OR DATA, OR OTHER FINANCIAL LOSS ARISING OUT OF OR IN CONNECTION WITH THE SALE, INSTALLATION, MAINTENANCE, USE, PERFORMANCE, FAILURE, OR INTERRUPTION OF ITS PRODUCTS, EVEN IF N-TRON OR ITS AUTHORIZED RESELLER HAS BEEN ADVISED OF THE POSSIBILITY OF SUCH DAMAGES, AND LIMITS ITS LIABILITY TO REPAIR, REPLACEMENT, OR REFUND OF THE PURCHASE PRICE PAID, AT NTRON'S OPTION. THIS DISCLAIMER OF LIABILITY FOR DAMAGES WILL NOT BE AFFECTED IF ANY REMEDY PROVIDED HEREIN SHALL FAIL OF ITS ESSENTIAL PURPOSE. DISCLAIMER: Some countries, states, or provinces do not allow the exclusion or limitation of implied warranties or the limitation of incidental or consequential damages for certain products supplied to consumers, or the limitation of liability for personal injury, so the above limitations and exclusions may be limited in their application to you. When the implied warranties are not allowed to be excluded in their entirety, they will be limited to the duration of the applicable written warranty. This warranty gives you specific legal rights which may vary depending on local law. GOVERNING LAW: This Limited Warranty shall be governed by the laws of the State of Delaware, U.S.A. (Revised 2011-07-20) page 145 of 145 For Sales and Support, Contact Walker EMD • www.walkeremd.com • Toll-free: (800) 876-4444 • Tel: (203) 426-7700 • Fax: (203) 426-7800