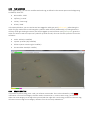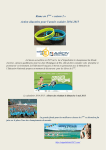
1
ITAG – Image tagging Software Version: 0.6.0.5 Authors: Sacha Viquerat & Abbo van Neer Source code written by: Sacha Viquerat Maintainer: Sacha Viquerat Maintainer email: itag.biology[at]yahoo.com Lizenz: GPL Document Save Date: 02.01.2015 15:32 Word Count: 3936 1 CONTENTS 2 Ambitions of iTAG ..........................................................................................................................4 3 License and Copyright notice ..........................................................................................................5 4 Version History (Major releases) .....................................................................................................6 5 Restrictions....................................................................................................................................7 6 Using the software .........................................................................................................................8 6.1 PREPARING YOUR IMAGES .................................................................................................... 8 6.2 SAMPLE SESSION .................................................................................................................. 9 6.3 6.4 6.5 7 6.2.1 SETTING UP A NEW SESSION ................................................................................... 9 6.2.2 RESUMING A PREVIOUSLY SAVED SESSION ............................................................ 10 MAIN INTERFACE................................................................................................................ 11 6.3.1 MOVING AROUND THE IMAGE.............................................................................. 13 6.3.2 TAGGING OBJECTS ............................................................................................... 13 6.3.3 TAG MODIFIERS ................................................................................................... 14 6.3.4 REMOVING A TAG ................................................................................................ 14 6.3.5 MAGNIFIER MODE ............................................................................................... 15 6.3.6 THE GENERAL PANEL ............................................................................................ 15 6.3.7 SAVING THE SESSION............................................................................................ 15 ENDING THE SESSION ......................................................................................................... 16 6.4.1 COLUMNS TO PROCESS ........................................................................................ 16 6.4.2 PROCESS IMAGES................................................................................................. 16 6.4.3 CREATE CSV FILES................................................................................................. 16 6.4.4 CREATE GOOGLE EARTHTM KML FILES .................................................................... 16 6.4.5 CREATE SQL FILE .................................................................................................. 16 THE DOWNLOADABLE SAMPLE SESSION .............................................................................. 17 Key references ............................................................................................................................. 18 7.1 SESSION SETUP .................................................................................................................. 18 7.2 MAIN INTERFACE................................................................................................................ 18 7.2.1 8 MAGNIFIER MODE ............................................................................................... 19 FAQ............................................................................................................................................. 20 2 A MBITIONS OF I TAG iTag has been designed at the Institute for Terrestrial and Aquatic Wildlife Research (ITAW, Werftstr. 6 in 25761 Büsum, Germany) for researchers that rely on photographic census techniques of animals that are hard to detect via image recognition algorithms and was originally developed for counting grey seals in the German Wadden Sea during March 2013. It has since then been further expanded and has now reached beta status. iTag allows users to define up to 9 different categories and name them accordingly. In addition, 4 modifiers are available to further increase the options during a tagging session. Option files can be saved to accommodate to different survey setups. Users are able to load a series of images into a session and add tags on objects on these images within previously defined categories and modifiers. Upon ending the session, result files are produced including (if provided by the EXIF data) the GPS information for each picture, the number of objects in each category and a detailed result file that describes each individual object. In addition, you can opt to have all images that were tagged saved as well as a legend, in a graphical and in a spreadsheet format. A sqlite compatible file that includes all the spreadsheet data and can be viewed with SQLite browsers is produced. All output is written into a folder named after the user created below the image directory. The user can also save the current session and resume later on. 3 L ICENSE AND COPYRIGHT NOTICE iTag is open source under LGPL (due to the PIL Library Copyright © 1997-2011 by Secret Labs AB and Copyright © 1995-2011 by Fredrik Lundh) and may be freely distributed as long as the authors of the program are properly cited (information on how to cite will be made available as soon as possible). iTag may not be changed in parts or as a whole without previous acknowledgement by the authors themselves. 4 VERSION H ISTORY (MAJOR RELEASES) Complete UI overhaul Added output Options Added new Panel 0.5 SQLite backend replaces old storage engine, thus improving speed and flexibility 0.4 Options can now be saved and restored Added new magnifier function and graphics filter Added output per image Added options to modify number of categories and modifier names 0.2 Added overview panel displaying session summary 0.1 All basic functions (adding and removing tags) present 0.6 0.3 5 R ESTRICTIONS iTag uses TkInter for all GUI elements, a graphical window manager not at all suited for image display and modification. A possible port to more potent environments such as WinAPI may improve performance in future releases While we regard the user interface to be ok, that sentiment may not necessarily apply to all users. We encourage you to submit any suggestions to the authors The manual constitutes a work in progress and is far from being comprehensive iTag will read all EXIF data stored within the image files, it will also replace any unavailable field with None values. If your camera saves EXIF info in a version non-compliant to EXIF 2.1 or below, please contact the authors Image display in python is using up a lot of memory – you will encounter problems when trying to load images that exceed 10000 x 10000 pixels. Reduce image size if possible 6 U SING THE SOFTWARE 6.1 PREPARING YOUR IMAGES In order to get the most out of iTag, you should organize your files in folders. Since it is very difficult to implement Unicode file browsing in iTag, pathnames may only contain ASCII characters (i.e. a pathname like C:\users\Sacha\Surveys\2014_09_11\Fifth Leg\ would be ok, whereas C:\users\Sacha\Surveys\2014_09_11\fünfte Runde\ raises an error due to the umlaut ü). iTag works with jpeg & bmp Images. iTag is case-insensitive, so any file ending with .jpg / .bmp or any upper / lower case version of jpg or bmp will be found. Since iTag will need to create Subfolders and write to that particular directory, you should also have full read / write access to that folder. Don’t put your image folder anywhere that you don’t have access to! iTag will create a subfolder with the name of the user and store all results inside that folder, including copies of all tagged images. iTag will never touch or modify your raw data! If your data complies with the EXIF 2.1 or earlier Standard and has geographical data stored, these will be read, otherwise the corresponding fields default to None. It is generally a good idea to sort your data by survey date or whatever is applicable for your specific design. Once you have put all your images into one folder, you can then open up iTag and continue with setting up the session. As Python is not very good at handling large images, there is a built in limit to the maximum allowed width or height of an image. The default maximum image size set to a limit of 10,000 pixels. You can override that setting by supplying iTag with start-up options. Right Click on your shortcut and change the target from “itag.exe” to “itag.exe –m5000”, setting the maximum side of images to 5,000 pixels (for example). 6.2 SAMPLE SESSION 6.2.1 SETTING UP A NEW SESSION Upon opening iTag, you will encounter the start page. If you wish to setting up a new session, you’ll need to go to ‘New Session (Ctrl-N)’ first by either clicking on File -> New Session (Ctrl-N) or by pressing ctrl + N A new session wizard will open, which will guide you through your session setup. The session wizard loads the default settings from disk, however, you can always specify a previously saved option file and later define this as your new default file. On the first slide, you will be prompted to enter your username. Characters that are not allowed will not be displayed. The username in combination with the information from the photographs will then be used to organize the output on your computer. Additionally, you can enter up to 9 generic parameters that could describe the specifics of your survey, e.g. the type of vessel you used, the weather conditions etc. Note: while theses parameters will be saved upon ending the session, they will not appear in any table. The export of a session table containing these info is still under construction. The next slide will prompt you to specify the image directory. You can click on ‘Choose Directory’ and select the folder that contains your images. Note: you should create a folder (such as one folder per survey day) and put all the images as JPG files or BMP into that folder. iTag will not parse subfolders and will not identify duplicates! Upon successfully loading the images from the directory, a small summary of the files is displayed within the wizard. In the next Wizard slide, you can further set up the categories and modifiers that will be available during your session. You can define up to 9 different categories and modify the text that is associated with the modifier keys. Note: If you don’t want to use some of the modifiers, just keep them as they are (but avoid duplicate modifier names). By clicking on the coloured button next to each category, you can then pick a colour for the category. iTag will warn you if you pick a colour that is very similar to another existing colour, but you will still be able to use duplicate colours! The last slide will then give you a short summary of your setup and offer you to save this specific setup as the default session setup (excluding the directory name). Upon clicking ‘Done’, your session will start immediately. 6.2.2 RESUMING A PREVIOUSLY SAVED SESSION Once you have a saved session on your computer, you can resume at any time by clickin g ‘Resume Session (Ctrl-O)’ or by clicking File -> Resume Session (Ctrl-O) or by simply pressing ctrl + O. A file browsing dialog asks you to select a previously saved session. The default file ending for iTag session files is ‘*.TiD’, as shown in the image above. Once you have selected the session file, iTag will load the session and you will be able to resume the session. In case that you load up a Save from a previous Version (before 0.6), iTag will attempt to automatically recover that session, transfer the save data into the new format and create a backup of the old save adding a ‘_bu’ to the file suffix (e.g. ‘sam.TiD_bu’ in above image is the backup of the old version save). In case that the folder saved within the save file does not exist anymore, iTag will prompt you to select the new location of the folder. If then found, iTag will compare the content of that folder with the images previously saved and warn you in case of missing images. As long as at least one image in the saved file was found in the new folder, iTag will open the session. If any file is missing, iTag will warn you about the number of missing files and their respective filenames. If none of the previous files can be found, iTag will ask you if you would like to try a data dump of the tag data, if available. In this case, iTag will try to export the tag data into a sqlite file within the save file’s folder and, if desired, the same csv tables as during the end of a session (see also 6.4.3) (experimental feature). 6.3 MAIN INTERFACE Upon loading the first image, you are presented with the main interface window showing the first image. The display of the Menu bar has now changed. The view Menu is now accessible, which includes the options: ‘Show General Panel (F9)’: toggles a panel displaying various information on the current image (see 6.3.6) Also, the Options Menu is now accessible, offering the following settings: ‘hide all tags’: toggles the display of all tags currently visible on the image on / off. Note: You cannot add or remove tags while tags are hidden from view ‘suppress warnings’: toggles warnings for duplicate tags on or off. The warnings get reset when you change images ‘increase tagsize (+)’’: increases the displayed tag size ‘decrease tagsize (-)’: decreases the displayed tag size Within the file menu, the following items are available: Save Session (Ctrl-S): Save your current session in order to have a well-earned break from clicking End Session (Alt-Q): Ends the current session and, if any tags had been placed, asks the user whether the session should be saved The next part of the window displays a status bar which shows the currently selected category, any message produced by the software, the current filename of the image, in square brackets the file number / total number of files, the objects tagged so far and the current user name. There are also controls that allow the user to quickly access pictures by either browsing to the beginning of pictures (<<), the previous picture (<), the next picture (>) or the last picture (>>). In addition, you can simply provide the image number you want to see and click ‘Goto’. The largest portion of the screen is reserved for the actual image display. To the bottom and the right of the image are rulers, in case the images are larger than the available screen space. The bottom gives you a short overview of the available categories in ascending order (1 through 9) and their respective colours. 6.3.1 MOVING AROUND THE IMAGE Panning the image is straightforward: simply left click and hold the mouse button, then move the mous e around. Additionally to displaying various info on the current session, the General Panel (activated by either clicking the button ‘Show General Panel (F9)’ or by hitting the F9 key, you can simply left click anywhere in the preview picture to jump straight to that position. 6.3.2 TAGGING OBJECTS Tagging objects is as straightforward as selecting a category by pressing 1 through 9 (depending on the number of categories you have defined) or clicking the category buttons at the bottom of the screen, positioning the mouse above the target object and right clicking the mouse. iTag will display a warning window when you place a new tag very close to an existing one (however, the tag will still be placed). By clicking View -> supress warnings, all such warnings are suppress until the image changes. 6.3.3 TAG MODIFIERS When right clicking, you can use modifiers with each tag, as defined in the session options at the beginning. Per default, these are: No modifier: ‘adult’ shift Key: ‘juvenile’ ctrl Key: ‘swimming’ alt Key: ‘dead’ In the example below, you can see that we have tagged an adult grey seal (yellow circle, yellow being the colour for grey seals and the circle being the symbol for adult animals). Additionally, by holding down the shift key while right clicking the animal, we’ve also tagged a juvenile harbour seal (green square; green the colour for harbour seals and square as symbol for juvenile animals). The use of these symbols is strict and is as follows: circles: adults (no modifier) squares: juveniles (shift modifier) hollow squares: swimming (ctrl modifier) horizontal bar: dead (alt modifier) 6.3.4 REMOVING A TAG If you want to remove a tag, press x and you will enter erase mode. This is also indicated by a red ERASE notification in front of the category identifier within the status bar. In order to erase a tag, you’ll have to select the same category as the tag to be removed and then right click near the tag you want to remove. iTag will never remove a tag from a category different from the currently selected one. 6.3.5 MAGNIFIER MODE As an additional tool, you can activate the magnifier tool by pressing the ‘m’ key. This will display a cropped version of the image next to your mouse pointer that you can zoom into using the mouse wheel. Note: existing tags will NOT be displayed within the magnifying tool! In addition, you can add various image filters to the magnifying tool by pressing the appropriate button: g: switches on/off solarised filter h: switch on/off the equalised histogram filter j: switches invert filter on/off k: switch on/off the autocontrast filter l: switches on/off posterised filter u: switches on/off unsharp filter s: switches on/off smart sharpen filter (experimental feature) 6.3.6 THE GENERAL PANEL After toggling the general panel, you will see a floating window displaying a scaled down version of the current picture. Upon left clicking on the panel picture, you will quickly pan to the selected area as indicated by the rectangle. There are two additional buttons below the panel image: Gps panel: Toggles display of an additional panel containing the spatial metadata of the current image file (if available in green, else displayed in red). If the coordinates are displayed in green and you click on the coordinates, a browser window will open and display the position on Google MapsTM Info panel: Toggles display of an additional panel containing the summary of the session 6.3.7 SAVING THE SESSION At any time, you can select ‘Save Session (Ctrl-S)’ by clicking File -> Save Session (Ctrl-S) or simply hit ctrl + S In order to save your current session in a single file named using your username and the ‘.TiD’ suffix. You can resume from this file any time you want to. 6.4 ENDING THE SESSION Once you have tagged all the animals and are satisfied with the tags, you can click on ‘End Session (Ctrl-Q)’ or press control + Q to display a save dialog and trigger the processing of the tagged images. As when saving in during a session, a single file (ending on .TiD) will be generated, allowing you to resume / review your choices anytime. Within the Output Options window, you will then be presented with various output options described in detail below. 6.4.1 COLUMNS TO PROCESS You can select the categories / modifiers combinations you want to see in the summary by either clicking on the corresponding check button to select or deselect a modifier / category combination or by simply clicking on the modifier name to unselect / select a complete modifier. Note: This only applies to the summary table. The detailed table and the sqlite database will not be affected by this decision. 6.4.2 PROCESS IMAGES By checking this value, tagged images will be produced within the ‘Images’ subfolder of the output directory. Per default, iTag will create scaled down jpg image files for each image containing the tags you’ve placed for future reference and archival. Also, a legend image is produced. 6.4.3 CREATE CSV FILES A database file will always be produced. However, you can also create spreadsheets of each database table. Per default, iTag will create multiple colon separated files in a subfolder called ‘Tables’ (using a point decimal separator). If enabled, iTag will produce a detailed table that contains info on each individual tag and an aggregated summary table that collates tags on each image. You can choose the column separator via the dropdown Menu. Note: The summary file will only contain the previously selected combinations of modifiers and categories. 6.4.4 CREATE GOOGLE EARTHTM KML FILES You can toggle the creation of a KML Layer that you can display within Google Earth. If you chose to export your tagged images, all images that had been tagged and that included spatial information are displayed upon loading the KML file into Google EarthTM. Note: The KML file does not include the Images, it’s just referencing them. As long as the images are within the Images subfolder, the images will be displayed correctly. If you share the KML file without providing the images, the images will not display properly within Google EarthTM. 6.4.5 CREATE SQL FILE iTag will try to create a native SQL dump of the database. You can import this file into any existing database that uses the SQL standard (feature is currently deactivated). 6.5 THE DOWNLOADABLE SAMPLE SESSION You can obtain a sample Session from the current version’s sourceforge directory. Instead of going through the whole session setup, you can simply load up the sample session provided within the extracted folder by choosing ‘Resume Session (Ctrl+O)’ or by clicking File -> Resume Session (Ctrl+O) or by simply hitting ctrl + O after iTag has started. Selecting the extracted folder, you should see a folder called ‘Sample Images’. Click on the file called ‘Example.TiD’ and confirm by clicking ‘Ok’. Since this file has been removed from its original folder, you will be prompted to specify the new location of the folder. If you want to save the new path, simply save the session by either ending it or pressing ‘Save Session (Ctrl – S)’ or by pressing ctrl + S. After a short intermission, the session will be resumed and you can review my session progress. As you can see, I have set up 4 categories, my user name is ‘Example’ and I have reassigned the modifier keys (from default swimming to flying). When you browse through the images by using q, w, ← (left arrow key) or → (right arrow key), you can see the different images that have been already assigned. Feel free to use all the tools at your disposal to review my tagging. Note: I deliberately made some obvious mistakes such as classifying a guy on a bike as ‘unknown bird’). 7 K EY REFERENCES Note: A ‘+’ sign indicates that both keys / mouse strokes have to be performed simultaneously. LMB / RMB indicates a left / right mouse button click. 7.1 SESSION SETUP Key Function Control + N Start a new session F1 Display help page Control + O Load session (resume previously saved session) Control + Q Exit iTag 7.2 MAIN INTERFACE Key Function Control + S Save the current session F9 Switch general panel on / off LMB On panel image: navigate image Control + Q End session 1 through 9 Select category (number of categories depends on session setup) + Increase tag size display size - Decrease tag size display size RMB Add tag Shift + RMB Add modified tag (shift modifier) Alt + RMB Add modified tag (alt modifier) Ctrl + RMB Add modified tag (ctrl modifier) x Enter eraser mode; right click near tag to remove tag LMB + drag mouse In main interface image: Navigate image w or ← (arrow key left) Go to previous image q or → (arrow key right) Go to next image m Switch magnifier mode on / off F1 Display help page 7.2.1 MAGNIFIER MODE Key Function g Switch solarized mode on / off h Switch equalized histogram on / off j Switch inverted image on / off k Switch auto contrast on / off l Switch posterize filter on / off u Switch unsharp filter on / off s Switch smart sharpen filter on / off Mouse Wheel up / down Zoom in / out 8 FAQ Q: Is there a limitation to the number of Images I can load / the number of tags I can create? A: In theory, there is. However, the number depends on the amount of ram you possess and will exceed a couple million tags / a hundred million images on any PC with 2 gb or more RAM. The speed when deleting items may be reduced significantly after a couple hundred thousand tags or so. Q: I have an old save but the images are gone. Do I have to redo everything? A: Usually, iTag will ask for a new directory when encountering missing files. Even though there is no clear indication on screen, iTag is basically in Recovery mode when no new file location is supplied. I would recommend ending the session and unchecking the export images option, that way you should get the database file as long as your tag data is present. Version 0.6.1 will clearly identify Recovery mode as such on the main window and lead the user to possible repair solutions, until then, use the hack described above. Q: iTag fails to load images even though I know that I have provided the right location! A: You should check for bad characters in your directory and filenames. Bad characters are special characters like ü, ö, ä or *~#. This is usually the most common reason why any file load operation may fail. However, in 0.6.1 this will hopefully have been fixed. Q: Sometimes there is a smaller widow visible before another window with content opens. Is something wrong? A: No. It’s just something I can’t figure out. When I have found out what causes this flicker, I will have it fixed! Q: Where is full screen mode? A: For reasons that I cannot disclose without losing my sanity, fullscreen just doesn’t seem to work when there is a menu. Maximizing the window offers basically the same space for the main window. Q: I would like to see some features that I find useful – where are they? A: Well, as long as they are only living inside of your head, there will be no change – contact me through sourceforge or [email protected] and make your suggestions and ideas heard!