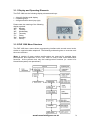
1
HouseHeat FHZ 1000 HouseMaster
User Guide
Product Code: HH45221
Please read these instructions carefully before installation and
operation and keep them for future reference
www.house-intelligence.co.uk
First UK Edition, November 2008, Documentation © 2008 HouseTech-Solutions Ltd.
All rights reserved. This document may not be reproduced or copied whole or in part in any
form or duplicated or processed by electronic, mechanical or chemical means without prior
permission. It is possible that this document contains technical or printing errors. The
information in this document is nonetheless regularly checked and corrections made in
subsequent editions. No liability is accepted for technical or printing errors or their
consequences. All trademarks and patents are acknowledged. Modifications owing to
technical improvements may be made without prior notification. Printed in Hong Kong.
45666 Y2008 V1.0
www.house-intelligence.co.uk
2
1. System Description ................................................................................... 5
1.1 FHZ 1000 HouseMaster ................................................................................. 5
1.2 FHT 80B Heating Control .............................................................................. 6
1.3. FHT 8V Valve Motor ...................................................................................... 6
2. Installation of System Components......................................................... 7
2.1. Installation of FHZ 1000 HouseMaster ........................................................ 7
2.1.1 Selecting a suitable location.........................................................................................7
2.1.2 Insertion of the 9-Volt battery / Input of date and time ............................................... 7
2.1.3 Placing / Wall-Mounting the FHZ 1000........................................................................ 9
2.2 Installation of FHT 8V Valve Motors ............................................................. 9
2.3 Installation of FHT 80B Heating Controls (Thermostats) .......................... 10
2.4 Establishing Communication between the FHZ 1000 and the FHT 80B
Heating Controls................................................................................................ 10
2.4.1 How communication works ........................................................................................10
2.4.2 Before commencing registration of FHT 80B Heating Controls ..............................11
2.4.3 Registration of FHT 80B Heating Controls................................................................12
2.4.4 De-registration of FHT 80B Heating Controls ...........................................................13
3. Operation of FHZ 1000 HouseMaster ..................................................... 13
3.1 Introduction ................................................................................................. 13
3.1.1 Display and Operating Elements ...............................................................................14
3.1.2 FHZ 1000 Menu Structure..........................................................................................14
3.1.2.1 Normal Operating Mode ..........................................................................................15
3.1.2.2 The Menu Level .......................................................................................................15
3.1.2.3 The Programming Level ..........................................................................................15
3.1.3 Display Contrast..........................................................................................................16
3.1.4 Display Illumination .....................................................................................................16
3.1.5 Key Lock ......................................................................................................................16
3.2 Programming of the HouseHeat System.................................................... 17
3.2.1 Operating Modes ........................................................................................................17
3.2.1.1 Automatic Mode .......................................................................................................17
3.2.1.2 Manual Mode ...........................................................................................................18
3.2.1.3 Holiday/Party Mode .................................................................................................18
3.2.2 Defining the Comfort- and Energy-Saving Temperatures........................................18
3.2.3 Creation of a Weekly Temperature Programme.......................................................19
3.2.4 Switching Between Comfort- and Energy-Saving Temperature..............................21
3.2.5 Heating Pause (Summer setting)...............................................................................21
3.2.6 Closing the Radiator Valves (No heating required)..................................................21
3.2.7 Changing the name of a Room/Zone ........................................................................21
3.2.8 Changing the Security Code of Room/Zone .............................................................22
3.3 Status Display.............................................................................................. 23
3.4 Alarms .......................................................................................................... 23
3.4.1 Alarm Conditions and Prioritisation ...........................................................................23
3.4.2 Alarm Acknowledgement............................................................................................25
3.4.3 Low-Temperature Alarm.............................................................................................26
3.4.3.1 Programming the Low-Temperature Condition - FHZ 1000 .................................27
3.4.3.2 Programming the Low-Temperature Condition – FHT 80B ..................................27
4. Internal Special Functions ...................................................................... 27
4.1 “CALC”: Setting the Day and Time for De-Calcification ........................... 28
4.2 “oC/ oF”: Selection of Preferred Temperature Units................................... 28
www.house-intelligence.co.uk
3
4.3 “dAt”: Setting System Date and Time ........................................................ 29
4.4 “CodE”: Changing the Security Code ........................................................ 29
4.5 “t-AL”: Programming of Low-Temperature Alarm..................................... 30
4.6 “no H”: Specification of Number of FHT 8V Valve Motors........................ 30
4.7 “SynC”: Re-synchronisation of Valve Motors ........................................... 31
4.8 “tESt": Testing System Wireless Communication .................................... 31
4.9 “StEL”: Display of Radiator-Valve Position ............................................... 32
4.10 “OFFS”: Radiator Offset Bias ................................................................... 32
5. Replacing the Battery.............................................................................. 32
5.1 FHZ 1000 HouseMaster ............................................................................... 32
5.1.1 Changing the battery when the FHZ 1000 is not wall-mounted ..............................32
5.1.2 Changing the battery when the FHZ 1000 is wall-mounted.....................................33
5.2 FHT 8V Valve Motor ..................................................................................... 33
6. Troubleshooting ...................................................................................... 34
Appendix A: Code Table ............................................................................. 35
www.house-intelligence.co.uk
4
1. System Description
1.1 FHZ 1000 HouseMaster
The HouseHeat FHZ 1000 HouseMaster offers centralised management and control
of a HouseHeat system. In conjunction with HouseHeat FHT 80B Wireless Heating
Controls the temperature may be separately regulated and controlled in up to 15
rooms or zones in addition to the room or zone in which the FHZ 1000 is situated.
The FHZ 1000 communicates with each individual FHT 80B Heating Control in the
system; these in turn regulate the temperature in their respective rooms or zones. All
settings for all rooms controlled by the HouseHeat system can be programmed
centrally using the FHZ 1000; these settings are then transmitted wirelessly to each
individual heating control (room thermostat). Similarly, any changes made locally to
any heating control are automatically communicated wirelessly back to the FHZ
1000. The FHZ 1000 can also regulate the temperature in the room or zone in which
it is located in a similar manner to the FHT 80B Heating Control. Functionality
offered includes:
•
•
•
•
•
Temperature control with separate day- and night-programmes for each
day of the week if desired
Control of up to 8 radiators in a room or zone
Holiday/party function to temporarily override the set temperature
Weekly de-calcification programme to prevent sticking of radiator valves
Frost-protection function
Unexpected events - for example large temperature fluctuations which could indicate
a system malfunction - are optically and acoustically signalled by the FHZ 1000.
The FHZ 1000 is simple to operate on account of its clearly structured menu system
and a large illuminated liquid-crystal display.
Wireless data exchange between the FHZ 1000 and the FHT 80B Heating Controls
uses the highly reliable 868 MHz frequency band. The signal-transmission duration
is restricted to a maximum of 36 seconds per hour to minimise the likelihood of
interference with other wireless equipment.
Power to the unit is supplied by a 9-Volt battery.
The FHZ 1000 is suitable for wall-mounting or may be freely placed on any suitable
surface in the room or zone.
www.house-intelligence.co.uk
5
1.2 FHT 80B Heating Control
Each HouseHeat FHT 80B Heating Control is installed
in a separate room or zone and communicates
wirelessly with the HouseHeat FHZ 1000 HouseMaster
and the FHT 8V HouseHeat Wireless Valve Motor on
each radiator. The FHT 80B measures the room
temperature and compares this with the commanded
temperature from the automatic heating programme
created by the user or the manually set commanded
temperature. The control algorithm calculates how
much to open or close the radiator valves according to
the difference between these two temperatures
(requested and actual temperature) in order to achieve
the requested room or zone temperature.
The
calculated valve opening required to achieve the
requested temperature is then transmitted wirelessly to
the HouseHeat Valve Motor mounted on each radiator
which then regulates the heat flowing into each radiator
accordingly.
Changes to the time programme
(switching times) and temperature settings (comfort and
energy-saving temperatures) may be made either on
the FHT 80B Heating Control in the room/zone in
question, or alternatively centrally using the FHZ 1000
HouseMaster. A regular exchange of data between the
FHT 80B Heating Control and FHZ 1000 HouseMaster
ensures that both units always have the identical current
settings programmed by the user. The FHT 80B
regularly transmits its status to the FHZ 1000 so that the
FHZ 1000 is always updated in case of system
malfunction or disturbance.
1.3. FHT 8V Valve Motor
The FHT 8V valve Motor replaces the existing
thermostatic radiator valve (TRV) head. Draining down
the radiator, bleeding air from the radiator, etc. is not
necessary for installation of the FHT 8V. The Valve
Motor is powered by two standard AA batteries and is
wirelessly controlled by the FHT 80B Heating Control or
the FHZ 1000 HouseMaster. No cables, wires or mains
power connection is required for the FHT 8V.
www.house-intelligence.co.uk
6
2. Installation of System Components
With a new installation (i.e. where HouseMaster is not being added to an existing
HouseHeat system), proceed with installation of the system components in the
following sequence:
1. Mount and Install FHZ 1000 HouseMaster (see Section 2.1 below)
2. Install FHT 8V Wireless Valve Motors – if any – which are under the
direct control of the FHZ 1000 in the room/zone in which the FHZ
1000 is located (see Section 2.2 below)
3. Install FHT 80B Heating Controls (“Room Thermostats”) and FHT 8V
Wireless Valve Motors in other rooms/zones (according to the
separate User Manual supplied with the Room Thermostats/Valve
Motors (the “HouseHeat User Manual”)) (see Section 2.3 below)
4. Register all FHT 80B Heating Controls to the FHZ 1000 HouseMaster
(see Section 2.4 below)
2.1. Installation of FHZ 1000 HouseMaster
2.1.1 Selecting a suitable location
The FHZ 1000 is suitable for wall-mounting or freely placing on any suitable surface
in the room or zone. A wall-mount holder is included with the FHZ 1000. When
selecting a suitable location, the following points should be taken into consideration.
The location should be:
• Ideally centrally located in the room or zone in which the FHZ 1000 directly
controls the Valve Motors directly assigned to it;
• Easily accessible;
• Ideally at eye level;
• Not on a poorly thermally isolated external wall;
• Not in direct sunlight;
• Not adjacent to a window
• Not on large metal objects;
• Not subject to heat sources such as televisions, lamps, refrigerators etc.
2.1.2 Insertion of the 9-Volt battery / Input of date and time
The next step is to insert the 9-Volt
battery. Please familiarize yourself briefly
with the location of the operating keys
(see Section 3.1.1) before continuing.
Then proceed as follows:
•
•
•
Slide the battery cover off the
rear of the unit in the direction
of the arrow
Insert the battery into the
battery
compartment
and
connect the battery to the
battery terminals, taking care
to ensure correct polarity.
Close the battery cover.
www.house-intelligence.co.uk
7
After a short display test the current date and time should be entered:
Pleas
Input Year:
•
•
Use the control wheel on the FHZ 1000
to select the year
Confirm with the “PROG” key
Input Month:
•
•
Use the control wheel to select the
month
Confirm with the “PROG” key
Input Day:
• Use the control wheel to select the day
• Confirm with the “PROG” key
Input Hour:
• Use the control wheel to select the hour
• Confirm with the “PROG” key
Input Minute:
• Use the control wheel to select the
minute
• Confirm with the “PROG” key
www.house-intelligence.co.uk
8
•
•
Thereafter the FHZ 1000 displays “Auto”, “120” and the software version installed.
The FHZ 1000 then counts down in 1-second intervals and after 120 seconds is in
normal operating mode.
The display of the FHZ 1000 shows an automatically generated random security
code e.g. “1234”. This code will be required later in the installation. Please
make a note of this security code now in Appendix A of this User Guide in
the line: “ FHZ 1000 Valve Motor Code”
Note: The FHZ 1000 communicates the current date and time automatically once per day
to all FHT 80B Heating Controls registered to it. If it becomes necessary to correct the
current time, it is only necessary to make this correction on the FHZ 1000 – not separately
on each FHT 80B Heating Control. An explanation of how to do this is given in Section
4.3.
2.1.3 Placing / Wall-Mounting the FHZ 1000
Using the Integrated Support (i.e. for placing on a flat surface)
Remove the wall-mount holder from the rear of the FHZ 1000 unit by sliding this
downwards.
Fold out the integrated support.
Wall-Mounting
Proceed as follows to mount the FHZ 1000 on a wall:
• Remove the wall-mount holder from the rear of the unit by sliding this
downwards
• Offer up the wall-mount holder to the wall in a vertical orientation with the
rounded-off corners at the top
• Use e.g. a pencil to mark through the position of the mounting holes on to
the wall
• Remove the wall-mount holder and drill holes using a 6mm drill bit
sufficiently deep for the mounting screws/rawlplugs. Take care not to drill
into cables, wires and pipes which may be buried in the wall
• Place the supplied rawlplugs in the wall and mount the wall-mount holder
on the wall with the supplied mounting screws
2.2 Installation of FHT 8V Valve Motors
If this is a new HouseHeat installation, the FHT Valve Motors should now be
mounted on all thermostatic radiator valves which are to be directly controlled by the
FHZ 1000 in its own room/zone.
Please consult the Section in the separate HouseHeat User Manual “Mounting the
FHT 8V valve-operating mechanism” for instructions on how to mount the Valve
Motors on each thermostatic radiator valve.
www.house-intelligence.co.uk
9
Note: if the FHZ 1000 HouseMaster does not itself control any FHT 8V Valve
Motors (and therefore radiators) in the room in which it is located, please skip the
remainder of this section and continue with Section 2.3. In this case, the function to
control FHT 8V Valve Motors directly from the FHZ 1000 should be switched off as
described in Section 2.4.4. Thereafter, the FHZ 1000 displays the actual measured
room/zone temperature in its own zone rather than a commanded temperature.
If FHT 8V Valve Motors are to be controlled directly by the FHZ 1000 in its own
room/zone, then the security code must be transmitted from the FHZ 1000 to these
directly controlled FHT 8V valve motors as described in Section 4.4 “CodE”.
Once the installation of FHT 8V Valve Motors on all radiators in the same room/zone
as the FHZ 1000 is complete, and the security code from the FHZ 1000 has been
transmitted to all Valve Motors under its direct control in its own room/zone, the
number of radiators/Valve Motors being controlled directly by the FHZ 1000 must be
set as described in Section 4.6 “No H” (“Number of Valve Motors”).
The FHZ 1000 will now automatically control these radiators in its own zone using
default factory settings. Modification of these factory settings to suit your individual
requirements can be made as described in Section 3.2.
2.3 Installation of FHT 80B Heating Controls (Thermostats)
If this is a new HouseHeat installation, the FHT 80B Heating Controls and FHT 8V
Valve Motors should next be installed in all other rooms/zones which are to be
controlled by the HouseHeat system.
Please consult the HouseHeat User Manual supplied with the FHT 80B Heating
Controls for instructions on how to do this.
2.4 Establishing Communication between the FHZ 1000 and
the FHT 80B Heating Controls
2.4.1 How communication works
In the same way that the FHT 80B Heating Controls (Room Thermostats)
communicate wirelessly with each individual FHT 8V Valve Motor, the FHZ 1000
HouseMaster communicates wirelessly with each FHT 80B Heating Control in the
HouseHeat system. Each FHT 80B Heating Control is assigned a unique security
code within the HouseHeat installation which serves to differentiate each individual
Heating Control under the central control of the FHZ 1000 HouseMaster. In order for
the FHZ 1000 and each respective FHT 80B Heating Control to ‘understand’ each
other, each FHT 80B must be ‘registered’ to the FHZ 1000 HouseMaster by
synchronisation of these security codes between the FHT 80B Heating Controls and
the FHZ 1000.
The transmission of the security code from FHT 80B Heating Control to the FHZ
1000 HouseMaster occurs automatically: the wireless receiver built in to the FHZ
1000 is permanently active and each FHT 80B transmits its status with its individual
security code ‘signature’ to the FHZ 1000.
www.house-intelligence.co.uk
10
The FHZ 1000 HouseMaster creates an internal list with all security codes received
from the FHT 80B Heating Controls which the system user is able to view in order to
confirm which security codes are registered. In this way, each FHT 80B is registered
to the FHZ 1000 HouseMaster and wireless communication between the two is
achieved.
In order to register a FHT 80B Heating Control to the FHZ 1000, proceed with
installation of the system components in the following sequence:
1. Install FHZ 1000 HouseMaster
2. Install FHT 8V Wireless Valve Motors in the room/zone in which the
FHZ 1000 HouseMaster is located (if any)
3. Install FHT 80B Heating Controls (“Room Thermostats”) and FHT 8V
Wireless Valve Motors in other rooms/zones (according to the
separate instructions supplied with the Room Thermostats/Valve
Motors (the “HouseHeat User Manual”))
4. View the list of security codes received by the FHZ 1000 and confirm
these to register each FHT 80B Heating Controller with the FHZ 1000
In order to be certain that each FHT 80B Heating Control only works with the FHZ
1000 HouseMaster in your building (and not, for example, with that in a neighbouring
building), an FHT 80B Heating Control may only be registered to one FHZ 1000
HouseMaster unit. If it is subsequently required to register a FHT 80B Heating
Control to a different FHZ 1000 then the FHT 80B must first be de-registered with the
original FHZ 1000. An explanation of how to achieve this is given in Section ‘Cent’ of
the HouseHeat User Guide supplied with each FHT 80B Heating Control.
2.4.2 Before commencing registration of FHT 80B Heating Controls
Before registering FHT 80B Heating Controls to the FHZ 1000 HouseMaster unit, the
FHZ 1000 and all FHT 8V Valve Motors in its own zone under its direct control should
be installed and operational (Sections 2.1 and 2.2 above). The FHT 80B Heating
Controls in all other rooms/zones should also be operational, together with the FHT
8V Valve Motors under their respective control (Section 2.3 above).
Note: All FHT 80B Heating Controls automatically display their security code for
communication with the FHZ 1000 HouseMaster unit following the insertion of
batteries into the FHT 80B. This security code should be noted in the table in
Appendix A of this User Guide together with the room/zone in which the respective
FHT 80B Heating Control is located e.g. “Living Room”, “Code 0607”. If you
already have operational FHT 80B Heating Controls in your HouseHeat system,
simply remove the batteries and replace them to view this security code.
Note: As previously mentioned, if a FHT 80B Heating Control was previously
registered to another FHZ 1000 HouseMaster then it must first be de-registered in
order that it can be registered to a new FHZ 1000. Please see Section ‘CEnt’ of the
HouseHeat User Guide supplied with each FHT 80B Heating Control in order to
learn how to achieve this.
www.house-intelligence.co.uk
11
2.4.3 Registration of FHT 80B Heating Controls
If you have wall-mounted the FHZ 1000 HouseMaster, you may find it more
convenient to remove the FHZ 1000 from its wall mount while you register all the
FHT 80B Heating Controls to the FHZ 1000. To do this, proceed as follows:-
•
•
•
•
•
•
•
•
•
•
•
•
•
•
•
•
•
•
•
•
Depress the “→” key once
Use the selection wheel to select “Sonderfkt.” (“Special Functions”)
Depress the “→” key once
Use the selection wheel to select “H(eizungs)regler” (“Heating
Controls”)
Depress the “→” key once
Use the selection wheel to select “Hinzufügen” (“Add”)
Depress the “→” key once
You can now rotate the selection wheel on the FHZ1000 to scroll
through a list of the FHT 80B Heating-Control security codes received
by the FHZ 1000. (“H0” is the “internal” Heating Control which the FHZ
1000 uses to directly control Valve Motors in its own room/zone)
Refer to the Table of security codes you noted earlier in the table in
Appendix A of this Guide (see Section 2.4.2 above) and use the
selection wheel on the FHZ 1000 HouseMaster to select a security
code e.g. “Code 0607” (“Living Room”)
Depress the “MAKRO/OK” key once
Rotating the selection wheel will now scroll through a list of sample
room-name templates in German. However, these may easily be overwritten as required with English room/zone descriptions which may
then be assigned to the appropriate security code for the room/zone in
question. In order to do this:
Rotate the selection wheel and select any one of the German words
displayed (it does not matter which):
Depress the “MAKRO/OK” key once
A blinking cursor is shown at the end of the line in the display
Use the “←” and “→” keys to select the first character in the word
displayed.
Rotating the selection wheel enables that letter of the word to be
changed. Use the “☾☀” key to toggle between upper- and lower-case
letters. In this way, an appropriate room/zone description may be
entered (e.g. “Living Room”) for the security code in question
After all letters have been changed as required to enter a meaningful
room/zone description, this must be saved to memory. To do this,
depress the “MAKRO/OK” key once. The display briefly shows
“gespeich.” (“saved”)
The FHZ 1000 is now once again back at the “Heizungsregler”
(“Heating Control”) menu level (see bullet point 4 above), and
“Hinzufügen” (“Add”) is once again displayed, inviting you to register
another FHT 80B security code to the FHZ 1000.
Repeat the above process until all the rooms/zones (i.e. security
codes) you listed in Appendix A have been registered to the FHZ 1000
HouseMaster.
Once all security codes have been registered, depress the “←” key
three times
The FHZ 1000 is returned to normal operating mode
www.house-intelligence.co.uk
12
2.4.4 De-registration of FHT 80B Heating Controls
In order to de-register (remove) a FHT 80B Heating Control from the FHZ 1000,
proceed as follows:-
•
•
•
•
•
•
•
•
•
•
•
•
•
•
Depress the “→” key once
Use the selection wheel to select “Sonderfkt.” (“Special Functions”)
Depress the “→” key once
Use the selection wheel to select “H(eizungs)regler” (“Heating
Controls”)
Depress the “→” key once
Use the selection wheel to select “Löschen” (“Delete”)
Depress the “→” key once
You can now rotate the selection wheel on the FHZ1000 to scroll
through a list of the FHT 80B Heating Controls currently registered to
the FHZ 1000
Use the selection wheel to select the Heating Control to be removed
and depress the “MAKRO/OK” key once
The display briefly shows “gelöscht” (“deleted”)
Following this last step, the FHZ 1000 is returned to the
“Heizungsregler” (Heating Control) menu level
If it is necessary to de-register further Heating Controls, repeat the
above steps as required by using the selection wheel to select
“Löschen” (“Delete”) once again
If no more Heating Controls are to be de-registered, depress the “←”
key three times
The FHZ 1000 is returned to normal operating mode
Note: If the FHZ 1000 is not required to control any FHT 8V Valve Motors in its own
room/zone, then this function in the FHZ 1000 must be de-activated as mentioned
above in Section 2.2. In order to do this, proceed as described above to de-register a
.FHT 80B Heating Control, and after selecting “Löschen” (“Delete”), select the
“internal” Heating Control (“H0”) and delete it. FHZ 1000 HouseMaster will now show
the actual temperature of the room/zone in which it is located rather than a
commanded temperature. If it is necessary to re-instate the “internal” Heating Control
to enable FHT 8V Valve Motors to be directly controlled by the FHZ 1000 then the
“internal” Heating Control (“H0”) must be re-registered by following the procedure in
Section 2.4.3.
3. Operation of FHZ 1000 HouseMaster
3.1 Introduction
Before commencing programming with the FHZ 1000 please take a few moments to
familiarise yourself with the liquid-crystal display, control keys and the basics of
operating the unit as described in Section.3.1.1 Display and Operating Elements.
www.house-intelligence.co.uk
13
3.1.1 Display and Operating Elements
The FHZ 1000 has the following display elements and keys:
• A back-lit liquid-crystal display
• 6 operating keys
• A large selection wheel (top right)
Please note the meaning of the following
display symbols:
“Mo”: Monday
“Di”: Tuesday
“Mi”: Wednesday
“Do”: Thursday
“Fr”: Friday
“Sa”: Saturday
“So”: Sunday
3.1.2 FHZ 1000 Menu Structure
The FHZ 1000 has a menu-driven programming interface with several menu levels,
similar to a typical mobile telephone. The following schematic gives an overview over
the menu structure.
(Note: A number of menu options and functions are reserved for possible future
development and expansion of the FHZ 1000 to control other home-automation
functions. At the present time, only the heating-control functions (i.e. control of a
HouseHeat system) are operational.)
www.house-intelligence.co.uk
14
The keys underneath the display have the following meaning:
• “→”: Enter the menu currently selected with the selection wheel
• “MAKRO/OK”: Confirm/save an entry
• “←”: Return to the previous menu
The three keys on the right underneath the selection wheel are identical to those
found on the FHT 80B Heating Control and have the same function (refer to the
HouseHeat User Guide for more information).
3.1.2.1 Normal Operating Mode
In normal operating mode the FHZ 1000 HouseMaster displays the following
information:
•
•
•
•
•
Current time
Current date
Current commanded temperature
Operating mode
Temperature profile (only when the FHZ 1000 itself controls room/zone
temperature directly i.e. not through a FHT 80B Heating Control (Room
Thermostat)
In normal operating mode all settings for the room/zone in which the FHZ 1000 is
located may be adjusted.
Note: Wireless data exchange with other system components is only possible in
normal operating mode. For this reason, the FHZ 1000 automatically reverts to
normal operating mode 2 minutes after the last user input. Changes made by the
user to any settings which are not saved (“MAKRO/OK” key) will be lost when the
FHZ 1000 reverts to normal operating mode.
3.1.2.2 The Menu Level
The menu level (see schematic on previous page) gives access to the sub-menus
used for the programming of system parameters. Up to 15 separate FHT 80B
Heating Controls (i.e. 15 zones/rooms) and the special-functions menu
(“Sonderfunktionen”) are selectable by rotating the selection wheel at the menu level.
3.1.2.3 The Programming Level
The programming level is reached after selection of the FHT 80B Heating Control
(Zone/Room) or selection of a particular Special Function (“Sonderfunktion”). Once
the programming level is reached, the following parameters may be adjusted and set:
www.house-intelligence.co.uk
15
3.1.3 Display Contrast
The contrast of the display can be adjusted to optimally suit the prevailing lighting
conditions. In order to change the display contrast, do the following:
Depress the “→” key once
Use the selection wheel to select “Sonderfkt.” (“Special Functions”)
Depress the “→” key once
Use the selection wheel to select “Konfig.” (“Configuration”)
Depress the “→” key once
Use the selection wheel to select “Kontrast” (“Contrast”)
Depress the “→” key once
The display contrast may now be adjusted in steps from 1 to 8 using the
selection wheel
• Depress the “MAKRO/OK” key once to save your setting
• The display briefly shows “Gespeich.” (“Saved”)
• Depress the “←” key four times to return to normal operating mode
•
•
•
•
•
•
•
•
3.1.4 Display Illumination
The background illumination of the FHZ 1000 display can also be set. The following
settings are available:
• “Off”: the background illumination is extinguished
• ‘Auto”: the background illumination switches on automatically whenever a
key is pressed and extinguishes approximately 15 seconds after the last
key press
• “On’: the background illumination is permanently switched on if a mains
cable is connected (Option not available in the U.K.). When operating on
battery power, background illumination defaults to “Auto” mode
In order to change the display illumination, do the following:
Depress the “→” key once
Use the selection wheel to select “Sonderfkt.” (“Special Functions”)
Depress the “→” key once
Use the selection wheel to select “Konfig.” (“Configuration”)
Depress the “→” key once
Use the selection wheel to select “Beleucht.” (“Illumination”)
Depress the “→” key once
The display illumination may now be set using the selection wheel to On,
Off or Auto
• Depress the “MAKRO/OK” key once to save your setting
• The display briefly shows “Gespeich.” (“Saved”)
• Depress the “←” key four times to return to normal operating mode
•
•
•
•
•
•
•
•
3.1.5 Key Lock
In order to prevent unintentional adjustment of any settings on the FHZ 1000 e.g. by
children, a key-lock function is provided for both the selection wheel and operating
keys. In order to activate the key lock, press the “FUNKTION” and “PROG” keys
simultaneously until a key symbol appears in the display. In order to remove the key
lock, press the “FUNKTION” and “PROG” keys simultaneously until the key symbol
disappears.
www.house-intelligence.co.uk
16
3.2 Programming of the HouseHeat System
All necessary settings for operation of the FHZ 1000 HouseMaster and FHT 80B
Heating Controls (Room Thermostats) have been made in the factory using a
standard programme. All settings are under user control and may be changed by the
user to suit individual circumstances and personal preferences in order to create a
custom heating programme ideally suited to your requirements. In addition to making
changes to settings for the room/zone in which the FHZ 1000 HouseMaster is
located, settings for all other rooms/zones may also be adjusted/programmed using
the FHZ 1000 HouseMaster.
1. To change settings for the room/zone in which the FHZ 1000 is located (and in
which it directly controls the FHT 8V Valve Motors mounted on each radiator)
please proceed as described in Section 3.2.1.
2. To change settings for any other room/zone, proceed as follows to select the
room/zone for which you wish to modify settings:
Depress the “→” key once
Use the selection wheel to select the room/zone
Depress the “→” key once
Make adjustments to settings as described in Sections 3.2.1 through 3.2.6
below. Adjustment of settings is made in exactly the same way as it is on
each individual FHT 80B Heating Control as described in the “HouseHeat
User Guide” supplied with each FHT 80B Heating Control using the 3 keys
located on the right side of the FHZ 1000 unit below the selection wheel.
• After completion of the settings adjustment these should be saved by
pressing the “MAKRO/OK” button
• The display briefly shows “Gespeich.”
• Depress the “←” key twice to return to normal operating mode
•
•
•
•
The adjustments which may be made are described in the next section.
3.2.1 Operating Modes
Like the FHT 80B Heating Controls, the FHZ 1000 HouseMaster also has three
operating modes which may be selected using the “Funktion” key:
3.2.1.1 Automatic Mode
In Automatic Mode (Display: “Auto”), the room/zone temperature follows the specified
heating programme for each day of the week.
• The temperature plan for the current day of the week is indicated by a profile in
the lower part of the display
• The symbols “☾” and “☀” indicate whether the energy-saving temperature (“☾”) or
the comfort temperature (“☀”) is currently the active commanded temperature
• If it is desired to temporarily change the current commanded temperature this can
quickly and easily be achieved by rotating the selection wheel to set a new
commanded temperature (“manual override”). At the next temperature switching
time occurring in the heating plan for that zone (from comfort temperature to
energy-saving temperature or vice versa), the FHZ 1000 automatically returns to
automatic mode.
• The procedure for making changes to the settings for this mode is described in
Section 3.2.3 below.
www.house-intelligence.co.uk
17
3.2.1.2 Manual Mode
In Manual Mode (Display: “Manu”) the FHZ 1000 remains constantly set to the
manually commanded temperature.
No automatic/programmed temperature
changes occur. This mode corresponds to a traditional thermostat.
• Use the “FUNKTION” key to select manual mode (Symbol “Manu” in the display)
• Use the selection wheel to set the desired temperature
3.2.1.3 Holiday/Party Mode
In this mode (indicated by a suitcase symbol in the display) the temperature remains
set to a constant value for a pre-defined period (for example the duration of a party or
a holiday). At the end of the time period, the FHZ 1000 returns automatically to the
Automatic mode described in 3.2.1.1.
• After selecting this operating mode (suitcase symbol in the display) with the
“FUNKTION” key, the time period is defined for which a constant temperature is
required. For the first 24 hours, the start and end times of the period may be
specified in half-hour intervals (suitable for a party). Thereafter, the end time is
specified as a number of days (suitable for a holiday). The day of return from the
holiday should be entered. Starting from 0:00 (midnight) on this day, the usual
heating programme will re-commence.
• After input of the desired time period confirm your entry by pressing the “PROG”
key.
• Use the selection wheel to select the desired temperature for the duration of the
party or holiday
By selecting a different operating mode with the “FUNKTION” key the Holiday/Party
mode can be terminated at any time.
3.2.2 Defining the Comfort- and Energy-Saving Temperatures
When the Automatic operating mode is active, automatic switching occurs at
specified times from the energy-saving temperature to the comfort temperature, and
vice versa. This is shown on the lower part of the FHZ 1000 display by a time profile
indicating when in the course of the day the ‘active’ (target) temperature is the
comfort temperature, and when it is the energy-saving-temperature. A sun symbol in
the display symbolises that the comfort temperature is active; a moon symbol
indicates that the FHZ 1000 is controlling the zone or room temperature down to the
energy-saving temperature. In order to change the comfort- and energy-saving
temperatures proceed as follows:
www.house-intelligence.co.uk
18
• Depress the “☾☀” key for more than three seconds
• The following is shown in the display with a blinking sun symbol:
• Use the selection wheel to set the desired comfort temperature
• Press the “☾☀” key briefly
• The following is shown in the display with a blinking moon symbol:
• Use the selection wheel to set the desired energy-saving temperature
• Press the “☾☀” key briefly. The settings are saved and the FHZ 1000 returns to
normal operating mode.
3.2.3 Creation of a Weekly Temperature Programme
The automatic switching times between comfort temperature and energy-saving
temperature can be set differently for each day of the week and therefore customised
to suit your personal requirements.
In the following, please note the meaning of the following display symbols:
“Mo”:
“Di”:
“Mi”:
“Do”:
“Fr”:
“Sa”:
Monday
Tuesday
Wednesday
Thursday
Friday
Saturday
“So”: Sunday
• Press the “PROG” key once.
• The display shows the following:
www.house-intelligence.co.uk
19
• “H0” in the display indicates that the settings currently being programmed relate to
the FHZ 1000 itself; “H1”, “H2” etc. indicates that one of the FHT 80B Heating
Controllers (Room Thermostats) is being programmed.
• Use the select wheel to select the temperature for which the time programme is to
be modified. Each day of the week may be programmed individually; alternatively
days may be programmed in ‘blocks’ as follows:
a) Week days (Monday – Friday)
b) The weekend (Saturday – Sunday)
c) All days together (Monday – Sunday)
• After selection of the day or days to be programmed, confirm your selection by
pressing the “PROG” key
• Now the first switching time to switch to the Comfort Temperature is displayed:
• Use the select wheel to define the start time at which the room/zone temperature
should be regulated to the Comfort Temperature
• The time profile at the bottom of the display reflects your selection
• Confirm the start time chosen by pressing the “PROG” key
• Now the first switching time to switch to the Energy-Saving Temperature appears
in the display:
• Use the select wheel to define the start time at which the room/zone temperature
should be reduced to the Energy-Saving Temperature
• The time profile at the bottom of the display reflects your selection
• Confirm the start time chosen by pressing the “PROG” key
• The above steps are repeated to define the second switching time for the Comfort
Temperature and the Energy-Saving Temperature respectively (if required)
• If no switching time is required, rotate the selection wheel until dashes appear.
• All selections should be confirmed by pressing the “PROG” key
• After programming the second switching time for the Energy-Saving Temperature,
the FHZ 1000 reverts to normal operating mode
The time profile in the lower section of the display reflects what has been
programmed by the user. In this way, the effect of user entries on the time-switching
profile is immediately apparent. It should be noted, however, that the temperature
(Comfort- or Energy-Saving-) with which the previous day ends is continued into the
following day.
For example, if the previous day finishes with the Comfort
Temperature being the active mode, this will continue to be the active mode from the
beginning of the following day. During programming this is not indicated by the timeswitching profile in the bottom of the display.
www.house-intelligence.co.uk
20
3.2.4 Switching Between Comfort- and Energy-Saving Temperature
If the temperature requirement for a room temporarily changes, it is possible to
temporarily over-ride the temperature currently being commanded by the automatic
programme by rotating the selection wheel. It is similarly possible to switch manually
at any time from the Comfort Temperature to the Energy-Saving Temperature and
vice versa by pressing the “☾☀” key. These manual changes will be over-ridden at
the next automatically programmed temperature-switching time.
3.2.5 Heating Pause (Summer setting)
if the heating source (e.g. the boiler) is switched off in summer, the life of the
batteries in the FHT 8V Valve Motors may be extended. In order to do this:
• Press the “FUNKTION” key until the Manual Mode (“Manu”) is selected
and appears in the display
• Rotate the selection wheel to the right (clockwise) until “ON” appears in the
display
• The radiator valves are now open and remain in this position, minimising
valve activity and thus extending battery life
• The weekly de-calcification cycle continues to be performed to guard
against sticking radiator valves
3.2.6 Closing the Radiator Valves (No heating required)
This operating mode should be selected when no heating at all is required in a room
or zone.
• Press the “FUNKTION” key until the Manual Mode (“Manu”) is selected
and appears in the display
• Rotate the selection wheel to the right (clockwise) until “OFF” appears in
the display
• The radiator valves will be closed and remain in this position
• The radiator valves will only automatically be opened when the danger of
frost is present (room/zone temperature less than 5oC)
• The weekly de-calcification cycle continues to be performed to guard
against sticking radiator valves
3.2.7 Changing the name of a Room/Zone
In order to change the name of a FHT 80B Heating Controller (i.e. of a Room/Zone),
proceed as follows:
•
•
•
•
•
•
•
Depress the “→” key once
Use the selection wheel to select “Sonderfkt.” (“Special Functions”)
Depress the “→” key once
Use the selection wheel to select “H(eizungs)regler” (“Heating
Controls”)
Depress the “→” key once
Use the selection wheel to select “Namen änd.” (“Change Name”)
Depress the “→” key once
www.house-intelligence.co.uk
21
•
•
•
•
•
•
•
You can now rotate the selection wheel on the FHZ1000 to scroll
through a list of the FHT 80B Heating-Controls registered to the FHZ
1000. (“H0” is the “internal” Heating Control which the FHZ 1000 uses
to directly control Valve Motors in its own room/zone)
Select the Room/Zone whose name is to be changed
Depress the “→” key once
The cursor blinks at the beginning of the name to be changed
Use the “←” and “→” keys to select the character in the word displayed
which is to be changed
Rotating the selection wheel enables that letter of the word to be
changed. Use the “☾☀” key to toggle between upper- and lower-case
letters.
After all letters have been changed as required, this must be saved to
memory. To do this, depress the “MAKRO/OK” key once. The display
briefly shows “Gespeich.” (“saved”)
Depress the “←” key four times to return to normal operating mode
3.2.8 Changing the Security Code of Room/Zone
In order to change the security code of a room/zone (.i.e. of the associated FHT 80B
Heating Control), proceed as follows:
•
•
•
•
•
•
•
•
•
•
•
•
•
•
Depress the “→” key once
Use the selection wheel to select “the FHT 80B (i.e. room/zone) whose
code is to be changed
Depress the “→” key once
Press and hold the “PROG” key until “Sond” appears in the display and
then release the key
Use the selection wheel to select “CodE” (“Change Code”)
Confirm with the “PROG” key
The display shows “CodE 1” and a two-digit number. This number is
the first part of the currently active security code
Use the selection wheel to select the first part of the new security code
(00 to 99)
Confirm with the “PROG” key
The display shows “CodE 2” and a two-digit number. This number is
the second part of the currently active security code
Use the selection wheel to select the second part of the new security
code (00 to 99)
Confirm with the “PROG” key
The display briefly shows “Gespeich.” (“Saved”)
Depress the “←” key twice to return to normal operating mode
Note: If a room/zone security code is changed as described in this section, then
the same change to the security code must also be made to the FHT 80B Heating
Control associated with that room/zone. Please see the “HouseHeat User Guide”
supplied with the FHT 80B Heating Control (Room Thermostat) for further
information on how to achieve this.
www.house-intelligence.co.uk
22
3.3 Status Display
By means of the Special Function “Statusanzeige” (“Status Display”), the following
FHT 80B Heating Control parameters can be displayed on the FHZ 1000 liquidcrystal display:
• Current room/zone temperature
• Security code
In order to do this, proceed as follows:
•
•
•
•
•
•
•
•
Depress the “→” key once
Use the selection wheel to select “Sonderfkt.” (“Special Functions”)
Depress the “→” key once
Use the selection wheel to select “H-Regler” (“Heating Controls”)
Depress the “→” key once
Use the selection wheel to select “Statusanz.” (“Status Display”)
Depress the “→” key once
Rotating the selection wheel on the FHZ1000 scrolls through a list of
the FHT 80B Heating-Controls registered to the FHZ 1000. (“H0” is the
“internal” Heating Control which the FHZ 1000 uses to directly control
Valve Motors in its own room/zone)
For each FHT 80B Heating Control (i.e. room/zone), the display shows
the following:
o Right side: current room/zone temperature (“—“ if no signal
reception from that FHT 80B Heating Control)
o Left side: Security code of the FHT 80B under consideration,
together with “H1”, “H2” etc. “H0” represents the FHZ 1000
itself (in its capacity as heating control for its own room/zone)
o Bottom line of display: name of the room/zone
3.4 Alarms
3.4.1 Alarm Conditions and Prioritisation
In the event of system malfunction the FHZ 1000 issues a warning alarm to the user.
Alarms are repeated at 10-minute intervals i.e. it takes a maximum of 10 minutes
before the FHZ 1000 reports an alarm event or cancels an alarm. Up to four different
alarm messages may be shown on the FHZ 1000 display. These are:
• ”Batterie” – the battery of a particular system component is empty
• “Untertemp” – The commanded temperature has not been achieved in
a room/zone
• “K. Empfang” – No wireless signal reception of the signal from one or
more FHT 80B Heating Controls
• “ext-Alarm” (external alarm - reserved for later use, currently unused)
The alarm is given both acoustically by means of an audible tone and also visually on
the FHZ 1000 display. When an alarm is given, an exclamation mark is shown in the
bottom left-hand corner of the display as shown below:
www.house-intelligence.co.uk
23
The acoustic alarm is sounded by means of the integrated buzzer. For each of the
four alarm conditions (low battery, low temperature, no wireless signal reception,
external alarm), three different priorities may be set: These three priorities are
ranked as follows:
Priority 0:
Priority 1:
Priority 2:
No acoustic alarm
Acoustic alarm given only between the hours of 08:00 to 23:00
Acoustic alarm always given
The alarm conditions “low battery”, “low temperature” and “no wireless signal
reception” are set in the factory to have Priority 1 by default.
In order to change the priorities assigned to each alarm condition, proceed as
follows:
•
•
•
•
•
•
•
•
Depress the “→” key once
Use the selection wheel to select “Sonderfkt.” (“Special Functions”)
Depress the “→” key once
Use the selection wheel to select “Konfig” (“Configuration”)
Depress the “→” key once
Use the selection wheel to select “Alarmprio.” (“Alarm Priorities”)
Depress the “→” key once
The following is shown in the display:
•
Use the selection wheel to select the desired priority for the lowtemperature alarm condition
Press the “MAKRO/OK” key once
The following is shown in the display:
•
•
•
Use the selection wheel to select the desired priority for the alarm
condition “no wireless signal reception”
www.house-intelligence.co.uk
24
•
•
Press the “MAKRO/OK” key once
The following is shown in the display:
•
•
•
Use the selection wheel to select the desired priority for the “battery
empty” alarm condition
Press the “MAKRO/OK” key once
The following is shown in the display:
•
•
•
•
•
•
•
•
•
•
•
(This should not be changed from the default value (‘Priority 0’))
Press the “MAKRO/OK” key once
The display briefly shows “Gespeich.” (“Saved”)
Press the “←” key three times to return to normal operating mode
3.4.2 Alarm Acknowledgement
In order to acknowledge an alarm, proceed as follows:
•
•
•
•
•
Depress the “→” key once
Use the selection wheel to select “Sonderfkt.” (“Special Functions”)
Depress the “→” key once
Use the selection wheel to select “Alarme” (“Alarms”)
Depress the “→” key once
A list of active alarms appears (if no alarm is active, the display shows “Alles OK”
(“All OK”). Rotating the selection wheel allows the user to scroll through the list of
currently active alarms. The alarm condition and room/zone description where the
alarm occurred are alternately shown in the bottom left-hand corner of the FHZ 1000
display. In the following example, the battery is empty in the FHT 80B heating
Control located in the W.C. area. The following displays appear alternately:
www.house-intelligence.co.uk
25
• In order to acknowledge the alarm, press the “MAKRO/OK” key
• The exclamation mark is replaced by a tick:
• Press the “←” twice to return to normal operating mode
Note: If no acknowledgement of the alarm is received within 10 minutes of the alarm
condition occurring, the message “Alarmwahl” appears in the display as a reminder to
acknowledge the alarm.
After the alarm condition has successfully been dealt with, all alarms are
automatically acknowledged (a tick is displayed instead of an exclamation mark and
the acoustic alarm tone is silenced). If the alarm condition is not dealt with, the
message “Alarmwahl” appears again after a time interval of ten minutes.
3.4.3 Low-Temperature Alarm
If the room/zone temperature falls below the programmed minimum temperature (see
below), the FHZ 1000 gives an alarm as described above.
Note: The low-temperature alarm is first given approximately 1.5 hours after the last
programmed automatic temperature change (e.g. from Comfort Temperature to
Energy-Saving Temperature).
The minimum temperature is always defined relative to the current commanded
temperature. A maximum temperature difference from the commanded temperature
can be specified. If this maximum difference is exceeded, the low-temperature alarm
is given. The temperature difference can be a value in the range from 1oC to 5oC.
For example, if the Comfort Temperature for a room/zone is set to 20oC and a
maximum-permissible temperature difference of 5oC has bee programmed, then a
low-temperature alarm will be given if the temperature falls below 15oC. Similarly, if
the heating programme created for the room/zone switches the commanded
temperature to an Energy-Saving Temperature of 15oC, then the low-temperature
alarm will be given if the temperature falls below 10oC. The maximum-permissible
temperature difference is programmed as follows:
www.house-intelligence.co.uk
26
3.4.3.1 Programming the Low-Temperature Condition - FHZ 1000
To define the maximum amount that the room/zone temperature may fall below the
commanded temperature before the low-temperature alarm is given for the FHZ 1000
HouseMaster (i.e. in the room/zone which it controls directly, if any):
• Press and hold the “PROG” key until “Sond” (“Special Functions”) appears in the
display, then release the key
• Use the selection wheel to select the Special Function “t-AL” (“Alarm Temperature
Difference”)
• Confirm your selection with the “PROG” key
• Use the selection wheel to set the desired temperature difference (as described in
Section 3.4.3 above)
• Confirm your selection with the “PROG” key
• The FHZ 1000 is returned to normal operating mode
3.4.3.2 Programming the Low-Temperature Condition – FHT 80B
To define the maximum amount that the room/zone temperature may fall below the
commanded temperature before the low-temperature alarm is given for each FHT
80B Heating Control (Room/Zone Thermostat):
•
•
•
•
•
•
•
•
•
Depress the “→” key once
Use the selection wheel to select the FHT 80B (i.e. room/zone) whose
low-temperature condition is to be specified
Depress the “→” key once
Press and hold the “PROG” key until “Sond” (“Special Functions”)
appears in the display and then release the key
Use the selection wheel to select “t-AL” (“Alarm Temperature
Difference”)
Confirm with the “PROG” key
Use the selection wheel to set the desired temperature difference (as
described in Section 3.4.3 above)
Confirm your selection with the “PROG” key
Depress the “←” key twice to return to normal operating mode
4. Internal Special Functions
The ‘Internal Special Functions’ menu refers to those special functions pertaining to
the FHZ 1000 HouseMaster itself.
The Internal Special Functions are as follows:
(1)
CALC
(2)
o
(3)
dAt:
C/ oF
Setting the weekly time at which the de-calcification operation
is performed
Selection of preferred temperature units for display (Celcius or
Fahrenheit)
Setting system date and time
www.house-intelligence.co.uk
27
(4)
CodE
(5)
t-AL
(6)
no H
(7)
(8)
(9)
(10)
SynC
tESt
StEL
OFFS
Changing the security code for wireless communication with
FHT 8V Valve Motors and setting the code of new Valve
Motors
Programming of minimum temperature for low-temperature
alarms
Specification of the number of FHT 8V Wireless Valve Motors
controlled directly by the FHZ 1000 in its own room/zone and
updating of the Valve Motors with this information
Re-synchronisation of the FHT 8V Motor Valves
Function for testing wireless communication of the system
Display of Radiator Valve Position
Function to compensate for uneven heat output from different
radiators in the same room/zone
4.1 “CALC”: Setting the Day and Time for De-Calcification
Once per week the radiator valve is automatically opened and closed completely.
This prevents the valve sticking owing to the build up of lime scale in the valve. The
time at which this operation is performed can be changed using the “CALC” function.
•
•
•
•
Press and hold the “PROG” key until “Sond” (“Special Functions”) is displayed
Use the selection wheel to select the function “CALC”
Confirm your selection with the “PROG” key
Use the selection wheel to select the week day as follows:
“Mo”:
“Di”:
“Mi”:
“Do”:
“Fr”:
“Sa”:
“So”:
Monday
Tuesday
Wednesday
Thursday
Friday
Saturday
Sunday
• Confirm your selection with the “PROG” key
• Use the selection wheel to specify the time of day
• Confirm your selection with the “PROG” key
4.2 “oC/ oF”: Selection of Preferred Temperature Units
The preferred units for display of temperature information, Celcius or Fahrenheit, can
be selected with this function:
•
•
•
•
•
Press and hold the “PROG” key until “Sond” (“Special Functions”) is displayed
Use the selection wheel to select the function “oC/ oF”
Confirm your selection with the “PROG” key
Use the selection wheel to select “oF” or “oC”
Confirm your selection with the “PROG” key
www.house-intelligence.co.uk
28
4.3 “dAt”: Setting System Date and Time
•
•
•
•
•
Press and hold the “PROG” key until “Sond” (“Special Functions”) is displayed
Use the selection wheel to select the function “dAt”
Confirm your selection with the “PROG” key
Further steps for this function are as described in Section 2.1.2
Changing the date and time on the FHZ 1000 updates date and time on all
registered FHT 80B Heating Controls (Room Thermostats)
4.4 “CodE”: Changing the Security Code
As described earlier in this Guide, the HouseHeat system is protected against
interference from other wireless systems by means of a two-part security code. Each
of the two parts can take 100 different values, so that in total 100 x 100 = 10,000
different security codes are available for use. In order that the FHZ 1000 and the FHT
8V Wireless Valve Motors which are controlled directly by the FHZ 1000 in its own
room/zone may communicate with each other, all units in the same zone/room (FHZ
1000 and FHT 8V Valve Motors) must use the same security code. In order to
achieve this, proceed as follows:
•
•
•
•
•
•
•
•
•
•
Press and hold the “PROG” key until “Sond” (“Special Functions”) is displayed
Use the selection wheel to select the function “oCodE”
Confirm with the “PROG” key
“CodE 1” appears in the display together with a 2-digit number
This number is the first part of the currently active security code
Use the selection wheel to select the first part of the new code (00 to 99)
Confirm with the “PROG” key
“CodE 2” appears in the display together with a 2-digit number
This number is the second part of the currently active security code
Use the selection wheel to select the second part of the new code (00 to 99)
Confirm with the “PROG” key
“CodE SynC 01” appears in the display
The first FHT 8V Valve Motor under direct control of the FHZ 1000 (in the same
room/zone as the FHZ 1000) should now be synchronised to use the new security
code:
• Remove the battery cover from the first FHT 8V Valve Motor by sliding it down
• Press the button on the FHT 8V Valve Motor for approximately 3 seconds until 3
beeps are heard. The Valve Motor is now ready to receive the new code and its
display shows “AC”
• Press the “PROG” key on the FHZ 1000 to initiate transmission of the new
security code to the Valve Motor
• The FHT 8V Valve Motor acknowledges successful acquisition of the new security
code with a beep
• Replace the battery cover
• The first time the FHT 8V Valve Motor receives a regular operational wireless
transmission from the FHZ 1000 HouseMaster after this synchronisation
operation, it beeps once more to confirm that this was received successfully
The above steps should be repeated for each FHT 8V Valve Motor (radiator) in the
room/zone in which the FHZ 1000 is located (and which is directly controlled by the
www.house-intelligence.co.uk
29
FHZ 1000 rather than by a FHT 80B Heating Control). After all FHT 8V Valve Motors
have been successfully synchronised, the FHZ 1000 returns to normal operating
mode.
Note: When more than one FHT 8V Valve Motor is directly controlled by the FHZ
1000 HouseMaster in the room/zone in which it is located, you should make a note
of which Valve Motor belongs to which radiator i.e. which number it has. If there is
a problem with the synchronisation of the security code on the Valve Motor with the
code on the FHT 1000, then the code can then easily be synchronised again.
To repeat the above steps for further FHT 8V Valve Motors:
• Proceed as described above but jump over the previously coded Valve Motors (so
instead of “Code SynC 01”, you see “Code SynC 02”, “Code SynC 03” etc.)
• If the display shows the number of a Valve Motor which has not yet received the
security code, remove the battery cover on the FHT 8V Valve Motor and press the
button on the Valve Motor for approximately 3 seconds until 3 beeps are heard.
The Valve Motor is now ready to receive the new code and its display shows “AC”
• Transmit the security code from the FHZ 1000 to the Valve Motor by pressing the
“PROG” key on the FHZ 1000 as before
4.5 “t-AL”: Programming of Low-Temperature Alarm
Please refer to Section 3.4.3 where this function is fully described.
4.6 “no H”: Specification of Number of FHT 8V Valve Motors
This function allows the user to specify how many FHT 8V Valve Motors are directly
controlled by the FHZ 1000 HouseMaster in its own room/zone (rather than indirectly
through the FHT 80B Heating Controls (Room Thermostats)).
If a new FHT 8V Valve Motor is added, it is important that this has the same security
code as the FHZ 1000, otherwise wireless communication between the two units will
not be possible. To set the total number of FHT 8V Valve Motors under the direct
control of the FHZ 1000 in its own room/zone, proceed as follows:
Press and hold the “PROG” key until “Sond” (“Special Functions”) is displayed
Use the selection wheel to select the function “no H”
Confirm with the “PROG” key
Use the selection wheel to select the number of radiators (i.e. the number of FHt
8V Valve Motors) in the room/zone where the FHZ 1000 is located
• Confirm with the “PROG” key
• “Code SynC 01” appears in the display
•
•
•
•
Now the first Valve Motor will be coded. The following steps should be repeated for
each Valve Motor in the room/zone of the FHZ 1000:
• Remove the battery cover from the first FHT 8V Valve Motor by sliding it down
• Press the button on the FHT 8V Valve Motor for approximately 3 seconds until 3
beeps are heard. The Valve Motor is now ready to receive the new code and its
display shows “AC”
www.house-intelligence.co.uk
30
• Press the “PROG” key on the FHZ 1000 to initiate transmission of the new
security code to the Valve Motor
• The FHT 8V Valve Motor acknowledges successful acquisition of the new security
code with a beep
• Replace the battery cover
• The first time the FHT 8V Valve Motor receives a regular operational wireless
transmission from the FHZ 1000 HouseMaster after this synchronisation
operation, it beeps once more to confirm that this was received successfully
Repeat the above steps for each additional Valve Motor in the room/zone (“Code
SynC 02” displayed…). Once all Valve Motors have been coded, the FHZ 1000
automatically reverts to normal operating mode.
Note: To skip Valve Motors which have already been coded, press the “PROG” key
several times until the number of the Valve Motor to be coded is shown (e.g. “Code
SynC 03”, “Code SynC 04” etc. where “03”, “04” etc. is the number of the valve
motor in the room/zone.
4.7 “SynC”: Re-synchronisation of Valve Motors
This function causes the FHZ 1000 to command all FHT 8V Valve Motors in the
same room/zone to commence re-synchronisation with the FHZ 1000 over a twominute period. Thereafter, normal operational wireless signal transmission recommences and the Valve Motors beep when they receive the first regular signal
following the synchronisation operation.
• Press and hold the “PROG” key until “Sond” (“Special Functions”) is displayed
• Use the selection wheel to select the function “SynC”
• Confirm with the “PROG” key
The display shows “Sync” and “120”. The FHZ 1000 now counts down in onesecond intervals after which normal operation is resumed.
4.8 “tESt": Testing System Wireless Communication
The ”test” function may be used to check whether all FHT 8V Valve Motors correctly
receive the wireless signal from the FHZ 1000 HouseMaster. The FHT 8V Valve
Motors signal correct reception of the wireless signal from the FHZ 1000 with a beep.
The selection wheel is used to select which Valve Motor or Valve Motors is/are to be
tested at any given time. A ‘0’ shown in the FHZ 1000 display indicates that all Valve
Motors are to be tested simultaneously. Other numbers (1,2,3…) indicate that only
that particular Valve Motor/radiator is to be tested. The timer in the upper-left section
of the display counts down to the time at which the next test signal will be sent.
•
•
•
•
•
Press and hold the “PROG” key until “Sond” (“Special Functions”) is displayed
Use the selection wheel to select the function “tESt”
Confirm with the “PROG” key
Use the selection wheel to select the Valve Motor(s) to be tested
Pressing “PROG” again terminates the test function and returns the FHZ 1000 to
normal operating mode
www.house-intelligence.co.uk
31
4.9 “StEL”: Display of Radiator-Valve Position
This function enables the FHZ 1000 to display the percentage of radiator-valve
opening (where fully open corresponds to 100% and fully closed to 0%) for the
radiator valve in the room/zone in which the FHZ 1000 is located and directly
controlling FHT 8V Valve Motors:
Press and hold the “PROG” key until “Sond” (“Special Functions”) is displayed
Use the selection wheel to select the function “StEL”
Confirm with the “PROG” key
The FHZ 1000 display shows the percentage opening of radiator valves in its
room/zone
• Press the “PROG” key again to terminate the function and return to normal
operating mode
•
•
•
•
4.10 “OFFS”: Radiator Offset Bias
When more than one radiator is being controlled directly by the FHZ 1000 in the
room/zone in which it is located, it is possible that these radiators have unequal heat
output. The reason for this might be varying flow characteristics of each individual
radiator valve or radiators of different/inappropriate dimensions. It may be possible
and appropriate to correct this problem by applying a bias (offset) to the heat output
from different radiators so that for the same percentage valve opening, the heat
output from each radiator is the same. A positive offset means that more heat will be
output from the radiator; a negative offset means that less heat will be output.
•
•
•
•
•
•
•
Press and hold the “PROG” key until “Sond” (“Special Functions”) is displayed
Use the selection wheel to select the function “OFFS”
Confirm with the “PROG” key
Use the selection wheel to select the Valve Motor/radiator to be corrected
Confirm with the “PROG” key
Use the selection wheel to set the amount of offset required
Confirm with the “PROG” key
It may be necessary to repeat the above procedure iteratively until the heat output
from each radiator appears equal.
5. Replacing the Battery
5.1 FHZ 1000 HouseMaster
If the symbol appears in the display then the battery needs replacing:
5.1.1 Changing the battery when the FHZ 1000 is not wall-mounted
• Open the battery compartment by sliding the cover off in the direction of the arrow
• Remove the used battery
• Insert a new 9-Volt battery, taking care to ensure the battery is connected with
correct polarity
• Close the battery cover
www.house-intelligence.co.uk
32
5.1.2 Changing the battery when the FHZ 1000 is wall-mounted
• Remove the FHZ 1000 from the wall mount
• Remove the used battery
• Insert a new 9-Volt battery, taking care to ensure the battery is connected with
correct polarity
• Close the battery cover
After a short display test, the system date and time should be re-entered as
described in Section 2.1.2.
5.2 FHT 8V Valve Motor
If the batteries need replacing in one of the FHT 8V Valve Motors, the low-battery
symbol will appear in the Valve Motor display. The Valve Motor sounds a warning
beep approximately every two minutes for one hour. This is repeated three times per
day.
• Remove the battery cover of the Valve Motor by sliding downwards
• Remove the used batteries
• Wait until all segments of the liquid-crystal display are extinguished. This can be
achieved more quickly by pressing and holding the button on the Valve Motor
• Insert the new batteries in the Valve Motor. Note: take care to ensure correct
polarity as otherwise damage to sensitive electronic components could
occur
• The display shows ‘C1’ and then a 2-digit number, followed by ‘C2’ and another 2digit number (the 2 numbers together represent the current saved security code of
the Valve Motor)
• The Valve Motor beeps and the display shows “A1”
• The Valve Motor tests the travel of the actuating pin of the radiator valve to check
full opening
• The Valve Motor displays “A2”
• Now press the button on the Valve Motor once briefly
• The display shows “A3” and the valve motor closes the valve fully
• The antenna symbol blinks in the display and the display shows “0%”
• The first operational wireless signal received from the FHZ 1000 is confirmed by a
beep and thereafter the antenna symbol is constantly displayed
• Replace the battery cover
www.house-intelligence.co.uk
33
6. Troubleshooting
The FHZ 1000 HouseMaster and FHT 8V Valve Motor indicate abnormal system
conditions or operation by means of acoustic and visual warnings. The following
table gives an overview of the meaning of warnings, and provides suggestions for
solving associated problems:
Error Message
LowBat-Symbol in display
Possible Cause
9 Volt battery empty
Key symbol in display. Key
entry not possible.
Warning tone sounds,
exclamation mark in
display
Low-temperature alarm
given
Key lock is active
A FHT 80B Heating
Control cannot be
registered to the FHZ 1000
(no entry appears in the list
of heating Controls on the
FHZ 1000)
A tick symbol appears in
the lower section of the
display
An alarm has been
triggered
Open window, defective
valve motor, radiator
valve stuck, hot-water
supply temperature too
low etc.
This Heating Control
has previously been
registered to another
FHZ 1000
An alarm has been
acknowledged but the
alarm cause still exists
Solution
Replace battery - see Section
5.1
Remove key lock - see Section
3.1.5
Acknowledge alarm and solve
alarm cause - see Section 3.4
Increase permitted deviation
from commanded temperature
(Section 3.4.3) or deal with
other cause
De-register the Heating Control
in order that it may be
registered to the new FHZ 1000
(Section ‘CEnt’ of the
HouseHeat User Guide supplied
with each Heating Control)
Deal with the cause of the alarm
(see Section 3.4)
www.house-intelligence.co.uk
34
Appendix A: Code Table
FHT 80B Heating Controls - Code Assignment
Zone/Room Description
Code
1
2
3
4
5
6
7
8
9
10
11
12
13
14
15
FHZ 1000 Valve Motor Code – own zone:
www.house-intelligence.co.uk
35