1
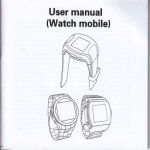
User Manual
8triloo'$,
Mobire svstem
l.l
GettiDg to
I .2
Insalling
1.3 Charging
2
1.4 Staning
1.5 Statu I@m
Uslng phone
6
Erchrtrglng
M6sgB
l7
20
,...,.25
E Goo91e...........,..
9
Experiendrg Multimedla
2t
Srfety
Nwfi
attenpt
io disffimble yow phooe. you alone re
w }ou phore &d ey cowquences
re{nmible for how you
of its
As a
u*.
gmnl role, ahrays witch off your phone wherevq the
of a phore is prohibned. Use of you phon€ is sbjfft ro
sfetlr measws designed to prctect w6 ed tlEir
w
mviro!rent-
Do trot us pu phore in dasrp rqs (bathrmq swiming
pmt...). Protot it tom liquids ed other rcisture.
Do not expose you phone to extrere tenpsahls lowq tho
- l0oC and higher thm + 55oC.
The physicochemical processes creatcd by chegeG impose
terpenture limits whq charging the battery. you phone
automtically protsts the battsies itr extreme tempemtures.
Do not loave yow phone within the rerch of smll children
'
(certain rercEble parts my be accidentally ingqted).
Electricsl mfety: Onty w the chargers listed
moufactufi's
in
the
catalogue, Using any othq chargq @y b€
dilgerous; it would als itrwlidate you wmty. Line voltage
mut be eretly the one indicated on the chilg€r,s wrial plate.
Aircmft ssfety: When traveliag by plme, you will nsd to
witch you phooe of when so inskucted by the sbin crew or
the
wming
signs.
Using a mbile phone may b€ dangercu to the operation of the
aircnft ud may dimpt th€ phone network.
fts us is illegal and you coutd be prosruted or baDrcd fiom
uing cellulr networks in the futue if you do not abide by
thew regulatiom.
E4rlosive materials: Pl6e compty with wming signs at
petrcl station asking you to switch you phorc off you wilt
reed to @rryly with mdio equipment uuge restrictions itr
places such o cbemiml plmts, firel depots ed at ffiy location
whse bldting operatioro ue
udo
way.
Electretric equipmetrt: To avoid the risk of demagnetiation,
do not let elstrcnic devics close to you phone for a long
time.
Electrcnic medicrl eq[ipment: yow phone
is a
radio
my interfere with el*tronic medical
or implants, such 6 heding aids, prcemakere,
imulin pmps, ctc. It is r@omended that i minimum
tmsmittq which
equipm€nt
sepmtbn of 15 cm be mintained betwen the phone md
2
u
implant. You doctor or the moufactum of ilch equipmeft
will be able to giv€ you any advice you my rced h this rea.
Hospitd$ Always make sue that you phore is witched otr
in hospitals when
staff.
s
irstrucled by wming signs
o
by medical
Road sfaty: Do not w )ou phorc when driving. ID ord{ to
give you full att@tiotr to drivitrg, stop ed puk safely before
making a mll. You mst conply with any cmetrt tegislatio[
Distsnce of op€ntlon: This phone md€l has be6 te$ted and
meets radiotequency exposue guidelines wha wd s
follows:
. Against the eil: Place or re@ive a phone call md hold the
phone u 1ou would a wire line telephone.
. Body wom: When trmmitting, pla@ the phone in a cfiry
accessry that contai$ no metal and positions the phore a
minimum of 2.5 cm fom you body. Use of othq accqrcries
my not emue complime with mdioftequency expome
guidelines. Ifyou do rct use a body wom accGsory and d€ trot
holding the phone at the ea, positiotr the phone a minimum of
2.5 cm ftom your body,
. Data operation: When using a data featue, position the phone
a minimum of 2.5 cm from you body for the whole dmtion of
ihe data traromission.
EN{retrment
Packrging: To Gcilitate the recycling ofprckaging mterials,
please obey the sorting rules instituted localty for this type of
waste.
Bstterles: Spat batteries must b€ deposited at the desigmled
collection points.
The product: The crosed{ut wmte bin mk affxed to the
product rem that it belongs to the fimily of elstrical and
electronic equipment.
To prcmote the recycling and
rsovery of waste electri@l and
electrcnic equipment (WEEE) ed at the me time ufegud
the mviroment, Ewpffi regulatioN require you to obey the
so{ing rules instituted locatly for this t},pe ofrete.
1 Getting Started
1.1 Gettirg to know your touch phone
1,2 hstalliog the SIM card, brttery, .nd $torage c&rd
You need to move the back cover before 5reu m iNtaU the
SIM card md battery. Also, rEke we to alwls tm of the
pows before iEtalling or replacing th€ SIM ced ed battery.
To remove the b.ck @ver
I . Make sue you devicc is tumed off
2. Fimly hold the device with both hed$ ard the ftont pael
frcing dom.
3. Push the back cover up with you thumbs util it disengages
fiom the device and then slide it up to remve.
Ib instdl the SIM cerd
The SIM ced @ntairo you phone number, seruice details, and
phorebool/ ressge memry. You device is supported both
l.8V ild 3V SIM ceds.
Note: I . Th€ phone cm be supported the double SIM cilds.
2. Sore tegrcy SIM wds my not frrnctior with you device.
You should coroult with you sryice provido for a
replacement SIM ced. There may be fe for this wrvice.
l. Remove the battery if it is iretalled
2. Locate the SIM cdd slot, ard then imert the SIM cud with
its gold contacts facing dom ad its cut{f comer facing out
the cild slot.
3. Slide the SIM @d cotrpletely into the slot.
To iNttll the brttery
YN delice coms with a rchargeable Lithium-ion battery ard
is designed to w only mmufactuer-specified original
batteris and &cewries. Battery prfomnce depends on
mny 6cton, including tretwor* configuatiol,
ud
signal strmgth,
uuge pattems.
Wming: To reduce risk of fue or bms:
' Do not attempt to opm, dismsemble, or serice the b@ttery
prck.
' Do mt crush, pucture, short exterol contacts, or dispos
in fue or water' Do not expose to temperatures above 6O"C (140"F).
of
' Replace
product.
ody with the battery pack
designated for this
'
or dispore of used battery
6
stipulated by local
Recy€le
regulatioru.
l. Align the
battery's exposed coppq contacts witb the battery
corectoG at the bottom part of the battqy compartment.
2. Ircrt thc contacts side of the bettery fust md thm gently
push the battery into place.
3. Replace the back cover
To remove the
battery
l. Make we your device is tumed off
2. Remve tlrc back cover
3. The bottom ofthe phoDe h6 a rctch. Liff the battery by the
notch to rercve it.
To install s mcmory card
To have additioml stomge for you imges, videos, music, and
files, you m puchree a memory cad md itstall it into you
device.
l. Make sw that 1ou device is tumed off, md thm remove
the back cover
2. Ircato the memry cad slot on the upper part of
the
exposed right pmel.
3. Inseft the remry cad into the slot with its gold contrcts
facing doM wtil it clicks into place.
Note: To rmove the remry crd, press it to eject it tom the
slot.
1.3 Charging the Battery
New battqies ae shipped padially ch{ged. Before you start
using you device, it is rccomended that you iNtall and
charge the battery Some batteries ioform best after *veml
full charge/dischage cycles.
Note: Only the AC adaptq ed USB sync cable provided with
yow device must be Ned to charge the device.
Comect the USB conn@tor of the AC adaptq to the sync
comector on you device, md then plw in the AC adaptq to
m electrical outlet to stat chilging the battery.
As the battery is being ch[ged while the device is on, a
charging icon al4reas in the title btr ofthe Hore rcreen. After
the battery bs been fully chilged, a ful battery icon appem in
the title bar of the Home sreen.
Wming: . Do not rmove the battery ftom the device while
you re chaging it using the AC or ctr adapter.
. As a safety prsautiorL the battery stops chaging before it
ovqheats.
1.4 Startitrg up the device
Power on/off
To power off you phone, press & hold POWER. On releoe,
the Phone options menu opeN. Sel@t 'Powq off' and confm.
To power on again, pres & hold POWER.
Silent mode
To silerce yow phone quickly, press & hold the volume
button to ao volume. Or on the Hore screen, touch p
md select Settings > Audio profiles. Selmt 'Silent' chok box.
Or on the lock sreer! slide the ring icon leftwtrd to switch the
silent rcde.
Scren sleep
Aftq a pqiod of imctivity, you srefl will go to
sle€p
(display will tm blacD. Itr sl@p, you phone Nes les battery
power You cm control this behavior:
Set sreen timut pdiod
l.
On the
Hom
screen, touch
p
md slect Seftings.
2. Select Display option.
3. Sel€ct ScrM tim@ut. Sel@t a time from the
Prevent sl€p while chdging
l.
On th€
Hore scr@n, then touch
Q
and
Settings.
2. Select Applications, ed then sel€ct Development.
3. Select 'Stay awake' check box.
lock scrm & put phone to sleep
Except wha on a phore call, ftom any scren, pres POWER
(imediately). Whilo rct on a call, to lock you contrcl buttotr
ad rcren from accidental touch activatior! pms POWER.
You ce increNe th€ suity of you phorc by stting a scrcetr
unlock pattm. Once set, itr order to unlock )ou s@, you'll
have to draw the conect ulock pattm. You
s6@n ulock pattem 6 follows:
@
set
)ou
l. On the Hore scren, touch p
and elect Settings.
2. Select lrcation & sudty, and then $roll dom to
Scrm unlock pattem wtioru
3. Set or change yow unlock pattem by slsting either
the
Set
unlock paftm or Change unlock pattem, r applicable.
4. Follow the prctrpts to define you pattem. Note: You mut
slide you finger aloog the scr@n to crete the patterq rot
slect individul dots. Comect at l€st fou dots.
When you unlock yow scren, if you want yow pattem to be
hidden u you draw it, clear 'Ure visible pattem'check box.
Ilome rcreen
The Hore rcreen is your starting point for uing all the
appli@tiom on you phone. You cm customire you Home
sreen to display applications, shortcuts, md widgets 6 you
tike.
Touch the appli€tion tab
(
B
) with you
fiagertip to
wn
rflal
AddtoHoresrmreouopru.
. Sel@t m Application shortcut,
a Shortcut to mre of yow
a play list), a Widget (a clock or
mved iqfomtior (srch
picture &ame), Folderc or Wallpapels for you Home rcrm.
. The applicatioo, shortcut, foldq, or widget appffi on th€
srm. If you sel@ted Wallpaptr, you'[ be 6ked to st@t a
s
m6u.
wlet
l.
rweal the application i@s,
2. The Hore
actually extends beyond the E6en width.
On }lome swn, slide yow fingertip left ad right along the
sreo to
the full width of th€ Hore men. This
additiomt space gives you morc mm to cWtomize i{ore with
applicatioN, shod@ts, and widgets.
3. Cr$te Hore sr@n shortqts md widgels:
. From the Hore sq@rl pGs MENU to Flect 'Add', The
picture.
Tip: To crate
m
application short@t quickly, touch the
rev6l all the appticatiotr ico$, then touch &
application icon Its shortot is added to the Hore
it.
sreen; clos the application tab to
4. To remve a shortot or widget from you Hore s@n,
touch & hold the item to mter '1rcve trpde". The application
tab turu into a Truh butlon. Drag the item to the Trsh buttotr
application tab to
hold
m
s
and releu. You'll know when you it€m is in the TrNh
becaw tlE item md the tab will tm red.
5. Move objects on the Home sr@n
. To mve m icon or othd item on the Hore sr@r! you must
fust torch & hold it to oter mve mode. The obj€ct wiU
mgnifu when it's redy to be mvcd.
. Without liffing yow fingcr (or you'll &op out of mve mode),
drag the object to the trw position. To mve m item to a
wtiotr of the Hom sr@n not in viw, mve it to the €dge of
the scrq md hold it thq€ for . mmnt. Th€ screq view will
shiff; position the object md releas.
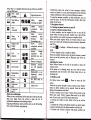
1.5 Strtus
Ions
Connedotr 3trtus icotrs
Along the top ofyou phone sre@ is the status bar. On the left
side, icoro
will
appeu, notirying you of a
nw
mewge,
upcoming calendu event, or prEthing else you should notice.
Oo the right side of the status bil, )ou'[t
con@tiotr statu
s
icons.
Note: The I or 2 numbq showed on the up ofthe icon is SIMI
SIM2 crd.
N
Nw emil
A
E-l
New SMS or
MMS
mffiI
L^J
E
tr
&
tr
EE
New
voicemil
is
of
(Silent
Call
in
progless
Missed call
m
Call on hold
@
Speakerphor
&
E
u
mr
GSM
sigul,
roming, no sigml
GPRS sryice
@mected, data
srylce
Edge
Song
playug
Ringer is
Sign-in/sync
eison
rnone
Cometed
GPS
on
EE
E6
5A
&r
g
E
tsts
0
6
comected,
data
flowing
Call
Vr'i-Fi
seruice
comected, Betwork
EaEery
cmge
indicators:
fulL
half-tuIl, low, very
low!
Battery is chaging
Wireless wices
ue off
(Airplane
Bluet@th@ i$ on,
Bluelooth
device
finger up the scren.
2 Using phone features
2.1 Thmitrg the phone furctiotr on and olf
To emble or disable Airplane Mode
In ruy countries, you ae required by law to tm off the
phone while on boud m aircmft. Aroths wav to tm offthe
pbone function is to switch you device to AirpLne Mode.
When you emble Airplane Mode, all wireless radios ol you
device ue tumed ofl includhg the phone functioq Bluetootll
mdWi-Fi.
L Touch
S
mde.
-> Senings -> Wircless & networks -> Ai4,lane
2. Touch 'Airplane mode' to omble or disable.
When you disble Airplue mode, the phone ftnction is
back on md the previous state of Bluetooth
tmed
ad Wi-Fi ue
rstored.
Adjusting the volume
Press Volume butlon on the side of the phone to show the
volume sqeen.
If
the phone is in vibrating mode, the voice will be muted
automtically and the device will vibmte when there is m
inmming call.
Making r crll
phone to enter the dial
On Home screen, touch
@_->
2.2
No SIM @rd o
Alam
the PC
(Gao your trouncauonS
Whea you w a notification in the status bar, touch the bar
$reen.
to enler a number, touch ,Delete'
button to delete numbere you've entered. Touch & hold to
delete all the numbers in the field.
To dial a number, touch 'CALLI' button (Green icon) by the
SIMI cad touch 'CALL2' buttoo (BIue icon) by the SIM2
c{d. To end a call, touch 'END' button (Red icon).
l. Call log tab: Select a mtry listed in the log to call the
Touch the on-screen dial pad
is set
C'om@ted
od
slide you finger dom the scr@n to open the list of
notificatiore displayed in the sliding window.
Ongoing notilications rcport activities such re call fomading
ON, (mnt call status, sng playing.
I
Notifications report the mival of new messages, calendd
ev€nts, ed alms. You ce cletr notificatioE list by selecting
'Ckel notificatioN at the top ofthe notificatioro window
To opm the message, reminder, or other notification,
)reu cm
touch the iteG. To close the notificatioE window, slide yow
number
2. Contacts tab: Contacts with phone nmbes de listed. Select
md then select the phone number to dial the call.
a contact,
3. Favorites tab: Favorile contacts with phone numbers ae
9
listed. Select a favorite, md thetr wlect the phone trumbq to
dial the call.
CalliLg voice mail
Numbq I is genenlly rcwrued for yow voice mit. Tap md
hold this button on the Phone rcreen keyrad to call voice roit
md retrieve you voice mil messges.
2.3 Answering and Ending e crll
When 1ou receive a phone @ll, the incoming voice call rcren
will appea, atlowing jrcu to either Nq or ignore the call.
1. To aNwer m incoming call, slide 'ANSWER'(Grffi icon)
rightwdd.
2. To rejfft a call, slide 'REJECT' button (Red icon) butlon
leftwad.
buttoD
h-csll optiotrs
While on a call, reveal the in-call optioN: Speake! Mute, Hold,
End and More.
Note that if Bluet@th serices ae on and you re com€cted to
2.4
a hmds-Ae device, the mre menu indicator will
show
Bluetooth oo.
l. Speaker: To uF the speaker, slect'Sp€aker'so it shows a
green ba. To tm it ofi select it agaia so the bu is ufitted.
The status bu will display this icon when the speaker is on
2. Mute: To mute you side of the onvqsatiorL select 'Mute'
rc it shows a green bu. To tm it off, select it again s the be
is ufilled. The status ba will display this icon when Mute is
oo.
3. Hold: To put m rctive call on hol4 select 'Hold' so it shows
a gren bu. To resme the call, or take the call offhold, seltrt
it again s the b{ is ufilled. Ifyou take a call while already
on a call the first call will beptaced on hold aulomtically. The
status b{ will display this icon when a call is on hold.
4. Add call Ifyou need to enter trumbers while on a call, touch
'More'tab and select 'Add call'.
5. lncoming ull: Duing call in progress, if )ou de on a call
.('tall iq progress') when another call cores in
ull"), you have a fw choices:
. Aswer
("incoming
the incoming call and place the call in prcgress on
hold. To switch calls at my time, touch 'More' buttotr to slect
'Swap calls'.
. If you don't wl !o iderupt your call in progress, then slide
'END' teftwrd.
l0
. Ifyou have one call in progress md ore caller on hold,
lo end
both calls, touch 'More' button to selwt ,End all,.
6. While on a call, you can confqence up to six callem,
couting )olrelf. Note ihat you cm also have e additioral
calleron hold during a conference call, regadlos of how rmy
participmts re on the confqence.
Nole: Whethfl the grcup call functiotr cm b€ ued depends on
whether the network opemtor spports ed proviies och
function s well as whetha you have applied for sch furction.
Pl@se contact network operator for details.
2.5 Using call history
l.
The missed call
missed a call.
icon
fl
alpeus in the title bar when you
2. Uw 'Call log' tab to check who the callq w6. or viw all
you dialed numbem. md received calls. To open .iall log.tab,
touch 'Call log' button in the phone rcreen to ota the call
history list.
3. Scroll to select the @ntact or numkr you mnt to dial. touch
'Call' button.
4. Tap md hold the selected contact you wet to call, md then
you cm make to do the following opriom ofell, edit number
before call send teK mssage, add to cootrcts or remve from
call log phone on the shortcut menu.
3 Setting on your dcvice
Contrcl phooe-wide settings from the Home sttings screen:
toucl @ md selecr Settings.
Dual-SIM settings
You ce select to actiute or deactivate the SIM ced you wmt
to opm.
3.2 Wireless conlmls
Wi-Fi onlotr: Select this check box if you prefer to uw WlFi
for you data corection.
Wi-Fi settings: Open the Wi-Fi settings $reen; stect it fiom
3.1
the network list. Prcvide
required,
you usmme or posword if
Bluetooth on/off Use this check box to
o! or off
tm
Bluetooth reryiaes
Bbetooth seilings: With Bluelooth swices on. you
the Bluetooth sttings sreen to:
. Remme you device.
. Selqt to
be discovqable for up
1l
to
cil
open
l2O wonds, or not
discovenble.
. Pair or upair with one of the Bluetooth devicas in nnge You will be 6ked to iype a PIN before paLing. Refer to the
lmuacturq's docuentation for the PIN code.
. Resm for devices.
Airplaoe mde on/of: When airplaoe rcde is slected, all
wirctess comectivity is
status
b{
off This icon t!
*r, uon", a
ro"
whetr airplme mode is selectod.
Mobile network
. Selst data rcmiDg capability.
. Select to comect only to 2G (slower) networks to
save
battery power.
.
Selrct a wireless opentor network - Sce for all available
selst a network automtically.
edit network Access Point Nffis (APNS) - Do not
chilge this stting uless advised to do so by you wireless
networks, or
. Add or
operator!
3.3 Cdl settings
Note that whm you open 'Call settings' for SIMI or SIM2,
you cuent rettings ile fetcheq which caD take a few
mmots.
Fixed Dialing Numbem: This featwe allows )ou to rdtrict
outgoing calls to a fixed st ofnumbes. To emble this featue
you must know the SIM PIN2 code for you phone. You cm
get this number from your wireless operator, ssuming this
f€hre
is supported.
news, and tili
Please @ntact
wice
you
info.
local network operator for more details.
3.4 Basic phone settings
Audio preffls
Sel@t ore uw profile atrd enter the following optiom:
Vibrate: Select to have yow phone vibBte for incoming ells.
Volme: S€lect to opo the vofume contrcl, and thm slide pu
fmger along the volume bd to *t m incoming ell iing
volume or alarrn, playing back muic, vidos.
Phone ring totre: Seltrt to doide on a ring toae to w for
incoming calls. Note that you co ovenide this stting for
individual contacts in the Edit contact details sre6.
Notification ring tore: Sel€ct a ring tone to ue for a
lotification (e.g., new ressage). Note that you cm overide
this setting for new Calende event notificatioN. text and
multimedia ressage notificatiom. Go to the applicaaioG
settings sc@ru to select spsific ring ton6.
Audible touch tooq: Select to have a tone mund when vou ue
the on-screq Dialer
Audible relection: Select to bave a sud play whm you select
m item on the sreen eithq 6hg touch.
Display settings
Brightnqs: Select to opa the brightness control" md then slide
you finger alotrg the brightnGs bil to st the levet. In sunlight,
increare the levelScr@n tim@ut: Select !o decide how long
imctive before the sretr tms off
you
phone
mNt be
Voi@mail service: Select to st a voicemil numbq that isnl
being rad from the SIM cud.
Catl fovrding: Select how you wilt buy, uanswred, md
wachable calls to be hmdled. Thqe is also m option to
Always fovud.
Calt bming: Restrict to mwer or dial the call in my situation
You ne€d to apply to the network operator for opening the
intemtional long-dist{ce function md get network restricting
code for baning retups.
Additioml Fttings: From this setting you cm set Jrcw Caller
ID preference md tum or/otrcall waiting.
Celt broadrct (supported by the network): Set md activate
receive of local infomtion broadcct Aom the network.
Choose whethq you want to receive infomtion broadcut
Aom 1ou network such as weather fors6t, tmffic update,
the pattem visible or invisible re you dmw it.
SIM crd lock wttings: Iock you SIM crd for qtra secuity.
You cm also chmge yow SIM crd pIN tom this scren. If
you don't know you SIM pIN, you cm obtain it tom
)ou
wireless operator
Visible powords: Sel6t to have )ou pdsword display as you
tJpe it.
12
l3
Seurity & locition
My Location: Select a swe for detmining you
location:
Wircless networks, or GPS sarellites. Typically GpS will be
morc &cwte (to street levet) but it coNures mre baftory
powq.
Sqren unlock pattem: Create a pattem you will be sked to
dnw before you scren will unlock. you cm rclect to make
Applicrtiors
Uil@m soucs:
Setect this check box if you wet the ability
to download applicatiotrs &om the Web. With this chcck box
rct relected, you will only be able to domload applicatiom
Aom Android Maket. To e6ue yow p6oml data dd phone
remin sew; it is rsomonded you not slect this chck
box.
yow
phone ud how much spee they o@upy. Ifyou've domloaded
m applicatiotr ftom An&oid Muket, you cm uniNtall it ftom
this scr@n. Seltrt a sprcific applietiotr to:
1. Clea you usr data (if you have ily Gmciated with a
Mmge applicatios: Viry all the applicatio6
stored on
particular applicatiotr).
2. Dis6sociate the application with
ey actions.
3. Uninstall - If you've domloaded an application ftom
Android Muket, you will be able io uinstall it fiom this
'
sreen by selecting Unimtall.
Development: If you e d spplication developo, you may be
intsested in these wttings: l. USB debugging: Ifyou wdt b€
dble to comuicatc with you phorc dir@tly via USB, slect
'USB debugging' ch@k box. 2. Stay awake: To prevent )ow
phone ftom sleeping while chaging (via powq adapta or
USB), seltrt 'Stay awake'chek box.
Accounts & slmc
Red mre iB "Data sytrcbronization" on page 17.
Tm on/offsynckonization for all swices.
Prlvacy
select to reset you phone to fictory settings. This will
all you data from the phoae ild requirc you to sigu in
and go tltrough the setup screm to use my of the applicatioro.
SD qrd& phone stonge
View md mmge the data storage on you phone.
Mercry cod: Monitor od trlmge the use of you Memry
cild from this sreen: l. Viw how Nch spee you [e sing
wd u
on low memory cad. 2. Seltrt to use you rery
USB ms storage when you phore is comected to you
You
ce
ere
corputa
(selected by defauit) 3.
Unmut/ej@t you memory
cad fiom you phone. Note that whq yow phone is @mected
to you computq via USB, you cmot viw pictu6 or play
uy
media stored on the crd from yow phone.
Inteml phone stonge: Repofis how mch intmal
Aee.
l4
storage is
Date & time
Set time, time rcne, ud date:
to overide the tretwork wlus.
Time
Date
Us Automtic
unless you reed
fomt: Select tom I 2 or 24 hou fomts.
fomt: Select from a wiety of fomts.
About phone
Viw your phone
Status: This,
sefl
lists a veietv of
infomtior, including you phone numbe, the network you
e-e guredly uing, the t)?e of network, sig@l stMgfb,
whethc you de rcming or not, my Wi-Fi addrews you,re
comected to, md rcre.
View the model nmber ad vesion infomtion for yow
phone.
4 ActiveSync
4.1 D.tr rynchredatlotr
Some Google applications oa you phone (Gmil, Calendr,
ed Contets) give you rcc6s to the sme pqrcml infomtion
tbat you cm add, view, md edit on you computer usitrg
Google Web appli@tio6. This mm that when you ad4
chage, o. delete you info@tion h ey of th6e applications
on the Web, the updated info@tion also appm on you
phone, ad vice vem. Also, if you lose you phone or if
1ou
phone is d6trcye4 you perrcml infomtion is mt tost ed
will appea, o before, on a tepla@retrt phone.
This minoring of infomiiotr happens through over-theair
data syncluoniatioc or data "syncing". Dala syncing occus in
the backgroud aod shouldn't ever gea itr yow way. you.ll
know you data is being slmchronized wheD you se tbis icoo
in the statN btr:
Becaue wndiag large mouls of data back atrd forth ovq the
air cm take time ild require considqable bandwidtb, there ue
sme setlings on the phone that allow )ou to ontol data syrc.
Sytrc by rpplicrtior
To ontrol syrcbroaiation for Groil Calende, md Contacts,
you co do the followitrg:
I . On the Hore screen, rhen rouch p
*O *t*t S"ttingr.
2. Sel4t Accouts & s;nc. When my of the applicatiom ae
syrchronizirg, you will s the ..sync,, icon@. Vou will atrc
se the last time you data w4 syrclnonized.
3. By default, the peNml infomation in Gmil, Calenda, md
Contrcts will s5mc whenever lou make a change or reeive a
l5
message. You @ chmge thb b€havrcr:
Auto-slDc: Wheo sl@ted, Auto-sync will sync Gmail,
Calendtr, ud Contacts automtically, m you make changes or
rcceive new messages. When OFF, infomtion will not be
synced automtically, although 1ou en force slmc by using the
nry
individual application check boxes described below.
GmiL Cler this check box to exclude Gmil ftom auto-sync.
Calendr: Clea this check box to exclude Calend{ fiom
autro-sJmc.
Contacb: Cled this check box
to
exclude Contacts
tom
auto-s)mc.
4. Sync problem:
lf you s this i"on @ to the lefi of the sync cbeik box.
then there w6 a terporoy prcblem with the data
slnchronization. Chak you data comection and try again
later
4.2 Bluetooth
You phone is equipped with Bluetooth@ wireless tecbnology
Specification 2.0. You cm us Bluet@th to smd md rceive
calls using a headset or hands-Aee
cu kit.
Ihm
on Bluetooth sewices
1. On the Home scieen, thm touch
p
ot
select Settings.
2. Select Wireless & networks, md then select 'Blu€tooth'
check box to tm on Bluetooth sryices3. When on, the Bluetooth icon app€ds in the statN
bil.
Di*ovenbility
By deftult, pu phore is not 'tiscovqable". This mem other
Bluet@th devices will not see you phone in their scam for
Bluetooth devices. Ifyou make you phoue disovqable, it will
be visible to othq Bluetooth dwices for up to 120 secondsTo make
you phone diwvqable:
Make src you have tmed Bluetooth on.
2. Select Settings > Wirel€ss & netwo*s> Bluetooth settings.
3. Select 'Dis@verable' check box to make you phone visible
to other Bluet@th devices for 120 seconds. You must stay otr
the Bluetooth settings sqeen to re@in disovemble.
4. Select 'Disovemble' again duing the 120 secolds, or leave
I.
2. Select Settings > Wireless & networkg Bluet@th settings >
Device mme.
3. Type ihe me for;rcu device in the diatog box, md thm
sl@t'OK'.
4. You new dwice me appeils on the Bluet@th settings
scrsn.
Pair & contrtrt wfth Bluetooth devices
Before you phone cm comuimte with a Bluetooth h@dset
or hads-ft@ cfl kit, the devices must 'bair", thm ,tomect,,:
I . Make sue you have tumed Bluetooth on.
2. Selst Settings > Wireless & uetworkp Bluetooth settings.
3. Yow phone starts scming for Bluetooth devices within
mnge. As they re foud, the devico appea in the list of
Bfuetmth dwices.
4. To pair with a device in the list, slect it.
5. TlTe the device's PIN, md thm Flect 'OK'. (Read the
ruufrcturqt docmentation if ,ou dont know the pIN.)
6. Once paied, slect the device mme to comst. you cm also
touch & hold the llme to opm the @ntext meilL and then
selst Com@t.
7. Pairing ud com@tiotr statu appetr uder the device mme.
8. Once the othq Bluetooth device shows "comected, status,
you cm start using it to make aud rweive phone calls.
9.. To disomect ot upair with a device, touch & hotd the
device to open the context menu. Select Discomect or Unpair,
s appropriatg. Ifyou relect 'Unpair'whea com@ted, you will
be di*omected m well.
Notes: The phone supports only the headset md hmds-ftee
Bluetooth profiles, so if you try to comect to a devica that is
rct a headFt or hmds-free cil kit, then you will rcceive u
'lrmble to comect" mesuge.
Ifyou pair with a second headset while comected to the fi$t,
the ftst headst will remin comected. To switch @mection
to the second h@dset you mNt mmully sele€t that headset
again afto pairing.
R6can for Bluetooth devicB
If you wut to update the list of Bfuetooth devictis, pr*s
MENU fld selst 'Scan for devices'.
udiscovqable.
5 Contrcts
The cootacls on you phone de synced with your accout
Name your Bluetooth device
l. Make sue you have tmed Bluet@th on.
To view the contacts on you phone, touch
the Bluetooth sttings scr@n, to @ke yow
16
phone
contacts stored on the lveb.
17
p
md
select
CoDtacts.
Contacts belonging to a specific group (you ce choop which
group) e listed in th€ Conlrcts tab. Only thoe contacts you
stfi s "favorit6" ue
listed in the Favorito tab. Browe
you contacts by rliding you fingertip up md dom on
the sreen Anothq way to find a contact quickly is to ue
"SEARCH" buHon. As s@n s you press "SEARCIr' button,
the quick sdch tab appcm on the top of the sree& input the
ftrst lettq of the llme you're lookirg for and touch swch icol\
the mtching contrcts ae appwed on the sreer
From the Contacts tab, you cm:
l. Take action on a contact: Towh & hold the cont ct's name to
open the context mm. Frcm the metru you @n select to viw
the Contrct details scr@& call the coDtactt numba, smd a
text ressge, add or r€move a std, edit the contrct details, or
through
delete the contact.
2. Go to Contact details: Sel@t the contacl's nme to opm
the Codact details sreen, whqe all sqeen the infomtion
you've saved for this contact is displayed.
Add
a
strtrct
md selet Contacts.
On the Hore sqeetL thfl touch p
You @trtrct list appe{s.
2. Press MENU and select 'Nw contet'.
3. Add alt the infomtion )ou w@t to store for tltis cootact in
the appropriate fields. You must add sre infomatiotr to saye
a contact. To change a dcfault lab€1, select the label name to
l.
opq
the label
mnu.
Select a
diffqent label o] cmte
label To add mre frelds, select + More ido.
a custom
Asuning pu have memry cud iserted with pichtrcs on it,
you cm usign a Caller ID icon to you @dact by touching
Calter ID icon. The Pictues application opfls. Navigate io a
pichue @d el€ct it, sir the cropper with you fingertips.
When fmished, wlect 'Save'. Th€ picture is dsociated with
you contrct. If you do oot csign m ion, a defauh udroid
icon will be osigned.
5. To sv€ you @ntact, prss BACK, or touch 'Do!e'.
Asrign frvorlts
Use Favorites 6 a way to drsptay only thoffi contacts you
codact most fiequqtly. To add a @otact to Favorits:
I From Cotrtacts, toucb & hold lhe coDtact you wl to add to
4.
Favorites. The cootext renu
2. Selst 'Add to fivoritG'.
opm.
18
3. Now you contact will be listed in Favorites. Their daails
sren will al6o display the @lored std
Edit contsct details
You cm always make cbmgas to the infomtion you've stored
for a contact:
l. Frcm Contacts, touch & hold the cootrct whos hfomtion
you wmt to edit. The context menu opeN.
2. Seltrt 'Edit @ntact'. The Edit contact ueen appeds.
3. Make you edits, then prss 'Done'.
Communicste with r cortlct
From Contacts )ou ce quickly call or text a @llact's default
nmber, 6 displayed b€low thcir nme on the sqeen. Howeyer
to view all the hforution you've storcd for a @ntact, ard to
initiate othq qpes.of @munication with that contact, opq
the Contact details sq@n. To opm a contaat's details scr@n,
$iEply slect their Bme &om Cotrtacts.
l. Call a @ntact: Frcm the @ntact [ist, touch & hold the
@trtact you wmt to call Select 'Calt codrct' to dial that
@ntact's primaq/ numbq (fi6t in the list on their detiils
soen).
2. To dial a diferent number for the @ntrct, select
the
contrct's mme, ed then select the numbq on their details
s@n ed then touch 'CALU icon.
3. Send a text or mltimedia: To send a text or multimedia
message to a @ntact, you must have a mqsage to a @otact
mobile nuber stored for them in contact details. Frcm the
Contact details sr@n, select a phone nmber ad click
'Meuge' icor, A Compo$ sreen op€N for you
new
yo{ message ud selwt 'Send'.
emil to a @ntact: To smd m emil message to a
you m6t have m eroil addres stored for them in
messge. Corrylete
4.
Send
@ntact,
their contact details.
. Seleci the @ntact iou
wt
to emil. Their Contact details
screen opru.
.In the Send
emil s@tioq select the e@il addrcss. If you {e
fetching POP3 or IMAP emil accouts to you phone, then
rccomt you wish to Ne to serd. A Compos $refl
o1m for 5our new mesuge.
. Cotrplet€ you message, select 'Send'.
SIM cotrtlcts importer
If you haye stored ,mes md phone numbeG on you SIM ce4
you cu add thN to the Contacts stored on you phone by
select tho
19
selecting this settings option. From the @ntrct list, prss
MENU to sel@t 'Import/Export', )ou m select to irport from
SIM cild or rercry cild, once the list of ,m6 md numb€G
appetrs you
m:
Import all mes/numbqs in the list - Pre$ MENU md select
'lmport all'.
Itrport only certain lmes/nmbas in the list - Select the
mme./nmber you wmt to import, thm rcpeat for othere o you
wish. (As sootr 6 you select the mm€/ombq, it is imported.)
6 Exchaaging Messages
6.1 SMS 8nd MMS mossgitrg
To open the SMS & MMS Messaging applicatiorL otr the
Hore ween, then touch p
md select the Mwaging icon.
About text and multimedia mBsages
SMS messages 4e also kDow 6 "text" messages md cm each
be mud 160 ch@ctqs. If you coatinue to type afts the limit
is reached, you ressage will be delivered s one, but cout 6
more thm one message. These
ae
called "concatemted"
messages.
MMS messges tre also krcM
6
'multimedia" or '!ichre"
messges and cm contain text, picture, audio, ud video files.
When you compose a message, the phone w.ill automti@lly
convert a text message into a multimedia ressage as sooo as
you add a subject or m attachrent, or if you ad&ess the
message using an emil address Bther thatr a phone numba.
\tew the mssrge frcm the mBsage list
Sel@t a ressage thread in the list to open it for reding. When
open, the individul messages appea stacked on the screen,
much like with instmt ressaging conversatioru (or chats).
Note that messges you send ile also listed in the Read view.
l. R@ding mftimedia
messages
Ifyou
View mesuge details.
2. Reply to a message: Simply start Rping you message in the
text box at the bottom ofthe screen io reply to a message. You
ca always press MENU md slat to add a subject or m
attachment to convert it to a mltimedia m6sage. Sel@t .Send'
when
rady.
3. Links in messages: If a messge contairo a link to a Web
page, it will be relectable. To view the Web page in the
Brow*r, sirnply select it.
4. Delete ressages: You messges will be saved mtil you
explicitly delete them.
Delete one message itr a thrcad - With the message thread open
in Read view, touch & hold the individual message you wilt to
delete to oper the context menu. Delete all mesuges in a
thread - With the message thread open in Read view, press
MENU > Delete theads. You cm also delete il 6tire thread
ftom the message list by pressing & holding the tbrad to op€n
the context metru, then sel@t 'Delete'.
Delete all message tlreads - From the message list, press
MENU md select Delete threads.
Compose text atrd multimedia messages
l. Press MENU md select'Comporc'. The Compose screen
ope6.
2. Add recipients by ryping a name, phone nmber, or emit
addrcss in the 'To'field. Matching contacts will apped Select
the recipi€nt or continue typing. Add 6 mmy recipi€nts as you
wish. If you send the message to m emil address, the messge
will automtically convert ftom a text to a multimedia
message.
3. To add a subject, press MENU md select'Add subject'. If
you add a subj€ct, the message will convet to a mltimedia
message.
have selected !o auto-retrieve you multimedia oessages,
then both the mesege header md body will domload.
If you ae domloading only the headers, thm you must fust
select the Domload button to rehieve the message body. If
1ou re concemed about the size of yow data domloads, you
cm check the message size before you domload.
Once the message has domloaded, selst the 't lay'' button to
view the ressage.
From a message red view, you cm do the following:
l. To view details about a particula message, in the Read view,
touch & hold the mesage to opm the context menu. Select
button.
5. Tlpe you message. As you type, you'll be able to track how
lrmy chtractervmessages )ou're creating. Remember that text
20
2l
4. To add a attachment, press MENU md select .Attach,.
Adding m attachment will always convert the message to a
multimedia message. Select from audio or picture files. you
m Flect to take a new picture ifyou wmt, or record a audio
file. Any rccordings you mke will be stored automtically in
the MBic application in a play list tmed "My recordings,,. To
remove m attachment, slect the attrchment's,Remove'
messges have a limit dound 160 chercters. Once )ou go over
that limit, a lw ressge is etully 6ated but automti@lly
joined into ore wh@ receivcd.
6. Select 'Send'whcn ready. You cu also save a dmff.
7. As 1ou resmge rends, progress displays in the title bar. If
you see this icotr to thc right of the message, it reffi you
messge is still being deliv@d.
Srve mssge $ dnft
White coryosing, pMs BACK )ow mesege automtically
syes 6 a dBft.
Tbrt rnd multimedh mssrge settings
To s€t text ed multimedia msBage prefererces, tom the
mesBge list, pres MENU ud rclet 'Settiags'. You cm st
the following ftom this screen:
l. Notification rettiogs
You cm rreive a notification erch time you reeive a new
message.
Setect 'Notificatioro' check box to rffeive a notificatiotr itr the
status bil when a ,w riEsage mives. If you wet you phone
to ring when a w res*ge mives, select that check box s
wel[. Select Ring tone to op€n the ring tone renu md select a
ring tore sp@ifrc to new text md multimedia
message
notificatioN. Note that when you chsk a dng tone, it plays
briefly.
If )ou wet you
phorc to vibrate whm you r@ive a new
message, select'Vibrate' check box.
2. Text ressage settings
Delivery retrnrts: To r@ive a report otr the delivery statN of
yow message, select this check box.
Mamge SIM ctrd ressages: Text messages cm als be stored
on you SIM @d. The eret SIM cad number deperds on
yow ced, but it is |Mlly iloud 25-50. To view mesuges on
you SIM cad, deleie therL @d copy them to you phone
mercry select this €tting.
3. Multimedia message settings
Delivery reports: To rcceive a relDrt on the delivery status of
yow meBsage, wlect this check box.
R€ad reports: To receive a report on whether e@h r@ipient h6
r@d or deleted the message without r$ding it, slect this check
tnx.
Auto-retrieve: To retrieve all yow MMS messages
autoMtically (the h€ad€r plus the mssage will doMtoad to
22
you
phone), sel@t this chwk box. Ifyou clee this check box,
then only the messge headers will be retrieved and disptay in
)ou
messge list. You cm retrieve the full ressage by
Domload buton that displays in the header. Once
selecting the
the ressage has downloaded, slect the '!lay' buttotr to
qpand the message.
Roming auto-retrieve: If you are concerired about data tEffc
and just wmt the meMge headers to domload ivhile roaming,
cleu the Roamirg auto-retrieve check box. Othemise, you cm
slect this check box to have )Du mesages domload even
while roming.
6.2 POP3 md IMAP emil accounts
Add ar emeil accoutrt
You ce fetch messages ftom up lo five POP3 or IMAP
accouts. Follow these steps:
l. Press Hore, then selst the Emil application.
2. The Set up nw accout sq@t appe4s.
3. Type you accout emil address md puword.
If you wmt, select the Smd emil fom this rccout by
default check box. This setting only applies if you have more
thn ore POP3 or IMAP accout set up.
4.
5. Se[@t
'Next'.
If
you have a popular emil accout, the application will set
everythitrg up for you! Beforc you go to )ow Inbox, you can
lme
the ecowt (if you doo't, you 9mil addres will be
uwd). You ue also asked to type you re s you wmt it to
display on or(going ressages. You rust @mplete this field
b€fore you cu select 'Next'ed go to you InboL
For less popular accounts, follow the pro(q,ts to typc the emil
wer, prctocol, and othq ecout info@tion yomelf After
)ou account settings have been verified, sel@t 'Next' to go to
)ou Inbox.
6. To add more accomts (up to five), fiom m Inbox or you
Accounts s@n, pr6s MENU md *lect 'Add accout'.
Us your FOP3 ard IMAP emeil rccoutrt
Once you've st up m ecout, you cm do the following:
I . ReA6h Inbox: From the hbox, press MENU md then sl@t
'Reftesh' to update your Inbox with any previously-unfetched
emil.
2, R€ad
pu
emit
You
m
display or @llapse the ressages in
Inbox by selecting Inbox. Umead mesuges display with a
colored band. (Erch accout you add will uE a different color.)
23
3. Foruad Reply, Reply all: You cm fomad, reply, or reply
all to m emil message Aom the Inbox. From the Inbox, touch
& hold the message to open its context menu. Select the action
Default account: If you have more t1w one POP3 or IMAP
e@il account st up on your phone ad wdt to use this
rccount by default when selecting Compose Aom the Accouts
sreen, select this check box.
E@il notifications: If you wmt e icon to appe{ in the status
You want to take.
4. Corpose new
Fiom the Inbox
l. Press MENU ad selst 'Compose'. 2. Add
r@ipients by t)?ing a mme or ad&ess in the'To'field.
Matching contacts will appeil. Sel@t the recipient or continue
typing the address. Add m mny m you wish. 3. Type a subject
md messge.4. Select'Sad','Saye 6 draft', or'Discild'.
Pressing BACK will also save
twed m],thing.
6
draft mless you have not
5. Delete ressage
ba when
I
I
From the.Inbox: l. Expild the Inbox to display the messages.
2. Touch & hold the message you want to delete. 3. Selst
'Delete'. 4. Yow resege is moved to the TrulL
6. Empty TBsh: Once you've moved a message to the Tr6h, to
ernpty mGsages in the Trash you must delete each message
individully. Press MENU ed select'Folders'to enter the
Trash.
Note that the message is only deleted from )ou phone, not
from the rccomt seryei
7. Remove m email accout: You c& always remove a POP3
or IMAP emil account ftom you phone. Go to you Inbox,
Fess MENU md rel@t 'Accowts'. You Accouts sqeen
opm. Touch & hold the accout you wmt to move to ops
the context menu. Selot 'Remove accout'. You will be oked
conf[m before the accout is removed.
Edit account Bettings
To open your AccoMt settings screen, do the following:
l. From you accout Inbox, press MENU md select 'A@ount
2. The Accout
settings sfi@n appe4s. You can do the
following Aom this screen:
Accomt lme: Select to change the mme of your accomt 6 il
appeds on youAccounts screen.
You nare: Select to chmge you mme 6 it appeam in
outgoing
emil.
Email check Aequency: Select this pop-up menu to set how
frequently your emil account is cheked for new messages.
Note that whqevq you opm a folder, emil is reteshed,
regedless of this rctting.
24
ffiives, select this check box.
e@il Aom seiler
Outgoing srver settings: Select Outgoing settings if you need
to edit the SMTP seryer, port, wurity type, option to require
sign-in, or uerume/posword.
Add &trother POP3 or IMAP
To add eother account (you cm add up to five), go to your
Inbox, press MENU md select 'Accomts'. You Accouts
so@n ope6.
Pres I{ENU md wlect 'Add accomt' atrother rccout.
7 Irtertret
7.1 Ways ofConnecting to the Irtemet
You device's netwo*ing capabilities allow you to ecess the
Intemet or )ow corpoate network tkough Wi-Fi, GPRS/3G, or
EDGE (if awilable).
You cm also add md set up
a
VPN or proxy comection.
wi-E'i
Wi-Fi provides wireless Intemet ecess ove! distmces of up to
100 meters (300 feet). To uw WlFi on you device, you need
rccess to a wireless access point or "hotspot". Note: The
amilabitity ild mnge ofyou device's Wi-Fi signal depends on
the numba, infrastructue, md other objects thrcugh which the
to
settings'.
a new message
Incoming ervq sttings: Seltrt Incoming settings if you need
to edil the uemamd paswot4 seruer, port, or option to delete
I
signal passes.
7.2 Browser
To opm the Browsq, touch
@ md select the Browso icotr.
The Browser always opens to the last Web page you were
viewing. The first time you enter the Brcwsr aftu powering
you home page will display.
You cm change 1ou hore page by pressing MENU
on,
ed
lel@ting More > Settings > Set home page.
Zoom rtrd nayigrtion in rrYeb pages
While viewing a Web page, )ou can press MENU md select
More > Settitrgs > Deftult aom to set the zoom conlrols.
Slide your fingertip in any dirwtion to shift your page view.
25
I'he Brcwse screen
From the Brcws screen you catr do the following:
l. Go to a Web page: Make Me the focus is trot on a text box
and then sta( g?ing the URL.
2. Add a bookmk: Bookm{k the Web page you 8e ffiently
viewing:
. Press MENU md select 'Bookmks"
. From the Bookmks sq@n, select 'Add'.
. Confum the URL od mme, ed then select 'OK'.
To view all you bookmks, Fess MENU md
select
Bookmuks.
3. Refresh a w€b page: To refresh the contents of the cwetrt
page, press MENU and select 'Refiesh'.
Open pages in seprrate wirdowg
You €o keep more thm one Web page open by using multiple
windows to display the pages. You cu oPen up to eight
windows.
Op€n a new window: From a Web page, pless MENU md
select 'Windows'. The Cuent windows srcen op€ns, showing
the Web page you started ionl plus a "nw window". S€lect
'New window'. Yow home page opens in a new window. To
retm to one of the other windows, press MENU ud sel@t
'Windows'. Selecl the page you wmt to viw
Manage bookmarks
You cm store 6 lmy bool@rks 6 you wut on you phone.
Press MENU md select 'BookD{ks'. The Bookmarks screen
oPem.
l. Bookma* any page: Select 'Add'. Type a mme md location
(URL) in the dialog box. Select 'OK'.
2. Send bookmked page's URL: Touch & hold the bookmk
you
wdt
to open. The context menu opens. Select
'Shm link'.
An email Cornpose screen opeN with the URL as the message.
Address you message and finish composing md select 'Send'.
3. View bool@rked page: Touch & hold the bookmark you
wmt to open. The context menu opem. Select View page or
Open in new window.
4. Edit bookmk Touch & hold the bookMk you wmt to e
open. The context menu opm. Select 'Edit bookMk'. The
edit bookmark dialog box opere. Type your chuge ed select
'oK'.
will be mked to onfrm.
6. Bokmk o[ent page: Go to a Web page you want to
bookmrk. Press MENU md select 'Bookmeks'. The
Bmkmaks scr@tr opem. Pre$ MENU and wlect B@kMk
last-viewed page. The Booknrk link dialog box opem.
Confim or edit the hformtion, thm select 'OK'.
Set your home page
You set your home page tom the Settings scren:
1. Press MENU md relect More > Settings.
screen
The Settings
opffi.
2. In the Page @ntent sctio& sel@t 'Set hore page'to
the dialog box.
3. Type the lrRL
ofthe page you want to
set
6
opq
home, and then
select'OK'.
Dowdoad Web frls and applications
Before you domload my files or applications Ning the
Browser, note the following:
1. Before you cm download Web applications, you mut
expticitly "allof' domloading ftom the Home > Settings
screen:
On the Hore screen, then pr""" $
ild select Settings.
Select 'Applicatio6', then on the Application settings $reen,
select 'Unknom souces' check box.
2. All items domloaded form the Web ile stored on you
memory ca{ so be sue you have a card irctalled in you
phone before you domload iom the Browser
3. The Browser will only allow you to domload item that ae
supported by m application installed on the phone.
Wming! Applications domloaded from the Web cm be ftom
urknom sources. To prctst you phone md p€rsonal data,
only domload applicatioN from sorees you trust, sch as
Android Market.
ltew your downloads
To see which files or applicatiom you've domloaded:
l. Frcm the Browse sqeen, press MENU md select Morc >
View domloads.
2. The Domload history screen appeas with the list of
domloads. If you have ao domloads, nothing will be shom
on this screetr.
5. Delete a bookmk: Touch & hold the bookMk you wmt to
open. The context renu op@s. Select 'Delote bookmk'. You
26
Brewser settings
To set Brcwser prcfqences ftom the Browser screen, press
MENU md select More > Settings.
27
l.
Page
contmt settings
T€xt;ize: Select to olm the Text size menu. Default setting is
Noml, but you can increase th€ size to Ldger or Lilgest, or
dec**i to S'*ltet or Smllest. Note that this text size setting
only affects pages you vi€w thxough the Bmwser
Blmk pop-up windows: Select this check box if you want
noo-uo windows to be blocked.
Loud i-ug.r, Select this check box ifyou want images on Web
ouna, to loud. For faster page loading. cleil this check box'
iu-to-fit pages: Selecr toiize pages to lhe screen aulomtically
Opm in background: Select ifyou want links to new pages to
oten in a new window in the background.
Sit home page: You cuently-set hom€ page is shom on the
page,
Settings sirein. To chmge your home, select Set home
type the URL for your home page, then select OK'
2 Privacv seltinss
to clear the following:
Select one oflhe-privacy
-Browsersettings
page-visited history stored cookie
Brow*r cache:
data saved fom data
AcceDt cookies: Select this check box if you want the Browser
t. .oi,e cookies. Some Web sites might not work properly with
cookies disabled.
Remember form data: Select this check box if you wet the
Browsr to rcmember text you have t)?ed in forms, so that you
cu select the same text later rather than retlping it'
"messge thrcads" or simply 'lhreads". A new mesuge or a
of a cwent message will begia a new
change to the subject
conYtrsation.
Inbox cotrveNation list
All the Cmil that you fetch to yow phone is delivered to you
inbox, md the Inbox is your default G@il view. The total
numbq of umead messages displays in the title ba md
individual umead messages display in bold. Ifyou have labeled
a message, its label appees in a colored rectdgle to the lell of
the date.
Convqsation labels
Organize your email by labeling your conversations. You can
filter the conversation list to show o.ly those with a specific
label. You can apply as ruy labels to a conve$ation as you
wish.
Use sttrs to mrk importdt conveGations, or ay way that you
wish. Other system labels include: Inbox, Sent, Outbox, Dmfts,
mdAll Mail.
Heie are some specific instructions on using labels, Aom a
conversation list, touch & hold a conversation to open the
context menu.
l. Iabel a convercatiofi
Select 'Change lab€ls'. The Labels
to either apply it or remove it
menu appears. Select the label
fiom the conversation, thm select 'OK' to retum to
the
view" codinues to
as new replies mive, so you cil always see you
ilessages in coniext. Conversariom are also refened to as
converstion list.
2. Sta a convgrsation: Select 'Add sttr'. lf the conve$ation
already is star€d md you waft to rcmove it, select 'Remove
star'.
3. Filter convematiom by label: From a conversation list, press
MENU md select 'View labeli'. Select the label of the
conversatioN you wmt to view, including system labels.
4. A list appears, showing just the conveNations marked with
the label you selected. To r€tum to the Inbox, press MENU ed
slect'Back to Itrbox', orpress BACK.
5. Select labels to slnc: You can select to slnchronize specific
labels: From a conve$ation list, press MENU @d select
'Settings', atrd then select Labels. All your labels appea in a
list. Select the labels you want s)mchronized on a regular basis.
6. ReAesh: From a conversation list, press MENU and select
Reftesh. Yow email is slmchronized per settings.
Read email
When you open a conversation for reading, the subject will
28
29
3. Secwity settings
Remember paswords: Select this check box to save usernames
and passwords to vdious Web sites.
Clea poswords: Select Cle[ passwords to cled all yout saved
passwords.
ihow security wmings: Select this check box i[ you wmt a
waming to Ui aisptayea when you
re
going to
m
itrecue
Web sile.
8 Google
8.1 Google
mail
and select
To open GmilrM webmail service, touch ffi
Gmil icon.
all the
grouped
with
with Gmail, each message you send is
responses you receive. This "conversation
sow
latest ressage
apped in a box at tbe top of the screen and the
*iil
at the bonom ofthe convesation'
"ooear
you can take on individul messages and
ii"..li" t"*
""i."s
convergtion:
ae
collapsed'
i:;;;;;ii;rt"
;";;i" r;;;**ces-ae expanded- their individul headers
body'
message
the
ii"rL"-iot"r, tr," rciaer to open/collapse
.e.*g"., Slid" you finger up or dom oo
messages:
il's.tiriruorgr,
;"-;;;;;;d;ckty
messages
bruih vou fmger up or dom to scrcll
f6ter.
ilu-t
;'ilJ
All read
"onu*utioo
,h"
6
spam: From a coovqsatiotr list' touch
to open the context menu Select
"oou"t*ti*
sPam'.
r-L itt.-i*a view, press
'R6ort
I1#rk
as
MENU md select More > Report
read/
wead: From a conversation list'
menu'
to open wead the context
hotd th"
to."h & "otu"*"tion
"oou"tsation
Select 'Mdk read'/'Mak uread' c appropriate'
a cof,velsation list' touch &
Flom
conversation:
S.,Lt"friu"-"on
to open the codext menu Select
iotJii"
you
i" "^"tion
"a*mil'.
archived messago'
"arirrir"l.
select'All
labels,
Comoose email
;
il;;;
mnvereation
list'
tom
press MENU
the list of
ild
select
'Cotrpose'.
in the 'To'field'
Z. ell *ipi.ns uy typing a name or address
*iil appeu select the recipient or continue
ftart"tt g
"i.""t
typing tlie address Add as many a you wish'
J. Tlpe a subject and message'
pictue attaihment' press MENU ild selecr
;a,ttu"t;. s"t""i u pi"ture. To remove il attachment' select the
;'i;-;i;
button'
attachmeat's'Remove'
-'s"na''save 6 draft'when ready Prcssing BACK
i.i]"|
will also
save as
dBft.
;."R;;;-R";ry .it. Fo*utd' with a conversation highliehted
to tbe end ofthe conversation Selecl
"' ""l'i.t .Liri"*. "croll
Eoruud rip: Alwavs double-check that
Giy:ri;pt;i;.
vou've made the right selection!
A;;;.
fressing
Search
;;; ;.t"*ge and Send or save
e,+cK *ill also save o drafl'
for messages
ii-c*iivu
ca-n
as
dmft when rcadv'
seach for a specific message by sender'
30
word in subject, or label:
l. From a conversation list, press MENU
You can also press SEARCH button.
od
select 'Seach'.
2. Type you sedch string into the box, md thfi
select
'Search'.
Add signrture to mBsages
You cu append a signatue to every message you send.
1. From a conveGation list, press MENU md select 'Settings'.
2.
Select'Sigmtue'.
3. Tlpe your signatwe in the box. Yow signatue cm b€
multiple lines, as long re you like. When fmished, touch 'OK'.
Selst labels to synchrcnire
You cm choose to slDchrooize messages based on the labels
you've assigned to them. Limiting the arcut of emil that is
regularly synchronized will cut dow on network data
exchmge.
l. Frcm a @nversation list, press MENU md select 'Settings'.
2. Select 'Labels' to open the Labels screen. In addition to the
labels you've creat€d, all the "system labels" (lnbox, Staned,
Chats. Sent. Spm md Trash) are listed.
3. Select a label nme to cycle through the sync options: Sync
4 days, Sync all, or Slmc none (no slnc option displays). Note:
You camot tm off sync for Inbox except through the Home >
Settings > Account & sync options.
Set trew email trotiffcationg
You cil receive a notificalion each time you receive a new
emil message:.
l. From a cotrversation list, press MENU md select 'Se(ings'.
2. Select 'Emil notificatioro'check box to se m icon in the
stafus br when a new message mives.
3. If you want a smd to play when a new message uives.
*lect
'Select ringtone'. From the ringtone menu, selecl a
ringtone that will play for new emil notificatiom. Note that
when you select a ringtone, it plays briefly. Ifyou don't wmt a
ringtone to play when you receive a trew mesage, select
'Silent'. The ringtone mked 'Default ringtotre' is defmed in
the Home > Settings > Sound & display > Notification ringtone
menu.
4. If you wilt you phone to vibrate when you receive a new
Bessge, select 'Vibmte' check box.
E.2 Google
talk
You can use Google Talkru instmt messaging serice to send
31
instmt messages to your fiends. All you need is Gmil accout
*a
md you're set up. To opetr Google Talk' touch E
relect Talk icon.
The IM accouts scrcen opens The number of open chats
disptays opposite the accouot ,]me. You cu have 6 mny
open chats
6
you wish.
8.3 Google Maps
To open Google Mapsfr mpping sruice, touch
-d
E
select Maps icon.
Find your loc&tiotr
1
Make sure you have enabled a "locatim soree" in global
Settings by doing the following: touch
E
,
-d tha
select
Settings.
Selecisecuity & location. Select either Wireless networks o!
GPS satellites, or both.
2. Frcm the min Map screerq press MENU md relect 'My
Location'.
3. Yout location is shom on the mp as a blue blinking dot
swouded. Touch the scren of zoom icon controls to zoom in
or rcon out the Mp.
Find &try location
l. Frcm the min Map scrcen, press MENU md sl€ct
'Seach'.
2. You
' Type
. Twe
.
cm use a vaiety
atr ad&ess.
ofsach
criteria in the warch box:
twe of business md city (e g.. sushi seattle)
Sit".t * address you've visited before in Maps from the
a
I . From the min Map soeen, press MENU and select
'Dir@tiom'.
2. EDter the starting point in the ftrst box. You ce type an
ad&ess, or select to opm the iocation sowce menu. Select
Aom:
. My curent location - Remember to have a location sel@ted.
. Contacts - Opes a list of the coffacts you've stored with a
physical address.
. Poiot on Mp- Opms a f,etru of places you've visited.
3. Enter your destiretiotr in the second box. You cm tlpe u
address or select to select from the location sowe menu.
4- Select Route. You cm choose to view yow directions in a
list, or you cm select Show mp, to view the gme diectio6
overlaid on a mp.
5. When finished readirg or following the dircctioro, press
MENU md select 'More > Cler map'. You destination is
saved in History.
Selst map mod€
Whenever you ae viewing a
map, you can switch you view.
MENU md select 'Iayer' to selst fiom Sa'tellite, Traffic,
Terain or Latitude View.
Satellite view: Satelliie images ile not real-time. Coogle Maps
acquires the best imagry awilable, most of which is
approximtely one to tlnee yeils old.
Traffic view: If available in you aea, ieal-time tramc
Press
onditiou re
8.4 G@gle
displayed over the highway as color-coded lines.
Calendrr
menu (stored in History).
3. S;bct 'Seilch'when ready. Your seuch results disptay.
4. Setect to ffi the highlighted result on a mp
5. Touch the result balloon to open the location's details.
In addition to seeitrg details about the locatioa, ftom this scrren
To open Gmgle Calend{rM mlendding seNice, press HOME
md select the Calendtr icon. The Calmdu on your phoDe stays
in sync with you Google Calendu events on the Web,
Crlendrr views
You cu view multiple calendes on you phone, so each
calmda event is coded with a color
you can:
. Zoom in to address
. Get diretions to address to another location
. Get directions ftom this address to oother location
. Add to Contacts
. Go to ssociated Web site, if available
Days
dropdom
Get directiotrs
To get detait€d dircctioro to a location, do the following:
32
Note: To crste new calendus, lrcu must go to Google
Calmda on the Web.
You cm view you calendtr in a v{iety ofways. Prcss MENU
to selfft fiom Month, Agenda, Week, or Day.
l. Month view
ae shom in a month grid. Busy time slots tre shom 6
v€rti@l bars in the corespooding part of the day. Aa all-day
event is shom as a small vertical br at the top ofthe slot (it
does not 6ll the mtirc slol).
33
View event details - Select a day to viow all the events in that
day. This will take you !o either the Agenda or Day view,
depanding on which you last vi6ited. Selst the event to view
its details.
Edit m evcnt - Fist select a day to go to either the Day or
Agenda view. From there, selftt the event to view its details.
Assuming )ou have mite privileges on an event, pres MENU
od sel@t 'Edit went' to open the wenl for editing. Navigat€
months - Slide you fingertip up/dow4 tbrough the days and
p6t the begiming/end of thc mnth to move to the
previouvnext montlL
Create new event- Touch & hold a <iay to open the context
menu. Selet 'New event'. You @ also pres MENU md
select'Nw event'.
Jump to cwnt day - Prms MENU md select 'Today'.
2. Agenda view
Events in the crent mnth tre shoM vertically in a list, one
event after the othol Days with no events re not displayed,
Repeating eyents - Muked with icon following the time or
date.
View event details - Selet the event to viaw its details.
Fiit m event - First, select the event to view its details.
Assming you have wite privileges on m eved, press MENU
atd select 'Edit event'to open the event for editing.
Navigate within the ffient month - Slide you fingertip
up/dom.
Jump to cwmt agmda - Prcss MENU md select 'Today'.
3. Week view
Days re shom verticalty within the Week view Time slots ile
defined horircntally in rows. Evmts re shom as blocks.
Vi€w ev€nt details - Highlight ao event to open a sroll popup
window in the lower part of the scren that prcvides more
event hformtion. This window will stay op@ for three
sonds. (Note that highlighted evmts ee outlined in or@ge.)
To viw the full eveil details, touch the pop-up window while
it's operL or wlect the ewnt itself You cm also touch & hold
the event to open the codext menu, thfl select 'View event'.
Edit atr event - Assuming you hlve wite prMleges on an event,
touch md hold the event to open the context menu, then slst
'Edit event'.
Navigate within the
up/doM.
cwflt week
-Stide your fmgertip
-
Slide you fingertip
NayiSate to a past or future w@k
leturight.
Jump to cMent day - Pres MENU md slect 'Today'. The
cunent time is highlighted.
4. Day view
Days tre divided into hou time slots. Events {e shom tiled
md span the timc they last. All-day events re displayed at the
top ofthe day lisl.
vi€w event details - Highlight e event to open a small popup
window in the lower part of the sr€@ that prcvides moe
event infomtion. This window
stay
opfl for thre
il
Cre&te
rn
evGnt
From my of the viws, press MENU ud relect 'New event'to
op€n the newEvent d€tails sreQn,
. Ty?e th€ infomatiotr in the fields.
. Select date & tim€. You can t,!e directly in the date fields if
you don't wmt to step tltrough Ning the + md - buttoN.
. Nme that appffi itr Day view.
r Description can be u long as you like.
. Sel@t a calend{ ifyou display more tho one. Set a default reminder time.
Press MENU to sel@t 'Show exha optioro' to Ft presence md
prirey:
.
.
Set oDline presence: available or
buy.
Sel&t calendd privacy Aom Default
(s
defined when
€lmd{
was created), Privat€, or Public,
When finishe4 selcct 'Done'. Pressing BACK also
ev€nt.
35
34
will
secon&. (Note that highlighted evdls ae outlioed in omge.)
To view the full eveot details, touch the pop-up window while
the pop-up wirdow is open, or slect the event itself. You cm
also touch & hold the event to ops the context mnu, then
slect View event.
€vent,
Edit m event - Assuming you have wite privileges on
touch md hold the went to opm the contcxt mnu, then select
Edit event.
Navigate within the cment day - Slide your fingsrtip up/dom.
Navigate to a p6t or future day - Slide you fingertip l€ffight
Jump to ffi@t day - Press MENU and select 'Today'. The
ffient time is highlighted.
Create new evetrt - Touch u empty time slot to open the new
Event details so@n.
sves the
Tip: Cr@te m event quickly in the Day or Wek view by
stecting m empty time slot. A new Evmt details screen
appm. The 'From' field @ntai$ lhe sttrted timc slot.
The View event icren
In the Day md Wek views, when you highlight m evflt, a
pop-up window with more details opms (the window stays
opeo for thr@ secolds). To G even more details, opfl the
Viw event scrm by touching the pop-up window.
Frcm the Agenda vieq simply solect m event to opo the Viry
went sreen. From the Mouth viry, lmt elect the day of the
event to go to eitho the Agenda or md Day view, theo s€lect
the event (Agenda view) or pop-up window (Day view).
Fiom the View event sreeq you cm do the following:
Viry details: All the hfomtion you've entered about the
event is displayed on the View event scren.
Reset reminder: Select the Reminders pop-up mmu to sel@t a
new remindq time.
Add reminder: Pre$ MEIIU md select 'Add reminder' to
cr@te mother reminder for the event. This will not replace
existing reminders. You m have up to five reminders per
event.
Delete reminder: Either sl@t the x to the right of a reminda,
or pre$ MENU md select 'Delete event'to rcmove the event
ftom you calendu. If this is a repgtitrg event, you will be
asked ifyou want to deletejust this one instance, this & future
events, or all eveDts.
Edit event: Press MENU md wl@t 'Edit event' to open the
event for editing. Ifthis is a rep@ting event, you will be uked
if
you wmt to chmge just this one instmce, this
&
futwe
events, or all eyetrts.
Event remindeB
Ifyou have set at le6t one remindq for m event (you @ set
up to five), the upcoming ovent icon will appeu in the leff side
of the status bd to remind you. To viw, dismiss, or moore the
reminda, do the following:
l. Touch the statN ba and slide you finger doM the sreen to
open the notificatioos list. Th€ upcoming evqt mme is
displayed. If you have only one reminder, the place is also
displayed.
2. To r@d mre details about the event, select the rcminder If
you have other remindos pending, they will be listed on this
rcreen o we[[. You cm Snooze or Dismi$ the reminde(s), or
36
press BACK to k@p the rminder($ pmding
notificatiom bil. The snooze time is five minutes.
Edit rn evetrt
in
the
To edit m event, you must have the View event srem open
md you mst have crated, or have wite privileges, for the
event.
I . Navigate to the
Viw
eveot
srm.
2. Pre$ MENU and setfft 'Edit event'. IfEdit event isn't e
option, then )rcu cmot make my changes to that particultr
event.
Ifyou event rcpeats, you will be asked to choose which
events you wmt chflged (only tho cu@t one you're editing,
all events in the sries, or the cuent event plus fuhre events).
3. Once you bave finished you edits, select 'Done'.
4. To delete the event, from the View event sr@rl press
Note:
MENU ed Fl@t 'Delete event'.
Go to todry
From uy viry, to jup to the screen that shoffi 'loda/', press
MENU md select 'Today'. If you ae in the Day or lVek viw,
the cuefi time wilt be highlighted.
View multiple caletrdrrs
Ifyou've qsted more the one Google Calendu on the Web
client, you can chmge which calendm ee displayed and
you phone:
Frcm my of the calend{ views, press MENU
synced to
l.
ed
Flect
More > My calendus.
2. All you synced calendm ae shom in a list. The checked
calendm re displayed on you phone.
3. To hide a calenda fiom display on you phone, cletr that
elendr's check box.
4. To remve a calendar md all its events tom you
phone,
pres MENU md relect 'Remove calendm'. On the menu that
appeils, select the calendr that you wet to rmove. Note:
Hiding or rercving calendds on you phone does not affect
the display ofcalendas on the Web.
Calend&r settirgs
From any of the calendfi views, press MENU md slect
More > Settings.
L Calendr view retting
Hide declined events; Select this check box iflou wmt all the
events you dsline to b€ hidden Aom all calendr views.
2. Reminder
sttings
37
Set alerts & notificatioN: Select to wt the 5?e of ev€nt
reminds you wmt:
. Alert - A dialog box will appeil to remind you ofthe event.
. Status bfl notification - An icon appws on the Ieft side ofthe
statN bd.
. Off- You will reive no reminder.
Select ring tono: Select Ritrg tone to opfl the ring tonc menu
ard select a ring tone sp@ific to rry event notifications. Not€
that when you check a ring tore, it plays briefly.
Vibnte: Select this check box to have you phone vibnte when
ee reminded ofm event.
Defiult reminder time: Sel@t to opm the deaut remindq
menu. The time you select will appeil by defiult ir the
Reminder wtion when you qeate a new eveot.
you
uble from you
T.ke r picture
phone and cotrrputer
Captued pictues
memory ctrd.
il€ sved to
the "DCIM' folder on you
Tip: Beforc you take a pictue, wipe the semor window (on the
back covq) to rmove any smll amouts of oil.
l.
To open the
Cam4
on the Hore screen, touch
S
mcl
select the Camera icon.
2. The Cmqa olrcns in capture mode. Frame you
within the screen md hold the phone steady. Press the OK
button to capture. Continue to hold the camera steady for a
wond affer you her the shutter sud.
3. Imediately after caphre, you catr select io Save, Set s
picture
or wallpaper), Sh{e (via a corryatible
application), or Delcte you picture.
4. If you selet to save, set s, or sh{e, yow pictue is sved to
(contact icon
Eiperiencirg Multimedia
9.1 C.mem & Picture
All the pictures you cm captue or view oa yow phone {e
stored on memry cild, which must b€ installed in you phone.
Before you cu Ne the Cmqa or viow pichues in Pictues,
9
make
sw
you have a card installed.
Load pictum ooto your memory card
R€d the imtructions below to add pictu6 to
you Memry
cad.
l. Mout you remry ctrd to you corputer
by doing one
of
the following: Rercve the memry cad ild insrt it into a
cdd reader altrched to you coEputq; or attach you phone to
you corryuter uitrg a USB @ble that crc in the box. If you
ue this metho4 make we Home > Settings > SD cild&
phone stomge > Use for USB stomge check tDx is selected. It
is selected by default.
2. On you @trputer, fmd the
muted USB &ive md open it.
3. Create a folder at the topJevel called '?ictues" or some
other desqiptive mme and op€n it.
4. Copy jpg or olher imge files into this foldq. To organize
pictues inlo albuG that will disptay in the Pictues applicatiorL
create a foldq and @py pictues thqe for each album you watrt
to d6play.
5. When finished, close the USB ddve window ed umunt or
eject the drive as required by your @mputefs op@ting system.
You can also go to Hore > Settings > SD cild& phone stoBgq
od cltr the Use for USB storage check box. Remove the USB
38
the
Pictws
application.
Vlew yolr plct[re3
To view the pictues you've captwd, s well 6 ey you've
storcd on you remory cdd go to the Gallery appli€tion:
t. To ops Pictures, on the lfomb *ren, touch p md
select Gallery icon.
2. Depending on how mtry pictues you've store4 they @y
take a few minutes to load.
3. If you've stored you pictwG in folders on you Memry
cdd, th€n the foldss will display s sptrate "album". The
top left albm always contaim all the pictues in all the alburc.
4. The individml pictures disptay in a grid in thumbmil fomt.
You cil slect to display smller or large thmbmils in
Settings.
5. To open a
pictue in full-screen viw, touch the pictue. Orce
select thE mws to sqoll through the pictues
within tbat albu. If the mows disappea, touch the picture
in irll-screeq
uom ed rcom controls.
Picture optiotrs
You co do the foltowing while in Pictues. Note: In all the
instroctioru b€low, you cu touch & hold a pictue to open the
context menu to access all actions, Bther thm opq the pictue
in full-rcren viw.
l. View full-screen: Select a pictue to opm it in full-scrcen
again to ieveal the
39
2. Shae a pictue: In full-screen view, press MENU md select
Shee. Select to shee you pictue via Messaging (MMS), or
eothq application (if you have aother application installed
on
you phone that supports shring).
3. Set 6 wallpapq: In full-scrren view, press MENU ed
wlect Set 6. From the renu that opens relect Wallpaper
Touch & hold an edge of the cropper to reveal the sizing
uows, thm dEg the edge in or out to size. Touch & dBg the
centq of the cropper to mve it within the pictue. When
you're happy with the cropped eea, wlect 'Save'.
4. Set as contact picture: In full-scrren viw, pres MENU ad
select Set s. Frcm the menu that opm, slect Contact icon.
You @ntact list opem. Sel@t the @ntact you wmt to
Gsociate with the pictwe. Touch & hold m edge ofthe croppa
to revel the sizing mom, then drag the edge in or out to siza.
Touch & drag the cmter of the cropper to move it within the
piclure.
Whm you're happy with the cropped aa, selet 'Save'. The
picture will oow appea in the Contact dgtails screm, as well re
on ey incoming call notificatioN.
7. Crcp pictwe: In full-scrren view, press MENU and sel6t
More > Crcp. Touch & hold a edge ofthe ooppq to reveal
the sizing mows, thetr drag the edge in or out to size. Touch &
drag the cmter of the mplEr to move it within the pictue. 3
When you ae happy with the crcpped uea, relect'Save'.
Select Disctrd to cmcel the crop. The crcpped pictuie is saved
to Pictures 6 a copy. Yow original is not touched.
8. Rotate picture: In full-sqeen view, prss MENU ad slect
Rotate. Select ftom Rotate left (counter-clockwise) o! Rotate
right (clockwis). Your pictre rotates md is
sved
automt ical ly.
9. Delete pictue: In full-rcren view, pess MENU md wlect
Delete.
The picture
will
b€ removed
fiom the Memory ctrd after you
confim,
10. View pictwe details: In full-sqeen view, press MENU md
seleat Moro > Details. The pichre details whdow opens. You
see the title, r€solutiorL file size, and date ofthe picture.
@
9.2 Mu$ic
To open
ud
you msic Libmry otr the Home screen, touch p
Music icon. You music is orgmired into fou
select the
40
categories: Artists, Album, Songs, and playlists. Selrct , a
etegory to view the lists within each. Once ir a category k€p
sl@ting until )ou rerch the music you wmt to play.
For enrple, if,ou Flect the Artists category you will see a
tist ofadists in A-Z order. Ifyou reltrt m artist, the list opff
to display that artisls albums. Select m albun! and the album,s
song list displays.
Lord mucic onto your Mcmory card
All the music you can listen to on your phorc is stored on
memory cdd. Read the instructiom below to add mNic to rcw
memry cad.
l. Mout you remry crd
to yow computer by doing one of
the following:
Remove the remory cad od insert it into a @d rcader
attached to you computer; or, attach you phone to your
cotrrputer Eing a USB cable that cme in the box. If you use
this method, make sue the Home > Settirgs > Data > SD cild
& phone stomge > Use for USB stomge check box is selected.
It is by defiult.
2. On your @mputer, find the
munted USB ddve ud open it.
3. Although you phone will find atl music files on )our
wd, it's advisable to keep the number of files or
memory
folders at the rcot level to a minimum. So, ifyou wish, create a
foldq at the top-level called "music" (or whatever you wmt) to
store yow files.
4. Open this folder ed copy music files into it. If you want,
crate folders within 'ltruic" to orgeize yow msic further If
you w@t to Ne certain music files as phone, trotificatior\ or
alam ring tones.
Note: lf you do not wilt a ringlone to appea in you msic
Library but you do wmt it to b€ available I a ringtore, md
thq qeate the '?itrgtones", 'hotifications", or ..alm,' folder
outside you "music" folda.
5. When finished copying, clos the USB ilrive window md
umomt or eject the &ive 6 required by you colputer,s
op€nting system. Remve the USB cable from you phone md
computtr
Play brck music
At my level in yow Library, touch & hotd a listing (a rcng,
artist, albur! or playlist) to open the context menu. Select play
to begin ptay and go to the Playback sren You cm do the
fotlowing using the Playback screen:
4l
I . Shuffle ongs: Shuffle ptays rcngs in rudom ordq. Touch to
tossle shume on and off Who the @n i8 grey, shufle is off'
2.-iepet mde: Touch to step tbrcugh rep€at mdes: rcpeat all
strgs, repat cwent $ng, don't r€Pat Grey icon).
3. Go to uy poi* in wng: Slide fingertip in prcgress bar to
desired point in a ong.
4. Playbrck @ntrct froE left to right i@ns: Go to begiming
mng, Pausd reure play and Go to lext of sog.
If a song is playhg while you re on the Libnry screen, 1ou
ce swiach to the Ptqtack mm quickly by sl@ting the
lower song bu.
Ptrylisti
You cm
create o my playlists s you wish. NotG that the
"Rwently added" playlisi is a system playlist ard camit be
deleted or rered Als, if you rEke ey voice recordings 6
part of a MMS ffiege, they will be stored automti€lly in a
playtist called "My recordings".
Cre.te s phylitt on your Phone
t. From ihg Libruy, rclict a category. From the list dBt
appeds, migate to the artist, albun\ or rcng that you wdt on
a ptaylist.
2. Touch & hold the artist, album, or sng to op4 the context
menu.
3. Select Add to playlist.
4. In the Add to ptaylist menu that opeN, rclect New
a rew playlist, or one of the qisting playlists.
5. The sng(s) ae added.
to q@te
Mrtrage yolr phylirtg
Go to the LiLrary sqwn ud wlwt 'Playlists'. All pu
playlists appeu.
iouch & bold rbe playlist to open the context menu' You cm
do tlE foltowing Aom this sr@n: Play, Edit (remmge rcngs)'
Delete ed Remme.
Crerte rington6 fmm strgg
oy ofyou songs c a phooe rhgtone:
From the Libruy, mvigate to a song you wmt to us s a
phone ritrglone.
,. Touch & hold the song in the list to open the context menu'
3. Setect UF 6 phone ringtone. The ringtore is sct as you
dehult incoming call ringlooe
4. Noq when you go to Hore > Settings > Audio profiles, md
stect a phone dtrgtore, you mrg will be listed 6 an option'
You cm set
l.
42
Delete music frem memory card
Atl the music you play o! you phone is stored on the iNerted
remry cad. From you phone, you cm delete mwid stored
on th€ cdd:
I . Frcm the Library rcrcer! Flect the Artists, Album, or Songs
category
2. Go to the scr@ that shows the artist, alburn, or sng thal
you wmt to delete.
3. Touch & hold the item to open th€ context renu.
4. S€ltrt 'D€lete'. You will b€ 6ked to @nfim that you
to delet€ the item ftom you remry c&d.
9.3 tr.l}I
wdt
Rrdio
This devire provides mdio function.
Note: Within doors or shielded environment, the rseiving
efect of mdio my be atr@ted. You cd improve the effst in
the following ways: Ntr window, adjust tlrc position of
qrphone cable or adopt
lmul
adjustment.
l0 Android Mrrket
Android McketrM provides you with diEct rccess to sftw[e
developere thrcughout the world. It is the place to go to fiod
fun gamc md cool applicatiom that have beetr mted by )ou
fellow Ar6oids. To open the M{ker. on tbe Hore wen,
toucn !
atrd seltrt the Meket icon
Ifyou ever nee.d help or have questions about Andtoid Meket,
pres MENU md select 'Help'. The Brower will take you to
the Android Mdket '1rclp & itrfo" Web page.
Brcw items to lnstall
When you ftrst flter Android M{ket, you will see featwed
item, a list of item categories, a link to swch, ad a link to
'Domloads'.
Scroll horizontally tltrough the f@tued item or select a
category to brows its contots, and thfl slect a ilbcategory.
Within ach subcategory you cm selet to view iteru srted by
popularity or by date. Note that all item in a subcategory ae
listed in €ch tab; those in the by popularity tab arc srted mst
popular to least popuk, and those in the by date tab ee srted
new6t to oldest.
lnstall an item
l. Navigate to e item you wat to imtall and select it.
2. The Item details screen appeils. Read more about the item
43
on this sqeerL including its ov@ll mting md coments by
uwrs. If 1ou scroll dom to the about the developer sectior!
you can viw mre applicatioN by this developer or smd the
dryeloper s email mesage.
3 , More info about item: Usq coments about item, Scroll
dom to view more of this developer's applications or to @il
the developer
Press MENU aDd select 'secuity' (pemissions) to vi€w the
functiom ud data this item cu accss on your phone.
4. To install the iteq select eithet Istall (item is ftee) or Buy,
whichever appeus. Itrportmt! If m application you re
domloading tequirs either rcc6s to any of you data or
control of my firnctions on yow phone, b€fore you proceed,
you'll se a scieen.that tells you. what the application can
access so you cu give yow pemission. Be sue to read this
carefulty! Be especiatty @utioN if en application has access to
mmy functions or a significmt aoout of yow data. Once you
wlect'OK'oo this srcer! you will be responsible for the
results ofusing this item on your phone.
. After
selecting 'Imtall', the item
will
start domloading
immediately.
. After slecting 'Buy', you my be oked to sign in to atr
additioml Ooogle accout. Sign in and select Puchare now if
you wanl to proceed. Step through the puclnse screms.
5. You ca see the domload progess of the item by opening
the notificatioN window. Domload prcgress appem in the
"ongoing" &ction of the notifications window. Once
domloaded md installed, a notificatioa appeas.
m item to post a coment.
Uni6tatl a downloaded item
L From the An&oid Maket Hore srer! pres MENU and
relst 'Domloads'. 2. Selmt the item you wmt to uinstall
The ltm details sre! appetrs.
3. Select 'Uninstall' button at the bottom
ofthe Me€n.
Opq dowrloaded item
l.
Frcm the Ardroid Mrket Home seen, pres MENU md
relect 'Domloads'. 2. Selst the item you want to open. The
Item details seen appffis.
3. Seltrt 'Open'button at the bottom ofthe sreen.
Read wurity pqmissioN for this item
Item you-domload md iretall on your
phone typically have
to functiomlity. you ce view what m itm hc rcces
jreu photre:
l. Frcm the Android Mdket Hore sr@n, pres MENU and
selmt 'Domloads'. 2. Select the item lreu want to @d about.
access
to on
The Item details scretr appeffi.
3. ftes MENU ard sel@t ,Struity'.
4.
All ee6 of you phorc that this item h6
so€n by seloting .OK'.
access to
re
listed.
5. Dismiss the
FLrg content
If
you have a concem about
further invstigation.
m iterl
..flag,,
1ou cm
it for
You cm frther mmge your Android Muket applications
Aom the Home > Settings > Applicatioru j - Mmge
Matrage your downloads
From the Android Mrket Home screen, slst 'Domloads'to
view yow domloaded item. From uy of the Android Maket
sqeeN, you c& piess MENU md select 'Domloads' to go to
applicatiom sreen.
Reviw lour domloaded item Rate a domloaded item
If you'd like to mte ore of the item you,ve domloaded ftom
Android Market, follow thes steps:
l. Frcm the Android Mdket Home soen, pres MENU ard
slect 'Domloads'. 2. Select the item you w@t to rate to opa
the screen.
You cm take the following etions fiom the
View domloads in progess
1. Sglecl 'My Eting' sectiotr to open rhe Rate it! diatog box.
Touch the numbq of stils )ou wmt to giye the item..mre
Domloads screen:
l. Frcm the Android Mrket hore screeq press MENU md
relect 'Domloads'. 2. lf you ue in the process of domloading
od installing an iter\ the progres will display at the top ofthe
screeI
Review I downloaded item
You cm rate dd post coments on any item you've
domloaded ftom Android Milket. Note that you must fist mte
44
its
Itfl
details screen
sttrs is b€fter!
When redy, select 'OK'to sbmit you rating.
Write r comment
Once 5ou've rated a domloaded iten! you cm post a
@ment:
l.
Frcm the Andrcid Matet Hore M@r! pre$ MENU ild
Select the item you wt to cometrt on to
elffa 'Douloads'.
45
opm its details ueen.
2. Selwt the Pos a @menl setiotr to op@ 'Post comat'
dialog box. If you dotr't we the Post a @lmilt sectio4 6rst
rate the
item
comnt, atrd th@ st@t 'OK'to Post it'
BtiDg strd/or comm€nt
Orce you've rited or @mented on m itetrL you cm always
rercve this reviw:
l. Frcm the An&oid Maket Hore srm, pres MENU ed
selot 'Downloads'. Selffl th€ item to open its datails sct@'
2- Press MENU md select 'Clw my review'.
3. Your lating md comments ue lemved.
3.
T,?e you
Remove
Vibrate: Sclect ihis check box to have yow phone vibBte when
it goes of
Repeat: The cu6t tqrcat relection is shom. To change the
wtting, sl€ct Rep@t and mke a relectbn from the mmu. To
have ;ou alam will olly go of otrc€ at tlE s€t time, don't
eleat ily of the optiore. A ore-time alm is shoM on the
Alm Clmk scren without ay dals under the sa fime.
Delete alarm: To delete the alaml press MENU md slect
Delete alarm.
Onoe you alam
scre!!
Otber rpplicatiotrs
11.1 Alam Clock
11
p
To opetr Alam Clock, otr the Hore scr@n, then touch
md select Clock icon- The Altrm clock offen 6 mny alems
s you w@t.
Set an alaru
Thrw alum re st up for you, ieady to customire' All thr@
alams ue tuned of by dofauh. Select the check box to tun on
go
the alam. If no day sh;ws undq the st time, the alam witl
of orce when the set time is rerched.
Friday'
ud
Tuesday
am
every
This alarm will go offat 9:00
To begiD, select one of the default alam to open Alarm
sttings.
foliowing options:
Select tie itteck box to tm atarm on (checked) or of
(cleued). This is the same check box that appws on tbe min
Alarm Clock sreer
iire: The time the alamwill go otris shou To chmge this
time, sel€ct Time to open the time wlstor Tap the + or buttoN od the AIIilPM buuon to set the time you wt, md
Set the
llm,
slect SeL
Tip: Touch & hold the + or - buttons to mve thrcugh the
numbm quickly.
Ring tw: Thi cment .ing tofle Ftstion is shom Select
Rin; lone ro oick mother ring tone ihat will play when tbe
alaril rings. ('when you slect a ring tooe. it plays bilefly)
ptay a
Note that;hfl you alarm goes off. lhe rhg tone will
mdimum of five minules.
then
46
goe ofr you wilt r@eive u alert with the
optiom to Smoa (for l0 minutes) or Dismis6.
Add more alarm
To add more thm three alams, from the min
press MENU
ed
select 'Add
alm'.
AIm
Ctock
Chetrge clock displ&y
You cm change the appe@ce of the clock displayed on the
maitr Alm Clock ssffi:
l. Go to the min Alm Clock scren.
2. Touch the clock with you fingertip lo opo the Clock
slection screm.
3. Slide yow fmgertip horircntally along the bottom clock face
row ed touch the face you wmt to display.
Chmge date & tiEe dlsplay
You cm change the fomr ofthe time displayed in you alums
tom
the global Settings sreen:
Go to lhe min Alm Clock $reen. On the Hore seeq
then touch
tfr* press MENU ud sl@t Settings.
l.
S
"na
Scroll dom md select 'Date & time'. The Date & time sttings
sq@n appem.
2. Use the network-prcvided Elues by eltrting .Auto@tic'
check box.
3. Select'UF 24 hou fomt'check box if you wish to us
thil 12 hou fomt.
that ralher
4. Seltrt t 'Sel@t date fomt' option to opo the renu of
fomts.
ll.2 Calculetor
veious, date
To
opfl
Calcutator, on the
Hore scrm
then touch
p
aod
select the Calculator icon.
TIE Calculator oferc two puels: bosic and adwc€d. Switch
back md forth betwm peels by pressing MENU md
Fltrting 'Advmced pael'or 'Boic panel', 6
47
you wish.
Crlcuhtor puels
Tm calq{etor's pels re available: bmic and advmed. Ue
the B6ic parel to mtq numbqs ald psbm buic additioD'
subtrrction, mltiplicatba ed divisior Us the Adwoed
pmel to i6€rt admced op€ratoE or delimiterc, such u sine,
c6ine, tmgat, sqlre mt, Pamthews, etc.
Switch brck ard 6rth betwen elolator prcls by pressing
MENU ard slecting 'Advree.d panel'or 'Bsic pel', s you
advaD@d opcmtor, th€ pmel
wish. As sotr
)ou el6t
sitcbG b@k to Bsic, whqe you operaror appes. when
you towh a k€y or the seo, the key fl8h€s red to let )ou
the red flub
know tbe *letion wro ude. Make src pu
before entaing pu rerl Nmber ot @mpleting tlrc operation
To delete mrnbs6, ore at a time, towh CLEAR on the rcrwn
To clu you operation history pm MENU ad sl€ct 'Cbu
history'.
I
il
w