1
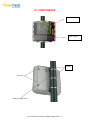
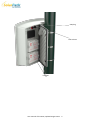
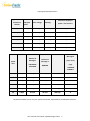
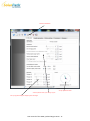
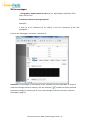
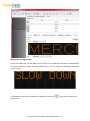
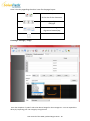
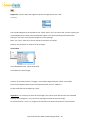
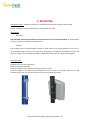
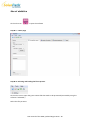
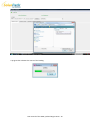
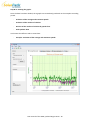
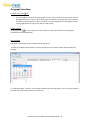
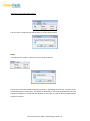
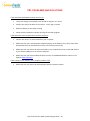
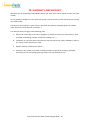
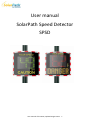
User manual SolarPath Speed Detector SPSD User manual of the SPSD, updated August 2013 1 Content I. PRESENTATION ......................................................................................................................................3 II. UNPACKING ..........................................................................................................................................3 III. COMPONENTS .....................................................................................................................................4 IV. START ..................................................................................................................................................6 Battery connection ..............................................................................................................................6 Pre-programming ................................................................................................................................6 Modify parameters..............................................................................................................................8 Download and install the software SolarPath ..............................................................................8 Change the parameters .................................................................................................................9 Write messages ........................................................................................................................... 15 Activation of the licenses (statistics, Bluetooth and Danger Signal) ................................................ 20 For SolarPath equiped with Bluetooth : safety coupling ................................................................ 21 V. MOUNTING ....................................................................................................................................... 23 VI. POWER SUPPLY ................................................................................................................................ 24 VII. COLLECTING AND PROCESSING STATISTICS .................................................................................... 26 Collecting statistics ........................................................................................................................... 26 Use of statistics ................................................................................................................................ 27 Evograph functions .......................................................................................................................... 30 VIII. PROBLEMS AND SOLUTIONS .......................................................................................................... 32 IX. WARRANTY AND SUPPORT............................................................................................................... 33 User manual of the SPSD, updated August 2013 2 I. PRESENTATION Thank you for choosing « SolarPath Speed Detector » Speed Display. It will encourage drivers to respect the speed limits by displaying: Their own speed in 3 different colors A pictogram « Danger Reminder » alternately in case of excessive speeds (optional) 5 Messages according to the speeds (optional). In addition, the device enables you to record the traffic statistics (optional). Setup and data collection for traffic statistics are done via the software « SolarPath » and the connection with the device is made by an USB cable (standard), Bluetooth (optional), remote transfer/shelf (optional) and G.P.R.S. (optional). II. UNPACKING At the time of delivery check the correspondence between the content of the cartons and the delivery note. Any mistake or any damage related to the transport should be reported to us within 2 working days. During the 2 years warranty keep the original packaging boxes and the protections for transportation. User manual of the SPSD, updated August 2013 3 III. COMPONENTS Speed display Text display braces Key locks Battery compartment User manual of the SPSD, updated August 2013 4 USB plug Dial selector batteries User manual of the SPSD, updated August 2013 5 IV. START The batteries are supplied charged. Battery connection By using the supplied key open one the battery compartment. Place the battery in vertical position using the maintaining hooks. Then connect the battery terminals. Within 3 seconds, a test procedure will start on the displays : On the speed display: 188 followed by a 3-digit number indicating the battery voltage (ex: 126 means ,6 Volts, follo ed a a red 8 for o GPR“ or a gree for GPR“ . On the text display: test OK . If nothing appears, check the battery voltage by using a voltmeter. If below 11 Volts, please contact us. Pre-programming Different thresholds are adjustable : Minimum threshold for the display Blinking threshold Threshold for the colour change Maximum threshold for the speed display (anti-record) to avoid the "race effect" Thresholds for messages In order to make the start easier, all the thresholds have already been pre-set according to the different types of speed areas, and standard messages are also pre-recorded. The dial selector enables to select the settings according to the speed limit in force on the installation site. User manual of the SPSD, updated August 2013 6 preprogrammed parameters : Type of area Position of selector Minimum displayed speed 20 mph 5 Mph 20 mph 25 mph 30 mph 30 mph 5 Mph 30 mph 35 mph 40 mph 40 mph 5 Mph 40 mph 45 mph 50 mph 50 mph 5 Mph 50 mph 55 mph 60 mph 60 mph 5 Mph 60 mph 65 mph 70 mph SP 5 Mph 20 mph 25 mph 30 mph Color change Release of Message 1 Speed limit blinking Maximum displayed speed « anti-record » Release of Message 5 Release of Message 2 PRUDENCE RALENTIR DANGER (time slots) Logo « DANGER SCHOOL» 20 5 Mph 20 mph 30 mph 160 mph 255 30 5 Mph 30 mph 40 mph 160 mph 255 40 5 Mph 40 mph 50 mph 160 mph 255 50 5 Mph 50 mph 60 mph 160 mph 255 60 5 Mph 60 mph 70 mph 160 mph 255 SP 5 Mph 30 mph 50 mph 160 mph 8 SP position enables you to use your specific thresholds, adjustable by the SolarPath software. User manual of the SPSD, updated August 2013 7 Modify parameters Download and install the software SolarPath Go to our website www.elancite.fr in "downloads». Username is "utilisateur" and password "radarSolarPath" Download the USB driver. Run the setup to start the installation. A black window that shows the progress of the installation will appear. Wait for it to disappear which will confirm the correct installation of the USB drivers User manual of the SPSD, updated August 2013 8 Load the software SolarPath and run the « setup » to start the installation. Let us guide you through the installation steps . 2 icons appear on the screen "desktop" on your computer. The software SolarPath will be used to contact the SolarPath and Evograph will enable you to generate statistical graphs. Change the parameters Note: changing the settings will affect the SP position only of the dial (specific). Therefore, once the settings have been modified as per the above described procedure , do not forget to choose the SP position of the dial in order to use new parameters. Connect your SolarPath (the device must be powered: battery charged and connected and dial positio other tha sleep positio ) to your computer by using the USB cable. At the first connection a procedure for the installation of the specific USB driver should start automatically in the bottom right of your screen. User manual of the SPSD, updated August 2013 9 Run the software « SolarPath » by clicking on the icon. The following window appears: Click on the icon , to start the automatic detection of devices. Once the confirmation message about the detection of the device appears, the connection is now established. You will be able to use the setup menu below. All the modifiable thresholds appear on the screen. The thresholds displayed are those stored in SolarPath memory. Modify the desired thresholds and, by using the icon , store the new thresholds into the SolarPath memory. The message « configuration envoyée » confirm the successful storage. You can save the configuration for later use. User manual of the SPSD, updated August 2013 10 Statistics download Set-up of internal clock Activation/deactivation of the Danger signal Set-up of speed steps for display of text messages User manual of the SPSD, updated August 2013 11 Icons key : Automatic detection of the connected material. Send to SolarPath the parameters stored in memory of speed display Send parameters from SolarPath to the SolarPath memory Recording the configuration for a later use Collecting the statistics Running a simulation on SolarPath Tricolor display: -3 colors for speed display: Green for correct speed, Amber for speed approaching posted limit, and Red for over speeding. - High brightness / low consumption LEDs, compliant with new RoHS European norms. - Auto adjustment LED brightness level. Activation: tick the box « tricolor display » Adjust : 0 to 20 M/H Complementary modes : User manual of the SPSD, updated August 2013 12 Display window: This option enables to program specific parameters automatically used some days or/and some times of the day (example: change speed limit from 50 to 30 at school times). By clicking on « yes », the following window appears: Set the desired parameters, days and times you want and click on OK. Concerning the parameterization presented as an example : at the time of schools entries and exits the thresholds automatically change from the parameters suitable for a 50 mph area (previous page) to parameters suitable for a 30 mph area. In addition, the broadcasting of the message Nr 5 only is activated during the selected periods. (This broadcasting will have to be deactivated on the main screen by increasing its broadcasting speed to 255): User manual of the SPSD, updated August 2013 13 Activation alternative display (useful if the SolarPath is equiped with the option « danger reminder ») This function enables to choose to broadcast the logo «danger reminder»: Alternately with the excessive speeds + beyond the anti-record threshold. Only beyond the anti-record threshold. By clicking on « yes », the following window appears: Select the broadcasting mode and click on OK. User manual of the SPSD, updated August 2013 14 Write messages - «full graphic» amber matrix 25 x 6 in (w x h). High display resolution: 25*6 pixels. Pitch: 0.4in Freedom of choice for message layouts: Examples: 2 lines up to 11 characters of 3in and/or 1 line of 6 characters of 6in and pi togra s… Cli k o ta Messages a d sele t SolarPath 2 : Attention : the messages in the memory of the SolarPath are not repatriated. In order to read the messages stored in memory, the test function ( ) enables to display and find back the messages in memory (at first use, the messages entered in memory are those described in page 5). User manual of the SPSD, updated August 2013 15 To write a message: Click on message 1 for example User manual of the SPSD, updated August 2013 16 Writing the messages / text In the text field enter the message of your choice. It is simulated in the matrix automatically using the resolution of the SolarPath diode matrix. You can choose to broadcast messages on 1 or 2 lines. The character size can be increased or reduced via the icon type of font. and you can choose the User manual of the SPSD, updated August 2013 17 Here is the key regarding the other icons for the page layout: Reduction/increase of the size of the characters Centring or alignment left/right Vertical centring or alignment bottom/top Automatic erase Creating a message / image From the dropdown "symbol" select the desired image for the message Nr 1. You can expand the library by importing your own image by using the icon User manual of the SPSD, updated August 2013 18 Brightness: You can adjust the brightness of the message thanks to the tab : Luminosity : The sta dard right ess orrespo ds to the eak optio . You a hoose the i te se optio recommended for the solar powered SolarPath radars or for those operating with autonomous battery) if you want to increase the brightness of the message. Note: the auto ode is ot a ti e a d this is therefore ot usa le. Caution, this parameter is common to all messages. Visual effect : In the dropdown menu, select the desired Visual effect for the message. Caution, we recommend the « full page » visual effect and possibly the O e the essage has ee ritte a d para eterised, li k o li k isual effe t. alidate ». Do the same with the messages Nr 2,3,4,5. Important : it is necessary to write the 5 messages. You cannot write and send into the SolarPath memory the message Nr 1 only. The other messages would be inserted as empty. Click on the button « send ». A progress bar will inform you about the evolution of the transfer. User manual of the SPSD, updated August 2013 19 ot Note: you can record your messages and the associated parameters via the button « record ». You will be a le to retrie e a d load the file ia the utto load later. User manual of the SPSD, updated August 2013 20 Activation of the licenses (statistics, Bluetooth, GPRS, and Danger Signal) The speed display is delivered with the options « statistics », « Bluetooth » and «Danger Reminder broadcast » included but deactivated. In order to activate them, it is necessary to be connected and bring your activation keys (license numbers) supplied at the delivery of the radar. Please contact your reseller for information. Under SolarPath, press at the same time on the keys « Ctrl » and « K ». The following window will appear: The activated options are indicated by the icon The deactivated options are indicated by the icon In the field « activation key » insert your supplied activation keys Press the ke se d . The functions are therefore activated and their statuses have to be changed on the screen. Confirm with the icon The functions purchased will then be activated and your device will be ready for use. User manual of the SPSD, updated August 2013 21 For SolarPath equipped with Bluetooth : safety coupling This option enables the easy and wireless communication with SolarPath. Maximum range is 30 feet. If your computer is not equipped with Bluetooth option, buy a Bluetooth adapter and connect it to the USB port. The following message will appear: The driver will then be automatically installed by your computer. Once the process is achieved, a message confirms correct installation of the driver: If it does not appear, make sure that the USB port is « active » and try to connect the Bluetooth key to another port. If the driver is not installed, the communication with SolarPath will not be possible. User manual of the SPSD, updated August 2013 22 Coupling your computer with SolarPath For safety reasons the connection is secured. You must perform a "coupling" so that the SolarPath is recognized and that other devices cannot communicate with him. Bluetooth icon Click on the Bluetooth icon to open the window below: Click on « ajouter un périphérique sans fil » (add a wireless device) Turn on SolarPath and put it near the radar. Among the detected devices there should be « ELANCITE RADAR » or« RADAR EXEMPLE ». Click o it. You’ll e the asked to e ter a « coupling code ». Enter this code: Fjs7bK3mPeLu64EQ Then validate or type « suivant » (next) A message indicates that the operation is successful. Note: it is common that the coupling fails at the first attempt. Try again a second time or a third time. Once your computer and SolarPath are coupled, your speed display will automatically be detected under SolarPath via the automatic detection procedure. User manual of the SPSD, updated August 2013 23 V. MOUNTING Installation height : between 3 and 16 feet (measured from the lower edge of the housing). Off set : the device can be installed up to 10 feet offside the road. Orientation : - Horizontal The SolarPath must be perpendicular to the road. Even in case of important offset, no angle should be given in order to maintain an optimal scope. - Vertical The housing must be installed plumb, except in some cases of very steep gradient. In this case, a vertical angle similar to the one of the gradient can be given to enable the radar beam to match the slope. The angle can be created by putting a wedge behind the upper part of the mounting bar. Fixing the radar : Standard: use your own fixing tools With the fixing kit (optional) : Strap the steel bar to the post by using collar clamps or strips. Screw the hooks on the back of the SolarPath and once you are on site insert them into the bar attached to the pole. A hole is provided so that you can padlock the whole. User manual of the SPSD, updated August 2013 24 Checking : Once the device has been installed, the scope should range from 330 to 820 feet. Some elements may alter this scope: non-straight a is, prese e of o sta les, fogs…. VI. POWER SUPPLY Depending on the option chosen when placing the order, 3 power supply modes are possible: The battery is systematically used. The different supply modes are used to recharge it: - External charger : This is a mains charger 12 Volts 2 Ah with automatic stop at the load. 9 hours charging enable a complete recharge of the battery. - Charger for the public lighting or permanent current : This is a mains charger with a quick charging 4 Ah. In case of power supplied by the public lighting, the battery is recharged during the night and enables the radar to function during the day. The male and female connection plugs are provided at the end of the power cable. The electronic card is protected against overvoltage by an electronic fuse (including an automatic self-reset). It is however recommended to protect all the installation by a differential circuit breaker 30 mA. Regarding the connection of the female plug to the public lighting network, the following connection must be achieved: Connect the neutral cable to the pitch thread marked with an « N » Connect the phase cable phase to the pitch thread marked with « 1 » Connect the earth to the central pitch thread. - Solar panel: this is an 80 Watts solar panel with a yield of 5 to 35 Ah per jour (simulation with an exposure 35° south of Lille). The optimal orientation is given by the square elbow of solar panel. The fixing kit supplied enables the installation the same way as with the SolarPath radar. Orientate the panel southward ideally. It is recommended to padlock the whole via the hole provided. Connect the whole via the cable wih oriented terminals. In order to double the autonomy, a second housing (on the left back of the panel) can house a second battery. User manual of the SPSD, updated August 2013 25 Description of the battery and advice for use The batteries used are brand YUASA. These lead-acid batteries are watertight, 12 Volts 17 or 22 Ah. Their lifetime depends on the type of use. In order to optimise it, important discharges have to be avoided. The voltage should always be superior to 11V. The electronic card contains a protection process in case of discharge: From 11,3V down to 11 Volts: speed display stopped and the display broadcast a « 1 » to alert the mayor of a low voltage Below 11 Volts: Automatic shutdown of the device until it gets a voltage of 11.8 Volts. In case of extended non-use, make sure that the battery voltage never goes below 11Volts in order to avoid altering its storage capacity. Electric protection A fuse 6.3A is positioned at the battery output to protect the device in case of polarity reversal. In case of malfunctioning during use, check it first. A fuse inside the housing protects the whole device too. It is however recommended to install a differential circuit breaker upstream (30 Ma type) for the SolarPath powered supplied by the public lighting or by the permanent electrical network. Standards The SolarPath meets all the French and European standards in force on this type of device, including: the Directive R&TTE 1999/5/CE on communications, the Directive electromagnetic compatibility 2004/108/CE (EMC), the Directive low voltage protection 2006/95/CE, the Directive RoHS 2002/95/CE. User manual of the SPSD, updated August 2013 26 VII. COLLECTING AND PROCESSING STATISTICS Collecting statistics Connect to SolarPath (with Bluetooth or USB), open SolarPath and make the connection with the device (cf. page 8). Once the communication is established, Press the icon memory. that symbolizes the retrieving of the statistics contained in the SolarPath You are then asked in which file you wish to record the statistics and what name you want to give to it. Erasing the device data or not. Internal memory capacity of SolarPath is 6 months. If the data have not been retrieved, writing the memory is locked and the data are stored. At the time of delivery of the radar, some days may be recorded without data. This would therefore slow down the data collection. To avoid this you can reset the memory before the first start by clicking on « erase » in the file menu. User manual of the SPSD, updated August 2013 27 Use of statistics Click on the icon to open the software Step Nr 1. Home page Step Nr 2. Selecting and loading the file to process Click on this icon to open the gross statistic file that needs to be processed (retrieved by using the soft are SolarPath Select the file you want User manual of the SPSD, updated August 2013 28 A progress bar indicates the status of the loading User manual of the SPSD, updated August 2013 29 Step Nr 3. Viewing the graphs Once the data have been loaded, the 4 graphs are immediately produced on the complete recording period. - Evolution of the average and maximum speeds - Evolution of the number of vehicles - Division of the number of vehicles by speed slices - And synthetic data Just browse the different tabs to view them: - Example : Evolution of the average and maximum speeds User manual of the SPSD, updated August 2013 30 Evograph functions Printing into a PDF file This key enables to transfer the PDF graphs in order to store them or to print them. You will be asked whether you want to print the 4 graphs or whether you prefer the active view only. The fields «measuring place » and « comments » can be completed and will appear directly on the page bottom of your prints (PDF or paper sheet). Export to Excel By using the icon , you can export your data to Excel in order to produce the custom graphs compile data (recording periods). Selecting data The graphs will initially cover the whole measuring period. In order to produce specific data on a certain period you can use the selection function with the calendar. A « magnifying glass » function on the graph enables to present the graph over a very precise period (Example: to trace a speed excess to the minute). User manual of the SPSD, updated August 2013 31 Precision (= time scale of the graphs ) You can select a scale based on half an hour or an hour (time stamp) Scope : This adjustment is made in relation to the counting of vehicles. The device records the number of displays accurately. Depending on the scope, a vehicle can be recorded between 1 and 8 times. The software, depending on the scope chosen divides the total number of displays by a coefficient that depends on the scope in order to define an approximate number of vehicles. User manual of the SPSD, updated August 2013 32 VIII. PROBLEMS AND SOLUTIONS If the SolarPath Speed Detector does not turn on: Check the voltage of the battery that should be superior to à 11.8V Check if the dial on the back on the radar is in the right position Move the battery to the other housing Check the fuse situated in the back housing of the radar (page 8) If the detection of the material does not work anymore : Check if the drivers are well installed on your computer. Make sure that your radar be power supplied (display of the battery test), check if the dial is well positioned on an area different from the one of the previous day. Make sure that your device be well connected to you computer by means of the USB cable or try on another USB port or on another computer. Make sure that you have installed the latest version of SOLARPATH\Elancite online on our website www.elancite.fr If the transfer of the statistics is not properly made or fails: Make sure that your device be well equipped with the statistics option User manual of the SPSD, updated August 2013 33 IX. WARRANTY AND SUPPORT We thank you for purchasing a SOLARPATH device. For after-sales service, please contact your local reseller. For any question related to use for which the answers cannot be found in this manual, please contact your local reseller. The device is warranted for 2 years from the purchase date (battery excepted) against any defect none related to use e ept falls, a dalis … This warranty does not apply in the following cases: A. Abuse and misuse due to the user’s eglige e or fault use o trar to i stru tio s or none pro ided, isha dli g, ollapse, a ide tal reakage, et … ; B. Installation or use of this device inconsistent with the technical or safety standards in force in the country where the device is used. C. Repairs made by unauthorized repairer ; D. Accidents, acts of God or any other cause beyond the control of the company Solarpath, especially, but not exclusively, lightning, floods, fire, i il distur a e, et … User manual of the SPSD, updated August 2013 34