1
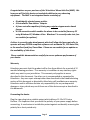
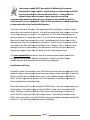
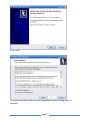
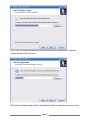
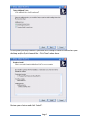
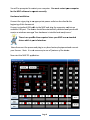
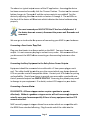
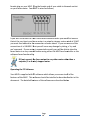
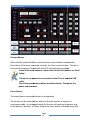
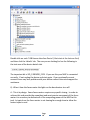
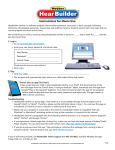
Mount Hub Pro v1.31
User Manual
http://www.hitecastro.co.uk
[email protected]
Table of Contents
Warranty
Connecting the device
Software Installation and Setup
Hardware Installation
……………Connecting a Dew Heater
……………Connecting Other Equipment
……………Connecting a Focus Motor
Operating The PC Software
……………Connect Button
……………Focus Control
……………Focus Presets
……………Heater Control
……………Power Output Control
……………Night Vision Mode
PC/Manual Mode Switch
General Dew Removal Advice
Troubleshooting
Contacting Us
Page 2
3
3
4
8
9
9
9
10
11
11
12
14
14
15
15
16
16
19
Congratulations on your purchase of the ‘HitecAstro’ Mount Hub Pro (MHP). We
hope you will find this device an invaluable addition to your observing
equipment . The MHP is an integrated device consisting of
• 8 Individually selected power outlets.
• 4 Controllable ‘Dew Heater’ Outputs.
• A focus controller capable of driving any unipolar stepper motor based
focuser.
• A USB connection which enables the above to be controlled from any PC
using Windows XP, Windows Vista. Windows 7 is currently under test (see
our website for updates.)
A driver is currently under development which will allow the focus controller to
operate with any ASCOM compliant software such as Maxim DL, CCD Auto Pilot,
or the excellent (and free) Focus Max. Please see our website for an update on
the availability of this driver.
Please read this documentation carefully to ensure optimum performance of
your device.
Warranty
HitecAstro warrants that this product will be free from defects for a period of 12
months following purchase. This warranty is in addition to any statutory rights
which may exist in your jurisdiction. This warranty only applies to use as
described in this document. No other use is recommended or supported by
HitecAstro. Any user repair attempt other than described in the troubleshooting
section of this document or directed by HitecAstro will invalidate your warranty.
HitecAstro and its affiliates disclaim any responsibility for any consequential
damage or injury which may result from use of this device except as described in
this document.
Connecting the device
Plug the cigar plug into a suitable output which delivers 12-15v DC Centre
Positive. It is important that you check the polarity of your power supply before
connecting. A mechanism is installed to protect against accidentally reversing the
polarity for a short period only.
Page 3
Your power supply MUST be capable of delivering the current
(measured in Amps) which is required by you’re the device and ALSO
any devices which is powered from the device
device. Ensure that the
output voltage of your power supply does not exceed the
recommended maximum
aximum rating of your equipment. Also check the polarity
requirements for your equipment. Refer to the manufacturer’s documentation
to determine the rating for individual devices.
amps. Your equipment/focuser/heaters must not draw
dr
Your unit is fused at 15amps.
more than this amount of current. It should be noted that dew heaters can draw
a very large amount of current. For example a 14” SCT dew removal tape can
draw as much as 4.1 amps on its own. If you do draw more power that this and
blow the 15amp fuse please refer to the ‘troubleshooting’ section later in this
document for the fuse replacement procedure. Under no circumstances should
you replace the fuse with one rated higher than 15amps.
amps. This is likely to cause
damage to the unit and possibly your eequipment and will void your warranty.
warra
Should you require more than 15 amps you will need multiple units.
It is your responsibility to ensure that your chosen power supply can deliver
enough current to power the device (typically .5amps) and your chosen
combination
ombination of dew heaters/focuser/
heaters/focuser/ancillary equipment.
Installation and Setup
Carefully choose a location for your MHP which will minimize the opportunity for
cables to snag or wrap around your telescope/mount when slewing to all parts of
the sky. Attach the provided Velcro strip to your chosen location and affix the
MHP. At this stage
tage do not connect it to the computer or ancillary equipment.
Now complete the software setup.
Place the software CD into an available CD/DVD drive. Run the setup program by
clicking Start->> Run and typing <cd drive>:
drive>:\MHP_setup.exe
MHP_setup.exe in the box labeled
Open.
pen. Replace <cd drive> with the drive letter corresponding to the drive in
which the CD is inserted. Click OK to begin setup. Alternatively browse to the
MHP_Setup.exe in the root of the CD drive by using windows explorer and double
click on it. You will be presented with the following;
Page 4
Click ‘Next’
You must read and accept the license agreement before clicking ‘Next’ to
proceed.
Page 5
Click ‘Next’ to accept the default install location on your hard drive or you may
choose an alternative location.
Click ‘Next’ to allow setup install a ‘Start Menu’ folder or choose one of your own.
Page 6
At this point you may choose if you wish MHP Setup to install a shortcut on your
desktop and/or Quick Launch Bar. Click ‘Next’ when done.
Review your choices and click ‘Install’.
Page 7
You will be prompted to restart your computer. You must restart your computer
for the MHP software to operate correctly.
Hardware installation.
Connect the cigar plug to an appropriate power outlet as described in the
beginning of this document.
Connect a standard USB cable to the MHP and plug the computer end into an
available USB port. The device should be automatically detected and you should
receive a windows message ‘Your hardware is installed and ready to use’.
use’
There is no specific driver required since your MHP uses a standard
driver which is part of windows.
Now disconnect the power and plug in any dew heaters/equipment and connect
your focuser. Note: It is not necessary to use all features of the device.
Now start the MHP PC application.
Page 8
The above is a typical output screen of the PC application. Assuming the device
has been connected correctly click the ‘Connect’ button. The text on the connect
button changes to ‘Connected’ and the various controls are enable
enabled.
d. Test the
device by adjusting the slider controls on heaters 1 through 4. The red LEDs on
the front of the device will illuminate which indicates the device has been setup
properly.
You must connect your MHP AFTER the PC has been fully booted. If
the
he device does not connect, disconnect the power wait 5 seconds and
reconnect.
We now go on to describe the process of connecting your MHP to your hardware.
Connecting a Dew Heater Tape/Pad.
Plug your dew heaterr to a chosen outlet on the MHP
MHP.. You may choose any
output. It is not necessary to plug in and out in any order. We recommend that
you disconnect the MHP before connecting or disconnecting heaters or other
devices.
Connecting Ancillary Equipment to the Relay Driven Power Outputs.
Equipment
quipment should be connected via a cable with a 2.1mm power plug on each
end. The cable should be rated to carry the current which your device demands.
HTA can provide a set of 8 compatible cables. Contact your HTA dealer for pricing
and availability. Should you choose to provide your own cables you should note
that all powered outputs aree CENTRE POSITIVE.. Reversing this polarity may result
in damage to your equipment. If in doubt
doubt, contact HTA support or your dealer.
Connecting a Focuser Motor
PLEASE NOTE: All focus stepper motors require a gearbox to operate
effectively. Without a gearbox a stepper motor will not have enough torque to
actually move your focuser especially if there is heavy equipment such as CCD
cameras attached.
MHP currently supports stepper driven focus motors which are compatible with
the ROBO focus standard of wiring. Plug the male end of the cable into the
Page 9
female plug on your MHP. Plug the female end of your cable to the male socket
on your focus motor. Your
ur MHP is wired as follows;
If you wish to connect to a non robo
robo-focus
focus standard motor you must first ensure
that at the very least your focus motor is a unipolar stepper motor rated at 12vDC
you must then adhere to the connection scheme above. If you aare
re unsure of the
connections it is UNLIKELY that you will cause any damage by taking a ‘try and
see’ approach. If your motor is connected correctly you will be able to slew the
focus motor in a very smooth fashion using either the MHP hand controller or the
software focus functionality.
DO not connect the focus output to any other motor other than a
unipolar (5 or 6 wire) stepper motor.
Operating the PC Software.
Your MHP is supplied with PC software which allows you access to all of the
features of the MHP. This software should be installed as described earlier in this
document. The detailed features of the software are described below
Page
10
Connect Button
When initially started all of the control buttons on the software are disabled.
Once the unit has been connected correctly, click the connect button. The text in
this control changes to ‘Connected’ and all of the controls are enabled.
Some of the most common reasons the unit will not connect are listed
below
The unit is not powered or conne
connected
cted to the PC via a standard USB
cable.
The unit was powered on before windows started. Disconnect the
power and reconnect.
Focus Control
This area allows a connected focuser to be operated.
The focuser can be moved either with by a discreet number of steps or in
continuous mode. In continuous mode the focuser will continue to slew as long
as the button is pressed. In ‘Steps’ mode enter the number of discreet steps you
Page
11
wish your focuser to move. Each press of the Focus In/Out buttons will move this
number of steps. This is very useful for achieving very fine focus.
The Focus In/Focus Out button should be fairly self explanatory. Push these
buttons to move your focuser either continuously or by a number of discreet
steps.
The speed at which your focuser moves is set by sliding the ‘Focus Speed’ slider
bar. Choose a value between 0 (Very Slow) or 100 (Very Fast).
The actual speed at which your focuser will slew is dependent on two factors.
• The resolution of your stepper motor.
• The ratio of the motor gearbox.
We recommend a ratio of between 50:1 and 70:1 to provide a good balance
between focus speed and torque.
PLEASE NOTE: All focus stepper motors require a gearbox to operate
effectively. Without a gearbox a stepper motor will not have enough torque to
actually move your focuser especially if there is heavy equipment such as CCD
cameras attached.
Absolute Positioning and Presets.
Your MHP software is capable of repeatedly setting your focuser to the exact
same position time after time. The current position of your focuser is displayed.
To move to a new position enter a value in the New Position field and click the
slew button underneath. Your focuser slews from the old position to the new
position. The position you just entered becomes the new current position.
Example 1:
Current Position: 3000
New Position: 4000
This will cause the focuser to move outward by 1000 steps.
Example 2:
Page
12
Current Position: 3000
New Position: 2500
This will cause the focuser to move inward by 500 steps.
It may not be apparent at first that this feature allows you to set your focus
position to suit a wide variety of your telescope eyepieces and CCD equipment.
Let’s see how you can do this.
To begin with your focuser must start with a known reference position. The exact
value of this position is not important, it is important that you use this same value
every time.
On setting up your equipment
equipment, first focus your telescope using a known eyepiece
or CCD camera (Use the In/Out buttons or handset). Now set the current position
to your reference value by entering this value in the required field and clicking
‘Set’. Next insert another piece of equipm
equipment which you would like to use. Again
focus using the handset.. Note the value now shown in the Current Position field.
Enter this into one of the preset fields. You may repeat this operation for up to
four pieces of equipment. Note that this is a onetime setup and is not required
every time you use the equipment. One you have the presets determined and
entered. Click the ‘Save Values’ button toward the bottom left of the MHP
screen. This will cause all the user entered values on the screen to be sa
saved and
reloaded each time you start the software. With the preset offsets stored you
can easily change focus when you change equipment (or CCD filters) by simply
clicking buttons 1, 2, 3,, or 4 underneath the relevant preset value.
Note that although thee above setup is a once off operation you must ensure that
the focuser is at the initial reference position each time you start up so that the
stored presets contain the correct offsets for your equipment.
It is good practice to return you focuser to the reference position
each time you finish observing. This way your focuser is at the
reference position when you next start up. This way all you need do
is enter your pre
pre-decided
decided reference value in the ‘Current Position’
field.
ap Directions’ checkbox. This causes the focus motor
Lastly please note the ‘Swap
to move in the opposite direction when the In/Out buttons (or handset) is
Page
13
pressed. This is useful if your focus motor moves in a different direction than you
might expect.
Heater Control.
Four slider controls are provided for setting the power to each of the four dew
heater outputs. Simply move the slider to your chosen value and that value (as a
percentage of full power) will be output to your dew heater tape/pads. E.g. a
value of 75 will operate your heater at 75% of full power. You can also click on
any of the quick set buttons provided to set a value of 0%, 25%, 50%, 75% or
100% of full power.
At the top of each slider control is a text field initially set at C11, C12, C13 and
C14. You may click on these fields and change them to something meaningful to
you.
Clicking on the ‘Save Values’ button will remember the set values each time the
MHP starts up (including labels).
Power Output Control
Your MHP has 8 controllable relay driven outputs. The power to these outputs
can be turned on/off by clicking the appropriate button. The order on screen is
from top left to bottom right being outputs 1 through 8.
Clicking on the gray label field underneath allows you rename each output to
something meaningful to you.
Clicking on the ‘Save Values’ button will remember the set names each time the
MHP starts up. However for safety reasons, on startup all power outputs are off.
This also allows you the added benefit of starting up your equipment in a chosen
order if required.
Lastly there are two buttons named ‘All On’ and ‘All Off’. We don’t think you
need too much explanation as to the functions of these buttons!
Page
14
Night Vision Mode.
Clicking on View->> Night Vision causes all of the controls on the MHP software to
red to help preserve your night vision. This does not affect windows or any other
open applications you may also be using.
This concludes the section describing the operation of the software. We hope
you agree that we have provided an eeasy
asy to use interface which is effective and
functional. We welcome any suggestions for future improvement.
PC/Manual Mode Switch
The dew heater outputs and focus control are capable of being operated even if
the unit is not connected to a PC.
‘Manual’.
Switch thee toggle switch to ‘Manual’
Adjust
djust the four turn knobs on the side of the unit to the power output required
for each heater. The brightness of the LED above each control knob indicated the
level of power set (Brightest 100% - LED off 0%)
The focuser may be operated by the optional handset (contact your HTA dealer
for availability and pricing). The push buttons on the handset slew the focuser in
and out. The turn knob will set the slew speed.
Although the power outputs and focuser cannot be set in manu
manual
al mode, the unit
will not turn off any of the power outputs if the unit is switched between
manual/pc mode.
If the unit is accidentally disconnected from the PC (or even if the PC
is powered off), the
he power outputs and heater tapes will remain at
theirr set values as long as the MHP is powered. This is important as
some equipment (e.g. certain CCD cameras have a power down
procedure which may involve the unit being gently warmed. You MUST power
down your equipment in accordance with the manufactures iinstructions.
nstructions.
Failure to do so may result in damage to your third party equipment.
Page
15
General Dew Removal Advice.
Dew removal tapes do not generally apply enough heat to cause degradation of
seeing under normal conditions. However we do recommend that you should not
leave your heater tapes on full power all of the time. On good nights you may
leave the heaters on at about 20% - 40% to keep your optics dew free.
Experimentation will determine the minimum power required to keep your
telescopes free of dew given your location. The developers have found that a
setting of around 50% is enough to keep optics dew free on even a relatively
damp and still night.
Troubleshooting
Q: My Mount Hub Pro does not operate at all.
A: Ensure that you have connected the device to an appropriate power supply.
(12v centre positive) See ‘Connecting the Device’ earlier in this document.
Disconnect and Reconnect the device. Also ensure that the 15amp fuse has not
blown, see below.
Q: Fuse Replacement.
A: The 15 amp protection fuse may have blown. This fuse is located inside the
cigar plug which connects to the power outlet. Procure a suitable replacement
from your local electrical retailer (or contact Hitecastro). To replace unscrew the
silver colored knurled ring at the tip of the cigar plug. Remove this taking care not
to lose the tip inside the knurled ring. You will be able to remove the fuse inside
and fit a replacement. Replace the knurled ring and tip carefully. When fitted
correctly you should be able to push the tip in slightly with a firm press of your
thumb.
Q: My MHP appears to operate properly but my heater tapes are not getting
warm.
A: Note that heater tapes are not designed to get very warm. In fact when
operated properly they may not even feel warm to the touch. In any case check
that the heater tapes are plugged in securely. Dew heater tapes may also be
quite fragile. Ensure that the tape is not damaged in any way according to the
procedure advised by the tape manufacturer.
Page
16
If you feel confident to do so you may measure the voltage of your heater output
with a good quality voltmeter. With the heater output turned up full you should
be able to measure a voltage corresponding to the full output voltage of your
power supply. This voltage will decrease as the corresponding knob is decreased
and will read close to 0v when turned fully anticlockwise. Take care not to create
a short circuit by creating a direct connection between the positive and negative
output on any channels. This may result in damage to your power supply. Do not
undertake this procedure unless you are qualified to do so.
Q I click ‘Connect’ but nothing happens
A First ensure that all cables are seated correctly and the unit is correctly
powered. If the unit was started before windows, disconnect and reconnect the
power supply. If the unit still does not connect, check that the device has been
detected by windows as a ‘USB Human Interface Device’ as follows.
Open Device Manager (Click Start->Run type ‘devmgmt.msc’ (without the quotes)
and click ok. Device Manager Opens. Look for the area labeled ‘Human Interface
Devices’. Click the ‘+’ sign to its left to expand this area. You may see many
Human Interface Devices.
Page
17
Double click on each ‘USB Human Interface Device’ (Hint start at the last one first)
and then click the ‘details’ tab. The one you are looking for has the following in
the text area of the device details tab.
The important bit is VID_12BF&PID_FF03. If you see this your MHP is connected
correctly. If not unplug the device and start again. If you continually cannot
connect there may be a problem with your device contact hitecastro support for
assistance.
Q: When I slew the focus motor the lights on the dew heaters turn off.
A: This is by design. Some focus motors require very specific timing. In order to
achieve this and provide the smoothest and most precise movement of the focus
motor it is necessary to dedicate all of the computing power of the MHP to this
task. In typical use the focus motor is not slewing for enough time to allow the
heater tapes to cool.
Page
18
Contacting Us
If the above does not solve your problem or you have any questions contact us by
e-mailing
[email protected]
or by contacting your retailer.
For software and driver updates see our website
http://www.hitecastro.co.uk
Page
19