1
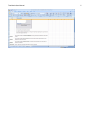
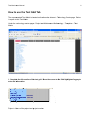
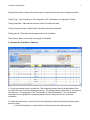
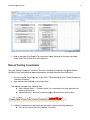
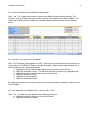
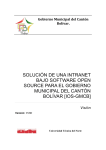
Test Matrix User Manual
January 5, 2012
Revision 2
Test Matrix User Manual
Table of Contents:
Overview of this training manual ............................................................................................ 3 Overview of the Test Matrix .................................................................................................... 4 Purpose - Scope ............................................................................................................... 4 Test Grid ........................................................................................................................... 4 Results ............................................................................................................................. 4 Special Note ..................................................................................................................... 4 How to use the Test Grid Tab................................................................................................. 6 Results Tab ............................................................................................................................ 8 Role of Testing Coordinator .................................................................................................... 9 Q&A ...................................................................................................................................... 10 2
Test Matrix User Manual
Overview of this training manual
This document serves as a supplement and guide to the recommended Test Matrix. It provides a
summary of functionality and features available. It provides detailed information on how to use this
recommended Test Matrix.
If there are any questions after reviewing this manual, please contact the IT – Application Quality
Team using the Lotus Notes Group ‘IT Application Quality’.
3
Test Matrix User
U
Manual
4
Overvie
ew of the
e Test Matrix
M
The test ma
atrix is an excel documen
nt that is ma
ade up of 4 ta
abs:
1. Purp
pose-Scope
2. Testt Grid
3. Resu
ults
4. Speccial Note
Purpose - Scope
S
The ‘Purposse’ tab is a place
p
for the user to ente
er any testing
g information that outline
es the scope
e and
procedures of the testin
ng that will be
e completed
d using the te
est grid. Thiis helps everyone involvved with
the testing to
t understan
nd what it is they
t
are tryin
ng to accom
mplish and ho
ow they are expected to do it.
Test Grid
The ‘Test Grid’
G
tab conttains the actual test matrrix, including
g the details for the test scenarios an
nd test
cases.
Results
This tab con
ntains the su
ummary information from
m the testing
g completed on the test matrix
m
tab. This
T
summary information includes the overall
o
testin
ng condition (Green, Yelllow, Red), th
he number of
o test
cases comp
pleted, the pe
ercentage co
ompleted, th
he number of
o cases passed and the number failed as
well as iden
ntifying progrress on high priority test cases.
Special No
ote
This provide
es informatio
on on what the user should be aware
e when usin
ng the Test Matrix
M
to enssure that
the calculatiion in the Re
esult tab is correct.
c
Thiss tab is not usually
u
changed by the Testing
T
Coorrdinator,
but is used as
a a user gu
uide and/or trouble
t
shoo
oting guide. See sample
e below.
Test Matrix User Manual
5
Test Matrix User
U
Manual
6
How to use the Test Grrid Tab
The recomm
mended Test Matrix is lo
ocated on the
e Ameritas Intranet – Te
echnology Center page. Below
is a path to this Test Ma
atrix.
T
Center
C
page
e – Project an
nd Maintena
ance Method
dology – Tem
mplates – Te
est
Under the Technology
Matrix
1. Complete
e the title section of th
he test grid. Move the cursor to th
he field high
hlighted in gray
g
to
enter the in
nformation.
Project = Na
ame of the project
p
and project
p
numb
ber
Test Matrix User Manual
7
Region/Environment = Name of the environment or region that this test matrix is being executed in.
Testing Type: Type of testing i.e. Unit, Integration, CAT, Performance, or Regression Testing
Testing Start Date: Date that the execution of this Test Matrix will start
Testing Completion Date: Date that this Test Matrix should be completed
Testing sign off: Date that the tester signed off on this Test Matrix
Tester Name: Name of the tester executing this Test Matrix
2. Complete the Test Matrix - Planning
2.1 In the test scenario column, number the Test Scenario(s) and provide a brief description of the
Test Scenario in the Test Case Description column. The example shown above uses “A” as a label for
Test Scenario. The description of the Test Scenario is “Partial Withdrawal”. The Test Scenario
information row is highlighted for formatting reason so that it stands out from the Test Case
information.
2.2 In the test case column, number the Test Case #(s) and provide the following information about
each Test Case.
a. Test Case Description – exact detail of how this test case should be executed
Test Matrix User Manual
8
b. Priority – select the priority from the drop down box.
High = testing not complete until executed and signed off; items critical to complete the
project, implement the modification, or correct the problem; include items that are high
frequency, high dollar impact, or immediate impact
Medium = testing not complete until executed and signed off; must still be completed
before move to production; may not have immediate implementation impact
Low = may not be completed prior to moving to production due to time constraints;
does not have large impacts or dollar expense; end user is willing to accept the risk
c. Expected Results – provide description on what you expect the “pass” result to be.
3. Complete the Test Matrix - Execution
When you are ready to execute the Test Matrix, the following fields should be completed.
3.1 Process Date: This is the date that the particular Test case was executed.
3.2 P/F: This is the result of the executed test case. Select either “P” or “F” from a drop down box.
3.3 Notes: This is an optional field that a tester can use for their own notes.
3.4 PLOG/Remedy #: This field is used to track any PLOG or remedy number associated with the
Test Case.
3.5 Tester Initial: This is the field used to track each tester initial. This is used in the event that there
are multiple testers using the same test matrix and each test case may be executed by a different
tester.
3.6 Factor 1 and Factor 2: These fields are free-form fields and can be customized to fit the needs of
a specific Test Matrix.
3.7 Traceability: This column is used to track traceability between test scenario/test cases and
requirement.
The test matrix can be further customized by adding additional Columns after Column N.
Results Tab
1. Results Tab displays testing status information, which is automatically calculated.
2. Here is a picture of Results Tab
Test Matrix User
U
Manual
e: A summarry of the Ressults Tab infformation is also
a
displayed in the upper right han
nd
3. Note
corner of the Test Grid tab fo
or a quick re
eference
Role of Testing Coordinator
Using the Te
esting Coord
dinator Test Matrix Sum
mmary, the Te
esting Coord
dinator can gather
g
Resu
ults
information from each in
ndividual tesster and dete
ermine a tessting status for
f the entire
e project.
1. Go to the Intrane
et Technolog
gy tab. In th
he UNIFI IT Flow
F
section
n, find the “T
Testing Coorrdinator
Testt Matrix Sum
mmary”.
2. Open and save this
t
template
e to the project folder.
This tem
mplate consis
sts of the folllowing tabs
a Data 1 th
a.
hrough Data 7 – Contain
ns copies of the results tab
t from eacch Individual test
matrix for the projectt.
b Master Summary
b.
S
– Provides
P
a summary pag
ge of Resultss for the enttire project.
3. Copyy the Resultts tab from each
e
individu
ual test matrix using the following pro
ocedure.
a Click on the Results tab of an ind
a.
dividual Test Matrix
9
Test Matrix User Manual
10
b. Left click on the top-far left hand corner of the spreadsheet. The entire spreadsheet is
now selected/highlighted
c. Right click and select “copy”
4. Paste the Results tab to Testing Coordinator Test Matrix Summary
a. Click Data1 tab
b. Right click on the top-far left hand corner of the tab and select “Paste”.
Continue copying and pasting each individual Test Matrix results tab using “Data2..3..and so
on”.
The Testing Coordinator Test Matrix Summary is set up to accommodate a total of 7 different Test
Matrix results, starting with the “Data1” tab. If additional tabs are needed for a project, please contact
IT Application Quality Team for assistance.
The Master Summary tab provides a summary of various Test Matrix results which can be used to
simplify status reporting. This summary information is automatically calculated for the project by the
test matrix spreadsheet. See sample below.
Q&A
Q1: If the testing completion date of the project changes after the testing starts, should I update the
Test Matrix – Testing Completion Date?
Ans1: Yes. The Testing Completion Date field on the Test Matrix should accurately represent the
date that the testing of this project is scheduled to be completed.
Test Matrix User Manual
11
Q2: Can this Test Matrix accommodate multiple testers?
Ans2: Yes. The Testers Initial column is used to track different testers executing various Test
Scenario. A list of multiple tester names can be input in Tester Name field of the Test Matrix. The
testing sign off field can have multiple sign off dates based on different testers. See an example
below.
Q3: How can I insert rows in the Test Matrix?
Ans3: The Test Matrix is formulated to row 500. Column K has a formula that must be present in all
rows in order for the RESULTS Page to calculate accurately. When inserting rows between row 11
and 500, please use the following procedure.
a. Highlight the entire row below the location where you want to insert the row.
b. Right click and select “Insert”. This will insert an empty row above your highlighted row.
c. Highlight the entire row above your newly inserted row(s).
d. Right click and select “Copy”.
e. Highlight the inserted row(s)
f. Right click and select “Paste”
By following this procedure, the newly inserted row(s) has the formula and validation required on the
Test Grid page.
Q4: Can I delete any rows between row 11 and row 500? How?
Ans4: Yes. To delete any rows, please use the following procedure.
a. Highlight the entire row that you would like to delete.
b. Right click and select “Delete”.