1
E-MANUAL
Thank you for purchasing
To receive more complete
your product at
this Samsung product.
service, please register
www.samsung.com/register
Model_
Seria_ No._
e-Manual
Viewing
Guide
Audio
the e-Manual
1
Scrolling
a Page
1
Using
Top
the
Ret_rning
2
Searching
the Index
2
Searching
Pages
2
Closi _g the e-Manual
Jumping
2
Updating
to the Home
to a Menu
For the LED 7450/7500, 8000 series models
15
For the $9 models
For the LED 7450/7500, 8000 and PDP 8500 series
models
17
For the $9 models
Computer
18
the e-Manual
20
Getting Started
Antenna
3
Connection
For the LED 7450/7500, 8000 and PDP 8500 series
For the $9 models
Video
Device
Connection
HDMI Connection
18
For the LED 7450/7500,
19
For the $9 models
HDMI-to-DVI
Connections
For the LED 7450/7500,
21
For the $9 models
Switching
Between
25
Auto
25
Remove
6
For the $9 models
Channel
8
For the LED 8000 and PDP 8500 series models
9
For the $9 models
For the LED 8000 and PDP 8500 series models
12
For the $9 models
Audio
Device
Digital
Audio
14
14
(Optical
Channels
Management
Restore
27
Program Rating Lock
Removed
Channels
27
B ock ng Programs
28
B ock ng based
on Movie
28
Bockqg
oJ_ CanadiaJ_
Er_g sh Rating
29
B ock ng Based
on Canadian
French
29
B ock ng Based
on Downloadab
29
Watching
Based
B ocked
Usng
the TV Rating
Rat J_g (MPAA)
/ Restr cted
Programs
Rename Analog Channels
Favorite
Channels
30
Add
Favorite
30
Remove
31
Rearrange
31
Rename
31
Copy a Favorite
Channels
Favorite
Channels
the Favorite
a Favorite
Channels
Channel
Channels
List
List
Rating
e U,S, Ratir_g
Connection
For the LED 7450/7500, 8000 and PDP 8500 series
models
For the $9 models
Scrambled
27
29
Connections
Program
Remove Channels
For the LED 7450/7500 series models
11
Video Sources
26
AV Connection
10
Connection
For the $9 models
For the LED 7450/7500, 8000 and PDP 8500 series
models
For the LED 7450/7500 series models
modes
23
5
7
8000 and PDP 8500 seres
For the LED 7450/7500, 8000 and PDP 8500 series
models
Programming
Connection
modes
22
HDMI Connection
Component
8000 and PDP 8500 seres
Connection
20
Smartphone
models
3
Return Channel)
16
Page
item
Connection
15
ARC (Audio
Icons
1
2
Output
List
NetworkConfiguration
32 WiredNetwork
32 }::or
theLED
7450/7500,
8000
andPDP
8500
seresmodes
33 Forthe$9models
34 Wireless
Network
34 Wire
essNetwork
Precautions
34 Network
Secur
tyProtocoJs
53
Adjusting
54
Show Status
54
Recommended
54
History
WiredNetworkSetup
35 Automatic
WiredNetwork
Setup
35 Manual
WiredNetwork
Setup
37 Failed
WiredConnection
Virtual
Wireless
Network
38
Automatic
39
Manual
40
Using
41
Failed Wireless
Wireless
Wireless
Network
Network
Setup
Setup
the WPS Button
Checking
Mobile
Setup
Wi-Fi Direct
44
AIIShare Settings
44
Rename the TV
Remote
Change
55
Using the Number
55
Using the Playback
55
Using the Quick
55
Adjusting
45
Connecting
46
(AAA
Access
the IR Extender
For the LED 7450/7500, 8000 and PDP 8500 seres modes
For the $9 modeJs
Registered
Device
to the TV
panel
Setup
57
X 2)
External
Text
Entering
Device
using
the
Text using
Control
Management
Onscreen
Keypad
the QWERTY
Keypad
Addit ona Features
Interaction
Precautions
59
Face Recognition
59
TV Camera Use
60
Mot}on Control
60
Voice Recognit on
Reconnecting the Smart [ouch Contro
Voice Recognition
46
Battery
Low Alarm
47
Buttons
and Descriptions
49
Special
Functions
Using
the touch
pad
50
Dragging
50
Pressing
51
Flicking
51
Pressing
and Holding
52
Pressing
and Dragging
52
Scrolling
Up/Down
52
Scrolling
Left/Right
53
Changing
Channels
53
Numerca
by Entering
nputGuide
Numbers
Panel
Panel
remote
Remote
SMART
Remote
Panel
Using the Universal
59
the Batteries
Control
57
Entering
Panel
Panel
the virtual
Remote
Control
of the Virtual
Add the External
Smart Touch Control
Inserting
a position
Remote
57
58
45
the Virtual
Connecting
56
57
the TV
Control
55
Status
Banner
Searching
Changing
58
Controlling
and Notification
55
56
Device Connection
44
54
pad
DeJet J_gHistory Data
Universal
Connection
the Network
54
the Touch
61
Operating
Environment
62
Voice
62
Enabling
62
Voice
63
Basic Voice
63
Voice
64
Interactive
64
Deactivating
Recognition
Environment
Test
Voice Recognition
Recognition
Tutorial
Recognition
Recognition
Voice
Use
Settings
Recognition
Voice Recognition
Commands
MotionControl
65 Operating
Environment
66 Motion
Control
Environment
Test
66 Motion
Control
Tutorial
66 Motion
Control
Activation
67 UsingtheBasicMotion
Controls
67 Motion
Control
Options
68 Motion
Control
Screen
68 [heScreen
Compos
tionwhile
Viewing
TV
69 The Smart Hub Screen Composition
Face
3D TV
81
Operating
72
Face Registration
72
73
nformat on
Using
Face Registrar on for the Smart Hub account using face
recognition
Face Recognition
Peripheral
Login
Devices
74
Keyboard
75
Mouse Connection
74
75
Connection
Activating
84
Setting
Program
76
Change
77
Guide
Calibration
Fine Tune
Audio
87
Digital
Broadcast
87
Analog
Sports
Options
Audio
Broadcast
Audio
Options
Options
Mode
Subtitles
88
Show Subtitles
89
Subtitle
Options
89
Subtitle
Display
Options
Basic Picture
Settings
90
Changing
the Picture
91
Picture
91
the Broadcast
Quality
92
Picture
Size
93
Screen
Position
93
Picture
Off
93
Reset Image
Signal
Cha _ge Channels
77
Change Category
77
Quick Nay gatior
77
Schedu e View}ng
77
Check ng the Program nfo
Channel
Advanced
List
Picture
78
78
Change Channels
Genre
78
Change the Broadcast Signal
78
Change the Channe Lst
Settings
Settings
Options
Basic Sound
Settings
98
Changing
the Sound
Mode
99
Adjusting
the Sound
Settings
99
Auto
99
TV Installation
99
Resetting
Viewing
Channel
Schedule
80
Gide
80
Program Info
80
Analog
Channel
80
Cancel
a Schedule
80
Edit Schedule
Schedule
List
Mode
AppIyi _g the Current Picture Quality Setti _g to Al_otqer
nput
Info
77
Digital
Screen
TV Settings
Mouse Use
76
79
3D Effects
Broadcast
TV Viewing
Schedule
3D Mode
Keyboard Use
TV Viewing
78
Tips
83
86
screen
73
Restrict oJ_s
82
Analog
Environment
Face Registration from the Smart Hub account
82
PiP
Recognition
71
Precautions
Viewing
Volume
Viewing
Viewing
Type
the Sound
Sound Customizer
SMART TV Features
100
Creating
a Custom
100
Modifying
Sound
100
Managing
Custom
Sound
Profiles
Smart
Sounds
3D Audio
Speaker
Speaker
102
Digital
102
Samsung
Audio
114
Samsung
Output
Audio
Setting
Device
Connection
A_to
104
Man_al
104
Sleep
Timer
105
On Timer
116
107
Screen
a SamsLng
114
Terms
aJ_d CoJ_d}tions
115
Logging
115
Lirfl<ing a Sams_ng
115
Managing
Keyword
116
Setting
Status
Protection
Eco Solution
Hub
Account
Creatng
116
117
106
to Use Smart
114
Resetting
Acco
nt
Privacy
Polcy
In
Account
to Ot_er
Accounts
AccoLnts
Smart
Hub
and
Maintenance
Search
Search
Scope
and Notification
Show
Off Timer
Screen
Required
Searching
the Time
104
105
Agreements
Select
Clock and Timer
103
113
Settings
102
Hub
Status
and
117
Voice
117
Samsur_g
117
Network
117
Check
Notification
Recognit}on
Banner
& Motion
Account
Contro
Config_Jation
Config_Jation
Confi%_ration
Not f cations
Social
108
Burn Protection
118
107
Pixel Shift
107
A to Protection Tree
108
Scrolling
108
Side (}ray
Auto
Protection
Time
Password
109
Change
Password
Additional
Changing
110
Game Mode
110
111
111
the Menu
Precautons
Language
and Restrictions
BD Wise
118
Checking the _\pp caton
118
Connecting a Service to a Samsung Accouter
119
Watching
119
Friend
Profile
119
Select
a friend
119
Filters
122
Installing
122
Launching
122
Samsung
122
122
Sound
111
Panel
112
Booting
Feedback
Locking
Logo
112
Light Effect
112
DivX(R_ Video
Videos
to call
121 Precautions
Menu Transparency
111
Settings
Apps
Features
110
Social
On Demand
123
Apps
Standard
Applications
an Application
Apps
Sea ching
nsta
for/\pps
ing/\pp
icat ons
Management
123
Ed}t My Apps
124
Deletng
App
124
Manag
ng App
124
Applicatior_
Lock/Unlock
124
Application
Update
124
Settir_g
icat ons
icat}on
up the App
Folders
cation
Auto
Update
125
Videos
Fitness
125
CreatJ_gaProf
125
Kids
126
WebBrowser
126
Social
e
137 Changing the view mode
137 Playlist Creation
137 Opening a Different File
Networks
137 Video Scanning
126
127
Linking Servce
Apps
Accounts
138 Show Subtitles
Settings
138 Additional
127
Auto Ticker
127
Push Notfcation
127
Channel-Bound
127
Properties
Music
Apps
On TV
129
On TV Settings
129
129
On T-V Setup
Recommendation
129
Auto Start
129
Recommendation
129
Adut Contents Bock
Notce
139
Changing
the view
mode
139
Playlist
139
Music Scanning
139
Opening
a Different
139
Additional
Music
Playback
the view
mode
Creation
File
Settings
Method
130
Watching
130
Scheduled
Recommended
130
Activating
the Guide
130
Program
Movies
an On-Air
Video Playback Settings
Settings
Photos
Recommended
Program
Program
140
Changing
Info
140
Slide Show
140
Recommendations
by Time
Slide Show Settings
140
Playlist
Creation
141
Opening
141
Background
141
Additional
a Different
File
& TV Shows
132 Buying Movies
141
132 Playing Movies
Music
Mini Player
Photo
Playback
Settings
132 Parental Control
Anynet+
Photos, Videos & Music
133
Restrictions
134
Supported
134
USB Device
134
File Formats
142
Precautions
143
Anynet+
143
Using the Anynet+
Connection
USB Device Removal
135
Playing
all the Content
135
Clearing
135
Using
the Recent
Networked
on a Storage
Device
Playlist
External
144
Storage
Devices
Allowing DLNA Device Connections
136
AIIShare
145
Exporting
Contents
Setup
(HDMI-CEC)
Switching
144
AJ_ynet+ (HDM-CEC)
between/\J_ynet_
Devces
Device Menu
ARC
Mobile
Device
Screens
MHL
145
146
136
(HDMI-CEC)
143
Sharing
136
(HDMI-CEC)
MHL USE
Screen
146
Mirroring
Moble Device Connecton
on the
TV
Other Information
Subtitle
and Media
Contents
file formats,
and Codec
158 Subtitle
Support
147 Remote Management
148
What
148
How
}s Remote
S_pport?
Does it Work?
Extema
158
Internal
159 Supported
image resolutions
159 Supported
music file formats
160 Video Codec
149 e-Manual
149 Self Diagnosis
149
158
Pcture
]-est
150 Sound 'r_st
150 Voice & Motion Control Envronment Check
150
Signa
Informaton
150 Reset
Update
now
151
Manual
Update
151
Auto
Other
Restrctions
161
Video
Decoders
161
Audio
Decoders
3D Precautions
162 CAUTION!
163 SAFETY PRECAUTIONS
151 Updating the Software
151
160
WARRANTY
164 PROCEDURE FOR MAKING A WARRANTY CLAIM
Update
152 Usage Mode
164 WARRANTY CONDITIONS
152 Support Info
S-Recommendation
Kensington
Display
Security
Lock
Resolution
153 IBM
Disclaimer
166
S Recommendation
166
S Recommendation
with
Voice
Interaction
Licenses
153 MAC
154 VESA DMT
Picture
Size and Input Signal
Supported
3D Resolutions
Troubleshooting
Screen
156 HDMI
156
3D Format
L/R, T/B
156
3D Format
Frame
157 Component
157 Digital Channel
157 Videos/Photos
Sound
Packing
3D TV
Antenna
(Air/Cable)
Connection
PC Connection
157 Computer via HDMI
Networking
Miscellaneous
Anynet+
(HDMI-CEC)
Apps
Photos,
Videos
& Music
Reset the Personal
Web Browser
Info and TV settings
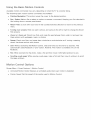
Viewing
the e-Manua
The embedded
e-Manual
This TV has a built-in
contains
information
user guide.
o
Open the Support
o
Press the IMORIE button
To read it, use one of the following
menu and choose
e-Manual
appears
Words in blue refer to screen menu options
e version
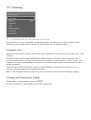
Scrolling
To scroll
of this guide
methods:
(Troubleshooting).
on the Smart Touch Control
Flick the Touch Pad until e-Manual
A pdntab
about your TV's key features.
to display
and select
and words
control
buttons
it.
in light blue refer to remote
pane
buttons_
is also avaitab e at www.samsung.com/supporL
a Page
a page, use of one of the following
or
button
on the scroll
methods:
o
Press the
o
Drag or flick up or down the line on either the left or right edge of the touch
o
Place the focus on the ,_
on the touch pad.
Using
on the screen.
or
button
bar at the right edge of the screen.
at the right edge of the screen,
pad.
drag or flick
up or down
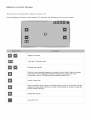
the Top Icons
Use the Back, Forward,
and Opened
pages. These icons are available
Retunsin9
to the
Home
pages icons on the top left of the screen to navigate
when two or more pages are passed.
Page
To return to the home page, select the B button
right of the screen.
To seect
a letter button
through
(1_1 D,
on the virtual
8_, D), press the MORE button
remote
panel or select _
on the Smart
display the virtua remote panel on the TV screen. Fick the Touch
appears, seect the _1 button, and then press the Touch Pad.
Pad until
Touch
Contro
the Playbac<
on the top
to disp ay to
Contro
Pane
Searching
the
_ndex
Select the D button on the virtual remote panel or select
on the top right of the screen to display
the index. Select a term to display the page containing
the term.
Searching
Pages
Select the [_;Sbutton on the virtual remote panel or select Q on the top right of the screen, and enter
search criteria. Select a page from the list of search results to display it.
C_osing
the e-Ma,rsua_
To close the e-Manual,
screen.
Jumping
To directly
to jump
press and hold the RIETURIN button
to a Menu
a menu item directly
the IMORIE button
that appears
corner
of the
to the related
on the Smart Touch Control
in the current section,
section
in the e-Manual.
select
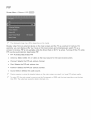
It is possible
On the screen menu, press
and then select eHManuall on the virtual
remote
panel
on the screen.
This feature
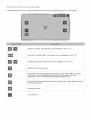
Updating
X at the upper-right
totem
jump to the menu item that is described
from
or select
may not be avai able, depending
on the menu_
the e,-Manual
Press the _ button and select Apps, and then select
same way with an application
update.
More Apps.
The e-manual
can be updated
in the
On the More Apps screen, select Update Apps, and then select e-Manual from the list. The e-Manual
starts updating to the latest version. However, Update Apps appears on the screen only when the
update
is required.
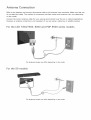
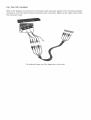
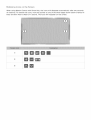
Antenna
Connection
Refer to the diagram
and connect
the antenna
do not bend the cable. The number
cable to the antenna
of connectors
input connector.
and their names and locations
Make sure that you
may vary depending
on the model.
Connect
the correct
However, an antenna
antenna
cable for your viewing
connection
is not necessary
For the LED 7450/7500,
The displayed
environment
(over-the-air
if you are using a cable box or satellite
8000 and PDP 8500 series models
image
may differ
depending
on the model.
image
may differ
depending
on the model.
For the S9 models
The displayed
or cable broadcasting).
receiver.
Video Device Connections
This TV has a wide range of connectors
DVD players,
descending
o
camcorders
and gaming
order of picture
for video
consoles.
input from video
Below
devices such as Blu-ray
is a list of featured
connectors
players,
shown
in
quality.
HDMI
Component
o
AV
Connect
the video device to the TV via an HDMI connector
does not have an HDMI connector,
try a component
for the best picture
connector
quality.
If the device
to get the next best possible
oicture
quality.
The number
of connectors
When connecting
device connectors
and their names and locations
an external
device,
refer to the device's
and their names and locations
may vary depending
operating
may vary depending
manual.
on the model
The number
on the manufacturer.
of external
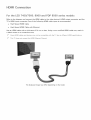
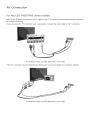
HDMi Connection
For the LED 7450/7500,
Refer to the diagram
TV's HDMI
and connect
input connector.
8000 and PDP 8500 series models
the HDMI cable to the video device's
One of the following
o
High-Speed
HDMI Cable
o
High-Speed
HDMI Cable with
HDMI output
connector
and the
is recommended:
Ethernet
Use an HDMI cable with a thickness
a blank screen or a connection
HDMI cable types
of 14 mm or less. Using a non-certified
HDMI cable may result in
error.
Some HDMI cables and devices may not be compatible with the TV due to different HDMI specifications,
This TV does not support the HDMI Ethernet Channe,
The displayed
image
may differ
depending
on the model.
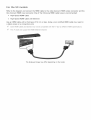
For the S9 models
Refer to the diagram
One Connect
HDMI
and connect
the HDMI cable to the video device's
input connector.
o
High-Speed
HDMI Cable
o
High-Speed
HDMI Cable with
One of the following
HDMI output
HDMI cable types
HDMI cables and devices
This TV does not support
and the
is recommended:
Ethernet
Use an HDMI cable with a thickness of 14 mm or less. Using a non-certified
a blank screen or a connection
error.
Some
connector
may not be compatible
the HDMI Ethernet
The displayed
image
with
the TV due to different
Channe,
may differ
HDMI cable may result in
depending
on the model.
HDMI specifications_
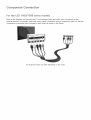
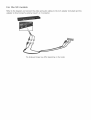
Component
Connection
For the LED 7450/7500
Refer to the diagram
external
device's
connectors
and connect
component
of the same color
video
series models
the TV's
component
and audio output
connect
The displayed
video
and audio input connectors
connectors
to each other, as shown
image
may differ
depending
using a component
in the figure.
on the model.
to the
cable, so that the
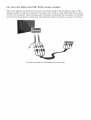
For the LED 8000 and PDP 8500 series models
Refer to the diagram
extension
and connect
the connect
cables, so that the connectors
into the TV's component
end into the external
a component
of the same color connect
video and audio input connectors,
device's
component
The displayed
cable to the provided
video
image
to each other. Plug the two jacks
and plug the five connectors
and audio output
may differ
two jack to-RCA
depending
connectors,
on the model.
as shown
on the other
in the figure.
For the S9 models
Refer to the diagram
(accessory)
the connector
and connect
the component
and to the One Connect
component
video
and audio cables to the component
input connectors.
Make sure the cable colors
colors.
The displayed
image
may differ
depending
adapter
on the model.
match
AV Connection
For the LED 7450/7500
Refer to the diagram
AV output
and connect
series models
the AV cable to the TV's external
input connectors
and the device's
connectors.
If you are using the TV's external
input 1 connectors,
connect
the video cable to the Y connector.
The displayed image may differ depending on the model.
If the TV's external
input 2 connectors
The displayed
are being used, use the enclosed
image
may differ
depending
AV connection
on the model.
adapter.
For the LED 8000 and PDP 8500 series models
Connect
a composite
the same color
connector,
cable to the provided
connect
extension
cable, so that the connectors
to each other. Plug the jack into the TV's composite
and plug the three connectors
and audio output
jack-to-RCA
connectors,
as shown
on the other end into the external
video and audio input
device's
in the figure.
The displayed image may differ depending on the model.
AV IN 2 is supported
in LED 8000 Series only.
The displayed
image
may differ
depending
of
on the model.
composite
video
For the S9 models
Refer to the diagram
adapter
and connect
to One Connect's
external
the video and audio cables to the A/V adapter
input 1 or 2 connector.
The displayed
image
may differ
depending
on the model.
(included)
and the
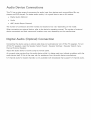
Audio
Device Connections
This TV has a wide range of connectors
players and DVD players.
o
Digital
Audio
for audio
For better audio quality,
input from devices
such as amplifiers,
Blu-ray
it is a good idea to use an AV receiver.
(Optical)
Audio
ARC (Audio
The number
Return Channel)
of connectors
When connecting
device connectors
and their names and locations
an external
device,
refer to the device's
and their names and locations
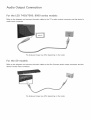
Digitam Audio (Optical)
Connecting
the device using an optical
off the TV speakers,
then set External
Adjust
open the Speaker
manual.
may vary depending
The number
of external
on the manufacturer.
Connection
cable does not automatically
Semect (Sound)
noise coming
volume
using
its remote
Speaker
turn off the TV speakers.
Settings
) Speaker
Select)
To turn
menu,
panel.
from the audio device while
audio device itself. If this is the case, ask for assistance
5.1-channel
operating
on the model.
Speaker.
the audio device's
An unusual
may vary depending
audio for digital
channels
is only available
it is being used may indicate
a problem
with the
from the audio device manufacturer.
with broadcasts
that support
5.1-channel
audio.
For the LED 7450/7500,
Refer to the diagram
device's
digital
and connect
8000 and PDP 8500 series models
the optical
cable to the TV's digital
audio output
connector
and the
audio input connector.
The displayed
image
may differ
depending
on the model.
For the S9 models
Refer to the diagram
and the device's
and connect
digital
the optical
audio input connector.
cable to the One Connect
digital
audio output
connector
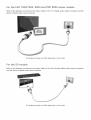
Audio Output Connection
For the LED 7450/7500,
Refer to the diagram
audio
and connect
8000 series models
the audio cable to the TV's audio output
connector
and the device's
input connector.
The displayed
image
may differ
depending
on the model.
For the S9 models
Refer to the diagram
device's
and connect
the audio cable to the One Connect
audio output
audio input connector.
The displayed
image
may differ
depending
on the model.
connector
and the
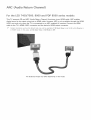
ARC (Audio Return Channel)
For the LED 7450/7500,
This TV supports
3D and ARC (Audio
8000 and PDP 8500 series models
Return Channel)
functions
via an HDMI cable. ARC enables
digital sound to be output using just an HDMI cable. However, ARC is only available through the HDMI
(ARC) port and only when the TV is connected to an ARC-enabled
AV receiver. Connect the HDMI
cable to the TV's HDMI
(ARC) connector
and the device's
HDMI output
Certain functions
such as the Smart Hub may not be avai abe if 3D Auto
in HDMI mode, In this case, set 3D Auto View or 3D Mode to Of£
The displayed
image
may differ
depending
connector.
View
on the model.
is set to On whie
Source
is
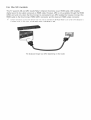
For the S9 models
This TV supports
digital
3D and ARC (Audio
sound to be output
Return Channel)
HDMI cable to the One Connect
functions
in HDMI mode,
via an HDMI cable. ARC enables
using just an HDMI cable. However, ARC is only available
(ARC) port and only when the One Connect
Certain
functions
is connected
HDMI (ARC) connector
such as the Smart
and the device's
Hub may not be avai able if 3D Auto
in this case, set 3D Auto
The displayed
to an ARC-enabled
may differ
depending
the HDMI
the
HDMI output connector.
View
View or 3D Mode to Of£
image
through
AV receiver. Connect
on the model.
is set to On while Source
is
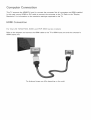
Computer
This TV supports
Connection
the HDMI/DVI
In this case, use an HDMI-to-DVl
Resolution"
for information
port for connect
cable to connect
on the resolution
the computer.
the computer
settings
supported
Not all computers
are HDMI-enabled.
to the TV. Refer to the "Display
to the TV.
HDM[ Connection
For the
LEID 7450/7500_
Refer to the diagram
HDMI output port.
8000
and connect
and PDP 8500
series
mode_s
the HDMI cable to the TV's HDMI input port and the computer's
The displayed
image
may differ
depending
on the model.
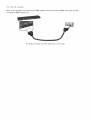
For the
$9 models
Refer to the diagram
computer's
and connect
HDMI output
the HDMI cable to the One Connect
HDMI input port and the
port.
The displayed
image
may differ
depending
on the model.
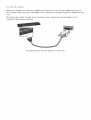
HDM -to-DVm
For the
Connection
LEI[i} 7450/7500_
Refer to the diagram
computer's
8000
and connect
DVl output
and PDP 8500
the HDMI-to-DVI
port. The HDMI-to-DVl
sedes
mode_s
cable to the TV's
connection
is available
HDMI (DVI) port and the
through
the HDMI (DVl) port
only.
DVl cannot
carry
audio. To listen to the computer
computer's
audio output
sound, connect
the external
connector.
The displayed
image
may differ
depending
on the model.
speaker to the
For the
$9 models
Refer to the diagram
the computer's
and connect
DVl output
the HDMI-to-DVI
port. The HDMI-to-DVl
cable to the One Connect
connection
is available
HDMI (DVI) port and
through
the HDMI (DVl) port
only.
DVI cannot
carry
audio. To listen to the computer
computer's
audio output
sound, connect
the external
connector.
The displayed
image
may differ
depending
on the model.
speaker to the
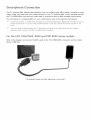
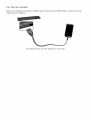
Smartphone
This TV supports
video,
Connection
MHL (Mobile
High-definition
image, and audio files from
the TV's
mobile
Link) via an MHL cable. MHL makes
devices
HDMI (MHL) port and only when used in conjunction
For information
on configuring
Connecting
change
the MHL-to-HDM[
automatical
MHL on your mobile
cable automatical
it possible
on your TV. However, MHL is only available
device,
y switches
with an MHL-enabled
refer to the device's
Picture
Size to Screen
y if you are using an HDMI adapter_ In this case_ change
mobile
to enjoy
through
device.
User Manual.
Fit, This setting
the setting
manua
will not
y in the
menu_
If you are using an HDMI adapte_
different
y than it would
the TV recognizes
to an MHL-to-HDMI
For the LED 7450/7500_
Refer
device's
to the diagram
USB
and connect
the signal
as an HDMI signal
and may respond
cable connection_
8000 and PDP 8500 series models
the MHL
cable
to the TV's
HDMI
(MHL)
connector
port.
The displayed
image
may differ
depending
on the model.
and the mobile
For the S9 models
Refer to the diagram
mobile
device's
and connect
the MHL cable to One Connect's
HDMI
(MHL) connector
USB port.
The displayed
image
may differ
depending
on the model.
and the
Switching
Between Video
Press the SOURCE button
For example,
to switch
SOURCE button.
to switch
between
to a game console
From the Source
devices
connected
connected
to the TV.
to the second
list, select HDM_2. The connector
HDMI connector,
press the
names may vary depending
on the
product.
Select Tools at the upper-right
o
corner
of the Source
Edit Narae: You can rename devices
With a computer
change
connected
functions.
to the TV to more easily identify
external
sources.
to the TV's HDMI
(DVI) port via an HDMI cable, for example,
you can
to the TV's HDMI
(DVI) port via an HDMI-to-DVI
Edit Name to PC.
With a computer
connected
you can change
example,
you can change
information:
to the TV's HDMI (DVl) port via an HDMI-to-DVI
information
Select this if a connected
device after selecting
Refresh,
about the connected
device does not appear
devices.
in the list. If the list does not show the
check the status of the TV-to-device
connection.
Remove USB: Remove the USB device from the list safely. This function
the USB device selected.
To add a new external
users can control
device to control
Remote
external
receiver. For details,
cable, for
Edit Name to DW Devices.
View detailed
and select Universal
cable, for example,
Edit Name to DW PC.
With an AV device connected
Refresh:
connected
screen to access the following
Setup
devices
see "Universal
it with the Smart Touch Control,
on the top right of the screen.
connected
Remote
when
press the SOURCE button
Using the universal
to the TV, such as a set-top
Setup".
is only available
box, Blu-ray
remote
control,
player, and AV
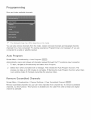
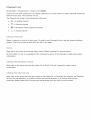
Programming
Scan and index available
The dispIayed
image
channels.
may differ
You can also remove channels
depending
on the modet,
from the index, restore removed
channels for a more convenient TV viewing
connected to a cable or satellite receiver.
experience.
channels
Programming
and designate
is not necessary
favorite
if you are
Auto Program
Screen
Menu > Broadcasting
Automatically
scans and indexes
To start, navigate
2.
> Auto
with a message.
index of channels
Remove Scrambled
Menu > Broadcasting
Remove scrambled
channels
channels, run this function.
channel is available.
received through
the TV's antenna
input connector.
and select Auto Program.
can take up to 30 minutes
is an existing
Screen
all channels
to Broadcasting
Select Start when prompted
process
Program
This initiates
to complete.
overwrites
If Starting
the previous
the Auto
Program
function.
The
the Auto Program
function
when there
index.
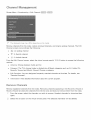
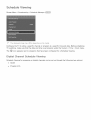
Channels
> Channel
Settings
(ex: pay-per-view
This function
> Clear Scrambled
channels)
is enabled
Channel
from channel
list. To remove scrambled
only for cable TVs when at least one digital
Channel
Screen
Menu > Broadcasting
> Edit: Channel
The dispIayed image may differ depending on the modet.
Remove channels
Channel
o
screen
from the index, restore removed
icons indicate
_, " An analog
@_" A favorite
e
channels,
and rename
analog
channels.
The Edit
the following:
channel
channel
A locked channel
From the Edit Channel
screen,
select the virtual
remote
panel's
TOOLS button
to access the following
options:
o
Antenna:
o
Category:
Recently
o
Cable and Air.
The TV's channel
Viewed
Edit Favorites:
"Favorite
o
Choose between
and Mostly
index is divided
Viewed.
You can designate
into different
categories
such as All, Added
Cho,
Choose a category.
frequently
watched
channels
as favorites.
For details,
see
Channels".
information:
View detailed
information
about the current
program.
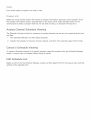
Remove Channels
Remove registered
Mostly
Viewed
channels
from the index. Removing
list clears the channels
from
From the screen, select the channels
channels
appearing
in the Recently
Viewed
the list only and does not remove them from the index.
you wish
to remove.
Unselect
channels
by choosing
again.
2,
Select the Sa button
on the virtual
remote
panel. The selected
channel(s)
will
be deleted.
them
or
Restore
Removed
Restore removed
option
Channels
channels.
is only available
Removed
for removed
Select the virtual
remote
channels
are displayed
in gray on the ANI list. In addition,
the Add
channels.
panel's
TOOLS button
to display
the list. Select Category
and then
select ANI.
From the All
2,
list, select the channels
you wish to restore.
Unselect
channels
by choosing
them
again.
3,
Select the #3 button
Program
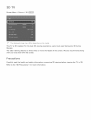
Screen
on the virtual
The Program
sources,
Rating
> Program
Lock blocks
what children
The Program
Blockin9
watch
to watch
Rating
Rating
will
be added.
programs
Lock
with ratings
higher than those desired.
on TV. This will not function
a blocked
Lock is available
Programs
To block content,
Usin9
for programs
This is useful for
originating
from external
TWY:
on the left:
Young children
TWY7:
Children
TWG:
7 and over
General audience
TWPG:
Parental
TW14:
Viewers
TWMA:
guidance
14 and over
Mature audience
on the top:
ALL: Lock all TV ratings.
FV: Fantasy violence
V: Violence
S: Sexual situations
L: Adult
Language
D: Sexually
Suggestive
only
in TV mode.
Ratin9
entry to lock. All programs
To unblock
row, select the lock under ALL.
Categories
program.
the IV
select a rating
require the PIN to watch.
Categories
channel(s)
such as DVD players or USB files.
This PIN is required
o
panel. The selected
Rating Lock
Menu > Broadcasting
controlling
remote
Dialog
a category,
at that level and higher are blocked
select the lock icon. To unblock
and
all the categories
in a
Blocking
based
on Movie
Bating
(MPAA)
Block movies based on their MPAA rating. This applies
to all material
with supplied
ratings
in the USA.
From the MPAA:
"The Motion
Picture Association
parents or guardians
of America
with advanced
(MPAA)
information
Select a lock beside one of the rating categories
unblock
o
a category,
guidance
R: Restricted.
Children
No children
X: Adults
a rating system
are appropriate
to block that category
that provides
for children."
and all higher categories.
To
(no restrictions).
suggested.
PGm13: Parents strongly
NC-17:
films
select the lock icon.
G: General audience
PG: Parental
has implemented
on which
cautioned.
under 17 should
be accompanied
by an adult.
under age 17.
only.
NR: Not rated.
Blocking
Based
Block material
on Canadian
English
Bating
based on its English Canadian
English-Canadian
rating. This applies
a category,
on
68+: Programming
their own
intended
for children
generally
G: General programming,
PG: Parental
to block that category
and all higher categories.
To
select the lock icon.
6: Programming
under age 8
considered
suitable
acceptable
for children
8 years and over to watch
on
for all audiences.
Guidance
14+: Programming
containing
age of 14
18+: Adult
viewed
TV channels.
Select a lock beside one of the rating categories
unblock
to all rated material
programming
themes
or content
which
may not be suitable
for viewers
under the
Blocking
Based
Block material
on Canadian
French
Ratin9
based on its French Canadian
French-Canadian
rating.
to all rated material
viewed
on
TV channels.
Select a lock beside one of the rating categories
unblock
This applies
a category,
to block that category
and all higher categories.
To
select the lock icon.
G: General
8 ans+: Programming
acceptable
for children
8 years and over to watch
13 ans+: Programming
that may not be suitable
for children
16 ans+: Programming
not suitable
under the age of 16
18 ans+: Programming
restricted
Blocking
Based
Block material
originating
Parental
on Downloadablle
information
the Downloadable
U°S° Rating
restriction
U,S, Rating.
downloaded
If the information
depending
while
only applies
watching
is unavailable
on the broadcasting
U.S. Rating name changes
Even when the on-screen
to material
DTV channels.
This
from the broadcasting
station,
display
depending
is set to another
language,
station,
and the default
on the downloaded
menu name
information.
the Downloadable
U.S. Rating
menu
only in English.
Select a lock beside one of the rating categories
unblock
a category,
Watching
a blocked
/ Restricted
program,
To
showing
enter the PIN when requested.
a restricted
program
it. Enter the PIN to unblock
Rename
Analog
button
and all higher categories.
Programs
Lock blocks
Select an analog
to block that category
select the lock icon.
Blocked
When initially
TOOLS
This rating system
menu is deactivated.
levels differ
and the Downloadable
To watch
Rating
is automatically
may take several seconds.
appears
US
US DTV channels.
restriction
Parental
under the age of 13
to adults
based on its Downloadable
from
download
for children
on their own
channel
to display
or movie, the screen is blank because the Program
the program
when a message
appears
requesting
Rating
the code.
Channels
from
the Edit Channel
a list of options.
You can now rename the selected
channel.
screen and then select the virtual
Select Rename Channel
remote
from the list.
The new name can be up to 5 characters
long.
panel's
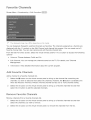
Favorite
Screen
Channels
Menu > Broadcasting
> Edit Favorites
The displayed image may differ depending on the model,
You can designate
frequently
watched
channels
as favorites.
The channels
assigned
displayed with the _ symbol on the Edit Channel and channel list screens.
favorite channel lists. You can also rename and edit favorite channel lists.
From the Edit Favorites
screen,
select the virtual
remote
panel's
TOOLS
as a favorite
are
You can create up to 5
button
to access the following
options:
o
Antenna:
Choose between
o
Edit Channel"
Cable and Air.
You can manage
the channels
saved on the TV. For details,
see "Channel
Management".
o
information:
View detailed
Add Favorite
Add a channel
information
about the current
program.
Channels
to a favorite
Select the _1 button
channels
list.
on the virtual
remote
panel to bring up the channel
list containing
the
channels you wish to add and then select the channels. However, the Q button is available only
when the Recently Viewed or Mostly Viewed channel list has one or more channel entries.
2,
Select the I[',iSbutton
on the virtual
select the _ button
to add the selected
Remove Favorite
Remove channels
select the channels
2,
Select the _ button
panel to bring up a favorite
channels
list and then
channels
list and then
channels.
Channels
from a favorite
Select the lOSbutton
remote
channels
on the virtual
list.
remote
panel to bring up a favorite
you wish to remove.
on the virtual
remote
panel, to remove the channels
from the list.
Rearrange
Rearrange
the Favorite
List
in a Favorite
Channels
the order of the channels
Select the [_ button
the channel
2.
Channels
on the virtual
List.
remote
panel to bring up the favorite
remote
panel to rearrange
channels
list and select
you wish to move.
Select the [] button
on the virtual
the order of the selected
channel.
Press the touch pad to finish.
Rename a Favorite
Rename an existing
favorite
Select the virtual
Channel List
channels
remote
panel's
list.
TOOLS button
to display
the list. Select Rename Favorites
from
the list.
2.
Rename the list in the popup window.
Copy
a Favorite
Copy channels
Channels
from one favorite
Select the [_ button
the channels
2.
list to another.
remote
panel to bring up a Favorite Channels
List and select
you wish to copy.
Select the virtual
remote
panel's
TOOLS button
the list, and then select the Favorite Channels
channels
long.
List
channels
on the virtual
The new name can be up to 20 characters
to the selected
Favorite
Channels
to display
the list. Select Copy to Favorites
from
List(s) you wish to copy to. This copies over the
List(s).
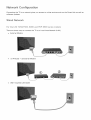
Network
Connecting
software
Configuration
the TV to a network
gives you access to online
services
such as the Smart Hub as well as
updates.
Wired Network
For the LED 7450/7500_
8000 and PDP 8500 series mode_s
There are three ways to connect
o
External
o
@ IP Router + @ External
o
Wall-mounted
the TV to a Local Area Network
Modem
LAN Outlet
Modem
(LAN).
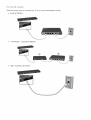
For the
$9 morsels
There are three ways to connect
o
External
o
(_ IP Router + @ External
the TV to a Local Area Network
(LAN),
Modem
Modem
®
o
Wall-mounted
LAN Outlet
Wireless
Connect
Network
the TV to the Internet
Wireless
o
Network
using a standard
router or modem.
P_ecautions
This TV supports
the IEEE 802.11a/b/g/n
IEEE 802.11n. Otherwise
communication
protocols.
when you play video over a network
Samsung
connection,
recommends
the video
using
may not play
smoothly.
To use a wireless
wireless
wireless
o
network,
router supports
network.
Select a channel
the TV must be connected
DHCP, the TV can use a DHCP or static
that is not currently
wireless router is currently
a communications
failure.
o
Most wireless
networks
to a wireless
in use for the wireless
being used by another
have an optional
security
system.
Secudty
The TV only
non-certified
Encryption
If the wireless
the following
touters:
Modes:
Types:
router
wireless
WEE WPAPSK,
new Wi-Fi
certification
using
network's
security
This security
key is then
security
protocols
and is unable to connect
to
WPA2PSK
TVs will
(Greenfield)
not support
802.11n mode and the
the connection
in compliance
with the
specifications.
supports
PBC (Push Button
configures
network
has been set to Pure High-throughput
Type to WEP or TKIE Samsung
router
and/or
To enable a wireless
and numbers.
set for the
interference
WEE TKIP, AES
Encryption
If the wireless
router. If the channel
to the
P_otoco_s
supports
wireless
Authentication
If the
IP address to connect
device, the result is usually
system, you need to create a security key using characters
needed to connect to the wireless network.
Network
router or modem.
WPS (Wi-Fi
Configuration)
Protected
Setup), it is possible
or a PIN (Personal
the SSID and WPA key settings.
Identification
to connect
to the network
Number). WPS automatically
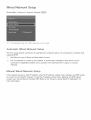
Network
Screen
Menu > Network
The dispIayed
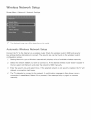
Automatic
> Network
image
may differ
depending
connection
on the modet,
Setup
is automatically
configured
when
it is connected
to a network
that
DHCP.
Set Network
o
Settings
Wired Network
The TV's wired network
supports
Setup
type to Wired
The TV attempts
connection
and then select Connect.
to connect
is established.
to the network.
A confirmation
Select OK to proceed.
message
If the attempt
is then shown
once a
fails, try again or connect
manually.
Manual Wired Network
If the network
to connect
requires
a static
to the network
contact your Internet
more information.
IP address,
manually.
Service
Setup
enter the IP address,
To get the IP address,
Provider
subnet
mask, gateway
subnet mask, gateway
(ISP). Refer to the "Dynamic
versus Static
and DNS values
and DNS values,
IP Addresses"
for
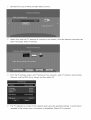
1,
Set Network
type to Wired
2,
Select Stop when the TV attempts
been interrupted,
3,
,
message
screen,
set JP Setting
and the DNS Server
The TV attempts
to connect
to the network.
Once the network
to Enter manually,
enter JP Address,
connection
has
select JP Settings.
From the JP Settings
Gateway,
and then select Connect.
to connect
is then shown
values,
Subnet
Mask,
and then select OK.
to the network
once a connection
again using the specified
is established.
settings.
Select OK to proceed.
A confirmation
Fai ed Wired Connection
H o n etwo r k ca hie fo u nd
Make sure the network
on, try turning
_P auto
Perform
cable is plugged
in. If it is connected,
settin
on. If it is
g fai_ed
the following
or set the IP address
Ensure that the DHCP server is enabled
2,
make sure the router is turned
it off and on again.
If this does not work, contact
your
manually
from JP Settings.
on the router and reset the router.
Internet
Service
Provider
for more information.
U n a b_e to co n n e ct t o t he netwo r k
Check the following:
Check the JP Settings
settings.
2,
Ensure that the DHCP server is enabled
3,
if this does not work, contact
Connected
to a Ioca_ network_
Make sure that the Internet
2,
Check the DNS settings
3,
If the problem
Hetwork
your
setup
if the problem
persists,
Internet
but not
Service
to the
Provider
and then plug the router back in.
for more information.
_nternet
LAN cable is connected
to the router's
external
under JP Settings.
contact
comp_ete_
persists,
on the router and unplug
contact
but
your
your Internet
unable
Internet
Service
to connect
Service
Provider.
to the
Provider.
_nternet
LAN port.
Wireless
Screen
Network
Menu > Network
The dispIayed
Automatic
> Network
image
may differ
Wireless
Connect the TV to the Internet
key settings before attempting
configuration
screen.
Setting
Network
o
attempt
o
connection
manually.
Setup
automatically
(SSID) you wish to connect
displays
a list of available
to. If the desired
and enter the network's
key and select Done. If the selected
a connection
The TV attempts
on the modet,
via a wireless router. Check the wireless router's SSID and security
to connect. The security key can be found on the wireless router's
type to Wireless
Select the network
Enter the security
depending
Network
the list, select Add Network
o
Settings
wireless
wireless
networks.
router doesn't
appear
SSID manually.
network
is not security-enabled,
the TV will
right away.
to connect
is established.
to the network.
A confirmation
Select OK to proceed.
in
message
If the attempt
is then shown
once a
fails, try again or connect
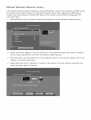
Manua
Wireless
If the network
to connect
contact
requires
Network
a static
to the network
your Internet
IP address,
manually.
Service
Setup
enter the IP address,
To get the IP address,
Provider
subnet
mask, gateway
subnet mask, gateway
(ISP). Refer to the "Dynamic
versus Static
and DNS values
and DNS values,
IP Addresses"
for
more information.
Setting
2_
Network
type to Wireless
Select the network
(SSID) you wish to connect
the list, select Add Network
3_
Enter the security
attempt
4_
displays
a list of available
to. If the desired
and enter the network's
key and select Done. If the selected
a connection
wireless
wireless
networks.
router doesn't
appear
select JP Settings.
to connect
in
SSID manually.
network
is not security-enabled,
the TV will
right away.
Select Stop when the TV attempts
been interrupted,
automatically
to the network.
Once the network
connection
has
Fromthe JPSettings screen,set JPSetting to Enter manually,enter JPAddress,SubnetMask,
Gateway,andthe DNSServervalues,andthen selectOK.
The TV attemptsto connectto the networkagain usingthe specifiedsettings.A confirmation
messageis then shown oncea connectionis established.SelectOK to proceed.
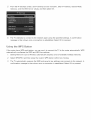
Using the WPS Button
If the router has a WPS push button,
automatically
Setting
2.
configures
Network
Select WPS(PBC)
type to Wireless
automatically
and then press the router's
The TV automatically
confirmation
you can use it to connect
the TV to the router automatically.
WPS
the SSID and WPA key settings.
message
acquires
displays
WPS button
the SSID and security
is then shown
a list of available
within
key settings
once a connection
wireless
networks.
two minutes.
and connects
is established.
to the network.
Select OK to proceed.
A
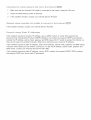
Fai ed Wireless
Wkeb
Connection
ss n etwo rk co n n ectio n fai_ ed_ o_" n o wkeb
Go to Network
Unabb
Settings
and select the correct
to connect
to a wkebss
ss rout e r sebct
ed,
router.
_'outer
Check the following:
Check that the router is turned
2,
Enter the correct
_P auto
Perform
settin9
security
faibd
the following
on, and if it is, turn it off and on again,
key if required,
_
or set the IP address
manually
from mPSettings.
Make sure that the DHCP server is enabled on the router and unplug
2,
Enter the correct
3,
if this does not work, contact
U na bb
to co nnect
security
and plug the router
key if required.
your
Internet
to t he network
Service
Provider
for more information.
Provider
for more information.
:{}_
Check the following:
Check the JP Settings
settings.
2,
Enter the correct
security
key if required.
3,
if this does not work, contact
your
Internet
Service
back in.
Connected
to a Ioca_ network_
Make sure that the Internet
2,
Check the DNS settings
3,
If the problem
Network
setup
If the problem
Dynamic
If the network
Dynamic
provide
requires
DNS values,
If the network
that support
contact
Service
to connect
Internet
IP address,
Protocol
subnet
Service
external
LAN port.
Provider.
to the
_nternet
Provider.
use an ADSL modem
(DHCP). Modems
mask, gateway
manually.
Most
and touters
or router that supports
that support
the
DHCP automatically
and DNS values the TV needs to access the Internet,
home networks
use a dynamic
so
IP address.
a static IP address, enter the IP address, subnet mask, gateway, and DNS values
up the network connection.
To get the IP address, subnet mask, gateway and
your Internet
requires
your Internet
unable
your
a dynamic
they do not have to be entered
If the network requires
manually when setting
to the router's
_P Addresses
Host Configuration
the IP address,
but
contact
Static
_nternet
LAN cable is connected
contact
comp_ete_
versus
to the
under JP Settings.
persists,
persists,
but not
a static
DHCP also allow
Service
IP address,
static
Provider
(ISP).
use an ADSL modem
IP addresses.
that supports
DHCP. ADSL modems
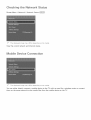
Checking the Network Status
Screen
Menu > Network
> Network
Status
The dispIayed image may differ depending on the modet,
View the current
Mobile
network
and Internet
status,
Device Connection
The dispIayed image may differ depending on the modet_
You can either
directly
connect
them on the same network
a mobile
device to the TV with no need for a wireless
to play media files from the mobile
device on the TV,
router or connect
Wi-Fi
Screen
Connect
Direct
Menu > Network
a mobile
Enable Wi-Fi
2,
> Wi-Fi
Direct
device that supports
Wi-Fi
Direct
device and then launch Wi-Fi
on the mobile
Direct to the TV without
scans for and displays
device.
a list of available
devices.
Select the device from
the list to initiate
a connection.
TV, a permission
connect
AlIShare
Screen
message
the mobile
appears
on the mobile
using a wireless
Direct.
The TV automatically
The TV's name also appears
If a connection
router.
request
device and vice versa. Accept
on the mobile
is made by the
the request to
device to the TV.
Settings
Menu > Network
> AIIShare
Settings
This TV can play media files from computers
a network. For details, see "Using Networked
or other DLNA-enabled
devices connected
External Storage Devices".
to the TV via
In addition,
this TV can be used as a display
for mobile
and tablets.
For details,
see "Screen
devices,
including
smartphones
Mirroring".
Rename the
Screen
Menu > Network
> Device
Name
Assign a unique name for your TV. The assigned
the TV via the network.
name appears
on the external
devices
connected
to
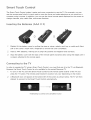
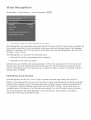
Smart Touch Control
The Smart Touch Control
use the remote
computer
change
panel's
using a mouse.
channels,
[nserdng
Slightly
In addition,
the Batteries
lift the battery
Insert 2 AAA
cover by pulling
making
the strap or using a plastic
on the screen to
card (e.g. a credit card). Next,
to remove the cover completely.
sure to align the positive
to the remote
and negative
ends correctly.
panel and press down along the edges until it
panel.
the TV using a Smart Touch Control,
However, the Smart Touch Control
is only available
press the TV button.
A Bluetooth
The remote
icon will appear
to connect
panel receiver's
at the bottom
at the remote
location
to connect
TV.
panel receiver of the TV and
may vary depending
left of the screen as shown
to the Smart Touch Control
<Attempting
you must first pair it to the TV via Bluetooth.
for the paired Samsung
To turn on the TV, point the Smart Touch Control
attempt
panel displayed
on a
to the TV
In order to operate
2,
remote
you can
as you would
(AAA X 2}
cover with the back of the remote
attached
Connecting
to use the TV. For example,
and make selections
you can use the virtual
notch with a fingernail
batteries,
Align the battery
is cleanly
touch pad to move the focus
play media files, and access favorites.
pull on the cover's
o
makes it easier and more convenient
built-in
automatically.
and completion
icons>
on the model.
below: The TV will then
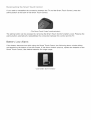
Reconnectin9
the
Smart
If you need to reestablish
pairing
button
Touch
Contro_
the connection
between
the TV and the Smart Touch Control,
press the
at the back of the Smart Touch Control.
<The Smart Touch Control's pairing button>
The pairing
pairing
button
button
Battery
If the battery
and appears
can be accessed
automatically
by removing
reestablishes
the Smart Touch Control's
the connection
between
battery
the control
cover. Pressing the
and the TV.
Low Amarm
becomes
low while
at the bottom
Smart Touch Control.
using the Smart Touch Control,
of the left screen.
Use alkaline
batteries
If the alarm window
for longer usage.
<Low battery
alarm
window>
the following
alarm window
pops up, replace
blinks
the batteries
of the
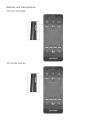
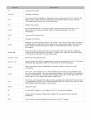
Buttons
<For U.S.A.
and Descriptions
and Canada>
<For the other
countries>
!
TV
Turns the TV on/off,
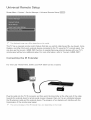
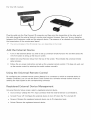
SOURCE
Changes
STIB
Turn on and off the satellite or cable set-top box connected
to the TV. For this, the
Smart Touch Control must be configured
as a universal remote control. Refer to
"Universal Remote Setup" for more information.
VOL
Adjusts
VOICE
Run Voice Recognition.
button and say a voice
information.
MUTE
Turns the TV sound
CH
Changes
the channel.
Displays
the virtual
MORE
the volume.
To speak a voice command,
press and hold the VOICE
command.
Refer to "Voice Recognition"
for more
on/off.
remote
panel on the screen.
a number panel, a playback
remote
pad to select numbers and buttons.
information.
::
Touch
the source.
The virtual
remote
panel consists
of
panel, and a quick access panel. Use the touch
Refer to "Virtual Remote Control" for more
Drag your finger on the touch pad as you would on the touch pad of a laptop to
move the focus displayed
on the screen. To select item, press the touch pad. Refer
to "Using the touch pad" for more information.
pad
RETURN / EXIT
Returns
to the previous
SMART
Launch
Smart
IHUB
terminates
menu.
Hub. While
the application.
an application
is running,
Refer to "Smart
pressing
the SMART
HUB button
Hub" for more information.
i
GUDE
Check the digital
information
channel
broadcasting
schedule.
Refer to "Guide"
for more
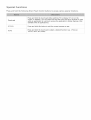
L_GHT
(for U.S.A. and Canada) Turn on the backlight
for the buttons. The backlight
lasts
for only a few seconds. Turns the remote panel light on or off. When on, the buttons
become illuminated
for a moment when pressed. (Using the remote panel with this
button set to On wit! reduce the battery usage time,)
IDVR
(for U.S.A. and Canada) This button is only available when the Smart Touch Control
is configured
to function
as a universal remote control to control a set-top box. Run
DVR (Digital Video Recording) in set-top box.
MEINU
Opens
3D
Turns the 3D image
IIINFO
the OSD,
on or off. Refer to "3D TV" for more information.
(for the other countries)
experience.
Enable Sports
(for the other countries)
Displays
Mode
information
for the optimal
sports
on the TV screen.
viewing
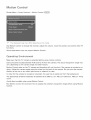
Special
Press
and
Touch
Functions
hold
pad
the following
Smart
Touch
Control
buttons
to access
various
special
functions.
Press and hold the touch pad while watching
TV to display OH List on the
screen. In addition, you can press and hold the touch pad for 2 seconds or more
while an application
is running to access the application's
hidden features. (Not
available with al! applications.)
RETURN
Press and hold this button
to quit the current
MORE
Press and hold the touch pad to select
TOOLS, INFO, etc.) easily.
process
a desired
or app.
function
(e.g. e-ManuaL
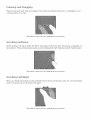
Using the touch
Use the touch
pad to perform
> Smart Touch Control
Settings
various
commands.
> Tutorial)
Navigate
to Tutorial
to view an on-screen
(System
> Device
Manager
guide to using the Smart Touch
Control.
Drag on the touch pad in the desired
finger
direction.
Move the focus
or the pointer
is dragging,
<The button's
name may vary, depending
on the country.>
Pressing
Press the touch
pad. This selects the focused
<The button's
item.
name may vary, depending
on the country.>
in the direction
the
Flicking
Flick on the touch
the direction
pad in the desired
This moves the focus
or scrolls
the screen
based on
and speed of the flick.
(The button's
Pressing
direction.
name may vary, depending
on the country.>
and Holding
Press and hold the touch
pad while
watching
TV to display
CH List on the screen.
can press and hold the touch pad for 2 seconds or more while an application
application's
hidden features. (Not available with all applications.)
<The button's
name may vary, depending
on the country.>
In addition,
is running
you
to access the
Pressing and Dragging
Press on the touch
current
location
pad, drag and release. This moves the selected
Scroll
This scrolling
feature easily
accommodates
both right-handed
name may vary, depending
a webpage
and left-handed
or a
users.
on the country.>
Left/Right
Move your finger
scroll
on the country.>
the line on either the left or right edge of the touch pad. This scrolls
<The button's
Scrolling
name may vary, depending
Up/Down
up/down
list up/down.
or your
on a map.
<The button's
Scrolling
web item in a webpage
a horizontal
horizontally
on the projected
line at the top of the touch pad. You can horizontally
list or the Smart Hub panel.
<The button's
name may vary, depending
on the country.>
Changing
Channels
While watching
TV, tap on the protruding
numerical
input window
to watch.
The recognized
channel.
by Entering
on the screen.
number
However, the number
line on the left or right edge of the touch pad to bring up the
Use your finger
is displayed
Numedca_
Refer to the diagrams
Adjusting
you have entered
below
may not be recognized
entries are recognized
name may vary, depending
when entering
the sequences
properly
you want
to the corresponding
by the TV. Refer to
accurately.
on the country.>
Menu > System
sensitivity
shown
numerical
values.
The TV may not recognize
your entries if
below.
the Touch pad
> Device
Users can adjust the sensitivity
adjust
for the channel
_nput Guide
you do not follow
Screen
to enter the number
on the screen and the TV switches
the guide below to ensure that your numerical
<The button's
Numbers
Manager
> Smart
of the Smart
and make it more convenient
Touch Control
Touch Control's
to use.
Settings
) Touch Sensitivity
touch pad. Set Touch Sensitivity
to
Show Status
and Notification
Press the MORE button
panel to display
Notification"
Banner
on the Smart Touch Control
the status and notification
and then select STATUS on the virtual
banner at the top of the screen.
Refer to the "Status
and
for more information.
This functions
is only available
on U.S.A.
and Canada.
Press the IRECOMMo / SEARCH and then select Recommended
the screen. This shows
Select a program
scheduled
remote
the current/scheduled
that is currently
program
from the list displayed
and application
airing to jump to the corresponding
to air to set up a Schedule
Viewing
setting.
at the bottom
of
recommendations.
channel
or a program
Refer to the "Scheduled
that is
Recommended
Program
Info" for more information.
Select an application
to launch.
Samsung
on the TV. Refer to the "Samsung
Apps"
Apps will
launch
if the selected
application
is not installed
for more information.
For U.S.A. and Canada
Press the RECOMM,
screen.
/ SEAIRCH and then select History
This displays
For the other
an interactive
list of recently
This displays
Deleting
Screen
channels,
at the bottom
media content
of the
and applications.
countries
Press the HISTORY / SEAIRCH and then select History
screen.
from the list displayed
accessed
History
an interactive
list of recently
from the list displayed
accessed
channels,
at the bottom
media content
of the
and applications.
Data
Menu > Smart
Features
You can delete the history
> Remove
information
viewing
about
history
recently
> History
viewed channels,
content
and applications.
For U.S.A. and Canada
Press the RECOMMo / SEARCH button
the screen.
on the Smart Touch Control.
Press the RECOMM_ / SEARCH
search criteria
information,
For the other
button
The list appears
at the bottom
again. The keypad will appear on the screen.
to search not only many apps and their contents
of
Enter
on the TV but also the Web. For more
refer to "Searching".
countries
Press the H_STORY / SEAIRCH button. The list appears at the bottom of the screen. Press the HISTORY
/ SEAIRCH button again. The keypad will appear on the screen. Enter search criteria to search not only
many apps and their contents
on the TV but also the Web. For more information,
refer to "Searching".
Virtua
Remote Controm
Press the MORE button
consists
select
of a number
numbers
appears.
to display
the virtual
panel, a playback
and buttons.
the Virtua_
Choose the number
panel on the screen. The virtual
panel
A quick access panel of virtual
pad to
remote
panel
easily.
Remote
panel, playback
remote
panel, and a quick access panel. Use the touch
Press and hold this button.
You can select screen buttons
Changing
remote
remote
Control
control
Panel
panel, or quick access panel as the panel to be shown
on
the screen.
Use the touch
beyond
pad to keep moving
the leftmost
Use left/right
scroll
or rightmost
function
on the touch
Change a position
Press the MORE button
the focus
left or right. The panel changes
pad to change
on the Smart Touch Control.
Using the Number
while
watching
TV. Changing
Use the playback
while
enjoying
control
Control
panel appears
a position
on the screen.
of the virtual
remote
panel
using the number
or to change
the channel
pad leaves a record, allowing
you to easily
Pane_
panel to pause, rewind,
fast forward,
skip to the next file, and much more
media content.
access the JNFO, TOOLS
depending
remote
on a keypad screen or webpage
the channel
Using the Quick Access
Quickly
The virtual
Users can change
channels.
the Playback
Using
the panel easily.
Panel
panel to enter numbers
return to previous
is moved
of the Virtua_ Remote Panel
press and hold the touch pad for one second.
of the screen.
Use the number
when the focus
edge.
on the operating
Panel
and e-Manual
buttons.
However, the availability
mode of the Smart Touch Control
(with
of buttons
may vary
the TV only, as a universal
remote,
etc.).
Adjusting
Screen
the virtuam remote
Menu > System
> Device
You can resize the virtual
remote
panel window
remote
before
Manager
pane_
> Smart
Touch Control
panel. If the virtual
using the virtual
remote
remote
panel.
Settings
panel buttons
> Onscreen
are too small,
Remote
Size
enlarge the
Remote Setup
Screen
Menu > System
The dispIayed
> Device
image
This TV has a universal
theaters,
may differ
remote
and other third-party
can also use the Anynet+
remote
panel without
Connecting
Manager
depending
control
external
any additional
devices
function
setup.
the external
transmission
The coot
Setup
that lets you control
cable boxes, Blu-ray
connected
to the TV using the TV's
to operate
Samsung
For more information,
external
devices
refer to "Anynet+
players,
remote
home
panel. You
with your TV's
(HDMI-CEC)".
the mRExtender
8000 and PDP 8500 series mode_s
Plug the cable into the TV IR connector
the IR extension
Remote
on the modet,
feature
(HDMI-CEC)
For the LED 7450/7500_
towards
> Universal
device's
remote
and then point the transmitter
panel receiver. However, there can' be any obstacles
cable and the external
of the remote
and design
at the other end of the cable
device.
The presence
of an obstacle
panel signal.
of the IR Extender
may vary depending
on the modet,
will
interfere
between
with the
For the
$9 models
Plug the cable into the One Connect
the cable towards
between
the external
the IR extension
the transmission
The coot
Select Universal
at the other end of
panel receiver. However, there can' be any obstacles
device.
The presence
of an obstacle
will interfere
with
panel signal.
may vary depending
on the modet,
Device
Turn on the external
SOURCE button
remote
of the IR Extender
Add the External
o
device's
and then point the transmitter
cable and the external
of the remote
and design
IR connector
device you wish
to set up universal
to bring up the Source
Remote
Setup from
remote
function
for and then press the
screen.
the top of the screen.
This initiates
the universal
remote
setup process.
o
Follow
the on-screen
up the remote
Using
control
the universal
already
connected,
sending
the input signals
Registered
and set up the universal
by entering
the Universal
By configuring
Universal
instruction
the model
Remote
remote
number
control
feature
to the corresponding
Remote
Setup
Device
screen,
manually.
for a connector
to which
as a universal
an external
remote
control
device is
simply
Management
o
Source
Setup:
Change the TV's input connector
o
Synced
Power
off: Configure
o
Rename:
o
Delete:
Remove the registered
If it does not work, set
connector.
select a registered
the external
Rename the registered
control.
Control
you can use the Smart Touch Control
External
remote
external
external
external
device.
that the external
device
is connected
device to turn off when the TV is turned
device (up to 15 characters
device.
long).
off.
to.
by
Entering Text using the Onscreen
An onscreen
keypad appears
into your Samsung
Entering
account,
when you need to enter text
etc.), allowing
the network
password,
logging
panel.
Text using the QWERTY Keypad
Use the QWERTY keypad as you would
them.
Ad{_itiona_
a normal
keyboard.
Simply
select the letters you want to enter
Features
Select the _
o
(entering
you to enter text using your remote
icon from the keypad to access the following
Language:
Select a language
Recommended
text:
Text feature displays
"lnternet",
from the list.
Enable/disable
the Recommended
Text feature. Enabling the Recommended
word recommendations
based on the entered characters. To enter the word
for example,
of recommended
all you have to do is enter "In" and select the word
Next Letter:
feature
eliminates
limited
to words that have previously
predicted
"lnternet"
from
the list
words.
Predict
for example,
features:
select
Enable/disable
the Text Prediction
the need to find and select individual
"1". A predicted
word to enter "lnternet".
feature.
Enabling
character
been added to the dictionary.
word will
the Text Prediction
keys. However, this feature
is
To enter the word "lnternet",
then appear next to the I key. Simply
select the
SMART Interaction
This TV features
TV operations
settings
SMART
without
Interaction,
and access features
recognition
which
the use of a remote
recognizes
a user's
panel. SMART
with ease. It takes approximately
to come online after turning
voice,
Interaction
actions,
and face to enable
makes it possible
15 seconds
to configure
for voice and motion
on the TV.
Face Recognition
This product
Smart
saves thumbnail
images of users' faces for use during the Face Login.
Hub via face recognition
TV Camera
result in legal liability.
including
concerning
criminal
and under certain
personal
in using an ID and password.
result in an invasion
camera surveillance
users agree that it will
(such as bathrooms,
of a person's
the use/misuse
under local privacy
data and on the free movement
laws, regulating
prohibited
legal conditions,
There may be obligations
By using the TV camera,
generally
into the
Use
Under some circumstances
individuals
may be less secure than logging
Logging
privacy
the protection
of such data, and possibly
both in the workplace
not be used (i) in locations
locker rooms or changing
or (iii) in violation
of the TV camera may
laws regarding
other laws
and elsewhere.
where cameras
are
rooms), (ii) in any manner that will
of any applicable
laws, regulations
statutes.
If you are using a camera,
Remove the sticker
first check the back for a sticker.
cover before
adjusting
When you are no longer using the camera,
prevents
any inadvertent
or unintentional
the TV camera angle.
rotate the lens downward
camera operation.
of
and secure it in place. This
or
Motion
Motion
Cont_o_
Control
works
by using the camera,
so the user must be within
the camera's
recognition
range.
The camera's recognition
range varies depending on the ambient light level and other factors. Run
Motion ControN Environment
Test before using Motion Control to determine the camera's recognition
range. User may experience
physical
fatigue
when using Motion
Control
for extended
periods.
Voice Recognition
For the best Voice Recognition
Voice Recognition
depending
Perform
clarity
is not available
on the language
a Voice Recognition
and the ambient
Voice Text Input requires
provide
Samsung
experience,
we recommend
in all languages,
chosen,
voice volume
Environment
the user's
or regions.
and ambient
agreement
MAC address
is particularly
varies
noise levels in the surrounding
to test the level and
with any third-party
app's voice privacy
policy
useful for searching,
-
Voice Recognition
privacy
Privacy Notice,
notices
and to
and other private information.
instead
browsing
of a mouse,
keyboard
before
Nuance Privacy
using
Notice
or remote
the web, and using applications
require text input.
You must agree to the following
area.
area.
Voice Text Input lets users enter text using voice commands
panel. This feature
Touch Control.
The performance
Test prior to using Voice Recognition
sound of the surrounding
with the user's
dialects
that you use a Smart
Interactive
Voice Recognition:
that
Voice Recognition
Screen
Menu > Smart
The displayed
image
Voice Recognition
the accurate
Features
may differ
recognition
in Language.
(System
> Time
of voice commands,
The TV's
Using the TV's built-in
o
Using the VOmCIE:button
noise can interfere
then say the command
Commands
specific
functions
pronounce
of the TV using voice commands.
words and phrases clearly
has to be set before
in the language
you use Voice Recognition.
Set the Clock
microphone
(from
ways:
a distance)
(up close)
with voice recognition.
word/phrase
0.3ft
to 0.4ft
may not be recognized
If this is the case, press the VOICE button
away from the microphone
if you speak too softly
and
on the Smart Touch
or loudly. The optimal
volume
and the Turn TV On voice command
a "Voice Recognition
Environment
should
be used within
13.1ft of the TV.
Test prior to using Voice Recognition
to test the level and
clarity and the ambient sound of the surrounding area. Ambient noise can cause Voice Recognition
to malfunction.
(Suitable Ambient Noise Level: Less than 40 dB, _40 dB - the sound at library or
area in the daytime.)
The voice recognition
environment
is
Environment
Voice Recognition
residential
For
75~80dB.
Operating
Perform
clock
can be used in the following
o
approximately
on the model,
> Clock).
Voice Recognition
Control.
depending
lets you access and remote
selected
Ambient
> Voice Recognition
Visit the Samsung
rate varies depending
(TV sound and ambient
noise).
website
for a list of standard
on the volume/tone,
pronunciation,
voice commands.
and ambient
Voice Recognition
Screen
Menu > Smart
This test determines
must be performed
Environment
Features
> Voice
how well Voice Recognition
Environment
Select Start to measure the ambient
proceed
3_
Recognition
> Voice
will work
before using Voice Recognition
Run the Voice Recognition
2_
Test
on the TV's screen.
recognizes
noise. If the ambient
Say the command
the user's voice,
in the TV's current
Test and stand within
the volume
Environment
to make sure it functions
to the next step. If this part of the test fails,
This part of the test measures
Recognition
and clarity
This test
13.1ft of the TV.
the test will
quiet and try again.
of the user's
loud and clear within
the test proceeds
environment.
properly,
noise level is suitable,
remain
Test
voice. A command
30 seconds.
to the next step.
will appear
If the TV successfully
If this part of the test fails, try
again.
4_
To measure the level of echo in the surrounding
Recognition
Enabling
Environment
Voice
Recognition)
to run Voice Recognition.
is not working,
has been enabled.
Wh eVoceRecognton
Screen
Recognition
Menu > Smart
This lets you familiarize
Tutorial
Test will end.
Say a command.
You can use Voice Recognition
the TV.
If Voice Recognition
Voice
the Voice
Recognition
Press the VOICE button
operate
area. If the echo level is suitable,
or activate
check to see if Voice
To use Voice Recognition,
sactvated,
Recognition
Voice
(Smart
Recognition
Features
> Voice
must be set to On.
the TV can turn on automat ca[ly due to an environmenta
npuL
Tutorial
Features
yourself
> Voice
Recognition
with the basics
Voice Recognition
> Voice
Recognition
Tutorial
of using Voice Recognition.
and then say "Guide me".
Run Voice
Recognition
to
Basic
Voice
Recognition
You can use the following
o
Moving
Use
commands
the Focus: Say "Focus Left",
focus.
However, these commands
Select
Item: Say "Select".
Available Voice Commands:
current state is shown.
All Voice Commands:
commands
Screen
Recognition
Menu > Smart
o
Language:
o
Trigger
"Focus Right",
Up", or "Focus
Down"
when the focus
ANI" to display
to move the
can be moved.
available
a complete
in the
list of voice
Say the name of a category.
are recognized.
Available
voice commands
may vary, depending
on the
Settings
Features
Word: Designate
> Voice
Recognition
for Voice Recognition.
certain
commands
as trigger
words.
To turn on the TV using a voice command,
"Hi TV, Power
ON")
TV Voice:
Enable/disable
the TV's voice responses
between
is active:
me". A list of basic voice commands
(Example:
choose
region.
"Focus
can only be used in situations
Say "Guide
Select a language
Voice Recognition.
while Voice Recognition
Say "Guide me" and then "Show
by category,
Only preset voice commands
software version.
Voice
anytime
a male and female voice.
Saying
a trigger
say "Trigger
Word + Power
to your Voice Recognition
This function
is not supported
word activates
commands
depending
ON".
and
on the
mnteractive Voice Recognition
Interactive
Voice Recognition
launch applications,
commands
Activate
o
and execute
or keywords.
off after 30 minutes
Interactive
When you don't
"Play <program
allows
Saying
you to set up a Schedule
various
other commands
Viewing
without
"Turn off the TV in 30 minutes,"
access VODs, search and
having to remember
for example,
specific
instructs
the TV to turn
(Sleep Timer).
Voice Recognition
and say a command.
know which channel
a specific
See the examples
program
below:
is on:
title>."
When you need information
"Which
Commands
_(genre
about a specific
name) shows
are on today?"
When you want to watch
a program
"Please
featuring
look up programs
genre:
featuring
_(cast
a specific
member).
actor or directed
/ Find me works
by a specific
directed
director:
by _(director
name)."
When you want to find out more information
about the program
"Who are the cast members
/ "What's
When you want
"Please
program
recommend
in this program?
the title of this program?"
recommendations:
something
to watch
this evening."
/ "Are there any shows
today?"
When you want to operate
"Adjust
the volume
Deactivating
To deactivate
you are watching:
the TV:
to ten." / "Change
to channel
_-_-"
Voice Recognition
Voice Recognition,
say "Close
Voice Recognition".
worth
watching
Motion
Screen
Menu > Smart: Features
> Motion
Control
The dispIayed image may differ depending on the modet,
Use Motion
Control
to change the channel,
adjust the volume,
move the pointer, and control
other TV
functions.
Some applications
Operating
may not support
Motion
Control.
Environment
Make sure that the TV camera is extended
before
using motion
controls.
Users should be located between 4.9ft and 13.1ft from the camera. The actual
vary depending on the camera angle and other factors.
Motion
down.
directly
Control
Adjust
relies on the TV camera and therefore
the camera angle using the wheel
at the sun or any other
The appropriate
ambient
brightness
movement,
is between
range may
if the camera is pointed
on the back of the camera.
light source or obstruct
In order for the camera to recognize
will not function
recognition
up or
Do not point the camera
its view.
the user has to stand out from the background.
50 to 500 lux. (ex: 100 Lux: bathroom,
400 Lux: living
room)
Avoid
direct sunlight
Run Motion
Control.
Control
when using Motion
Environment
Control.
Test to assess the camera's
recognition
range before
using Motion
Motion
Screen
Control
Menu > Smart
Run this test before
Run Motion
reflects
2,
Adjust
Environment
Features
> Motion
using Motion
Control
Control
Environment
on the TV screen,
recognizes
Control
to use Motion
Test
4.9ft and 13.1ft of the TV. If light
Control.
inside the square displayed
fails,
on the screen.
Once
from left to right. Spread
the TV. An arrow cursor appears
on the screen when the TV
try again.
Tutoda
Features
> Motion
Control
the instructions.
> Motion
Control
Tutorial
This lets you familiarize
yourself
with the basics of
Controm Activation
Menu > Smart
Features
> Motion
Raise your hand with the palm facing
Control
> Motion
Control
the TV. Hold it for a moment
side to side three or four times. When your hand is successfully
activated
Environment
the camera angle, wave one hand slowly
If recognition
Run Motion Control and follow
using Motion Control.
Screen
Control
to ensure proper functionality.
user can be difficult
adjusting
the action.
Menu > Smart
Motion
> Motion
Test and select Start within
your hand out with the palm facing
Screen
Control
the camera angle so that you appear
you have finished
Motion
Test
and a pointer
is displayed
and slowly
recognized,
wave your hand from
the Motion
Control
is
on the screen.
Dropping your hand out of the range of the TV camera
seconds to reactvate
t_
deact vates Moton
Contro _ Rase your hand withn
3
Using
the Basic
Available
motion
The following
o
Motion
commands
basic motion
Pointing
Navigation:
Run / Select:
like holding
Return:
ControMs
may vary, depending
control
commands
This action
Make a circle
doing.
are available:
moves the cursor to the desired
Make a fist to select an option
down a remote
on what the TV is currently
or execute
position.
a command.
Keeping
your fist clenched
panel button.
with your hand in the counterclockwise
direction
to return to the previous
menu.
Turning
over screens:
Hold one palm vertical,
and swing to the left or right to change
the Smart
Hub screens.
Zoom
in / Zoom
these actions
Rotate:
out: Clench two fists,
with webpages,
and make the gap between
Use these actions
with
Like: Without
activating
automatically
Facebook.
adds Facebook's
Pan: While
Scrolling
zoomed
or narrower.
or anticlockwise
as if turning
a steering
photos.
the Motion
Control,
raise and hold your thumb
"Like" option.
into the photo,
However, This motion
for 2 seconds.
is available
make a fist and then move it left/right/up/down
a web page: While viewing
Screen
Control
Menu > Smart
Animated
Pointer
Motion
Speed:
Guide:
> Motion
Displays
to pan.
a web page, make a fist and then move it up/down
Options
Features
This
only on the
the page up/down.
Motion
Use
maps, or photos.
Clench two fists, and rotate them clockwise
wheel.
them wider
Control
an animated
Set the speed of the pointer
guide when user motion
used in Motion
Control.
is detected.
to scroll
is
Motion
Control
The Screen
Launching
Screen
Composition
Motion
Control
while
while
Viewing
watching
"[V
TV displays
the following
icons
on the
screen:
The Smart
Launching
Hub Screen
Motion
/
/
Control
Composition
while
using
Smart
Adjust
the volume.
Turns
the TV sound
Changes
Hub
displays
This function
on/off.
the channel.
Returns to the previous
the following
is only available
This function
This function
is only
icons
on the
screen:
on the On TV.
available
is only available
on the On _#.
on the On TV.
menu.
Check the recommended
program information
and air times. Select a program
from the list to view detailed information
about that program. For more
information,
refer to "Scheduled Recommended
Program Info".
Displays the virtual remote panel on screen. Refer to the "Virtual Remote Control"
for more information.
H
Change the source.
Turn off the TV.
RetHevin9
Icons
When using Motion
of inactivity.
on the Screen
Control
with Smart
Hub, the icons will
To retrieve the icons, move the pointer
blue) and then hold it there for 1 second.
@
/
/
@
/
/
@
/
disappear
to one of the three edges shown
The icons will reappear
/
automatically
/
on the screen.
after two seconds
below
(marked
in
Face Recognition
Users can register their faces and log into their Smart
face may be registered
per account,
tone, the TV may have difficulty
Operating
Depending
recognizing
Hub accounts
on the ambient
through
brightness
Face Recognition,
One
level and the user's skin
the user's face,
Environment
Users should
be located
between
4,9ft
and 13,1ft from the camera, The actual
vary depending
on the camera angle and other factors,
The appropriate
ambient
brightness
is between
recognition
50 to 500 lux, (100 Lux: bathroom,
range may
400 Lux: living
room)
Face Recognition
can recognize
The TV may have difficulty
individuals,
Note the following
o
up to 5 different
recognizing
twins
users at a time,
and people with similar
when using Face Recognition:
Do not cover your face with a hat, a pair of sunglasses,
The user's entire face must be visible to the camera,
prevent
faces as two different
the camera from
Keep your expression
recognizing
or your hair,
Avoid
shadows
over your face, Shadows
your face accurately,
as neutral as aossible,
In addition,
keep your mouth
closed
but at the same
time as neutral as possible,
User's facial
expression
expression
when logging
during the registration
into your Samsung
process,
account
must be the same as the facial
Face Registration
Users can register their faces to the Smart
have one, Refer to the "Creating
Face Registration
from
Hub accounts,
a Samsung
the Smart
Account"
Create a new account
section
Hub account
if you do not already
for details,
information
screen
Log nto Smart Hub first.
Open the Smart
2.
Features
Read the instruction,
Account
> Edit Profile
select OK, and then enter the password
3. Select Take Picture,
in the red dotted
> Samsun9
and the user's
frame.
face appears
menu, and select Register
for the Samsung
on the screen.
The face is successfully
registered
Face.
account.
Keep the face to be completely
when the frame turns green.
If it fails,
select Retry.
.....
Iihe _ser s entire face must be vsbe
the camera from
recogrfiz
Keep yOLr express on as _e_tra
as _e_£ra as possibe,,
lit s better
to select
higher securi_x Wth
face recogr_ tion,,
4. Select Save to finish.
to the camera,, Avod
shadows
over yo_r face,, Shadows
prevent
ng yo_r face acc_ rate _
the checkbox
the checkbox
as possib e,, Iin addition,
besde
I want
seected,
keep your nsoutli_ closed
to enter password
as well
but at the same time
for increased
the _ser m_st enter the password
security
for
when ofi_gin(t_ n _sin(t_
Face Registration
for
the
Sma_t
Hub account
From the Smart Hub Iogin window,
automatically
recognizes
2_
Select a face to register
3_
Read the instruction
4_
face
select Face recognition,
r_ecognition
and then select Start.
The TV
the user's face.
from
the list, and then select Register
from the popup window,
However, a user account
user is logged
using
appears
Face in the popup window.
select OK, and then select the account
in the list if the TV has a record
of the user's
from
account
the list.
and the
in.
Enter the password
for the Samsung
account.
To make face recognition
more accurate,
scan the
user's face again.
Select Take Picture.
The user's face appears
red round. The face is successfully
on the screen.
registered
Keep the face completely
within
the
when the round turns green. Select OK to proceed.
The user's entire face must be vsble to the camera, Avoid shadows over your face, Shadows prevent the
camera from recogn z ng your face accurately_
Keep your expression as neutral as possib e, In addition, keep your mouth closed but at the same tree as
neutra as possible,
It is better to select the checkbox beside _want to enter password as welJ for increased security for
hgher security_ With the checkbox seected, the user must enter the password when logg ng n usng face
recognit on_
Face Recognition
Select Face recognition,
a user's face.
Profile,
Login
and then select Start from the Iogin window.
If recognition
fails,
try again.
you need to enter your password
The user's entire face must be vsble
camera
from recognizing
Keep your expression
neutraI as poss ble.
Once recognition
If the password
The TV automatically
entry option
has been enabled
as well in order to log into the Smart
to the camera.
Avod
shadows
recognizes
under Edit
Hub.
over your face. Shadows
prevent
the
your face accurately_
as neutral as possib e. In add t on, keep your mouth
succeeds,
the TV logs into the Smart
registered faces, a list of corresponding
unreg stered face prompts a warn ng_
accounts
Hub automat
appears_ Seect
cosed
but at the same tree
caIly, If the TV recognizes
the appropriate
account_
as
two or more
Recogn t on of an
Using Peripheral
The displayed image may differ depending on the modet,
This TV can be controlled
These peripheral
Certain
models
Keyboard
Screen
devices
USB HID class keyboards
a keyboard
Select
instead of a remote
panel.
to use the TV.
and mice.
Connection
> Device
Manager
Keyboard:
Add Bluetooth
> Keyboard
Settings
to the TV for easier text entry, To use a USB keyboard,
into the TV's USB port. With a Bluetooth
o
and a mouse
make it easier and more convenient
do not support
Menu > System
Connect
with a keyboard
Designate
Keyboard:
which
keyboard,
plug the keyboard
pair it using the TV's Bluetooth
keyboard
to use. Only one keyboard
View a list of Bluetooth
keyboards
within
cable
function.
can be used at a time. !;:_:
range. Select the keyboard
you wish to use.
Keyboard
Keyboard
Options:
Configure
the language,
type and other basic keyboard
settings.
Use
Use the following
keyboard
keys to remote
the iV.
,
Arrows key (Moves the focus), Windows (_), Menu (TOOLS), Enter (Selects and activates), ESC
(RIETURIN), Numbers (Numbers)
o
F1 (B), F2 (D), F3 (),
F4 (@), F5 ( t_ ), F6 (SOURCE button),
button), Fg/F10 (Vollume Remote), F11/F12 (Change Channel)
o
Page Up / Down:
Scroll
a webpage
up or down.
F7 (CIH LIST button),
F8 (MUTE
Mouse Connection
Screen
Menu > System
Connect
> Device
Manager
a mouse to the TV and right-click
then use the screen menu, Smart
> Mouse
Settings
on the mouse to bring up the Go To screen.
Hub, and other TV functions
You can
using the mouse as you would
on a
computer.
To use a USB mouse,
using the TV's
plug the mouse cord into the TV's USB port. To use a Bluetooth
Bluetooth
o
Select
Mouse:
o
Add Bluetooth
mouse,
pair it
function.
Designate
Mouse:
which
mouse to use. Only one mouse may be used at a time.
View a list of Bluetooth
mice within
_! ::!:1!
i:!:
range. Select the mouse you wish to
use.
Mouse
Mouse
o
Options:
Configure
button
assignments,
pointer
speed and other basic mouse settings.
Use
Left Button:
Selects
Right Button:
and activates.
Brings up the Go To screen,
which
Menu, Smart Hub, and Tools.
Mouse
wheel:
Scroll
a webpage
up or down.
includes
options
such as Power Off, Screen
TV Viewing
The displayed image may differ depending on the modet,
Use this feature to view the program
features
are not available
Program
guide and program
when viewing
information
more easily. However, these
TV using a cable box or satellite
receiver.
mnfo
Select the virtual
remote
panel's
IINIFO button
while
watching
TV to view information
about the current
program.
However, Program
Info is only available
you must first set the TV's
Program
certain
Info may vary depending
on the touch
Viewing
setting
Refer to the "Schedule
on the type of incoming
pad to check out other programs
for the selected
Viewing"
Change the Broadcast
Screen
channels.
navigate
In order to use the Program
to Clock
signal
(System
> Time
Info,
> Clock).
and may not be available
Menu > Broadcasting
Choose an antenna
section
Signal
> Antenna
to receive digital
or press the touch pad to set up a
program.
for more information
broadcast
signals
from.
about Schedule
Viewing
The
at all for
programs.
Drag left/right
Schedule
with digital
clock. To set the clock,
settings.
ScreenMenu> Broadcasting> Guide
View eachdigital channel'sprogrammingschedule.Checkthe programmingschedulesand evensetup
a ScheduleViewing. Pressthe GUIDEbutton to launchthe guide.
Change
Channels
Select a channel
Change
from
on the virtual
remote
panel to change
the desired
on the virtual
remote
panel. A popup window
category,
Navigation
Select the [] button
on the touch
programming
Schedule
pad moves the focus
schedule.
detailed
two hours back or forward,
However, the focus
cannot
will open. Dragging
enabling
faster
left or right
browsing
be on a time prior to the current
of the
time.
Viewing
Select a program
that hasn't
information
Schedule
button
reserved
Checking
Highlight
information
incoming
right away,
Category
Select the @ button
Quick
Guide to jump to that channel
Viewing.
screen.
Schedule
on the virtual
aired yet and then the virtual
Select Schedule
Viewing
remote
Viewing
is only available
panel and navigate
remote
panel's
from the detailed
for programs
to the Schedule
I_/IFO button
information
that haven't
Manager
to display
screen to set up a
aired yet. Select the
screen to view a list of
programs.
the
Program
a program
_nfo
and select the INIFO button
about the highlighted
signal
program.
and may not be available
on the virtual
The Program
at all for certain
remote
panel. This displays
Info may vary depending
programs.
the
detailed
on the type of
Channel List
Screen
Menu > Broadcasting
> Channel
Launch OH List while watching
TV to change
hold the touch pad. This launches
The Channel
o
__
.
@:
List screen
channel
A favorite
channel
A Schedule
_
on other channels.
Press and
the following:
reserved
channel
Channels
Select a channel
to jump to it right away. To quickly
The focus
moves up and down
On the Added
information.
Change
Oh, list, it is possible
the Broadcast
Drag right on the touch
immediately.
Change
Drag right
the Channel
on the touch
list can only be selected
added,
scroll
through
the list, use the channel
up/down
the list in one page.
Drag left on the touch pad and then select Genre.
previously
or to check what's
: A locked channel
Change
buttons.
Viewing
channels
OH List.
icons indicate
An analog
List
to filter
Select a desired
channels
by genre,
TV channel
genre.
if the channels
contain
proper genre
Siglna_
pad and then select Air or Cable. This will change
the signal
source
List
pad and then switch
if it contains
select Edit Favorites
to the Added
at least one favorite
and add channels
Cho or Favorites
channel.
list. However, the Favorites
If no favorite
channel
from the Edit Favorites
screen.
was
Schedule
Screen
Viewing
Menu > Broadcasting
> Schedule
Manager
The displayed image may differ depending on the model,
Configure
the TV to show a specific
TV watching,
The _
Schedule
next to programs
Channel Schedule
Viewing
o
Guide
o
Program
or program
at a specific
make sure that the date and time is set properly
icon appears
Digital
channel
Info
for programs
time and date. Before scheduling
under the System
that have been configured
for a Schedule
> Time
> Clock
menu.
Viewing.
Viewing
on digital
channels
can be set up through
the following
two options:
FromGuide,selecta programyou wish to view.
P_"ogram _nfo
Select the virtual
the program
remote
remote
information
INFO button
screen,
drag left/right
panel to select a program
Analog
The Schedule
and date.
Specify
to display
information
on the touch
about the current
pad or press left/right
that has not yet aired and set up a Schedule
program.
button
Viewing
From
on the
for it.
Channe_ Schedume Viewing
Viewing
Run Schedule
2,
panel's
function
Manager
that program's
for programs
on analog
channels
can be set up by specifying
the time
and then select Schedule.
Antenna,
Channel,
Repeat,
and Start Time
and then select, OK to finish.
Cancel a Schedume Viewing
To cancel a Schedule Viewing for a specific program, select the program
screen. A popup menu wJ[[ appear. Select Demete to cancel.
Edit Schedule
of the selected
Manager
List
Select an entry from the Schedule
settings
from the Schedule
entry.
Manager
screen and then select Edit from the popup menu. Edit the
3D TV
Screen
Menu > Picture
> 3D
The dispIayed image may differ depending on the modet,
This TV is 3D-enabled.
For the best 3D viewing
experience,
users must wear Samsung's
3D Active
Glasses.
The ideal viewing
distance
is three times
or more the height of the screen.
We also recommend
sitting
with your eyes level with the screen.
Carefully
read the health and safety
Refer to the "3D Precautions",
information
concerning
for more information.
3D viewing
before
viewing
the TV in 3D.
Thereareseveralrestrictionswhen using 3D TV:
o Runningthe SmartHubautomaticallydeactivates3D viewing.
P_Pcannot be used.
CertainPictureoptions are disabled.
IRType Samsung3D Active Glassesand third-party 3D glassesare not supported.
The left and right 3D imagesmay initially overlapwhenthe TV is turnedon. It takesa moment
for the display to optimize andthe overlappingto go away.
The 3D Active Glassesmay not work properlyif there is another3D productor electronicdevice
turnedon nearthe glassesor TV. If there is a problem,keepother electronicdevicesas far away
as possiblefrom the 3D Active Glasses.
Whetheror not 3D video is displayedin true HD is usuallydeterminedby the quality of the
content.
Activating
Screen
3D Mode
Menu > Picture
Choose a 3D mode
input signal.
mode
according
to the input signal.
Some 3D contents
for watching.
Available
> 3D > 3D Mode
may differ
Select a 3D mode from
3D modes
may vary depending
Available
prefered
3D modes
3D mode.
the available
may vary depending
In this case, change
3D modes
depending
on the
the desired
3D
on the input signal.
on the input signal.
o
_
Off: Deactivates
3D viewing.
o
_
Normal:
o
_
L/R: Splits
a single
image
into left and right overlapping
o
_
T/B: Splits
a single
image
into top and bottom
o
_ Horizontal Line: Switches between left and right images one horizontal
mode is not supported on the UHD $9 Series models.
o
_ Vertical Line: Switches between left and right
not supported on the UHD $9 Series models.
o
_ Pixel: Switches between left and right
on the UHD $9 Series models.
o
_ Frame: Switches between left and right
supported on the UHD $9 Series models.
Converts
(Horizontal Line), _
normal
images to 3D images.
(Vertical Line), and _
Some formats
overlapping
do not support
this mode.
images to create the 3D effect.
images to create the 3D effect.
images one vertical
line at a time. This
line at a time. This mode is
images one pixel at a time. This mode
is not supported
images one frame at a time. This mode is not
(Pixel) can only be seected when the computer's
reso ution
is set to 1920x1080 or the computer is connected to the TV via an HDMI-DVl cable,
D
(Frame} can only be se ected when the computer's reso ution is set to 1920x1080 and the frequency to
60Hz,
Resolutions supported
Resolutions".
by the TV may vary, depending
on the 3D mode.
For details,
see "Supported
3D
Setting
3D Effects
There are several adjustments
O
3D Perspective:
O
Depth:
Adjusts
<T/B).
O
L/R Change:
O
3D
to _
Adjusts
Swaps the left and right
(Normal)
applications
watch
o
function
Notice
are running,
3D Auto View
Adjust
is available
images.
This function
brings
to On switches
up a message
The TV can not switch
the 3D. This function
3D Light control:
be used if 3D mode
is set to _
(L/R) or
is not available
if 3D mode
is set
(Off).
View: Setting
View to Message
cannot
pictures.
3D images to normal
or _
more enjoyable.
the 3D perspective.
the 3D depth. This option
_ 2D: Converts
3D Auto
that can be made to make 3D content
is available
the brightness
for LED 745017500,
the TV to 3D automatically.
Setting
screen when the TV receives a 3D signal.
3D. In this case, close the application
for LED 745017500,
of 3D images.
8000 series models
If the screen
8000 series models
only.
3D Auto
If some
and then
only.
is too dark, select High. This
Screen
Menu > Picture
> P_P
The dispIayed image may differ depending on the modet,
Display
example,
video from an external
you can display
picture-in-picture.
PIP is active
device on the main screen and the TV as a picture-in-picture.
a Blu-ray
movie on the main screen and simultaneously
PIP is not available
automatically
deactivates
while
the Smart Hub or 3D TV is active.
For
watch TV as a
Turning
off the TV while
PIP.
o
PP: Activates/deactivates
PIP.
o
Antenna:
Select either Air or Cable as the input source for the sub-picture
o
Channel:
Selects
o
Size: Selects the PIP sub-picture
o
Position:
o
Sound Select:
the PIP sub-picture
screen.
channel.
size.
Selects the PIP sub-picture
position.
Selects the audio source.
Playing a game or using the karaoke feature on the main screen can result in a lower PIP picture qualit'¢_
To enjoy PIP, the main screen's source must be Component or HDMI and the input reso ution must be less
than FHD, The subscreen supports digital channe s onbz
Analog
Screen Calibration
The dispIayed image may differ depending on the modet,
Analog
and/or
pictures
reduce
can become
shaky and full of noise, If this happens,
you can fine tune the signal
noise to clear up the picture,
Fine Tune
Screen
Menu ) Broadcasting
Clear up shaky
pictures.
) Channel
Settings
Fine tune the pictures
Select Reset to reset the Fine Tune operation.
) Fine Tune
until they are clear and then select Save or Close.
This option
is only available
for analog broadcasts.