1
C H A P T E R
4
Using Wiki
O
K, you’ve installed Perl, the QuickWiki script, maybe even a full-blown Web
server, and you did the test run. Everything seems to work, so now you’re all set
to go with your very own wiki! Only, go where? And how?
That’s what this chapter deals with: a mix of mechanics and guidelines to get you
familiar with actually using the wiki to do something useful. This sort of guidance
seems required for most newcomers, in part because the Wiki concept is so totally
open and (initially) unstructured. The case studies from the academic (Chapter 11)
and corporate worlds (Chapter 12) both strongly suggest the need for some level of
coaching for new users in task-oriented settings. While this need may be less
pronounced in the public discussion setting, usually because helpful content by the
administrator and other users already exists, a new wiki easily induces the dreaded
“blank page” syndrome familiar to writers.
However, even if you are an experienced wiki user, don’t ignore this chapter. We
believe there is interesting material here for you as well, because apart from the
“simple” walkthrough, the text takes up numerous more general and complex issues
that aren’t all that well known.
IN THIS CHAPTER
In this chapter, we focus on the user’s point of view and take up the practical side of using
a wiki. Also featured are some conceptual models to help you better understand what is
happening behind the scenes. The assumption is that you have a successfully installed
wiki; for example, the basic QuickiWiki stand-alone installation explained in Chapter 3.
73
74
USING WIKI
• Quicki Quick-Start first presents a short discussion about what to use a
personal wiki for. Then A Virtual Notebook gives a basis for how to
begin building your local database, illustrated by practical example in
Making Wiki Notes, a Walkthrough. This includes summaries of the
most commonly used edit conventions in the style of “desired result—
do this”.
• Wiki as PIM is a change of pace and shows a fast and furious, blow-byblow example of a personal notebook wiki applied to a specific purpose
and how its scope changes as the linked associations leverage the usefulness
step by step.
• The Content Model takes a step back to give an abstracted “peek” at how
the wiki organizes and manages content. Internal and External Hyperlink
Models and Browsing Pages provide the dual perspective of server side and
client side.
• Editing Pages is the core reference section, starting with a view of the
browser editing model and its consequences. Building Wiki Content takes
up some general issues raised by the walkthrough that started the chapter.
Finally, Editing and Markup Conventions sets out the basic “common
feature set” for a wiki and related usability aspects, with recommended
edit syntax. Tips about customizing and hacking the source for enhanced
features are reserved for the chapters that follow.
QUICKI QUICK-START
Maybe a short diversion first: What can you use your personal wiki for?
Some suggested ways to use a wiki database on your own include
• A commented list of your favorite Web sites—list your bookmarks/
favorites in the order you want them, arranged by topics, easily updated
and restructured
• Your VCR tape collection, so you can find the two hours free you need to
record that movie starting in just five minutes
• A free-form recipe collection—find all recipes that can use those six egg
yolks sitting in the fridge
• A log and notebook for all the software installations, system tweaks,
problems, ideas, Web resources, and computer books to order (along with
ordering links!)
QUICKI QUICK-START
75
• A contacts book with names, addresses, phone numbers, and linked local
files and Internet resources
• A notebook resource to help write that complex novel you’ve been
thinking about for the past decade or two
Well, anything at all, really. Since it is free-form, your use can grow with time. You don’t
need to sit down and figure out data fields or structure first. So don’t worry about it or
about mixing different uses; just start making those notes and see where it all leads.
A VIRTUAL NOTEBOOK
The notebook model is perhaps the most pragmatic way of viewing the wiki and how
to use it. In this notebook, you can either edit existing page content or add new pages
at will. Over time, as you add cross-links between pages and expand your notes to
include references to external resources, you create added value in these notes.
Tip 4.1: Free-form
Think of a wiki primarily as a free-form, searchable notebook with unlimited
pages and in principle unlimited associative scope.
An illustrative example of increasing value is given in the section Wiki as PIM,
where a basic inventory-type list is taken step by step to a richly cross-referenced
source of information always at your fingertips.
Tip 4.2: Access anywhere
In addition, if your wiki server is accessible over the Internet, you can access and
update your notes from anywhere, from any Web browser client, as long as you
have basic connectivity and your host system is running.
The mechanics of implementing your personal notebook wiki on your system
are straightforward. For completion, we start with physically setting up the wiki
(installing QuickiWiki), because this procedure is repeated for each new wiki instance
you wish to have.
Setup
Given the QuickiWiki package on the companion CD, creating a new instance means
simply installing again, as explained in Chapter 3, but in a different directory. The
76
USING WIKI
simple steps can also be applied to an existing (customized) instance and are
summarized here (for a Windows system).
1. Create a holding directory for the wiki and the subdirectory pages. Include
any “seed” pages you wish to start with.
2. Copy to the new holding directory all the wiki CGI files, the quicki.txt
server file, the template.html file, and a chosen logo graphic. (The logo file
is defined in the template—you can edit this in any text or HTML editor or
rename another graphic file to replace the existing one.)
3. Create a shortcut for the quicki.txt file or edit an existing one. Ensure that
the working directory (“Start in”) in the shortcut properties dialog has the
correct path to the newly created directory and that the command line
correctly references your perl installation path—if perl is correctly installed,
you should be able to simply type in a line that reads PERL.EXE quicki.txt 80.
4. Rename the shortcut file appropriately for your wiki and drag (copy) the
shortcut to your desktop. (These last two steps are not required if you have
an installed Web server, typically the case in Linux.)
Additionally, in Linux you are probably already aware of the issue of permissions. All
perl files and their containing directory (or directories) must then have the “wrx”
permissions set for the intended user group, along with page directory “wr-”
permissions; otherwise, it won’t work.
This gives you a working wiki, ready to run but with no initial pages. Initial
emptiness is not a problem, because creating new pages (including the first and top one)
is an integral and natural operation in Wiki. The early structure linked from the default
top page might include links to main topics, RecentChanges, and the search function;
pages explaining how the wiki works, syntax examples, and recommended style
guidelines; and pages for a guestbook and a copyright notice—for public wiki use.
Tip 4.3: Seeding a wiki
You can always “seed” a wiki with a selection of standard core files to give it
some initial structure and provide a “user manual”, and this is recommended if
your wiki will be used by others. A sample collection of seed pages is included
on the companion CD.
QUICKI QUICK-START
77
A selection of “standard templates” to use when adding form-type content
can prove useful. A wiki can in fact be customized to automatically include
template text when you edit a new page, with template file selection based on a
proposed page name. Several clones often used in corporate settings have this
functionality.
Starting a wiki is a two-step process: server and browser.
Start-up
In the QuickiWiki stand-alone model (in Windows), you have a Quicki shortcut (an
icon as a serving hand) to start the wiki; it is usually on your desktop but can be
placed anywhere convenient.
Tip 4.4: When you don’t need “Quicki”
In a Linux or Windows environment with an existing Web server, you don’t need
this special Quicki server process at all. Instead, just create the browser
bookmarks to the respective wiki.cgi files for each wiki instance.
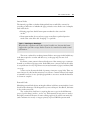
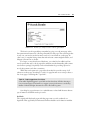
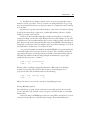
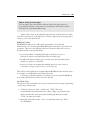
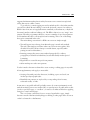
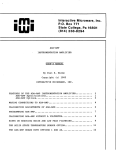
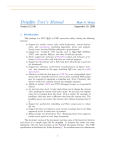
If you later install several wikis, a shortcut for each one should be given an
appropriate name, as shown in Figure 4-1. Each “server” thus defines in its Properties
dialog the location (and port number) for the instance it belongs to.
Double-click on the appropriate icon, and the server module should start up and
run in a minimized DOS window. It remains there until you explicitly shut it down. As
FIGURE 4-1.
Renamed “start serving”
icons for two standalone QuickiWicki
Wikis
78
USING WIKI
long as it is running, you can access the wiki using any Web browser client, read
content, modify it, and add new content.
To access a (running) QuickWiki instance, start your favorite Web browser
application and point it at http://localhost (optionally qualified with port number; for
instance, http://localhost:8080 if you have defined several concurrent Quicki processes
to listen to different ports). Strictly speaking, the default is http://localhost:80/wiki.cgi,
but the server can interpolate defaults, so the shortened form is sufficient.
Anytime you point your browser to your wiki without specifying a page, you
reach the top, default page. In normal circumstances, especially in a multiuser
context, this page should introduce the wiki theme and have a few page links to the
top-level topic pages.
Adding Content
To start with, you need to generate the content. Making and modifying notes is core
functionality in your personal wiki. The strength of a wiki is the ability for users to
quickly and intuitively modify or add content. The wiki method is therefore made as
simple and intuitive as possible.
• To add content to or modify any wiki page, simply browse to that page and
click on the Edit link.
• To create a new page, edit in a suitable WikiWord title on an appropriate
page and save this to create a “dangling link” (“?”). Follow this new link to
the edit form, add content, and save to immediately create the page.
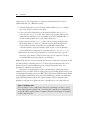
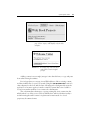
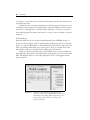
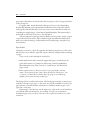
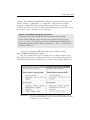
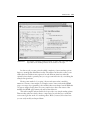
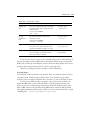
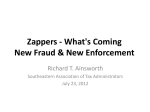
• If you don’t find a starting page at all—in other words—you only see an
“empty” template in an “unseeded” wiki—create one by simply following the
Edit link (or button) on the template. An example of this is shown in Figure 4-2.
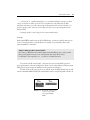
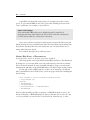
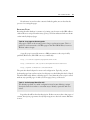
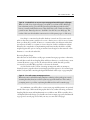
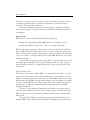
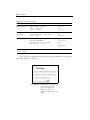
Optionally, the wiki can generate a prompt message as shown in Figure 4-3 and such
as the following: “This page does not exist. Please edit to create some content.”
Tip 4.5: Check for typos if you get an unexpectedly empty page
However, when you get directly to an empty page like this, you should, strictly
speaking, always verify that you have specified a valid page name. In the previous
examples, the correct (and existing) page might have been the alternate singular/
plural form “WikiBookProject” and “WelcomeVisitors”, respectively.
QUICKI QUICK-START
FIGURE 4-2.
79
Starting a wiki with no pages defined. The default
page is then “empty” and displays only the bare
template.
FIGURE 4-3.
An empty page, but in another
wiki and now with a helpful
prompt
Adding content is easy enough: just type it into the edit form, or copy and paste
from other existing documents.
Don’t forget that you can type in any URL address to link to existing content,
and that includes files on your local system. Using the file://D:/folder/file notation is
often adequate for the local wiki, because following such a link generally starts the
application or browser applet you need to view file content. But it is not valid for
access from another machine across a network or the Internet.
The only immediate advantage to copying existing file (text) content into the
wiki database is to allow you to search it with the basic wiki search functionality—
and in knowing that wiki content is in plain-text format instead of a closed
proprietary document format.
80
USING WIKI
Some URLs can break link word parsing—for example, those that contain
spaces. To parse the full URL in such cases, replace the offending characters with
“hex” equivalents—for example, a space with %20.
Tip 4.6: Inline images
Your wiki handles URL references to identified graphic format files by
displaying the image inlined in the text. The location of the file is immaterial:
local file system, network, or Internet (if connected).
Don’t worry about any explicit formal structure to begin with. The search and
linking features let you incrementally introduce relevant structural relationships later.
In particular, the simple but fast search means that you can always find notes, no
matter where they were placed.
Let’s examine the application of this in practice.
MAKING WIKI NOTES, A WALKTHROUGH
Access the wiki!—server on, browser on, point to localhost.
The first page that comes up by default is titled WelcomeVisitors. This default can
be changed, or you can later define your own preferred entry point from an external
link or browser bookmark. In a new, unseeded wiki with no pages, you only see the
template’s text and links, along with the Edit button. Use this to begin creating content.
For the sake of this walkthrough let’s assume you are setting up a bookmark
wiki of useful Web resources. Edit (create) your front page to have text something like
the following:
This intends to collect interesting web resources.
* http:changes.cgi
[Search]
* MostFrequent
* InternetPeople
* AuthorResources -- BookPublishers
* WikiChanges
Note how the intended page links are written—as WikiWords with no spaces, also
known as InterCap or EmbeddingCapitals. (Most of the time, this is easy to do. On
occasion, problems can arise because of word selection, abbreviations, or other
QUICKI QUICK-START
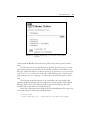
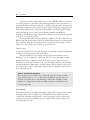
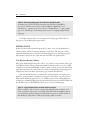
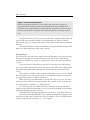
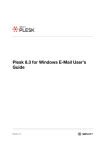
FIGURE 4-4.
81
Example default page for a new wiki collecting Web
resources
conflicts with the WikiWord formation rules. This issue is taken up in more detail
later.)
Use the Save button to publish the page. In the base wiki, you get a scriptgenerated page that confirms this. Click any WelcomeVisitors link there to see
the page captured in Figure 4-4. Notice the magical appearance of a search form
in place of [Search]. Since none of the other intended pages are created yet, the
page links here are all “dangling”, as indicated by the prefixed question mark
link.
The first item in the list, however, is an active link to the script module that
generates the Recent Changes list. It is traditional to always include a link to Recent
Changes, which—if it is an actual page (and not generated on the fly)—the wiki
automatically creates when you save the first page.
Next click on the question mark link prefixed to MostFrequent. Once again you
come to the edit form. Start with something simple:
To visit often:
* http://www.wiki.org -- Home page for The Wiki Way support
82
USING WIKI
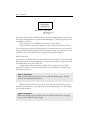
FIGURE 4-5.
Detail, when
MostFrequent has
been created
After you save this, return to WelcomeVisitors using the template link to the top page.
You will see that the item list now shows MostFrequent as a defined page link, as seen
in the Figure 4-5 detail.
That’s all there is to it, the Wiki mantra: browse, edit, and save.
You have already seen in this example a couple of the edit conventions. There
aren’t all that many to learn. In fact hardly any are essential, since the focus is on plaintext notes. Most are fairly intuitive, such as starting a line with a star (asterisk) to create
a bullet list. You can learn them all in a single session with little problem.
Edit Conventions
Conventions for editing are discussed more fully later, including some of the reasoning
behind which ones to include and why to use a given syntax, but as a quick-start aid,
we summarize the basic set in Table 4-1.
Continue this working example by editing and creating more pages. Notice
especially how easy it is to spawn new pages at any point simply by creating a page
link pattern in the text.
Tip 4.7: Associations
Think about the different ways you can cross-reference different pages, existing
and new, by creating links in this way.
When you have a selection of pages, do some searches to get the feel of how to
find notes and references on any page. Check out RecentChanges to see which pages
you recently modified.
Tip 4.8: Entry points
Think about which pages you might want to bookmark in the browser as regular
entry points in addition to the top page.
WIKI AS PIM
TABLE 4-1.
Summary of basic edit conventions
DESIRED EFFECT
DO THIS
Link to another database page
Form a WikiWord name in the text
Link to Internet location (URL)
Write out the full URL, including protocol
Text in same paragraph
Keep on writing, single new lines are ignored
New paragraph
Insert extra (blank) line before starting text
Monospaced text (preformatted)
Start line with one or more spaces
Bullet list
Start item with asterisk (*), end with new line
Numbered list
Start item with pound (#), end with new line
Emphasis (usually as italic font)
Surround text with ''double apostrophes''
Strong (usually as bold font)
Surround text with '''triple apostrophes'''
Horizontal rule (section break)
Start line with four or more hyphens (----)
Enough of this—we think you see the picture. Let the following section be a
glimpse into the practical side of running a personal notebook wiki.
WIKI AS PIM
Someone posting on WikiWikiWeb once had this to say about the risks of running
your own wiki as notebook, seen from the point of view of someone addicted to
following public wiki discussions:
Even worse than being a write-addict is when you download the script and
create your own wiki den. Then, you’re all alone. And when you start
commenting on your own pages, you get scared …
And you thought talking to yourself was bad?
Setting up your own wiki-based notebook, or perhaps several, can change the
way you do a lot of things. This is especially true if you tend to have the system
running most of the time, a browser window always at hand to jot down notes.
If you’re anything like the rest of us, you have notes on paper here and there:
notebooks, pads, Post-Its, and other scraps. Even with papers neatly ordered in
binders or documents on your hard disk, how do you find things? Not terribly
83
84
USING WIKI
efficiently, we’d wager, even if you do use some kind of personal information manager
(PIM). How do you manage the changing relationships between different notes? Do
you even discover the interconnectivity?
Imagine instead directly asking your scattered notes where references to
“thingamy” are and having the appropriate bits of papers levitate into view, slide out
of bookshelves, and be there at your fingertips. A fanciful prospect, but not
impossible as a concept.
Probably the most intriguing part of wiki as PIM is that eventually everything
starts to interconnect: notes, files, e-mail, contacts, comments, relational cross-links,
Internet resources, and so on. There are no fixed boundaries, limited numbers of data
fields, maximum size constraints, limited numbers of cross-reference or topic links—
instead, the whole thing evolves almost organically in response to your growing body
of notes.
A WORKING EXAMPLE
A simple proof-of-concept example can be useful to illustrate the process and how one
begins to “think” when setting up a wiki.
Consider the convenience of having all your VCR recordings and DVDs always
kept up to date in a wiki database. Let’s walk through this example to see how a wiki
can grow in scope and usefulness.
Initial Thoughts
This can start just like any other listing, in a new instance of a wiki. The tapes and
discs may be numbered, so set up a main table of contents page that points to all the
volumes by number. (Most people tend to start ordering such things systematically, if
at all, by sequential number.)
Hmm, numbers alone don’t make wiki page titles—well, they could, but not in
the base WikiWord linkage model. (It’s hackable. See also Swiki and TWiki, to name a
few clones that allow arbitrary titles.)
OK, so what other parameter is of interest for a VCR tape? Try the recording
length in minutes: first a capital letter—“T” for tape, “C” for CD, “D” for DVD—
followed by a number. Then the length, as usually coded on VCR tapes: “E240” for a
four-hour tape. That gives a workable WikiWord link: “T24E180.” With this, we can
at least find all volumes of a given length—just a click away.
Not a very informative title, you say? It doesn’t matter, it’s just a handle to hang
the page on for now. We might be tempted to include genre or category now, but such
things change with rerecording, so stay with unchanging parameters for the basic list.
WIKI AS PIM
85
We’ll be cross-linking later with more meaningful things, but we don’t want to worry
about the structure just yet. The first priority is entering the inventory of volumes. In
short order, the initial volume-number page will fade in importance as we develop
new entry points into the database.
Adding More Information
So, the initial contents page lists all the tapes, each a link to the respective page that
will describe what’s recorded. Enter the data for each volume: typically program titles,
recording date, and any other notes of interest. Again, don’t sweat the exact format.
Later searches won’t care about which order the information comes in, just that it’s
there.
An important “other” item is typically the remaining free space (for example,
free2h), because then we can instantly find space to record on by searching for
“free”. If some recording is no longer relevant and can be recorded over, note this
and add the available length to the free-space item ( free-1h40-2h—by avoiding
spaces here, even the simple base search displays the noted times, not just the single
word “free”).
In fact, if we hack context results (see Chapter 6) into the wiki search code, why
not make FreeSpace a topic page and change the text free2h to FreeSpace 2h.
Bookmark the topic page, and the free listing is now only two clicks away, Favorites,
then Backlinks. We could even have different topic collections for FreeSpace, listing
some standard lengths in addition to the general case: FreeSpace 1h, FreeSpace 1h30,
and so on.
More Data Options
Suppose we have all the episodes of the TV series Babylon 5 recorded on VCR. That’s
over a hundred—perhaps 25 or 30 tapes. After entering all the episodes on the respective
volume pages, we can find them by episode name. Perhaps we even make some notes
about the pivotal events. “Kosh dies (is killed by Shadow advisors to Morden).” “New
improved Lyta returns from the Vorlons.” Our searches become more useful.
In a series we might want to quickly find the next tape or the previous. A oneclick solution: edit in appropriate cross-links on each page (made simpler if the
automatic backlink hack has been applied).
What about a topic page, Babylon5Episodes? This lists all the episodes by name
in their proper order, with links to the respective tapes and date recorded. Even better,
add a topic page for each season—for example Babylon5Season4—and make sure
appropriate cross-links are inserted for each tape’s page.
86
USING WIKI
The possible entry points are multiplying rapidly. Depending on what we are
looking for, different pages give optimal starting points.
Including External Resources
Then we remember that there are episode resources on the Web. Great! Add the URLs
to the topic pages, for example. Only a click away.
Browsing these external resources further, we find episode analysis, cast, comments
by the producer, and complete plot summaries. Aha, link each episode directly to the
respective summary and analysis. Better yet, make each episode title a link, and collect
episode resources on each episode page. Copy the summaries to each page.
Now we can wiki-search with a much more fine-grained resolution to answer
questions like these.
• Which episode was it when Sheridan first saw a White Star ship? (Search
for “white star” and go to the earliest.)
• Which episodes were about Mars? (Search for “Mars”.)
Mars, by the way … Where’s a good map of Mars when you need one? On the Web,
of course, along with orbital images. Add the URLs. Still only a click away.
Hmm, novels have been written in the Babylon 5 universe. Link to a new page,
list the titles (found via one of the earlier URLs to resources), and add URLs to, for
example, Amazon.com, author home pages, reviews, and summaries. Now ordering
one of the books is … yup, only a click away. Cross-link to the episode page nearest in
the timeline of events.
Timeline? Right, another page with a B5 events timeline. Oh, and links back
from the timeline to the respective episodes, films, and books.
More Associations
The question arises, Do we have anything else recorded that actor Bruce Boxleitner
played in? Come to that, what has he played in? More links to Web resources that can
look this up and to any wiki page we find.
As time goes by and more links and cross-references are added, we see that the
wiki turns into a valuable resource for anything to do with this episode collection that
so much time was invested in to record.
Compressed like this, the description can seem extreme, even manic, but it
represents a natural evolution of a wiki-style notebook.
THE CONTENT MODEL
87
However, you might by now be wondering how all this content is stored and
organized internally to provide such flexibility. The next stop, therefore, is a look at
the Wiki content model. An understanding of this is useful when you later start
modifying the code.
THE CONTENT MODEL
Wiki content is divided into an arbitrary number of interlinked pages in the wiki
database, each containing mainly text, and largely unformatted text at that. There are
good reasons for this, discussed later.
Even so, we still make a formal distinction between the source text of a page and
the rendered text of that same page as seen in the browser window. As a wiki user, you
see the source text of a page only when you edit it, and this is the only time you are
concerned with the defined formatting conventions. A number of text string
substitutions occur in the subsequent process of serving the page, foremost being the
creation of active hyperlinks from the defined link patterns. There can be additional
“hidden fields” in the stored page that the wiki uses for special purposes.
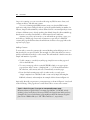
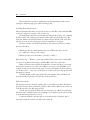
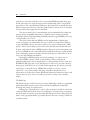
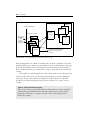
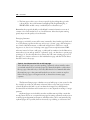
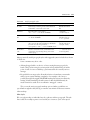
This relationship between the actual database and what you see when
browsing may be clearer from Figure 4-6, which shows in schematic form how the
wiki serves a requested page. The wiki responds to the request by building the page
Wiki page database
HTTP Get
XxxXxx
ThisPage
XxxXxx
XxxXxx
ThisPage
Server files
source text
XxxXxx
HTML Template
CSS
logo
XxxXxx
ThisPage
tagged text
and active
hyperlinks
script-defined
substitutions of
text patterns
HTTP Serve
ThisPage
FIGURE 4-6.
How a wiki serves a page from the database
88
USING WIKI
from the database content and a number of other components and sending the result
as HTML.
The wiki implementations presented in later chapters finish building a page
in memory before sending it, which is the more straightforward approach when
using templates. Earlier versions that didn’t use template pages instead sent
rendered content line by line as it was processed. Different clones do one or the
other. Curiously, the authors note a trend back to the original “partial response”
model by, for example, Swiki, seemingly because this gives a better user experience
for pages that have components requiring a lot of processing time to finish.
The content model is by itself not enough to describe the wiki.
What makes the wiki more than just a simple notebook is the interactive
hyperlink functionality that the wiki leverages via the Web browser you access it with.
Quite honestly, this is the only reason to accept the inferior user interface for editing
text that current Web browsers provide.
The power of hyperlinking is that other pages, e-mail, local files, network
resources, and Internet resources are just a click away from your wiki notes. You can
seamlessly integrate all into a single, free-form, searchable, text-based database.
Furthermore, because it is Web served, the database becomes independent of platform
and, given hosting and connectivity, of location.
Central to understanding how this works is the wiki’s hyperlink model.
INTERNAL AND EXTERNAL HYPERLINK MODELS
Hyperlinks in a wiki follow two different syntax conventions:
• Wiki-internal page links, which are simply page name references that are
later converted to wiki page requests
• “External” resource links, where the Internet URL address is written
explicitly in the text, including the protocol prefix
In either case, the link is not “active” until the wiki replaces a particular text pattern
in the page with the appropriate HTML code before serving it. This reduces much
visual clutter when editing; otherwise, you would be confronted with something like
this:
<a href="http://localhost/mywiki/wiki?SomePage">SomePage</a>
THE CONTENT MODEL
89
Internal Links
The internal page links are further distinguished (in most wiki-like contexts) by
providing an indication of whether the page pointed to exists. In the source examples
used in this book:
• Existing pages have the full name pattern rendered as the active link
anchor.
• Name patterns that do not yet have a page created have a prefixed question
mark as the active link—the “dangling” or open link.
Tip 4.9: ?NewPage or NewPage?
We prefer the ?=prefix model to the original ?=suffix one, because this better
suggests the open-link concept. Prefix notation also interferes less with normal
punctuation.
The server overhead for rendering internal links to new pages in this helpful way
is the time required to scan the wiki directory (or the page map in some clone
variations).
Each time a name pattern is detected in the text of the current page, a test must
be made to see if the target page exists. In the Web server context, however, this delay
is acceptable even for very large directories (many thousands of pages) and many links
on a page.
A later section discusses the kind of pattern to interpret as page links. There are
several ways to do this, but the main issue is to follow a convention that is both simple
to remember and easy to use. Specifying hyperlinks to resources outside the database
is a bit more complex.
External Links
Identifying external links by just writing the address in full may seem simplistic, but it
does have the advantage of working much as you would expect. In addition, the intent
is clear in the source text.
The overhead involved here is requiring the user to type in the full Internet
protocol prefix (http://, mailto:, and so on). Unfortunately, many users are used to
the highly automated features of newer editing applications, which automatically
(and sometimes incorrectly or inappropriately) replace URL-like patterns with
90
USING WIKI
“best-guess” active links. Users are thus initially disappointed at the manual entry
required by the wiki.
Despite this, the consistent requirement to explicitly type in the full protocol for
an Internet resource address seems preferable to any kind of hidden and inconsistent
automation—although this is a possible tweak. Automatic conversion can surprise
users and then generally requires some kind of “escape” syntax to disable it in special
situations.
Link Rendering
How hyperlink anchors are rendered visually depends, like all HTML, mainly on
browser and user settings as well as styling settings in Web page and associated style
sheets. As a rule, the Web author or wiki tweaker should avoid enforcing any specific
hard-coded styling unless there are good reasons for doing so, because many users
have definite opinions on how they want a Web page to be rendered.
Figure 4-7 shows an example page rendered with anchors for several different
hyperlink types and includes a separate window showing the source text for the same
links. The template links to a Cascading Style Sheet (CSS) to add suggested visual
styling elements.
FIGURE 4-7.
Example of page and external hyperlinks. The
“browse” version of the edit partially overlays the
edit window. CSS styling adds visual pizzazz (color,
fonts, border graphic) without “forcing” user
preference settings.
THE CONTENT MODEL
91
Now that we’ve seen how the content is linked together, we can describe the
process of accessing the pages.
BROWSING PAGES
Browsing the wiki database is a matter of pointing your browser to the URL address
of the wiki server script. From this entry point, you follow whatever links are shown
on the initially displayed page.
Tip 4.10: Any page can be entry point
Any page in a wiki can be an entry point as long as you know its name. This is a
general access characteristic of all Web pages on the World Wide Web (a fact most
Web site authors forget).
A specific page is passed by name as a URL parameter to the script. A fully
qualified (Web server) wiki URL can vary considerably:
http://localhost/mywikis/myagenda/wiki?ToDo
http://wikiserver.com/cgi-bin/wikipub?DiscussionServers
http://mywiki.someserver.com/GuestBook
The particular details depend on server and configuration. Typically, you just
bookmark pages from earlier sessions for this purpose, thus hiding this level of detail.
The wiki additionally defines a default page for cases when the server script is called
without any specified page—in effect, its front page, the top of the stack.
Tip 4.11: Default page identifies wiki
The default page name is a useful configuration item, because defining a unique
descriptive name for it makes a convenient way to identify a particular wiki for a
visitor.
Page titles should be short but descriptive. If there are more than a few pages of
content, descriptive page names clearly help navigation to desired content. But there
is more.
92
USING WIKI
A pervasive tendency among wiki users is to use a WikiWordTitle as shorthand
for casual references to any subject, thus implying that there is more information (or
that there should be a discussion initiated) on a wiki page by that name. Currently, the
underlying assumption is that you know which wiki or, failing that, will try the most
likely. Developments with concepts like FederatedWiki and PeerToPeerWiki might
make even that specification unnecessary. (Readers familiar with Wiki will
doubtlessly already be browsing to their favorite haunt to see if any of these page titles
exist, alone or as part of another.)
The big question when using any database is, Where is xx? For a wiki, like any
Web site, this question becomes a bit more qualified: On what page is xx mentioned?
Once you know the page, locating the pattern on it then becomes a matter of visual
inspection or using the browser’s own local search function.
Finding Pages
A decent search function is one of the strengths of a wiki and a valuable complement
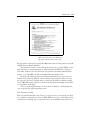
to whatever structure you give the page database.
The typical wiki has a special page explaining the search function, such as
FindPage—a good candidate for a seed page. This contains at minimum a simple
search-pattern form, sometimes a selection of search options. Type in a word or
fragment, and click on the button to start a search (most browsers also allow simply
pressing the Return or Enter key to send the request). The base wiki accepts several
space-separated words as a single match pattern, and customized versions can have
more advanced options.
Tip 4.12: Search from anywhere
The search form is not restricted to a particular page. It is in fact an inline
magic pattern (such as [Search]) that can be included in any wiki page; for
instance, a frequent entry point. Including a fixed link to FindPage on the
template is a simple way to make search functionality accessible from any
location in the wiki.
Search Results
Performing a search on any simple text patterns yields a list of all pages that contain a
matching pattern, such as in Figure 4-8, and helpfully the word the pattern was
contained in. Note that each page title is a link to that page; click to visit. For user
convenience, the generated results page can include another instance of the form,
allowing further searches.
THE CONTENT MODEL
FIGURE 4-8.
93
Results of a sample search in a demo QuickiWiki
This basic search is speeded up somewhat by going on to the next page at the
first pattern match instead of collecting all matches for the page. The reasoning is that
in any case you need to use the browser search to locate instances on the page. In
other cases, a complete listing of matches with relevant context might be better, and
Chapter 6 shows how to do this.
For larger or more heavily used databases, you often find an additional fastsearch option that only looks at page titles and thus uses the demanding full-content
search more sparingly. Capability can be refined further by providing options for
word-only patterns and other constraints.
When the search pattern is a page title, the results list provides a map of all
references to that page. Searching for a title of a page known not to exist produces a
list of any pages containing this “open link”.
Tip 4.13: Topic suggestions for visitors
Some wikis implement generic open-link searches that show all links referring to
not-yet-created pages. The intent is to suggest open topics that users can develop
further—links that might otherwise be overlooked and forgotten.
Searching for page references is so useful that two related wiki features deserve
special mention: backlinks and topic search.
Backlinks
The original wiki displayed pages with the page name as a title, rendered as a
hyperlink. That apparently self-referential link invoked the search function with the
94
USING WIKI
page name as the pattern. As noted earlier, this search gives a list of all pages that refer
to the current one.
For public wikis, having this explicit link proved very resource demanding,
because Web indexing robots spawned new backlink searches in the wiki itself for
each page they indexed. For this reason, later versions move this functionality into
something less trigger-happy: a form button labeled Backlinks. The functionality is
unchanged; it only needs a live user to click the button.
Your first impression perhaps is that backlinks only tell you the “parent” page in
a typical hierarchical structure. This is useful enough, but additional benefits arise
when you realize the synergy of fully editable and creatable pages, using the Topic
Search feature.
Topic Search
Sometimes you want to collect all pages that deal with a particular topic. The search
functionality can provide this, especially if given a little bit of help by judicious editing
of pages.
Topic search can be both implicit and explicit.
• In the implicit form, wiki convention suggests that pages on related topics be
given similar names—for example, SomeConcept, SomeConceptRefuted,
MoreOnSomeConcept. Thus a search of “SomeConcept” lists the related
pages as well.
• In the explicit form, say that you create a topic page with a relevant
name—TopicSomeConcept—and a short description of that topic. You,
or anyone, can then edit in a link to the topic page on any wiki page
judged to have some bearing on that topic.
Two things follow from the explicit form. All related pages state their common topic
and link to the same topic page—a click away. Second, the backlinks list for the topic
page generates a list that includes at least the set of all these member pages—each
again just a click away.
Interestingly, some Internet search engines also exploit the overall usefulness
of backlinks when presenting hits; for example, Google.com. Sometimes a
backlinked page can prove more relevant to the original search than any of the
actual hits.
THE CONTENT MODEL
95
Tip 4.14: Use backlinks to return to parent page when editing spin-off pages
When you edit a list of spin-off pages, you spend a lot of time on the child pages
but sometimes need to go back to the parent page. Backing up in the browser
history is usually inefficient because of the many edit copies cached since the last
parent browse. Instead, perform a “backlink” search from your child page. The
results of this search include the current version of the parent page—a click away.
Searching is constrained to the wiki database it runs from. If you run several
wikis on the same system, usually each covers a distinct area, so this is more a feature
than a problem. It is possible, however, to construct wider search functionality that
encompasses all wikis on a system or even a selection of wikis on different systems.
However, the complexities of implementing such functionality should be carefully
weighed against the option of using an external search engine on the network or the
Internet to cover the selected wikis.
Browsing Empty Pages
Most discussions about links to wiki pages assume the target page exists—otherwise,
the wiki detects and shows dangling links and directs the user to an edit form to create
content. However, a page can also be referenced from outside the wiki, possibly
incorrectly, by another Web page link or a browser bookmark.
As noted earlier in the context of starting an empty new wiki, an attempt to
directly browse a page that doesn’t exist simply gives what appears to be a normal page
with no body text but containing the hyperlinks defined in the script or page template.
Tip 4.15: First edit creates new page on Save
Wiki newcomers can find this empty template confusing at first, perhaps incorrectly
assuming that they have just created a spurious page in the database. This is why a
prompting text is a good idea, explaining that Edit and Save will create the page.
At a minimum, you will be able to create a new page with that name. An optional
tweak of the script could instead bring up the edit form, as when following an internal
dangling link, but most wiki implementations avoid that route. With a sensible choice
of template links in the design, you should even from an empty page easily find the wiki
top page and a search page and so find your way to some other valid page.
96
USING WIKI
Tip 4.16: Browsing empty page can indicate a typing mistake
An empty page can be an indication that the page reference in the URL is
incorrect. A common cause can be confusion between “MainTopic” and
“MainTopics”, extraneous (noise) words as in “TheMainTopic”, or just a simple
typo as in “MaiinTopic”. Performing a title search on a fragment might find the
right page.
So much for the mechanics of browsing and creating pages. This leads to a
discussion of how editing wiki pages works.
EDITING PAGES
In this section we take up the editing model of a wiki, some overall guidelines for
editing content, and the formatting (markup) conventions. The last part is fairly
extensive and mixes theory and practical syntax suggestions to give the prospective
wiki tweaker a feel for how to later structure and order new pattern rules.
THE BROWSER EDITING MODEL
It has to be admitted right away: the “editor” for a wiki is a very primitive affair—it is
your Web browser’s text-in-a-form environment. Using the server protocol for GET
(request to read content) and POST (request to write content), you receive the current
page (the source text) in a form, make your edits, and submit the changed page back
to the server. The server then replaces the page content in the database.
You will doubtlessly miss your interactive spelling checker, your styling and
typefaces, and any number of features from your favorite editor or word processor.
Never mind. Maybe by generation 8 or 9 of Web browsers, form editing will have
evolved into something halfway decent. Currently, the browser paradigm is What You
Got Is What You Get (WYGIWYG). That’s not too bad as such things go.
Tip 4.17: Copy and paste from another editor an option
There’s nothing to stop you from copying and pasting the form contents to and
from a regular word processor if you really want all the bells and whistles support
for your writing. Spell checking is probably the main reason you would want to do
that. Reducing online time (on dial-up) by writing offline is another.
EDITING PAGES
97
So, the Wiki rule for editing is simple: enter your notes as paragraphs of text,
written as clearly as possible. Focus on content, not styling. Plain text can go a long
way as typewriters have shown over the past century or so and much e-mail continues
to in our time.
However, most people today feel the need for some form of (visual) text styling.
As will be seen later, there is support for considerable markup, and more could be
added if you really, really want it.
In this book we repeatedly make the point that visual styling is a side effect of
structural markup, not an end in itself. Realize, therefore, that examples of, say, italic
and bold text you see in rendered wiki pages are in fact indirect styling, external to the
wiki. These are the visual, interpreted results of the served HTML content markup as
dictated by your browser client, its defaults, and your preference settings. It can look
very different for another user or in another browser.
As a practical example, text marked up with the HTML PRE tag (preformatted) is
commonly rendered in a monospace font by a browser. This convention allows the
page author the luxury of assuming that space-tabled content will reliably render as
intended. The numbers in the following example would therefore appear right
justified in their respective “columns”.
item 1
item 2
1234
12
totaling 56789
34
However, there is nothing stopping the adventurous Web surfer from defining
another, nicer-looking font for this in the browser—one that happens to be
proportional. This user would thereafter see the following:
item 1
item 2
1234
12
totaling
56789
34
Other, less obvious cases can also mess up an intended page layout.
Styling (Markup) Options
Most wiki flavors provide at least a few basic text markup options. Anyone with
access to the wiki code, and who cares to program, can freely modify or extend this
functionality.
Instead of using raw HTML tags in the source text, Wiki convention is to reserve
some special text patterns to indicate format changes. These embedded syntax
98
USING WIKI
patterns are converted on the fly to the corresponding HTML tags when the page is
served. Choosing not to support inappropriate visual markup (italic) can guide the
page author to use content markup (emphasis)—the visual effect is (usually) the same,
but more important, the intent is preserved and rendered correctly even, for example,
in nonvisual browser applications for the blind.
The chosen starting set of content markup options implemented as simple text
patterns allows meaningful structuring of content. It aims to enhance browsing
readability without degrading editing readability. Heavily tagged HTML source is by
contrast hardly easy to read.
This doesn’t mean that raw HTML can’t be implemented as editable page
source; we just don’t recommend this option for casual use. Some wiki variants do
accept raw HTML tags in source text, possibly as an optional editing mode. “Wiki
purists” often frown on this practice, however, because this just turns the wiki-andbrowser combo into an inferior HTML tag editor. Except in special environments, the
presence of HTML in text to edit additionally intimidates many users and keeps them
from contributing content. As stated earlier, the main purpose of the wiki is to be an
easy-to-use, hyperlinked text database.
Returning to HTML markup and visual rendering, one cannot say too
often that HTML is mostly about content markup. There is widespread
misunderstanding that it was designed just for visual markup because of the way
WYSIWYG Web page editors give this impression. The fact is, browsers have by
design great freedom in how to visually render tagged text. It is therefore hardly
surprising if “advanced layout” HTML that attempts to create a “visual
experience” can produce widely diverging, sometimes unreadable screen
representations of the same content. Rendering differences between browsers, and
even browser versions, alone constitute good reason to keep source markup
simple.
The Edit Page
The default action in a wiki is browse (read only). Modifying content is accomplished
with explicit POST requests sent to the server. Like everything else on the Web,
browsing and posting are asynchronous.
Editing page content therefore occurs locally, on the user’s system, in a text form
cached and displayed by the browser. Local editing has some important consequences
that we’ll return to later. For now, just realize that the server knows nothing about the
status of any page update until it is posted by the user. The user can even go offline for
an arbitrary time.
EDITING PAGES
Wiki page database
HTTP Get
99
XxxXxx
edit=ThisPage
XxxXxx
XxxXxx
ThisPage
Server files
source text
XxxXxx
HTML Template
XxxXxx
ThisPage
text source in
edit form
HTTP Serve
Edit ThisPage
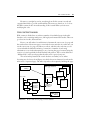
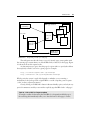
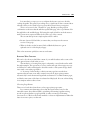
FIGURE 4-9.
Requesting an edit of a wiki page
The wiki generates the edit form as a special (virtual) page, sent together with
the current page content when you click the Edit link (or button) for that page. Figure
4-9 shows how an edit request works.
An alternative way to get to the edit page for a given title is to specify the address
that explicitly calls this action for a given page; for example:
http://localhost/mywiki/edit.cgi?TestPage
http://wikiserver.com/cgi/wikipub?edit=TestPage
Which particular syntax is applicable depends on whether you are running a
modularized code package such as QuickiWiki or a wiki script that parses requests
(“edit” is then a request parameter).
Clearly, clicking on an Edit link or button is the user-friendly option, and only in very
special circumstances would you ever wish to explicitly type the URL for the “edit page”.
Tip 4.18: Link to Edit for frequent update
You might consider bookmarking the edit URL for a frequently modified page so
that selecting this immediately takes you to the edit form for that page’s content.
100
USING WIKI
HTTP Post
Wiki page database
XxxXxx
ThisPage
XxxXxx
XxxXxx
ThisPage
Browser Submit
ThisPage
modified text
source in edit
form
Browser copy of received edit form
source text
(replaced)
XxxXxx
XxxXxx
Script-generated
acknowledgment
HTTP Serve
ThankYou page
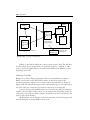
FIGURE 4-10.
Ultimately show
modified page
Posting an edited page
Editing occurs entirely within the context of your browser client. The wiki first
becomes aware of your update when you specifically request to “publish” it. This
action is tied to the submit button, variously labeled Submit, Save, Publish, or Post,
depending on the wiki.
Submitting Your Edit
When you are done editing, selecting the edit form’s submit button requests a
POST action by the server. POST functionality on the server replaces the
current page content with the sent content of the form’s text field, as shown in
Figure 4-10. The same thing happens even if the named page you are editing does
not exist—this just creates the page instead of replacing an existing file.
Some processing of the submitted text can occur before the wiki saves the page,
and this is discussed later in the context of code analysis and customizing. Such postedit parsing can provide you with a number of useful shortcut entry conventions, and
even a form of spell checking.
Modifying the content of pages you have browsed does, however, bring up some
issues that depend on how the Web browser works.
EDITING PAGES
101
Edit and Browser Stack
The way the Web browser cache stacks viewed pages, combined with page content
that changes, can unfortunately confuse new wiki users. For the usual “static” Web
page, this is rarely an issue, but in the wiki context, we need to clarify what happens
“under the hood.”
Your browser uses a (configurable) local cache for pages and images that it has
already loaded. Most Web pages seldom change, so caching saves time and network
bandwidth when you revisit sites. The browser can compare server and cache versions
and load the server version only if it is more recent. The browser then displays the
most recent copy of content in its cache that corresponds to the given URL. (Other
layers of caching can also occur between wiki and browser.)
Local caching is especially convenient when looking back through a history list
of visited pages. Then the browser doesn’t even bother to check whether a server page
is more recent than the cached copy. Instead, it just serves up the cached version—
what you last saw. The point is to view browser history. You don’t have to be
connected as long as the previous content is still in the browser cache. Eventually, of
course, old content is pushed out as you continue browsing.
However, problems can arise with “dynamic” Web pages (created as they are
requested), in particular when we edit in a wiki a page in the browser. When you go
back in the browser history, your displayed page can end up out of sync with the
actual content of the wiki page.
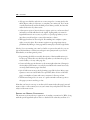
Consider this sequence of events.
1. You browse to a particular wiki page. The page is put on the stack of
visited pages in the cache.
2. You decide to edit the page and follow the link to the edit form, which is
then filled with the current page content. This too is a “page” from the
point of view of the browser and is stacked with the final (changed) form
contents when you submit it.
3. You post the edit and next see the wiki “Thank You for Edit” page, which
becomes the third stacked page in this example.
4. At this point, you reflexively use the browser Back button (twice) to return
to look at the edited page. There is no sign of your changes.
The reason for this mystery is that you are looking at a stacked, old version of the
page, not at what is currently in the wiki database. In fact, your history cache will
contain several different, progressively older versions of the same page after you have
102
USING WIKI
Wiki page database
Browser stack timeline
XxxXxx
XxxXxx
XxxXxx
ThisPage
Cached pages in stack
version 3
Use browser
Back button to
see older
(cached)
versions of
edited page.
ThisPage v1
Edit v1
Thankyou 1
ThisPage v2
Edit v2
XxxXxx
XxxXxx
Post v3
Thankyou 2
ThisPage v3
Get page
most recent
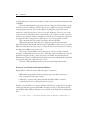
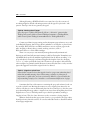
FIGURE 4-11.
See current version of page by
requesting it using a page link.
This forces a reload of the
contents.
How edited pages stack in the browser cache
been working with it for a while. To illustrate this, we show a schematic of browser
stacking in Figure 4-11, where a version number on each cached instance of the page
shows its relationship to the current database content. Backing up in the browser
history stack thus shows you content that no longer corresponds to the current wiki
content.
This applies not only the page but also the content of the various edit page forms
in the stack. For this reason, you should avoid backing up to continue editing the
same page. In fact, some solutions to multiple-user edit conflicts as a side effect
prevent a user from posting changes from such a cached version, citing “version
conflict”.
Tip 4.19: Ensure valid form content
There are two ways to ensure valid edit form content. One is to always request the
edit from the page’s Edit link/button. The other, which can be used if you have
backed up to the form, is to request a browser reload of the edit page before
making any changes.
EDITING PAGES
103
It is unrealistic to expect you to reconfigure the browser options to disable
caching altogether. The gains from caching are too significant in other contexts. More
relevant is that you be careful of how you use the browser’s history navigation.
This is one reason for the “Thank You” page. Besides providing explicit
confirmation to the user that the wiki has updated the page, it has a prominent clickthrough link to the modified page. Following this explicit link forces the browser to
make a new server request and thus load a fresh copy of the content.
We can sum this up in two simple update rules for wikis:
• Browse forward (follow links) to ensure that you always see the current
version of any page.
• When in doubt, use the browser’s Reload (Refresh) button to get an
updated version of the displayed page.
This cache awareness quickly becomes second nature.
BUILDING WIKI CONTENT
We now look at how you build the content of your wiki database and at some of the
more general issues raised in the process.
The mechanics of creating new pages is adequately covered in the earlier walkthrough examples. The operations to create content and spin off new pages are easy
and natural in a wiki and designed so that file transfer or file system storage details
never need concern the page author.
A “bootstrap” functionality to edit/create new pages lets even the least
experienced newcomer create wiki content from scratch. Appropriate patterns
automatically form both external hyperlinks and internal cross-links between pages,
and the browse status of the latter is evaluated and displayed. It is true online editing
in its simplest and most direct form.
Choosing Page Names
There are no hard rules about how to select appropriate page names.
Let common sense determine a short but descriptive name, based on the
intended content. In traditional Wiki, capitalizing and running together existing
words in a phrase defines a page hyperlink; in other variants special framing
characters do so. We favor the former method or at least an implementation where the
latter is an extra option, not the rule.
104
USING WIKI
Although forming a WikiWord link favors natural word order, some word
reordering might be desired and unimportant words dropped if a particular “title
pattern” develops. Articles are generally dropped.
Tip 4.20: Naming spin-off pages
Spin-off pages in a public wiki generally follow a “derivative” pattern in that
ThisPage may spawn offshoots named ThisPageComments or ThisPageWorks,
which in turn spawn ThisPageCommentsRefuted or ThisPageWorksNot.
Common problems in page naming and in subsequent page references are rooted
in the English language. One such problem is whether to use singular or plural forms.
For example, WelcomeVisitor and WelcomeVisitors are two separate pages in the
wiki. Another problem is due to natural wording variations, such as
WelcomeToVisitors or VisitorWelcomePage.
There is no easy way to automatically manage these usually unintentional
distinctions well. One half-automatic attempt (coded by Christopher Vermeulen) seen
in JOSWiki deals specifically with the singular/plural issue. It detects an ending “s” in
proposed titles for new pages and instead suggests the singular form (also changing
“ies” to “y”) in the opened edit form. Such a feature is easy enough to add and works
often enough to be genuinely useful. However, it must allow the user to easily override/
ignore the suggestion and use the original form if so desired.
Tip 4.21: Singular or plural form
General wiki convention favors the singular form for a page name, unless the plural
makes the intended meaning clearer. This naming convention is perhaps more
important for a public wiki, and your opinion may differ. For a personal wiki, the
important thing is simply to be consistent to avoid unwanted duplication of pages.
Sometimes the flow of the sentence containing the proposed reference leads one
to prefer a plural form. Revising the sentence to use a singular form instead is one
solution. Another is to use an adulterated plural such as SomeTopic(s)—this has some
precedent in English usage, where a singular form is used even though the plural form
might be more correct. The link pattern stops at the left parenthesis, making it
singular in form. This also clues other users to the convention of using singular.
When in doubt about the appropriate form for a proposed title, the page author
should perform a few title searches on it and its individual words to determine which
related pages might exist.
EDITING PAGES
105
Tip 4.22: Verify your link target
You can always open a new browser window to the search page and see if a
proposed page reference corresponds to your intentions. Avoid words of minor
value that can create unintended variants.
A wiki tends to show some redundant pages because of this uncertainty of title
form. The convention for such duplicates is to keep a deprecated variant page empty
except to point to the desired form.
WikiWord Conflicts
The WikiWord method can conflict with certain kinds of acronyms and
abbreviations, not to mention quasiEmbeddedCapital-style names of products and
companies. There are some different solutions to situations when such a word or
WordJam would create unwanted links.
• Ignore the problem. A dangling link might actually be an asset as a
reminder to reference and explain the term on another page.
• Disable. Split the term with a space, or insert some other punctuation that
disables recognition as a wiki link.
• Reform. Consider also whether the multiple uppercase form can be reformed into a single-capital version or an all-caps one.
This issue becomes slightly more frequent when the WikiWord rule is made broader—
for example, to include hyphenated capitalized words.
Conversely, problems sometimes occur when you form acceptable WikiWords
from other names that don’t easily conform to the rule.
One-Word Topics
The question of how to handle one-word topic names has several answers, depending
on your users and wiki style.
1. “FalseCap” the word. “Title” could become “TiTle”. This is not
recommended and is usually referred to as being “UgLy”. In particular, if the
wiki is customized to insert spaces when rendering the titles, the example
“Ti Tle” becomes very unclear.
2. Merge the word with another “noise” word. Instead of the topic “Title”,
use “TitleName”.
106
USING WIKI
3. The best approach is to try to be more specific by describing the topic with
a short phrase. Any of the names CreatingPageTitle, PageNamingTip, or
WikiWordTitle would convey considerably more about the topic.
Remember, the page title should provide helpful content information even out of
context—in a search results list or as a back reference. More descriptive naming
greatly improves the quality of search results.
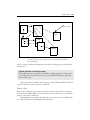
Emerging Structure
The pages you initially create will in turn (eventually) have further page links and
so on. Each new page has in this way at least one “parent” page, and we begin to
see a kind of default structure, as indicated in Figure 4-12. This has a certain
elegance to it, does it not? Creating a new page from an explicit/external URL
reference instead of from a wiki page, as indicated by number 6 in the illustration,
means that you can end up with an “orphaned” page, one that has no parent page
pointing to it. You should, therefore, always first edit some existing page (as in 2
through 5) to obtain a reference to the intended new page and then follow this to
the edit form for that page.
Tip 4.23: Provide pervasive link to wiki top page
Your default first page is, strictly speaking, orphaned, at least initially, unless
you include references to it in later pages. It is distinctly helpful to always have
the top page of the wiki only a click away. We therefore recommend that either
the template page or the generated header/footer section contain an explicit
link to the top page as a navigational aid, as shown here in many page
captures.
The Recent Changes page—whether an actual wiki page or just created on the
fly—initially provides one automatic reference link to every new page, however
created. However, this link is soon lost when the changes list is subsequently
shortened. How and when such list truncation occurs depends on settings or usage
patterns.
Orphaned pages are included in searches and thus turn up if they contain the
search pattern. If you are concerned about pages becoming orphaned, see the section
on wiki page management in Chapter 8, which describes code to automatically flag
orphaned pages. It is possible, but not necessarily a good thing, to add a test to the
EDITING PAGES
107
1
1b
FrontPage
2
RecentChanges
6
5
4
3
2
1
Created via URL
6
NewTopic
(orphan)
MainTopics
3
4
TopicOne
TopicTwo
5
SubTopic
FIGURE 4-12.
Emerging page structure, with numbers indicating the order of creation
from the respective pages. All changes are automatically tracked in
RecentChanges.
edit or posting code that would prevent a user from creating a page if a link did not
already exist.
Tip 4.24: Backlinks can identify orphan
The backlinks function can advise you whether a displayed page is an orphan, and
you should always check this if you create a page without following an open link
from another page.
Most of the time, you will be authoring page content in the wiki. What follows is
a general discussion of the basic edit conventions.
Editing a Page
How to edit a wiki page can be answered on two levels: formal format conventions
and overall style guide. Much can be said about format conventions, so we take that
up in its own section a little later.
Beginning with overall style, the expectations and conventions in a public wiki
are commonly expressed something like the following.
108
USING WIKI
• All pages are editable, and visitors are encouraged to (constructively) edit
them. Expect others to elaborate or complete your own work. Try to write
casually but factually and in the third person where possible, because this
makes elaboration by others easier.
• A first-person point of view is taken to register opinion or relate anecdotal
information and should therefore be signed. Signing with your name in
hyperlink format is an easy way to point to a special page where you can
introduce yourself and give contact information to others.
• Wiki pages need not be chronological. If something isn’t complete or quite
right, correct it in place. If you want to register an opposing viewpoint, try
parenthetically linking to a new page whose name plays off of the original title.
Clearly, if you are running your own local wiki as a personal notebook, you can
ignore these multiuser conventions and type in text pretty much as you see fit.
Nevertheless, note these general points.
• Page naming should be reasonably descriptive of the intended main topic
for the page. These titles are what show up when you bookmark a page, in
search results, or in any other page list.
• Create and edit pages in whatever order seems right at the time. Changes in
relationships and structure can easily be retrofitted and content later easily
cut and pasted between pages if needed.
• Spin off side issues at any point by forming a page link in place. More pages
equates to more associative links. Use open links (defer creation of the new
page) as reminders of issues and notes you want to follow up on later.
• The Recent Changes list can serve as a quick reminder and entry point to
the pages you were working on last.
Now that you have in one way or another valid content in the edit page form and
want to enter or edit content, how can you format it beyond plain text? This is the
subject of the next section.
EDITING AND MARKUP CONVENTIONS
The next two sections take up a common set of markup conventions for Wiki, along
with the special hyperlink syntax. This is a detailed look at the why and how of a
EDITING PAGES
109
suggested minimum markup functionality. It restates some conventions explained
earlier, but now in a fuller context.
To provide for (content) tagging, we need to embed specific codes in the text that
can easily be edited. Because editing occurs in the plain-text context of an ordinary
Web browser form, we can’t apply the menu commands, toolbar buttons, or keyboard
shortcuts found in traditional editing tools. The Wiki solution is to use “magic” text
patterns. The wiki programmer, therefore, reserves a number of special text patterns
and formulates the rules to allow explicit text formatting. This is one of the things
that can be customized in the code.
The main editing conventions for Wiki source text are simple enough.
• Text will appear in word wrap form when the page is served and rendered.
The rule is that single-spaced lines in the source text are run together. (Not
all wikis follow this, but word wrap is a useful feature, especially when
pasting in text from elsewhere.)
• Inserting an empty line starts a new rendered paragraph. For ordinary
paragraphs you should not indent lines, because this usually invokes special
formatting.
• Hyperlinks are created from special text patterns.
• Other markup uses other text patterns.
You don’t need to know more than this to start creating or editing pages in any wiki.
A few supplementary rules apply to most wikis.
• Starting a line with particular characters (including a space and a tab) can
invoke special paragraph styles.
• Identified text patterns are replaced by corresponding inline formats,
evaluated results, or links.
A new user to any public wiki will probably want to do some experimentation and
study how existing sources are rendered. It is accepted practice on public wikis to edit
(create) a special test page, or “sandbox”, for users to see what works before applying
changes to actual content pages.
The core format convention is how to create a hyperlink in a page, simply
because so much of the functionality hinges on linking to other pages and to resources
on the local network or the Internet.
110
USING WIKI
Creating Hyperlinks
The basis for a wiki hyperlink is a special text pattern in the source text, but
implementation can vary from wiki to wiki, and there is continued discussion about
what is most practical.
Wiki recognizes two categories: page links (internal to the wiki) and resource
links (usually external URL references).
Page Links
Page hyperlinks are fundamental to the wiki concept and must be simple to make or
break and clear to read even in the absence of the active hyperlink rendering.
The original Wiki method to define a page link is the WikiWord convention,
explained earlier. When served, a WikiWord text pattern is automatically converted
into an active hyperlink to the corresponding wiki page. Most wiki implementations
additionally indicate visually whether or not the page exists.
This method has a number of interesting benefits.
• It’s easy to do and fairly intuitive for both the author and the subsequent
reader of the page where the link leads.
• You can easily make or break links, usually without affecting existing word
flow.
• In most wiki databases, the title can correspond directly to the file name for
the stored page, at least on any file system that supports long file names.
• Title and backlink searches are easy to implement and perform.
The basic syntax rule for page titles only accepts alphabetical patterns, but commonly
this is extended to include numbers as well so that, for instance, ThisPage4 is a valid
link (numbers are treated the same as lowercase letters).
In some contexts, this rule is extended even further by allowing special
characters, such as a hyphen or a period—for instance, JohnJones-MyPage or
Category.SomePage. Although often useful in particular contexts, this extension can,
however, trigger spurious page references in unexpected places. What can be termed
“surprise” effects from overly ambitious options can make editing confusing to the
user. Note also the need for easy methods to “escape” normal wiki processing within
designated blocks of text.
Other wiki or wiki-clone implementations (notably Swiki, which also names
page files numerically) define hyperlinks differently by using some kind of “title
EDITING PAGES
111
framing”. Surrounding the intended anchor with special punctuation designates the
link; for example, “{A Page Link}” or “*another link*”. Page references are then
mapped to the files. The risk for spurious link formation is less, even though
confusion can still arise because of conflicts with common styling conventions in plain
text (e-mail), such as “intending a *bold* styled word.”
Tip 4.25: Avoid difficult typography for patterns
A wiki should avoid typographically unclear patterns and potentially
hard-to-find or difficult-to-type characters. An example is the use of curly
braces, “{” and “}”, because the typical user will have significant difficulty in
distinguishing them from the ordinary parentheses, “(” and “)”, in most screen
resolutions and fonts.
Some users complain that WikiWord links make for difficult reading,
EspeciallyWhenTheTitleIsaVeryLongOne …
One way to address this issue is to include a bit of code that reinserts spaces
when rendering the anchor. See Figure 4-13, which compares page renderings with
and without this presentation tweak. This is a purely cosmetic change and does not
FIGURE 4-13.
The effect of reinserting spaces (right) when rendering page anchors
formed with EmbeddedCapitals. Not having underlined links can make
the difference even more marked.
112
USING WIKI
affect the source text convention in any way. One consideration, however, is that it
can make page links harder to see when user preferences or wiki CSS drop the
convention of showing links underlined.
The same normalizing technique can also be applied to rendering page titles,
often cryptic enough as it is without having to visually deal with them as unspaced
word pileups.
External Links
Wiki refers to resources outside the wiki in this pragmatic way.
• Simply write out the fully qualified URL address, including the protocol.
• Spaces in the URL are replaced by “%20” to not break up the link.
Wiki uses the protocol pattern to identify and “activate” the link anchor when the
page is rendered. The basic Internet protocols to consider are http, ftp, mailto, and
news—often also https, nntp, file, and gopher. For pattern recognition, we include the
colon, as in “mailto:”, and expect the rest to be a valid URL. This works, even “http:”
without the slashes.
It is generally a good thing to hide “messy detail” from view when users are just
browsing pages. An example of this is to allow the page author to make a page not
render unnecessary details of complex URLs, and one approach is explained in the
next section.
Using Citation Links
The concept of rendering a “hidden URL” as a “numbered citation link” is a useful
extension to the base wiki, and it is therefore taken up as a customization option in
Chapter 6. In many situations it is unnecessary to see the URL in all its arcane detail.
Having many explicit URLs in a page quickly reduces overall readability; for example,
in a list of external Web resources. The citation method can in addition be made to
handle longer or unusually constructed address strings where the normal URL
substitution might fail.
The best, one-step method to implement citation links is to have the wiki do
some advanced substitution based on a special syntax pattern. You then specify the
URL in full in the source text but have it substituted visually with a numbered link
when served.
The page detail in Figure 4-14 shows how the citation technique keeps even
multiple URLs on the same item line manageable. The numbering is automatic, and
EDITING PAGES
FIGURE 4-14.
113
How using “citation links” with hidden
URLs can greatly improve readability in
pages that contain many resource links
the page author only needs to specify the URL within citation format patterns and add
suitable labels to identify the links.
The pattern to specify a citation link in the source text is “[[some URL]]”. Some
wiki clones have a separate edit page to define this kind of hidden link, a legacy of
early wikis. In these cases, the source text only specifies a manually numbered link
pattern, “[1]”. The URL is stored in a hidden field in the database file.
However, the multistep edit found in these implementations is not very user
friendly. Saving the page with the citation number and saving the address become
two separate operations, and the author can mix up the reference number and the
correct URL. The design of the second edit form also limits the number of such links
you can define on the page.
This covers the hyperlink basics, so now the focus shifts to formatting the text,
or, more specifically, applying markup codes.
Text-Formatting Codes
First, let’s state this unequivocally: There is no single correct, or necessarily even best,
way to define a markup syntax for text. While Wiki tries to give a small and logically
consistent set of markup options, given the nature of current Web clients, there is no
114
USING WIKI
way it can even come close to functioning as a full-featured HTML editing tool.
Instead, the intent is to give the user something that is useful, reasonably intuitive (or
at least easy to learn), and easy to use.
We find a (large) number of proprietary markup standards in use in different and
specialized situations and a handful of widely used open standards. The bottom line is
that the markup code itself is arbitrary, even though the structural concepts (usually)
have a common basis. Anyone interested in this topic can study the background of the
Standard Generalized Markup Language (SGML) to learn more about markup
theory—see Appendix B for book and Web references.
Because of the World Wide Web, Hyper Text Markup Language (HTML, a subset
of SGML) is the best-known markup standard and probably the most misunderstood!
Wiki servers use HTML as the framework to define a served page and have it
render in the client browser. However, the actual source text markup can be pretty
much anything we want, because in the serving process the wiki substitutes the
corresponding HTML markup. It is also possible to redesign the wiki substitutions to
serve XML or other less public encoding standards for markup.
Looking at the various Wiki, Swiki, and other clone solutions, we see two basic
approaches, sometimes mixed.
• Allow HTML tags in text source, which has the advantage of allowing the savvy page
author to format the text as any other Web page but the disadvantage of forcing all
users to explicitly deal with the full complexity of HTML tags when editing.
• Use “arbitrary” syntax, which has the advantage of easier editing for
users but the disadvantage of users needing to learn a wiki-specific
markup, however simplified.
The latter approach is exemplified by the capture in Figure 4-15, which shows both
the source text and the rendered result for a wiki page containing list elements. The
example also illustrates an aspect of wiki usage that is easy to overlook.
Tip 4.26: Multiple instances of same pages
You can have any number of wiki pages open at the same time, browse or edit,
simply by opening another window and specifying the appropriate URL. This
includes multiple instances of the same page, perhaps as different edit versions from
the browser stack in order to reconcile and merge content from a version conflict.
This leads to the second statement about markup: Less is more.
EDITING PAGES
FIGURE 4-15.
115
An example of arbitrary syntax as used in our wikis. The source text on the
left renders as the headings and lists in the window on the right.
In other words, at some point the added complexity of more markup options
begins to outweigh the added functionality. The authors feel that this comes sooner
rather than later. Different user expectations and different situations make this
optimal balance hard to quantify, but you can get some indication by considering the
example lists given later.
Having some method of “escaping” the normal syntax rules is useful in
numerous contexts. A user might, for example, want to insert ready-made HTML
pages or excerpts of programming code and have these served unprocessed. While this
can appear simple enough, there are some complications due to the nature of the
medium, the HTML page framework, and browser behavior.
The wiki examples analyzed in this book provide a very simple markup palette.
These markup rules have always been a compromise, because they try to make the
source text tag do the work of a rendering editor. We do, however, show later how
you can easily modify and expand them.
116
USING WIKI
Tip 4.27: Preferred syntax patterns
Preferred formatting patterns are of two kinds: start a line with a pattern for
paragraph formats, and use paired patterns that bracket inline substitution. In
both cases, we recommend the use of (repeated) basic punctuation characters used
in such a way that there is minimal risk of spurious patterns occurring in normal
text.
In Appendix A, we provide an overview of the most common markup rules and
options seen in various wiki and wiki-clone implementations. This information
indicates the range of conventions that meet a visitor who browses between different
wiki sites.
As mentioned, there is a distinction between paragraph and inline markup. This
distinction affects both usage and parsing solutions.
Paragraph Styles
For convenience, the wiki treats simple line breaks like white space when serving
the page. Paragraph text automatically wraps into the browser window size,
unless the text width is specified or constrained in some other way (by template
or CSS).
Some users want to manually start new lines in particular places when typing
into a form, while others let the form do word wrap, but neither choice should affect
the rendered paragraph breaks. Manual line breaks, however, are retained in the
source.
The usual way to define a new paragraph in wiki page source is to insert a blank
line. Transitions to new paragraphs can also occur implicitly whenever some special
paragraph format starts (or ends), by definition.
Wiki syntax for paragraph markup is the rule that a text source new line starts
with a particular character or character pattern. For example, a rule can be that any
line starting with an asterisk (*) is a bullet list item.
For convenience we also assume that the list item ends at the next line break.
This does away with the requirement to specify (and track) matching closing markup,
markedly simplifying the task of writing.
A minimum set of useful paragraph styles is fairly short, as shown in Table 4-2.
The wiki code handles substitutions by combining subsequent paragraphs of the
same style into the same overall block so that, for example, a series of bulleted items
ends up inside the same enclosing <UL>..</UL> tag pair.
EDITING PAGES
TABLE 4-2.
117
Useful paragraph styles
STYLE
DEFINED AS
WIKI SYNTAX
Normal
Default style; rendering reverts to this whenever
a blank line occurs in the source text
Default after blank
line
Bullet list
Unordered list; corresponds to
<UL>..<LI>..</UL> blocks in HTML.
* starts line;
** level 2 lists, etc.
Numbered
list
Ordered list; corresponds to <OL>..<LI>..</
OL> blocks in HTML
# starts line;
## level 2 lists, etc.;
1. or 1) optional
Preformatte
A block of text where spaces and line breaks render as given in the text and where by default the
browser uses a monospaced font;
corresponds to <PRE>..</PRE> in HTML means
space starts line
(not the same as an
“escaped” block)
Horizontal
rule
Used for structural breaks; is included for the
convenience of generating the tag <HR> in the
rendered page
---- starts line (four
or more hyphens)
Other potentially useful paragraph styles with suggested syntax include those shown
in Table 4-3.
Some comments may be in order.
• Although tagged tables can be nice to have, setting them up properly by
hand coding can be taxing for an inexperienced user. Additionally, from the
point of view of source readability, a preformatted block is usually easier to
manage.
• Escaped blocks are supposed to allow the inclusion of text where you want the
wiki to ignore syntax matching completely—for example, code source or
possibly text explicitly tagged with HTML markup. Because we are effectively
turning off wiki formatting, the wiki syntax for this should deliberately be
made nontrivial to stand out in an otherwise “untagged” context.
This covers the main paragraph markup options. Other possibilities are
specialized enough that they belong to extreme customization. Next we examine
inline markup.
Inline Styles
We can apply markup to individual words or phrases within a paragraph. The rule
here is that the markup segment is enclosed by two instances of the same special
118
USING WIKI
TABLE 4-3.
More paragraph styles
STYLE
DEFINED AS
WIKI SYNTAX
Headings
Corresponds to a practical subset of the
<H1>..<H6> range in HTML—typically only
the three sublevels H2..H4.
(Wiki uses H1 for page title.)
!! starts line H2,
!!! for H3,
!!!! for H4
Definition
lists
Logically defines terms and term definitions;
corresponds to <DT>..<DD> blocks
:term: definition,
::term: level 2, def, etc.
Table rows
Coding a wiki for table-tag substitution is a
good example of an option that you should
probably avoid unless it is really needed.
||cell||cell||
Quoted
blocks
Equivalent to HTML <BLOCKQUOTE>..
</BLOCKQUOTE> for given paragraphs.
"" (repeated double
quote)
Escaped
block
No substitution rules applied within the specified text block, although HTML-specific and
< > are still tagged to render properly.
This has no direct HTML equivalent.
[literal]..
[/literal]
and
[esc] .. [/esc]
for each row
pattern or alternatively starts with or consists of a specific pattern. Hyperlinks,
discussed earlier, are in this sense a special application of inline patterns according to
the latter.
As before, we first give a minimum useful markup set in Table 4-4. Note that this
list concerns only logical markup styles, not visual markup.
Does this seem too limited? Some might, for instance, argue that having only
two emphasis options is inadequate.
Then again, how much markup does most text actually need?
Others might argue that emphasis equals italic and strong equals bold and should
be marked up simply as the HTML <i>..</i> and <b>..</b>. Apart from segueing
from content markup to visual markup, such a convention raises the question, If some
HTML tags, why not all?—an issue addressed in all its complexity later.
Further inline styles you might want to consider for special situations are shown
in Table 4-5.
At some point in this feature list, however, you will run into the problem of
trying to implement your own personal HTML editor—not a good idea. For the most
part you won’t need more than the basics.
EDITING PAGES
TABLE 4-4.
119
Useful inline markup
STYLE
DEFINED AS
WIKI SYNTAX
Emphasized
text
A browser usually renders this as italicized
text, but note that this is distinct from the
visual-only <I>.
2 x single quote;
''emphasized''
Corresponds to HTML
<EM>..</EM>.
Strongly
emphasized
text
The visual rendering is usually bold,
sometimes colored.
3 x single quote;
'''strong'''
Page links
The core of wiki functionality. From the
user point of view, these should be both
uniquely identifiable and simple to create.
WikiWord;
see hyperlinks
URL links
To access various wiki-external (Internet)
resources. Ideally, you should be able to
enter these exactly as defined.
Protocol-specified;
see hyperlinks
Corresponds to HTML
<STRONG>..</STRONG>.
Forms for user entry in a page are also included in the group for inline markup, if
only because that’s how the simplest wiki syntax handles them: a magic word pattern.
Wiki forms are taken up in the Chapter 6 section about searching. Input forms can vary
greatly in detail and generally need to be coded for each application.
We note in passing two further examples of inline substitution.
Including Images
As mentioned, a wiki is primarily text oriented. There are situations where inclusion
of graphics in the rendered page would be useful. Your problem as page author,
however, is that you must work within the constraints of a text form in the browser.
For this reason, Wiki provides a pragmatic approach based on inclusion of a
hyperlink URL. If the resource link ends with a recognized image extension, the
anchor is served as an inlined image. Figure 4-16 shows the rendered page for this
kind of URL reference. Note that the image URL must normally be fully qualified,
although the implemented wiki syntax can allow various notational shortcuts—a path
something like ../img/this.jpg or $myserver/img/that.png.
120
USING WIKI
TABLE 4-5.
More inline markup
STYLE
DEFINED AS
WIKI SYNTAX
Relative font size
Make text larger or smaller;
<BIG>..</BIG> and
<SMALL>..</SMALL>
[-smaller-]
and
[+larger+]
Subscript and
superscript
Raised and lowered text;
corresponds to <SUB>..</SUB> and
<SUP>..</SUP>
#-sub-#
and
#+super+#
Change tracking
Revision markup;
represented in HTML by
<STRIKE>deleted text</STRIKE>
and <INS>new text</INS>
-[..]for deleted
text
+[..]+
for inserted
text
Citation, code,
sample, variable
Other specialized content markup
(Choose wisely)
You could code something very similar to this image substitution if you want to
inline other media file content.
FIGURE 4-16.
Including an image file; in this
case, from the local file
system. The page also
illustrates some of the
renderings mentioned in the
tables.