1
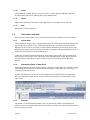
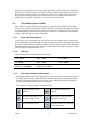
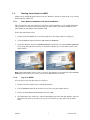
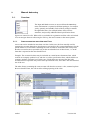
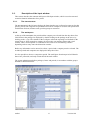
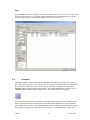
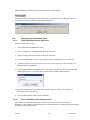
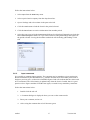
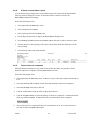
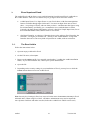
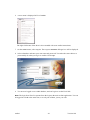
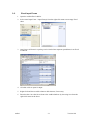
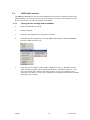
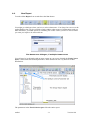
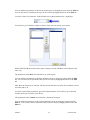
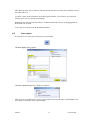
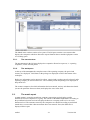
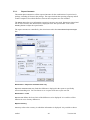
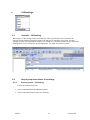
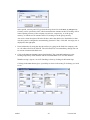
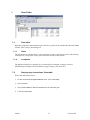
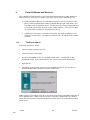
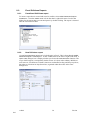
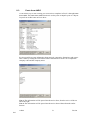
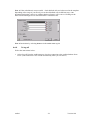
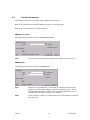
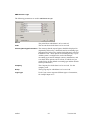
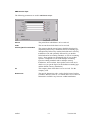
AARO Training Manual for End-Users AARO 2008-08-15 1. GENERAL INFORMATION ABOUT AARO ................................... 2 1.1. THE AARO MENU ............................................................... 2 1.2. INFORMATION AND HELP ................................................... 3 1.3. THE MENU STRUCTURE OF AARO ..................................... 4 1.4. THE WINDOW LAYOUT IN AARO ....................................... 5 1.5. STARTING INSTRUCTIONS FOR AARO............................... 7 1.6. THE HOME SCREEN ............................................................. 8 2. Manual data entry............................................................................... 10 2.1. OVERVIEW ......................................................................... 10 2.2. SHORT GUIDE TO THE FINANCIAL REPORTING PROCESS 11 2.3. DESCRIPTION OF THE INPUT WINDOW ............................. 13 2.4. RECONCILIATION REPORT ............................................... 14 2.5. COMPLETE ......................................................................... 15 2.6. STEP-BY-STEP INSTRUCTION INPUT ................................. 16 3. Excel Input and Send ......................................................................... 19 3.1. THE EXCEL ADD-IN........................................................... 19 3.2. EXCEL INPUT FORMS ........................................................ 21 3.3. ABS SEND FORMULAS ...................................................... 22 4. The analysis tool – Drill down........................................................... 25 4.1. PREDEFINED REPORTS ...................................................... 25 4.2. DRILL DOWN ..................................................................... 27 4.3. EDIT REPORT ..................................................................... 28 4.4. NEW REPORT ..................................................................... 31 4.5. SAVE REPORT..................................................................... 33 4.6. VARIOUS OPTIONS ............................................................. 34 4.7. EXCEL CONNECTIVITY ..................................................... 36 5. Intercompany Items / Match .............................................................. 38 5.1. SHORT GUIDE TO INTERCOMPANY REPORTING............... 38 5.2. DESCRIPTION OF THE MATCH WINDOW .......................... 38 5.3. THE MATCH REPORT ......................................................... 39 5.4. CONTACT LIST ................................................................... 42 5.5. STEP-BY-STEP INSTRUCTIONS MATCH............................. 42 6. JV-Bookings ...................................................................................... 45 6.1. JOURNALS – JV BOOKING ................................................ 45 6.2. STEP BY STEP INSTRUCTIONS JV BOOKINGS ................... 45 7. View Table......................................................................................... 47 7.1. VIEW TABLE ....................................................................... 47 7.2. STEP-BY-STEP INSTRUCTIONS VIEW TABLE .................... 47 8. Excel Drilldown and Retrieve............................................................ 48 8.1. THE EXCEL ADD-IN........................................................... 48 8.2. EXCEL DRILLDOWN REPORTS ......................................... 50 8.3. PASTE FROM AARO.......................................................... 51 8.4. ABS RETRIEVE FORMULAS .............................................. 52 8.5. FORMULA PARAMETERS ................................................... 59 1 Version 10.0 GENERAL INFORMATION ABOUT AARO 1. 1.1. The AARO menu The leftmost menu on the main menu bar is referred to as the AARO menu in this document. The actual name of the menu varies among installations. The AARO menu contains a number of standard items such as page header, printer setup etc. The contents of the AARO menu change depending on which window is active: specific functions of the active window (such as Load, Save etc.) are added to the AARO menu. 1.1.1. Page header A page header is printed at the top of most reports in AARO. It is possible to disable the use of the page header. The same header info is used for all reports. The contents of the header are configured using Page Header on the AARO menu. The page header can be changed either temporarily, by pressing the OK button, in which case it reverts to its previous permanent value the next time you log on to AARO, or it can be saved permanently to the database, by pressing the Save button. 1.1.2. Printer set-up Printer set-up is found on the AARO menu and is used to connect a printer to AARO. 1.1.3. Help The online help can be called up through Help on the AARO menu, or by pressing F1. The subject displayed in the online help depends on the active window. AARO 2 Version 10.0 1.1.4. Links The Links menu contains links to various web sites. A link to the Aaro website is typically included; other links can be added by the system administrator. 1.1.5. About About shows information about the AARO application, for example version and date. 1.1.6. Exit Exit exits the AARO application. 1.2. Information and Help This section describes further sources of information and help in addition to the user manual. 1.2.1. Online Help There are three different ways to open the online help: the AARO menu, the Help button in the upper right corner, and the F1 key. When the help function is opened a separate window is displayed on the screen. It is possible to either read the information on-screen or print it. The help sections contain step-by-step instructions that give guidance through different functions in AARO as well as links to closely related subjects. AARO also contains a further help function which allows group staff to pass on instructions about accounts and forms to users who report in the DataEntry/Input screen. Right-clicking a cell and selecting either Help on form or Help on code from the menu reaches that help function. 1.2.2. Information fields in Data Entry In the upper right corner of the window there is a blue field, in the shape of a rounded rectangle. This field shows different kinds of information depending on the module you are using, e.g. company, period and currency. Another help function is the text area in the middle below the buttons; here the application shows an explanation if the form is not open for the chosen period or is read-only for some other reason. 1.2.3. Periods The period is a crucial selection whatever task you perform in AARO. All information in AARO is entered, controlled and followed-up in terms of periods.You report financial data and extract reports per period. AARO 3 Version 10.0 A Period is a defined space of time. Any number of periods can be defined, different in duration, for example month and quarter, or in type, for example actual or budget. It is the responsibility of the system administrator to create and define periods, preferably using a well thought through naming scheme. 1.2.4. Packages A Package is a set of forms and is a crucial selection in the Input screen. To serve the information need for a period, one or several packages are used. Different packages are used for matching inter-company transactions, and for reconciling financial information. The system administrator defines packages according to the group’s demands on information flow, as well as forms and periods. Example: A package named MONTHLY, containing certain input forms, is connected to the periods January, February, April, May etc. Another package, named QUARTERLY, containing a slightly different set of forms (perhaps with more detail specifications), is connected to the periods March, June etc. 1.2.5. Tool tip A tool tip is a pop-up box, which is displayed when you rest the cursor on a button or another object in the interface. The tool tip displays a brief description of the object. 1.3. The menu structure of AARO The menu structure in AARO is flexible and can be adjusted to fit the company’s requirements. AARO is delivered with a standard menu profile. This standard menu profile is used in the screenshots throughout this manual. The system administrator can alter existing menu profiles and create new menu profiles in the administrative section of the program, and assign different menu profiles to different users, and even name the same menu item differently for different users. E.g. the menu item for the main report tool may be called “Drill Down” for some users and “Report builder” for other users, even though it opens the exact same screen. Other common name variations include “JV Bookings” vs. “Group Adjustments”, and “Match” vs. “Inter-company”. All in all, this means that your particular menu may differ from the ones seen here. 1.3.1. Drop-down lists and combo boxes A drop-down list is a list that displays all available alternatives in the different windows. The user must open the list. Periods, packages, forms, period types etc. are examples of information displayed in drop-down lists. The drop-down lists often contain both code and description. 1.3.2. System-related functions and characters AARO is a case-sensitive program, i.e. it is important to distinguish between capital letters and lower-case letters. The permissible characters for defining account codes are the capital letters A-Z, the figures 1-9 and the characters underscore (_) and minus (-). The same applies to several other entities, such as periods and companies. AARO 4 Version 10.0 Other parts of the application let you mix capital and lower-case letters freely. For example, the descriptions of accounts, periods and companies allow a mixture capital and lower-case letters and also most punctuation marks. It is common in AARO to use capitals only for the codes of things, but mix capitals and lower-case letters in the descriptions of things. Most entities in AARO (accounts, periods, companies etc.) have a code and a description. 1.4. The window layout in AARO Most windows in AARO follow the same pattern and structure. The left pane of the window contains a tree structure displaying for example companies or packages. The right pane consists of a working space where the user can register information. The working space does also often contain different tabs. This disposition and layout of windows are characteristic of the editable windows, where the user can register information. 1.4.1. Keys and mouse buttons To move from one cell to another you can always use the mouse pointer, but it is also possible to use the tab button or the arrow keys. The right mouse button is used to add details to accounts and forms, to obtain information about an account or form or to edit accounts, forms and menus. The Delete button on your keyboard can only be used to delete an account in an input or output form or to remove information from a cell. 1.4.2. Hot keys A list of hot keys used in the application follows below: Load – Ctrl L Save – Ctrl S Find – Ctrl F Cut – Ctrl X Copy – Ctrl C Paste – Ctrl V Delete row – Ctrl Delete Duplicate row – Ctrl D 1.4.3. The toolbar buttons of the interface The standard toolbar buttons in the application are used to add, remove, find objects, print out etc. Each window can have a different number of buttons but there are some buttons that are common to all windows and thus always visible. A description of the button is displayed if you move and hold the mouse cursor over the button. A list of the most common buttons is displayed below. AARO Loads information from database. Saves the entered data to the database. Saves the information as, for example, another period. Prints or gives a preview of the information in the view. Orders different reports. Searching function for companies in the legal structure 5 Version 10.0 Adds a new object to the current view. Deletes all entered information from the view. Deletes all information in a window or table. Links to various sites. Online Help. Copies data from one or more cells. Pastes the selected information. Adds a column to the input Deletes a column from the input form. form. Inserts a row into the view. Deletes a row from the view. Fetches data from another Effectuates a data import. period. Marks the input package as completed, thus disabling further reporting on it this period. Adds and updates company contact information. AARO Orders a consolidation. Displays a list of all available accounts. Displays various options to edit settings for a Drill Down report. Renames an item. Runs the selected report in the Drill Down window. Disables all filters and displays all consolidations ever ordered. Refreshes the information in the current window. Updates the account structure in the Edit Accounts window. Applies a filter to the current view, in order to show a shorter list of items. Transposes the current report, i.e. causes the rows and the columns to change places. 6 Version 10.0 1.5. Starting instructions for AARO AARO can be started through a shortcut on your Windows desktop or Start menu, or by directly opening the file ABS.EXE. 1.5.1. Add / Remove database from client installation The very first time you start AARO you will have to add a database to your AARO installation. This procedure is only necessary the first time you start AARO. The last-used database will subsequently be the default in the database field. Follow the instructions below: 1. Double-click the AARO icon to start the application. The login window is displayed. 2. Click the Options button and select Add / Remove databases. 3. Select the database from the Available databases list and move it to the Installed databases list by using the right-directed arrow or by double-clicking on it. Click OK to return to the login window. Note! If the information in the srv file is incorrect, the database is not displayed in the Available databases field. In this case, contact your system administrator for advice. 1.5.2. Log in to AARO In everyday use, the start procedure is as follows: 1. Double-click the AARO icon to start the application. 2. Choose Database from the drop-down list (or just accept the default choice). 3. Enter your User Name and Password, and click Login. 4. The application now works for a while, downloading some lists from the database. This can take some time the very first time you log in, but next time you log in this will be much faster AARO 7 Version 10.0 1.6. The Home screen The following screen – the Home screen – is always displayed when you have logged in. The Home screen can always be reached from other screens by using the Home button on the top right, visible on all screens except for the Home screen itself. A short description of the Home screen and the main menu bar (as it typically may appear – the actual menus available and their wording depends on the installation and on the user logged in): Home screen elements Calendar In the calendar the system administrator can put information about deadlines for reporting packages etc. In addition to plain text, the calendar can contain clickable links to the reporting packages. Documents To meet an increased demand for instructions and other files available directly through the AARO database the start page has a document manager. It can contain three kinds of documents: – Group Documents It is possible to create Group specific folders. In these folders you can put common files regarding instructions for budget and reporting, specific documents for divisions, business units etc AARO 8 Version 10.0 – Legal Documents Documents that have been added in the acquisition register are possible to see in this folder – Legal documents. The legal tree is filtered according to user rights. Only users that have access to a company can see this particular company in the tree. – Document explorer Each user can in an easy way add documents for a specific company, product etc. Documents are added per reporting period and it is only possible to add documents according to user rights. In the same way it is only possible to view attached documents that correspond with user rights. Main menu (typical) AARO The AARO menu (the leftmost menu) offers different functions depending on the chosen module. Some items are always available: Printer set-up, Page header, Help, About, Links and Exit. Data Entry The Data Entry menu leads to the input screens: Input, Match (also known as the Intercompany module), Legal, and Group Adjustments (also known as JV bookings). Sometimes an Import menu item is available here, too. Only a subset of these items may be available to you. Reports The Reports menu typically contains the Drill Down report tool. Validation The Validations menu usually contains a Match report and a Reconciliation report. There may also be a Check Status report. Utilities The Utilities menu often contains the Import function and the tables displaying the period rates and companies (View table). System administators typically have a longer list of items on this menu, including Edit Periods, Edit Accounts, Edit Input, Administrative Tools etc. Window The Window menu lists all windows (screens) that have been opened by the user so far, and allows quick switching between them, and also contains options to arrange (cascade/tile) the windows visually. AARO 9 Version 10.0 Manual data entry 2. 2.1. Overview The Input and Match screens are accessed from the Data Entry menu. Information is reported in different packages, for example yearly, quarterly and monthly. Each of these packages contains the applicable forms, for example balance sheet, income statement, and possibly additional detail specification forms. Figures are entered in cells. White cells are available for registration and blue cells are blocked. You can navigate between cells using the Tab key, the arrow buttons or the mouse pointer. 2.1.1. Same account on more than one Form An account can be included in more than one form. In this case, the form actually used for reporting the account depends on what forms are activated (by the system administrator) for the period at hand. If several forms containing the same account are activated in the same period, then the account becomes reportable only on the most detailed one of these forms, i.e. on the form that is reported on the most detailed level. Example: The account Net Sales may be included on a main Income Statement form, which could be on company+product level, and also on a Sales specification form, which could be on company+product+customer level. In this case, if both forms are activated, the Net Sales account becomes reportable only on the Sales specification form, since that is the more detailed one of the two. The other form(s) containing the same account will show the account’s value, summed up from the more detailed form, but will not allow editing/reporting of the value. AARO 10 Version 10.0 2.2. Short guide to the financial reporting process 1. Select Input from the Data Entry menu 1.1 Select the reporting period and your company. 1.2 Open up an input package in the tree structure, by clicking the boxed + sign in front of it. Select an input form in the package. 1.3 Click the Load button to load the input form. Alternatively, you can double-click the form name. 2. Report the financial information in the form. White cells are open for editing. 2.1 The operational input forms are often reported on sub-dimensions, such as per market, customer, product, business unit, division etc. The detail level has been decided by the system administrator for each form. Sub-dimension values can be added to the input form by clicking the Add Column button. 2.2 The legal input forms are reported on company total level and no sub-dimensions are therefore needed. 2.3 Click the Save button when you wish to save the information you have entered. 3. Possibility to comment input reporting 4.1 There is a functionality to comment input data. The comment may be mandatory given certain rules that are maintained by the administrator. The comments are added per input grid cell, by double-clicking the cell and entering the comment. The comments can then be viewed from the Input screen itself or via reports run from Drill Down (see below). It is also possible to attach documents, or hyperlinks to internal or external documents, to input cells. 4. Input comments in Drill Down 4.1 Show all comments in drill down by selecting “Show comments” in settings. A comment for a certain input cell can be disclosed by double clicking on the cell. In preview mode, any comments are indicated by a footnote and can be found at the end of the report. 5. Extract a reconciliation report 5.1 Click the Reports button and select Reconcile. 5.2 The ‘Rules’ area lists the reconciliation rules that have been set up by the administrator. You can pick individual recon rules to check, if you wish. Selecting no rules has the same effect as selecting all rules. A reconciliation rule is a comparison between two accounts that are supposed to have the same value reported. 5.3 The ‘Settings’ area contains boxes for Package, Company, Limit, and Include JV Bookings. A period must be selected to extract a reconciliation report. If only differences above a certain amount should be displayed, enter the wanted amount in the ‘Limit’ field. Recon rules can have default limits attached to them by the AARO 11 Version 10.0 administrator. It is possible to choose to ‘Override all individual rule limits’; by doing that you enforce your own choice of Limit, and disregard the administrator’s default choices. 5.4 Click OK to display the reconciliation report. 6. Report the period as completed. This is done when all information is entered. 6.1 Click on the Complete button to report the input forms in the current package as completed. The forms are then closed for any further reporting. 6.2 An automatic Reconciliation check is performed when the Complete button is pressed. The package of forms cannot be reported as completed as long as there are any reconciliation errors. AARO 12 Version 10.0 2.3. Description of the Input window This section describes the contents and layout of the Input window, which is used to enter and reconcile financial information for a period. 2.3.1. The tree structure The tree structure in the left pane displays the forms that the user is allowed to report on for that specific period. Sub-categories are predefined and can for example be used for sub-specification for different divisions, business units, product groups or customers. 2.3.2. The workspace At the top of the workspace, the period and the company are selected from the drop down lists. Valid forms in the package are displayed by double clicking on the package in the tree or by clicking on the + sign. The columns in the workspace reflect the reporting level defined for the current form. A form reported on company level has only one entering column and a total column, while a form reported on a dimension can consist of several entering columns depending on how many items the dimension contains. Before any information can be entered in a form, a period and a company must be selected. The available periods and companies are displayed in drop-down lists. It is also possible to choose a comparison period. The total figure from that period will then be shown in a yellowish, read-only column beside the total column. The system administrator defines packages, forms and periods, in accordance with the group’s demand for information flow. AARO 13 Version 10.0 2.4. Reconciliation Report This section describes the use, layout and content of a reconciliation report. A reconciliation report is a compilation of the different totals in the input forms. It is created to reconcile the financial information entered for a period in the Input window. The report is used to secure that the entered information is correct. If not, the difference is displayed in the report. 2.4.1. Report Contents The recon report summarizes the differences found in reported amounts. If all financial data is entered correctly, then the Reconciliation report will be empty. Only one period is displayed at a time. The report includes possible subcategories, such as divisions etc. A reconciliation report can be extracted at any time during the reporting flow. 2.4.2. Report Layout The report is built up symmetrically. To the left the first comparison value is displayed and to the right the second comparison value is displayed. Any difference is displayed in the middle of the report. There are several possibilities of refining the information that is about to be extracted. For example, it is both possible to extract a report where all reconciliation rules are included, or to select only one or a few rules at a time. The list of rules to choose from can be limited to all rules, to intra-package rules – which means rules whose both sides lie within the current package – or to “for complete”, which shows exactly the rules that would be used in the Reconciliation check that is run automatically before a Complete attempt. The report can only be viewed in local currency. Settings The ‘Settings’ field contains boxes for Period, Package, Company, Limit and Include JV Booking. A period must be selected to extract a reconciliation report. If only differences above a certain amount should be displayed, make sure ‘Use Limit’ is checked and enter the wanted amount in the ‘Limit’ field. E.g. enter 1000 to see only differences > 1000. In order to get a report on all rules even if 0 you uncheck the box which means no limit is applied. Recon rules can have default limits attached to them by the administrator. It is possible to choose to ‘Override all individual rule limits’; by doing that you enforce your own choice of Limit, and disregard the administrator’s default choices. AARO 14 Version 10.0 Rules The field Rules contains a window with the reconciliation rules. One, several or all rules can be selected for the report. To see only the possible differences for the loaded package, tick the check box Intra-package. The function Clear clears the selection made. 2.5. Complete The input window contains a function that should be used when the reporting for a period is done. This function reports a selected package for a period as completed and closes the form in the package for further reporting. The user reports a package as completed by clicking the Complete button at the top of the Input window. The system administrator can then view in Validations/Check Status which companies have reported the period as completed. A package of forms cannot be reported as completed as long as there are any differences left between the reconciliation accounts in the reported financial information. A reconciliation is started when the user clicks on the Complete button and if no differences are found the period and package are reported as completed for that company. A confirmation note, which says AARO 15 Version 10.0 Period complete, is displayed on the list at the bottom of the window. An information box is displayed if there still excist reconciliation errors. The errors must be corrected before the period can be reported as completed. 2.6. 2.6.1. Step-by-step instruction Input Enter information in the input form Follow the instructions below: 1. Select Input from the Data Entry menu. 2. Select a Period and a Company from the drop-down lists. 3. Open a Package and select a Form in the pane to the left. 4. Click the Load button to retrieve any already reported information for your selection. 5. Continue to Step 8 if no sub-categories are used. A sub-category can, for example, be a Business Unit or a Customer. 6. Click the Add column button to select sub-categories from the drop-down lists in the Add column dialogue box. Click OK, and a column will be added to the input form. 7. Enter the information in the cells. White cells are open for editing. The total sum is displayed in the Total column. 8. Click the Save button when you have finished. 2.6.2. Fetch information from another period It is possible to fetch information from another period. You can choose between two alternatives: only fetching the grid headings from another period, or fetching both grid headings and figures from another period. AARO 16 Version 10.0 Follow the instructions below: 1. Select Input from the Data Entry menu. 2. Select a period and a company from the drop-down lists. 3. Open a Package and select a Form in the pane to the left. 4. Click the Load button to load the form for the period selected. 5. Click the Fetch button to retrieve information from another period. 6. Select the source period in the Fetch Period dialogue box displayed. Remember to check the Fetch Data with figures check box if you want to retrieve both grid headings and figures for the period selected. Leaving the checkbox unchecked will fetch only grid headings. Click OK. 2.6.3. Input comments It is possible to comment input reporting. The comment may be mandatory given certain rules that are maintained by the administrator, e.g. notable deviation from some other period such as budget or previous year, or otherwise remarkable figures. Red cells indicate that the values need to be commented. The cell-colouring is updated only when the form is Loaded; thus it is good practice to Save figures and then Load the form again, to watch for any mandatory comments. Follow the instructions below: 1. Double-click the red cell. 2. A Comment dialogue is displayed where you can see the comment rule. 3. Enter your comment, and save it. 4. After saving the comment the red cell becomes green AARO 17 Version 10.0 2.6.4. Extract a reconciliation report A reconciliation report displays the reconciled data entered for a period in the Input module. Only one period is displayed at a time. If all financial data is entered correctly, the Reconciliation report will be empty. Follow the instructions below: 1. Select Input from the Data Entry menu. 2. Select a period and a company. 3. Select a package from the left-hand pane. 4. Choose Reports/Reconcile to display the Reconciliation dialogue box. 5. Select Settings and Rules for the reconciliation report and click on OK to order the report. 6. Tick the check box Intra-package if the report only should contain the differences for the active package. 7. Click Close to return to the Input window. 2.6.5. Report forms as completed When all financial information for a period is entered into the forms, the package of forms should be reported as completed. The Complete button does this. Follow the instructions below: 1. Select Input from the Data Entry menu. Continue to step 5 if the forms and period already are in use. 2. Select the period and the company for the forms that should be reported as completed. 3. Select the package in the pane to the left. 4. Click the Load button to load the form for the period selected. 5. Click the Complete button to report the package of forms as completed. A confirmation note, which says Period complete, is displayed on the list at the bottom of the workspace. 6. The period will not be completed if there are reconciliation errors. If so correct the errors, save and click the Complete button again. AARO 18 Version 10.0 Excel Input and Send 3. The AARO/Excel Add-In allows you to send information from Microsoft Excel workbooks to the AARO database. There are two distinct ways to get figures from Excel into AARO: AARO Input Forms: Live Input Forms on your Excel sheets, with direct manipulation features available through right-click menus. You insert an input form onto an Excel sheet – or a package of forms, with one form per sheet – and then enter the figures using Excel functionality, and finally give a command to Save (send) the data to AARO. Currently, the Input Forms functionality in Excel is limited to simple Input forms; Excel does not handle Match forms, Matrix forms or Text forms. ABS Send Formulas: A selection of formulas, that work as ordinary Excel formulas, but send data – one figure per formula cell – directly to the AARO database. Using Send formulas data can be sent to any kind of input form in AARO, with no restrictions. 3.1. The Excel Add-In Follow the instructions below: 1. Open an empty workbook in Excel. 2. On the File menu, select Open. 3. Browse to the ABSXL.xll file. It is normally stored under C:\AARO (the AARO installation folder). If you cannot find the file, contact your system administrator. 4. Open the file. 5. Depending on the security settings in your installation of Excel, you may have to click the Enable macros button to activate AARO Excel. Note: Security level settings in Excel are accessed via the menu Tools>Macro>Security in Excel 2000 and 2003. (When using Excel 2007, a Windows administrator may need to import the Aaro Systems certificate and make it trusted, before the AARO/Excel Add-In can be used.) AARO 19 Version 10.0 6. A new menu is displayed in Excel: AARO. The right-click menu of the sheet is also extended with some AARO menu items. 7. On the AARO menu, select Log On. The Log in to database dialogue box will be displayed. 8. Select a database and enter your user name and password. You make the same choices as you normally do when you log in to AARO. Click Login. 9. You are now logged on to AARO database, and can begin to use the Excel link. Note: The login from Excel is separate from the login to the main AARO application. You can be logged in to both at the same time, or to only one of them, just as you wish. AARO 20 Version 10.0 3.2. Excel Input Forms 1. Open the AARO/Excel Add-In. 2. Select Aaro Input Form > Input Form(s) from the right-click menu on an empty Excel sheet. 3. One form or all forms in a package can be loaded into separate spreadsheets in an Excel workbook. 4. All white cells are open for input. 5. Right-click and choose Add column to add columns, if necessary. 6. Enter the data. Save the form’s data to the AARO database by choosing Save from the right-click menu in the sheet. AARO 21 Version 10.0 3.3. ABS Send Formulas The ABS send formulas are used to send information from an Excel workbook directly to the AARO database. This may be used if a lot of information is stored in excel workbooks. Then the user does not have to enter all information manually. 3.3.1. Short guide for sending data to database 1. Open the AARO/Excel Add-In. 2. Define a template. 3. Define the cell references and copy them if needed. 4. Send information to database by selecting ABS Send Formulas > Send to Database from the AARO menu in Excel. 5. If the data you are trying to send contains validations errors (e.g. unknown account codes, misspelt company codes, invalid combinations of dimension values etc.), you will be presented with a dialogue box showing these. If you get a validation error, correct the error and try to save again. Nothing will be changed in the database until the data being sent is flawless. AARO 22 Version 10.0 3.3.2. Formula parameters The different AARO Excel formulas expect different parameter lists. Note 1: The parameters also differ depending on the set-up of the system. ABS Send Oper ABSSendOper is the send formula used for the majority of input forms. Period The period for which data is sent. Co The Company for which data is sent. Use the company code. Code The account to which data is sent. Dimensions The specific dimension values, such as Profit Center, Product, Customer, Business Unit etc., for which data is sent. Dimensions vary between AARO installations. When sending data, you must make sure to fill in all required fields. Which fields are required depends on the account code, and which form(s) that account is reported through this period. Although Excel Send itself does not work with forms, the account’s form still decides the detail level for reporting, so you have to be aware of that. If you leave a required dimension blank, you will get a validation error when you attempt to send the data. If you get a validation error, correct the error and try to save again. Nothing will be changed in the database until the data being sent is flawless. AARO 23 Version 10.0 ABS Send Match ABSSendMatch is the send formula used for match data (intercompany transactions). TransCurr The transaction currency. Used if the form is to be reported in transaction currency. TransAmount The amount that is reported in transaction currency. LocValue The reported amount in local currency. Period The period for which data is sent. Code The account code to which data is sent. Company The reporting company for which data is sent. CounterCo The counter-company for which data is sent. Use the company code. Own BU The reporting company’s Business Unit (or other dimension). Used if the form is to be reported on a Business Unit (or other dimension) level. Counter-BU The counter-company’s Business Unit (or other dimension). Used if the form is to be reported on a Business Unit (or other dimension) level. AARO 24 Version 10.0 The analysis tool – Drill down 4. This chapter is an introduction to AARO Drill Down. After reading this you will understand how to order a Report, how to adjust it and how to build new Reports. Drill Down is the AARO report generator. Basically it is an OLAP report generator containing your entire organization. To start Drill Down, select Drill Down from the Reports menu. 4.1. Predefined Reports Predefined reports are reports that you or someone else has prepared and saved in AARO’s report folder structure. The report folders are stored in the AARO database, so you will see the same folders regardless of which computer you log in from. You access the predefined reports through the Reports tab. The report folders are adjusted to your needs and might look different from our example. You run the report you want by double-clicking it, or by selecting it and clicking the Run Report button. Some reports require parameters and in those cases you will get one or more selection windows, such as the one below, where you have to specify for example what Period you want to see in the report: AARO 25 Version 10.0 Make your selection(s) and press the OK button. When all selections are done, the figures will be retrieved and the report shown as below. AARO 26 Version 10.0 4.2. Drill Down If you are interested in a certain figure and want to see more details about it, then you can drill down into it. Select a Cell, Row or Column, and right-click. You will then get a menu from which you select Drilldown By, and then the parameter that you want to drill down by. In our example we are interested in the Total Income (account 3999) for Business Area SUPER, and want to drill it down by Company. The new drilled-down report appears in a new tab. The GrandTotal of the new report (10 299 103) is the same figure that we originally drilled down from. AARO 27 Version 10.0 Drill-down may be repeated indefinitely. Each new drill will produce a new unique report tab. You can access an old report by pressing its tab. 4.3. Edit Report For more advanced changes to the report, press the Edit tab. The organisation of the Edit tab can vary greatly, but it always contains all the different entities that are available to build a report with. When the Edit tab is selected, the row and column definition areas open up next to the report: AARO 28 Version 10.0 In this state everything in the report is possible to change. The report is defined by Fixed limitations, Row definitions, and Column definitions. Fixed limitations are limitations that affect the entire report. In our example: Currency USD, Period Y112A, Accounting Type IFRS and a business area named SUPER. The Fixed Criteria Space filled with Parameters You can change the fixed limitations for your report by clicking the icon on the right edge of the parameter tray in the fixed criteria space: You can, for example, change the Currency from USD to EUR. When you click the little icon you get a selection window where you specify what currency you want. Row definitions define the rows of the report. In our example it is the Report layout “PNL_RPT1”. Column definitions define the columns of the report. In our example it is Companies, and “All companies” means that we have not specified any specific companies, so our report will include all companies that have any data on them. AARO 29 Version 10.0 For rows and columns more than one item can be chosen. The first item is the first sort order, the second item is the second sort order and so on. You can change the report definition by dragging items from the Edit tab to the Fixed critera space or onto the Row or Column definition areas. You can also move items between the three areas, or rearrange items inside an area, by dragging the items around. By clicking an item that is located in the row or column area you get the possibility to specify things like data range, headers, sort order, totals etc. in a dialogue such as as the one below. When you want your changed report to be updated, press the Run Report Button. AARO 30 Version 10.0 4.4. New Report To make a New Report from scratch Press the New button. You might get a dialogue where you have to select a datasource. You always have access to the AARO database but it is also possible to link AARO to other sources of informations such as a Data Warehouse, your ERP system or something else. If this is done you have to choose where you want your report to be retrieved from. The Datasource dialogue, if multiple Datasources You will now be in edit mode with an empty report on your screen. Initially the Fixed Critera Space is filled with some default parameters. These default can also vary between AARO installations. The parameters in the Fixed Criteria space affect the entire report. AARO 31 Version 10.0 You can Add new parameters to the Fixed criteria space by dragging in items from the Edit tab. You can also remove parameters that you do not want by dragging them back to the Edit tab. To set the values of a parameter, click the little icon on that parameter tray’s right edge. You will now get a selection window as below where you can specify your criteria. When satisfied with the Fixed Criteria Space content, proceed with Rows and Columns in the same way. The parameters in the Row area affect the rows of the report. You can Add new parameters to the Row definition space by dragging in items from the Edit tab. You can also remove parameters that you do not want by dragging them back to the Edit tab. More than one item may be choosen. The first will be the first sort order, the second the second sort order and so on. To set the values of the parameters, press the actual parameter. You will now get a selection window where you can make your choices. The parameters in the Column area affect the columns of the report. You can Add new parameters to the Column definition space by dragging in items from the Edit tab. You can also remove parameters that you do not want by dragging them back to the Edit tab. AARO 32 Version 10.0 More than one item may be choosen. The first will be the first sort order, the second the second sort order and so on. To set the values of the parameters, press the actual parameter. You will now get a selection window where you can specify your settings. Parameters may me moved between Rows, Columns and Fixed Criterias, by dragging them to the desired new location. To see your new report press the Run Report button. 4.5. Save report If you want to save your report for future use, press Save. The Save report dialog appears. This Save report dialogue has a number of options: Most users are only allowed to save the report in their own personal folder. Administrators can save reports everywhere in the report structure. AARO 33 Version 10.0 The report name is the name shown in the Reports tree (you may regard this as a kind of “file name” of the report), while the heading is the text that will be written as the heading on the output report. If you want some of the choices to be parameters for the future report then tick-mark them. If you want the system to adjust the report as time goes by – e.g. when it is May, replace April with May, and so on – then tickmark Save Periods as Relative. (This works only if periods in the system are properly maintained by the system administrator.) If you have formatted the report and want to keep the format then tickmark Include report format settings. (Not all format information is stored, though. For elaborate and persistent formatting, we recommend Excel.) Press Save and your report is stored for future use. 4.6. 4.6.1. Various options Calculated items Follow the instructions below 1. Enter the detail selection dialogue box for a Criteria in the report. 2. Make sure the items needed for the calculation are entered in the Selected items field. Click on Calculated Item. 3. Enter a name for the calculated item in the Heading field. 4. Enter the formula in the Expression field. Click on the buttons for the items, operands and numbers to include them in the calculation. If needed, use the Backspace button to delete the last character. 5. Click OK to enter the calculated item into the Selected items field. AARO 34 Version 10.0 Click on OK twice to view the report. 4.6.2. Transpose rows and columns 1. Click the Transpose button to let the rows and columns switch places. 2. Click again on the Transpose button to change back again. 4.6.3. Delete zero columns or rows Click the Delete button and select Zero columns or Zero rows from the menu displayed to remove columns/rows that contain zeroes only from the current report. 4.6.4. Delete report sheets (worksheets) Click the Delete button and select Current sheet or All sheets from the menu displayed to delete either the currently active report sheet or all sheets. This tidies up your workspace. 4.6.5. Delete a predefined report permanently Click the Delete button and select Report from the menu displayed if you wish to delete a predefined report from the Reports tab. The report will be permanently deleted from the database. 4.6.6. Rename a sheet Click the Rename button and rename the report or select the current report tab and click right and select Rename from the menu displayed. 4.6.7. Save an existing report with a new name Follow the instructions below: 1. Open the report by selecting it in the tree structure and click the Run Report button. 2. Click the Save as button or right-click the report tab to save the report with a new name. AARO 35 Version 10.0 3. After entering the new name, click the Save button to save the information. 4.6.8. Delete a row or a column in a drill down report Select the row or column that should be deleted in the report and right-click and select Delete row(s) or column(s) from the menu displayed to remove a row or a column. 4.6.9. Change Cell format 1. Select one or several cells in the report. 2. Change the cell format either by using the buttons in the top right corner of the workspace or by right-clicking and selecting Cell Format from the menu displayed. 4.6.10. Display statistics 1. Select several cells in the report. 2. Right-click and select Statistics from the menu displayed. The statistics (count, sum, max, min, average) for the selected cells are displayed. 4.6.11. Sort column in a report Select a column in the report and click right and select Sort column from the menu displayed. 4.7. Excel Connectivity AARO is tightly linked with Excel. Once you have made a report in AARO Drilldown it is easy to export that report to Excel. 4.7.1. Copy to Excel When you want to move information to Excel, press the Copy button. In the appearing Copy menu, make your selections. Select what to Copy and start Excel. When in Excel, paste the material (Ctlr+V). AARO 36 Version 10.0 4.7.2. Live copy to Excel The Copy button also offers Live copy to Excel functionality. This command starts Excel automatically, opens the AARO/Excel Add-In, logs on to the AARO database from Excel, and enters the Report content and functionality into a new Excel workbook or worksheet. Live in this context means that it is now possible to continue to work with the figures. E.g. change fixed limitations, drill down into the figures etc. For further details, see the Excel Drilldown chapter. AARO 37 Version 10.0 Intercompany Items / Match 5. Intercompany transactions are reported and reconciled in AARO’s Match module. (This module is called Match on some installations, and Intercompany on some other installations. It is the exact same module in both cases.) It is accessed via Match on the Data Entry menu. 5.1. Short guide to intercompany reporting 1. Select Match from the Data Entry menu. 1.4 Select a period and a package 1.5 Select the reporting company in the tree structure. Figure data is loaded into the grid immediately when the reporting company is selected. 2. Report your inter-company data in the forms. White cells are open for editing. 1.1 Select a counter-company by clicking on the Insert Row button. 1.2 Click on the Save button to save the entered information. 3. Extract a match report 1.1 Click on the Report button and select Match report. 1.2 Select from the various options in the Order Match report dialogue box and click OK to display the match report. 5.2. Description of the Match window The inter-company transactions can either be reported at overall company level or at some subdimension level. Inter-company transactions can be reported in both local currency and transaction currency (Loc & TransAmount) or only local currency (Loc). The detail level and currencies available depend on how the form has been set up by the system administrator. The result of the reconciliation between inter-company transactions is displayed in a Match report. The report can be extracted for all match rules or for a single rule, and either on company total level or on a fine-grained sub-dimension level (this option is available if the match forms involved are reported on such a finer level). It is possible to match the transaction currency amount, the local currency amount, or both. AARO 38 Version 10.0 The Match items window consists of two panes. The left pane contains a tree structure that displays the companies which are allowed to report financial data on and the right pane consist of a working space. 5.2.1. The tree structure The tree structure in the left pane displays the companies allowed to report on, i.e. reporting companies, for the selected period. 5.2.2. The workspace At the top of the workspace the complete name of the reporting company, the period and currency are displayed. Valid forms in the package are displayed as tabs at the bottom of the workspace. Before any information can be entered in a form, a period and a package must be selected, and a reporting company be selected in the tree. The available periods and packages are displayed in drop-down lists. The counter-companies for which information has been entered, and any sub-dimension details (in case the particular form uses them) are displayed as rows in the form. 5.3. The match report A match report is created to match inter-company transactions and to display possible differences between companies in a group. The content of the Match report differs according to the predefined selections and can be displayed either on a company total level or on a subdimension level. The amounts entered by the companies are checked according to predefined match rules, to secure that coherent amounts have been entered. If not, the difference is displayed in the report. AARO 39 Version 10.0 5.3.1. Report Contents The match report summarizes all the reported amounts for the combination of a period and a package, including all forms in the package. The report includes the reporting company and all counter-companies. Possible differences between the companies are also included. The Match report also gives information on period, currency rates used, dimension selected and rule or rules selected. This information is displayed below the report header. Click on the Heading button to adjust the report header. The report contents are controlled by the selections made in the Order Match Report dialogue box. Restrictions – Report for selected rules only Report for selected rules only limits the differences displayed in the report to specifically selected matching rule. You can choose to see a report of all rules or just one rule. Restrictions – Limit Report Limit defines the lower limit of the differences to be displayed. It is useful as a filter function in cases of many differences Report currency Currency refers to the currency in which the information is displayed. It is possible to choose AARO 40 Version 10.0 between all currencies that have exchange rates defined for the selected period. Figures to match You have the following options: Loc: The report will match Loc figures, i.e. the figures reported in local currency by the two companies. The Loc figures will be converted to the report currency, and then compared. Transaction Amount: The report will match TransAmount figures, i.e. the figures reported in transaction currency by the two companies. This also implies that there will be one row in the report for each currency code. Total Specification: The report will match both Loc and TransAmount figures in a single, broad report, that also includes a specification of translation diffs. (Translation diffs appear when the Loc and TransAmount figures reported use some currency exchange rate other than the official one stored in the AARO system for the period. This is not necessarily an error, but something that one might want to be aware of, and the Total Specification match report is an aid here.) Report Layout The Report Layout area lets you choose how much information to include in the report, and also which entities to use in the matching. This is done by ticking the check-boxes below the texts Specification of and With match on counterpart’s... The check boxes represent the different report dimensions available for a match report. What the available dimensions are depends on what has been defined by the system administrator. The dimension could be e.g. a business unit, customer, or invoice number. Company Description This check-box is ticked if the whole company name should be displayed in the report layout. Normally it is only the company code that is displayed in the report layout. Sorting The report can be sorted and displayed by the company code or by the match rule. Report Destination The report can either be displayed in a grid, or as a standard report, or be saved as a text-file. Match Sum Order In addition to the general sort order (by company or by rule), the report can further be sorted by diff size. A typical use would be to have the largest diffs listed first; to achieve that, select the Sum descending option. If No sum order is selected, the report is simply sorted alphabetically. 5.3.2. Report Layout Two identical parts build up the report. The left side of the report displays information regarding the reporting company, i.e. your own company, and the right side what the countercompany has reported as the counter-company. Any difference is displayed in the middle. AARO 41 Version 10.0 There are several possibilities of refining the information that is about to be extracted. For example, it is possible to extract a report where all match rules are included or to extract a report that includes one rule at the time. The report can also be viewed in either the transaction amount or in local currency, or both. Example: Match report 5.4. Contact list The Contact list should be used to register contact information concerning the companies. The contact information is entered in the Edit company information dialogue box displayed when clicking on the Contact button. The Contact list report is accessed through the Reports button, and the report can be sorted either by Company Code or Company Description. 5.5. 5.5.1. Step-by-step instructions Match Enter information in a match form Follow the instructions below: 1. Select Match from the Data Entry menu. 2. Select a period and a package from the drop-down lists. 3. Select a reporting company in the left-hand pane of the window. 4. Click on a tab at the bottom of the window to load a form. 5. Add a counter-company by clicking on the Insert row button. 6. Select counter-company, and sub-level (in case the form requires it) from the drop-down lists displayed in the Add row dialogue box. Click on OK. 7. Enter the financial information in the cells. White cells are open for editing and white tabs are active. 8. Click on the Save button to save information. AARO 42 Version 10.0 5.5.2. Extract a match report Follow the instructions below: 1. Select Match from the Data Entry menu. 2. Select a period and a package. 3. Select a company or All companies in the left-hand pane 4. Click on the Reports button and select Match report to order a match report. An Order Match Report dialogue box will be displayed. 5. Select whether you want to see the report for all match rules or for one match rule only. 6. Select what Figures to match: Loc, Transaction Amount, or both (Total Specification). 7. Decide how detailed a report you want: Tick the appropriate check-boxes in the Report Layout area. (You may want to experiment a bit with this to get the feel of how it works.) 8. Select whether you want to sort the report by Rule or by Company and whether you want to save the report as a file or display it as a standard report or in a grid. 9. Click on OK to display the Match report. 10. Click on the Print button to print the report, and use the Next and Prev buttons to move between the pages in the report. It is also possible to adjust the size of the report on the screen by using the two sheet buttons. 11. Close the report by clicking on the Close button. AARO 43 Version 10.0 5.5.3. Edit contact information Follow the instructions below: 1. Select Match from the Data Entry menu. 2. Select a period and a package. 3. Select a company from the left-hand pane. 4. Click on the Contact button, then click Edit, and an Edit Company information dialogue box will be displayed. 5. Enter company information such as Receivable and Payable contact. 6. Click OK to save the information. 5.5.4. Extract a contact list report Follow the instructions below: 1. Select Match from the Data Entry menu. 2. Select a period and a package. 3. Select a company or All companies in the left-hand pane 4. Click on the Reports button and select Contact List. A dialogue box will be displayed. 5. Select to display the Contact list sorted by Company Code or Company Description, and select the companies to be included in the contact list. 6. Click OK to display the report. AARO 44 Version 10.0 JV-Bookings 6. 6.1. Journals – JV Booking When figures in the closing need to be changed by other users than the ones responsible for entering data for different companies/entities, the function JV Booking can be used. It makes changes traceable and separated from Input. JV bookings are sometimes called Group Adjustments, although their use is not limited to group adjustments. JV stands for Journal Voucher. 6.2. Step by step instructions JV bookings 6.2.1. Enter a journal – JV booking Follow the instructions below: 1. Select JV Booking from the Data Entry menu. 2. Click on the button New to add a new booking. AARO 45 Version 10.0 Select period, currency and JV Type from the drop down lists in the New JV dialogue box. Currency can be specified as LOC, which means that the amounts in this JV booking will be in the reporting currency of the company on each row, respectively, or as the group currency, in which case all amounts in this JV booking are in the group currency. Also write a short descriptive ID in the ID box (unless the edit box for ID disabled; in that case the system is configured to automatically generate JV IDs). Click OK. An empty row is displayed in the right pane. 3. Enter information by using the drop-down lists (or typing) in the fields for company, code etc. All white cells must be filled in. The cell called Text is not mandatory, though, but can be used to comment individual rows. 4. Click on the Save or Prepare button when finished. The command Prepare saves the booking temporarily in the database and the command Save saves it to the database. Note Reversing a sign in a saved JV Booking is done by clicking on the button Sign. Clicking on the Filter button gives a possibilty to select wich existing JV bookings you wish to see. AARO 46 Version 10.0 View Table 7. 7.1. View table Reporting companies and translation rates valid for a period can be monitored in the View Table window. This is only a monitoring tool. 7.1.1. Rates The option rates are displayed for a selected period: currency, opening rate (rate on the first day of the period), average rate, closing rate (rate on the last day of the period). 7.1.2. Companies The displayed option of a company for a selected period; company, company currency, translation type (method used to translate to group currency), tax (local tax). 7.2. Step-by-step instructions View table Follow the instructions below: 1. On the View Period Companies/Rates menu, select View table. 2. Select a period. 3. Select Period Rates or Period Companies in the left-hand pane. 4. Click the Load button. AARO 47 Version 10.0 Excel Drilldown and Retrieve 8. The AARO/Excel Add-In allows you to fetch information from the AARO database to Microsoft Excel. There are two distinct ways to get figures from AARO into Excel: AARO Drilldown Reports: Live Drilldown reports on your Excel sheets, with plenty of direct manipulation features available through right-click menus. You can either insert a predefined report – one that has been created in Drill Down and saved in the report folder structure on the AARO database – onto an Excel sheet, or you can build a brand new report directly in Excel. ABS Retrieve Formulas: A selection of formulas, that work as ordinary Excel formulas, but fetch data – one figure per formula cell – directly from the AARO database. 8.1. The Excel Add-In Follow the instructions below: 1. Open an empty workbook in Excel. 2. On the File menu, select Open. 3. Browse to the ABSXL.xll file. It is normally stored under C:\AARO (the AARO installation folder). If you cannot find the file, contact your system administrator. 4. Open the file. 5. Depending on the security settings in your installation of Excel, you may have to click the Enable macros button to activate AARO Excel. Note: Security level settings in Excel are accessed via the menu Tools>Macro>Security in Excel 2000 and 2003. (When using Excel 2007, a Windows administrator may need to import the Aaro Systems certificate and make it trusted, before the AARO/Excel Add-In can be used.) AARO 10.0 48 Version 6. A new menu is displayed in Excel: AARO. The right-click menu of the sheet is also extended with some AARO menu items. 7. On the AARO menu, select Log On. The Log in to database dialogue box will be displayed. 8. Select a database and enter your user name and password. You make the same choices as you normally do when you log in to AARO. Click Login. 9. You are now logged on to AARO database, and can begin to use the Excel link. Note: The login from Excel is separate from the login to the main AARO application. You can be logged in to both at the same time, or to only one of them, just as you wish. AARO 10.0 49 Version 8.2. 8.2.1. Excel Drilldown Reports Predefined Drill-Down report To insert a report that is created and stored in AARO, select AARO Drill-down Report > Predefined.... from the AARO menu or from the sheet’s right-click menu. Look in the folders for the report that you want and open it by double-clicking. The report is inserted onto the current Excel sheet. 8.2.2. New Drill-down report A brand new Drill Down report can be built directly in Excel. This is done through AARO Drill-down Reports > New Report... on the AARO menu or the sheet’s right-click menu. A report order dialogue box is displayed when you choose the New Drill-down function. The way to build a report is conceptually similar to how it is done in the ordinary Drilldown tool; however, Fixed/Rows/Columns criteria are not handled as drag-and-drop trays here, but rather as selections in drop-down lists, organised under three tabs in the same dialogue box. AARO 10.0 50 Version 8.3. Paste from AARO A convenient way to start creating your own retrieve templates in Excel is through Paste from AARO. The Paste from AARO function is used to paste an Input Layout or a Report Layout from AARO onto an Excel sheet. It is also possible to paste information about periods, companies, dimensions and groups. This is done by ticking the radio button Other. Information to fetch is for example the company code and the company name. Note 1: The information will be pasted into the active sheet, from the active cell down and to the right. Note 2: The information will be pasted into the active sheet without formulas and/or formats. AARO 10.0 51 Version 8.4. 8.4.1. ABS Retrieve Formulas Define a template After you have pasted information, or by any other available source copied information, into the excel template you can begin to create layouts for your own purposes. The report content is entirely defined by the user. The report layout and data to be included is defined in the excel template. Note: Formula parameters are explained briefly in the text below. For more detailed descriptions, please see the section Formula Parameters at the end of this chapter. Follow the instructions below: 1. Type heading names in the worksheet. Type one heading for each piece of information you want to use in matrix, such as company code, period and currency. 2. Type actual values for chosen categories, for example under or beside the headings. In the exercise chosen categories are Company (PCHAL), Period (0107A), Currency (EUR) and Code (IS3100 etc). Note: The retrieve function is case sensitive and you must therefore type the exact code or value name. AARO 10.0 52 Version 8.4.2. Define cell references To be able to retrieve data from the AARO database into your own templates you need to define cell references. This is done for each unique cell that you want to retrieve information to. Follow the instructions below: 1. Place the cursor in the top cell in the matrix where the data will be retrieved and displayed (in this exercise: cell E8). 2. On the Insert menu, select Function. The Paste Function dialogue box will be displayed. 3. Select category ABS data retrieve from the drop down list. The functions ABSGetAccountText, ABSGetName, ABSRetrieveOper and ABSRetrieveLegal will be displayed in the Function name list to the right. 4. Select ABSRetreiveOper function and click on OK. The ABS Retrieve dialogue box will be displayed. 5. Select a field for a formula parameter to be used to retrieve data in the ABS Retrieve dialogue box. AARO 10.0 53 Version The following information categories are valid for ABSRetrieveOper: Period The period from which data is to be retrieved. Code The account from which data is to be received. Currency/AcT/Trnsl/AccStd The currency that the report figures should be displayed in. (Optionally followed by a backslash and an accounting type, and optionally followed by another backslash and a currency translation code, and optionally followed by yet another backslash and an accounting standard (=a sum of accounting types) – these options are meaningful only if your AARO system is configured to work with multiple accounting types/accounting standards and/or multiple currency translations, and even then, these options can be left out, in which case you get the figure for the default accounting type and the default currency translation.) Co The company from which data is to be received. Use the company code. Dimensions The specific dimension value, such as Profit Center, Product, Customer, Business Unit etc., for which data is to be retrieved. Dimensions available vary between AARO installations. 6. Type the parameter value, or click a cell in the worksheet from where the parameter value is to be retrieved; that cell then becomes referenced in the ABS Retrieve dialogue box. 7. Define whether the cell reference should be locked or not. You can enter a dollar sign ($) in front of the column letter to lock the column, or in front of the row number to lock the row. If dollar signs are entered both in front of the column letter and the row number the unique cell is locked. You can also press F4 repeatedly until the desired definition (of dollar sign) is displayed. AARO 54 Version 10.0 8. Select the next parameter to be used to retrieve data in the ABS Retrieve dialogue box. Repeat until all parameter values have been defined. 9. Click on OK when you have finished. Note 1: The formula parameters differ depending on the set-up of the system, as well as on whether you want to retrieve legal or operational information. Note 2: It is not mandatory to use all parameters. Leaving a parameter blank means “give me the sum of all of these”, for example leaving Company blank means “give me the sum of all companies”. (The sum retrieved will, however, always be limited to what the current user is authorized to see.) The only mandatory parameters, that can never be left blank, are Period, Account Code and Currency. AARO 55 Version 10.0 8.4.3. Copy cell definition After you have prepared one formula cell properly (especially regarding the use of $ signs to lock references to rows/columns intelligently) that cell can be copied to other cells in the template. Depending on the complexity of the matrix in your template this can be done in different ways. Note 1: It is good practice to check the retrieve formulas in the cells you have defined so they are correct. Note 2: Do not forget to save your template. Choose File menu and click Save to save the active workbook. AARO 56 Version 10.0 8.4.4. Retrieve Information When you have defined all cells in your template (in the example above: Cell E8 to E25) and entered all actual values (in the example: Period, Company, Currency and Code) you can retrieve the requested data. The data is fetched (refreshed) from the AARO database only when you actually command it to be, and you do that through the AARO menu in Excel. Follow the instructions below: 1. Select one of the items under ABS Retrieve Formulas > on the AARO menu. The three menu items differ only in how much of Excel they recalculate. Retrieve All refreshes AARO formulas throughout all open workbooks; Retrieve Sheet Only refreshes only the current worksheet; Retrieve Multiple Sheets lets you select a number of individual sheets to be refreshed. 2. Excel calculates the workbook and the relevant information will be displayed in the workbook. AARO 57 Version 10.0 Note 1: If the calculation is not successful – check defined cells and values used in the template. Depending of the setup of your Excel you can check defined cells in different ways. One important checkpoint is always to validate that the reference cell is correct. Clicking on the Paste Function dialogue box to check that data is found does this. Note 2: Recalculate by selecting Retrieve in the AARO menu again. 8.4.5. To log off Follow the instructions below: 1. Select Log off from the AARO menu to close the connection to the AARO database from Excel. (The connection is also closed automatically when you exit Excel.) AARO 58 Version 10.0 8.5. Formula Parameters The different AARO Excel formulas expect different parameter lists. Note 1: The parameters also differ depending on the set-up of the system. Note 2: It is not mandatory to use all parameters. ABSGetAccountText The following parameters are used in ABSGetAccountText: Code An account in the database, the description of which is to be retrieved. ABSGetName The following parameters are used in ABSGetName: Type Either the word COMPANY, or the name of a dimension in the system (such as e.g. Profit Center, Market, Customer or Business Unit – what is available depends entirely on the specific AARO installation. Be sure to spell the dimension name exactly as it is defined.). Code Code of either a company or a dimension value, the description of which is to be retrieved. AARO 59 Version 10.0 ABS Retrieve Legal The following parameters are used in ABSRetrieveLegal: Period The period from which data is to be retrieved. Code The account from which data is to be received. Currency/AcctType/Translation The currency that the report figures should be displayed in. (Optionally followed by a backslash and an accounting type, and optionally followed by another backslash and a currency translation code – these options are meaningful only if your AARO system is configured to work with multiple accounting types and/or multiple currency translations, and even then, these options can be left out, in which case you get the figure for the default accounting type and the default currency translation.) Company The Company for which data is to be received. Use the company code. Group The legal group for which data is to be received. Legal Type Used if you want to separate different types of transaction, for example Input or JV. AARO 60 Version 10.0 ABS Retrieve Oper The following parameters are used in ABSRetrieveOper: Period The period from which data is to be retrieved. Code The account from which data is to be received. Currency/AcT/Trnsl/AccStd The currency that the report figures should be displayed in. (Optionally followed by a backslash and an accounting type, and optionally followed by another backslash and a currency translation code, and optionally followed by yet another backslash and an accounting standard (=a sum of accounting types) – these options are meaningful only if your AARO system is configured to work with multiple accounting types/accounting standards and/or multiple currency translations, and even then, these options can be left out, in which case you get the figure for the default accounting type and the default currency translation.) Co The company from which data is to be received. Use the company code. Dimensions The specific dimension value, such as Profit Center, Product, Customer, Business Unit etc., for which data is to be retrieved. Dimensions available vary between AARO installations. AARO 61 Version 10.0