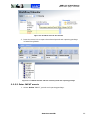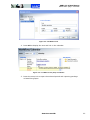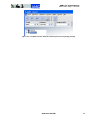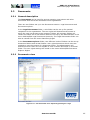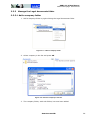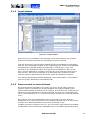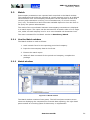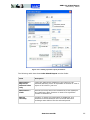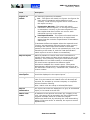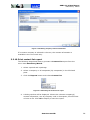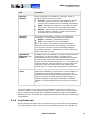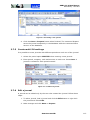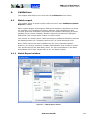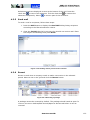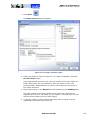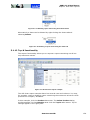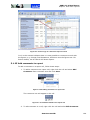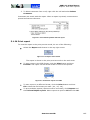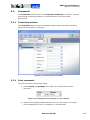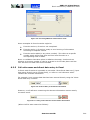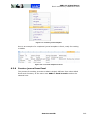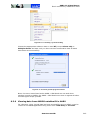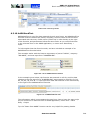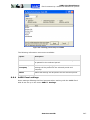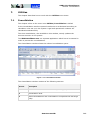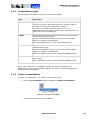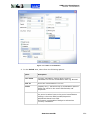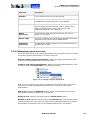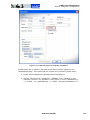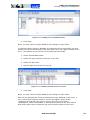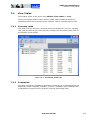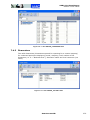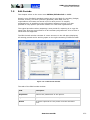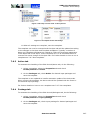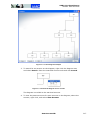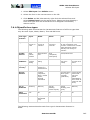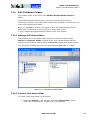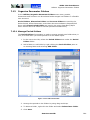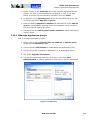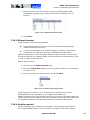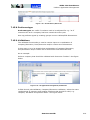
1
AARO 11.0 USER MANUAL Last updated: 2012-08-24 Table of Contents 1. General 10 1.1 AARO system overview 10 1.2 Validation 14 2. AARO start page 17 2.1 2.2 General description Calendar 17 18 2.3 Documents 25 2.4 News 31 3. Data Entry 33 3.1 Input 33 1.1.1 1.1.2 1.1.3 1.2.1 1.2.2 1.2.3 1.2.4 1.2.5 2.2.1 2.2.2 2.2.3 2.3.1 2.3.2 2.3.3 2.3.4 2.4.1 2.4.2 2.4.3 3.1.1 3.1.2 3.1.3 3.1.4 3.1.5 3.1.6 3.1.7 3.1.8 3.1.9 3.1.10 3.1.11 3.1.12 3.1.13 3.1.14 System map Architecture/technical components Basic entities Technical overview Central gatekeeper Local pre-validation Fixed/built-in validation Customisable validation General description Calendar view Enter events in the calendar General description Documents view Manage the Legal documents folder Manage the Document explorer folder General description News view Enter news text 10 11 12 14 14 14 15 16 18 18 19 25 25 26 29 31 31 31 Use the Input window Input window Same account on several forms Short guide to the financial reporting process Load an input form Filter OS form Report financial information Fetch data from another period Input comments Input comments in drill down reports Reconcile reports from Input, or Reconciliation? Reconciliation report from Input Report period as completed Print an input form AARO SYSTEMS AB 33 34 34 35 35 37 37 39 41 43 44 44 46 47 i AARO 11.0 USER MANUAL 3.1.15 Print Contact List report 47 3.2 Match 50 3.3 Import 61 3.4 Legal 74 3.5 Company information 98 3.2.1 3.2.2 3.2.3 3.2.4 3.2.5 3.2.6 3.2.7 3.2.8 3.2.9 3.2.10 3.2.11 3.3.1 3.3.2 3.3.3 3.3.4 3.3.5 3.3.6 3.3.7 3.3.8 3.3.9 3.3.10 3.4.1 3.4.2 3.4.3 3.4.4 3.4.5 3.4.6 3.4.7 3.4.8 3.4.9 3.4.10 3.4.11 3.4.12 3.4.13 3.4.14 3.4.15 3.4.16 3.4.17 3.4.18 3.4.19 3.4.20 3.4.21 3.5.1 3.5.2 3.5.3 Use the Match window Match window Load a match form Report intercompany transactions Fetch data from another period Generate a match report Match report description Complete a match package Contact list Print contact list report Print a match form Short guide for importing a text file Import window Properties tab Convert tab Create a file to import Create a specification Perform import Rename specification Print import specification Delete specification Legal groups Legal window Create a legal group Delete a legal group Add a company/subsidiary Delete a company/subsidiary Past equity eliminations operationally Ownership tab Past Equity tab Excess value tab Equity tab Complete reporting Legal reconciliation From company and legal types Check reports ‘01. Balance sheet difference in local currency’ ‘02. Balance sheet difference in group currency’ ‘03. Investments in subsidiaries’ ‘04. Special Investment in subsidiaries’ ‘05a & 05b. Past Equity by Co, Change/Closing’ Miscellaneous reports Add company information Print company information Company Information tabs AARO SYSTEMS AB 50 50 51 51 52 53 54 57 57 58 60 61 62 63 64 65 65 68 72 73 73 74 74 75 77 77 79 79 79 81 86 91 92 93 93 93 93 94 95 95 96 97 98 99 99 ii AARO 11.0 USER MANUAL 3.6 Shares 103 3.7 Journals 108 4. Validations 121 4.1 Match report 121 4.2 Reconciliations 126 4.3 Process Status 130 4.4 Process Journals 137 4.4.1 4.4.2 4.4.3 Process Journals window Load journals Filter journals 3.6.1 3.6.2 3.6.3 3.6.4 3.6.5 3.6.6 3.6.7 3.6.8 3.6.9 3.7.1 3.7.2 3.7.3 3.7.4 3.7.5 3.7.6 3.7.7 3.7.8 3.7.9 3.7.10 3.7.11 3.7.12 4.1.1 4.1.2 4.1.3 4.1.4 4.2.1 4.2.2 4.2.3 4.3.1 4.3.2 4.3.3 4.3.4 4.3.5 4.3.6 4.3.7 4.3.8 4.3.9 Shares window Description of fields in the Shares window Set up an account structure for the Shares window Open the Shares window for entries Add shares System journal in owning company Opening balances in Shares Drill down report example Print the shares report Journals window Journal types and folders Load journals Create a journal Create multi-JV bookings Edit a journal Copy journal to another period Delete journal Filter journals Filter journal rows Expand button Add/remove link to document Match Report window Print a match report Report contents Report layout Reconciliations window Print a reconciliation report Settings for reconciliation reports What is a package? Process Status window Load packages Filter packages Send mail Revert Multi-complete Multi-revert Audit a package AARO SYSTEMS AB 103 103 104 106 106 106 107 107 107 108 109 110 111 113 113 114 114 114 116 117 119 121 122 122 125 126 126 128 130 131 132 132 133 133 134 135 136 138 138 139 iii AARO 11.0 USER MANUAL 5. Reports 5.1 Drill down reports 140 5.2 Comments 167 6. Excel connectivity 6.1 Using AARO with Excel 170 6.2 AARO Excel retrieve 180 5.1.1 5.1.2 5.1.3 5.1.4 5.1.5 5.1.6 5.1.7 5.1.8 5.1.9 5.1.10 5.1.11 5.1.12 5.1.13 5.1.14 5.1.15 5.1.16 5.1.17 5.1.18 5.1.19 5.1.20 5.1.21 5.1.22 5.1.23 5.1.24 5.1.25 5.1.26 5.2.1 5.2.2 6.1.1 6.1.2 6.1.3 6.1.4 6.1.5 6.2.1 6.2.2 6.2.3 6.2.4 6.2.5 6.2.6 6.2.7 6.2.8 140 Predefined reports Drill down by Expand by Edit a report Create a report Save a report Save report with new name Save periods as relative Delete a report Rename a sheet Delete report sheets Top-N functionality Calculated items Calculated periods Calculated currency translation Transpose rows and columns Delete or hide columns and rows Change report settings Change cell format Display statistics Sort column in a report Copy report data Excel Connectivity Live copy to Excel Add comments to report Print report Comments window Print comments 140 142 144 144 147 149 151 151 153 153 153 154 156 157 158 159 159 160 160 161 162 162 163 163 164 165 167 167 Installing a digital certificate for AARO/Excel Excel macro security settings Open the AARO Excel Add-In Log on Log off ABS Selecting Excel retrieve formulas Entering formulas directly Formula results Cell references and direct data entry in Excel Formats for Excel functions Description of Excel retrieve functions ABSGetAccountText AARO SYSTEMS AB 170 170 175 177 179 179 180 180 181 181 182 182 183 183 iv AARO 11.0 USER MANUAL 6.2.9 6.2.10 6.2.11 6.2.12 6.2.13 6.2.14 6.2.15 6.2.16 6.2.17 6.2.18 6.2.19 6.2.20 6.2.21 ABSGetCompanyRate ABSGetMinorities ABSGetName ABSGetRate ABSRetrieveLegal ABSRetrieveOper ABSRetrieveOperFlex ABSRetrieveTextAmount ABSRetrieveTextString ABSRetrLegalAssoci Retrieve information from AARO to Excel Validation Further Excel functions 6.3 AARO Excel send 197 6.4 Excel drill down reports 218 6.3.1 6.3.2 6.3.3 6.3.4 6.3.5 6.3.6 6.3.7 6.3.8 6.3.9 6.3.10 6.3.11 6.3.12 6.3.13 6.3.14 6.3.15 6.3.16 6.3.17 6.3.18 6.3.19 6.3.20 6.3.21 6.3.22 6.3.23 6.3.24 6.4.1 6.4.2 6.4.3 6.4.4 6.4.5 6.4.6 6.4.7 6.4.8 6.4.9 6.4.10 6.4.11 ABS Excel send - menu commands Entering formulas directly Formula results Cell references and direct data entry in Excel Description of Excel send functions AAROCreateNewJV Create a journal from Excel Viewing data from AAROCreateNewJV in AARO AAROSendText Viewing data from AAROSendText in AARO ABSSendMatch Viewing data from ABSSendMatch in AARO ABSSendOper Viewing data from ABSSendOper in AARO ABSSendOperFlex Viewing data from ABSSendOperFlex in AARO ABSSendOS Viewing data from ABSSendOS in AARO ABSSendOSFlex Viewing data from ABSSendOSFlex in AARO Send information from Excel to AARO Validation Further Excel functions Accessing Excel drill down reports ‘Live Copy to Excel’ from the AARO application Create a report by logging into AARO from Excel Criteria for a drill down report Predefined drill down reports Right mouse button functions Drill down options Run a drill down report in Excel Edit a drill down report in Excel Excel drill down report settings Shadow sheet AARO SYSTEMS AB 183 184 184 185 185 187 189 191 192 192 193 195 196 197 197 199 199 200 201 201 202 203 204 205 205 207 207 209 209 210 211 213 213 214 215 216 217 218 218 219 221 226 228 229 230 230 231 232 v AARO 11.0 USER MANUAL 6.4.12 Delete a drill down report from Excel 6.4.13 Run all reports in a workbook 6.4.14 Further Excel functions 233 233 234 6.5 Excel input forms 235 6.6 Additional AARO Excel options 245 7. Utilities 7.1 Consolidation 248 7.2 7.3 Freeze consolidations Integrator configuration 255 256 7.4 View Tables 271 7.5 Edit Periods 273 6.5.1 6.5.2 6.5.3 6.5.4 6.5.5 6.5.6 6.5.7 6.5.8 6.5.9 6.5.10 6.5.11 6.5.12 6.5.13 6.5.14 6.5.15 6.5.16 6.6.1 6.6.2 6.6.3 6.6.4 7.1.1 7.1.2 7.1.3 7.1.4 7.1.5 7.1.6 7.3.1 7.3.2 7.3.3 7.3.4 7.3.5 7.4.1 7.4.2 7.4.3 7.5.1 7.5.2 7.5.3 Limitations of Excel input forms Menu command steps Open an AARO input form in Excel Export data to AARO Menu items in Excel for AARO input forms Load an input form into Excel Edit an input form Excel input form settings Protection options Selectable cells Look and feel Other options: auto-fit columns Colour palette Visual refresh Reconcile Save an input form in AARO Order consolidation Paste background data Paste period setup AARO Excel settings 235 235 236 238 240 240 240 241 242 242 243 243 243 243 243 244 245 245 246 247 248 Consolidation types Order a consolidation Order the Sum Consolidation Sort and filter the consolidation queue Delete a consolidation from the queue Consolidation report Data sources Import Specification Importing data Importing data using forms directly Import using the consolidator order form Currency rates Companies Dimensions 249 249 252 252 253 253 256 263 265 265 267 271 271 272 Toolbar buttons Properties tab Open tab 274 275 279 AARO SYSTEMS AB vi AARO 11.0 USER MANUAL 7.5.4 7.5.5 7.5.6 7.5.7 7.5.8 7.5.9 7.5.10 7.5.11 7.5.12 7.5.13 7.5.14 7.5.15 7.5.16 Active tab Rates tab Complete tab Validation tab Open for Revert tab Packages tab Organisation tab Publish tab Create a new period Copy an existing period Multi open/close Set current period Print/Print Preview active tab 7.6 Period Setup 293 7.7 Edit Accounts 300 7.8 Edit Dimensions 319 7.9 Edit Input 342 7.10 Edit Report Layouts 367 7.11 Edit Drilldown Folders 372 7.6.1 7.6.2 7.6.3 7.6.4 7.6.5 7.6.6 7.6.7 7.7.1 7.7.2 7.7.3 7.7.4 7.7.5 7.7.6 7.7.7 7.7.8 7.7.9 7.8.1 7.8.2 7.8.3 7.8.4 7.9.1 7.9.2 7.9.3 7.9.4 7.9.5 7.9.6 7.10.1 7.10.2 7.10.3 7.10.4 General description Open tab Active tab Package tab Open for Revert tab Complete tab Run templates 281 281 282 282 284 284 284 285 289 290 291 292 292 293 293 297 297 298 298 299 Properties tab Account types Radio buttons for Normal and Basic accounts Help tab Create an account Remove an account Filter accounts Account report Sum diagram Company Dimension Group Currency 300 302 306 313 314 314 314 315 316 319 322 335 341 Forms Packages Recon Match rules Match bins Org_Conditions 342 358 362 363 364 365 Create a report layout Edit a report layout Rename a report layout Delete a report layout 7.11.1 Manage drill down folders AARO SYSTEMS AB 367 369 370 371 372 vii AARO 11.0 USER MANUAL 7.11.2 7.11.3 7.11.4 7.11.5 7.11.6 Create a drill down folder Add reports to a folder Delete a drill down folder or report Rename a drill down folder Set up user responsibilities 7.12 Edit Drilldown Container 378 7.13 Organize Parameter Folders 380 7.14 User Administration 385 7.15 Application Management 405 7.16 Edit Currency translations 419 7.17 Database Monitor 430 7.18 Edit Eliminations 432 7.19 Edit Settings 436 7.12.1 Manage a drill down container 7.13.1 7.13.2 7.13.3 7.13.4 Manage Manage Manage Manage Period folders Input Period folders Dimension folders Account folders 7.14.1 User information and database rights 7.14.2 User information tab 7.14.3 Database rights tab 7.14.4 Add a user 7.14.5 Delete user 7.14.6 Prepare a user 7.14.7 Remove a prepared user 7.14.8 Edit a user 7.14.9 Regenerate users 7.14.10 Reports 7.14.11 Show Log 7.14.12 Setup password rules 7.15.1 File management 7.15.2 Page header and other 7.15.3 Responsibilities 7.15.4 Relative period 7.15.5 Consolidation 7.15.6 Accounting type 7.15.7 Currency Translation 7.15.8 Proforma type 7.15.9 Validations 7.15.10 Menu Management 7.16.1 General description 7.16.2 Create a currency translation 7.16.3 Create calculations 7.17.1 Use the database monitor 7.18.1 7.18.2 7.18.3 7.18.4 7.18.5 Add/edit/delete an elimination rule Elimination information Dimension Restrictions Eliminations AARO SYSTEMS AB 372 374 375 376 376 378 380 381 382 383 385 386 391 396 398 398 399 399 399 400 403 403 405 407 408 410 411 412 413 414 414 417 419 420 421 430 432 433 434 434 434 viii AARO 11.0 USER MANUAL 8. Additional menu items 8.1 8.2 8.3 8.4 8.5 Start AARO menu Page header Reload Lists About Window menu AARO SYSTEMS AB 440 440 441 442 443 444 ix AARO 11.0 USER MANUAL General. AARO system overview 1. General In this chapter you will be presented with general system information, an overview of the system landscape and features which are accessible using web access. 1.1 AARO system overview The following chapter presents an introduction to the system, defines the central concepts to AARO, and provides an overview of the AARO system as a whole. It first presents a map of the functionality in AARO followed by an overview of the technical system components – the system architecture – and finally lists the basic entities that are used throughout the AARO system. 1.1.1 System map The following map displays the AARO system as a whole – the data stored in the system, the consolidator process at its heart, and the output reports. Please note that a few reports (Recon and Match) present input data directly, without any need to consolidate first. However, most reports present consolidated data, and thus require the consolidator process to have been run before figures will become available. AARO SYSTEMS AB 10 AARO 11.0 USER MANUAL General. AARO system overview INPUT DATA BACKGROUND DATA (STEERING INFO) Input Data (Company reporting) JV bookings (Group Adjustments) CONSOLIDATED DATA Currency rates, Account definitions, Group structure, Dimension structure, elimination rules Allocation rules Consolidated data System JVs Legal Recon report Consolidator Match report All Other Reports (Drilldown, Excel, Web) Input Comments DD Comments Figure 1.1—1 System Map 1.1.2 Architecture/technical components Technically, the system consists of the following components: Component Description Database Stores all data. Application Contains business logic and upholds security. AARO SYSTEMS AB 11 AARO 11.0 USER MANUAL General. AARO system overview Component Description Server 1.1.3 Client applications Stores all applications visible to users. Consolidator Performs complicated calculations. RegenServer Regenerates users. LogServer Logs activities. Optional. Basic entities The following basic entities are to be found in the AARO system. 1.1.3.1 Fixed entities Fixed entities – present in every AARO installation: Period The fundamental time entity. Common uses include budget, forecast and actual periods, for months (accumulated year-to-date, isolated, rolling 12 months etc.), weeks, quarters etc. There is no restriction in the system as to how periods can be used; every installation of AARO can create its own nomenclature, e.g. 0806A for June 2008 Actual, 0806B for June 2008 Budget, 0806AM for June 2008 Actual (Isolated Month) etc. A period is simply a way to collect all data for a fixed period in time into a set of its own. This set may (but there is no obligation) be related to other sets in various ways. Company The fundamental reporting entity. Almost all input data is reported per company. Legal Group A group of companies with an ownership structure. Any number of groups can be defined in AARO, and subsequently consolidated. Account Fundamental reporting and calculation entity. Every input figure is reported in relation to an account e.g. Net Sales, Cost of Sales. Also every figure calculated by the system belongs to an account, e.g. Gross Profit, Minority Interest. There are several types of accounts in AARO: Normal input accounts, summation accounts, ratios, average calculations, DSO calculations etc. AcctType Accounting type is an entity that can, optionally, be used to tag input figures with. Data for a period can then be presented in two or more accounting types, e.g. IFRS and USGAAP, with different figures AARO SYSTEMS AB 12 AARO 11.0 USER MANUAL General. AARO system overview presented for different accounting types. 1.1.3.2 Customisable entities Customisable entities – can differ between AARO installations: Dimensions Optional entities, e.g. Business Unit, Product, Market, Customer. These dimensions can be used in data reporting as well as output reports. Dimensions can be defined to sum up other dimensions, e.g. the Product dimension can sum up the Business Unit dimension, which in turn can sum up the Business Area dimension. In this way, a dimension hierarchy is created. Each value in the sub dimension must belong to exactly one value in the dimension above, e.g. a certain product must belong to exactly one business unit. The number of dimensions available is limited by the AARO license. Groups Optional entities for summing. Groups can be used in output reports only. Groups always add together dimensions or other groups, e.g. there can be a group “Region” that sums up the Market dimension, or a group “Product Group” that sums up the Product dimension. Furthermore there may also be a group “Product Family” that sums up the “Product Group” group. Groups are organized in a similar way to dimensions. The difference is that with groups, the same dimension value can sum up several different group values above, e.g. a product can belong to many product groups, or a market can belong to many Regions (e.g. the market SCOTLAND may belong to all of the regions UK, WESTERN EUROPE, EUROPE and EMEA). There is – in practice - no limit to the number of groups that can be created, although certain modules in the system have a maximum limit of 30. AARO SYSTEMS AB 13 AARO 11.0 USER MANUAL General. Validation 1.2 Validation Validation, in AARO, is the concept of making sure that only valid input data is stored in the database. Invalid input data, such as reporting on unknown product codes or unknown country codes (occasionally a result of misspellings), no longer used customer codes, no longer existent business areas (e.g. following a reorganization), or product codes not valid in combination with a particular reporting company, should be removed. There is no single menu item or screen named “validation”. This term is rather a concept that is dealt with in many parts of the system and governed by several different settings. This chapter will describe the validation concept. Some validation rules are fixed (built-in), while others are customisable by the system administrator. 1.2.1 Technical overview It is helpful to understand the difference between the ultimate validation performed by the application server – the “gatekeeper” – and additional, local pre-validations. 1.2.2 Central gatekeeper The AARO Application Server – the middle tier between client applications and the AARO database – is the ultimate gatekeeper that validates all input data. No invalid data can pass the application server. Regardless of the input tool used – be it one of the Input screens in the AARO application, an import/integration tool, Excel send formulas or input forms, or some third-party tool - the input data is always sent through the AARO Application Server and validated there. There is no other way that data may enter the AARO database. The AARO Application Server will always validate all input data and stop any invalid data. Therefore, there is a certainty that no invalid data ever gets stored in the AARO database. 1.2.3 Local pre-validation In addition to the ultimate validation (always performed by the application server) input screens in various client applications may have their own, additional, local pre-validation. For example, the Input screen in the AARO application does certain pre-validation of data before it even tries to send the data to the application server. In addition to this some screens have lookup lists that help the user choose valid values. Examples of this are the “Add Column” and “Insert Row” dialog windows in the Input and Match screens of the AARO application, and in Excel input forms. Those dialogs show lists of values to choose from, typically precisely the valid values for that situation (i.e. for that period, company, user etc.) This is – however - only a local pre-validation – which may be helpful, but a double check is always performed by the final gatekeeper: the AARO Application Server. If, for example, the system administrator changes the AARO SYSTEMS AB 14 AARO 11.0 USER MANUAL General. Validation validation rules at exactly the same time as a user is entering figures in the Input screen, a value presented by the “Add Column” dialog as valid one minute ago may be invalid at the time of the user pressing the Save button. The invalid value will subsequently be caught by the AARO Application Server resulting in the data not to be saved, and a validation error message will be returned and displayed to the user. 1.2.4 Fixed/built-in validation A certain number of validation rules are fixed (built-in), while others are customisable by the system administrator. The validation rules built into the system, and thus fixed, are the following: Period known Company known and valid in the period. The company must exist in the period’s organisation with a reporting currency specified. Account reportable. Accounts are reportable only if they are of type Normal and included on an input form that is activated for the period in question. Additionally, summary accounts are reportable in case none of the summary account’s terms is reportable for the period in question. Form/company open, and not completed. As long as the account is reportable for at least one open form, it will pass the validation check. On the other hand, as soon as the account is included in at least one completed form, it will fail the validation check. The exception to this rule is if the account is reported specifically from a non-completed form in the Input screen in the AARO application, it will then pass the validation. Sufficient detail level. The reporting must specify values for all dimensions that are required according to the form that the account is reported through for the period in question. This may vary between periods as various forms may be activated in different periods. Dimension values known Validation errors stemming from these fixed/built-in validation rules are seldom seen when working in the AARO application since the AARO application helps the user choose only valid values. The fixed/built-in validation rules are more interesting when reporting data from Excel (or importing data using an import tool) where misspellings and other errors are more likely to occur. AARO SYSTEMS AB 15 AARO 11.0 USER MANUAL General. Validation Figure 1.2—1 Validation errors from an Excel send attempt 1.2.5 Customisable validation There are two kinds of customisable validation, that is, validation rules that can be turned on/off and fine-tuned by the system administrator: Dimension, company/dimension and form/dimension validation. Valid dimension values can be listed for individual periods or for individual companies or individual input forms. These validation methods are further detailed in the section Application Management/Validation. Conditions: Conditions can be created and connected to individual accounts. A condition enables or disables the use of the account regarding certain dimension values or combinations. Conditions are further detailed in the section Edit Input/Org_Conditions. AARO SYSTEMS AB 16 AARO 11.0 USER MANUAL AARO start page. General description 2. AARO start page This chapter describes the start page that appears when starting the AARO application. 2.1 General description The AARO start page contains all the menus in the system as well as the features Calendar, Documents and News. Use the Calendar for highlighting important reporting deadlines and inserting links to the relevant reporting packages in the system. Store reporting instructions in the Document folders accessible for users and display important organizational news in the News window. Figure 2.1—1 AARO start page AARO SYSTEMS AB 17 AARO 11.0 USER MANUAL AARO start page. Calendar 2.2 Calendar 2.2.1 General description The calendar can be used to highlight important deadlines/events and link deadlines to relevant reporting packages in the system. 2.2.2 Calendar view The Date field is used to select the date for the calendar. Pressing the dropdown list reveals a normal day and month control display. The default is today’s date but can be changed. Figure 2.2—1 The Date field. The calendar shows ten weeks in total, starting from the week containing today’s date or the selected date. AARO SYSTEMS AB 18 AARO 11.0 USER MANUAL AARO start page. Calendar Figure 2.2—2 Calendar on the AARO start page 2.2.3 Enter events in the calendar Three types of events can be entered in the calendar. The first is normal text whereas the other two are MATCH and INPUT events respectively. 1. Right-click the day of choice and select option Edit to enter an event. Figure 2.2—3 Adding an event to the calendar The Manage events window appears. 2. Press the +/- to enter/delete an event. AARO SYSTEMS AB 19 AARO 11.0 USER MANUAL AARO start page. Calendar Figure 2.2—4 Creating an event 3. Select the event Action as described in the following sections. 2.2.3.1 Enter a text event 1. Select the Action ‘Text’. Figure 2.2—5 Text event 2. Press OK to display the text in the calendar. AARO SYSTEMS AB 20 AARO 11.0 USER MANUAL AARO start page. Calendar Figure 2.2—6 Text event in the calendar 2.2.3.2 Enter a MATCH event 1. Select Action ‘MATCH’, period and reporting package. Figure 2.2—7 MATCH event 2. Press OK to display the text and link in the Calendar. AARO SYSTEMS AB 21 AARO 11.0 USER MANUAL AARO start page. Calendar Figure 2.2—8 MATCH event in the calendar 3. Press the event link to open the selected period and reporting package in Data Entry/Match. Figure 2.2—9 MATCH window with the selected period and reporting package 2.2.3.3 Enter INPUT events 1. Select Action ‘INPUT’, period and reporting package. AARO SYSTEMS AB 22 AARO 11.0 USER MANUAL AARO start page. Calendar Figure 2.2—10 INPUT event 2. Press OK to display the text and link in the calendar. Figure 2.2—11 INPUT event (link) in Calendar 3. Press the event link to open the selected period and reporting package in Data Entry/Input. AARO SYSTEMS AB 23 AARO 11.0 USER MANUAL AARO start page. Calendar Figure 2.2—12 INPUT window with the selected period and reporting package AARO SYSTEMS AB 24 AARO 11.0 USER MANUAL AARO start page. Documents 2.3 Documents 2.3.1 General description The Documents can be used for storing reporting instructions and other documents that should be accessible to the organization. There are two folders set up in the Documents section: Legal documents and Document explorer. In the Legal documents folder, a sub folder can be set up for optional companies in the organization. The user rights will determine the extent to which the user has access to the company folders. All company folders will contain the same set of sub folders which are set up by the administrator in the menu Utilities/Edit Legal Document Hierarchy. The Legal Documents folder can also be viewed from the menu Data Entry/Legal. In the Document explorer folder, two different kinds of folders can be set up: dimension folders and normal folders. User rights determine which users are entitled to view the content of a dimension folder. The administrator will determine which users are not eligible to view a certain document in a normal folder. The user rights settings are made in the menu Utilities/Edit Document Explorer Rights. 2.3.2 Documents view Figure 2.3—1 The Documents area. Expand by pressing the +sign AARO SYSTEMS AB 25 AARO 11.0 USER MANUAL AARO start page. Documents 2.3.3 Manage the Legal documents folder 2.3.3.1 Add a company folder 1. Add a company folder by right-clicking the Legal documents folder. Figure 2.3—2 Add a company folder 2. Select company in the list and press OK. Figure 2.3—3 Select company in the list. 3. The company folder, with sub folders, has now been added. AARO SYSTEMS AB 26 AARO 11.0 USER MANUAL AARO start page. Documents Figure 2.3—4 The company folder, with sub folders, has now been added. 2.3.3.2 Delete a company folder Delete a folder by first deleting all documents in the folder. Then right-click the documents area, press Reload documents. 2.3.3.3 Add a document 1. Add a document to a company folder by right-clicking the folder and pressing Add document (this can be done on the start page as well as in the menu Data Entry/Legal). Figure 2.3—5 Add a document to the company sub folder. 2. Browse for the document and press OK. AARO SYSTEMS AB 27 AARO 11.0 USER MANUAL AARO start page. Documents Figure 2.3—6 Browse for the document and press OK. 3. The document is added in the folder. Figure 2.3—7 The document is added in the folder. 2.3.3.4 Delete a document To delete a document do the following: 1. Go to the menu Data Entry/Legal. 2. Select the company and right-click the document in the Documents area. 3. Press Delete document. AARO SYSTEMS AB 28 AARO 11.0 USER MANUAL AARO start page. Documents Figure 2.3—8 Deleting a document 2.3.3.5 Access to legal documents Access to legal documents is determined by the settings applied in User Administration. For more information, please see 7.14 User Administration. 2.3.4 Manage the Document explorer folder Folders are managed by right-clicking the Document explorer folder (or sub folders). Select from the following options: Figure 2.3—9 Managing the Docuement explorer folder 2.3.4.1 Add/delete a document To add/delete a document in a folder, right-click the folder and select Add document/Delete document. This functionality is restricted to normal users most commonly. 2.3.4.2 Add/delete a folder To add/delete a sub folder to a normal folder, right-click a folder and select Add folder/Delete folder. AARO SYSTEMS AB 29 AARO 11.0 USER MANUAL AARO start page. Documents 2.3.4.3 Add a dimension folder Dimension folders are accessible only for those who have user rights for that particular dimension. A dimension can be period, company or dimensions (levels). Figure 2.3—10 Adding a dimension folder 2.3.4.4 Allow users to create documents Ticking this option will make it possible for users to create documents in a selected folder. 2.3.4.5 Always show this item All users can view the folder if this option is ticked, Should this option not be ticked, it will deny users access to the folder. The settings, per user, are made in the menu Utilities/Edit Document Explorer Rights. 2.3.4.6 User rights for documents Access to documents in the Document explorer area is determined by settings applied in User Administration. For more information, please see 7.14 User Administration. AARO SYSTEMS AB 30 AARO 11.0 USER MANUAL AARO start page. News 2.4 News 2.4.1 General description The News area can be used for displaying e.g. organizational news to the reporting entities. 2.4.2 News view Figure 2.4—1 The News view on the AARO start page. 2.4.3 Enter news text 1. Right-click the News area and press Edit News. Figure 2.4—2 Adding news. 2. Enter text in the text area (press Add if text already exists) and then press OK. AARO SYSTEMS AB 31 AARO 11.0 USER MANUAL AARO start page. News Figure 2.4—3 Edit News window 3. Text has been added in the News view. See below. Figure 2.4—4 Added news AARO SYSTEMS AB 32 AARO 11.0 USER MANUAL Data Entry. Input 3. Data Entry This chapter describes how to work with the Data Entry menu items. 3.1 Input The Input window is used for manual entry of data as well as for importing data from an external source (not described here). Information is reported in different packages, for example yearly, quarterly and monthly. Each of these packages contains the applicable forms such as balance sheet, income statement and possibly additional detail specification forms. Figures are entered in cells. White cells are accessible for editing and blue cells are disabled. It is possible to navigate between cells using the [Tab] key, the arrow buttons or the mouse pointer. The menu command for the Input window in AARO is Data Entry/Input. 3.1.1 Use the Input window The Input window is used to enter and reconcile financial information for a period. The Input window is used as follows: 1. Load an input form for the period and company. 2. Input the financial data in the form or fetch from another period. 3. Add comments if required. 4. Extract the reconciliation report to see if the entered data satisfies the reconciliation rules. 5. When all data is entered for the period, complete the period. AARO SYSTEMS AB 33 AARO 11.0 USER MANUAL Data Entry. Input 3.1.2 Input window Figure 3.1-1 Input window At the top of the workspace, the reporting period and company are selected from the drop down lists and the comparison period if required. The tree structure in the left pane displays the forms combined into packages that the user is allowed to report on for a specific period. Forms in the package are displayed by double-clicking the package or clicking the + sign. The columns in the workspace reflect the reporting level defined for the current form. A form reported on company level has only one entering column and a total column, while a form reported on a dimension may consist of several entering columns depending on how many items the dimension contains. The system administrator defines packages, forms and periods, in accordance with the group’s demand for information flow. 3.1.3 Same account on several forms An account can be included in more than one form. In this case, the form actually used for reporting the account depends on forms activated by the system administrator for the period in question. If several forms containing the same account are activated in the same period, the account is reportable only on the most detailed one, i.e. on the form that is reported on the most detailed level. An example: The account Net Sales may be included on a main Income Statement form, which would be on the company+product level. It can also be included on a Sales specification form which would be on the company+product+customer level. If, as in this case, both forms are activated, the Net Sales account becomes reportable only on the Sales specification form, AARO SYSTEMS AB 34 AARO 11.0 USER MANUAL Data Entry. Input as this is the more detailed one of the two. The other form(s), containing the same account, will show the account’s value summed up from the more detailed form, but will not allow editing/reporting of this value. Figure 3.1—2 Income statement Figure 3.1—3 Sales specification 3.1.4 Short guide to the financial reporting process The following sections describe in details main steps of the financial reporting process in AARO. 3.1.5 Load an input form To load an input form for reporting, follow these steps: 1. Select Data Entry/Input in the main menu. 2. Select a reporting period and company in the drop-down lists Period and Company. Figure 3.1-4 Period and company selection fields 3. To filter periods and companies available for selection, click the filter icon . AARO SYSTEMS AB 35 AARO 11.0 USER MANUAL Data Entry. Input 4. Expand an input package in the tree by clicking the + sign or doubleclicking the package. Select an input form in the package and click Load. Alternatively, the form name can be double-clicked. The form is loaded in the work area. White cells are enabled for editing. If the form is closed for reporting in the period, the following notification is shown on the top panel: Figure 3.1-5 Closed form notification 5. To load the form on the sub dimension level (i.e. business unit or customer), expand the form in the tree, select the sub dimension value and click Load. Figure 3.1-6 Income Statement form loaded for business unit CLOTHES 6. Select a comparison period in the Compare with field if you want to compare the input data with an earlier period. Reload the form. The total figure from the comparison period will subsequently be shown in a yellowish, read-only column beside the total column. AARO SYSTEMS AB 36 AARO 11.0 USER MANUAL Data Entry. Input Figure 3.1-7 Comparing input data for two periods This functionality is available for forms of type Input only. 3.1.6 Filter OS form It is possible to filter an OS form by column values. Follow these steps: 1. Right-click a cell in a column used to filter the form and select Filter. Figure 3.1-8 Filter an OS form by product code 2. Enter the value in the Filter by column on value dialog and click OK. Value 'B' will match all values starting with 'B', i.e. 'BATH', 'BIKES', 'BREAD'. Only rows satisfying the entered value will now be visible. 3. Reload the form to see all rows. 3.1.7 Report financial information Operational input forms are often reported on sub dimensions, such as per market, customer, product, business unit, division etc. The detail level is set up by a system administrator for each form. Input forms for the Legal functionality AARO SYSTEMS AB 37 AARO 11.0 USER MANUAL Data Entry. Input are reported on the company total level and therefore no sub dimensions are needed. To enter financial information into a form, follow these steps: 1. Load the form for period and company. 2. If sub dimensions are used in the form, do one of the following: Input forms For forms of type Input, click the Add Column and select a sub dimension from the drop-down list in the dialog window. Click OK, and a column will be added to the input form. Figure 3.1-9 Adding a column to an input form OS and Text forms For OS and text forms, click Insert Row button and a new row will be added to the form. Figure 3.1-10 New row added to the Sales specification form 3. Enter the information in the cells. White cells are open for editing. In OS forms it is possible to select a value by right-clicking the cell and selecting Lookup value. Red cells indicate that the value is mandatory. AARO SYSTEMS AB 38 AARO 11.0 USER MANUAL Data Entry. Input Figure 3.1-11 Looking up for a cell value in the OS form The total sum is displayed in the Total column or row. 4. Click the Save button when finished. 5. If a period folder was selected in the Period field and consolidation is activated when an input form is saved, then the "Select Periods to consolidate" window appears. Select the periods to be consolidated and click OK. The selected periods will be sent for consolidation. Figure 3.1-12 Selecting periods to consolidate 3.1.8 Fetch data from another period Using the Fetch button, it is possible to easy retrieve information and data from another period so that it can be transferred into the period you are working in. AARO SYSTEMS AB 39 AARO 11.0 USER MANUAL Data Entry. Input Figure 3.1-13 Fetch There are two fetch alternatives to choose from: bringing back only the headings from another period or retrieving both headings and figures. Follow the instructions below: 1. Load a form for a period and company. 2. Click the Fetch button to retrieve information from another period. The Fetch Period dialog appears. Figure 3.1-14 Fetching a form from another period 3. Select the source period. 4. Check Fetch Data With Figures if both grid headings and figures are to be retrieved. Leaving the check box unchecked will merely bring back grid headings. AARO SYSTEMS AB 40 AARO 11.0 USER MANUAL Data Entry. Input 5. In the Fetch to section, select whether the current form only or all forms will be retrieved. 6. Click OK. 7. Click Save. 3.1.9 Input comments It is possible to comment input reporting. The comment may be mandatory given certain rules maintained by the administrator, e.g. notable deviation from another period such as budget, previous year or otherwise remarkable figures. Red cells indicate that the values need to be commented. The cell-colouring is only updated when the form is loaded; it is thus good practice to save figures and reload the form to see mandatory comments. A comment can be added to a cell if the following conditions are met: Cell contains data. Comparison with another period is not performed. Comments are not disabled for the form (In Utilities/Edit Input, the Comments Disabled check box is unchecked). To add comments to a cell, follow these steps: 1. Double-click a cell or right-click and select Add/Edit Comment. Figure 3.1-15 Adding a comment to the input form The Comment Form dialog is displayed where the comment rule can be seen. AARO SYSTEMS AB 41 AARO 11.0 USER MANUAL Data Entry. Input Figure 3.1-16 Entering comments 2. Enter relevant text, 3. To add a file or external document to the comment, right-click the External document or Attached file link. Follow the prompts to add an external document or attach a file. Figure 3.1-17 Adding a file to the comment 4. To fetch a comment from another period, click Fetch. In the Fetch Comment for Period dialog, select a source period and fetch options and click OK. AARO SYSTEMS AB 42 AARO 11.0 USER MANUAL Data Entry. Input Figure 3.1-18 Fetching comment from another period 5. Press Save, and close the Comment Form window. The text and attachments will now be stored in the input form. A paperclip icon appears in a cell with an added comment. Once the mandatory comment has been saved the red cell becomes green. Figure 3.1-19 Comment added to a cell 3.1.10 Input comments in drill down reports To view input comments in drill down reports, follow these steps: 1. A comment in a drill down report can be displayed by clicking Show comments from the Settings button. AARO SYSTEMS AB 43 AARO 11.0 USER MANUAL Data Entry. Input Figure 3.1-20 Activating comments in drill down reports 2. A comment for a certain input cell can be opened by double-clicking the cell. 3. In the print preview mode, any comments are indicated by a footnote and placed at the end of the report. For more information, see 5.1.25 Add comments to report. 3.1.11 Reconcile reports from Input, or Reconciliation? Note: reconciliation reports are available from two different menu items: Input and Reconciliations. This is because some companies choose to have restricted user roles, so that some users who extract reconciliation reports may not have access to input data. 3.1.12 Reconciliation report from Input A reconciliation report displays the reconciled data entered for a period in the Input window. Only one period is displayed at a time and if all financial data is entered correctly, the reconciliation report will be empty. To view the reconciliation report, follow the instructions below: 1. Load a form for a period and company. 2. Click Reports and select Reconcile to display the Reconciliation dialog window. 3. Make necessary settings and select rules for the report. AARO SYSTEMS AB 44 AARO 11.0 USER MANUAL Data Entry. Input Figure 3.1-21 Reconciliation report settings from Input The Rules area lists the reconciliation rules set up by the administrator. Individual recon rules can be selected. Following options are available: All – select all rules. For complete – select rules valid for the package selected in the Package field and related extra-package set up for period complete in Utilities/Edit Periods/Complete tab. Intra-package – show only rules that are valid for the package selected in the Package field. Selecting no rules has the same effect as selecting all rules. The Settings area allows to filter data included into the report, such as Normal journals only. The Period must be selected. Enter the requested amount in the Limit field if only differences above a certain amount should be displayed. The administrator may attach default limits to recon rules. By choosing Override all individual rule limits a personal choice of limit is selected and the administrator’s default choices will be disregarded. Note: the limit can be used with the counter code only, not the counter value. 4. Click OK to order the report. AARO SYSTEMS AB 45 AARO 11.0 USER MANUAL Data Entry. Input Figure 3.1-22 Reconciliation report example For more information on the reconciliation report, see 4.2 Reconciliations. 3.1.13 Report period as completed When the reporting for the period is done, the package of forms for the period should be reported as completed, or achieved, by pressing the Complete button. This closes the package for further reporting. The system administrator will then be able to check out which companies have reported the period as completed in Validations/Process Status. Follow the instructions below: 1. Load a form from a package to be completed. 2. Click the Complete button to report the package as completed. An automatic reconciliation check is performed. The package of forms cannot be reported as completed as long as there are differences left between the reconciliation accounts in the reported financial information. An information window is displayed if reconciliation errors still exist. The errors must be corrected before the period can be reported as completed. Figure 3.1-23 Notification about reconciliation errors when completing a package 3. In case of reconciliation error, correct the errors, save, and click the Complete button again. If no difference is found, the period and package are reported as completed for the company in question. A confirmation note, which says Period complete, is displayed in the list at the bottom of the window. Figure 3.1-24 Period completed confirmation AARO SYSTEMS AB 46 AARO 11.0 USER MANUAL Data Entry. Input 3.1.14 Print an input form There are two alternatives to print input forms by sending them to a printer or saving in a file (in the .xls, .rtf, or .txt format): Print current form To print the currently loaded form: 1. Click the Print button. 2. Select Preview to open the form in the PDF format, select Printer to send the form to the printer, or select File to save the form in a file. Print several forms from the package To print all or several forms from the package: 1. Right-click the package and select Print Forms. Figure 3.1-25 Print package forms 2. Select all or several forms to be printed and click OK. Figure 3.1-26 Select forms to print 3.1.15 Print Contact List report To view and print company contact information entered in Utilities/Edit Dimensions/Company details follow these steps. AARO SYSTEMS AB 47 AARO 11.0 USER MANUAL Data Entry. Input 1. Click the Reports button and select Contact List. Figure 3.1-27 Running Contact List report 2. Select companies and company information to include into the report. Figure 3.1-28 Selecting company contact information 3. Click OK. AARO SYSTEMS AB 48 AARO 11.0 USER MANUAL Data Entry. Input The report appears in the Preview mode or the file save dialog appears depending on the Print option selected. Figure 3.1-29 Contact List report for company ARLANDA AARO SYSTEMS AB 49 AARO 11.0 USER MANUAL Data Entry. Match 3.2 Match Intercompany transactions are reported and reconciled in the Match window. The transactions can either be reported at overall company level or at a defined sub dimension level. Intercompany transactions can be reported in both local currency and transaction currency (Loc & TransAmount) or in local currency (Loc) only. The detail level and currencies available depend on how the form is set up by the system administrator. The result of the reconciliation between intercompany transactions is displayed in a match report. The report can be extracted for all match rules or for a single rule, either on total company level or on a more detailed sub dimension level. The menu command for the Match window is Data Entry/Match. 3.2.1 Use the Match window The Match window is used as follows: 1. Load a match form for the reporting period and company. 2. Input the intercompany data in the forms. 3. Extract the match report. 4. When all data is entered for the period and company, complete the package. 3.2.2 Match window Figure 3.2-1 Match window The Match window consists of two panes. The left-hand pane contains a tree structure displaying the companies for financial data reporting; the right-hand pane consists of a working space for data entry or adjustments. AARO SYSTEMS AB 50 AARO 11.0 USER MANUAL Data Entry. Match The complete name of the reporting company, period and currency, are displayed in the information field in the top right-hand corner of the workspace. Valid forms in the package are displayed as tabs at the bottom of the workspace. The counter companies for which information has been entered can be visible in the tree by expanding the company name by clicking the plus sign or doubleclicking the name. In the form, counter companies and sub dimension details are displayed as rows. A user with restrictions on specific dimensions can see records applying to their own dimensions and all associated counter dimensions; they can only report on valid dimensions according to their user role. 3.2.3 Load a match form To load a match form for reporting, follow these steps: 1. Select Data Entry/Match in the main menu. 2. Select a reporting period and match package in the drop-down lists Period and Package. Also Dimension/Group and Company group can be selected to filter companies visible in the tree. Figure 3.2-2 Match form parameter selection 3. Select a reporting company in the tree and a tab with form required. 4. To load an entry created for one counter company, expand the company name in the tree and click the counter company name. Figure 3.2-3 Match form loaded for one counter company 3.2.4 Report intercompany transactions To enter intercompany transactions, follow these steps: 1. Load a match form for period and company. 2. Click Insert Row and select a counter company and Bin values in the drop-down lists. Click OK. AARO SYSTEMS AB 51 AARO 11.0 USER MANUAL Data Entry. Match Figure 3.2-4 Adding a row to a match form 3. Enter values and click the Save button. For more information on fetching data from another period, see 3.2.4 Report intercompany transactions. 3.2.5 Fetch data from another period It is possible to retrieve information from another period. There are two alternatives to choose from: bringing back just the grid headings from another period or retrieving both grid headings and figures. Follow the instructions below: 1. Load a form for a period and company. 2. Click the Fetch button to retrieve information from another period. The Fetch Period dialog appears. Figure 3.2-5 Fetching a form from another period AARO SYSTEMS AB 52 AARO 11.0 USER MANUAL Data Entry. Match 3. Select the source period. Check Fetch Data With Figures if both grid headings and figures are to be retrieved. Leaving the check box unchecked will merely bring back grid headings. In the Fetch to section, select whether the current form only or all forms will be retrieved. Click OK. 4. Click Save. 3.2.6 Generate a match report The match report displays intercompany transactions, and highlights intercompany differences between companies in a group. To generate the match report from the Data Entry menu, follow the instructions below: 1. Select a period and package. 2. Select a company or My companies in the tree. 3. Click the Reports button and then Match report. 4. Refine report contents as described in 3.2.7.1 Report content. 5. Press OK. Depending on the destination selected, various options are open to show a grid-layout report, a standard report, or to save the report as a text-file. From the standard report view it is possible to send the report to a printer. Other standard icons are: Zoom In / Zoom Out, Previous / Next page, Close the print preview. Figure 3.2—6 Match report preview AARO SYSTEMS AB 53 AARO 11.0 USER MANUAL Data Entry. Match Note: Match report can also be generated from the menu item Validations/Match reports as described in 4.1 Match report. 3.2.7 Match report description The match report displays intercompany transactions, and highlights intercompany differences between companies in a group. For example, one company may have a different value registered for due invoices (accounts receivable) compared to the respective bookings (accounts payable) at its counter company. Monthly reports are produced to highlight differences, and ensure action is taken to resolve them. The content of the match report varies according to predefined selections and can be displayed either on a company total level or on a sub dimension level. 3.2.7.1 Report content The match report summarises all reported amounts for the combination of a period and a package (including the collection of forms that are defined within a package). The report includes the reporting company and all selected counter companies. Possible differences between the companies are also included. The match report also gives information on period, currency rates used, dimension selected, and rule/s selected. This information is displayed below the report header. The report contents are controlled by the selections made in the Match Report dialog window. The definitions for available report restrictions are supplied below. AARO SYSTEMS AB 54 AARO 11.0 USER MANUAL Data Entry. Match Figure 3.2-7 Setting up match report parameters The following table describes Order Match Report window fields: Field Description Restrictions – Report for selected rules only Limits the differences displayed in the report to the selected matching rules. It is possible to choose to view a report of all rules or just one. Restrictions – Limit Defines the lower limit of the differences to be displayed. It is useful as a filter function in cases of a significant number of differences. Report currency Currency in which the information is displayed. It is possible to choose between all currencies that have exchange rates defined for the selected period. AARO SYSTEMS AB 55 AARO 11.0 USER MANUAL Data Entry. Match Field Description Figures to match The following options are available: Loc - The report will match Loc figures: the figures for both sets of companies will be based on local currency. Local currency figures will be converted to the report currency. Transaction Amount - The report will match transaction amount figures, i.e. the figures reported in transaction currency by the two companies. This also implies that there will be one row for each individual currency in the report. Total Specification - The report will match both Loc and transaction amount figures in a single broad report that also includes a specification of translation differences. (Translation differences appear when the reported Local currency and transaction amount figures use a currency exchange rate other than those stored in the AARO system for the period. This is not necessarily an error, but something to be aware of, and the Total Specification match report is an aid in these circumstances). Report layout Makes it possible to choose how much information to include in the report and also which entities to use in the matching. This is done by ticking the check boxes under ‘Specification of’ and ‘With match on counterpart’s’. The check boxes represent the different report dimensions available for a match report. The system administrator defines what the available dimensions are. The dimension could be e.g. a business unit, customer, or invoice number. Company description This check box is ticked if the whole company name should be displayed in the report layout. Sorting The report can be sorted and displayed by the company code or by the match rule. Match rules can be setup as required, for example by counter company or a specific account number ordering. Note: match rules are setup in Utilities/Edit Input. Report destination The report can either be displayed in a grid, as a standard report, or be saved as a text-file. Match sum order In addition to the general sort order (by company or by rule), the report can be sorted by the size of differences. A typical example would be to have the largest differences listed first, by selecting the ‘Sum descending’ option. If ‘No sum order’ is selected, the report is sorted alphabetically. AARO SYSTEMS AB 56 AARO 11.0 USER MANUAL Data Entry. Match 3.2.7.2 Report layout The report is based upon two areas containing identical fields. The left side of the report displays information regarding the reporting company, i.e. your own company, and the right side what the counter company has reported as counter company. Differences between the two sets of figures are shown in the centre of the report. If the report layout is not in the required style, close the print preview screen and adjust the report contents accordingly. 3.2.8 Complete a match package When the reporting for a period and company is done, the match package for a period and company should be reported as completed, or achieved, by pressing the Complete button. This closes the package for further reporting. The system administrator will then be able to check out which companies have reported the period as completed in Validations/Process Status. Follow the instructions below: 1. Load a form from a package to be completed. 2. Click the Complete button. The form completed notification appears at the top. 3.2.9 Contact list The contact list is used to register contact information concerning the companies. To view the contact list, follow these steps: 1. Select a company in the tree and click the Contact button . 2. In the Edit contacts window, select the relevant company (or dimension if applicable), and press Edit. 3. Enter the contact information and press OK to save. AARO SYSTEMS AB 57 AARO 11.0 USER MANUAL Data Entry. Match Figure 3.2-8 Editing company contact information If a counter company is selected in the tree, the contact information is available in the view mode only. 3.2.10 Print contact list report The following steps detail how to generate a Contact List report from the menu item Data Entry/Match: 1. Select a period and a package. 2. Select a company or all companies (My companies) in the left-hand pane. 3. Click the Reports button and select Contact List. Figure 3.2-9 Running the Contact List report 4. A dialog window will be displayed. Choose the relevant company(s) contact information, sort by company code or description, Print Preview or Print to file. Click OK to display or save the report. AARO SYSTEMS AB 58 AARO 11.0 USER MANUAL Data Entry. Match Figure 3.2-10 Setting up Contact List report criteria The report will be displayed (Print Preview), or a Save specification (Print to file) dialog window will be displayed. AARO SYSTEMS AB 59 AARO 11.0 USER MANUAL Data Entry. Match Figure 3.2-11 Contact List report example 3.2.11 Print a match form To send a form to the printer or save it in a file (in the .xls, .rtf, or .txt format), follow these steps: 1. Load the form to be printed and click the Print button. 2. Select Preview to open the form in the PDF format, select Printer to send the form to the printer, or select File to save the form in a file. AARO SYSTEMS AB 60 AARO 11.0 USER MANUAL Data Entry. Import 3.3 Import The import screen in AARO is designed to import into the AARO database any kind of ASCII-file of up to 10000 lines. The system administrator may, for each company, design an import specification that can be repeated for consecutive periods. The procedure consists of selecting a file from the hard drive or another location on the corporate network. It then has to be decided in which way a column in the text file is related to a column in AARO for the specification which will be saved. When the file is sent to the database, the existing data is deleted either for the whole form or only for the specified accounts. The menu command for import in AARO is Data Entry/Import. 3.3.1 Short guide for importing a text file To import a file such as a text file, follow these steps: 1. Define a file to import. 2. Press Import under the menu Data Entry. 3. Define or select a specification. 4. Open the file with the specification. 5. Run the import procedure. AARO SYSTEMS AB 61 AARO 11.0 USER MANUAL Data Entry. Import 3.3.2 Import window Figure 3.3-1 Import module The import module consists of two main frames. The tree structure in the left frame represents the different import specifications: Specification type GlobalSpec Description Global specifications applied to all companies. Figure 3.3-2 Global specification Using the global specification, an import on several companies and periods in one single import may be performed, improving the process for importing historic data. CompanySpec Specifications created for specific companies. These specifications are displayed as sub entries for the selected company. AARO SYSTEMS AB 62 AARO 11.0 USER MANUAL Data Entry. Import Figure 3.3-3 Company specification An import specification must be created before a text file can be imported to AARO. In the frame to the right two tabs – ‘Properties’ and ‘Convert’ can be found. The different options in these tabs are detailed below. 3.3.3 Properties tab The Properties tab contains different properties for the text file to be imported: Property Description Separated by char Character that separates fields in the text file. Fixed fieldlength The number of characters each field contains. This setting is used when fields have the same length and are not separated by other characters. Text delimited by Character that surrounds values in the fields. Columnnames in first row Tick this check box if the file contains column names in the first row. Column names will appear in the column header. SIETYP (UB) Tick this check box for files of SIE-format type. Row delimiter Character that separates rows. Skip rows Number of rows from file beginning not to be imported. Decimal separator Character that separates decimals in the text file. Account Indicator of whether imported accounts belong to input or match forms. This setting only specifies the column headers available for selection in the import specification for the file. AARO SYSTEMS AB 63 AARO 11.0 USER MANUAL Data Entry. Import The imported text file is displayed in the lower part of the dialog box when the specification is created. The text file must then be given column headers that are consistent with the column headers in AARO before it can be imported. There are also some special functions available to add to the text file. 3.3.4 Convert tab If the data needs to be converted, for example if source data has different parameters to those in AARO, the Convert tab is used to convert source data into AARO data. This is done by defining conversion rules. Figure 3.3-4 Convert tab A rule consists of the following parameters: Column Description Seq Nr A sequential number for each line must be added in this field. Operation RENAME (only one choice present). Multiplier Multiplies the converted value with this multiplier (e.g. Loc, Amount). From Column 1 First dimension name – e.g. Period, Code, etc. With Value 1 First dimension value – e.g. 0712A, 3999. Range allowed. From Column 2 Second dimension name, if required – e.g. Company, Business Unit. With Value 2 Second dimension value – e.g. ARLANDA, CLOTHES. Range allowed. To Column 1 Column to be imported into AARO. Set Value 1 New converted value for the column to be imported into AARO. Wildcards: it is also possible to use "wildcards" in the rule: by entering a * you can allow all values for a field, entering * before or after a character enables further restrictions – e.g. 11* will return all values starting with 11, *A will return all values ending with A. AARO SYSTEMS AB 64 AARO 11.0 USER MANUAL Data Entry. Import Range: it is possible to define a range by entering .. in the Value field. For example 3000..3099 would define all numbers in the range between 3000 and 3099. For example: From Column 1: Period With Value 1: 0101A From Column 2: Code With Value 2: PH00..PH22 To Column 1: Code Set Value 1: 100800 The line above will convert all lines with Period = ‘0101A’ and code between ‘PH00’ and ‘PH22’ (PH00, PH01, PH02 up to PH22) to the same period but now with code = ‘100800’. Note: Each one of the conversion rules is applied to the whole imported file, one by one according to the rule sequence number. For example, if the first rule converts code PH00 to 100800 and the second one converts code 100800 to 1080, the resulting code, after all rules are applied, will be 1080. Note: The use of user defined columns makes it easier to define rules with more than two parameters. 3.3.5 Create a file to import The file should be delivered prepared from the back-end system or be converted in the import window as the codes for periods, accounting, companies and forms often differ between the two systems. During the import process, all codes will be validated and if any code is incorrect, an error message will be displayed. The format of the file can appear in any text format such as; .txt, .skv, .csv. Each field has to be delimited by a delimiter, for example semicolon ‘;’. 3.3.6 Create a specification Follow the steps below when creating a new import specification: 1. Press Import from the Data Entry menu. 2. Select a company in the tree structure or GlobalSpec. Press the New button to add a new specification. The Select Text file dialog box is displayed. 3. Select the file to be imported in the local directory or LAN and press Open. 4. Enter a name for the new specification, specify type Company or Global and press OK. AARO SYSTEMS AB 65 AARO 11.0 USER MANUAL Data Entry. Import Figure 3.3-5 Saving import specification 5. If Company was selected in the previous step, select the company for which the specification should be added. Figure 3.3-6 Selecting company for import 6. The new specification is then displayed in the tree structure as a sub entry to the selected company or GlobalSpec. AARO SYSTEMS AB 66 AARO 11.0 USER MANUAL Data Entry. Import Figure 3.3-7 Added Import specification 7. Define specification properties on the Properties tab. Specify how the text file is separated and delimited. The program automatically searches for combinations that are compatible, but occasionally it is necessary to enter the information manually. In this example, the separator is set to “;” and the Rows are set to skip the first line as it is a header line that does not contain any data. Figure 3.3-8 Set up specification properties 8. To specify column headers manually, right-click a column header and select a dimension name for it from the list of available dimensions. The empty alternative moves the column header back to the list. This might be necessary if the first file row does not contain column headers that match AARO dimensions. AARO SYSTEMS AB 67 AARO 11.0 USER MANUAL Data Entry. Import Figure 3.3-9 Adding header to the Import specification The following additional menu items are available from the right-click column header pop-up menu: Add fix column – add a fixed parameter to all lines, for example a period name for the import specification. Multiplier – select this option to multiply or divide the amount column by a specified number. The number must be prefixed by * or /, e.g. enter /1000 to divide the amount column by 1000. User defined – use this option to specify a column name of your choice, for example ‘Business Area’. 9. If the data needs to be converted, complete the Convert tab. For example, if the business unit CLOTHES should be changed to MEDIA and account 5010 should be changed to account 5210 the Convert tab should be completed as shown below. Figure 3.3-10 Converting data Use Insert Row and Delete Row buttons to add/delete rows on the tab. Use Copy and Paste buttons to copy values between cells. 10. Press Save to save the specification with the given name or Save as to save the specification with a new name. 3.3.7 Perform import The import procedure consists of three steps: 1. Fetch – file data is fetched and displayed. 2. Convert – conversion rules are applied. 3. Validate & Send – data is validated and either sent to the database or validation errors are shown. To import the file, follow these steps: 1. Press the Import button . File data is loaded and converted according to conversion rules. AARO SYSTEMS AB 68 AARO 11.0 USER MANUAL Data Entry. Import In the example below, account 5010 is replaced by account 5210 and business unit CLOTHES is replaced by business unit MEDIA. Figure 3.3-11 Converted data ready for loading 2. To save the converted data to a text or Excel file, press the Save as text file button. Select the file format (.txt or .xls), enter file name and press Save. Alternatively the data can be copied to the clipboard by pressing the Copy to clipboard button. 3. Press the Next button to go the next step. File data validation and sending is performed at this step. During validation, the program checks for all combinations of period, form and company. Check the file to confirm it is correct before proceeding. AARO SYSTEMS AB 69 AARO 11.0 USER MANUAL Data Entry. Import Figure 3.3-12 Validating and sending data 4. To replace text in a column, press the Replace text button. Enter the old and new values, select columns and press OK. Figure 3.3-13 Replacing text in a column 5. Specify what data will be updated. Select of the following radio buttons: Account code - only accounts that are loaded will be updated with new values. Input Form - the complete form will be emptied first and then loaded with new values. AARO SYSTEMS AB 70 AARO 11.0 USER MANUAL Data Entry. Import Figure 3.3-14 ‘Replace old data’ options 6. Select how data will be validated and sent. Select one of the following radio buttons: Send only if all rows are correct – the file will be sent only if all rows will pass validation successfully. Send nothing, merely validate – no data will be send. Only validation will be performed. Send correct rows – correct rows will be sent regardless of validation errors in other rows. When all or part of rows are sent, the old data is erased in the database either for specified accounts only or for the whole form depending on the ‘Replace old data’ option. 7. Press the Finish button to validate and send the data to the database. If the data contains errors, an error message will be shown and erroneous data will be highlighted in yellow. Press OK to close the warning message. Figure 3.3-15 Validation errors found AARO SYSTEMS AB 71 AARO 11.0 USER MANUAL Data Entry. Import Figure 3.3-16 Viewing errors 8. The error can be corrected in the window or in the original file and loaded again. After the corrections have been made, the Finish button can be pressed again. If the figures are correct the following message will be shown: Figure 3.3-17 Successfully sent message 9. The data is now available in Data Entry/Input or Match. 3.3.8 Rename specification To rename an import specification: 1. Load an import specification with the file. 2. Press the Rename button . 3. Enter the new name of the specification and select the specification type, Company or Global. If Company was selected, select the company in the further dialog. Press ok. AARO SYSTEMS AB 72 AARO 11.0 USER MANUAL Data Entry. Import If another specification type or company is selected, the specification is copied to the new location with the new name. Figure 3.3-18 Renaming an import specification 3.3.9 Print import specification To print an import specification, press the Print button and choose Preview. The import specification will be opened in the print preview mode will provide information about text file settings and conversion rules. 3.3.10 Delete specification To delete an import specification, follow these steps: 1. Load an import specification with the file. 2. Press the Delete button . Press Yes. AARO SYSTEMS AB 73 AARO 11.0 USER MANUAL Data Entry. Legal 3.4 Legal The menu command for legal entries in AARO is Data Entry/Legal. 3.4.1 Legal groups The AARO installation is required to have at least one legal group (main group), to which all companies/subsidiaries are added in accordance to the ownership structure. If one or more subgroup should be subject to separate consolidation (i.e. a subsidiary in the group, with one or more sub subsidiaries, should be treated/analysed as a ‘stand alone’ group with full consolidation), each of these groups may be created in parallel to the main group. 3.4.2 Legal window Figure 3.4-1 Legal window AARO SYSTEMS AB 74 AARO 11.0 USER MANUAL Data Entry. Legal The Legal window consists of two panes. The left pane contains the legal tree consisting of legal groups and included companies. The right pane contains information related to the selected legal group or company. The information is divided into tabs: Tab 3.4.3 Description Ownership General legal group or company information. Past Equity Past equity entered for a subsidiary. Excess value Excess value details. Equity Company equity information presented as a report. Create a legal group To create a legal group, follow these steps: 1. Select a period in the Period drop-down list. 2. Press the New button, select Group and enter the details for the group: Figure 3.4-2 Creating a legal group Complete the following fields: Field Description Legal Group Enter the desired code for the legal group, i.e. ‘Aaro Group’ or ‘Main Group’ (10 characters, ‘A-Z’, ‘1-9’ and ‘_’). Parent Company Enter the code of the parent company or select it from the list of already existing companies. If the company does not exist in the database it will now be created. AARO SYSTEMS AB 75 AARO 11.0 USER MANUAL Data Entry. Legal Field Description Description Enter a description for the legal group (50 characters, ‘A-Z’, ‘1-9’, ‘_’ and ‘ ’), e.g. ‘The Aaro Group’. Currency Select the group currency. 3. If the company entered does not exist, you will be asked whether you want to create a new parent company. The system will require some basic company data. Figure 3.4-3 Creating a company Complete the following fields: Field Description Company description Free text company description. Corporate number Corporate company number. Registered office Registered company office address. Phone Company contact phone number. Security level Company security level in AARO. Enter at least a default value, i.e. ‘Normal’. Company type Company type in AARO. The default company type is ‘Normal’. 4. Press OK. AARO SYSTEMS AB 76 AARO 11.0 USER MANUAL Data Entry. Legal The group is now created and the parent company code will be displayed to the left as a top node in the tree structure: Figure 3.4-4 Group information 5. Select Equity consolidation method and click Save. 3.4.4 Delete a legal group Delete a legal group by selecting the group in the tree structure and pressing the Delete button. 3.4.5 Add a company/subsidiary A company/subsidiary is added to a legal group in the specified period only. An already existing company can be added in the period or a new company can be created and added to a legal group. Follow these steps: 1. Select a period in the Period drop-down list. 2. Select the parent company in the legal tree, click the New button and select Company. 3. Enter the code of the company or select it from the list of already existing companies. If the company does not exist in the database it will now be created. AARO SYSTEMS AB 77 AARO 11.0 USER MANUAL Data Entry. Legal Figure 3.4-5 Add company dialog 4. If a new company is created, enter some basic data: Figure 3.4—6 Add new company dialog Field Description Company description Free text company description. Corporate number Corporate company number. Registered office Registered company office address. Phone Company contact phone number. Security level Company security level in AARO. Enter at least a default value, i.e. ‘Normal’. Company Type Company type in AARO. The default company type is ‘Normal’. 5. Press OK. The company appears in the tree structure under its parent company. AARO SYSTEMS AB 78 AARO 11.0 USER MANUAL Data Entry. Legal Figure 3.4—7 Company added to a group 6. For the company, enter the Ownership tab as described in 3.4.8 Ownership tab. 7. Enter the Past Equity tab as described in 3.4.9 Past Equity tab. 8. Enter the Excess value tab as described in 3.4.10 Excess value tab. 9. Click the Cons button to consolidate the entered data. 10. See the Equity tab and check reports on whether the entered data is correct as described in 3.4.11 Equity tab and 3.4.15 Check reports. Note: The ownership structure (i.e. which parent(s) owns which subsidiaries) is unique in every period. It is, however, not manually entered every period but copied from relevant previous period. 3.4.6 Delete a company/subsidiary Within the legal module, a company/subsidiary is deleted from a legal group in the specified period only. The company is not deleted entirely from the database. To delete a company/subsidiary from a period, follow these steps: 1. Select a period in the Period drop-down list. 2. Expand the legal group. 3. Select the company and click the Delete button. 3.4.7 Past equity eliminations operationally If past equity eliminations should be distributed operationally (i.e. create ability to analyse past equity eliminations or excess values per operational dimension), this has to be set up in AARO. Contrary, if this is not requested, this setting should not be selected. The main setting for this is in the table SETTING_SETTINGS and the property ‘LegalEquityLevel’. The StringValue for this property should be set to the requested level number i.e. ‘Level1’. In further handling of the past equity register, ‘Level1’ will in this case be mandatory to report every acquisition, excess value etc. 3.4.8 Ownership tab Select a period and company. AARO SYSTEMS AB 79 AARO 11.0 USER MANUAL Data Entry. Legal Figure 3.4—8 Company ownership information Fill out the relevant values for: Field Description Currency Reporting currency for the company. Translation type Rate method: Current - Current rate method Temporal - monetary/non-monetary method Tax Company tax percentage. This is used for the split of untaxed reserves in deferred tax and equity. Can also be used for other calculations where company tax percentage should be part of the equation. Consolidation method The only possible choice is PE (purchase method) AARO SYSTEMS AB 80 AARO 11.0 USER MANUAL Data Entry. Legal Field Description Minority method If the ownership of a company is less than 100%, a minority method should be chosen: Normal - minority interest is automatically booked as a share of the net income and liability to the minority owner based on the ownership percentage. Split - will split the company in two parts, account per account, based on the ownership percentage. Manual - there will be no automatic handling of the minority interest. Instead, it needs to be handled manually with journal bookings. Override category The system will suggest - based on the ownership percentage – if the company should be treated as: Equity - subsidiary, associated company Cost - cost company (not consolidated). If, for any reason, the company should be treated differently than the default, the category may be set here and this will then override the default category. The default values are: Subsidiary 50-100%, Equity 2049,9% and Cost 0-19,9% Operational dimension, i.e. Product In AARO there is a possibility to add an operational level (dimension) to each acquisition. The past equity eliminations can then be posted operationally. However, there are some legal group eliminations that are not directly linked to a certain acquisition, i.e. minorities and untaxed reserves. The operational level value has to be selected in order for these items to be operationally posted. See 3.4.7 Past equity eliminations operationally. <PARENT> owns The ownership share/percentage in relation between the parent and subsidiary is entered here. If the company is owned partly by another company in the group, the subsidiary should be added under that parent in the tree structure with the relevant ownership percentage. If another company in part owns the presently selected company, an information field on the right will inform of this. In the blue fields to the right in the ‘Consolidation information’ section the relevant category, minority percentage (direct or indirect) and currency rates for the company and period will be added automatically based on the details added to the left. The fields are completed automatically after period and group consolidation. 3.4.9 Past Equity tab On this screen the past equity (acquired equity) is entered for each subsidiary. This information is used in the past equity elimination which is a vital part of AARO SYSTEMS AB 81 AARO 11.0 USER MANUAL Data Entry. Legal the consolidation in AARO, and is automatically booked to the balance sheet/equity in accounting. Figure 3.4—9 Past Equity tab In the start-up package (the AARO default configuration) the logic for linking the past equity register entries to the group accounting is set by certain settings in data background tables, with a few exceptions described below. The Past Equity tab represents a matrix with four sections of accounts horizontally and columns for opening balances, period change and closing balances vertically. The section of accounts contains: information regarding the actual investment made by the parent information regarding the acquired capital information regarding the excess values the full acquired balance sheet (optionally and used for cash flow purposes, not necessary to fill out to get a complete legal consolidation of the company) 3.4.9.1 Load the past equity form To load the past equity form for a company, follow these steps: 1. In the Legal screen, select the relevant period in the Period drop-down list. AARO SYSTEMS AB 82 AARO 11.0 USER MANUAL Data Entry. Legal 2. In the tree, expand the legal group, select the company and click the Past Equity tab. 3. In the Group drop-down list, select the currency in which the values will be represented. This drop-down list contains the main group currency and the legal group currency if they are different. 4. In the Decimals field, select the number of decimals visible in the form. 5. By default only summery information is shown on the Past Equity tab. To see journals included into the balances, click the Expand button. 3.4.9.2 Add a past equity entry To create a ‘Period change entry’ on the Past Equity tab, follow these steps: 1. Load the past equity form for subsidiary. 2. Press Add column button. The Edit PE dialog appears. Figure 3.4—10 Edit PE dialog The Edit PE dialog contains the following fields: Field New ID Description Past equity entry identifier. AARO SYSTEMS AB 83 AARO 11.0 USER MANUAL Data Entry. Legal Field Description Amount Field Select LOC. In the Past Equity tab all values entered should be in the subsidiary’s local currency with one exception described below. PEDate Enter the date for the acquisition Comment Free text commentary. <Operational dimension>, i.e. Period If past equity eliminations are to be posted operationally, the relevant operational dimension value is selected here. 3. Press OK and a new column will appear in the past equity matrix screen. Figure 3.4—11 Past equity entry added The relevant values regarding the acquisition may now be filled in. Account codes may differ depending on installation. Investment Amount in Parent Currency – PE1310P. Enter the parent company’s investment in its local currency (this is the only exception from entering all values in the subsidiary’s local currency, LOC). This information is used to adjust the parent company’s balance sheet reporting with the past equity register. For associated companies the code PE1330P is used for corresponding information. Investment currency rate – RATE. Enter the rate between the subsidiary’s currency and the group currency at the investment date. Investment Amount in Local Currency – PE1310L. Enter the parent company’s investment in the subsidiary´s currency (i.e. LOC). This information is translated to group currency with the investment rate and is used for elimination of investments in group companies reported in the balance sheet of the parent company. For associated companies the code PE1330L is used for corresponding information. AARO SYSTEMS AB 84 AARO 11.0 USER MANUAL Data Entry. Legal The acquired capital is consequently specified on relevant equity accounts. Figure 3.4—12 Specify acquired capital With the above information entered, if there is a difference between the invested amount and the acquired capital, this difference will be apparent at the PEDELDIFF row in the matrix. The difference should now be specified as an excess value in order for the past equity specification to be complete. Figure 3.4—13 PEDELDIFF on the Past Equity tab 3.4.9.3 Edit a past equity entry To edit a past equity entry, follow these steps: 1. Load the past equity form for the period and company. 2. Right-click the column and select Edit Past Equity Information. AARO SYSTEMS AB 85 AARO 11.0 USER MANUAL Data Entry. Legal Figure 3.4—14 Edit a past equity entry 3. In the Edit PE window make changes and click OK. 4. Click the Save button. Automatic recalculation of the calculated fields is performed. 5. Click the Cons button to send changed data to consolidation. 3.4.10 Excess value tab The excess value is specified in detail in the Excess value tab. The information is used as the base for the automatic creation of the excess value related items in the group balance sheet, income statement and relevant specifications (i.e. net value, depreciations and translation differences in relation to the excess value asset). Each acquisition can have more than one excess value entry, i.e. for different types of assets and duration of depreciation. 3.4.10.1Load the excess value form To load the excess value form for a company, follow these steps: 1. In the Legal screen, select the period in the Period drop-down list. 2. In the tree, expand the legal group, select the company and click the Excess value tab. 3. In the Group drop-down list, select the currency in which the values will be represented. This drop-down list contains the main group currency and the legal group currency if they are different. 4. In the Decimals field, select the number of decimals visible in the form. 3.4.10.2Add an excess value entry To create an excess value entry (GWID), follow these steps: 1. Load the excess value form for the period and subsidiary. 2. Click Add Column and enter the Edit excess value window. AARO SYSTEMS AB 86 AARO 11.0 USER MANUAL Data Entry. Legal Figure 3.4-15 Adding an excess value entry The fields are as follows: Field Description GWID Excess values entry identifier. PE change ID Link the GWID to a certain PE entry (typically there could be more than one PE entry for one acquisition). PECode Select the relevant asset to link the excess value to. Change Enter the value of the excess value. Acq Date/End Date Enter the date for the acquisition and the date when the asset should be fully depreciated (this will determine the amount depreciated each month). If no automatic depreciation is to be done for this specific GWID, the end date can be set to Acq date – 1 day. If no automatic depreciation is to be calculated for a certain asset type (i.e. Goodwill) this can be set up per period in the Edit Period window. LocAmount Select LOC (on the Excess value tab all values entered should be in the subsidiary’s local currency). AARO SYSTEMS AB 87 AARO 11.0 USER MANUAL Data Entry. Legal Field Description Comment Free text comment. Depreciation Information In the start-up package (the AARO default configuration) the logic for linking the past equity register entries to the group accounting is set by certain settings in data background tables. The linking of depreciations of excess values to the income statement is, however, one exception to this. This linking is set case by case when creating the GWID´s. Select transaction type ‘Deprecation’, select account in the income statement for to book the depreciation and finally select the operational level/dimension* to post this booking. (* determined by the level the selected account is set to be reported in, i.e. in which form the account is active in the chosen period. For further details, see the Edit Input section) 3. Press OK and two columns will be added to the excess value matrix. Figure 3.4-16 New GWID added 4. When all values are entered, click Save. AARO SYSTEMS AB 88 AARO 11.0 USER MANUAL Data Entry. Legal Automatic recalculation is performed for all affected accounts. A system excess value journal is generated for the entry. 5. Click the Cons button to send the entered data to consolidation. Upon consolidation the transfer and linking of the PEID and GWID to the accounting is completed. When the excess values are specified and saved in the excess value screen, the same specification on a net level may be found on the Past Equity tab. PEDIFF row will indicate if 100% of the excess value is specified or if there are still some differences left. Figure 3.4-17 PEDIFF on the Past Equity tab 3.4.10.3Edit an excess value To edit an excess value entry, follow these steps: 1. Load the excess value form for the period and company. 2. Select the relevant column and press the Edit button. 3. In the Edit excess value window make changes and click OK. 4. Click the Save button. Automatic recalculation of the calculated fields is performed. 5. Click the Cons button to send changed data to consolidation. 3.4.10.4Excess value matrix tab The Excess value tab is a matrix with six sections horizontally and two columns vertically: one for LOC (local currency) and one for group currency. The sections are: AARO SYSTEMS AB 89 AARO 11.0 USER MANUAL Data Entry. Legal Base information regarding the GWID entered in the GWID creation dialog described above. The excess value at cost and gross values, from opening balance via change to closing balance Translation differences for the above, OB/change/CB Deprecations, OB/change/CB Translation differences for the deprecations, OB/change/CB Net values/totals, OB/change/CB Figure 3.4—18 Excess value tab Most of the values in the matrix are calculated automatically based on previously entered data, i.e. translation differences and depreciation for the period. To complete the net values with opening balances for these items at start up the ‘Sales/Retirements’ rows in each section may be used. These rows are also used to handle changes in the ownership of the company. AARO SYSTEMS AB 90 AARO 11.0 USER MANUAL Data Entry. Legal 3.4.11 Equity tab The majority of report and analyze possibilities are to be found in the Drill Down reporting tool. There are, however, some limited and high level analysis that may be made directly in the Legal menu. The Equity tab is a report presenting the company’s contribution to the group equity in detail and how this contribution is built up from reported values via past equity to a consolidated value. This report is based on a report layout maintained in the Drill Down menu where it also may be altered. Figure 3.4—19 Equity tab The columns in this report are typically based on the so called ‘legal types’ described below. 3.4.11.1Legal types Legal types can be seen as classifications of transactions to determine the origins of a certain transaction. Type Description Input The company’s unconsolidated reporting. JV Loc Journal bookings in local currency. JV SEK Journal bookings in group currency. TransDiff Translation differences. UR Untaxed reserves. DM Direct minority. IM Indirect minority. Split The split, when that minority method is applied. AARO SYSTEMS AB 91 AARO 11.0 USER MANUAL Data Entry. Legal Type Description PE Past equity eliminations. Goodwill Excess values. PECta Translation differences in relation to the parent investment. EqShare P/L and capital regarding associated companies. PEREDIST Suggested distribution within the equity to obtain elimination ‘from the top’ (used in OPER/LEGAL logic only). 3.4.12 Complete reporting The company’s local figures need to be reported in input in order to get a complete picture of the company’s contribution to the group equity and balance sheet. The company’s equity specification, balance sheet and income statement need to be reported. The opening balances in the equity specification are reported in the account 20xx04 Organisational change in each relevant section of the equity. Figure 3.4—20 Entering company equity information These values should be translated to group currency based on a historic rate unknown to the system. For this reason, the entries must also be booked in manually in group currency. Accounts 20xx04 has the translation type ‘None’ indicating that they will not be translated to group currency automatically. AARO SYSTEMS AB 92 AARO 11.0 USER MANUAL Data Entry. Legal Figure 3.4—21 Entering equity data in the group currency 3.4.13 Legal reconciliation When data is entered in the past equity register as well as in Input and the Journal menus, some analyses and reconciliations are recommended in order to make sure that the group accounting is fully in order. The following tools and reports may be helpful. 3.4.14 From company and legal types From company is a very useful tool when analysing the legal accounting. All eliminations made in the consolidation process, i.e. elimination of past equity, addition of excess values to the group figures etc. are typically booked to the company EL (and in some cases EL_IC). In order to analyse the actual company that has contributed with the elimination, the EL company can be drilled down by the From Company criterion and the eliminations will then be separated per company. To further analyse each company’s contributed eliminations, the from company can be drilled down by legal type and the different types of eliminations will then be separated into individual columns. 3.4.15 Check reports The start-up package (AARO default configuration) is delivered with a number of prepared reports, but these can easily be extended with more reports to facilitate analyses and reconciliation. The start-up package reports should be regarded as templates and examples to build from. Here is a description of some of the useful reports in the start-up package. 3.4.16 ‘01. Balance sheet difference in local currency’ A check that all companies are in balance in local currency. AARO SYSTEMS AB 93 AARO 11.0 USER MANUAL Data Entry. Legal Figure 3.4—22 Balance sheet difference in local currency If the function input/complete is used in a correct way, a difference will not occur. Please note that imbalance can be due to incorrect account logic in accounts created after implementation. 3.4.17 ‘02. Balance sheet difference in group currency’ A check that all companies are in balance in group currency. Figure 3.4—23 Balance sheet difference in group currency If imbalance is at hand, first check the balance in local currency before checking for journals in group currency that may be unbalanced. AARO SYSTEMS AB 94 AARO 11.0 USER MANUAL Data Entry. Legal To further track an imbalance in group currency the difference can be drilled down by the Legal Type criterion. The total of the legal types Input + JV Loc + JV SEK + TransDiff should total zero unless the input values, journals or possibly currency values are incorrect. Should the EL company be unbalanced, this company may be drilled down by the From Company criterion (as described above) which in turn – if itself imbalanced – may be drilled down by the Legal Type criterion. The legal type Input + JV Loc + JV SEK + TransDiff should here again total zero unless the input values, journals or possibly currency rates are faulty. The legal types PE and Goodwill should also total zero unless something is incorrect in the past equity register (its values or the logic between the register and the accounting). All other legal types should be balanced. 3.4.18 ‘03. Investments in subsidiaries’ Figure 3.4—24 Investments in subsidiaries A check that the parent companies (all companies that own subsidiaries in a legal group) reporting regarding investments in subsidiaries (i.e. account 1310) comply with the corresponding amount in the past equity register. Should there be differences, a dialog between the HQ and the parent company is required. In order to facilitate the reconciliation, the past equity data can further be broken down in the next report. For the corresponding check regarding associated companies the accounts can easily be changed to 1330 and 1330PE. 3.4.19 ‘04. Special Investment in subsidiaries’ This report specifies the investment made by the parent company according to the past equity register. AARO SYSTEMS AB 95 AARO 11.0 USER MANUAL Data Entry. Legal Figure 3.4—25 Spec Investment in subsidiaries The account type can be changed to ‘change’ to reflect the change in the period rather than the closing balance values. The account may furthermore be changed here to PE1330P with the purpose of specifying the corresponding values for associated companies. 3.4.20 ‘05a & 05b. Past Equity by Co, Change/Closing’ This report checks for any imbalances in the past equity register. The difference net row at the bottom should be zero. If this report is compared to the Past Equity tab in the Legal menu, the rows/accounts are the same. The difference is that a view of all parent company/subsidiary relations is possible here. Figure 3.4—26 Past Equity by Co, Change/Closing AARO SYSTEMS AB 96 AARO 11.0 USER MANUAL Data Entry. Legal The selected accounts can be viewed by expanding the Account criterion in the report edit mode. Figure 3.4—27 View selected accounts. The amount type can be changed to ‘Closing’ (report 05b) in order to specify the closing balances rather than the period change values. 3.4.21 Miscellaneous reports 06 Check PE – Excess Value 07 Not CTA accounts to check 08 Balance sheet by Company 09 Balance sheet by FromComp 10 Balance sheet by LegalType 11 Equity by company 12 Equity by FromCompany 13 Equity by Legal Type by Company 14 Equity by Legal Type 15 Equity change AARO SYSTEMS AB 97 AARO 11.0 USER MANUAL Data Entry. Company information 3.5 Company information The menu command for entering company information is Data Entry/Company Information. Enter specific company information here, such as telephone numbers and email addresses for key employees, plus bank accounts and other company information. Figure 3.5-1 Basic company information 3.5.1 Add company information To add information for a company, follow these steps: 1. Select a company in the tree. 2. Enter data on the Basic info tab and click Save. 3. On other tabs, to add a row, click the Insert Row button or the [down arrow] on your keyboard. To delete a row, click the Delete Row button. AARO SYSTEMS AB 98 AARO 11.0 USER MANUAL Data Entry. Company information 3.5.2 Print company information Each tab, except Basic info, can be printed as a report. Select company and tab and then press the Print button . Figure 3.5-2 Company information report 3.5.3 Company Information tabs The following sections describe Company Information tabs. 3.5.3.1 Basic info tab The Basic info tab contains information including company name and address, Auditor name and contact information, and field for optional comments. AARO SYSTEMS AB 99 AARO 11.0 USER MANUAL Data Entry. Company information Figure 3.5—3 Basic info tab 3.5.3.2 Contacts tab The Contacts tab contains a table used for entering contact information of key employees in the organization. Figure 3.5—4 Contacts tab 3.5.3.3 E-mail Contacts tab The E-mail Contacts tab is used by the mail functionality in the menu Validations/Process Status. In the menu Process Status the status for each package per company is displayed and mail can be sent to the persons responsible for reporting. This tab contains information about each person that is responsible for/has interest in the status of a certain reporting package. AARO SYSTEMS AB 100 AARO 11.0 USER MANUAL Data Entry. Company information Explanations to the fields in the tab: Field Description Total If ‘Total’ is selected, the email recipients will receive information about all packages. Package If a package is selected, the email recipients will receive information about the package. Form If a form is selected, the email recipients will receive information about the form. Name Name of email recipient. Email E-mail address. Rec/CC Entered text (Rec/CC/BCC) decides if the receiver will be ‘Recipient’, ‘CC’ or ‘BCC’. Telephone Phone number of the e-mail recipient. Comment Free text comment. Please read more about the mail functionality in 4.3.5 Send mail. Figure 3.5—5 E-mail Contacts tab 3.5.3.4 Board of directors tab The tab contains information about the board of directors. Figure 3.5—6 Board of directors tab 3.5.3.5 Branch offices tab The tab contains information about eventual branch offices. AARO SYSTEMS AB 101 AARO 11.0 USER MANUAL Data Entry. Company information Figure 3.5—7 Branch offices tab 3.5.3.6 Bank Accounts tab The Bank Accounts tab contains bank account information including account numbers, currency and other information required for company transactions. Figure 3.5—8 Bank Accounts tab 3.5.3.7 Previous names tab The Previous names tab contains information regarding eventual name changes in the organization. Figure 3.5—9 Previous names tab AARO SYSTEMS AB 102 AARO 11.0 USER MANUAL Data Entry. Shares 3.6 Shares The shares register is managed via the menu item Data Entry/Shares. Changes in the number/value of shares and other information such as acquisitions or a split can be entered here. Drill down reports can be used to display the shares accounts. 3.6.1 Shares window Figure 3.6—1 Shares window 3.6.2 Description of fields in the Shares window The Shares window contains the following fields: Field Description Code Select account in drop down list. See list of accounts below. Date Enter date of acquisition/disposal etc. Type of shares This field has three options: Ordinary, N.P.V. and ANDELAR. For the last two, the Number of shares and Amount/Share fields are read only; the only fields updated are Total amount and Carrying value. Number of shares Enter number of shares. Amount/Share Enter nominal value per share. Total amount Depending on type of shares, this value will be manually entered or calculated automatically. AARO SYSTEMS AB 103 AARO 11.0 USER MANUAL Data Entry. Shares 3.6.3 Field Description Carrying value Book value. Description Tick checkbox to enter a description. Previous period descriptions Tick the checkbox to show previous period descriptions. Displays descriptions added on previous periods within the current year. Set up an account structure for the Shares window Below follows an example of how the shares account structure can be set up. All shares accounts are set up in the menu Utilities/Edit Accounts. Similar for all shares accounts is that the Shares radio button is selected in the Legal/Oper area. Shares accounts are also assigned a code type in the CodeType field when applicable. See a screenshot below. Figure 3.6-2 Creating a shares account The code type determines the characteristics of the account. The following code types are available: Code type Description OpeningCode Used for calculating opening balance, beginning of year. Account is always visible in the Shares window. PerOpenCode Used for calculating opening balance, beginning of period. Account is always visible in the Shares window. AARO SYSTEMS AB 104 AARO 11.0 USER MANUAL Data Entry. Shares Code type Description ReadOnlyCode Account used for registering changes in the period. Account is selectable in the drop down list in the Shares window. MarketCode Used for entering market value. Account is always visible in the Shares window. OwnershipCode Used for entering percentage of ownership. Account is always visible in the Shares window. The following accounts are used in Shares: 13001 Holding, beginning of year 13002 Holding, beginning of period 13010 Stock issue 13020 Stock dividend 13030 Stock split 13040 Change in par value 13050 Write-up/write-down 13060 Acquisition/disposal 13072 Contribution by stockholders 13076 Contribution, stock option plan 13090 Holding, end of period (Sum of accts 13002 – 13076) 13090E Investments in associated companies 13090S Investments in subsidiaries 13091 Market value 13095 Percentage of ownership. Value is rolled into the next period when period is consolidated, also to the next year. The field has to be ‘0’ in order to get the amount from previous period. If the field value is changed manually, this amount remains. To keep ‘0’ in the field, account 13090 must be zero. Please note that new accounts must be added in the sum of 13090. AARO SYSTEMS AB 105 AARO 11.0 USER MANUAL Data Entry. Shares 3.6.4 Open the Shares window for entries In order to be able to enter values for a period, the Shares window must be opened in the menu Utilities/Edit Periods. Add SHARESEDIT, in the Open tab. Figure 3.6—3 Opening the Shares window for entries 3.6.5 Add shares To add shares, follow steps below: 1. Select a period in the Period drop-down list. 2. Expand a legal group and select a company. 3. Enter values in the fields. Figure 3.6—4 Enter values in fields 4. Use the Insert Row/Delete Row buttons to add a new row/delete an entered row. 5. Press Save. 6. Press Cons to send the entered values to consolidation. When the period has been consolidated, the values entered will be in the opening balance values for the next period. 3.6.6 System journal in owning company When a consolidation is run for the period, a journal of type System is made based on account 13090. The journal is made on the owning (mother) company AARO SYSTEMS AB 106 AARO 11.0 USER MANUAL Data Entry. Shares in local currency (LOC) on account 13090 and 13090E or 13090S depending on whether the owned company is an equity company or a subsidiary. This gives the possibility to separate numbers on different company types in drill down reports. This functionality is set-up/adjusted directly in a background table – please contact AARO Systems if you need support with this configuration. 3.6.7 Opening balances in Shares Opening values can be added in a historic period on an account. When the first period in the coming year is consolidated, the closing balance on account 13090 will be rolled forward as the opening balance on accounts 13001 and 13002. Journals cannot be made on shares accounts as journals do not have owned company as entry field and the shares values are saved to a table of its own. 3.6.8 Drill down report example Use drill down reports to retrieve shares register information. Go to the menu Reports/Drill Down. Select parameters according to the figure below. Figure 3.6—5 A drill down report example for shares accounts 3.6.9 Print the shares report Press the Print button to Print or Preview a report for shares. The report shows period, company, owned company and the account details. AARO SYSTEMS AB 107 AARO 11.0 USER MANUAL Data Entry. Journals 3.7 Journals Journals can be used when figures in the closing need to be changed by users other than the ones responsible for entering data for different companies/entities. This function makes changes traceable and separated from input. The menu command for journals in AARO is Data Entry/Journals. A journal can have the following status: Prepared Journal is temporarily saved in the database. Approved Journal is saved in the database. 3.7.1 Attested Journal has been attested in menu Validations/Process Journals. Audited Journal has been audited in menu Validations/Process Journals. Journals window Figure 3.7-1 Journals window The Journals window consists of two tabs to the left and a work area to the right. The tabs are: Journals – contains folders with journals. The folder name indicates the journal type. Filter – visible journal filter by journal fields. The work area contains the loaded journal(s). A journal consists of a header (top section) and records below the header. The bottom shows the difference between debit and credit totals for the loaded records. Journals menu buttons are as follows: AARO SYSTEMS AB 108 AARO 11.0 USER MANUAL Data Entry. Journals 3.7.2 Button Description Load Retrieves journals from the database. Save Saves a new or edited journal, with the status: Saved. Save as Makes a copy of an existing journal in the current or new period with a new journal ID. The journal is given the status: Saved. Print Prints the currently journal records in a report. Reports Prints optional journals from the selected folder in a report. Prepare Saves a journal in the database with the status: Prepared. Prepared journals do not show in drill down. Prep as Makes a copy of an existing journal in the current or new period with a new journal ID, with the status: Prepared. New Creates a new journal. Edit Opens a journal in edit mode. Insert Row/ Delete Row Inserts or deletes a row in a journal. A journal must be opened in edit mode for these buttons to become available. Copy Copies optional journals from another period from the selected folder. Journals are given status: Prepared. When copied over year end, journal rows are given the text “From Previous Year(s)”, are marked in blue and can’t be edited. However, if they have the Active status "Y" the rows are outlined in red and can be deleted (but not edited). Expand Expands journal records to see additional fields. Sign Changes sign (+/-) in a journal. Journal types and folders Journal types and related folders are: Folder Journal type Description Opening Opening Journals adjusting opening period values. These journals are created on opening accounts. These journals are created by a user. Correction Correction Journals generated by system when a correction is performed in an input form. AARO SYSTEMS AB 109 AARO 11.0 USER MANUAL Data Entry. Journals 3.7.3 Folder Journal type Description System System Journals generated by system as a result of changes in input figures, legal structure or operational structure. Normal Normal Journals created by a user on accounts opened for input. Adjustment Adjustment Journals generated by system when adjustments are performed in an input form. Recurrent Recurrent Journals identical to Normal journals but run periodically. Input Opening Normal Recurrent Journals created manually. My Journals Opening Normal Recurrent Journals created by the current user. All Journals All types All journals existing in the system. Load journals Journals available to a user depend on user rights set up by an administrator. To load journals, follow these steps: 1. In the menu, select Data Entry/Journals. 2. Select a journal folder. 3. To load all journals from the folder, click Load or double-click the folder. Journal records for all journals in the folder will be loaded without journal headers. 4. To load records for one journal, expand the folder by clicking the plus sign, select the journal and click Load or double-click the journal. The information about the loaded journal appears in the information box in the top right corner. 5. To sort records by a column, click the column header. Figure 3.7-2 Sorting journal records AARO SYSTEMS AB 110 AARO 11.0 USER MANUAL Data Entry. Journals 6. To remove a journal from the list of journals visible in the folder, rightclick the journal and select Remove journal from filter. Figure 3.7-3 Removing a journal from visible journals 7. To restore the list of visible journals, right-click the folder and select Refresh. 8. To view the journal header information without loading the journal, right-click the journal and select Information. Figure 3.7-4 Viewing journal header information 3.7.4 Create a journal To create a journal manually, follow these steps: 1. Select the folder in the left hand pane and press the New button or right-click the folder and select New. 2. Complete fields in the New Journal dialog and press OK. Figure 3.7-5 Creating a journal AARO SYSTEMS AB 111 AARO 11.0 USER MANUAL Data Entry. Journals New Journal dialog fields are: Field Description Period Period where the journal to be created. Journal Type The journal type can be specified as ‘Normal’, ‘Recurring’, ‘Opening’. Currency Currency can be specified as follows: LOC –the journal uses the reporting currency for the company. These amounts are translated to the group currency. Group - all amounts in the journal are in group currency (without any translation to company local currency). The currency code used here is defined in Utilities > Edit Settings, DefaultCurr. FIXLOC – the journal uses only the reporting currency of the company. Values are not translated to group currency. Journal ID It is advisable to write a short descriptive identifier in the ID field (unless the edit field for identifier is disabled; in that case the system is configured to generate journal IDs automatically). 3. Enter information in journal records by using the drop-down lists (or typing) in the fields for company, code etc. All white cells must be filled in. The cell called Text is not mandatory but can be used to comment upon individual rows. Add/delete a row by clicking the Insert Row/Delete Row buttons or add a row by using the arrow keys. Only accounts satisfying the following criteria are available for selection in the Code field: of the proper type (i.e. opening accounts for opening journals) with the journal settings set up to Y (Journal Loc for Loc journals and Journal SEK for SEK journals) available according user rights AARO SYSTEMS AB 112 AARO 11.0 USER MANUAL Data Entry. Journals Figure 3.7-6 Creating a new journal 4. Click the Save or Prepare button when finished. The command Prepare saves the journal temporarily in the database while the command Save saves it to the database. 3.7.5 Create multi-JV bookings It is possible to enter journals with different periods on each row of the journal. 1. Select the period option MULTIJV when entering a new journal. 2. Enter period, company, code and amount on each row. Press Save. A journal is created for each period entered. Figure 3.7—7 MULTI JV journal 3.7.6 Edit a journal A journal can be edited only by the user who created the journal. Follow these steps: 1. To edit a journal, load a journal and click the Edit button or right-click the journal and select Edit. 2. Make changes and click Save or Prepare. AARO SYSTEMS AB 113 AARO 11.0 USER MANUAL Data Entry. Journals 3.7.7 Copy journal to another period To copy a journal to another period, follow these steps: 1. Select a folder or journal and click the Copy button. 2. Select the period and journals to be copied. 3. Click OK. The copied journal gets the status Prep. A journal copied from a previous period is indicated by the text record 'From previous year(s)'. If a journal is copied to the opening balance period and account value is sent to the opening balance then the account in the Code field changes to the opening balance account. In this case the copied journal is disabled for editing. For example, a journal made on account 3010 in period 0712A is copied to the period 0802A which gets the opening balance from 0712A from account 3010 to account 209102. Figure 3.7-8 Journal copied to the next period 3.7.8 Delete journal To delete a journal from the system, follow these steps: 1. Load the journal. 2. Click Edit. 3. Delete all rows by clicking the Delete Row button. 4. Click Save. 3.7.9 Filter journals By using drag and drop different filters can be applied to restrict which journals should be displayed in the folders in the left pane. To filter journals: 1. Select the Filter tab in the left pane. AARO SYSTEMS AB 114 AARO 11.0 USER MANUAL Data Entry. Journals 2. Drag and drop one or more parameters from the list to the header. Figure 3.7—9 Drag and drop filter 3. Select a value in the selected filter parameter. AARO SYSTEMS AB 115 AARO 11.0 USER MANUAL Data Entry. Journals Figure 3.7—10 Select filter value 4. Double-click the relevant folder to display journals. The journals in respective folders in the left pane will contain rows corresponding to the selected filters. 3.7.10 Filter journal rows To filter journal rows, click on the header at the top of a column. AARO SYSTEMS AB 116 AARO 11.0 USER MANUAL Data Entry. Journals Figure 3.7—11 Apply a filter The filter for journal rows is used to limit the rows visible in the work area. To filter journal rows: 1. Load a journal. 2. Press the arrow on the column header and select values. The selection can, for example, be restricted to a certain company. 3. Selections made are displayed as text at the bottom of the work area. Press the button to remove all selections. Tick the check box to remove the selections temporarily. Select to remove or change part of the selected criteria. Figure 3.7—12 Selections 3.7.11 Expand button The Expand button has the following features: Legal spec makes it possible to enter values for legal group and legal type in a journal. AARO SYSTEMS AB 117 AARO 11.0 USER MANUAL Data Entry. Journals Figure 3.7—13 Legal specification Show description displays a description to the account of which values are to be entered. The accounts affecting the account of which values are entered will also be displayed. Figure 3.7—14 Show description Grouping makes it possible to group and sum the journals in the grid by selected column headings (drag and drop). This functionality is useful when entered journals need to be reconciled. a. Double-click relevant folder/journal in the left pane to display all journals/rows in that folder/journal. b. Select the option Expand/Grouping. c. Drag and drop optional column headers to the top of the grid. E.g. Company and Legal Type. The sum of the journals will be displayed on a row under the headers. AARO SYSTEMS AB 118 AARO 11.0 USER MANUAL Data Entry. Journals Figure 3.7—15 Grouping Selections made are displayed as text at the bottom of the grid. Tick the check box to remove all selections. Tick the check box to remove the selections temporarily. Select to remove part of the selections. 3.7.12 Add/remove link to document It is possible to add a link to an external document to a journal. A user can add a link to the own journal only. Follow these steps: 1. Load a journal. 2. In the attachments box, right-click External document reference and select Edit link to external document. Figure 3.7-16 Attaching a link to a document 3. Enter link title and full path to the document and click OK. AARO SYSTEMS AB 119 AARO 11.0 USER MANUAL Data Entry. Journals Figure 3.7-17 Specifying the link to the document The title of the link will now be visible in the External document field. Figure 3.7-18 Link to the external document 4. Click the link to load the document. 5. To remove the link, right-click it and select Remove link to external document. AARO SYSTEMS AB 120 AARO 11.0 USER MANUAL Validations. Match report 4. Validations This chapter describes how to work with the Validations menu items. 4.1 Match report This chapter refers to match reports under the menu item Validations/Match Reports in AARO. Match reports display intercompany differences between companies in a group. For example, one company may have a different value registered for due invoices (accounts receivable) compared to the respective bookings (accounts payable) at its counter company. Monthly reports are produced to highlight differences, and ensure action is taken to resolve them. The content of a match report varies according to predefined selections and can be displayed either on a company total level or on a sub dimension level. Note: match reports are also available from the menu Data Entry/Match. However, for security reasons a company administrator may choose to restrict user access through the Data Entry menu. For more information on the Data Entry/Match menu item, please refer to the 3.2 Match chapter. 4.1.1 Match Report window Figure 4.1—1 Match Report window AARO SYSTEMS AB 121 AARO 11.0 USER MANUAL Validations. Match report The Match window consists of two panes: the left pane contains companies for the selected period and dimension/group and the right pane contains report settings. 4.1.2 Print a match report To print a match report from the Validations menu, follow the instructions below: 1. Select Match Reports from the Validations menu. 2. Select a Period, Dimension/Group and Company group. 3. Select a company or All my companies in the left-hand pane. 4. Define the report content (see Report contents section). 5. Press Print > Preview. Depending on the destination selected (see Report destination in the Report contents section), various options are available to show a grid-layout report, a standard report, or to save the report as a text-file. From the standard report display it is possible to print the report to a printer or save it as a PDF file. Other standard icons are: Zoom In / Zoom Out, Previous or Next page, Close the print preview window. Figure 4.1—2 Example of the match report in the PDF format 4.1.3 Report contents The match report summarises all reported amounts for the combination of a period and package (including the collection of forms that are defined within a package). The report includes the reporting company and all selected counter companies. Possible differences between the companies are also included. The match report also gives information on period, currency rates used, AARO SYSTEMS AB 122 AARO 11.0 USER MANUAL Validations. Match report dimension selected, and rules selected. This information is displayed below the report header. The report contents are controlled by the selections made in the match report dialog area. The definitions for available report restrictions are supplied below. Field Description Restrictions: Report for selected rules only Limits the differences displayed in the report to a specifically selected matching rule. It is possible to choose to view a report with all rules or just one rule. Restrictions: Limit Defines the lower limit of the differences to be displayed. It is useful as a filter function in cases of a significant number of differences. Report currency Currency in which the information is displayed. It is possible to choose between all currencies that have exchange rates defined for the selected period. Figures to match The following options are available: Loc - The report will match Loc figures: the figures for both sets of companies will be based on local currency. Local currency figures will be converted to the report currency. Transaction Amount - The report will match transaction amount figures, i.e. the figures reported in transaction currency by the two companies. This also implies that there will be one row for each individual currency in the report. Total Specification - The report will match both Loc and transaction amount figures in a single broad report that also includes a specification of translation differences. Translation differences appear when the reported local currency and transaction amount figures use a currency exchange rate other than those stored in the AARO system for the period. This is not necessarily an error, but something to be aware of, and the Total Specification match report is an aid in these circumstances. Report layout Makes it possible to choose how much information to include in the report and also which entities to use in the matching. This is done by ticking the check boxes under ‘Specification of’ and ‘With match on counterpart’s’. The check boxes represent the different report dimensions available for the match report. The system administrator defines the available dimensions. The dimension could be e.g. a business unit, customer, or invoice number. AARO SYSTEMS AB 123 AARO 11.0 USER MANUAL Validations. Match report Field Description Company description This check box is ticked if the whole company name should be displayed in the report layout. Sorting The report can be sorted and displayed by the company code or by the match rule. Report destination The report can either be displayed in a grid, as a standard report, or be saved as a text-file. Match sum order In addition to the general sort order (by company or by rule), the report can be sorted by the size of differences. A typical example would be to have the largest differences listed first, by selecting the ‘Sum descending’ option. If ‘No sum order’ is selected, the report is sorted alphabetically. Define the restrictions required for the report and press OK. Figure 4.1—3 Match report settings with the total Specification AARO SYSTEMS AB 124 AARO 11.0 USER MANUAL Validations. Match report 4.1.4 Report layout The report is based upon two areas containing identical fields. The left side of the report displays information regarding the reporting company, i.e. your own company, and the right side shows figures reported for the counter company. Differences between the two sets of figures are shown in the centre of the report. If the report layout is not in the required style, close the print preview screen and adjust the report contents accordingly. Figure 4.1—4 Example of a match report AARO SYSTEMS AB 125 AARO 11.0 USER MANUAL Validations. Reconciliations 4.2 Reconciliations This chapter refers to the menu item Validations/Reconciliations in AARO. In the reconciliation window different rules for reconciliation of reported figures within the reporting unit/legal company may be selected. Reconciliation between different legal companies - intercompany matching - is made in the menu item Validations/Match Reports. See 4.1 Match report. 4.2.1 Reconciliations window Figure 4.2—1 Validations/Reconciliations window The Reconciliations window consists of three panes: companies for the selected period and dimension/group to the left, reconciliation report settings in the middle and reconciliation rules to the right. A reconciliation rule defines how accounts are compared in relation to each other. Reconciliation rules are managed in Utilities/Edit Input, Recon table by an administrator. The Rules table of the reconciliation form displays only general settings of the rules: CodeA (account) on FormA (input form) will be compared with CodeB on FormB by default on the level set up in the SpecialRule column. Default column can be left blank which means that the default for reconciliation will be done on lowest common level/dimension. CT in the SpecialRule column means company total. 4.2.2 Print a reconciliation report Follow these steps: 1. Select Reconciliations from the Validation menu. AARO SYSTEMS AB 126 AARO 11.0 USER MANUAL Validations. Reconciliations 2. Select Period and Dimension/Group and Company group as required. The list of companies on the left pane is updated to match the selection. 3. Select a company or All my companies in the left-hand pane. 4. Set up Settings for the report as described in the section below. 5. Select reconciliation rules for the report. One, all or several rules can be selected. 6. Press the Print button and then Preview. Figure 4.2—2 Print button The reconciliation report shows the difference between FormA/CodeA & FormB/CodeB according to the settings set up for a rule. Figure 4.2—3 Reconciliation report example AARO SYSTEMS AB 127 AARO 11.0 USER MANUAL Validations. Reconciliations 4.2.3 Settings for reconciliation reports Settings tab. Use Limit - Check this option and enter a numeric value into the text field if only rules with larger differences than an entered value should be included into the report. The administrator may attach default limits to recon rules. By choosing Override all individual rule limits a personal choice of limit is selected and the administrator’s default choices will be disregarded. Note that if the Override check box is checked then for rules with Calc Group = ‘N’ the currency of the limit will be LOC, but rules with Calc Group = ‘Y’ will be the group currency. If the Override check box is not checked then limit‘s currency is LOC. Note: the limit can be used with the counter code only, not the counter value. Include Journals - Tick this checkbox to included journals to the reconciled values. If this checkbox is ticked then the “Journal settings” tab settings are enabled. Sort by - Tick if the report should be sorted by rule or company. Tick the checkbox if there should be a page break between different rules/companies. Figure 4.2-4 Setting up a reconciliation report Detail level. Select at which level the reconciliation should be done: company total or more detailed level, e.g. by cost centre. This depends on which level the accounts are reported. Default – Rule’s default level. Use the detail level which is defined in the rule. Maximum detail - Lowest level where both accounts in the rule are reported. Company total - The figures summarized to the company total level before reconciliation. Other - Specified at the selected dimension. AARO SYSTEMS AB 128 AARO 11.0 USER MANUAL Validations. Reconciliations Journal settings tab. The “Journal settings” tab settings becomes enabled if the Include Journals checkbox on the “Settings” tab is ticked. Choose journals of which Journal Type should be included into reconciliation. All journal types or just a few may be included. Figure 4.2-5 Selecting journals for a reconciliation report AARO SYSTEMS AB 129 AARO 11.0 USER MANUAL Validations. Process Status 4.3 Process Status This section refers to the menu item Validations/Process Status. A reporting package has a different status depending on whether the reporting has been finalised. When companies have finalised reporting in the menu Data Entry/Input, the reporting package is completed when the Complete button is pressed. With the process status functionality it is possible to check whether a reporting package for different companies has been completed. It is also possible to change the status of packages to complete/reverted and send e-mail reminders/queries. The complete/multi-complete functionality is useful if there are inactive companies, or companies that have not finalised their reporting on schedule. 4.3.1 What is a package? A package (or input package) is simply a collection of forms. Packages are used for convenience – they show up as folders in the tree structure of the Data Entry/Input screen or as items in a drop-down list in the Data Entry/Match screen. For more information, please refer to the 7.9 Edit Input section. The status for a package can be: Status Description Empty All editable cells are empty for all forms in a package. In progress At least one editable cell has data entered in the forms in the package. Completed A package or dimension is completed as follows: For a package completed on the company level, this status indicates that there are no differences between the reconciliation accounts in the reporting package. For a package completed by dimension, this status indicates that the dimension is completed with or without difference between accounts. Completed with differences A package completed on the company level is completed with a difference relating to a reconciliation rule. Audited Indicates that a user with an audit role has audited a package. AARO SYSTEMS AB 130 AARO 11.0 USER MANUAL Validations. Process Status 4.3.2 Process Status window Figure 4.3—1 Process Status window The Process Status window consists of two panes: the left pane contains companies for the selected period, dimension/group and company group and the right pane contains the list of packages for the select company or all companies grouped by the package status. Window buttons are: Button Description Load Loads selected packages, grouped according to their status. Print Displays selected grid in a printer-friendly format. Multi Complete Completes several packages. Multi Revert Reverts several completed packages to the previous status. Copy all Copies the grid content to clipboard. Mail Sends email to recipients selected in the menu Data Entry/Company Information/E-mail Contacts tab. Each recipient has restrictions to certain companies and packages. This button is visible when at least email contact is added. AARO SYSTEMS AB 131 AARO 11.0 USER MANUAL Validations. Process Status 4.3.3 Load packages To load packages, follow these steps: 1. Select Process Status in the Validations menu. 2. Select Period and Dimension/Group and Company group. The list of companies on the left pane is updated to match the selection. 3. Select a company or All my companies and click Load. Packages are loaded separated by status into sections. A section can be collapsed/expanded by clicking the + sign. Figure 4.3-2 Records separated by package status 4. To sort rows, click the column header. Figure 4.3-3 Sorting Process status records 4.3.4 Filter packages To filter packages visible in the table by column values, press the arrow on the column header and select values. The selection can e.g. be limited to a certain status, package or company. Figure 4.3-4 Filtering Process status records AARO SYSTEMS AB 132 AARO 11.0 USER MANUAL Validations. Process Status Selections made are displayed as text at the bottom of the grid. Press the check box to remove all selections. Tick the check box to remove the selections temporarily. Select to remove part of the selections. 4.3.5 Send mail To send e-mail to recipients, follow these steps: 1. Press the Mail button to display the Send Mail dialog listing recipients according to the filtered selection criteria. 2. Clear the Include box/es for anyone who should not receive mail. Enter the Subject and Message and press Send. Figure 4.3-5 Sending mail to process status contacts 4.3.6 Revert Revert is used when a company needs to make new entries in the selected period. Select a row in the grid and click the Revert button. Figure 4.3-6 Reverting a package A package cannot be reverted by default. The package should listed as open for revert in the menu Utilities/Edit Periods/Open for Revert tab before it can be reverted. AARO SYSTEMS AB 133 AARO 11.0 USER MANUAL Validations. Process Status 4.3.7 Multi-complete With multi-complete, multiple companies and packages can be completed. Follow these steps: Note: the companies and packages selected are highlighted in blue; use Ctrl + left mouse button to select/clear multiple companies or packages. 1. Select the company or select “All my companies” in the left pane to load the relevant packages. 2. Press button Multi Complete. The following window is displayed. Figure 4.3-7 Completing several packages and companies 3. Select packages and companies to be completed. To select all the companies which have not completed, press the All not completed button. 4. Click the Check button to find out whether companies have reconciliation errors. AARO SYSTEMS AB 134 AARO 11.0 USER MANUAL Validations. Process Status Figure 4.3-8 Multi-complete check results The Multi-Complete Result window shows which companies have already been completed, companies that can be completed and companies that have reconciliation errors. The reconciliation error report can be viewed by clicking the View error report button or can be saved to a file by clicking the Save report file. 5. Complete companies without reconciliation errors with the button Check and complete. 4.3.8 Multi-revert With multi revert multiple companies can be reverted to the previous status. To be reverted, the package and company combination must be open for revert in the period (Utilities/Edit Periods/Open for Revert tab). 1. Press the button Multi Revert. The following window is displayed. AARO SYSTEMS AB 135 AARO 11.0 USER MANUAL Validations. Process Status Figure 4.3-9 reverting several packages and companies 2. Select the packages and companies to be reverted for reporting and click Revert. 4.3.9 Audit a package The audit functionality enables users, with certain rights set up in the User Administration menu, to apply an Audited status to a package. The auditor can change status ‘Completed’ and ‘Completed with difference’ to ‘Audited’. Select the package to change status for and press AARO SYSTEMS AB . 136 AARO 11.0 USER MANUAL Validations. Process Journals 4.4 Process Journals The menu item Validations/Process Journals gives an overview of all manually entered journals in the system. Process Journals also supports company checks and controls; different user roles can be allocated depending on whether users Prepare, Save (approve), Attest, or Audit a journal. A journal can have following statuses: Journal status Description Prepared The journal is temporarily saved in database. The numbers are not consolidated. Journals are prepared in menu Data Entry/Journals. Approved The journal is saved in database. The numbers are consolidated. Journals can be saved in menu Data Entry/Journals as well as in this menu. Attested The journal is attested in menu Process Journals. Audited The journal is audited in menu Process Journals. The order of events for processing a journal entry is: Prepared Approved Attested Audited Different combinations of the responsibilities Prepared, Approved and Attested are set up as ‘Journal functions’ through the menu Utilities/Application Management and the Application Management/Responsibilities folder. The ‘Journal functions’ are then applied to the users. The responsibility Auditor is a special user right set directly on a user. The Auditor only has read rights to the system except for the Audit button. AARO SYSTEMS AB 137 AARO 11.0 USER MANUAL Validations. Process Journals 4.4.1 Process Journals window Figure 4.4—1 Validations/Process Journals The Process Journals window consists of two panes: companies for the selected period, dimension/group and company group to the left and journals for the selected company or all companies to the right. The window buttons are: 4.4.2 Button Usage Load Loads journals for the selected period and company. Print Prints loaded journals as a report. Save Saves a prepared journal to the database. Attest Attests a prepared or saved journal. Audit Audits a saved or attested journal. Cancel Cancels attested or saved journal. The status will be prepared after pressing Cancel. Load journals To load journals, follow these steps: 1. Select Process Journals from the Validations menu. 2. Select Period, Dimension/Group and Company group. The list of companies is updated according to the selected values. 3. Select a company or All my companies and click Load. Journals are loaded. 4. To sort the rows, click the column header. AARO SYSTEMS AB 138 AARO 11.0 USER MANUAL Validations. Process Journals Figure 4.4-2 Sorting Process journals 5. To see the journal in Data Entry/Journals, click the Id link. 4.4.3 Filter journals To filter records visible in the table by column values, pressing the arrow on the column header and select values. The selection can e.g. be limited to a certain status or user. Figure 4.4-3 Filtering Process journals Selections made are displayed as text at the bottom of the grid. Tick the check box to remove all selections. Tick the check box to remove the selections temporarily. Select to remove part of the selections. AARO SYSTEMS AB 139 AARO 11.0 USER MANUAL Reports. Drill down reports 5. Reports This chapter describes how to work with the Reports menu items. 5.1 Drill down reports This chapter is an introduction to AARO drill down reports. After reading this you will understand how to order a report, how to adjust it and how to build new reports. Drill down is the AARO report generator. Basically it is an OLAP report generator containing your entire organization. The menu item for drill down reports is Reports/Drill Down. 5.1.1 Predefined reports Predefined reports are reports that you or someone else has prepared and saved in AARO’s report folder structure. As the report folders are stored in the AARO database, the same folders will be visible regardless of which computer you log in from. The predefined reports can be accessed through the Reports tab. Figure 5.1—1 Predefined drill down reports The report folders will be adjusted to your needs and might look different from our example. The requested report will be accessed by double-clicking or by selecting and clicking the Run Report button. AARO SYSTEMS AB 140 AARO 11.0 USER MANUAL Reports. Drill down reports Some reports may require parameters. In this case one or more selection windows, such as the one below, will be visible where you have to specify your criteria, i.e. period in the example below. Figure 5.1—2 Drill down report parameter Period Make your selection(s) and press OK. When all selections are done, the figures will be retrieved and the report shown as below. AARO SYSTEMS AB 141 AARO 11.0 USER MANUAL Reports. Drill down reports Figure 5.1—3 Drill down report example 5.1.2 Drill down by If a certain number is of interest and more details required, drill down by can be used. Right-click a cell, row or column. A menu will appear from which Drilldown By is selected, after which a choice of parameter is made. In our example we are interested in the total income (account 3999) and would like to drill it down by company. AARO SYSTEMS AB 142 AARO 11.0 USER MANUAL Reports. Drill down reports Figure 5.1—4 Drill down options The new drilled-down report appears in a new tab. The grand total of the new report (10 506 465) is the same figure as the one we originally drilled down from. Figure 5.1—5 Drill down report example Drill down by may be repeated indefinitely. Each new drill down will produce a new unique report tab. An old report can be accessed by pressing its tab. AARO SYSTEMS AB 143 AARO 11.0 USER MANUAL Reports. Drill down reports 5.1.3 Expand by To view details without creating a new report, the expand functionality can be used. Expand can be used with rows only. Right-click a row. A menu will appear from which Expand by is selected, after which a choice of parameter is made. Figure 5.1-6 Performing report expand by business area New rows appear under the selected row. Figure 5.1-7 Account expand by business area An expanded row is collapsed by selecting Collapse from the right-button menu. Figure 5.1-8 Collapse an expanded row 5.1.4 Edit a report If more advanced changes to the report are to be made, press the Edit tab. The organisation of the Edit tab can vary greatly, but it always contains all the different entities necessary to build a report. AARO SYSTEMS AB 144 AARO 11.0 USER MANUAL Reports. Drill down reports When the Edit tab is selected, the fixed, row and column criteria panels open up in the report: Figure 5.1—9 Editing a drill down report When in this state, everything in the report is possible to change. The report is defined by: Fixed parameters affecting the entire report; A fixed parameter can have only one item selected, i.e. only one currency. Row parameters defining the rows of the report; Column parameters defining the columns of the report. More than one item can be chosen for rows and columns. The first item is the first sort order. The second item is the second sort order and so on. The report definition can be changed by dragging items from the Edit tab to the Fixed, Row or Column panels. Items can also be moved between the three panels, or rearranged inside a panel, by the use of drag-and-drop. It is possible to select parameter values for the report and other settings such as headings, sort order, totals etc in the parameter selection dialog by clicking the parameter selection icon. Figure 5.1-10 Opening the Parameter selection dialog AARO SYSTEMS AB 145 AARO 11.0 USER MANUAL Reports. Drill down reports Figure 5.1-11 Selecting currency values for a drill down report AARO SYSTEMS AB 146 AARO 11.0 USER MANUAL Reports. Drill down reports Figure 5.1—12 Multiple values selection for a parameter For fixed criteria, only values can be selected, not other settings. In order to update the changed report, press the Run Report Button. 5.1.5 Create a report To create a report from scratch, follow these steps: 1. Press the New button . 2. You might get the select data source dialog. The AARO database is always accessible but it is also possible to link AARO to other sources of information such as a Data Warehouse, ERP system or others. In this case, select a data source to retrieve a report from. AARO SYSTEMS AB 147 AARO 11.0 USER MANUAL Reports. Drill down reports Figure 5.1-13 Selecting a data source for a drill down report The new empty report will now appear. Initially the Fixed panel is filled with some default parameters and these can also vary between AARO installations. Figure 5.1-14 New drill down report with default parameters The parameters on the Fixed panel relate to the entire report. 3. New parameters can be added to the fixed panel from the Edit tab by drag-and-drop. Parameters can likewise be removed by being dragged back to the Edit tab. 4. To select the parameter value, click the select parameter icon Figure 5.1-15 Changing drill down parameter value The select parameter window will appear where specified criteria are chosen. AARO SYSTEMS AB 148 AARO 11.0 USER MANUAL Reports. Drill down reports Figure 5.1-16 Selecting currency for a drill down report 5. When satisfied with the Fixed panel content, proceed with Rows and Columns panels accordingly. More than one item may be chosen for rows and columns parameters. The first parameter will be the first sort order, the second - the second sort order and so on. Parameters may be moved between Rows, Columns and Fixed panels by dragging them to the new requested location. 6. To execute the new report press the Run Report button . Note: The UserId parameter shows users who created journals. It should be used together with the Journal Id, Journal Totals or Journal Type parameter. 5.1.6 Save a report If you want to save your report for future use, perform the following steps: AARO SYSTEMS AB 149 AARO 11.0 USER MANUAL Reports. Drill down reports 1. Press Save . The Save report dialog will appear. Figure 5.1-17 Saving a drill down report 2. Select the folder to save the report in. To create a subfolder, press the Create Folder button. User rights determine where the user has access to save the report in a folder. Most users are only allowed to save the report in their own personal folder. Administrators are able to save reports everywhere in the report structure. 3. Enter report name in the Report field and heading in the Heading field. The report name is the name shown in the report tree (this can be regarded as a kind of “file name” for the report). The heading is the text written as the heading on the output report. 4. To prompt users to select criteria when they open a report, tick the appropriate parameter check box/-es. AARO SYSTEMS AB 150 AARO 11.0 USER MANUAL Reports. Drill down reports 5. The Save Reports as Relative check box enables users to create flexible reports with up-to-date criteria. For more information, 5.1.7 Save periods as relative. 6. To save the report formatting, tick the Include report format settings check box. (Note: for more elaborate formatting, or formatting which cannot be overwritten through updates or upgrade processes, Excel is recommended). 7. Press Save and the report will be stored for future use. 5.1.7 Save report with new name To save the report with a new name, follow the instructions below: 1. Open the report by selecting it in the tree structure and click the Run Report button. 2. To rename the saved report: Click the Save button and enter new report name, or Right-click the report tab and click SaveAs. 3. Proceed as described in 5.1.6 Save a report. 5.1.8 Save periods as relative The Save Periods as Relative check box enables users to create flexible reports with up-to-date criteria. For example, in May you may choose to replace April with May, and in June you may choose to replace May with June, and so forth. Periods can be saved as relative when you have identical period type, time series, time series type, year and period index settings. To save periods as relative, perform the following steps: 1. To prompt period selection on report run, tick the Period parameter check box. 2. Tick Save Periods as Relative check box and press the Edit Relative Info button (this is possible only if periods in the system are appropriately maintained by the system administrator). AARO SYSTEMS AB 151 AARO 11.0 USER MANUAL Reports. Drill down reports Figure 5.1-18 Saving periods as relative 3. Select the following periods: Base Period – period the report is based on. Other periods are relative to this period. Absolute Period Index – fixed period regardless of the base period. When a report is run, the periods are selected as follows: If period is saved as parameter, the base period is prompted. If period is not saved as parameter, the current period set up in the system is used as the base period. For example, a report can show prior year closing period, current month actual period and current month budget period for four different base periods: 0712A 0801A 0801B – initial configuration, where 0801A was saved as base period and 0712A - as absolute period index with period parameter selection check box ticked. 0712A 0806A 0806B – base period 0806A was selected on report run. 0712A 0812A 08012B – base period 0812A was selected on report run. 0812A 0903A 0903B – base period 0903A was selected on report run. AARO SYSTEMS AB 152 AARO 11.0 USER MANUAL Reports. Drill down reports 5.1.9 Delete a report To delete a report permanently, do one of the following: Delete the currently opened report. Click the Delete button and select Report from the menu displayed. Figure 5.1-19 Deleting a report using the Delete button Delete report in the tree. Right-click the report in the tree and click Delete report entirely. Figure 5.1-20 Deleting a report in the tree 5.1.10 Rename a sheet Click the Rename button and enter new name. Alternatively, right-click the report tab and click Rename. 5.1.11 Delete report sheets Click the Delete button and select Current sheet or All sheets from the menu displayed to delete either the currently active report sheet or all sheets. This will enable you to tidy up your workspace. AARO SYSTEMS AB 153 AARO 11.0 USER MANUAL Reports. Drill down reports Figure 5.1-21 Deleting report sheet using the Delete button Alternatively a sheet can be deleted by right-clicking the sheet tab and selecting Delete. Figure 5.1-22 Deleting a report sheet using the sheet tab 5.1.12 Top-N functionality This report functionality allows you to request a report containing not all but only maximum values. Figure 5.1-23 Drill down report example The drill down report example above has several rows and columns. You may, for example, want to display a report containing the maximum values for three products for company: ATLANTA. In this example, click the Product dimension. The Select Product dialog window appears. In the Selection area click the Top-N radio button. Top-N settings appear in the right-pane: AARO SYSTEMS AB 154 AARO 11.0 USER MANUAL Reports. Drill down reports Figure 5.1-24 Top-N settings Top-N setting fields are as follows: Field Description Top count Amount of top rows (columns) which should be displayed. Value to select by Radio button that determines how the report values should be compared: using Actual, Absolute or Negated values. Sortorder Radio button that determines whether the report should be sorted in the ascending or descending order. Bind Top-N to the column value (row value) Select which column (row) should be used for comparison. AARO SYSTEMS AB 155 AARO 11.0 USER MANUAL Reports. Drill down reports Choosing to enter Top-N settings as shown above and executing the report provides us with the following example, showing the top 3 products for the report. Figure 5.1-25 Top-N drill down report 5.1.13 Calculated items An item calculated based on report parameters can be added to the report. To create a calculated item, follow the instructions below: 1. Enter the detail selection dialog window for a criterion in the report. 2. Make sure the items needed for the calculation are entered in the Selected items field. Click Calculated Item. 3. Enter a name for the Calculated item in the Heading field. 4. Enter the formula in the Expression field. Click the buttons for the items, operands and numbers to include them in the calculation. If needed, use the [Backspace] button to delete the last character. 5. Click OK. AARO SYSTEMS AB 156 AARO 11.0 USER MANUAL Reports. Drill down reports Figure 5.1-26 Calculated items 6. Click OK to view the report. 5.1.14 Calculated periods Calculated periods can be set up in the menu Utilities/Edit Periods to perform required calculation in the report (i.e. isolated month, last 12 months, average for several periods) as alternative to calculated items. The advantage of calculated periods is that they have the common definition for all users. Two types of calculated periods can be used in AARO: Calculated – calculated when the report is executed. Calculated periods use the report translation of the account (set up in Utilities/Edit Accounts). PreCalc – calculated by the consolidation process and stored in the database. Precalculated periods use the translation of the account (set up in Utilities/Edit Accounts). For information how to set up calculated and precalculated periods, see 7.5 Edit Periods. The following example represents how to set up a calculated period for isolated month calculation. Period 0802_I is calculated as 0802A – 0801A for average and fixed account translation and is equal to 0802A for closing and opening translation. AARO SYSTEMS AB 157 AARO 11.0 USER MANUAL Reports. Drill down reports Figure 5.1-27 Isolated period setup example In the report a calculated or precalculated period can be retrieved together or without other periods. Figure 5.1-28 Calculated period in the report 5.1.15 Calculated currency translation Another alternative to calculated items and calculated periods is the currency translation set up in the menu Utilities/Edit Currency Translations. Different currency translations can be set up to perform various calculations as described in 7.16 Edit Currency translations. The following example represents the currency translation calculating an isolated month. The IsoMonth currency translation is calculated as current period minus previous period. AARO SYSTEMS AB 158 AARO 11.0 USER MANUAL Reports. Drill down reports Figure 5.1-29 Currency translation calculating an isolated month The following report represents figures for Normal and IsoMonth currency translations. Figure 5.1-30 User defined currency translation in the report 5.1.16 Transpose rows and columns To transpose a report, do as follows: 1. Click the Transpose button switch places. to enable the rows and columns 2. Click again the Transpose button to revert. 5.1.17 Delete or hide columns and rows Do one of the following: To delete zero rows or columns from the whole report, click the Delete button and select Zero columns or Zero rows. Figure 5.1-31 Deleting empty rows from a drill down report AARO SYSTEMS AB 159 AARO 11.0 USER MANUAL Reports. Drill down reports To delete selected columns or rows, right-click a row or column to be deleted in the report and select Delete Row(s) or Delete Column(s). Figure 5.1-32 Deleting a row from a drill down report To hide rows or columns temporarily, right-click a row or column to be hidden in the report and select Hide Row(s) or Hide Column(s). Rows and columns can be brought back by clicking Unhide All. 5.1.18 Change report settings To change settings for the report, go to the edit mode and click the Settings button. Here you can select to show or hide report lines, page breaks and comments or change other settings by clicking Report settings. Figure 5.1-33 Changing report settings 5.1.19 Change cell format To change report cell format, do as follows: 1. Select one or several cells in the report. AARO SYSTEMS AB 160 AARO 11.0 USER MANUAL Reports. Drill down reports 2. Change the cell format either by using the buttons in the top right corner of the workspace or by right-clicking and selecting Cell Format from the menu displayed. Figure 5.1-34 Formatting drill down report cells 5.1.20 Display statistics To view report statistics, do as follows: 1. Select several cells in the report. 2. Right-click and select Statistics from the menu displayed. The statistics (count, sum, max, min, average) for the selected cells are displayed. AARO SYSTEMS AB 161 AARO 11.0 USER MANUAL Reports. Drill down reports Figure 5.1-35 Viewing drill down report statistics 5.1.21 Sort column in a report Select a column in the report, right-click and select Sort Column from the menu displayed. Figure 5.1-36 Sorting a drill down report 5.1.22 Copy report data To copy report data to the clipboard, click the Copy button and then Copy selection to copy the selected cells only or Copy all to copy all report cells. AARO SYSTEMS AB 162 AARO 11.0 USER MANUAL Reports. Drill down reports Figure 5.1-37 Copying report data to clipboard The copied data can be pasted to Excel or another application (Ctrl+V). 5.1.23 Excel Connectivity AARO is closely linked to Excel. Once a report is created in Reports/Drill Down it can be easily exported to Excel. Note: Microsoft Excel versions prior to Office 2007 should open Excel documents automatically. However, Microsoft Excel 2007 requires an Add-In to be activated, for more information about required settings, please refer to 6 Excel connectivity. 5.1.24 Live copy to Excel The Copy button also offers Live copy to Excel functionality. Figure 5.1-38 Report Live copy to Excel This command will start Excel automatically, open the AARO/Excel Add-In, log on to the AARO database from Excel, and enter the report content and functionality into a new Excel workbook or worksheet. AARO SYSTEMS AB 163 AARO 11.0 USER MANUAL Reports. Drill down reports Figure 5.1-39 Live copy of a drill down report to Excel 'Live' in this context indicates that it is now possible to continue to work with the figures, e.g. change fixed limitations, drill down into the figures etc. For further details, see 6.4 Excel drill down reports. 5.1.25 Add comments to report To add a comment to a report cell, follow these steps: 1. To add a comment to a report cell, right-click the cell and select Add Comment. Enter comment text and click Save. Figure 5.1-40 Adding comment to a report cell The comment icon will appear in the cell. Figure 5.1-41 Comment added to the report cell 2. To edit comment in a cell, right-click the cell and select Edit Comment. AARO SYSTEMS AB 164 AARO 11.0 USER MANUAL Reports. Drill down reports 3. To delete comment from a cell, right-click the cell and select Delete Comment. Comments are saved with the report. When a report is printed, comments are printed as footnote reference. Figure 5.1-42 Comment printed with the report 5.1.26 Print report To view the report in the print preview mode, do one of the following: Select the Report radio button in the top right corner. Figure 5.1-43 Report radio button The report is shown in the print preview mode in the work area. To open report in the PDF format, click the Print button and then Preview. The report can be saved as PDF or sent to the printer. Figure 5.1-44 Preview report in as PDF To save report in a different format, click the Print button and then File. Select the file format you want (.xls, .rtf, .txt). To print multiple reports (reports must be executed), click Reports and then Print multiple reports. Select reports to print or All and click OK. AARO SYSTEMS AB 165 AARO 11.0 USER MANUAL Reports. Drill down reports Figure 5.1-45 Print multiple reports AARO SYSTEMS AB 166 AARO 11.0 USER MANUAL Reports. Comments 5.2 Comments The Comments window (menu item Reports/Comments) is used for viewing and printing comments entered in comment forms in the menu Data Entry/Input. 5.2.1 Comments window The Comments window contains settings defining what comments should be retrieved and printed on one page. Figure 5.2—1 Drill down report comments 5.2.2 Print comments To print comments, follow these steps: 1. Select Period and Package from where the comments are to be retrieved. Figure 5.2-2 Selecting period and package to view comments 2. Select how the page breaks should be set up in the report. The report can be displayed by form, by company or by dimension. AARO SYSTEMS AB 167 AARO 11.0 USER MANUAL Reports. Comments Figure 5.2-3 Setting up page breaks for a comment report 3. Specify the comments report per form, company, dimension or a combination of the previous. Figure 5.2-4 Setting up restrictions for a comment report 4. Click the Print button and then Preview or Printer. Figure 5.2-5 Printing a comment report The comments report shows comments made in comment forms in the menu Data Entry/Input. AARO SYSTEMS AB 168 AARO 11.0 USER MANUAL Reports. Comments Figure 5.2-6 Comment report example AARO SYSTEMS AB 169 AARO 11.0 USER MANUAL Excel connectivity. Using AARO with Excel 6. Excel connectivity This chapter describes how to work with the AARO application from Excel. 6.1 Using AARO with Excel AARO includes the Excel Add-In function that provides users with multiple options to access AARO data directly from Microsoft Excel. There are two options for accessing data: Input data can be sent from Excel to the AARO database. Consolidated data can be retrieved from the AARO database to Excel. Two different techniques exist for these alternatives: Formulas Excel Drill-down and Excel input forms The following table summarizes the possibilities: Direction Overview of Possibilities Technique Formulas Without formulas Data from Excel into AARO ABS send formulas Excel input forms Data from AARO into Excel ABS retrieve formulas Excel drill down reports There are differences between the two techniques and it is advisable to become acquainted with both in order to choose the most appropriate. The two techniques can also be mixed. In addition to the above major features, AARO Excel Add-In supports the creation of journal bookings from Excel. Each feature is described in depth in its own chapter. This chapter describes the characteristics of all features: how to open the AARO Excel Add-in and how to log on. The AARO Excel add-in can be used with Excel 2000 up to Excel 2010. Versions prior to Excel 2000 are not supported. 6.1.1 Installing a digital certificate for AARO/Excel Depending on the security settings on Excel installation user might be required to install the signed certificate from Aaro Systems AB. This process is described below. To install the certificate, follow these steps: 1. Right-click the file ABSXL.XLL and select properties. Select the signature and press the Details button. AARO SYSTEMS AB 170 AARO 11.0 USER MANUAL Excel connectivity. Using AARO with Excel Figure 6.1-1 ABSXL.xll file properties, Digital signatures The Digital Signature Details window appears. 2. Click the View Certificate button. AARO SYSTEMS AB 171 AARO 11.0 USER MANUAL Excel connectivity. Using AARO with Excel Figure 6.1-2 Digital Signatures Details window The Certificate window appears. 3. Click Install Certificate. AARO SYSTEMS AB 172 AARO 11.0 USER MANUAL Excel connectivity. Using AARO with Excel Figure 6.1-3 Installing the certificate The Certificate Import Wizard window appears. 4. Click Next and then select Place all certificates in the following store and click the Browse button. AARO SYSTEMS AB 173 AARO 11.0 USER MANUAL Excel connectivity. Using AARO with Excel Figure 6.1-4 Selecting the certificate store 5. Select the Trusted Publishers folder and click OK. Figure 6.1-5 Selecting the Trusted Publishers folder 6. Click Next and then Finish. AARO SYSTEMS AB 174 AARO 11.0 USER MANUAL Excel connectivity. Using AARO with Excel Figure 6.1-6 Finishing certificate installation The Aaro Systems AB certificate is now located in the Trusted Publishers/ Certificate folder. 6.1.2 Excel macro security settings For Excel Add-In to work, Excel Macros need to be enabled for use. This is dependent on Macro Security settings in Excel. This manual assumes that settings are selected as ‘Medium’ in Excel 2003 or `Disable all macros with notification´ in Excel 2007 and higher. Excel 2003 In Excel 2003 the Macro security level is set up through the Excel menu Tools > Options, and the Security tab, Macro Security… button. AARO SYSTEMS AB 175 AARO 11.0 USER MANUAL Excel connectivity. Using AARO with Excel Figure 6.1-7 Excel 2003 Macro security settings Figure 6.1-8 Setting up Macro security level in Excel 2003 Excel 2007 and higher AARO SYSTEMS AB 176 AARO 11.0 USER MANUAL Excel connectivity. Using AARO with Excel In Excel 2007 and higher the Macro security settings are located under the Excel menu Excel Options > Trust Center. Click the Trust Center Settings button. Figure 6.1-9 Excel 2007 Macro security settings Tick the setting Disable all macros except digitally signed macros and click OK. Figure 6.1-10 Setting up Macro security level in Excel 2007 6.1.3 Open the AARO Excel Add-In To open the AARO Excel Add-in: 1. Start Microsoft Excel. AARO SYSTEMS AB 177 AARO 11.0 USER MANUAL Excel connectivity. Using AARO with Excel 2. On the File menu, select Open. 3. Browse to the ABSXL.XLL file, and open it. It is normally found under C:\AARO (the AARO installation folder). If the file cannot be found, contact your system administrator. The AARO folder also contains another Excel file– AARO Reports.xla – used internally by ABSXL.XLL and thus not advisable to open. 4. If a Security Warning dialog is shown, make sure that the macros are from Aaro Systems AB and, if that is the case, click the Enable Macros button to activate AARO Excel. Depending on the security settings in Excel, this dialog may or may not be seen. If Excel 2007 or higher is used, the certificate of Aaro Systems AB needs to be imported and trusted separately before the AARO Excel Add-in can be opened. Figure 6.1—11 Enable Macros 5. A new menu named AARO appears on Excel’s main menu bar. In Excel 2007 and higher, it is to be found in the Add-Ins section. Figure 6.1—12 AARO Menu in Excel AARO SYSTEMS AB 178 AARO 11.0 USER MANUAL Excel connectivity. Using AARO with Excel 6.1.4 Log on Logon is necessary before any data can accessed in the AARO database. To log on to AARO from Excel after opening Add-In, follow these steps: 1. On the AARO menu in Excel, select Log On. The log on dialog window will be displayed. 2. Select a database (or just accept the default choice), and enter user name and password. Log on to AARO in the same way as usual. Press Login. Figure 6.1—13 AARO Logon from Excel 3. The application will now operate and download some lists from the database. Initially, this may take some time but subsequent login attempts will be much faster. 4. After logging on to the AARO database from Excel, all the AARO Excel features can be accessed. Note: It is recommended to quit and restart Excel once after having logged on to a certain AARO database for the first time. This is because certain help texts in the function wizard of Excel relating to AARO formulas will be updated at the first logon, but displayed only after Excel has been restarted. 6.1.5 Log off When closing Excel, there is no need to issue the Log off command separately as there is an automatic logoff from AARO in Excel. There will also be an automatic logoff from AARO if there is no activity for 2 hours (or another specific period of time that has been set up by the system administrator). Log Off from the AARO menu in Excel is an option if a logoff from AARO in Excel without closing Excel is requested. AARO SYSTEMS AB 179 AARO 11.0 USER MANUAL Excel connectivity. AARO Excel retrieve 6.2 AARO Excel retrieve Formulas in Microsoft Excel can be used to retrieve data from the AARO application into Excel workbooks. This provides extra flexibility and options for data manipulation in Excel. This manual refers to the Excel functions used to retrieve data from AARO to Excel. 6.2.1 ABS In this manual, there is frequent reference in formulas to “ABS”. This is because the AARO application was formerly known “ABS” (Aaro Business Systems). The older product name has been preserved in some of the Excel formulas so that customers who working with existing Excel workbooks do not have to make unnecessary changes. From a working point-of-view the terms ABS and AARO are interchangeable; AARO is simply the more modern term. 6.2.2 Selecting Excel retrieve formulas The various AARO Excel retrieve formulas can be accessed by pressing the Insert Function button in Excel. Figure 6.2-1 Inserting an AARO function into Excel worksheet The AARO Excel retrieve formulas are listed under the ABS data retrieve category. AARO SYSTEMS AB 180 AARO 11.0 USER MANUAL Excel connectivity. AARO Excel retrieve Figure 6.2-2 Selecting AARO data retrieve formulas 6.2.3 Entering formulas directly If you are a more experienced Excel user and/or working with existing formulas, it is possible to enter the required AARO retrieve equation directly in the formula bar, for example: =ABSRetrieveOperFlex(5555;"0712A";"ARLANDA";3010;"Business Unit:FOOD") 6.2.4 Formula results Before entering data using Excel retrieve functions, it is worthwhile noting that when entering function arguments, the formula result (highlighted below) contains useful information. Figure 6.2—3 Formula result AARO SYSTEMS AB 181 AARO 11.0 USER MANUAL Excel connectivity. AARO Excel retrieve Some examples of formula results might be: Formula result=0, formula is not completed. Formula result=1, formula is ready to retrieve a string of information according to template criteria. Formula result = “Net sales, external”, or any other text string or number. This directly displays the information received from AARO, dependent on the criteria input into the formula. 6.2.5 Cell references and direct data entry in Excel In Excel retrieve formulas it is possible to use either ‘direct Excel data entry’ (input data going directly into a function field), or refer to a cell reference which contains the relevant information. For example, here some data has been entered directly here, using the ‘direct Excel data entry’ method: Figure 6.2—4 Direct Excel data entry However, a cell reference containing the relevant information returns exactly the same result. Figure 6.2—5 Data entry into excel using cell references (Where Cell B1 was entered as follows): Figure 6.2-6 Selecting cell data Throughout this chapter, the first model of ‘direct Excel data entry’ has been used in order to avoid confusion. However, users may prefer to cell references instead, depending on the customers’ needs. 6.2.6 Formats for Excel functions It is important to make sure that criteria in Excel functions have the right format, otherwise problems can occur. Note: where possible, Microsoft Excel tries to interpret criteria as cell references. If it can, they are then converted to cell references. If it can't, then they get quoted and become strings. AARO SYSTEMS AB 182 AARO 11.0 USER MANUAL Excel connectivity. AARO Excel retrieve Using the similar example to the ‘direct Excel data entry’ example outlined above, if a period is specified as B0803 for example, the function will look for cell B803. This is because of some of the programming and ‘smart functions’ contained in Excel. However, if the data is entered in quotations such as “B0803” the value is taken as absolute. 6.2.7 Description of Excel retrieve functions Detailed descriptions of all the Excel retrieve functions are provided throughout this chapter, along with examples for reference. 6.2.8 ABSGetAccountText ABSGetAccountText displays the descriptive text for an account, given the account code. An example of an ABSGetAccountText function is outlined below, with a brief explanation of the required parameter underneath. Figure 6.2—7 ABSGetAccountText Code 6.2.9 Account number whose descriptive text is to be retrieved. ABSGetCompanyRate ABSGetCompanyRate displays the exchange rate for the reporting currency of a company based on the period and rate type. For reference, an example of an ABSGetCompanyRate function is outlined below, along with a brief explanation of the function parameters underneath. Figure 6.2—8 ABSGetCompanyRate Period Period for which data is to be retrieved. Co Company code. AARO SYSTEMS AB 183 AARO 11.0 USER MANUAL Excel connectivity. AARO Excel retrieve RateType Ope (opening), Ave (average) or Clo (closing) 6.2.10 ABSGetMinorities ABSGetMinorities displays the minority percentage for a specified MinorityType (direct, indirect or total) for a company shareholding within a legal group, for a given period. For reference, an example of an ABSGetMinorities function is outlined below, along with a brief explanation of the function parameters underneath. Figure 6.2—9 ABSGetMinorities Period Period for which data is to be retrieved. Co Company code. MinorityType DIR (Direct), IND (Indirect) or TOT (Total) LegalGroup Legal group. If left empty, the default value is assumed. 6.2.11 ABSGetName ABSGetName displays the description of a company, group or other dimension based on the dimension name and given value for that dimension. For reference, an example of an ABSGetName function is outlined below, along with a brief explanation of the function parameters underneath. Figure 6.2—10 ABSGetName Type Dimension whose description is to be retrieved – e.g. company, group or the name of a dimension (such as e.g. “Product” or “Business Unit” – make sure to spell this exactly as defined in the database, including any spaces and upper/lower case). AARO SYSTEMS AB 184 AARO 11.0 USER MANUAL Excel connectivity. AARO Excel retrieve Code Name or code, e.g. of a company, group or other dimension, whose description is to be retrieved. 6.2.12 ABSGetRate ABSGetRate displays the exchange rate for a specified currency for a given period and rate type. For reference, an example of an ABSGetRate function is outlined below, along with a brief explanation of the function parameters underneath. Figure 6.2—11 ABSGetRate Period Period for which data is to be retrieved. Currency Currency code. RateType Ope (opening), Ave (average) or Clo (closing) 6.2.13 ABSRetrieveLegal The ABSRetrieveLegal function displays values for a selected legal group and other criteria. For reference, an example of an ABSRetrieveLegal function is outlined below, along with a brief explanation of the function parameters underneath. AARO SYSTEMS AB 185 AARO 11.0 USER MANUAL Excel connectivity. AARO Excel retrieve Figure 6.2—12 ABSRetrieveLegal Period Period from which data is to be retrieved. Code Account for which data is to be retrieved. Curr/AcT/Trn Currency - currency for the report figures. AcT - accounting type. Trn - currency translation code. The way information is entered here will depend on how your AARO system has been configured. If information is left blank, default figures will be returned. Example: to retrieve figures in EUR which were translated using the currency translation “Last Year”, enter “EUR//Last Year” in this field. Company Company code for which data is to be retrieved. If left empty, the group’s total figure is retrieved. Group Legal group from which data is to be retrieved. If left empty, the default value is assumed. LegalType Legal type displaying requested figures. Some examples include (but are not limited to): Input, JV LOC, JV SEK, TransDiff, UR, DM, IM, Split, EqShare, PE, PEInv, PECta, Goodwill, PEREDIST, ElimApar, EL_IC, REVERSAL, CA. (If left empty, the total for all legal types is assumed.) AARO SYSTEMS AB 186 AARO 11.0 USER MANUAL Excel connectivity. AARO Excel retrieve FromCo Reporting company – i.e. the company that the figure originates from. For reported input and journal figures, FromCo equals Co. For elimination companies (e.g. EL), FromCo is the original company whose value has been eliminated. OwnedCo, AmountType, JournalType, JVTotal etc. Further dimensions for which data is retrieved. The dimensions defined here will depend on the setup of the form, and upon which forms the system administrator has activated for the current period in the AARO application. In the example above, it was not necessary to enter data in these fields to successfully retrieve data from AARO. 6.2.14 ABSRetrieveOper The ABSRetrieveOper function is used for retrieving operational figures that are reported through input or matrix forms. For reference, an example of an ABSRetrieveOper function is outlined below, along with a brief explanation of the function parameters underneath. AARO SYSTEMS AB 187 AARO 11.0 USER MANUAL Excel connectivity. AARO Excel retrieve Figure 6.2—13 ABSRetrieveOper Period Period from which data is to be retrieved. Code(:JVxx) Account for which data is to be retrieved. Currency/ AcT/ Trn/ AcSt Currency - currency for the report figures. AcT - accounting type. Trn - currency translation code. AcSt - accounting standard. The way information is entered here will depend on how your AARO system has been configured. If information is left blank, default figures will be returned. Example: to retrieve figures in EUR (translated using the currency translation “Last Year”, and for accounting standard IFRS), “EUR//Last Year/IFRS” should be entered in this field. AARO SYSTEMS AB 188 AARO 11.0 USER MANUAL Excel connectivity. AARO Excel retrieve Co/FromCo Co - Company code for which data is to be retrieved. FromCo - Reporting company. For example, the company that the figure originates from. If left empty, the total for all companies in the system is retrieved. Dimensions (varying number) Specific dimension value, such as Product, Customer, Business Unit, Business Area etc., for which data is to be retrieved. Available dimensions vary between AARO installations. NA Indicates that this parameter is not available and not used. Gr1 Group type 1. To retrieve the total figure for a group, type the name of the group (e.g. “Cust Group”). GrCod1 Group code 1. To retrieve the total figure for a group, type the group value (e.g. “RETAILERS”). Gr2 Group type 2. GrCod2 Group code 2. Note: Gr1/GrCod1 are used as a pair, therefore you must always fill in both parameters. The same scenario applies to the pair Gr2/GrCod2. 6.2.15 ABSRetrieveOperFlex The ABSRetrieveOperFlex function is used for retrieving operational figures that are reported through input or matrix forms. The “Flex” part of the formula allows users to define dimensions themselves, rather than according to predefined criteria – see Dim1 / Dim2 etc. For reference, an example of an ABSRetrieveOperFlex function is outlined below, along with a brief explanation of the function parameters underneath. AARO SYSTEMS AB 189 AARO 11.0 USER MANUAL Excel connectivity. AARO Excel retrieve Figure 6.2—14 ABSRetrieveOperFlex The following parameters are valid in the ABSRetrieveOperFlex function: Period The period for data to be retrieved. Co Company code from which data is to be retrieved. Code Account from which data is to be retrieved. Curr Currency for the data to be retrieved. CurrTrans Currency translation, e.g. Actual, Budget, LastYear. AccType Accounting type. e.g. Normal, IFRS or USGAAP. AcctStd Accounting standard (a summary of one or more accounting types) AARO SYSTEMS AB 190 AARO 11.0 USER MANUAL Excel connectivity. AARO Excel retrieve Dim1, Dim2 etc Dim1, Dim2, Dim3, etc: these are defined by the dimension name such as “Market” or “Business Unit” (exact names vary depending on the dimensions setup in each AARO installation), followed by “:”, followed by the dimension value. In the example above, the dimension, separator “:”, and dimension values were entered directly into the cell. Figure 12. ABSRetrieveOperFlex “Dimension:Dimension Value” Alternatively, the values may be taken from in individual cell references (e.g. “I48;I49”) instead. 6.2.16 ABSRetrieveTextAmount The ABSRetrieveTextAmount function is used for retrieving operational figures that are reported through text forms. For reference, an example of an ABSRetrieveTextAmount function is outlined below, along with a brief explanation of the function parameters underneath. Figure 6.2—15 ABSRetrieveTextAmount Period Period for data to be retrieved. Company Company code from which data is to be retrieved. Form Text form in AARO from which data is to be retrieved. Code ‘DimensionInTable’ in the text form for which the amount will be returned in the formula result. Currency Currency for the data to be retrieved. KeyFieldNames ‘NameInTable’ in the text form for the component which will be used to look up the description returned in the formula result. AARO SYSTEMS AB 191 AARO 11.0 USER MANUAL Excel connectivity. AARO Excel retrieve KeyFieldValues Value to be looked up for the KeyFieldName. 6.2.17 ABSRetrieveTextString The ABSRetrieveTextString function is used for retrieving descriptions that are contained within text forms. For reference, an example of an ABSRetrieveTextString function is outlined below, along with a brief explanation of the function parameters underneath. Figure 6.2—16 ABSRetrieveTextString Period Period for data to be retrieved. Company Company code from which data is to be retrieved. Form Text form in AARO from which data is to be retrieved. ReturnField ‘NameInTable’ in the text form for the description which will be returned in the formula result. KeyFieldNames ‘NameInTable’ in the text form for the component which will be used to look up the description returned in the formula result. KeyFieldValues Value for the KeyFieldName to be looked up. 6.2.18 ABSRetrLegalAssoci The ABSRetrLegalAssoci function is used for retrieving figures from a legal group defined in AARO. Criteria can further be refined by legal type and reporting company if desired. For reference, an example of an ABSRetrLegalAssoci function is outlined below, along with a brief explanation of the function parameters underneath. AARO SYSTEMS AB 192 AARO 11.0 USER MANUAL Excel connectivity. AARO Excel retrieve Figure 6.2—17 ABSRetrLegalAssoci Period The period for data to be retrieved. Code The account from which data is to be retrieved. Curr/AcT/Trn Curr - currency for the report figures. AcT - accounting type. Trn - currency translation code. The way information is entered here will depend on how your AARO system has been configured. If information is left blank, default figures will be returned. Example: to retrieve figures in EUR which were translated using the currency translation “Last Year”, enter “EUR//Last Year” in this field. Company Company code from which data is to be retrieved. Group Legal group from which data is to be retrieved. If left empty, MainGroup is assumed. LegalType Legal type displaying requested figures. Some examples include (but are not limited to): Input, JV LOC, JV SEK, TransDiff, UR, DM, IM, Split, EqShare, PE, PEInv, PECta, Goodwill, PEREDIST, ElimApar, EL_IC, REVERSAL, CA. If left empty, the total for all legal types is assumed. FromCo Reporting company – i.e. the company that the figure originates from. For reported input and journal figures, FromCo equals Co. For elimination companies (e.g. EL), FromCo is the original company whose value has been eliminated. 6.2.19 Retrieve information from AARO to Excel When the relevant formulas and data cells have been completed, information is retrieved from AARO to Excel via the menu item ABS Retrieve. AARO SYSTEMS AB 193 AARO 11.0 USER MANUAL Excel connectivity. AARO Excel retrieve The user can then choose one of the options: Option Action All Retrieve data into all open Excel workbooks from AARO. Sheet Only Retrieve data into the open Excel worksheet from AARO. Multiple Sheets Retrieve data into multiple Excel worksheets from AARO. In this scenario, the user is presented with a choice of which worksheets he or she would like to retrieve data for. An example for retrieving a data for a multiple worksheets is referenced below: Figure 6.2—18 ABS Retrieve menu If the user chose All, or Sheet Only, they will not see the next window: the criteria chosen will depend on the users’ requirements. Explanations for how to use the dialog windows are provided within the Excel Dialog windows to guide users through the necessary steps. An example for retrieving a data for a couple of open worksheets is referenced below: AARO SYSTEMS AB 194 AARO 11.0 USER MANUAL Excel connectivity. AARO Excel retrieve Figure 6.2—19 Retrieve multiple sheets 6.2.20 Validation When data is received from AARO, a dialog window appears informing the user whether the data has been successfully received. Figure 6.2—20 AARO Excel retrieve progress If data cannot be received from AARO to Excel, a dialog window appears showing validation errors. The content of this dialog window will depend on the errors returned from the AARO application. For data to be received successfully from AARO, these errors must be fixed before the process of receiving data is completed. For reference, an example of an error where an account number was not AARO SYSTEMS AB 195 AARO 11.0 USER MANUAL Excel connectivity. AARO Excel retrieve specified has been included here: Figure 6.2—21 AARO Excel retrieve – validation error 6.2.21 Further Excel functions Excel retrieve functions can be combined with Excel send functions and Excel drill down reports. For further reference to those functions, please refer to the appropriate section of the user manual. AARO SYSTEMS AB 196 AARO 11.0 USER MANUAL Excel connectivity. AARO Excel send 6.3 AARO Excel send Formulas in Microsoft Excel can be used to send data from Excel workbooks to the AARO application. This provides extra flexibility and options for data manipulation before data is sent from Excel to AARO. This manual refers specifically to the Excel functions used to send data from Excel to AARO. For more detailed information about the AARO bookings themselves, please refer to the appropriate section of the AARO user manual. 6.3.1 ABS In this manual, there is frequent reference in formulas to “ABS”. This is because the AARO application was formerly known “ABS” (Aaro Business Systems). The older product name has been preserved in some of the Excel formulas so that customers who working with existing Excel workbooks do not have to make unnecessary changes. From a working point-of-view the terms ABS and AARO are interchangeable; AARO is simply the more modern term. 6.3.2 Excel send - menu commands The Menu command to access the AARO Excel send function is as follows: 1. Open Microsoft Excel. 2. From the File menu, open the file ABSXL.xll, which usually located in C:\AARO. Figure 6.3—1 Open ABSXL.xll An AARO Menu will now be visible in Excel next to the Help menu. AARO SYSTEMS AB 197 AARO 11.0 USER MANUAL Excel connectivity. AARO Excel send 3. Choose Log On from the AARO menu in Microsoft Excel. 4. Log on to AARO from within Microsoft Excel. This enables the use of AARO formulas and AARO menu items within Microsoft Excel. Figure 6.3—2 Log On Screen 5. The various AARO Excel send formulas can be accessed by pressing the Insert Function button in Excel. Figure 6.3—3 Insert Function The AARO Excel send functions are listed under the ABS data send category. AARO SYSTEMS AB 198 AARO 11.0 USER MANUAL Excel connectivity. AARO Excel send Figure 6.3—4 Select ABS Data send function category 6.3.3 Entering formulas directly If you are a more experienced Excel user and/or working with existing formulas, it is possible to enter the required AARO send equation directly in the formula bar, for example: =ABSSendOperFlex(5555;"0712A";"ARLANDA";3010;"Business Unit:FOOD") 6.3.4 Formula results Before entering data using Excel send functions, it is worthwhile noting that when entering function arguments, the formula result (highlighted below) contains useful information. AARO SYSTEMS AB 199 AARO 11.0 USER MANUAL Excel connectivity. AARO Excel send Figure 6.3—5 Viewing ABS data send function result Some examples of formula results might be: Formula result=0, formula is not completed. Formula result=1, formula is ready to send a string of information according to template criteria. Formula result=4869 (or any other number). This refers to a specific number which will be sent from an Excel send function to a corresponding field in AARO. Note: no validation has taken place in AARO at the stage; checks such as whether an account number is valid or a period is do not take place until the user has sent the data from Excel to AARO. 6.3.5 Cell references and direct data entry in Excel In Excel send formulas it is possible to use either ‘direct Excel data entry’ (input data going directly into a function field), or refer to a cell reference which contains the relevant information. For example, here is some data that has been entered directly using the ‘direct Excel data entry’ method: Figure 6.3—6 Direct Entry of Parameter information However, a cell reference containing the relevant information returns exactly the same result. Figure 6.3—7 Using a Cell reference for Parameter information (Where Cell B1 was entered as follows): AARO SYSTEMS AB 200 AARO 11.0 USER MANUAL Excel connectivity. AARO Excel send Figure 6.3-8 Selecting cell data Throughout this chapter, the model of ‘direct Excel data entry’ has been used in order to avoid confusion. However, users may prefer to cell references instead, depending on the customers’ needs. 6.3.6 Description of Excel send functions Detailed descriptions of all of the Excel send functions are provided throughout this chapter, along with examples for reference. 6.3.7 AAROCreateNewJV The AAROCreateNewJV function is used to create journals, and is an alternative process to manually entering data in AARO. The Excel function shows very little data, except an indication that data will be sent from Excel to AARO, indicated by ‘Formula result = 1’. Figure 6.3—9 Formula results in an AARO send function In Excel, the AAROCreateNewJV function can only be used in combination with journal templates. These are pasted onto an Excel worksheet by following the menu steps: AARO > Paste from AARO > Journal Template. AARO SYSTEMS AB 201 AARO 11.0 USER MANUAL Excel connectivity. AARO Excel send Figure 6.3—10 Paste journal template Here is an example of a completed journal template in Excel, ready for sending to AARO: Figure 6.3—11 Journal template in Excel 6.3.8 Create a journal from Excel The process for sending journals to AARO is slightly different from other AARO Excel send functions, as the menu item AARO > Send Journals needs to be selected here. AARO SYSTEMS AB 202 AARO 11.0 USER MANUAL Excel connectivity. AARO Excel send Figure 6.3—12 Creating a journal booking Choose the appropriate submenu item to send All, current Sheet only or Multiple Sheets and wait until you have received confirmation that all items have been sent successfully. Figure 6.3—13 Create journal progress window Note: the menu items listed under AARO > ABS Send are not used when sending journals to AARO; the AARO > ABS Send menu item is against all other function types except journals. 6.3.9 Viewing data from AAROCreateNewJV in AARO For reference, when journal data has been successfully sent to AARO, it can be viewed in the AARO application using menu item: Data Entry > Journals. AARO SYSTEMS AB 203 AARO 11.0 USER MANUAL Excel connectivity. AARO Excel send Picture 6.3—14 View journals 6.3.10 AAROSendText AAROSendText is used for data reported through text forms. An AAROSendText formula in Excel contains the period, company, and the name of the text form associated with the entry. Data is then ‘picked up’ in cells directly to the right of the formula, and parameters follow the same order as you would find them in the relevant form in the AARO application, in menu item: Data Entry > Input. To help explain how the formula works, we have included an example of an AAROSendText formula below. This example works with the function arguments of period “0803A”, company “ARLANDA”, and text input form “SHARESSUBS”. Figure 6.3—15 An AAROSendText function In the example given below, the formula was entered in cell A2, and the data relating to the text input form “SHARESSUBS” was entered in cells B2, C2, D2, E2, F2, G2, H2, and I2. i.e. the input form data was entered in the cells directly to the right of the AAROSendText formula. Figure 6.3—16 AAROSendText data The information which is sent against the text form, has to have the same style as you would find in with the form in AARO application, menu item > Data Entry > Input. Tip: the “Paste from AARO” function can be very helpful for pasting header AARO SYSTEMS AB 204 AARO 11.0 USER MANUAL Excel connectivity. AARO Excel send information into an Excel worksheet – this provides a helpful template for Excel data entry. Here is an example where input layout “SHARESSUBS” was pasted into cell B2. In the example below, easy data entry was facilitated for the formula contained in cell A6. Figure 6.3—17 AAROSendText template and data 6.3.11 Viewing data from AAROSendText in AARO For reference: when text form data has been successfully sent to AARO, it can be viewed in the AARO application using menu item: Data Entry > Input, and choosing the relevant form (the same form as referenced in the Excel function for AAROSendText). Here is a screenshot of how the information looks in a “SHARESSUBS” text form in AARO. Figure 6.3—18 Text form in Data Entry > Input Note: the order of the data entry fields in AARO (from left to right) is exactly the same as those entered in Excel for a text form. 6.3.12 ABSSendMatch ABSSendMatch is used for data reported for intercompany match reports, and is used to send match (Intercompany) figures to AARO. ABSSendMatch Excel formulas contain more parameters than earlier examples specified in this user manual; an example of an ABSSendMatch function is outlined below, with detailed explanations of the parameters underneath. AARO SYSTEMS AB 205 AARO 11.0 USER MANUAL Excel connectivity. AARO Excel send Figure 6.3—19 An ABSSendMatch function TransCurr Transaction currency is used if the form is to be reported in transaction currency. TransAmount Transaction amount - value in transaction currency. LocValue Amount in the company’s local currency. Period Period for which data is sent. Code Account for which data is sent. Company Reporting company, identified by company code. CounterCo Counter company, identified by company code. Bin1 (e.g. Own BU) Dimension value 1 - if the form is to be reported on a dimension level, a value for one of the reporting company’s dimensions (such as BU – Business Unit) may be entered here. Bin2 (e.g. Counter-BU) Dimension value 2 - if the form is to be reported on a dimension level, a value for one of the counter company’s dimensions (such as BU – Business Unit) may be entered here. Bin3 – Bin6 In a similar way to ‘Own BU’ and ‘Counter-’BU’ above, fields Bin3 – Bin6 may be used for additional dimensions that have been setup in match forms. AARO SYSTEMS AB 206 AARO 11.0 USER MANUAL Excel connectivity. AARO Excel send 6.3.13 Viewing data from ABSSendMatch in AARO For reference: when data has been successfully sent to AARO, it can be viewed in the AARO application using menu item: Data Entry > Match. A screenshot for the ABSSendMatch example illustrated above has been included here: Figure 6.3—20 Match form in AARO, Data Entry > Match 6.3.14 ABSSendOper The ABSSendOper function is used for sending data that is reported through input or matrix forms into the AARO database, and is an alternative process to manually entering data in AARO data entry input screens. Here is an example of an ABSSendOper function: AARO SYSTEMS AB 207 AARO 11.0 USER MANUAL Excel connectivity. AARO Excel send Figure 6.3—21 An ABSSendOper function The formula result in this example is 4869, the other parameters in the function route the value to the appropriate period, account, company, product and business unit. An explanation for the fields available in an ABSSendOper function field is provided below: Value Value for which data will be sent. Period Period for which data is sent. Code Account for which data is sent. Company Company for which data is sent, identified by company code. Dimension (e.g. Product) Dimension for which data is sent - if the form is to be reported on a dimension level, an appropriate value may be entered here. The dimension defined here will depend on the setup of the form, and upon which forms the system administrator has activated for the current period in the AARO application. Additional Dimensions (e.g. Business Unit, etc) Additional dimensions for which data is sent - if the form is to be reported on a dimension level, an appropriate value may be entered here. The additional dimensions defined here will depend on the setup of the form, and upon which forms the system administrator has activated for the current period in the AARO application. AARO SYSTEMS AB 208 AARO 11.0 USER MANUAL Excel connectivity. AARO Excel send NA (not applicable) Indicates that this field is not used. 6.3.15 Viewing data from ABSSendOper in AARO For reference: when ABSSendOper data has been successfully sent to AARO, it can be viewed in the AARO application using menu item: Data Entry > Input. In the example given above, data was viewed in the form IS_ALL, for the product “FOOD”. A screenshot has been included for reference here: Figure 6.3—22 ABSSendOper data viewed in AARO, Data Entry > Input 6.3.16 ABSSendOperFlex The ABSSendOper function is used for sending data that is reported through input or matrix forms into the AARO database, and is an alternative process to manually entering data in the AARO data entry input screens. The “Flex” part of the formula allows users to define dimensions themselves, rather than according to predefined criteria – see Dim1 / Dim2 etc. This is explained in more detail in the “Additional Dimension” area of the table below. Here is an example of an ABSSendOperFlex function in Excel: AARO SYSTEMS AB 209 AARO 11.0 USER MANUAL Excel connectivity. AARO Excel send Figure 6.3—23 An ABSSendOperFlex function The following parameters are valid in the function: Value Value for which data will be sent. Period Period for which data is sent. Co Company for which data is sent, identified by company code. Code Account for which data is sent. Additional Dimension: Dim1, Dim2 etc Dim1 - Dim20: these are defined by the dimension name such as “Market” or “Business Unit” (exact names vary depending on the dimensions setup in each AARO installation). The format for input is “Dimension name:dimension value”. In the example above, the dimension, separator “:”, and dimension values were given as “Business Unit:FOOD”. In the same way as other parameters, dimensions and dimension values may also be taken from individual cell reference (such as a cell reference of I48). 6.3.17 Viewing data from ABSSendOperFlex in AARO ABSSendOperFlex data can be viewed in the AARO application using menu item: Data Entry > Input, and choosing an appropriate form. In the example given above, data was viewed in the form IS_ALL, for the product “FOOD”. A screenshot has been included for reference here: AARO SYSTEMS AB 210 AARO 11.0 USER MANUAL Excel connectivity. AARO Excel send Figure 6.3—24 ABSSendOperFlex data viewed in AARO, Data Entry > Input 6.3.18 ABSSendOS ‘OS’ is short for Orders and Sales (which is what OS forms have historically been used for) and OS forms are very similar to text forms. OS forms may, however, be used for any kind of data. The ABSSendOS function is used for sending data that is reported through OS forms into the AARO database, and is an alternative process to manually entering data in the AARO data entry input screens. For data to be transmitted from an ABSSendOS formula in Excel, to AARO an appropriate OS form must be set up to receive the data. In the case of the example given below, we set up an OS form in AARO specifically to handle this example. AARO SYSTEMS AB 211 AARO 11.0 USER MANUAL Excel connectivity. AARO Excel send Figure 6.3—25 An ABSSendOS function Value Value for which data will be sent. Period Period for which data is sent. Code Account for which data is sent. Company Company for which data is sent, identified by company code. Dimension (e.g. Product) Dimension for which data is sent - if the form is to be reported on a dimension level, an appropriate value may be entered here. The dimension defined here will depend on the setup of the form, and upon which forms the system administrator has activated for the current period in the AARO application. Additional Dimensions (e.g. Business Unit, etc) Additional dimensions for which data is sent - if the form is to be reported on a dimension level, an appropriate value may be entered here. The additional dimensions defined here will depend on the setup of the form, and upon which forms the system administrator has activated for the current period in the AARO application. Customer Customer code – given as CUST_03 in this example AARO SYSTEMS AB 212 AARO 11.0 USER MANUAL Excel connectivity. AARO Excel send (OS)Co Buying company – enter the company code for the buying company here NA Not applicable: indicates that this field is not used Note: there are various parameters such as Business Unit and Business Area that did not need to be filled in: their contents are skipped in the program logic and therefore not sent to AARO. 6.3.19 Viewing data from ABSSendOS in AARO For reference: when ABSSendOS data has been successfully sent to AARO, it can be viewed in the AARO application using menu item: Data Entry > Input, in the relevant OS (Order & Sales) form. A screenshot example of an OS form setup for demonstration purposes is included here: Figure 6.3—26 ABSSendOS data viewed in AARO, Data Entry > Input 6.3.20 ABSSendOSFlex As indicated in the previous chapter, ‘OS’ is short for Orders and Sales (which is what OS forms have historically been used for). Send formulas containing the ‘OS’ function send data into OS forms in AARO. For data to be transmitted from an ABSSendOSFlex formula in Excel, to AARO an appropriate OS form must be set up to receive the data. In the case of the example given below, we set up an OS form in AARO specifically to handle this example. The ABSSendOSFlex function is very similar to the ABSSendOS function, except that dimensions defined in the function are flexible. The “Flex” part of the formula allows users to define dimensions themselves, rather than according to predefined criteria – see Dim1, Dim2 etc. More detail regarding dimension definitions is highlighted in the "Additional Dimension" section of the table below. AARO SYSTEMS AB 213 AARO 11.0 USER MANUAL Excel connectivity. AARO Excel send Figure 6.3—27 An ABSSendOSFlex function Value Value for which data will be sent. Period Period for which data is sent. Co Company for which data is sent, identified by company code. Code Account for which data is sent. Additional Dimension: Dim1, Dim2 etc Dim1 - Dim20: these are defined by the dimension name such as “Buying Co” or “Customer” (exact names vary depending on the dimensions setup in each AARO installation). The format for input is “Dimension name:dimension value”. In the first example specified above, the dimension, separator “:”, and dimension values were given as “Product:BOOKS”. In the same way as other parameters, dimensions and dimension values may also specified from individual cell references. 6.3.21 Viewing data from ABSSendOSFlex in AARO For reference: when ABSSendOSFlex formula data has been successfully sent to AARO, it can be viewed in the AARO application using menu item: Data Entry > Input, in the relevant OS (Order & Sales) form. A screenshot example of an OS form setup for demonstration purposes is included here: AARO SYSTEMS AB 214 AARO 11.0 USER MANUAL Excel connectivity. AARO Excel send Figure 6.3—28 ABSSendOSFlex data viewed in AARO, Data Entry > Input 6.3.22 Send information from Excel to AARO When the relevant formulas and data cells have been completed, information is sent from Excel to AARO or to a File via the menu item ABS Send. The user can then choose one of the following options: Option Action All to Database Send data from all open Excel workbooks to AARO application. Sheet to Database Send data from the open Excel worksheet to AARO application. Multiple Sheets Send data from multiple Excel worksheets to AARO application. In this scenario, the user is presented with a choice of which worksheets he or she would like to send. to File Send data to a file which can be picked up by AARO or another application later. AARO SYSTEMS AB 215 AARO 11.0 USER MANUAL Excel connectivity. AARO Excel send Figure 6.3—29 Send Data from Excel to AARO 6.3.23 Validation When data is transmitted to AARO, a dialog window appears informing the user whether the data has been successfully transmitted. Figure 6.3—30 Excel data send progress If data cannot be sent from Excel to AARO, a dialog window appears showing validation errors. The content of this dialog window will depend on the errors returned from the AARO application. If a validation error occurs, no values are sent from Excel to AARO. For data to AARO SYSTEMS AB 216 AARO 11.0 USER MANUAL Excel connectivity. AARO Excel send be sent successfully to AARO, these errors must be fixed before the processing of sending data is completed. For reference, an example containing some validation errors has been included below: Figure 6.3—31 AARO/Excel Send – Validation error 6.3.24 Further Excel functions Excel send functions can be combined with Excel retrieve functions and Excel drill down reports. For further reference to those functions, please refer to the appropriate chapter of the user manual. AARO SYSTEMS AB 217 AARO 11.0 USER MANUAL Excel connectivity. Excel drill down reports 6.4 Excel drill down reports Excel drill down reports can be used in a similar way to ‘Drill Down’ in the AARO application. Working with Excel instead of the AARO application brings various advantages and disadvantages, depending on which task/s the user is working with. For example, in Excel drill down reports you can also take advantage of all Excel features such as formatting, calculations, connectivity to the Excel Chart Wizard, and so on. However, some users may find that it is easier to drag and drop report criteria and visualize information within Reports/Drill Down. Drill down reports combined with full Excel connectivity gives users complete support for all of their reporting requirements. 6.4.1 Accessing Excel drill down reports There are two ways to access Excel drill down reports: 1. Use ‘Live Copy to Excel’ from the AARO application, menu item Reports/Drill Down. 2. Login to AARO from Microsoft Excel. Go through the menu AARO > AARO Drilldown Report. Figure 6.4-1 AARO drill down reports menu 6.4.2 ‘Live Copy to Excel’ from the AARO application To start up Excel drill down reports from AARO, login into the AARO application, and go into the menu item Reports/Drill Down. AARO SYSTEMS AB 218 AARO 11.0 USER MANUAL Excel connectivity. Excel drill down reports 1. Create a drill down report as required. 2. Press the Copy Button, and choose the Live Copy to Excel option. New Workbook. Opens the Microsoft Excel application, and replaces Sheet 1 with an Excel drill down report containing the AARO drill down report data. New Sheet. Copies the AARO ‘Drill Down’ report data to a new worksheet in the open Excel workbook. Figure 6.4-2 Live copy to Excel 3. Choose to Enable Macros, and the new Excel workbook or sheet will displayed. Figure 6.4—3 Enable Macros in Excel 6.4.3 Create a report by logging into AARO from Excel The Menu command to access the AARO Excel drill down function from Excel is as follows: 1. Open Microsoft Excel. 2. From the File menu, open the file ABSXL.xll, which usually located in C:\AARO\. AARO SYSTEMS AB 219 AARO 11.0 USER MANUAL Excel connectivity. Excel drill down reports Figure 6.4—4 ABSXL.xll An AARO Menu will now be visible in Excel next to the Help menu. 3. Choose Log On from the AARO menu in Microsoft Excel. Log on to AARO from within Microsoft Excel. This enables the use of AARO menu items and drill down options within Microsoft Excel. Figure 6.4—5 AARO Logon from Excel 4. To create a new Excel drill down report, go to AARO Drilldown Report > New Report. The Report Order pop-up window appears. See the following section on selecting criteria in the Report Order window. AARO SYSTEMS AB 220 AARO 11.0 USER MANUAL Excel connectivity. Excel drill down reports Figure 6.4—6 Creating a new drill down report in Excel 6.4.4 Criteria for a drill down report When creating a drill down report, 1. Define output criteria for: Fixed data: data for the report output. AARO SYSTEMS AB 221 AARO 11.0 USER MANUAL Excel connectivity. Excel drill down reports Figure 6.4-7 Setting up drill down report criteria in Excel Rows: rows displayed in the report output. AARO SYSTEMS AB 222 AARO 11.0 USER MANUAL Excel connectivity. Excel drill down reports Figure 6.4-8 Setting up drill down report rows in Excel Columns: columns displayed in the report output. AARO SYSTEMS AB 223 AARO 11.0 USER MANUAL Excel connectivity. Excel drill down reports Figure 6.4-9 Setting up drill down report columns in Excel 2. To add or change criteria, choose appropriate Criteria from the drop down lists: Figure 6.4-10 Selecting drill down report criteria in Excel 3. To change Criteria, press the button and choose data from the list presented (see selection dialog box below). 4. To Delete Selection Criteria, press the delete icon criteria you wish to delete. AARO SYSTEMS AB for the row of 224 AARO 11.0 USER MANUAL Excel connectivity. Excel drill down reports Options such as adding or removing report totals, grand totals, percentages, calculated items are also available from the selection dialog box, along with options for changing sort order: Figure 6.4-11 Selecting parameter values for a drill down report in Excel Note: users may prefer to filter data using the filter button to refine selection criteria, for example by choosing accounts that are in the range 30003999. Figure 6.4-12 Filtering parameter values for a drill down report in Excel AARO SYSTEMS AB 225 AARO 11.0 USER MANUAL Excel connectivity. Excel drill down reports 6.4.5 Predefined drill down reports For predefined drill down reports, go into the AARO menu in Excel and choose AARO Drilldown Report > Predefined. This option is also available via the right mouse button: Figure 6.4—13 Running a saved drill down report in Excel Select a predefined report (‘Income Statement - Group Legal’ in the example provided here): Figure 6.4—14 Load Predefined report Make further selections if necessary (Selected items: periods 0612A, 0712A, and 0712B; all currencies; and legal group ‘MainGroup’ were chosen in the AARO SYSTEMS AB 226 AARO 11.0 USER MANUAL Excel connectivity. Excel drill down reports example below. The ‘Show Description’ checkbox was left clear.) Figure 6.4—15 Choose period AARO SYSTEMS AB 227 AARO 11.0 USER MANUAL Excel connectivity. Excel drill down reports Figure 6.4—16 Choose currency Figure 6.4—17 Choose legal group The AARO report will then be entered onto the active worksheet; the user can then manipulate and format the data in Excel as desired. 6.4.6 Right mouse button functions One of the key features of working with AARO in combination with Excel is the AARO SYSTEMS AB 228 AARO 11.0 USER MANUAL Excel connectivity. Excel drill down reports ability to work with the right mouse button to ‘call-up’ dynamic functions. Depending on which cell is selected when the right mouse button is clicked, many different features may be accessed such as edit settings, delete, run a report, change report criteria, and choose drill down criteria. The example below shows how it is easy to change the report currency by pressing the right mouse button on the cell containing currency information in the report header. In the report example below, clicking right mouse on cell A3 enables the user to change currency. Figure 6.4—18 Changing currency using the right-click menu In the same way as currency selections were chosen in the example above, clicking the right mouse button on cells B3 and C3 gives options to change period and legal group respectively. 6.4.7 Drill down options Pressing the right mouse button on rows, columns or cells in Excel drill down reports allows the user to generate greater report detail as required, and drill down into report information. This example shows a column being drilled down by reporting currency: Figure 6.4—19 Drilling-down column by reporting currency When a report has been drilled down for refined criteria, the drilldown report opens in a new Excel worksheet: AARO SYSTEMS AB 229 AARO 11.0 USER MANUAL Excel connectivity. Excel drill down reports Figure 6.4—20 Report created after drill-down It is possible to keep drilling down into columns, rows or cells many times; every time a new drill down operation is performed, a new worksheet is opened. 6.4.8 Run a drill down report in Excel Choosing Run from the AARO Drilldown Report menu (either from the AARO menu or by clicking the right mouse button) gives user the option to Run (refresh) a drill down report. This is particularly useful for refreshing reports when source data in AARO has been changed. Figure 6.4—21 Run drill down report 6.4.9 Edit a drill down report in Excel To edit a drill down report, choose Edit from the AARO Drilldown Report menu (either from the AARO menu, or by clicking the right mouse button) From here it is possible to edit report criteria in the same way as outlined in 6.4.3 Create a report by logging into AARO from Excel. AARO SYSTEMS AB 230 AARO 11.0 USER MANUAL Excel connectivity. Excel drill down reports Figure 6.4—22 Edit a drill down report 6.4.10 Excel drill down report settings Report settings can be changed by choosing Settings from the AARO Drilldown Report menu. Figure 6.4—23 Drilldown report Settings From here, you can choose to change report layouts – some example include: Print options: from Landscape to Portrait Display options for Rows, Columns and Fixed data can be adjusted as desired Rows/columns with zero values are not displayed Codes or descriptions are displayed or hidden Change font & font size for reports Reset to default setting AARO SYSTEMS AB 231 AARO 11.0 USER MANUAL Excel connectivity. Excel drill down reports Figure 6.4—24 Change drill down report settings 6.4.11 Shadow sheet The Shadow Sheet menu item provides options to paste drill down report values into another sheet or sheets in a workbook. Figure 6.4—25 Shadow Sheet After choosing Shadow Sheet, enter the sheet number for a shadow sheet. AARO SYSTEMS AB 232 AARO 11.0 USER MANUAL Excel connectivity. Excel drill down reports Figure 6.4—26 Select Sheet for Shadow data When ‘Run’ is selected, data will be pasted onto the Shadow Sheet (Sheet2 in the example above) as well as updated on the open worksheet. This enables users to update multiple worksheets with AARO drill down data simultaneously. 6.4.12 Delete a drill down report from Excel Choosing Delete from the Drilldown Report menu deletes the drill down report from the excel sheet. Follow the instructions to confirm deletion. Figure 6.4—27 Delete Excel drill down report Note: although values may still appear in the current worksheet after they have been deleted through this method, right mouse button functions (such as drill down) will not be available. 6.4.13 Run all reports in a workbook Choose Run All Reports in Workbook to update all of the various drilldown reports that may be contained on worksheets in an open Excel workbook. AARO SYSTEMS AB 233 AARO 11.0 USER MANUAL Excel connectivity. Excel drill down reports Figure 6.4—28 Run All Report in Workbook 6.4.14 Further Excel functions Excel drill down reports can be combined with Excel send and Excel retrieve functions. For further reference to those functions, please refer to the appropriate section of the user manual. AARO SYSTEMS AB 234 AARO 11.0 USER MANUAL Excel connectivity. Excel input forms 6.5 Excel input forms Excel input forms provide an alternative to direct data input using the AARO application. This provides the user with the flexibility to use the wide of array features available within the Excel application before data is uploaded into AARO. 6.5.1 Limitations of Excel input forms Excel input forms are currently limited to form type: Input. Therefore the AARO forms of type: Match, Matrix, Text, OS, Comments are not available from within the Excel application. In addition, the required form must have the “use as output report” checkbox ticked in the AARO application, menu item Utilities/Edit Input otherwise the form cannot be output into Excel. For more information regarding different form types within the AARO application, please refer to 7.9.1 Forms). 6.5.2 Menu command steps To access the input forms menu, proceed as follows: 1. Open the Excel application. 2. Choose File, Open. Open ABSXL.xll (Microsoft Office Excel XLL Add-In) – usually located in C:\AARO klienter\. For more information, please refer to the 6.1 Using AARO with Excel section. 3. Choose a cell in an Open Excel Worksheet. 4. Go through the menu AARO > AARO Input form > Input Form(s). AARO SYSTEMS AB 235 AARO 11.0 USER MANUAL Excel connectivity. Excel input forms Figure 6.5—1 Input Form menu command steps 6.5.3 Open an AARO input form in Excel Choose an appropriate input form (IS_ALL Income Statement in the example given here), appropriate dimensions such as Period, Company and Business Unit: AARO SYSTEMS AB 236 AARO 11.0 USER MANUAL Excel connectivity. Excel input forms Figure 6.5—2 Settings for an AARO input form in Excel Pressing the Protection, Look and Feel Settings button gives an option for changing AARO Excel input form settings. For more information on this, please refer to the 7.19 Edit Settings section of this user manual. The Excel input form will then be opened and available for data entry; white cells are open for data entry. AARO SYSTEMS AB 237 AARO 11.0 USER MANUAL Excel connectivity. Excel input forms Figure 6.5—3 AARO Excel input form 6.5.4 Export data to AARO To export data into the AARO application, choose the menu item AARO > AARO Input Form > Save. Figure 6.5—4 Save AARO Excel input form from the AARO menu AARO SYSTEMS AB 238 AARO 11.0 USER MANUAL Excel connectivity. Excel input forms Alternatively, click the right mouse button, and choose the menu item AARO Input Form > Save. Figure 6.5—5 Saving AARO Excel input form using the right mouse button If the information has been successfully exported, a confirmation message will appear: Figure 6.5—6 Confirmation message for successfully exported data To check the information in the AARO application, log into AARO, and go into the menu item Data Entry > Input and load the relevant form; load the relevant form in AARO to check the data entry. Figure 6.5—7 Verification of input form data to the AARO application AARO SYSTEMS AB 239 AARO 11.0 USER MANUAL Excel connectivity. Excel input forms 6.5.5 Menu items in Excel for AARO input forms In addition to the menu item to Save an AARO Excel input form, there are some other menu items available in Excel for AARO input forms. These are described below. Figure 6.5—8 AARO Excel input form menu items 6.5.6 Load an input form into Excel Use the load feature to load (or reload) an AARO form into Excel. 6.5.7 Edit an input form A form type can be changed by choosing the Edit menu item and choosing another input form type. Depending on the settings within a form, various attributes may be available to filter input options. In the example below, period, company and business unit are available for filtering. Excel worksheet settings for ‘Protection, Look and Feel’ are also accessible from this screen (detailed further in the 7.19 Edit Settings section of this user manual). AARO SYSTEMS AB 240 AARO 11.0 USER MANUAL Excel connectivity. Excel input forms Figure 6.5—9 Edit AARO Excel input form 6.5.8 Excel input form settings The Settings menu item displays the following screen. Settings can also be changed when the “Protection, Look and Feel Settings” button is pressed when a new form is selected, or an existing form is edited (see screenshot above). AARO SYSTEMS AB 241 AARO 11.0 USER MANUAL Excel connectivity. Excel input forms Figure 6.5—10 Settings for an AARO Excel input form 6.5.9 Protection options Various protection options are available for an Excel worksheet which is being used as an AARO input form; choose the option best suited to your needs. Maximum protection – “Strict input form style” Only the figure cells are editable. Everything else on the sheet is protected. All changes to the sheet, except simple figure editing, must be performed through the menus (e.g. adding columns, changing fixed selections). Medium protection – “Relaxed input form” Input table figure cells are editable, as are column headings, fixed selections, and anything else outside the figure area. Only not input table cells in the figure area are protected (i.e. sums and greyed-out cells). No protection – “Pure Excel Sheet” No protection at all is applied. Anything on the sheet can be edited. 6.5.10 Selectable cells Ticking the box to “Allow only editable cells to be selected in the sheet (Makes TAB or Enter jump to the next editable cell)” is useful if you want to restrict the form to editable cells only – the may be useful for manual entry of a large number of figures, as each entry press of [Enter] or [Tab] moves the cursor onto the next editable cell. Note: this feature only functions when either Maximum or Medium level protection settings are chosen. AARO SYSTEMS AB 242 AARO 11.0 USER MANUAL Excel connectivity. Excel input forms 6.5.11 Look and feel This section describes “Paint the sheet with colours” and “Modify the workbook to contain AARO colours” options. The default setting for Excel input forms is to have a worksheet coloured, so that it is easy to identify editable cells. If the “Paint the sheet with colours” checkbox is clear when an Excel input form is created, the form will be created without any colour being applied. In addition, it is possible to choose whether standard Windows colours or AARO colours are applied to a worksheet. The default setting is to work with AARO colours. If the checkbox “Modify the workbook to contain AARO colours” is clear when an Excel input form is created, standard Windows colours are applied to the worksheet instead of the default AARO colours. Note: the ‘Look and Feel’ settings discussed here for colour formatting are ‘forward steps’; clearing a checkbox does not automatically apply ‘backward steps’ to change a worksheet to a previous state. 6.5.12 Other options: auto-fit columns If the “Auto-Fit Columns” checkbox is clear when an Excel input form is created, the form will be created without formatting to AutoFit Column widths. 6.5.13 Colour palette It is possible to change the colour palette used in Excel input forms to either AARO colours, or to Excel (Windows) standard colours. Choose the appropriate colour palette setting, press Close when the appropriate colours have been applied to the active worksheet. Figure 6.5—11 Colour Palette for an AARO Excel input form 6.5.14 Visual refresh Refresh worksheet formatting to the Excel input form default if formatting has been modified by pressing the ‘Visual Refresh’ menu item. 6.5.15 Reconcile The Reconcile menu item calls up an Excel version of AARO reconciliation reports. AARO SYSTEMS AB 243 AARO 11.0 USER MANUAL Excel connectivity. Excel input forms Reconciliation within Excel operates in a similar way to reconciliation from the AARO application. The only significant exception is that companies and legal groups are chosen from within the settings of an AARO Excel input form; when working with reconciliations in the AARO application, companies and legal groups are chosen in the left pane. For more details on the AARO reconciliations function, please refer to the 4.2 Reconciliations section of user manual. 6.5.16 Save an input form in AARO Choosing the Save menu item exports data from the AARO Excel input form and saves it into the AARO application. If the information has been successfully exported, a confirmation message will appear. For more detail about the Save function see 6.5.4 Export data to AARO. AARO SYSTEMS AB 244 AARO 11.0 USER MANUAL Excel connectivity. Additional AARO Excel options 6.6 Additional AARO Excel options The AARO Excel Add-In provides some additional options that can be helpful when working with drill down reports, input forms and AARO formulas. 6.6.1 Order consolidation It is possible to order a consolidation from Excel. To do this, select menu AARO > Consolidation, select period and company and press OK. Figure 6.6-1 Ordering consolidation from Excel The ordered consolidation appears in the consolidation queue in the AARO application, as seen in AARO application menu Utilities > Consolidation. 6.6.2 Paste background data It is possible to paste background data from the AARO application to Excel. The following data can be pasted: Input form layout Report layout List of dimension values Cash and benchmarking data The user must be logged on to the AARO database. To paste background data, perform the following: 1. In Excel, select a cell where the data will be pasted. 2. Select the menu item AARO > Paste from AARO > Background Data. 3. Select the information source and data to be pasted and press Paste. AARO SYSTEMS AB 245 AARO 11.0 USER MANUAL Excel connectivity. Additional AARO Excel options Figure 6.6-2 Pasting background data from AARO The following information sources are available: 6.6.3 Option Description Input Layout Input layouts existing in the database. Report Layout Report layouts existing in the database. Other Dimensions and groups existing in the database. Benchmarking Cash and benchmarking data. Paste period setup Period validation setup and period rates can be pasted to Excel from the AARO application. The user must be logged on to the AARO database. To paste period validation setup or rates, do as follows: 1. In Excel, select a cell where the data will be pasted. 2. Select the menu item AARO > Paste from AARO > Period Setup. 3. Select period, company if required, the information source and data to be pasted and press Paste. AARO SYSTEMS AB 246 AARO 11.0 USER MANUAL Excel connectivity. Additional AARO Excel options Figure 6.6-3 Pasting period setup from AARO The following information sources are available: 6.6.4 Option Description Dimension Validation > Dimension validations tab settings will be pasted for the selected period. Dimension/ Company Validation > Company / Dimension validations tab settings will be pasted for the selected period and company. Rates Rates tab settings will be pasted for the selected period. AARO Excel settings Some settings affecting the Excel progress when working with the AARO Excel Add-In are set up in the menu AARO > Settings. AARO SYSTEMS AB 247 AARO 11.0 USER MANUAL Utilities. Consolidation 7. Utilities This chapter describes how to work with the Utilities menu items. 7.1 Consolidation This chapter refers to the menu item Utilities/Consolidation in AARO. In the Consolidation window reported numbers are recalculated according to calculation rules set up in the system. Legal and operational numbers are calculated simultaneously. The Sum consolidation, also available in this window, mainly updates the account structure in the system. The ABSConsolidator.exe is a separate application which has to be started in order to process the consolidations. The Consolidation window shows the ordered consolidation queue. Figure 7.1-1 Consolidation window The Consolidation window consists of the following sections: Section Description 1 Filter used to filter the consolidation queue by properties. 2 Consolidation area. 3 Failed consolidations and consolidations completed with warnings today. AARO SYSTEMS AB 248 AARO 11.0 USER MANUAL Utilities. Consolidation 7.1.1 Consolidation types The following consolidation types are performed in AARO: Type Description SUM Updates the account structure in input forms and drill down reports. It must be performed after any changes made in accounts in the menu Utilities/Edit Accounts. The Sum consolidation is given priority ‘0’ in the consolidation queue, which means that it will always be run before all other consolidations. TOTAL Recalculates legal and operational numbers simultaneously for the selected legal group. Default consolidation priority is 2 for group consolidation and 8 for company consolidation. This consolidation type is used with TOTAL periods. OPER Recalculates operational numbers simultaneously for the selected legal group. Default consolidation priority is 2 for group consolidation and 8 for company consolidation. This consolidation type is used with LEGAL/OPER periods. LEGAL Recalculates legal numbers simultaneously for the selected legal group. This consolidation type is used with LEGAL/OPER periods. Note: other options for consolidation types may also be available here, depending on how the consolidation options are set up in Utilities/Application Management/Consolidation. 7.1.2 Order a consolidation To order a consolidation, e.g. TOTAL, follow these steps: 1. Press the Consolidation button followed by Order consolidation. Figure 7.1-2 Order consolidation The following window will be displayed: AARO SYSTEMS AB 249 AARO 11.0 USER MANUAL Utilities. Consolidation Figure 7.1-3 Order a consolidation 2. In the Period area, select from the following options: Option Description Curr. trans Currency translation. Select which currency translation to run the consolidation with e.g. Normal. Save as Period the consolidation is run for. Period (Display only) - Period set up in consolidation options within the period in the menu Edit Periods, tab Properties. Rates from Period from which the rates are retrieved By default the period is taken from to the period consolidation setting in the menu Edit Periods/Properties tab/Default Rates from field. This option is selectable if Budget is selected as currency translation. AARO SYSTEMS AB 250 AARO 11.0 USER MANUAL Utilities. Consolidation Option Description Org. from Period from which the organizational structure is derived according to the period consolidation setting in the menu Edit Periods/ Properties tab/Default Organization from field. This field is read-only. Note: for reference, the picture below shows which consolidation options may be selected for a period (in Utilities, Edit Periods, Properties tab): Figure 7.1-4 Consolidation options in the menu Edit Periods, tab Properties 3. In the Type section, select type of consolidation, LegalGroup and Template as required. Template - This option updates the set up for a period according to templates created in menu Utilities/Edit Period Setup. 4. In the When section, select when and with what priority the consolidation should be run: Option Description High Priority Checking this option will set the priority to ‘1’. ‘Normal’ is priority ‘2’. Order now The consolidation will be run immediately. Schedule Schedule the consolidation to be run at a certain time. Repeat until Repeat the consolidation at an optional interval to an optional stop time. 5. To change priority for a consolidation in the queue, double-click the Prio column for the consolidation. In the Change Prio window, set the Prio field and click OK. AARO SYSTEMS AB 251 AARO 11.0 USER MANUAL Utilities. Consolidation Figure 7.1-5 Change Consolidation priority 7.1.3 Order the Sum Consolidation To order the Sum consolidation, click the Cons button and select Order Sum consolidation to start an update of the account structure. Figure 7.1-6 Order Sum consolidation A Sum consolidation will always get priority ‘0’ in the consolidation queue, which means that it will be run before all other consolidations. 7.1.4 Sort and filter the consolidation queue By default, the consolidation queue is sorted by period. To filter or sort the consolidation queue by different parameters, follow these steps: To sort the queue in the consolidation order, tick the check box Show in consolidation order. Figure 7.1-7 Show in consolidation order To sort the queue by a column, click the column header. To filter the consolidation queue by property, set up the property filter and click Refresh: AARO SYSTEMS AB 252 AARO 11.0 USER MANUAL Utilities. Consolidation Property Description Period Reporting period. Type Type of consolidation: e.g. SUMM, TOTAL Obj Filter by object: e.g. select ‘blank’ indicating ‘All’ or select a company. UserId User who initiated the consolidation. Status Status of the consolidation: e.g. Done, Waiting etc. Example of property filter settings: Figure 7.1-8 Filter the consolidation queue by property To filter the queue by date, in the date filter, tick the appropriate check box and select period interval for when the consolidation was Entered/Scheduled/Started/Finished or a combination of the options. Click Refresh to apply the filter. Figure 7.1-9 Consolidation queue date filter options 7.1.5 Delete a consolidation from the queue To delete a consolidation from the queue, select the consolidation to be deleted and click Delete. 7.1.6 Consolidation report The consolidation report shows the consolidation error and warning messages from the server for the failed consolidations and consolidations completed with warning. To view the consolidation report, select a failed consolidation or consolidation completed with warning, click the Reports button and select Consolidation server Report. AARO SYSTEMS AB 253 AARO 11.0 USER MANUAL Utilities. Consolidation Figure 7.1-10 Executing the consolidation report AARO SYSTEMS AB 254 AARO 11.0 USER MANUAL Utilities. Freeze consolidations 7.2 Freeze consolidations This chapter refers to the menu item Utilities/Freeze Consolidations in AARO. The freeze consolidations functionality is used to freeze, or save, the automatic bookings made by the system for a period. This means that even if something is changed in the legal logic, this will not affect the automatic bookings already made for a period, should a consolidation be run again. Frozen periods can also be made active again if/when required. Figure 7.2-1 The Freeze Consolidations window The Freeze Consolidations window consists of two sections: Section Description Periods Periods available in the system. Journals System journals for the selected period. AARO SYSTEMS AB 255 AARO 11.0 USER MANUAL Utilities. Integrator configuration 7.3 Integrator configuration The AARO integrator has an extensive set of features to handle integrations with external sources. Its main function is to retrieve data from external sources into the AARO database. External sources can be of various types such as SQL tables, SQL views, text files, Excel files, stored Procedures. The integrator can also manage combinations of file types. The menu item for Integrator is Utilities/Integrator configuration in AARO. Note: this menu item will only be available if has been activated in AARO. Figure 7.3—1 Integrator configuration window The tree on the left in the configuration user interface contains a few top level “nodes”. The most important are Data Sources, Import Specifications and Import Sources. 7.3.1 Data sources A data source defines the external source of data – where it is located and how to extract data from it. The data source configuration interface will vary depending on the type of external data source. AARO SYSTEMS AB 256 AARO 11.0 USER MANUAL Utilities. Integrator configuration Figure 7.3—2 Example of Data Source definition form 7.3.1.1 General data source configuration Some parameters are the same no matter what type of data source is chosen, these are referred to as general data source parameters. Changing these parameters on an existing data source should be made with care. Here is a list of parameters together with a description: Parameter Description Name The name that the data source will be referred to within the context of AARO integrator. Changing the name of an existing data source will cause failures in all import sources that depend on it. Fetch Module The fetch module is a “connector” to be used for accessing the data external source. There are different fetch modules for different types of data sources (SQL table, text file, Excel file etc). Depending on selection here, there are few additional parameters to be set. Amount Dimension The technical name of the amount dimension (see next chapter). AARO SYSTEMS AB 257 AARO 11.0 USER MANUAL Utilities. Integrator configuration Parameter Description Transaction Amount Dimension The technical name of the transaction amount dimension (see next chapter). Dimension/ Technical Names A list of mappings between technical name and a name usable within the AARO integrator (see next chapter). 7.3.1.2 Dimension definitions All data sources must have a dimension concept. In case of the SQL table data source, dimensions are normally represented as columns in a table. A definition must be made of all dimensions that should be available for the AARO integrator. All external dimensions that should be exposed should be listed with their technical names. The technical name is the name of the dimension in the external data source. In the SQL table data source it is, most likely, column names. For every technical name there should also be a dimension name. The dimension name is the name that the dimension will be referred to within the AARO integrator. Exceptions to this are the amount and transaction amount dimensions which both have their own input forms. In their form only the technical name needs to be entered. There are three reasons for doing a dimension definition. To get a more user friendly name. In many cases the technical dimension name is not very user-friendly. Therefore, it can be given another name here for use within the AARO integrator. To limit the exposure of the data source. Perhaps there are dimensions which should not be accessible from AARO. If so, simply do not define them here. To be able to reuse rules. Rules can be applied to different data sources if they share the same dimension names. The chapter about import sources discusses this in details. When assigning names one should bear in mind the last of these reasons, reusability. 7.3.1.3 SQL table data source configuration Except for the general data source parameters listed in the previous chapters, there are some specific parameters to set depending on the fetch module selected. When connecting to a database table, the fetch module parameters listed below must be set. AARO SYSTEMS AB 258 AARO 11.0 USER MANUAL Utilities. Integrator configuration Figure 7.3—3 SQL table data source configuration example Parameter Value extTableName Name of the table in the source database dsJndiName JNDI name of the database. JNDI is a standard way to describe a database location in Java. See http://java.sun.com/products/jndi/ IgnoreInSql Includes a comma separated list of external dimensions you want to be excluded from the WHERE clause of the generated SQL statement. Normally you don’t have to enter anything, use only if you have problems with the generated SQL. AARO SYSTEMS AB 259 AARO 11.0 USER MANUAL Utilities. Integrator configuration Parameter Value ReplaceNulls Set to true if you want NULL values be replaced with empty strings in the external data. This parameter is needed only if you need some special conversions for NULL values, because conversion rules currently do not support NULL values, so the only way to handle them is to replace them with empty strings. Normally you don’t need this parameter, leave it blank or set to false. SimplifyExpressions Set to true if you want to add several external accounts to one AARO account. 7.3.1.4 Excel file data source configuration Except for the general Data Source parameters listed in the previous chapters, there are some specific parameters to be set depending on the fetch module selected. When connecting to Excel files, the fetch module parameters listed below must be set. Figure 7.3—4 Excel file data source configuration Parameter Value SkipFirstLine If “true”, ignore the first row in the Excel sheet. Probably since it contains column headers. SkipLastLine If “true”, ignore the last row with data in the Excel sheet. Probably since it contains column summary information. Filename pattern A pattern for identifying useful data in the Excel file name such as company, period information, type of data. AARO SYSTEMS AB 260 AARO 11.0 USER MANUAL Utilities. Integrator configuration Parameter Value Error directory The directory where not successfully read files are located by the integrator after import. Directory Location of the Excel files to be read by the integrator Filename Dimensions Connected to the “Filename pattern” above. Defining the dimensions that can be extracted from the file names. This is a comma separated list of external dimensions. Read Directory The directory where successfully read files are located by the integrator after import. MoveFiles If set to false, files won’t get moved to the Read directory after they are successfully read The technical names used for Excel import refer to the corresponding column number in the Excel files. In the example above, we expect account info to be located in column 1, Cost Centre to be located in column 2 etc in the Excel files. Note that the first column in Excel has index 0. As can be seen in the example above, there are no technical names defined for company and period type. This is because this information is extracted from the file name (see value for Filename Dimensions). 7.3.1.5 Plain text data source configuration To import data from a plain text (separated) file use the Text file source. Specific parameters are: Parameter Value DelimiterChar A character separating fields in the text files, i.e. comma, semicolon etc. QuoteChar It is possible to have the delimiter character inside a field. In that case the field must be quoted i.e. enclosed in quote characters. For example if this parameter is set to ‘, the field should look like ‘field contents’. Filename pattern Only files with names matching the pattern will be read. Pattern should be a valid Java regular expression. To read all files from the directory, leave it blank. Error Directory The directory where not successfully read files are located by the integrator after import. Directory Location of the Excel files to be read by the integrator. AARO SYSTEMS AB 261 AARO 11.0 USER MANUAL Utilities. Integrator configuration Parameter Value Read Directory The directory where successfully read files are located by the integrator after import. MoveFiles If set to false, files won’t get moved to the Read directory after they are successfully read. 7.3.1.6 XML file data source configuration To import data from an XML file use the “XML file” source. This data source is similar to the previous one since they both deal with text files. Parameter Value RecordElementName Name of the “record level” xml element. AmountElementName Name of the xml element containing amount. ErrorDir The directory where not successfully read files are located by the integrator after import. IncomingDir Location of XML files to be read by the integrator. ReadDir The directory where successfully read files are located by the integrator after import. An example of an xml fragment with comments: <row> <company>ARLANDA</company> <period>June</period> <year>2009</year> <account>3010</account> <loc>1000.00</loc> </row> In the fragment above, row is the “record level element”, so RecordElementName parameter should be set to “row”. AmountElementName should be set to “loc”. In the Dimension/Technical names table all other elements below the record level elements should be mapped to the corresponding external dimensions using xml element names as technical names, e.g. Ext.Company mapped to company etc. 7.3.1.7 Creating and editing a data source To create a data source, right-click Data Sources in the left frame and select New Item. AARO SYSTEMS AB 262 AARO 11.0 USER MANUAL Utilities. Integrator configuration Figure 7.3—5 Creating a data source To edit an existing data source, click the data source you wish to edit in the left frame under Data Sources. 7.3.2 Import Specification An import specification is a set of rules that together contains the logic for converting data. A rule must always be a member of one, and only one, import specification. When importing data one import specification is used for the conversion process. Hence, a user can use different import specifications to get different results. All import specifications are completely independent of each other. Figure 7.3—6 Example of an import specification 7.3.2.1 Conversion rules Conversion rules are used to define relations between dimension values in AARO and dimension values of other data sources. An external data set needs to undergo a conversion process when being imported into AARO. This conversion can be anything from simply keeping the external value to more advanced transformations. To define the conversion process, rules are used. This chapter starts out with an example which shows how rules are used and then goes into details on the components from which rules are built. Finally, a list of examples is given for common rules used in real implementations. A more formal definition of what a conversion rule is in the AARO integrator will be given later but for now we will look at some examples based on the rules in the table. AARO SYSTEMS AB 263 AARO 11.0 USER MANUAL Utilities. Integrator configuration Rule field Description Enabled If not checked, the rule will be ignored. ID The unique identifier of the rule. This value is automatically created when the rule is added. Pri The priority of the rule. In case of a conflict the rule with the highest priority will be used. A higher value means a higher priority. Only one rule for each dimension name can have priority 0. Match Expression The conditions that must be fulfilled for the rule to match (i.e. be used). Return Type If the rule matches the expression it will affect the field specified in this column of the AARO Result. Evaluation Expression An expression which results in a value returned for the specified return type. 7.3.2.2 Managing conversion rules Since all rules belong to an import specification the first step is either to select an existing import specification or create a new one. Edit an existing import specification: Select an import specification from the list of import specifications in the left frame. Create a new import specification: Right-click Import Specifications in the left frame and select New Item from the pop-up menu. Figure 7.3—7 Creating an import specification Now all of the existing rules will be presented in the right frame. From here there are a couple of possible actions that can be made on the import specification. Add a rule: Press the Add Rule button. A new row is added to the import specification and all its fields can be modified. Delete a rule: Select a rule and press the Delete Rule button. Disable a rule: Select a rule and clear the Enabled field. The rule still exists but will not be used. This option is useful when making changes to an import specification so that old rules can be disabled before they are deleted. AARO SYSTEMS AB 264 AARO 11.0 USER MANUAL Utilities. Integrator configuration Copy rules to the new import specification: Select rules to be copied, press the Copy to New button, enter the new import specification identifier and click OK. Rules can also be copied and pasted into other documents, like Excel. Test a rule: Select a rule and press the Test Rule button. Editing rules are made by selecting a rule in the list of rules. With the rule selected the following can be done: Change priority of the rule: Use the increase and decrease priority buttons as appropriate. Add a comment: Click the Comment field and enter a text. Edit the evaluation expression: Click in the Evaluation Expression field, click the ... button. The Evaluation Expression Editor will then be presented. Create the expression and press OK. Edit the match expression: Click in the Match Expression field, click the ... button. The Match Expression Editor will be presented. Create and expression and click OK. 7.3.3 Importing data There are two ways to import data: 1. Importing data for a specific company, period and form on command. 2. Using the consolidation order form for importing data for one or several periods, companies or forms. 7.3.4 Importing data using forms directly When a form is open it can be loaded with external data by pressing the “Load Ext” toolbar button. The request will be sent to the integrator and then on to the external source. It will contain the form, period and company selected in the top of the screen. AARO SYSTEMS AB 265 AARO 11.0 USER MANUAL Utilities. Integrator configuration Figure 7.3—8 Example of form for Data Entry If more than one import source is registered for the selected company, the import source selection dialog window will appear. Otherwise, the import source will be selected automatically. After the data is imported it will appear in the form. Note that at this point data is not saved to the AARO database. It will be saved only after pressing the Save button. Importing data this way is similar to inserting data manually into the white cells on the form. 7.3.4.1 Data validation In case imported data does not match the validation requirements defined in AARO, the following form will appear informing the user about the data which is violating the validation requirements. It also allows the user to correct the imported data by changing the data highlighted in the yellow cell. Note: this will only change the imported data only and not the source data. AARO SYSTEMS AB 266 AARO 11.0 USER MANUAL Utilities. Integrator configuration Figure 7.3—9 Validation errors and correction form This validation process is performed in AARO after the integrator has performed its task. All data passing the validation test will be saved into the AARO database. 7.3.5 Import using the consolidator order form If the user prefers to import several forms, periods and companies simultaneously or to schedule the import procedure for delayed start, the consolidator import can be used. Open Utilities/Consolidation, press the Cons button, select Order consolidation from the dropdown menu. Select the desired type of an external consolidation on the right. AARO SYSTEMS AB 267 AARO 11.0 USER MANUAL Utilities. Integrator configuration Figure 7.3—10 Ordering import through the consolidator In case there are no options, the data source has not been updated in the consolidation table - this update can be carried out by following these steps: 1. Select Utilities/Application Management/Consolidation. 2. Add the following line: ConsQueue = IMPORT; Typ = ISCALA (in this example); Period = All; IntOrEx t= EXT; Field1 = Form; ListOrSetting1 = L; Field2 = Co, ListOrSetting2 = L; Field3 = Period,ListOrSetting3 = L. AARO SYSTEMS AB 268 AARO 11.0 USER MANUAL Utilities. Integrator configuration Figure 7.3—11 Adding new consolidation queue 3. Click Save. Note: you may need to restart AARO for the changes to take effect In case this option button is disabled, the data source has most likely not been defined for the period selected in the drop-down list in the upper left part of the form - this update can be carried out by following these steps: 1. Select Utilities/Edit Period. 2. Select the import period in the tree to the left. 3. Select the Open tab. 4. Add the data source name to the list. Figure 7.3—12 Adding new data source to a period 5. Click Save. Note: you may need to restart AARO for the changes to take effect After having selected the external consolidation type (ISCALA in this case), a form, period and company selection screen will appear. Select forms, companies and periods you want to import, click Save and order a consolidation, either immediately or scheduled according to the form above. Note that import can be scheduled not more frequent than once per hour. AARO SYSTEMS AB 269 AARO 11.0 USER MANUAL Utilities. Integrator configuration After having pressed “Order consolidation”, the ordered consolidation will appear in the consolidation queue. After it has finished processing, it will disappear from the queue. In case you leave the selections empty, all available forms periods and companies will be requested. 7.3.5.1 Import status If the import fails, the consolidation will appear in the Failed & Warnings Today table with status Warning or Error. Warning means that import data is missing. Error means that some of the imported data has failed in the validation tests. There is a log file with more detailed information about warnings and validation failures. The order can be accessed by selecting the corresponding row in the bottom table and pressing the Reports button. If data is imported successfully, no log file will be shown and the Reports button will be disabled. 7.3.5.2 Import log file A more detailed import log file in the text format is created after each import. The location of the file can be specified in the integrator configuration user interface. The name of the file is the date and time of the import completion. The log file contains the following information: Periods, forms and companies requested Import start time Import stop time Import status, (successful, warnings, errors) Number of records read Number of records saved Number of records failed List of validation problems, if any List or warning messages and error messages, if any AARO SYSTEMS AB 270 AARO 11.0 USER MANUAL Utilities. View Tables 7.4 View Tables This chapter refers to the menu item Utilities/View Tables in AARO. In the View Tables window valid currency rates, valid companies as well as valid dimensions can be monitored for a period. This is a monitoring tool only. 7.4.1 Currency rates The valid currency rates for a selected period are displayed: currency, opening rate (rate on the first day of the period), average rate and closing rate (rate on the last day of the period). Figure 7.4—1 The PERIOD_RATES table 7.4.2 Companies The valid companies (companies opened for reporting) for a selected period are displayed; period, company, company currency, translation type (method used to translate to group currency) and tax (local tax percentage rate). AARO SYSTEMS AB 271 AARO 11.0 USER MANUAL Utilities. View Tables Figure 7.4—2 The PERIOD_COMPANIES table 7.4.3 Dimensions The valid dimensions (dimensions opened for reporting for a certain company) for a selected period are displayed; period, company, level number of the dimension (i.e. 2 = “Business Unit”), dimension name and level comment (not used). Figure 7.4—3 The PERIOD_COLEVEL table AARO SYSTEMS AB 272 AARO 11.0 USER MANUAL Utilities. Edit Periods 7.5 Edit Periods This chapter refers to the menu item Utilities/Edit Periods in AARO. Period is one of AARO’s standard entities and is used both for actuality (budget, forecast, actual), and term (Dec2007,Q12008). Base data such as organizations and rates are stored once for each period. To simplify maintenance it is possible to copy information between periods. It is also possible to keep specific period as masters for rates and organizations. The typical procedure when preparing a new period for reporting is to copy the setup from previous period and to do all necessary adjustments. A lot of time is saved with this approach. The Edit Periods window consists of a tree structure in the left pane displaying all existing periods and a working space to the right consisting of different tabs. Figure 7.5—1 Edit Periods window The tabs of the Edit Periods window: Field Description Properties Defines the parameters of the period. Open Opens and closes forms for the period. Active All forms reported for the period must be activated here. AARO SYSTEMS AB 273 AARO 11.0 USER MANUAL Utilities. Edit Periods 7.5.1 Field Description Rates Currency exchange rates for the period. Complete Defines which packages should be reconciled when a period is completed. Validation Consists of information about which dimension items that are valid. Tab is activated in the menu Utilities/Application Management/Validations. Open for Revert Used to allow users with different input functions to revert forms so that information may be edited. Packages Activates input packages for the period. If some packages have been added in this tab, then only those are visible in the period. If no packages are added, then all packages are visible. Organisation Consists of three other tabs, COMPANIES, GROUPS and OB ORGANISATION, which defines the legal and operational structure for the period. Publish Links an account to a user identifier. If this option is enabled, the user identifier will only have access to the specific account/s listed (e.g. in drill down reports, etc). Toolbar buttons The following buttons can be found: Field Description Load Retrieve information from the selected period. Save Save all information in the working space to the database. Save As Inactive Print Display a menu with options: ‘Preview’ will display the data in a report. ‘Print’ will print it. ‘File’ - inactive. Reports Inactive. New period Add a new period to the tree structure. Start with filling in information on the Properties tab and saving it before continuing with the other tabs. Copy period Copy information from another period to the current period. Note that when copying a period to the start of a new year most often recurrent journals and PE/GOODWILL is not selected to be copied (legal info). AARO SYSTEMS AB 274 AARO 11.0 USER MANUAL Utilities. Edit Periods 7.5.2 Field Description Delete period Delete period. Due to the fact that very important information is attached to the period name, it is not possible to delete a period name using this button, but all other data can be deleted. If you would like to entirely remove a period from the database (including it’s name), contact AARO Support. Insert Row Insert a row in a table. This button is active for all tabs except the Properties tab. Delete Row Delete a row in a table. This button is active for all tabs except the Properties tab. Copy Copy information from selected cells. This button is active for all tabs except the Properties tab. In the Rates tab, this copies the entire table including the currency codes. Paste Pastes copied information. This button is active for all tabs except the Properties tab. Note: when pasting to the Rates tab it is only possible to paste the entire table including the currency codes. However, if data in a cell is selected in dark blue, it is also possible to overwrite the selected data in that specific cell. Clear Clear the current tab from information. Duplicate Duplicates the selected row. Find Search for information. Current Set current month, week etc. Information for ‘Relative periods’ functionality. Open Quick tool to open forms for reporting. All forms can be opened simultaneously. Only active in the Open tab. Close Quick tool to close forms for reporting. All forms can be closed simultaneously. Only active in the Open tab. Properties tab The Properties tab is divided into different areas, as follows: 7.5.2.1 Period area The period area contains the following basic information about the period: AARO SYSTEMS AB 275 AARO 11.0 USER MANUAL Utilities. Edit Periods Field Description Description Description of the period. Mandatory to enter. Opening balance from Opening balances are fetched from the period set up in this field. If empty, opening balances will be zero. Previous Period Previous period is used for currency translation and only needed when the income statement is calculated to group currency using other average algorithms than ‘normal’. See average field. Responsible User identifier of the person responsible for the period and its creation; not mandatory. Annual factor The annual factor is set as a factor that the IS item is multiplied with when a key ratio is calculated with both an IS part and a BS part. Example: If the IS reflects six months accumulated result, the factor is 2. If the IS reflects 3 months accumulated result the factor is 4 and so on. Comparison Period Comparison period is used for deviation analyses. See accounts of type ‘ConsRatio’. Logic version It is possible to define different sets of elimination logic. If this is done, a choice of which set to use has to be made, otherwise always enter 0 in this field. Average Translation Defines different ways to translate the income statement from local to group currency. The algorithms are: ‘Average’ - the amount in local currency is multiplied with the average exchange rate for the period. ‘GAAP’ – the amount in local currency from the previous period (see previous period field) is subtracted from the reported local amount. The remaining Loc amount is translated to group currency using the average rate and added to the group amount from previous period (see previous period field). There are some other variants that may be activated. Ask AARO support for further details. Long description Free text description of the period. Use publish features on this Period Turns on the publish functionality for the period. For more information, please refer to the Publish Tab section. AARO SYSTEMS AB 276 AARO 11.0 USER MANUAL Utilities. Edit Periods 7.5.2.2 Dynamic Period area In the Dynamic Period area information about actuality, reporting interval etc is edited. The information is needed in drill down reports when reports are automatically populated with relevant periods (relative reports). Note that the combination of information in the Dynamic Period area must be unique for each period. If identical periods are required then at least the period type must differ. New period types, time series, etc are added in the menu Utilities/Application Management/Relative period. Field Description Period type Actuality of the period, choices will be according to the setup. Typical actualities are actual, budget and forecast. Timeseries Time series signifies the interval of the reporting period. Choices will be according to the setup. Typical time series are Monthly, Tertially, Quarterly, Weekly, Daily. Timeseries type Time series type is used to describe the accumulations interval for the income statement of the period. Choices will be according to the setup. Typical choices are. YTD (year to date), MTD (month to date), IM Isolated month and IW (isolated week). Year The year of the period. Period index ‘Period index’ displays the index the period has within its time series, i.e. for a monthly period, it can be 1-12 (1 for January and 12 for December) and for a weekly time series it is 1-52 and so on. 7.5.2.3 Consolidation area In the consolidation area it is defined how the period is consolidated. Field Description Logic The Logic type of a period is set here. The alternatives are Normal, Calculated and PreCalc (there is an old type “Opening” that is not used anymore). ‘Normal’ is used for periods that are reported and consolidated, ‘Calculated’ and ‘PreCalc’ are used for periods that are not reported but calculated from other periods. The difference between ‘Calculated’ and ‘PreCalc’ is that ‘Calculated’ periods are calculated by the report generator and ‘PreCalc’ periods are calculated by the consolidator, i.e. ‘PreCalc’ periods needs to be consolidated. AARO SYSTEMS AB 277 AARO 11.0 USER MANUAL Utilities. Edit Periods Field Description The argument to use ‘PreCalc’ periods instead of ‘Calculated’ is that these are slightly faster and that ‘PreCalc’ periods are possible to use for further calculations based on periods whereas ‘Calculated’ are not. Default Rates from Period from which rates are taken. Normally the same period as the reported but can also be another one. Default Organization from Period from which the organization is taken. Normally the same period as the reported but it can also be a different one. Consolidation prio Priority of the consolidation. The priorities are ‘High’, ’Normal’ and ‘Low’. Periods with higher priority are consolidated before periods with lower priority. 7.5.2.4 Period relation area Mathematics between periods is established here, either for entire periods or for individual accounts. The area consists of a table with following fields: Field Description Code Affected code: empty if the logic applies to all codes. Translation Translation type for the affected accounts. If translation type is given it affects all accounts with that translation type. PerCalc The period from which figures are retrieved. Multiplier A multiplier that retrieved figures is multiplied with. For example, to define a calculated isolated period for IS, enter it as follows: Code Translation PerCalc Multiplier Average 0712A 1 Average 0711A -1 7.5.2.5 Excess Value area First and last date of the period. These dates are used to calculate how many days excess values will be depreciated. GW depreciation is ‘Y’ if goodwill is depreciated for the period, ‘N’ if not. AARO SYSTEMS AB 278 AARO 11.0 USER MANUAL Utilities. Edit Periods In order to stop depreciation for a period you also have to specify the accounts in the table LEGAL_GOODWILL_DEPR. 7.5.2.6 Average area It is here defined how average accounts are calculated for a specific period, for example; average number of employees, average capital employed and so on. The area consists of a table with fields as: 7.5.3 Field Description AverageType Averages can be calculated based on different number of periods. For example: One is based on every single month, another only on quarters and so on. Here the name of the average definition is given and the same name should be given for the corresponding average accounts. AvePeriod Name of the period included in the average definition. Open tab This is where periods are opened and closed for changes. The area consists of a table with the following fields: Field Description Form Forms that need to be open for the period are specified here. To close a form for the period, delete the form from the tab. Tip: you can also place an x in front of the form if you want to save the information for future reference. Company If a company name is entered the row applies to that particular company. ‘*’ signifies all companies. Input function Different user categories may have different input functions. If a form for a specific group of people is to be opened, their input function is entered. If ‘All’ is entered, the row comprises everyone. AARO SYSTEMS AB 279 AARO 11.0 USER MANUAL Utilities. Edit Periods Field Description InputJV The following values can be entered: Input – the form is open for input. JV – the form is open for adjustment through journals. When the form is saved, an adjustment journal is generated. This function can be used with match forms with Loc values only. All – the form is open for all possible changes. Import – the form is open for adjustment through uploading a file in the menu Data Entry / Import. AcctType This applies to journals only. Journals for a form might be open for a specific accounting type (such as ‘GAAP’), or for ‘All’ accounting types. Responsible Enter responsible user. Keep Used with the period setup functionality. It indicates if the record is affected by the template when it is applied: Y – not affected N – affected. Other than specifying input or match forms to be opened for the period, “Form” can perform several other functions – these are outlined below: Form Function DELETE Opens the period for deletion. PASTEQUITY Opens the Past Equity and Excess value tabs in the Data Entry / Legal view for edit. SHARESEDIT Opens the Shares form in the Data Entry / Shares view for edit. TOTAL Opens the period for total consolidation. Import source name Import sources defined in Utilities / Integrator Configuration should be added here to be opened in the period. For more information, see the Integrator manual. The “Forms” listed above do not need to be added to the Active tab. AARO SYSTEMS AB 280 AARO 11.0 USER MANUAL Utilities. Edit Periods 7.5.4 Active tab The area consists of a table with a single field ‘Form’. All forms that are reported for a specific period must be entered here and thereby activated. Based on the activated forms it is possible for AARO to calculate which accounts are open for changes in which forms. For example, if the specification for buildings is not activated, buildings are edited directly in the BS. If the specification is activated, buildings are edited in the specification. It is important that this information is updated before reporting starts. If updating after reporting has been initiated, it might be confusing. If accounts for a form reported for an active period are changed, the period has to be reactivated by pressing the Save button in the active tab. 7.5.5 Rates tab The Rates tab contains the exchange rates for the selected period. Opening, average and closing rates are entered here. Additional rates can also be used if required – these are defined in the menu Utilities/Application Management/CurrencyTranslation, in the ‘Valid currency types’ area. The Rates tab consists of a table containing the following fields: Field Description Currency Currency code, e.g. EUR, USD, SEK. Opening Opening rate Average Average rate Closing Closing rate The Inverted values check box enables an opposite exchange rate calculation, e.g. multiply by 10 instead of divide by 10. The whole rates table including the currency codes can be copied to the clipboard by clicking the Copy button. All of the rates information for the period can then be pasted to another program such as Excel or Notepad. The whole rates table including the currency codes (such as SEK, EUR and USD) can be pasted into the Rates tab by clicking the Paste button. Note: when pasting using the Paste button, the data to be pasted must be the complete rates table and must contain the currency code in the furthermost left column. If you need to paste an individual exchange rate value, double-click a AARO SYSTEMS AB 281 AARO 11.0 USER MANUAL Utilities. Edit Periods cell so that it’s dark blue, copy the data using Ctrl+C and paste the data directly from the clipboard using the shortcut Ctrl+V. To delete a currency from the table, right-click the currency code in the left column and select Delete currency. 7.5.6 Complete tab In the Complete tab, it is possible to link two packages in order for these to be reconciled when completing a form which belongs to the first package. The default setting is for only one package to be reconciled for the period during completion. The complete tab consists of a table with following fields: Package ExtraPackage Package to be reconciled together with an extra package. The extra package to be reconciled together with the first package. When two packages are linked, a cross-package reconciliation rule is applied when reconciling one of the packages. See the following example: Figure 7.5-2 Cross-package reconciliation rule In this example, two forms from different packages are compared. The IS_ALL is in the MONTHLY package and the SALE_SPEC is in the ANNUAL package. Figure 7.5-3 Complete tab setup example When completing the ANNUAL package, the account 3010 will be compared between the ANNUAL and MONTHLY packages. For more information on reconciliation rules, see the Utilities / Edit Input / reconciliation rules view description. 7.5.7 Validation tab The validation functionality is used to restrict input to a combination of company/dimension, form/dimension and/or certain set of dimensions. AARO SYSTEMS AB 282 AARO 11.0 USER MANUAL Utilities. Edit Periods The tab Validation (and the respective sub tabs for each combination above) is opened when the functionality is activated in menu Utilities/Application Management/Validations. In the menu Application Management/Validations it is to be stated what combinations of company/dimension, form/dimension and/or certain set of dimensions that should be valid. Based on the combinations set up in Application Management/Validations, the detailed combinations are set up in this tab. An example: In Application Management, select that company should be validated with dimension ‘Product’. Figure 7.5—4 Application Management/Validations In Edit Period, tab Validation, company/dimension validation, select the exact combinations of company and product members that should be valid, e.g. company ‘ATLANTA’ and product ‘BATH’. Figure 7.5-5 Period validation settings AARO SYSTEMS AB 283 AARO 11.0 USER MANUAL Utilities. Edit Periods Note: after changes are made, you should restart AARO to make sure the changes made in the Validation tab in Edit Periods are applied in Data Entry/ Input. 7.5.8 Open for Revert tab If a completed package should reopened for input, it must be listed in this tab. 7.5.9 Packages tab Packages entered here are shown in the input screens for the period. The reason to enter packages in these screens is to reduce visible choices for the reporting entities. If no packages are entered, the default is that all packages are available. The area consists of a table with a single field ‘Package’ where the packages to be available for the period in question are entered. 7.5.10 Organisation tab This tab consists of three sub tabs, COMPANIES, GROUP and OP_ORGANISATION. 7.5.10.1Companies sub tab This tab is edited from the Legal module if a legal structure is used. In the COMPANIES tab all companies for the period are entered. Companies that are not entered here will not be visible for input or produce consolidated figures. The area consists of a table with following fields: Field Description Company Company code. Currency Currency that the company reports in. Note that the currency might differ for different periods. It is therefore easy to change reporting currency from, for example, SEK to EUR when needed. Translation type Translation method for the company; the only choice available is ‘Current’. Tax Tax rate for standard tax calculation. EquityLevelCode Default dimension value for this company. If properly set up, all “non operational” figures will be given this value. Functionality is currently being reviewed. Contact AARO support regarding questions. AARO SYSTEMS AB 284 AARO 11.0 USER MANUAL Utilities. Edit Periods 7.5.10.2Group sub tab The GROUP tab contains information about Legal groups and their consolidation method. Normally this information is edited from the Legal module. The area consists of a table with following fields: Field Description LegalGroup Legal group code. EquitConsMethod Method for consolidation. Always ‘Equity’. 7.5.10.3Op_Organization sub tab This tab shows the operational structure in the table form. This window is normally not used for editing as all changes in the operational structure are implemented in the Edit Dimension window. 7.5.11 Publish tab The Publish tab gives options to link accounts to a user. If this option is enabled, the user will only have access to the specific account/s listed for example in drill down reports. For reference, the example below was set up for account 3010 (Net sales, external) in period 0912A: 1. First you have to setup the responsibility code (to be used on the Publish tab for controlling access): Go into the menu item Utilities/Application Management/Responsibilities, press the Insert Row button and Add Publish responsibility. Enter appropriate text in the Publish field (see example below) and press Save: AARO SYSTEMS AB 285 AARO 11.0 USER MANUAL Utilities. Edit Periods Figure 7.5—6 Add Publish responsibility in Utilities/Application Management 2. Go to Utilities/Edit Periods/ Properties tab, tick the check box Use publish features on this period and press Save. AARO SYSTEMS AB 286 AARO 11.0 USER MANUAL Utilities. Edit Periods Figure 7.5—7 Publish features on the Properties tab 3. Go to the Publish tab. Enter the account code(s) which you would like to allow access to, and enter the ResponsCode created in the previous step. Figure 7.5—8 Setup of the Publish tab for an account 4. To restrict user access to publish information according to the rules set up above, tick the appropriate checkbox in Published Responsibilities area of User Administration screen, and press Save: AARO SYSTEMS AB 287 AARO 11.0 USER MANUAL Utilities. Edit Periods Figure 7.5—9 Published Responsibilities checkbox in User Administration For the example given above, access is unblocked for account 3010, and blocked for all other accounts for user AARO in period 0912A. The following drill down report example (from Reports/Drill Down) shows no data against accounts 3060, 3080 and 3099, while data is still visible against account 3010 in period 0912A: AARO SYSTEMS AB 288 AARO 11.0 USER MANUAL Utilities. Edit Periods Figure 7.5—10 Drill down report example where account 3010 has been allowed 7.5.12 Create a new period To create a new period, do as follows: 1. Select Edit Periods from the Utilities menu. 2. Click the New button and enter period name in the ‘Create new period’ dialog window and click OK. Figure 7.5—11 Create new period dialog The new period will appear in the left-hand pane. AARO SYSTEMS AB 289 AARO 11.0 USER MANUAL Utilities. Edit Periods Figure 7.5—12 Enter description in Properties tab 3. Update the Properties tab with basic information. Press Save. 4. If information from another similar period (mostly previous period of the same type) is to be copied, proceed to copy information, otherwise continue to update the remaining relevant tabs. 7.5.13 Copy an existing period To copy information from an existing period: 1. Select the target period in the Edit Periods window. If a new period is to be created, see previous section. 2. As a security measure a ‘security’ row has to be added in the Open tab before it is possible to copy information to the target period. The reason for this is to make it more difficult to ruin an important period by copying information to it by mistake. The ‘security’ row should be entered as below with form ‘DELETE’. Figure 7.5—13 Enter ‘DELETE’ when information is to be copied AARO SYSTEMS AB 290 AARO 11.0 USER MANUAL Utilities. Edit Periods 3. Click the Copy period button and the Copy Period dialog window will appear. Select from which period data is to be copied and select the different information categories to copy. 4. Select parameters to copy. Note that the check boxes Recurrent Journals and PE/GOODWILL (legal info) are normally not selected when copying information to a period that represents the beginning of a new year. Figure 7.5—14 Copy Period dialog 5. Press OK. 7.5.14 Multi open/close To open/close forms for reporting is occasionally time consuming work. There are two buttons, Open and Close, designed to reduce the work involved. Go to the Open tab and press Open. Following dialog will appear: AARO SYSTEMS AB 291 AARO 11.0 USER MANUAL Utilities. Edit Periods Figure 7.5—15 Open button, Parameters dialog In this dialog it is possible to open all forms for a package at the same time. It is also possible to select a group of companies. Press Save and all relevant rows are created in the Open table. Close works in the same way but with reversed functionality. In the close dialog there is an extra choice; “Close all” which closes everything. 7.5.15 Set current period To set the current month, week and year, press the Current button. A dialog will appear where information can be updated. Figure 7.5—16 Set current period dialog This information is used for the relative period functionality. Please refer to Utilities/Application Management/Relative Period area for more details. 7.5.16 Print/Print Preview active tab To print the information on the active tab, press the Print button and then Preview to open the report in the print preview mode or Printer to send the report to the printer AARO SYSTEMS AB 292 AARO 11.0 USER MANUAL Utilities. Period Setup 7.6 Period Setup Period Setup controls automation of some period settings, such as Open and Active tabs. The functionality is available under the menu item Utilities/Period Setup 7.6.1 General description The general purpose of this functionality is to automate the handling of the following period related settings (usually handled manually in Edit Periods): Open, Active, Package, Complete and Open for Revert tabs. The user needs to have the Manage templates special right in order to administrate this functionality. 7.6.2 Open tab To automate completion of the Open tab in the Edit Periods menu, the Open template needs to be created. 1. Create an Open template by right-clicking the Open folder and select Add open. Figure 7.6-1 Adding an Open template 2. Enter a template name and click OK. The template appears in the tree under the Open folder. The template table appears on the screen. Table fields correspond to fields on the Edit Period/Open tab. AARO SYSTEMS AB 293 AARO 11.0 USER MANUAL Utilities. Period Setup Figure 7.6-2 Open template fields 3. Complete the Open template table and click Save. Figure 7.6-3 Open template completed 4. Create a template by right-clicking the Template folder and select Add template. AARO SYSTEMS AB 294 AARO 11.0 USER MANUAL Utilities. Period Setup Figure 7.6-4 Adding a template 5. Enter a template name and click OK. The template appears in the tree under the Template folder. Figure 7.6-5 Template properties 6. In the Properties tab, check Enable/Default for Open. AARO SYSTEMS AB 295 AARO 11.0 USER MANUAL Utilities. Period Setup Figure 7.6-6 Template properties checked for Open 7. Select the Packages tab. This tab lists all input packages and included forms created in the Edit Input menu. 8. Select the wanted combination of input package and Open template by selecting the Open template in the combo box next to the package. 9. To exclude one or more forms from the template, expand the package and select the forms to be excluded. Figure 7.6-7 Template setup for packages 10. To handle other functions used in the Open tab, such as LEGALEDIT and DELETE, the Forms tab is used. The forms used in the Forms tab are set up in the background table SETTING_PROPERTY_VALUES. AARO SYSTEMS AB 296 AARO 11.0 USER MANUAL Utilities. Period Setup Figure 7.6-8 Setup of terms used on the Open tab Figure 7.6-9 Template Forms tab settings 11. When all settings are complete, save the template. The template can now be executed and the Open tab will be updated according to the settings in the Open and Template templates. Typically a number of Open and Template templates are created to reflect the changing appearance of the Open tab in Edit input. These templates are run at scheduled times to execute the actual change of the Open tab. For further details on how to run a template see 7.6.7 Run templates. 7.6.3 Active tab To automate the handling of the Edit Periods/Active tab, do the following: 1. Select a template, select the Properties tab and check Enable/Default for Active. 2. On the Packages tab, check Active for desired input packages and save the template. The template is now updated to handle automatic update of the Active tab. When running the template, the Active tab will be updated with the forms in the selected input package. For further details on how to run a template see 7.6.7 Run templates. 7.6.4 Package tab To automate the handling of the Edit Periods/Packages tab, do the following: 1. Select a template, select the Properties tab and check Enable/Default for Input package. 2. On the Packages tab, check input package for desired packages and save the template. AARO SYSTEMS AB 297 AARO 11.0 USER MANUAL Utilities. Period Setup The template is now updated to handle automatic update of the Packages tab. When running the template, the Packages tab will be updated with the packages selected. For further details on how to run a template see 7.6.7 Run templates. 7.6.5 Open for Revert tab To automate the handling of the Edit Periods/Open for Revert tab: 1. Select a template, select the Properties tab and check Enable/Default for Open revert complete. 2. On the Packages tab, select and save the wanted combination of input package and Open template by selecting the requested Open template in the Open uncomplete field. The template is now updated to handle automatic update of the Open for Revert tab. When running the template the Open for Revert tab will be updated according to the settings in the Open and Template templates. For further details on how to run a template see 7.6.7 Run templates. 7.6.6 Complete tab To automate the handling of the Edit Periods/Complete tab, do the following: 1. Create a Complete template by right-clicking the Complete folder and select Add Complete. 2. List packages to be completed (i.e. the packages to be combined with other packages in the Complete tab in the Edit Period menu). Figure 7.6-10 Complete template example 3. Select a template, select the Properties tab and check Enable/Default for Complete. 4. On the Packages tab, select the Complete template for desired packages and save the template. The template is now updated to handle automatic update of the Complete tab. The result of running the template is updating of the Complete tab according to the settings in the Complete and Template templates. For further details on how to run a template see 7.6.7 Run templates. AARO SYSTEMS AB 298 AARO 11.0 USER MANUAL Utilities. Period Setup 7.6.7 Run templates To execute a template, proceed as follows: 1. Select the template in the tree and press the Run button. 2. Select the periods to be updated. It is also possible to select the part of the template that should be executed. Figure 7.6-11 Template execution After the run the result can be viewed in the relevant tabs in the Edit Period menu. AARO SYSTEMS AB 299 AARO 11.0 USER MANUAL Utilities. Edit Accounts 7.7 Edit Accounts This chapter refers to the menu item Utilities/Edit Accounts in AARO. Accounts are created and edited in this window. All existing accounts are displayed in the left pane. Accounts make the basis for the construction of input and output forms. The Edit Accounts window consists of a tree structure in the left pane and a work area consisting of two tabs to the right, the Properties tab and the Help tab. By expanding the tree structure for an account, information will appear about which input forms, report layouts, ratios and sums the account is part of and also what accounts sum up to selected account. Figure 7.7—1 Edit Accounts Note: if an account has been created or modified, a Sum consolidation must be performed in Utilities/Consolidation to update the account structure for input forms and drill down reports. For more information, please refer to section 7.1 Consolidation. 7.7.1 Properties tab The Properties tab shows detailed information about an account. The fields in the Account Heading section are identical for all account types. The Account definition section varies depending on the account type specified. 7.7.1.1 Account heading Field Description Account The account code which cannot be changed once created. AARO SYSTEMS AB 300 AARO 11.0 USER MANUAL Utilities. Edit Accounts Field Description Description The account name. Maximum number of characters is 50. Short name A shorter version of the account name. Used in reports with limited space. Account type Selected account type determines how the account is handled in the system. Different account types have different settings in the Account definition section. This field cannot be changed once the account is created. Translation The translation controls which exchange rate should be used in the consolidation process to translate local currencies to group currency. ‘Opening’, ‘Average’ and ‘Closing’ will be translated based on the rates per period and company. ‘Fixed’ will be translated with a factor 1 regardless of currency (used for volumes, i.e. ‘number of employees’). ‘None’ will incur any translation and is used for accounts where the local currency amount should be translated based on a rate that is not known to the system. The group currency amount should consequently be booked with a journal). ‘Quotient’ is rarely used and then only in connection with Temporal (MiM) translation. Report Translation Indicates what currency rate will be used when running a report in Reports/Drill Down. Most often the same as ‘Translation’ but can e.g. be used to recalculate accounts where ‘Translation’ is set to ‘None’. Decimals This field is used to specify the figures in the output reports (drill down) and should be displayed with decimals or not (please find further documentation regarding specifying number of decimals in the Data Entry/Input menu). Multiplier The multiplier field is used to specify a factor with which the stored value on the account will be multiplied before being presented in output reports (drill down). JV Multiplier The JV Mmultiplier field is used to specify a factor, 1 or -1. An amount booked in the Journals menu will, depending on the sign (- or +) of the booking and the JV multiplier, be registered as either debit or credit at the bottom of the Journal menu screen. The logic for this can typically be described as this: Revenues are reported with ‘+’ and with a JV multiplier -1 this will give ‘+’ x ‘-’ = ‘-’, hence credit. Expenses are reported with ‘-’ and with a JV multiplier -1 this will give ‘-’ x ‘-’ = ‘+’, hence debit. Assets are reported with ‘+’ and with a JV multiplier AARO SYSTEMS AB 301 AARO 11.0 USER MANUAL Utilities. Edit Accounts Field Description 1 this will give ‘+’ x ‘+’ = ‘+’, hence debit. Liabilities are reported with ‘+’ and with a JV multiplier -1 this will give ‘+’ x ‘-’ = ‘-’, hence credit. Note: The JV multiplier does not affect the actual storage of the registered amount at all, only the credit and debit indication in the Journal menu JV SEK Indicates (Y=Yes or N=No) if it should be possible to create a journal in group currency on the account. JV Loc Indicates (Y=Yes or N=No) if it should be possible to create a journal in local currency on the account. 7.7.1.2 Legal/Oper radio button The radio buttons specify which part of the system the accounts are used in. ‘Legal only’, ‘Operational only’ or ‘Legal & Operational’ specify that the account is used in these parts (i.e. will be processed by either Legal or Oper consolidations and after that stored in the legal or operational figure table). ‘Past Equity’ specifies that the account is used only in Legal/Past Equity tab. ‘Shares’ specifies that the account is used only in the Shares menu. When ‘Operational’ or ‘Legal & Operational’ is chosen, a subcategory for Operational also needs to be specified. Per default there is only one subcategory. An alternative subcategory needs to be created and applied for any accounts used in OS forms. For further details please note documentation for creation of input forms and more particularly the section regarding OS forms. ‘Summ Level’ is rarely used, and then for optimizing the consolidation process (consolidation time). For further details please contact an AARO consultant. 7.7.2 Account types The following account types can be used in the AARO application. Field Description Normal Accounts used for input and reception of calculations/transfers from past equity. Basic Accounts used for receiving calculations/transfers from past equity register. The difference from a ‘Normal’ account is that a ‘Basic’ account cannot be used for input. AARO SYSTEMS AB 302 AARO 11.0 USER MANUAL Utilities. Edit Accounts Field Description Opening Accounts holding opening balances from earlier periods. The following account definition should be specified: Opening balance account - the account holding the closing balance in the prior period (i.e. year end, prior year). Summ Accounts used for summation of other accounts. The following account definition should be specified: Summ multiplier - multiplier applied to a summ account. The multiplied value is stored in the database. Impact on opening account - an opening account receiving the Summ account value. It is set up when the Summ account should affect an opening balance. Summ account - the accounts to be added together and a multiplier indicating a factor for each account to be multiplied by before being added to the sum account. Note 1: A Summ account may also be used for input if the terms are not activated in the period. Note 2: A Summ account is calculated by the consolidation and the result is stored in the database. ReportSum Accounts used for summation of other accounts. The following account definition should be specified: Report Sum account - the accounts to be added and a multiplier indicating a factor for each account to be multiplied by before being added to the sum account. Note: A ReportSumm account is calculated when running the report it is included in. The result is not stored in the database. Average Accounts used for calculation of an average value based on another account. The following account definition should be specified: Account - the account that the calculation should be based on (base account); Average type - free text average type. The calculation definition for each average type is defined in Edit Periods/Properties tab/Average section for each period. Each calculation point (i.e. period) is listed as AvePeriod and the relevant AverageType is listed per calculation point. The equation is: (([value on the base account] for [AvePeriod1]) + ([value on the base account] for [AvePeriod2])…etc) / AARO SYSTEMS AB 303 AARO 11.0 USER MANUAL Utilities. Edit Accounts Field Description ([number of calculation points]). Note: An Average account is calculated when running the report it is included in. The result is not stored in the database. ConsAvg Accounts used for calculation of an average value based on another account. The following account definition should be specified: Account - the account that the calculation is based on (base account); Average type – free text average type. The calculation definition for each average type is defined in Edit Periods/Properties tab/Average section for each period. Each calculation point (i.e. period) is listed as AvePeriod and the relevant AverageType is listed per calculation point. The equation is: (([value on the base account] for [AvePeriod1]) + ([value on the base account] for [AvePeriod2])…etc) / ([number of calculation points]). Note: The difference from Average account is that if a company does not exist in a period included into calculation, this period will be excluded from the calculation. Note: A ConsAvg account is calculated by the consolidation and the result is stored in the database. Ratio Accounts that are used for calculation of ratios. The following account definition should be specified: Account – accounts used in ratio calculation. Operator - operator (+,-,* or /). Annualfactor – if ticked, the annual factor from Edit Periods/Properties tab is applied to the account value. It is used when one of the values/accounts needs to be annualized before the calculation. Note: A Ratio account is calculated when running the report it is included in. The result is not stored in the database. ConsRatio Accounts to be used for calculation of ratios. The following account definition should be specified: Account - two base accounts the ratio is calculated on. Operator - operator (+,-,* or /) applied to base accounts. Comparison Period – if ticked, the value for the base account is taken from the comparison period AARO SYSTEMS AB 304 AARO 11.0 USER MANUAL Utilities. Edit Accounts Field Description set up in Edit Periods/Properties tab. The comparison period should be ticked if the ratio to calculate is the discrepancy for (typically) one account. Note: A ConsRatio account is calculated by the consolidation and the result is stored in the database. Calculated Accounts used for summation of the value from one account in X number of periods. The following account definition should be specified: Account - the account that the summation is based on. The calculation definition is set per period in the Edit Periods/Properties tab/Period relation area. The Calculated account is specified in the ‘Code’ column and each period to include in the calculation is specified in the PerCalc column. A multiplier is specified as a factor to multiply the value in each period by before the summation to the calculated account. The field Translation should be set to Calculated for each row. CFAve Accounts used for calculating cash flow effects (calculated in local currency and translated to group currency). The following account definition should be specified: Account - the base account to build the calculation on; Multiplier – the factor, the base account is multiplied with when presenting in reports. Normally, 1 and -1 values are used. The equation is: (([value in local currency in the present period]) -([ value in local currency in the opening balance period*])) x [currency rate**] * - period specified in Edit Periods/Properties tab/Opening balance from field. ** - rate depending on selected translation under for the account. Cashflow Accounts used for calculating cash flow effects, such as calculated directly, based on group currency. The following account definition should be specified: Account - one account to build the calculation on. The equation is: ([value in group currency in the present period])-([ value in group currency in the opening balance* period]) *) - period specified in Edit Periods/Properties tab/Opening balance from field. AARO SYSTEMS AB 305 AARO 11.0 USER MANUAL Utilities. Edit Accounts Field Description DSO Account used for calculating ratios like ‘Days of sales outstanding’. The following account definition should be specified: Accounts receivable – account receivable. Sales – sales account. The value for the account receivable in the present period is compared to isolated values for the sales account for a series of periods. This is done in order to calculate the number of days needed to accumulate the value of the first account. The table PERIOD_DSO is used to define the isolated periods for each relevant period. Rate Accounts used to calculate alternative/cross currency rates based on the rates information in Edit Period/ Rates tab. The following account definition should be specified: FromCurr – source currency code; ToCurr – destination currency code; RateType – rate type(AVE, CLO or OPE). Currency codes and the rate types are listed on the Rates tab in the Edit Period menu, i.e. Average rate in Rate tab for USD = 9.00. The Rate account then is specified: FromCurr = SEK, ToCurr = USD and RateType = AVE, this will result in RATE account = 0,111. WeightAve Weighted average accounts are used for calculating a weighted average within a period. The following account definition should be specified: Base account – account used in calculation. Weight account – account representing the weight applied to the base account. The equation is: (([base account] x [weight account]) for dimension1 + ([base account] x [weight account]) for dimensioin2)…etc) / ([sum of weight accounts for dimensions]) Note: A WeightAve account is calculated by the consolidation and the result is stored in the database. 7.7.3 Radio buttons for Normal and Basic accounts The radio buttons are used to define and display additional information for Normal and Basic accounts. Tick the radio buttons to display additional fields under Account definition section for legal logic. AARO SYSTEMS AB 306 AARO 11.0 USER MANUAL Utilities. Edit Accounts Field Description Translation Specifies which account should form base for calculation of a currency translation difference. The difference will be added to the Normal account (LegalCode). Minority Specifies which account should form base for calculation of minority eliminations. The elimination will be added to the Normal account (LegalCode). Goodwill Specifies which account in the excess value part of the past equity register that should transfer figure data to the regular group accounting account, the Normal account. PE Specifies which account in the past equity part of the past equity register that should transfer figure data to the regular group accounting account, the Normal account. Taxes Specifies the account that holds untaxed reserves to be split up in an equity part and a tax part. The Normal’ account will receive X % of the untaxed reserve amount depending on the additional details. Shares Indicates that the account is used to support the menu Data Entry/Shares (Shares register). Bookings Indicates that the account is used for certain reallocations/adjustments. Opening Adjust Indicates that the account is used for opening balance minority adjustments. 7.7.3.1 Translation Field Description TransCode Translation difference code (account) to be eliminated. TranslationType Indicates for what companies (Current or Temporal) the translation adjustment will be calculated. ‘Temporal’, meaning temporary in Swedish is very rarely used, this field is usually set to ‘Current’. CompanyLevel Y – the elimination will be made on the owned company. N – the elimination will be made on the company specified in the Co field. Co Alternative company if CompanyLevel = N. AARO SYSTEMS AB 307 AARO 11.0 USER MANUAL Utilities. Edit Accounts Field Description MultiplierGroup 1/-1: The value in consolidated currency is fetched and multiplied by the multiplier value. 0: No value is fetched in the consolidated currency. MultiplierLoc 1/-1: The value in local currency is fetched and multiplied by the multiplier value. 0: No value is fetched in the local currency. CurrencyChangeAdj Indicates if a change in reporting currency should be taken into account in the translation adjustment calculation (‘Y’=Yes; ‘N’=No). LegalType Indicates which Legal type the translation adjustment will be booked on, e.g. ‘TransDiff’, ‘PECta’. AcctType Indicates on what accounting type the booking will be made. TransType Indicates how translation adjustments are calculated on an account. Available values are: Average is used where a change in a balance sheet item shall be recalculated with the average rate. Invest is used for balance sheet items where changes can be booked in another exchange rate than the average rate. PEInv is used to calculate translation differences on accounts used in the acquisition register (investments in group companies), Data Entry/Legal/Past Equity tab. The amount in local currency is booked in the owning company while the corresponding amount in group currency is booked on the owned company. TransCodeAmount This field is used when TransType PEInv is used. Enter the account, in group currency, on which the calculation should be based. PEType This field is used when TransType PEInv is used. Enter on which company the booking should be made, the owning company (Co) or the owned company (OwnedCo). OBCode This field is used if the opening balance should be based on another account than what is entered in TransCode. Default is that opening balance is fetched from the TransCode from the opening balance period. AARO SYSTEMS AB 308 AARO 11.0 USER MANUAL Utilities. Edit Accounts 7.7.3.2 Minority Field Description MinorityCode Indicates on what account the calculation is based. MinorityType Possible choices are ‘Indirect’, ‘Direct’, ‘Minority’ and ‘OperMin’. LegalType Indicates on what legal type the minority elimination will be booked (E.g. ‘DM’, ‘IM’). Co Alternative company if CompanyLevel = ‘N’. CompanyLevel Y - Booking is made on company level N or blank - Company must be specified in the Co field AcctType Indicates on what accounting type the booking will be made. MultiplierGroup 1/-1: The value in consolidated currency is fetched and multiplied by the multiplier value (no sign change/sign change). 0: No value is fetched in consolidated currency. MultiplierLoc 1/-1: The value in local currency is fetched and multiplied by the multiplier value (no sign change/sign change). 0: No value is fetched in local currency. 7.7.3.3 Goodwill Field Description LogicVersion Logic versions can be created so that different logic can be used in the same period. This functionality can be used if you for example want to work with fixed assets specifications in the quarters but not in the months in between. The functionality can also be used if the logic is changed and you do not want to affect previous periods. Logic versions are set up in the menu Utilities/Application Management. PECode Acquisition code (account) to be eliminated. PEAmountType Select the amount type for the above account. Selectable options are: ‘Opening’ - Gross value, opening balance. ‘Change’ – Acquisitions. ‘Cancel’ - Sales. ‘Closing’ - Gross value, closing balance. ‘Net’ - Net of Gross value, depreciations and AARO SYSTEMS AB 309 AARO 11.0 USER MANUAL Utilities. Edit Accounts Field Description translation differences. ‘CTAAcqOB’ - Translation differences, opening balance. ‘CTAAcqOBCanc’ - Translation differences, adjustments OB. ‘CTAAcqChange’ - Translation differences, actual period. ‘CTAAcqCB’ - Translation differences, closing balance. ‘DeprOB’ - Depreciations, opening balance. ‘DeprOBCanc’ - Depreciations, adjustments OB. ‘DeprDepr’ – Depreciations, actual period. ‘DeprCancel’ - Depreciations, adjustments. ‘DeprCB’ - Depreciations, closing balance. ‘CTADeprOB’ - Translation differences on depreciations, opening balance. ‘CTADeprOBCanc’ - Translation differences on depreciations, adjustments OB. ‘CTADeprOChange’ - Translation differences on depreciations, actual period. ‘CTADeprCB’ - Translation differences on depreciations, closing balance. ‘CTAOB’ – Translation differences, net opening balance. Sum of ‘CTAAcqOB’ and ‘CTADeprOB’. ‘CTAOBCanc’ – Translation differences, adjustments on net OB. Sum of ‘CTAAcqOBCanc’ and ‘CTADeprOBCanc’. ‘CTAChange’ - Translation differences, net actual period. Sum of ‘CTAAcqChange’ and ‘CTADeprOChange’. ‘CTACB’ - Translation differences, net closing balance. Sum of ‘CTAAcqCB’ and ‘CTADeprCB’. MultiplierGroup 1/-1: The value in consolidated currency is fetched and multiplied by the multiplier value (no sign change/sign change). 0: No value is fetched in consolidated currency. MultiplierLoc 1/-1: The value in local currency is fetched and multiplied by the multiplier value (no sign change/sign change). 0: No value is fetched in local currency. CompanyLevel ‘Y’: Amount is booked on OwnedCo. ‘N’ or blank: Amount is booked on the LegalCo value. LegalCo It is only possible to enter a value if CompanyLevel=N. Then a company code must be entered. AARO SYSTEMS AB 310 AARO 11.0 USER MANUAL Utilities. Edit Accounts Field Description LegalType Indicates on what Legal type the booking will be made. AcctType Indicates on what accounting type the booking will be made. 7.7.3.4 PE Field Description LogicVersion Parallel logic versions can be created so that different logic can be used in the same period. This can be used if you for example want to work with fixed assets specifications in the quarters but not in the months in between. It can also be used if the logic is changed and you do not want to affect previous periods. Logic versions are set up in the menu Utilities/Application Management. PECode Acquisition code (account) to be eliminated. PEAmountType Select the amount type for the above account. Selectable options are: ‘Opening’, ‘Change’, ‘Cancel’ and ‘Closing’. MultiplierGroup 1/-1: The value in consolidated currency is fetched and multiplied by the multiplier value (no sign change/sign change). 0: No value is fetched in consolidated currency. MultiplierLoc 1/-1: The value in local currency is fetched and multiplied by the multiplier value (no sign change/sign change). 0: No value is fetched in local currency. PEType Indicates where the aggregated value on the stated account should be booked and also from what company that value should be fetched. Selectable options are: ‘Co’ (subsidiary), ‘OwnedCo’ (parent), ‘Elim’ (Elimcompany). ReplaceOrNot ‘Replace’ indicates that previously reported values are replaced by this value if the value exists in the acquisition information. ‘Not’ indicates that an addition to the existing value will be made. Category States companies affected (owning or owned): ‘Subsidiary’, ‘Equity’ , ‘All’ LegalCo It is only possible to enter a value if PEType=Elim. Then a company code must be entered. AARO SYSTEMS AB 311 AARO 11.0 USER MANUAL Utilities. Edit Accounts Field Description LegalType Enter the legal type on which the booking shall be made. AcctType Indicates on what accounting type the booking will be made. 7.7.3.5 Taxes Field Description TaxCode Indicates on which account the calculation should be based. TaxFactor Enter the factor with which the TaxCode should be multiplied. TAX = the tax rate entered for a company, e.g. 28%. Entered value can also be e.g. 100%-TAX or 100%. MultiplierGroup 1/-1: The value in consolidated currency is fetched and multiplied by the multiplier value (no sign change/sign change). 0: No value is fetched in consolidated currency MultiplierLoc 1/-1: The value in local currency is fetched and multiplied by the multiplier value (no sign change/sign change). 0: No value is fetched in local currency. CompanyLevel ‘Y’ - Company level ‘N’ - Company must be specified in LegalCo LegalCo Specified if CompanyLevel = N above. LegalType Enter the legal type for which the booking shall be made. Enter ‘UR’ for Untaxed Reserves. AcctType Indicates on what accounting type the booking will be made. 7.7.3.6 Shares Field Description CodeType ‘MarketCode’ - code used for market value. ’OpeningCode’ - code used for holding, beginning of year. ’OwnershipCode’ – code used for percentage of ownership. ’PerOpenCode’ - code used for holding, beginning of period. ‘ReadOnlyCode’ - code used for holding, end of period. AARO SYSTEMS AB 312 AARO 11.0 USER MANUAL Utilities. Edit Accounts 7.7.3.7 Bookings Field Description LegalType Indicates which legal type will be used in the booking. If blank, then the original legal type will be used. AcctType Indicates which accounting type will be used in the booking. If blank, the original accounting type will be used. MultiplierGroup 1/-1: The value in consolidated currency is fetched and multiplied by the multiplier value (no sign change/sign change). 0: No value is fetched in consolidated currency. MultiplierLoc 1/-1: The value in local currency is fetched and multiplied by the multiplier value (no sign change/sign change). 0: No value is fetched in local currency. CompanyLevel ‘Y’: Booking is made on company level ‘N’ or blank: Company must be specified in Co Co Alternative company if CompanyLevel = ‘N’. CodeFrom Indicates from what account values are fetched. Dimension Indicates from what dimension values are fetched. DimensionValue Indicates from what dimension member values are fetched. 7.7.3.8 Opening Adjust 7.7.4 Field Description AdjustCode Indicates from which account the adjustment on the opening balance should be based. Help tab The Help tab contains a tool for help texts. The system administrator can write a text or instructions for each account. Instructions/texts are available to the user in the input and Match view. The user accesses this information by rightbutton click an input cell and selecting Help on code from the menu. This tool operates in the same way as an ordinary word-processing program. The functions and the buttons are identical to the ones in e.g. MS Word. AARO SYSTEMS AB 313 AARO 11.0 USER MANUAL Utilities. Edit Accounts 7.7.5 Create an account In Edit Accounts, to create an account, follow these steps: 1. Click the New button. Figure 7.7-2 Add account 2. Enter the account code, select account type and translation, and click OK. The following characters are permitted: A-Z, 0-9 and _ The new account appears at the bottom of the account tree. 3. Complete the information in the Properties tab. 4. Click the Save button. 7.7.6 Remove an account To remove an account, follow these steps: 1. Select an account in the left pane and click the Delete button. 2. Click OK in the displayed dialog window to remove the account. A message dialog is always displayed when an account is about to be removed and it is not possible to remove it because the account is ‘in use’, i.e.: contains data in any period; is part of any input form or report layout; is included as a term for another account. 7.7.7 Filter accounts It is possible to filter accounts visible in the tree by different account parameters. To do this, click Filter, enter filter parameters and click OK. Only accounts satisfying the filter settings will now be visible in the tree. In the following example, Summ accounts in the IS_ALL report layout in the code range from 3010 to codes started with 4010 are selected. AARO SYSTEMS AB 314 AARO 11.0 USER MANUAL Utilities. Edit Accounts Figure 7.7-3 Account filter Figure 7.7-4 Accounts filtered according to the filter settings 7.7.8 Account report The account report shows details of the selected accounts. To view the report, follow these steps: 1. Click the Reports button and select Account Report. The Account Report window appears. AARO SYSTEMS AB 315 AARO 11.0 USER MANUAL Utilities. Edit Accounts Figure 7.7—5 Select accounts for the report 2. In the Account selection section, select accounts to be included into the report. Use the Filter button to filter the accounts available in the Account selection section. 3. In the Extra details section, select account details to be included into the report. 4. To open the report in the PDF format, click Preview. 5. To save the report in the Excel format, click To file. Enter file name, select the destination folder and click Save. 7.7.9 Sum diagram The sum diagram represents the summation hierarchy for the selected Summ account. To view the diagram, follow these steps: 1. In the account tree, select an account for which you want to view the diagram. 2. Right-click the account and select Sum Diagram. The sum diagram appears in a separate window. AARO SYSTEMS AB 316 AARO 11.0 USER MANUAL Utilities. Edit Accounts Figure 7.7—6 Sum diagram example 3. To search for an account on the diagram, right-click the diagram area and select Search. Enter the searched account code and click Search. Figure 7.7-7 Search the diagram for an account The diagram is scrolled to the searched account. 4. To view the parent account for some account on the diagram, select the account, right-click, and select View Parents. AARO SYSTEMS AB 317 AARO 11.0 USER MANUAL Utilities. Edit Accounts Figure 7.7—8 View the parent account 5. To return to the full diagram, right-click the diagram and select View All. 6. It is also possible to save the diagram to a file (Save or Save as) and send it to the printer (Print). 7. To close the diagram, click Close. AARO SYSTEMS AB 318 AARO 11.0 USER MANUAL Utilities. Edit Dimensions 7.8 Edit Dimensions This chapter refers to the menu item Utilities/Edit Dimensions in AARO. Companies, dimensions, groups and currencies used in the system are created and edited here. Figure 7.8-1 Edit Dimensions The left pane contains folders for companies, dimensions, groups and currencies. There are several differences between dimensions and groups: Dimensions carry though into consolidated data; groups are calculated from their underlying dimensions when a report is run. A sub dimension can only be a part of one dimension. However, a dimension or sub dimension can belong to several groups. Period information can affect links from one dimension to another, whereas links for groups cannot be steered directly by period. 7.8.1 Company Select the Company folder in the left pane to display a list of all companies in the system. AARO SYSTEMS AB 319 AARO 11.0 USER MANUAL Utilities. Edit Dimensions Figure 7.8—2 List of all companies The company list contains the following information: Field Description Co Company code. Maximum ten characters. This is the only mandatory field in the list. CoName Company name full name. SeqNo Sequence number in a drop-down list. If all companies have sequence number zero, alphabetical order will be applied. CorporateNo Corporate number. Enter the company’s registration number. RegisteredOffice Registered office. Enter the city where the company is registered. SecurityLevel Security level. Default is ‘Normal’. This functionality makes it possible to limit the visibility of companies to users with certain rights. See 7.14.2.9 SecurityLevel. CoType Company type. Default is ‘Normal’. Enter ‘System’ for companies that are used by the system for e.g. eliminations. If a company in the list is selected, the field to the far right displays what groups the companies belong to in the group structure. This is simply grouping of companies for operational purposes, not legal groups. Legal groups are described in another chapter in this manual. AARO SYSTEMS AB 320 AARO 11.0 USER MANUAL Utilities. Edit Dimensions Figure 7.8—3 Company group information Clicking on the plus sign next to the Company folder expands the structure. Select a company in the expanded list to display more information about the company. The information entered in this view (not mandatory) will be visible in the Contact list report in the menu Data Entry/Match. Figure 7.8—4 Company information 7.8.1.1 Create a company There are two ways to create a company: 1. Select the last company in the list and press the Insert Row button or the [down arrow] on the keyboard to add a new row. Enter data for the AARO SYSTEMS AB 321 AARO 11.0 USER MANUAL Utilities. Edit Dimensions new company and press Save. Select the new company in the left pane to also enter contact information. 2. Create a company in the menu Data Entry/Legal. The created company will also be added to this list. Select the new company in the left pane to also enter contact information. Please note that companies created in this menu will not be added to the menu Data Entry/Legal, but will be selectable as alternatives in drop down lists. The difference between the menus is that all companies in the menu Data Entry/Legal are tied to a certain period and group while the companies in the above list are merely listed. 7.8.1.2 Delete a company Delete a company in the list by selecting it and pressing the Delete Row button. 7.8.2 Dimension Select the Dimension folder in the left pane to display a list of all dimensions in the system. Figure 7.8-5 Dimensions All dimensions are created in this view. Each dimension is created as a folder containing dimension members. The dimension members of one dimension can have the dimension members of another dimension, company, from company, accounting type, proforma type or legal type as sub dimensions. Sub dimension structures are tied to a specific period. The links from one dimension to another can be copied between periods in the menu Utilities/Edit Periods. A dimension that has sub dimensions will be calculated as the sum of the sub dimensions and it is not possible to enter data directly on that dimension. If AARO SYSTEMS AB 322 AARO 11.0 USER MANUAL Utilities. Edit Dimensions figures are entered on the sub dimension level then it is not possible to enter data directly on that dimension. If figures are entered at the dimension level then they can be edited at this level. (This is the ‘normal’ set up. The level for input is optional for an input form.) Select a dimension member in the left pane to display (eventual) sub dimensions belonging to that dimension member. Figure 7.8—6 Dimension members 7.8.2.1 Create a dimension/dimension members Follow these steps to create a dimension: 1. Select the Dimension folder in the left pane. 2. Press the New button. Figure 7.8-7 New Dimension dialog 3. Enter Dimension Name and press OK. The dimension name may contain the following characters: A-Z, 0-9 and _. 4. To create a dimension member, go into the Details tab of a dimension, then select a row and press the Insert Row button or using the [down arrow] on the keyboard. Enter data and press Save. AARO SYSTEMS AB 323 AARO 11.0 USER MANUAL Utilities. Edit Dimensions 7.8.2.2 Add sub dimensions to a dimension member Do the following to add sub dimensions to a dimension member: 1. Select the dimension in the tree and select the Properties tab. 2. In the Sub dimension field, select a sub dimension and click Save. (Lists should be reloaded to take effect in the current session.) 3. Select a dimension member in the tree under the dimension. 4. Select Period for which sub dimension linking will be performed. 5. Press the Sub Dim button. The Sub Dimension pop-up window appears with the list of sub dimension members. 6. Select sub dimensions by using drag and drop. Figure 7.8-8 Drag and drop sub dimension 7. Press Save. 7.8.2.3 Rename a dimension member To rename a dimension member, follow these steps: 1. Select the dimension in the tree and select the Details tab. 2. Select the dimension member to be renamed and click the Rename button. 3. In the Information window, click OK to continue. 4. Enter the new name and click OK. AARO SYSTEMS AB 324 AARO 11.0 USER MANUAL Utilities. Edit Dimensions 7.8.2.4 Delete a dimension member To delete a dimension member from a dimension, follow these steps: 1. Select a dimension in the tree and select the Details tab. 2. Select the dimension member to be deleted and press the Delete Row button. Press OK to continue. A warning message about table connections appears. Figure 7.8-9 Warning about dimension member relations 3. To delete the dimension member without checking connected tables, press No. To check whether the dimension member has relations, click Yes. 4. If the dimension member is used, the message with the related table name appears. To continue, click Yes. Figure 7.8-10 Warning about dimension member usage in the related table 5. Click Save. 6. Click Refresh on the dimension in the left pane to see the changes in the tree. NB! The relation of a dimension member to another dimension is not deleted from the database. 7.8.2.5 Delete a dimension A dimension can be deleted if its members are not linked to another dimension. To delete a dimension, follow these steps: 1. Select a dimension to be deleted in the tree. AARO SYSTEMS AB 325 AARO 11.0 USER MANUAL Utilities. Edit Dimensions 2. Right-click the dimension name and select Remove dimension. Click Ok to continue. 3. If dimension members have relations, the warning message appears and the dimension cannot be deleted. In this case, dimension member relations should be removed first. Figure 7.8-11 Warning about dimension relation 4. If dimension members are not linked but exist, the warning about dimension member existence appears. Figure 7.8-12 Warning about dimension member existence 5. To delete the dimension and all of its members, click Yes. To delete the dimension but leave the members in the database, click No. 7.8.2.6 Details tab Select the Dimension folder in the left pane together with the Details tab to display a list of all dimension members. AARO SYSTEMS AB 326 AARO 11.0 USER MANUAL Utilities. Edit Dimensions Figure 7.8—13 Details tab The Dimension list contains the following information: Field Description LevelCode Dimension code. Maximum ten characters. Name Dimension full name. SeqNo Dimension member number in drop-down lists. If all dimensions have sequence number zero, alphabetical order will be applied. 7.8.2.7 Groups/Dimensions tab The field Dimensioncode contains a list of all dimension members in selected dimension. If the selected dimension is a sub dimension the field Groups/Dimensions displays the higher dimension level. Select one of the dimension codes to display to which dimension or group the sub dimension belongs (ticked check box). Please note that links from one dimension to another are period related while links from a dimension to a group are not. AARO SYSTEMS AB 327 AARO 11.0 USER MANUAL Utilities. Edit Dimensions Figure 7.8—14 Groups/Dimensions tab 7.8.2.8 Properties tab In the Sub dimension drop down list, a sub dimension can be selected. The SeqNo for consolidation field is used to get appropriate order on consolidation of different levels of dimensions. The consolidation will be performed in numerical order. It is essential that the sub dimension is consolidated before the higher level dimension is consolidated. The Level/Group number is allocated by the system, when the dimension is first created. AARO SYSTEMS AB 328 AARO 11.0 USER MANUAL Utilities. Edit Dimensions Figure 7.8—15 Properties tab Note: AcctType, ProformaType and LegalType are not available for selection as sub dimensions but are available as sub groups. 7.8.2.9 Dimension default values Figure 7.8-16 Dimension default values AARO SYSTEMS AB 329 AARO 11.0 USER MANUAL Utilities. Edit Dimensions A dimension value can be set up to be used by default as follows: Field Description Default value Dimension value on which data is booked by default, if missed. Default error value Dimension value on witch imported data is booked by default, if imported dimension is unknown. 7.8.2.10Mixed dimensions The dimension members of one dimension can have a mix of dimension members of two or more dimensions as sub dimensions. Sub dimensions can be e.g. another dimension and company. Mixed dimensions are used in drill down reports to make it easier to retrieve relevant combinations of dimensions. 1. In the Properties tab, select sub dimension Mixed. Then select relevant sub dimensions. Figure 7.8—17 Mixed sub dimension, Properties tab 2. For each member of the mixed dimension, select the relevant combination of sub dimension members. AARO SYSTEMS AB 330 AARO 11.0 USER MANUAL Utilities. Edit Dimensions Figure 7.8—18 Mixed sub dimension, dimension member 7.8.2.11Dimension diagram The dimension diagram shows dimension member relations graphically. To view the dimension diagram for a dimension, follow these steps: 1. In the dimension tree, select a dimension for which you want to view the diagram. 2. Right-click the dimension name and select Dimension Diagram. 3. Select the period and click OK. The dimension diagram appears in a separate window. AARO SYSTEMS AB 331 AARO 11.0 USER MANUAL Utilities. Edit Dimensions Figure 7.8-19 Dimension diagram for business area 4. To search for a dimension member on the diagram, right-click the diagram area and select Search. Enter the searched name and click Search. Figure 7.8-20 Search the diagram for a dimension member The diagram is scrolled to the searched name. 5. To view the parent dimension member for a sub dimension member, select the sub dimension member on the diagram, right-click, and select View Parents. AARO SYSTEMS AB 332 AARO 11.0 USER MANUAL Utilities. Edit Dimensions Figure 7.8-21 View the parent dimension member 6. To return to the full diagram, right-click the diagram and select View All. 7. It is also possible to save the diagram to a file (Save or Save as) and send it to the printer (Print). 8. To close the diagram, click Close. 7.8.2.12Structure diagram The dimension structure diagram shows dimension member relations as a table. To view the structure diagram, follows these steps: 1. In the dimension tree, select a dimension for which you want to view the diagram. 2. Click the Reports button and select Structure. 3. Select the period and click OK. 4. Make the report settings: Select dimension members to be included into the report. No selection means that all members are included. Tick the check box to the bottom to include dimension members not linked to sub dimensions. AARO SYSTEMS AB 333 AARO 11.0 USER MANUAL Utilities. Edit Dimensions Figure 7.8-22 View the parent dimension member 5. Click OK and select the destination for the report: As report – the report will be shown in a separate window. As file – the report will be saved to the specified file. 6. Click OK to view or save the report. Figure 7.8-23 Structure report for business area for period 0712A AARO SYSTEMS AB 334 AARO 11.0 USER MANUAL Utilities. Edit Dimensions 7.8.3 Group Select the Group folder in the left pane to display a list of all dimensions in the system. Figure 7.8—24 Groups All groups are created in this view. Each group is created as a folder containing group members. The group members of one group can have the members of another dimension, group, company, from company, accounting type, proforma type or legal type as sub dimensions/sub groups. Sub group structures are not tied to a specific period. Group values are calculated when running a report. A group that has sub dimensions/sub groups will be calculated as the sum of the sub dimensions/sub group and it is not possible to enter data directly on that dimension. Data must be entered on the lowest level. (This is the ‘normal’ set up. The level for input is optional for an input form.) Select a group member in the left pane to display sub dimensions/sub groups belonging to that group member. AARO SYSTEMS AB 335 AARO 11.0 USER MANUAL Utilities. Edit Dimensions Figure 7.8—25 Group members 7.8.3.1 Create a group/group members Follow these steps to create a group/group member: 1. Select the Group folder in the left pane. 2. Press the New button. 3. Enter Group Name and press OK. The Create as unique checkbox enables the options for group to be created as unique i.e. so that each group member needs to contain unique sub dimensions. Figure 7.8-26 Create a group 4. Create group members in the Details tab by pressing the Insert Row button or using the [down arrow] on the keyboard. Enter group member identifiers and descriptions and press Save. 7.8.3.2 Add sub dimensions to a group member Follow these steps to add sub dimensions to a group member: AARO SYSTEMS AB 336 AARO 11.0 USER MANUAL Utilities. Edit Dimensions 1. Select a group in the tree. 2. On the Properties tab, select the Sub dimension radio button and choose the relevant item from the drop-down list. Click Save. 3. Select a group member in the tree in the left-pane under the group name. 4. Press the Sub Dim button. The Sub Dimension pop-up window appears with the list of available sub dimension members. 5. Select sub dimensions by using drag and drop. 6. Press Save. Figure 7.8-27 Add sub dimensions/sub groups to a group member 7.8.3.3 Rename a group member To rename a group member, follow these steps: 1. Select a group in the tree in the left-pane and select the Details tab. 2. Select the group member to be renamed and click the Rename button. 3. In the Information window, click OK to continue. 4. Enter the new name and click OK. 7.8.3.4 Delete a group member To delete a group member from a group, follow these steps: 1. Select a group in the tree and select the Details tab. 2. Select the group member to be deleted and press the Delete Row button. Press OK to continue. AARO SYSTEMS AB 337 AARO 11.0 USER MANUAL Utilities. Edit Dimensions The warning message about table connection appears. 3. To delete the group member without checking against other tables, press No. To check whether the group member has relations, click Yes. Figure 7.8-28 Warning about group member relations 4. If the group member is linked, an error message appears saying that “The linked group member cannot be deleted”. In this case, you should unlink the group member before it is deleted. Figure 7.8-29 Error that the group member is linked 7.8.3.5 Delete a group To delete a group, follow these steps: 1. Select a group to be deleted in the tree. 2. Right-click the group name and select Remove group. Click Ok to continue. 3. If group members have relations to a dimension, the warning message appears and the group cannot be deleted. In this case, group member relations should be removed first. Figure 7.8-30 Warning about dimension relation AARO SYSTEMS AB 338 AARO 11.0 USER MANUAL Utilities. Edit Dimensions 4. If group members are not linked to a dimension but exist, the warning about group member existence appears. Figure 7.8-31 Warning about dimension member existence 5. To delete the group and its members, click Yes. To delete the group but leave the members in the database, click No. 7.8.3.6 Details tab Select the Group folder in the left pane together with the Details tab to display a list of all group members. Figure 7.8—32 Details tab The group list contains the following information: Field Description GroupID Group code. Maximum ten characters. Description Group description. 7.8.3.7 Groups/Dimensions tab The field Dimensioncode contains a list of all group members in selected group. If the selected group is a sub group the field Groups/Dimensions AARO SYSTEMS AB 339 AARO 11.0 USER MANUAL Utilities. Edit Dimensions displays the higher group level. Select one of the dimension codes to display to which group the sub group belongs (ticked check box). Figure 7.8—33 Groups/Dimensions tab 7.8.3.8 Properties tab Figure 7.8—34 Properties tab In the Sub dimension/Other group drop down list a sub dimension or a sub group can be selected. AARO SYSTEMS AB 340 AARO 11.0 USER MANUAL Utilities. Edit Dimensions The check box Used in User admin indicates if it should be possible to apply user rights in the selected group (see menu Utilities/User Administration, tab Database rights). The Level/Group number is merely a number allocated when the group was created. 7.8.4 Currency The Currency folder contains all currencies used by the system. Add a currency: 1. Select the Currency folder in the left pane. 2. Select a row in the list, press Insert Row or use the [down arrow] on the keyboard to add arrow. 3. Enter data and press Save. The currency list contains the following information: Field Description Currency Currency code. CurrencyName Currency full name. ReportsDefault Enter Y/N depending on if the currency should be selectable when running a report in Reports/Drill Down or not. AARO SYSTEMS AB 341 AARO 12.0 USER MANUAL Utilities Edit Input 7.9 Edit Input This chapter explains how to create AARO input forms and packages using the Edit Input screen. The purpose of forms is to provide convenient reporting in the Data Entry screens (Input and Match) for company reporters and to define the detail level of the reporting. To open the screen, select Utilities/Edit Input menu. The screen below will appear: Figure 7.9—1 Edit Input: forms and packages The left-hand pane shows a tree structure with all the packages and forms that exist in the AARO database. Details about the selected package or form in the tree are visible on the right hand side. A few special items such as Recon, Matchrules, Matchbin, Org_Condition and PackageForms are to be found below the mentioned tree structure. These will be further described in this chapter. 7.9.1 Forms The following sections describe input forms used to enter data. 7.9.1.1 What is a form? Let us first establish the concept of a form or input form in AARO. Form = Accounts + Layout + Reporting detail level AARO SYSTEMS AB 342 AARO 12.0 USER MANUAL Utilities Edit Input A form is a collection of accounts plus a layout specification. The accounts are laid out according to the layout. The form also specifies the reporting detail level, i.e. the dimensions that will be required when reporting figures through this particular form. A certain form may require its figures to be reported per company and business unit, while another form may demand figures per company, business unit and customer. Dimensions vary among AARO installations, subsequently all installations will not have the same specific dimensions (business unit and customer could just as well be profit center, product, segment, division, or similar). 7.9.1.2 Form types There are six different types of forms in AARO: ordinary Input, Match, Matrix, Text, Comments and OS forms. There are differences between the form types as to performance as well as in some of the details. As each form type has its own specific advantages and limitations, it is advisable to become acquainted with all of these in order to select the most appropriate one(s). 7.9.1.3 Create a form – step by step instructions To create a form (following steps are identical for all form types), follow these steps: 1. Select Edit Input from the Utilities menu. 2. In the tree structure on the left, select the Forms folder (or one of subsequent forms). 3. Click the New button alternatively right-click the Forms folder and select New>Form from the pop-up menu. A New Form dialog window will appear. 4. Enter the name of the new form. The name can be up to 10 characters in length and include uppercase letters A-Z, numbers and underscore characters (_) but no spaces or other special characters. Click OK after entering the form’s name. Figure 7.9—2 Creating a form 5. Enter a form heading in the Heading field. The heading can be up to 40 characters long and include any characters. 6. Choose a form type, by selecting one of the radio buttons in the Source area (see below for detailed information on different form types). AARO SYSTEMS AB 343 AARO 12.0 USER MANUAL Utilities Edit Input Figure 7.9—3 Form type setup 7. Under Figure field, typically choose Loc (only for forms of type Match may other options be selected; see below for more information on match forms). 8. Under Acct. Type, typically leave the default selection unchanged. In certain circumstances a non-standard accounting type for the form might be an alternative. Selecting an accounting type other than the system’s default will here result in a journal of type Adjustment, and the selected accounting type (e.g. IFRS or USGAAP) will be created automatically each time values are saved from this input form in the Data Entry/Input screen. 9. Tick the checkbox Use as Output Report if this form layout is to be usable as an output report layout (it will then show up in the Edit Report Layout screen with the note “This layout is maintained via Edit Input”. It will function as an ordinary report layout in the drill down report tool). 10. Tick Comment Disabled if users should not to be able to leave input comments through this form. 11. Select the detail level for this input form; move the selected dimension(s) from Available fields to the Input fields by using the right-arrow (>) button. The detail level must always include period and company (for match forms also counter company). Additional dimensions are optional. Figure 7.9—4 Selection of dimensions for a form 12. Save the information and continue to the following tab (Layout or Tables). The content of this tab depends on the selected form type. Please find the specifics of each form type below. Don’t forget to save the Properties tab before moving on to the next tab. 13. Optionally, a help text for the form can also be entered on the Help on Form tab. This text can then be called up from the Data Entry/ Input screen through the right-click menu. The help text editor supports basic word processing features. 7.9.1.4 Delete a form Permanently delete a form from the system (note that no figures are deleted only the form definition): AARO SYSTEMS AB 344 AARO 12.0 USER MANUAL Utilities Edit Input 1. Select Edit Input from Utilities menu. 2. Select the form in the tree structure on the left. 3. Click Delete and OK. Alternatively right-click the selected form and select Delete Form from the popup menu. Please note that deleting a form with right-click will cause the form to disappear immediately without notice! 7.9.1.5 Specific form types The following table summarizes the characteristic features of all form types that may be used: Input, Match, Matrix, Text and OS forms. Form type Input Match Matrix Text OS Layout Accounts layout on rows Account layout on columns Individual account in each cell Account layout on columns – but not necessarily in all columns. Columns can contain either dimension values, arbitrary text strings or amounts Toolbar buttons Add/ Delete Column Insert/Delete Row None (completely fixed layout) Insert/Delete Row Local validation Add Column dialog Insert Row dialog Reporting currency Loc Loc and/or TransCurr+ TransAmount /Feature Special features Loc Counter companies, “Bins”, match report, Internal elimination Cell validation (red cell if invalid) Valid values on right-click menu Loc Loc 10 extra string values (with no global significance) 3 extra string values that can have global explanation(c an be used as criteria in drill down) Use in Drilldown Ordinary Ordinary Special Special handling handling (text (matrix layout) layout) Ordinary Input Comments Yes No No No No Recon Yes Yes (for designated bins) Yes Yes Yes The following sections describe each form type’s characteristic features in detail. AARO SYSTEMS AB 345 AARO 12.0 USER MANUAL Utilities Edit Input 7.9.1.6 Input forms The simplest and most common type of form is the Input form. Forms of this standard are sometimes called “ordinary input forms”, to distinguish them from other, more specialized, types of forms. Input forms are well suited for typical report-style forms such as the Income Statement, Balance Sheet and various kinds of sub specifications. An ordinary input form has the following characteristic features: Account layout on rows (i.e. each row comprises one account). The rows are fixed. Dimensions are set up in columns (a varying number) and handled through Add Column and Delete Column buttons. In the following screenshot an example of an input form can be seen. The name of the example form is IS_ALL, its heading is “Income Statement”, its layout contains many different accounts, such as 3010, and its reporting detail level is period/company/business unit. Figure 7.9-5 Example of an input form 7.9.1.6.1Create an input form To create a new input form, follow the general step by step instructions in 7.9.1.3 Create a form – step by step instructions. Select ‘Input’ as the form type (source). Make sure the information is saved on the Properties tab by pressing the Save button before continuing. 7.9.1.6.2Input form layout The layout of an input form is created and maintained as follows: 1. Select the form in the tree structure. 2. Select the Layout tab. AARO SYSTEMS AB 346 AARO 12.0 USER MANUAL Utilities Edit Input 3. In the Layout tab, click the Accounts button on the toolbar. A Chart of Accounts dialog window will appear which contains all available accounts. Figure 7.9—6 Layout of an input form 4. Select the requested account(s) from the list and use drag-and-drop to move them to their position in the layout tab (multiple accounts may be selected at once by Ctrl-clicking or Shift-clicking in the Chart of Accounts). It is possible to change the mutual order among the accounts in the form layout by dragging them around. A simple text row (or empty row) can also be inserted into the form’s layout by dragging in a HEADER or TEXT element from the Chart of Accounts window. 5. To delete a row from the layout either right-click and select Delete Row(s) or press the [delete] button on the keyboard. 6. Finally save the work using the Save button. Please note: if a sum account is selected in the layout its terms (i.e. the accounts that form part of the sum) will be displayed with green plus signs in front of them. This has no impact on the form editing; it is merely a visual clue (summation rules are set up in the Edit Accounts screen). 7.9.1.7 Match forms (intercompany specifications) Intercompany transactions can be reported on Match forms. Match forms need to be put into MATCH packages and the reporting will be done through the special Data Entry/Match screen (not through the ordinary Data Entry/Input screen) While it is not necessary to use a match form for intercompany transactions (an ordinary input form could be used instead), it does give the possibility to specify reporting unit(s) as well as a counter company and its reporting unit(s). Subsequently by using the match report, two parties reporting data are able to match their reporting against each other and in this way detect differences. . AARO SYSTEMS AB 347 AARO 12.0 USER MANUAL Utilities Edit Input Using match forms also allows the system to perform internal eliminations in a convenient way, not only for the main group, but also for other legal groups (sub groups) as well as for operational dimensions, such as e.g. a consolidated business unit (BU) total with BU-internal transactions eliminated. Match forms further allow transactions to be reported in both the original transaction amount/transaction currency and in the reporting company’s reporting currency (Loc). Please find more information on the Match menu and its features in the 3.2 Match chapter. A match form has the following characteristic features: Account layout on columns (i.e. each column (or column group) involves one account). The columns are fixed. Counter companies and dimensions in rows (a varying number). These are handled through Insert Row and Delete Row buttons. Choice between TransAmount/TransCurr and/or Loc for reporting. Reporting detail level is specified by bins, rather than directly by dimensions (please find section on match bins below). In the following screenshot an example of a match form appears. The name of the form in this example is IC_ASSETS, its heading is ‘Intercompany Assets’ and its layout contains accounts 1320 and 1560 (and possibly more accounts; the right edge of the form is not visible in this screenshot). It uses figure fields Loc & TransAmount (thus three columns for each account: TransCurr, TransAmount, and Loc) and its reporting detail is period/company/counter company/own business unit/counter business unit (where Own BU and CounterBU are two match bins in this particular AARO installation). This is the reporting of company ARLANDA and various intercompany transactions with its counterparts COPENHAGEN, GOTHENBURG and HELSINKI can be seen in the screenshot). Figure 7.9—7 Example of a match form AARO SYSTEMS AB 348 AARO 12.0 USER MANUAL Utilities Edit Input 7.9.1.7.1Create a match form To create a match form, follow the general step by step instructions in 7.9.1.3 Create a form – step by step instructions. Select Match as the form type (source). Under Figure Field, there is a choice – of essence only for match forms – of Loc, TransAmount or Loc & TransAmount. Choose Loc if figures are to be reported in local currency only (i.e. the local currency of the reporting company, as in all other types of input in AARO). Choose TransAmount if figures are to be reported in the transaction currency only. The user will have to report both the amount itself and the currency code. If this option is selected, this match form cannot feed other forms and its figures will not be part of the consolidation. The figures can only be used for matching. Choose Loc & TransAmount if figures are to be reported in both Loc and TransAmount. The user will have to report three things: transaction currency, transaction amount and local currency amount. It is the local currency amount that will be fed to other forms and considered in the consolidation. The transaction amount is reported purely for matching and informational purposes. When the Detail level for a match form is specified, the available fields are not simply the system’s dimensions (as it would be for ordinary input forms and other types of forms) but a list of bins. These bins, or match bins, are defined as the Matchbin section. See 7.9.5 Match bins. Make sure to save the information on the Properties tab by pressing the Save button before continuing. 7.9.1.7.2Match form layout The layout of a match form is created and maintained in exactly the same way as for ordinary input forms, with the exception that HEADER and TEXT elements cannot occur in the layout. See 7.9.1.6.2 Input form layout. Below find an example of what it may look like when a match form’s layout is being edited: AARO SYSTEMS AB 349 AARO 12.0 USER MANUAL Utilities Edit Input Figure 7.9—8 Example of editing match form layout 7.9.1.8 Matrix forms If a completely fixed layout (for both rows and columns) - where each individual cell contains a separate account - is requested, Matrix is the form type to use. Matrix forms can also be used specially in the drill down report tool where they will show up as matrix layouts. No Add/Delete Column, Insert/Delete Row or similar will appear when a matrix form is shown in Data Entry/Input as the layout is entirely fixed. If a matrix form is given a reporting detail level that includes anything more than just period and company (such as e.g. business unit) the matrix form must be loaded into Data Entry/Input for one business unit at a time. It is not possible to edit the figures for all business units at once. In the following screenshot an example of a matrix form is presented: BS_TANG, ‘Tangible fixed assets’ can be seen: AARO SYSTEMS AB 350 AARO 12.0 USER MANUAL Utilities Edit Input Figure 7.9—9 Example of a matrix form 7.9.1.8.1Create a matrix form To create a matrix form, follow the general step by step instructions in 7.9.1.3 Create a form – step by step instructions. Select Matrix as the form type (source). 7.9.1.8.2Matrix form layout The layout of a matrix form is created and maintained as follows: 1. Select form in the tree structure. 2. Select Layout tab. 3. Type account codes into white cells, and headings into light blue cells. As there is no look-up list of accounts here the account codes have to be known. It is not necessary to enter account codes into all white cells but the grid has to be filled up from the upper left corner and downwards to the right. 4. Expand the row and column definition areas by clicking the + signs near the upper left corner and set up the row/columns definitions. Explanation of row/column definitions: Kind: enter ‘TEXT’ for header rows and ‘NORMAL’ for rows containing accounts. Format: This number here corresponds to the formats defined in the RG_FORMAT background table. This may be applied in some (but not all) reporting tools. Enter 0 for the default format. Suppress zeroes: Type Y to suppress this row/column in output reports if values are zero throughout and N to leave visible in a case. Visible in Input, Visible in Report: Y/N decides whether this row/column is visible or not in Input or Reports menus respectively. It may be preferable to leave some accounts visible only in reports if the AARO SYSTEMS AB 351 AARO 12.0 USER MANUAL Utilities Edit Input accounts are calculated or only in input if the value is a basis for a calculation (but not of interest in the final output reports). 5. Save the work using the Save button. Please find below an example of a matrix form with an edited layout: Figure 7.9—10 Matrix form layout 7.9.1.9 Comments forms Comments forms exist for the sole purpose of entering text comments of different lengths. They do not allow reporting of numbers thus there are no accounts involved in the definition of a comments form. The whole comment form is instead a blank area where the reporting user can type (or paste) any text information as well as arranging it using basic word processing features. The only important setting of a comments form is the reporting detail level. If the detail level is set to period/company, the comment is about a company as a whole for the period in question. If instead the level is set to e.g. period/company/business unit the comment is about a particular business unit within a company for a fixed period. NB! Comment forms should not be confused with input comments, the feature for commenting individual figure cells in ordinary input forms. In the following screenshot please find an example of a comments form (the name of which also happens to be ‘COMMENTS’) where comments about the company ATLANTA are being reported for 0803A: AARO SYSTEMS AB 352 AARO 12.0 USER MANUAL Utilities Edit Input Figure 7.9—11 Example of a comments form (An alternative to using a comments form - in the above example - is to enter input comments directly onto the individual cells of the ordinary input forms where sales, discounts etc are reported). 7.9.1.9.1Create a comments form To create a comments form, follow the general step by step instructions in 7.9.1.3 Create a form – step by step instructions. Select Comments as the form type (source). Comments forms do not have a layout. 7.9.1.10Text forms The Text form is a fairly flexible form type with many possible uses. It is, however also fairly complicated to set up as no user-friendly screen is currently available to assist with the set-up of its layout in Edit Input. The main distinguishing feature of a text form is that it allows figures to be reported not only on ordinary dimension values, but also connected to arbitrary additional descriptive text strings. The additional text strings can be either just extra information or be part of the ‘key’ (together with any dimension values). A text form has the following characteristic features: Layout on columns – but columns are not limited to accounts only. A column can contain either an account (i.e. a figure will be reported in this column) or a dimension value or an additional text string. Each text form can have up to 10 such additional text strings with up to 170 characters in length each (note however, that the SQL Server may impose a lower limit on the total number of characters in a row). Each text form can assign its own significance to those additional text strings; there is no sharing of this between text forms (as opposed to OS forms where the additional text strings must have a shared meaning). AARO SYSTEMS AB 353 AARO 12.0 USER MANUAL Utilities Edit Input By using the Insert Row and Delete Row buttons any number of rows can be added (an exception to this rule is text forms with fixed rows; see below). Cell validation – the background turns red if an invalid dimension value is entered (there is, however, no list to choose valid values from). Text forms can be used in the drill down report tool where they show up as text layouts. In the following screenshot please find an example of a text form. The name of the example form is EO and its heading is “Extra-Ordinary Income and Expenses”. Its layout contains two accounts (EO8710 and EO8750) and its reporting detail level is period/company/product. In the screenshot figures reported for several products can be found and – characteristic for text forms – each product can appear more than once: in the example, BOOKS appears twice, with different additional descriptive text strings beside it. The user can insert more rows using the Insert Row button. Figure 7.9—12 Example of a text form 7.9.1.10.1Create a text form To create a text form, follow the general step by step instructions in 7.9.1.3 Create a form – step by step instructions. Select Text as the form type (source). 7.9.1.10.2Text form layout The layout of a text form is defined by editing two tables: INPUT_FORMSET and INPUT_SPECSET. (There is currently no user-friendly screen available for this) The following example shows a set up of a text form: AARO SYSTEMS AB 354 AARO 12.0 USER MANUAL Utilities Edit Input Figure 7.9—13 Text form layout Formula can be used to create a calculated column. To do this, enter e.g. the formula ‘FloatValue1+FloatValue2’. Rows with a specified formula do not need an account code (and should it be filled in, it would be disregarded). The formula-calculated value is not stored in the database but a Summ or Ratio account can be defined to achieve the same calculation effect in the consolidated figures and output reports. Aaro consultants may assist with other possible usage for a text form such as automatically entering currency conversion rates, the current date, or the current user’s login id, and having predefined rows with fixed additional text strings. Text forms have limited functionality and are designed so that input forms can contain very detailed information – that same style is reflected in a text layout in Reports/Drill Down. Note: it is not possible to use full drill down functionality when using a text layout in a drill down report. This is because text layouts use unconventional settings and are fixed to the same parameters as specified in the input form. This also means that items such as journals are not included when text layouts are used. If you would like a more flexible drill down report, use a conventional report layout and/or enter parameters such as Account and Business Unit individually. 7.9.1.11OS forms OS is short for Orders and Sales (which is what this form type has historically been used for) and OS forms are very similar to text forms. OS forms may, however, be used for any kind of data. An OS form has the following characteristic features (many of which are similar - but not identical - to those of text forms): Layout on columns – but columns are not limited to accounts only. A column can contain either an account (i.e. a figure will be reported in AARO SYSTEMS AB 355 AARO 12.0 USER MANUAL Utilities Edit Input this column) or a dimension value or an additional text string (this is identical to text forms). Each OS form can have up to 3 such additional text strings (text forms can have up to 10), each of them up to 10 characters in length (text forms allow up to 170). Note, however, that the SQL Server may impose a lower limit on the total number of characters in a row. It must be agreed upon that there is a shared meaning for all OS forms in respect of those 3 additional text strings; it is not possible for an individual OS form to be assigned its own significance (as opposed to text forms where the additional text strings do not have a shared meaning). This content must be defined in the background table SETTING_PROPERTY_VALUES with up to 3 rows similar to these: Figure 7.9—14 SETTING_PROPERTY_VALUES background table It is not necessary to use all 3 string values in each OS form; a form can also use only 1 or 2 of these. Any number of rows can be added to an OS form in Data Entry/Input, by using the Insert Row and Delete Row buttons. A Lookup Value: List of valid values is available on the right-click menu for dimension cells. OS forms do not have any specific support in the drill down report tool (as opposed to text forms with their corresponding text layouts). This is, however, a useful feature rather than a shortcoming: OS accounts can be used ‘normally’ in Reports/Drill Down and the additional text strings of OS forms can also be used ‘normally’ as ordinary ‘first-class’ entities, in the Drill Down report tool (the names of these entities in the Drill Down report tool derive from the Mapping settings; see above.) Drilldown will present values on the additional OS entities (the additional text strings) only for accounts that are specially set up in the Edit Accounts screen: they must have Subcategory of operational set to a value (such as “OS” in the example below) that maps to FigTable OSF_FIGLEVEL in SETTING_PROPERTY_VALUES: Figure 7.9—15 Setting up an OS account AARO SYSTEMS AB 356 AARO 12.0 USER MANUAL Utilities Edit Input Figure 7.9—16 Setting up OS form mapping Please find an example of an OS form in the following screenshot: Figure 7.9—17 Example of an OS form 7.9.1.11.1Create an OS form To create a new OS form, follow the general step by step instructions in 7.9.1.3 Create a form – step by step instructions. Select OS as the form type (source). 7.9.1.11.2OS form layout The layout of an OS form is created and maintained in exactly the same way as for text forms. See 7.9.1.10.2 Text form layout. Here is the layout definition of the form from the example above: Figure 7.9—18 Layout of an OS form (INPUT_SPECSET) AARO SYSTEMS AB 357 AARO 12.0 USER MANUAL Utilities Edit Input Figure 7.9—19 Layout of an OS form (INPUT_FORMSET) 7.9.2 Packages The following sections describe packages grouping input forms. 7.9.2.1 What is a package? A package (or input package) is simply a collection of forms. Packages are used for convenience – they show up as folders in the tree structure of the Data Entry/Input screen or as items in a combo box in the Data Entry/Match screen. For each period, it is possible to define (in the Edit Period screen) what packages should be used. If this is done, the Data Entry/Input screen will show only those packages. Forms can be collected into packages in different constellations. An example of a typical set of packages could be ANNUAL, MONTHLY, QUARTERLY – with each package containing the forms to be reported in that kind of closing (with these packages, Edit Period would probably be used to define the package(s) to use each period). Another set could be EARLY, INTERMED, LATE – corresponding to different phases of the closing. Another set could be DAY1, DAY2, DAY3 and DAY4. Alternatively all of the forms may be kept in a single package. A form can be contained in several packages. Packages also play a role when the Complete function is used: complete will mark a whole package as completed (and not just a single form). 7.9.2.2 Package types There are basically two types of packages: INPUT packages show up in the Data Entry/Input screen and they can contain forms of all types except Match. MATCH packages show up in the Data Entry/Match screen and they can contain only forms of type Match. There is a third, rarely used, package type: MATCHGL (GL stands for General Ledger). This is identical to MATCH in all regards, except that the match data will have to be reported using ledger/counter ledger pairs (instead of company/counter company pairs). Find more information on this feature in the 3.2 Match chapter. AARO SYSTEMS AB 358 AARO 12.0 USER MANUAL Utilities Edit Input 7.9.2.3 Create a package – step by step Instructions This is how a new package is created: 1. Select Edit Input from the Utilities menu. 2. In the tree structure on the left, select the Packages folder or one of the packages below as an alternative. 3. Click the New button (alternatively, right-click the packages folder and select New>Package from the pop-up menu). A New Package dialog window will appear. 4. Enter the name of the new package. The name can be up to 10 characters in length, include uppercase letters A-Z, numbers and underscore characters (_) but no spaces or other special characters. Click OK after entering the package’s name. Figure 7.9—20 Create a package 5. Enter a package heading in the Heading field. The heading can be up to 40 characters long and include any characters. 6. Choose a package type (See above for information on the different package types.) otherwise the package will not show up in the Data Entry screens. Figure 7.9—21 Package details AARO SYSTEMS AB 359 AARO 12.0 USER MANUAL Utilities Edit Input 7. Tick Lock higher levels if users are to edit figures only on the most detailed level of each form in this package and to hinder editing of the forms at any higher level (only applicable to packages of type INPUT) As an example a form may be reported with detail level period/company/business unit and put into a package with Lock higher levels ticked. The form’s figures then become editable only when a single business unit is loaded into the grid but not when the whole company (with all business units) is. 8. Tick Comment Disabled if users should not to be able to leave input comments through forms in this package. 9. Tick Figures Disabled if users should not to be able to edit figures through forms in this package (this is useful if a package is to be made a ‘place for commenting only’). 10. The detail level has no significance for packages (it is only visible here for INPUT packages as a remnant from earlier versions of AARO). 11. Save the information by clicking the Save button. 7.9.2.4 Collect forms into packages A package is meaningful only if it contains forms. There are two ways to assemble forms into packages: First method: Drag-and-drop 1. Select the form to be included in the package. 2. Drag it into the selected package. A Confirm message appears when the form is being dropped onto the package. Click OK. Figure 7.9—22 Adding a form to a package by drag-and-drop 3. Repeat this for all forms that are to be included in the package. Second method: Table Editing Dragging might prove difficult if there are a multitude of forms and packages, as the packages may not be visible at the top of the tree. The following method may then be preferable: 1. Select the item called ‘PackageForms’ at the bottom of the tree. A simple table of packages and forms is shown. AARO SYSTEMS AB 360 AARO 12.0 USER MANUAL Utilities Edit Input 2. Edit the list of packages and forms directly. SeqNo can be used to order forms within packages: this is the sequence number for the form within the package. Figure 7.9—23 Adding a form to a package through the table 3. Save the information by clicking the Save button. 7.9.2.5 Remove a form from a package Remove a form from a package: 1. Select Edit Input from the Utilities menu. 2. Select the package in the tree structure on the left. 3. Click the plus sign to display the forms of the package. 4. Select the form that should be removed from the package. 5. Click the Delete button and confirm the selection alternatively rightclick the selected form and select Remove Form from Package from the popup menu. 7.9.2.6 Delete a package Delete a package permanently: 1. Select Edit Input from the Utilities menu. 2. Select the package in the tree structure on the left. 3. Click the Delete button and confirm the selection alternatively rightclick the selected package and select Delete Package from the popup menu. Attention: deleting a package by right-clicking will result in the package to disappear immediately without notice! AARO SYSTEMS AB 361 AARO 12.0 USER MANUAL Utilities Edit Input 7.9.3 Recon Figure 7.9—24 Reconciliation rules setup Reconciliation rules are used in the Reconciliation report. A reconciliation rule specifies that the value of a certain account should equal the value of another account, within a company’s own reporting. The reconciliation report then checks these rules and presents any differences found. The reconciliation rules are created and maintained as follows: 1. Select Edit Input from the Utilities menu. 2. Select a form or the Recon icon in the left pane 3. Select the tab Recon if a form was selected in the left pane. 4. Enter the form name in the Form column. 5. Enter the account Code by typing it or by selecting it in the displayed drop-down-list 6. In addition to Normal accounts, Summ accounts and certain other account types can also be used in reconciliation rules (as opposed to match rules where only directly reported Normal accounts can be used). 7. Enter a multiplier (normally 1). 8. Enter the CounterForm. 9. Enter the CounterCode by typing it or by selecting it in the displayed drop-down-list. 10. Enter CounterMult – the multiplier for the counter account (normally 1). 11. CounterValue and BlockLimitValue are not used and should always be left empty. 12. SpecialRule can either be left empty; in this case the reconciliation report will compare the two accounts on the most detailed level possible (or according to user preferences when the report is ordered); or SpecialRule can be specified as “CT”, indicating that the reconciliation AARO SYSTEMS AB 362 AARO 12.0 USER MANUAL Utilities Edit Input check should be done on company total level. SpecialRule can also be specified as an integer value corresponding to a dimension number and that means that the reconciliation check shall be done on that particular detail level. 13. Limit field defines the limit of the difference shown in the reconciliation report: blank or 0 - all differences will be shown regardless of their size. numeric value (integer or floating) - only differences greater than this limit will be shown. The currency of the limit depends on Calc Group setting: N – limit is set in local currency; Y – limit is set in group currency. 14. Click the Save button. 7.9.4 Match rules Figure 7.9—25 Match rules setup Match rules are used in the Match report. A match rule specifies that the value of a certain account in one company’s reporting should equal the value of another specified account in the counter company’s reporting. The match report checks these rules and presents any differences found. The match rules are created and maintained as follows: 1. Select Edit Input from the Utilities menu. 2. Select a match form or the Match rules icon in the left pane. 3. Select the Match rules tab if a match form is selected in the left pane. 4. Enter a RuleID for the rule. This is a short text of up to 20 characters to identify the rule. If several rows have the same RuleID, those rows together form one rule, which – in turn - compares the sum of the lefthand accounts with the sum of the right-hand accounts. 5. Enter a Form name. AARO SYSTEMS AB 363 AARO 12.0 USER MANUAL Utilities Edit Input 6. Enter the account Code by typing it or by selecting it in the appearing drop-down-list. Only directly reported Normal accounts can be used in match rules (as opposed to reconciliation rules, where also other account types are possible to use). 7. Enter the Sign - multiplier (normally 1). 8. Enter the CounterForm. 9. Enter the CounterCode code by typing it or by selecting it in the appearing drop-down-list. 10. Enter a multiplier for the counter account (normally 1). 11. Click the Save button. 7.9.5 Match bins Match bins are used to specify the reporting detail level of match forms. For other form types, the reporting detail level is specified by choosing dimensions directly, but for match forms, the reporting detail level is specified using these bins. The reason for this is that a match form may need to have both ‘own’ and ‘counter part’s’ dimension value, e.g. both own business unit (Own BU) and counterpart’s business unit (Counter BU). A bin can contain a dimension value or some arbitrary text value (such as e.g. an invoice number). There may be up to 6 bins. The list of available bins is defined in the table Matchbin table of the Edit Input screen. The match bins are created and maintained as follows: 1. Select Edit Input from the Utilities menu. 2. Select the Matchbin icon in the left pane. The following example shows how to set up the match bins: AARO SYSTEMS AB 364 AARO 12.0 USER MANUAL Utilities Edit Input Figure 7.9—26 Explanation of match rules 3. Click the Save button. 7.9.6 Org_Conditions Conditions can be used to create validation rules attached to individual accounts e.g. to define rules such as “account 8810 (Tax Fund) that may be reported only on business unit FINANCE”. Conditions are created and maintained in the Edit Input screen: they are defined in the Condition section, and attached to accounts through the layout of an input form. Find below an example that shows two conditions – “FinOnly” and “Picnic”: Figure 7.9-27 Setting up conditions Each line contains a condition name (text of up to 10 characters), dimension level number and specific dimension value. A condition has a name – a short text of up to 10 characters – and a definition, which contains dimension number(s) and dimension value(s). A condition can be as simple as a single dimension value, or as complex as a combination of several dimension values on several dimensions. In addition to dimensions, companies can be part of the condition. In that case, AARO SYSTEMS AB 365 AARO 12.0 USER MANUAL Utilities Edit Input write “Co” instead of a dimension number in the Dimension column. Once created, conditions can be connected to accounts. (Until they are connected to an account, they have no effect.) This connection is done in the layout of an input form. A row is double-clicked in the form layout and a condition chosen in the dialog window. A choice is furthermore made as to whether the condition should be applied in “Enabled” or “Disabled” form. These options are mentioned as “Allow” and “Forbid”: Enabled Allows only the dimension values (combinations) in the condition, when reporting on this account. Disabled Forbids the appearance of any of the dimension values in the condition, when reporting on this account. NB! Despite the fact that conditions are connected to accounts through the layout of a specific input form, the condition actually applies to the account in all input forms. AARO SYSTEMS AB 366 AARO 12.0 USER MANUAL Utilities. Edit Report Layouts 7.10 Edit Report Layouts The report layout defines the accounts and look of the report run in Reports/Drill Down. Utilities followed by Edit Report Layouts enable report layout alterations. When selecting this menu choice, the live Edit Report Layouts window opens up. Figure 7.10-1 The Layout for the report GROUP_BS Balance Sheet Report layouts for input forms created in Utilities/Edit Input are not editable. They are identified by the record "THE LAYOUT IS MAINTAINED VIA EDIT INPUT". Only layouts created in this menu item are editable. 7.10.1 Create a report layout To create a report layout, follow these steps: 1. Click the New button. The New Layout pop-up dialog appears. Alternatively, a new report layout can be created from an existing report layout by using the Save as button. 2. Enter layout code and description. Specify if the layout will be created from scratch or based on an input form. Click OK. AARO SYSTEMS AB 367 AARO 12.0 USER MANUAL Utilities. Edit Report Layouts Figure 7.10-2 Create a new report layout New Layout window fields are: Field Description Report Code Report code. Maximum 10 characters are allowed. Description Report description. Blank Report Report will be created from scratch. Import Input Form Report will be created based on the input form layout selected in the drop-down list. 3. To add accounts to the layout, click the Accounts button. The Report Layout Items pop-up window appears. Drag-and-drop accounts to the layout. It is also possible to add TEXT line, dividing LINE, and PAGEBREAK. AARO SYSTEMS AB 368 AARO 12.0 USER MANUAL Utilities. Edit Report Layouts Figure 7.10-3 Add accounts to the report layout 4. Press Save. The saved layout can now be selected in Reports/Drill Down in the Report Layout criterion. Figure 7.10-4 Select the report layout 7.10.2 Edit a report layout To edit a report layout, follow these steps: AARO SYSTEMS AB 369 AARO 12.0 USER MANUAL Utilities. Edit Report Layouts 1. In left hand pane, select the layout to be edited. 2. Double-click the record to be edited. The Edit Details pop-up window appears. Set up fields and close the window. Figure 7.10-5 The Edit Details dialog Edit Details window fields are: Field Description Account The code of an account to be added to the report. Default text Default description of the selected account. Text Text that will be shown in the report instead of Default text. Multiplier Multiplier applied to the account value in the report. Supress Zeroes If checked, the account with 0 will appear as blank. Format Format applied to the record when the report is run or printed. The format can be selected using the drop-down list. 3. To delete a record from the layout, select the record and click the keyboard button [delete]. 7.10.3 Rename a report layout To rename a report layout, select the layout to be renamed and click the Rename button. Enter the new name and click OK. AARO SYSTEMS AB 370 AARO 12.0 USER MANUAL Utilities. Edit Report Layouts NB! If the renamed report layout is used in a saved report, the report will generate an error. 7.10.4 Delete a report layout To delete a report layout, select the layout to be deleted and click the Delete button. Click OK to continue. NB! If the deleted report layout is used in a saved report, the report will generate an error. AARO SYSTEMS AB 371 AARO 12.0 USER MANUAL Utilities. Edit Drilldown Folders 7.11 Edit Drilldown Folders This chapter refers to the menu item Utilities/Edit Drilldown Folders in AARO. In the Edit Drilldown Folders menu, drill down reports (global) may be rearranged in folders. The reports will subsequently be easier to find and to use in the menu Reports/Drill Down. Note: it is possible to restrict user rights to allow only selected users to this menu item. If restricted access is required, please refer to the 7.14.2.14 Drilldown Responsibilities section of the user manual. 7.11.1 Manage drill down folders The left pane of the drill down folders window contains two main folders, Folders and Reports. Folder contains all the user-created folders that are visible in the Drill Down window while the Reports contain all available reports. The right pane contains the choice of responsibilities applicable to a folder. Figure 7.11—1 Drill Down folders window 7.11.2 Create a drill down folder To create a drill down folder, do as follows: 1. Right-click Folders in the left pane and select New>Folder. A sub folder can furthermore be created to an existing folder. AARO SYSTEMS AB 372 AARO 12.0 USER MANUAL Utilities. Edit Drilldown Folders Figure 7.11—2 Creating a new folder 2. Enter a name in the upcoming dialog. Press OK. Figure 7.11—3 Enter a name 3. The new folder appears in the folders tree. 4. Select the chosen responsibilities for the folder in the menu Reports/Drill Down (folder structures can be prepared by creating folders first and selecting responsibilities later on). Each user is allocated one or more responsibilities in the menu Utilities/User Administration. Press Save and the folder will be saved in the menu Reports/Drill Down. AARO SYSTEMS AB 373 AARO 12.0 USER MANUAL Utilities. Edit Drilldown Folders Figure 7.11—4 Select the chosen responsibilities Figure 7.11—5 Report folder in the menu Reports/Drill Down (with added reports). 7.11.3 Add reports to a folder Reports are created in the menu Reports/Drill Down. Selected users can save a report in a global folder instead of the personal folder. All reports saved in global folders are displayed in the Reports folder (and in a global folder) in the menu Utilities/Edit Drilldown Folders. In order to add a report to a new folder; 1. Right-click a folder. 2. Choose Add Reports to folder and select report in the list. Press OK in the upcoming dialog. A report can be selected to multiple folders. AARO SYSTEMS AB 374 AARO 12.0 USER MANUAL Utilities. Edit Drilldown Folders Figure 7.11—6 Select report to add 7.11.4 Delete a drill down folder or report A drill down folder cannot be deleted unless all reports are removed from the folder. A drill down report cannot be deleted unless the report is first removed from all folders. 1. Remove a report from the folder by right-clicking it and selecting Remove Report from Folder. The report can also be selected directly followed by the [delete] button. Figure 7.11—7 Remove report from folder 2. Delete folder by right-clicking it and selecting Delete Folder. The folder can also be selected directly followed by the [delete] button. Figure 7.11—8 Delete folder 3. Delete report by selecting it in the Reports folder and selecting Delete Report. Please note that the report will be entirely deleted. The report can also be selected directly followed by the [delete] button. Reports can also be deleted from the menu Reports/Drill Down by users permitted to perform this action. AARO SYSTEMS AB 375 AARO 12.0 USER MANUAL Utilities. Edit Drilldown Folders Figure 7.11—9 Delete report 7.11.5 Rename a drill down folder To rename a folder, do as follows: 1. Select and right–click a folder. 2. Select Rename Folder and enter the new name in the dialog window. 7.11.6 Set up user responsibilities User responsibilities are set, per user, in the menu Utilities/Administrative Tool. The names of the drill down responsibilities are edited in the menu Utilities/Application Management/Responsibilities. AARO SYSTEMS AB 376 AARO 12.0 USER MANUAL Utilities. Edit Drilldown Folders Figure 7.11—10 User Administration/DrillDown Responsibilities AARO SYSTEMS AB 377 AARO 12.0 USER MANUAL Utilities. Edit Drilldown Container 7.12 Edit Drilldown Container This chapter refers to the menu item Utilities/Edit Drilldown Container in AARO. In the menu Reports/Drill Down, drill down reports are defined with sets of mandatory/optional parameters. In order to define reports, the drag-and-drop method is used to add/remove parameters from the groups/folders to the report. The parameters in the Edit tab are organized in groups/folders. Figure 7.12—1 The Edit tab in Reports/Drill Down The sorting/editing of parameters into different groups/folders is managed in the menu Edit Drilldown Container. 7.12.1 Manage a drill down container To add, delete, and modify folders in the drill down container: 1. Add/delete folders by right-clicking the left pane and pressing Add group/Delete group (add sub folders by right-clicking an existing folder). 2. Add parameters/items to the groups/folders by using drag-and-drop from the list in the right pane. Remove by right-clicking parameters and selecting Delete item. 3. Make the folder expandable by default in the menu Reports/Drill Down by right-clicking the folder and selecting Expand at startup. 4. Change the order between the groups/folders by using drag-and-drop. AARO SYSTEMS AB 378 AARO 12.0 USER MANUAL Utilities. Organize Parameter Folders 5. Rename a group, by right-clicking the group and selecting Rename group. Figure 7.12—2 Edit Drill Down Container window AARO SYSTEMS AB 379 AARO 12.0 USER MANUAL Utilities. Organize Parameter Folders 7.13 Organize Parameter Folders In the Utilities/Organize Parameter Folders menu item, periods, dimensions and accounts can be selected and arranged into folders in a flexible tree structure. Period folders, Dimension folders and Account folders are used by the Select Period, Select Dimension, and Select Account windows in Reports/Drill Down while Input Period folders are used in the menu Data Entry/Input when entries are to be made for several periods simultaneously. 7.13.1 Manage Period folders The Period folders functionality is used to arrange periods into folders that, in turn, are used when you select period for a drill down report. 1. In the tree to the left, select the Period folders item under the Period folders folder. 2. Add a folder or sub folder by right-clicking the Period folders pane or an existing folder and selecting Add folder. Figure 7.13-1 Add Period folder 3. Arrange the periods in the folders by using drag-and-drop. 4. To delete a folder, right-click the folder and select Delete item: folder. 5. Click Save. AARO SYSTEMS AB 380 AARO 12.0 USER MANUAL Utilities. Organize Parameter Folders The Period folders are visible in the Select Period window in Reports/Drill Down. Figure 7.13-2 The Select Period window in Reports/Drill Down 7.13.2 Manage Input Period folders The Input Period folders functionality is used when data is to be entered for several periods at the same time, e.g. when budget numbers are entered (please note that this functionality can be used with input forms only). 1. In the tree to the left, select the Input Period folders item under the Period folders folder. 2. Add a folder or sub folder by right-clicking the Input Period folders pane or an existing folder and selecting Add folder. Then name the folder (e.g. ‘BUDGET_08’). AARO SYSTEMS AB 381 AARO 12.0 USER MANUAL Utilities. Organize Parameter Folders Figure 7.13-3 Add Input Period folder 3. Arrange the periods in the folders by using drag-and-drop. 4. Delete a folder by right-clicking and selecting Delete item: folder. 5. Go to the menu Data Entry/Input. Select e.g. ‘BUDGET_08’ as the input period, select company and load the preferred Input form. All periods contained in the period folder (‘BUDGET_08’ in this example) will be available for data entry. Figure 7.13-4 The Input Period folder ‘BUDGET_08’ is selected in Data Entry/Input 7.13.3 Manage Dimension folders The Dimension folders functionality is used to arrange dimensions into folders that, in turn, are used when you select dimension for a drill down report. 1. In the tree to the left, expand the Dimension folders folder and select the dimension which members will be organized. 2. Add a folder or sub folder by right-clicking the Dimension folders pane or an existing folder and selecting Add folder. AARO SYSTEMS AB 382 AARO 12.0 USER MANUAL Utilities. Organize Parameter Folders Figure 7.13-5 Add dimension folder 3. Arrange the dimensions in the folders by using drag-and-drop. 4. To delete a folder, right-click the folder and select Delete item: folder. The Dimension folders are visible in the Select Dimension window in Reports/Drill Down. 7.13.4 Manage Account folders The Account folders functionality is used to arrange accounts into folders that are used when you select accounts in drill down reports. 1. In the tree to the left, select the Account folders folder. 2. Add a folder or sub folder by selecting Account folders in the left pane or select an existing folder if you would like to add a sub folder. Rightclick and click Add folder. Figure 7.13-6 Add Account folder AARO SYSTEMS AB 383 AARO 12.0 USER MANUAL Utilities. Organize Parameter Folders 3. Arrange the accounts in the folders by using drag-and-drop. 4. To delete a folder, right-click the folder and select Delete item: folder. Account folders are visible in the Select Account window in Reports/Drill Down: Figure 7.13-7 The Select Account window in Reports/Drill Down AARO SYSTEMS AB 384 AARO 12.0 USER MANUAL Utilities. User Administration 7.14 User Administration This chapter refers to the menu item Utilities/User Administration in AARO. Users are created, removed or edited here. New users are configured to have access to functionality and data in the system based on their responsibilities. The core of AARO’s security system is a role based security solution, where a user can be given access to specific functionality as well as a required group. An AARO user may, for example, report figures for a company and act as a controller for a product area. In this case two different AARO roles are used. Select ‘Normal users’ and a screen similar to the one below will appear: Figure 7.14-1 User Administration In the left pane, there are two folders: Normal users – users that are activated in the system; Prepared users – these are not activated in the system and may be used as templates. The area under the heading “Users to regenerate” is a “regeneration” tool which will be described further on in the section ‘Regenerate Users’. Users visible in the tree and the “Users to regenerate” area can be filtered by pressing the Filter button; select parameters to filter the users. 7.14.1 User information and database rights Open the normal users or prepared users folder and select an individual user in the left pane. Users are defined here, within two tabs: User information – user details are entered here. Database rights – data restrictions are set up here. AARO SYSTEMS AB 385 AARO 12.0 USER MANUAL Utilities. User Administration The User information and Database rights tabs are described in detail below. 7.14.2 User information tab The following screen is displayed when a user is selected in the left pane of User Administration: Figure 7.14-2 User information tab (in Advanced Mode) The following sections describe User information tab fields. 7.14.2.1Advanced Mode Tick the check box Advanced Mode to gain access to all options in the menu. The options for User role(s), Other special right(s) and Background table(s) will now be visible in the work area. 7.14.2.2Deactivate user If the Deactivate user check box is ticked, the user will be deactivated and cannot log on until the check box is cleared. 7.14.2.3Username This is the user identifier that is used when logging into the database. The username has a maximum length of 10 and minimum 4 alphabetic or numerical characters, with no spaces. 7.14.2.4Full name Full name of the user. AARO SYSTEMS AB 386 AARO 12.0 USER MANUAL Utilities. User Administration 7.14.2.5Start application The start application is the application which launches AARO for a selected user on their PC. All users should have ABSNAV.EXE as their start application except for the consolidation user/s who should have ABSCONSOLIDATOR.EXE. 7.14.2.6E-mail address The user’s e-mail address; this is only informative and not used anywhere in the system. 7.14.2.7Menu profile Each individual AARO user can be given a profile containing the menu choices relevant for the user in question. Menus are built via the menu Utilities/Application Management and the Menu Management folder. 7.14.2.8Group membership Administrators should be given the group ABS_Admin and all other users the group ABS_User. A database administrator user can also be created here given the group membership DB_Admin. For such user no settings are made in User Administration. 7.14.2.9SecurityLevel In AARO it is possible to define increased company security, i.e. not only the figures are classified but also the visibility of a company in the system. This functionality applies to the entire application except the administrative menus. The parameter FromCompany is included in the functionality but not Counter Company. If the functionality for increased company security is activated, access to different security levels are setup here. Normal is always the lowest security level. All users have Normal selected by default. It is possible to select more than one security level for a user. Security level for a company is selected in the menu Utilities/Edit Dimensions. If new security levels are required, contact AARO support: new security levels will need to be added to the APP_SECURITYLEVEL table. Limitations for companies also need to be set up in the Database rights tab. 7.14.2.10 Input function Input function is used for two purposes: 1. To open/close forms for a period in the menu Data Entry/Input for different categories of users. 2. To give the possibility for a specific category of users to make revert forms to being incomplete for a period in the menu Validations/Process Status. Different categories of users are given different input functions. AARO SYSTEMS AB 387 AARO 12.0 USER MANUAL Utilities. User Administration Input functions are created by going into the menu Utilities/Application Management, followed by selecting the Responsibilities folder in Application management. Note: Input function is only active if more than one input function has been created. Input functions are tied to one or more forms for a period in the menu Utilities/Edit Periods, tabs Open (1) and Open for Revert (2). Please note that if the input function All is set up, then all forms are open for the user regardless of the form input function. If the input function All is tied to a form in the above tabs, the form is open for all users and that all users can make that form incomplete (irrespective of which input function the user has been given). 7.14.2.11 JV function JV function is used to give different categories of users different setups for 1) Preparing, 2) Saving and 3) Attesting Journals. Different categories of users are given different JV functions. JV functions are created in the menu Utilities/Application Management, followed by selecting the Responsibilities folder in Application management. Any combination of Preparing, Saving and Attesting can be given to a JV function. However, users can never attest their own bookings. Journals are prepared and saved in the menu Data Entry/Journals. Journals can be attested by going into menu Validations/Process Journals. Please note that different JV functions are only visible and selectable for a user if additional JV functions other than ‘All’ have been created. Imported journals are always given the status Saved (approved). Journals created in the menus’ Data Entry/Input and Data Entry/Match are always given the highest status available according to the users’ settings. The Save button is always used to approve journals. Journals can only be attested by users who do not prepare/save the original journal. 7.14.2.12 Application group In AARO all programs are stored in the database server and the local client is, when needed, upgraded to the latest version. This facilitates an upgrade of AARO. Where bandwidth is not an issue, all programs and users can have “All users” as their application group. This is the simplest way to set up AARO application groups. In some cases, however, bandwidth may be restricted. Programs which are relevant only to administrators can be classified as belonging to a specific Application group in order to reduce the amount of bandwidth used. The application group “All users” is normally the only application group required. AARO SYSTEMS AB 388 AARO 12.0 USER MANUAL Utilities. User Administration 7.14.2.13 Change Password If a user has forgotten his password, a new one can be set up by pressing the Change Password button. Figure 7.14-3 Change Password In the lower part of the dialog shown above all password rules are represented by a description and a “traffic light” to show if the rule is fulfilled or not. 7.14.2.14Drilldown Responsibilities Drill down responsibilities specifies which report folders a user may access in the menu Reports/Drill Down. Drill down responsibilities are created by going into the menu Utilities/Application Management followed by the Application Management and Responsibilities folders. Please note that this functionality is only visible, and a Responsibility selectable for a user, if at least one drill down responsibility has been created. Report folders are created in the menu Utilities/Edit Drilldown Folders. Drill down responsibilities are tied to one or more drill down report folders. AARO SYSTEMS AB 389 AARO 12.0 USER MANUAL Utilities. User Administration 7.14.2.15Input Responsibilities Input Responsibilities specify which input packages a user may access in the menu Data Entry/Input. Input responsibilities are created by going into the menu Utilities/Application Management followed by the Application Management and Responsibilities folders. Please note that this functionality is only visible, and a Responsibility selectable for a user, if at least one input responsibility has been created. Input responsibilities are tied to one or more input packages in the menu Utilities/Edit Input and Packages folder. 7.14.2.16Published Responsibilities The Published Responsibility functionality is used to restrict access for a user to particular accounts in a specified period. You can assign a Published responsibility to the user here. Note! Publish responsibility should only be applied on users that have read rights on all of their user roles. A user with publish responsibility should never be allocated a write role. For more information, see 7.5.11 Publish tab. 7.14.2.17 User role It is possible to “lock” different tables and/or menu items for a user. A user role is set up in the menu Utilities/Other Security and the Other Security/Locks folder. 7.14.2.18 Other special rights Special right Description Regenerator Admin Signifies that the user is a user administrator that can add, change and remove other users. Order consolidations with lower priority Signifies that the user can order consolidations but that these consolidations are given low priority. Show all JV documents Signifies that the user can see all documents stored in journals when editing group adjustments. Edit JV bookings on all dimensions The user will be able to use the alternative Expand/All dimensions in the Legal menu. (note: this is activated in background table SETTING_SETTINGS, Property: JVExpand, StringValue: Y) Edit all global Drilldown Reports The user will be able to change global reports, alternatively it is only possible to change own reports in the personal folder. Visibility change import batches Functionality under review, contact AARO support. AARO SYSTEMS AB 390 AARO 12.0 USER MANUAL Utilities. User Administration Special right Description Manage templates Signifies that the user is allowed to set up templates in Utilities/Period Setup. Comment Drilldown Reports Signifies that the user is allowed to comment figures in drill down reports. Security officer A security officer can print logged information. View other personal reports Signifies that a user can view other users’ personal reports in the menu Reports/Drill Down. User is Auditor Signifies that the user can give status Audited to packages in the menu Validations/Process Status Read and to Adjustment Bookings in the menu Validations/Process Adjustment Bookings. An Auditor has read rights in the system. DataUtil manager Signifies that a user has rights to the menu Utilities/Data Utilities where it is possible to copy, edit and erase data. 7.14.2.19 Background tables Ticked check box gives viewing rights to selected table in the menu Utilities/Edit Background Tables. If all are unchecked this means that rights are given to all. Please contact AARO support to get more information concerning this functionality. 7.14.2.20 Full rights to editing tables It is possible to grant full access to editing tables in the menu Utilities/Edit Background Tables, however for security reasons this access is restricted and not visible. Please contact AARO support if you need to get more information concerning this functionality. 7.14.3 Database rights tab In the tab Database rights tab roles are set up for each user. Each tab consists of one role (role 1, role 2 etc). A role signifies a specific responsibility for a user, such as being a product area controller or a company reporter. A user can have one or more roles. A role is defined by its restrictions. This means that if the role has no restrictions the user has access to everything (otherwise the user has access to selected restrictions). AARO SYSTEMS AB 391 AARO 12.0 USER MANUAL Utilities. User Administration Figure 7.14-4 The Database rights tab As a guideline, some general principles to bear in mind are: Keep things as simple as possible when you are working with user roles. The more complicated a user setup is, the more difficult it is to keep under control. Understand which forms the user needs access to, and what the user needs to review in the Drill Down report tool. As every customer can have a unique set of circumstances and unique employee roles, we cannot provide information to cover all customer requirements within this user manual. However, the underlying principles are detailed through the rest of this chapter, to give you the tools you need to set up your users with the correct amount of access within AARO. 7.14.3.1Set up a role To set up a user role, do as follows: 1. Press the Add role button. Note: this is not necessary when you set up the first role since it already exists (without restrictions). 2. A role can be either a read restriction or a write restriction. This is selected by checking Read/Write in the field Viewright. 3. Select the dimension to be restricted in the Rights field. AARO SYSTEMS AB 392 AARO 12.0 USER MANUAL Utilities. User Administration 4. To select items that should be accessible to the user there are some alternatives: Enter in plain text the items that should be accessible to the user (precise item name). If you want to use wildcards then tick the check box Use wildcards; you can place wildcard sign “*” in the beginning of the item, or at the end of the item (but not in the middle of the item. “*” means any number of any symbols). For example, write “A*” to select all items starting with ‘A’, or write “*A” to select all items ending with ‘A’. Press the Edit button to select the items that should be accessible for the user. The accessibility is either with read or write rights, depending on previous selection. 5. Tick the check box Exclude items to, instead of selecting accessible items, select items that should not be accessible to the user. Please note that the functionality Use wildcards and Exclude items only can be used together with the dimensions, period and company. Figure 7.14-5 Adding a restriction on companies 6. More than one restriction can be added for the same role. Continue by selecting the next dimension and repeat the procedure above. A role is made up of the sum of all its restrictions. 7. Approver reference indicates that more than one row of text can be added to each role. Each row can contain 30 characters. 8. Use the button Add Ref Doc to attach a document to each role. AARO SYSTEMS AB 393 AARO 12.0 USER MANUAL Utilities. User Administration 9. In order to remove a role, press the Drop role button. 10. Tick the check box Advanced Mode to view the functionality Tables to fetch security definitions for. Please contact AARO support if more information is required about this functionality. A user identifier is made up of a combination of all its roles. 7.14.3.2Database Rights tab and read/write roles Each user role in the database rights tab allows either read or write access for the set of parameters defined. Each role signifies a specific responsibility or set of responsibilities for a user. Write roles allow users to input data For example, a user may input data for some specific companies in Input, Match and Journals menus. Users with write-roles can also view the same data they have access to in Data Entry in drill down reports. Read roles allow users to view data For example, a simple read-only role may allow a user to view a few companies: this will allow the user to see restricted company information in Input, Match, Journals, and Drill Down menus. This setup may be used, for example, by someone who only needs to read / review data in drill down reports but will not be working with data entry. 7.14.3.3 AND/OR principles in user roles The underlying principles involves in setting up a user role are: If there is more than one dimension in a user role, the access is restricted so as to only allow access to dimension ‘X’ AND dimension ‘Y’, in combination with each other. For example, if you restrict users to company “1000” and business unit: “Film” in the same role, the user will have no access another than business unit “Film” within company “1000”. If there is more than one role set up, the principle is allow access to all parameters in role 1 OR allow access to all parameters in role 2. For example, if you restrict users to company “1000” in one role and restrict user access to business unit: “Film” in another role, the user will have access to all of company “1000”, and in addition will have access to business unit “Film” - for all companies. 7.14.3.4 Input forms and user roles Before user roles are setup, it is important to have a clear understanding of how your company users work before setting up their user roles, particularly regarding which input forms users work with. The user roles set up in AARO should reflect the input forms the users work with, not the company’s organisational structure. Note: if a user if required to enter data on an input form for a given dimension: e.g. business unit, then that user will need to have defined access rights for that particular dimension. The exception to this is for a user who has no restrictions. AARO SYSTEMS AB 394 AARO 12.0 USER MANUAL Utilities. User Administration For example, if a user works within a business area of “Media” and enters information on input forms relating to business units “Film” and “Books”, then user role restrictions should be set up to work against business units: “Film” and “Books”. For reference, for the example above is shown here; first: we look at some examples of forms the user works with, in Edit Input: Figure 7.14-6 Example of a form in Edit Input for User Administration In this example, the user works within the MEDIA business area. To do this, the user needs to enter data into the input form IS_ALL for business unit: FILM and BOOKS. In this case, the user would need to have a user role as follows: AARO SYSTEMS AB 395 AARO 12.0 USER MANUAL Utilities. User Administration Figure 7.14-7 Example of a user working with restricted business unit access For the example above, the user would have access for a limited number of 5 companies and would be restricted to enter only on business unit: MEDIA. 7.14.4 Add a user To add users do the following: 1. Select User Administration on the Utilities menu. 2. Select the Normal user folder in the left-hand pane, right-click and select Add User from the options displayed. AARO SYSTEMS AB 396 AARO 12.0 USER MANUAL Utilities. User Administration Figure 7.14-8 Add user The Add user dialog is displayed: Figure 7.14-9 ‘Add user’ dialog 3. Enter a user identifier and the name of the user in the Username and Full name fields. 4. Enter a password in the Password field and retype it in the Retype password field. 5. Select a suitable Menu profile and a Group membership. The group membership used for a standard user is “ABS_User”. AARO SYSTEMS AB 397 AARO 12.0 USER MANUAL Utilities. User Administration 6. If relevant, select an Input function, JVFunction and Starting application. For normal users the starting application should be “ABSNav.exe”. 7. Click OK when all of the necessary information has been entered. See the “User information tab” chapter for further explanation of fields. Before the user is applicable, roles have to be added in order to define what data the user has access to. The “The Database rights tab” chapter describes how roles are entered. Note: a lot of time can sometimes be saved by loading a similar user and pressing the Save as button. 7.14.5 Delete user When deleting a user, the user is deleted as follows: from the current database only if the same user exists on other databases of the same database server; from the database and the database server if the user exists on the current database only. The user can no longer work in AARO, nor in any other applications based on the current database. To delete a user, right-click the user in the Normal users list, and select Delete user. Confirm deletion. Figure 7.14-10 Delete a user 7.14.6 Prepare a user If lots of users are handled in AARO, it might be of interest to use the prepare users before they are saved as normal users. Prepared users are users that are entered in the system but not activated, i.e. nobody can log into AARO using a prepared user identifier. A prepared user is created in exactly the same way as a normal user the only difference being that, when saving a prepared user, the Prepare and Prep As buttons are used. To activate a prepared user, load it from the Prepared user list and press Save. The user will now move from prepared users to normal users. To deactivate a normal user, load it from the Normal user list and press Prepare. The user will now move from normal users to prepared users. AARO SYSTEMS AB 398 AARO 12.0 USER MANUAL Utilities. User Administration 7.14.7 Remove a prepared user Removing a prepared user removes the user from the Prepared users list only. If a prepared user exists in the Normal users list, then it is activated when the prepared user is removed. To remove a prepared user, right-click the user in the Prepared users list, and select Remove prepared user. Confirm selection. Figure 7.14-11 Remove prepared user 7.14.8 Edit a user To edit a users do the following: 1. Select User Administration in the Utilities menu and select the Normal user folder in the left pane. 2. Select a user in the left-hand pane. 3. Select the User information tab to set responsibilities or to make changes in the password, group membership etc. 4. Select the Database rights tab to change access rights or read/write access. 7.14.9 Regenerate users Regeneration is normally only brought about after upgrades of AARO and when the database server is being changed. To “regenerate” means that AARO physically establishes the security in the database for selected users. To get the user regeneration screen, select the Normal users folder. AARO SYSTEMS AB 399 AARO 12.0 USER MANUAL Utilities. User Administration Figure 7.14-12 Normal users to regenerate Select the user(s) to be generated. Normally all tables should be selected but it is possible to select a number of them (only on the advice from AARO support) In an installation with many users, regeneration of all of them might be time consuming. To avoid disturbances it is possible to select when regeneration will be started. For example, in the middle of the night when very few users will be present). To start regeneration, press the Regenerate button. Users that are logged into the database during regeneration may experience erroneous behaviour from the system. In that case, the solution is simply to log out and then log into AARO again. 7.14.10Reports When you select on the Normal users folder in the left pane of User Administration, there are two reports available from the Reports button: Print User Information Print auto-deactivated users These reports are explained in more detail below: AARO SYSTEMS AB 400 AARO 12.0 USER MANUAL Utilities. User Administration Figure 7.14-13 User Administration reports 7.14.10.1Print user information To print a breakdown of user information: select the users you require information for, using ctrl-click if necessary and select whether you would like the output to a Preview printer or as a File. Figure 7.14-14 Print user information – select users You can also generate a report for a specific user by selecting the user in the left pane and pressing Reports > Print User Information for that user. To print the report to a preview mode, select Preview printer and press OK. AARO SYSTEMS AB 401 AARO 12.0 USER MANUAL Utilities. User Administration Figure 7.14-15 Print User information report to a printer To print the report to a file, select File, press the browse button [...], name the file and choose a destination and press OK. The file is saved as an .xls file type. 7.14.10.2Print auto-deactivated users The Print auto-deactivated user report prints a list of users who have been automatically deactivated because they have not logged on for a long time. For the auto-deactivated users report to function, user inactivity period must have been setup and the user must have exceeded the ‘LoginExpires’ date. The LoginExpires date is setup in Utilities/Edit Settings, or alternatively in the background table SETTING_SETTINGS, as follows: Figure 7.14-16 Setting for LoginExpires in Edit Settings AARO SYSTEMS AB 402 AARO 12.0 USER MANUAL Utilities. User Administration When the LoginExpires data has been set up, you will be able run the Print auto-deactivated users report: Figure 7.14-17 Print preview for auto-deactivated users 7.14.11Show Log If the Log button is pressed, the latest changes in the system affecting the selected user will be shown. Figure 7.14-18 The Log button 7.14.12Setup password rules The applicable password rules are set in the background table SETTING_PROPERTY_VALUES. Below a example for role no. 1 Figure 7.14-19 Background table for password rules Repeat this for all rules that should be activated, one exception is rule no. 5 which demands an extra row in SETTING_PROPERTY_VALUES, example below. Figure 7.14-20 Rule no. 5 in background table for password rules The rule numbers are listed below: AARO SYSTEMS AB 403 AARO 12.0 USER MANUAL Utilities. User Administration 5. At least 8 characters long. 6. Contains both characters and numbers. 7. Does not contain part of username (3 characters). 8. Does not contain part of old password (3 characters). 9. Part of password is not listed as prohibited. 10. Old and new password differ. 11. New and retyped password are identical. 12. Begins with a non-numeric character. 13. Contains illegal character(s). 14. English uppercase characters (A through Z). 15. English lowercase characters (a through z). 16. Base 10 digits (0 through 9). 17. Non-alphabetic characters (for example,!,%,#,&). Rule no. 7 and 8 are always applicable, and if a minimum of rules is required one of these can be entered in SETTING_PROPERTY_VALUES, due to the fact that the system require at least one password rule. AARO SYSTEMS AB 404 AARO 12.0 USER MANUAL Utilities. Application Management 7.15 Application Management The Utilities/Application Management menu item contains various functionalities used for the administration of AARO. Figure 7.15—1 Application Management window 7.15.1 File management In the File management menu it is possible to upload new versions of the application/s. Furthermore it is possible to create application groups to which users can be allocated. An application group determines which applications a user may run. Figure 7.15—2 File Management 7.15.1.1Upload files to the database How to add new files/update the application files: AARO SYSTEMS AB 405 AARO 12.0 USER MANUAL Utilities. Application Management 1. Select a folder in the Local files area that contains requested files for upload. The files in selected folder are displayed in a list in the area below. Local files can be filtered by extension using the Filter. 2. To add files to the Upload queue, select the requested files in the list and press the button Add files to queue. 3. Press the button Add files to database to add the files in the Upload queue to the database. Existing files in the database can be viewed in the list to the far right in the menu. 4. Tick the check box Client global update enabled to allow download of files to clients. 7.15.1.2Manage Application groups How to manage application groups: 1. Select a file in the list Existing files on database or Upload queue and press the Edit Entry button. 2. Use the buttons Add/Delete to create/delete an Application group. 3. Tick the check box to attach an application to an Application group. 4. Set up the Upgrade information. 5. Tick the corresponding check box for a user in the menu User Administration to make it possible for that user to run the application. Figure 7.15-3 Edit entry AARO SYSTEMS AB 406 AARO 12.0 USER MANUAL Utilities. Application Management 7.15.2 Page header and other The Page header and other settings allow set up report page header, set closing rules in drill down reports, keep alive signal interval, period to hold offline lists and service user password The window contains following functionality: Function Description Logotype configuration Set up the position of the Logotype in drill down reports. Press the Preview Logo button to preview the report header. Page header Disables the possibility for users to decide if a Page header should be visible in drill down reports. If the check box here is ticked, the Header disabled check box will be ticked in the menu AARO/Page header. (see example below) Figure 7.15-4 Page header The page header is used in print-outs, for example for drill down reports. Userlogin expires Enter number of days until a new password need to be changed. Closing rules in Drill Down Tick the check box Closing in progress to enable the functionality. Enter maximum number of criteria selectable on the same axis in drill down reports. Too many criteria selected could limit performance. Keep alive signal A signal is sent to the server to prevent the connection to close down. Useful for VPN connections. Hold offline lists Press the Deactivate button to stop the download of offline lists to the client. Serviceuser alternative password Serviceuser is used to fetch password rules when user is not yet logged on to the system. Default password is ‘aaroserviceuser’. Change the password for the service user here. AARO SYSTEMS AB 407 AARO 12.0 USER MANUAL Utilities. Application Management 7.15.3 Responsibilities The Responsibilities sub menu contains options to restrict user access in drill down reports and other areas of AARO: user responsibilities, journal functions and input functions. Figure 7.15—5 Responcibilites page 7.15.3.1Drilldown responsibilities Drill down responsibilities are used to specify which report folders a user may access in the menu Reports/Drill Down. Drill down responsibilities are tied to users and to report folders. In this menu the responsibilities are created. Please read more about the functionality in the 7.14.2.14 Drilldown Responsibilities section. Add a drill down responsibility: 1. Left-click in the Responsibilities pane. 2. Press the Insert Row button and select Add Drilldown responsibility. Figure 7.15—6 Add drilldown responsibility 3. Enter a name for the responsibility and press Save. Figure 7.15—7 Enter a responsibility name AARO SYSTEMS AB 408 AARO 12.0 USER MANUAL Utilities. Application Management 7.15.3.2Input responsibilities Input responsibilities are used to specify which input packages a user may access in the menu Data Entry/Input. Input responsibilities are tied to users and input packages. In this menu the responsibilities are created. Please read more about the functionality in the 7.14.2.15 Input Responsibilities section. Add an input responsibility: 1. Left-click in the Responsibilities pane. 2. Press the Insert Row button and select Add Input responsibility. 3. Enter a name for the responsibility and press Save. Figure 7.15—8 Enter responsibility name 7.15.3.3Publish responsibility Publish responsibilities are used to restrict access for a user to particular accounts in a specified period. In this menu item the responsibility options are created. For a more detailed explanation of how to add publish responsibility, please refer to 7.5.11 Publish tab. How to add a publish responsibility: 1. Click the Responsibilities pane. 2. Press the Insert Row button and select Add Publish responsibility. 3. Enter a name for the responsibility and press Save. Figure 7.15-9 Enter publish responsibility name 7.15.3.4JVFunction JV functions are used to give different categories of users different possibilities to prepare, save and attest journals. Different categories of users are given different JV functions. In this menu the JV functions are created. Please read more about the functionality in the 7.14.2.11 JV function section. Add a JV function: 1. Left-click in the JVFunction pane. 2. Press the Insert Row button or use the [down arrow] on the keyboard to insert a row. AARO SYSTEMS AB 409 AARO 12.0 USER MANUAL Utilities. Application Management 3. Enter a name for the JV function and select Y/N depending what possibilities (prepare, save, attest) should be connected to the JV function. Figure 7.15—10 Enter JV function name 4. Press Save. 7.15.3.5Input function Input function is used for two purposes: To open/close forms for a period in the menu Data Entry/Input for different categories of users. To give the possibility for a specific category of users to make forms uncomplete for a period in the menu Validation/Process Status. Different categories of users are given different input functions. In this menu the input functions are created. Please read more about the functionality in the 7.14.2.10 Input function section. Add an input function: 1. Left-click in the Input function pane. 2. Press the Insert Row button or use the [down arrow] on the keyboard to insert a row. 3. Enter a name for the input function and press Save. Figure 7.15—11 Enter input function name Input functions are tied to one or more forms for a period in the menu Utilities/Edit Periods, tabs Open (1) and Open UnComplete (2). Please note that if the input function All is tied to a form in the above tabs, this means that the form is open for all users and that all users can make that form uncomplete irrespective of what input function the user has been given. 7.15.4 Relative period Values inserted in this window are selectable in the Dynamic Period area in menu Utilities/Edit Periods. The information is needed in drill down reports AARO SYSTEMS AB 410 AARO 12.0 USER MANUAL Utilities. Application Management when reports are automatically populated with relevant periods (relative periods). Figure 7.15—12 Relative period Valid periodtypes – typical actualities are Actual, Budget and Forecast. Valid timeseries – typical time series are Monthly, Quarterly and Weekly. Valid timetypes – typical time types are MTD (month to date) and YTD (year to date). Set current button – Enter the current year and period index for each time series, e.g. Monthly; ‘2010’ and ‘12’ (December). Figure 7.15—13 Set current button 7.15.5 Consolidation The Consolidation window is used to configure the dialog where consolidations are ordered in the menu Utilities/Consolidation. AARO SYSTEMS AB 411 AARO 12.0 USER MANUAL Utilities. Application Management Figure 7.15—14 Consolidation page The value ‘SPC’ in the field *IntOrExt’ indicates that additional options will be available in the dialog (defined in the fields Field1, Field2 and Field3). 7.15.6 Accounting type Accounting types are useful if numbers need to be adjusted for different accounting standards, e.g. US GAAP or IFRS. Figure 7.15-15 Accounting types page Sum up accounting types by creating groups in menu Utilities/Edit Dimensions. AARO SYSTEMS AB 412 AARO 12.0 USER MANUAL Utilities. Application Management 7.15.7 Currency Translation Figure 7.15—16 Currency Translation page This menu contains two separate functionalities. Currency Translation is used in the menu Utilities/Consolidation when a consolidation is to be run with a currency rate from another period than selected. 1. Add a CurrTransCode besides ‘Normal’. 2. Select the new CurrTransCode in the menu Utilities/Consolidation (any other than ‘Normal’). When any other CurrTransCode than ‘Normal’ is selected, the field ‘Rates from:’ will be enabled. See figure below. Figure 7.15—17 Order Consolidation dialog Valid currencytypes is used if other currency types than Opening, Average and Closing is wanted for a period. SeqNo is the order in which the currencies are displayed. See example below: AARO SYSTEMS AB 413 AARO 12.0 USER MANUAL Utilities. Application Management Figure 7.15—18 Edit Period, Rates tab 7.15.8 Proforma type Proforma types are useful if numbers need to be adjusted for e.g. ‘as if’ scenarios like as if a company has been owned the entire year. Sum up proforma types by creating groups in menu Utilities/Edit Dimensions. 7.15.9 Validations The validation functionality is used to restrict input to a combination of company/dimension, form/dimension and/or certain set of dimensions. In this menu it is to be stated what combinations of company/dimension, form/dimension and/or certain set of dimensions that should be valid. As an example: Select a company that should be validated with dimension ‘Product’. See figure below. Figure 7.15—19 Application Management/Validations In Edit Periods, tab Validation, Company/Dimension validation, select the exact combinations of company and product members that should be valid, e.g. company ‘ATLANTA’ and product ‘BATH’. See figure below. AARO SYSTEMS AB 414 AARO 12.0 USER MANUAL Utilities. Application Management Figure 7.15—20 Period validation settings Based on the combinations set up in Application Management/Validations, the detailed combinations are set up in this tab. Note: after changes are made, you should restart AARO to make sure the changes made in the Validation tab in Edit Periods are effected in Data Entry, Input. 7.15.9.1Dimension, company/dimension and form/dimension validation Dimension values (such as product codes, country codes, business unit codes, profit centre codes etc) can be setup for validation in Application Management. The fixed/built-in validation checks for correct dimension values, but only against the basic list of known values in the system, i.e. against the complete list in Edit Dimensions. At times additional control may be required: for example, there may be a need to limit the range of valid values to a subset of that list. AARO supports three variations for this, as follows: Dimension validation: A common situation may be that that some product codes, which have been used in the past, should no longer be used for reporting. The older product codes themselves still need to be in the system in order for output reports from older periods to continue to function, however the product codes should not be allowed for new reporting. Similarly, old business unit codes may no longer be valid for reporting after a reorganisation: here, validation is required against new business unit codes, whilst the old business unit codes still need to exist in the system. In these kinds of cases, dimension validation is the best approach to take. Company/dimension validation: Another possible scenario is that not all companies are allowed to report on all products. Each company has its own set of products, which the company in question may report on. In this case, company/dimension validation is the feature to use. Form/dimension validation: if a certain input form (as a whole) should be restricted to a specific subset of dimension values, it is preferable to use this type of validation method. AARO SYSTEMS AB 415 AARO 12.0 USER MANUAL Utilities. Application Management 7.15.9.2Set up validations To use the validations feature, you should turn on the required validation types and specify the necessary companies, dimensions and forms as follows: 1. Set up validations. Go to Application Management. Select Application Management / Validation in the tree at the left pane: Figure 7.15—21 Validations settings In the right-pane you can see 3 check boxes which turn on different validation types. If the check box is ticked you need to specify the settings for a given validation type: choose the dimension(s) for which the validation(s) should be applied. 2. List valid values. At this stage, the valid dimension values must be specified for each period. These are specified in the menu item Edit Periods, Validation tab, and further detailed in the sub tabs Company/Dimension validations, Form/Dimension validations, and Dimension validations corresponding to the settings in Application Management as illustrated above. The Validation tab is not shown until a validation type has been activated. Appropriate sub tabs are also shown for activated validation types only. The list shown below provides some examples from Edit Periods, Validation settings, where valid values have set up in Application Management (see previous paragraph). It is possible to refine validation settings further here. Note: after changes are made, it may be necessary to restart AARO for the changes to the Validation tab in Edit Periods to be updated. In Edit Periods, tab Validation, Company/Dimension validation, select the exact combinations of company and product members that should be valid, e.g. company ‘ATLANTA’ and product ‘CHILD_WEAR. See example below: AARO SYSTEMS AB 416 AARO 12.0 USER MANUAL Utilities. Application Management Figure 7.15-22 Setting up period validation Based on the combinations set up in Application Management/Validations, the details for the required combinations are set up in this tab. 7.15.10Menu Management Follow these steps to create new Menu profile: 1. Select the Menu Management folder in the left pane. 2. Right-click and click Add Menu. Alternatively, an existing menu profile can be saved as a new one using the Save as button. 3. Enter the name of the new menu template. The new menu template will appear under the Menu management node. 4. Click the Add Header button to add a new header. 5. Click the Menu Items button. Use drag and drop to add menu items/header/separator in selected menu. Figure 7.15-23 Menu management, add new Menu item 6. To rename the menu items header, right-click the header and click Rename Item. Figure 7.15-24 Rename menu items header AARO SYSTEMS AB 417 AARO 12.0 USER MANUAL Utilities. Application Management 7. To delete a menu item, right-click the item and click Delete Item. Figure 7.15-25 Delete a menu item 8. Use drag and drop to change place of the menu items. 9. Use Left and Right buttons to move menu headers. 10. To preview the menu profile, select the profile and click Print > Preview. Click Exit! to close the Preview Menu window. \ Figure 7.15-26 Preview a menu profile 11. To delete a menu profile, select the profile and click the Delete button AARO SYSTEMS AB 418 AARO 12.0 USER MANUAL Utilities. Edit Currency translations 7.16 Edit Currency translations Currency translation is a way to recalculate numbers entered in local currencies to group currency. Different currency translations can be set up in AARO. Currency translations are created and edited under the menu Utilities/Edit Currency Translation. Figure 7.16-1 Edit Currency Translation window The Edit Currency Translations window consists of two panes: the left pane contains currency translation names and related currency rates under it; the right pane contains calculations for the selected currency rate or currency translation settings. 7.16.1 General description Each account in AARO is defined with a translation, e.g. fixed, opening, closing and average. Translation decides how the account should be recalculated. Each period in AARO is defined with currency rates set up for the different translations (normally only applicable for opening, closing and average). The Normal currency translation is based on the following currency rates: Opening is the opening exchange rate. Closing is the exchange rate at the end of the period, typically used for the balance sheet accounts. Average is normally the average rate from the beginning of the year to the actual period, typically used for income statement accounts. An example of an alternative currency translation is to calculate the income statement numbers using previous year’s rates or budget rates. Another example is to create currency translation calculations that replace the use of calculated periods. The currency translation calculation takes place when drill down reports are processed. Default is ‘Normal’ currency translation. Run the report with the parameter CurrTranslation with which an alternative currency translation can be selected. AARO SYSTEMS AB 419 AARO 12.0 USER MANUAL Utilities. Edit Currency translations 7.16.2 Create a currency translation Do like this to create a currency translation: 1. Right-click the left pane and select Add Currency Translation. Figure 7.16-2 Add a currency translation 2. Enter name of the new currency translation and click OK. A new currency translation is now created. Calculations still have to be added. 3. Tick the relevant currency translation checkbox/es in the right pane: Figure 7.16-3 Currency translation checkboxes Checkbox Description Is default Default currency translation if nothing selected (only one). Precalculated Figures for the currency translation are calculated by the consolidator and stored in the database. Trans diff calculated Calculation of transaction difference in accordance with the currency translation used (otherwise calculated in consolidation). It may be heavy on performance. AARO SYSTEMS AB 420 AARO 12.0 USER MANUAL Utilities. Edit Currency translations 7.16.3 Create calculations The following steps describe a procedure for creating a calculation. 7.16.3.1Basic steps To create a calculation, follow these steps: 1. In the left pane, under the currency translation name, select the rate to set up calculation for, e.g. ‘Average’. Please note that a translation can contain one or more calculations. 2. Right-click the right pane, click Insert New Row and then OK. Figure 7.16-4 Creating a calculation A Calculation is created containing two header rows and one calculation row. The calculation can contain one or more calculation rows. On each row a calculation is stated. All calculation rows are aggregated in the calculation. Figure 7.16-5 Currency translation settings 3. To add a new calculation row, right-click the calculation grid, press Insert New Row, select Calculation Step, and press OK. AARO SYSTEMS AB 421 AARO 12.0 USER MANUAL Utilities. Edit Currency translations Figure 7.16-6 Adding one more calculation step 4. Enter relevant data in the fields. 5. Press Save. 7.16.3.2Header row fields Figure 7.16-7 Edit Currency translations, header rows The combination of the two fields in the first row determines for which periods the calculation will be used, as follows: Field Description Weight Can be 1, 2, etc. Higher number gives a higher priority. Calculations with higher weights are processed first. Period Filter Different period filters can be created by selecting Edit Period Filters in the drop-down list: AARO SYSTEMS AB 422 AARO 12.0 USER MANUAL Utilities. Edit Currency translations Field Description Figure 7.16-8 Edit Period filters The fields correspond to the Relative Period area in the menu Edit Periods. Select one period filter for each calculation. The period that matches the period filter will be calculated. Entering * in the period filter matches all periods. Period Index - E.g. 1-12 (months) or 1-52 (weeks) Period type - Actual, Budget, Forecast etc. Time series - Monthly, Weekly etc. Time type - YTD, MTD, QTD etc. Year - E.g. 2009. Figure 7.16-9 Period filter Rate Type Figure 7.16-10 Rate type Enter the relevant rate type for the currency translation – e.g. Opening, Average, or Closing. Rate Calculation Type Rate calculation type indicates which recalculation technique will be used: AARO SYSTEMS AB 423 AARO 12.0 USER MANUAL Utilities. Edit Currency translations Field Description Figure 7.16-11 Rate calculation type AMOUNT_MULTIPLIER_ONLY – The multiplier is applied to the amount in the group currency only. AMOUNT_NONE – No recalculation. E.g. used for Fixed. (amount) AMOUNT_NORMAL – Normal recalculation. E.g. used for Opening and Closing. (amount/rate) LOC_BY_REPCURR – Used for e.g. staggered calculations. Transaction difference not calculated by default. (LOC * reporting rate / rate) LOC_MULTIPLIER_ONLY – The multiplier is applied to the amount in LOC only. LOC_NONE – No calculation in LOC. 7.16.3.3Calculation row fields Figure 7.16-12 Edit Currency translations, calculation rows In calculation rows, the following fields are used: Field Description Multiplier Indicates which sign will be used when the rows are aggregated. (1, 0, -1). AARO SYSTEMS AB 424 AARO 12.0 USER MANUAL Utilities. Edit Currency translations Field Description Iteration Type Figure 7.16-13 Iteration types Iteration types indicate how the periods will be calculated: COUNT – used together with Iteration Index. Add number of periods according to index. COUNT_SKIP12 – used together with Iteration Index. Used e.g. when previous period is subtracted from a period and December should not be subtracted from January. NONE – no iteration. NONE_LIMITED – like NONE but not calculated when referring back to last year (January December). TO_FIRST – calculated from present to the first period (e.g. in the year or quarter). TO_INDEX – iterated from present period to stated index period. Iteration Index Parameter used for some Iteration types, e.g. COUNT, COUNT_SKIP12 and TO_INDEX, this field may be left blank or can contain an Index number such as 1 or 2. Relative Period Enter the period, relative to the iterated period. Figure 7.16-14 Select relative period AARO SYSTEMS AB 425 AARO 12.0 USER MANUAL Utilities. Edit Currency translations Field Description Amount Period The period from which the amount is to be fetched. Amount period is relative to the iterated period. Rate Period The period from which the rate is to be fetched. Rate period is relative to the amount period. Period index Index +/- number of periods. Index relation type ABSOLUTE – exact period index pointed out. RELATIVE – relative to iterated period used RELATIVE_CURRENT – relative to the current period set in Edit Periods. Period type Actual, Budget, Forecast etc. Time series Monthly, Weekly etc. Time type YTD, MTD, QTD etc. Year E.g. 2009. Year relation type See Index relation type. 7.16.3.4Example – calculate actual numbers to previous year’s rates (or budget rates) This example is useful if comparisons are to be made between the years without considerations to currency exchange rates. In the example below the rates are fetched from a period one year before the current period set in Edit Periods. Figure 7.16-15 Calculate actual numbers to previous year’s rates 7.16.3.5Example – isolated month In the example below, the result for one isolated month is calculated. If calculation is run for January, the December figures will not be deducted (NONE_LIMITED). AARO SYSTEMS AB 426 AARO 12.0 USER MANUAL Utilities. Edit Currency translations Figure 7.16-16 Calculated result for one isolated month Figure 7.16-17 Relative period setup for the isolated month calculation 7.16.3.6Example – rolling 12 months In the example below, the accumulated result for the last twelve months is calculated. The first row adds current month’s accumulated result. The second row adds the accumulated result from period twelve last year and the third row deducts the accumulated result in the period twelve months back from current. Figure 7.16-18 Rolling 12 months AARO SYSTEMS AB 427 AARO 12.0 USER MANUAL Utilities. Edit Currency translations Figure 7.16-19 Relative period setup for the Rolling 12 months first calculation row Figure 7.16-20 Relative period setup for the Rolling 12 months second calculation row 7.16.3.7Example – staggered The Staggered calculation model is sometimes demanded because it correctly considers varying currency rates over the year. The Income Statement is calculated by aggregating each month’s isolated result multiplied by the average rate for that particular month. Figure 7.16-21 Staggered AARO SYSTEMS AB 428 AARO 12.0 USER MANUAL Utilities. Edit Currency translations Figure 7.16-22 Relative period setup for the Staggered calculation AARO SYSTEMS AB 429 AARO 12.0 USER MANUAL Utilities. Database Monitor 7.17 Database Monitor This chapter refers to the menu item Utilities/Database Monitor in AARO. The database monitor is used to view AARO processes running on the SQL server. 7.17.1 Use the database monitor Use the Refresh button to view current processes. Figure 7.17—1 The Database Monitor window Explanations to the list displayed: Field Description Username User name. Application Shows what application is run, e.g. if AARO is run from Excel or ABSNAV.EXE. Hostname Shows from what machine the user is running the application. Blocked Shows if the process is blocked or not. DB Name Database name Command Command used at the moment. Status Status of the process. PID Process id Time Blocked Time period the process has been blocked. Functionality in the window: Select Sort by to select by what field the list should be sorted. AARO SYSTEMS AB 430 AARO 12.0 USER MANUAL Utilities. Database Monitor Tick Show system processes to include processes run by the system in the list. Select Beep at DEADLOCK to make the computer beep when deadlock occurs. The number of ongoing processes is shown in the upper left corner. Use the drop down list (Max processes) to adjust the scale on the diagram. AARO SYSTEMS AB 431 AARO 12.0 USER MANUAL Utilities. Edit Eliminations 7.18 Edit Eliminations This chapter refers to the menu item Utilities/Edit Eliminations in AARO. All eliminations are entered here. Figure 7.18—1 Edit Eliminations window The elimination is selected in the left pane; the right pane displays the information for the selected elimination. For the selected elimination, the upper part of the window consists of elimination information that applies to all eliminations underneath. Elimination rules displays eliminations separated per account. For a better overview, it is recommended to create many elimination rules with few eliminations rather than few elimination rules with many eliminations. Group the eliminations into elimination rules according to what should be eliminated. 7.18.1 Add/edit/delete an elimination rule To add, edit, or delete an elimination rule, right click in the left pane. Figure 7.18-2 Edit elimination rule It is also possible to add a new elimination rule by pressing the New button in the AARO toolbar. When you have finished making changes to an elimination rule, press the Save button to save changes. AARO SYSTEMS AB 432 AARO 12.0 USER MANUAL Utilities. Edit Eliminations 7.18.2 Elimination information Elimination Information contains parameters for the selected elimination rule, as explained further below. The elimination information is displayed in the right pane, with restricted editing options: Figure 7.18-3 Elimination information These can be edited by right clicking the rule in the left pane and selecting Edit Rule: Figure 7.18-4 Add/edit elimination rule Field Description EliminationLevel Indicates if the elimination will be booked on company (‘Company’) or group (‘Group’) level. Elimination Company Indicates on which company the elimination will be booked. LegalType Indicates on which legal type the elimination will be booked. ExchLegalType Indicates on which legal type the translation difference, originating from match forms, will be booked. AARO SYSTEMS AB 433 AARO 12.0 USER MANUAL Utilities. Edit Eliminations Field Description TransLegalType Indicates on which legal type the translation difference, which is a result of the fact that different exchange rates are used for B/S and I/S, will be booked. ElimRateType Indicates if the exchange rate should be fetched according to the account (Elimcode) that is eliminated (select report) or according to the account (Code) that is used for the elimination (select Receive). 7.18.3 Dimension Dimension contains the default dimension for the eliminated value. Field Description Dimension Indicates on which dimension the elimination will be booked. Value Indicates on which dimension member the elimination will be booked. 7.18.4 Restrictions Restrictions define the company, dimension, and Legal group affected by the elimination. Field Description ConditionCo Indicates for which companies the elimination rule should be used. Dimension Indicates for which dimensions the elimination rule should be used. Value Indicates for which dimension members the elimination rule should be used. LegalGroup Indicates for which legal group the elimination rule should be used. 7.18.5 Eliminations Elimination rules define eliminated and elimination accounts and factors applied to the eliminated value. AARO SYSTEMS AB 434 AARO 12.0 USER MANUAL Utilities. Edit Eliminations Field Description Code Indicates on which account the elimination is booked. ElimCode Indicates which account is eliminated. ExchCode Indicates on which account the translation difference originating from match forms will be booked. TransCode Indicates on which account the translation difference, which is a result of the fact that different exchange rates are used for B/S and I/S, will be booked. LocMult 1: The value in local currency is fetched with unchanged sign. -1: The value in local currency is fetched with the opposite sign. 0: No value is fetched in local currency. GroupMult 1: The value in consolidated currency is fetched with unchanged sign. -1: The value in consolidated currency is fetched with the opposite sign. 0: No value is fetched in consolidated currency. Percentage Indicates what percentage of the account that is eliminated, e.g. ‘50’ or ‘100’. AARO SYSTEMS AB 435 AARO 12.0 USER MANUAL Utilities. Edit Settings 7.19 Edit Settings The menu item Utilities/Edit Settings contains various global settings for the system. A setting can e.g. be used for switching on functionality or giving a parameter a fixed value. For each setting it is possible to select a value. Sometimes the value can be text and sometimes a numerical value. For some settings the selectable values are predefined in a drop down list. Figure 7.19—1 Edit Settings menu Below follows the standard settings used by AARO: Setting Description AcctStdActivated Accounting standard item added as default when adding new report in Reports/Drill Down. AcctStdDefaultValue The default accounting standard value. AcctStdGroupNumber Level group number as seen in the menu Edit Dimension/Group/Accounting Standard, tab Properties. AllowAuto Activates automatic upgrade of the client files. Managed in menu Application Management/File management. AllowLogin Activates the possibility to limit user access to AARO. Only user stated in setting AllowedUser is allowed access. Default value is Y (= no limitations). AllowedText The login window text when AllowLogin is activated. AllowedUser Enter user identifier for the user allowed to log in when AllowLogin setting is activated. AppLongName Text visible in the application window header AARO SYSTEMS AB 436 AARO 12.0 USER MANUAL Utilities. Edit Settings Setting Description AppShortName Text visible in the first menu selection. Autologoff Logs off user after stated time in minutes. If nothing is entered 120 min is default. '0'=Function is inactivated (IntValue). COMPLETE Activates the Complete functionality CompleteLimit Enter the maximum difference that is acceptable for COMPLETE. ConsCoIncluded If set to 'Y' company consolidations are run. Otherwise set to 'N'. ConsInputLegal Starts legal consolidation automatically when figures for a company are changed (Y/N). DefaultCurr Default group currency. DefaultEquityReport The equity report is displayed in menu Data Entry/Legal, tab Equity. Enter the name of the drill down report that is default. DrilldownSystem Activates folders in the menu Reports/Drill Down: DD, CRH or both. EnableDrillThru Activates Drillthrough. GWBSCode BS account used for excess value depreciations (affects operational consolidation only). GWCo Company used for excess value depreciations (affects operational consolidation only). GWISCode IS account used for excess value depreciations (affects operational consolidation only). GWLegalType Legal type used for excess value depreciations (affects operational consolidation only). InputDecimals Number of decimals used in the Input menu. JVIDCounter Automatic numbering of journals. LegalEquityLevel Level no used for linking acquisition to operational dimension in legal equity (Level1, Level2 etc). LoginExpiredText Text shown when a user has not logged in number of days stated in LoginExpires. LoginExpires Locks the application if a user has not logged in stated number of days. AARO SYSTEMS AB 437 AARO 12.0 USER MANUAL Utilities. Edit Settings Setting Description LogoFile If a report logo is called anything other than logo.bmp this name should be entered. This is used to change logo if a user accesses two or more databases through the same AARO catalogue. LogoLeft Setting for logotype. Edited in the menu Application Management/Page header. LogoScale Setting for logotype. Edited in the menu Application Management/Page header. LogoTop Setting for logotype. Edited in the menu Application Management/Page header. MainGroup Main legal group. OperEquityCo Enter the company that is used for booking the difference between legal and operational eliminations. Not used for 'TOTAL' elimination. PERIOD_COLEVEL Period/company/dimension validation. Edited in the menu Application Management/Validations. PERIOD_FORMLEVEL Period/form validation. Edited in the menu Application Management/Validations. PERIOD_LEVEL Period/dimension validation. Edited in the menu Application Management/Validations. ProformaActivated Proforma item added as default when creating a drill down report. ProformaDefaultValue Default proforma value. ProformaGroupNumber Level group number as seen in the menu Edit Dimension/Group/Accounting Standard, tab Properties. RG_AllowUndefined Values without dimension are displayed as 'Undefined' in drill down reports. ReportHeader Disable/enable report header text. Global setting. Edited in menu Utilities/Application Management/Page header and other. (Local setting in leftmost menu/Page header). ServicePassword Security setting. ShowText1 Text part 1 in toolbar. ShowText2 Text part 2 in toolbar. This text is displayed directly after text part 1. SplitType Legal type for split. AARO SYSTEMS AB 438 AARO 12.0 USER MANUAL Utilities. Edit Settings Setting Description StartOldApplications Start application when version differs. 'Y' means that an error message is displayed but it is possible to continue. 'N' means that it is not possible to continue. StartText1 Text part 1 when logging on abs.exe. StartText2 Text part 2 when logging on abs.exe. StopText If 'Y' a message will be displayed at start-up that user actively must tick off. Otherwise 'N'. StopText1 Text row 1 for stop text. StopText2 Text row 2 for stop text. SupportSolverAddr Address for the support link in the menu. SupportSolverText Address and text for the support link in the menu. SystemJVLOCLogic Activate/inactivate LEGAL/OPER logic (create system bookings of type LOC). AARO SYSTEMS AB 439 AARO 12.0 USER MANUAL Additional menu items. Start AARO menu 8. Additional menu items This chapter describes additional AARO functionality located under the start AARO menu and Window menu. 8.1 Start AARO menu The name of the start menu located far left is configurable by the administrator, e.g. AARO in our example. Figure 8.1-1 The start AARO menu The start menu contains the static items and items dependent on the active window that repeat the main window buttons. For example, when Data Entry/ Input is opened the start menu repeats buttons of this window. Figure 8.1-2 The start AARO menu when Input is opened AARO SYSTEMS AB 440 AARO 12.0 USER MANUAL Additional menu items. Page header 8.2 Page header The Page header for reports can be adjusted in AARO. Settings in the menu Utilities/Application Management, and folders ‘Application Management’, ‘Page header and other’ followed by the check box ‘Disable Page Header’ determine whether the Page header is open for editing. For more information regarding settings, please refer to the Application Management chapter. To adjust the Page Header go into the start menu (labelled AARO in this example) and select Page header. Figure 8.2-1 Setting up the page header To enter Page header information, first make sure the Header is active by clearing the check box ‘Header Disabled’. (Note: If the check box area has been greyed-out, settings in Application Management have disabled the ability for the user to choose whether a Page header is active or not). Figure 8.2-2 Completing the page header information The information entered will now appear in the Page Header of AARO reports: Figure 8.2-3 Example of the page header in a report AARO SYSTEMS AB 441 AARO 12.0 USER MANUAL Additional menu items. Reload Lists 8.3 Reload Lists The data lists in AARO are usually updated whenever the application is restarted, so that information such as the period list in Data Entry/Input is updated. It is also possible to update lists in AARO without exiting the application and logging in again, to do this, in the AARO menu choose Tools > Reload All Lists (or Reload Changed Lists). Figure 8.3-1 Reload all lists AARO SYSTEMS AB 442 AARO 12.0 USER MANUAL Additional menu items. About 8.4 About Information about the current AARO database can be viewed under the menu AARO/About. The user is provided with information about the current database used and the installed version. AARO SYSTEMS AB 443 AARO 12.0 USER MANUAL Additional menu items. Window menu 8.5 Window menu The currently open menu items in AARO can be arranged by pressing the menu Window and then selecting the arrangement method Cascade, Tile or Arrange. Figure 8.5-1 Window menu It is also possible to switch between open items in AARO by pressing the Window menu, then selecting the relevant menu item (such as Input in the example above). AARO SYSTEMS AB 444