1
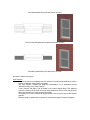
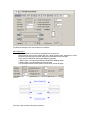
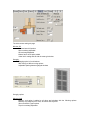
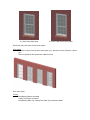
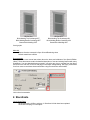
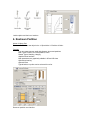
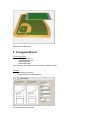
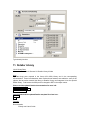
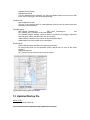
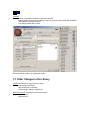
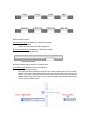
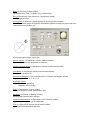
Special Edition Library
Manual
Table of Contents
Preface .................................................................................................................3
Acknowledgements...............................................................................................3
Installation.............................................................................................................3
1. Doors and Windows..........................................................................................4
2. Storefronts ......................................................................................................11
3. Elevator...........................................................................................................12
4. Gutters and Downspouts ................................................................................14
5. Ladders...........................................................................................................15
6. Restroom Partition ..........................................................................................16
7. Sport Fields.....................................................................................................17
8. Corrugated Sheets..........................................................................................18
9. Steel Sections .................................................................................................19
10. Timber Joist ..................................................................................................19
11. Detailer Library..............................................................................................20
12. Updated Startup file ......................................................................................21
13. Other Changes in the Library ........................................................................22
Preface
Dear AC User!
This Manual contains the short description of the changes and enhancements that have been
completed in the US Library since the AC9 version. This document gives you a list of the new or
modified library objects and also detailed instructions for how to use them.
Important Note
We have significantly changed the parameters and the user interface of some objects (e.g
doors and windows) therefore this library is not compatible with the AC 9 US library. In
order to avoid any conflicts between new and old objects please don't load this library
over an existing project and do not load old and new ArchiCAD libraries together! Please
also read the detailed object documentations before starting to use them.
Acknowledgements
We would like to say thank you for all the members of the US Local Content Beta Forum and the
beta testers who contributed to the development of this library. Special thanks to Karl Ottenstein
for updating the MSA library and Ransom Ratcliff for developing the new startup template.
Installation
1. Download the compressed library and startup files from the library update web site and
uncompress them on your computer.
2. Move the AC9 Library Special Edition folder and the AC9 Special Edition StartUp.tpl file into
your ArchiCAD folder.
For best performance and compatibility we recommend using the SE library with the new startup
template. For this you have to do the following:
1. Start ArchiCAD
2. Select File/ New…
3. Choose Use a template
4. Select the AC9 Special Edition StartUp.tpl from the ArchiCAD folder
5. The AC9 Library Special Edition will be automatically loaded if you have placed it in the
ArchiCAD folder
1. Doors and Windows
List of Library Parts
All elements of the Doors 9 and Windows 9 folders have been updated (except wall openings and
bay and bow windows).
Instructions
1. Before placing the doors and windows on the floor plan select the type of the wall (in
which the object will be inserted) on the General tab page of the User interface.
2. Set the unit size and the rough opening size on the General tab page of the user
interface.
3. If the object is placed in a brick veneer wall you also have to define the masonry opening
size
4. Place the object in the corresponding type of wall on the floor plan
5. Please read the illustrated door and window manual for more info:
Window Manual
Door Manual
Wall Types
We have introduced a Wall Type parameter with the following options: Masonry Wall,
Stud Wall, Stud Wall with Siding and Brick Veneer Wall. This parameter has to be set
correctly before placing the window in a wall.
The default parameter values are changing according to the actually selected wall type
Stud Wall with Siding (detailed floor plan and exterior 3D view)
Stud Wall (detailed floor plan and exterior 3D view)
Brick Veneer Wall (detailed floor plan and exterior 3D view)
Solid Wall (detailed floor plan and exterior 3D view)
Windows in different wall types
User interface
We have introduced a completely new user interface for all doors and windows in order to
make the parameter setting easier and faster.
The user interface contains the graphical representation of all parameters except
“ArchiFM & Listing” and “Cavity Closure”
A new "General" tab page is set as default in the custom setting dialog. This graphical
interface includes only the most commonly used parameters. Novice users can get along
with these parameters in early stages of the design.
The figures on the user interface tab pages show the real structure of the actual window
and wall.
Different groups of parameters are placed on separate tab pages for easier navigation.
The General tab page of the new window user interface
Main Dimensions
The most typical US unit sizes are available from a pop-up list
Rough opening size can be defined with the "rough opening extra" parameter to avoid
incorrect rough opening sizes when stretching the windows on the floor plan.
There are two methods for defining the Masonry Opening:
1, Masonry Op.= Unit Size+Brick Molding Width+Brick Molding Offset
2, Masonry Op.= Unit Size+Masonry Opening Extra
You can switch between these options on the “Brick Veneer tab page.
Unit size, rough opening and masonry opening
Floor plan symbol
New floor plan symbol option has been added to the 2D Detail Level parameter. Currently
the following options are available: Scale sensitive, Detailed, Middle, Simple, Off
Users can customize the scales where the floor plans symbols are changing
Background fills can be turned on/off for all doors and windows (including frames, sills,
leafs etc.)
Middle hotspot has been added to the windows floor plan symbol (on the exterior side) to
make dimensioning easier
Show sill option for windows
Show grills for windows
Ghost swing option for doors
Double line leaf option for doors in Middle scale
Optional clearance hotspots added for doors. This feature can be very useful when
designing spaces for disabled people.
Detailed
Middle
Simple
OFF
Detailed, Show Grills=ON
Detailed, Show Sash Frame=OFF
Window floor plan symbols
Brick veneer
Brick veneer can be aligned automatically to any wall layer (using the reveal setting), or
manually by defining the depth of the reveal.
You can switch between these options on the “Brick Veneer tab page
The brick veneer setting tab page
Window Sill
Brick and wood sill options
Stool overhang adjustable
Sill overhang adjustable
Bottom frame at sill option added
Value list for casing and sill with the most typical sizes
Ganging
Ganging option in four directions
With Casing or Without casing options
Adjustable spacing between ganged windows
Ganging options
Masonry Arch
Masonry arch option is added to all doors and windows with the following options:
Masonry Arch, Masonry Arch Jack, Jack Arch with Keystone
Stucco and Brick Types options
Top trim overhang adjustable
Masonry Arch, Stucco
Masonry Arch, Brick
Masonry Jack Arch
Masonry Jack Arch with Keystone
Masonry arch types
Window Sash
Unequal sash sizes can be set with the following methods: proportion, bottom sash
height, equal glass panes
If the “equal glass panes” option is selected the size of the bottom and top sash is
automatically calculated so that each glass panes has the same height
H-V Grid, Equal Sash Sizes
H-V Grid, Equal Glass Pane Heights
Equal sash sizes and equal window pane heights
Door panels
Descriptive names used for door panel styles (e.g. Standard 4 Panel, Eyebrow 4 Panel
etc.)
The most typical US door panels are added to the list
Door panel styles
Casing
Brick Molding Bottom Overhang
Casing Trim Bottom Overhang
Brick Molding Width Top, Casing Trim Width Top parameters added
Sill Out=ON
Brick Molding Top Overhang=OFF
Brick Molding Bottom Overhang=OFF
Bottom Brick Molding=OFF
Sill Out=OFF
Brick Molding Top Overhang=ON
Brick Molding Bottom Overhang=ON
Bottom Brick Molding=ON
Casing styles
Materials
Texture direction corrected in Open GL and Rendering views
Default material set to White
Documentation
A comprehensive user manual was written about the doors and windows of the Special Edition
Library. These documents contain the detailed description of new and existing features with many
illustrations. You can download these manuals if you select any door or window from the library
and click on the web link on the info tab page in the object settings dialog. We highly recommend
for all our users to read these documents before using the new doors and windows.
Link to the documentation
2. Storefronts
List of Library Parts
All elements of the 08 Door-windows 9 / Storefront 9 folder have been updated.
W Storefront Sloping is a new object.
Features
More flexible configuration of rail sizes (bottom, middle, top mullions)
New floor plan symbols: Simple, Middle, Detailed
If the mullion widths are set to zero the mullions will be turned off
Texture direction corrected in 3D
Configurable rail sizes for door panels
Panic bar options added to D2 Commercial Door
Ghost swing in D2 Storefront 3
Ghost Opening Line on-off parameter
Please read the illustrated storefront door and window manuals for more info:
Storefront Manuals
Storefront objects and their user interface
3. Elevator
Name of Library Part
Elevator Standard is a new object in the 14 Conveying Systems 9/ Elevators and Escalators 9
folder
Instructions for Use
1. Define at least two stories in the Story settings dialog
2. Place the elevator object on the bottom floor and turn on the Show on all stories option
in the Object Setting dialog
3. Open the parameter list of the object (or the user interface) and set the number of
required elevator stories
4. The elevator’s story heights are automatically set according the Story settings dialog
5. Go back to the object editor and modify the door position if needed on each story with
the "Index of story to be edited" parameter
6. There is a new parameter called Structural story height. If the height of a given story is
less then this value, the elevator will be represented with only its shaft wall contours on
that story.
Features
No limitation for the number of stories
Elevator story heights changes automatically according to the "Story settings" dialog
Mechanical vs. Hydraulic options
Passanger capacity parameter with the most typical values. The car size will be
automatically set according to this parameter.
Car size and shaft size can be set independently
Side counter weight option for mechanical elevators
Counter weight can be turned off in 2D
"Structural story" parameter added. If this option is turned on the object is represented
with only the shaft walls on that story.
Plan symbol and user interface of the elevator object
4. Gutters and Downspouts
List of Library Parts
Downspout
Downspout Complex
Downspout Elbow
Downspout Offset
Gutter
Gutter Head Leader
Gutter Mitered
All the elements are located in the 07 Therm and Moist Prot 9 / Gutters 9 folder.
Features
All objects are equipped with user editable hotspots and a graphical user interface.
You can choose the most typical US gutter profiles from a pop-up value list.
Elements can be connected to each other allowing you to model complex gutter and
downspout systems.
Different profiles (rectangular, rounded, square etc.) with adjustable sizes
Typical/custom sizes available from a popup list
Sloping angles can be defined for gutters
Option to place parts separately
User defined number and position for straps and brackets
Hangers can be turned off
Hangers angle can be set
Gutter ends can be mitered for joining other gutters
Leaderhead resizable
Gutters and their user interface
5. Ladders
List of Library Parts
Caged Ladder
Platform with Ladder
Ship Ladder 60
Vertical Ladder
Wall Mounted Ladder
All the elements are located in the 10 Specialties 9 / Ladders 9 folder.
Features
The most important structural dimensions are all parametric
Hotspot editing in 2D and 3D
Graphical user interface.
Ladder objects and their user interface
6. Restroom Partition
Name of Library Part
Restroom Partition is a new object in the 10 Specialties 9 / Partitions 9 folder.
Features
You can create restroom stalls with pilasters, doors and partitions
Main Types: Pilaster, Door with pilasters, Panel
Pilaster Types: Standing, Hanging
Graphical User Interface
Main parameters are graphically editable in 2D and 3D views
Optional top bracing
Optional footer
Typical latches or pullers can be selected from a list
Restroom partition user interface
7. Sport Fields
List of Library Parts
American Football
Baseball Field
Basketball Court
Field Events
Soccer Field
Tennis Court
All the elements are located in the 17 Sport-Recreation 9 / Sport Fields 9 folder.
Features
Baseball Field
Field types: Major league, Little League
Optional outfield
Optional outfield fence
Adjustable backstop height
Infield (dirt vs. grass)
American Football
NFL, CFL and NCAA sizes
Field on/off in 3D
Optional uprights
Goal post on/off
Inbound lines on/off
Soccer Filed
Running tracks deleted. This feature added to the Field Events object.
Basketball Court
Court Types: Standard, High School, Junior High
Backboard types (normal, foldable, ceiling)
Adjustable run-out field sizes
Tennis Court
Optional run-out field
Field Events
Filed Types: Football, Soccer, Special field
Optional "Stripe only" (possible to place it on top of other fields)
Discus, hammer
Javelin -Putting and shot
Running tracks
Baseball and football fields
8. Corrugated Sheets
List of Library Parts
Corrugated Sheet Inc
Corrugated Sheet Vert
Profiled Sheet Inc
Profiled Sheet Vert
All the elements are located in the 09 Finishes 9 / Cladding 9 folder.
Features
Revised user interface
Horizontal/Vertical sheeting option
Corrugated Sheet user interface
9. Steel Sections
List of Library Parts
All elements in the 05 Metals 9 / Steel Sections 9 folder
Features
Completely new graphical user interface for steel beams
Selectable insertion points at top or bottom
New preview pictures
More logical cutting angle definition for steel beams
Simple and detailed 3D models
Steel Beams and their user interface
10. Timber Joist
List of Library Parts
Wood I Joist object in the 06 Wood Plastic 9 / Web Joists 9 folder
Features
Most typical joist sizes are available from a parameter value list
The structural dimensions and properties (area of section) are set automatically
Options to place the object at the bottom or at the top of the beam with the Stationary
Point parameter
Typical web joist sizes
11. Detailer Library
List of Library Parts
All the elements of the 01 General 9 / Detailer Library 9 folder
Note
Important bugs were reported in the former AC9 MSA Library and in the corresponding
documentation. These inconsistencies were fixed and new features were added to some of the
objects. We have also renamed the library to Detailer Library and integrated it into the Special
Edition library. Furthermore the MSA prefix is changed to DET in the object names.
Please read the updated Detailer documentation for more info:
Detailer User’s Guide
Detailer Library Catalogue
Detailer Steel Guide
You can download the updated Detailer template files from here:
Windows
Mac
Features
Documentation
Entirely new User's Guide
Updated Library Catalog
Updated Steel Guide
You can download these manuals if you select any detailer object and click on the web
link on the info tab page in the object settings dialog.
Template files
New template files made
The size of the template object is scale-dependent (always have the same output size
regardless of drawing scale).
Template objects
DET_Detailer_Template.gsm,
DET_Layout_Template.gsm
and
DET_Module_Size_Calculator revised and updated
Four editable hotspots enabled: stretch template in grid-size units (snappy), adjust dim
and note panel widths, and adjust title area size (margin).
Added hotlines to borders of the cells in the layout template object.
Added hotlines for text line fields of the notes panel.
Detail Objects
Hard-coded fill and pen definitions converted to parameters.
All macros have been set non-placeable (macro objects can’t be seen in the object
browser)
Reported bugs fixed
DET_Screw is a new element in the Connectors folder
Typical detail drawing made with Detailer
12. Updated Startup file
Name of File
AC9 Special Edition StartUp.tpl
You can download the updated startup template file from here:
Windows
Mac
Features
The list of materials have been revised and extended
Material attributes have been modified in order to produce similar results with ArchiCAD
and Lightworks rendering engines
Tool setting defaults also revised
Revised material attributes for Lightworks engine
13. Other Changes in the Library
Lamps (16 Electrical 9 / Light Sources 9 folder)
Bath bar light: new object
Night stand lamp: new object
Corrected light casting in LightWorks
Builder Dimension (available for doors and windows)
4 marker styles
Optional suffix
Builder dimension styles
Masonry Arch objects (04 Masonry 9 / Wall Extras 9 folder)
Hotspots corrected
Correct brick and mortar size and arrangement
W Lesene and W Niche (04 Masonry 9 / Wall Extras 9 folder)
Correct 2D symbol in composite walls
Niche and Lesene objects placed in a composite wall
Door Marker NCS (available for doors and windows)
Room ID is a new text option
This object has been modified to show the room number independently from the marker
position. The marker object always displays that room number where its center of gravity
will fall. (You have to consider that the marker starts with the circle and ends with the
editable hotspot where the cursor is so the center of gravity of this whole thing must fall
into the room you want to show)
Beds (12 Furnishing 9 / Beds 9 folder)
Typical beds sizes: Twin, Full, Queen, King, California King
Bar joist (05 Metals 9 / Steel Structure 9 / Spaceframes 9 folder)
Sloping angle can be set
North symbol (01 General 9 / Graphic Symbols 9 / Drawing Symbols 9 folder)
Follow Project North option: 2D symbol is automatically adjusted according to project north set in
Image/3Dprojection set/More sun..
North symbol object follows project north
Kitchen Cabinets (12 Furnishing 9 / Kitchen Cabinets 9 folder)
Counter size is corrected if end panels are turned on
Washer and Dryer objects (11 Equipment 9 / Kitchen and Household 9 folder)
2D text option added
Sink Belfast (11 Equipment 9 / Kitchen and Household 9 folder)
Option to turn off drain in 2D
Dormers and Skylights (07 Therm and Moist Prot 9 / Dormers and Skylights 9 folder)
Slope setting modes: °, % , in 12’, in 12”
Roofmaker objects
Revised hotspot editing
Adjustable eave overhang
Piano (11 Equipment 9 / Leisure 9 folder)
Optional lid positions: Closed, partially open, open
Mouldings (09 Finishes 9 / Moldings 9 folder)
Default profile sizes have been enlarged
Smoke and Heat Detector (10 Specialties 9 / Fire Protection 9 folder)
Floor plan symbol according to NCS standards
Sinks (11 Equipment 9 / Kitchen and Household 9 folder)
Sink General renamed to Multi Style Sink
Coat rack and Wall Hanging Racks
Objects moved to 10 Specialties 9/ Hat-Coat Racks and Accessories folder according to CSI
standards
Mechanical (15 Mechanical 9 / Heating 9 folder)
Stop Tap renamed to Stop Valve